

Page 1

L
C
N
ÉS
O
A
V
A
S
M
L
A
E
A
A
O
A
CAMCO
KEYCHAIN
SLEUTELHA
PORTE-CL
LLAVERO C
SCHLÜSSEL
PORTA-CHA
KOLOROWA
VC8N
OLOUR CAMERA
GER MET KLEUR
AVEC CAMÉRA C
N CÁMARA COLO
NHÄNGER MIT F
ES COM CÂMAR
KAMERA W BREL
NCAMERA
OULEUR
R
RBKAMERA
A CORES
CZKU DO KLUCZ
Y
USER MANU
GEBRUIKER
NOTICE D’E
MANUAL DE
BEDIENUNG
MANUAL DO
INSTRUKCJ
L
HANDLEIDING
PLOI
USUARIO
SANLEITUNG
UTILIZADOR
UŻYTKOWNIKA
2
6
9
12
16
19
23
Rev.
01
Page 2
e
c
n
n
s
o
r
e
o
ging
n
n
e
O
c
k
A
m
r
o
e
o
m
a
v
n
h
©
m
o
a
t
n
o
a
s
g
CAMC
LVC8N
Rev. 01
*not incl. – ni
1. Introdu
To all reside
Important e
This
disp
envir
unso
speci
retur
Resp
If in doubt, c
Thank you for
before brin
transit, don't i
t meegelev. - non in
no incl. - bra
USER M
tion
ts of the European
vironmental infor
ymbol on the device
sal of the device afte
onment. Do not disp
ted municipal waste;
alized company for r
ned to your distribut
ct the local environ
ntact your local w
choosing Velleman! P
this device into ser
stall or use it and co
l. – no incl. - nicht
w zestawie
NUAL
Union
ation about this pr
or the package indic
its lifecycle could ha
se of the unit (or bat
it should be taken to
cycling. This device s
r or to a local recycli
ental rules.
ste disposal auth
lease read the manu
ice. If the device was
tact your dealer.
itgeliefert –
duct
tes that
rm the
eries) as
a
hould be
service.
rities.
l thoroughly
dama
ed in
2. Safety I
Keep th
30.05.2011
structions
device away from c
ildren and unauthori
2
ed users.
Velleman nv
Page 3

CAMCOLVC8N Rev. 01
3. General Guidelines
Refer to the Velleman® Service and Quality Warranty on the final
pages of this manual.
• Protect this device from shocks and abuse. Avoid brute force when
operating the device.
• Protect the device against extreme heat and dust.
• Indoor use only. Keep this device away from rain, moisture,
splashing and dripping liquids.
• Familiarise yourself with the functions of the device before actually
using it.
• All modifications of the device are forbidden for safety reasons.
Damage caused by user modifications to the device is not covered
by the warranty.
• Only use the device for its intended purpose. Using the device in
an unauthorised way will void the warranty.
• Damage caused by disregard of certain guidelines in this manual
is not covered by the warranty and the dealer will not accept
responsibility for any ensuing defects or problems.
• DO NOT use this product to violate privacy laws or perform other
illegal activities.
4. Features
• very small digital video recorder camera
• recording on micro SD-card (not incl.)
• no flash memory built in
• only 2 operation switches
• picture, audio and video recording
• comes with USB cable
5. Overview
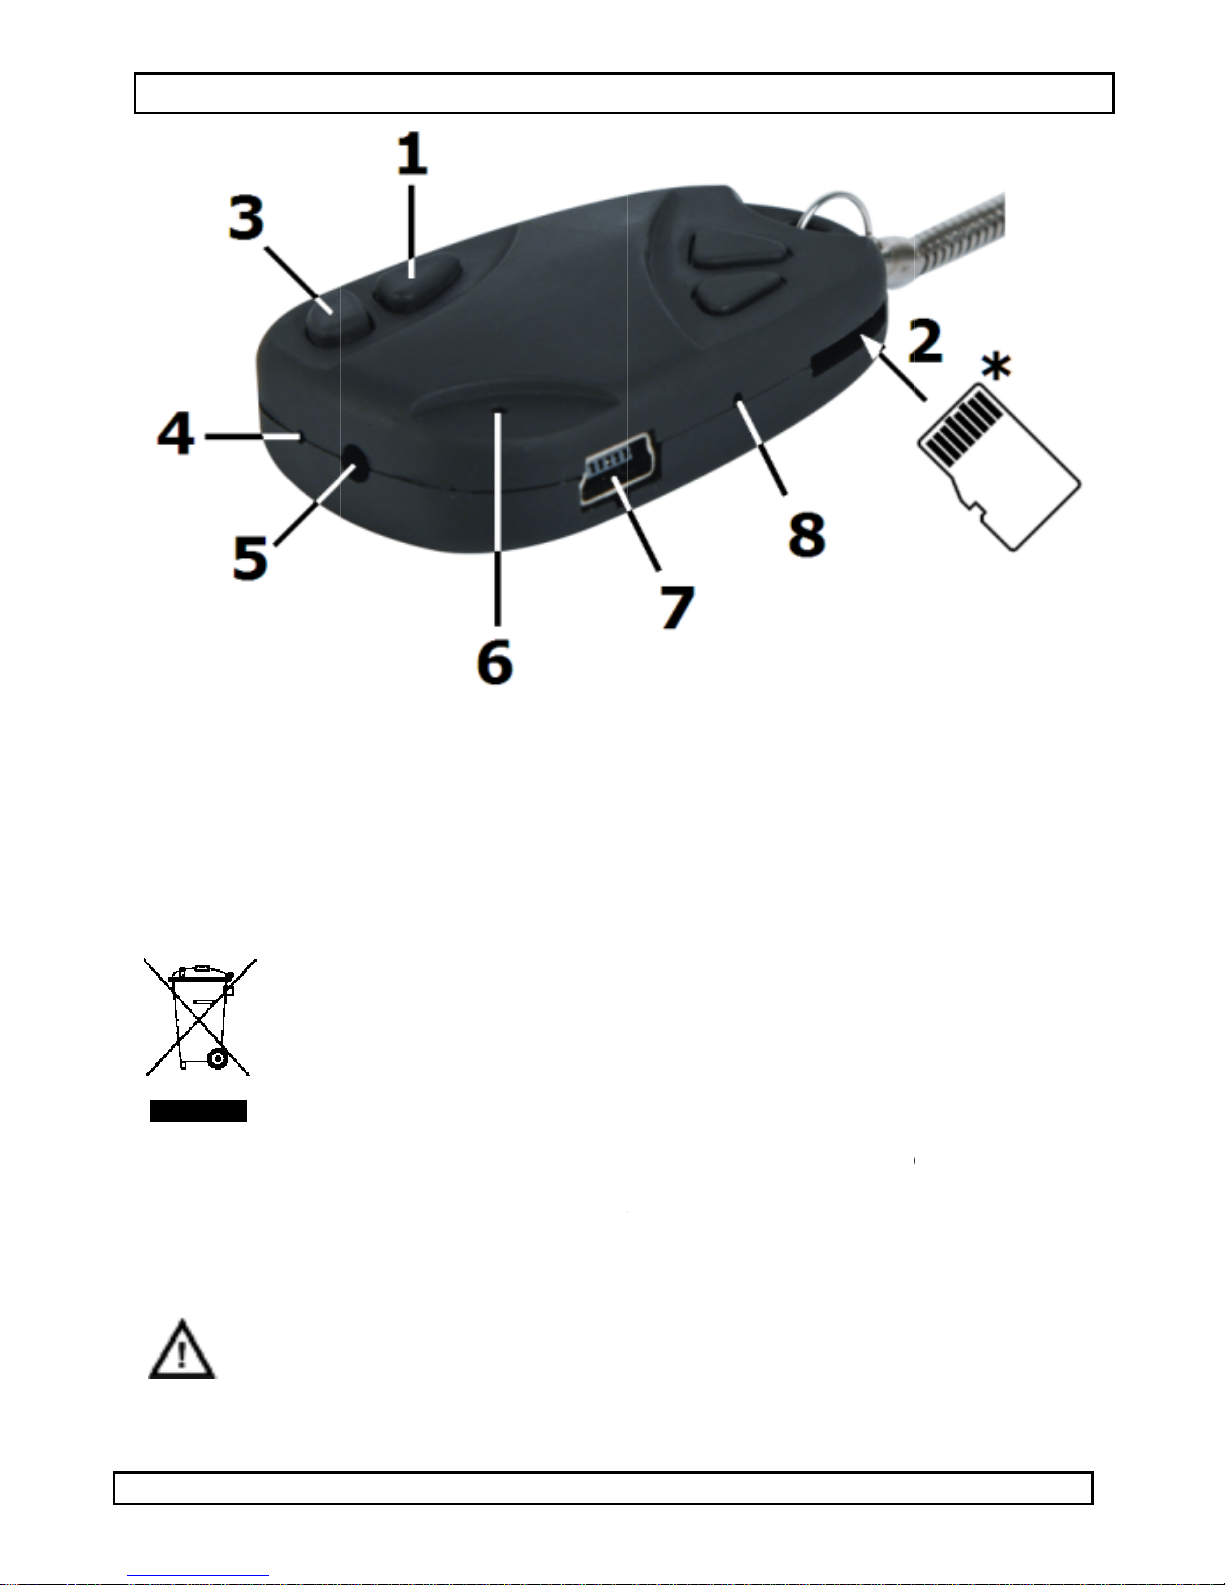
Refer to the illustration on page 2 of this manual.
1 ON/OFF button 5 camera
2 micro SD card slot 6 status LED
3 control button 7 Mini-B USB port
4 microphone 8 reset button
6. Operation
• Press the ON/OFF button [1] to switch the device on. The status
LED [6] turns on orange to indicate that the device is ready.
• Press and hold the ON/OFF button [1] for 4s to switch the device
off.
Taking pictures
• Point the camera [5] towards the field of interest.
• Press the control button [3] shortly. The status LED [6] switches
off and on again.
30.05.2011 3 ©Velleman nv
Page 4

CAMCOLVC8N Rev. 01
Recording
• Point the camera [5] towards the field of interest.
• Press and hold the control button [3] for 3s. The status LED [6]
flashes 3 times and switches off. The device is now recording. The
recorded format is AVI.
• Press the control button [3] again to stop recording. The LED [6]
turns orange again. Note that this might take a few seconds.
Note: when the memory is full or battery power becomes low, the
current file is saved and the device powers off automatically
Play back
• Connect the included USB cable to the USB port [7] and insert the
other end into a USB port of a computer (not incl.).
• The status LED [6] will light up orange and the device will now act
as a regular USB memory device. Copy, open or delete the
recordings as you would with other files on your computer system.
Note: stop the USB device in the appropriate way before
disconnecting from the US port.
Charging
• When the status LED [6] is flashing slowly, battery power is low.
• The battery charges when the device is connected to a powered
USB port or USB power adaptor (not included).
Reset
• When the device does not react anymore, use a small pin (e.g. a
paper clip) to gently press the reset-button [8].
7. Update system time
• Create a text file named TAG.txt.
• In that text file, enter the date and time in the following format:
[date]
YYYY/MM/DD
hh:mm:ss
(YYYY=year, MM= month, DD= date, hh=hour, mm=minutes,
ss= seconds)
• Plug the CAMCOLVC8N into the USB port of your PC.
• Copy TAG.txt to the root directory of the CAMCOLVC8N.
• Shut the USB device down in a proper way and unplug it from the
USB port.
• Switch on the CAMCOLVC8N. At this point, date and time as
specified in the TAG.txt file are loaded into the system memory
and the file itself is removed from the directory.
8. Battery
• This recorder contains an internal rechargeable battery. When the
device is end-of-life, this battery has to be removed.
• Wear sufficient and appropriate protection (goggles, gloves …)
when breaking the housing.
30.05.2011 4 ©Velleman nv
Page 5

e
a
n
t
g
s
n
t
m
p
c
l
m
h
s
o
n
p
e
O
s
O
B
o
o
-
m
°
e
e
ge
y
r
c
©
e
o
0
0
e
o
o
c
y
w
o
c
s
CAMC
LVC8N
Rev. 01
WARNI
Dispos
regulat
9. Technic
pick-up eleme
lens angle
storage capaci
video recordin
frame rate (fp
recording capa
image recordi
power supply
battery capaci
charging time
current consu
NG:
of batteries in acc
ordance with local
ions. Keep batterie
l Specification
t colour CM
65°
y max. 16G
recording
video res
) 30
city <70MB/m
recording
image res
built-in Li
y 1h
2h
ption max. 170
format AVI (audi
lution 720 x 48
in
format JPEG
battery (recharge via
away from childr
S sensor
micro SD card (not
lution 1280 x 1
A
n.
incl.)
and video)
pixels
24 pixels
USB)
dimensions
weight
operating tem
Use this devi
cannot be he
resulted fro
concerning t
please visit o
this manual i
© COPYRIGHT N
The copyright t
reserved. This ma
reproduced, transl
rior written cons
52 x 32 x
20g
erature 0°C ~ 40
e with original acc
d responsible in th
(incorrect) use of
is product and the
ur website www.v
subject to chan
OTICE
this manual is owned b
ual is copyrighted. No pa
ated or reduced to any ele
nt of the copyright holder.
12mm
C
essories only. Vell
event of damage
this device. For mo
latest version of th
lleman.eu. The inf
without prior noti
Velleman nv. All world
t of this manual may be c
tronic medium or otherwi
man nv
r injury
re info
is manual,
rmation in
e.
ide rights
ied,
e without the
30.05.2011
5
Velleman nv
Page 6

E
z
m
y
e
d
t
;
y
n
n
d
w
a
i
n
V
h
e
e
g
d
ghe
d
u
g
j
n
d
s
n
O
o
e
s
n
b
s
R
e
t
n
r
a
n
s
e
e
ge
g
d
o
a
©
G
o
g gee
o
e
e
j
r
jd
e
t
g
e
e
b
j
a
m
a
j
CAMC
LVC8N
Rev. 01
G
1. Inleid
Aan alle inge
Belangrijke
Dit s
als h
scha
even
afval
voor
een lokaal rec
milieuwetgevi
Hebt u vrage
betreffende
Dank u voor u
toestel in gebr
transport, inst
2. Veilighe
Houd
BRUIKERSH
ing
etenen van de Eur
ilieu-informatie b
mbool op het toestel
t na zijn levenscyclu
e kan toebrengen aa
uele batterijen) niet
het moet bij een ge
recyclage. U moet dit
clagepunt brengen.
.
, contacteer dan d
e verwijdering.
aankoop! Lees dez
uik neemt. Werd het
lleer het dan niet en
dsinstructies
buiten het bereik va
ANDLEIDIN
pese Unie
treffende dit produ
of de verpakkin
wordt weggeworpen
het milieu. Gooi dit
ij het gewone huish
pecialiseerd bedrijf t
toestel naar uw verd
especteer de plaatse
e plaatseli
handleiding grondig
oestel beschadigd ti
raadpleeg uw dealer.
kinderen en onbevo
ke auto
ct
ft aan dat,
, dit toestel
toestel (en
udelijke
rechtkomen
ler of naar
ke
li
iteiten
voor u het
ens het
den.
3. Algeme
Raadpleeg de
achteraan de
• Bescherm t
bediening.
• Bescherm t
• Gebruik het
vochti
• Leer eerst
gebruiken.
• Om veili
Schade doo
niet onder
• Gebruik het
onoordeelk
• De
richtli
verantwoor
rechtstreek
• Installeer e
respecteer i
heid
arantie
nen i
e richtlijnen
elleman® service-
andleiding.
en schokken en ve
en extreme temper
toestel enkel binne
en opspattende vloei
e functies van het to
idsredenen mag u ge
r wijzigingen die de
e garantie.
toestel enkel waarvo
ndig gebruik vervalt
eldt niet voor scha
deze handleiding en
elijkheid afwijzen vo
verband mee houde
gebruik deze camer
eders privacy.
en kwaliteitsgaran
mijd brute kracht tijd
turen en stof.
shuis. Bescherm te
toffen.
stel kennen voor u h
n wijzigingen aanbr
bruiker heeft aange
or het gemaakt is. Bi
de garantie.
e door het negeren v
uw dealer zal de
r defecten of proble
n.
niet voor illegale pr
ie
ens de
en regen,
t gaat
ngen.
racht valt
n bepaalde
en die hier
ktijken en
30.05.2011
6
Velleman nv
Page 7

CAMCOLVC8N Rev. 01
r
4. Eigenschappen
• zeer kleine, digitale camera met opnamefunctie
• opname op micro SD-kaart (niet meegelev.)
• geen intern flashgeheugen
• slechts 2 bedieningsknoppen
• beeldopname, audio- en video-opname
• geleverd met USB-kabel
5. Omschrijving
Raadpleeg de figuur op pagina 2 van deze handleiding.
1 aan-uitschakelaa
2 poort voor SD-kaart 6 statusled
3 functieknop 7 Mini-B USB-poort
4 microfoon 8 resetknop
5 camera
6. Gebruik
• Druk de aan-uitschakelaar [1] in om in te schakelen. De oranje
statusled [6] licht oranje op om aan te geven dat de camera klaar
is om op te nemen.
• Houd de aan-uitschakelaar [1] gedurende 4 seconden ingedrukt
om de camera uit te schakelen.
Momentopname
• Richt de camera [5].
• Druk kort op de functietoets [3]. De statusled [6] dooft en licht
opnieuw op.
Opname
• Richt de camera [5].
• Houd de functietoets [3] gedurende 3 seconden ingedrukt. De
statusled [6] knippert 3 keer en dooft. De sleutelhanger neemt nu
de beelden op in AVI-formaat.
• Druk opnieuw op de functietoets [3] om de opname te stoppen.
De oranje statusled [6] licht opnieuw op. Dit kan enkele seconden
duren.
Opmerking: Bij een vol geheugen of zwakke batterij wordt het
huidige bestand bewaard en zal de sleutelhanger automatisch
uitschakelen.
Afspelen
• Koppel de sleutelhanger aan een USB-poort van een
ingeschakelde computer via de meegeleverde USB-kabel.
• De oranje statusled [6] licht op. U kunt de sleutelhanger nu
gebruiken als een USB-geheugen en bestanden kopiëren, openen
en verwijderen.
Herladen
• Bij een zwakke batterij zal de statusled [6] langzaam knipperen.
• Koppel de sleutelhanger aan een USB-poort of aan een USB-
voedingsadapter om de interne batterij op te laden.
30.05.2011 7 ©Velleman nv
Page 8
p
v
e
b
[Yh
a
e
C
C
C
g
g
e
d
g
h
A
c
n
e
t
t
g
u
O
a
o
=
e
a
a
b
e
n
s
v
t
t
m
©
e
g
n
=
c
n
e
g
u
r
e
o
j
n
(
e
i
4
Resetten
• Reset het a
voorwerp, z
paraat door de reset
oals een paperclip, z
CAMC
LVC8N
knop [8] met een kl
chtjes in te drukken.
Rev. 01
in
7. Update
• Maak een t
• Voer in dit
formaat:
(YYYY= ja
ss= second
• Koppel de
• Kopieer het
CAMCOLV
• Schakel het
• Schakel de
econfigure
ekopieerd.
8. De batt
• Deze recor
batterij aan
• Draa
besc
WA
van
an de systeemt
kstbestand aan en n
estand datum en tijd
date]
YYY/MM/DD
h:mm:ss
r, MM= maand, DD
n)
AMCOLVC8N aan d
bestand TAG.txt na
8N.
USB-apparaat uit en
AMCOLVC8N in. D
erd zijn, worden nu n
Het bestand zelf wor
rij
er bevat een herlaad
het einde van de lev
ermende kleding wa
RSCHUWING: Hou
kinderen.
ijd
em het TAG.txt.
in vol
dag, hh= uur, mm
USB-poort van uw p
r de rootdirectory va
ontkoppel het van d
tum en tijd zoals ze i
aar het systeem
dt uit de directory ve
are batterij. Verwijd
nscyclus van de rec
neer u de behuizing
d de batteri
ens het volge
ehe
buite
de
minuten,
.
de
USB-poort.
n TAG.txt
en
wijderd.
r deze
rder.
opent.
het bereik
9. Technis
opneemeleme
lenshoek
opslagcapacite
video-opname
beelden per s
opnamecapaci
beeldopname
voeding
autonomie bat
laadduur
verbruik
afmetingen
ewicht
werktemperat
30.05.2011
he specificaties
t kleuren CMOS-
65°
it SD-microkaart
opnameformaa
videoresolutie
conde 30
eit <70 MB/min.
opnameformaa
beeldresolutie
ingebouwde lith
erij 1 u
2 u
max. 150 mA
52 x 32 x 12 m
20 g
ur 0°C ~ 40°C
ensor
an max. 16 GB (niet
AVI
JPEG
iumbatterij (herladen
8
audio
720 x 480 p
1280 x 102
meegelev.)
n video)
xels
pixels
via USB)
Velleman nv
Page 9

o
n
ge
n
a
o
g
H
e
e
g
v
c
d
s
i
m
n
o
o
i
r
e
g
n
e
m
g
u
e
e
g
n
a
O
i
h
v
e
n
r
ga
D
e
t
u
v
r
v
e
e
e
a
v
r
e
c
a
d
©
b
m
n
n
g
e
e
m
u
q
d
t
s
o
a
t
n
CAMC
LVC8N
Rev. 01
Gebruik dit t
nv is niet aa
(verkeerd)
dit product e
www.vellem
allen tijde w
kennisgevin
© AUTEURSREC
Velleman nv he
Alle wereldwijde r
edeelten ervan o
op een elektronis
rechthebbende.
1. Intro
Aux résident
Des informat
ce produit
Ce sy
l’élimi
l'envir
électr
munic
l’appa
votre fourniss
respecter la ré
l’environneme
En cas de qu
élimination.
Nous vous re
attentivement
été endomma
votre revende
estel enkel met or
sprakelijk voor sc
bruik van dit toest
de laatste versie
n.eu. De informati
rden gewijzigd zo
.
T
ft het auteursrecht voo
chten voorbehouden. Het
er te nemen, te kopiëren,
h medium zonder vooraf
NOTICE
uction
de l'Union europé
ons environnemen
bole sur l'appareil o
ation d’un appareil e
nnement. Ne pas jet
nique (et des piles é
paux non sujets au t
eil en question. Ren
ur ou à un service d
lementation locale r
t.
stions, contacter l
ercions de votre ach
avant la mise en ser
é pendant le transpo
r.
inele accessoires.
ade of kwetsuren
el. Voor meer infor
an deze handleidi
in deze handleidi
der voorafgaande
deze handleiding.
is niet toe
te vertalen, te bewerken
ande schriftelijke toestem
estaan om dez
’EMPLOI
nne
ales importantes c
l'emballage indique
n fin de vie peut poll
er un appareil électri
entuelles) parmi les
i sélectif ; une déchè
oyer les équipement
recyclage local. Il co
lative à la protection
s autorités locales
t ! Lire la présente n
ice de l’appareil. Si l’
t, ne pas l’installer e
Velleman
ij
atie over
, zie
kan te
handleiding of
n op te slaan
ing van de
oncernant
que
er
ue ou
échets
erie traitera
usagés à
nvient de
de
pour
tice
ppareil a
consulter
2. Consign
Garder h
autorisé
3. General
Se reporter à l
s de sécurité
ors de la portée des
s.
Guidelines
a garantie de servi
fin de notice.
• Proté
er co
tre les chocs et le tr
l’opération.
• Tenir à l’éc
30.05.2011
rt de la poussière et
nfants et des person
e et de qualité Vell
iter avec circonspect
es températures ext
9
es non
®
eman
en
ion pendant
rêmes.
Velleman nv
Page 10

CAMCOLVC8N Rev. 01
• Utiliser cet appareil uniquement à l'intérieur. Protéger de la
pluie, de l’humidité et des projections d’eau.
• Se familiariser avec le fonctionnement avant l’emploi.
• Toute modification est interdite pour des raisons de sécurité. Les
dommages occasionnés par des modifications par le client ne
tombent pas sous la garantie.
• N’utiliser qu’à sa fonction prévue. Un usage impropre annule
d'office la garantie.
• La garantie ne s’applique pas aux dommages survenus en
négligeant certaines directives de cette notice et votre revendeur
déclinera toute responsabilité pour les problèmes et les défauts
qui en résultent.
• Installer et utiliser la caméra en respectant la législation et la vie
privée des tiers.
4. Caractéristiques
• petite caméra numérique avec fonction d'enregistrement
• enregistrement sur carte SD micro (non incl.)
• pas de mémoire flash intégrée
• seulement 2 touches d'opération
• capture d'image, enregistrements audio et vidéo
• livré avec câble USB
5. Description
Se référer à l’illustration à la page 2 de cette notice.
1 bouton marche/arrêt 5 caméra
2 port pour carte SD 6 DEL d’état
3 bouton de fonction 7 port USB Mini-B
4 microphone 8 bouton de réinitialisation
6. Emploi
• Enfoncer le bouton marche/arrêt [1] pour allumer la caméra. La
DEL [6] s’allume en orange pour indiquer qu’elle est prête à
l’emploi.
• Éteindre l’appareil en maintenant enfoncé le bouton [1] pendant
4 secondes.
Capture d’image
• Pointer la caméra [5].
• Enfoncer brièvement le bouton de fonction [3]. La DEL [6]
s’éteint et se rallume.
Enregistrement
• Pointer la caméra [5].
• Maintenir enfoncé le bouton de fonction [3] pendant 3 secondes.
La DEL [6] clignote 3 fois et s’éteint. Le porte-clés enregistre les
images au format AVI.
• Renfoncer le bouton de fonction [3] pour interrompre
l’enregistrement. La DEL [6] se rallume en orange (ceci peut
30.05.2011 10 ©Velleman nv
Page 11

u
:
a
e
e
e
b
B
b
e
e
o
e
o
[Yh
n
e
A
C
É
p
C
s
L
v
u
I
s
a
é
t
O
g
g
L
e
e
p
a
u
’
jo
A
e
p
u
e
u
e
©
e
s
é
e
t
=
o
t
o
s
e
,
o
o
d
t
CAMC
LVC8N
Rev. 01
durer quelq
Remarque
s’éteint
pile faibl
Lecture de l’
• Connecter l
l’aide du câ
• La DEL [6]
une clef US
effacés.
Recharge
• Une pile fai
• Connecter l
un adaptat
Réinitialisati
• Enfoncer l
7. Mise à j
• Créer un fic
• Entrer dans
(YYYY=an
ss=second
• Insérer le C
• Copier le fic
CAMCOLV
•
teindre le
USB.
• Allumer le
paramétrée
du CAMCO
es secondes).
Le fichier est sauve
utomatiquement lors
.
nregistrement
porte-clés à un port
le USB inclus.
s’allume en oran
et les fichiers peuv
le est indiquée par l
porte-clés à un port
ur USB (non inclus)
n
bouton de réinitialis
e.
ur de l’heure d
hier texte TAG.txt.
ce fichier la date et l
date]
YYY/MM/DD
h:mm:ss
ée, MM=mois, DD=
s)
MCOLVC8N dans u
hier TAG.txt dans le
8N.
ériphérique USB et l
AMCOLVC8N. À ce
dans le fichier TAG.
VC8N. Le fichier est
ardé et a caméra est
d’une mémoire plein
USB d’un ordinateur
e stylo peut être utili
nt être ouverts, copi
clignotement lent d
USB d’un ordinateur
our recharger la pile.
tion [8] à l’aide d’un
système
heure selon le forma
ur, hh=heure, mm
n port USB de votre
répertoire racine du
déconnecter dûmen
oint, date et heure c
txt sont copiées dan
effacé du répertoire.
la caméra
ou d’une
allumé à
é comme
s ou
la LED [6].
allumé ou à
trombone.
suivant :
minutes,
rdinateur.
du port
mme
la mémoire
8. La pile
• Ce stylo-ca
en fin de vi
• Porter des
de l’ouvert
AVERT
enfant
9. Spécific
capteur
angle de l'obje
capacité de m
enregistremen
30.05.2011
méra contient une pil
e de l’appareil.
êtements adaptés (l
re du boîtier.
SSEMENT : Garder
.
tions techniqu
ctif 65°
moire carte SD mic
vidéo format d'enr
CMOS coule
11
e rechargeable. Retir
nettes de protection
la pile hors de la p
s
r
ro de max. 16 Go (n
istrement AVI (au
r cette pile
gants) lors
rtée des
n incl.)
io et vidéo)
Velleman nv
Page 12

c
g
e
g
e
ge
p
c
s
m
e
a
p
T
a
e
q
d
a
i
a
i
s
O
d
e
u
A
e
c
e
n
f
é
d
d
o
L
r
r
a
e
a
j
d
©
8
v
o
m
a
i
é
o
d
c
u
o
r
t
m
a
t
e
s
CAMC
LVC8N
Rev. 01
images par se
capacité
d'enre
istrem
capture d'ima
alimentation
autonomie pil
délai de char
consommation
dimensions
oids
temp. de servi
N’employer c
Velleman ne
lésions surve
plus d’infor
version de c
www.vellem
cette notice
préalable.
© DROITS D’AU
SA Velleman est
Tous droits mondi
intégrale ou parti
support électroni
droit.
résolution vi
onde 30
<70 Mo/min
nt
e format d'enr
résolution d'i
accu au lithi
1 h
2 h
max. 170 m
52 x 32 x 12
20 g
e 0°C ~ 40°C
et appareil qu’avec
era aucunement r
nus à un usage (in
ation concernant c
tte notice, visitez
n.eu. Toutes les in
euvent être modifi
EUR
l’ayant droit des droits
ux réservés. Toute repro
lle, du contenu de cette n
ue que se soit est interdite
éo 720 x 4
istrement JPEG
mage 1280 x 1
m intégré (recharge
mm
des accessoires d’
sponsable de dom
orrect) de cet app
t article et la dern
otre site web
ormations présent
es sans notificati
’auteur pour cette noti
uction, traduction, copie o
tice par quelque procédé
sans l’accord préalable éc
0 pixels
024 pixels
ia USB)
rigine. SA
ages ou
reil. Pour
ère
es dans
n
e.
diffusion,
u sur tout
it de l’ayant
MANUAL DE
1. Intro
A los ciudad
Importantes
concerniente
Este
tira l
amb
en l
espe
distr
leye
Si tiene duda
residuos.
30.05.2011
ucción
nos de la Unión Eu
informaciones sob
a este producto
símbolo en este apar
as muestras inservibl
ente. No tire este ap
basura doméstica; d
cializada en recicla
buidor o a la unidad
locales en relación c
s, contacte con las
USUARIO
opea
e el medio ambien
to o el embalaje indi
s, podrían dañar el
rato (ni las pilas, si l
ebe ir a una empresa
e.
Devuelva este apara
e reciclaje local. Res
on el medio ambient
autoridades locale
12
e
ca que, si
edio
s hubiera)
o a su
pete las
.
para
Velleman nv
Page 13

a
d
.
c
g
a
n
u
g
a
c
g
a
e
á
d
e
g
p
i
t
r
á
g
e
m
a
ga
c
r
a
O
M
d
a
x
o
n
o
a
o
p
o
a
p
c
n
d
e
e
5
6
7
8
©
n
a
o
s
e
e
o
g
m
d
s
a
CAMC
LVC8N
Rev. 01
¡Gracias por h
instrucciones
algún daño en
su distribuidor
2. Instruc
Manten
capacit
3. Normas
Véase la Gara
manual del us
• No a
y la instala
• No expon
• Utilice el ap
lluvia, hum
• Familiaríces
• Por razones
aparato est
no autoriza
• Utilice sólo
manual. Su
• Los daños c
se
no será res
resultantes.
• Instale y ut
privada de
ite el
uridad d
ber comprado el CA
el manual antes de u
el transporte no lo in
iones de seguri
a el aparato lejos de
das y niños.
generales
tía de servicio y c
ario.
parato. Evite usar e
ión.
a
este aparato a polvo
rato sólo en interi
dad ni a ningún tipo
e con el funcionamie
de seguridad, las m
n prohibidas. Los d
as, no están cubiert
l aparato para las a
uso incorrecto anula
ausados por descuid
e este manual invalid
onsable de ningún d
lice la cámara al res
erceros.
COLVC8N! Lea ate
sarlo. Si el aparato h
stale y póngase en c
ad
l alcance de persona
lidad Velleman® al
cesiva fuerza durant
ni temperaturas extr
res. No exponga est
de salpicadura o gote
to del aparato antes
dificaciones no autori
ños causados por m
s por la garantía.
licaciones descritas e
la
arantía completa
de las instrucciones
arán su garantía y su
ño u otros problema
ectar la legislación y
tamente las
sufrido
ntacto con
no
final de este
el manejo
emas.
equipo a
o.
de utilizarlo.
zadas del
dificaciones
n este
ente.
e
distribuidor
la vida
4. Caracte
• pequeña c
•
• no hay me
• sólo 2 puls
• captura de
• se entre
rabación
5. Descrip
Véase las figu
1 interruptor
2 puerto par
3 botón de fu
4 micrófono
30.05.2011
ísticas
mara digital con fun
n tarjeta micro SD (
oria flash incorpora
dores
imagen, grabación d
con cable USB
ión
as en la página 2 de
ON/OFF
tarjeta SD
nción
13
ión de grabación
o incl.)
a
audio y vídeo
ste manual del usua
cámara
LED de estado
puerto USB Mini-B
botón de reinicializ
rio.
ción
Velleman nv
Page 14

CAMCOLVC8N Rev. 01
6. Uso
• Pulse el interruptor ON/OFF [1] para activar la cámara. El LED
[6] se ilumina (naranja) para indicar que el aparato está listo
para utilizar.
• Desactive el aparato al mantener pulsado el botón [1]
4 segundos.
Sacar una foto
• Apunte la cámara [5].
• Pulse brevemente el botón de función [3]. El LED [6] se apaga y
vuelve a iluminarse.
Grabar
• Apunte la cámara [1].
• Mantenga pulsado el botón de función [3] 3 segundos. El LED [6]
parpadea 3 veces y se apaga. El aparato graba las imágenes en el
formato AVI.
• Vuelva a pulsar el botón de función [3] para interrumpir la
grabación. El LED [6] vuelve a iluminarse (naranja) (esto puede
durar algunos segundos).
Nota: El fichero se guarda y la cámara se desactiva
automáticamente si la memoria está llena o si la pila está
agotada.
Reproducir
• Conecte el llavero con el cable USB incluido a un puerto USB de
un ordenador activado.
• El LED de estado [6] se ilumina (naranja). Es posible utilizar el
bolígrafo como memoria USB y abrir, copiar o borrar archivos.
Recargar
• El parpadeo lento del [6] indica que la pila agotada está agotada.
• Conecte el llavero a un puerto USB de un ordenador activado o a
un adaptador USB (no incl.) para recargar la pila.
Reinicializar
• Pulse el botón de reinicialización [8] con un objeto pequeño.
7. Actualizar la hora del sistema
• Cree un fichero de texto TAG.txt.
• Introduzca la fecha y al hora en este fichero según el formato
siguiente: [date]
YYYY/MM/DD
hh:mm:ss
(YYYY=año, MM=mes, DD=día, hh=hora, mm=minutos,
ss=segundos)
• Introduzca el CAMCOLVC8N en un puerto USB del ordenador.
• Copie el fichero TAG.txt al directorio raíz del CAMCOLVC8N.
• Desactive el aparato USB y desconéctelo correctamente del puerto
USB.
• Active el CAMCOLVC8N. Ahora, se copian la fecha y la hora,
30.05.2011 14 ©Velleman nv
Page 15

i
o
o
a
M
c
m
p
m
g
v
s
g
a
g
e
o
p
r
s
d
a
d
E
s
d
e
O
l
s
l
r
M
c
e
e
g
)
m
°
o
n
p
e
s
a
©
a
c
j
d
8
1
c
e
n
a
e
i
l
o
l
CAMC
LVC8N
Rev. 01
como han s
del CAMCO
8. La pila
• Este aparat
tirar aparat
• Lleve ropa
caja.
¡OJO!:
9. Especifi
elemento de i
ángulo de la ó
capacidad de
rabación de
imágenes por
capacidad de
captura de im
alimentación
autonomía bat
tiempo de car
consumo
dimensiones
peso
temperatura d
funcionamient
Utilice este a
Velleman NV
causados po
información
este manual
www.vellem
el contenido
© DERECHOS D
Velleman NV dis
Todos los derecho
traducir, copiar, e
permiso escrito d
do configuradas en e
LVC8N. El fichero mi
funciona con una pi
.
decuada (gafas de p
antenga las pilas l
aciones
agen sensor C
tica 65°
emoria tarjeta mi
ídeo formato d
resolución
egundo 30
rabación <70MB/m
en formato d
resolución
ima
batería de
USB
ería 1h
a 2h
máx. 170
52 x 32 x
20g
0°C ~ 40
arato sólo con los
no será responsabl
un uso (indebido)
obre este product
el usuario, visite
n.eu. Se pueden m
e este manual sin
AUTOR
one de los derechos d
mundiales reservados. E
itar y guardar este manu
l derecho habiente.
en
fichero TAG.txt, a l
mo se borra del dire
a recargable. Saque l
otección, guantes) al
os del alcance de
e
OS color
ro SD de máx. 16GB
grabación AVI (au
vídeo 720 x 4
in.
grabación JPEG
de la 1280 x
litio incorporada (re
A
12mm
C
accesorios original
e de daños ni lesio
de este aparato. P
y la versión más r
uestra página web
odificar las especif
previo aviso.
autor para este manua
tá estrictamente prohibid
l del usuario o partes de e
memoria
torio.
a pila al
abrir la
niños.
(no incl.)
io y vídeo)
0 píxeles
024 píxeles
argar por
s.
es
ra más
ciente de
caciones y
del usuario.
reproducir,
lo sin previo
30.05.2011
15
Velleman nv
Page 16

h
o
w
s
a
n
e
R
e
e
gungsr
e
e
e
e
a
e
S
v
e
k
g
t
B
n
h
d
O
S
c
ü
o
e
S
o
m
s
e
h
S
ö
g
a
e
t
b
Qu
d
e
m
e
a
h
e
r
s
G
G
r
©
t
c
s
n
t
l
m
e
h
e
G
u
h
i
grü
g
h
e
g
g
r
CAMC
LVC8N
Rev. 01
1. Einfü
A
n alle Einw
Wichtige Um
Diese
an, d
Lebe
Entso
nicht
verw
Firma zwecks
Händler oder
werden. Resp
Falls Zweifel
Entsor
Wir bedanken
Bedienungsanl
Überprüfen Si
sein, verwend
Händler.
BEDIENUNG
rung
hner der Europäis
eltinformationen
Symbol auf dem Pr
ss die Entsorgung di
szyklus der Umwelt
rgen Sie die Einheit (
als unsortiertes Haus
ndeten Batterien mü
ecycling entsorgt w
in örtliches Recycling
ktieren Sie die örtlic
bestehen, wenden
ichtlinien an Ihre
uns für den Kauf des
eitun
, ob Transportschäd
n Sie das Gerät nich
vor Inbetriebn
ANLEITUNG
hen Union
ber dieses Produk
dukt oder der Verpa
ses Produktes nach
chaden zufügen kan
der verwendeten Ba
üll; die Einheit oder
sen von einer spezia
rden. Diese Einheit
-Unternehmen retour
en Umweltvorschrifte
ie sich für
rtliche Behörde.
CAMCOLVC8N ! Les
hme sorgfältig durc
n vorliegen. Sollte di
und wenden Sie sich
kung zeigt
einem
.
terien)
isierten
uss an den
niert
n.
n Sie diese
.
s der Fall
an Ihren
2. Sicherh
Halt
3. Allgeme
Siehe Vellem
Bedienungsanl
• Vermeiden
während d
• Schützen
• Verwenden
das Gerät
• Nehmen Si
seinen Fun
• Ei
• Verwenden
• Bei Schäde
enmäch
verboten.
Änderunge
dieser Bedi
Produkt fü
verursacht
resultieren
Haftung.
itshinweise
n Sie Kinder und Un
ine Richtlinien
n® Service- und
eitung.
Sie Erschütterungen.
r Installation und Be
ie das Gerät vor extr
Sie das Gerät nur i
or Regen und Feucht
das Gerät erst in B
tionen vertraut gem
ige Veränderungen s
ei Schäden verursac
erlischt der Garanti
Sie das Gerät nur fü
enungsanleitung son
ren und erlischt der
n, die durch Nichtbea
werden, erlischt der
e Folgeschäden übe
efugte vom Gerät fer
alitätsgarantie am
Vermeiden Sie rohe
ienung des Gerätes.
men Temperaturen
Innenbereich. Sc
e.
trieb, nachdem Sie s
cht haben.
ind aus Sicherheits
t durch eigenmächti
anspruch.
Anwendungen besc
t kann dies zu Schäd
arantieanspruch.
chtun
arantieanspruch. Fü
nimmt der Hersteller
der Bedienun
n.
Ende dieser
ewalt
nd Staub.
ützen Sie
ch mit
nden
e
rieben in
n am
sanleitung
daraus
keine
30.05.2011
16
Velleman nv
Page 17

CAMCOLVC8N Rev. 01
• Installieren und verwenden Sie die Kamera nicht für illegale
Praktiken und beachten Sie die Intimsphäre aller.
4. Eigenschaften
• sehr kleine, digitale Kamera mit Aufnahmefunktion
• Aufnahme auf SD-Microkarte (nicht mitgeliefert)
• es gibt keinen internen Flash-Speicher
• nur 2 Bedienungstasten
• Bild-, Audio-und Video-Aufnahme
• Lieferung mit USB-Kabel
5. Umschreibung
Siehe Abbildungen, Seite 2 dieser Bedienungsanleitung.
1 EIN/AUS-Schalter 5 Kamera
2 Anschluss für SD-Karte 6 Status-LED
3 Funktionstaste 7 Mini-B USB-Anschluss
4 Mikrofon 8 Reset-Taste
6. Anwendung
• Drücken Sie den EIN/AUS-Schalter [1] um das Gerät
einzuschalten. Die LED [6] leuchtet (orange), um anzuzeigen,
dass die Kamera fertig ist, um aufzunehmen.
• Halten Sie den EIN/AUS-Schalter [1] 4 Sekunden gedrückt, um
die Kamera auszuschalten.
Ein Foto machen
• Richten Sie die Kamera [5].
• Drücken Sie kurz die Funktionstaste [3]. Die Status-LED [6]
erlischt und leuchtet wieder.
Aufnahme
• Richten Sie die Kamera [5].
• Halten Sie die Funktionstaste [3] 3 Sekunden gedrückt. Die
Status-LED [6] blinkt 3 Mal und erlischt. Das Gerät macht nun die
Bilder in AVI-Format.
• Drücken Sie die Funktionstaste [3] wieder, um die Aufnahme zu
stoppen. Die Status-LED [6] leuchtet wieder. Dies kann einige
Sekunden dauern.
Bemerkung: Bei einem vollen Speicher oder einer schwachen
Batterie wird die aktuelle Datei gespeichert und schaltet der
Schlüsselanhänger automatisch aus.
Abspielen
• Verbinden Sie den Schlüsselanhänger über das mitgelieferte USB-
Kabel mit dem USB-Anschluss eines eingeschalteten Computers.
• Die orangefarbige Status-LED [6] leuchtet. Sie können den
Kugelschreiber nun als Memorystick verwenden und Dateien
kopieren, öffnen und löschen.
Laden
• Bei einer schwachen Batterie blinkt die Status-LED [6] langsam.
30.05.2011 17 ©Velleman nv
Page 18

S
U
n
e
n
o
[Yh
h
e
S
e
C
e
e
n
e
f
S
g
U
c
m
m
u
pa
gu
O
n
d
e
e
t
T
N
u
fig
m
g
w
a
t
)
r
u
r
g
L
©
P
d
s
h
e
m
d
o
e
i
a
u
e
c
x
U
CAMC
LVC8N
Rev. 01
• Verbinden
mit einem
Rüscksetzen
• Setzen Sie
einem klei
drücken.
7. Die Syst
• Kreieren Si
• Geben Sie i
folgendes F
(YYYY=Ja
ss=Sekund
• Verbinden
• Kopieren Si
CAMCOLV
• Schalten Si
Port.
• Schalten Si
TAG.txt ko
selber wird
ie den Schlüsselanhä
SB-Netzteil, um die i
das Gerät zurück, in
en Gegenstand (z.B.
emzeit aktualisi
eine Textdatei mit d
dieser Datei das Da
rmat):
date]
YYY/MM/DD
h:mm:ss
r, MM=Monat, DD=
n
ie den CAMCOLVC8
die Datei TAG.txt z
8N.
das USB-Gerät aus
den CAMCOLVC8N
uriert, werden zu
elöscht.
nger mit einem USB-
terne Batterie zu la
em Sie die Reset-Ta
Heftklammer) vorsic
ren
m Namen TAG.txt.
um und die Uhrzeit
ag, hh=Stunden, m
mit dem USB-Port
um Hauptverzeichnis
nd trennen Sie es v
ein. Datum und Uhrz
Speicher kopiert. D
ort oder
en).
te [8] mit
tig
in (siehe
=Minuten,
es PC.
des
m USB-
it, wie in
e Datei
8. Die Batt
• Das Gerät
Entfernen
Gerätes.
• Tra
en Sie
ACHT
9. Technis
Aufnahme-Ele
Blickwinkel
Speicherkapaz
Video-Aufnah
Bilder per Sek
Aufnahmeka
Bildaufnahme
Stromversor
rie
unktioniert mit einer
ie diese Batterie am
eeignete Kleidung
NG: Halten Sie die
wiederaufladbaren B
Ende des Lebenszykl
enn Sie das Gehäus
Batterien von Kind
he Daten
ent CMOS-Farbk
65°
ität SD-Microkar
mitgeliefert
e Aufnahmefo
Video-Auflös
nde 30
zität <70MB/Min.
Aufnahmefo
Bildauflösun
ng eingebaute
mera
e von max. 16GB (ni
mat AVI (Audio u
ng 720 x 480 Pi
mat JPEG
1280 x 1024
ithiumbatterie (über
tterie.
s des
öffnen.
ern fern.
ht
nd Video)
el
Pixel
SB
30.05.2011
18
Velleman nv
Page 19

t
c
S
n
a
e
g
H
s
crep
d
t
u
i
x
o
g
ç
t
d
o
u
h
a
O
H
w
P
t
ge
ü
r
u
U
o
o
a
g
c
o
O
p
n
©
b
n
ä
u
m
p
h
o
d
n
e
p
r
o
o
m
o
e
n
aufladen)
Autonomie Ba
Ladezeit
Stromverbrau
Abmessungen
Gewicht
Betriebstempe
Verwenden
Velleman NV
Verletzunge
mehr Inform
Version dies
Alle Änderun
© URHEBERREC
Velleman NV be
Alle weltweiten Re
Urhebers ist es ni
roduzieren, zu
terie 1 Std.
2 Std.
h max. 170mA
52 x 32 x 12
20g
ratur 0°C ~ 40°C
ie dieses Gerät nur
übernimmt keine
bei (falscher) An
tionen zu diesem
r Bedienungsanlei
en ohne vorheri
T
itzt das Urheberrecht f
chte vorbehalten. ohne vo
ht gestattet, diese Bedien
kopieren, zu übersetzen, z
CAMC
LVC8N
mm
mit originellen Zu
aftung für Schade
endung dieses Ger
rodukt und die ne
ung, siehe www.ve
Ankündigung vorb
r diese Bedienungsanle
herige schriftliche Geneh
ngsanleitung ganz oder in
u bearbeiten oder zu s
eic
Rev. 01
ehörteilen.
oder
tes. Für
este
lleman.eu.
ehalten.
itung.
igung des
Teilen zu
ern.
1. Intro
Aos cidadãos
Importantes
respeita a es
Este
enq
amb
nol i
em r
ao p
relat
Em caso de d
os resíduos.
Obri
instru
ada por t
ões des
sofrido algum
contacto com
2. Instr
MANUAL DO
ução
da União Europeia
informações sobre
e produto.
símbolo no aparelho
anto desperdícios, p
ente. Não deite o ap
o doméstico; dirija-s
ecicla
sto de reciclagem lo
ivas ao meio ambient
úvidas, contacte c
er adquirido o CAMC
e manual antes de o
ano durante o trans
seu distribuidor.
ções de segura
em. Devolva o
TILIZADOR
o meio ambiente n
u na embalagem in
derão causar danos
relho (nem pilhas, s
e a uma empresa es
aparelho ao seu dist
al. Respeite as leis l
e.
m as autoridades l
LVC8N! Lei atenta
usar. Caso o aparelh
orte não o instale e
ça
que
ica que,
o meio
as houver)
ecializada
ibuidor ou
cais
cais para
ente as
tenha
ntre em
Manten
capacit
30.05.2011
a o aparelho fora do
das e crianças.
alcance de pessoas
19
ão
Velleman nv
Page 20

CAMCOLVC8N Rev. 01
p
3. Normas gerais
Veja a Garantia de serviço e qualidade Velleman® no final deste
manual do utilizador.
• Não abane o aparelho. Evite usar força excessiva durante o
manuseamento e instalação.
• Não exponha o aparelho ao pó ou temperaturas extremas.
• Utilize o aparelho apenas em interiores. Não exponha o
aparelho à chuva, humidade ou a qualquer tipo de salpicos.
• Familiarize-se com o funcionamento do aparelho antes de o
utilizar.
• Por razões de segurança, estão proíbidas quaisquer modificações
ao aparelho não autorizadas.
modificações não autorizadas, não estão cobertos pela garantia.
• Utilize o aparelho apenas para as aplicações descritas neste
manual. Uma utilização incorrecta anula a garantia
completamente.
• Os danos causados pelo não cumprimento das normas de
segurança referidas neste manual anulam a garantia e o seu
distribuidor não será responsável por quaisquer danos ou outros
problemas resultantes.
• Instale e utilize a câmara respeitando a legislação em vigor e a
privacidade de terceiros.
Os danos causados por
4. Características
• pequena câmara digital com função de gravação
• gravação em micro cartão de memória SD (não incl.)
• sem memória flash incorporada
• apenas 2 pulsadores
• cabo USB incluído
5. Descrição
Veja as figuras da página 2 deste manual do utilizador.
1 interru
2 entrada para cartão SD 6 LED de estado
3 botão de função 7 porta USB Mini-B
4 microfone 8 botão de reinicialização
tor ON/OFF 5 câmara
6. Utilização
• Prima o interruptor ON/OFF [1] para activar a câmara. O LED [6]
acende-se (laranja) para indicar que o aparelho está pronto a
utilizar.
• Desligue o aparelho pressionando o botão [1] durante
4 segundos.
Tirar uma foto
• Aponte a câmara [5].
30.05.2011 20 ©Velleman nv
Page 21

CAMCOLVC8N Rev. 01
• Prima brevemente o botão de função [3]. O LED [6] apaga-se e
volta a acender-se.
Gravar
• Aponte a câmara [1].
• Pressione o botão de função [3] durante 3 segundos. O LED [6]
pisca 3 vezes e apaga-se. O aparelho grava as imagens em
formato AVI.
• Volte a pressionar o botão de função [3] para interromper a
gravação. O LED [6] volta a acender (laranja) (pode demorar
segundos).
Nota: O ficheiro é guardado e a câmara desliga-se
automáticamente caso a memória esteja cheia ou a pilha
esteja gasta.
Reproduzir
• Ligue o porta-chaves usando o cabo USB incluído a uma porta
USB de um computador ligado.
• O LED de estado [6] acende (laranja). É possível utilizar o
bolígrafo como memória USB e abrir, copiar ou apagar arquivos.
Recarregar
• O piscar lento de [6] indica que a pilha está gasta.
• Ligue o porta-chaves a uma porta USB de um computador ligado
ou a um adaptador USB (não incl.) para recarregar a pilha.
Reinicializar
• Prima o botão de reinicialização [8] utilizando um objecto
pequeno.
7. Actualizar a hora do sistema
• Crie um ficheiro de texto TAG.txt.
• Introduza a data e a hora no ficheiro no seguinte formato:
[date]
YYYY/MM/DD
hh:mm:ss
(YYYY=ano, MM=mês, DD=dia, hh=hora, mm=minutos,
ss=segundos)
• Introduza o CAMCOLVC8N na porta USB com computador.
• Copie o ficheiro TAG.txt para o directório raiz do CAMCOLVC8N.
• Desligue o dispositivo USB e retire-o correctamente da porta USB.
• Ligue o CAMCOLVC8N. Agora, a data e a hora são copiadas,
conforme foram configuradas no ficheiro TAG.txt, para a memória
do CAMCOLVC8N. O ficheiro apag-se automáticamente do
directório.
8. A pilha
• Este aparelho funciona com uma pilha recarregável.
• Use roupa adequada (óculos de protecção, luvas) para abrir o
aparelho.
30.05.2011 21 ©Velleman nv
Page 22

ÇÃ
s
m
g
v
e
a
b
e
e
o
d
e
d
m
a
a
O
e
g
e
ga
m
°
m
v
ç
d
t
a
v
o
r
o
©
e
d
8
1
a
a
o
a
o
f
u
e
ATEN
criança
O!: Mantenha as pi
.
CAMC
LVC8N
lhas fora do alcace
Rev. 01
das
9. Espec
elemento de i
ângulo óptico
capacidade de
ravação em
imagens por s
capacidade de
captura de im
alimentação
autonomia da
tempo de carr
consumo
dimensões
ificações
agem sensor CM
65°
memória micro cart
(não incl.)
ídeo formato d
resolução
undo 30
ravação <70MB/m
em formato d
resoluçao
bateria de
(recarre
ateria 1h
amento 2h
máx. 170
52 x 32 x
OS a cores
ão de memória SD d
gravação AVI (áu
de vídeo 720 x 4
in.
gravação JPEG
de imagem 1280 x
lítio incorporada
mento por USB)
A
12mm
máx. 16GB
io e vídeo)
0 píxeis
024 píxeis
peso
temperatura d
funcionament
Utilize este a
Velleman NV
lesões causa
mais informa
mais recente
web www.ve
o conteúdo d
© DEREITOS DE
A Velleman NV
Todos os direitos
copiar, editar e gr
autorização escrit
20g
0°C ~ 40
parelho apenas co
não será responsá
os pelo uso (indev
ão sobre este pro
deste manual do u
lleman.eu. Podem
ste manual sem a
AUTOR
etem os direitos de aut
undiais reservados. É est
var este manual do utiliza
por parte da detentora d
C
acessórios origin
el por quaisquer d
ido) deste aparelh
uto e para consult
ilizador, visite a n
lterar-se as especi
iso prévio.
r sobre este manual do
ictamente proíbido reprod
dor ou partes do mesmo s
s direitos.
is. A
nos ou
. Para
r a versão
ssa página
icações e
utilizador.
zir, traduzir,
m prévia
30.05.2011
22
Velleman nv
Page 23

N
p
a
m
y
j
n
c
i
ą
p
g
k
c
n
t
n
z
j
r
k
s
z
k
d
j
j
m
g
y
j
ą
z
j
O
Ż
U
o
a
j
o
z
y
p
o
d
w
m
ż
e
w
g
d
g
o
n
©
A
a
d
o
t
d
j
j
u
y
o
r
a
n
a
z
U
a
g
j
j
j
I
STRUKCJA U
CAMC
LVC8N
YTKOWNIK
Rev. 01
1. Wstę
Przeznaczon
Ważne infor
Ten s
wskazu
środow
śmietni
em
po
firmą zajmują
dystrybutorow
zgodnie z zasa
Jeśli masz w
utylizacją od
Dziękujemy za
zapoznanie się
zostało uszkod
nie
o i skonta
2. Instruk
Chro
nieau
dla mieszkańców
acje dotyczące śr
mbol umieszczony n
e, że wyrzucenie pr
iska. Nie wyrzucaj ur
ka, tylko do specjalni
ików na urządzenia e
ą się recyklingiem. U
lub firmie zajmujące
dami bezpieczeństwa
tpliwości skontakt
adów.
wybór produktu firm
z instrukcją obsługi
zone podczas transp
towanie się ze sprze
ja bezpieczeńst
ić przed dziećmi oraz
oryzowanymi..
nii Europejskiej.
dowiska.
urządzeniu bądź op
duktu może być szko
ądzenia lub baterii d
e przeznaczonych do
lektroniczne lub skon
rządzenie możesz od
się recyklingiem. Po
dotyczącymi środowi
się z firmą zajm
u
Velleman! Prosimy
rzed użyciem. Jeśli u
rtu prosimy o nie ko
awcą.
a.
użytkownikami
kowaniu
liwe dla
zbiorczego
o
te
aktuj się z
ać
stępu
ska.
ącą się
dokładne
rządzenie
zystanie z
3. General
Proszę o zapo
i gwarancja
niniejszej inst
• Wszelkie sz
niniejszą in
ponosi za ni
• Wszelkie s
przez użyt
• Chroń urzą
nadmierne
• Zapozna
urządzenie
• Ze wz
samodzieln
• Używa
niezgodne
• Nie używa
prywatność
si
lędu
urz
e postanowieni
nanie się z warunka
akości, które znajdzi
ukcji.
ody spowodowane u
trukcją nie są objęte
e odpowiedzialności.
kody powstałe na sk
ownika nie są objęt
zenie przed wstrząs
siły podczas użytko
ę z instrukcją obsłu
.
bezpieczeństwa zab
ch modyfikacji urzą
dzenie zgodnie z je
przeznaczeniem sp
produktu w sposób
osób trzecich.
a.
i gwarancji. Vellem
ecie na ostatniej stro
ytkowaniem niezgod
warancją, a sprzed
utek samodzielnej m
gwarancją.
ami i wszelkimi udar
ania produktu.
i zanim rozpocznies
rania się wszelkich
zenia.
o przeznaczeniem.
woduje utratę gwar
aruszający prawo lu
n® Serwis
ie
nym z
wca nie
odyfikac
ami. Unika
pracę z
żytkowanie
ncji.
b
i
30.05.2011
23
Velleman nv
Page 24

CAMCOLVC8N Rev. 01
ą
4. Charakterystyka produktu.
• Bardzo mała cyfrowa kamera
• Rejestracja na karcie micro-SD, (brak w zestawie.)
• brak wbudowanej pamięci flash
• obsługa przy pomocy 2 przycisków
• rejestracja dźwięku oraz obrazu
• przewód USB w komplecie
5. Opis produktu
Zapoznaj się z ilustracją na stronie 2 niniejszej instrukcji.
1 Wł
2 Gniazdo karty pamięci micro-SD 6 Dioda LED status kamery
3 Przycisk sterowania 7 Port USB
4 Mikrofon 8 Przycisk zerowania
cznik zasilania 5 Kamera
6. Obsługa urządzenia.
• Włącznikiem ON/OFF [1] włącz kamerę. Gotowość kamery do
pracy potwierdzi zaświecenie się diody LED statusu kamery [6] w
kolorze pomarańczowym.
• Aby wyłączyć kamerę naciśnij i przytrzymaj przycisk ON/OFF [1]
na czas nie krótszy niż 4 sekundy.
Robienie zdjęć
• Skieruj obiektyw kamery [5] w kierunku, który cię interesuje.
• Aby zrobić zdjęcie wciśnij krótko przycisk sterowania [3].
Wykonanie zdjęcia zostanie zasygnalizowane krótkim zgaśnięciem
diody LED statusu kamery [6].
Rejestracja obrazu
• Skieruj obiektyw kamery [5] w kierunku, który cię interesuje.
• Aby rozpocząć rejestrację obrazu ( filmu) wciśnij i przytrzymaj nie
przez okres nie krótszy niż 3 sekundy przycisk sterowania [3].
Rozpoczęcie filmowania zostanie zasygnalizowane trzykrotnym
błyskiem diody LED statusu kamery [6]. Obraz video zostanie
zarejestrowany w formacie AVI.
• Aby zatrzymać rejestrację obrazu naciśnij ponownie przycisk
sterowania [3]. Dioda LED statusu kamery zaświeci się w kolorze
pomarańczowym.
UWAGA: Gdy zostanie zapełniona pamięć micro-SD lub
akumulator zostanie rozładowany, urządzenie zapisze
bieżący plik i wyłączy się.
Odtwarzanie plików.
• Przy pomocy przewodu USB będącego w zestawie podłącz kamerę
z komputerem PC.
• Dioda LED statusu kamery [6] zaświeci się w kolorze
pomara
widziana w systemie jako dysk wymienny USB. Dane można
kopiować, odtwarzać lub kasować.
ńczowym. Podłączona kamera do komputera będzie
30.05.2011 24 ©Velleman nv
Page 25

a
k
m
w
p
S
y
n
s
[Yh
k
y
P
j
s
p
e
k
a
e
ę
g
p
r
Tobu
a
e
O
p
o
k
r
d
)
guj
ż
ż
m
o
A
ą
=
c
g
ą
W
k
d
s
y
o
b
c
ć
ą
T
©
p
s
o
k
ż
o
a
C
z
g
p
j j
CAMC
LVC8N
Rev. 01
UWAGA: Z
Ładowanie a
• Niski stan n
pulsowanie
• Aby nałado
komputera
wyjściem U
Resetowanie
• Jeżeli urząd
zresetować.
wcisnąć prz
7. Ustawia
• Utwórz plik
• W pliku tek
(YYYY=ro
mm=minut
• Za pomocą
komputera
• Skopiu
pamięć ma
• Odłącz w s
• Włącz kam
zostaje zała
Plik ustawia
usuwany z
plik
trzymaj urządzenie
umulatora.
aładowania akumulat
dioda LED statusu
ać wewnętrzną bate
rzy pomocy przewo
B ( brak w zestawie
urządzenia.
zenie nie rea
W tym celu należy u
cisk resetowania ka
e na
ie daty system
tekstowy o nazwie T
towym podaj bieżąc
date]
YYY/MM/DD
h:mm:ss
, MM= miesiąc, DD
, ss= sekundy)
przewodu USB podłą
C.
TAG.txt do katalo
owa CAMCOLVC8N.
osób bezpieczny urz
rę CAMCOLVC8N.
dowany do systemu
nia daty po jego zała
atalogu głównego sy
rzed wyjęciem go z
ra sygnalizowany je
amery [6].
ie aparatu/kamery p
u USB lub do ładowa
.
adne przyciski, nale
yć igłę lub spinacz d
ery [8].
wej.
G.txt.
datę i czas wg form
dzień, hh=godzina,
z kamerę CAMCOLV
u
głównego kamery wi
dzenie z portu USB.
chwili włączenia plik
amery i ustawiony c
owaniu jest automat
temu plików kamery
ortu USB.
t powolnym
dłącz do
i z
y je
papieru i
tu:
8N do
dziane
TAG.txt
as i data.
ycznie
.
ako
8. Akumul
• W kamerz
skończy si
• Do te
środki och
o ty
OS
lok
dzi
30.05.2011
tor wewnętrzn
CAMCOLVC8N zam
jego przydatność na
u czynności musisz
ony (okulary, rękawi
RZEŻENIE: Zwróci
dowy baterii. Pozb
lnymi przepisami.
ci.
25
.
ntowany jest akumu
leży
yć wyposażony w od
e …).
szczególną uwagę
dź się baterii zgod
rzymaj baterie z d
o zdemontować
lator. Gdy
.
owiednie
na stan
nie z
ala od
Velleman nv
Page 26

CAMCOLVC8N Rev. 01
9. Specyfikacja techniczna.
Przetwornik obrazu CMOS kolor
Kąt patrzenia obiektywu 65°
Pojemność pamięci max. 16 GB micro-SD (brak w zestawie)
Format zapisu video Format zapisu AVI (audio i video)
rozdzielczość 720 x 480 pixli
Liczba półobrazów (fps) 30
Prędkość zapisu <70MB/min
Prędkość zapisu zdjęć Format zapisu JPEG
rozdzielczość 1280 x 1024 pixels
Zasilanie Wbudowany akumulator litowy
(ładowanie przez port USB)
Pojemność akumulatora
1h
wewnętrznego
Czas ładowania 2h
Pobór prądu max. 170mA
Wymiary 52 x 32 x 12mm
Waga 20g
Temperaturowy zakres
0°C ~ 40°C
pracy
Używaj tylko oryginalnych akcesoriów. Velleman N.V. nie
ponosi odpowiedzialności za straty lub szkody
spowodowane złym korzystaniem z urządzenia. Jeśli chcesz
uzyskać więcej informacji o tym produkcie lub o marce
Velleman, wejdź na stronę: www.velleman.eu. Velleman nie
jest dystrybutorem wszystkich marek zawartych w tej
instrukcji. Informacje zawarte w niniejszej instrukcji
obsługi mogą ulec zmianie bez wcześniejszego
powiadomienia.
© INFORMACJA O PRAWACH WŁASNOŚCI
Instrukcja ta jest własnością firmy Velleman NV i jest chroniona prawami autorskimi.
Wszystkie prawa są zastrzeżone na całym świecie. Żadna część tej instrukcji nie może
być kopiowana, przedrukowywana, tłumaczona lub konwertowania na wszelkie nośniki
elektronicznych lub w inny sposób, bez uprzedniej pisemnej zgody właściciela praw
autorskich.
30.05.2011 26 ©Velleman nv
Page 27

Velleman® Service and
Quality Warranty
Velleman® has over 35 years of
experience in the electronics world and
distributes its products in more than 85
countries. All our products fulfil strict
quality requirements and legal stipulations
in the EU. In order to ensure the quality,
our products regularly go through an extra
quality check, both by an internal quality
department and by specialized external
organisations. If, all precautionary
measures notwithstanding, problems
should occur, please make appeal to our
warranty (see guarantee conditions).
General Warranty Conditions
Concerning Consumer Products (for
EU):
• All consumer products are subject to a
24-month warranty on production flaws
and defective material as from the original
date of purchase.
• Velleman® can decide to replace an
article with an equivalent article, or to
refund the retail value totally or partially
when the complaint is valid and a free
repair or replacement of the article is
impossible, or if the expenses are out of
proportion.
You will be delivered a replacing article or
a refund at the value of 100% of the
purchase price in case of a flaw occurred
in the first year after the date of purchase
and delivery, or a replacing article at 50%
of the purchase price or a refund at the
value of 50% of the retail value in case of
a flaw occurred in the second year after
the date of purchase and delivery.
• Not covered by warranty:
- all direct or indirect damage caused after
delivery to the article (e.g. by oxidation,
shocks, falls, dust, dirt, humidity...), and
by the article, as well as its contents (e.g.
data loss), compensation for loss of
profits;
- frequently replaced consumable goods,
parts or accessories such as batteries,
lamps, rubber parts, drive belts...
(unlimited list);
- flaws resulting from fire, water damage,
lightning, accident, natural disaster, etc.
…;
- flaws caused deliberately, negligently or
resulting from improper handling,
negligent maintenance, abusive use or use
contrary to the manufacturer’s
instructions;
- damage caused by a commercial,
professional or collective use of the article
(the warranty validity will be reduced to
six (6) months when the article is used
professionally);
- damage resulting from an inappropriate
packing and shipping of the article;
- all damage caused by modification,
repair or alteration performed by a third
party without written permission by
Velleman®.
• Articles to be repaired must be delivered
to your Velleman® dealer, solidly packed
(preferably in the original packaging), and
be completed with the original receipt of
purchase and a clear flaw description.
• Hint: In order to save on cost and time,
please reread the manual and check if the
flaw is caused by obvious causes prior to
presenting the article for repair. Note that
returning a non-defective article can also
involve handling costs.
• Repairs occurring after warranty
expiration are subject to shipping costs.
• The above conditions are without
prejudice to all commercial warranties.
The above enumeration is subject to
modification according to the article
(see article’s manual).
Velleman® service- en
kwaliteitsgarantie
Velleman® heeft ruim 35 jaar ervaring in
de elektronicawereld en verdeelt in meer
dan 85 landen. Al onze producten
beantwoorden aan strikte kwaliteitseisen
en aan de wettelijke bepalingen geldig in
de EU. Om de kwaliteit te waarborgen,
ondergaan onze producten op regelmatige
tijdstippen een extra kwaliteitscontrole,
zowel door onze eigen kwaliteitsafdeling
als door externe gespecialiseerde
organisaties. Mocht er ondanks deze
voorzorgen toch een probleem optreden,
dan kunt u steeds een beroep doen op
onze waarborg (zie
waarborgvoorwaarden).
Algemene waarborgvoorwaarden
consumentengoederen (voor
Europese Unie):
• Op alle consumentengoederen geldt een
garantieperiode van 24 maanden op
productie- en materiaalfouten en dit vanaf
de oorspronkelijke aankoopdatum.
• Indien de klacht gegrond is en een gratis
reparatie of vervanging van een artikel
onmogelijk is of indien de kosten hiervoor
buiten verhouding zijn, kan Velleman®
beslissen het desbetreffende artikel te
vervangen door een gelijkwaardig artikel
of de aankoopsom van het artikel
gedeeltelijk of volledig terug te betalen. In
Page 28

dat geval krijgt u een vervangend product
of terugbetaling ter waarde van 100% van
de aankoopsom bij ontdekking van een
gebrek tot één jaar na aankoop en
levering, of een vervangend product tegen
50% van de kostprijs of terugbetaling van
50 % bij ontdekking na één jaar tot 2
jaar.
• Valt niet onder waarborg:
- alle rechtstreekse of onrechtstreekse
schade na de levering veroorzaakt aan het
toestel (bv. door oxidatie, schokken, val,
stof, vuil, vocht...), en door het toestel,
alsook zijn inhoud (bv. verlies van data),
vergoeding voor eventuele winstderving.
- verbruiksgoederen, onderdelen of
hulpstukken die regelmatig dienen te
worden vervangen, zoals bv. batterijen,
lampen, rubberen onderdelen,
aandrijfriemen... (onbeperkte lijst).
- defecten ten gevolge van brand,
waterschade, bliksem, ongevallen,
natuurrampen, enz.
- defecten veroorzaakt door opzet,
nalatigheid of door een onoordeelkundige
behandeling, slecht onderhoud of
abnormaal gebruik of gebruik van het
toestel strijdig met de voorschriften van
de fabrikant.
- schade ten gevolge van een
commercieel, professioneel of collectief
gebruik van het apparaat (bij
professioneel gebruik wordt de
garantieperiode herleid tot 6 maand).
- schade veroorzaakt door onvoldoende
bescherming bij transport van het
apparaat.
- alle schade door wijzigingen, reparaties
of modificaties uitgevoerd door derden
zonder toestemming van Velleman®.
• Toestellen dienen ter reparatie
aangeboden te worden bij uw Velleman®verdeler. Het toestel dient vergezeld te
zijn van het oorspronkelijke
aankoopbewijs. Zorg voor een degelijke
verpakking (bij voorkeur de originele
verpakking) en voeg een duidelijke
foutomschrijving bij.
• Tip: alvorens het toestel voor reparatie
aan te bieden, kijk nog eens na of er geen
voor de hand liggende reden is waarom
het toestel niet naar behoren werkt (zie
handleiding). Op deze wijze kunt u kosten
en tijd besparen. Denk eraan dat er ook
voor niet-defecte toestellen een kost voor
controle aangerekend kan worden.
• Bij reparaties buiten de waarborgperiode
zullen transportkosten aangerekend
worden.
• Elke commerciële garantie laat deze
rechten onverminderd.
Bovenstaande opsomming kan
eventueel aangepast worden
naargelang de aard van het product
(zie handleiding van het betreffende
product).
Garantie de service et de
qualité Velleman®
Velleman® jouit d’une expérience de plus
de 35 ans dans le monde de l’électronique
avec une distribution dans plus de 85
pays. Tous nos produits répondent à des
exigences de qualité rigoureuses et à des
dispositions légales en vigueur dans l’UE.
Afin de garantir la qualité, nous
soumettons régulièrement nos produits à
des contrôles de qualité supplémentaires,
tant par notre propre service qualité que
par un service qualité externe. Dans le cas
improbable d’un défaut malgré toutes les
précautions, il est possible d’invoquer
notre garantie (voir les conditions de
garantie).
Conditions générales concernant la
garantie sur les produits grand public
(pour l’UE) :
• tout produit grand public est garanti 24
mois contre tout vice de production ou de
matériaux à dater du jour d’acquisition
effective ;
• si la plainte est justifiée et que la
réparation ou le remplacement d’un article
est jugé impossible, ou lorsque les coûts
s’avèrent disproportionnés, Velleman®
s’autorise à remplacer ledit article par un
article équivalent ou à rembourser la
totalité ou une partie du prix d’achat. Le
cas échéant, il vous sera consenti un
article de remplacement ou le
remboursement complet du prix d’achat
lors d’un défaut dans un délai de 1 an
après l’achat et la livraison, ou un article
de remplacement moyennant 50% du prix
d’achat ou le remboursement de 50% du
prix d’achat lors d’un défaut après 1 à 2
ans.
• sont par conséquent exclus :
- tout dommage direct ou indirect survenu
à l’article après livraison (p.ex. dommage
lié à l’oxydation, choc, chute, poussière,
sable, impureté…) et provoqué par
l’appareil, ainsi que son contenu (p.ex.
perte de données) et une indemnisation
éventuelle pour perte de revenus ;
- tout bien de consommation ou
accessoire, ou pièce qui nécessite un
remplacement régulier comme p.ex. piles,
Page 29

ampoules, pièces en caoutchouc,
courroies… (liste illimitée) ;
- tout dommage qui résulte d’un incendie,
de la foudre, d’un accident, d’une
catastrophe naturelle, etc. ;
- out dommage provoqué par une
négligence, volontaire ou non, une
utilisation ou un entretien incorrects, ou
une utilisation de l’appareil contraire aux
prescriptions du fabricant ;
- tout dommage à cause d’une utilisation
commerciale, professionnelle ou collective
de l’appareil (la période de garantie sera
réduite à 6 mois lors d’une utilisation
professionnelle) ;
- tout dommage à l’appareil qui résulte
d’une utilisation incorrecte ou différente
que celle pour laquelle il a été initialement
prévu comme décrit dans la notice ;
- tout dommage engendré par un retour
de l’appareil emballé dans un
conditionnement non ou insuffisamment
protégé.
- toute réparation ou modification
effectuée par une tierce personne sans
l’autorisation explicite de SA Velleman® ;
- frais de transport de et vers Velleman®
si l’appareil n’est plus couvert sous la
garantie.
• toute réparation sera fournie par
l’endroit de l’achat. L’appareil doit
nécessairement être accompagné du bon
d’achat d’origine et être dûment
conditionné (de préférence dans
l’emballage d’origine avec mention du
défaut) ;
• tuyau : il est conseillé de consulter la
notice et de contrôler câbles, piles, etc.
avant de retourner l’appareil. Un appareil
retourné jugé défectueux qui s’avère en
bon état de marche pourra faire l’objet
d’une note de frais à charge du
consommateur ;
• une réparation effectuée en-dehors de la
période de garantie fera l’objet de frais de
transport ;
• toute garantie commerciale ne porte pas
atteinte aux conditions susmentionnées.
La liste susmentionnée peut être
sujette à une complémentation selon
le type de l’article et être mentionnée
dans la notice d’emploi.
Garantía de servicio y calidad
Velleman®
Velleman® disfruta de una experiencia de
más de 35 años en el mundo de la
electrónica con una distribución en más de
85 países. Todos nuestros productos
responden a normas de calidad rigurosas
y disposiciones legales vigentes en la UE.
Para garantizar la calidad, sometimos
nuestros productos regularmente a
controles de calidad adicionales, tanto por
nuestro propio servicio de calidad como
por un servicio de calidad externo. En el
caso improbable de que surgieran
problemas a pesar de todas las
precauciones, es posible apelar a nuestra
garantía (véase las condiciones de
garantía).
Condiciones generales referentes a la
garantía sobre productos de venta al
público (para la Unión Europea):
• Todos los productos de venta al público
tienen un período de garantía de 24
meses contra errores de producción o
errores en materiales desde la adquisición
original;
• Si la queja está fundada y si la
reparación o la sustitución de un artículo
es imposible, o si los gastos son
desproporcionados, Velleman® autoriza
reemplazar el artículo por un artículo
equivalente o reembolsar la totalidad o
una parte del precio de compra. En este
caso, recibirá un artículo de recambio o el
reembolso completo del precio de compra
al descubrir un defecto hasta un año
después de la compra y la entrega, o un
artículo de recambio al 50% del precio de
compra o la sustitución de un 50% del
precio de compra al descubrir un defecto
después de 1 a 2 años.
Por consiguiente, están excluidos
entre otras cosas:
- todos los daños causados directamente o
indirectamente al aparato y su contenido
después de la entrega (p.ej. por
oxidación, choques, caída,...) y causados
por el aparato, al igual que el contenido
(p.ej. pérdida de datos) y una
indemnización eventual para falta de
ganancias;
- partes o accesorios que deban ser
reemplazados regularmente, como por
ejemplo baterías, lámparas, partes de
goma, ... (lista ilimitada)
- defectos causados por un incendio,
daños causados por el agua, rayos,
accidentes, catástrofes naturales, etc. ;
- defectos causados a conciencia ,
descuido o por malos tratos, un
mantenimiento inapropiado o un uso
anormal del aparato contrario a las
instrucciones del fabricante;
- daños causados por un uso comercial,
profesional o colectivo del aparato (el
Page 30

período de garantía se reducirá a 6 meses
con uso profesional) ;
- daños causados por un uso incorrecto o
un uso ajeno al que est está previsto el
producto inicialmente como está descrito
en el manual del usuario ;
- daños causados por una protección
insuficiente al transportar el aparato.
- daños causados por reparaciones o
modificaciones efectuadas por una tercera
persona sin la autorización explicita de SA
Velleman® ;
- se calcula gastos de transporte de y a
Velleman® si el aparato ya no está
cubierto por la garantía.
• Cualquier reparación se efectuará por el
lugar de compra. Devuelva el aparato con
la factura de compra original y
transpórtelo en un embalaje sólido
(preferentemente el embalaje original).
Incluya también una buena descripción del
defecto ;
• Consejo: Lea el manual del usuario y
controle los cables, las pilas, etc. antes de
devolver el aparato. Si no se encuentra un
defecto en el artículo los gastos podrían
correr a cargo del cliente;
• Los gastos de transporte correrán a
carga del cliente para una reparación
efectuada fuera del periode de garantía.
• Cualquier gesto comercial no disminuye
estos derechos.
La lista previamente mencionada
puede ser adaptada según el tipo de
artículo (véase el manual del usuario
del artículo en cuestión)
Velleman® Service- und
Qualitätsgarantie
Velleman® hat gut 35 Jahre Erfahrung in
der Elektronikwelt und vertreibt seine
Produkte in über 85 Ländern. Alle
Produkte entsprechen den strengen
Qualitätsforderungen und gesetzlichen
Anforderungen in der EU. Um die Qualität
zu gewährleisten werden unsere Produkte
regelmäßig einer zusätzlichen
Qualitätskontrolle unterworfen, sowohl
von unserer eigenen Qualitätsabteilung als
auch von externen spezialisierten
Organisationen. Sollten, trotz aller
Vorsichtsmaßnahmen, Probleme auftreten,
nehmen Sie bitte die Garantie in Anspruch
(siehe Garantiebedingungen).
Allgemeine Garantiebedingungen in
Bezug auf Konsumgüter (für die
Europäische Union):
• Alle Produkte haben für Material- oder
Herstellungsfehler eine Garantieperiode
von 24 Monaten ab Verkaufsdatum.
• Wenn die Klage berechtigt ist und falls
eine kostenlose Reparatur oder ein
Austausch des Gerätes unmöglicht ist,
oder wenn die Kosten dafür
unverhältnismäßig sind, kann Velleman®
sich darüber entscheiden, dieses Produkt
durch ein gleiches Produkt zu ersetzen
oder die Kaufsumme ganz oder teilweise
zurückzuzahlen. In diesem Fall erhalten
Sie ein Ersatzprodukt oder eine
Rückzahlung im Werte von 100% der
Kaufsumme im Falle eines Defektes bis zu
1 Jahr nach Kauf oder Lieferung, oder Sie
bekommen ein Ersatzprodukt im Werte
von 50% der Kaufsumme oder eine
Rückzahlung im Werte von 50 % im Falle
eines Defektes im zweiten Jahr.
• Von der Garantie ausgeschlossen
sind:
- alle direkten oder indirekten Schäden,
die nach Lieferung am Gerät und durch
das Gerät verursacht werden (z.B.
Oxidation, Stöße, Fall, Staub, Schmutz,
Feuchtigkeit, ...), sowie auch der Inhalt
(z.B. Datenverlust), Entschädigung für
eventuellen Gewinnausfall.
- Verbrauchsgüter, Teile oder
Zubehörteile, die regelmäßig
ausgewechselt werden, wie z.B. Batterien,
Lampen, Gummiteile, Treibriemen, usw.
(unbeschränkte Liste).
- Schäden verursacht durch
Brandschaden, Wasserschaden, Blitz,
Unfälle, Naturkatastrophen, usw.
- Schäden verursacht durch absichtliche,
nachlässige oder unsachgemäße
Anwendung, schlechte Wartung,
zweckentfremdete Anwendung oder
Nichtbeachtung von Benutzerhinweisen in
der Bedienungsanleitung.
- Schäden infolge einer kommerziellen,
professionellen oder kollektiven
Anwendung des Gerätes (bei gewerblicher
Anwendung wird die Garantieperiode auf 6
Monate zurückgeführt).
- Schäden verursacht durch eine
unsachgemäße Verpackung und
unsachgemäßen Transport des Gerätes.
- alle Schäden verursacht durch
unautorisierte Änderungen, Reparaturen
oder Modifikationen, die von einem Dritten
ohne Erlaubnis von Velleman®
vorgenommen werden.
• Im Fall einer Reparatur, wenden Sie sich
an Ihren Velleman®-Verteiler. Legen Sie
das Produkt ordnungsgemäß verpackt
(vorzugsweise die Originalverpackung)
und mit dem Original-Kaufbeleg vor.
Page 31

Fügen Sie eine deutliche
Fehlerumschreibung hinzu.
• Hinweis: Um Kosten und Zeit zu sparen,
lesen Sie die Bedienungsanleitung
nochmals und überprüfen Sie, ob es
keinen auf de Hand liegenden Grund gibt,
ehe Sie das Gerät zur Reparatur
zurückschicken. Stellt sich bei der
Überprüfung des Geräts heraus, dass kein
Geräteschaden vorliegt, könnte dem
Kunden eine Untersuchungspauschale
berechnet.
• Für Reparaturen nach Ablauf der
Garantiefrist werden Transportkosten
berechnet.
• Jede kommerzielle Garantie lässt diese
Rechte unberührt.
Die oben stehende Aufzählung kann
eventuell angepasst werden gemäß
der Art des Produktes (siehe
Bedienungsanleitung des Gerätes).
Garantia de serviço e de
qualidade Velleman®
Velleman® tem uma experiência de mais
de 35 anos no mundo da electrónica com
uma distribuição em mais de 85 países.
Todos os nossos produtos respondem a
exigências rigorosas e a disposições legais
em vigor na UE. Para garantir a qualidade,
submetemos regularmente os nossos
produtos a controles de qualidade
suplementares, com o nosso próprio
serviço qualidade como um serviço de
qualidade externo. No caso improvável de
um defeito mesmo com as nossas
precauções, é possível invocar a nossa
garantia. (ver as condições de garantia).
Condições gerais com respeito a
garantia sobre os produtos grande
público (para a UE):
• qualquer produto grande público é
garantido 24 mês contra qualquer vício de
produção ou materiais a partir da data de
aquisição efectiva;
• no caso da reclamação ser justificada e
que a reparação ou substituição de um
artigo é impossível, ou quando os custo
são desproporcionados, Velleman®
autoriza-se a substituir o dito artigo por
um artigo equivalente ou a devolver a
totalidade ou parte do preço de compra.
Em outro caso, será consentido um artigo
de substituição ou devolução completa do
preço de compra no caso de um defeito no
prazo de 1 ano depois da data de compra
e entrega, ou um artigo de substituição
pagando o valor de 50% do preço de
compra ou devolução de 50% do preço de
compra para defeitos depois de 1 a 2
anos.
• estão por consequência excluídos :
- todos os danos directos ou indirectos
depois da entrega do artigo (p.ex. danos
ligados a oxidação, choques, quedas,
poeiras, areias, impurezas…) e provocado
pelo aparelho, como o seu conteúdo (p.ex.
perca de dados) e uma indemnização
eventual por perca de receitas ;
- todos os bens de consumo ou
acessórios, ou peças que necessitam uma
substituição regular e normal como p.ex.
pilhas, lâmpadas, peças em borracha,
correias… (lista ilimitada) ;
- todos os danos que resultem de um
incêndio, raios, de um acidente, de una
catastrophe natural, etc. ;
- danos provocados por negligencia,
voluntária ou não, uma utilização ou
manutenção incorrecta, ou uma utilização
do aparelho contrária as prescrições do
fabricante ;
- todos os danos por causa de uma
utilização comercial, profissional ou
colectiva do aparelho ( o período de
garantia será reduzido a 6 meses para
uma utilização profissional);
- todos os danos no aparelho resultando
de uma utilização incorrecta ou diferente
daquela inicialmente prevista e descrita no
manual de utilização ;
- todos os danos depois de uma devolução
não embalada ou mal protegida ao nível
do acondicionamento.
- todas as reparações ou modificações
efectuadas por terceiros sem a
autorização de SA Velleman® ;
- despesas de transporte de e para
Velleman® se o aparelho não estiver
coberto pela garantia.
• qualquer reparação será fornecida pelo
local de compra. O aparelho será
obrigatoriamente acompanhado do talão
ou factura de origem e bem acondicionado
(de
preferência dentro da embalagem de
origem com indicação do defeito ou
avaria) ;
• dica : aconselha-mos a consulta do
manual e controlar cabos, pilhas, etc.
antes de devolver o aparelho. Um
aparelho devolvido que estiver em bom
estado será cobrado despesas a cargo do
consumidor ;
• uma reparação efectuada fora da
garantia, será cobrado despesas de
transporte ;
Page 32

• qualquer garantia comercial não
prevalece as condições aqui mencionadas.
A lista pode ser sujeita a um
complemento conforme o tipo de
artigo e estar mencionada no manual
de utilização.
Velleman ® usługi i
gwarancja jakości
Velleman ® ma ponad 35letnie doświadczenie w świecie
elektroniki. Dystrybuujemy swoje
produkty do ponad 85 krajów. Wszystkie
nasze produkty spełniają surowe
wymagania jakościowe oraz wypełniają
normy i dyrektywy obowiązujące w
krajach UE. W celu zapewnienia
najwyższej jakości naszych produktów,
przechodzą one regularne oraz dodatkowo
wyrywkowe badania kontroli jakości,
zarówno naszego wewnętrznego działu
jakości jak również wyspecjalizowanych
firm zewnętrznych. Pomimo dołożenia
wszelkich starań czasem mogą pojawić się
problemy techniczne, prosimy odwołać się
do gwarancji (patrz warunki gwarancji).
Ogólne Warunki dotyczące gwarancji:
Wszystkie produkty konsumenckie
podlegają 24-miesięcznej gwarancji na
wady produkcyjne i materiałowe od daty
zakupu.
W przypadku, gdy usterka jest niemożliwa
do usunięcia lub koszt usunięcia jest
nadmiernie wysoki Velleman ® może
zdecydować o wymianie artykułu na nowy,
wolny od wad lub zwróci
ć zapłaconą
kwotę. Zwrot gotówki może jednak
nastąpić z uwzględnieniem poniższych
warunków:
zwrot 100% ceny zakupu w przypadku,
gdy wada wystąpiła w ciągu pierwszego
roku od daty zakupu i dostawy
wymiana wadliwego artykułu na nowy,
wolny od wad z odpłatnością 50% ceny
detalicznej lub zwrot 50% kwoty ceny
nabycia w przypadku gdy wada wystąpiła
w drugim roku od daty zakupu i dostawy.
Produkt nie podlega naprawie
gwarancyjnej:
- gdy wszystkie bezpośrednie lub
pośrednie szkody spowodowane są
działaniem czynników środowiskowych lub
losowych (np. przez utlenianie, wstrząsy,
upadki, kurz, brud, ...), wilgotności;
- gwarant nie ponosi odpowiedzialności za
szkody wynikających z utraty danych;
- utrata zysków z tytułu niesprawności
produktu; z gwarancji wyłaczone są
matriały eksploatacyjne: baterie, żarówki,
paski napędowe, gumowe elementy
napędowe... (nieograniczona lista);
- usterka wynika z działania pożaru,
zalania wszelkimi cieczami, uderzenia
pioruna, upadku lub klęski żywioł
owej,
itp.;
- usterka wynika z zaniedbań
eksploatacyjnych tj. umyślne bądź
nieumyślne zaniechanie czyszczenia,
konserwacji, wymiany materiałów
ekspolatacyjnych, niedbalstwa lub z
niewłaściwego obchodzenia się lub
niezgodnego użytkowania z instrukcją
producenta;
- szkody wynikające z nadmiernego
użytkowania gdy nie jest do tego celu
przeznaczony tj. działalność komerycjna,
zawodowa lub wspólne użytkowanie przez
wiele osób - okres obowiązywania
gwarancji zostanie obniżony do 6 (sześć)
miesięcy;
- Szkody wynikające ze źle zabezpieczonej
wysyłki produktu;
- Wszelkie szkody spowodowane przez
nieautoryzowaną naprawę, modyfikację,
przeróbkę produktu przez osoby trzecie
jak również bez pisemnej zgody firmy
Velleman ®.
• Uszkodzony produkt musi zostać
dostarczony do sprzedawcy ® Velleman,
solidnie zapakowany (najlepiej w
oryginalnym opakowaniu), wraz z
wyposażeniem z jakim produkt został
sprzedany. W przypadku wysyłki towaru w
opakowaniu innym niż oryginalnym ryzyko
usterki produktu oraz tego skutki
przechodzą na właściciela produktu. Wraz
z niesprawnym produktem należy dołączyć
jasny i szczegółowy opis jego usterki,
wady;
• Wskazówka: Aby zaoszczędzić na
kosztach i czasie, proszę szczegółowo
zapoznać się z instrukcja obsługi; czy
przyczyną wady są okoliczności techniczne
czy też wynikaja wyłącznie z
nieznajomości obsługi produktu. W
przypadku wysyłki sprawnego produktu do
serwisu nabywca może zostać obciążony
kosztmi obsługi oraz transportu.
• W przypadku napraw pogwarancyjnych
lub odpłatnych klient ponosi dodatkowo
koszt wysyłki produktu do i z serwisu.
wymienione wyżej warunki są bez
uszczerbku dla wszystkich komercyjnych
gwarancji.
Powyższe postanowienia mogą
podlega
wyrobu (patrz art obsługi).
ć modyfikacji w zależności od
 Loading...