

Page 1

A
O
A
K
D
U
E
F
F
N
R
R
T
I
G
R
R
U
T
U
G
BTS
BLUETO
BLUETO
HAUT-P
ALTAV
BLUETO
VIVAVO
USER M
GEBRUI
NOTICE
MANUAL
BEDIEN
MANUAL
P1
OTH® HANDS
OTH® HANDS
RLEUR MAI
Z MANOS LIB
OTH® FREISP
CE BLUETOO
NUAL
ERSHANDLEID
’EMPLOI
DEL USUARIO
NGSANLEITUN
UTENTE
REE SPEAKE
REE LUIDSP
S LIBRES BL
ES BLUETOO
ECHEINRICH
H® PER CELL
NG
PHONE
EKER VOOR
ETOOTH®
H®
TUNG
LARI
3
9
15
21
27
33
SM
Page 2
BTSP1 Rev. 06
31.01.2011 ©Velleman nv
2
Page 3
n
b
c
®
f
K K
Rsp I
r
n
r
r
l
l
b
u
e
e
m
f
d
t
a
s
r
h
t
h
s
y
n
o
r
o
a
o
t
s
a
n
o
a
f
e
y
A
n
s
o
r
.
g
d
o
w
u
0
h
n
t
i
d
1. Int
To all res
Importa
If in dou
Thank you
this device
and conta
manual is
for any en
Enjoy the
Bluetooth
lightweigh
effective c
2. Sa
roduction
idents of the Eu
t environmenta
This symbol on
device after its
of the unit (or
taken to a speci
This device sho
recycling servic
t, contact your
for choosing Velle
into service. If th
t your dealer. Da
not covered by th
suing defects or p
convenience and
speakerphone, i
t speakerphone is
ommunication is
ety Instruct
BTSP1
User ma
opean Union
information ab
the device or the
ifecycle could har
atteries) as unso
alized company f
ld be returned to
. Respect the loc
local waste disp
man! Please read
device was dama
age caused by di
e warranty and th
roblems.
reedom of wirele
eal for use in the
the perfect comp
he key.
ions
ual
ut this product
package indicates
m the environme
ted municipal wa
r recycling.
your distributor
l environmental
sal authorities
he manual thorou
ged in transit, don
sregard of certain
e dealer will not a
s communication
car, office or at h
nion for a busy li
Rev.
that disposal of t
t. Do not dispose
te; it should be
r to a local
ules.
hly before bringi
't install or use it
guidelines in this
ccept responsibili
with this
ome. This
festyle, when
6
e
g
y
3. Ge
Refer to th
manual.
• Protect
device.
• Protect
• Familia
• All mod
• Only us
way wil
31.01.2011
eep this device a
eep this device a
l
iquids.
OAD SAFETY: h
teering wheel at
rimary concern.
NTERFERENCE:
esulting in dimini
eral Guideli
e Velleman® Se
this device from s
the device agains
ise yourself with t
ifications of the de
e the device for it
l void the warrant
way from childre
way from rain, m
eed to all local tr
ll times. Road sa
all wireless devic
hed performance
nes
vice and Qualit
ocks and abuse.
extreme heat and
e functions of the
vice are forbidden
intended purpose
.
3
and unauthorize
isture, splashing
ffic rules. Keep b
ety when driving
s may be subject
s.
Warranty on th
void brute force
dust.
device before act
for safety reasons
. Using the device
users.
and dripping
th hands on your
should be your
to interference
e last pages of th
hen operating the
ally using it.
.
in an unauthorise
©Velleman
s
nv
Page 4

BTSP1 Rev. 06
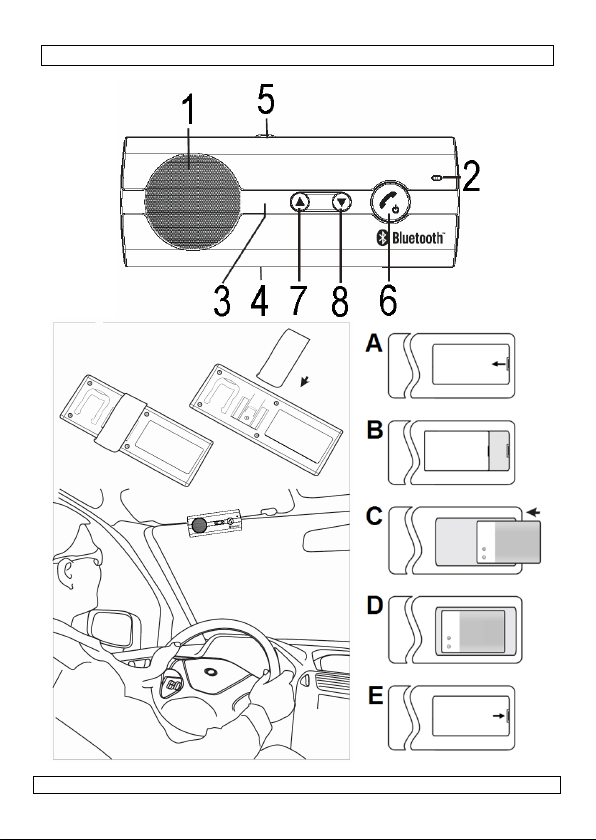
4. Overview
Refer to the illustrations on page 2 of this manual.
speaker
1
microphone
2
LED
3
5-pin USB charging socket
4
MODE button
5
MF button (multi-function button)
6
volume increase (V+)
7
volume decrease (V-)
8
5. Inserting and Charging the Battery
Refer to the illustrations on page 2 of this manual (A – E).
• Prior to using the speakerphone, it is recommended to charge the battery fully
for the first time. Normal full charge time is approximately three hours.
• Insert the battery as illustrated. Connect the car adapter plug to the
speakerphone using the included cable. Insert the car adapter plug into a 12V
outlet.
• Charging indication will be delayed for a few minutes if the speakerphone has
not been used for a long time or if the battery is drained.
• To prolong durability of the battery, it is recommended to charge the
speakerphone whenever low battery is encountered. The red LED will flash every
three seconds. The battery’s life will be decreased if the speakerphone is
constantly being used under low battery condition.
6. Use
Switching On/Off Your Speakerphone
• Switch on the speakerphone by pressing and holding the MF button for ±4
seconds until you hear a short beep. The blue LED will flash 5 times.
• Switch off the speakerphone by pressing and holding the MF button for ±4
seconds until you hear a short beep. The red LED will flash 5 times.
Pairing Your Speakerphone
• Place the speakerphone and mobile handset no more than one meter apart.
Ensure the speakerphone is switched off.
• Press and hold the MF button for 6 seconds until. The LED flashes red and blue
alternatively. Your speakerphone is now ready for pairing.
• Activate the Bluetooth
accessible Bluetooth
details.
• Select BT speaker form the list.
• Enter the pre-programmed code 0000 and press OK to pair the speakerphone
and the handset. When pairing is completed, the blue LED will flash every 3
seconds. The speakerphone is now in standby mode.
• Install your speakerphone (Refer to the illustrations on page 2).
NOTE: If the pairing is not completed within two minutes after the pairing mode
has been activated, press and hold the MF button again for 6 seconds.
®
function on your mobile handset and search for
®
devices by referring to your mobile handset user guide for
31.01.2011 ©Velleman nv
4
Page 5

BTSP1 Rev. 06
Connecting/Disconnecting Your Speakerphone
• To connect, select BT speaker from the list on your mobile handset. Next, press
the MF button on the speakerphone and select ACCEPT on your mobile handset.
• To disconnect, power off the speakerphone. Next, select DISCONNECTING to
interrupt the connection between the speakerphone and the mobile handset.
NOTE: when the connection is lost, the speakerphone will automatically power
off after 10 minutes. The blue LED will flash every 3 seconds.
Using Your Speakerphone
• Answering a Call
To answer a call, wait for the speakerphone to ring, then press the MF button
briefly to accept the call or answer the call via the mobile handset.
• Ending a Call
Press the MF button briefly or end the call via the mobile handset.
• Rejecting a Call
To reject a call, wait for the speakerphone to ring, then press and hold the MF
button for 2 seconds until you hear a short beep.
• Voice Dialling
Under standby mode, press the MF button and say the voice tag when you hear
the beep. Make sure to record a voice tag on your mobile handset before using
the function. Functionality varies according to your mobile handset model. Refer
to your mobile handset user guide.
• Re-Dialling the Last Number
Under standby mode, press the MF button twice.
• Adjusting the Volume
Press V+ to increase, press V- to decrease.
• Enabling/Disabling the Mute Function
Press the MODE button shortly to mute the speakerphone; the red LED starts
flashing. Press again to un-mute.
{delete privacy function}
• Call Interchanging
To transfer the call from the speakerphone to the mobile handset during
conversation, press and hold both V+ and V-. Press V+ and V- briefly to transfer
the call back to the speakerphone.
• Hold the call
During a call, press the MF button twice to hold the phone call. Press the MF
button again two times to resume conversation.
• Answering a second call
When receiving a second call, press the MF button once to end the first call and
answer the second call. Press the MF button twice to hold the phone call on the
first line and answer the second line.
• Rejecting a second call
When receiving a second call, press and hold the MF button for ±2 seconds to
reject the call.
• Switching between calls
Press the MF button twice to switch to the other call. Pressing once will end the
first call and returns to the second call.
31.01.2011 ©Velleman nv
5
Page 6

l
a
s
m
t
e
n
h
a
t
e
m
s
+
+
n
a
n
e
n
t
a
t
h
t
u
w
c
y
e
d
e
e
t
t
t
p
e
s
n
t
o
v
e
a
c
r
e
p
e
t
e
a
m
h
o
d
h
a
e
+
u
b
o
e
a
d
o
t
i
c
e
o
g
h
h
v
w
0
t
a
t
p
7. Mu
Activate
• It is po
function
• To activ
beep is
paired
• To deac
beep is
connect
Multipoin
• Pair the
speaker
• Press a
device.
• Press th
Multipoin
• When t
to the l
• Under s
is heard
devices
Using th
• The pri
device i
• Press V
• Press V
Notes:
When o
voice di
When a
disconn
call is fi
8. Ba
• When b
Charge
• When t
automa
tipoint feat
multipoint con
sible to connect t
. Default this fun
ate, under standb
heard. The speak
obile phones.
ivate, under stan
heard. The speak
d device when r
t pairing
speakerphone wi
phone.
d hold the MF bu
e MF button shor
t connection
e speakerphone
st 2 mobile devic
andby mode, pre
. The speakerpho
it was connected
second Blueto
ary Bluetooth de
controlled via th
once to activate
twice to redial l
ly one device is
l and redial.
incoming call is
cted from the sp
ished.
tery
ttery voltage dro
he battery.
e voltage drops b
ically.
WARNING:
Dispose of ba
the device is
Keep battery
BTSP1
re
nection
o mobile devices
tion is off.
mode press and
rphone will auto
by mode press a
rphone will switc
booted.
h the first Blueto
ton for ±6 secon
ly to connect to t
owers on, it will
s it was connect
s and hold the V
e will automatica
o before.
th device
ice is controlled
V+ button.
the secondary ph
st outgoing num
onnected it is als
eceived on one p
akerphone and r
s below 3.3V, the
low 3.0V, the spe
teries in accor
nd-off-life.
way from child
at the same time
hold the V+ butt
atically connect t
nd hold the V- bu
off and will conn
th device. Power
s to pair the seco
e first paired dev
utomatically sear
d to before.
button for ±3 s
lly connect to the
sing the MF butt
ones’ voice diallin
er of the seconda
possible to use t
hone, the other p
connected autom
red LED flashes e
kerphone will po
ance with local
ren.
Rev.
via the multipoin
n for ±3s until a
o the last two
ton for ±3s until
ect to the last
off the
nd Bluetooth
ce.
h for and connec
conds until a bee
last 2 mobile
n; the secondary
function.
ry phone.
e V+ button for
one will be
atically when the
ery 3 seconds.
er off
regulations whe
6
n
31.01.2011
6
©Velleman
nv
Page 7

BTSP1 Rev. 06
9. Restoring to Default Settings
• To restore the speakerphone to its original settings go to standby mode and
press and hold the V+ and V- for ±10 seconds until the blue and red LED flash 5
times.
• When the speakerphone was connected to a mobile phone before the restore
default settings procedure, it will enter pairing mode automatically. When it was
not connected, it returns to standby mode after restoring default settings.
10. LED indication
Mode Red LED Blue LED Sound
Off Off Off
Switch on 5 flashes 1x bi
Switch off 5 flashes 1x bi
Standby Flash every 4s
Standby – low battery Flash every 3s 2x bi
Talking Flash alternatively
Pairing completed Flash every 3s 1x bi
Mute Flashing
Charging On
Charging completed Off Off
Lost connection Flash every 3s
Restoring default
settings
5 flashes
Per minute
11. Care and Maintenance
• Do not expose the speakerphone to rain, humidity, high temperatures and direct
sunlight.
• Protect the speakerphone from sharp objects to avoid scratches.
• Clean the speakerphone with a dry cloth. Do not use abrasive cleaning solvents.
• There are no user-serviceable parts. Do not attempt to disassemble the
speakerphone.
• Store the speakerphone in a dry place away from dust, humidity and high
temperatures.
12. Safety Information
• Check the local regulations regarding the use of a mobile handset and
speakerphone while driving. Ensure that your attention and focus remains on
your responsibility of driving safely.
• Never allow children to play with the speakerphone.
• Observe all signs requiring RF radio products to be switched off, i.e. in hospitals,
blasting areas, potentially explosive atmospheres and prior to boarding an
aircraft.
• Never place or store the speakerphone over the area of the vehicle’s airbag
deployment.
31.01.2011 ©Velleman nv
7
Page 8

BTSP1 Rev. 06
13. Troubleshooting
• Unable to connect the speakerphone to your mobile handset
• Ensure the speakerphone is paired with your mobile handset.
• Ensure the Bluetooth® function on your mobile handset is enabled.
• Ensure the speakerphone is within 10m of your mobile handset and that there
are no obstructions such as walls or other electric devices.
• This speakerphone is compliant with and adopts Bluetooth® 2.1. Interoperability
depends on compatibility between the speakerphone and the used mobile
handset.
14. Technical specifications
Bluetooth® V2.1 + EDR
class II (10m)
talk time up to 10h
standby time up to 30 days
charging time ±3h
battery 650mAH rechargeable lithium-ion battery
dimensions 123 x 46 x 20mm
Use this device with original accessories only. Velleman nv cannot be held
responsible in the event of damage or injury resulted from (incorrect) use
of this device. For more info concerning this product, please visit our
website www.velleman.eu. The information in this manual is subject to
change without prior notice.
© COPYRIGHT NOTICE
This manual is copyrighted. The copyright to this manual is owned by
Velleman nv. All worldwide rights reserved. No part of this manual may be
copied, reproduced, translated or reduced to any electronic medium or otherwise
without the prior written consent of the copyright holder.
31.01.2011 ©Velleman nv
8
Page 9
e
k
r
r
e
n
a
o
m
c
e
n
o
H B VLh
a RAp
r
m
r
m
a
r
e
e
e
e
i
e
o
a
h
e
e
G
r
s
e
l
e
n
x
n
e
e
w
j
o
r
e
d
o
n
e
h
n
t
d
t
r
n
t
v
e
a
n
u
o
h
a
t
e
l
t
s
t
e
0
n
n
1. Inl
Aan alle i
Belangrij
Hebt u v
verwijde
Dank u vo
gebruik n
dan niet e
negeren v
verantwo
verband
Communi
luidspreke
het drukk
zit, op ka
2. Vo
Geb
iding
ngezetenen van
e milieu-infor
Dit symbool o
zijn levenscyc
toebrengen a
niet bij het ge
gespecialisee
toestel naar u
Respecteer d
agen, contactee
ing.
or uw aankoop! L
emt. Werd het to
raadpleeg uw d
n bepaalde richtl
rdelijkheid afwijz
ee houden.
eer draadloos en
rtelefoon. Deze c
bedrijfsleven wa
toor of thuis.
r uw veilig
BTSP1
ruikersha
de Europese U
atie betreffend
p het toestel of d
lus wordt wegge
n het milieu. Goo
wone huishoudeli
d bedrijf terechtk
w verdeler of naa
plaatselijke milie
r dan de plaats
es deze handleidi
stel beschadigd t
aler. De garantie
jnen in deze han
n voor defecten
in alle vrijheid da
mpacte luidsprek
r communicatie
eid
ndleiding
ie
dit product
verpakking geef
orpen, dit toestel
i dit toestel (en e
ke afval; het mo
men voor recycl
een lokaal recycl
uwetgeving.
lijke autoriteite
ng grondig voor
ijdens het transp
geldt niet voor sc
leiding en uw de
f problemen die h
kzij deze Bluetoo
rtelefoon is de p
eel belangrijk is,
Rev.
aan dat, als het
schade kan
entuele batterije
t bij een
ge. U moet dit
agepunt brengen.
inzake
het toestel in
rt, installeer het
ade door het
ler zal de
ier rechtstreeks
h®
rfecte hulp voor
of u in de wagen
6
a
)
3. Alg
Raadpleeg
handleidin
• Besche
• Bescher
• Leer ee
31.01.2011
oud buiten het b
escherm tegen r
ERKEERSVEILI
eef alle locale ve
anden vast. De v
andachtspunt.
ADIOSTORING
lle draadloze toe
restaties kan bel
emene richt
de Velleman® s
g.
m tegen schokke
tegen stof en e
st de functies van
reik van kindere
gen, vochtigheid
HEID
keersregels na. H
erkeersveiligheid
tellen kunnen on
mmeren.
ijnen
rvice- en kwali
. Vermijd brute k
treme hitte.
het toestel kenne
9
en onbevoegden
en opspattende v
oud het stuur me
ijdens het rijden
erhevig zijn aan
eitsgarantie ach
acht tijdens de b
voor u het gaat g
.
oeistoffen.
altijd beide
is het belangrijkst
toring die de
eraan deze
diening.
ebruiken.
©Velleman
e
nv
Page 10

BTSP1 Rev. 06
• Om veiligheidsredenen mag u geen wijzigingen aanbrengen. Schade door
wijzigingen die de gebruiker heeft aangebracht valt niet onder de garantie.
• Gebruik het toestel enkel waarvoor het gemaakt is. Bij onoordeelkundig gebruik
vervalt de garantie.
4. Omschrijving
Raadpleeg de figuur op pagina 2 van deze handleiding.
luidspreker
1
microfoon
2
led
3
5-pin USB-laadingang
4
MODE-toets
5
MF-toets (multifunctionele toets)
6
volume vermeerderen (V+)
7
volume verminderen (V-)
8
5. De batterij plaatsen en laden
Raadpleeg de figuur op pagina 2 van deze handleiding (A-E).
• We raden aan, alvorens de luidsprekertelefoon voor de eerste maal te gebruiken,
de batterij volledig te laden. Een normale laadbeurt duurt ongeveer drie uur.
• Plaats de batterij zoals afgebeeld. Koppel de adapterplug aan de
luidsprekertelefoon door middel van de meegeleverde USB-kabel. Steek de
adapterplug in de 12V-uitgang van de wagen.
• De laadaanduiding kan gedurende de eerste minuten niet verschijnen indien de
luidsprekertelefoon een lange tijd niet is gebruikt of indien de batterij volledig
ontlaad is.
• Laad de luidsprekertelefoon van zodra de batterij zwakker wordt om de levensduur
van de batterij te behouden. De rode led flitst om de drie seconden. U kunt de
batterij beschadigen indien u de luidsprekertelefoon met een zwakke batterij
gebruikt.
6. Gebruik
De luidsprekertelefoon in- en uitschakelen
• Schakel de luidsprekertelefoon in door de MF-toets ±4 seconden ingedrukt te
houden tot u een korte pieptoon hoort. De blauwe led flitst 5 maal.
• Schakel de luidsprekertelefoon uit door de MF-toets ± 4 seconden ingedrukt te
houden tot u een korte pieptoon hoort. De rode led flitst 5 maal.
De luidsprekertelefoon aan de gsm koppelen
• Plaats de luidsprekertelefoon niet verder dan 1 m van de gsm. Schakel de
luidsprekertelefoon uit.
• Houd de MF-toets gedurende zes seconden ingedrukt tot de led afwisselend rood
en blauw flitst. uw luidsprekertelefoon is nu klaar om gekoppeld te worden.
• Schakel de Bluetooth®-functie op uw gsm in en zoek het gepaste Bluetooth®-
toestel in de lijst. Raadpleeg de handleiding van uw gsm.
• Selecteer de BT-luidspreker uit de lijst.
• Typ code 0000 in en druk op OK om de luidsprekertelefoon aan de gsm te
koppelen. Eenmaal gekoppeld zal de blauwe led elke 3 seconden flitsen. De
luidsprekertelefoon staat nu in stand-by.
• Installeer uw luidsprekertelefoon (raadpleeg de figuur op pagina 2).
31.01.2011 ©Velleman nv
10
Page 11

BTSP1 Rev. 06
OPMERKING: Lukt de koppeling niet binnen de twee minuten nadat u de
koppelmodus hebt ingeschakeld, houd de MF-toets opnieuw ingedrukt
gedurende zes seconden.
De luidsprekertelefoon aansluiten en de aansluiting verbreken
• Selecteer de BT-luidspreker uit de lijst in uw gsm. Druk vervolgens op de MF-toets
op de luidsprekertelefoon en selecteer ACCEPT op uw gsm.
• Verbreek de aansluiting door eerst de luidsprekertelefoon uit te schakelen.
Selecteer vervolgens DISCONNECTING om de koppeling tussen de
luidsprekertelefoon en de gsm te onderbreken.
Opmerking: Bij verlies van de aansluiting zal de luidsprekertelefoon
automatisch na 10 minuten uitschakelen. De blauwe led zal elke 3
seconden flitsen.
Hoe de luidsprekertelefoon te gebruiken
• Een oproep beantwoorden
Wacht tot de luidsprekertelefoon belt en druk daarna kort de MF-toets in om de
oproep te aanvaarden.
• Een gesprek beëindigen
Druk kort de MF-toets in om het gesprek te beëindigen.
• Een oproep weigeren
Wacht tot de luidsprekertelefoon belt en houd daarna de MF-toets gedurende
twee seconden ingedrukt tot u een korte pieptoon hoort.
• Spraakherkenning
In stand-by, druk op de MF-toets en spreek in de microfoon wanneer u de
pieptoon hoort. U dient vooraf de spraakopname op de gsm te hebben gedaan
alvorens de functie te kunnen gebruiken. Deze functie is afhankelijk van het
gsm-model. Raadpleeg de handleiding van uw gsm.
• Het laatste nummer opnieuw oproepen
In stand-by, druk tweemaal op de MF-toets.
• Het volume bijregelen
Druk op V+ om het volume te verhogen, druk op V- om het volume te verlagen
• De mutefunctie in- en uitschakelen
Druk op de MODE-toets om de mutefunctie in te schakelen. De rode led zal
flitsen. Druk opnieuw om de luidsprekertelefoon opnieuw normaal te gebruiken.
• Een oproep transfereren
Om tijdens een gesprek van uw luidsprekertelefoon naar de gsm over te
schakelen, houd zowel V+ als V- ingedrukt. Druk kort op V+ en V- om opnieuw
naar de luidsprekertelefoon over te schakelen.
• Een oproep in de wacht zetten
Druk tijdens een gesprek tweemaal op de MF-toets om de oproep in de wacht te
zetten. Druk opnieuw tweemaal op de MF-toets om het gesprek te hervatten.
• Een tweede oproep beantwoorden
Druk eenmaal op de MF-toets om het eerste gesprek te beëindigen en de
tweede oproep te aanvaarden. Druk tweemaal op de MF-toets om het eerste
gesprek in de wacht te zetten en de tweede oproep te aanvaarden.
• Een tweede oproep weigeren
Houd de MF-toets gedurende 2 seconden ingedrukt om het gesprek te weigeren.
31.01.2011 ©Velleman nv
11
Page 12

l
p
d
k
t
a
d
e
e
d
D
e
d
t
w
n
n
i
p
t
e
e
t
n
o
o
o
d
e
f
n
e
e
a
d
t
n
m
d
l
p
s
p
N
k
s
e
n
e
o
m
e
p
m
e
d
p
e
i
v
e
o
a
e
d
d
e
e
e
c
t
g
o
b
0
n
n
D
• Schake
Druk tw
7. Mu
De multi
• De mult
gsm’s.
• Plaats d
ingedru
automa
• Schakel
Houd d
luidspre
Multipoin
• Koppel
luidspre
• Houd d
koppele
• Druk ko
luidspre
Multipoin
• Bij het i
laatst g
• In stan
hoort.
gekopp
De twee
• De eers
• Druk ee
• Druk tw
opnieu
Opmerki
Gebruik
gsm aa
Bij een
ontkop
8. De
• Bij een
onmidd
• Bij onvo
len tussen twee
eemaal op de MF-
tipointkopp
ointfunctie insc
ipointfunctie laat
eze functie is sta
e luidsprekertelef
t tot u een piept
isch aan de twee
de functie uit do
arna V- geduren
kertelefoon kopp
tkoppeling
e luidsprekertele
kertelefoon uit.
MF-toets gedure
n.
rt op de MF-toets
kertelefoon aan t
taansluiting
nschakelen, zal d
koppelde gsm’s
-by, houd V+ ge
e luidsprekertelef
lde gsm’s aanslui
e gsm gebruike
e gekoppelde gs
nmaal op V+ om
eemaal op V+ om
te vormen.
gen:
de V+-toets voor
de luidsprekerte
nkomende oproe
elen en na het ge
batterij
e lage voedingspa
llijk de batterij.
ldoende voedings
WAARSCHUWI
kinderen.
BTSP1
oproepen
toets om naar de
ling
hakelen
oe de luidspreker
daard uitgescha
on op stand-by e
on hoort. De luid
gsm’s.
r de luidsprekert
e ± 3 seconden i
lt zich automatisc
oon aan de eerst
de ± 6 seconden
om de eerste gek
sluiten.
luidsprekertelefo
ansluiten.
urende ± 3 secon
oon zal zich auto
en.
bedient u met d
e voice dialing o
het laatst gevor
voice dialing en r
efoon gekoppeld i
op een gsm zal
prek opnieuw ko
nning zal de rode l
anning schakelt d
G: Houd batter
tweede oproep o
telefoon te gebrui
eld.
n houd V+ gedur
prekertelefoon k
lefoon eerst in st
gedrukt tot u een
h aan de laatst g
gsm en schakel
ingedrukt om de
ppelde gsm aan
on zich automatis
den ingedrukt tot
atisch aan de tw
MF-toets; de tw
de tweede gsm i
de nummer op d
dial indien er sle
s.
e tweede gsm au
pelen.
ed flitsen. Vervan
luidsprekertelefo
jen buiten het
Rev.
er te schakelen.
ken met twee
nde ± 3 seconde
ppelt zich
nd-by te plaatse
pieptoon hoort.
koppelde gsm.
e
tweede gsm te
e
ch aan de twee
u een pieptoon
e laatst
ede met V+.
n te schakelen.
tweede gsm
hts een enkele
omatisch
in dit geval
n automatisch uit
ereik van
6
.
e
.
31.01.2011
12
©Velleman
nv
Page 13

BTSP1 Rev. 06
9. De fabrieksinstellingen herstellen
• Plaats de luidsprekertelefoon in stand-by en houd V+ en V- gedurende 10
seconden gelijktijdig ingedrukt tot de rode led 5 keer flitst.
• Indien u de fabrieksinstellingen herstelt op een luidsprekertelefoon aangesloten
op de gsm, dan zal de luidsprekertelefoon zich automatisch opnieuw aan de gsm
koppelen.
10. De leds
stand rode led blauwe led geluid
uitgeschakeld uit uit
inschakelen 5 flitsen 1x bi
uitschakelen 5 flitsen 1x bi
stand-by flits elke 4 s
stand-by – batterij laag flits elke 3 s 2x bi
gesprek afwisselend flitsen
koppeling compleet flits elke 3 s 1x bi
mute flitsen
koppeling aan
koppeling compleet uit uit
verlies aansluiting flits elke 3 s
herstelling fabrieks-
instellingen
5 flitsen
per minuut
11. Onderhoud
• Houd de luidsprekertelefoon uit de regen, vochtigheid, hoge temperaturen en
direct zonlicht.
• Bescherm de luidsprekertelefoon tegen scherpe objecten om krassen te vermijden.
• Maak de luidsprekertelefoon schoon met een droge doek. Vermijd schuurmiddelen.
• De gebruiker mag geen onderdelen vervangen en het toestel niet uit elkaar halen.
• Berg de luidsprekertelefoon op een plaats weg van stof, vochtigheid en hoge
temperaturen.
12. Veiligheidsinstructies
• Raadpleeg de plaatselijke voorschriften in verband met het gebruik van gsm’s en
luidsprekertelefoons in de wagen. Zorg dat u te allen tijde de verkeersregels
respecteert en de weg in het oog houdt.
• Houd de luidsprekertelefoon uit de buurt van kinderen.
• Leef alle voorschriften in verband met draadloze elektronica na. Schakel de
luidsprekertelefoon dus uit in ziekenhuizen, tankstations, vliegtuigen en op
plaatsen met brandbare stoffen.
• Plaats de luidsprekertelefoon weg van airbags.
31.01.2011 ©Velleman nv
13
Page 14

BTSP1 Rev. 06
13. Problemen en oplossingen
• Geen aansluiting met de gsm mogelijk
o Koppel de luidsprekertelefoon eerste aan de gsm.
o Schakel de Bluetooth®-functie op de gsm in.
o Plaats de luidsprekertelefoon op minder dan 10 m van de gsm. Verwijder alle
voorwerpen die de verbinding kunnen verzwakken.
• Deze luidsprekertelefoon ondersteunt Bluetooth® 2.1. de wisselwerking tussen de
luidsprekertelefoon en de gsm is afhankelijk van de compatibiliteit tussen beide
toestellen.
14. Technische specificaties
Bluetooth® V2.1 + EDR
klasse II (10 m)
autonomie tot 10 u
autonomie in stand-by tot 30 dagen
laadduur ± 3 u
batterij herlaadbare lithium-ionbatterij (650 mAh)
afmetingen 123 x 46 x 20 mm
Gebruik dit toestel enkel met originele accessoires. Velleman nv is niet
aansprakelijk voor schade of kwetsuren bij (verkeerd) gebruik van dit
toestel. Voor meer informatie over dit product, zie www.velleman.eu. De
informatie in deze handleiding kan te allen tijde worden gewijzigd zonder
voorafgaande kennisgeving.
© AUTEURSRECHT
Velleman nv heeft het auteursrecht voor deze handleiding.
Alle wereldwijde rechten voorbehouden. Het is niet toegestaan om deze
handleiding of gedeelten ervan over te nemen, te kopiëren, te vertalen, te
bewerken en op te slaan op een elektronisch medium zonder voorafgaande
schriftelijke toestemming van de rechthebbende.
31.01.2011 ©Velleman nv
14
Page 15

d
e
e
o
u
e
®
e
o
u
G P SRm
d ITd
e
r
r
O
e
n
u
r
e
g
t
o
r
e
o
o
o
u
I
e
t
f
é
s
e
r
c
E
p
m
p
n
e
e
l
t
e
é
d
s
t
a
a
r
s
e
a
o
é
p
r
u
v
s
d
n
n
a
0
e
m
n
t
1. Int
Aux rési
Des infor
l’environn
En cas d
Nous vous
la mise en
transport,
pas aux d
votre reve
qui en rés
Profitez d
Bluetooth
maison. C
chargée,
2. Po
roduction
ents de l'Union
mations enviro
Ce symbole su
d’un appareil e
un appareil éle
les déchets m
traitera l’appa
votre fourniss
respecter la ré
ment.
questions, con
remercions de v
service de l’appa
ne pas l’installer
mmages survenu
ndeur déclinera t
ltent.
la facilité de la c
, le haut-parleur
haut-parleur lég
ù la communicati
r votre séc
N
TICE D’
uropéenne
nementales im
r l'appareil ou l'e
n fin de vie peut
ctrique ou électro
nicipaux non suje
eil en question. R
ur ou à un servic
lementation loca
acter les autori
tre achat ! Lire la
eil. Si l’appareil a
t consulter votre
s en négligeant c
ute responsabilit
mmunication san
idéal pour usage
er est l’outil parfa
n est primordiale
rité
BTSP1
MPLOI
ortantes concer
ballage indique q
olluer l'environne
ique (et des pile
ts au tri sélectif ;
nvoyer les équip
de recyclage loc
e relative à la pr
és locales pour
présente notice a
été endommagé
revendeur. La ga
rtaines directives
pour les problèm
s fil grâce à ce ha
ans la voiture, a
it pour vous qui a
.
Rev.
nant ce produit
ue l’élimination
ment. Ne pas jet
éventuelles) par
une déchèterie
ments usagés à
l. Il convient de
tection de
limination.
ttentivement ava
endant le
antie ne s’appliqu
de cette notice e
es et les défauts
ut-parleur
bureau ou à la
ez une vie
6
r
i
t
e
3. Dir
Se référer
• Protége
• Protége
• Se famil
31.01.2011
arder hors de la
rotéger de la plui
CURITÉ ROUT
especter toutes l
ains sur le volan
oit être la sécuri
NTERFÉRENCE
ous les appareils
’entraver les per
ctives gén
à la garantie de
contre les chocs
contre la poussiè
iariser avec le fon
portée des enfant
e, de l’humidité e
RE
s réglementation
t. Votre préoccup
é routière.
sans fil peuvent s
ormances.
rales
ervice et de qu
t le traiter avec ci
e. Protéger contre
tionnement avant
15
et des personne
des projections
s locales, et toujo
tion première pe
ubir des interfére
lité Velleman®
conspection pend
la chaleur extrêm
l’emploi.
non autorisées.
’eau.
urs garder les
dant la conduite
ces susceptibles
en fin de notice.
nt l’opération.
e.
©Velleman
nv
Page 16

BTSP1 Rev. 06
• Toute modification est interdite pour des raisons de sécurité. Les dommages
occasionnés par des modifications par le client ne tombent pas sous la garantie.
• N’utiliser qu’à sa fonction prévue. Un usage impropre annule d'office la garantie.
4. Description
Se référer à l’illustration à la page 2 de cette notice.
1 haut-parleur 5 touche MODE
2 microphone 6 touche MF (touche multifonction)
3 LED 7 augmentation du volume (V+)
4 prise de charge USB 5 broches 8 diminution du volume (V-)
5. Insertion et chargement de l’accu
Se référer à l’illustration à la page 2 de cette notice (A-E).
• Nous vous conseillons de charger l’accu avant le premier emploi. Le délai de charge
complet dure environ trois heures.
• Insérer l’accu comme illustré. Raccorder la fiche allume-cigare au haut-parleur à
l’aide du câble inclus. Insérer la fiche dans l’allume-cigare 12 V.
• Le processus de charge ne commencera qu’après quelques minutes lors d’un accu
complètement déchargé ou lorsque le haut-parleur a été stocké pendant une très
longue période.
• Nous vous conseillons de charger l’accu dès que l’accu s’affaiblit afin de préserver
sa durée de vie. La LED rouge clignotera toutes les trois secondes. La durée de vie
de l’accu s’amoindrit lorsque l’on utilise le haut-parleur avec un accu faible.
6. Emploi
Allumer et éteindre l’appareil
• Allumer le haut-parleur en maintenant enfoncé la touche MF pendant ±4 secondes
jusqu’à ce l’appareil émette une courte tonalité. La LED bleue clignote 5 fois.
• Éteindre le haut-parleur en maintenant enfoncé la touche MF pendant trois
secondes jusqu’à ce l’appareil émette une courte tonalité. La LED rouge clignote 5
fois.
Relier le haut-parleur
• Placer le haut-parleur et le portable à une distance de maximum 1 m. Éteindre le
haut-parleur.
• Maintenir enfoncé la touche MF pendant six secondes jusqu’à de que les LED rouge
et bleue clignotent successivement. Votre haut-parleur est prêt à être relié.
• Activer la fonction Bluetooth® sur votre portable et chercher le haut-parleur mains
libres dans la liste des appareils. Consulter la notice de votre portable.
• Sélectionner le haut-parleur mains libres dans la liste.
• Saisir le code 0000 préprogrammé et enfoncer OK pour relier le haut-parleur au
portable. Une fois le lien établi, l’appareil émettra une longue tonalité et la LED
bleue clignotera toutes les 3 secondes. Le haut-parleur se place en mode veille.
• Installer votre haut-parleur (se référer à l’illustration à la page 2).
REMARQUE : Si le haut-parleur ne se relie pas dans les deux minutes après
l’activation de la fonction, maintenir enfoncé la touche MF pendant six
secondes.
31.01.2011 ©Velleman nv
16
Page 17

BTSP1 Rev. 06
Connecter et déconnecter le haut-parleur
• Connecter le haut-parleur en le sélectionnant dans la liste de votre portable.
Ensuite, enfoncer la touche MF sur le haut-parleur et sélectionner ACCEPT sur votre
portable.
• Déconnecter le haut-parleur en l’éteignant. Ensuite, sélectionner DISCONNECT
pour interrompre la communication entre le haut-parleur et votre portable.
REMARQUE : Lors d’une perte de la connexion, le haut-parleur s’éteindra
automatiquement après 10 minutes. La LED bleue clignotera toutes les 3
secondes.
Gérer les appels
• Accepter un appel
Attendre que le haut-parleur sonne, ensuite enfoncer brièvement la touche MF.
• Mettre fin à un appel
Enfoncer brièvement la touche MF pour terminer l’appel.
• Refuser un appel
Attendre que le haut-parleur sonne, ensuite maintenir enfoncé la touche MF
pendant 2 secondes jusqu’à ce que l’appareil émette une courte tonalité.
• Reconnaissance vocale
En mode veille, enfoncer la touche MF et prononcer l’étiquette vocale dans le
microphone après le bip sonore. Veiller à enregistrer préalablement l’étiquette
dans votre portable. Cette fonction dépend du modèle de portable. Consulter la
notice du portable.
• Recomposition du dernier numéro composé
En mode veille, enfoncer la touche MF à deux reprises.
• Réglage du volume
Enfoncer V+ pour augmenter, enfoncer V- pour diminuer.
• Mise sous silence
Enfoncer la touche MODE pour désactiver le son du haut-parleur. La LED rouge
clignote. Renfoncer la touche pour réactiver le son.
• Basculer un appel
Basculer l’appel de votre haut-parleur vers votre portable en maintenant
enfoncé les touches V+ et V-. Enfoncer brièvement V+ et V- pour retransférer
l’appel vers votre haut-parleur.
• Mettre un appel en attente
Enfoncer la touche MF à deux reprises pour mettre un appel en attente ou pour
revenir vers l’appel.
• Accepter un deuxième appel
Lors d’un deuxième appel, enfoncer la touche MF pour terminer le premier appel
et accepter le deuxième appel. Enfoncer deux fois la touche MF pour mettre le
premier appel en attente et accepter le deuxième appel.
• Refuser un deuxième appel
Lors d’un deuxième appel, maintenir enfoncé la touche MF pendant ± 2
secondes pour refuser l’appel.
• Commuter d’un appel à l’autre
Enfoncer deux fois la touche MF pour commuter vers l’autre appel. Enfoncer une
fois la touche MF pour terminer le premier appel et pour commuter vers le
deuxième.
31.01.2011 ©Velleman nv
17
Page 18

n
n
-
v
l
j
t
v
e
d
e
n
t
e
t
e
m
m
e
U
l
o
r
b
-
t
o
n
r
u
m
e
s
n
h
u
s
x
t
u
p
u
c
e
r
m
s
q
E
a
t
é
c
m
e
6
a
s
e
é
u
m
n
r
n
o
l
r
b
e
a
p
-
e
m
c
o
a
n
c
n
s
m
3
l
0
e
e
n
7. Co
Activatio
• Le haut
désacti
• Activer
usqu’à
automa
• Désacti
second
s’éteint
Associer
• Relier l
• Mainten
télépho
• Enfonce
relié.
Connexio
• Lors de
automa
• En mod
que le h
automa
Utiliser l
• Le pre
V+.
• Enfonce
deuxiè
• Enfonce
sur le d
REMARQ
Utiliser
recomp
Le deux
sur le p
reconne
8. La
• Recharg
• Le haut
nexion mul
d’une connexi
parleur peut acce
ée par défaut.
a fonction en mai
ce que le haut-pa
iquement aux de
er la fonction en
s jusqu’à ce que l
et se connecte au
eux téléphone
premier télépho
ir enfoncé la touc
e.
r la touche MF po
n multiple
l’initialisationaprè
iquement les deu
veille, maintenir
aut-parleur émet
iquement aux de
deuxième télé
ier téléphone est
r la touche V+ po
e téléphone.
r deux fois la tou
uxième téléphon
E :
a touche V+ pou
ser le dernier nu
ième téléphone e
emier téléphone.
cté dès la fin de l’
atterie
er la batterie dès
parleur s’éteint au
AVERTISSEM
enfants.
BTSP1
iple
n multiple
pter simultanéme
tenant enfoncé l
leur émette une
x téléphones reli
aintenant enfon
haut-parleur é
dernier téléphon
au haut-parleu
e au haut-parleur
e MF pendant ±
r connecter le ha
l’allumage, le h
téléphones relié
enfoncé la touch
e une tonalité. Le
x téléphones reli
hone
contrôlé par la to
r activer la foncti
he V+ pour reco
.
activer la fonctio
éro composé su
t automatiqueme
Le téléphone déc
appel.
ue la LED rouge c
tomatiquement lo
NT : Garder la
nt deux téléphon
touche V+ pend
onalité. Le haut-
s.
é la touche V- pe
ette une tonalité.
relié.
r
. Éteindre le haut
secondes pour r
ut-parleur au pre
ut-parleur recher
.
V+ pendant ± 3
haut-parleur se c
s.
che MF ; le deuxi
on de reconnaiss
poser le dernier
de reconnaissan
l’unique télépho
t déconnecté lor
nnecté est auto
ignote toutes les
s d’une batterie fa
atterie hors de
Rev.
s. La fonction est
nt ± 3 secondes
arleur se connect
ndant ± 3
Le haut-parleur
parleur.
lier le deuxième
ier téléphone
he
secondes jusqu’à
nnecte
ème par la touch
nce vocale du
uméro composé
e vocale et pour
e relié.
d’un appel entra
atiquement
secondes.
ible.
a portée des
6
e
t
31.01.2011
18
©Velleman
nv
Page 19

BTSP1 Rev. 06
9. Configuration d’usine
• Mettre le haut-parleur en veille et maintenir enfoncé les touches V+ et V-
pendant ± 10 secondes jusqu’à ce que les LED rouge et bleue clignotent.
• Le haut-parleur se reliera automatiquement au téléphone relié avant le
rétablissement de la configuration d’usine.
10. LED indication
Mode LED rouge LED bleue Tonalité
Éteint éteinte éteinte
Allumage 5 flashes 1x bi
Extinction 5 flashes 1x bi
Veille flash toutes les 4 s
Veille – batterie faible flash toutes les 3 s
Conversation clignotent alternativement
Lien établi flash toutes les 3 s 1x bi
Mise sous silence clignotante
Chargement en cours allumée
Chargement complété éteinte éteinte
Perte de connexion flash toutes les 3 s
Rétablissement
configuration d’usine
5 flashes
2x bi
par minute
11. Entretien
• Tenir le haut-parleur à l’abri du soleil et l’écart de la pluie, l’humidité, les
températures extrêmes.
• Protéger le haut-parleur contre les objets pointus afin d’éviter les rayures.
• Nettoyer le haut-parleur à l’aide d’un chiffon doux. Éviter les produits abrasifs.
• Il n’y a aucune pièce maintenable par l’utilisateur. Ne pas désassembler le haut-
parleur.
• Stocker le haut-parleur dans un endroit sec et à l’écart de la poussière, l’humidité
et les températures extrêmes.
12. Information relative à la sécurité
• Consulter les réglementations relatives à l’usage d’un kit mains libres pendant la
conduite d’un véhicule. Votre préoccupation première pendant la conduite doit être
la sécurité routière.
• Tenir le haut-parleur à l’écart des enfants.
• Observer la réglementation concernant l’utilisation des appareils radio : veiller à
éteindre le haut-parleur dans les hôpitaux, les endroits à risque d’explosions, les
stations-service et avant l’embarquement dans un avion.
• Vérifier que le déploiement des airbags n’est pas entravé de quelque manière que
se soit.
31.01.2011 ©Velleman nv
19
Page 20

BTSP1 Rev. 06
13. Problèmes et solutions
• Connexion entre le haut-parleur et le portable impossible à établir
o Établir d’abord le lien entre les deux appareils.
o Activer la fonction Bluetooth® sur votre portable.
o Veiller à ce que la distance entre les deux appareils ne dépasse pas les 10 m et
qu’il n’y ait aucun obstacle (mur, autre appareil électrique…).
• Ce haut-parleur supporte le Bluetooth® 2.1. Intercommunication dépend de la
compatibilité entre le haut-parleur et le portable.
14. Spécifications techniques
Bluetooth® V2.1 + EDR
classe II (10 m)
autonomie jusqu'à 10 h
autonomie en mode veille jusqu'à 30 jours
délai de charge ± 3 h
alimentation accu au lithium-ion 650 mAH
dimensions 123 x 46 x 20 mm
N’employer cet appareil qu’avec des accessoires d’origine. SA Velleman ne
sera aucunement responsable de dommages ou lésions survenus à un
usage (incorrect) de cet appareil. Pour plus d’information concernant cet
article, visitez notre site web www.velleman.eu. Toutes les informations
présentées dans cette notice peuvent être modifiées sans notification
préalable.
© DROITS D’AUTEUR
SA Velleman est l’ayant droit des droits d’auteur pour cette notice.
Tous droits mondiaux réservés. Toute reproduction, traduction, copie ou diffusion,
intégrale ou partielle, du contenu de cette notice par quelque procédé ou sur tout
support électronique que se soit est interdite sans l’accord préalable écrit de
l’ayant droit.
31.01.2011 ©Velleman nv
20
Page 21

d
n
d
o
n
o
e
g
o
r
M
n N
s S
R
m
e
I
C
m
r
G
e
í
N
n
e
s
e
c
o
e
t
a
a
m
e
c
d
a
e
A
A
u
n
i
s
a
d
a
d
d
l
m
o
a
c
v
e
l
z
a
a
c
e
d
a
m
s
e
e
n
m
o
a
d
e
m
0
v
o
d
a
1. Int
A los ciu
Importa
producto
Si tiene
¡Gracias p
manual a
instale y p
las instruc
distribuid
Disfrute la
libres Blu
aparato li
agitada, d
2. Pa
3. No
Véase la
usuario.
• No agit
• No expo
extrema
• Familiar
MA
roducción
adanos de la U
tes informacion
Este símbolo en
muestras inserv
No tire este apa
doméstica; deb
este aparato a
Respete las ley
udas, contacte
r haber comprad
tes de usarlo. Si
óngase en contac
ciones de segurid
r no será respons
facilidad de la co
tooth®. Es ideal p
ero es la herrami
nde la comunica
a su seguri
antenga el apar
iños.
o exponga este
alpicadura o gote
EGURIDAD VI
espete todas las
anos en el volan
stá conduciendo.
NTERFERENCI
ualquier aparato
olestas.
mas genera
arantía de servi
el aparato. Evite
nga este equipo a
s.
cese con el funcio
BTSP1
UAL DEL
ión Europea
es sobre el med
este aparato o el
ibles, podrían dañ
rato (ni las pilas,
ir a una empres
u distribuidor o a
s locales en relaci
on las autorida
el BTSP1! Lea
l aparato ha sufri
o con su distribui
d de este manua
ble de ningún da
unicación inalá
ara el uso en el c
nta ideal para cu
ión es primordial.
ad
to lejos del alcan
quipo a lluvia, hu
o.
L
normas de circula
te. La seguridad
inalámbrico pued
les
cio y calidad Ve
sar excesiva fuer
polvo. No expong
amiento del apar
USUARIO
o ambiente con
embalaje indica q
ar el medio ambi
i las hubiera) en
especializada en
la unidad de recic
ón con el medio a
es locales para
tentamente las in
o algún daño en
or. Daños causa
invalidarán su g
ño u otros proble
brica gracias a e
che, la oficina o
lquier persona ll
e de personas no
medad ni a ningú
ción locales, y sie
ial es lo más imp
estar sometido
leman ® al final
a durante el man
este equipo a te
to antes de utiliza
Rev.
erniente a este
ue, si tira las
nte.
la basura
reciclaje. Devuel
laje local.
mbiente.
residuos.
strucciones del
el transporte no l
os por descuido
rantía y su
as resultantes.
te altavoz manos
n casa. Este
vando una vida
capacitadas y
tipo de
pre mantenga l
rtante mientras
interferencias
e este manual de
jo y la instalación.
peraturas
rlo.
6
a
e
s
l
31.01.2011
21
©Velleman
nv
Page 22

BTSP1 Rev. 06
• Por razones de seguridad, las modificaciones no autorizadas del aparato están
prohibidas. Los daños causados por modificaciones no autorizadas, no están
cubiertos por la garantía.
• Utilice sólo el aparato para las aplicaciones descritas en este manual. Su uso
incorrecto anula la garantía completamente.
4. Descripción
Véase la figura en la página 2 de este manual del usuario.
altavoz
1
micrófono
2
LED
3
entrada de carga USB de 5 polos
4
tecla MODE
5
tecla MF (tecla multifunción)
6
aumentar el volumen (V+)
7
disminuir el volumen (V-)
8
5. Introducir y cargar la batería
Véase las figuras en la página 2 de este manual del usuario (A-E).
• Cargue la batería antes del primer uso. El tiempo de carga completo dura
aproximadamente tres horas.
• Introduzca la batería (véase la figura). Conecte el conector mechero al altavoz con
el cable incluido. Introduzca el conector a la toma encendedor mechero de 12V.
• El procedimiento de carga empezará sólo después de algunos minutos si la batería
está completamente descargada o si el aparato no ha sido utilizado durante un
largo período de tiempo.
• Cargue la batería en cuanto la batería se debilite para prolongar la duración de
vida. El LED rojo parpadeará cada tres segundos. La duración de vida de la batería
se disminuirá al utilizar el aparato con batería débil.
6. Uso
Activar y desactivar el aparato
• Active el aparato al mantener pulsada la tecla MF durante ±4 segundos hasta que
emita una señal corta. El LED azul parpadea 5 veces.
• Desactive el aparato al mantener pulsada la tecla MF durante ±4 segundos hasta
que emita una señal corta. El LED rojo parpadea 5 veces.
Conectar el aparato
• Ponga el aparato y el móvil a una distancia de máx. 1m. Desactive el altavoz
manos libres.
• Mantenga pulsada la tecla MF durante seis segundos hasta que el LED rojo y el LED
azul parpadeen sucesivamente. El aparato está listo para estar conectado.
• Active la función Bluetooth® del portátil y busque el altavoz manos libres en la lista
de los aparatos. Consulte el manual del usuario de su portátil.
• Seleccione el altavoz manos libres en la lista.
• Introduzca el código 0000 preprogramado y pulse OK para conectar el altavoz al
portátil. Después de haber realizado la conexión, el LED azul parpadeará cada 3
segundos. El altavoz se pone en el modo standby (espera).
• Instale el aparato (Véase las figuras en la página 2).
NOTA: Si la conexión no se hace dentro de los dos minutos después de la
activación de la función, mantenga pulsada la tecla MF durante seis segundos.
31.01.2011 ©Velleman nv
22
Page 23

BTSP1 Rev. 06
Conectar y desconectar el aparato
• Conecte el aparato al seleccionarlo en la lista de su portátil. Luego, pulse la tecla
MF del aparato y seleccione ACCEPT en el portátil.
• Desconecte el aparato al desactivarlo. Luego, seleccione DISCONNECT para
interrumpir la comunicación entre el altavoz manos libres y el portátil.
NOTA: Si se pierde la conexión, el altavoz se desactivará automáticamente
después de 10 minutos. El LED azul parpadea cada 3 segundos.
¿Cómo utilizar el aparato?
• Descolgar
Espere hasta que el aparato suene. Luego, pulse brevemente la tecla MF.
• Colgar
Pulse brevemente la tecla MF para terminar la llamada.
• Rechazar una llamada
Espere hasta que el aparato suene. Luego, mantenga pulsada la tecla MF durante 2
segundos hasta que el aparato emita una señal corta.
• Reconocimiento de la voz
• En el modo standby, pulse la tecla MF y diga un nombre en el micrófono después
del bip sonoro. Asegúrese de que grabe el nombre de antemano. Esta función
dende del modelo del portátil. Consulte el manual del usuario del portátil.
• Volver a marcar el último número usado
En el modo standby, pulse la tecla MF dos veces.
• Ajustar el volumen
Pulse V+ para aumentar, pulse V- para disminuir.
• Función « mute »
Pulse la tecla MODE para desactivar el sonido del altavoz. El LED rojo parpadea.
Vuelva a pulsar la tecla para volver a activar el sonido.
• Transmitir una llamada
Transmita la llamada del aparato al portátil al mantener pulsada las teclas V+ y V-.
Pulse brevemente V+ y V- para volver a transmitir la llamada al altavoz.
• Poner una llamada en espera
Pulse la tecla MF dos veces para poner una llamada en espera o para responder a
la llamada en espera.
• Aceptar una segunda llamada
Al recibir una segunda llamada, pulse la tecla MF para terminar la primera
llamada y aceptar la segunda llamada. Pulse dos veces la tecla MF para poner la
primera llamada en espera y aceptar la segunda llamada.
• Rechazar una segunda llamada
Al recibir una segunda llamada, mantenga pulsada la tecla MF durante ± 2
segundos para rechaza la llamada.
• Conmutar de una llamada a la otra
Pulse dos veces la tecla MF para conmutar a la otra llamada. Pulse una vez la
tecla MF para terminar la primera llamada y para conmutar a la segunda
llamada.
7. Conexión múltiple
Activar una conexión múltiple
• El altavoz puede aceptar simultáneamente dos móvils. La función está
desactivada por defecto.
31.01.2011 ©Velleman nv
23
Page 24

a
v
o
e
g
a
d
o
e
o
a
r
á
t
o
u
o
e
o
a
o
a
a
n
t
o
l
r
+
ó
n
a
a
r
a
u
c
c
d
v
s
l
m
e
c
m
e
a
s
r
a
a
o
3
c
n
n
o
c
m
n
ú
a
n
t
u
a
a
a
0
a
d
o
• Active l
que el a
móviles
• Desacti
que el a
móvil c
Conectar
• Conect
• Manten
móvil.
• Pulse la
Conexión
• Al activ
conecta
• En mod
que el a
móviles
Utilizar u
• El prim
controla
• Pulse la
móvil.
• Pulse d
móvil.
NOTA
Utilice l
volver a
El segu
en el p
autom
15. Ba
• Recargu
• El altav
9. Aj
• Ponga e
durante
• El altav
restable
función al mant
ltavoz emita un t
conectados.
e la función al m
ltavoz emita un t
nectado.
dos móviles al
el primer móvil a
a pulsada la tecl
tecla MF para co
múltiple
r el aparato, el al
os.
de espera, man
ltavoz emita un t
conectados.
n segundo móvi
r móvil está cont
do por la tecla V
tecla V+ para act
s veces la tecla V
tecla V+ para ac
marcar el último
ndo móvil se desc
imer móvil. El m
ticamente en cua
ería
e la batería en cu
z se desactiva aut
¡OJO! Manteng
stes de fáb
l altavoz en el mo
± 10 segundos h
z se conectará a
cer los ajustes de
BTSP1
ner pulsada la te
no. El altavoz se
ntener pulsada la
no. El altavoz se
ltavoz
l altavoz. Desacti
MF durante ± 6
ectar el altavoz a
tavoz busca auto
enga pulsada la t
no. El altavoz se
olado por la tecla
.
ivar la función de
+ para volver a
tivar la función d
número del móvil
onecta automátic
vil desconectado
to se termine la l
nto el LED rojo pa
omáticamente si l
la batería lejos d
ica
do de espera y m
sta que el LED r
tomáticamente al
fábrica.
la V+ durante ±
onecte automáti
tecla V- durante
esactiva y se co
e el altavoz.
egundos para co
primer móvil con
áticamente los d
cla V+ durante ±
onecta automáti
MF; el segundo
marcación media
arcar el último n
marcación medi
conectado.
mente durante u
e vuelve a conec
lamada.
padee cada 3 seg
batería está agot
el alcance de niño
ntenga pulsada l
jo y el LED azul p
móvil conectado
segundos hasta
amente a los dos
± 3 segundos has
ecta al último
ectar el segundo
ectado.
s móvils
3 segundos hast
amente a ambos
óvil está
te voz del segun
mero del segund
nte voz y para
a llamada entran
ar
ndos.
da.
s.
tecla V+ y V-
arpadeen
ntes de
Rev.
6
ta
o
te
31.01.2011
24
©Velleman
nv
Page 25

BTSP1 Rev. 06
10. Indicación LED
Modo LED rojo LED azul Señal
Desactivado desactivado desactivado
Activar 5 parpadeos 1x bi
Desactivar 5 parpadeos 1x bi
Standby parpadea cada 4s
Standby – batería baja parpadea cada 3s 2x bi
Conversación parpadean alternativamente
Conexión establecida parpadea cada 3s 1x bi
Mute parpadear
Cargar activado
Carga terminada desactivado desactivado
Pérdida de la conexión parpadea cada 3s
Ajustes de fábrica 5 parpadeos
por minuto
11. Mantenimiento
• No exponga el aparato al sol, la lluvia, la humedad, las temperaturas extremas.
• Proteja el altavoz contra objetos afilados para evitar rayas.
• Limpie el aparato con un paño suave. No utilice productos abrasivos.
• El usuario no habrá de efectuar el mantenimiento de ninguna pieza. No desmonte
el aparato.
• Guarde el aparato en un lugar seco y no lo exponga a polvo, humedad ni
temperaturas extremas.
12. Instrucciones de seguridad
• Consulte las normas locales de circulación en relación con un kit manos libres. La
seguridad vial es lo más importante mientras está conduciendo.
• Mantenga el aparato fuera del alcance de niños.
• Observe la ley en relación con el uso de aparatos inalámbricos: asegúrese de que
desactive el aparato en hospitales, gasolineras, aviones y lugares con substancias
inflamables.
• Instale el aparato fuera del alcance de airbags.
13. Solución de problemas
• No es posible establecer una conexión entre el altavoz y el portátil
o Primero, establezca la conexión entre los dos aparatos.
o Active la función Bluetooth
o Asegúrese de que la distancia entre ambos aparatos no sobrepase los 10m y
evite cualquier objeto que pueda debilitar la conexión (pared, otro aparato
eléctrico…).
• Este aparato soporta Bluetooth® 2.1. Intercomunicación depende de la
compatibilidad entre el aparato y el portátil.
®
del portátil.
31.01.2011 ©Velleman nv
25
Page 26

BTSP1 Rev. 06
14. Especificaciones
Bluetooth® V2.1 + EDR
clase II (10m)
Autonomía hasta 10h
autonomía en el modo
de espera (standby)
tiempo de carga ±3h
Bacteria batería de litio-ion 650Mah
dimensiones 123 x 46 x 20mm
Utilice este aparato sólo con los accesorios originales. Velleman NV no
será responsable de daños ni lesiones causados por un uso (indebido) de
este aparato. Para más información sobre este producto, visite nuestra
página www.velleman.eu. Se pueden modificar las especificaciones y el
contenido de este manual sin previo aviso.
© DERECHOS DE AUTOR
Velleman NV dispone de los derechos de autor para este manual del
usuario.
Todos los derechos mundiales reservados. Está estrictamente prohibido reproducir,
traducir, copiar, editar y guardar este manual del usuario o partes de ello sin
previo permiso escrito del derecho habiente.
máx. 30 días
31.01.2011 ©Velleman nv
26
Page 27

f
m
e
B
i
t
d
z
h
r
H
S V
B
F FAu
g
g
n
T
a
E
t
d
s
e
t
a
o
n
w
e
r
G
E
l
c
h
u
g
o
p
H
e
m
t
f
e
f
t
r
u
o
V
f
a
S
G
h
d
e
r
d
p
e
u
f
m
t
L
d
ä
e
0
n
k
e
r
1. Ein
An alle Ei
Wichtige
Dieses Sy
Falls Zw
örtliche
Wir bedan
vor Inbetr
vorliegen.
verursach
Folgeschä
Kommuni
Lautsprec
Büro oder
wichtig ist
2. Fü
BEDI
ührung
nwohner der Eu
Umweltinforma
bol auf dem Pro
Entsorgung die
Schaden zufüg
Batterien) nich
verwendeten B
Recycling ents
ein örtliches Re
Sie die örtliche
ifel bestehen,
ehörde.
ken uns für den K
ebnahme sorgfält
Bei Schäden, die
werden, erlischt
en übernimmt d
ieren Sie drahtlos
ertelefon. Dieses
zu Hause oder fü
.
Ihre Sicher
BTSP1
NUNGSA
ropäischen Uni
ionen über dies
ukt oder der Ver
es Produktes nac
n kann. Entsorge
als unsortiertes
tterien müssen v
rgt werden. Dies
cycling-Unterneh
Umweltvorschrif
enden Sie sich
auf des BTSP1! L
ig durch. Überprü
durch Nichtbeach
der Garantieansp
r Hersteller keine
und in aller Freih
kompakte Gerät i
das hektische Le
heit
NLEITUN
n
es Produkt
ackung zeigt an,
h seinem Lebensz
n Sie die Einheit (
ausmüll; die Ein
on einer spezialisi
Einheit muss an
en retourniert w
en.
ür Entsorgungs
sen Sie diese Be
en Sie, ob Trans
ung der Bedienun
uch. Für daraus r
Haftung.
eit mit diesem Bl
st die perfekte Hil
ben, in dem Kom
Rev.
dass die
yklus der Umwelt
oder verwendete
eit oder
erten Firma zwec
en Händler oder
rden. Respektier
ichtlinien an Ih
ienungsanleitung
ortschäden
gsanleitung
sultierende
etooth®
e im Wagen, im
unikation sehr
6
s
n
e
3. All
Siehe Vell
Bedienun
• Vermeid
Installat
• Schütze
emper
31.01.2011
alten Sie Kinder
chützen Sie das
ERKEHRSSICH
eachten Sie alle
i
mmer mit beiden
ahrens ist der wi
UNKSTÖRUNG
lle drahtlosen Ge
nterworfen sein.
emeine Ric
eman® Service-
sanleitung.
en Sie Erschütter
ion und Bedienun
Sie das Gerät vo
turen.
und Unbefugte vo
erät vor Regen
RHEIT
okalen Verkehrsv
Händen fest. Die
htigste Schwerpu
räte können Inter
tlinien
und Qualitätsg
ngen. Vermeiden
des Gerätes.
r Staub. Schützen
27
m Gerät fern.
nd Feuchte.
rschriften. Halte
erkehrssicherhei
nkt.
erenzen, die die
rantie am Ende
ie rohe Gewalt w
Sie das Gerät vor
Sie das Lenkrad
während des
eistung verringer
ieser
hrend der
xtremen
©Velleman
n,
nv
Page 28

BTSP1 Rev. 06
• Nehmen Sie das Gerät erst in Betrieb, nachdem Sie sich mit seinen Funktionen
vertraut gemacht haben.
• Eigenmächtige Veränderungen sind aus Sicherheitsgründen verboten. Bei Schäden
verursacht durch eigenmächtige Änderungen erlischt der Garantieanspruch.
• Verwenden Sie das Gerät nur für Anwendungen beschrieben in dieser
Bedienungsanleitung sonst kann dies zu Schäden am Produkt führen und erlischt
der Garantieanspruch.
4. Umschreibung
Siehe Abbildungen, Seite 2 dieser Bedienungsanleitung.
Lautsprecher
1
Mikrofon
2
LED
3
5-pol. USB-Lade-Eingang
4
MODE-Taste
5
MF-Taste (Mehrzwecktaste)
6
Lautstärke erhöhen (V+)
7
Lautstärke verringern (V-)
8
5. Die Batterie einlegen und laden
Siehe Abbildungen, Seite 2 dieser Bedienungsanleitung (A-E).
• Laden Sie die Batterie vor der ersten Inbetriebnahme völlig auf. Eine normale
Ladezeit dauert etwa drei Stunden.
• Legen Sie die Batterie ein (Siehe Abbildung). Verbinden Sie den Netzteilstecker
über das mitgelieferte USB-Kabel mit dem Lautsprechertelefon. Stecken Sie den
Netzteilstecker in den 12V-Ausgang des Fahrzeuges.
• Die Lade-Anzeige kann während der ersten Minuten nicht erscheinen wenn das
Lautsprechertelefon längere Zeit nicht verwendet worden ist oder wenn die Batterie
völlig entladen ist.
• Laden Sie das Lautsprechertelefon sobald die Batterie schwächer wird, um die
Lebensdauer der Batterie zu erhalten. Die rote LED leuchtet, jede drei Sekunden.
Sie können die Batterie beschädigen wenn Sie das Lautsprechertelefon mit einer
schwachen Batterie verwenden.
6. Anwendung
Das Lautsprechertelefon ein- und ausschalten
• Schalten Sie das Lautsprechertelefon ein, indem Sie die MF-Taste ±4 Sekunden
gedrückt halten bis ein kurzer Beep ertönt. Die blaue LED blinkt 5 Mal.
• Schalten Sie das Lautsprechertelefon aus, indem Sie die MF-Taste gedrückt halten
bis ein kurzer Beep ertönt. Die rote LED blinkt 5 Mal.
Das Gerät mit dem Handy verbinden
• Installieren Sie das Lautsprechertelefon nicht weiter als 1m vom Handy. Schalten
Sie das Lautsprechertelefon aus.
• Halten Sie die MF-Taste während sechs Sekunden gedrückt. Die LED blinkt
wechselweise rot und blau. Das Lautsprechertelefon ist nun fertig, um eine
Verbindung mit Ihrem Mobiltelefon (Pairing) herzustellen.
• Schalten Sie die Bluetooth®-Funktion des Mobiltelefons ein und suchen Sie das
geeignete Bluetooth®Gerät in der Liste. Siehe Bedienungsanleitung des
Mobiltelefons.
• Wählen Sie de BT-Lautsprecher uit de lijst.
31.01.2011 ©Velleman nv
28
Page 29

BTSP1 Rev. 06
• Trage, Sie Code 0000 ein und drücken Sie OK, um das Lautsprechertelefon mit
dem Mobiltelefon zu verbinden. Nachdem die Geräte verbunden sind, blinkt die
blaue LED alle 3 Sekunden. Das Lautsprechertelefon befindet sich nun im StandbyModus.
• Installieren Sie das Lautsprechertelefon (Siehe Abbildungen, Seite 2).
BEMERKUNG: Gelingt die Verbindung nicht innerhalb von zwei Minuten nachdem
Sie den Pairing-Modus eingeschaltet haben, so halten Sie die MF-Taste
wieder während 6 Sekunden gedrückt.
Das Lautsprechertelefon verbinden und die Verbindung verbrechen
• Wählen Sie den BT-Lautsprecher aus der Liste im Mobiltelefon aus. Drücken Sie
danach die MF-Taste des Lautsprechertelefons und wählen Sie ACCEPT im
Mobiltelefon.
• Verbrechen Sie die Verbindung, indem Sie zuerst das Lautsprechertelefon
ausschalten. Wählen Sie dann DISCONNECTING, um die Verbindung zwischen dem
Lautsprechertelefon und dem Mobiltelefon zu verbrechen.
BEMERKUNG: Bei Verlust des Anschlusses schaltet das Gerät automatisch nach
10 Minuten aus. Die blaue LED blinkt alle 3 Sekunden.
Wie das Lautsprechertelefon verwenden?
• Einen Anruf beantworten
Warten Sie bis das Lautsprechertelefon klingelt und drücken Sie dann kurz die
MF-Taste, um den Anruf zu akzeptieren.
• Einen Anruf beenden
Drücken Sie kurz die MF-Taste um den Anruf zu beenden.
• Einen Anruf abweisen
Warten Sie bis das Lautsprechertelefon klingelt und halten Sie dann die MF-Taste
während zwei Sekunden gedrückt bis ein kurzer Beep ertönt.
• Sprachanwahl
Im Standby-Modus, drücken Sie die MF-Taste und sprechen Sie in das Mikrofon
wenn der Beep ertönt. Beachten Sie, dass Sie die Anrufnamen vorher im
Mobiltelefon speichern müssen, ehe Sie diese Funktion verwenden können. Diese
Funktion hängt vom Handy-Modell ab. Siehe Bedienungsanleitung des
Mobiltelefons.
• Wahlwiederholung
• Im Standby-Modus, drücken Sie die MF-Taste zwei Mal.
• Die Lautstärke regeln
• Drücken Sie V+ um die Lautstärke zu erhöhen, drücken Sie V- um die Lautstärke
zu verringern
• Mute-Funktion (Stummschaltung) ein- und ausschalten
Drücken Sie die MODE-Taste, um die Mute-Funktion einzuschalten. Die rote LED
blinkt. Drücken Sie wieder, um das Gerät wieder normal zu verwenden.
• Einen Anruf transferieren
Um während eines Gespräches vom Lautsprechertelefon auf das Handy
umzuschalten, halten Sie sowohl V+ als auch V- gedrückt. Drücken Sie kurz V+
und V- um wieder auf das Lautsprechertelefon umzuschalten.
• Anklopfen
Drücken Sie während des Gespräches zwei Mal die MF-Taste, um den Anruf zu
halten. Drücken Sie wieder zwei Mal die MF-Taste um den wartenden Anruf
anzunehmen.
31.01.2011 ©Velleman nv
29
Page 30

BTSP1 Rev. 06
• Einen zweiten Anruf beantworten
Drücken Sie die MF-Taste ein Mal, um den ersten Anruf zu beenden und den
zweiten Anruf anzunehmen. Drücken Sie die MF-Taste zwei Mal, um den ersten
Anruf zu halten und den zweiten Anruf anzunehmen.
• Einen zweiten Anruf abweisen
Halten Sie die MF-Taste 2 Sekunden gedrückt, um den Anruf abzuweisen.
• Zwischen zwei Anrufen schalten
Drücken Sie die MF-Taste zwei Mal, um zum zweiten Anruf zu schalten
7. Mehrpunktverbindung
Die Mehrpunktverbindung einschalten
• Dank der Mehrpunktverbindung können Sie zwei Handys verwenden. Diese
Funktion ist Standard ausgeschaltet.
• Stellen Sie das Gerät im Standby-Modus und halten Sie V+ während ± 3
Sekunden gedrückt bis ein Beep ertönt. Das Gerät verbindet sich automatisch
mit beiden Handys.
• Schalten Sie die Funktion aus, indem Sie das Gerät zuerst im Standby-Modus
stellen. Halten Sie danach V- während ± 3 Sekunden gedrückt bis ein Beep
ertönt. Das Gerät verbindet sich automatisch mit dem zuletzt angeschlossenen
Handy.
Zwei Handys anschließen
• Verbinden Sie das Gerät mit dem ersten Handy und schalten Sie das Gerät aus.
• Halten Sie die MF-Taste ± 6 Sekunden gedrückt, um das zweite Handy
anzuschließen.
• Drücken Sie kurz die MF-Taste, um das erste angeschlossene Handy mit dem
Gerät zu verbinden.
Mehrpunktverbindung
• Beim Einschalten verbindet das Gerät sich automatisch mit den zwei letzt
angeschlossenen Handys.
• Im Standby-Modus, halten Sie V+ während ± 3 Sekunden gedrückt bis ein Beep
ertönt. Das Gerät verbindet sich automatisch mit den zwei zuletzt
angeschlossenen Handys.
Das zweite Handy verwenden
• Das zuerst angeschlossene Handy bedienen Sie mit der MF-Taste; die zweite mit
V+.
• Drücken Sie V+ ein Mal, um die Sprachanwahl des zweiten Handys
einzuschalten.
• Drücken Sie V+ zwei Mal, um die letzte Nummer vom zweiten Handy wieder zu
wählen.
Bemerkungen:
Verwenden Sie die V+-Taste für die die Sprachanwahl und wählen Sie wieder
wenn da nur ein Handy mit dem Gerät verbunden ist.
Bei einem eingehenden Anruf entkoppelt sich das andere Handy automatisch und
nach dem Gespräch schließt es sich wieder an.
31.01.2011 ©Velleman nv
30
Page 31

t
r
F
e
e
S
e
i
e
M
s
t
aGe
n
L
g
d
r
n
n
n
c
k
S
a
e
e
e
d
e
v
c
n
e
o
e
s
m
n
B
g
h
e
e
r
a
n
e
V
D
g
h
D
S
S
S
e
h
i
0
15. Ba
• Bei eine
diesem
• Bei ung
16. Di
• Stellen
Sekund
• Wenn S
Handy r
Handy.
10. Di
Ein
Aus
Standb
Pairi
Völli
Verbin
Wiede
Werkei
11. Wa
• Schütze
und dire
• Schütze
vermeid
• Reinige
keine S
• Es gibt
• Lagern
Temper
terie
zu niedrigen Stro
all sofort die Batt
nügender Stromv
WARNUNG: Hal
Werkseinst
ie das Gerät in d
n gleichzeitig ge
e die Werkseinst
ücksetzen, dann
LEDs
odus
Aus
chalten
schalten
S
andby
y – niedrige
B
tterie
spräch
g beendet
Mute
aden
geladen
ungsverlust
herstellung
nstellungen
rtung
Sie das Lautspre
ktem Sonnenlicht.
Sie das Lautspre
en.
Sie das Lautspre
heuermittel.
eine zu wartende
ie das Lautsprech
turen.
BTSP1
mversorgung, blin
rie.
rsorgung schaltet
ten Sie Kinder v
ellungen wi
n Standby-Modu
rückt bis die rote
llungen von eine
erbindet sich das
Rote LED
Aus
5 Blitze
blinkt jede 3Sek.
blinken
Ein
Aus
chertelefon vor Re
chertelefon vor sc
hertelefon mit ein
Teile. Demontier
rtelefon fern von
kt die rote LED. E
das Gerät autom
n Batterien fer
derherstell
und halten Sie
und die blaue LE
an das Gerät an
Gerät automatisc
Blaue LE
Aus
5 Blitze
blinkt jede 4
bli
ken
blinkt jede 3
Aus
blinkt jede 3
5
litze
en, Feuchte, hoh
arfen Gegenständ
m trockenen Tuc
n Sie das Gerät ni
Staub, Feuchtigke
Rev.
6
setzen Sie in
tisch ab.
.
n
+ und V- 10
5 Mal blinken.
eschlossenen
wieder mit dem
Beep
ek.
ek. 1x bi
ek.
n Temperaturen
en, um Kratzer zu
. Verwenden Sie
cht.
t und hohen
1x bi
1x bi
2x bi
pro Minute
31.01.2011
31
©Velleman
nv
Page 32

BTSP1 Rev. 06
12. Sicherheitshinweise
• Beachten Sie alle lokalen Verkehrsvorschriften in Zusammenhang mit der
Anwendung von Mobiltelefone und Lautsprechertelefone im Wagen. Beachten Sie,
dass Sie zu jeder Zeit die Verkehrsvorschriften respektieren und behalten Sie die
Straße im Auge.
• Halten Sie das Lautsprechertelefon von Kindern fern.
• Beachten Sie alle Vorschriften in Zusammenhang mit drahtlosen Geräten. Schalten
Sie das Lautsprechertelefon also in Krankenhäusern, Tankstellen, Flugzeugen und
Orten mit brennbaren Stoffen.
• Installieren Sie das Lautsprechertelefon von Airbags fern.
13. Problemlösung
• Es ist keine Verbindung mit dem Mobiltelefon möglich
o Verbinden Sie das Lautsprechertelefon zuerst mit dem Handy.
o Schalten Sie die Bluetooth®-Funktion des Mobiltelefons ein.
o Installieren Sie das Lautsprechertelefon in einem Abstand von weniger als 10m
vom Mobiltelefon. Entfernen Sie alle Gegenstände, die die Verbindung
schwächen können.
• Das Lautsprechertelefon unterstützt Bluetooth® 1.2. Die Wechselwirkung zwischen
dem Lautsprechertelefon und dem Handy hängt von der Kompatibilität zwischen
beiden Geräten ab.
14. Technische Daten
Bluetooth® V2.1 + EDR
Klasse II (10m)
Autonomie bis zu 10 Std.
Autonomie in Standby max. 30 Tage
Ladezeit ± 3 Std.
Batterie 650mAH aufladbare Lithium-Ionbatterie
Abmessungen 123 x 46 x 20mm
Verwenden Sie dieses Gerät nur mit originellen Zubehörteilen. Velleman
NV übernimmt keine Haftung für Schaden oder Verletzungen bei
(falscher) Anwendung dieses Gerätes. Für mehr Informationen zu diesem
Produkt, siehe www.velleman.eu. Alle Änderungen ohne vorherige
Ankündigung vorbehalten.
© URHEBERRECHT
Velleman NV besitzt das Urheberrecht für diese Bedienungsanleitung.
Alle weltweiten Rechte vorbehalten. Ohne vorherige schriftliche Genehmigung des
Urhebers ist es nicht gestattet, diese Bedienungsanleitung ganz oder in Teilen zu
reproduzieren, zu kopieren, zu übersetzen, zu bearbeiten oder zu speichern.
31.01.2011 ©Velleman nv
32
Page 33

e
n
m
a
i
o
,
a
c
c
r
T
q T
d SRe
d ITc
g
l
g
e
g
r
m
a
o
e
o
q
l
p
o
p
n
b
b
m
c
v
v
A
n
i
i
a
a
u
d
v
g
e
r
n
s
z
f
e
o
m
e
l
d
a
e
s
i
d
t
e
s
e
z
m
o
0
è
a
e
e
o
t
e
a
o
1. Int
A tutti i r
Importa
Per inform
l’ufficio co
quale è st
3
La ringraz
informazi
Assicurars
evenienza
indicazioni
non sarà r
Godetevi l
Bluetooth
leggero e
la comuni
2. Pe
3. Re
Riferirsi al
• Proteg
durant
• Proteg
• Familia
31.01.2011
roduzione
sidenti dell’Uni
ti informazioni
Questo simbol
vietato smaltir
vitale in quant
smaltire il prod
indifferenziato;
nel riciclaggio.
azioni più dettagli
unale, il servizio
to effettuato l’ac
amo per aver sce
ni contenute nel
i che l’apparecchi
contattare il pro
fornite nel prese
itenuto responsa
comodità e la li
®, ideale per l'uti
ompatto, è il co
azione efficace è
la vostra si
enere il dispositi
ualificate.
enere il dispositi
i liquidi.
ICUREZZA STR
ispettare tutte le
ntrambe le mani
urante la guida d
NTERFERENZE
utti i dispositivi s
onseguente dimi
ole general
a garanzia serv
ere il dispositivo d
l'utilizzo.
ere il dispositivo d
izzare con le funzi
BTSP1
anuale
one Europea
mbientali relati
riportato sul pro
il prodotto nell’a
può essere noci
otto (o le pile, se
dovrebbe essere
ate circa il ricicla
locale di smaltim
uisto.
to Velleman! Si p
resente manuale
non sia stato da
rio fornitore. I da
te manuale non
ile di eventuali da
ertà di comunica
lizzo in auto, in uf
pagno perfetto p
la chiave.
urezza
o lontano dalla p
o lontano da piog
DALE
regole vigenti in
sul volante in qua
ovrebbe essere la
enza fili possono
uzione delle prop
zio e qualità Ve
gli urti. Evitare di
eccessivo calore
oni del dispositivo
33
tente
ve a questo pro
otto o sull’imball
mbiente al termin
o per l’ambiente
utilizzate) come r
smaltito da un’im
gio di questo pro
nto rifiuti oppure
ega di leggere at
prima di utilizzar
neggiato durante
nni derivanti dall’i
ono coperti da ga
nni cagionati a co
ione wireless con
icio o in casa. Qu
r uno stile di vita
rtata di bambini
gia, umidità, spru
ateria di sicurez
lsiasi momento. L
vostra principale
ssere soggetti a i
rie prestazioni.
leman® alla fine
scuotere violente
e polvere.
prima di utilizzarl
Rev.
otto
ggio, indica che
del suo ciclo
tesso. Non
fiuto urbano
presa specializzat
otto, contattare
il negozio presso
entamente le
il dispositivo.
il trasporto; in ta
nosservanza dell
ranzia; il venditor
e o persone.
questo vivavoce
esto vivavoce,
frenetico, quand
di persone non
zzi e gocciolamen
a stradale. Tener
a sicurezza strad
preoccupazione.
nterferenze con
del manuale.
ente il dispositiv
.
©Velleman
6
il
le
o
le
nv
Page 34

BTSP1 Rev. 06
• Per ovvie ragioni di sicurezza è vietato apportare delle modifiche al dispositivo.
• Utilizzare il dispositivo solamente per lo scopo per il quale è stato progettato. Ogni
altro tipo di utilizzo determina la decadenza della garanzia.
4. Descrizione
Fare riferimento all’illustrazione riportata a pagina 2 del presente manuale.
1 altoparlante 5 tasto MOD
2 microfono 6 tasto MF (tasto multifunzione)
3 LED 7 tasto incremento volume (V+)
4 connettore per la ricarica
(mini –USB 5 pin)
8 tasto decremento volume (V-)
5. Installazione e ricarica della batteria
Fare riferimento all’illustrazione riportata a pagina 2 del presente manuale (A – E).
• Prima di utilizzare per la prima volta il vivavoce, si raccomanda di caricare la
batteria. Normale il tempo necessario per la ricarica completa è di circa 3 ore.
• Inserire la batteria nel dispositivo come illustrato in figura. Collegare il
caricabatterie d’auto al dispositivo tramite il cavo fornito in dotazione. Inserire il
caricabatterie nella presa accendisigari dell’auto (12V).
• L’indicazione di ricarica sarà ritardata di alcuni minuti se il dispositivo non è stato
utilizzato per diverso tempo o se la batteria è scarica.
• Per prolungare la durata della batteria del vivavoce, si raccomanda di ricaricarla
non appena risulta scarica (il LED rosso emetterà un lampeggio ogni 3 secondi). La
durata della batteria si riduce notevolmente se il vivavoce viene frequentemente
utilizzato con la batteria scarica.
6. Utilizzo
Accensione/spegnimento del vivavoce
• Per accendere il vivavoce premere e tenere premuto per più di 4 secondi il tasto MF
fino ad udire due note acustiche. Il LED blu lampeggerà 5 volte.
• Per spegnere il vivavoce premere e tenere premuto per più di 3 secondi il tasto MF
fino ad udire due note acustiche. Il LED rosso lampeggerà 5 volte.
Associazione dell’auricolare (Pairing)
• Posizionare il vivavoce ed il telefono cellulare ad una distanza non superiore a 1
metro. Assicurarsi che il vivavoce sia spento.
• Premere e tenere premuto, sul vivavoce, il pulsante MF per più di 6 secondi finché
il LED blu e quello rosso lampeggeranno alternativamente. Il dispositivo è ora
pronto per essere associato con il telefono cellulare.
• Attivare la funzione Bluetooth® sul proprio telefono cellulare ed effettuare la ricerca
di nuovi dispositivi Bluetooth® (per le istruzioni consultare le istruzioni del telefono
cellulare).
• Selezionare BT speaker dalla lista.
• Digitare il codice predefinito 0000 quindi premere OK per completare
l’associazione. Terminata l’operazione il LED blu emetterà 3 lampeggi ogni 3
secondi. Il vivavoce si trova ora in modalità standby.
• Installare il vivavoce sul proprio veicolo (fare riferimento all’illustrazione di pag. 2).
31.01.2011 ©Velleman nv
34
Page 35

BTSP1 Rev. 06
NOTE: se l’associazione non viene eseguita entro 2 minuti dall’attivazione della
procedura, premere e tenere premuto nuovamente il tasto MF per altri 6
secondi.
Connettere/Disconnettere il vivavoce
• Per connettere il vivavoce al telefono cellulare, selezionare su quest’ultimo “BT
speaker” dalla lista dei dispositivi Bluetooth®. Premere sul vivavoce il tasto MF e di
seguito selezionare ACCEPT sul proprio telefono cellulare.
• Per disconnettere il vivavoce dal telefono cellulare, è necessario spegnerlo tenendo
premuto a lungo il tasto MF. Successivamente selezionare DISCONNECTING sul
proprio telefono cellulare per interrompere la connessione tra i due dispositivi.
NOTA: quando la connessione viene persa il vivavoce si spegne
automaticamente dopo 10 minuti. Il LED blu lampeggia ogni 3 secondi.
Utilizzo del vivavoce
• Rispondere a una chiamata
Premere brevemente il tasto MF o utilizzare il proprio telefono.
• Terminare una chiamata
Premere brevemente il tasto MF o utilizzare il proprio telefono.
• Rifiutare una chiamata
Premere e tenere premuto per più di 2 secondi il tasto MF fino ad udire un breve
segnale acustico.
• Esecuzione chiamata mediante comandi vocali
In modalità standby, premere brevemente il tasto MF, attendere il segnale acustico
quindi impartire il comando ad alta voce. Prima di utilizzare i comandi vocali,
verificare che siano abilitati e registrati nel telefono cellulare in uso. La gestione del
telefono cellulare mediante comandi vocali varia da telefono a telefono. Per
maggiori informazioni sui comandi vocali, consultare il manuale utente del proprio
telefono cellulare.
• Ricomporre l’ultimo numero chiamato
In modalità standby, premere due volte il tasto MF.
• Regolazione del volume
Premere il tasto V+ per aumentare il volume, premere il tasto V- per diminuirlo.
• Abilitare/Disabilitare la funzione Mute
Premere brevemente il tasto MODE per disattivare l’altoparlante; il LED rosso inizia
a lampeggiare. Premere nuovamente per riattivarlo.
• Trasferimento dell’audio
Per trasferire la chiamata dal vivavoce al telefono cellulare durante la
conversazione, premere brevemente e simultaneamente i tasti V+ e V-. Per
trasferire nuovamente la chiamata al telefono cellulare premere brevemente e
simultaneamente i tasti V+ e V-.
• Trattenere una chiamata
Durante una chiamata, premere due volte il tasto MF per trattenere una
chiamata. Premere due volte il tasto MF per riprendere la conversazione.
• Rispondere alla seconda chiamata
Quando si riceve una seconda chiamata, premere una volta il tasto MF per
terminare la prima chiamata e rispondere alla seconda. Premere due volte il
tasto MF per mettere in sospensione la prima e rispondere alla seconda.
31.01.2011 ©Velleman nv
35
Page 36

BTSP1 Rev. 06
• Rifiutare una seconda chiamata
Quando si riceve una seconda chiamata, premere e tenere premuto per circa 2
secondi il tasto MF per rifiutare la chiamata.
• Passare da una chiamata all’altra
Premere due volte il tasto MF per passare all’altra chiamata. Premere una volta
il tasto MF per terminate la prima chiamata e tornare alla seconda.
7. Funzione multipoint
Attivare la connessione multipoint
• La funzione multipoint permette di collegare contemporaneamente due telefoni
cellulari. Per impostazione predefinita tale funzione è disattivata.
• Per attivare la funzione, in modalità standby, premere e tenere premuto il tasto
V+ per circa 3 secondi fino ad udire un segnale acustico. Il dispositivo si
collegherà automaticamente agli ultimi due telefoni cellulari precedentemente
associati.
• Per disattivare la funzione, in modalità standby, premere e tenere premuto il
tasto V- per circa 3 secondi fino ad udire un segnale acustico. Il vivavoce si
spegnerà automaticamente e al suo riavvio si connetterà solo con l’ultimo
dispositivo a cui era collegato.
Associazione multipoint
• Associare il vivavoce al primo dispositivo Bluetooth. Spegnere il vivavoce.
• Premere e tenere premuto il tasto MF per circa 6 secondi per associare il
secondo dispositivo Bluetooth.
• Premere brevemente il tasto MF per connettersi al primo dispositivo associato.
Connessione multipoint
• Il vivavoce, all’accensione, effettuerà una ricerca e si collegherà
automaticamente agli ultimi 2 cellulari connessi in precedenza.
• In modalità standby, premere e tenere premuto il tasto V+ per circa 3 secondi
fino ad udire un segnale acustico. Il vivavoce si collegherà automaticamente agli
ultimi 2 cellulari connessi in precedenza.
Utilizzo del secondo dispositivo Bluetooth
• Il primo dispositivo Bluetooth viene controllato tramite il tasto MF mentre il
secondo tramite il tasto V+.
• Premere una volta il tasto V+ per attivare la funzione di composizione vocale del
secondo telefono.
• Premere due volte il tasto V+ per richiamare l’ultimo numero in uscita del
secondo telefonino.
Note:
Quando il vivavoce è in modalità multipoint ed è connesso con un solo telefono
cellulare, è possibile utilizzare il tasto V+ per effettuare la chiamata vocale e la
ripetizione dell’ultimo numero.
Quando uno dei cellulari riceve una chiamata in entrata, l’altro telefono cellulare
verrà scollegato dal viva voce, ma riprenderà automaticamente la connessione
quando il primo telefono avrà terminato la conversazione.
8. Batteria
• Quando la tensione della batteria scende al di sotto dei 3,3V, il LED rosso emette
un lampeggio ogni 3 secondi. Ricaricare la batteria.
31.01.2011 ©Velleman nv
36
Page 37

t
p
s
o
g
a
o
d
o
SAcc
gSt
b
c
n
s
o
a
r
r
d
a
e
d
m
d
z
m
e
i
n
a
c
d
n
v
0
e
o
n
n
d
a
a
m
t
,
p
e
n
e
a
a
e
r
l
m
g
g
g
a
u
r
0
o
v
n
a
a
o
• Quando
automa
9. Ri
• Per ripri
sia in m
per 10 s
5 lampe
• Se il viv
l’operazi
collegat
10. In
Stat
Spe
Stand
In
Pairing
Carica
Conne
Ripristin
11. Cu
• Non esp
del sole.
• Non por
• Pulire il
prodotti
• Non son
• Conserv
esporlo
31.01.2011
la tensione scend
icamente.
ATTENZIONE:
batterie secon
giunge al ter
dalla portata
ristino delle
tinare le imposta
dalità standby qu
econdi i tasti V+ e
gi.
voce, prima del ri
one entrerà auto
ad alcun cellular
icazione de
sistema
pento
ensione
nimento
andby
y – batteria
s
carica
hiamata
completato
Mute
I
carica
completata
sione persa
impostazioni
f
bbrica
a e manute
orre il dispositivo
e il dispositivo a c
ispositivo sempli
abrasivi.
o disponibili parti
are il dispositivo i
temperature ele
BTSP1
al di sotto dei 3,
maneggiare le b
o le vigenti dir
ine del suo cicl
ei bambini.
impostazio
ioni predefinite de
indi premere e ten
V- fino a quando i
pristino, risulta co
aticamente in mo
, terminata l’oper
LED
LED rosso
Spento
5 lampeggi
Lampeggia ogni
3 secondi
Lampeggiano
Lampeggia
Acceso
Spento
5 la
zione
pioggia, umidità,
ontatto con ogget
emente con un pa
i ricambio. Non te
un luogo asciutto
ate.
37
V, il vivavoce si s
atterie con caut
ttive locali qua
vitale. Tenere l
i di fabbric
l vivavoce assicur
ere premuto cont
l LED blu e quello
nesso ad un cellu
alità pairing. Se il
zione entrerà in
5 lampegg
Lampeggia o
lternativamente
Lampeggia o
Lampeggia o
peggi
ad alte temperatu
i spigolosi per evit
nno asciutto. Non
ntare di smontare
lontano da polve
egne
la. Smaltire le
do il dispositiv
batterie fuori
rsi che il dispositi
mporaneamente
osso non emetto
are, terminata
dispositivo non er
odalità standby.
LED blu
Spento
i 1x bi
Spento
ni
ni 1x bi
ni
re e ala luce dirett
re di graffiarlo.
tilizzare solventi
il dispositivo.
e, umidità e non
4 secondi
3 secondi
3 secondi
Rev.
Segnale
acustico
1x bi
2x bi
al minuto
©Velleman
6
o
o
nv
Page 38

BTSP1 Rev. 06
12. Informazioni relative alla sicurezza
• Verificare le vigenti normative in materia di uso di un telefono cellulare e vivavoce
durante la guida. Ricordarsi che è sotto la propria responsabilità mantenere una
guida attenta e sicura.
• Non permettere ai bambini di giocare con il vivavoce.
• Rispettare i cartelli che raccomandano di spegnere qualsiasi apparecchio RF in aree
dove sussistano pericoli di esplosione, in ospedali e prima di salire a bordo di aerei.
• Non collocare o lasciare mai il vivavoce sopra l’area di espulsione dell’airbag del
veicolo.
13. Risoluzione dei problemi
• Impossibile collegare il vivavoce al proprio cellulare
o Assicurarsi che il vivavoce sia accoppiato con il telefono cellulare.
o Assicurarsi che la funzione Bluetooth® sia attiva sul proprio cellulare.
o Assicurarsi che il vivavoce non disti più di 10 metri dal telefono cellulare e che
tra I due dispositivi non vi siano ostacoli quali pareti o altri apparecchi elettrici.
• Questo vivavoce è Bluetooth® 1.2 compatibile. Interoperabilità dipende dalla
compatibilità tra il vivavoce e il telefono cellulare utilizzato.
14. Specifiche tecniche
Bluetooth® V2.1 + EDR
class II (10m)
autonomia in
conversazione
autonomia in standby fino a 30 giorni
tempo di ricarica ~3h
batteria a ioni di litio da 650mAh
dimensioni 123 x 46 x 20mm
Utilizzare questo dispositivo solo con accessori originali. In nessun caso
Velleman nv ed i suoi rivenditori possono essere ritenuti responsabili di
danni o lesioni derivanti da un uso improprio od errato di questo
dispositivo. Per ulteriori informazioni relative a questo prodotto, vi
preghiamo di visitare il nostro sito www.velleman.eu. Le informazioni
contenute in questo manuale possono essere soggette a modifiche senza
alcun preavviso.
© NOTA LEGALE
Questo manuale è protetto dai diritti di proprietà intellettuale di Velleman
nv. Non è possibile riprodurre, duplicare e distribuire liberamente questo manuale
indipendentemente o come parte di un pacchetto in formato elettronico e/o
stampato senza l'autorizzazione esplicita di Velleman nv.
fino a 10h
31.01.2011 ©Velleman nv
38
Page 39

BTSP1 Rev. 06
R&TTE Declaration of Conformity
R&TTE-verklaring van overeenstemming
Déclaration de conformité R&TTE
R&TTE Konformitätserklärung
Declaración de conformidad R&TTE
We / wij / nous / Wir / nostros
SA Velleman NV
Legen Heirweg, 33
9890 Gavere (België)
Declare on our own responsibility that the finished product(s):
Verklaren op eigen verantwoordelijkheid dat het afgewerkte product:
Déclarons sous notre propre responsabilité que le produit fini :
Erklären voll verantwortlich dass nachfolgendes Produkt:
Declaramos bajo nuestra sola responsabilidad que el producto mencionado a continuación:
Trade name / handelsnaam / denomination commerciale / Markenname / denominación
Type or model / type of model / type ou modèle / Typ oder Modell / tipo o modelo:
requirements and other relevant stipulations of the R&TTE Directive (1999/5/EC).
vereisten en andere relevante bepalingen van de R&TTE-richtlijn (1999/5/EC).
et toute autre stipulation pertinente de la directive R&TTE (1999/5/EC).
anderen relevanten Vereinbarungen der R&TTE-Richtlinie (1999/5/EC) entspricht.
Directiva R&TTE (1999/5/EC).
31.01.2011 ©Velleman nv
constituting the subject of this declaration, conforms with the essential
die het voorwerp uitmaakt van deze verklaring, voldoet aan de essentiële
faisant l’objet de la présente déclaration, satisfait aux exigences essentielles
auf das sich diese Erklärung bezieht, den grundlegenden Anforderungen und
cumple los requisitos esenciales y las otras estipulaciones relevantes de la
Brand / merk / marque / Marke / marca:
VELLEMAN
commercial:
BLUETOOTH CAR SPEAKER PHONE
BTSP1
39
Page 40

BTSP1 Rev. 06
The product conforms to the following norm(s) and/or one or several other normative
documents:
Het product voldoet aan de volgende norm(en) en/of meerdere andere normgevende
documenten:
Le produit est conforme à la norme suivante / aux normes suivantes et/ou à plusieurs
autres documents normatifs :
Das Produkt entspricht den folgenden Normen und/oder anderen normativen
Dokumenten:
Es conforme a la(s) siguiente(s) norma(s) y/o a uno o varios otros documentos
normativos:
EN 301 489-17 V1.3.2 (2008)
EN 301 489-1 : 2008 v1.8.1
EN 301 328 : 2006 v1.7.1
EN 60950-1 : 2006
Technical data are available and can be obtained from:
Les données techniques sont disponibles et peuvent être obtenues chez :
Technische gegevens zijn beschikbaar en kunnen worden aangevraagd bij:
Die technische Dokumentation zu den oben gennanten Produkten wird geführt bei:
Los datos técnicos están disponibles y pueden ser solicitados a:
SA Velleman nv
Legen Heirweg, 33
9890 Gavere (België)
Place and date of issue / Plaats en datum van uitgifte / Place et date d’émission / Ort und
Datum der Ausstellung / Lugar y fecha de emisión:
Gavere, 14/05/2009
Authorised signatory for the company / Bevoegde ondertekenaar voor de firma /
Signataire autorisé(e) de la société / bevollmächtigte Person/ Respabonsle de la empresa:
Mr. Vince Van Balberghe - Quality Manager
31.01.2011 ©Velleman nv
40
Page 41

Velleman® Service and Quality Warranty
Velleman® has over 35 years of experience in
the electronics world and distributes its
products in more than 85 countries.
All our products fulfil strict quality
requirements and legal stipulations in the EU.
In order to ensure the quality, our products
regularly go through an extra quality check,
both by an internal quality department and by
specialized external organisations. If, all
precautionary measures notwithstanding,
problems should occur, please make appeal to
our warranty (see guarantee conditions).
General Warranty Conditions Concerning
Consumer Products (for EU):
• All consumer products are subject to a 24-
month warranty on production flaws and
defective material as from the original date of
purchase.
• Velleman® can decide to replace an article
with an equivalent article, or to refund the
retail value totally or partially when the
complaint is valid and a free repair or
replacement of the article is impossible, or if
the expenses are out of proportion.
You will be delivered a replacing article or a
refund at the value of 100% of the purchase
price in case of a flaw occurred in the first year
after the date of purchase and delivery, or a
replacing article at 50% of the purchase price
or a refund at the value of 50% of the retail
value in case of a flaw occurred in the second
year after the date of purchase and delivery.
• Not covered by warranty:
- all direct or indirect damage caused after
delivery to the article (e.g. by oxidation,
shocks, falls, dust, dirt, humidity...), and by
the article, as well as its contents (e.g. data
loss), compensation for loss of profits;
- frequently replaced consumable goods, parts
or accessories such as batteries, lamps, rubber
parts, drive belts... (unlimited list);
- flaws resulting from fire, water damage,
lightning, accident, natural disaster, etc. …;
- flaws caused deliberately, negligently or
resulting from improper handling, negligent
maintenance, abusive use or use contrary to
the manufacturer’s instructions;
- damage caused by a commercial, professional
or collective use of the article (the warranty
validity will be reduced to six (6) months when
the article is used professionally);
- damage resulting from an inappropriate
packing and shipping of the article;
- all damage caused by modification, repair or
alteration performed by a third party without
written permission by Velleman®.
• Articles to be repaired must be delivered to
your Velleman® dealer, solidly packed
(preferably in the original packaging), and be
completed with the original receipt of purchase
and a clear flaw description.
• Hint: In order to save on cost and time,
please reread the manual and check if the flaw
is caused by obvious causes prior to presenting
the article for repair. Note that returning a
non-defective article can also involve handling
costs.
• Repairs occurring after warranty expiration
are subject to shipping costs.
• The above conditions are without prejudice to
all commercial warranties.
The above enumeration is subject to
modification according to the article (see
article’s manual).
Velleman® service- en kwaliteitsgarantie
Velleman® heeft ruim 35 jaar ervaring in de
elektronicawereld en verdeelt in meer dan 85
landen.
Al onze producten beantwoorden aan strikte
kwaliteitseisen en aan de wettelijke bepalingen
geldig in de EU. Om de kwaliteit te
waarborgen,
ondergaan onze producten op regelmatige
tijdstippen een extra kwaliteitscontrole, zowel
door onze eigen kwaliteitsafdeling als door
externe gespecialiseerde organisaties. Mocht er
ondanks deze voorzorgen toch een probleem
optreden, dan kunt u steeds een beroep doen
op onze waarborg (zie waarborgvoorwaarden).
Algemene waarborgvoorwaarden
consumentengoederen (voor Europese
Unie):
• Op alle consumentengoederen geldt een
garantieperiode van 24 maanden op productieen materiaalfouten en dit vanaf de
oorspronkelijke aankoopdatum.
• Indien de klacht gegrond is en een gratis
reparatie of vervanging van een artikel
onmogelijk is of indien de kosten hiervoor
buiten verhouding zijn, kan Velleman®
beslissen het desbetreffende artikel te
vervangen door een gelijkwaardig artikel of de
aankoopsom van het artikel gedeeltelijk of
volledig terug te betalen. In dat geval krijgt u
een vervangend product of terugbetaling ter
waarde van 100% van de aankoopsom bij
ontdekking van een gebrek tot één jaar na
aankoop en levering, of een vervangend
product tegen 50% van de kostprijs of
terugbetaling van 50 % bij ontdekking na één
jaar tot 2 jaar.
• Valt niet onder waarborg:
Page 42

- alle rechtstreekse of onrechtstreekse schade
na de levering veroorzaakt aan het toestel (bv.
door oxidatie, schokken, val, stof, vuil,
vocht...), en door het toestel, alsook zijn
inhoud (bv. verlies van data), vergoeding voor
eventuele winstderving.
- verbruiksgoederen, onderdelen of
hulpstukken die regelmatig dienen te worden
vervangen, zoals bv. batterijen, lampen,
rubberen onderdelen, aandrijfriemen...
(onbeperkte lijst).
- defecten ten gevolge van brand,
waterschade, bliksem, ongevallen,
natuurrampen, enz.
- defecten veroorzaakt door opzet, nalatigheid
of door een onoordeelkundige behandeling,
slecht onderhoud of abnormaal gebruik of
gebruik van het toestel strijdig met de
voorschriften van de fabrikant.
- schade ten gevolge van een commercieel,
professioneel of collectief gebruik van het
apparaat (bij professioneel gebruik wordt de
garantieperiode herleid tot 6 maand).
- schade veroorzaakt door onvoldoende
bescherming bij transport van het apparaat.
- alle schade door wijzigingen, reparaties of
modificaties uitgevoerd door derden zonder
toestemming van Velleman®.
• Toestellen dienen ter reparatie aangeboden
te worden bij uw Velleman®-verdeler. Het
toestel dient vergezeld te zijn van het
oorspronkelijke aankoopbewijs. Zorg voor een
degelijke verpakking (bij voorkeur de originele
verpakking) en voeg een duidelijke
foutomschrijving bij.
• Tip: alvorens het toestel voor reparatie aan
te bieden, kijk nog eens na of er geen voor de
hand liggende reden is waarom het toestel niet
naar behoren werkt (zie handleiding). Op deze
wijze kunt u kosten en tijd besparen. Denk
eraan dat er ook voor niet-defecte toestellen
een kost voor controle aangerekend kan
worden.
• Bij reparaties buiten de waarborgperiode
zullen transportkosten aangerekend worden.
• Elke commerciële garantie laat deze rechten
onverminderd.
Bovenstaande opsomming kan eventueel
aangepast worden naargelang de aard van
het product (zie handleiding van het
betreffende product).
Garantie de service et de qualité
Velleman®
Velleman® jouit d’une expérience de plus de
35 ans dans le monde de l’électronique avec
une distribution dans plus de 85 pays.
Tous nos produits répondent à des exigences
de qualité rigoureuses et à des dispositions
légales en vigueur dans l’UE. Afin de garantir la
qualité, nous soumettons régulièrement nos
produits à des contrôles de qualité
supplémentaires, tant par notre propre service
qualité que par un service qualité externe.
Dans le cas improbable d’un défaut malgré
toutes les précautions, il est possible
d’invoquer notre garantie (voir les conditions
de garantie).
Conditions générales concernant la
garantie sur les produits grand public
(pour l’UE) :
• tout produit grand public est garanti 24 mois
contre tout vice de production ou de matériaux
à dater du jour d’acquisition effective ;
• si la plainte est justifiée et que la réparation
ou le remplacement d’un article est jugé
impossible, ou lorsque les coûts s’avèrent
disproportionnés, Velleman® s’autorise à
remplacer ledit article par un article équivalent
ou à rembourser la totalité ou une partie du
prix d’achat. Le cas échéant, il vous sera
consenti un article de remplacement ou le
remboursement complet du prix d’achat lors
d’un défaut dans un délai de 1 an après l’achat
et la livraison, ou un article de remplacement
moyennant 50% du prix d’achat ou le
remboursement de 50% du prix d’achat lors
d’un défaut après 1 à 2 ans.
• sont par conséquent exclus :
- tout dommage direct ou indirect survenu à
l’article après livraison (p.ex. dommage lié à
l’oxydation, choc, chute, poussière, sable,
impureté…) et provoqué par l’appareil, ainsi
que son contenu (p.ex. perte de données) et
une indemnisation éventuelle pour perte de
revenus ;
- tout bien de consommation ou accessoire, ou
pièce qui nécessite un remplacement régulier
comme p.ex. piles, ampoul es, pièces en
caoutchouc, courroies… (liste illimitée) ;
- tout dommage qui résulte d’un incendie, de la
foudre, d’un accident, d’une catastrophe
naturelle, etc. ;
- out dommage provoqué par une négligence,
volontaire ou non, une utilisation ou un
entretien incorrects, ou une utilisation de
l’appareil contraire aux prescriptions du
fabricant ;
- tout dommage à cause d’une utilisation
commerciale, professionnelle ou collective de
l’appareil (la période de garantie sera réduite à
6 mois lors d’une utilisation professionnelle) ;
- tout dommage à l’appareil qui résulte d’une
utilisation incorrecte ou différente que celle
Page 43

pour laquelle il a été initialement prévu comme
décrit dans la notice ;
- tout dommage engendré par un retour de
l’appareil emballé dans un conditionnement
non ou insuffisamment protégé.
- toute réparation ou modification effectuée par
une tierce personne sans l’autorisation explicite
de SA Velleman® ; - frais de transport de et
vers Velleman® si l’appareil n’est plus couvert
sous la garantie.
• toute réparation sera fournie par l’endroit de
l’achat. L’appareil doit nécessairement être
accompagné du bon d’achat d’origine et être
dûment conditionné (de préférence dans
l’emballage d’origine avec mention du défaut) ;
• tuyau : il est conseillé de consulter la notice
et de contrôler câbles, piles, etc. avant de
retourner l’appareil. Un appareil retourné jugé
défectueux qui s’avère en bon état de marche
pourra faire l’objet d’une note de frais à charge
du consommateur ;
• une réparation effectuée en-dehors de la
période de garantie fera l’objet de frais de
transport ;
• toute garantie commerciale ne porte pas
atteinte aux conditions susmentionnées.
La liste susmentionnée peut être sujette à
une complémentation selon le type de
l’article et être mentionnée dans la notice
d’emploi.
Garantía de servicio y calidad Velleman®
Velleman® disfruta de una experiencia de más
de 35 años en el mundo de la electrónica con
una distribución en más de 85 países.
Todos nuestros productos responden a normas
de calidad rigurosas y disposiciones legales
vigentes en la UE. Para garantizar la calidad,
sometimos nuestros productos regularmente a
controles de calidad adicionales, tanto por
nuestro propio servicio de calidad como por un
servicio de calidad externo. En el caso
improbable de que surgieran problemas a
pesar de todas las precauciones, es posible
apelar a nuestra garantía (véase las
condiciones de garantía).
Condiciones generales referentes a la
garantía sobre productos de venta al
público (para la Unión Europea):
• Todos los productos de venta al público
tienen un período de garantía de 24 meses
contra errores de producción o errores en
materiales desde la adquisición original;
• Si la queja está fundada y si la reparación o
la sustitución de un artículo es imposible, o si
los gastos son desproporcionados, Velleman®
autoriza reemplazar el artículo por un artículo
equivalente o reembolsar la totalidad o una
parte del precio de compra. En este caso,
recibirá un artículo de recambio o el reembolso
completo del precio de compra al descubrir un
defecto hasta un año después de la compra y
la entrega, o un artículo de recambio al 50%
del precio de compra o la sustitución de un
50% del precio de compra al descubrir un
defecto después de 1 a 2 años.
• Por consiguiente, están excluidos entre
otras cosas:
- todos los daños causados directamente o
indirectamente al aparato y su contenido
después de la entrega (p.ej. por oxidación,
choques, caída,...) y causados por el aparato,
al igual que el contenido (p.ej. pérdida de
datos) y una indemnización eventual para falta
de ganancias;
- partes o accesorios que deban ser
reemplazados regularmente, como por ejemplo
baterías, lámparas, partes de goma, ... (lista
ilimitada)
- defectos causados por un incendio, daños
causados por el agua, rayos, accidentes,
catástrofes naturales, etc. ;
- defectos causados a conciencia , descuido o
por malos tratos, un mantenimiento
inapropiado o un uso anormal del aparato
contrario a las instrucciones del fabricante;
- daños causados por un uso comercial,
profesional o colectivo del aparato (el período
de garantía se reducirá a 6 meses con uso
profesional) ;
- daños causados por un uso incorrecto o un
uso ajeno al que est está previsto el producto
inicialmente como está descrito en el manual
del usuario ;
- daños causados por una protección
insuficiente al transportar el aparato.
- daños causados por reparaciones o
modificaciones efectuadas por una tercera
persona sin la autorización explicita de SA
Velleman® ;
- se calcula gastos de transporte de y a
Velleman® si el aparato ya no está cubierto
por la garantía.
• Cualquier reparación se efectuará por el lugar
de compra. Devuelva el aparato con la factura
de compra original y transpórtelo en un
embalaje sólido (preferentemente el embalaje
original). Incluya también una buena
descripción del defecto ;
• Consejo: Lea el manual del usuario y controle
los cables, las pilas, etc. antes de devolver el
aparato. Si no se encuentra un defecto en el
artículo los gastos podrían correr a cargo del
cliente;
Page 44

• Los gastos de transporte correrán a carga del
cliente para una reparación efectuada fuera del
periode de garantía.
• Cualquier gesto comercial no disminuye estos
derechos.
La lista previamente mencionada puede
ser adaptada según el tipo de artículo
(véase el manual del usuario del artículo
en cuestión)
Velleman® Service- und Qualitätsgarantie
Velleman® hat gut 35 Jahre Erfahrung in der
Elektronikwelt und vertreibt seine Produkte in
über 85 Ländern.
Alle Produkte entsprechen den strengen
Qualitätsforderungen und gesetzlichen
Anforderungen in der EU. Um die Qualität zu
gewährleisten werden unsere Produkte
regelmäßig einer zusätzlichen
Qualitätskontrolle unterworfen, sowohl von
unserer eigenen Qualitätsabteilung als auch
von externen spezialisierten Organisationen.
Sollten, trotz aller Vorsichtsmaßnahmen,
Probleme auftreten, nehmen Sie bitte die
Garantie in Anspruch (siehe
Garantiebedingungen).
Allgemeine Garantiebedingungen in Bezug
auf Konsumgüter (für die Europäische
Union):
• Alle Produkte haben für Material- oder
Herstellungsfehler eine Garantieperiode von 24
Monaten ab Verkaufsdatum.
• Wenn die Klage berechtigt ist und falls eine
kostenlose Reparatur oder ein Austausch des
Gerätes unmöglicht ist, oder wenn die Kosten
dafür unverhältnismäßig sind, kann Velleman®
sich darüber entscheiden, dieses Produkt durch
ein gleiches Produkt zu ersetzen oder die
Kaufsumme ganz oder teilweise
zurückzuzahlen. In diesem Fall erhalten Sie ein
Ersatzprodukt oder eine Rückzahlung im Werte
von 100% der Kaufsumme im Falle eines
Defektes bis zu 1 Jahr nach Kauf oder
Lieferung, oder Sie bekommen ein
Ersatzprodukt im Werte von 50% der
Kaufsumme oder eine Rückzahlung im Werte
von 50 % im Falle eines Defektes im zweiten
Jahr.
• Von der Garantie ausgeschlossen sind:
- alle direkten oder indirekten Schäden, die
nach Lieferung am Gerät und durch das Gerät
verursacht werden (z.B. Oxidation, Stöße, Fall,
Staub, Schmutz, Feuchtigkeit, ...), sowie auch
der Inhalt (z.B. Datenverlust), Entschädigung
für eventuellen Gewinnausfall.
- Verbrauchsgüter, Teile oder Zubehörteile, die
regelmäßig ausgewechselt werden, wie z.B.
Batterien, Lampen, Gummiteile, Treibriemen,
usw. (unbeschränkte Liste).
- Schäden verursacht durch Brandschaden,
Wasserschaden, Blitz, Unfälle,
Naturkatastrophen, usw.
- Schäden verursacht durch absichtliche,
nachlässige oder unsachgemäße Anwendung,
schlechte Wartung, zweckentfremdete
Anwendung oder Nichtbeachtung von
Benutzerhinweisen in der Bedienungsanleitung.
- Schäden infolge einer kommerziellen,
professionellen oder kollektiven Anwendung
des Gerätes (bei gewerblicher Anwendung wird
die Garantieperiode auf 6 Monate
zurückgeführt).
- Schäden verursacht durch eine
unsachgemäße Verpackung und
unsachgemäßen Transport des Gerätes.
- alle Schäden verursacht durch unautorisierte
Änderungen, Reparaturen oder Modifikationen,
die von einem Dritten ohne Erlaubnis von
Velleman® vorgenommen werden.
• Im Fall einer Reparatur, wenden Sie sich an
Ihren Velleman®-Verteiler. Legen Sie das
Produkt ordnungsgemäß verpackt
(vorzugsweise die Originalverpackung) und mit
dem Original-Kaufbeleg vor. Fügen Sie eine
deutliche Fehlerumschreibung hinzu.
• Hinweis: Um Kosten und Zeit zu sparen,
lesen Sie die Bedienungsanleitung nochmals
und überprüfen Sie, ob es keinen auf de Hand
liegenden Grund gibt, ehe Sie das Gerät zur
Reparatur zurückschicken. Stellt sich bei der
Überprüfung des Geräts heraus, dass kein
Geräteschaden vorliegt, könnte dem Kunden
eine Untersuchungspauschale berechnet.
• Für Reparaturen nach Ablauf der Garantiefrist
werden Transportkosten berechnet.
• Jede kommerzielle Garantie lässt diese
Rechte unberührt.
Die oben stehende Aufzählung kann
eventuell angepasst werden gemäß der
Art des Produktes (siehe
Bedienungsanleitung des Gerätes).
Garanzia di Qualità Velleman®
Velleman® ha oltre 35 anni di esperienza nel
mondo dell'elettronica e distribuisce i suoi
prodotti in oltre 85 paesi. Tutti i nostri prodotti
soddisfano rigorosi requisiti di qualità e
rispettano le disposizioni giuridiche dell'Unione
europea. Al fine di garantire la massima
qualità, i nostri prodotti vengono regolarmente
sottoposti ad ulteriori controlli, effettuati sia da
un reparto interno di qualità che da
organizzazioni esterne specializzate. Se,
nonostante tutti questi accorgimenti, dovessero
sorgere dei problemi, si prega di fare appello
Page 45

alla garanzia prevista (vedi condizioni generali
di garanzia).
Condizioni generali di garanzia per i
prodotti di consumo:
• Questo prodotto è garantito per il periodo
stabilito dalle vigenti norme legislative, a
decorrere dalla data di acquisto, contro i difetti
di materiale o di fabbricazione. La garanzia è
valida solamente se l’unità è accompagnata dal
documento d’acquisto originale.
• Futura Elettronica provvederà, in conformità
con la presente garanzia (fatto salvo quanto
previsto dalla legge applicabile), a eliminare i
difetti mediante la riparazione o, qualora
Futura Elettronica lo ritenesse necessario, alla
sostituzione dei componenti difettosi o del
prodotto stesso con un altro avente identiche
caratteristiche.
• Le spese di spedizione o riconsegna del
prodotto sono a carico del cliente.
• La garanzia decade nel caso di uso improprio,
manomissione o installazione non corretta
dell’apparecchio o se il difetto di conformità
non viene denunciato entro un termine di 2
mesi dalla data in cui si è scoperto il difetto.
• Il venditore non è ritenuto responsabile dei
danni derivanti dall’uso improprio del
dispositivo.
• L’apparecchio deve essere rispedito con
l’imballaggio originale; non si assumono
responsabilità per danni derivanti dal trasporto.
• Il prodotto deve essere accompagnato da
un’etichetta riportante i propri dati personali e
un recapito telefonico; è necessario inoltre
allegare copia dello scontrino fiscale o della
fattura attestante la data dell’acquisto.
L’eventuale riparazione sarà a pagamento
se:
• Sono scaduti i tempi previsti.
• Non viene fornito un documento comprovante
la data d’acquisto.
• Non è visibile sull’apparecchio il numero di
serie.
• L’unità è stata usata oltre i limiti consentiti, è
stata modificata, installata impropriamente, è
stata aperta o manomessa.
 Loading...