

Page 1
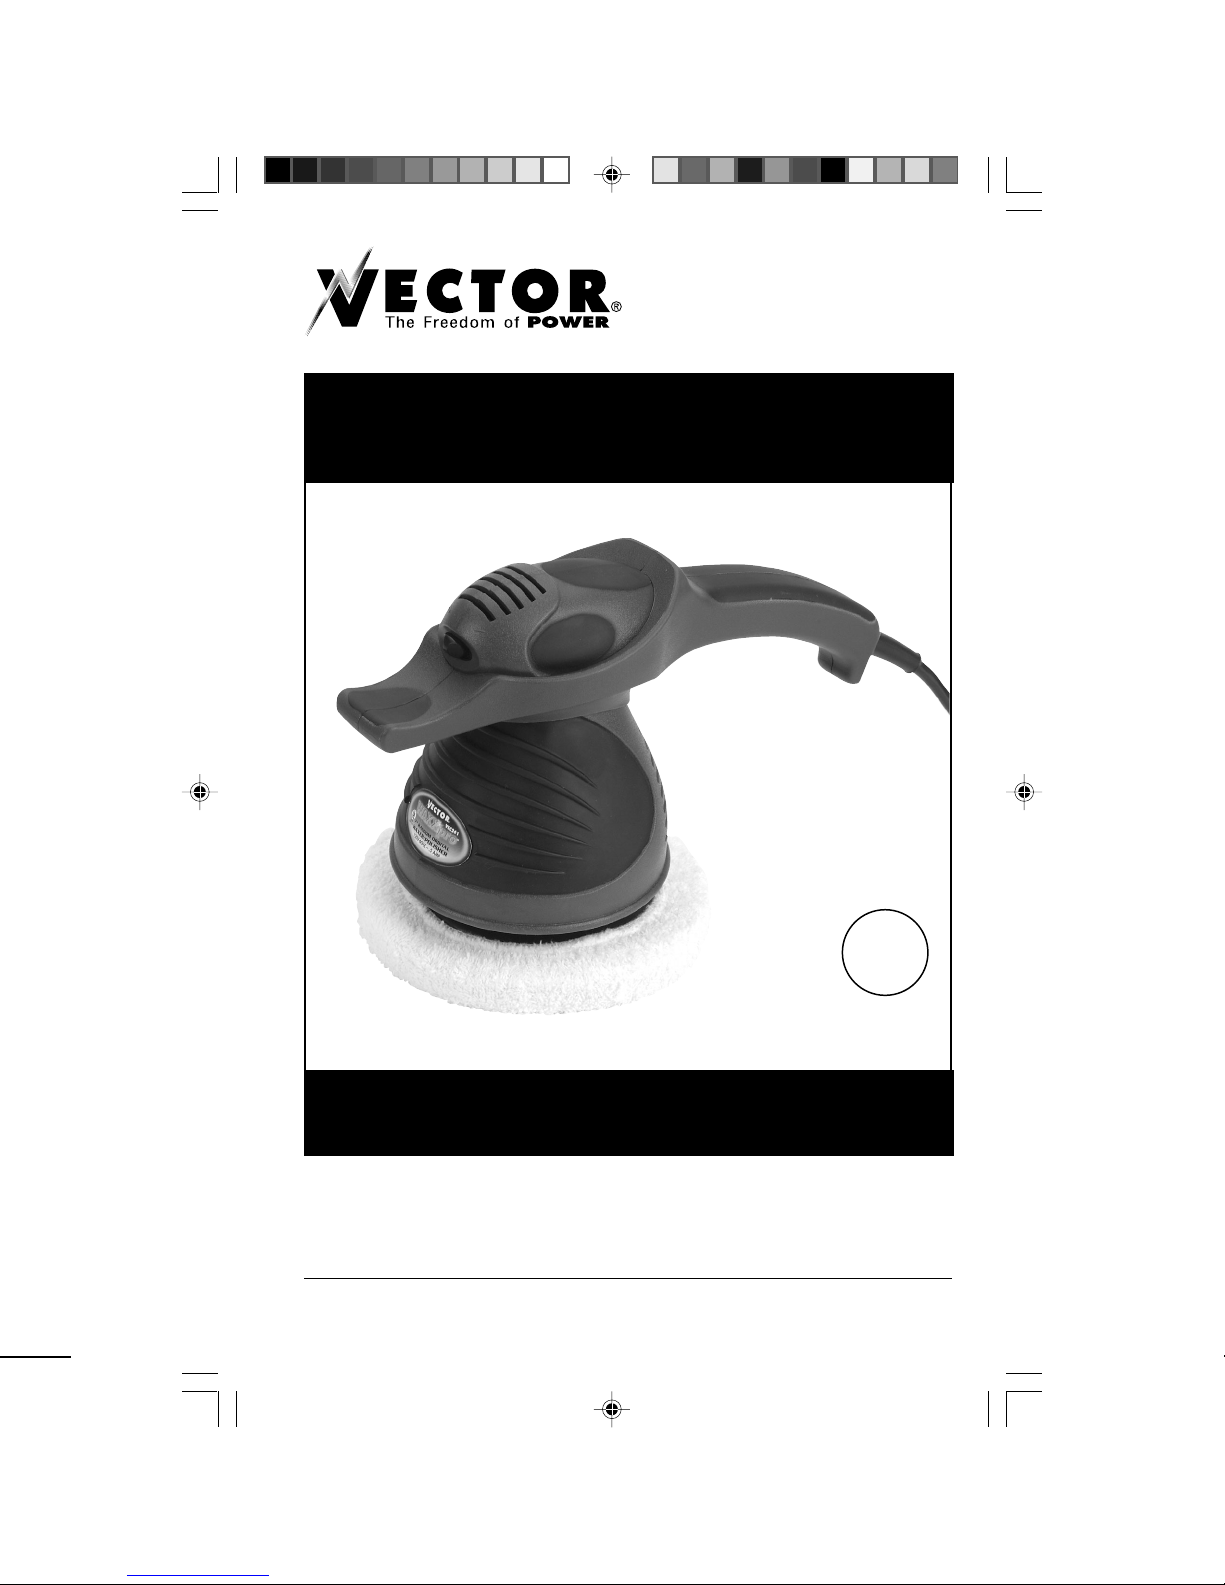
7” RANDOM
ORBITAL WAXER
VEC261
OWNER’S MANUAL
& WARRANTY INFORMATION
THIS MANUAL CONTAINS IMPORTANT INFORMATION REGARDING SAFETY, OPERATION,
MAINTENANCE AND STORAGE OF THIS PRODUCT. BEFORE USING, READ AND
UNDERSTAND ALL CAUTIONS, WARNINGS, INSTRUCTIONS AND PRODUCT LABELS.
FAILURE TO DO SO COULD RESULT IN INJURY AND/OR PROPERTY DAMAGE.
4140 SW 28TH WAY, FT. LAUDERDALE, FL 33312
TEL 954-584-4446 • TOLL FREE: 866-584-5504 • FAX 954-584-5556
www.vectormfg.com
VEC261-7" manual 12/23 1/21/03, 4:47 PM1
U
L
®
LISTED
1MF5
1
Page 2
GENERAL SAFETY RULES
WARNING! Read and understand all instructions. Failing to follow instructions listed below
may result in electric shock, fire and/or serious personal injury.
SAVE THESE INSTURCTIONS
SAVE THESE INSTRUCTIONS IN A SAFE PLACE FOR FUTURE REFERENCE.
1. Keep your work area clean and well lit. Cluttered benches and dark areas invite accidents.
2. Do not operate power tools in explosive atmospheres, such as in the presence of flammable
liquids, gases, or dust. Power tools create sparks which may ignite the dust or fumes.
3. Keep bystanders, children, and visitors away while operating power tools. Distractions can
cause you to lose control.
LEGEND
No = No stands for No Load
V=Volts
Hz = Frequency/Hertz
RPM = Revolutions Per Minute
= Double Insulated Wire
ELECTRICAL SAFETY
DOUBLE INSULATION TOOLS!
Double insulated tools are equipped with a polarized plug (one blade is wider than the other.)
This plug will fit in a polarized outlet only one way. If the plug does not fit fully in the outlet,
reverse the plug. If it still does not fit, contact a qualified electrician to install the polarized
outlet. Do not change the plug in any way. Double insulation eliminates the need for the
three wire grounded power cords and grounded power supply system.
1. Avoid body contact with grounded surfaces such as pipes, radiators, ranges and
refrigerators. There is an increased risk of electric shock if your body is grounded.
2. Don’t expose power tools to rain or wet conditions. Water entering a power tool will
increase the risk of electric shock.
3. Do not abuse the cord. Never use the cord to carry the tools or pull the plug from an outlet.
Keep cord away from heat, oil, sharp edges or moving parts. Replace damaged cords
immediately. Damaged cords increase the risk of electric shock.
• When operating a power tool outdoors, use only outdoor rated extension cords marked
“W-A” or “W”. These cords are rated for outdoor use and reduce the risk of electric shock.
2
VEC261-7" manual 12/23 1/21/03, 4:47 PM2
Page 3
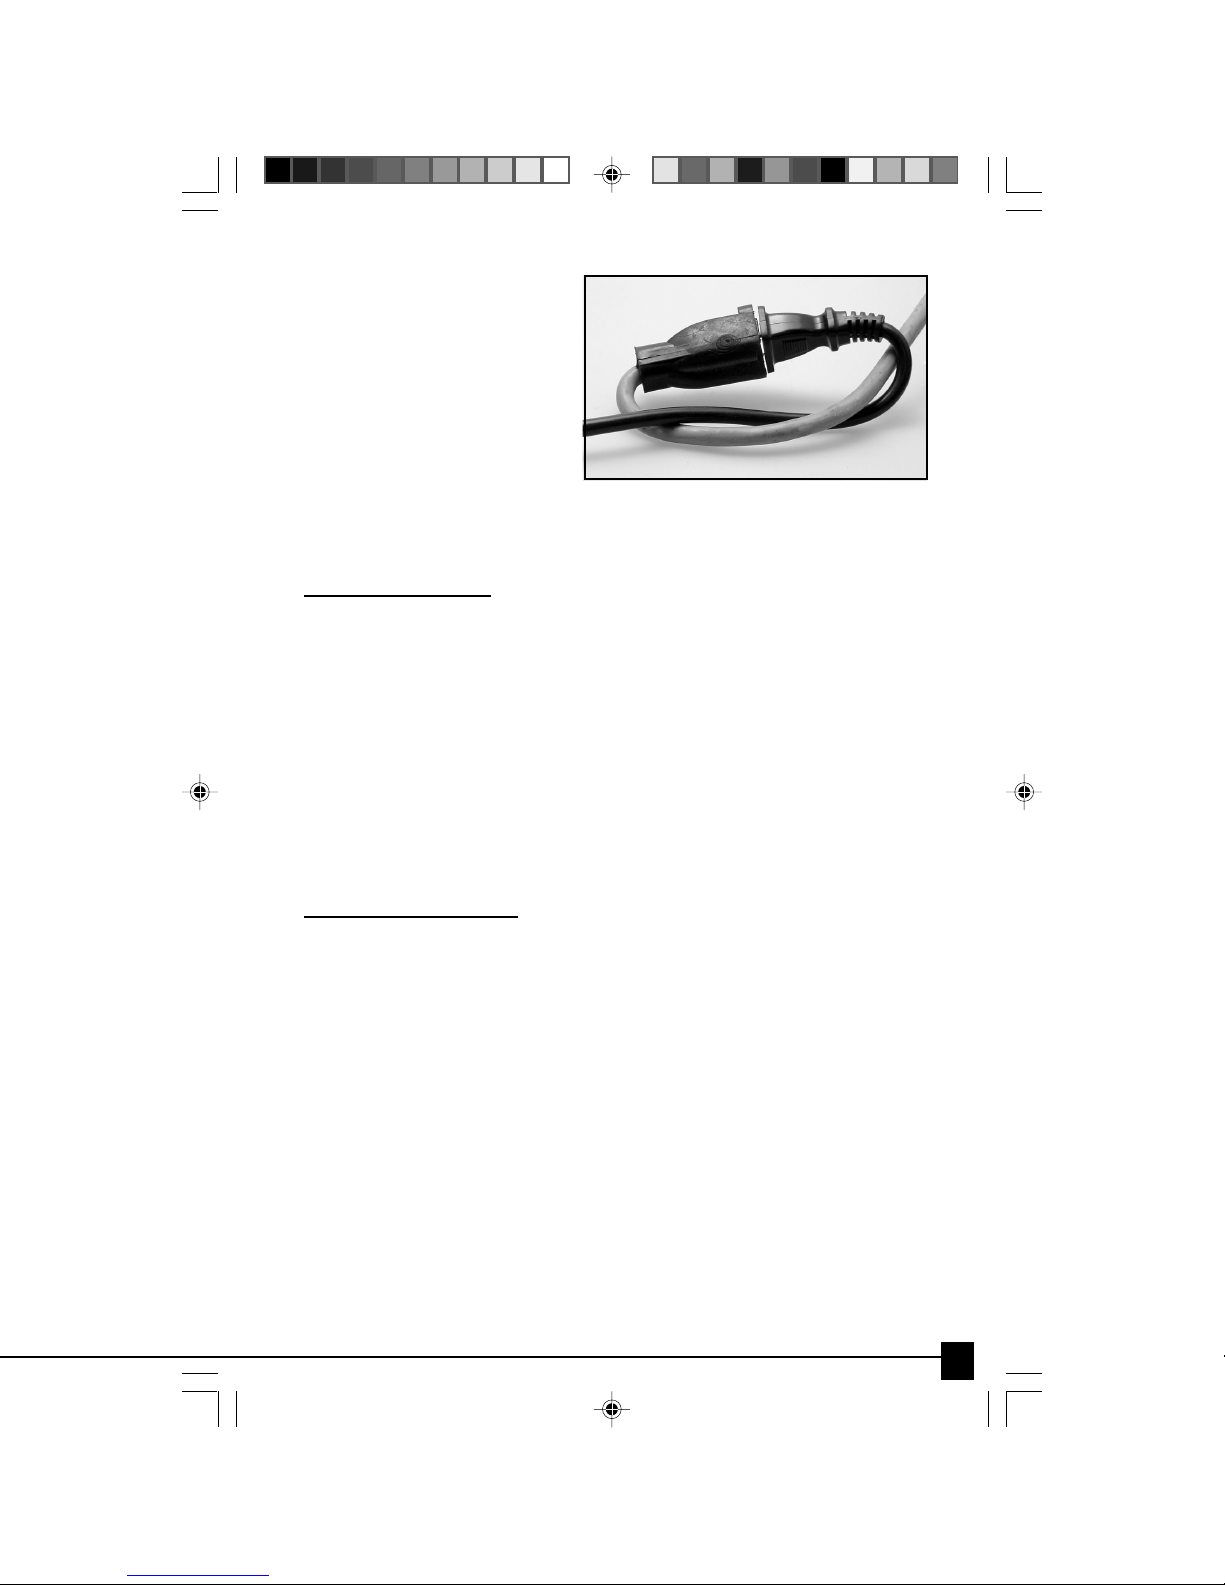
FIGURE 1
Connect cords as shown:
An appropriate size extension
Cord is available at your local
Hardware store.
Extension Cord Length In feet: 0-50 51-100 101-150
Minimum required wire size (A.W.G.) in cable 16 14 12
PERSONAL SAFETY
1. Stay alert, watch what you are doing and use common sense when operating a power tool.
Do not use tool while tired or under the influence of drugs, alcohol, or medication. A moment
of distraction while operating power tools may result in serious personal injury.
2. Dress properly. Do not wear loose clothing or jewelry. Contain long hair. Keep your hair,
clothing, and gloves away from moving parts. Loose clothes, jewelry, or long hair can be
caught in moving parts.
3. Avoid accidental starting. Be sure switch is off before plugging in. Carrying tools with your
finger on the switch or plugging in tools that have the switch on invites accidents.
4. Remove adjusting keys or switches before turning the tool on. A wrench or a key that is left
attached to a rotating part of the tool may result in personal injury.
5. Do not overreach. Keep proper footing and balance at all times. Proper footing and balance
enables better control of the tool in unexpected situations.
6. Use safety equipment. Always wear eye protection. Dust mask, non-skid safety shoes, hard
hat, or hearing protection must be used for appropriate conditions.
TOOL USE AND CARE
1. If a small item is being waxed, use clamps or another practical way to secure and support the
work piece to a stable platform. Holding the work by hand or against your body is unstable
and may lead to loss of control.
2. Do not force tool. Use the correct bonnet for your application. The correct tool will do the job
better and safer at the rate for which it is designed.
3. Do not use tool if switch does not turn it on or off. Any tool that cannot be controlled with the
switch is dangerous and must be repaired.
4. Disconnect the plug from the power source before making any adjustments, changing
accessories, or storing the tool. Such preventive safety measures reduce the risk of starting
the tool accidentally.
5. Store idle tools out of reach of children and other untrained persons. Tools are dangerous in
the hands of untrained users.
6. Maintain tools with care. Keep cutting tools sharp and clean. Properly maintained tools with
sharp cutting edges are less likely to bind and are easier to control.
7. Check for misalignment or binding of moving parts, breakage of parts, and any other
condition that may affect the tool operation. If damaged, have the tool serviced before
using. Poorly maintained tools cause many accidents.
8. Use only accessories that are recommended by the manufacturer for your model.
Accessories that may be suitable for one tool may become hazardous when used on
another tool.
VEC261-7" manual 12/23 1/21/03, 4:47 PM3
3
Page 4

SERVICE
1. Only qualified repair personnel must perform tool service. Service or maintenance performed
by unqualified personnel could result in a risk of injury.
2. When servicing a tool, use only identical replacement parts. Follow instructions in the
maintenance section of this manual. Use of unauthorized parts or failure to follow
Maintenance Instructions may create a risk of electric shock or injury.
WARNING:
NO USER - SERVICEABLE COMPONENTS INSIDE
OPENING UNIT WILL VOID WARRANTY!
INTRODUCTION
Congratulations on selecting the Vector 7" Random Orbit Waxer. You can now obtain a professional shine with a higher luster than imaginable by hand. Lightweight and easy to use, the
Vector 7" Random Orbit waxer/polisher imitates a hand polishing motion leaving an even
finish with no hot spots, streaks or swirls. The action is ideal for delivering a loster that
ordinarily takes hours to produce by hand. The random orbital movement of the Vector polisher
oscillates as it rotates so burns, streaks and swirl marks are no longer a problem if the
guidelines for use are strictly followed.
• Ideal for buffing Cars, Boats, Trucks, SUV’s and Recreational Vehicles
• Powerful, high performance, quiet running motor makes polishing quick and easy
• Safe for all finishes, lightweight and easy to use
SERVICE AND PARTS
For service and parts contact the Vector Customer Service Department at:
VECTOR Manufacturing, Ltd. 4140 SW 28th Way, Ft. Lauderdale, 33312
Tel: (866) 584-5504 • Fax: (954) 584-5556
• Only qualified repair personnel must perform tool service.
• Use only identical replacement parts. Follow instructions in the Maintenance section of this
Owners manual. Use of unapproved parts or failing to follow Maintenance Instructions may
produce the danger of electrical shock, injury and will void the product warranty.
WARNING:
The use of unapproved parts or accessories not recommended with this power tool might
produce a dangerous condition.
OPERATION
SURFACE PREPARATION
•Wash your car or surface thoroughly to remove all dirt and oil. Pay special attention to
areas that capture excessive layers of dirt such as, areas around wheel wells and next to
bumpers. It is very important that your car be clean and dry before applying wax. Any wax
protection will wear longer and protect better if applied directly to the paint.
• After washing, move the car or surface you’re working on to a dry area out of direct sunlight
and allow the surface to dry and cool.
WAX APPLICATION
WARNING: DISCONNECT POLISHER FROM POWER BEFORE CHANGING BONNETS
• With the foam pad facing up, attach the smooth “Wax on” applicator bonnet (bonnet with
the plastic liner), making sure the bonnet is centered on the foam head.
4
VEC261-7" manual 12/23 1/21/03, 4:47 PM4
Page 5

FIGURE 2
NOTE:
If you turn the polisher on without the applicator bonnet touching your
work surface, the bonnet will loosen and sail off.
Make sure the polisher with
bonnet is lightly resting on the surface you intend to polish and remains on the surface after
powering up and stopping the unit.
Your unit is now ready to apply wax. A liquid wax is recommended because of its ease of
•
application, but a paste wax will also work with a little more effort. Using a good quality
wax apply it directly on the bonnet, adequately covering the entire bonnet, and also spread
a small amount of wax to the bonnet edges. Invert the polisher and place the bonnet
directly on the surface you want to apply the wax to and slide the power-switch to the on
position. You can also substitute a cleaning agent at this step if the surface is oxidized.
Place the power cord over your shoulder to avoid contact with the polisher head or the
surface while the unit is running. Always start and stop polisher on or against the car surface.
FIGURE 3
•Turn the polisher on and steer it in long sweeping strokes in a criss-cross figure-eight pattern,
working the wax/cleaner into the paint. DO NOT APPLY PRESSURE TO THE UNIT.
The weight of the polisher is adequate to do the task correctly.
• Apply more wax to the bonnet as necessary to maintain a thin even coat on the car surface
(NOTE: Applying too much wax adds no more protection to the surface and makes the task
of removal far more difficult). It’s easiest to apply wax to the entire surface before starting the
removal phase. For best results, refer to the specific application recommendations of the
product being used.
• Any areas inaccessible to the Vector waxer/polisher should be waxed by hand.
VEC261-7" manual 12/23 1/21/03, 4:47 PM5
5
Page 6

WAX REMOVAL
1. Once the wax has thoroughly dried to a white haze, it can be removed. A second terry cloth
“Wax Off” bonnet is provided for wax removal. This is the reversible terry cloth bonnet
without the plastic liner. Install this bonnet as described earlier and the polisher is ready for
wax removal.
2. Follow the same long sweeping strokes in a criss-cross figure-eight motion previously
described, gliding the polisher over the surface, again permitting the weight of the unit to do
the work.
3. Occasionally it becomes necessary to remove the bonnet and shake out the dried polish
residue. A bonnet laden with wax residue will bring about streaks on the surface.
4. After removing the wax from all the major flat surfaces, use the edge of the pad to reach the
curved or concave surfaces.
5. Small areas, such as near and around mirrors, should be finished by hand.
FINISH POLISHING
1. A third “Polishing” bonnet is provided with your Vector polisher, designed to generate that
professional gleaming finish. This is the smooth foam padded “baby diaper” bonnet. Install
this bonnet as described earlier and your polisher is ready for polishing.
2. Follow the same figure-eight motion described previously, gliding the polisher over the
surface, again permitting the weight of the unit to do the work.
3. Small areas such as near and around mirrors should be finished by hand.
MAINTENANCE
• All bonnets can be cleaned by hand washing in warm soapy water. Allow bonnets to fully
dry before use
WARNING: DO NOT IMMERSE THE FOAM PAD OR POLISHING UNIT IN WATER.
1. When storing this polisher, store with the pad up, as this will prevent the foam pad from
compressing or being set in a wrong position.
2. All plastic parts should be cleaned with a soft damp cloth. NEVER use solvents when cleaning
any plastic part as this may damage the finish.
WARNING: DO NOT at any time let Gasoline, Brake Fluids or any petroleum-
6
VEC261-7" manual 12/23 1/21/03, 4:47 PM6
based products come in contact with plastic parts or power cord.
They contain chemicals that can damage, weaken or destroy plastic
and insulation.
Page 7

ACCESSORY ORDER FORM
You can order accessories for your Vector Waxer/Polisher direct from Vector Manufacturing.
Fill in the form below completely and mail it to us at the address below.
Ship to: NAME ______________________________________________________________
Address: ____________________________________________________________________
City:________________________ State _______ Zip __________ Phone_______________
Part NO. Description Quantity Price Total
VEC235 Replacement Bonnets $8.99 $
■ PRICES SUBJECT TO CHANGE Sub Total $________
Indicate method of payment:
Fl. Residents Tax 6.5%________
❑ Check or Money Order enclosed
Charge my: Postage & Handling: $6.50
❑ VISA ❑ Mastercard ❑ American Express
Card #_________________________________________ TOTAL $________
Exp. Date:______________________________________
Signature:______________________________________
Please send check or money order payable to:
Vector Manufacturing, Ltd. (for total amount due)
4140 SW 28th Way, Ft. Lauderdale, Fl. 33312
Attn: Customer Service
VEC261-7" manual 12/23 1/21/03, 4:47 PM7
7
Page 8

2 YEAR LIMITED WARRANTY PROGRAM
This limited warranty program is the only one that applies to this product, and it sets forth all the
responsibilities of Vector Manufacturing, Ltd., regarding this product. There are no other warranties, other
than described herein.
This Vector Manufacturing, Ltd. product is warranted, to the original purchaser only, to be free of defects in
materials and workmanship for two year from the date of purchase without additional charge. The
warranty does not extend to subsequent purchasers or users. Vector Manufacturing, Ltd. will not be
responsible for any amount of damage in excess of the retail purchase price of the product under any
circumstances. Incidental and consequential damages are specifically excluded from coverage under this
warranty.
This product is not intended for commercial use. This warranty does not apply to accessories or damage to units
from misuse or incorrect installation. Misuse includes wiring or connecting to improper polarity power sources.
RETURN/REPAIR POLICY: Defective products, other than accessories, may be returned postage prepaid to
Vector Manufacturing. Any defective product, other than accessories, that is returned to Vector
Manufacturing within 30 days of the date of purchase will be replaced free of charge. If such a product is
returned more than 30 days but less than two year from the purchase date, Vector Manufacturing will
repair the unit or, at its option, replace it free of charge.
If the unit is repaired, new or reconditioned replacement parts may be used, at Vector Manufacturing’s
option. A unit may be replaced with a new or reconditioned unit of the same or comparable design. The
repaired or replaced unit will then be warranted under the terms of the remainder of the warranty period.
The customer is responsible for the shipping charges on all returned items. During the warranty period,
Vector Manufacturing, Ltd. will be responsible for the return shipping charges.
LIMITATIONS: This warranty does not cover accessories, or bonnet defects resulting from
normal wear and tear (including chips, scratches, abrasions, discoloration or fading due to usage or
exposure to sunlight), accidents, damage during shipping to our service facility, alterations, unauthorized
use or repair, neglect, misuse, abuse, failure to follow instructions for care and maintenance, fire, flood
and Acts of God.
If your problem is not covered by this warranty, call our Technical Support Department at
(954) 584-4446 Ext. 19, toll-free (866) 584-5504 or www.vectormfg.com for general repair information
and charges if applicable.
STATE LAW RIGHTS: This warranty gives you specific legal rights. Some states do not allow limitations on
how long an implied warranty lasts or the exclusion or limitation of incidental or consequential damages,
so the exclusions or limitations stated herein may not apply. This warranty gives the purchaser specific
legal rights; other rights, which vary from state to state, may apply.
TO REQUEST WARRANTY SERVICE FOR THIS PRODUCT: Contact Vector Manufacturing
Technical Support by telephone, fax or mail. We suggest that you keep the original packaging in case you
need to ship the unit. When returning a product, include your name, address, phone number, dated sales
receipt (or copy), and a description of the reason for return. After repairing or replacing the unit, we will
attempt to return it to you within four weeks.
WARRANTY ACTIVATION: Please complete Warranty Activation Card and mail to Vector
Manufacturing. All Vector Manufacturing, Ltd. products must be registered within 10 days of purchase.
To activate this warranty, mail completed registration form, a copy of the original sales receipt to:
4140 SW 28th Way, Ft. Lauderdale, Florida 33312
8
VEC261-7" manual 12/23 1/21/03, 4:47 PM8
WARRANTY REGISTRATION
VECTOR MANUFACTURING, Ltd.
© 2002 VECTOR MANUFACTURING, Ltd.
FT. LAUDERDALE, FL 33312 MADE IN CHINA
 Loading...