

Page 1

VEC251
USER’S MANUAL
& WARRANTY INFORMATION
IMPORTANT SAFETY INFORMATION, SAVE THESE INSTRUCTIONS
TO REDUCE THE RISK OF INJUR
Y, USER MUST READ AND UNDERSTAND
THIS INSTRUCTIONAL MANUAL. THIS MANUAL CONTAINS IMPORTANT
INFORMA
TION REGARDING THE OPERA
TION AND WARRANTY OF THIS
PRODUCT. PLEASE RETAIN FOR FUTURE REFERENCE.
4140 S.W
. 30th A
ve., Ft. Lauderdale, FL 33312
T
oll Free: 866-584-5504
Air Compressor
with 2-LED Work Light
Corded • Cordless• Rechargeable
www.vectormfg.com
TWO YEAR LIMITED WARRANTY PROGRAM
This limited warranty program is the only one that applies to this product, and it sets forth all the
responsibilities of Vector Products, Inc., regarding this product. There is no other warranty, other than
t
hose described herein. Any implied warranty of merchantability or fitness for a particular purpose on
this product is limited in duration to the duration of this warranty.
This Vector Products, Inc. product is warranted, to the original purchaser only, to be free of defects in
materials and workmanship for two years from the date of purchase without additional charge. The
warranty does not extend to subsequent purchasers or users. Manufacturer will not be responsible for
any amount of damage in excess of the retail purchase price of the product under any circumstances.
I
ncidental and consequential damages are specifically excluded from coverage under this warranty.
T
his product is not intended for commercial use. This warranty does not apply to damage to units from
misuse or incorrect installation/connection. Misuse includes wiring or connecting to improper polarity
power sources.
RETURN/REPAIR POLICY: Defective products may be returned to manufacturer. Any defective product
that is returned to manufacturer within 30 days of the date of purchase will be replaced free of charge.
If such a product is returned more than 30 days but less than two years from the purchase date,
manufacturer will repair the unit or, at its option, replace it, free of charge.
If the unit is repaired, new or reconditioned replacement parts may be used, at manufacturer’s option.
A unit may be replaced with a new or reconditioned unit of the same or comparable design. The
repaired or replaced unit will then be warranted under the terms of the remainder of the warranty
period. The customer is responsible for the shipping charges on all returned items. During the warranty
period, manufacturer will be responsible for the return shipping charges to the customer in the United
States.
LIMITATIONS: This warranty does not cover accessories, such as charging adapters, bulbs, fuses and
batteries, damage or defects resulting from normal wear and tear (including chips, scratches, abrasions,
discoloration or fading due to usage or exposure to sunlight), accidents, damage during shipping to our
service facility, alterations, unauthorized use or repair, neglect, misuse, abuse, failure to follow
instructions for care and maintenance, fire, flood and Acts of God.
If your problem is not covered by this warranty, call our Technical Support Department at 954-584-4446
or toll free at 866-584-5504 for general repair information and charges if applicable. You may also
contact us through our website at www.vectormfg.com.
STATE LAW RIGHTS: This warranty gives you specific legal rights. Some states do not allow limitations
on how long an implied warranty lasts or the exclusion or limitation of incidental or consequential
damages, so the exclusions or limitations stated herein may not apply. This warranty gives the purchaser
specific legal rights; other rights, which vary from state to state, may apply.
TO REQUEST WARRANTY SERVICE FOR THIS PRODUCT: Contact Technical Support by telephone, fax
or mail (see below). We suggest that you keep the original packaging in case you need to ship the unit.
When returning a product, include your name, address, phone number, dated sales receipt (or copy)
and a description of the reason for return and product serial number. After repairing or replacing the
unit, we will make every effort to return it to you within four weeks.
WARRANTY ACTIV
ATION: Please complete Warranty Activation Card and mail to Vector Products, Inc..
Enter “VEC251” as Model and “Airpro™ Rechargeable Air Compressor with 2-LED Work Light” as
Product Type. All Vector products must be registered within 30 days of purchase to activate this warranty.
Mail the completed registration form, along with a copy of the original sales receipt, to:
ATTN.: CUSTOMER SERVICE
4140 S.W. 30th Ave., Ft. Lauderdale, FL 33312
• TOLL FREE: 866-584-5504 • FAX: 954-584-5556 •
WARRANTY IS NON-TRANSFERABLE.
BD061506
© 2006 VECTOR PRODUCTS, INC.
MADE IN CHINA
VEC251_Manual_061506.qxp 6/15/06 10:22 AM Page 6
Page 2

1
TABLE OF CONTENTS
I
ntroduction . . . . . . . . . . . . . . . . . . . . . . . . . . . . . . . . . . . . . . . . . . . . . . . . . . . 1
F
eatures . . . . . . . . . . . . . . . . . . . . . . . . . . . . . . . . . . . . . . . . . . . . . . . . . . . . . 1
Control and Function Guide . . . . . . . . . . . . . . . . . . . . . . . . . . . . . . . . . . . . . 2
Charging/Recharging the Battery . . . . . . . . . . . . . . . . . . . . . . . . . . . . . . . . . . . . 2
Powering the Unit . . . . . . . . . . . . . . . . . . . . . . . . . . . . . . . . . . . . . . . . . . . . . . . 3
Powering the Unit Using the Rechargeable Battery . . . . . . . . . . . . . . . . . . . . . . 3
Powering the Unit Using the 12 Volt DC Power Adapter . . . . . . . . . . . . . . . . . . 3
Operating Instructions . . . . . . . . . . . . . . . . . . . . . . . . . . . . . . . . . . . . . . . . . . . . 3
Inflating Items With a Valve Stem . . . . . . . . . . . . . . . . . . . . . . . . . . . . . . . . . 3
Inflating Items Without a Valve Stem . . . . . . . . . . . . . . . . . . . . . . . . . . . . . . . 4
Using the LED Work Light . . . . . . . . . . . . . . . . . . . . . . . . . . . . . . . . . . . . . . . . . 4
Care and Maintenance . . . . . . . . . . . . . . . . . . . . . . . . . . . . . . . . . . . . . . . . . . . 4
Replacement Parts . . . . . . . . . . . . . . . . . . . . . . . . . . . . . . . . . . . . . . . . . . . . 4
Fuse Replacement (12 Volt DC Power Adapter) . . . . . . . . . . . . . . . . . . . . . . . . 4
Battery Replacement/Disposal . . . . . . . . . . . . . . . . . . . . . . . . . . . . . . . . . . . . 5
Specifications . . . . . . . . . . . . . . . . . . . . . . . . . . . . . . . . . . . . . . . . . . . . . . . . . . 5
INTRODUCTION
Congratulations on purchasing the VEC251 Rechargeable Air Compressor
with 2-LED Work Light. The Air Compressor offers the power of an advanced
high-pressure system, with the convenience of mobile use. The Air Compressor is
supplied with a standard tire valve chuck for filling auto, truck, bicycle and motorcycle
tires. Also included are two different Nozzles to inflate soccer balls, footballs and
other popular inflatables. These Nozzles are conveniently stored in a built-in Nozzle
Hatch.
The Air Compressor is powered by its own built-in rechargeable battery to be used
anywhere. The supplied standard 120 Volt AC Charger can be used to recharge the
battery when needed. Typically, up to three completely flat tires can be inflated before
the battery needs recharging. The unit can also operate from a standard 12 volt DC
electrical system found on most vehicles and boats, using the supplied DC Power
Adapter, if extended operating time in the field is required.
FEA
TURES
• Trigger Switch with Trigger Lock to allow hands-free operation
• Corded use — includes a DC Power Adapter for use with standard 12 volt DC
power sources
• Cordless use — includes a rechargeable, non-spillable, maintenance-free, heavy
duty
, sealed, high-density lead-acid batter
y
•
Supplied 120 Volt AC Charger is UL safety tested and listed
• Battery Charging Indicator LED automatically activates during AC recharge
• Built-in clamps for storing Air Hose
• Backlit Analog Pressure Gauge to 120 PSI
• 2 Nozzles and Nozzle Hatch for storage
• Built-in long-life 2-LED Work Light
IMPORTANT SAFETY INSTRUCTIONS
WARNINGS
1. Wear protective goggles while operating these appliances. There is risk
of dust or dirt projectiles being released if the compressor hose or
nozzles are not clean when the compressor is turned on.
2. Do not direct air into eyes, ears, nose or other parts of the body.
3. Do not operate unit if there is any evidence of damage. Replace worn or
defective parts immediately — contact Vector
®
Customer Service
Department, toll-free, at 866-584-5504.
4. Make sure the AC Charging Adapter is kept away from water or
moisture during use. If recharging near water, make sure the 120 volt
AC outlet is GFCI protected.
5. Make sure all cords and adapter wires are placed so they are not tripped
over or damaged by pinching, abrading or cutting. Do not place wires
near moving objects, doors or sharp objects.
6. Never exceed recommended pressures — bursting articles can cause
serious injury. Always check pressure with the pressure gauge.
7. There are no user serviceable parts. The only replaceable parts are the
AC Charging Adapter, the 12 Volt DC Power Adapter and the 12 Volt DC
Power Adapter fuse.
8. Never use air compressor near flammable liquids, gas or open flames.
9. Keep working area well lit.
10. Never cover unit while it is operating.
CAUTIONS
1. When operating the Air Compressor using an external DC power source, make sure the voltage is
rated at 12 volts DC. DO NOT OPERATE WITH 6 VOLTS OR 24 VOLTS.
2. Do not use the Air Compressor continuously for longer than 15 minutes. Extended use will cause it
to overheat and can damage the product. After 15 minutes of continuous use, turn the unit OFF and
wait 15 minutes before resuming operation.
3. Make sure the built-in battery is fully charged before operating. Recharge for the recommended time
after each use, or every 60 days when not in frequent use, to extend battery life. For immediate
use, attach the 12 Volt DC Adapter and operate the unit from an external 12 volt DC source.
4. Do not expose the unit to heat or direct sunlight.
5. Do not charge the battery when it is at or above 122°F (50°C). Allow the unit to cool before
charging.
6. To avoid over-inflation, carefully follow instructions on articles to be inflated.
7. Never leave the unit unattended while in use.
8. Do not use accessories that are not supplied or recommended by the manufacturer for use with this
unit.
9. Do not carry this unit by its cords or adapters as this can cause damage.
10. Never submerge the unit in water or any other liquid. See “Care and Maintenance” on page 4 for
cleaning instructions.
THIS UNIT IS NOT FOR USE BY CHILDREN AND SHOULD ONLY BE OPERATED BY ADULTS.
Read This User’
s Manual Before Using This Unit.
SAVE THESE INSTRUCTIONS
VEC251_Manual_061506.qxp 6/15/06 10:22 AM Page ii
Page 3
3
POWERING THE UNIT
The VEC251 can be powered by either the built-in rechargeable battery or the
12 Volt DC Power Adapter.
Powering the Unit Using the Built-In Rechargeable Battery
The built-in battery can power the compressor for short duration, cordless operation.
The battery should be fully charged before first use (see “Charging/
Recharging the Battery”).
Powering the Unit Using the 12 Volt DC Power Adapter
The DC Power Adapter can operate the Air Compressor from an external 12 volt
power source for extended periods of time.
The DC Power Adapter features a gold-tipped, fused DC plug at one end and a barrel
connecter at the other. Simply connect the gold-tipped plug to a working 12 volt DC
power source, such as a vehicle’s 12 volt DC accessory outlet. Connect the barrel
connector to the 12 Volt DC Power Port on the back of the unit.
Note: When using a vehicle’s 12 volt DC accessory outlet as a power source, be
aware that some vehicles require the ignition be turned on to power the
accessory outlet.
OPERATING INSTRUCTIONS
This VEC251 is the ultimate compressor for vehicle and trailer tires and recreational
inflatables. Two different nozzles are supplied.
The Compressor ON/OFF Trigger controls operation of the compressor. Just depress
and release to control inflation. Control pressure by monitoring the gauge and releasing
the Trigger when the correct pressure is achieved. For longer inflation operations, push
Trigger Lock on to lock the Trigger in the ON position. Pushing the Trigger Lock to the
opposite direction releases the Trigger (turning it OFF) and inflation stops.
WARNINGS
The compressor is capable of inflating to 120 pounds per square inch
(PSI) pressure (approximately 8 kg/cm). To avoid over-inflation,
carefully follow instructions on articles to be inflated. Never exceed
recommended pressures. Bursting articles can cause serious injury.
Always check pressure with the pressure gauge.
Never leave compressor unattended while in use.
Allow the unit to cool for 15 minutes after 15 minutes of continuous
operation.
Inflating Items with Valve Stems
1. Unhook the Air Hose from its storage clamps.
2. Open the thumb latch and place the connector (chuck) on valve stem.
3. Push the connector toward valve stem and close the thumb latch.
4. Make sure the connector is pushed on to valve stem as far as possible before
closing thumb latch.
5.
Press the Air Compressor T
rigger to turn it ON (for larger items, engage the
Trigger Lock).
6. Observe pressure with the pressure gauge.
2
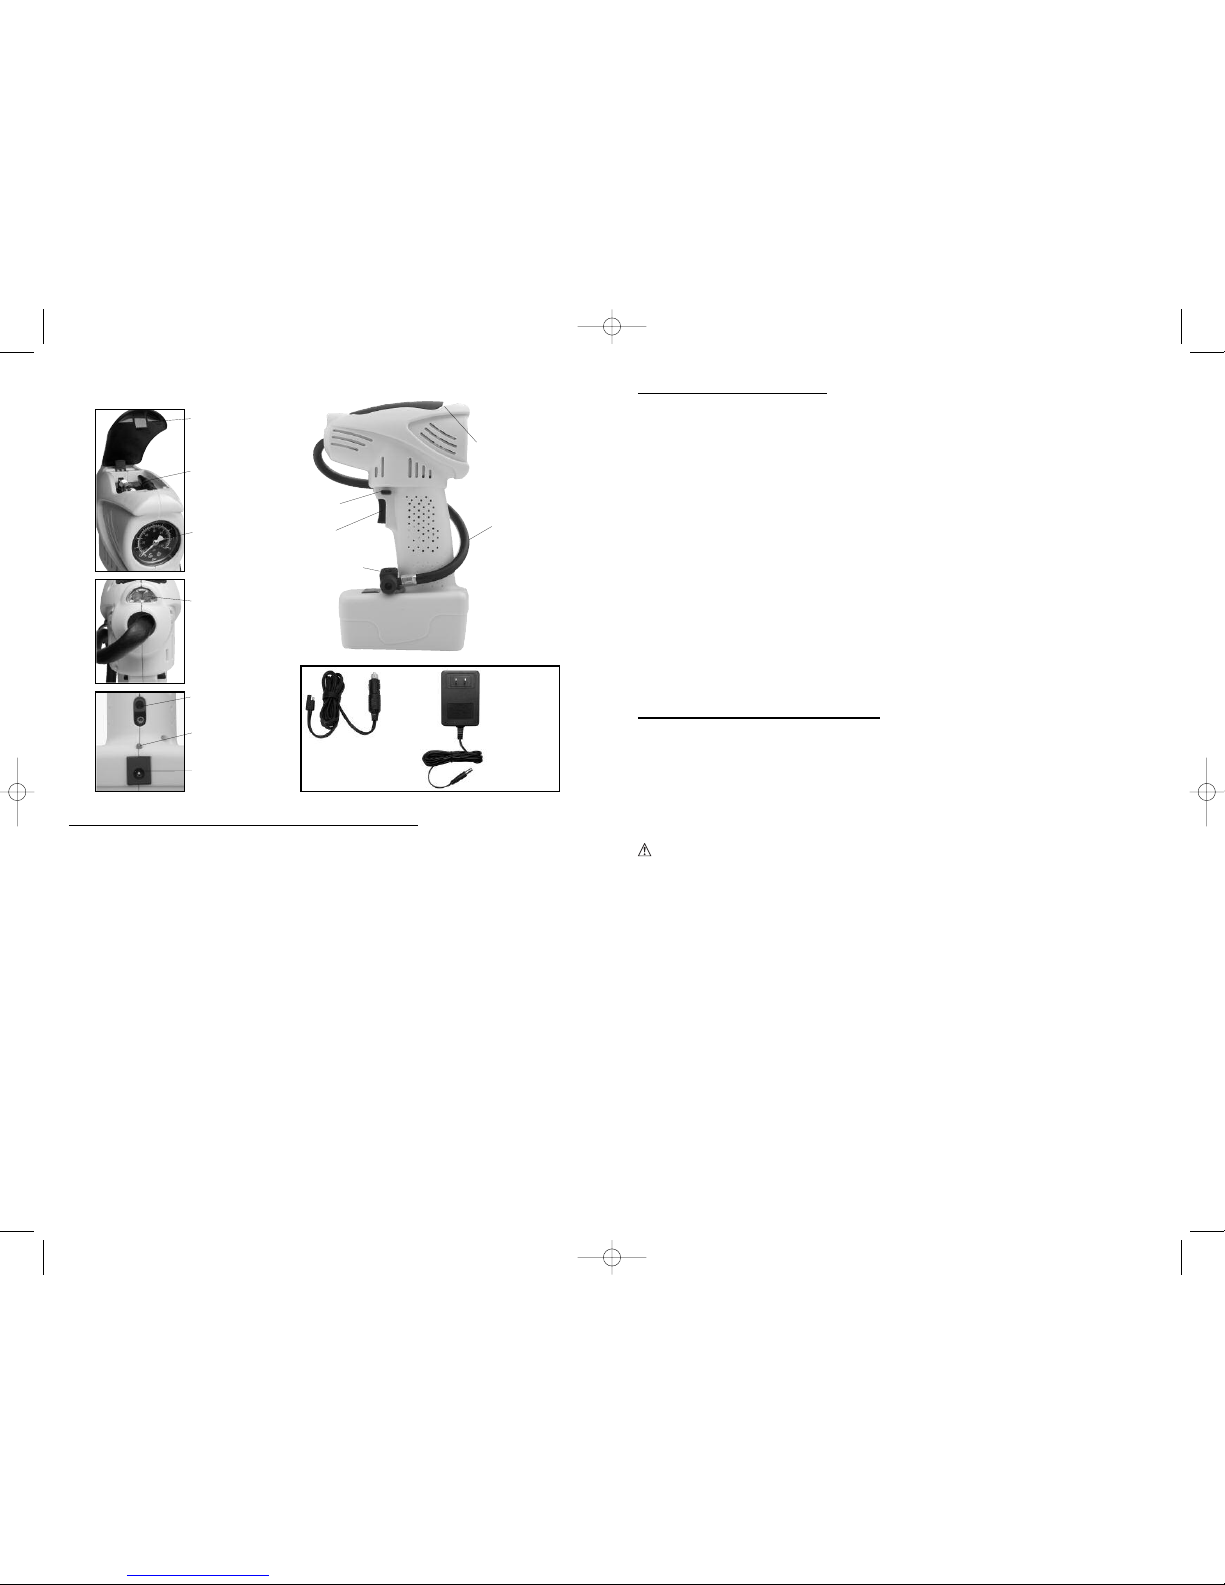
Control and Function Guide
CHARGING/RECHARGING THE BA
TTERY
All lead-acid batteries suffer from self-discharge over time and more rapidly when they
are used for prolonged periods or at higher temperatures. Therefore, these types of
batteries need periodic charging to replace energy lost through self-discharge.
The built-in rechargeable battery should be recharged as soon as possible after each
use. If it is allowed to remain in a discharged state, battery life will be reduced. When
the unit is not in frequent use, recharge the unit at least once every 60 days.
Notes: The unit is delivered in a partially charged state. It MUST be fully charged
before using it for the first time using the supplied AC Charging Adapter. Initial
AC charging time is approximately 20 hours.
Recharging the battery after each use will prolong battery life; frequent heavy
discharges between recharges will reduce battery life. Overcharging will
reduce battery life. NEVER CHARGE FOR MORE THAN 36 HOURS.
The time required to fully recharge the built-in battery depends on the charge
status after use. Approximate recharging time is 12 hours.
The AC Charging Adapter must be powered from a standard 120 volt AC, 60 Hz
North American household outlet.
1.
Insert the barrel connector of the AC Charging Adapter into the 120 Volt AC
Recharge Por
t on the back of the unit. Plug the AC Charging Adapter into a
standard North American 120 volt AC household outlet. The red Charging
Indicator LED lights, indicating the unit is charging.
2. Charge for the recommended time. Do not overcharge!
3.
Disconnect the AC Charging Adapter from the unit and the 120 volt AC power
source when not in use.
NOZZLE
HATCH COVER
NOZZLES
PRESSURE
GAUGE
LED WORK
LIGHT
12 VOLT DC
POWER PORT
120 VOLT AC
RECHARGE PORT
CHARGING
INDICATOR LED
120 VOLT AC
CHARGING
ADAPTER
12 VOLT DC
POWER ADAPTER
LED WORK
LIGHT ON/OFF
PUSHBUTTON
COMPRESSOR
HOSE
TRIGGER
TRIGGER
LOCK
TIRE CHUCK
VEC251_Manual_061506.qxp 6/15/06 10:22 AM Page 2
Page 4

5
Battery Replacement/Disposal
Battery Replacement
The built-in battery should be replaced when the operating performance is reduced
to about half. Make sure that the battery is fully charged before determining whether
it should be replaced. The unit must be returned to the manufacturer for replacement.
Do not attempt to open the unit casing, as this may damage the unit and will void
the manufacturer’s warranty. Contact Vector Technical Support, toll-free, at 866584-5504.
Battery Disposal
This unit contains a maintenance-free, non-spillable, sealed lead-acid
battery. This battery is fully recyclable and should be accepted at
any location that accepts common automotive batteries. Examples of
places that accept these batteries are: county or municipal recycling
drop-off centers, scrap metal dealers and retailers who sell
automotive replacement lead acid batteries.
WARNINGS
Do not dispose of the battery in fire, as this may result in an explosion.
Before disposing of the battery, protect exposed terminals with
heavy-duty electrical tape to prevent shorting (shorting can result in
injury or fire).
Do not expose battery to fire or intense heat, as it may explode.
SPECIFICATIONS
Compressor: 120 PSI maximum at pump
Current: Approx. 8 amps
Battery: 12 Volt, 3 A/h, non-spillable, sealed lead-acid
12 Volt DC Power Adapter Fuse: 15 amp
4
7. When desired pressure is reached, open thumb latch and remove connector from
valve stem.
8. Release the Air Compressor Trigger to turn it OFF (unlock the Trigger Lock, if used).
Inflating Items Without Valve Stems
Inflation of items without valve stems requires the use of one of the nozzles. The nozzle
fits directly in the free end of the tire chuck.
1. Open the Nozzle Hatch cover and select the required nozzle.
2. With the tire chuck thumb latch open, firmly insert the nozzle.
3. Close the tire chuck thumb latch.
4. Make sure the Nozzle is clean and secure before turning on the Compressor.
5. Insert nozzle (e.g needle) into item to be inflated and inflate to desired pressure.
6. Press the Air Compressor Trigger to turn it ON.
7. Inflate to desired pressure.
8. Release the Air Compressor Trigger to turn it OFF.
9. After use, release the Nozzle by opening the tire chuck thumb latch and return
the nozzle to the Nozzle Hatch.
WARNING
Always follow manufacturer’s recommendations for pressure on item
to be inflated.
CAUTION
To avoid damage, always secure the Air Hose in its storage clamps when the unit is
not in use. Make sure the tire chuck thumb latch is closed.
USING THE LED WORK LIGHT
The LED Work Light is controlled by the ON/OFF Pushbutton located on the top of the
unit behind the Nozzle Hatch (see “Controls and Functions” on page 2).
CARE AND MAINTENANCE
Cleaning
Periodically, cables, hose, nozzles and connectors should be inspected for damage,
corrosion, dust and dirt. If surfaces are dirty, they can be wiped clean with a cloth
moistened with water and a drop of detergent. Never submerge this unit in
water or any other liquid.
Replacement Parts
For replacement parts (12 Volt DC Power Adapters, 120 Volt AC Charging
Adapters), contact Vector Technical Support, toll-free 866-584-5504.
Fuse Replacement (12 V
olt DC Power Adapter)
1. Disconnect the 12 Volt DC Power Adapter from the unit and from any 12 volt DC
power source.
2. Remove the gold cap by turning counterclockwise and lifting off.
3. Remove center pin and spring. Remove the fuse.
4. Replace with a new 15 amp fuse.
5. Replace center pin and spring inside plug.
6. Replace the gold cap by tur
ning clockwise.
VEC251_Manual_061506.qxp 6/15/06 10:22 AM Page 4
 Loading...