


VBrick v4.2.1 VOD-W Server
EtherneTV VOD-W
Video on Demand Server
Admin Guide
April 15, 2008
4410-0167-0002

Copyright
© 2008 VBrick Systems, Inc. All rights reserved.
12 Beaumont Road
Wallingford, Connecticut 06492, USA
www.VBrick.com
This publication contains confidential, proprietary, and trade secret information. No part of this document may be
copied, photocopied, reproduced, translated, or reduced to any machine-readable or electronic format without
prior written permission from VBrick. Information in this document is subject to change without notice and
VBrick Systems assumes no responsibility or liability for any errors or inaccuracies. VBrick, VBrick Systems, the
VBrick logo, StreamPlayer, and StreamPlayer Plus are trademarks or registered trademarks in the United States and
other countries. Windows Media is a trademarked name of Microsoft Corporation in the United States and other
countries. All other products or services mentioned in this document are identified by the trademarks, service
marks, or product names as designated by the companies who market those products. Inquiries should be made
directly to those companies. This document may also have links to third-party web pages that are beyond the
control of VBrick. The presence of such links does not imply that VBrick endorses or recommends the content of
any third-party web pages. VBrick acknowledges the use of third-party open source software and licenses
VBrick products. This freely available source code is posted at http://www.vbrick.com/opensource.
in some
About VBrick Systems
Founded in 1997, VBrick Systems, an ISO 9001 certified vendor, is a privately held company that has enjoyed rapid
growth by helping our customers successfully introduce mission critical video applications across their enterprise
networks. Since our founding, VBrick has been setting the standard for quality, performance and innovation in the
delivery of live and stored video over IP networks—LANs, WANs and the Internet. With thousands of video
appliances installed world-wide, VBrick is the recognized leader in reliable, high-performance, easy-to-use
networked video solutions.
VBrick is an active participant in the development of industry standards and continues to play an influential role in
the Internet Streaming Media Alliance (ISMA), the MPEG Industry Forum, and Internet2. In 1998 VBrick
invented and shipped the world's first MPEG Video Network Appliance designed to provide affordable DVDquality video across the network. Since then, VBrick's video solutions have grown to include Video on Demand,
Management, Security and Access Control, Scheduling, and Rich Media Integration. VBrick solutions are
successfully supporting a broad variety of applications including distance learning and training, conferencing and
remote office communications, security, process monitoring, traffic monitoring, business and news feeds to the
desktop, webcasting, corporate communications, collaboration, command and control, and telemedicine. VBrick
serves customers in education, government, healthcare, and financial services markets among others.

VOD-W v4.2.1 Admin Guide
Organization . . . . . . . . . . . . . . . . . . . . . . . . . . . . . . . . . . . . . . . . . . . . . . . . . . . . . . . . . . . . .vii
Getting Help . . . . . . . . . . . . . . . . . . . . . . . . . . . . . . . . . . . . . . . . . . . . . . . . . . . . . . . . . . . . . vii
Font Conventions . . . . . . . . . . . . . . . . . . . . . . . . . . . . . . . . . . . . . . . . . . . . . . . . . . . . . . . . viii
Related Publications. . . . . . . . . . . . . . . . . . . . . . . . . . . . . . . . . . . . . . . . . . . . . . . . . . . . . . . viii
Printer-Friendly . . . . . . . . . . . . . . . . . . . . . . . . . . . . . . . . . . . . . . . . . . . . . . . . . . . . . . . . . . viii
1. Server Overview
Server Description . . . . . . . . . . . . . . . . . . . . . . . . . . . . . . . . . . . . . . . . . . . . . . . . . . . . . . . . . . 1
Server Models . . . . . . . . . . . . . . . . . . . . . . . . . . . . . . . . . . . . . . . . . . . . . . . . . . . . . . . . . .1
Server Compatibility . . . . . . . . . . . . . . . . . . . . . . . . . . . . . . . . . . . . . . . . . . . . . . . . . . . . . 2
System Requirements . . . . . . . . . . . . . . . . . . . . . . . . . . . . . . . . . . . . . . . . . . . . . . . . . . . . 2
External Storage . . . . . . . . . . . . . . . . . . . . . . . . . . . . . . . . . . . . . . . . . . . . . . . . . . . . . . . .2
Server Software . . . . . . . . . . . . . . . . . . . . . . . . . . . . . . . . . . . . . . . . . . . . . . . . . . . . . . . . . . . . 3
VOD-W Product CD . . . . . . . . . . . . . . . . . . . . . . . . . . . . . . . . . . . . . . . . . . . . . . . . . . . . 4
Technical Support . . . . . . . . . . . . . . . . . . . . . . . . . . . . . . . . . . . . . . . . . . . . . . . . . . . . . . . . . . 4
2. Getting Started
Contents
Installing the VOD-W Server . . . . . . . . . . . . . . . . . . . . . . . . . . . . . . . . . . . . . . . . . . . . . . . . . 7
Step 1. Unpack the Server . . . . . . . . . . . . . . . . . . . . . . . . . . . . . . . . . . . . . . . . . . . . . . . . . 7
Step 2. Connect the Server . . . . . . . . . . . . . . . . . . . . . . . . . . . . . . . . . . . . . . . . . . . . . . . . 8
Step 3. Configure the IP Address . . . . . . . . . . . . . . . . . . . . . . . . . . . . . . . . . . . . . . . . . . 10
Step 4. Configure the ETV Portal Server . . . . . . . . . . . . . . . . . . . . . . . . . . . . . . . . . . . . 10
Step 5. Verify the Installation . . . . . . . . . . . . . . . . . . . . . . . . . . . . . . . . . . . . . . . . . . . . . 11
Configuring Secure Communications . . . . . . . . . . . . . . . . . . . . . . . . . . . . . . . . . . . . . . . . . . 12
Basic Authentication . . . . . . . . . . . . . . . . . . . . . . . . . . . . . . . . . . . . . . . . . . . . . . . . . . . . 12
SSL Encryption . . . . . . . . . . . . . . . . . . . . . . . . . . . . . . . . . . . . . . . . . . . . . . . . . . . . . . . . 13
Post Configuration Steps . . . . . . . . . . . . . . . . . . . . . . . . . . . . . . . . . . . . . . . . . . . . . . . . . . . . 14
3. Server Administration
Overview . . . . . . . . . . . . . . . . . . . . . . . . . . . . . . . . . . . . . . . . . . . . . . . . . . . . . . . . . . . . . . . . 17
Using a Remote Desktop Connection. . . . . . . . . . . . . . . . . . . . . . . . . . . . . . . . . . . . . . . 17
Using a Direct Connection . . . . . . . . . . . . . . . . . . . . . . . . . . . . . . . . . . . . . . . . . . . . . . . 18
Configuring the Server. . . . . . . . . . . . . . . . . . . . . . . . . . . . . . . . . . . . . . . . . . . . . . . . . . . . . .18
Launching the Configuration Utility . . . . . . . . . . . . . . . . . . . . . . . . . . . . . . . . . . . . . . . . 18
Using HTTP Tunneling. . . . . . . . . . . . . . . . . . . . . . . . . . . . . . . . . . . . . . . . . . . . . . . . . . 19
Changing the Web Service Communication Port . . . . . . . . . . . . . . . . . . . . . . . . . . . . . . 20
Advanced Options . . . . . . . . . . . . . . . . . . . . . . . . . . . . . . . . . . . . . . . . . . . . . . . . . . . . . 21
Adding External Storage . . . . . . . . . . . . . . . . . . . . . . . . . . . . . . . . . . . . . . . . . . . . . . . . . 21
Using Secure URL Password Protection . . . . . . . . . . . . . . . . . . . . . . . . . . . . . . . . . . . . . 22
Manually Ingesting Content. . . . . . . . . . . . . . . . . . . . . . . . . . . . . . . . . . . . . . . . . . . . . . . . . . 23
VOD-W Admin Guide iii

Monitoring the Server . . . . . . . . . . . . . . . . . . . . . . . . . . . . . . . . . . . . . . . . . . . . . . . . . . . . . .24
Backup and Restore . . . . . . . . . . . . . . . . . . . . . . . . . . . . . . . . . . . . . . . . . . . . . . . . . . . . . . . .24
Database Backup. . . . . . . . . . . . . . . . . . . . . . . . . . . . . . . . . . . . . . . . . . . . . . . . . . . . . . . 24
Database Restore. . . . . . . . . . . . . . . . . . . . . . . . . . . . . . . . . . . . . . . . . . . . . . . . . . . . . . . 25
Server Restore . . . . . . . . . . . . . . . . . . . . . . . . . . . . . . . . . . . . . . . . . . . . . . . . . . . . . . . . . 25
Best Practices . . . . . . . . . . . . . . . . . . . . . . . . . . . . . . . . . . . . . . . . . . . . . . . . . . . . . . . . . . . . . 25
4. Monitoring the Server
Starting the QVOD Server Service . . . . . . . . . . . . . . . . . . . . . . . . . . . . . . . . . . . . . . . . . . . . 27
Using the QVOD Server Console . . . . . . . . . . . . . . . . . . . . . . . . . . . . . . . . . . . . . . . . . . . . . 27
Sessions . . . . . . . . . . . . . . . . . . . . . . . . . . . . . . . . . . . . . . . . . . . . . . . . . . . . . . . . . . . . . . 28
Contents . . . . . . . . . . . . . . . . . . . . . . . . . . . . . . . . . . . . . . . . . . . . . . . . . . . . . . . . . . . . .30
Network . . . . . . . . . . . . . . . . . . . . . . . . . . . . . . . . . . . . . . . . . . . . . . . . . . . . . . . . . . . . .31
Storage . . . . . . . . . . . . . . . . . . . . . . . . . . . . . . . . . . . . . . . . . . . . . . . . . . . . . . . . . . . . . . 33
Media. . . . . . . . . . . . . . . . . . . . . . . . . . . . . . . . . . . . . . . . . . . . . . . . . . . . . . . . . . . . . . . . 34
Log Options . . . . . . . . . . . . . . . . . . . . . . . . . . . . . . . . . . . . . . . . . . . . . . . . . . . . . . . . . .34
Events . . . . . . . . . . . . . . . . . . . . . . . . . . . . . . . . . . . . . . . . . . . . . . . . . . . . . . . . . . . . . . .35
5. Ingesting Content
Overview . . . . . . . . . . . . . . . . . . . . . . . . . . . . . . . . . . . . . . . . . . . . . . . . . . . . . . . . . . . . . . . . 39
Ingestion Considerations . . . . . . . . . . . . . . . . . . . . . . . . . . . . . . . . . . . . . . . . . . . . . . . . 39
Content Ingestion . . . . . . . . . . . . . . . . . . . . . . . . . . . . . . . . . . . . . . . . . . . . . . . . . . . . . . . . . 39
Content Backup and Recovery . . . . . . . . . . . . . . . . . . . . . . . . . . . . . . . . . . . . . . . . . . . . 40
Best Practices . . . . . . . . . . . . . . . . . . . . . . . . . . . . . . . . . . . . . . . . . . . . . . . . . . . . . . . . . . . . . 41
6. Troubleshooting
VOD-W Event Manager . . . . . . . . . . . . . . . . . . . . . . . . . . . . . . . . . . . . . . . . . . . . . . . . . . . . 43
Generating Custom Reports . . . . . . . . . . . . . . . . . . . . . . . . . . . . . . . . . . . . . . . . . . . . . . 43
Windows Event Viewer . . . . . . . . . . . . . . . . . . . . . . . . . . . . . . . . . . . . . . . . . . . . . . . . . . . . .44
VOD-W License Diagnostics. . . . . . . . . . . . . . . . . . . . . . . . . . . . . . . . . . . . . . . . . . . . . . . . . 45
7. Reinstalling the Software
Overview . . . . . . . . . . . . . . . . . . . . . . . . . . . . . . . . . . . . . . . . . . . . . . . . . . . . . . . . . . . . . . . . 47
Installation Prerequisites . . . . . . . . . . . . . . . . . . . . . . . . . . . . . . . . . . . . . . . . . . . . . . . . . 47
Reinstalling the VOD-W Software. . . . . . . . . . . . . . . . . . . . . . . . . . . . . . . . . . . . . . . . . . . . . 47
Reinstalling the Dongle Driver . . . . . . . . . . . . . . . . . . . . . . . . . . . . . . . . . . . . . . . . . . . . . . . 53
Uninstalling the Software. . . . . . . . . . . . . . . . . . . . . . . . . . . . . . . . . . . . . . . . . . . . . . . . . . . .54
8. Adding Storage to 1850/2850 Servers
Overview . . . . . . . . . . . . . . . . . . . . . . . . . . . . . . . . . . . . . . . . . . . . . . . . . . . . . . . . . . . . . . . . 55
Monitoring Performance. . . . . . . . . . . . . . . . . . . . . . . . . . . . . . . . . . . . . . . . . . . . . . . . . 55
Adding Storage to 1850 Servers (VOD 50W) . . . . . . . . . . . . . . . . . . . . . . . . . . . . . . . . . . . . 56
Adding Storage to 2850 Servers (VOD 125/300W) . . . . . . . . . . . . . . . . . . . . . . . . . . . . . . . 60
iv Contents

9. Adding Storage to 1950/2950 Servers
Overview . . . . . . . . . . . . . . . . . . . . . . . . . . . . . . . . . . . . . . . . . . . . . . . . . . . . . . . . . . . . . . . . 67
Adding Storage to VOD 50/125/300W Servers . . . . . . . . . . . . . . . . . . . . . . . . . . . . . . . . . . 67
Index
VOD-W Admin Guide v

vi Contents

VOD-W v4.2.1 Admin Guide
This VOD-W Admin Guide is written for anyone who will be using a VBrick EtherneTV
VOD-W Video on Demand Server. This includes system administrators, network technicians,
and others. This document explains how to set up and configure the VOD-W server, how to
perform initial admin tasks, and how to add storage. For most common tasks like ingesting
content, use the ETV Portal Server and refer to the ETV Portal Server Administrator Guide
for details. You can perform most administration tasks using the Portal Server and it is
unlikely you will ever need to access the VOD-W interface. EtherneTV VOD-W servers are a
key component in VBrick's EtherneTV Media Distribution System. The EtherneTV VOD-W
server provides all standard video-on-demand (VOD) features including support for
MPEG-1, MPEG-2, and MPEG-4 content.
Organization
Server Overview
Getting Started
Server Administration
Monitoring the Server
Ingesting Content
Troubleshooting
Reinstalling the Software
Adding Storage to 1850/
2850 Servers
Adding Storage to 1950/
2950 Servers
provides a brief introduction to the features and functionality
of the VOD-W server and explains the differences between
server models.
explains how to unpack, connect, and configure the server. It
also explains how to install the license dongle key.
explains how to use the configuration utility in case you need to
reconfigure server parameters or reboot the system.
explains how to use the monitoring utility to view performance
characteristics and set log levels.
explains the concepts of ingesting content. It also describes
important considerations and best practices.
explains how to do basic troubleshooting when you run into
problems.
explains how to reinstall all VOD-W software in the unlikely
event that it becomes necessary.
explains how to connect and configure external storage devices
to 1850/1950 servers when you need more memory.
explains how to connect and configure external storage devices
to 1950/2950 servers when you need more memory.
Getting Help
If you need help, or more information about any topic, use the online help system. Use the
book icons in the left pane to open documents and the up and down arrows in the right pane
to page through them. Use the Search box to find specific information. Simply enter one or more
words in the box and press
words you entered highlighted in yellow (Internet Explorer only). The Search box is not casesensitive and does not recognize articles (a, an, or the), operators (+ and – ), or quotation
marks. You can narrow the search by adding words. To view all VBrick documentation,
VOD-W Admin Guide vii
Enter. The search results will return pages that have all of the

including the latest updates, go to www.vbrick.com/support/documentation If you can't find
the information you need from the online help, the VBrick documentation, or your certified
VBrick reseller, you can contact VBrick Support Services
on the web. Support Services will
make every effort to answer your technical questions in 24 business hours or less. VBrick is
committed to accurate and reliable documentation. If you find errors or omissions in any of
our documents, please send e-mail to documentation@vbrick.com
and let us know.
Font Conventions
Arial bold is used to describe dialog boxes and menu choices, for example: Start > All
Programs > VBrick
Courier fixed-width font is used for code elements (C++, HTML) as well as
filenames, directories, etc.
Black Courier fixed-width font is used to indicate user input in keyboard commands,
scripts, etc.
Folder names and user examples are displayed in this sans serif font.
Folder names and user input are displayed in this bold sans serif font.
Italics are used to emphasize specific words or phrases.
Related Publications
VBrick ETV Portal Server Admin Guide
Dell PowerEdge 1850 Systems User's Guide
Dell PowerEdge 2850 Systems User's Guide
Dell PowerEdge 1950 Product Documentation
Dell PowerEdge 2950 Systems Product Documentation
Dell PowerVault 220S Systems Service Manual
Dell PowerVault MD1000 Product Documentation
Printer-Friendly
VOD-W Server Release Notes
VOD-W Server Admin Guide
T To sa ve or print a PDF document:
1. Click once to open the PDF document in Acrobat Reader.
2. To save or print a PDF document, right-click and select
Save Target As or Print Target.
viii Preface

Server Overview
VBrick's EtherneTV VOD-W Server has been integrated with the EtherneTV family of
products including the EtherneTV Portal Server, MPEG-1/2/4 streaming encoders, and the
EtherneTV STB. The EtherneTV VOD-W delivers stored MPEG assets as unicast streams
across an Ethernet network. The EtherneTV VOD-W is built on a Dell hardware platform as
detailed in the following tables. Other features include the ability to schedule asset playback,
asset searching, user and system statistics, and more. The EtherneTV Portal Server is
required to gain the full benefits of the EtherneTV VOD-W server and is sold separately.
In order to set up the EtherneTV Portal Server, follow the directions in the EtherneTV Portal
Server Admin Guide. Once the ETV portal server is setup and configured, you can access
video on the EtherneTV VOD-W server through the ETV Portal Server web interface.
VBrick uses its own software-based components to decode streams on the desktop. There is
no client-side software to install. The EtherneTV Portal Server automatically downloads
components to your desktop PC the first time you access to the system.
Topics in this chapter
Chapter 1
Server Description . . . . . . . . . . . . . . . . . . . . . . . . . . . . . . . . . . . . . . . . . . . . . . . . . . . . . . . . . . 1
Server Software . . . . . . . . . . . . . . . . . . . . . . . . . . . . . . . . . . . . . . . . . . . . . . . . . . . . . . . . . . . . 2
Technical Support . . . . . . . . . . . . . . . . . . . . . . . . . . . . . . . . . . . . . . . . . . . . . . . . . . . . . . . . . . 3
Server Description
The VBrick VOD-W servers provide interactive, on-demand playback of standards-based,
high-quality video that is stored on the server with a variety of methods. The VOD-W servers
are a basic component in the VBrick's EtherneTV solution and work seamlessly with the
EtherneTV Portal Server. They ingest and stream unicast and multicast streams in the
following formats:
• MPEG-1, MPEG-2, MPEG-4 RTSP unicast
• MPEG-1, MPEG-2, MPEG-4 multicast
Server Models
Although VBrick currently supports all of the server models shown in shown in Table 1,
VBrick has transitioned to Dell 1950/2950 servers and all new systems shipped after the date
of this publication will be either 1950 or 2950 devices. VBrick will continue to provide
support for all 1850/2850 series models. Contact VBrick Support Services
reseller for more information about upgrade options.
or your authorized
VOD-W Admin Guide 1

Tab l e 1 . VOD-W Server Models
Model Hardware Max Throughput Max Users
VOD-50W Dell PowerEdge 1850 50 Mbps 50
Dell PowerEdge 1950
VOD-125W Dell PowerEdge 2850 125 Mbps 125
Dell PowerEdge 2950
VOD-300W Dell PowerEdge 2850 300 Mbps 300
Dell PowerEdge 2950
Table 2. VOD-W Server Specifications
Model Operating System O/S Drives Internal Content Drives
VOD-50W Win Server 2003
Web Edition
VOD-125W Win Server 2003
Web Edition
VOD 300-W Win Server 2003
Web Edition
1 Drive 1 Drive
2 Drives RAID1 4 Drive Hardware RAID5
2 Drives RAID1 4 Drive Hardware RAID5
Server Compatibility
The VOD-W servers are compatible with the following VBrick devices:
•VBrick EtherneTV Portal Server – v3.1.0 or later (see note below).
• VBrick Set Top Box – v3.7.2 or later.
• VBrick Decoders – MPEG-1/MPEG-2 via Multicast; MPEG-4 via RTSP.
Note The secure web interface to the Portal Server and the secure URL features require
Portal Server 4.2.1 or higher, as does automatic streaming to Internet clients over
HTTP.
System Requirements
The VOD-W server has been tested to provide the specified performance (50, 125, or 300
Mbps) with no additional software installed. Be aware that the installation of virus scanners or
security software that consume system I/O resources may have an adverse impact on streaming
performance. These components are not tested by VBrick and you should test the VOD-W for
performance and reliability after installing them. If additional programs are installed, it may
be necessary to re-install the VOD software and the database in order to restore proper
operation. Contact VBrick Support Services for more information.
External Storage
Although VBrick currently supports all of the external storage devices shown in shown in
Table 3, VBrick has transitioned to PowerVault MD1000 storage devices and all storage
shipped with servers after the date of this publication will be MD1000 devices. VBrick will
2 © 2008 VBrick Systems, Inc.

Server Overview
continue to provide support for all PowerVault 220S models. Contact VBrick Support
Services or your authorized reseller for more information about upgrade options.
The external storage arrays shown in Table 3 are compatible with VOD-W servers to increase
video storage or to backup existing content. If the VOD-W server you purchased from
VBrick included external storage, the storage array was installed and configured before
delivery to your site. As shown below, each external storage array has 5–15 drives and
provides up to 4.5 TB of storage. You can add additional storage as necessary; if you are
adding storage to an existing system, see Adding Storage to 1850/2850 Servers
Adding Storage to 1950/2950 Servers
Table 3. VOD-W External Storage Device Specifications
Model Hardware Servers Interface Raw Capacity Drives
ES3 Dell PowerVault 220S 1850/2850 SCSI 1 TB 7
ES4 Dell PowerVault 220S 1850/2850 SCSI 2 TB 14
ES5 Dell PowerVault MD1000 1950/2950 SAS 1.5 TB 5
ES10 Dell PowerVault MD1000 1950/2950 SAS 3 TB 10
on page 67.
on page 55 or
ES15 Dell PowerVault MD1000 1950/2950 SAS 4.5 TB 15
Table 4. VOD-W External Storage RAID Type
Model Hardware RAID Type
VOD-50W Dell PowerEdge 1850 Software Striped
Dell PowerEdge 1950 Hardware RAID5
VOD-125W Dell PowerEdge 2850 Hardware RAID5
Dell PowerEdge 2950 Hardware RAID5
VOD-300W Dell PowerEdge 2850 Hardware RAID5
Dell PowerEdge 2950 Hardware RAID5
Server Software
All server software and licenses are pre-installed by VBrick. If, for some reason, you ever
need to reinstall the software, use the Dell recovery CDs to reinstall the Windows Server
2003 Web Edition operating system and the VOD-W Server Software CD to restore the
VOD-W content server and other components (see Reinstalling the VOD-W Software
page 47 for details). Each VOD-W server has the following software pre-installed.
on
• Windows Server 2003 Web Edition with Service Pack 2.
• Microsoft Desktop Engine (MSDE).
• Internet Information Services (IIS).
•ASP.NET.
• QuickVideo Content Server application.
VOD-W Admin Guide 3

VOD-W Product CD
Use the VOD-W Server Product CD if you ever need to reinstall the content server and other
components. It also includes this VOD-W Server Admin Guide in searchable HTML format.
Technical Support
If you can't find the information you need from the documentation or your reseller, you can
contact VBrick Support Services on the web. The Support Services website has downloads,
FAQs, documentation, support guidelines, and an on-line form you can use to submit
questions. VBrick will make every effort to answer your technical questions in 24 business
hours or less.
4 © 2008 VBrick Systems, Inc.

Server Overview
VOD-W Admin Guide 5

6 © 2008 VBrick Systems, Inc.

Getting Started
Topics in this chapter
Installing the VOD-W Server . . . . . . . . . . . . . . . . . . . . . . . . . . . . . . . . . . . . . . . . . . . . . . . . 14
Configuring Secure Communications . . . . . . . . . . . . . . . . . . . . . . . . . . . . . . . . . . . . . . . . . . 12
Post Configuration Steps . . . . . . . . . . . . . . . . . . . . . . . . . . . . . . . . . . . . . . . . . . . . . . . . . . . . 14
Installing the VOD-W Server
The installation of the QVOD server is straightforward. Please make sure that your QVOD
dongle key is attached to the USB port of your designated server before proceeding with
installation. When you purchase a QuickVideo OnDemand Server, a dongle key and a
corresponding license file with the proper settings are included in your package. This dongle
key needs to be attached to the USB port of the server machine to enable video streaming
through the server. The license file regulates the maximum video streaming throughput and
the maximum number of simultaneous video streams. For example, if you purchase a 125
Mbps license key, the maximum video throughput from the server will be limited to 125
Mbps and the maximum number of simultaneous users accessing the server will be limited to
125. Unpack the server and connect the cables as described below. As noted, all software and
licenses are pre-installed.
Chapter 2
T To install the server onsite at your location:
Step 1. Unpack the Server . . . . . . . . . . . . . . . . . . . . . . . . . . . . . . . . . . . . . . . . . . . . . . . . . . . .7
Step 2. Connect the Server . . . . . . . . . . . . . . . . . . . . . . . . . . . . . . . . . . . . . . . . . . . . . . . . . . .8
Step 3. Configure the IP Address . . . . . . . . . . . . . . . . . . . . . . . . . . . . . . . . . . . . . . . . . . . . . 10
Step 4. Configure the ETV Portal Server . . . . . . . . . . . . . . . . . . . . . . . . . . . . . . . . . . . . . . . 10
Step 5. Verify the Installation. . . . . . . . . . . . . . . . . . . . . . . . . . . . . . . . . . . . . . . . . . . . . . . . .11
Step 1. Unpack the Server
Each shipment comes with:
• A complete EtherneTV VOD-W (including external storage if purchased).
• All power cords and cables.
• Rack mount kit.
•This EtherneTV VOD-W Server Admin Guide.
• Product CD case with these items:
• VBrick VOD-W Server Software CD.
• VBrick VOD-W Server License CD.
• USB dongle key corresponding to the license file.
• EULA (End User License Agreement).
VOD-W Admin Guide 7

Step 2. Connect the Server
Note The following steps explain how to connect Dell PowerEdge 1950/2950 servers. To
connect 1850/2850 servers, refer to the previous version of this manual that was
shipped with those servers. To view all VBrick product documentation, go to
www.vbrick.com/support/documentation
T To set up the VOD-W server:
1. Connect the monitor, keyboard, dongle, mouse, and network cables as described below.
Figure 1. VOD 50W (Dell 1950 – Rear View)
Figure 2. VOD 125/300W (Dell 2950 – Rear View)
2. If rack mounting the unit, mount the VOD-W server in the rack, using the rack mount
kit provided.
8 © 2008 VBrick Systems, Inc.

Getting Started
3. Connect the VOD-W server to the network by plugging the 10/100/1000 BaseT
Ethernet cable into the Ethernet port 1 on the rear of the unit.
4. Connect the monitor cable to the blue video port (front or rear) on the VOD-W server.
Turn the monitor on.
5. Connect a mouse and keyboard to any available USB ports (front or rear) on the VOD-W
server.
6. Insert the dongle key (included in the Product CD case) in any available USB ports (front
or rear). It will illuminate when the unit is powered on.
7. Plug the VOD-W server into a power source, using the power cords provided. (All VOD
servers have redundant power supplies, each with its own cord.)
8. Turn the VOD-W server's main power on by pressing the power switch at the front of
the unit.
Figure 3. VOD 50W (Dell 1950 – Front View)
Figure 4. VOD 125/300W (Dell 2950 – Front View)
9. The VOD-W server will boot and automatically load using the default settings. Wait 5–8
minutes for the unit to fully power up. As new hardware is attached (for example a
keyboard and mouse) the operating system will automatically find and install the drivers.
VOD-W Admin Guide 9

Step 3. Configure the IP Address
You need to configure the IP address as explained below on both the server machine and in the QVCS
application. When done, be sure to reboot the machine before configuring the server in the
ETV Portal Server. VBrick strongly recommends that you use a static IP address rather than
a dynamically-configured DHCP. The use of a DHCP server creates a number of issues when
the IP address changes. For example clients configured to point to the VOD-W server's IP
address may need to be re-configured. Also, the ETV Portal Server is configured to use the
IP address of the VOD-W server so the Portal Server configuration will have to change. You
can configure the IP address by connecting a monitor to the VGA port on the server or by
using a remote connection (see Using a Remote Desktop Connection
T To configure the static IP address of the server machine in Windows:
1. Go to
2. Then click on
3. Click on
Start > Control Panel > Network Connections > Local Area Connection.
Properties and double-click on Internet Protocol (TCP/IP).
Use the following IP address and enter the values provided by your system
on page 17).
administrator for IP address, Subnet mask, and Default gateway.
4. Click
OK when done.
5. Optional. If you wish to configure secure communications between the Portal Server and
the VOD-W, see Configuring Secure Communications
on page 12.
Step 4. Configure the ETV Portal Server
The VOD-W server must be configured in VBrick's ETV Portal Server before it is
recognized as part of the ETV system
T To configure the VOD-W server in ETV Portal Server:
1. Launch ETV Portal Server and login as an administrator.
2. Go to
Global Settings > Servers and select VOD W from the dropdown list.
10 © 2008 VBrick Systems, Inc.

Getting Started
3. Enter the IP or Domain, Server Description (optional), FTP User Name (default =
vbrickuser) and FTP Password (default = vbrickuser).
4. Accept the default
Publishing Point parameters and click Add when done.
This completes the Portal Server Configuration. However in order to verify the installation as
explained below, you must sync the VOD-W server with the ETV Portal server as follows:
T To manually sync the VOD-W server with the ETV Portal Server:
1. Launch the ETV Portal Server admin tool and go to
Assignments > Assign VOD Polling Interval
2. Click
Sync Now. Do not change anything else and exit when done.
.
Global Settings > Global
Step 5. Verify the Installation
Use the following sequence of steps to verify the VOD-W server is installed properly and can
communicate with the ETV Portal Server. If you can use the ETV Portal Server to launch a
video stored on the VOD-W Server, you have tested connectivity and verified the installation.
For more information about ETV Portal Server, see the ETV Portal Server Admin Guide.
T To verify the installation:
1. Ping the IP address of the VOD-W server from any PC in the same network.
2. Launch an ETV Portal Server client. (Open a browser and enter the ETV Portal Server
hostname or IP address (e.g.
3. Go to
Browse Video Library and launch any video in the Demo folder. The video should
display in the preview window.
4. On the VOD-W server, go to
QVOD Server
to launch the QVOD Server Console.
5. In the navigation pane on the console, click on Sessions
video you just launched. Important: You must view the Session Manager while playback
is in progress. If the video ends, no data will be shown.
6. Verify that the
Host Name IP address matches the computer from which you launched
the video. If the IP address matches and a DataRate is shown, you have verified
connectivity between the VOD-W server and the ETV Portal server.
http://portalserveripaddr) in the address bar.
Start > Program > QuickVideo OnDemand Server > Monitor
to view playback data for the
VOD-W Admin Guide 11

Configuring Secure Communications
Use this optional functionality to protect communication between the Portal Server and
VOD-W. The Portal Server controls the VOD-W over a web service communications
interface. Starting with Portal Server v4.2.1, there are two ways to protect communication
between the Portal Server and VOD-W:
• Basic authentication – this method uses the FTP username and password configured on
the VOD-W. See "Changing the Default FTP Password" in the VOD-W Release Notes for
instructions on how to configure this user name and password on the VOD-W and on
the Portal Server. The VOD-W challenges the Portal Server for login information and
the Portal Server responds.
• SSL encryption – communication between the VOD-W and Portal Server is encrypted
using a certificate installed on the VOD-W.
Basic Authentication
Basic authentication (without SSL encryption) passes passwords in an easily discovered
format. SSL encryption is recommended if you wish to protect communications between the
Portal Server and VOD-W.
T To enable basic authentication:
1. From the VOD-W Server, start the Microsoft Internet Information Services (IIS)
Manager.
2. Expand the server name and select the
3. Right-click the default web site and click
4. Select the
5. Click the
Directory Security tab.
Edit... button under Authentication and access control.
Default Web Site.
Properties.
12 © 2008 VBrick Systems, Inc.

Getting Started
6. Make sure Enable anonymous access is not checked.
7. Under
Authenticated access, check Basic authentication (password is sent in clear text)
and uncheck other boxes.
SSL Encryption
Since you are managing both the VOD-W and the Portal Server, you know you can trust the
VOD-W and you can use any certificate to encrypt communications. You may already have a
certificate installed that you can use.
1. Checking for an Installed Certificate
T To check for an installed certificate:
1. From the VOD-W Server, start the Microsoft Internet Information Services (IIS)
Manager.
2. Expand the server name and select the
3. Right-click the default web site and click
4. Select the
5. Click on the
6. Click
7. Select
8. If the
Directory Security tab.
Server Certificate... button to launch the Server Certificate Wizard.
Next on the Welcome dialog box.
Assign an existing certificate and click Next.
Select a certificate list is not empty, there is a certificate on the VOD-W you can
use (you can use this one or you can get a new a certificate as explained below.) Select a
certificate, and click Next three times and Finish to install.
9. Then click
10. Check
128-bit encryption
11. Click
Edit... under Secure communications.
Require secure channel (SSL). For more secure encryption, also check Require
. Click OK.
Apply and OK and you are done configuring SSL encryption with an existing
certificate.
Default Web Site.
Properties.
2. Getting a New Certificate
1. Click < Back to choose a different method of obtaining a certificate.
2. Select
3. Select
4. Type a descriptive name for the certificate in the
5. Type an organization name (e.g. VBrick) in the
6. In the
VOD-W Admin Guide 13
Create a New Certificate and then select Next. (If Create a New Certificate is
unavailable, the certificate has probably been installed already. If that is the case, skip the
rest of these steps, and go to 4. Installing a New Certificate from a Certificate Authority
If you want to create new certificate for the VOD-W, select
certificate
in the
to remove the certificate first, and then restart the procedure.)
Prepare the request now, but send it later and then select Next.
Name field, type a bit length for the key
Bit length field, and then select Next.
Organization field and type an
organizational unit (such as Sales Department) in the
Next. (This information will be placed in the certificate request, so make sure it is
Remove the current
Organizational unit field, and select
accurate. The Certificate Authority will verify this information and will place it in the
certificate.)
Common name field, type a common name, and then select Next. (Important: The
common name is one of the most significant pieces of information that ends up in the
certificate.)
.

7. Enter the appropriate information in the Country/Region, State/Province, and City/
locality
fields, and then select Next.
8. Enter a file name for the certificate request. The file contains information similar to the
following:
------BEGIN NEW CERTIFICATE REQUEST -----MIIDZjCCAs………
------END NEW CERTIFICATE REQUEST ---------
This is a Base 64 encoded representation of the certificate request. The
request contains the information entered into the wizard and also your public
key and information signed with your private key.
9. Select Next. The wizard displays a summary of the information contained in the
certificate request.
10. Select
Next and select Finish to complete the request process.
3. Submitting a Certificate Verification Request
If a CA-signed Certificate from a trusted Certificate Authority (such as VeriSign or Thawte)
is going to be purchased, the certificate request can now be sent to a CA for verification and
processing. After the certificate response is received from the CA, the installation process can
continue on the VOD-W. You can also generate your own certificate rather than using a
certificate authority.
4. Installing a New Certificate from a Certificate Authority
T To install the certificate on the VOD-W:
1. Start the Microsoft Internet Information Service (IIS) Manager.
2. Expand the server name and select the web site for which the certificate will be installed.
3. Right-click the web site and then select
4. Select the
5. Select
6. Select
Directory Security tab
Server Certificate to launch the Web Server Certificate Wizard
Process the pending request and install the certificate and then click Next.
7. Enter the path and file name of the file that contains the response from the CA, and then
Next.
click
8. Examine the certificate overview, click
installed on the VOD-W.
9. Click
10. Check
11. Click
Edit... under Secure communications.
Require secure channel (SSL). For more secure encryption, also check Require
128-bit encryption
Apply and OK.
. Click OK.
Properties.
Next, and then click Finish. A certificate is now
Note The default FTP server also transmits user names and passwords in an easily
discovered form. The topic "Using Secure FTP" in the Portal Server Admin Guide
explains how to install and configure secure FTP.
Post Configuration Steps
No additional configuration is required after installation and once you have completed the
steps up to this point you are good to go. However, if you subsequently need to change the
IP address or default storage path for example, use the server configuration utility (see
Configuring the Server
following and others:
14 © 2008 VBrick Systems, Inc.
on page 18). The supported configurable parameters include the

• Server IP address.
• Storage path.
• Log file configuration parameters.
• Maximum number of simultaneous ingestion sessions.
• Ingestion process timeout period.
• Secure RTSP URL enable and password.
• HTTP tunneling enable and port.
Getting Started
VOD-W Admin Guide 15

16 © 2008 VBrick Systems, Inc.

Server Administration
Topics in this chapter
Overview . . . . . . . . . . . . . . . . . . . . . . . . . . . . . . . . . . . . . . . . . . . . . . . . . . . . . . . . . . . . . . . . 17
Configuring the Server. . . . . . . . . . . . . . . . . . . . . . . . . . . . . . . . . . . . . . . . . . . . . . . . . . . . . .18
Manually Ingesting Content. . . . . . . . . . . . . . . . . . . . . . . . . . . . . . . . . . . . . . . . . . . . . . . . . . 23
Monitoring the Server . . . . . . . . . . . . . . . . . . . . . . . . . . . . . . . . . . . . . . . . . . . . . . . . . . . . . .24
Backup and Restore . . . . . . . . . . . . . . . . . . . . . . . . . . . . . . . . . . . . . . . . . . . . . . . . . . . . . . . .24
Best Practices . . . . . . . . . . . . . . . . . . . . . . . . . . . . . . . . . . . . . . . . . . . . . . . . . . . . . . . . . . . . . 25
Overview
There are three utility applications on the VOD-W server. As explained below, you can access
these utilities locally by connecting a monitor to the VGA port or with a Remote Desktop
Connection.
Utility Description Access Method
Chapter 3
Server Configuration Used for initial configuration or when
adding storage. You must reboot the server
after any configuration changes. See
Configuring the Server
Ingest Content For use by VBrick Support Services only.
All VOD-W users should use ETV Portal
Server to add content to the server. (See
Ingesting Content
Monitor QVOD Server Use to view status of various server
functions.
on page 18.
on page 39.)
Local or with
Remote Desktop
Connection.
Using a Remote Desktop Connection
To connect to the VOD-W server you can attach a monitor directly to the VGA port on the
server or you can use the Windows
T To launch a Remote Desktop Connection:
1. From a remote computer, go to
Remote Desktop Connection
2. Enter an IP address or select from the dropdown list and click
3. Enter a valid
window.
4. The procedure to launch each utility is explained below in Using a Direct Connection
User name and Password and click OK. This launches a Remote Desktop
Remote Desktop Connection utility.
Start > All Programs > Accessories > Communications >
.
Connect.
.
VOD-W Admin Guide 17

Using a Direct Connection
You can access the three utilities described above by connecting a standard monitor to the
VGA port on the VOD-W server.
T To launch the utilities using a direct connection:
1. Connect a monitor to the VGA port on the VOD-W server.
2. To launch the monitor utility, go to
Monitor QVOD Server
.
3. To launch the configuration utility, go to
4. To launch the ingestion utility, go to
Ingest Content
.
Configuring the Server
This section is provided as an overview of the Product Configuration utility. Once the server
is up and running you will seldom need to make configuration changes. However in the event
that you do need to make a change, you must reboot the server before the changes are
applied.
Launching the Configuration Utility
Start > All Programs > QuickVideo OnDemand Server >
Start > Control Panel > InfoValue Quick Video.
Start > All Programs > QuickVideo OnDemand Server >
Note All changes to the
QVOD page on the Configuration Utility (including, for example,
changes to the Storage Path) require a reboot before the changes are applied. To
reboot, go to
T To launch the server configuration utility:
1. Go to
Start > Control Panel > InfoValue Quick Video.
Start > Shutdown > Restart.
Streaming IP IP address of the Content Server. Use the drop down menu to select
the appropriate IP address or use
18 © 2008 VBrick Systems, Inc.
Auto.

Server Administration
Management IP Always select
Auto. Management IP address of the VOD Server. For
a single host VOD Server, the Management IP is the same as the
Streaming IP.
Support RTSP
The port used for RTSP interleaving. Default = 554. Do not change.
Interleaved using port
Support HTTP
Tunneling using port
The port used for HTTP tunneling. Default = 8000. Must not
conflict with port used for web service communication. See note
below.
Storage Path Always set to
D:\Content. Use the Browse button to change the
path. If the new folder does not exist, it will be created for you.
Add Storage Path The system can support multiple storage locations. Click
Storage Path
to select the additional storage to be added. Click
to launch the Add Storage Path window. Click Browse
Add to add the
Add
new storage.
File Path Location of the content server log files. If not specified, the default
log path
Server\Logs
C:\Program Files\InfoValue\QuickVideo Content
will be used.
Number of Files Default = 7.
Maximum Size Size of each file size. Default = 1024 KB.
Log Level Content Server log level. Default = 99.
Using HTTP Tunneling
HTTP tunneling is often used as a means for communicating from network locations with
restricted connectivity, for example behind firewalls or proxy servers. To enable HTTP
tunneling on the VOD-W you must specify the port that will be used for tunneling and the
maximum number of tunneled streams allowed. HTTP tunneling must be configured on both the
VOD-W Server and on the Portal Server.
T To configure for HTTP tunneling on the VOD-W Server:
1. In the Configuration Utility, go to the
using port
.
2. Configure the tunneling port on the VOD-W. Default = 8000. In typical application, port
80 is used for HTTP tunneling. By default, the Portal Server and the VOD-W
communicate over port 80. Therefore if you select port 80 as the tunneling port you
must also reconfigure the web service communications port (see Changing the Web
Service Communication Port on page 20).
3. Click on the
VbPortal tab and configure the maximum number of tunneled streams.
VBrick recommends a maximum of 50 streams for all servers.
T To configure for HTTP tunneling on the Portal Server:
1. Open the Portal Server Admin console, go to
VoD/FTP Servers
2. Configure the same
, and select the VOD-W server you wish to configure.
HTTP Tunneling Port (see screenshot below) used on the VOD-W.
Default = 8000. This port must match the port configured in Step 2 above.
3. Check
Supports HTTP Tunneling? (see following screenshot).
QVOD tab and check Support HTTP Tunneling
Global Settings > Servers > Add/Modify
VOD-W Admin Guide 19
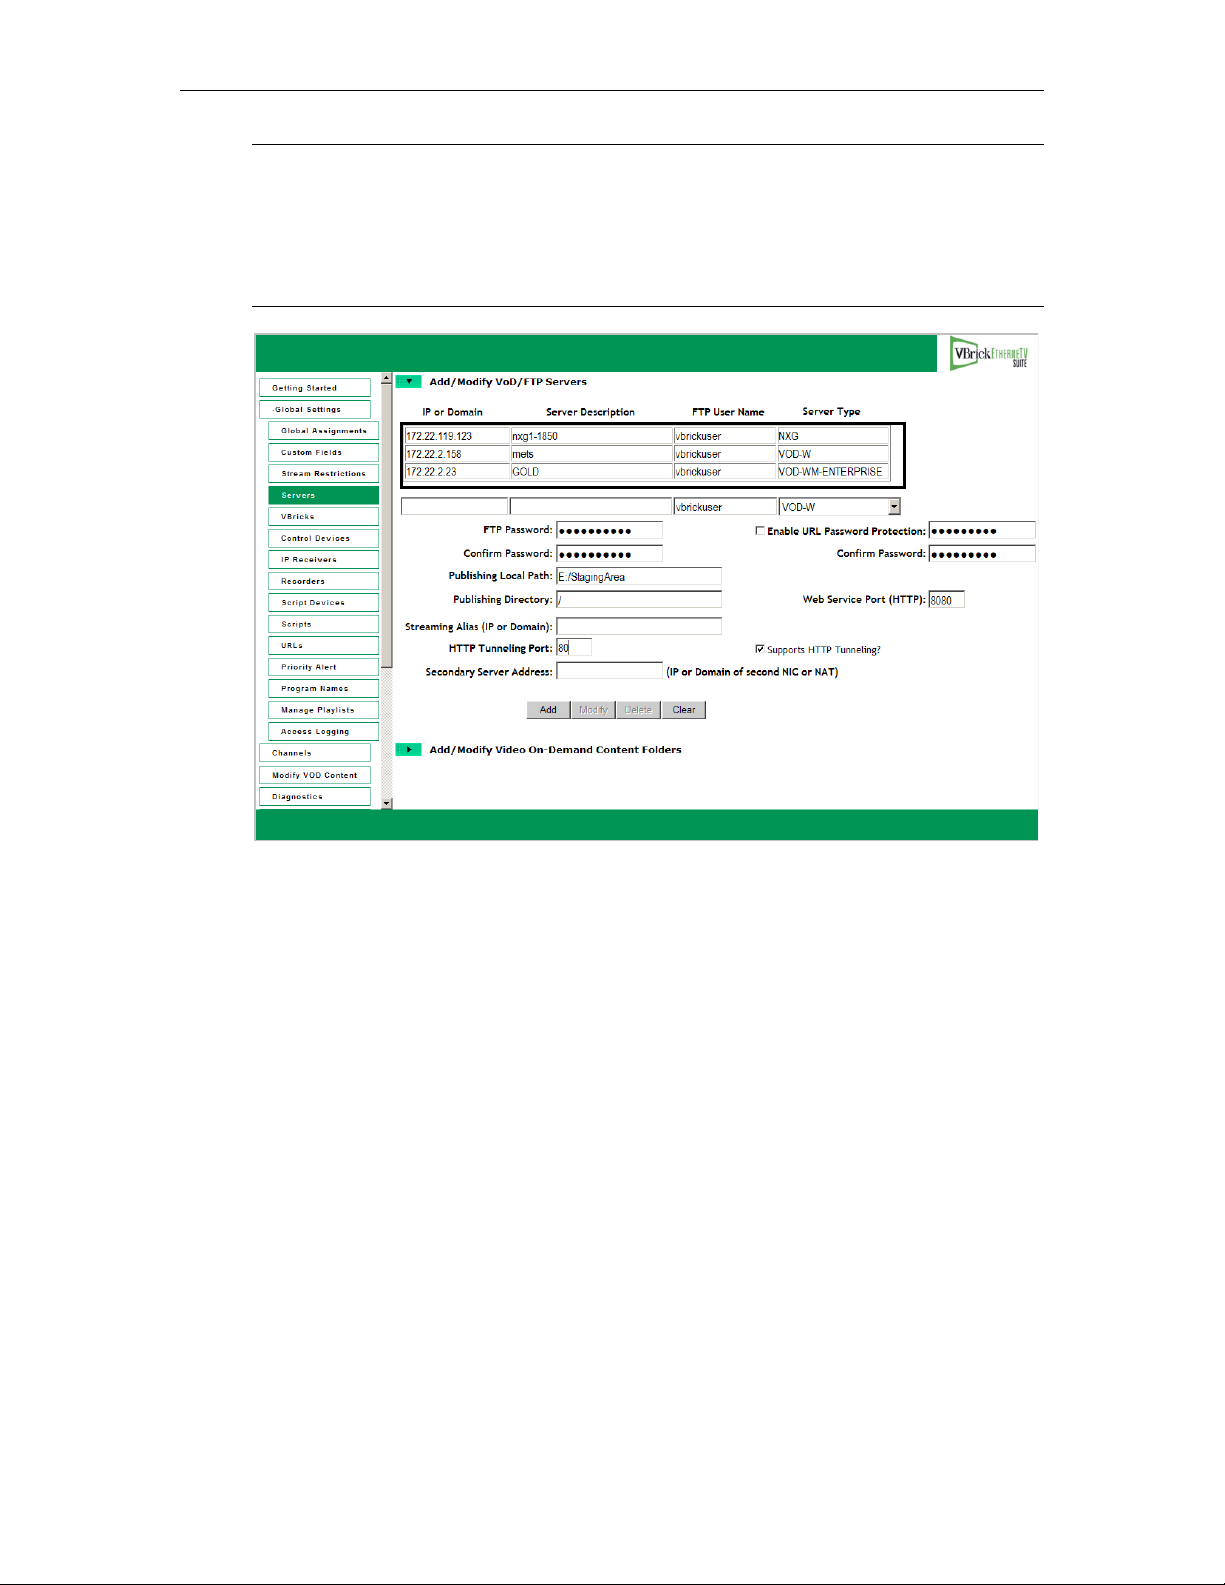
Note The Portal Server and the VOD-W communicate using a web service configured to
use port 80 by default. If you choose to tunnel over port 80, you must use a different
port for the web service communication. To specify a different port for the web
service communication (for example 8080), configure the
the Portal Server
with the specified port number. Then configure the VOD-W to use
Web Service Port (HTTP) on
this same port for the web service as described below.
Configuring a Macintosh for Tunneled Streams
You may need to perform certain configuration steps on a Macintosh before you can use
QuickTime to view streams tunneled over HTTP from a VOD-W server.
T To configure QuickTime for tunneled streams:
1. Launch QuickTime on a Macintosh and click on the
Apple QuickTime player to set focus
on the task bar at the top of the screen.
2. Click
3. On the
4. Check the
QuickTime Player in the task bar and go to QuickTime Preferences.
Advanced tab, click on Transport Setup and then Custom.
Port ID used for the HTTP Transport Protocol. The Port ID must match the
HTTP Tunneling Port set on the Portal Server for the VOD-W server (default = 8000). If
necessary, get this port number from your system administrator. See the Portal Server
Admin Guide for more information.
Changing the Web Service Communication Port
The Portal Server and the VOD-W communicate using a web service configured to use port
80 by default. If you choose to tunnel over port 80, you must use a different port for the web
service communication.
20 © 2008 VBrick Systems, Inc.
Server Administration
T To change the port used for web service communication between the Portal Server and
VOD-W:
1. Open IIS (go to
Manager
).
2. Select the web site for the web service from the tree on the left (go to
Web Sites > Default Web Site
3. Right-click on
4. On the
Web Site tab, change the TCP port to match the port configured on the Portal
Start > Administrative Tools > Internet Information Services (IIS)
ComputerName >
).
Default Web Site and select Properties.
Server (80 in the example above).
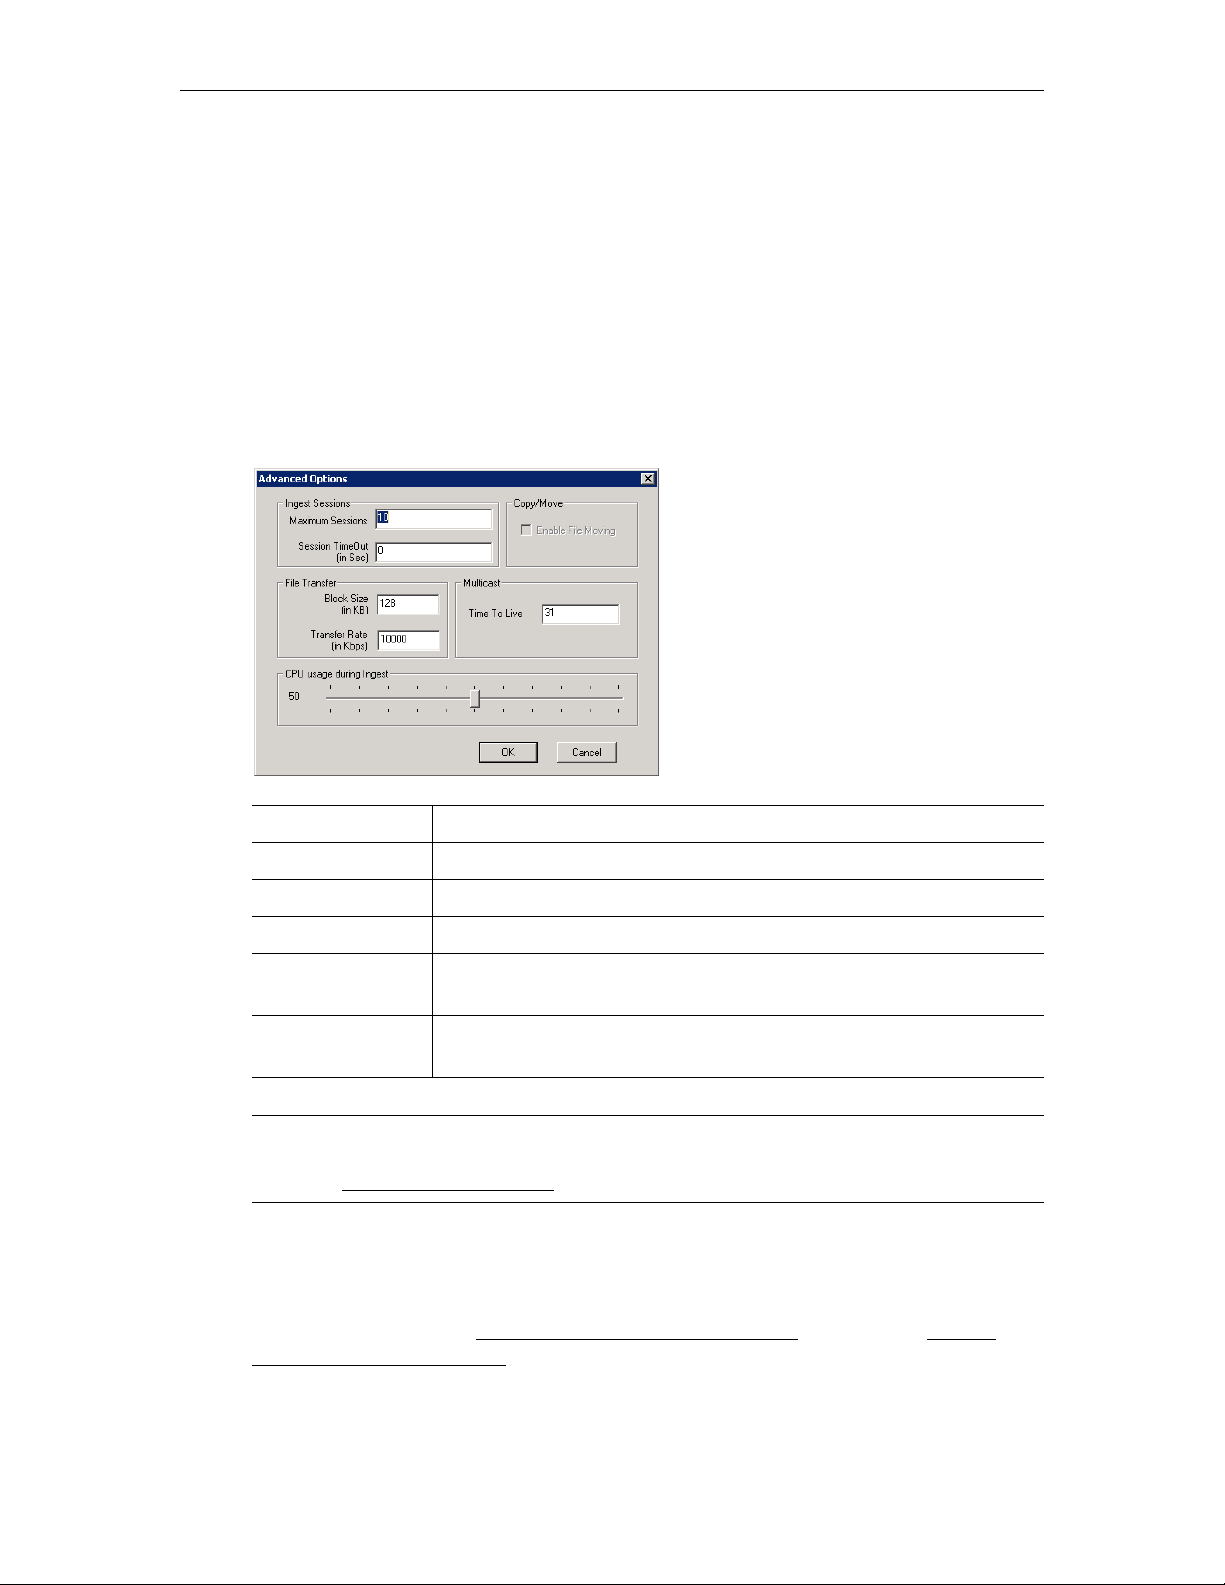
Advanced Options
Maximum Sessions Do not change except as directed.
Session Timeout Do not change except as directed.
Block Size Do not change except as directed.
Transfer Rate Do not change except as directed.
CPU usage during
Ingest
This setting can speed ingestion time. Do not change except as
directed.
Time To Live Default = 31. Use the default except as directed. The QuickVideo
OnDemand Server can also be used as a multicast source.
Note The VOD-W Server requires a license file and a matching dongle key. If either is
missing, you will get a popup error message after a reboot. To reinstall the license file,
see Reinstalling the Software
on page 47.
Adding External Storage
If you purchased a system with external storage, the storage is configured and shipped with
the VOD-W server—no additional configuration is required. If you are adding external
storage at a later date, see Adding Storage to 1850/2850 Servers on page 55 or Adding
Storage to 1950/2950 Servers on page 67 for instructions.
VOD-W Admin Guide 21

Using Secure URL Password Protection
Use the VbPortal tab on the Configuration Utility to configure secure URL password
protection. Secure URL protection prevents users from bypassing Portal Server
authentication and playing back VOD content directly from VOD-W servers. Requests from
player software and devices (for example STBs, IPRs, and PCs) include a key that is generated
by the Portal Server and validated by the VOD-W server. This key is valid for a limited time and
is generated using a password configured on both the VOD-W Server and the Portal Server. These
passwords must match.
VOD-W Configuration
T To enable URL password protection on the VOD-W Server:
1. Open the VOD-W control panel application (go to
QuickVideo
2. Select the
3. Check
).
VbPortal tab
Enable RTSP URL Password Protection and enter and confirm the password. (The
Start > Control Panel > Infovalue
default password is vbrickkey.) This password must match the VOD-W Server.
4. Click
OK to save and exit the control panel application.
5. Reboot the server when done to apply changes.
Portal Server Configuration
T To enable URL password protection on the Portal Server:
1. Open the Portal Server Admin console, go to
VoD/FTP Servers
2. Check
Enable RTSP URL Password Protection and enter and confirm the password. (The
default password is
3. Click
Modify to save your changes.
, and select the VOD-W server you wish to configure.
vbrickkey.) This password must match the Portal Server.
If you wish to enable URL protection but also have some devices that are not connected to
the Portal Server, you can enable VOD requests to these devices by adding their IP addresses
to the list of
and click
Allowed IPs. Simply enter the enter the IP address of a device in the New IP field
Add. Devices that access VOD content through the Portal Server do not need to be
configured in this manner. Only those devices that communicate with the VOD server
directly—without going through a Portal Server—require this configuration.
Global Settings > Servers > Add/Modify
22 © 2008 VBrick Systems, Inc.

Server Administration
Enable RTSP URL
Enables secure URL password protection on the VOD-W server.
Password Protection
Allowed IPs Enables URL protection on devices not directly connected to the
Portal Server.
New IP Use to populate the list of Allowed IPs.
Maximum Number of
Tunneled Streams
Sets the maximum number of tunneled streams allowed. Default =
50. VBrick recommends a maximum of 50 tunneled streams for all
VOD-W servers. The VOD servers have been qualified to tunnel 50
simultaneous streams at 1Mbps each. If you are tunneling at a lower
bitrate, you can increase the number of tunnelled streams.
Manually Ingesting Content
VBrick strongly recommends that you use the EtherneTV Portal Server exclusively to ingest all
VOD-W content. The ETV Portal Server Admin Guide explains in detail how to automate
content ingestion. With the ETV Portal Server you can add individual files or you can FTP or
copy pre-recorded content to the ETV Portal Server for easy ingestion to the VOD-W
server. The ETV server periodically (every 5 minutes) polls certain folders for presence of
content and if found ingests the content onto multiple VOD-W servers. This process is
called Automatic Content Ingestion or simply auto-ingestion. The content is placed in a predefined sub-folder under the FTP root folder. This pre-defined folder is called the autoingest root folder. (For more information, see Ingesting Content
also be added by using the
stream.
Add Video function in ETV Portal Server or by recording a live
on page 39.) Content can
In some exceptional cases you may need to ingest content from the QuickVideo Ingest
application. Use this application as explained below only when directed. For best results
always use the ETV Portal Server to ingest content.
T To ingest content from the QVCS application.
1. Go to
VOD-W Admin Guide 23
Start > All Programs > QuickVideo OnDemand Server > Ingest Content.

2. Use the QuickVideo Ingest interface to ingest content. Click the More >> button to see all
options.
Content Import Location Location path of the content to be ingested.
• Content File – directly from the content file.
• Meta File – not supported.
• Batch File – not supported.
Content Name Required. This is the title seen by users. All content titles must
Storage Location Must be blank.
Use content from current
location
Do not process content Check this box when ingesting MPEG-2 audio-only content.
Monitoring the Server
See Monitoring the Server on page 27 for complete details.
Backup and Restore
Database Backup
The VOD-W server automatically runs a daily script at 03:00 that backs up the SQL database.
to
D:\DataBase_Backup. The server keeps backup files for the last five days and
QVIDB_1.dat_bak is always the most recent backup file. Note that this daily backup procedure
backs up the database (authentication data, passwords, metadata, etc.) only. It does not back up
begin with a forward slash (/).
Not recommended. Content will not be copied/moved but will
be processed in its current location.
The content will not be pre-processed but ingested as is. Used
for pre-processed content i.e. content with trick mode files
already generated.
24 © 2008 VBrick Systems, Inc.

Server Administration
any content. In order to back up content, you need a separate backup strategy and a robust
storage capability.
T To run an on-demand database backup:
1. Go to
2. Right-click on
3. When done, right-click on
4. (You can also modify the backup schedule as desired. Left-click on
Start > Control Panel > Scheduled Tasks.
dbbackup and select Run.
dbdelete and select Run.
on the
Schedule tab to modify the backup schedule.)
dbbackup and click
Database Restore
It is unlikely you will ever need to restore the database except in the context of a system crash
in which case you will need to restore the entire server (see Server Restore
database.
T To restore the database:
1. Go to
C:\Database_Scripts and double-click on Restore_Database.bat. This will restore
the most recent database backup file (QVIDB_1.dat_bak). To restore a different backup
file, edit Restore_Database.sql and then run the restore script.
2. Wait for the restore to complete, then go to
Remove_Add_QVIDBUser.bat. After this file runs, the database restore is complete.
C:\Database_Scripts and double-click on
), including the
Server Restore
VBrick and Dell installation CDs are shipped with the server in case the software ever needs
to be restored (see Reinstalling the Software
"Server Restore" refers to the server and operating system software only—not to the
database or to any content on the server.
Table 5. Installation CD Contents
CD-ROM What it does
Dell Recovery CDs Restore the Windows 2003 Server Web Edition operating system.
VOD-W Server
Product CD
Installs the following software:
• QuickVideo Content Server application.
• Multicast joiner service and SQL redistribution.
• Database backup utility.
• Configures IIS with ASP.NET, FTP, and creates an FTP account
with a home directory in
• Demo content available. If restoring the server, you must use the
manual ingestion utility to ingest this content (see Manually
Ingesting Content on page 23 for details)
VOD-W License CD Contains a license file (matching your dongle key) that you will need
when reinstalling the VOD-W software.
on page 47 for complete details). Note that this
e:\StagingArea
Best Practices
• All video assets stored on the server should have backup copies available in the event of
disk corruption. This will allow for an easy restoral.
VOD-W Admin Guide 25

• StreamPlayerPlus allows the recording of live streams to MPEG-1, MPEG-2 and
MPEG-4 files. Once saved the files can then be installed on the EtherneTV VOD-W
server for playback. Make sure the "hinting" option is checked when recording MPEG-4
files.
• When recording MPEG-4 and MPEG-2 files using StreamPlayer Plus software, it is
advisable to keep the length of the record to under 50 minutes to facilitate creating
playlists and keep viewing time manageable.
• As the disks become full, the performance of head-seek times diminishes and streaming
performance may be affected. Purge unnecessary files and defragment as appropriate.
• Do not use spaces in filenames. Use underscores; for example:
my_history_class.mp4.
• Apple QuickTime 6.5 or higher, with native MPEG-4 support, is the recommended MAC
desktop player for accessing MPEG-4 files from the EtherneTV VOD-W. QuickTime
supports the Seek feature (accessed through a slider-bar) for MPEG-4 streams. Make
Edit > Preferences > QuickTime Settings > Streaming Transport option is set to
sure
Automatically determine the best protocol and port ID or to Use UDP, RTSP Port ID 554.
26 © 2008 VBrick Systems, Inc.

Monitoring the Server
Topics in this chapter
Starting the QVOD Server Service . . . . . . . . . . . . . . . . . . . . . . . . . . . . . . . . . . . . . . . . . . . . 27
Using the QVOD Server Console . . . . . . . . . . . . . . . . . . . . . . . . . . . . . . . . . . . . . . . . . . . . . 27
Starting the QVOD Server Service
The QVOD Server Service is automatically started when the server machine is started and it
may take several seconds. During this time, a crossed QVOD Server icon will appear in the
system tray. The crossed icon will change when the service has successfully started. Mousing
over the system tray icon will display the text
Service does not start as expected, check to see if the QVOD license file is installed and if the
dongle key is attached to a USB port. (Use the lower right USB port on the 1850/2850 or any
USB port on the 1950/2950.) If you have to re-attach the dongle key, always reboot the
system after doing so. QVOD Server Service depends heavily on the system clock for
scheduling time-critical tasks. Adjusting the local clock while QVOD is running could disrupt
the QVOD Server Service or totally stop it. If you need to change the local time, first stop
the QVOD Server Service. Go to
OnDemand Service
.
Start > Settings > Control Panel > Services > QuickVideo
QVOD Server is running. If the QVOD Server
Chapter 4
Using the QVOD Server Console
The QVOD Server Console is used to manage streams and to access administrative
functions. The QVOD Server Console serves as the main back-end interface to the server.
From this interface, you can view and manage video sessions streamed with the QVOD
Server.
VOD-W Admin Guide 27

T To launch the QVOD Server Console:
1. Go to
Start > Programs > QuickVideo OnDemand Server > Monitor QVOD Server.
The QVOD Server Console will not be started if the QVOD Server Service is not running.
When the QVOD Server Service is running, there will be a small icon in the system tray, and
the tool tip will show
QVOD Server is running.
When you first open the console, you will see a tree view in the left pane, with a window in
the right pane showing the version number and license (the license will be the license key you
should have attached to the server's USB port). If the QVOD Server subtree is collapsed,
double-click on the QVOD Server, or click on the
+ sign that appears to the left of QVOD
Server to expand the subtree. To display a different view in the right pane, simply select and
click on the desired tree node from the tree view in the left pane or choose among the six
management radio button options provided. Each of the views listed below is explained in
detail on the following pages:
Sessions . . . . . . . . . . . . . . . . . . . . . . . . . . . . . . . . . . . . . . . . . . . . . . . . . . . . . . . . . . . . . . . . . 28
Contents. . . . . . . . . . . . . . . . . . . . . . . . . . . . . . . . . . . . . . . . . . . . . . . . . . . . . . . . . . . . . . . . . 30
Network . . . . . . . . . . . . . . . . . . . . . . . . . . . . . . . . . . . . . . . . . . . . . . . . . . . . . . . . . . . . . . . . . 31
Storage . . . . . . . . . . . . . . . . . . . . . . . . . . . . . . . . . . . . . . . . . . . . . . . . . . . . . . . . . . . . . . . . . .33
Media . . . . . . . . . . . . . . . . . . . . . . . . . . . . . . . . . . . . . . . . . . . . . . . . . . . . . . . . . . . . . . . . . . . 34
Log Options. . . . . . . . . . . . . . . . . . . . . . . . . . . . . . . . . . . . . . . . . . . . . . . . . . . . . . . . . . . . . . 34
Events . . . . . . . . . . . . . . . . . . . . . . . . . . . . . . . . . . . . . . . . . . . . . . . . . . . . . . . . . . . . . . . . . . 35
Sessions
The Sessions view displays all the actively streaming sessions. The Sessions window is
divided into four areas: the
and the
28 © 2008 VBrick Systems, Inc.
Detail of Session No. section. Each field is explained below.
Statistics section, the Refresh section, the Session List section,

Monitoring the Server
Statistics This section displays the statistical information about the QVOD
Server. The statistics displayed in this section include Total Sessions
and Total Data Rate.
Total Sessions The total number of sessions or independent video streams currently
being played from the QVOD Server. If the current bandwidth and
number of streams are less than the licensed maximums, the next
stream requested will be allowed regardless of bitrate.
Total Data Rate The aggregate data rate of all active streaming videos from the
QVOD Server. The unit of measure is the Mbps (Megabit per
second). If the current bandwidth and number of streams are less
than the licensed maximums, the next stream requested will be
allowed regardless of bitrate.
Refresh This section lets you set the Refresh to manual or auto.
• Manual – the session list must be refreshed manually.
• Refresh – use to refresh the page if Manual refresh is selected. The
session will not be manually refreshed unless you click this button.
• Auto – the session list will be refreshed automatically at the
refresh interval.
• Refresh Interval – specifies the refresh period, in seconds, for
auto refresh.
Session List Each actively playing session is listed in its own row. To terminate a
session, right-click on a row in the Session List group and select
Session
. When confirmed, the session is removed from the server.
Kill
No. A unique internal session number assigned to each actively playing
session.
VOD-W Admin Guide 29

Host Name The host machine name (or IP Address) of the client machine which
is playing the video stream.
User Name The user name of the person logged on to the client machine playing
the video file (blank for RTSP clients).
File Name The full path name of the video file that is being played back.
Data Rate The average data rate, computed over four-second intervals. The
number displayed is the dynamic data rate which may be different
from the encoded data rate.
Type The type of the session. M2U means an RTSP session.
Detail of Session No. Shows additional information for a particular session. To display the
detail of a session, go to a row in the Session List group and doubleclick on any cell in the row. The details will be displayed in the Detail
of Session No. group. The session number of session being displayed
is listed in the small box right after the text
Detail of Session No.
Client IP Address The IP address of the corresponding client machine. The port
number being used by the client machine is displayed after the IP
address.
Start Time The time (QVOD Server time clock) when the video file was opened
by the client machine.
DN A count showing the number of times when data was not ready to be
sent.
NP Average number of packets sent.
UF Underflow (count).
DT Disk Time (Avg time).
NT Network send time.
LP In RTSP streaming, LP represents number of times the scheduler was
called.
Contents
The Contents page shows all VOD content on the server. The information includes Ingestion
, Size, Type, Duration, and the Rate at which it was encoded.
Time
30 © 2008 VBrick Systems, Inc.

Monitoring the Server
Network
In the navigation tree on the left side of the QVOD Server Console, click on Network. The
right-hand side of the QVOD Server Console will display the network utilization.
The following information is displayed and updated every two second:
VOD-W Admin Guide 31

• IP Address.
• Current Data Rate (Mbps).
• Utilization (current data rate/network speed) shown as a status bar.
Individual Network Interface Card
Network Manager View is a good place to see an overview of all network activity. From the
left side of the QVOD Server Console, if the Network Manager sub-tree branch is collapsed,
double-click on
Network Manager, to expand the subtree. After the branch is expanded, you will see a tree
node showing the IP address of the server NIC. Click on the IP address of your server and
the right-hand side will display the individual network interface card view. This view has the
NIC section and the Performance sections.
Network Manager or click on the plus sign + that appears to the left of
IP Address IP address of the selected NIC.
MAC Address MAC address of the selected NIC.
Slider bar Allows you to set a limit on the usage of the selected NIC. To limit the
usage, move the slider bar to select the maximum throughput allowed
(Max. Allowed Mbps) for streaming through the NIC (as a percentage
(Pct. Allowed) of the total NIC speed (Network Speed Mbps), then
click on the Set Pct. Allowed button to activate the setting.
The NIC speed setting function allows an administrator to limit the amount of video data
that is streamed over a network segment by a QVOD Server. If, for example, the IT group in
a company only allows a portion of its network to be used for video streaming, an
administrator can use this feature to define a limit that complies with this restriction. The
Performance window in the individual NIC view, displays more detailed information of the
NIC.
32 © 2008 VBrick Systems, Inc.

Monitoring the Server
• A running graph plotting the most recent utilization history.
• Current Data Rate (Mbps).
• Utilization of the interface card as a percentage of the total NIC speed.
• List of the individual video streams going through the network card. An administrator
can terminate a session by right-clicking on a session.
Storage
From the left side of the QVOD Server Console, click on the tree item that says Disk
Manager
for each drive in the system. For each drive, the following information will be shown and
updated every two seconds:
• Current Data Rate (Mbytes/sec).
• Utilization (current data rate/drive speed) shown as a status bar.
. The right hand-side of the QVOD Server Console will display utilization statistics
Individual Drive
From the left side of the QVOD Server Console, if the Disk Manager subtree branch is
collapsed, double-click on Disk Manager or click on the plus sign (+) to expand the tree
branch. After the branch is expanded, you will see the tree nodes displaying drive letters of
each logical drives in the system. To view or edit the settings of a particular drive, click on
that tree node, and the right-hand side will display the individual drive view. The individual
drive view has two sections in it. They are the
letter) section and the Performance section.
VOD-W Admin Guide 33
Drive: x (where x is the corresponding drive

Set Pct. Allowed Always set to 100 per cent.
Performance This window in the individual drive view displays more detailed
information for the drive.
• A running graph plotting the most recent utilization history
(updated every second).
• Current Data Rate (MBytes/sec).
• Utilization of the drive as a percentage of the total drive speed.
• List of the individual video streams going through this drive. An
administrator can also terminate a session by right-clicking on it.
Media
This page is not used or supported with any VOD-W features or functions.
Log Options
From the left side of the QVOD Server Console, click on Log Options. The right-hand side
of the QVOD Server Console will change to the Log Options view. This view lets you specify
the event types you want to see. Only the selected events will be saved to the log file and
displayed in the Event Viewer. The supported events include, Disk I/O, Management,
Performance, Session, License, Network, Protocol and System based. Select the desired
settings and click the
Apply for the settings to take effect.
Note Use the Logging Manager to set the
configurable parameters on the QVOD Server Console.
34 © 2008 VBrick Systems, Inc.
Log Level and Log Category. These are the only

Monitoring the Server
Log Level Select a Log Level from 1–5. The Log Level determines the
verbosity of messages in the Event Log.
Log Category Select some or all categories. These are the items that will be
written to the log.
Events
The Events page lets you view the most recent events that were logged by QVOD Server.
The logged events correspond to the Log Level and Log Category you selected in Log
Options
from log data, see Generating Custom Reports
. You can select different logs from the drop down list box. To create custom reports
on page 43.
VOD-W Admin Guide 35

From the left side of the QVOD Server Console, click on Events. The right-hand side of the
QVOD Server Console will display events in the most recent log file. Use the drop down
menu to select other log files. The Events page also lets you manipulate the view by changing
the type of columns displayed, filtering log events, bookmarking, etc. For example,
T To get server host system information:
1. Click on
T To change the column types that are displayed:
1. Click on
System Info.
Columns.
36 © 2008 VBrick Systems, Inc.

T To manipulate the way log events are displayed:
1. Click
Filter.
Monitoring the Server
For example, if you select
172.30.10.32 as the Value, then select the And operator, clicking on Filter will display only
IP as the Field Name, contains as the operator and type
the log lines with the IP address 172.30.10.32.
Export Use to export log files in text format.
Remove BookMarks Bookmarks can be added by double-clicking of individual rows in the
log. Click on
VOD-W Admin Guide 37
Remove BookMarks to remove all the BookMarks.

38 © 2008 VBrick Systems, Inc.

Ingesting Content
Topics in this chapter
Overview . . . . . . . . . . . . . . . . . . . . . . . . . . . . . . . . . . . . . . . . . . . . . . . . . . . . . . . . . . . . . . . . 39
Content Ingestion . . . . . . . . . . . . . . . . . . . . . . . . . . . . . . . . . . . . . . . . . . . . . . . . . . . . . . . . . 39
Best Practices . . . . . . . . . . . . . . . . . . . . . . . . . . . . . . . . . . . . . . . . . . . . . . . . . . . . . . . . . . . . . 41
Overview
VBrick strongly recommends that you use the EtherneTV Portal Server exclusively to ingest all
VOD-W content. With the ETV Portal Server you can add individual files or you can FTP or
copy pre-recorded content to the ETV Portal Server for easy ingestion to the VOD-W
server. The ETV server periodically (every 5 minutes) polls certain folders for presence of
content and if found ingests the content onto multiple VOD-W servers. This process is
called Automatic Content Ingestion or Auto-ingestion. The content is placed in a pre-defined
subfolder under the FTP root folder. This pre-defined folder is called the auto-ingest root
folder. Content can also be added by using the
by recording a live stream.
Chapter 5
Add Video function in ETV Portal Server or
Video content added to a VOD-W server goes through a transformation process known as
ingestion. This process takes the original source MPEG video file and generates additional
"trick" files which are used for indexing, fast forward, and rewind. These files are managed by
an internal SQL database on the VOD-W which is used to keep track of all the trick files
associated with a single piece of video content. This chapter describes the process of
ingestion and its impact on data storage, content backup and recovery.
Ingestion Considerations
• Extra space in the server file system is required during ingestion. The space required is
approximately three times the size of the file being ingested. Make sure you have enough
free space available before performing an ingestion.
• You should also understand that ingestion time is a function of (1) the configured
ingestion rate and (2) the file size (or file duration and bit rate).
• The maximum number of simultaneous ingestions on the ETV Portal Server is two. If
the number of attempted ingestions exceeds two, they will be queued up.
• All content titles must begin with a forward slash (/) and apostrophes are not allowed.
Content Ingestion
Before the ingestion process begins, the video content must physically reside on the VOD-W
server. In most cases, this file transfer is handled automatically by the EtherneTV Portal
Server. In a typical scenario, after recording a piece of video content, the ETV Portal Server
automatically FTPs the video to a temporary staging area on the VOD-W and launches the
ingestion process. Ingestion is a software process that runs in the background on the VOD-
VOD-W Admin Guide 39

W server and may take place even while the VOD-W is serving up a large number of
simultaneous video streams. Depending on the size of the video asset and overall VOD-W
server load, the ingestion process may only take a few minutes or more than an hour. Once
the Portal Server driven ingestion is complete, the original source video file held in the VODW disk staging area is deleted.
For MPEG-1 or MPEG-2 content, a total of 6 supplemental trick files are generated in
addition to the main or original video asset. During normal playback, the actual file streamed
by the VOD server is the main MPEG asset. However, when the remote client hits the Fast
Forward (or Rewind) button on his player or Set Top Box, the VOD server gets the FF
command and uses the accompanying Fast Forward index, map, and main files to locate the
proper position in the video and begin a Fast Forward stream. Rewind works in a similar
fashion. Without these supplement trick files, viewers would be limited to basic play, pause,
and stop commands.
Ingested video content on the VOD-W is stored in the
d:\content directory on the server.
When additional external storage is added to the VOD-W, the content resides here as well
under directory names such as
G:\content2, H:\content3, I:\content4, or J:\content5. Note
that some additional storage overhead is incurred as a result of the file ingestion process. The
following table shows the total number of stored files and added overhead for each type of
MPEG video asset.
MPEG Type Total Files Disk Storage Overhead
MPEG-1 6 41%
MPEG-2 6 42%
MPEG-4 6 122%
C o n t e n t B a c k u p a n d R e c ov e r y
The ingestion process has implications related to content backup and recovery that system
administrators need to keep in mind. VBrick strongly recommends that all stored VOD-W
video content be backed up to an external storage system, a Storage Area Network (SAN), or
a tape backup system. Backing up the ingested video content onto an external system is
insurance against the failure of one or more of the VOD-W disk drives. Since the backed up
content is stored in "post-ingested" form (the main asset plus all associated trick files),
content recovery is rapid and straightforward. The VOD-W database is backed up each
evening, so that recovery from disk failure is a relatively straightforward process of restoring
the backup file.
If a system administrator does not have a disk backup system in place, the video content
restoration is a more time consuming and labor intensive process. Each piece of video
content must be re-ingested from its original source file. If a customer has loaded several
hundred hours of video content on their VOD-W system over the course of a year, then this
manual recovery process could take many hours or even days to complete. As described
above, it is possible to replicate the original piece of MPEG-1 or MPEG-2 video content
from the stored Main Asset, although locating and copying the proper file can be time
consuming if more than a few files are involved.
40 © 2008 VBrick Systems, Inc.

Best Practices
• If you encounter problems during file ingestion, the likely cause is a faulty or corrupted
source file. All MPEG-2 source files must be recorded and saved as transport streams—
not program streams. Suspected problem files can be checked with a standalone player
like StreamPlayer.
• The VOD-W server maintains a log file of all successful or attempted file ingestions. If a
file ingestion fails, the log file can be examined for hints as to why the file ingestion
failed. See the Log Options
• After adding a new video to the EtherneTV system using the Portal Server, it may take
up to 120 minutes after ingestion before new video appears in the Portal Server content
directory. Use the
4. Configure the ETV Portal Server on page 10).
Ingesting Content
on page 34 for more about log files.
Sync Now function to make the content available immediately (see Step
VOD-W Admin Guide 41

42 © 2008 VBrick Systems, Inc.

Troubleshooting
Topics in this chapter
VOD-W Event Manager . . . . . . . . . . . . . . . . . . . . . . . . . . . . . . . . . . . . . . . . . . . . . . . . . . . . 43
Windows Event Viewer . . . . . . . . . . . . . . . . . . . . . . . . . . . . . . . . . . . . . . . . . . . . . . . . . . . . .44
VOD-W License Diagnostics. . . . . . . . . . . . . . . . . . . . . . . . . . . . . . . . . . . . . . . . . . . . . . . . . 45
VOD-W Event Manager
The Event Manager lets you view the most recent events that were logged by the VOD-W
server. The logged events correspond to the Log Level and Log Category you selected in the
Logging Manager. See the Events on page 35 for more details about this utility.
T To la u nch th e VOD- W Even t Manager :
1. Go to
2. Click on
Start > Programs > QuickVideo OnDemand Server > Monitor QVOD Server.
Event Manager to display the event log. Select a log file from the drop down list
and click Refresh to update the page.
Chapter 6
Generating Custom Reports
The VOD-W server automatically generates the following log files during normal operation.
If necessary, you can use Crystal Reports or a similar reporting tool to create customized
VOD-W Admin Guide 43

reports. The QVSR log, for example, can be used to generate access reports by individual user.
The log files are saved by default in the Log folder at: C:\Program
Files\InfoValue\QuickVideo OnDemand Server\Log
• QVSR-xxx-xxx.log – usage data including user name, video type, and duration.
QVOD-xxx-xxx.log – usage data including video duration, and video type.
•
QVCS-xxx-xxx.log – system-level command executions and errors.
•
Windows Event Viewer
The Windows Event Viewer is available on Windows Server 2003 Web Edition and other
operating systems. Use this tool to review any system-level messages written to the Windows
system event log.
T To launch the Windows event viewer:
.
1. Go to
Start > Control Panel > Administrative Tools > Event Viewer and click on
Application to populate the viewer with messages.
2. For more details, double-click on any event to launch the
Event Properties window. Use
the arrows buttons on this window to page through the log.
44 © 2008 VBrick Systems, Inc.

VOD-W License Diagnostics
License diagnostics will show the dongle key ID, the number of licensed seats, and the total
licensed throughput in megabytes per second.
Troubleshooting
T To run VOD-W server license diagnostics:
1. Go to
Start > Control > Panel > InfoValue QuickVideo.
2. On the Product Configuration window, click the
Diagnostics
Files\infovalue\LicenseDiagnostic.log
3. Click
. The diagnostic results are saved to a log file in C:\Program Files\Common
.
OK to exit.
License tab and then click Run
VOD-W Admin Guide 45

46 © 2008 VBrick Systems, Inc.

Reinstalling the Software
Topics in this chapter
Overview . . . . . . . . . . . . . . . . . . . . . . . . . . . . . . . . . . . . . . . . . . . . . . . . . . . . . . . . . . . . . . . . 47
Reinstalling the VOD-W Software. . . . . . . . . . . . . . . . . . . . . . . . . . . . . . . . . . . . . . . . . . . . . 47
Reinstalling the Dongle Driver . . . . . . . . . . . . . . . . . . . . . . . . . . . . . . . . . . . . . . . . . . . . . . . 53
Uninstalling the Software. . . . . . . . . . . . . . . . . . . . . . . . . . . . . . . . . . . . . . . . . . . . . . . . . . . .54
Overview
The VBrick EtherneTV VOD-W server is shipped with Windows 2003 Server Web Edition
and the VOD-W software already installed. Installation instructions are provided here only
in the unlikely event that you need to reinstall the software. These instructions explain
how to install the VOD-W software on a system that already has Windows 2003 Server
Web Edition installed. Keep in mind that if you reinstall the software as explained here, you
will also need to restore the database and video content (see Database Restore
Chapter 7
on page 25).
Installation Prerequisites
Before installing the VOD-W software from the EtherneTV VOD-W Server Software CD,
make sure that Windows 2003 Server Web Edition is already installed. This software is
included with the Dell recovery CDs that are shipped with the server (see Server Restore
page 25 for more information). Also make sure there are no previous versions of the
QuickVideo Content Server installed.
T To manually check for previous versions:
1. Go to
2. The services
3. The services
4. The service
Start > Settings >Control Panel > Administrative Tools > Services.
QuickVideo Content Server, QuickVideo OnDemand Server and QuickVideo
Stream Redirector
page 54.
and started.
) should not be listed. If they are, refer to Uninstalling the Software on
IIS Admin Service and World Wide Web Publishing Service should be present
ASP.NET State Service should be present and started.
Reinstalling the VOD-W Software
T To install the VOD-W software on a system with Windows 2003 Server Web Edition
already present:
1. Insert the EtherneTV VOD-W Server Product CD in the CD-ROM drive on the server.
2. Navigate to
3. In the
4. Click
5. Wait until the process completes and reboot when done.
MSDERedistribution.exe and double-click to launch the program.
MSDE Redistribution window select Continue to accept the default.
Yes to create a folder.
on
VOD-W Admin Guide 47

6. Install the InfoValue QuickVideo OnDemand Server by double-clicking on
SetupVOD-W_x_x_x_x.exe.
7. Click
Next on Welcome to the InstallShield Wizard for EtherneTV-VOD-W.
8. In the Choose Destination Location window select Next to accept the default.
9. If prompted, you may need to insert the Windows 2003 Web Edition CD in the drive.
10. When prompted, insert the EtherneTV VOD-W Server Software CD in the drive.
11. Click
12. Click
13. Click
Next on the Welcome to the QuickVideo OnDemand Server page.
Yes on the License Agreement.
Next on the Readme File.
14. Click Next on Choose Destination Location page to accept the default.
15. Click
16. Click
17. Click
18. Click
48 © 2008 VBrick Systems, Inc.
Next on Setup Type.
Next on Select Program Folder to accept the default.
Next on the Start Copying Files window.
OK to skip the License Registration screen.

19. Click Next on the Configuration Completed page.
Reinstalling the Software
20. When the InfoValue Product Configuration page is displayed, select your
address from the drop down list and click
VOD-W Admin Guide 49
OK.
Server IP

21. When the first Installation QuickVideo OnDemand Complete page is displayed, click
Finish.
22. When the second Installation Complete page is displayed saying the EtherneTV VOD-W
has finished installing, click
Finish to restart your computer.
23. Wait for the computer to restart and then login. Then go to
InfoValue Quick Video
50 © 2008 VBrick Systems, Inc.
.
Start > Control Panel >

Reinstalling the Software
24. On the License tab, click Load License File and then navigate to the file, select it and
click
Open. (The license file is included with the VOD-W server software on a separate
VOD-W Server License CD.)
25. Click
OK and OK again when the license file has been successfully loaded.
26. Launch the configuration utility: Go to
27. Change
Storage Path 1 to D:\Content to store video. The total amount of storage
Start > Control Panel > InfoValue QuickVideo.
capacity on the D: drive depends on your VOD-W server:
Model Platform Total Sto r a g e
VOD 50W PowerEdge 1850/1950 136 GB
VOD 125W PowerEdge 2850/2950 409 GB
VOD 300W PowerEdge 2850/2950 836 GB
28. Reboot the server, wait for reboot to complete, and then login.
29. If external storage is configured, click
on the external storage volume. Then click
Add Storage Path, browse to the Content directory
Add and click OK.
VOD-W Admin Guide 51

30. Repeat the step above for each external storage volume.
31. When done click
Shutdown > Restart
OK to exit the configuration utility and reboot the server: Go to Start >
.
32. After the reboot, ingest the demo content as follows. There are seven demo files to
ingest and they must be ingested one at a time.
33. Go to
52 © 2008 VBrick Systems, Inc.
Start > All Programs > Video OnDemand Server > Ingest Content.

Reinstalling the Software
34. In the Content Import Location field click Browse and navigate to E:\StagingArea.
35. Highlight the first demo file and in the
Content Title field enter the title that will be seen
by users in the format:
/Demo/< Name of Demo file >
36. Click Start. When done repeat these steps for the other six files.
Reinstalling the Dongle Driver
The license file corresponding to maximum streams and bandwidth you purchased is preinstalled on the server by VBrick. Under normal circumstances you will never have to reinstall the license. When you purchase a VOD-W, a dongle key with the proper settings is also
included. This dongle key must be connected to any available USB port (front or rear) on the
unit to enable video streaming through the server. The license dongle regulates the maximum
video streaming throughput and the maximum number of simultaneous video streams. The
license file is pre-installed on the VOD-W server in the
still need to reinstall the dongle driver if you ever need to reinstall the system.
Installing the Dongle Driver
T To load the license with the dongle:
1. Attach the dongle key to any available USB port and click
Hardware Wizard
2. Go to
Start > Control Panel > InfoValue QuickVideo.
3. Click on the
4. After loading a valid license, click on
restart the service, and load the new license.
.
License tab and click the Load License File button.
Load Dongle Driver. This will load the dongle driver,
\system32 folder. However, you will
Continue to run the Found New
VOD-W Admin Guide 53

Note If errors occur, click Run Diagnostics (on the license tab) and send the log file, the
infovalue.lic file, and your dongle ID to VBrick Support Services. See VOD-W
Event Manager on page 43 for more information.
Viewing License Status
T Viewing the current license status:
1. Launch the QVOD Server Console.
2. Review the information of the splash page for current status:
Streams
and Maximum Throughput.
Uninstalling the Software
This procedure does not delete or remove any content that has already been ingested. To
remove ingested content, use the content deletion procedures before or after installation.
T To un-install the VOD-W software:
Maximum Number of
1. Go to
Start > Programs > QuickVideo OnDemand Server > Uninstall QVOD Server to
uninstall the QuickVideo OnDemand Server.
2. For a cleaner un-install, you should also uninstall the database components. To un-install
database components, go to
Start > Settings > Control Panel > Add or Remove Programs
and un-install Microsoft SQL Server Desktop Engine.
3. Go to the file system and delete the folder
4. To un-install the remaining VBrick VOD-W components, go to
Panel > Add or Remove Programs
and un-install EtherneTV-VOD-W.
C:\Program Files\Microsoft SQL Server.
Start > Settings > Control
5. Reboot the host after un-installing these items.
If you are planning to reinstall the VOD-W software, delete the following folders in
C:\Program Files:
• Infovalue
Microsoft SQL Server
•
• MSDE Redistribution
•
VBrick
The license file will remain in
C:\Windows\System. If you are reinstalling the VOD-W
software, there is no need to reload the license file.
54 © 2008 VBrick Systems, Inc.

Chapter 8
Adding Storage to 1850/2850 Servers
Topics in this chapter
Overview . . . . . . . . . . . . . . . . . . . . . . . . . . . . . . . . . . . . . . . . . . . . . . . . . . . . . . . . . . . . . . . . 55
Adding Storage to 1850 Servers (VOD 50W) . . . . . . . . . . . . . . . . . . . . . . . . . . . . . . . . . . . . 56
Adding Storage to 2850 Servers (VOD 125/300W) . . . . . . . . . . . . . . . . . . . . . . . . . . . . . . . 60
Overview
VBrick's SCSI-attached ES3 and ES4 external storage arrays are available to Dell 1850/2850
VOD-W customers to increase video storage or to backup existing content. The VOD 125W
and 300W servers use RAID5 technology for speed, performance, and to protect against the
failure of a single drive. Data is written across three or more drives to protect drive the
content. If the VOD-W server you purchased from VBrick included external storage, the
storage array was installed and configured before delivery to your site. Use the steps in this
chapter only if you are adding external storage at a later date.
Table 6. 1850/2850 VOD-W External Storage Devices †
Model Hardware Interface Raw Capacity Drives
ES3 Dell PowerVault 220S SCSI 1 TB 7
ES4 Dell PowerVault 220S SCSI 2 TB 14
For detailed technical information, LED descriptions, troubleshooting procedures, etc.
†
refer to the Dell PowerVault manuals listed in Related Publications
on page viii.
Monitoring Performance
To verify that the external file system is working properly, launch the QVOD Server Console
(see Monitoring the Server
view detailed performance characteristics. You can also check the status LEDs on the each
the drive. They should all be illuminated steady green. If not, refer to the appropriate Dell
documentation. (The Dell PowerVault documentation is online and the manuals are in
Related Publications
Services. They will explain the warranty process and arrange for a replacement. All drives are
hot swappable but it will take several hours or more to rebuild an array and you may want to
rebuild at night or during off-peak hours.
Note There is no way to specify where content is saved. If you add additional storage, newly
ingested content may be saved on any available drive (internal or external) as
determined by the VOD-W software.
on page 27), and open the Disk Manager. Click on any drive to
on page viii.) If any of the LEDs show a failure, contact VBrick Support
VOD-W Admin Guide 55

Adding Storage to 1850 Servers (VOD 50W)
Use the following procedure to add external storage to VOD 50W servers. The procedure is
the same for ES3 (1 TB) and ES4 (2 TB) devices.
1. Power everything down.
2. ES3/ES4 setup.
a. Connect both power cords on ES3/4.
b. Connect SCSI cable to the VOD 50W.
c. SCSI termination is internal; no terminator is necessary.
3. EtherneTV VOD-50W (VBrick VOD 50W Dell 1850) setup.
a. Connect the SCSI cable from the ES3/4 to SCSI 1/A port connector on the
EtherneTV VOD-50W; this is on the back of the 1850 on the right and the
connector on the two ports SCSI card (as shown below). If you are connecting two
external ES3/4 arrays, then connect the SCSI cable from the second storage array to
the SCSI 2/B port connector on the EtherneTV VOD-50W.
4. Power up ES3/4.
5. Power up Dell 1850.
6. After the system reboots, logon as
7. Click
8. Select
Start > Administrator Tools > Computer Management.
Disk Management under Storage. In the Initial and Convert Disk Wizard Welcome
Windows select
Next.
Administrator.
56 © 2008 VBrick Systems, Inc.

Adding Storage to 1850/2850 Servers
9. In the Select Disks to Initialize window, select all disk(s) displayed and Next.
10. In the
11. In the Completing the Initialize and Convert window, click
12. In the
Select Disks to Convert window, select all disk(s) displayed and Next.
Finish.
Computer Management window, right-click on the Basic disk and select Convert to
Dynamic Disk
. (The 1850 uses Dynamic Disks.) Do this for all 14 drives if they are not
Dynamic and click OK when done.
13. Right click on
page, click
VOD-W Admin Guide 57
Disk0 and select Create New Volume. In the New Volume Wizard Welcome
Next.

14. In the Select Volume Type page, select Striped and click Next.
15. In the
16. In
58 © 2008 VBrick Systems, Inc.
Select Disks page, select Disk0. Then click Remove and Next.
Select Disks page, highlight disks 0–6. Then click Add then Next.

17. In the Assign Drive Letter or Path page, click Next.
Adding Storage to 1850/2850 Servers
18. In the
VOD-W Admin Guide 59
Format Volume page, click Next.

19. When the New Volume Wizard is complete, click Finish.
20. Repeat Steps 13– 19 for the second TeraByte: Disks 7–-13.
Adding Storage to 2850 Servers (VOD 125/300W)
Use the following procedure to add storage to both VOD 125W and VOD 300W servers. The
procedure is the same for ES3 (1 TB) and ES4 (2 TB) devices. Note that the 2850 uses Basic
Disks.)
1. Power everything down.
2. ES3/ES4 setup.
a. Connect both power cords on ES3/4.
b. SCSI termination is internal; no terminator is necessary.
3. EtherneTV VOD-125W (VBrick VOD125 Dell 2850) setup.
a. Connect the SCSI cable from the ES3/4 to SCSI 0 port connector on the
EtherneTV VOD-125W; this is bottom left connector on the two port SCSI card (as
shown below). If you are connecting two external ES3/4 arrays, then connect the
SCSI cable from the second storage array to the SCSI 1 port connector on the
EtherneTV VOD-125W.
4. Power up the ES3/4.
5. Power up Dell Server (VOD-125W).
6. During Dell boot up:
a. Do not type
b. Watch for message
Ctrl-A to enter the Adaptec SCSI BIOS.
PowerEdge RAID controller BIOS then press Ctrl-M to go to RAID
controller configuration. It takes several minutes to enter the config utility.
60 © 2008 VBrick Systems, Inc.

Adding Storage to 1850/2850 Servers
7. In PERC RAID BIOS screens:
a. Perform
Configure > View/Add Configuration scans all channels.
b. You should see one logical drive on RAID Ch-0, IDs=0 and 1; this is the first drive
in the system and is used to store the operating system, the VOD server software,
and database
c. You should see the remaining four internal drives configured as a RAID 5 array.
These drives are used to store the video content on the system. These drives are
configured on Ch-0, ID=1 and Ch-1, IDs: 2, 3, & 4. The RAID 5 array ensures that
no video content is lost if a single drive fails.
d. Select
e. Perform
Adapter then Adapter-1 (Bus=09, Dev=04, Slot=003) Perc 4/DC.
Configure > View/Add Configuration scans all channels.
f. On channel 0 of the RAID BIOS configuration screen, you should see all 14 drives
of the ES3/4 storage array. These are ID’s 0 through 5, and 8 and ID’s 9 through 15.
Use the arrow keys on the keyboard to move to the Channel 0, ID=0 drive and use
the space bar to select this drive. Repeat this procedure for the first seven drives (IDs
0 through 5 and 8) on Channel 0. When you have completed this process, press
Space F10
to enter the RAID 5 configuration and then arrow down to the Advanced
menu section. Set the RAID 5 configuration as follows:
F10
Stripe = 128k
Write policy = wrback
Read policy = Adaptive
Cache policy = Direct I/O
Press
Esc then Enter.
Select Initialize. Use Space bar to select the logical drive(s) then Yes.
For an ES4, repeat this procedure for IDs 9 through 15 to create a second logical
drive.
If you are installing a second ES3/4 2TB storage array, repeat all of the above steps
in Section d, but configure all the drives in the second 2TB storage array to use
Channel 1. Set the parameters in the
then press
Esc and then Enter when finished.
Save config? = yes
Exit and reboot the system.
8. After the system reboots, login as
9. Click
10. Select
Start > Administrator Tools > Computer Management.
Disk Management under Storage. In the Initial and Convert Disk Wizard Welcome
Windows select
Next.
Advanced menu to be the same as Section d,
Administrator.
VOD-W Admin Guide 61

11. In the Select Disks to Initialize window, select all disk(s) displayed and Next.
12. In the
13. In the Completing the Initialize and Convert window, click
14. In the
Select Disks to Convert window, select all disk(s) displayed and Next.
Finish.
Welcome to the New Volume Wizard page click Next.
15. In the
62 © 2008 VBrick Systems, Inc.
Select Volume Type page, select Simple and click Next.

16. In the Select Disks window click Next.
Adding Storage to 1850/2850 Servers
17. In the Assign Drive Letter or Path window click
VOD-W Admin Guide 63
Next.

18. In the Format Volume window, select Perform a quick format to speed up the format, then
click Next. This option will complete the format in 5–10 minutes.
19. When the New Volume Wizard is complete, click Finish.
20. Repeat steps 14–19 for the second Terabyte. The external storage will not be available
until the format is complete. You can monitor the progress of the format from the
Computer Management page.
T To monitor the progress of the format:
1. Go to
2. Double-click
3. Then click
Start > Control Panel > Administrative Tools > Computer Management.
Storage in the left pane to expand the tree.
Disk Management and you can monitor the progress of the format from the
following window.
64 © 2008 VBrick Systems, Inc.

Adding Storage to 1850/2850 Servers
VOD-W Admin Guide 65

66 © 2008 VBrick Systems, Inc.

Chapter 9
Adding Storage to 1950/2950 Servers
Topics in this chapter
Overview . . . . . . . . . . . . . . . . . . . . . . . . . . . . . . . . . . . . . . . . . . . . . . . . . . . . . . . . . . . . . . . . 67
Adding Storage to VOD 50/125/300W Servers . . . . . . . . . . . . . . . . . . . . . . . . . . . . . . . . . . 67
Overview
If you purchased a system with external storage, the storage is configured and shipped with
the VOD-W server—no additional configuration is required. Use the steps in this chapter
only if you are adding external storage at a later date. The procedure is the same for VOD
50/125/300 servers. The direct-attached ES5/10/15 external storage arrays shown in
Table 7 are available to Dell 1950/2950 VOD-W customers.
Table 7. 1950/2950 VOD-W External Storage Devices †
Model Hardware Interface Raw Capacity Drives
ES5 Dell PowerVault MD1000 SAS 1.5 TB 5
ES10 Dell PowerVault MD1000 SAS 3 TB 10
ES15 Dell PowerVault MD1000 SAS 4.5 TB 15
For detailed technical information, LED descriptions, troubleshooting procedures, etc.
†
refer to the Dell PowerVault manuals listed in Related Publications
Adding Storage to VOD 50/125/300W Servers
Use the following procedure to add storage to an existing VOD-W 50/125/300 server. This
procedure includes the installation of a Perc 5/E External RAID Controller card.
T To add external storage:
1. Power everything down.
2. Remove bracket shown here:
on page viii.
VOD-W Admin Guide 67

3. The next photo shows the Dell 1950 with the top cover off.
4. The next photo shows the Dell 2950 with the top cover off.
As shown in the next photo, make sure the split backplane switch is in the upward
position for "single disk."
68 © 2008 VBrick Systems, Inc.

Adding Storage to 1950/2950 Servers
5. Insert the Perc 5/E External RAID Controller shown below into the Dell 1950/2950.
VOD-W Admin Guide 69

6. The next photo shows Dell 1950 top cover off with PERC 5/E external RAID inserted.
7. The next photo shows the Dell 2950 top cover off with PERC 5/E external RAID
inserted.
70 © 2008 VBrick Systems, Inc.

Adding Storage to 1950/2950 Servers
8. The next photo shows Dell 1950 back view with PERC 5/E external RAID connected.
9. The next photo shows MD1000 back view with PERC 5/E external RAID connected.
10. VOD-W setup for both Dell 1950 and 2950 Servers.
Connect the SCSI cable from the DM1000 to SCSI 0 port connector on the 1950/2950;
this is bottom left connector on the two-port SCSI card (shown below). If you are
connecting a second external DM1000 array, then connect the SCSI cable from the Out
port of the first external to the In port of the second external on the right from the back
storage array. If you are connecting a third external DM1000 array, then connect the
SCSI cable from the Out port of the second external to the In port of the third external
on the right from the back storage array.
VOD-W Admin Guide 71

11. The next photo shows the back view of 2950/MD1000 with PERC 5/E external RAID
connected.
12. Dell 2950 back view PERC 5/E external RAID ports.
13. MD1000 setup.
a. Connect both power cords on DM1000.
b. CSI termination is internal; so no terminator is needed.
14. Power up the MD1000.
15. Power up the 1950/2950 Dell Server.
16. During Dell boot up watch for the message
Ctrl-R to go to RAID controller config (this takes several minutes to enter the config
PowerEdge RAID controller BIOS then press
utility).
17. In the PERC RAID BIOS screens:
a. Use Arrow Up/Down to select
Function 0x00
then Enter.
b. Hit F2 use Tab or Up/Down arrow key to select
72 © 2008 VBrick Systems, Inc.
Controller 1: Perc 5/E adapter Bus 0x0F Device 0x0E
Create New VD then Enter.

Adding Storage to 1950/2950 Servers
c. Use Tab or Arrow Up/Down key to highlight on Raid Level and Enter to select
RAID-5 then Enter.
d. To select the drives use the Tab to
Physical Disks then Space to select drive ID
01:00–01:04 for 5 drives (300 GBs each). The approximate size is about 1142272
MB. (First 1.5 TB)
e. Use the Tab or Up/Down key to select
OK then hit Enter.
f. Hit OK
g. Hit F2 on
Virtual Disk 0 and select Initialization > Fast Init then enter and OK.
h. If there are 5 disks in the enclosure being configured skip to step v.
i. Use Tab or Arrow Up/Down key to highlight on
RAID-5 then
j. To select the drives use the Tab to
Enter.
Physical Disks then Space to select drive ID
Raid Level and Enter to select
01:05–01:09 for 5 drives (300 GB each). The approximate size is about 1142272 MB.
(Second 1.5 TB)
k. Use the Tab or Up/Down key to select
l. Hit
OK.
m. Use Tab or Arrow Up/Down key to highlight
n. Hit F2 on
Virtual Disk 1 and select Initialization > Fast Init then enter on OK.
OK then hit Enter.
Virtual Disk 1.
o. If there are 10 disks in the enclosure then skip to step v.
p. Use Tab or Arrow Up/Down key to highlight
then
Enter.
q. To select the drives use the Tab to
Physical Disks then Space to select drive ID
Raid Level and Enter to select RAID-5
01:10–01:14 for 5 drives (300 GB each). The approximate size is about 1142272 MB.
(Third 1.5 TB)
r. Use the Tab or Up/Down key to select
s. Hit
OK.
t. Use Tab or Arrow Up/Down key to highlight on
u. Hit F2 on
v. H it
w. H i t
x. Simultaneously hit
Virtual Disk 2 and select Initialization > Fast Init then enter on OK.
Esc to exit.
OK.
Ctrl-Alt-Del key to reboot the server.
OK then hit Enter.
Virtual Disk 2.
18. Repeat step 17 for each additional enclosure. The drive IDs will be different in the
second enclosure and in the third enclosure in the system.
19. After the system reboots, logon as
20. Go to
Start > Administrator Tools > Computer Management.
Administrator.
VOD-W Admin Guide 73

21. Go to Storage > Disk Management. In the Initialize and Convert Disk Wizard welcome
window select
Next.
22. In the Select Disks to Initialize window, click
Next. As an example, the following window
is shown for ES5 1.5 TB devices. The window you see will vary depending on the
capacity of the devices you are actually configuring.
74 © 2008 VBrick Systems, Inc.

Adding Storage to 1950/2950 Servers
Note The windows you see from this point on will vary depending on the capacity of the
devices you are actually configuring. As shown in Table 8 on page 82, you may be
configuring arrays with 1.5–13.5 TB of storage. The windows for arrays other than 1.5
and 3 TB are similar to the screens shown here but are not identical.
As another example, the following window is shown for ES10 3 TB devices.
23. In the Initialize and Convert Disk Wizard screen, leave all disks unchecked and click
Next.
Note Two or more disk arrays may appear if you have 10 or more physical disks since each
group of 5 disks were configured as a single RAID5 array in step 22.
As an example, the following window is shown for ES5 1.5 TB devices.
VOD-W Admin Guide 75

76 © 2008 VBrick Systems, Inc.

Adding Storage to 1950/2950 Servers
As an example, the following window is shown for ES5 3 TB devices.
Note Two or more logical disks may appear if you have 10 or more physical disks since each
group of 5 disks were configured as a single RAID 5 array in step 22.
24. When the Completing the Initialize and Convert Disk Wizard window is displayed, click
Finish. As noted the data in the window will vary depending on the amount of storage
you are adding. For ES5 1.5 TB devices, only Disk 2 will be displayed.
VOD-W Admin Guide 77

For ES10 3 TB devices, Disk 2 and Disk 3 will displayed.
25. In the Computer Management window, right-click on Disk 2 and select
New Partition.
The example above is for 10 external disks. Disk 3 would not be present if only 5 disks are
deployed. Likewise, Disk 4, Disk 5, etc. may be present for larger external configurations.
78 © 2008 VBrick Systems, Inc.

Adding Storage to 1950/2950 Servers
26. In the Welcome to the New Partition Wizard window select Next.
27. In the Select Partition Type window select
28. In the Specify Partition Size window select
Next.
Next.
VOD-W Admin Guide 79

29. In the Assign Drive Letter or Path window select Next.
30. In the Format Partition window select
Next.
31. In the Completing the New Volume Wizard window select
Finish.
32. Repeat steps 26–31 for drives H and I if necessary. If there is more than one disk
enclosure, repeat for drives J through O (as many as present).
33. Open Windows Explorer.
80 © 2008 VBrick Systems, Inc.

Adding Storage to 1950/2950 Servers
34. Select G drive and create Content2 by right-clicking and selecting New > Folder. Then
create Content3 on the H: drive and Content4 on the I: drive if necessary. If there is more
than one disk enclosure, repeat for drives J through O as necessary.
35. Go to
Control Panel > InfoValue QuickVideo.
36. Click on
37. Click on
Content4 on drives H and I if necessary. If second or third enclosure is present, repeat
Add Storage Path.
Browse and select G:\Content2. Then click Add. Repeat for Content3 and
for drives I through O as necessary. Your results should appear as follows. Then click OK.
38. Then click
VOD-W Admin Guide 81
OK to close InfoValue QuickVideo.

39. When complete, the drive letters and folder names should correspond to the number of
drives according to the following table.
Table 8. Disk Number and Capacity
Disks Capacity (TB) Drive Letter for
Last Logical Disk
Content Folder for
Last Logical Disk
5 1.5 G /Content2
10 3 H /Content3
15 4.5 I /Content4
20 6 J /Content5
25 7.5 K /Content6
30 9 L /Content7
35 10.5 M /Content8
40 12 N /Content9
45 13.5 O /Content10
82 © 2008 VBrick Systems, Inc.

Index
Numerics
1. Unpacking the Server 7
2. Connecting the Server 8
2. Submit a Certificate Request 14
3. Configuring the IP Address 10
3. Install the Certificate 14
4. Configuring the ETV Portal Server 10
A
Adding External Storage 21
Adding Storage 55
Adding Storage to 1850 Servers (VOD 50W) 56
Adding Storage to 1850/2850 Servers 55
Adding Storage to 1950/2950 Servers 67
Adding Storage to 2850 Servers (VOD 125/
60
300W)
Adding Storage to VOD 50/125/300W Servers
67
Administration - NXG1/2 17
B
Backup and Restore 24
Backup Database 24
Best Practices 41
Best Practices 25
C
Compatibility 2
Configuring the Server 18
Content Backup and Recovery 40
Content Ingestion 39
G
Generating Custom Reports 43
Getting Started 1, 7
Getting Started - NXG1/2 1
I
Individual Drive 33
Individual Network Interface Card 32
Ingesting Content 23, 39
Ingesting Content NXG1/2 39
Ingestion Considerations 39
Installation Prerequisites 47
Installing the Dongle Driver 53
L
Launching the Configuration Utility 18
Logging Manager 34
M
Monitoring Performance 55
Monitoring the Server 24, 27
N
Network Manager 31
O
Overview 17, 39, 47, 55, 67
P
Post Configuration Steps 14
Product Overview 1
D
Database Backup 24
Database Restore 25
Disk Manager 33
R
Reinstalling the Dongle Driver 53
Reinstalling the Software 47
Reinstalling the VOD W Software 47
Restore Application 25
E
EtherneTV-VOD 125W/300W 60
EtherneTV-VOD 50W 56
Event Manager 35
Event Viewer 44
External Storage 2
F
Feature Overview 1
VOD-W Admin Guide 83
S
Server Administration 17
Server Compatibility 2
Server Description 1
Server Models 1
Server Overview 1
Server Restore 25
Server Software 3
Session Manager 28
Starting the QVOD Server Service 27

Step 1. Unpack the Server 7
Step 2. Connect the Server 8
Step 3. Configure the IP Address 10
Step 4. Configure the ETV Portal Server 10
Step 5. Verify the Installation 11
System Requirements 2
T
Technical Support 4
Troubleshooting 43
U
Uninstalling the Software 54
Using a Direct Connection 18
Using a Remote Desktop Connection 17
Using the QVOD Server Console 27
V
Viewing License Status 54
VOD W Content Servers 1
VOD W Event Manager 43
VOD W External Storage Devices 2
VOD W License Diagnostics 45
VOD W Product CD 4
VOD W Software 3
Z
Event Manager 35
Individual Network Interface Card 32
Logging Manager 34
Manually Ingesting Content 23
Windows Event Viewer 44
84 Index


VBrick Systems, Inc.
12 Beaumont Road
Wallingford, Connecticut 06492, USA
 Loading...