

Page 1
20L Wet & Dry
MULTIFUNCTION CLEANER
20L WET & DRY
MULTIFUNCTION
CLEANER
LET’S GET STARTED.
VX49
vax.com.au
vax.co.nz
Page 2

Let’s talk safety
Basic safety precautions
This machine is intended for household use only, and
NOT for commercial or industrial use.
WHEN USING THE VACUUM CLEANER:
Basic safety precautions should always be observed,
including the following:
• Do not leave the vacuum cleaner unattended when
plugged in. Unplug it from the socket when not in
use.
• Not to be used as a toy.
• Children should be supervised to ensure that they
do not play with the appliance.
• This appliance is not intended for use by persons
(including children) with reduced physical, sensory
or mental capabilities, or lack of experience and
knowledge, unless they have been given supervision
or instruction concerning the use of the appliance by
a person responsible for their safety.
• Use only as described in this manual. Use only Vax
recommended attachments.
• Do not use the vacuum cleaner if it has been
dropped, damaged, left outdoors or dropped
into water. Do not use the vacuum cleaner with
a damaged cord or plug. If the supply cord is
damaged, it must be replaced by the manufacturer
or a recommended service agent to avoid a hazard.
• Do not handle the plug or machine with wet hands.
• Do not leave outdoors.
• Do not pull or carry by cord. Do not use cord as a
handle, close a door on the cord or pull cord around
sharp edges or corners. Do not run the machine
over the cord. Keep the cord away from heated
surfaces.
• Do not put any objects into openings or operate with
openings blocked. Keep them free of anything that
might reduce airow.
• Keep hair, loose clothing, ngers and all parts of
body away from openings and moving parts.
Don’ts
• Do not pick up hot coals, cigarette butts, ash,
matches or any hot, smoking or burning objects.
• Do not use the vacuum without the lters in place.
• Turn o all controls before unplugging.
• Do not vacuum up harmful or toxic material
(chlorine, bleach, ammonia, drain cleaner etc.).
• Do not vacuum up hard or sharp objects such as
glass, nails, screws, coins, etc.
• Do not vacuum baking soda or any other powderbased carpet refresher or deodoriser.
• Do not vacuum plaster dust, concrete dust or any
other building or vitreous material.
Page 3

Do’s
• Use only approved 10 amp extension cords. Care
should be taken to arrange the cord so that the cord
cannot be tripped over. Only use a weatherproof 10
amp extension cord when using in wet mode.
• Store the vacuum cleaner in a cool, dry area.
• To prevent dirty water from running into motor, do
not hold the appliance upside-down or lay on its
side. Use appliance in normal vacuuming position.
• Take extra care when cleaning on stairs.
• Turn o the on/o switch before unplugging the
vacuum cleaner.
• Do not carry appliance while motor is running.
• We recommend the use of a residual current device
with a residual current rating of 30mA or less.
WHEN USING BLOWER FUNCTION:
• Direct air discharge at work area only – never at
people or animals.
• Do not use blower as a sprayer in wet mode.
• Wear a dust mask and protective eye wear.
WARNING
Always switch o and unplug the machine
from the electrical outlet before assembling,
opening, emptying the dirt container,
before connecting/disconnecting the
attachments, or carrying out maintenance or
troubleshooting checks.
WARNING
If the hose or tools are blocked, switch o
the cleaner and remove the blockage(s)
before re-starting your machine.
WARNING
Cleaning lters and replacing them regularly
maintains vacuum performance. Vax
recommends that your lters should be
checked, cleaned and replaced periodically.
DAMAGE TO THE VACUUM CLEANER CAUSED
AS A DIRECT RESULT OF NOT ADHERING TO
THE GENERAL SAFETY INFORMATION AND THE
INSTRUCTIONS IN THIS USER GUIDE INVALIDATES
THE WARRANTY.
PLEASE KEEP THESE INSTRUCTIONS FOR
FURTHER USE.
If servicing of this product is required, it should only
be performed by a qualied service agent. Please
visit the Vax website for a most up to date list of vax
service agents or contact our Customer Care Line
on: AU: 1300 361 505 / NZ: 0800 800 900 (Mon-Fri
8:30am to 5:00pm)
vax.com.au / vax.co.nz
Page 4

Thank you for buying this Multifunction Cleaner.
The VX49 is a powerful 20L Wet & Dry Multifunction cleaner ideal for both wet and dry
pick-ups. Featuring easy to manoeuvre castor wheels, this cleaner can be used both in the
home and garage, making it ideal for any home.
Taking care of your 20L Wet & Dry Multifunction Cleaner
Inside this guide are instructions on maintaining your new machine, so it’s always ready when
you are to tackle cleaning jobs throughout your home and garage.
We’re here if you need us
For troubleshooting simply visit or call:
Australia: 1300 361 505* New Zealand: 0800 800 900*
vax.com.au vax.co.nz
*Monday – Friday: 8:30am -5:00pm
Calls are charged at the standard local rate. Please make note of the serial
number and model number of the product before calling.
Page 5

Contents
Multifunction Cleaner
Let’s talk safety
Getting to know your machine
Getting started
Using your machine
Taking care of your machine
What to do if it goes wrong
Included with
your machine
3 Extension Tubes
1 Crevice Tool
1 Foam Filter
1 Dry Filter
Getting in touch
Accessories / Notes
1 Paper Dust Bag
1 Dual Function Floor Tool
Page 6
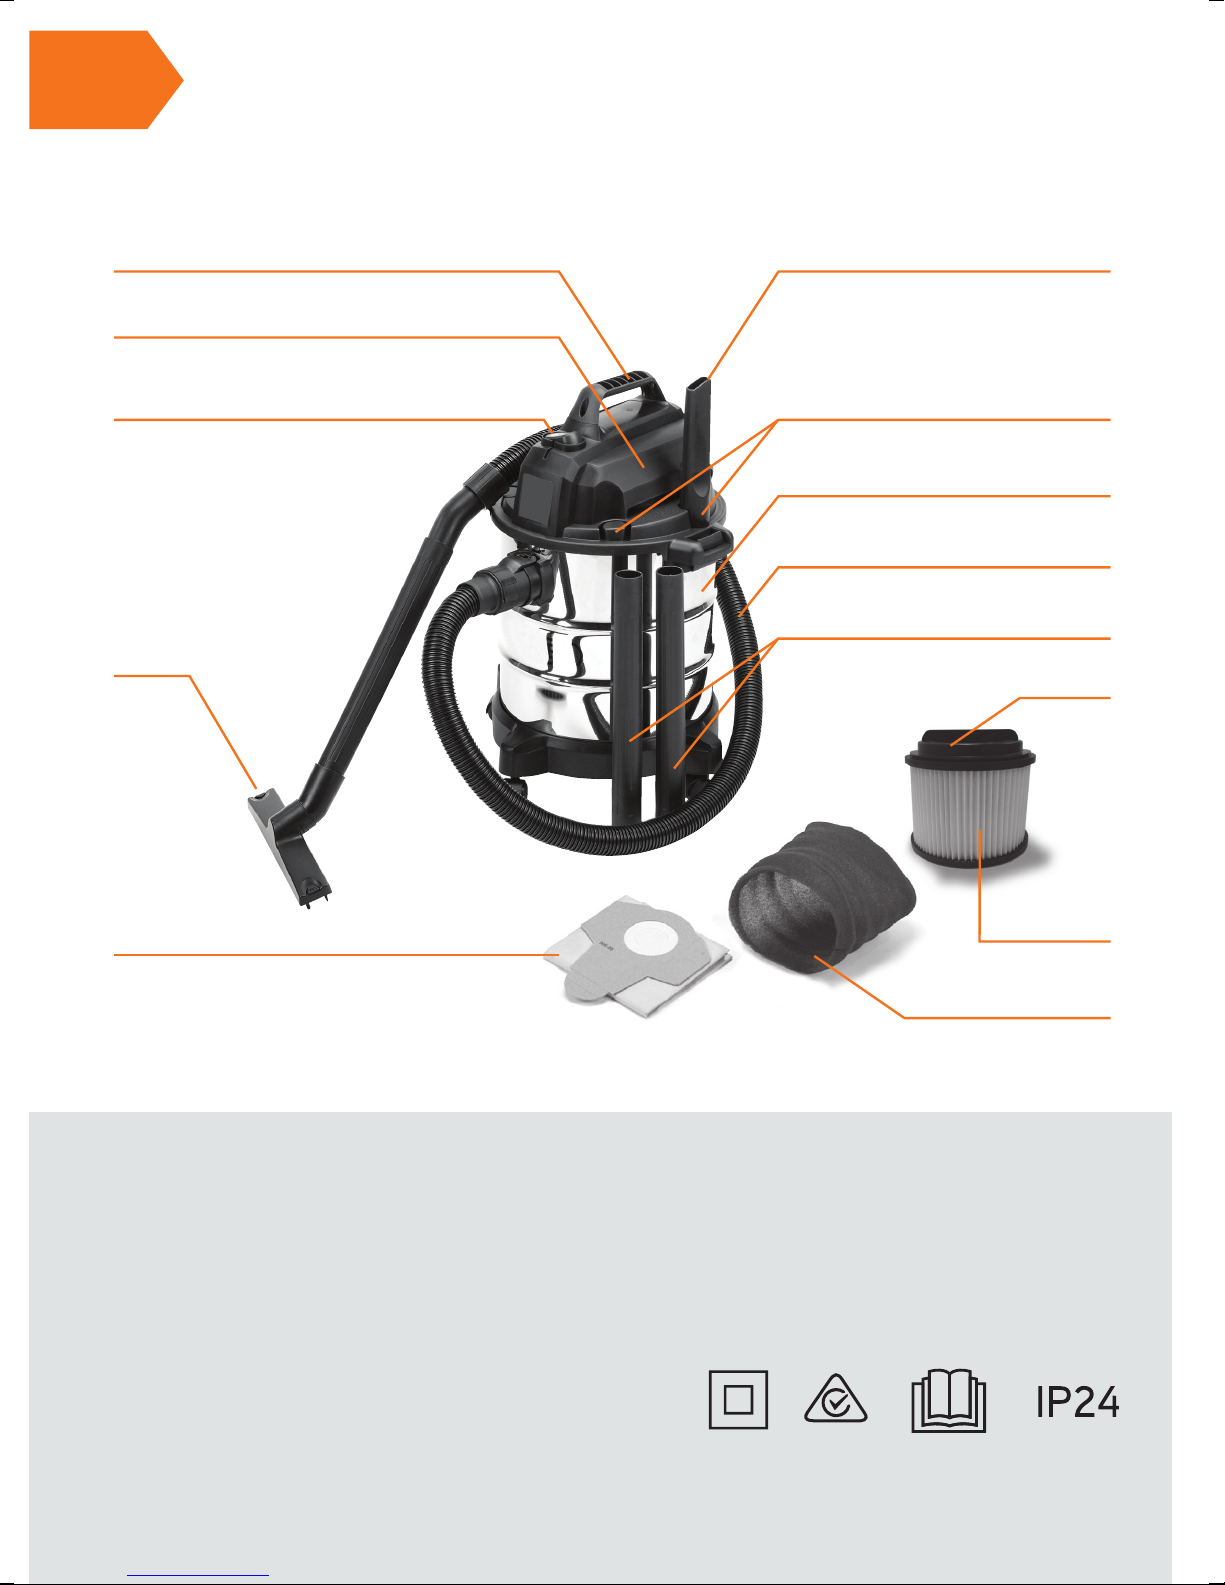
Getting to know your machine
Insulated
Indoor
Use
Read
Instructions
Instructions
Carry handle
Motor housing
On/o switch
Dual function oor
tool (dry / liquids
accessory)
Crevice attachment
Accessory holders
Tank
Flexible hose
Extension tubes x3
Filter Retainer
Paper dust bag
Technical Specifi cation
Name Wet & Dry Canister
Voltage 220-240V ~ 50/60Hz
Wattage 1250W
Tank capacity 20 Litres
Vacuum Pressure 14kpa
Sound Pressure 80dB(A)
Cord length 8m
Weight 5.1kg
Double
Dry lter
Foam lter
Read
Subject to technical change without notice.
*To purchase consumables and accessories, please visit vax.com.au
Page 7

Getting started
PLEASE READ ‘LET’S TALK SAFETY’ AT THE BEGINNING BEFORE USE
Assembling your wet & dry vacuum cleaner
WARNING: To reduce the risk of personal injury, unplug the vacuum cleaner when assembling.
Place the tank upside down
and rmly press the four
caster wheels into the base
of the tank.
Attach the 3 piece wand
to the end of the hose and
then the dual function oor
tool to the end of the wand.
Place the top motor housing
cover onto the main tank
and secure into position
with the retaining clips on
each side. Use the screws
provided to attach the
motor housing handle.
Push the exible hose
into the connector and twist
slightly clockwise.
To remove the exible hose,
twist house anticlockwise
and pull.
Use bristles on the oor
tool for hard surfaces.
For soft surfaces such as
carpet, remove bristles by
pressing the 2 clips down.
Page 8

Using your machine
SETUP the Cleaner from WET to DRY Vacuuming
NOTE: Empty the tank and dispose of any liquid which may have been picked up in wet mode.
Remove the foam lter.
Dry o any excess moisture
from the oat cage.
NOTE: as the suction power decreases, this may indicate that the paper dust bag is full and needs replacing.
Attach the dry lter
beneath the motor housing
by pushing it on.
(This dry lter must
ALWAYS be used in dry
vacuuming mode to help
provide protection and
avoid motor damage).
Once the dry lter has been
pushed onto the oat cage
- align the lter retainer cap
onto the base of lter and
turn clockwise to lock into
place.
Attach the paper dust
bag to the inner side
of the hose connector
on the inside of the tank
as shown.
Push the bag on to
the hose connector.
Place the top motor housing
cover onto the main tank
and secure
into position with the
two retaining clips.
Connect the vacuum
cleaner to the power supply
and switch ON
by pushing the on/o
switch “I”.
Page 9
Using your machine
SETUP the Cleaner from DRY to WET Vacuuming
NOTE: Empty the tank and dispose of any dirt/dust which may have been picked up previously in dry mode.
Remove the dry lter and
replace it with the foam
lter – this slides over the
oat cage as shown.
IMPORTANT: Never vacuum dry dust and dirt with just this foam lter tted as it will provide little or no protection,
resulting in motor damage. To be used in wet mode only.
Remove dust bag from
tank.
Place the top motor housing
cover onto the main tank
and secure into position
with the two retaining clips.
When vacuuming up uids
– the crevice nozzle can be
used when the water level
is too high to use the oor
tool. To ensure the
air ow is adequate, we
recommend that the end
of the nozzle is not totally
immersed.
NOTE: Clean and dry the inside and outside of the machine before storage.
When the uids have
reached the maximum tank
capacity, the oat regulator
will cover the motor lter
causing the motor to work
harder and it will become
noticeably nosier. At this
point turn o the machine
and unplug it from the mains
power and empty the tank.
Once the water tank is
emptied, place the top
motor housing cover back
onto the main tank and
secure into position with
the two retaining clips.
Connect the vacuum
cleaner to the power supply
and switch ON
by pushing the on/o
switch “I” to continue
to vacuum in wet mode.
Page 10

WARNING:
Keep bystanders clear from blowing debris (including persons and animals)
WARNING:
Wear a dust mask and protective eye wear when using blower function .
Make sure the tank container is empty before using the blower.
Using your machine
SETUP the Blower Function
WARNING: Keep bystanders clear from blowing debris (including persons and animals)
WARNING: Wear a dust mask and protective eye wear when using blower function .
IMPORTANT: Make sure the tank container is empty before using the blower.
Remove the hose from
the standard hose outlet
used for cleaning modes
and place it on the blower
outlet located at the back of
the machine. Remove oor
tool and connect the crevice
nozzle to hose.
Connect the vacuum
cleaner to the power supply
and switch ON
by pushing the on/o
switch “I”.
Page 11

Taking care of your machine
Storage
NOTE: Before storing away, make sure to empty all contents of tank container.
NOTE: Make sure all parts, tank and lters are dry prior to storing machine.
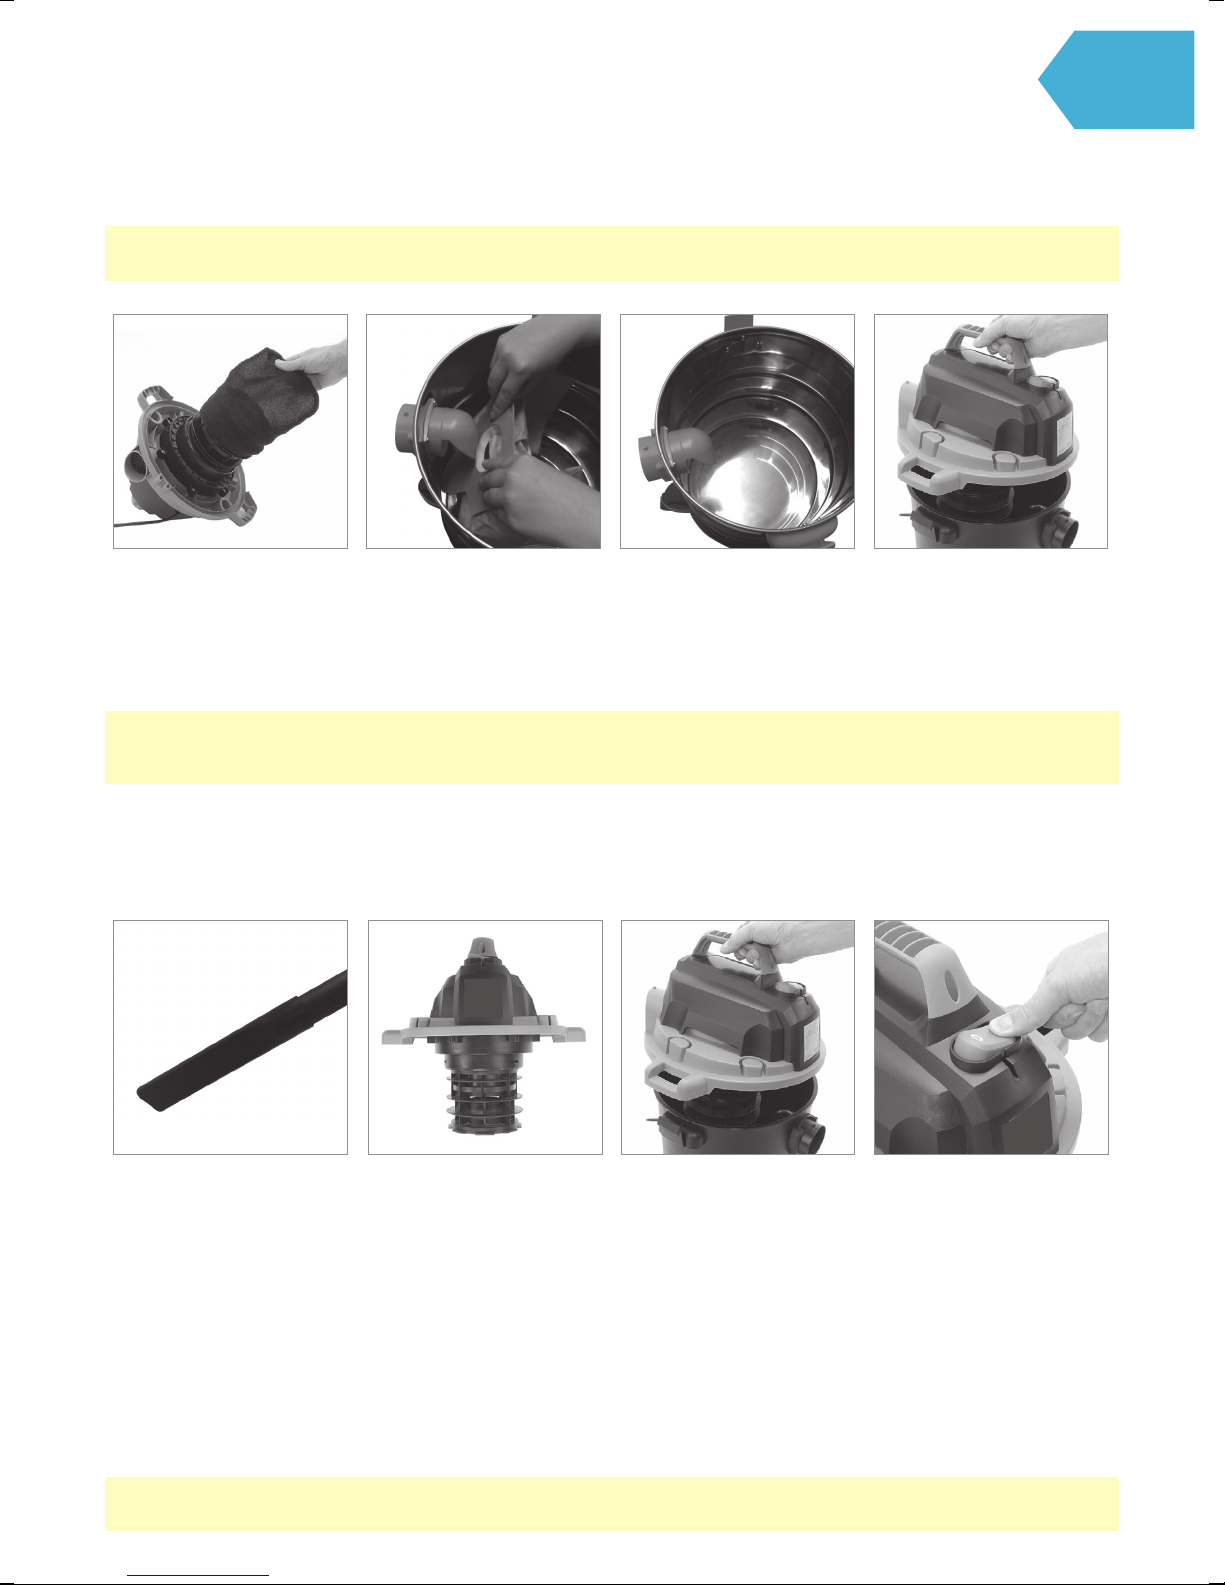
Installing and cleaning the DRY fi lter
NOTE: Unplug machine from the power outlet before performing maintenance.
Installing Dry Filter
1. Install the dry lter over the lter cage with the at end of the lter towards the vacuum power head. Carefully
push lter in until it stops against the power head. (g. 1 & 2)
2. Place lter retainer on top of cartridge lter over the raise lip and tighten down by turning retainer clockwise,
do not over tighten. ( g. 3 & 4)
Removing and Cleaning Dry Filter (THIS FILTER IS NOT WASHABLE)
1. Unlock and remove the lter retainer by turning retainer handle anticlockwise.
2. Carefully hold and pull the dry lter up for removal. (g. 5)
3. Clean the cartridge lter by gently tapping or brushing dirt o . For optimal performance it is recommended
to regularly change this lter depending on level of use (eg. 3-6 months).
4. Install cleaned or new lter into place as instructed above.
Installing and cleaning the FOAM fi lter
NOTE: Unplug machine from the power outlet before performing maintenance.
Installing Foam Filter
1. Follow instructions to remove dry dust lter rst before changing to foam lter.
2. Carefully slide foam lter down over the lter cage making sure the whole cage is covered. (g. 1 & 2)
Cleaning Foam Filter
3. Carefully remove foam lter. ( g. 3)
4. Use a mild soap and water solution to wash foam lter and rinse with clean water. ( g. 4)
5. Allow lter to air dry before installing and using again.
Page 12

What to do if it goes wrong
There is an
accessory missing.
The vacuum cleaner
has no power?
SolutionProblem
• Check the Parts Overview page in the guide to make sure the part is
de nitely included in your unit.
• If the part is missing we’re here to help. Simply call us on:
AU 1300 361 505 / NZ 0800 800 900
• Unit may not be plugged into the electrical outlet correctly, ensure the
plug is pushed in securely.
• The electrical outlet may not be working properly, check the fuse or
breaker, or consult an electrician.
• The power cord may be damaged, if so it must be replaced by the
manufacturer or Vax authorised agent in order to avoid invalidating
the warranty.
• Tank is full of liquid
Solution: Empty the tank
What do I do if the unit/
an accessory becomes
damaged or broken?
Dust is escaping
from the motor cover?
Low luction power
and high motor speed /
vibrations?
• Visit vax.com.au for parts and spares.
• Please call our Careline to purchase new spares or order a replacement.
• The dust bag is missing or damaged
Solution: Put in a dust bag or replace it.
• Dust bag is full.
Solution: Replace the dust bag.
• Suction nozzle, hose, or tank inlet is blocked.
Solution: Check the suction nozzle, hose, and tank inlet for obstructions.
CAUTION: To reduce the risk of personal injury, unplug the product before performing
maintenance/troubleshooting checks.
Page 13

Getting in touch
* Calls are charged at the standard local rate. Please make a note of the serial number and model number of the vacuum cleaner
before calling.
Page 14

Accessories
Don’t forget your accessories!
AU: www.vax.com.au / NZ: www.vax.co.nz
Paper dust bag
Model No. VX40B
Foam fi lter
Model No. VX40FW
Dry fi lter
Model No. VX40FD
Page 15

Notes
Page 16

Distributed by Techtronic Industries Australia Pty. Ltd.
31 Gilby Road, Mt Waverley, VIC 3149 Australia.
Careline AU: 1300 361 505 www.vax.com.au
Careline NZ: 0800 800 900 www.vax.co.nz
 Loading...