

Page 1
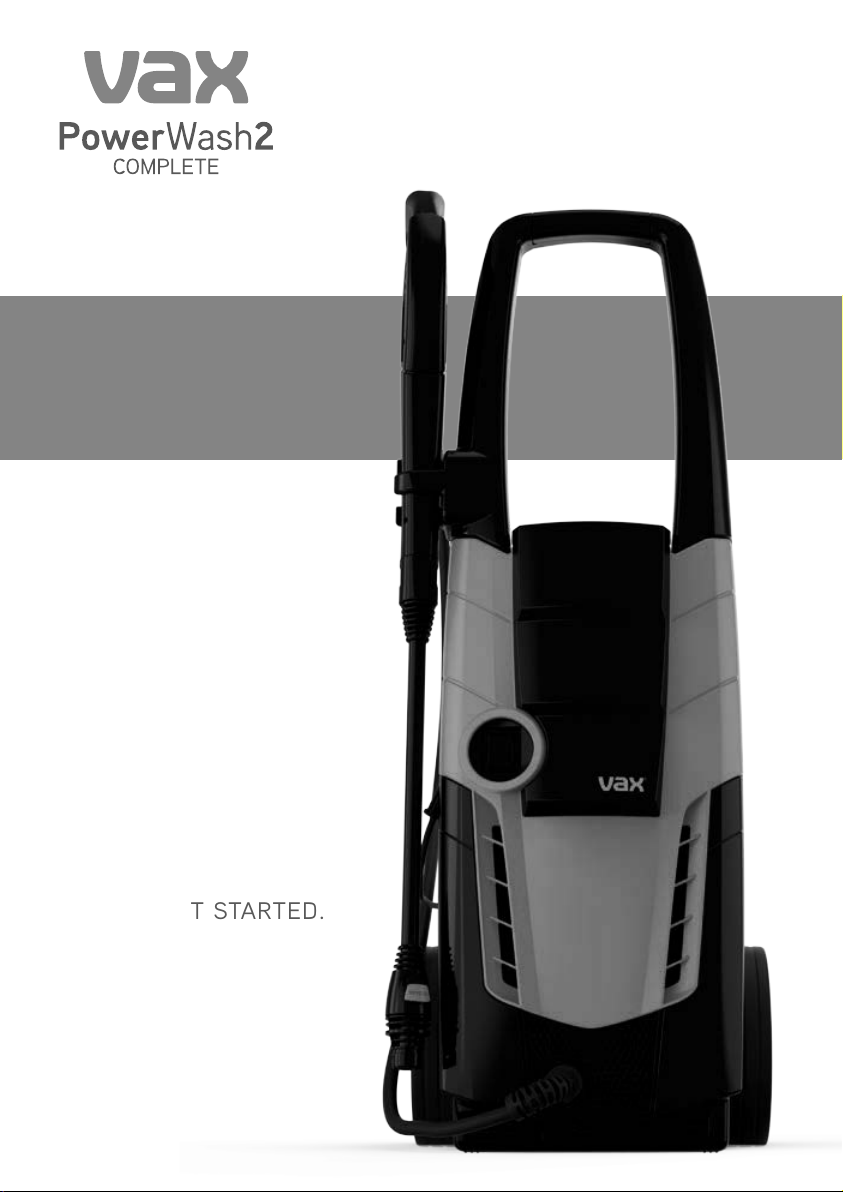
THE IDEAL OUTDOOR
CLEANING SOLUTION
FOR LARGE AREAS
LET’S GET STARTED.
VPW3C
Page 2

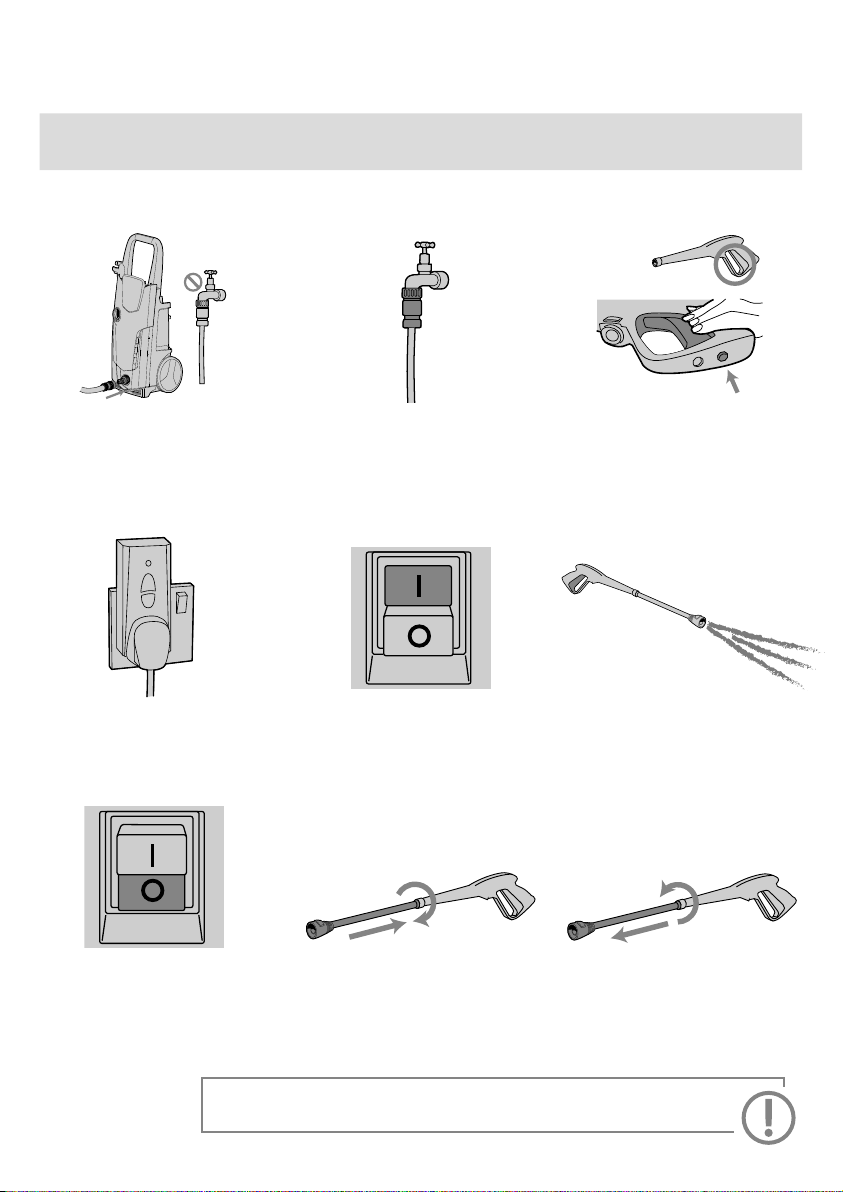
Let’s talk safety
This pressure washer is intended for household use only
and NOT for commercial or industrial use.
This Pr
•
It is y
Basic
safety
precautions
Don’ts
•
to be cleaned. V
damage caused.
• K
and openings whilst using
When using y
•
distance betw
cleaned is 30cm.
Don
•
in use for more than 5 minutes without depressing the trigger.
Don
•
damaged or
Don
•
damaged. Please c
0330 026 8455 (R
to 6:30pm, Sat 9:00am to 5:00pm).
Don
•
Don
•
length 7
essure washer is for outdoor use only.
our responsibility to check the suitability of the surface
ax UK Ltd cannot be held responsible for
eep ngers, hair and loose clothing from moving parts
the pressure washer.
our pressure washer the recommended working
een the nozzle and surface area or object to be
’t leave the pressure washer unattended or running when not
’t use this pressure washer if it has been dropped,
immersed in water.
’t use pressure washer if the power cord or plug is
ontact our Customer Care Line on (UK)
OI) 1-800 928 308. (Mon - Fri 8:30am
’t handle the plug of the pressure washer with wet hands.
’t use the pressure washer without supply hose (minimum
.5m) in place and unwind the hose fully from reel.
Do’s
• Always wear suitable clothing footwear and eye protection
whilst using
• Always connect the water supply, remove the lance and squeeze
the
trigger to run water through the machine before switching
the po
• Always use a suitable hose connector to match the coupling
on
of
• Always unplug the pressure washer before cleaning or carrying
out any
• Always turn o and unplug the pressure washer before
disc
wer on.
the pressure washer with a non-return valve at tap end
the supply hose.
onnecting or connecting the hose, after use always
wrap the pressure hose and power cord around the storage
clips provided.
the pressure washer.
maintenance.
Page 3

• This appliance can only be used by children aged from 8 years and above
and persons with reduced physical, sensory or mental capabilities or lack
of experience and knowledge if they have been given supervision or
instruction concerning use of the appliance in a safe way and understand
the hazards involved. Children should not play with the appliance.
Cleaning and user maintenance shall not be made by children
without supervision.
• Vax only recommend the use of Vax genuine accessories and solution
to be used with this pressure washer. The use of non-branded Vax
accessories and solution will invalidate your warranty.
Don
•
’t use the pressure washer without the water lter in place.
Don
•
’t pull or carry this pressure washer by the power cord. Don’t use the
power cord as a handle, pull the power cord around corners or sharp edges
or close a door over the power cord. Don’t unplug pressure washer by pulling
on the power cord.
Don
•
’t aim the pressure washer at people, animals, plants, electrical
components, wires, or the pressure washer itself.
Don
•
’t use the pressure washer on electrical components, damaged/delicate
paint surfaces, tyres, engines/motors.
Don
•
’t use the pressure washer with incorrect voltage as this may result in
damage or injury to the user. The correct voltage is listed on the rating label.
• Always release any built up pressure in the handle prior to disconnecting the
hose and ensure water inlet lter is clean prior to storage in a cool dry place.
Use only
•
extension cords may overheat. Care should be taken to arrange the extension
cord as it could be a trip hazard.
• Always make sure the power/extension cord is fully unwound and prevent
the power/extension cord from getting wet during use.
• Always replace the fuse in the plug with a British 13amp fuse.
• Always protect the power cable from heated surfaces or near open ames.
• Always carry the pressure washer by the handle.
• Always check water hose and accessories are not damaged, broken or worn
before use.
CE approved 13amp extension cords with RCD, non-approved
Page 4
Thank you for buying this Pressure Washer.
Taking care of your outdoor cleaning
This pressure washer is designed to make outdoor cleaning tasks as eective and ecient
as possible and this user guide will help you get the most out of your machine.
Completing outdoor cleaning tasks using a Vax pressure washer will keep your outdoor
items and surfaces cleaner for longer.
Taking care of your Pressure Washer
Also inside this guide are instructions on maintaining your new machine, so that it’s always
ready when you are to tackle your outdoor cleaning tasks.
Taking care of you
We’re here if you need us. Instead of taking me back
to the shop, simply visit:
vax.co.uk/support or call:
(UK) 0330 026 8455 (ROI) 1-800 928 308
Monday-Friday 8:30am to 6:30pm, Saturday 9:00am to 5:00pm
Calls are charged at the UK local rate. Please make a note of the serial number and model number
of the product before calling.
Alternatively, you can write to us at:
Vax Ltd., Plot 302, Stonebridge Cross Business Park, Hampton Lovett, Droitwich, WR9 0LW, UK
This user guide can be found online at: vax.co.uk/support
Let us know what you think @VaxUK
Page 5
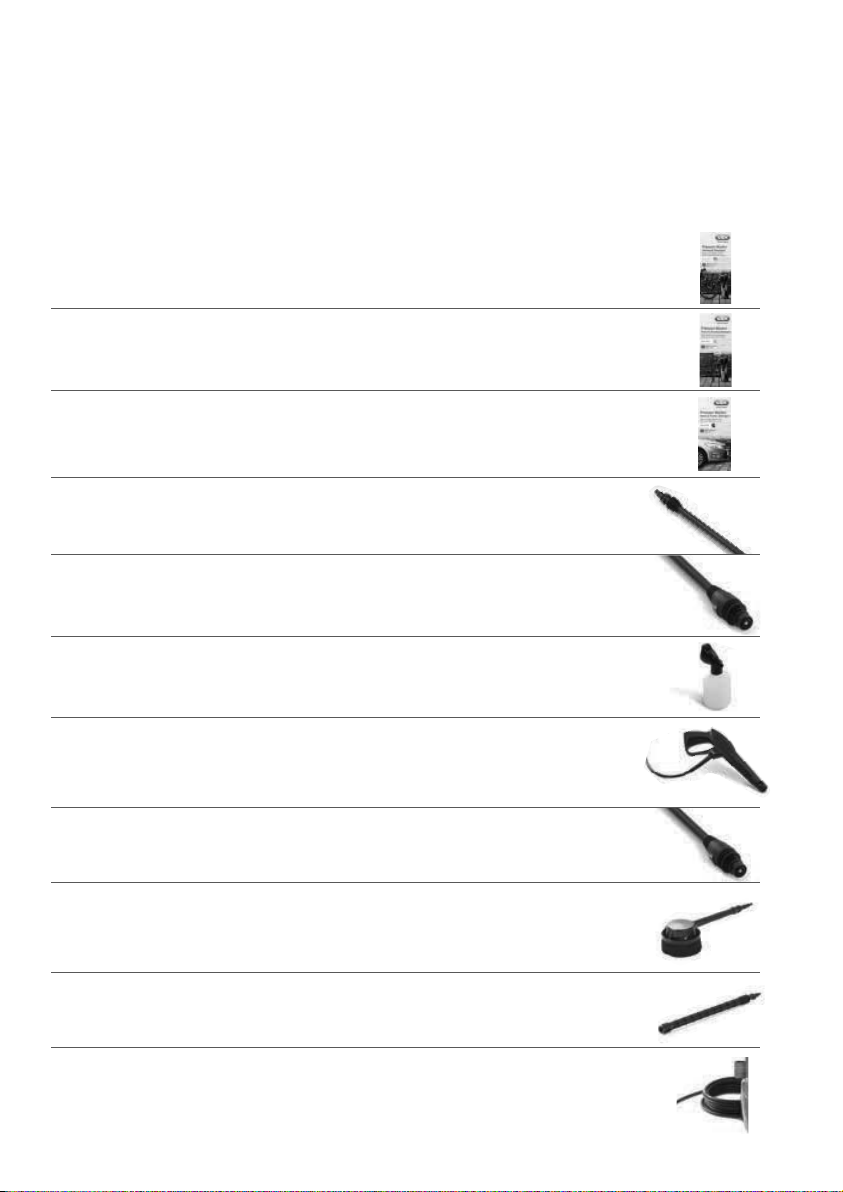
Contents
Let’s talk safety
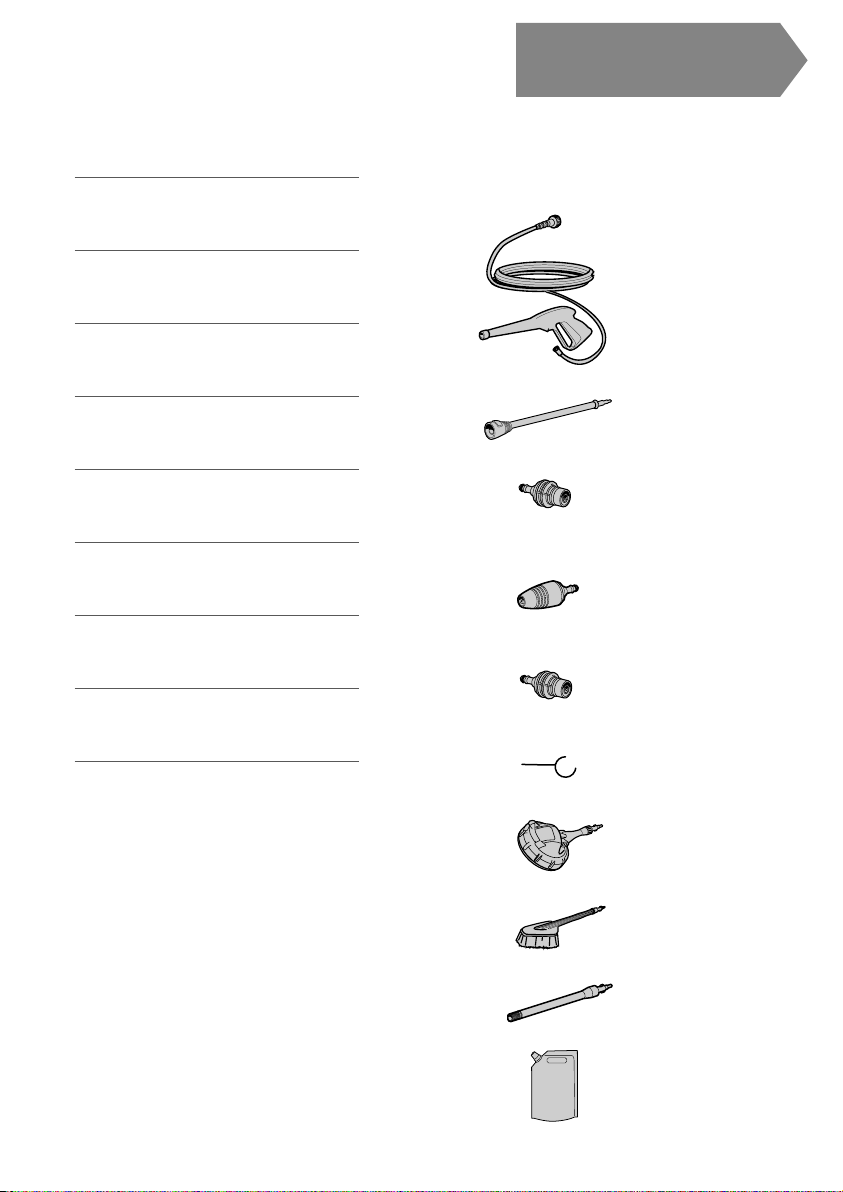
Power Wash 2 Complete
Included with
your machine
Getting to know your machine
Getting started
Using your machine
Taking care of your machine
Let’s talk technical
Accessories
What to do if it goes wrong
Getting in touch
Pressure Hose
Trigger Handle
Lance
Jet Nozzle
(blue nib)
Turbo Nozzle
(black nib)
Solution Nozzle
Nozzle Cleaning Tool
Patio Brush
Car Brush
Extension Tube
Universal Detergent
Page 6

Getting to know your machine
Handle
Trigger handle
storage
On/O switch
Lance storage
Power cord and
pressure hose
storage hook
Water inlet and
connector
(already installed)
Technical Specication
Name PowerWash 2 Complete
Wattage
oltage
V
Max Pressure
orking Pressure
W
Flo
w Rate
Subject to technical change without notice.
2200W
240V
220160 bar
110 bar
470L/hr
Wheel
Water outlet
Accessories & Consumables
ash & Protect
Universal Detergent
1-9-133398-00
Patio & Decking Deter
1-9-133401-00
*To purchase consumables and accessories, please visit vax.co.uk
gent
W
Vehicle Detergent
1-9-133400-00
Page 7
Getting started
PLEASE READ ‘LET’S TALK SAFETY’ AT THE BEGINNING BEFORE USE
Always make sure the pressure washer and water supply is o before connecting or disconnecting the hose
and accessories. The pressure washer is equipped with a thermal cut-out. If for any reason the pressure washer does
overheat the thermostat will automatically turn the washer o. If this happen switch and unplug from the electrical socket.
Remove the lance, nozzle and lter and check for blockages. Allow the pressure washer to cool for approx 4 hours.
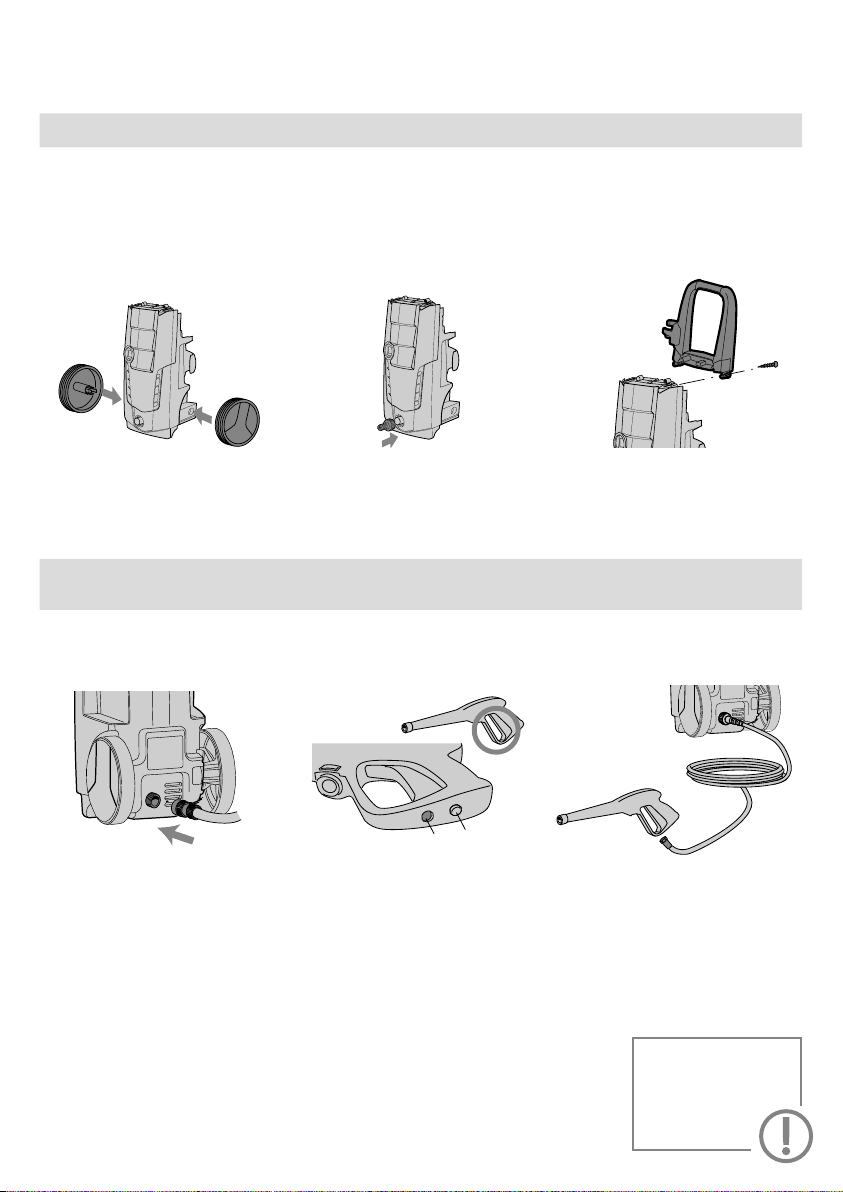
Assembling your pressure washer
Attach both wheels and push until
they click into place.
IMPORTANT: Always make sure the trigger safety lock is in the LOCKED position when not in use or connecting/
disconnecting the pressure hose.
Always check water hose, pressure hose, lance and accessories are not damaged broken or worn before use.
Attach the hose connector to water
inlet by turning clockwise until tight.
Slot the handle into the top of the
machine and insert the 2 screws.
Turn clockwise to tighten, making
sure not to trap the solution tube.
Preparing your pressure washer for use
UNLOCKED
LOCKED
Push the pressure hose rmly to the
water outlet and turn the pressure
hose collar clockwise until tight.
A trigger safety lock is located
underneath the handle. The safety
lock should always be in LOCKED
position before connecting/
disconnecting the pressure hose
to the trigger handle.
To connect pressure hose to trigger
handle, press the pressure hose
release button and push pressure
hose to lock into position. Gently
pull the pressure hose to check
the connection.
Never use the turbo
nozzle on cars,
tyres and engines.
CAUTION
Page 8
Using your machine
CAUTION: Always use an RCD (Residual Current Device) adaptor when using this pressure washer.
CAUTION: Don’t leave the pressure washer running when not in use for more than 5 minutes to prevent overheating.
Before switching the machine on, the trigger handle must be squeezed to release water and to remove any airlocks in the
machine or pressure hose. Always release any build up pressure in the handle prior to disconnecting the hose.
Make sure water supply is not
connected. Firmly push the
water hose pipe with suitable
connector onto the water inlet
to lock into position.
Connect the power cord to the mains
supply via an RCD adaptor.
Push ‘O’ switch to turn o.
Connect water hose pipe to a suitable
water supply and turn water on.
Push the ‘I’ switch to turn on.
The machine will run for a few
seconds then stop but no water
will be released.
Whilst rmly pushing the lance into
the trigger handle turn clockwise to
lock into position.
Before plugging the machine in,
press the unlock safety button on
the trigger handle and squeeze the
trigger until water starts to ow
through the nozzle.
Squeeze the trigger on the trigger
handle to release a high pressured
water jet, and start cleaning.
To remove the lance from the trigger
handle rmly push and twist the lance
anti-clockwise. When unlocked pull
to remove.
CAUTION
Don’t aim the pressure washer directly at people, animals, plants,
electrical components, wires or the pressure washer itself.
Page 9

Using your machine
IMPORTANT: Always make sure the machine is switched o and the safety button on the trigger handle is LOCKED
before connecting/disconnecting the lance, nozzle or accessories.
IMPORTANT: Lance and Nozzle must be attached to the hose for pressurised water to be produced.
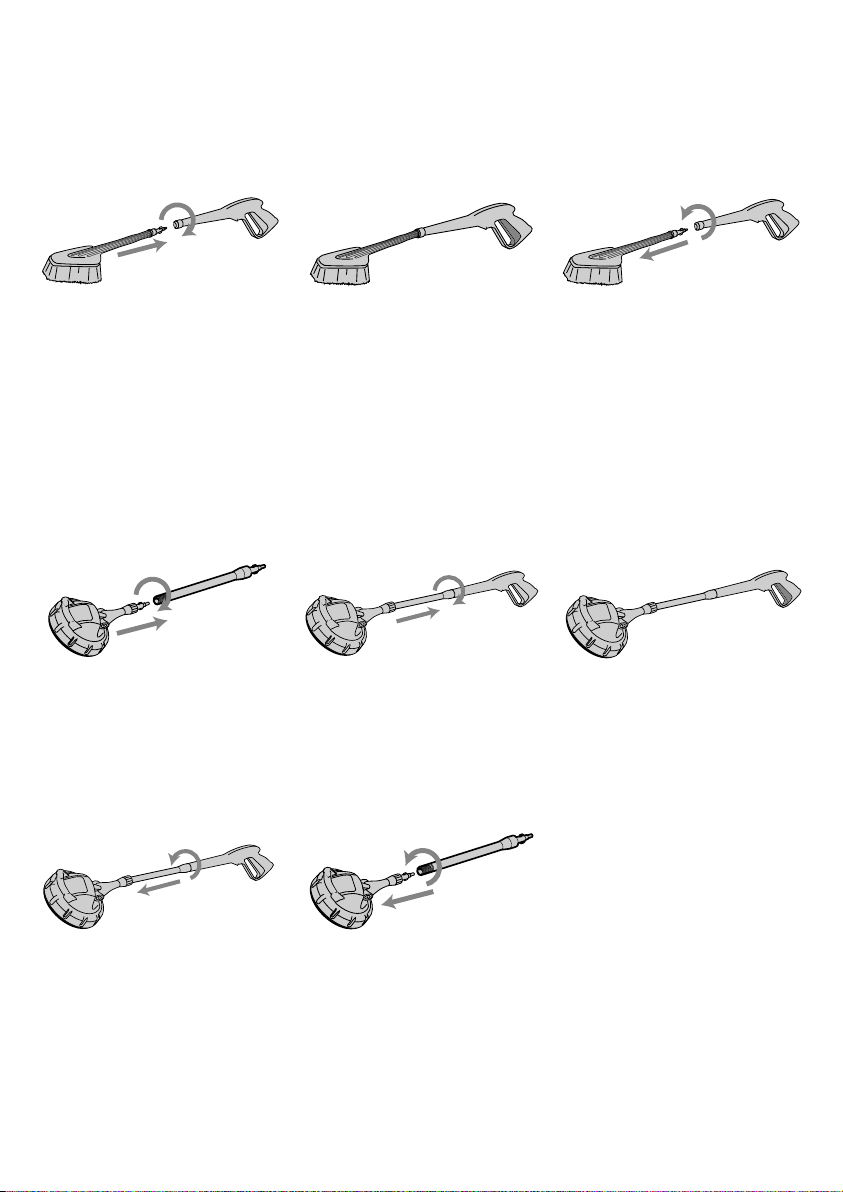
Using your accessories
(Jet nozzle blue nib)
The jet nozzle has a wider spray and is ideal for use on surface areas such as cars, garden furniture, decking and boats.
To attach the jet nozzle. Fit the lance
with a rm push and twist clockwise
to lock into place.
(Turbo nozzle black nib)
The turbo nozzle has a more concentrated spray and is ideal for use on very dirty surfaces, patios and masonry.
As it is not tted with a pressure regulator, it is not suitable for use on delicate or painted surfaces.
To attach the turbo nozzle, t the
lance with a rm push and twist
clockwise to lock into place.
Hold down the release button
on the lance, push the jet nozzle
and lance rmly together until
you hear an audible CLICK.
Release the button and gently
pull the jet nozzle to make sure
it is locked securely before use.
Hold down the release button
on the lance, push the turbo nozzle
and lance rmly together until you
hear an audible CLICK. Release
the button and gently pull the
turbo nozzle to make sure
it is locked securely before use.
Switch the pressure washer
on and squeeze the trigger handle
to release a high pressured jet
and start cleaning.
Squeeze the trigger on the trigger
handle to release a high pressured
water jet, and start cleaning.
After connecting
pressure hose,
lance and accessories
check they are securely
tted and locked in
place before
turning on.
TIP
Page 10
Using your machine
Using the car brush (included in selected models only, see ‘Included with your machine’)
Attach the car brush to the trigger
handle. Firmly push the car brush
and trigger handle together, turn
clockwise to lock into position.
Switch on the pressure washer and
squeeze the trigger to release water
spray or water and detergent mix.
To remove the brush from the trigger
handle rmly push and twist the
lance anti-clockwise to unlock.
Pull to remove.
Using the patio brush (included in selected models only, see ‘Included with your machine’)
Push the extension tube onto the
patio brush head and turn clockwise
to secure. Twist and push the patio
head collar to lock the extension tube
into position.
Attach the extension tube onto the
trigger handle, push rmly and twist
clockwise to lock into place.
Switch on the pressure washer and
squeeze the trigger to release the
rotary water spray.
To remove the extension tube from
the trigger handle, rmly push
and twist the extension tube anticlockwise to unlock. Pull to remove.
To remove the patio brush from the
extension tube, twist the patio head
collar anti-clockwise. Push and twist
the patio brush anti-clockwise to
unlock, pull to remove.
Page 11
Using your machine
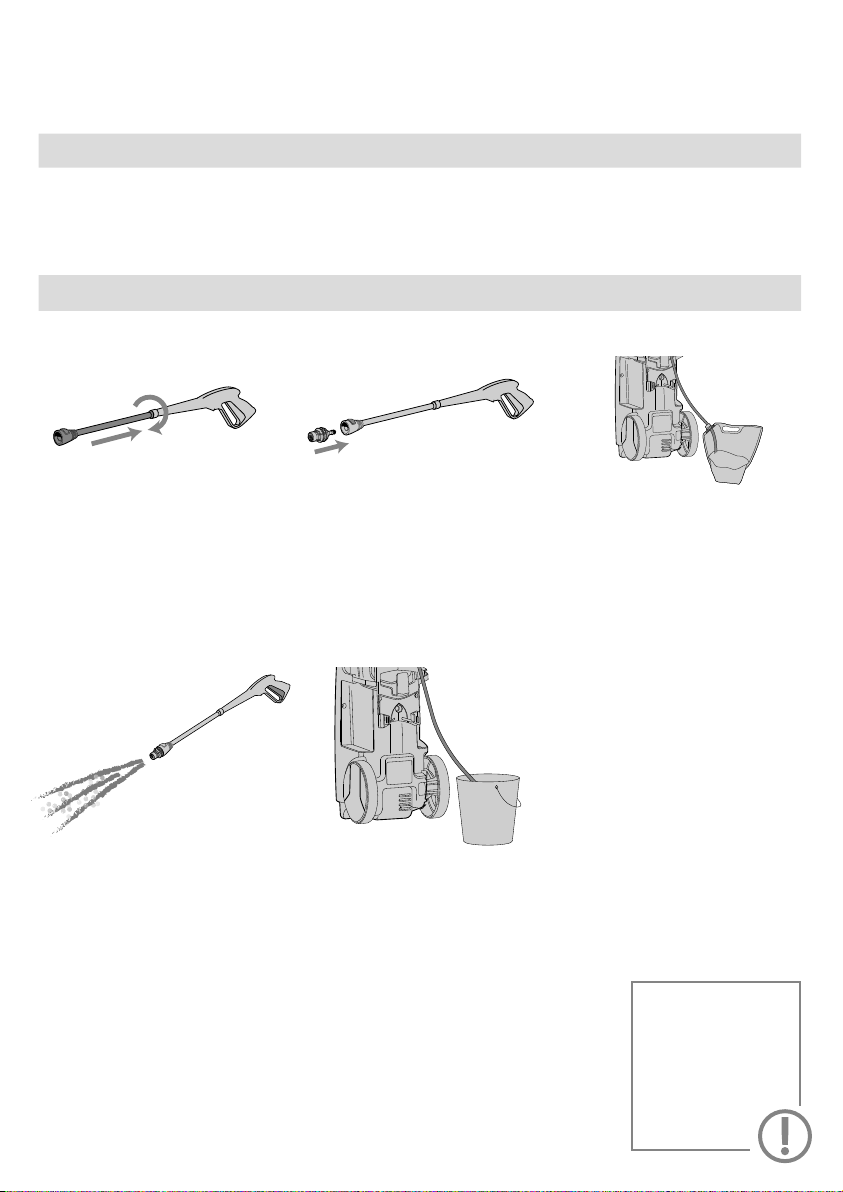
IMPORTANT: When using solution make sure you follow the dilution instructions and use Vax solution only.
Using solution with your pressure washer
Solution can only be used when the solution nozzle or car/outdoor brush is attached.
Solution cannot be used with Jet and Turbo Nozzles.
IMPORTANT: Always make sure the solution tube is fully submerged into the solution/watermix inside the solution bag.
To attach the solution nozzle, t the
lance with a rm push and twist
clockwise to lock into place.
Switch the machine on and squeeze
trigger to dispense the water and
solution mix.
Hold down the release button on the
lance, push the solution nozzle and
lance rmly together until you hear an
audible CLICK. Release the button and
gently pull the solution nozzle to make
sure it is locked secure before use.
After use rinse the pressure washer
to prevent blockages. Inset the solution
tube into a bucket of fresh water
(Max 40�C), turn the machine on and
squeeze the trigger for 1 minute.
Unhook the solution tube and insert
into the solution bag. Solution only
dispensed with the trigger handle,
lance and solution nozzle, or car/
outdoor brush
To remove the hose,
lance, nozzle or
accessories always
squeeze trigger until
water stops to release
pressure build up.
CAUTION
Page 12
Let’s talk technical
IMPORTANT: Always rinse fresh water through your pressure washer and accessories for 1 minute after using
solution to prevent blockages.
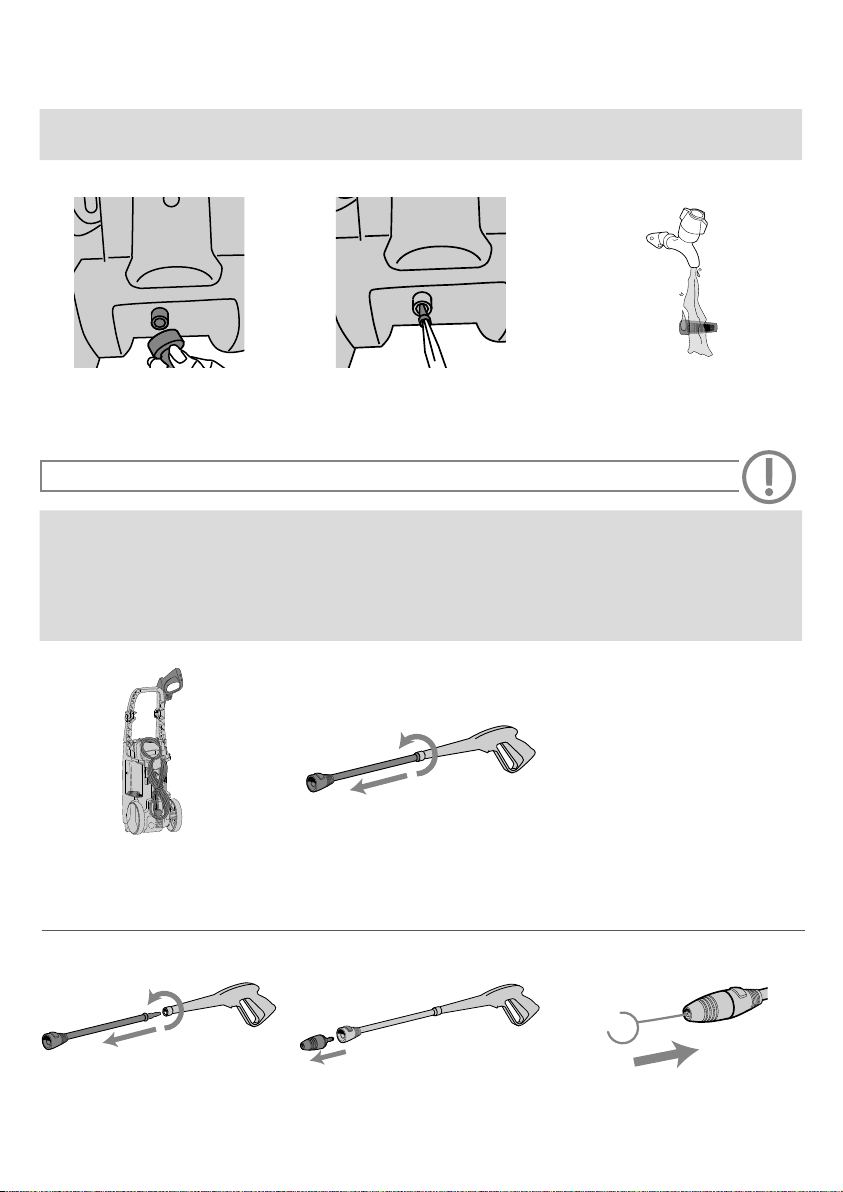
Maintenance
To access water lter unscrew water
inlet connector and remove.
CAUTION
IMPORTANT: If using the pressure washer with water from a water butt, the water lter will need to cleaned
more frequently.
IMPORTANT: Before storing your machine always make sure no water remains in the pressure washer, hose/
accessories. Once machine is switched o and before removing the nozzles, lance or trigger handle always squeeze
the trigger until no more water comes out, to prevent frost damage. Keep in a dry place above zero degrees and out
of the reach of children.
Before carrying out any maintenance make sure the machine is switched o and unplugged.
To remove water lter, pinch the
inner water lter tab with pliers
and gently pull.
Water lter can be rinsed under
running water periodically.
Storage
Always store tools, power cord
and pressure hose into allocated
storage slots.
To remove the lance from the trigger
handle rmly push and twist the lance
anti-clockwise. When unlocked pull
to remove.
Removing a blockage in the lance and nozzles
To remove the lance from trigger
handle rmly push and twist the
lance anti-clockwise, when
unlocked pull to remove.
To remove the nozzles press the
nozzle release button and pull.
Insert the nozzle cleaning tool into the
end of lance and nozzles to remove
any dirt or debris.
Page 13
Accessories
Don’t forget your accessories!
Order at: www.vax.co.uk/spares-and-solutions
Universal Detergent 1-9-133398-00
Universal detergent to aid the break down and removal of stubborn dirt, moss, and grime.
Patio & Decking Detergent 1-9-133401-00
Patio & decking detergent to aid the break down and removal of stubborn dirt
from patio and decked areas.
Wash & Protect Vehicle Detergent 1-9-133400-00
Wash & protect vehicle detergent to aid the removal of road dirt, oil and grease
from vehicles, and provide short term protection against weathering conditions.
Standard Lance 1-9-133749-00
Standard lance connection between your trigger handle and attachments.
Detergent Nozzle 1-9-133759-00
A detergent nozzle to directly apply detergent to surfaces to help loosen dirt, moss, and grime.
Attachable Detergent Bottle 1-2-133752-00
A detergent nozzle to directly apply detergent to surfaces to help loosen dirt, moss, and grime.
Trigger Handle 1-2-133750-00
A smooth shape hand handle with an easy squeeze trigger and a built in safety
lock for easy on/o trigger release.
Jet Nozzle 1-9-133754-00
Jet nozzle to apply concentrated pressure to dislodge dirt and grime on all surface types.
Rotary Brush 1-9-133766-00
A rm bristled brush with 360 degree rotation, providing extra scrub power for
an extra clean. Ideal for: Car alloy wheels, Car grills.
Extension Bar 1-9-133768-00
An additional connection tube providing you extra reach.
Replacement Hose (10m) 1-9-133751-00
An additional high pressure hose, highly durable and resistant to weather conditions.
Page 14

What to do if it goes wrong
SolutionProblem
• Check the ‘This pack contains’ panel on the box to make sure the part
is included with your machine.
There is an
accessory missing
•
e sure the on/o switch is set to the ‘I’ position.
Mak
•
The plug may
Why won’t my pressure
washer turn on?
Why won’t the water
/solution dispense?
• Check the fuse in the plug if this needs replacing, always replace with
a British 13amp fuse.
•
Check if y
•
wer cord maybe damaged. Please contact our Customer Care
The po
Line on (UK) 0330 026 8455 (ROI) 1-800 928 308.
• The trigger has not been squeezed the pressure washer will be silent,
to activate squeeze the trigger handle.
•
essure washer is equipped with a thermal cut-out.
The pr
If for any reason the pressure washer does overheat the thermostat
will automatically turn the washer o. If this happens switch and
unplug from the electrical socket. Remove the lance, nozzle and
lter and check for blockages. Allow the pressure washer to cool for
approx 4 hours.
• The pump may have stopped, make sure the on/o switch is set to the
‘I’ position and check the plug fuse.
•
The pump may
to poor water supply. Check the water ow rate to your water supply.
•
Hose may
any blockages. Straighten out the hose to ensure no kinks and check
the hose pipe connections to the tap and water inlet.
•
e may be an air lock. To unlock the trigger safety lock, squeeze
Ther
the trigger to release water before the machine is switched on.
•
the assembly of the solution tube and bag. Go to ‘Using
Check
your machine’.
•
Nozzle/
with nozzle cleaning tool. Go to ‘Lets talk technical’ page.
• Turbo/Jet Nozzle attached, remove and attach solution Nozzle.
No solution will be released when using the turbo/jet nozzle go
to ‘Using your machine’ page
not be fully pushed into the electrical socket.
our RCD has been tripped, if it has tripped, reset it.
have stopped. This may be because of overheating due
be blocked or kinked, check for leaks in the hose and clear
accessory may be blocked, clear any blockages and clean
Why won’t my
pressure washer
reach operating
pressure?
•
Lance and Nozzle not at
to the hose for pressurised water to be produced. Go to ‘Taking care
of your machine’.
•
Hose may
any blockages. Straighten out the hose to ensure no kinks and check
the hose pipe connections to the tap and water inlet.
•
Nozzle may
Go to the ‘Lets talk technical’ page.
• Remove and clean the water inlet lter. Go to the ‘Taking care of your
machine’ page.
•
Check
be blocked or kinked, check for leaks in the hose and clear
be blocked, clear any blockages and clean nozzle.
the water ow rate to your water supply.
tached. A lance and Nozzle must be attached
Page 15

Getting in touch
†
Registration required. Terms and conditions apply, see vax.co.uk for details.
* Calls are charged at the UK local rate. Please make a note of the serial number and model number of the product before calling.
Page 16

GET IN TOUCH
0330 026 8455 VaxVacu umsinfo@vax.co.uk vax.co.uk @Vax UK
EEC Statement of Compliance: Manufacturer/EEC importer: Vax Limited, hereby on our own responsibility, declare that the
VPW3C is manufactured in compliance with the following Directives: Safety: 2006/95/EC Low Voltage Directive.
EMC: 2004/108/EC Electromagnetic Compatibility Directive.
Waste electrical products should not be disposed of with household waste. Please recycle where facilities exist. Check with your
Local Authority or retailer for recycling advice.
© 2015 Vax Limited. All rights reserved. The VAX trade mark and Vax lozenge is the property of Techtronic Floor Care
Technology Ltd and is registered in the EU and may be pending or registered in other countries.
 Loading...