

Page 1

Vax Careline:
0870 6061248
Instruction Manual
Please read carefully before using
the Wet/Dry vac. Always fully extend
the mains cable before use.
www.vax.co.uk
VO-7000
Wet/Dry vac
with exclusive two-tank system
Vax VO-7000 D7 IL 10/19/04 3:35 PM Page 1
Page 2

Box contents
Remove the parts from the tank and check that the
following are all present:
A. Outer tank
B. Inner tank
C. Cleaner lid and motor housing
D. Caster supports (4)
E. Casters (4)
F. Caster support screws (4)
G. Hose
H. Adapter
I. Vacuum nozzle
J. Small float ball
K. Wet/dry nozzle
L. Reusable cartridge filter - connected to the
cleaner lid
M. Crevice tool
N. Squeegee insert
O. Small foam filter - connected to the inner tank
P. Extension tubes
Q. Small float cage
R. Blower nozzle
S. Large foam filter
Please note: 1) Parts D&E are already assembled.
2) Vax are constantly looking at ways to improve their product, therefore product
may vary from one shown.
2
1. Diagram
1-1
A
C
B
D
E
F
L
O
S
M
N
P
G
I
H
K
J
Q
R
Parts overview
Fig.1
Vax VO-7000 D7 IL 10/19/04 3:35 PM Page 2
Page 3

3
FOR DOMESTIC USE ONLY
When using the Wet/Dry vac, basic safety precautions
should always be observed, including the following:
1. The Wet/Dry vac must be stored indoors, in a cool
dry area.
2. Turn off the Wet/Dry vac controls before
connecting to or disconnecting from the mains
supply.
3. Always unplug the Wet/Dry vac before
connecting or disconnecting the vacuum hose.
4. Close attention is necessary when used by or near
children. Do not allow children to use as a toy.
5. Use only as described in this manual. Use only
the manufacturer’s recommended attachments.
6. Do not use the Wet/Dry vac with a damaged cord
or plug. Do not use the Wet/Dry vac if it has been
dropped, damaged, left outdoors or dropped into
water. Return the Wet/Dry vac to a Vax
Authorised Service Agent or suitably qualified person for examination, repair or adjustment.
7. Do not pull or carry by the cord. Do not use the
cord as a handle, close a door on the cord or
pull the cord around sharp edges or corners.
Do not run the Wet/Dry vac over the cord. Keep
the cord away from heated surfaces.
8. Do not handle the plug or the unit with wet
hands. Do not use in wet conditions. Only use
in the garden in dry conditions.
9. Do not put any objects into openings. Do not
use with any openings blocked and do not
restrict air flow. Keep all openings free of dust,
lint, hair or anything that may reduce airflow.
10. Keep hair, loose clothing, fingers and all parts of
body away from openings and moving parts.
11. Do not pick up hot coals, cigarette butts,
matches or any hot, smoking or burning objects.
12. Do not pick up flammable or combustible
materials (lighter fluid, petrol, kerosene, etc.)
or use in the presence of explosive liquids or
vapours.
13. Do not vacuum up harmful or toxic material
(chlorine bleach, ammonia, drain cleaner, etc).
14. Do not vacuum up hard or sharp objects such
as glass, nails, screws, coins, etc.
15. Do not use without the filter in place.
16. Use extra care when vacuuming on steps.
17. Keep vacuuming area well lit.
18. Turn off the switch before unplugging.
19. Use only CE-approved 13A extension cords.
Non-approved extension cords may overheat.
Care should be taken to arrange the cord so
that the cord cannot be pulled or tripped over.
WARNING:
WHEN USING THE BLOWER:
1. The blower can result in foreign objects being
blown into eyes, which can result in eye damage.
Always wear eye protection (not provided) when
operating the blower.
2. Do not permanently cover openings of blower
accessories.
3. Do not leave the Wet/Dry vac unattended.
WARNING: Do not point the air outlet openings at
people or animals.
WARNING: Always switch off and unplug Wet/Dry
vac from electrical outlet before assembling, opening
or emptying the dust container, or connecting/disconnecting the attachments.
CAUTION: Keep the suction intake opening free from
obstruction at all times; otherwise the motor will
overheat and Wet/Dry vac damage may result.
CAUTION: The Wet/Dry vac is a very powerful unit.
Before plugging cord into outlet make sure the switch
is in the ‘off’ position. Hold the Wet/Dry vac firmly when
starting and in use.
IMPORTANT: If the vacuum inlet or hose are blocked,
switch off the Wet/Dry vac and remove the blockage(s)
before starting it.
IMPORTANT: Washing the foam filter will improve the
Wet/Dry vac's performance. Make sure the filter is
completely dry before inserting back in the Wet/Dry vac.
This Wet/Dry vac is intended for household use only
and not for commercial or industrial use.
2. Safety Information
Safety Information
Vax VO-7000 D7 IL 10/19/04 3:35 PM Page 3
Page 4

4
A
A
A
B
B
B
B
A
2
1
3
Attach caster supports and casters
Remove Wet/Dry vac lid and inner tank. Turn outer tank
upside down. Match letters (A or B) on bottom of caster support with letters on wet/dry vac tank.
Align square tabs (1) on supports with rails (2) on tank.
Slide tabs on to rails until caster support (3) snaps in
place.
Insert support screw into hole nearest tank. Tighten
screw with a Phillips screwdriver.
3. Assembling the Wet/Dry vac
Insert inner tank
With inner tank duct toward drain side of outer tank,
align tab (C) on inner tank with slot (D) in outer tank;
slide inner tank into place.
Assembly
Fig.2
Attach Wet/Dry vac lid
Rotate lid latches (E) outward. With wet/dry selector
(F) toward drain side of tank, align ribs (G) on front of
tank with slots (H) on either side of hose inlets; place
lid on tank.
Rotate latches inward to lock lid in place.
Note: For convenience in attaching and removing
the lid, finger holds are provided.
Vax VO-7000 D7 IL 10/19/04 3:35 PM Page 4
Repeat with remaining casters and screws. Turn the
cleaner tank up the right way.
Once in place, do not remove the float assembly.
NOTE: The large filter cage and the float ball on
Wet/Dry vac lid are not removable parts.
Attach small float cage
Turn inner tank upside down. Place float ball over round
opening in bottom of tank. Snap tabs (A) on float cage
into slots (B) on tank.
B
A
Fig.3
E
F
G
H
E
Fig.5
D
C
C
Fig.4
Page 5

5
Assembly
Press squeegee insert firmly into wet/dry nozzle opening.
Use squeegee for wet pick-up only.
Attach drain cap
Screw drain cap (I) on to lower, front of tank as shown.
Additional tools and accessories that are not included,
are available at additional cost from your Vax Service
Cente or Authorised Vax Dealer.
Fig.8
Fig.7
Vax VO-7000 D7 IL 10/19/04 3:35 PM Page 5
I
Attach hose, wands and cleaning tool
Push hose into hose inlet on tank; twist hose to
tighten or loosen connection. The wands and tools
attach to hose in the same manner.
Fig.6
Page 6

Use & Function
4. Using the Wet/Dry vac
6
5
20
19
13
14
Cleaner Description
The assembled Wet/Dry vac will look like the drawing
(21/2 inch diameter tools are shown on cleaner).
Operate cleaner only at voltage specified on
rating label on Wet/Dry vac lid.
1. On/off switch
2. Cleaner lid
3. Cleaner lid latches
4. Carrying handles
5. Hose
6. Hose inlet
7. Wet/dry selector
8. Caster supports
9. Casters
10. Tank drain cap
11. Cleaner tank
12. Extension tube storage holders
13. Extension tubes
14. Vacuum nozzle
15. Cord hook: loop cord over hook for storage
16. Blower port
17. Crevice tool
18. Wet/Dry nozzle with squeegee insert
19. Adapter: used with 2
1
/2 inch diameter hose* and
some 11/4 inch diameter tools*
20. Blower nozzle
Fig.9
Vax VO-7000 D7 IL 10/19/04 3:35 PM Page 6
1
2
3
3
4
5
6
7
10
8
9
11
12
13
16
15
17
18
Page 7

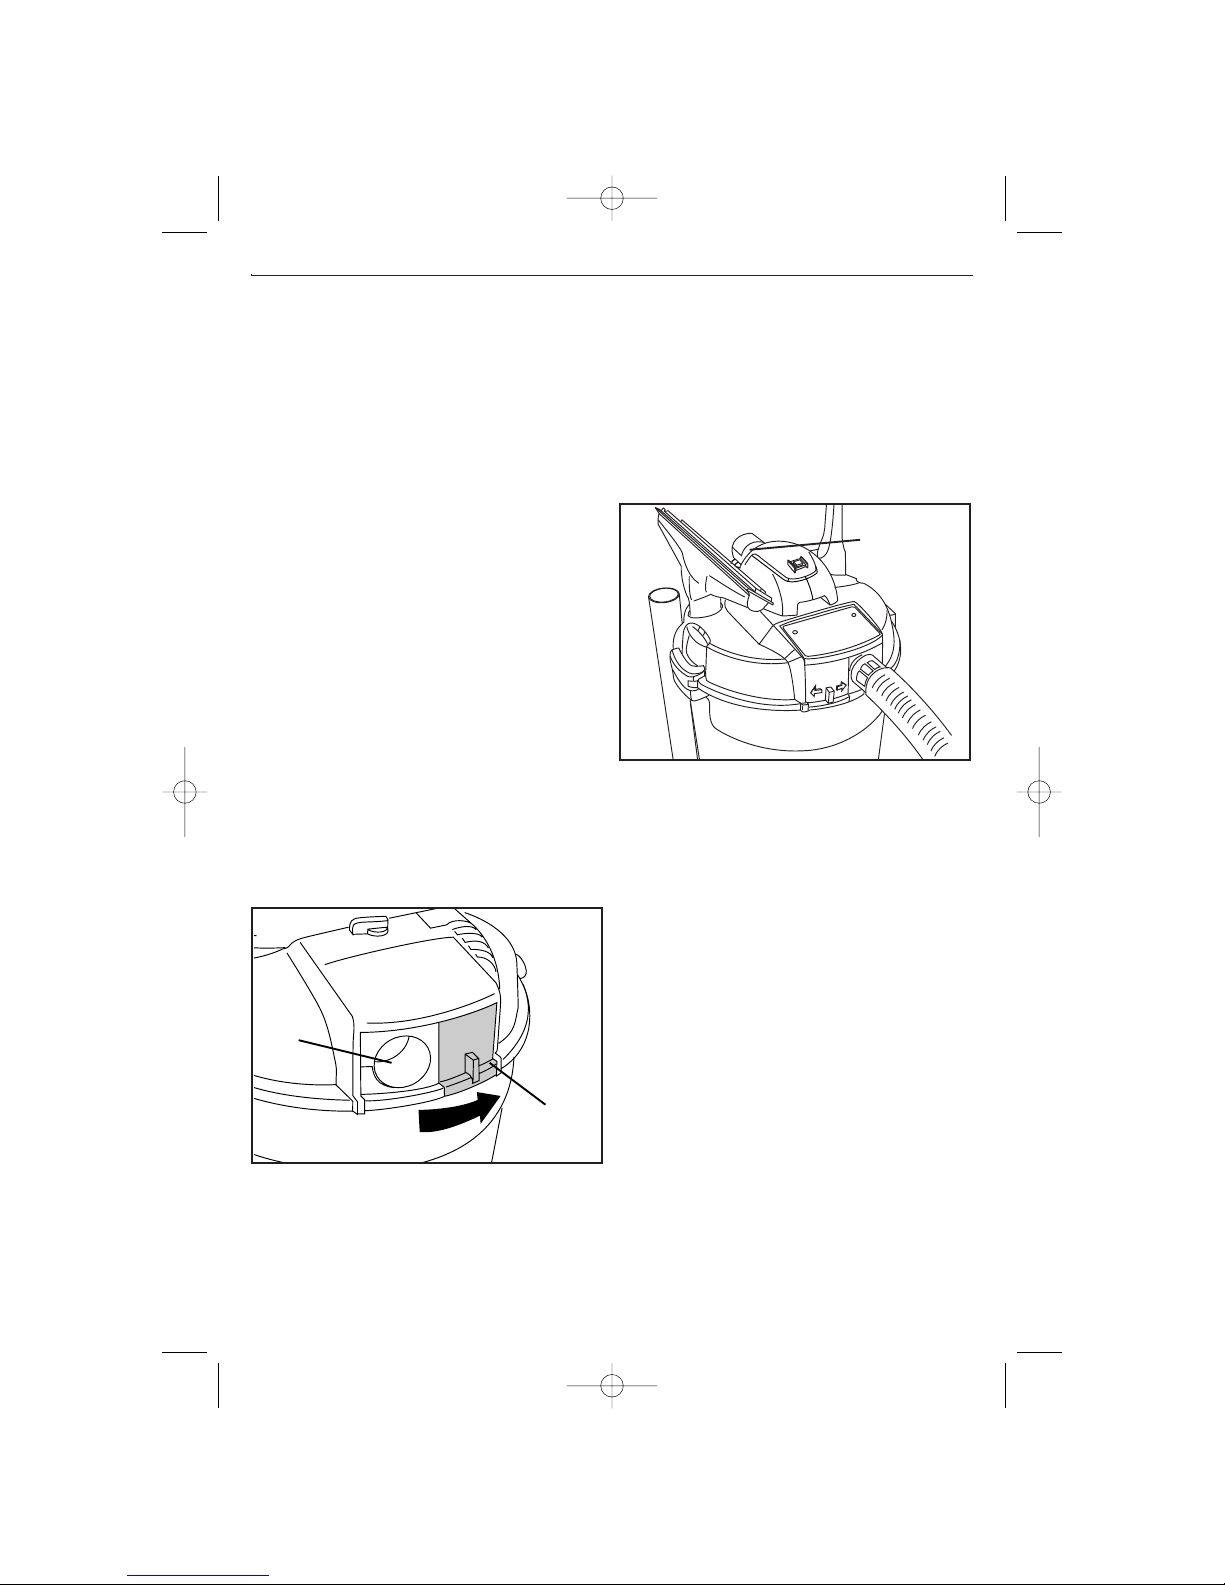
Dry pick-up
Disconnect Wet/Dry vac from electrical outlet.
With hose removed from cleaner, slide wet/dry
selector (A) to expose ‘dry tank inlet’ (B). (Fig.11) Selector
will snap into place. Insert hose into ‘dry tank inlet’.
Attach the desired tool to hose end.
Make sure cleaner lid is locked in place.
7
Use & Function
Adapter
To use 11/4 inch smaller diameter tools (not included)
with the 21/2 inch diameter hose, attach adapter (A) to
hose, then attach the tool to the adapter..
Twist adapter and tool to tighten or loosen.
Separate wet/dry tanks
This feature enables the user to change from wet
pick-up to dry pick-up without having to empty the
tank or change filters. Dry debris will collect in the inner
tank and wet debris will collect in the outer tank.
Wear ear protection if operating Wet/Dry vac for
a prolonged period of time.
Make sure that the small foam and cartridge
filters are in place.
A
A
B
C
A
Wet pick-up
Disconnect Wet/Dry vac from electrical outlet.
With hose removed from Wet/Dry vac, slide wet/dry
selector (A) to expose ‘wet tank inlet’ (C). (Fig.12)
Selector will snap into place. Insert hose into ‘wet tank
Fig.10
Fig.11
Fig.12
Vax VO-7000 D7 IL 10/19/04 3:35 PM Page 7
Attach desired tool (with squeegee if available) to hose
end.
Make sure cleaner lid is locked in place.
Do not use Wet/Dry vac as a pump to clean
out clogged drains, sinks or other plumbing
fixtures. If cleaner will not pick up, check filters.
They may need to be cleaned or replaced,
see ‘Maintenance’ section.
inlel,.
Page 8
8
Use & Function
Single tank operation
For picking up very large amounts of debris (either
wet or dry), the cleaner may also be operated without
the inner tank in place.
Disconnect Wet/Dry vac from electrical outlet.
Remove inner tank and set aside.
Attach hose to either the wet or dry intake port.
Plug power cord into a properly grounded outlet and
turn cleaner on.
When using single tank for dry pick-up, cartridge
filter must be in place.
For best results, when using single tank for wet
pick-up, use a Vax Large foam filter sleeve
instead of the cartridge filter. (Ref to Fig.18)
Automatic wet shut-off
When either tank is full of liquid, the automatic shut-off
mechanism will shut off Wet/Dry vac pick-up. When
this happens, the motor sound will become noticeably
higher in pitch. Turn Wet/Dry vac off and empty tank
to continue use.
The automatic shut-off will also engage if the Wet/Dry
vac has been tipped over. To continue use, turn
Wet/Dry vac off and set it upright. Wait a few seconds
to allow the motor to come to a complete stop.
The automatic shut-off will function for both
separate wet/dry tank and single tank operation.
Dry tank dust
For best results when picking up dry dust, slide wet/
dry selector (A) to expose ‘wet/dry inlet’ and make
sure no water or moisture is in the wet tank (outer tank).
Keep inner tank in position. Insert hose into ‘wet tank
inlet’ and attach desired tool to hose end.
Blower feature
The blower can be used to blow dirt out of areas
where it is impossible for suction to reach.
Inside of hose and tools must be free of litter
before operating blower.
It is recommended that the filters be in place when
operating the blower feature.
Disconnect Wet/Dry vac from electrical outlet.
Push hose into blower port (C); twist hose to
tighten or loosen connection. Attach blower nozzle or
other tool if desired.
CAUTION: Wear safety goggles when using blower
feature. Do not blow toward people, animals, or
objects that may be damaged by flying debris.
Wear ear protection if using the blower for a
prolonged period of time.
Plug power cord into a properly grounded outlet,
grasp free end of hose, and turn cleaner ON.
Fig.13
Fig.14
Vax VO-7000 D7 IL 10/19/04 3:35 PM Page 8
A
B
C
Page 9

9
Use & Function/Maintenance
Storage
Empty tanks (see ‘Maintenance’ section). Rinse
inside of tank thoroughly with clean water
particularly if spills or other liquid substances
other than plain water have been picked up.
Wipe inside of tank dry.
Loop cord over cord storage hook, located on tool rack.
Extension tubes store on rear caster supports as shown.
The extension tubes fit into triangle.
A
After wet pick-up
Disconnect Wet/Dry vac from electrical outlet.
Unscrew drain cap (A) from bottom of outer tank.
Empty contents into a suitable drain.
As the liquid level decreases, it may be necessary to
tip cleaner to allow remaining liquid to drain out.
Rinse inside of tank thoroughly with clean water
particularly if spills or other substances other
than water have been picked up.
Wipe inside of tank dry.
Filters
Do not operate cleaner without filters in place.
Filters are available from approved Vax dealers, or
via the Vax website at www.vax.co.uk
To ensure that the Wet/Dry Vax operates at peak
performance, it is imperative only genuine Vax
filters are used.
5. Maintenance
Emptying tanks
After dry pick-up
Disconnect Wet/Dry vac from electrical outlet.
Release lid latches and remove Wet/Dry vac lid from
tank.
To avoid back strain, do not lift a full tank. First,
scoop out enough debris to make tank easier
to lift.
Empty contents into a suitable receptacle.
Rinse inside of tank with clean water and wipe dry.
Fig.15
Fig.16
Note: If not very full, the inner tank may be easier to
empty if it is removed from the outer tank.
When emptying the inner tank, do not grab on to
filter cage.
Vax VO-7000 D7 IL 10/19/04 3:35 PM Page 9
Page 10

10
Maintenance
B
C
Foam filter
Disconnect Wet/Dry vac from electrical outlet.
To clean, remove foam filter (B) and rinse with clean
water. Let filter air dry.
To replace, slide filter completely down over openings
on inner tank filter cage (C). (Fig.17)
The small foam filter must be in place whenever
the inner tank is in use.
If the Wet/Dry vac is used as a single tank unit for wet
pick-up, it is best to use a Vax foam filter sleeve
instead of the cartridge filter.
D
E
After wet pick-up, allow filter to dry and gently brush
with a soft brush. Check filter thoroughly and replace
it if there are any tears or holes in it.
If extremely dirty, the cartridge filter can be cleaned by
a soft bristle brush.
NOTE: Vigorous scrubbing may shorten the life of the
cartridge filter. Do not use water to clean cartridge
filter.
Lubrication
The motor is equipped with bearings which contain
sufficient lubrication for the life of the motor. The
addition of lubricant could cause damage. Do not
add lubricant to motor bearings.
UK Service & Help
Vax Care 0870 6061248
Monday-Friday 9.00am to 5.00pm.
An answerphone is available out of these hours. If
you have queries or concerns about using your Vax,
call the Vax Careline. Calls are charged at the UK
national rate.
Please make a note of the serial number and model
number of your Wet/Dry vac before calling. There
are over 400 approved Vax Service Agents in the UK.
For your nearest Service Agent, please call the Vax
Careline.
www.vax.co.uk
Fig.17
Fig.18
Reusable cartridge filter
Disconnect Wet/Dry vac from electrical outlet.
After dry pick-up, remove filter (D) and gently tap it
against inside of Wet/Dry vac tank or brush off debris
with a soft brush.
Vax VO-7000 D7 IL 10/19/04 3:36 PM Page 10
To replace, slide the cartridge filter over filter cage (E)
until it will not go on any further.
Page 11

If a minor problem occurs, it can usually be solved quite easily by using the checklist below.
PROBLEM: Wet/Dry vac won’t run
Cause: Not firmly plugged in
Solution: Plug unit in firmly.
Cause: No voltage in wall plug
Solution: Check fuse or circuit breaker.
Cause: Blown fuse/tripped circuit breaker
Solution: Replace fuse/reset circuit breaker.
PROBLEM: loss of suction or air flow
Cause: Obstruction in hose wand or tool
Solution: Clear obstruction.
Cause: Clogged cartridge or foam filter
Solution: Clean filter as described in ‘Maintenance’.
Cause: Hose/split in hose
Solution: Inspect and replace hose.
Cause: Automatic shut-off engaged
Solution: See ‘Automatic wet shut-off’ section
11
Troubleshooting/Technical Specification
7. Technical Specification
Power supply: 220-240V/50Hz
Motor power: 1000-1200W
Capacity 60 litres
Filter system: Cartridge filter (pleated paper)
Foam filter
Cord length: 7.1m
Weight: 11kg
Subject to technical change without notice.
6. Troubleshooting
Vax VO-7000 D7 IL 10/19/04 3:36 PM Page 11
Page 12

EEC STATEMENT OF COMPLIANCE
Manufacturer/EEC importer: Vax Limited, hereby on our own responsibility, declare that the product
VO-7000 Wet/Dry vac is manufactured in compliance with the following:
Safety: 73/23/EEC Low Voltage Directive, as modified by 93/68/EEC
EMC: 89/336/EEC Electromagnetic Compatibility Directive, as modified by 93/68/EEC
Waste electrical products should not be disposed of with household waste. Please recycle where
facilities exist. Check with your Local Authority or retailer for recycling advice.
Vax VO-7000 D7 IL 10/19/04 3:36 PM Page 12
Vax Ltd., Kingswood Road, Hampton Lovett, Droitwich, Worcestershire, WR9 OQH, UK.
email: enquiry@vax.co.uk - website: www.vax.co.uk
Version 1
 Loading...