

Page 1

VBT3ASV1
USER GUIDE
Page 2

2
SAFETY INFORMATION
About this user guide
Read this user guide completely before
using the machine. Keep this user
guide for reference. If you pass your
machine on to third parties, it must
be accompanied with this user guide.
Failure to adhere to this user guide can
lead to serious injuries or damage to
the machine. We assume no liability for
damage caused as a result of failure
to adhere to this user guide. Important
information not included in this chapter
is indicated as follows:
General usage
This stick vac is intended for
household use only and NOT for
commercial or industrial use.
Only use the stick vac indoors on
dry surfaces and keep the area you’re
cleaning well lit.
Don’t vacuum up hard or sharp
objects such as glass, nails, screws,
coins, etc.
Don’t vacuum up hot coals, cigarette
butts, matches, or items that are
burning or smoking.
Don’t use in an area that is wet
or where there may be harmful uids
(chlorine, bleach and ammonia
drain cleaner).
Don’t attempt to remove blockages
with sharp objects as this may cause
damage to your stick vac.
Only Vax recommended charger,
tools and accessories should be used
with this stick vac and always check
the oorhead and accessories are
free from damage, dirt and debris
before use.
Always turn o or unplug the stick
vac from the charger before carrying
out any maintenance. Please refer to
the appropriate section in the user
guide to review necessary precautions.
Always make sure the separator
and lters are tted correctly before
using your stick vac.
Keep all openings clear and free
from debris as this may aect the
airow/suction.
Take extra care when using the
stick vac on the stairs.
NOTE Highlights tips and information.
WARNING: Warns of health
hazards and identies possible
risks of injury.
!
CAUTION: Indicates possible
dangers to the machine or
other objects.
WARNING: Always switch o
the stick vac and unplug from
the charger and mains before
carrying out any maintenance or
troubleshooting.
!
CAUTION: Don’t over ll the
dirt container to avoid blocking
the air ow through the stick vac.
For best cleaning results, empty
the dirt container after every use.
Filters should be tapped over a bin
every 4-6 uses to remove dirt and
debris and washed every 3 months.
Filters should be replaced every
6-9 months depending on the level
of use.
Page 3

3
Safety
This stick vac can be used by
children aged from 8 years and above
and persons with reduced physical,
sensory or mental capabilities or
lack of experience and knowledge if
they have been given supervision or
instruction concerning use of the stick
vac in a safe way and understand the
hazards involved. Children must not
play with the stick vac. Cleaning and
user maintenance must not be made
by children without supervision.
Keep ngers, hair and loose clothing
away from moving parts and openings
whilst using the stick vac.
Don’t use the stick vac if it has been
dropped, damaged, immersed in water
or left outdoors.
Don’t handle the charger plug or
use the stick vac with wet hands.
Don’t use the stick vac charger if
the charger cord or plug is damaged.
Don’t unplug the charger by pulling
on the charger cord.
Power supply
Don’t charge the stick vac outdoors,
or leave the charger connected to the
mains when not in use.
Don’t use the stick vac with the
incorrect charger as this may result
in damage or injury to the user. The
correct charger information is listed on
the ratings label.
Always use the charger supplied
with the stick vac. If charging the stick
vac through an extension cord, use
only CE approved 13amp extension
cords, non-approved extension cords
may overheat. Care should be taken to
arrange the extension cord as it can be
a trip hazard.
Brushbar
WARNING: The brushbar in
the powered head constantly
rotates when switched on. Never
use the powered head on one
spot for an extended period of
time as the brushbar may damage
the oor surface. Always turn the
powered head brushbar o when
cleaning hard oors. To prevent any
damage being sustained, test on an
inconspicuous area of the ooring
rst.
!
CAUTION: If the brushbar in
the powered head has been
obstructed, the brushbar motor
protection sensor may have been
activated. The brushbar will stop
and the light on the powered head
will illuminate red. To reset switch
the brushbar and stick vac o,
remove the powered head from the
reach wand/handheld and clear any
obstruction. Wait 1 minute before
retting the powered head tool,
switch the stick vac on and press
the brushbar ON/OFF button.
WARNING: For the purposes
of recharging the battery, only
use the detachable supply unit
provided with this appliance.
!
Page 4

4
Storage
Store your stick vac in a cool, dry
area. If lters have been cleaned as
per user guide instructions ensure
they are thoroughly dry before storing
away. This stick vac does not stay
upright without constant support.
Between uses, lie at on the oor
in a suitable location so that it does
not become a trip hazard or can be
stepped on.
Battery and Disposal
The battery must be removed from
the appliance before disposal and the
used battery disposed of safely and
promptly. Keep away from children.
Prior to disposal, protect exposed
terminals with heavy insulating tape to
prevent shorting. The battery is to be
disposed of safely at your local battery
recycling centre.
Do not attempt to disassemble
the battery, remove any component
projecting from the battery terminals
and do not dispose of in a re.
The battery and charger have no
user serviceable parts. Fire or injury
may result.
The appliance must be
disconnected from the mains supply
before use or when removing the
battery before disposal. In case of
battery leakages avoid any contact with
the skin and contact 0800 092 7737.
PLEASE KEEP INSTRUCTIONS
FOR FURTHER USE
CAUTION: The battery used in
this device may present a
risk of re or chemical burn if
mistreated. Do not disassemble
or heat above manufacturer’s
maximum temperature limit
(60°C/140°F) or incinerate. Use of
another battery may present a risk
of re or explosion.
Page 5

5
Alternatively, our UK based Customer Care Team
is here to help and provide support with assembly,
operational or performance problems, and buying
and tting new accessories.
Visit vax.co.uk/contactus
WELCOME TO VAX
Thank you for buying the Vax BLADE 2 MAX,
we hope you enjoy using your new product.
This user guide will help you get the most
out of your machine and gives advice
on maintenance and cleaning.
GET IN TOUCH
Need help with your machine?
For troubleshooting tips and machine help
see page 15 or visit vax.co.uk/support
REGISTER
For your FREE 2 year guarantee*,
register online at vax.co.uk/registration
* 1 year guarantee on battery
YOUR MACHINE
Make a note of your machine details:
Model:
Serial Number:
Page 6

6
WARRANTY
If a Vax machine is used in the way
it is intended and it breaks down
within the guarantee period, it’s our
responsibility to repair or replace it.
Here’s what isn’t covered:
Normal wear and tear of
consumable items, for example: belts,
lters, brushbars, fuses etc.
Batteries or rechargeable batteries
which have become faulty or have
a reduced service life as a result of
normal wear or improper handling.
Accidental damage
- Damage as a result of use not in
accordance with the product
user guide.
- Damage caused by not carrying
out regular maintenance.
- Damage to cable.
- Blockages caused by misuse.
Faults caused by:
- Negligent use, misuse, neglect or
careless operation of the machine;
- Use of the vacuum cleaner which
is not in accordance with the
user guide.
- Use of a Vax product for
anything other than normal
domestic household purposes
in the country in which it was
purchased.
- Use of parts, accessories and
consumables, which are not
genuine Vax components.
- Faulty installation or repairs –
unless carried out by a qualied
electrician or engineer.
TECHNICAL
EU Statement of Compliance: Manufacturer/EU importer: Vax Limited, hereby
on our own responsibility, declare that the Vax BLADE 2 MAX is manufactured
in compliance with the following Directives:
Safety: 2014/35/EU Low Voltage Directive.
EMC: 2014/30/EU Electromagnetic Compatibility Directive.
Waste electrical products should not be disposed of with household waste.
Please recycle where facilities exist. Check with your Local Authority or retailer
for recycling advice.
© 2018 Vax Limited. All rights reserved. The VAX trade mark and Vax lozenge
are the property of Techtronic Floor Care Technology Ltd and are registered in
the EU and may be pending or registered in other countries.
Page 7

7
1
54
3
A
L
K
D
E
B
C
M
F
J
N
O
P
G
H
I
1 2
2
A B
VBT3ASV1
Page 8

8
6 7
1 2 3
2
1
3
8
9 10
2
1
Page 9

9
11
13
14
3
1
2
2
1
12
2
1
Page 10
10
15 16
1
1
2 2
3
3
Page 11

11
1
2
22
21
2
1
20
18
1
2
19
17
1 2
24hr
40°C
1
Crevice Tool 1-9-138707
2
Dusting Brush 1-9-139014
3
Filter 1-7-138708
1 2
Accessories
3
23
1
2 3
24
Page 12

12
GETTING TO KNOW YOUR MACHINE
Fig.
1
A. Carry handle
B. Dirt container
C. Dirt release button
D. Filter cover and lter
E. Dirt container release latch
F. Battery level indicator light
G. Boost button
H. Brushbar ON/OFF button
I. ON/OFF button
J. Charging port
K. Reach wand
L. Powered head
M. Brushbar
N. Charger
O. Wall mount, 2 screws and wall plugs
P. Crevice tool storage caddy
Contents Fig.
2
A. Crevice tool B. Dusting brush
Unpacking and assembly
1. Unpack the contents and check they are
complete. (Fig.
1
and
2
).
2. Attach the reach wand and powered
head to the handheld. They will click
when locked into place (Fig.
3
).
3. Push the crevice tool storage caddy
onto the reach wand and slot the tool
into place (Fig.
4
).
Attaching the wall mount
1. Without the handheld attached to the
reach wand and powered head, push the
wall bracket onto the top and back of the
reach wand. (Fig.
5
/1 ).
2. Choose a location for the stick vac to be
stored, preferably near to a mains supply
although not directly above or below a
mains socket. Stand the stick vac powered
head and wand against the wall, ensuring
the powered head is at on the oor.
3. Holding the wall bracket securely
against the wall, use a pencil to make a
small mark for each screw. (Fig.
5
/2 )
Use the screws and wall plugs to secure
the wall bracket to the wall.
4. The charger cord and dusting brush
can be tted onto the wall bracket
(Fig.
6
).
5. Fully assemble the stick vac and rmly
press the stick vac into the wall bracket
to secure. Always ensure the stick vac is
securely locked into place.
Charging the stick vac
1. To charge the stick vac, securely attach
the stick vac into the wall bracket. You
can also charge as a handheld; detach the
stick vac from the reach wand and tools,
and place on a at, stable surface.
2. Insert the charger lead into the
charging port (Fig.
1
/J ) located on the
carry handle of the handheld and plug the
charger plug into the mains.
3. The battery indicator level lights will
illuminate in turn as the battery charges,
until all four lights are illuminated (Fig.
7
/1 and 7/2 ) Once fully charged, the
lights will go out. If charging for the rst
time the initial charge time is 3 hours.
4. When the stick vac is in use the battery
level indicator lights will illuminate
indicating how much charge is remaining.
NOTE The initial charge is 3 hours
and charging will be required before
rst use. Failure to fully charge the
battery before rst use may result in
poor battery performance. The life
expectancy of the battery will vary
depending on the usage of the
stick vac.
Page 13

13
When less than 20% charge is remaining
the bottom light will ash red indicating
the battery is running low and charging is
required (Fig.
7
/3).
Using the stick vac
1. Place your foot on the powered head
(Fig.
8
/1) and pull the handle backwards
to recline (Fig.
8
/2) .
2. To switch the stick vac on, press the
ON/OFF button located on the handle
(Fig.
9
/1). The On/O button and battery
level indicator lights on the handle will
illuminate (Fig.
7
/2).
3. To increase suction for particularly
dirty areas that require additional cleaning
boost mode can be activated (Fig.
9
/3).
4. To switch the brushbar on, press the
brushbar ON/OFF button (Fig.
9
/2).
The light on the powered head and the
brushbar ON/OFF light will illuminate
when the brushbar is on and the brushbar
will constantly spin. Press the brushbar
ON/OFF button again to turn the
brushbar o.
5. All of the accessories, including the
powered head can be attached directly
onto the handheld (Fig.
10
) or the reach
wand. The crevice tool and dusting
brush can be used for hard to reach
places and at dierent heights for above
oor cleaning.
MAINTAINING THE STICK VAC
Removing and retting the dirt container
1. Push down the latch on the dirt
container (Fig.
11
/1) to release, tilt and lift
to remove the dirt container from the stick
vac. (Fig.
11
/2).
WARNING: The brushbar in the
powered head constantly rotates
when switched on. Never use the
powered head on one spot for an
extended period of time as the
brushbar may damage the oor
surface. Always turn the powered
head brushbar o when cleaning hard
oors. To prevent any damage being
sustained, test on an inconspicuous
area of the ooring rst.
!
WARNING: Always switch o
the stick vac and unplug from the
charger and mains before carrying out
any maintenance or troubleshooting.
!
CAUTION: If the brushbar in the
powered head has been
obstructed, the brushbar motor
protection sensor may have been
activated. The brushbar will stop
and the light on the powered head
will illuminate red (Fig.
18
). To reset
switch the brushbar and stick vac
o, remove the powered head from
the reach wand/handheld and clear
any obstruction. Wait 1 minute before
retting the powered head tool,
switch the stick vac on and press the
brushbar ON/OFF button.
NOTE: The powered head brushbar
should be ON for carpets and OFF for
hard oors. Constant use of the boost
mode and brushbar will reduce the
battery run time.
NOTE: Before retting, if the lid of the
container with separator has been
removed for cleaning make sure the
separator has been locked into place
(Fig.
13
).
Page 14

14
2. To ret, line up the dirt container
connection with the stick vac handle
(Fig.
12
/1). Press the dirt container
release latch (Fig.
12
/2) and push the dirt
container onto the stick vac. Release the
dirt container latch to lock the dirt into
place.
3. When correctly tted all 3 connection
points will be aligned and will sit ush
(Fig.
13
).
Emptying the dirt container
1. Push down the latch on the dirt
container (Fig.
11
/1) to release, tilt and lift
to remove the dirt container from the stick
vac. (Fig.
11
/2).
2. Hold the dirt container over a bin and
press the dirt release button to allow dirt
and debris to fall out. (Fig.
14
/1 & 2).
3. To close, push the dirt release door
until it locks into place (Fig.
14
/3).
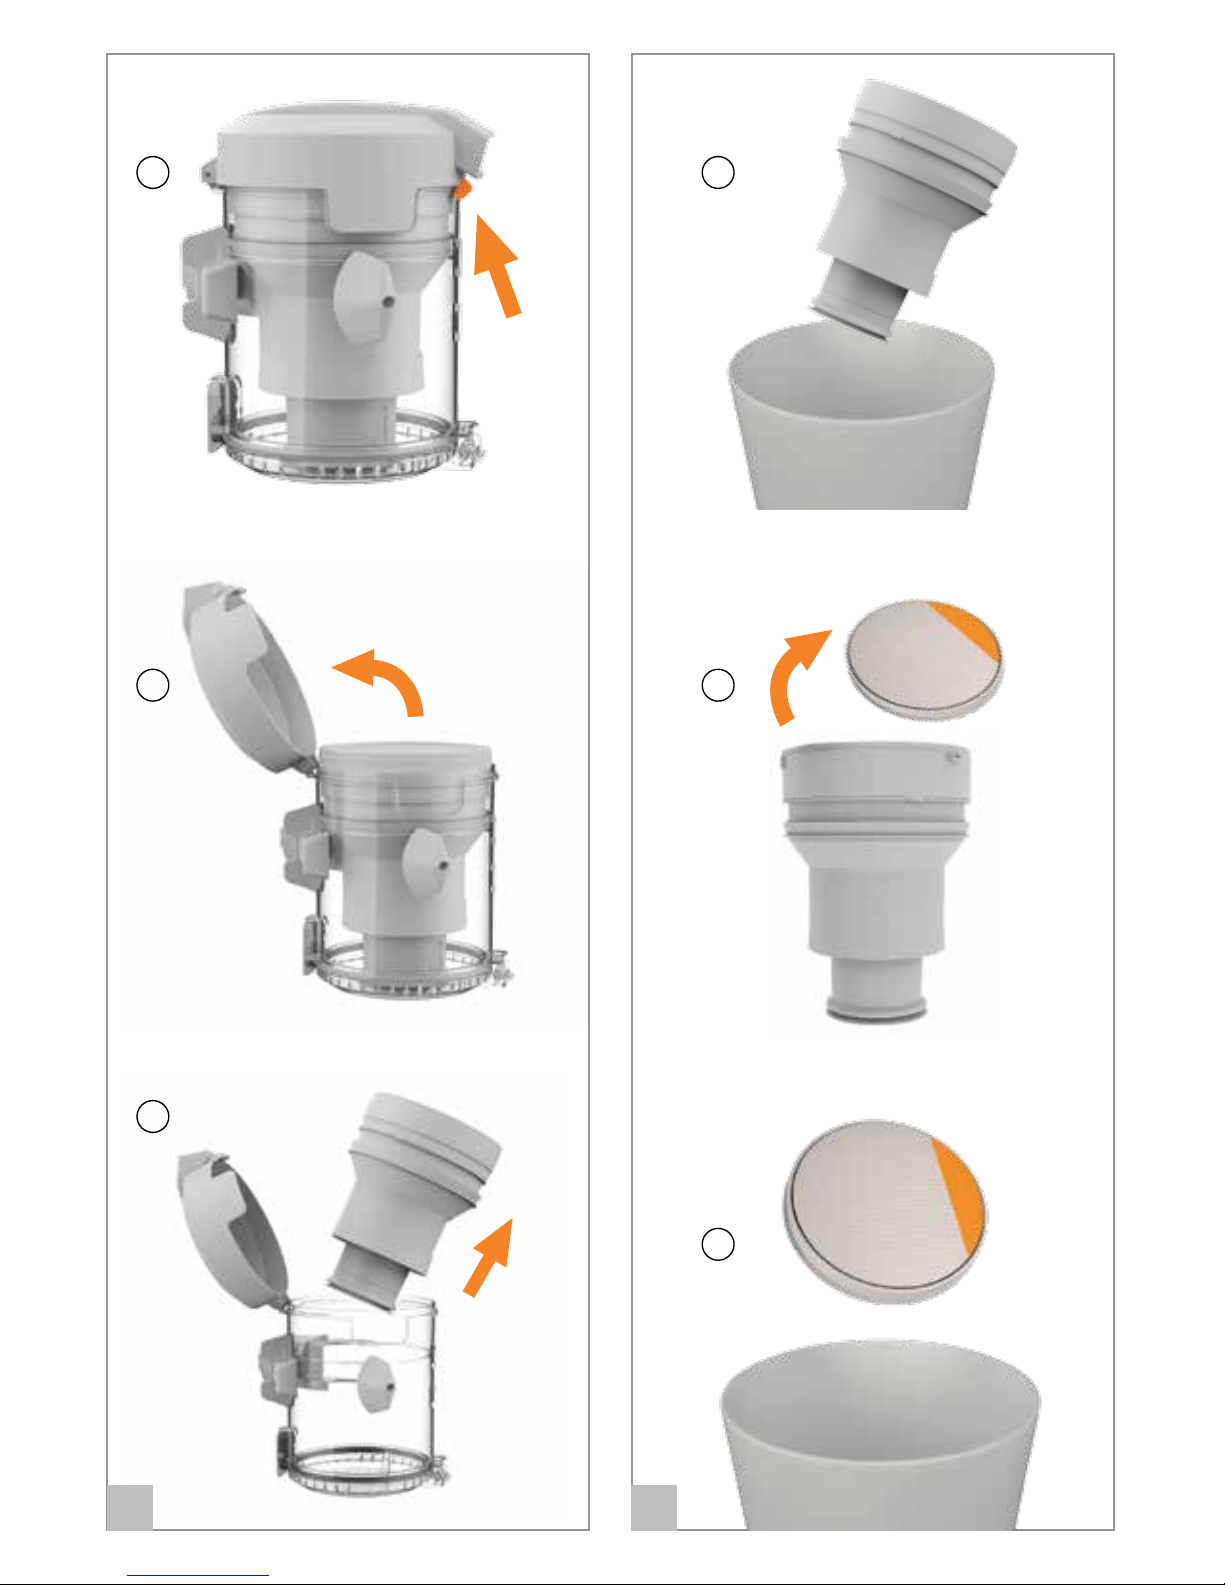
Cleaning the lter and separator
1. Empty the dirt container (Fig.
14
).
2. Push the tab on the lid of the dirt
container to access the lter
(Fig.
15
/1 & 2). Lift the lter cover
and separator from the dirt container
(Fig.
15
/3).
3. Tap the separator over a bin to remove
dirt and debris and wipe over the metal
shroud with a dry cloth (Fig.
16
/1).
4. Pull the tab on the lter to remove from
the separator (Fig.
16
/2). Tap the lter
against the bin to remove any dirt and
debris (Fig.
16
/3).
5. Wash the lter under running water
(40°C max) (Fig.
17
). Leave for at least
24hrs or until fully dry before replacing.
Cleaning and replacing the powered
head brushbar
1. Using a coin, push and turn the
brushbar lock anticlockwise to release
the brushbar (Fig.
19
/1).
2. Pull the brushbar out from the
brushbar housing (Fig.
20
/1).
3. To remove any threads or hair, slide the
blade of a pair of scissors into the groove
on the brushbar and cut along the groove.
Clear any dirt/debris from the end caps
and inside the housing of the powered
head (Fig.
21
).
4. Ret the brushbar (Fig.
20
/2) and turn
the brushbar lock clockwise to lock
(Fig.
19
/2).
Removing and replacing the powered
head belt
1. Using a cross head screwdriver,
unscrew the 3 screws and remove the
cover (Fig.
22
/1).
2. If the belt is broken, remove the old belt
and clean any debris from the cogs.
To replace the belt rstly hook the belt
over the small cog. Slide the belt over the
top of the large cog and rotate the belt
and cog anticlockwise. During rotation the
belt will slide onto the cog (Fig.
22
/2)
3. Ret the belt cover and tighten the
screws to secure.
CAUTION: Don’t over ll the dirt
container to avoid blocking the air
ow through the stick vac.
For best cleaning results, empty the
dirt container after every use. Filters
should be tapped over a bin every
4-6 uses to remove dirt and debris
and washed every 3 months. Filters
should be replaced every 6-9 months
depending on the level of use.
Page 15

15
Checking for blockages
1. Press the handheld release button and
remove the reach wand. Check and clear
any dirt and debris from the handheld
connection point and the bin inlet.
(Fig.
23
/1)
2. Check the powered head for any
blockages and use a blunt object to
remove the blockage. (Fig.
23
/2)
3. To test for a blockage in the reach
wand, drop a small ball of paper into the
wand. The paper will drop through if
the wand is clear. Use a broom handle
or similar blunt object to remove any
blockage (Fig.
23
/3).
TROUBLESHOOTING
There is an accessory missing
Check the contents (Fig.
2
)
Why does the stick vac have no power?
The stick vac may need recharging.
Go to Charging the stick vac.
The motor thermostat may have
tripped. Empty the dirt container and
check for blockages. Clean the lters
and allow the stick vac to cool for
approximately 1 hour. If you have washed
the lters, wait 24 hours to fully dry
before placing back on the stick vac.
Why won’t the stick vac pick up?
The dirt container may be blocked.
Check the dirt container and hand held
inlet for blockages.
Go to Emptying the dirt container.
The lters may be clogged. Go to
Cleaning the lter and separator.
There maybe a blockage.
Go to Checking for blockages.
The brushbar on the powered head
has not been activated. Go to Using the
stick vac.
The powered head may be blocked.
Go to Cleaning and replacing the
powered head brushbar.
The stick vac, powered head and
reach wand may not be correctly tted.
Go to Unpacking and assembly.
Why is there a red light on the unit?
Battery charge is running low (<20%).
Go to Charging the stick vac.
Why is there a red light on the
powered head?
The powered head brushbar has been
obstructed. Go to Cleaning and replacing
the powered head brushbar.
Why won’t the powered head turn?
The brushbar on the powered head
has not been activated. Go to Using the
stick vac.
The tool/brushbar may be obstructed.
Go to Cleaning and replacing the
powered head brushbar.
The stick vac, powered head and
reach wand may not be correctly tted.
Go to Unpacking and assembly.
The belt on the tool may be broken.
Go to Removing and replacing the
powered head belt.
Page 16

Vax Ltd, Pointon Way, Stonebridge Cross Business Park, Hampton Lovett, Droitwich, WR9 OLW, UK
info@vax.co.uk vax.co.uk
 Loading...