


www.vava.com
NORTH AMERICA
E-mail: support@vava.com Tel: 1-888-456-8468 (Monday-Friday: 9:00 – 17:00 PST) Address: 46724 Lakeview Blvd, Fremont, CA 94538
EUROPE
E-mail: support.uk@vava.com(UK) support.de@vava.com(DE) support.fr@vava.com(FR) support.es@vava.com(ES) support.it@vava.com(IT) EU Importer: ZBT International Trading GmbH, Halstenbeker Weg 98C, 25462 Rellingen, Deutschland
ASIA PACIFIC
E-mail: support.jp@vava.com(JP)
JP Importer:
MANUFACTURER
Shenzhen NearbyExpress Technology Development Co., Ltd.
Address: 333 Bulong Road, Shenzhen, China, 518129
Learn more about the EU Declaration of Conformity: https://www.vava.com/downloads-VA-CD001-CE-Cert.html
VA-CD001
|
|
|
VAVA DASH CAM |
MADE IN CHINA |
User Guide |
||

CONTENTS
English Deutsch Français Español Italiano
01/07
08/14
15/21
22/28
29/35
36/42

EN
|
|
|
|
|
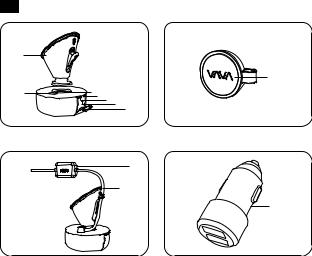
Product Diagram |
|
|
|
|
|
Car Mount |
|
|
|
|
|
Micro USB Port |
|
|
|
|
|
Magnet |
|
|
|
|
|
Power / Working Status LED |
|
|
|
|
|
WiFi Status LED |
|
|
|
|
Reset Button |
|
|
|
|
|
||
|
|
|
|
Micro SD Card Slot |
|
|
|
|
|
|
|
|
|
|
|
|
Snapshot Button |
|
|
|
|
|
GPS Module |
|
|
|
|
|
Micro USB Cable |
|
|
|
|
|
VAVA Car Charger |
|
|
|
|
|
|
|
|
|
|
|
|
What’s In the Box:
1 x VAVA Dash Cam |
1 x VAVA Car Charger |
5 x Cable Clips |
1 x Quick Installation Guide |
|
1 x Car Mount |
1 x Micro USB Cable with GPS Module |
1 x Button Cell |
1 x Thank You Card |
|
1 x Snapshot Button |
1 x Crowbar |
1 x User Guide |
|
|
Specifications |
|
|
|
|
|
|
|
|
|
CPU |
|
NT96663 |
|
|
|
|
|
|
|
Vision Processor |
|
Sony IMX291, 1/2.8 in |
|
|
|
|
|
|
|
Lens |
|
Full 6G + 1 IR Lens |
|
|
|
|
|
|
|
Angle |
|
155° |
|
|
|
|
|
|
|
G-Sensor |
|
3-axis Accelerometer |
|
|
|
|
|
|
|
|
|
1920*1080/60fps (Default) |
|
|
Resolution |
|
1920*1080/30fps |
|
|
|
1280*720/30fps |
|
|
|
|
|
|
|
|
|
|
840*480/30fps |
|
|
|
|
|
|
|
Storage |
|
Class 10 Micro SD Card up to 128GB (max) |
|
|
Wireless Connections |
|
WiFi (between phone and VAVA Dash Cam) |
|
|
|
2.4G (between Snapshot Button and VAVA Dash Cam) |
|
||
|
|
|
||
|
|
|
|
|
RAM |
|
2Gb |
|
|
Operating Temperature |
-20°C to 50°C |
|
|
|
-4°F to 122°F |
|
|
||
|
|
|
|
|
|
|
|
|
|
Built-in Battery |
|
320mAh |
|
|
|
|
|
|
|
01/02
Dash Cam
LED Indicator |
Status |
|
|
Blue LED light slowly blinks |
Working |
|
|
Blue LED light on |
Stop working / micro SD card storage full |
|
|
|
Recording an emergency video clip |
|
|
Red LED light blinks |
Recording a 15 second video clip after the video recording |
|
icon is tapped in the app |
|
|
Red LED light fast flashes |
Micro SD card error |
|
|
Red LED light flashes once |
Snapshot photo has been taken |
|
|
White LED light on |
Connected to WiFi |
|
|
White LED light off |
Not connected to WiFi |
|
|
Snapshot Button
1.Dash Cam and Snapshot Button Pairing: Once the dash cam is turned on, press and hold the Snapshot Button for 5 seconds until you hear 4 beep sounds and they are synced. The Snapshot Button enters standby mode once there is no operation in 1 minute. Press again to restart and take a photo.
2.Snapshot Button Operations: 1) Press once to take photos; 2) Press and hold for 3 seconds with a beep sound to take videos.
Note:
1.After the dash cam and the Snapshot Button is successfully paired, the Snapshot Button enters standby mode when the dash cam is shut off. When the dash cam is turned on again, press the Snapshot Button to activate the button while taking a snapshot photo, it takes around 3 seconds to resume normal working status.
2. Continually pressing the Snapshot Button will drain the button battery. Replace the button cell if you run out of battery.
Emergency Recording Mode
A 20 second video will be captured when the G-Sensor is activated in case of sharp turns or a sudden stop. When the capacity of these videos reaches 30% of the SD card space, the oldest ones will be overwritten by the new ones.
Parking Mode
When your car is not running, i.e. engine being shut down, the dash cam will automatically power off in 10 seconds and enter Parking Mode. When a shock or crash is detected, the G-Sensor will activate the dash cam and start recording a 15 second video. The dash cam will then re-enter the Parking Mode.
VAVA Dash App
Downloading the VAVA Dash App
For Android / iOS phones, search for “VAVA Dash” in the Google Play Store or Apple App Store. Download the app and install it on your phone.
Connecting the VAVA Dash to Your Phone
Connect your Android / iOS smartphone with the VAVA Dash Cam through WiFi: Settings > WLAN > Select “VAVA WiFi” > Enter password > Open the VAVA Dash App Note: The initial WiFi password is 12345678.
Live Preview
Once your phone is connected to the VAVA Dash Cam, open the app to view a real-time video feed and configure the
dash cam.
03/04

Take Photos and Videos
Press the Snapshot Button or tap the snapshot icon in the app to take a photo. Tap the video recording icon in the app to record a video from 5 seconds before the pressing or tapping to 15 seconds afterwards. The photo and the video clip will be automatically downloaded from the VAVA Dash Cam onto the VAVA Dash App.
Media Gallery Management
View, edit, and share captured photos and videos.
Path
Check information regarding driving routes.
Travel Log
Add photos to driving routes and turn it into a Travel Log. Click the share icon to post it on your favorite social networks (Facebook, Twitter, Instagram, etc.)!
Installing the VAVA Dash Cam
1.Insert the micro SD card into the micro SD card slot.
2.Stick the car mount onto your car windshield (ideally right in the middle).
3.Fix the VAVA Dash Cam onto the mount via the magnet.
4.Connect the USB cable to the micro USB port of the dash cam. Run the cable along the edge of the windshield, tuck it away in the seams, and extend it all the way to the USB port of the Car Charger. Be sure to keep it away from the airbag area.
5.Insert the Car Charger into your cigarette lighter, connect the Dash Cam to the Car Charger.
6.Start your car to turn on the VAVA Dash Cam. Connect it with your phone (refer to the “VAVA Dash App” section) and open the VAVA Dash App to view a real-time feed.

Ideal Mounting Position Car Charger GPS
05/06
Note
·The dash cam supports up to a class 10 micro SD card up to 128GB. Do not remove or insert the micro SD card when the camera is working.
·Suggested micro SD card brands: Samsung, Sandisk, Transcend.
·Stick the Snapshot Button with a 3M adhesive tape on the dashboard or besides the steering wheel. Do not put it on the airbag.
·Stick the GPS module with a 3M adhesive tape on the top left/right corner of windshield.
·Do not use the Car Charger to charge devices with Quick Charge technology.
·Install the car mount on windshields that are titled on an angle between 17° - 58°.
Attention
·Our apps and camera firmware will be updated regularly, you can update the firmware via apps.
·Do not use cardboard, paper towel, or napkin to clean the lens.
·Do not attempt to repair, dismantle, or modify the dash camera hardware by yourself.
DE
|
|
|
|
Produktabbildung |
|
|
|
|
Autohalterung |
|
|
|
|
Micro-USB-Anschluss |
|
|
|
|
Magnet |
|
|
|
|
Betriebs- / Status-LED |
|
|
|
|
WLAN-Status-LED |
|
|
Reset-Knopf |
||
|
|
|
||
|
|
|
|
Micro-SD-Kartenschacht |
|
|
|
|
Schnappschuss-Knopf |
|
|
|
|
GPS-Modul |
|
|
|
|
Micro-USB-Kabel |
|
|
|
|
VAVA Autoladegerät |
|
|
|
|
|
|
|
|
|
|
07/08
Was ist im Lieferumfang enthalten:
1 x VAVA Dashcam |
1 x VAVA Autoladegerät |
1 x Knopfzelle |
1 x Danke-Schön-Karte |
1 x Autohalterung |
1 x Micro-USB-Kabel mit GPS-Modul |
1 x Bedienungsanleitung |
|
1 x Schnappschuss-Knopf |
1 x Stemmeisen |
1 x Schnellstartanleitung |
|
Spezifikationen
CPU |
NT96663 |
Visionprozessor |
Sony IMX291, 1/2.8 in |
|
|
Linse |
Full 6G + 1 IR Linse |
|
|
Winkel |
155° |
|
|
G-Sensor |
3-Achsen Beschleunigungsmesser |
Auflösung |
1920*1080 / 60fps (Standard) |
|
1920*1080 / 30fps |
|
1280*720 / 30fps |
|
840*480 / 30fp |
Speicher |
Class 10 Micro-SD-Karte bis 128GB (max.) |
Kabellose Verbindungen |
WLAN (zwischen Handy und VAVA Dashcam) |
|
|
|
2.4G (zwischen Schnappschuss-Knopf und VAVA Dashcam) |
RAM |
2Gb |
Betriebstemperatur |
-20°C bis 50°C |
|
|
Eingebaute Batterie |
320mAh |
|
|
Dashcam
LED-Anzeige |
Status |
|
|
Die blaue LED blinkt langsam |
Am Arbeiten |
|
|
Die blaue LED ist an |
Funktion eingestellt / Micro-SD-Kartenspeicher voll |
|
|
Die rote LED blinkt |
Aufnahme eines Not-Videoclips |
|
|
|
Aufnahme eines 15-sekündigen Videoclips, nachdem das |
|
Videoaufnahme-Symbol in der App gedrückt wurde |
|
|
Die rote LED blinkt schnell |
Micro-SD-Kartenfehler |
Die rote LED blinkt einmal auf |
Es wurde ein Schnappschuss-Foto geschossen |
|
|
Die weiße LED ist an |
Mit WLAN verbunden |
|
|
Die weiße LED ist aus |
Nicht mit WLAN verbunden |
|
|
Schnappschuss-Knopf
1.Koppeln von Dashcam und Schnappschuss-Knopf: Halten Sie den Schnappschuss-Knopf 5 Sekunden lang gedrückt, sobald die Dashcam eingeschaltet ist, bis Sie 4 Pieptöne hören und beide synchronisiert sind. Nach 1-minütiger Inaktivität wechselt der Schnappschuss-Knopf in den Standby-Modus. Drücken Sie ihn erneut, um ihn wieder zu aktivieren und ein Foto schießen zu können.
2.Bedienung des Schnappschuss-Knopfs: 1) Drücken Sie ihn ein Mal, um Fotos zu schießen; 2) Halten Sie ihn 3 Sekunden lang gedrückt, bis ein Piepton ertönt, um Videos aufzunehmen.
09/10
Anmerkung:
1.Nachdem die Dashcam und Schnappschuss-Knopf erfolgreich gekoppelt wurden, wechselt der Schnappschuss-Knopf in den Standby-Modus, wenn die Dashcam ausgeschaltet wird. Drücken Sie den Schnappschuss-Knopf, wenn die Dashcam wieder eingeschaltet ist, um den Knopf zum Fotoschießen zu aktivieren; es dauert ca. 3 Sekunden den normalen Betriebsstatus wiederaufzunehmen.
2.Kontinuierliches Drücken des Schnappschuss-Knopfes wird die Knopfbatterie entleeren. Ersetzen Sie die Knopfzelle, wenn die Batterie leer ist.
Reset-Knopf
Im Falle eines Systemabsturzes drücken Sie den Reset-Knopf, um das Gerät auf Werkseinstellungen zurückzusetzen.
Not-Aufnahme-Modus
Es wird ein 20-sekündiges Video aufgenommen, wenn der G-Sensor im Falle von scharfen Drehungen oder plötzlichen Stopps aktiviert wird. Sobald die Größe dieser Videos 30% des SD-Kartenspeichers füllt, werden die ältesten von den neuen überschrieben.
Park-Modus
Wenn Ihr Auto nicht an ist, d.h. wenn der Motor ausgeschaltet wird, schaltet sich auch die Dashcam automatisch nach 10 Sekunden aus und wechselt in den Park-Modus. Sobald eine Erschütterung oder ein Unfall registriert wird, aktiviert der G-Sensor die Dashcam und startet eine 15-sekündige Videoaufnahme. Danach wird die Dashcam wieder in den Park-Modus schalten.
VAVA Dash App
Herunterladen der VAVA Dash App
Suchen Sie für Android / iOS Handys im Google Play Store oder Apple App Store nach "VAVA Dash". Laden Sie die App herunter und installieren Sie sie auf Ihrem Handy.
Verknüpfen von VAVA Dash mit Ihrem Handy
So verknüpfen Sie Ihr Android / iOS Smartphone über WLAN mit der VAVA Dashcam:
Einstellungen > WLAN > Wählen Sie “VAVA WiFi” > Geben Sie das Passwort ein > Öffnen Sie die VAVA Dash App Anmerkung: Das voreingestellte WLAN-Passwort ist 12345678.
Live-Vorschau
Sobald Ihr Telefon mit der VAVA Dashcam verbunden ist, können Sie die App öffnen, um einen Echtzeit-Videofeed einzusehen und die Dashcam einzurichten.
Fotos und Videos aufnehmen
Drücken Sie den Schnappschuss-Knopf oder tippen Sie auf das Schnappschuss-Symbol in der App, um ein Foto aufzunehmen. Tippen Sie auf das Videoaufnahme-Symbol in der App, um ein Video von 5 Sekunden vor dem Drücken / Tippen bis 15 Sekunden danach aufzunehmen. Das Foto und der Videoclip wird automatisch von der VAVA Dashcam in die VAVA Dash App heruntergeladen.
Verwaltung der Mediengalerie
Ansehen, Bearbeiten und Teilen aufgenommener Fotos und Videos.
Route
Überprüfen Sie Informationen bezüglich der Fahrrouten.
Reiseprotokoll
Fügen Sie den Fahrrouten Fotos hinzu und verwandeln Sie diese so in ein Reiseprotokoll. Klicken Sie das Teilen-Symbol an, um es auf Ihren bevorzugten Sozialen Netzwerken zu posten (Facebook, Twitter, Instagram etc.)!
Montage der VAVA Dashcam
1.Stecken Sie die Micro-SD-Karte in den Micro-SD-Karteneinschub.
2.Kleben Sie die Autohalterung an die Windschutzscheibe Ihres Autos (idealerweise in der Mitte).
11/12
 Loading...