

Page 1

VA-BH002
www.vava.com
NORTH AMERICA
E-mail: support.@vava.com
Tel: 1-888-456-8468 (Monday-Friday: 9:00 – 17:00 PST)
Address: 46724 Lakeview Blvd, Fremont, CA 94538
EUROPE
E-mail:
support.uk@vava.com(UK)
support.de@vava.com(DE)
support.fr@vava.com(FR)
support.es@vava.com(ES)
support.it@vava.com(IT)
EU Importer: ZBT International Trading GmbH,
Halstenbeker Weg 98C, 25462 Rellingen, Deutschland
ASIA PACIFIC
E-mail: support.jp@vava.com(JP)
MANUFACTURER
Shenzhen NearbyExpress Technology Development Company Limited
Address: Block D, Minle Industrial Park, Meiban Road, Longhua District,
Shenzhen, China. 518131
MADE IN CHINA
VAVA MOOV 21 TRUE WIRELESS EARPHONES
User Guide
Page 2

CONTENTS
English
Deutsch
Français
Español
Italiano
日本語
01/05
06/10
11/15
16/20
21/25
26/30
Page 3
US UK CA
Thank you for choosing the VAVA MOOV 21 True
Wireless Earphones. If you have any questions or issues,
please contact our customer support team by email at
support@vava.com.
Package Contents
1 x VAVA MOOV 21 True Wireless Earphones with Charging Dock
·
1 x USB Charging Cable
·
6 x Earbud Tips (two are already attached)
·
1 x User Guide
·
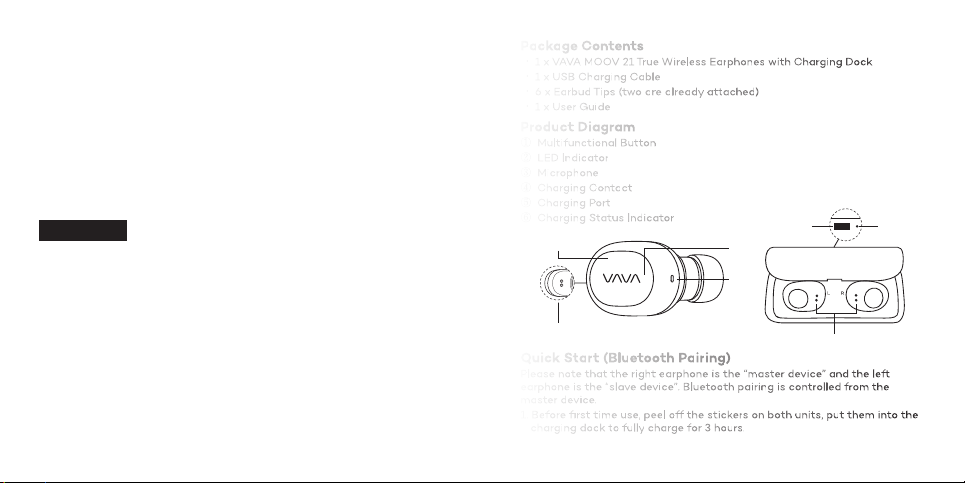
Product Diagram
① Multifunctional Button
② LED Indicator
③ Microphone
④ Charging Contact
⑤ Charging Port
⑥ Charging Status Indicator
①
②
③
⑤ ⑥
④
Quick Start (Bluetooth Pairing)
Please note that the right earphone is the “master device” and the left
earphone is the “slave device”. Bluetooth pairing is controlled from the
master device.
1. Before first time use, peel off the stickers on both units, put them into the
charging dock to fully charge for 3 hours.
④
01/02
Page 4
2. Remove the master device from the dock, press and hold the Multifunction
Button until the LED Indicator flashes red and white alternately to enter
pairing mode.
3. Turn on the Bluetooth function on your phone and search for “VAVA MOOV
21_R”, tap to connect.
4. Remove the slave device from the dock and put it close to the master unit
and press and hold the Multifunction Button until the LED Indicator flashes
white. They will sync and connect automatically.
Note: The earphones can remember previously paired devices. If you have
previously paired with a device, simply turn on your device and the
earphones and they will connect automatically without going into
pairing mode.
Control Functions
Function
Power On
Power Off
Play / Pause
Answer Phone Call
Hang Up Phone Call
Reject Phone Call
Master Device
(Right Earphone)
Press and hold the Multifunction Button until the
LED Indicator flashes white
Press and hold the Multifunction Button until the
LED Indicator becomes red and then shuts off
Press the Multifunction Button once
When a call is incoming, press the
Multifunction Button once
During a call, press the Multifunction
Button once
When a call is incoming, press and hold
the Multifunction Button for 2 seconds
Slave Device
(Left Earphone)
N/A
N/A
N/A
Activate Voice Control
Charging
Charging
Charging the Earphones
Charging the Earphones
When battery is low, the LED Indicator flashes red with a voice prompt to
When battery is low, the LED Indicator flashes red with a voice prompt to
remind you of a low battery. Put the earphones in their corresponding dock
remind you of a low battery. Put the earphones in their corresponding dock
to charge and the LED Indicator turns white and then shuts off when fully
to charge and the LED Indicator turns white and then shuts off when fully
charged.
charged.
Note: The LED Indicator flashes red once to indicate a correct connection
Note: The LED Indicator flashes red once to indicate a correct connection
when being inserted into the dock.
when being inserted into the dock.
Charging the Dock
Charging the Dock
The LED Indicator beside the charging port will turn red when the dock is
The LED Indicator beside the charging port will turn red when the dock is
being charged and become blue after fully charged.
being charged and become blue after fully charged.
When not playing music or on a
call, press the Multifunction Button
for 1 second
N/A
03/04
Page 5

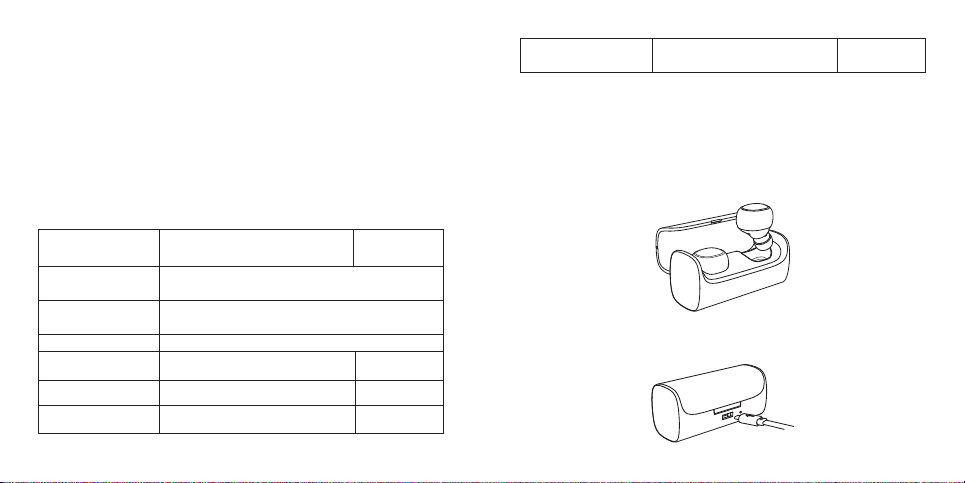
How to Wear
How to Wear
Wear the earphones as shown in the diagram:
Wear the earphones as shown in the diagram:
Note: Please note the “L” and “R” markings on the earphones, which
Note: Please note the “L” and “R” markings on the earphones, which
correspond to your left side and right side, respectively.
correspond to your left side and right side, respectively.
FAQ
FAQ
Q: Why can I only hear music from one of the earphones?
Q: Why can I only hear music from one of the earphones?
A: Make sure the earphones are synced together:
A: Make sure the earphones are synced together:
1) Pair the master device (right earphone) with your phone.
1) Pair the master device (right earphone) with your phone.
2) Turn the master device off.
2) Turn the master device off.
3) Hold the Multifunction Button of both units until the white indicators
3) Hold the Multifunction Button of both units until the white indicators
are on.
are on.
4) Wait until you hear a voice prompt telling you the two devices are
4) Wait until you hear a voice prompt telling you the two devices are
connected.
connected.
Q: My earphones will not switch on.
Q: My earphones will not switch on.
A: Please recharge them and make sure they have enough power.
A: Please recharge them and make sure they have enough power.
Vielen Dank, dass Sie sich für die VAVA MOOV 21 Komplett
DE
Kabellosen Kopfhörer entschieden haben. Wenn Sie Fragen haben
und Hilfe benötigen, kontaktieren Sie bitte unseren Kundendienst
per Email unter: support.de@vava.com.
05/06
Page 6
Lieferumfang
1 x VAVA MOOV 21 Komplett Kabellose Kopfhörer mit Ladestation
·
1 x USB-Ladekabel
·
6 x Ohradapter(zwei sind bereits an den Kopfhörern)
·
1 x Bedienungsanleitung
·
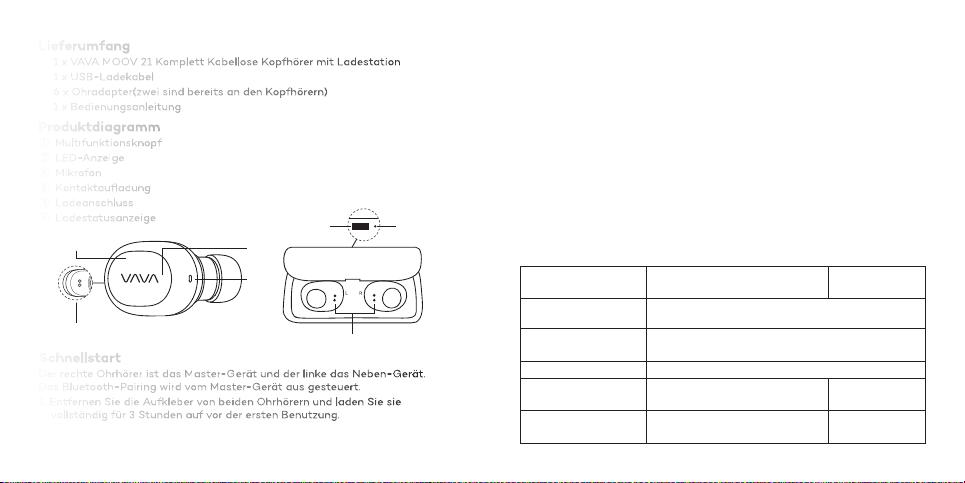
Produktdiagramm
① Multifunktionsknopf
② LED-Anzeige
③ Mikrofon
④ Kontaktaufladung
⑤ Ladeanschluss
⑥ Ladestatusanzeige
①
④
Schnellstart
Der rechte Ohrhörer ist das Master-Gerät und der linke das Neben-Gerät.
Das Bluetooth-Pairing wird vom Master-Gerät aus gesteuert.
1. Entfernen Sie die Aufkleber von beiden Ohrhörern und laden Sie sie
vollständig für 3 Stunden auf vor der ersten Benutzung.
②
③
⑤ ⑥
④
2. Entfernen Sie das Master-Gerät von der Ladestation und halten Sie die
Multifunktionstaste gedrückt bis die LED-Anzeige abwechslungsweise rot
und weiß blinkt, um den Pairing-Prozess zu starten.
3. Schalten Sie die Bluetooth-Funktion auf Ihrem Smartphone ein und
suchen Sie nach “VAVA MOOV 21_R”. Tippen Sie es an, um sich zu
verbinden.
4. Entfernen Sie das Neben-Gerät von der Ladestation und legen Sie es
nahe an das Master-Gerät. Halten Sie die Multifunktionstaste des
Neben-Gerätes gedrückt bis die LED-Anzeige weiß leuchtet. Die beiden
Ohrhörer werden sich automatisch beginnen zu synchronisieren.
Hinweis: Der Bluetooth-Kopfhörer merkt sich vorherige Verbindungen. Falls
Sie den Kopfhörer schon einmal mit einem Gerät verbunden haben, schalten
Sie das Gerät und den Kopfhörer ein. Das Gerät und der Kopfhörer werden
automatisch versuchen, die jeweils letzte Verbindung wieder herzustellen,
ohne dass Sie in den Verbindungsmodus wechseln müssen.
Kontrollfunktionen
Funktion
Einschalten
Ausschalten
Wiedergabe / Pause
Anrufen annehmen
Anruf beenden
Master-Gerät
(Rechter Ohrhörer)
Halten Sie den Multifunktionsknopf gedrückt bis
die LED-Anzeige weiß blinkt
Halten Sie den Multifunktionsknopf gedrückt bis
die LED-Anzeige rot wird und dann abstellt
Drücken Sie den Multifunktionsknopf einmal
Wenn ein Anruf eingeht, drücken Sie
den Multifunktionsknopf einmal
Während des Anrufs, drücken Sie
den Multifunktionsknopf einmal
Neben-Gerät
(Linker Ohrhörer)
N/A
N/A
07/08
Page 7

Wenn ein Anruf eingeht, halten Sie den
Anruf abweisen
Sprachsteuerung
aktivieren
Laden
Laden
Laden der Ohrhörer
Laden der Ohrhörer
Wenn der Akkustand niedrig wird, beginnt die LED-Anzeige rot zu blinken
Wenn der Akkustand niedrig wird, beginnt die LED-Anzeige rot zu blinken
und eine Sprachansage wird Sie daran erinnern, die Ohrhörer aufzuladen.
und eine Sprachansage wird Sie daran erinnern, die Ohrhörer aufzuladen.
Legen Sie die Ohrhörer in Ihr entsprechendes Dock und die LED-Anzeige wird
Legen Sie die Ohrhörer in Ihr entsprechendes Dock und die LED-Anzeige wird
weiß. Wenn die Ohrhörer vollständig aufgeladen sind, erlischt die
weiß. Wenn die Ohrhörer vollständig aufgeladen sind, erlischt die
LED-Anzeige.
LED-Anzeige.
Hinweis: Die LED-Anzeige blinkt einmal rot auf, um anzuzeigen, dass die
Hinweis: Die LED-Anzeige blinkt einmal rot auf, um anzuzeigen, dass die
Kopfhörer in das korrekte Dock gelegt wurden.
Kopfhörer in das korrekte Dock gelegt wurden.
Aufladen des Docks
Aufladen des Docks
Die LED-Anzeige neben dem Ladeanschluss leuchtet rot, wenn das Dock
Die LED-Anzeige neben dem Ladeanschluss leuchtet rot, wenn das Dock
geladen wird und wird blau, wenn es vollständig aufgeladen ist.
geladen wird und wird blau, wenn es vollständig aufgeladen ist.
Multifunktionsknopf für 2 Sekunden
gedrückt
Drücken Sie den Multifunktionsknopf
für 1 Sekunde (Wenn Sie gerade nicht in
einem Gespräch sind oder Musik hören)
N/A
N/A
Trageweise
Trageweise
Bitte tragen Sie den Kopfhörer, wie auf dem Diagramm gezeigt:
Bitte tragen Sie den Kopfhörer, wie auf dem Diagramm gezeigt:
Hinweis: Bitte achten Sie darauf, dass Sie den Kopfhörer gemäß den
Hinweis: Bitte achten Sie darauf, dass Sie den Kopfhörer gemäß den
Markierungen“L”und“R”richtig tragen.
Markierungen“L”und“R”richtig tragen.
Häufig gestellte Fragen
Häufig gestellte Fragen
Q: Weshalb höre ich nur aus einem Ohrhörer Musik?
Q: Weshalb höre ich nur aus einem Ohrhörer Musik?
A: Stellen Sie sicher, dass die beiden Ohrhörer miteinander verbunden sind:
A: Stellen Sie sicher, dass die beiden Ohrhörer miteinander verbunden sind:
1) Synchronisieren Sie das Master-Gerät (rechter Ohrhörer) mit Ihrem
1) Synchronisieren Sie das Master-Gerät (rechter Ohrhörer) mit Ihrem
Smartphone.
Smartphone.
2) Schalten Sie das Master-Gerät aus.
2) Schalten Sie das Master-Gerät aus.
3) Halten Sie den Multifunktionsknopf beider Ohrhörer gedrückt, bis die
3) Halten Sie den Multifunktionsknopf beider Ohrhörer gedrückt, bis die
LED-Anzeige weiß leuchtet.
LED-Anzeige weiß leuchtet.
4) Warten Sie, bis Sie die Sprachansage hören, dass beide Ohrhörer
4) Warten Sie, bis Sie die Sprachansage hören, dass beide Ohrhörer
verbunden sind.
verbunden sind.
F: Meine Kopfhörer lassen sich nicht einschalten.
F: Meine Kopfhörer lassen sich nicht einschalten.
A: Stellen Sie sicher, dass die Kopfhörer noch genug Akku haben.
A: Stellen Sie sicher, dass die Kopfhörer noch genug Akku haben.
09/10
Page 8

Merci d’avoir choisi les Écouteurs Entièrement Sans Fil VAVA MOOV
FR
21. Pour toute question ou doute, veuillez contacter notre service
clientèle par email à l'adresse support.fr@vava.com.
Contenu du Package
1 x Écouteurs Entièrement Sans Fil VAVA MOOV 21 avec la Station de Charge
·
1 x Câble de Charge USB
·
6 x Oreillettes (deux sont déjà installées)
·
1 x Guide d’Utilisation
·
Description du Produit
① Bouton Multifonction
② Voyant à LED
③ Micro
④ Contacts de Charge
⑤ Port de Charge
⑥ Voyant d’État de Charge
①
②
③
⑤ ⑥
④
Démarrage Rapide (Couplage Bluetooth)
Veuillez noter que l'écouteur droit est « le maître » et l'écouteur gauche est «
l’esclave ». Le couplage Bluetooth est commandé depuis le maître.
1. Avant la première utilisation, décollez les autocollants sur les deux
écouteurs, placez-les dans la station de charge pour les recharger
complètement pendant 3 heures.
④
11/12
Page 9

2. Retirez le périphérique maître de la station, appuyez et maintenez le
Bouton Multifontion jusqu’à ce que le voyant à LED clignote
alternativement rouge et blanc pour entrer en mode de couplage.
3. Activez la fonction Bluetooth sur votre téléphone et cherchez "VAVA
MOOV 21_R", cliquez dessus pour vous y connecter.
4. Retirez le périphérique esclave de la station et posez-le près du
périphérique maître , appuyez et maintenez le Bouton Multifontion jusqu’à
ce que le voyant à LED clignote blanc. Ils se synchroniseront et se
connecteront automatiquement.
Remarque: Le casque Bluetooth peut se rappeler des périphériques
précédemment appairés. Si vous avez déjà couplé le casque avec un
appareil, allumez simplement cet appareil, puis le casque et il se
connectera automatiquement au dernier appareil couplé sans devoir entrer
en mode de couplage.
Commandes de Contrôle
Fonction
Marche
Arrêt
Lecture / Pause
Répondre à un Appel
Téléphonique
Raccrocher un Appel
Appareil Maître
(écouteur droit)
Maintenez appuyé le Bouton Multifonction jusqu’à
ce que le voyant clignote blanc
Maintenez appuyé le Bouton Multifonction jusqu’à
ce que le voyant devienne rouge puis s’éteigne
Appuyez une fois sur le Bouton Multifonction
En cas d’appel entrant, appuyez
une fois sur le Bouton Multifonction
Pendant un appel, appuyez une fois
sur le Bouton Multifonction
Appareil Esclave
(écouteur gauche)
N/A
N/A
Rejeter un Appel
Activer le
Contrôle Vocal
Chargement
Chargement
Charger les Écouteurs
Charger les Écouteurs
Lorsque la batterie est faible, le voyant à LED clignote en rouge et un
Lorsque la batterie est faible, le voyant à LED clignote en rouge et un
message vocale vous rappelle que la batterie est faible. Mettez les écouteurs
message vocale vous rappelle que la batterie est faible. Mettez les écouteurs
dans leur station de charge pour qu’ils se chargent et que le voyant à LED
dans leur station de charge pour qu’ils se chargent et que le voyant à LED
devienne blanc, puis s'éteigne quand la charge est terminée.
devienne blanc, puis s'éteigne quand la charge est terminée.
Remarque : le voyant à LED clignote en rouge une fois pour indiquer une
Remarque : le voyant à LED clignote en rouge une fois pour indiquer une
bonne connexion lors de l’insertion dans la station de charge.
bonne connexion lors de l’insertion dans la station de charge.
Charger la Station
Charger la Station
Le voyant à LED à côté du port de charge devient rouge lorsque la station
Le voyant à LED à côté du port de charge devient rouge lorsque la station
d'accueil est en cours de charge et devient bleu une fois la charge est
d'accueil est en cours de charge et devient bleu une fois la charge est
terminée.
terminée.
En cas d’appel entrant, maintenez appuyé
2 secondes le Bouton Multifonction
En dehors de la lecture de musique ou
d’un appel, maintenez appuyé 1
seconde le Bouton Multifonction
N/A
N/A
13/14
Page 10

Comment porter le casque
Comment porter le casque
Veuillez porter le casque comme indiqué sur ce schéma:
Veuillez porter le casque comme indiqué sur ce schéma:
Remarque: Veuillez noter les repères « L » et « R » sur le casque, ils
Remarque: Veuillez noter les repères « L » et « R » sur le casque, ils
correspondent aux côtés gauche et droit respectivement.
correspondent aux côtés gauche et droit respectivement.
FAQ
FAQ
Q : Pourquoi je n’entends qu’un seul des deux écouteurs ?
Q : Pourquoi je n’entends qu’un seul des deux écouteurs ?
R : Assurez-vous que les écouteurs sont synchronisés ensemble :
R : Assurez-vous que les écouteurs sont synchronisés ensemble :
1) Couplez le périphérique maître (écouteur droit) à votre téléphone.
1) Couplez le périphérique maître (écouteur droit) à votre téléphone.
2) Éteignez le périphérique maître.
2) Éteignez le périphérique maître.
3) Maintenez le Bouton Multifonction des deux écouteurs jusqu'à ce que les
3) Maintenez le Bouton Multifonction des deux écouteurs jusqu'à ce que les
voyants à LED soient allumés en blanc.
voyants à LED soient allumés en blanc.
4) Attendez le message vocal vous disant que les deux appareils sont
4) Attendez le message vocal vous disant que les deux appareils sont
connectés.
connectés.
Q : Mes écouteurs ne s'allument pas.
Q : Mes écouteurs ne s'allument pas.
R : Veuillez les recharger et vous assurer qu'ils ont assez de puissance.
R : Veuillez les recharger et vous assurer qu'ils ont assez de puissance.
Gracias por elegir los auténticos auriculares inalámbricos VAVA
ES
MOOV 21. Si tiene alguna pregunta o preocupación, por favor
siéntase libre de contactar a nuestro soporte técnico a
support.es@vava.com.
15/16
Page 11

Contenido del paquete
1 x VAVA MOOV 21 Auténticos Auriculares inalámbricos con base de carga
·
1 x Cable de carga USB
·
6 x Fundas auriculares (dos ya están puestas)
·
1 x Guía del usuario
·
Diagrama del paquete
① Botón multifunción
② Indicador LED
③ Micrófono
④ Contacto de carga
⑤ Puerto de carga
⑥ Indicador de estado de la carga
①
④
Inicio rápido
Tenga en cuenta de que el auricular derecho es el "dispositivo maestro" y el
auricular izquierdo es el "dispositivo slave". El emparejamiento Bluetooth se
controla desde el dispositivo maestro.
1. Antes de usar por primera vez, despegue las etiquetas en ambas unidades,
póngalas en la base de carga para cargar por completo durante 3 horas
②
③
⑤ ⑥
④
2. Extraiga el dispositivo maestro de la base, presione y mantenga el botón
multifunción hasta que el indicador LED parpadee en rojo y en blanco
alternativamente para entrar en el modo de emparejamiento.
3. Active la función Bluetooth en su teléfono y busque "VAVA MOOV 21_R",
toque para conectarse.
4. Extraiga el dispositivo esclavo de la base y colóquelo cerca de la unidad
maestra. Presione y mantenga el botón multifunción hasta que el
Indicador LED parpadee en blanco. Se sincronizarán y se conectarán
automáticamente.
Nota: El auricular Bluetooth puede recordar dispositivos vinculados
anteriores. Si ha emparejado previamente el auricular con un dispositivo,
basta con encender el dispositivo y los auriculares y se conectarán de forma
automática sin entrar en el modo de emparejamiento.
Funciones de control
Función
Encendido
Apagado
Reproducir/ pausa
Contestar llamada
telefónica
Colgar llamada
telefónica
Rechazar llamada
telefónicaa
Dispositivo principal
(auricular derecho)
Mantenga pulsado el botón multifunción hasta
que el indicador LED parpadee en blanco
Mantenga presionado el botón multifunción hasta
que el indicador LED se encienda y luego se apague
Pulse el botón Multifunción una vez
Cuando una llamada es entrante,
presione el Botón Multifunción una vez
Durante una llamada, presione el
botón multifunción una vez
Cuando se recibe una llamada,
mantenga presionado el botón
multifunción durante 2 segundos
Dispositivo slave
(auricular izquierdo)
N/A
N/A
N/A
17/18
Page 12

Cuando no esté reproduciendo
Activar control de voz
Cargando
Cargando
Carga de los auriculares
Carga de los auriculares
Cuando la batería está baja, el indicador LED parpadea en rojo con un
Cuando la batería está baja, el indicador LED parpadea en rojo con un
mensaje de voz para recordarle que la batería está baja. Coloque los
mensaje de voz para recordarle que la batería está baja. Coloque los
auriculares en su base correspondiente para cargar y el indicador LED se
auriculares en su base correspondiente para cargar y el indicador LED se
vuelve blanco y luego se apaga cuando está completamente cargado.
vuelve blanco y luego se apaga cuando está completamente cargado.
Nota: El indicador LED parpadea en rojo una vez para indicar una conexión
Nota: El indicador LED parpadea en rojo una vez para indicar una conexión
correcta cuando se inserta en la base.
correcta cuando se inserta en la base.
Puerto de carga
Puerto de carga
El indicador LED situado al lado del puerto de carga se volverá rojo cuando
El indicador LED situado al lado del puerto de carga se volverá rojo cuando
la base esté cargada y se volverá azul después de haber cargado
la base esté cargada y se volverá azul después de haber cargado
completamente.
completamente.
música o en una llamada,
presione el botón multifunción
durante 1 segundo
N/A
Cómo usar
Cómo usar
Por favor, use los auriculares como se muestra en el diagrama:
Por favor, use los auriculares como se muestra en el diagrama:
Nota: Por favor, tenga en cuenta el marcado "R" en el auricular "L" y,
Nota: Por favor, tenga en cuenta el marcado "R" en el auricular "L" y,
corresponden a lado derecho e izquierdo, respectivamente.
corresponden a lado derecho e izquierdo, respectivamente.
P/R más frecuentes
P/R más frecuentes
P: ¿Por qué sólo puedo escuchar música de uno de los auriculares?
P: ¿Por qué sólo puedo escuchar música de uno de los auriculares?
R: Asegúrese de que los auriculares estén sincronizados:
R: Asegúrese de que los auriculares estén sincronizados:
1) Empareje el dispositivo maestro (auricular derecho) con su teléfono.
1) Empareje el dispositivo maestro (auricular derecho) con su teléfono.
2) Apague el dispositivo maestro.
2) Apague el dispositivo maestro.
3) Mantenga pulsado el Botón Multifunción de ambas unidades hasta que
3) Mantenga pulsado el Botón Multifunción de ambas unidades hasta que
los indicadores blancos estén encendidos.
los indicadores blancos estén encendidos.
4) Espere hasta que escuche un mensaje de voz indicándole que los dos
4) Espere hasta que escuche un mensaje de voz indicándole que los dos
dispositivos están conectados.
dispositivos están conectados.
P: Mis auriculares no se encienden.
P: Mis auriculares no se encienden.
R: Por favor, recárguelos y asegúrese de que tienen suficiente potencia.
R: Por favor, recárguelos y asegúrese de que tienen suficiente potencia.
19/20
Page 13

Grazie per aver scelto gli Auricolari Bluetooth VAVA MOOV 21. Nel
IT
caso ci fosse bisogno di ulteriore assistenza, si prega di contattare
il nostro team di assistenza clienti a support.it@vava.com.
Contenuto della Confezione
1 x VAVA MOOV 21 Autentici Auricolari Bluetooth con Custodia di Ricarica
·
1 x Cavo di Ricarica USB
·
6 x Gommini Auricolari (2 presenti sugli auricolari)
·
1 x Guida Utente
·
Schema del Prodotto
① Tasto Multifunzione
② Indicatore LED
③ Microfono
④ Contatto di Ricarica
⑤ Porta di Ricarica
⑥ Indicatore Stato di Ricarica
①
②
③
⑤ ⑥
④
Associazione Veloce
Notare che l’auricolare destro è il dispositivo “dominante” o primario mentre
l’auricolare sinistro è quello secondario. La connessione Bluetooth si effettua
e controlla tramite il dispositivo primario.
1. Per il primo utilizzo, rimuovere gli adesivi presenti su entrambi gli auricolari,
inserirli nell’apposita custodia e ricaricarli per 3 ore.
④
21/22
Page 14

2. Rimuovere l’auricolare dominante dalla custodia, premere e tenere premuto
il Tasto Multifunzione fino a che l’indicatore LED lampeggi rosso e bianco
per segnalare che si è in modalità di connessione.
3. Accendere la funzione Bluetooth del proprio smartphone e cliccare “VAVA
MOOV 21_R” tra i dispositivi disponibili nelle vicinanze.
4. Rimuovere il dispositivo secondario dalla custodia e posizionarlo affianco
a quello dominante e premere e tenere premuto il Tasto Multifunzione fino
a che l’indicatore LED lampeggi bianco i due si sincronizzeranno e
connetteranno automaticamente.
Nota: Gli auricolari Bluetooth memorizzano i dispositivi elettronici appaiati
in precedenza. È sufficiente accendere il proprio dispositivo elettronico e gli
auricolari, e gli auricolari si connetteranno in automatico all'ultimo
dispositivo associato senza entrare in modalità di associazione.
Funzioni di Controllo
Funzione
Accensione
Spegnimento
Riproduzione / Pausa
Rispondere alle
Chiamate
Terminare una
Chiamata
Rifiutare una
Chiamata
Dispositivo Primario
(Auricolare Destro)
Premere e tenere premuto il Tasto Multifunzione fino
a che l’indicatore LED lampeggi in bianco
Premere e tenere premuto il Tasto Multifunzione fino
a che l’indicatore LED diventi rosso e si spenga
Premere una volta il Tasto Multifunzione
Quando si riceve una chiamata,
premere una volta il Tasto
Multifunzione
Durante una chiamata, premere
una volta il Tasto Multifunzione
Quando si riceve una chiamata,
premere e tenere premuto il Tasto
Multifunzione per 2 secondi
Dispositivo Secondario
(Auricolare Sinistro)
N/A
N/A
N/A
Attivare i
Controlli Vocali
Ricarica
Ricarica
Ricaricare gli Auricolari
Ricaricare gli Auricolari
Quando il livello della batteria è basso, l’indicatore LED lampeggerà in rosso
Quando il livello della batteria è basso, l’indicatore LED lampeggerà in rosso
ed una notifica vocale avvertirà del basso livello della batteria. Inserire gli
ed una notifica vocale avvertirà del basso livello della batteria. Inserire gli
auricolari nella custodia per ricaricarli - l’indicatore LED diventerà bianco e si
auricolari nella custodia per ricaricarli - l’indicatore LED diventerà bianco e si
spegnerà a ricarica completata.
spegnerà a ricarica completata.
Nota: L’indicatore LED lampeggia in rosso una volta per segnalare l’avvenuta
Nota: L’indicatore LED lampeggia in rosso una volta per segnalare l’avvenuta
connessione con i contatti di ricarica quando si inseriscono gli auricolari
connessione con i contatti di ricarica quando si inseriscono gli auricolari
nella custodia.
nella custodia.
Ricaricare la Custodia
Ricaricare la Custodia
L’indicatore LED affianco alla porta di ricarica si accenderà in rosso durante
L’indicatore LED affianco alla porta di ricarica si accenderà in rosso durante
la ricarica della custodia e diventerà blu a ricarica completata.
la ricarica della custodia e diventerà blu a ricarica completata.
Premere e tenere premuto il Tasto
Multifunzione per 1 secondo (quando
non si riproduce musica o si effettua
una chiamata)
N/A
23/24
Page 15

Come Indossare gli Auricolari
Come Indossare gli Auricolari
Indossare gli auricolari come raffigurato nello schema:
Indossare gli auricolari come raffigurato nello schema:
Nota: Posizionare gli auricolari seguendo i segnali “L” (sinistro) e“R” (destro)
Nota: Posizionare gli auricolari seguendo i segnali “L” (sinistro) e“R” (destro)
incisi nel rivestimento esterno.
incisi nel rivestimento esterno.
Domande Frequenti
Domande Frequenti
D: Perché la musica / l’audio si sente solo da uno degli auricolari?
D: Perché la musica / l’audio si sente solo da uno degli auricolari?
R: Assicurarsi che gli auricolari siano sincronizzati:
R: Assicurarsi che gli auricolari siano sincronizzati:
1) Connettere l’auricolare primario (quello destro) allo smartphone.
1) Connettere l’auricolare primario (quello destro) allo smartphone.
2) Spegnere l’auricolare primario.
2) Spegnere l’auricolare primario.
3) Tenere premuto il Tasto Multifunzione di entrambi gli auricolari fino a che
3) Tenere premuto il Tasto Multifunzione di entrambi gli auricolari fino a che
gli indicatori si accendano in bianco.
gli indicatori si accendano in bianco.
4) Una notifica vocale avvertirà dell’avvenuta connessione dei due auricolari.
4) Una notifica vocale avvertirà dell’avvenuta connessione dei due auricolari.
D: Gli auricolari non si accendono.
D: Gli auricolari non si accendono.
R: Ricaricare gli auricolari ed assicurarsi che il livello della batteria sia
R: Ricaricare gli auricolari ed assicurarsi che il livello della batteria sia
sufficiente.
sufficiente.
この度はVAVAMOOV21スマートワイヤレスイヤホンをお買い上げ頂きまし
JP
て誠にありがとうございます。何かありましたら、お気軽にカスタマーサポー
トsupport.jp@vava.com までメールでお問合せください。
25/26
Page 16

セ ット 内 容
1 x VAVA MOOV 21 完全ワイヤレスイヤホン充電ドック付
·
1 x USB 充電ケーブル
·
6 x イヤ ー チップ (2個は装着済)
·
1 x 取扱説明書
·
製品図
①マルチファンクションボタン
②LEDインジケーター
③マイク
④充電接続部
⑤充電ポート
⑥充電状態インジケーター
①
④
クイックスタート(Bluetoothペアリング)
このイヤホンは、右用が“マスターデバイス”であり、左用は“スレーブデバイス”です。
Bluetoothデバイスとのペアリンは、まず右用のマスターデバイスで行います。
1.お使いになる前に、両方の包装を取り外し、まず約3時間、充電ドックでフル充電します。
2.マスターデバイスをドックからとりはずして、しばらく押すと、LEDインジケーターが赤白で
点滅し ペアリング モード に なります。
3.接続するデバイスのBluetooth機能を有効にして、表示される“VAVAMOOV21R”をタップ
②
③
⑤ ⑥
④
し接続します。
し接続します。
4.スレーブのイヤホンをドックから取り外し、マスターデバイスに近づけます。、しばらく押すと
4.スレーブのイヤホンをドックから取り外し、マスターデバイスに近づけます。、しばらく押すと
インジケーターが白で点滅、2つのイヤホンは自動的に連携し接続状態になります。
インジケーターが白で点滅、2つのイヤホンは自動的に連携し接続状態になります。
付記:本製品はペアリングされたことがあるデバイスを記憶します。一回本製品とペアリングし
付記:本製品はペアリングされたことがあるデバイスを記憶します。一回本製品とペアリングし
たことがあるデバイスは次回本製品をご利用する際に本製品に記憶されたので、本製品を電
たことがあるデバイスは次回本製品をご利用する際に本製品に記憶されたので、本製品を電
源オンにすることだけで自動的にご利用デバイス(Bluetoothがオンすることを確認してくださ
源オンにすることだけで自動的にご利用デバイス(Bluetoothがオンすることを確認してくださ
い) に ペアリングしま す。
い) に ペアリングしま す。
コント ロ ー ル ファンク ション
コント ロ ー ル ファンク ション
ファンクション
電源 オン
電源 オフ
再生/ポーズ
電話に出る
電話を切る
電話を拒否する
ボ イス コント ロー ル
を有効にする
充電
充電
イヤホンを充電する
イヤホンを充電する
バッテリー残量が少なくなると、LEDインジケーターが赤く点滅し「バッテリーロー」の警告音
バッテリー残量が少なくなると、LEDインジケーターが赤く点滅し「バッテリーロー」の警告音
声が聞こえます。対応する充電ドックに装着し、充電してください。充電中、LEDインジケーター
声が聞こえます。対応する充電ドックに装着し、充電してください。充電中、LEDインジケーター
が白く光り、充電が完了すると電源はOFFになります。
が白く光り、充電が完了すると電源はOFFになります。
マスターデバイス
(イヤホン右)
マルチファンクションボタンをLEDインジケーターが
白で点滅するまで長押しする
マルチファンクション ボタンをLED インジケーターが
赤に なって、消 えるまで長 押しする 。
マルチファンクションボタンを1度押す
着信中にマルチファンクションボタンを1度押す
通話中にマルチファンクションボタンを1度押す
着信中に、マルチファンクションボタンを2秒長押しする。
音楽再生、または通話中でない時に、
マル チ ファンクション ボタ ンを 1 秒 長 押しし ます 。
スレーブデバイス
(イヤホン左)
N/A
N/A
N/A
N/A
27/28
Page 17

付記:イヤホンは、対応する正しい充電ドックに装着されると、LEDインジケーターが赤で1度
付記:イヤホンは、対応する正しい充電ドックに装着されると、LEDインジケーターが赤で1度
点滅し ます。
点滅し ます。
ドックを充電する
ドックを充電する
充電ポートの横のLEDインジケーターは、充電中は赤で点灯し、充電完了後青に変わります。
充電ポートの横のLEDインジケーターは、充電中は赤で点灯し、充電完了後青に変わります。
着装方法
着装方法
図の示すように、イヤホンを着用ください。
図の示すように、イヤホンを着用ください。
ご注意:イヤホンにある“L”と“R”マークにご注意ください。“L”は左側で“R”は右側に対応してい
ご注意:イヤホンにある“L”と“R”マークにご注意ください。“L”は左側で“R”は右側に対応してい
ます。
ます。
困った 時
困った 時
Q:片方からしか聞こえないのですが…?
Q:片方からしか聞こえないのですが…?
A:イヤホンがペアになっているか確認しましょう:
A:イヤホンがペアになっているか確認しましょう:
1)マスターデバイス(イヤホン右)を電話とペアリング完了する。
1)マスターデバイス(イヤホン右)を電話とペアリング完了する。
2)マスターデバイスの電源を切る。
2)マスターデバイスの電源を切る。
3)両方のイヤホンのマルチファンクションボタンをインジケーターが白く光るまで、同時に長
3)両方のイヤホンのマルチファンクションボタンをインジケーターが白く光るまで、同時に長
押ししま す。
押ししま す。
4)二つのイヤホンが接続したと音声ガイドが聞こえるまでお待ちください。
4)二つのイヤホンが接続したと音声ガイドが聞こえるまでお待ちください。
Q:イヤホンに電源が入りません。
Q:イヤホンに電源が入りません。
A:充電されていますか?器機が正常に動作するバッテリー残量がないのかもしれません。
A:充電されていますか?器機が正常に動作するバッテリー残量がないのかもしれません。
29/30
Page 18

NOTE:
This equipment has been tested and found to comply with the limits for a
Class B digital device, pursuant to part 15 of the FCC Rules. These limits are
designed to provide reasonable protection against harmful interference in a
residential installation. This equipment generates uses and can radiate radio
frequency energy and, if not installed and used in accordance with the
instructions, may cause harmful interference to radio communications.
However, there is no guarantee that interference will not occur in a particular
installation. If this equipment does cause harmful interference to radio or
television reception, which can be determined by turning the equipment off
and on, the user is encouraged to try to correct the interference by one or
more of the following measures:
· Reorient or relocate the receiving antenna.
· Increase the separation between the equipment and receiver.
· Connect the equipment into an outlet on a circuit different from that to
which the receiver is connected.
· Consult the dealer or an experienced radio/TV technician for help
Changes or modifications not expressly approved by the party responsible
for compliance could void the user's authority to operate the equipment. This
device complies with Part 15 of the FCC Rules. Operation is subject to the
following two conditions:
(1) this device may not cause harmful interference, and(2) this device must
accept any interference received, including interference that may cause
undesired operation.
EN The Bluetooth® word mark and logos are registered
such marks by Sunvalleytek International Inc. is under license. Other trademarks and
trade names are those of their respective owners.
DE Die Marke Bluetooth® und das Bluetooth Logo sind eingetragene Markenzeichen
der Bluetooth SIG, Inc. und jegliche Verwendung dieser Marke durch Sunvalleytek
International Inc. ist lizensiert. Die Rechte an anderen Markenzeichen liegen beim
jeweiligen Eigentümer.
FR Le terme et les logos Bluetooth® sont la propriété de Bluetooth SIG, Inc. et toute
utilisation de ces marques par Sunvalleytek International Inc. se fait sous licence.
Les autres désignations commerciales et marques mentionnées sont détenues par
leur propriétaire respectif.
ES La marca Bluetooth® y los logotipos son de propiedad de Bluetooth SIG, Inc. y se
encuentra autorizado cualquier uso de estas marcas por parte de Sunvalleytek
International Inc. Otras marcas y nombres comerciales son aquellas de sus
respectivos propietarios.
IT La parola e i loghi Bluetooth® sono marchi di fabbrica registrati di proprietà di
Bluetooth SIG, Inc. e qualsiasi utilizzo di questi marchi da parte di Sunvalleytek
International Inc. avviene su licenza. Gli altri marchi di fabbrica e nomi commerciali
appartengono ai rispettivi proprietari.
JP Bluetooth
Sunvalleytek International Inc.はこれらの マークおよびロゴをライセンスに基 づいて 使用し
ています。その他の 商標およびトレードネームは、それぞれの所有者に帰属します。
trademarks owned by the Bluetooth SIG, Inc. and any use of
®
のワードマークお よびロゴ はBluetooth SIG, Inc.が所有する登録商標であり 、
Page 19

成品尺寸:85X85cm
封面封底:128g铜板纸 过哑油
内页:80g书纸
订装方式:骑马钉
 Loading...