


Mode d’emploi et manuel de l’utilisateur

SAFETY INFORMATION
GO TO VAPAMORE.COM TO SEE THE MR-100 PRIMO INSTRUCTIONAL VIDEO
FAILURE TO FOLLOW SAFETY INFORMATION AND WARNINGS MAY
!
CAUSE PERMANENT DAMAGE AND VOID PRODUCT WARRANTY.
use only with a grounded outlet.
Only use distiled water. Using hard water can cause
calcium or mineral build up and void the warranty.
Never use additives such as perfumes, stain removers, or
other chemicals in the water tank as they will void the
Vapamore in order to prevent a fire hazard.
warranty, cause permanent damage, and be dangerous.
storage.
Make sure the water tank cap is fully secured
Do not pull or drag steam cleaner using the
steam gun and hose.
Steam cleaner must be level and on the floor during use.
listed on the label.
Drain water tank prior to shipping, transporting.
supply cord.
Do not leave the steam cleaner on and unattended. Always
switch the steam cleaner off and remove plug from wall
outlet when unattended.
37.*To provide continued protection against risk of electrical
shock, connect to properly grounded outlets only.
38. *Not for space heating purposes.
before use.
(See cleaning and storage).
39. Do not over extend retractable cord past stopping point.
.

GO TO VAPAMORE.COM TO SEE THE MR-100 PRIMO INSTRUCTIONAL VIDEO
PARTS OVERVIEW
PARTS LIST
E
TECHNICAL SPECIFICATIONS
10.5lbs - 4.8kg

STEAM CLEANER ASSEMBLY
GO TO VAPAMORE.COM TO SEE THE MR-100 PRIMO INSTRUCTIONAL VIDEO
!
Fig. 1
Accessory
compartment
Fig. 2
The MR-100 Primo has an accessory compartment
that houses the Detail adapter, Jet nozzle
attachment, Clothes / fabric - smooth surface tool,
and all brushes. Open the accessory compartment
by pulling the accessory cover back - away from
the machine. Remove the desired accessory from
the accessory compartment and close the
accessory cover.
(Fig.1)
Accessories twist lock onto the detail adapter
Fig. 3
Detail adapter attaches
to the steam gun or
extension tubes.
Fig. 4
Fig. 5
The detail adaptor is required when using all
accessories. Attach by aligning the arrow on the
accessory with the arrow on the detail adapter and
twisting to lock in place. The detail adapter attaches
directly to the steam gun and also can be attached
to the extension tubes.
(Fig. 2 and 3)
Connect the steam hose to the steam socket on
the front of the steam cleaner. To do this flip down
the dust cover door and push the connector on the
steam hose firmly into the socket until both tabs
click into place. To remove the steam hose, press
in both release tabs located on the left and right side
of the steam hose connector and pull out to release
from the socket.
(Fig. 4)
Fig. 6
!
!
GO TO VAPAMORE.COM TO SEE THE MR-100 PRIMO INSTRUCTIONAL VIDEO
FILLING & OPERATION
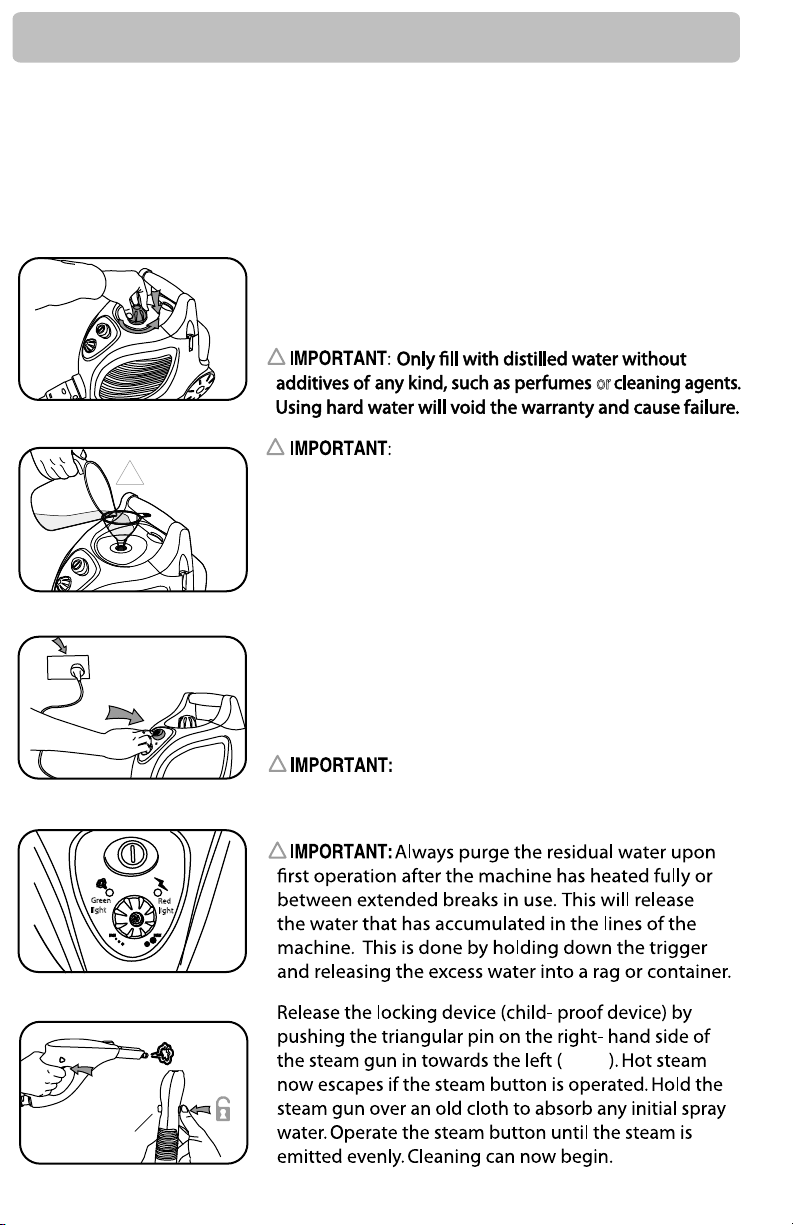
To ll the water tank, switch the steam cleaner o and remove the plug from the wall
outlet. Allow steam cleaner to cool down before removing water tank cap. Unscrew the
water tank cap (Fig.7) by pressing the cap down and simultaneously turning counter
clockwise. Use the supplied funnel and the measuring cup lled to the top line marked
700ml two (2) times to equal 1.4 liters of water. (Fig.8)
Replace the water tank cap by pressing down on the cap
Fig. 7
and simultaneously turning it clockwise. Make sure the
cap is fully tight to prevent any steam from leaking out.
If steam leaks from the cap area turn the Vapamore o
and once cooled down tighten cap further.
or
Fig. 8
Fig. 9
Fig. 10
Fig. 11
Green
light
NOTE:
!
Do not ov
Do not over ll
Red
light
er fill
Do not exceed the maximum of 1.4 liters
of water when lling the water tank. 1.4 liters is equal to
lling the measuring cup to the 700ml mark tow (2) times.
Plug the Vapamore into a proper wall outlet and switch
to the on position by pressing the on / o switch. (Fig.9)
The red light will illuminate when the power button is
depressed indicating the unit is heating. The green light
will illuminate indicating the unit is fully heated and
ready for use (approximately 11 minutes). The green
light will cycle on and o with the heater to maintain full
temperature during use. (Fig.10)
!
Never aim steam directly at people,
animals, plants, or electrical systems. There is a risk of
scalding or electrical shock.
!
andle safety latch.
h
Fig. 11

OPERATION
GO TO VAPAMORE.COM TO SEE THE MR-100 PRIMO INSTRUCTIONAL VIDEO
!
!
!
Vapamore
at a
Fig.12
(Fig.12)
on the oor or at surface when in operation.
!
the steamer is always
A
The red
!
WARNING: Hot steam may escape when opening the cap if the machine is not
fully cooled o and / or all the remaining pressure is not released.
green lamp turn on.

GO TO VAPAMORE.COM TO SEE THE MR-100 PRIMO INSTRUCTIONAL VIDEO
OPERATION
Fig.13
‘
’
CLICK
Attach the oor cleaning head to the end of the
extension tube (use 1 to 3 tubes as desired). Ensure
that the oor cleaning head clicks into place. (Fig.13)
The oor cleaning head can be used with or without the
Fig.14
Fig.15
Hard oors
Carpets
Fig. 16
micro ber cloth depending on the surface to be
cleaned. Place the oor cleaning head on the micro
ber cloth and secure the overhanging material under
the clips located on left and right side of the oor
cleaning head. (Fig.14)
The oor cleaning head is ideal for tile, stone, vinyl, and
wood oors along with cleaning washable walls and
hard surfaces. It can also be used on carpet to sanitize,
deodorize, kill allergens, bedbugs and dust mites.
(Fig. 15) (Attach the micro ber cover to allow the oor
cleaning head to glide when using on carpet).
!
The steam gun, extension tubes, and oor
cleaning head can be stored (as shown on the cover
page of this instruction manual) by inserting the tab on
the oor cleaning head into the slot located on the side
of the Vapamore.
Use on steam gun
or extension tube
Fig. 17
Fig. 18
90 Deg. jet nozzle
Detail adaptor
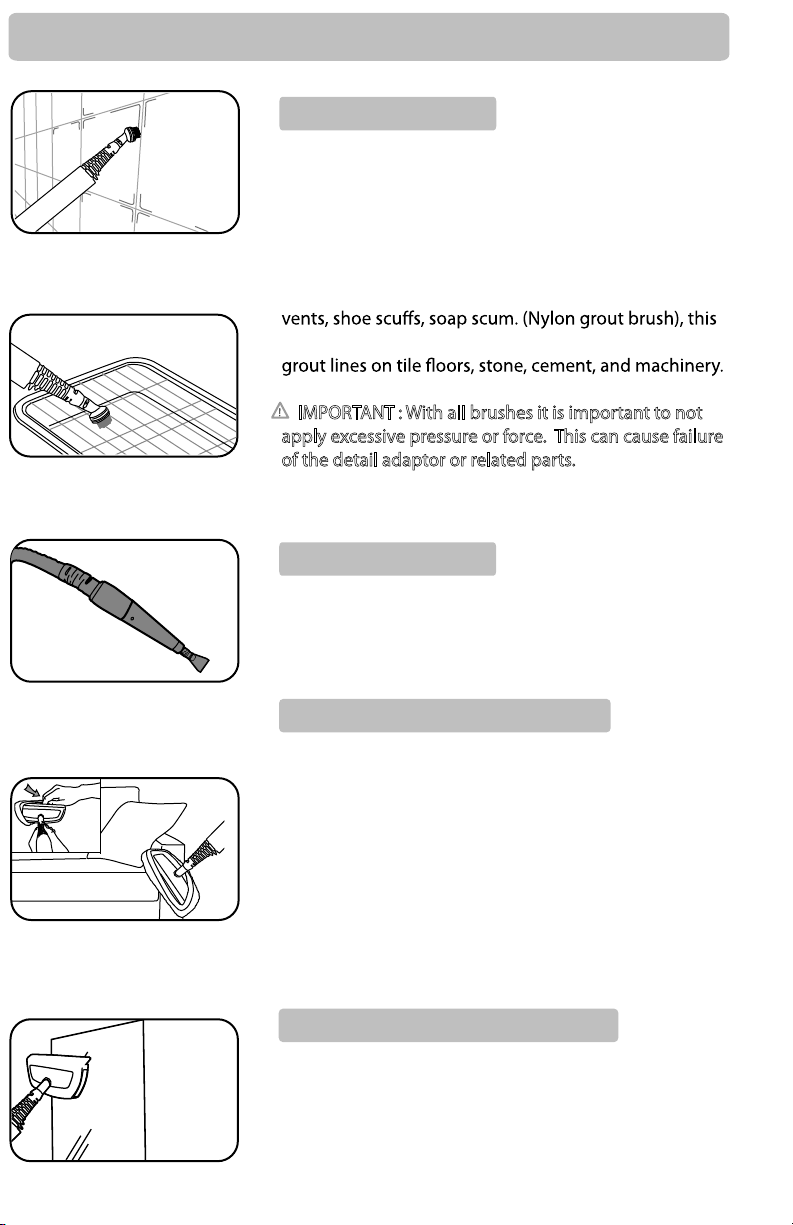
ACCESSORIES / DETAIL ADAPTOR
The detail adaptor can be attached directly to the steam
gun or to any of the extension tubes. (Fig. 16)
The detail adaptor is needed in order to use the brushes,
detail scraper clothes / fabric - smooth surface tool, and
the jet nozzle attachment. To attach any of these
accessories, Push the accessory onto the detail adaptor
aligning the arrow on the accessory with the arrow on
the detail adaptor. Twist the accessory on the detail
adaptor to lock into place. Remove in the reverse order.
(Fig.17)
The detail adaptor can also be used on its own as a
straight jet nozzle tool or along with the 90 degree jet
nozzle attachment. These tools are great for removing
soap scum in the bath, shower and around faucets. Also
for cleaning tight areas such as toilet hinges where high
pressure steam can reach and blow out dirt and debris.
This tool is most eective when applied direct to the
surface being treated. The steam temperature will
condense and cool within 1’’ of the jet tip. (Fig.18)
Sanitize counter tops,
tile, stone,
granite, glass,
stainless steel,
walls, etc.
GO TO VAPAMORE.COM TO SEE THE MR-100 PRIMO INSTRUCTIONAL VIDEO
OPERATION
Fig. 19
ACCESSORIES / BRUSHES
There are 4 brushes supplied with the Vapamore
MR-100 Primo. The brushes attach to the detail
adaptor by aligning the arrows and twisting to lock.
Suggested uses (Metal brush), Oven grills, BBQ grates,
cement stains, machinery, and metal surfaces. (Nylon
medium duty and large nylon brush), used for more
Fig.20
Fig. 21
sensitive materials such as blinds, carpet, furniture, air
brush is used for harder less sensitive areas such as
IMPORTANT : With all brushes it is important to not
apply excessive pressure or force. This can cause failure
of the detail adaptor or related parts. When using the
brushes let the steam do the work and the brush to
help agitate the stain or area being cleaned. (Fig. 19 /20)
ACCESSORIES / SCRAPER
The scraper tool is great for removing stuck on food
or spills on hard smooth surfaces. Also for removing
wall paper, shelve paper and removing gum from
hard ooring / cement. (Fig. 21)
Fig. 22
Fig. 23
ACCESSORIES / CLOTHES - FABRIC TOOL
Start by installing the supplied cotton cover on the
clothes - fabric / smooth surface tool. Now this tool can
be used for steaming and sanitizing along with
eliminating odors in garments, fabrics, furniture,
curtains, drapes, etc.
BEDBUGS AND ALLERGENS
Use this tool on beading, pillows, and furniture by
applying light pressure and slowly passing it along the
surface to kill Bedbugs, dust mites and other allergens.
(Fig.22)
ACCESSORIES / SMOOTH SURFACE TOOL
Using the clothes - fabric / smooth surface tool without
the cotton cover acts as a squeegee and is great for
sanitizing kitchen and bathroom counter tops chemical
free along with smooth surfaces such as stone, granite,
wood, glass, tile and stainless steel. (Fig.23)

BEDBUG - DUST MITES - ALLERGENS
straight jet nozzle tool or along with the 90 degree jet
nozzle attachment. These tools are great for cracks and
crevices. Make sure to concentrate the steam directly on
possible, no more than 1’’ away. The steam will condense
and cool o and not be eective to kill pests and their
treated. The detail adaptor can be attached directly to
The Vapamore MR-100 Primo produces steam with an output temperature between 210˚
to 220˚ degrees. Pests such as bedbugs, dust mites and other allergens along with their
eggs are killed on contact at a temperature of 180˚ degrees. Using steam is an extremely
eective and chemical free way to kill these pest along with E. Coli, Salmonella, H1N1 and
other bacteria or viruses without leaving any harmful chemical residue behind. The tools
supplied with the Vapamore MR-100 Primo allow you to treat all areas where these pests
The clothes / fabric tool with the cotton cover is ideal for
treating bedding, furniture, pillows, and carpet areas
around bed posts and base boards. Start by installing
smooth surface tool. Apply light consistent pressure and
slowly pass it along the surface (1” per second) to insure
The oor cleaning head with micro ber cover is also
great for treating large surface areas such as bedding,
supplied micro ber cover on the oor cleaning head.
temperature during use and allows the oor cleaning
Apply light consistent pressure and slowly pass it along
treated has a chance to come to full temperature killing
GO TO VAPAMORE.COM TO SEE THE MR-100 PRIMO INSTRUCTIONAL VIDEO
WHY USE STEAM?
can hide such as bedding, sofas, furniture, pillows, carpet, cracks and crevices that are
ideal hiding places for pests.
BEDDING / FURNITURE
Fig. 25
the supplied cotton cover on the clothes - fabric /
the area being treated has a chance to come to full
Fig.26
Fig.27
BEDS
temperature killing pests and their eggs. (Fig.25)
furniture, and carpet areas. Start by installing the
The micro ber cover thermal core maintains full
head to glide over fabric or carpet. (Fig.26)
the surface (1’’ per second) to insure the area being
pests and their eggs. (Fig.27)
Fig.28
90 Deg. jet nozzle
Carpet
Detail adaptor
The detail adaptor can also be used on its own as a
the area to be treated with as minimal distance as
eggs if the jet tip is not directly on the surface being

GO TO VAPAMORE.COM TO SEE THE MR-100 PRIMO INSTRUCTIONAL VIDEO
CLEANING /STORAGE
CLEANING / MAINTENANCE
Always ensure before cleaning or maintaining the Vapamore MR-100 Primo that it is
switched of and unplugged from the wall outlet. Only clean the outer surface with a
slightly, water moistened cloth. Do not use any cleaning agents, abrasives or alcohol
since they may damage the housing nish.
Lubricate the threads on the water tank cap with light oil or lubricating spray such as
R
WD-40 once every 3 months or when needed.
The included micro ber cover and cotton cover can be machine washed using normal
detergents and wash cycle.
STORAGE
IMPORTANT :
When storing the Vapamore, turn the machine o and unplug from
the wall outlet. After the machine has cooled (aprox. 15 min), hold the steam gun trigger
down to release the remaining steam pressure.
!
or
Fig.24
The tank should be emptied before storing for any
extended period of time (30 days or more). To empty
the tank, make sure the Vapamore is completely cooled
down, remove the water tank cap and ip the Vapamore
upside down to drain any remaining water from the
tank. Leave the water tank cap o until the water tank
is completely dry. (Fig.24)
ACCESSORIES
!
The steam gun, extension tubes, and oor cleaning head can be stored (as
shown on the cover page of this instruction manual) by inserting the tab on the oor
cleaning head into the slot located on the side of the Vapamore.
Parts, extension tubes and accessories can also be stored in the supplied mesh storage
bag.
Replacement accessories and parts are available to order online at vapamore.com or by
calling Vapamore at 480-951-8900.

GO TO VAPAMORE.COM TO SEE THE MR-100 PRIMO INSTRUCTIONAL VIDEO
d has been
r.
ll chemicals must be
ything other than 100%
TROUBLESHOOTING
PROBLEM?
What do I do if the machine or an accessory becomes damaged or broken?
Visit www.vapamore.com for a complete list of parts and accessories available for
purchase or simply call us at 480-951-8900 or E-mail us at info@vapamore.com to
purchase replacement parts or schedule a repair. WE ARE HERE TO HELP...
IMPORTANT :
Vapamore is authorized to facilitate all repairs to keep the highest quality and ETL
standards. Repairs or tampering by any other party will void the Warranty.
TROUBLESHOOTING
One of the ETL protection devices has been triggered or the power cor
damaged.
Do not return to the place of purchase for warranty or repairs. Only
Call us at 480-951-8900 or E-mail us at info@vapamore.com to schedule a repai
The tank could have a build up of lime scale due to the use of hard water.
The tank must be de scaled by using a chemical de scaler . A
removed from the water tank before the machine is operated. An
pure water inside the tank during operation could cause permanent failure of damage
and can be very unsafe to operate.

GO TO VAPAMORE.COM TO SEE THE MR-100 PRIMO INSTRUCTIONAL VIDEO
N
T
S
,
y
TIPS
APPLICATIO
FLOORS / CHEMICAL FREE CLEANING WITH NO RESIDUE LEFT BEHIND
Vinyl Tile Or Vinyl Sheet Medium - High
Stone Tile, Slate, Ceramic Tile, Grout High
Smooth Surface Concrete High
CARPETS / SPOT TREATMENT
Wall To Wall, Rugs, Spot Care High
CARPETS / DEOTERIZE + KILL BEDBUGS - DUST MITES AND ALLERGENS
Wall To Wall, Rugs High
WALLS, CEILING
Painted, Wood Paneling, Wallpaper Low - Medium
UPHOLSTERY / SPOT TREATMENT
Vinyl, Synthetic, Cotton Medium - High
STEAM VOLUME
w - MediumoLdoowdraH
hgiHlavomeR repapllaW
hgiH- muideMstneV riA
woLrehtaeL
ATTACHMEN
Floor Cleaning Head +
Micro fiber + Extension
Tubes + Nylon Brush.
Floor Cleaning Head +
Micro Fiber + Extension
Tubes + Nylon Brush +
Grout Brush + Nylon Brush
Jet Nozzle
Floor Cleaning Head +
Micro Fiber + Extension
Tubes + Grout Brush +
Nylon Brush + Metal Brush +
Jet Nozzle
Floor Cleaning Head +
Micro Fiber + Extension
Tubes
Nylon Brush + Jet Nozzle +
Paper Or White Cotton Towel
Floor Cleaning Head +
Extension tubes + Micro
Fiber + Jet Nozzle
Floor Cleaning Head +
Extension tubes + Micro
Fiber + Nylon Brush +
Clothes / Fabric tool
with cotton cover.
Nylon Brush, Jet Nozzle,
Extension Tubes + Smooth
Surface Tool + Scraper
Nylon Brush, Jet Nozzle,
Extension Tubes, Cotton
Towel
Nylon Brush, Jet Nozzle,
Clothes Steamer, Cotton
Cotton Towel
Cover
Clothes Steamer, Cotton
Cover, Cotton Towel
TECHNIQUE
Sweep or vacuum first. Steam mop with
floor cleaning head and micro fiber cover.
Corners and baseboards with nylon brush.
Sweep or vacuum first. Steam mop with
floor cleaning head, heavy stains use
without micro fiber cover. Corners and
baseboards with nylon brush. Grout lines
use grout brush and / or jet nozzle. Finish
with floor cleaning head / micro fiber cover.
Sweep or vacuum first. Steam mop with
floor cleaning head, heavy stains use
without micro fiber cover. Corners and
baseboards with nylon brush. Joint lines
use grout or metal brush and / or jet nozzle.
Finish with floor cleaning head / micro fiber.
Sweep or vacuum first. Steam mop with
floor cleaning head and micro fiber cover.
Vacuum area first then steam using brush
or jet. Use towels to blot stain away.
Chemical cleaner can be used prior to
steam treatment.
Vacuum area first then steam using floor
cleaning head with micro fiber cover. Pass
slowley over area to allow heat to kill pests.
Use jet nozzle for corners and cracks.
Painted, wood paneling, wallpaper walls
are heat sensitive. Always test small area
first and be careful not to over heat finish.
Use Floor Cleaning head with micro fiber
cover or clothes steamer with cotton cover.
Use nylon brush for corners and stains.
Use at full power to soften glue and
remove wallpaper. Wallpaper stripper can
be applied first.
Clean using brush and jet tip. Wipe down
with clean cotton towel.
Test a small area first. Some synthetic
materials will not handle high heat. Use
lon brush with soft pressure for larger
n
stains and jet tip for small stains. Blot with
cotton towel. Use clothes steamer with cotton
cloth to go over all surfaces to deoterize.
Test a small area first. Steam over stained
area and then blot with cotton towel. Use
clothes steamer with cotton cloth to go
over all surfaces to deoterize.
UPHOLSTERY / KILL BEDBUGS - DUST MITES AND ALLERGENS
Vinyl, Synthetic, Cotton Medium - High
Jet Nozzle, Clothes
Steamer, Cotton Cover
Test a small area first. Some synthetic
materials will not handle high heat. Use
clothes steamer with cotton cover and
slowley pass over area to allow heat to
kill pests. Use jet nozzle for cracks and
corners.

GO TO VAPAMORE.COM TO SEE THE MR-100 PRIMO INSTRUCTIONAL VIDEO
N
T
TIPS
APPLICATIO
WINDOW BLINDS
Levolor, Venetian, Horizontal, Vertical Low-Medium
GLASS
Window Screens, Window Frames Medium -High
KITCHENS
Sinks, Faucets, Drains Medium - High
Counter Tops Low- Medium
BATHROOM
(NOTE: HARD WATER AND CALCIUM STAINS CAN ONLY BE REMOVED WITH CHEMICALS.
Porcelain Toilets, Chrome Fixtures Medium - High
Shower, Tubs, Doors Medium
AUTO, MOTORCYCLE, MARINE
Detailing, Exterior, Engine Medium - High
STEAM VOLUME
muideMsrorriM ,swodniW
muideMsecnailppA llamS
ATTACHMEN
Nylon Brush, Jet Nozzle,
Detail Nozzle, Extension
Tubes, Cotton Towel
Smooth Surface Squeegee,
Extension Tubes, Nylon
Brush, Paper Towels
Detail Nozzle, Nylon Brush,
Extension Tubes
Nylon Brush, Brass Brush,
hgiH - muideMsnevO ,spoT evotS
Extension Tubes, Paper
towels
Nylon Brush, Detail Nozzle,
Paper towels
Nylon Brush, Detail Nozzle,
Paper towels
Smooth Surface Sqeegee,
Nylon Brush, Detail Nozzle,
Paper towels
Floor Cleaning Head +
Micro Fiber + Extension
hgiH - muideMtuorG ,eliT
Tubes + Grout Brush + Jet
Nozzle
Nylon Brush, Detail Nozzle,
Paper towels
Nylon Brush, Detail Nozzle,
Extension Tubes, Paper
towels
Nylon Brush, Jet Nozzle,
hgiH - muideMsaerA roiretnI
Clothes Steamer, Cotton
Cover, Cotton Towel
Nylon Brush, Detail Nozzle,
Jet Nozzle
TECHNIQUE
Dust area first. Thin plastic blinds may not
be able to handle heat from the steam.
Test a small area first. Use jet or detail
nozzle from 4'' away. Wipe off with cotton
towel.
Pre-steam glass from 6'' away to heat
glass. Use brush for edges and bases.
Finish with window cleaner squeegee. Do
not use if temperature is under 32 degrees
to prevent cracking.
Steam area with detail nozzle. Use brush
for edges and corners.
Use nylon brush over all surfaces and
brass brush for interior oven grates. Wipe
down with paper towels
Use brush over all areas and detail nozzle
for small corners and seems. Wipe down
with paper towels.
Use brush over all areas and detail nozzle
for small corners and seems. Wipe down
with paper towels.
Use brush over all areas and detail nozzle
for small corners and seems. Use smooth
surace squeege to sanitize counter tops
by slowly passing over area then wipe area
with paper towel for chemical free cleaning.
Sweep or vacuum first. Steam mop with
floor cleaning head, heavy stains use
without cotton cover. Corners and
baseboards with nylon brush. Grout lines
use grout brush and / or jet nozzle .Finish
with floor cleaning head with micro fiber.
Use brush over all areas and detail nozzle
for small corners, hinges, and seems. Wipe
down with paper towels.
Use brush over all areas and detail nozzle
for small corners and seems. Wipe down
with paper towels.
Test a small area first. Some synthetic
materials will not handle high heat. Use
nylon brush with soft pressure for larger
stains and jet tip for small stains. Blot with
cotton towel.
Use brush over all areas and detail nozzle
for small detail areas.
NEED HELP?
Visit www.vapamore.com to see video demonstrations and tips along with full details
or simply call us at 480-951-8900 or E-mail us at info@vapamore.com
WE ARE HERE TO HELP...

Lifetime Limited Warranty for the
Vapamore MR-100 Steam Cleaning System
Coverage:
1: Lifetime parts and labor on the boiler, heating element and all internal electronics.
The Vapamore MR-100 Steam Cleaning System boiler tank, heating element and all internal electronic
parts are lifetime warranted to be free from defects in material and workmanship when utilized for
normal household use by the original purchaser only.
2: One (1) year parts and labor on accessories and housing.
The Vapamore MR-100 Steam Cleaning System accessories and housing are warranted to be free from
defects in material and workmanship for a period of one (1) year from the date of purchase when
utilized for normal household use by the original purchaser only. This does not include replacement of
items due to wear including but not limited to the Floor Brush, Nylon Brush, Grout Brush, Metal Brush,
Jet tip, Clothes Steamer Cotton Cover, Floor Brush Cotton / Micro Fiber Cover.
For this warranty to apply the original purchaser must return the warranty registration form (included in
the original packaging or available online at vapamore.com) along with a copy of the original purchase
receipt to Vapamore 7464 East Tierra Buena Ln Suite 108 – Scottsdale, AZ 85260 within 15 days after
the original purchase date.
Should any defect covered by the terms of this lifetime limited warranty be discovered, Vapamore will
repair or replace any defective part provided the unit is returned by the original purchaser on file with the
warranty form information.
The liability under this warranty is limited solely to the cost of the replacement parts or the complete unit
at the discretion of Vapamore. This warranty is void if damage is resulting from accident, misuse,
improper operation, unauthorized repair or alteration, tampering, substance other than distilled water
used in the boiler tank, commercial or other than home use, or damages accruing in transit. This
warranty does not cover any shipping fees to or from our facility.
This warranty is extended to the original purchaser only and excludes all other legal and / or conven-
assumed by it under the terms of the lifetime limited warranty. In no event is Vapamore liable for
incidental or consequential damages of any kind whatsoever.
Customer is responsible for all shipping fees to and from our facility. Carefully pack returning items for
repair to avoid damage in transit. Be sure to include in the box all your contact information including
name, phone number, email address and shipping address along with a prepaid return ship tag from
UPS or FedEx. Vapamore does not ship and will not accept items sent via USPS. Contact Vapamore
at 480-951-8900 or email customersupport@vapamore.com for making arrangements to return items
for repair or service. Vapamore is not responsible for any shipping cost to or from our facility.
R

CONSIGNES DE SECURITE
Aller sur www.vapamore.com pour voir la vidéo d’instructions du MR-100 Primo
ATTENTION : LE NON SUIVI DES CONSIGNES DE SÉCURITÉ ET PRÉCAUTIONS PEUT ENTRAINER
!
DES DOMMAGES PERMANENTS ET L’ANNULATION DE LA GARANTIE DU PRODUIT.
Ne pas laisser le nettoyeur vapeur sans surveillance lorsqu’il
est branché au mur. Le débrancher quand il n’est pas utilisé.
Pour éviter toute électrocution, utiliser avec une prise à
trois fiches.
Ne pas utiliser comme jouet. Une grande attention est
nécessaire lorsque l’appareil est utilisé près d’enfants.
Utiliser uniquement comme indiqué dans le manuel.
Ne pas utiliser avec un câble d’alimentation ou une prise
endommagée. Si le câble d’alimentation et/ou la prise sont
endommagés, les faire remplacer par Vapamore pour éviter
dommages ou risque d’incendie.
Ne pas tirer ou porter l’appareil par le câble d’alimentation,
ne pas l’écraser, ne pas le mettre en contact avec des
surfaces chaudes ou tranchantes.
Ne pas débrancher l’appareil en tirant sur le câble
d’alimentation.
Ne pas toucher l’appareil ni la prise avec les mains
humides.
Ne pas tirer ou trainer l’appareil par le pistolet ou le tuyau.
Utiliser uniquement la poignée pour transporter le
nettoyeur vapeur.
Le nettoyeur vapeur doit être sur une surface plane
pendant l’utilisation.
Ne pas utiliser de rallonge électrique.
Ne pas tenter de déboucher l’appareil avec des objets
pointus qui pourraient causer des dommages.
Ranger le nettoyeur à l’intérieur après utilisation
afin d’éviter tout accident.
Toujours utiliser le voltage approprié pour éviter de causer
des dommages au nettoyeur vapeur et blesser l’utilisateur.
Le voltage approprié est indiqué sur l’étiquette.
Vider le réservoir d’eau avant tout transport ou d’envoyer
l’appareil.
Un incident peut survenir si le nettoyeur vapeur passe
sur le câble d’alimentation.
Les accessoires chauffent pendant l’utilisation. Laisser
refroidir avant manipulation.
Ne jamais immerger le nettoyeur vapeur dans de l’eau
ou autre liquide.
Protéger le nettoyeur vapeur de la pluie et de l’humidité.
L’appareil n’est pas adapté à un usage extérieur.
N’utiliser l’appareil que dans des endroits qui ne contiennent
ni eau ou autre liquide.
Ne pas utiliser l’appareil quand il n’y a pas d’eau dans
le réservoir. Toujours vérifier que le réservoir contient de l’eau.
Utiliser exclusivement de l’eau distillée. L’utilisation de l’eau
du robinet peut entrainer un amas de calcium et minéral qui
annulerait la garantie.
Ne jamais utiliser d’additifs tels que parfums, détachants,
ou autres produits chimiques dans le réservoir. Ils sont
dangereux et peuvent causer des dommages à l’appareil et
annuleraient la garantie.
Toujours débrancher le câble d’alimentation de la prise de
courant et laisser refroidir complètement le nettoyeur vapeur
avant de le ranger.
Ne pas trop remplir le réservoir. Ne pas dépasser le niveau
maximum. Utiliser l’entonnoir fourni.
S’assurer que le bouchon du réservoir est correctement fermé
avant utilisation.
Vider le réservoir si l’appareil est rangé (voir nettoyage et
rangement).
Ne toucher aucune partie chaude de l’appareil. Il est normal
que nettoyeur vapeur chauffe pendant l’utilisation.
Ne pas utiliser le nettoyeur vapeur sur des vêtements pendant
qu’ils sont portés.
La force et la chaleur du nettoyeur vapeur peuvent avoir un
effet adverse sur certains matériaux. Toujours tester
préalablement sur une petite surface l’effet du nettoyeur
vapeur.
Toujours joindre les consignes de sécurité et le manuel
d’instruction en cas de prêt de l’appareil à un tiers.
Ne jamais diriger le nettoyeur vapeur vers des personnes,
animaux ou plantes (risque de brulure) ! Ne pas diriger
l’appareil vers des systèmes électriques.
Ne jamais laisser l’appareil sans surveillance lorsqu’il est en
marche. Toujours éteindre l’appareil et le débrancher de la
prise murale quand il est sans surveillance.
Le nettoyeur vapeur est équipé d’un thermostat et d’une
protection thermique pour la surchauffe.
*Pour éviter toute électrocution, s’assurer de connecter le
37.
nettoyeur vapeur a une prise trois fiches (reliée à la terre).
*Ne pas utiliser comme appareil de chauffage.
38.
39.
Ne pas sortir le câble d’alimentation rétractable au-delà
du point d’arrêt

VUE D’ENSEMBLE DES ACCESSOIRES
Aller sur www.vapamore.com pour voir la vidéo d’instructions du MR-100 Primo
LISTE DES ACCESSOIRES
Entonnoir
Tasse de mesure
Pistolet à vapeur avec tuyau et connecteur
Embout de fixation des accessoires (adaptateur)
Accessoire tuyau jet
Grattoir pour détails
Brosse en nylon pour joints
Brosse en nylon pour surfaces moyennement encrassées.
Grande brosse en nylon pour surfaces moyennement
encrassées.
Brosse en acier
Applicateur en coton
Chiffon en microfibre pour les sols
Accessoire pour les sols
3 tubes d’extension
Accessoire de surface pour les vêtements - tissus
Nettoyeur vapeur
Sac de rangement des accessoires
Set de joints de remplacement
SPECIFICATIONS TECHNIQUES
Modèle: MR-100 Primo
Alimentation électrique: 120V – 60Hz
Puissance de chauffage: 1500W
Vapeur sous pression: 3.5 bar (max)
Pression admissible: 5 bar
Volume du réservoir d’eau: 1.6 litre (max)
Durée vapeur: 50 minutes
Temps de chauffe: 11 minutes
Débit de vapeur: 40g /min (max)
Niveau sonore : 30 dB(A) pendant l’utilisation
Poids: 4.8Kg – 10.5lbs sans les accessoires
Sous réserve de modification technique
sans notification préalable.

nettoyeur vapeur pour le nettoyage des sols ou des
l’extrémité ouverte du tube dans le pistolet à vapeur,
Pour retirer les tubes d’extension, presser le bouton de
MONTAGE DU NETTOYEUR VAPEUR
Ouvrir le compartiment d’accessoires en l’éloignant
L’embout de fixation (adaptateur) est nécessaire pour
l’utilisation de tous les accessoires. Pour le fixer, aligner
la flèche de l’accessoire avec la flèche de l’adaptateur
L’adaptateur se fixe directement au pistolet à vapeur
Connecter le tuyau de la vapeur au connecteur vapeur
situé sur le devant de l’appareil. Pour cela, ouvrir le
connecteur du tuyau dans l’ouverture jusqu'à ce que
les deux onglets soient en place et s’enclenchent par
un clic. Pour retirer le tuyau à vapeur, appuyer sur les
connecteur du tuyau de la vapeur et tirer pour le sortir
Aller sur www.vapamore.com pour voir la vidéo d’instructions du MR-100 Primo
!
Ne jamais dévisser le bouchon du réservoir d’eau pendant l’utilisation. Le réservoir est sous pression.
Fig. 1
Compartiment
des accessoires
ACCESSOIRES
Le MR-100. Primo a un compartiment pour les
accessoires qui contient l’embout de fixation
(adaptateur), le tuyau jet, l‘accessoire de surface
pour les vêtements - tissus, et toutes les brosses.
Fig. 2
Tourner et bloquer les accessoires
dans l’embout de fixation (adaptateur)
Fig. 3
L’adaptateur se fixe sur le
pistolet à vapeur ou sur les
tubes d’extension
Fig. 4
Fig. 5
de l’appareil. Retirer l’accessoire désiré du
compartiment et refermer. (Fig. 1)
et tourner pour mettre en place et bloquer.
et peut aussi être relié aux tubes d’extension.
(Fig. 2 et 3)
bouchon anti poussière et introduire fermement le
deux onglets localisés à droite et à gauche du
de la prise vapeur. (Fig 4).
TUBES D’EXTENSION
Fig. 6
Assembler les tubes d’extension pour utiliser le
surfaces difficiles d’accès. Pour cela, introduire
le pousser pour le mettre en place jusqu’au clic.
Ajouter de un à trois tubes d’extension selon
besoin. (fig 5)
relâche et tirer sur les tubes vers le bas. (Fig 6)

Aller sur www.vapamore.com pour voir la vidéo d’instructions du MR-100 Primo
REMPLISSAGE ET UTILISATION
Pour remplir le réservoir d’eau, toujours s’assurer que le nettoyeur vapeur est éteint et
débranché et est froid avant d’enlever le bouchon du réservoir. Dévisser le bouchon du
réservoir (Fig. 7) en appuyant sur le bouchon et le tournant simultanément dans le sens
inverse des aiguilles d’une montre. Utiliser l’entonnoir et la tasse de mesure inclus.
Remplir la tasse de mesure jusqu’à la marque de 700ml deux (2) fois pour totaliser
1.4 litre d’eau. (Fig. 8)
Fig. 7
Replacer le bouchon du réservoir en appuyant et tournant
simultanément dans le sens des aiguilles d’une montre.
S’assurer que le bouchon est parfaitement fermé pour éviter
toute fuite de vapeur. Si une fuite de vapeur survient par le
bouchon, éteindre le nettoyeur vapeur, attendre le complet
refroidissement et refermer correctement le bouchon.
Fig. 8
Fig. 9
Fig. 10
Voyant vert – voyant rouge
Fig. 11
Loquet de sécurité
Green
light
Ne pas dépasser
!
la limite de
Do not ov
remplissage
Red
light
er fill
IMPORTANT: N’utiliser que de l’eau distillée sans additifs
d’aucune sorte tels que parfum ou détergents. L’utilisation
d’additifs peut causer des dommages et annulerait la garantie.
IMPORTANT: Ne pas dépasser la limite de 1.4 litre d’eau lors du
remplissage.1.4 litre est égal au remplissage de deux tasses de
mesure jusqu’à la marque de 700ml.
Brancher le Vapamore dans une prise murale appropriée et
mettre en position «marche» en appuyant sur le bouton
on/o. (Fig. 9)
Le voyant rouge s’allume quand le bouton on/o est pressé
indiquant que le nettoyeur vapeur chaue. Quand le voyant
vert s’allume, l’appareil est chaud et prêt à l’emploi
(approximativement 11 minutes). Ce voyant peut s’allumer et
s’éteindre pendant l’utilisation selon les cycles de chaue pour
maintenir la température maximum durant l’utilisation. (Fig. 10)
IMPORTANT: Ne jamais diriger le nettoyeur vapeur vers des
personnes, animaux, plantes, ou systèmes électriques. ll y a un
risque de brulure ou d’électrocution. Toujours purger le résidu
d’eau après la première utilisation et que la machine ait eu une
chaue complète ou entre de longs arrêts entre les utilisations.
La purge permet de vider l’eau accumulée dans l’appareil. Pour
purger, maintenir la gâchette appuyée et vider l’eau sur un
chion ou dans un récipient.
Déverrouiller le loquet de sécurité (à l’épreuve des enfants) en
poussant la goupille triangulaire vers la gauche, située sur le
coté droit du pistolet à vapeur (Fig. 11). La vapeur sort quand le
bouton de la vapeur est pressé. Diriger le premier jet d’eau/
vapeur vers un vieux chion jusqu'à ce la vapeur ait un débit
constant. Le nettoyage peut maintenant commencer.

UTILISATION
Aller sur www.vapamore.com pour voir la vidéo d’instructions du MR-100 Primo
NOTE: Toujours tester le nettoyeur vapeur au préalable sur une partie invisible de la
surface ou du matériel à nettoyer pour vérier leur tolérance à la vapeur. La vapeur peut
avoir pour eet éventuel de déteindre les bois vernis ou peints, décolorer les plastiques
brillants. L’acrylique, le velours et le lin réagissent très sensiblement à la vapeur.
NOTE: Vapamore ne peut être tenu responsable pour les dommages d’objets,
matériaux, personnes, animaux ou plantes dus à une mauvaise utilisation du nettoyeur
vapeur ou à une intolérance à la vapeur.
NOTE: Le Vapamore est équipé d’un thermostat et d’une protection thermique pour la
surchaue. Le nettoyeur vapeur s’éteint automatiquement à une température de 250
degrés F pour éviter une surchaue.
Fig.12
Le ot de vapeur peut être régulé et ajusté au niveau
désiré en tournant le bouton de contrôle de la vapeur.
Tourner le bouton de contrôle dans le sens des aiguilles
d’une montre pour diminuer le ot de vapeur, et dans
le sens inverse des aiguilles d’une montre pour
l’augmenter. (Fig. 12)
Ne pas basculer ou incliner le nettoyeur vapeur pendant l’utilisation et s’assurer que
le l’appareil est toujours sur le sol ou sur une surface plane durant le fonctionnement.
Un réservoir d’eau complet permet une utilisation de 50 minutes maximum. Ne jamais
laisser le nettoyeur vapeur sans surveillance lorsqu’il est en marche, et si nécessaire,
utiliser le loquet de sécurité enfants pour bloquer le bouton de vapeur. Pour cela,
pousser la goupille triangulaire de la gauche, vers la droite du pistolet à vapeur.
IMPORTANT: L’appareil et les accessoires chauent pendant l’utilisation. Laisser
refroidir avant de changer d’accessoire. : Ne jamais ouvrir le bouchon du réservoir
pendant l’utilisation/ ou en marche. Le réservoir est sous pression.
REMPLISSAGE D’EAU
Le réservoir doit être rempli quand le débit de la vapeur commence à faiblir. Eteindre le
nettoyeur vapeur et le débrancher de la prise murale. Le voyant rouge va s’éteindre.
Attendre que l’appareil refroidisse (au moins 15 minutes). Appuyer sur la gâchette de
la vapeur pour libérer toute vapeur restante. Ouvrir le bouchon du réservoir en
appuyant et tournant dans le sens inverse des aiguilles d’une montre.
ATTENTION: De la vapeur chaude peut s’échapper à l’ouverture du bouchon si
l’appareil n’est pas totalement refroidi et/ou quand la pression restante n’a pas été
libérée.
Ajouter de l’eau en utilisant la tasse de mesure et l’entonnoir, puis, avec précaution,
refermer le bouchon du réservoir. Le MR-100. Primo peut alors être rebranché et mis
en marche. L’appareil est prêt à l’emploi dès que le voyant vert s’allume.

UTILISATION
Aller sur www.vapamore.com pour voir la vidéo d’instructions du MR-100 Primo
Fig.13
Enclencher
Fig.14
Fig.15
Fig. 16
Utilisation avec le pistolet
à vapeur ou les tubes
d’extension
Fig. 17
Fig. 18
uyau jet incliné à 90 degrés
Sols
Tapis
Embout de xation
(adaptateur)
ACCESSOIRES: ACCESSOIRE POUR LES SOLS
Fixer l’accessoire pour les sols au bout du tube d’extension
(utiliser de 1 à 3 tubes selon besoin). S’assurer que
l’accessoire soit bien en place (clic). (Fig. 13)
L’accessoire pour les sols peut être utilisé avec ou sans les
chions en microbre selon le type de surface à nettoyer.
Placer l’accessoire pour les sols sur le chion microbre,
et placer l’excédent de tissu sous les attaches situées sur
la droite et la gauche de l’accessoire pour les sols. (Fig. 14)
L’accessoire pour les sols est idéal pour le carrelage, la
pierre, le vinyle et les parquets en bois, ainsi que les murs
lavables et les surfaces dures. Il peut aussi être utilisé pour
les tapis pour désinfecter, désodoriser et éliminer les
allergènes, les punaises des lits et les acariens. (Fig. 15).
(Utiliser le chion microbre sur les tapis pour permettre
à l’accessoire des sols de glisser)
NOTE: Le pistolet à vapeur, les tubes d’extension et
l’accessoire pour les sols peuvent être xés (voir page de
garde du manuel de l’utilisateur) au nettoyeur vapeur en
insérant la languette située sur l’accessoire pour les sols
dans la fente située sur le coté du Vapamore.
ACCESSOIRES: EMBOUT DE FIXATION (ADAPTATEUR)
L’embout de xation (adaptateur) peut être utilisé xé
directement au pistolet à vapeur ou relié aux tubes
d’extension. (Fig. 16)
L’embout de xation des accessoires est nécessaire pour
utiliser les brosses, le grattoir, le tuyau jet, les accessoires
de surface pour les vêtements - tissus et sols. Pour le
xer à ces accessoires, pousser l’accessoire dans
l’adaptateur, aligner la èche de l’accessoire avec la
èche de l’adaptateur et tourner pour mettre en place et
bloquer. Faire l’opération inverse pour retirer l’accessoire.
(Fig. 17)
L’embout de xation (adaptateur) peut aussi être utilisé
seul pour un jet direct, ou avec le tuyau jet incliné à 90
degrés. Ces outils sont parfaits pour retirer la couche de
savon dans la baignoire, la douche ou autour des lavabos,
mais aussi pour nettoyer les surfaces étroites telles que
les charnières de toilettes que la vapeur à haute pression
peut atteindre et faire disparaitre saleté et débris. Cet
accessoire est plus ecace si appliqué directement sur la
surface à traiter. La vapeur se condense et refroidit à 2,5cm
de la sortie du tuyau. (Fig. 18)

Sanitize -
counter tops,
tile, stone,
granite, glass,
stainless steel,
walls, etc.
UTILISATION
Aller sur www.vapamore.com pour voir la vidéo d’instructions du MR-100 Primo
Fig. 19
ACCESSOIRES/ BROSSES
Quatre brosses sont fournies avec le Vapamore MR-100.
Primo. Attacher les brosses à l’adaptateur en alignant les
èches et en tournant pour bloquer. Utilisations
suggérées: Brosse en acier: Grilles de fours et de BBQ,
taches de ciment, machinerie et surfaces en métal. Brosses
moyenne et large en nylon: Pour les surfaces plus fragiles
telles que vénitien nes, tapis, meubles, ventilations,
Fig.20
Fig. 21
marques sur les chaussures, dépôt de savon. Brosse en
nylon pour joints: Cette brosse est utilisée pour des s
urfaces dures et moins sensibles telles que les joints de
carrelage, la pierre, le ciment et la machinerie.
IMPORTANT: Concernant toutes les brosses: Il est i
mportant de ne pas user trop de force ou de pression,
ceci pouvant endommager l’accessoire ou l’adaptateur.
Lors de l’utilisation des brosses, laisser la vapeur faire le
travail, et utiliser la brosse pour aider à frotter la tache
ou la surface à nettoyer. (Fig. 19 -20)
ACCESSOIRES / GRATTOIR
Le grattoir est le parfait outil pour retirer des gommes à
mâcher ou de la nourriture collée sur les sols durs et lisses
ou le ciment, et pour retirer du papier peint mural ou
d’étagère. (Fig. 21)
Fig. 22
Fig. 23
Désinfecte comptoir,
carrelage, pierre,
granite, surfaces
vitrées, inox, murs
ACCESSOIRES / APPLICATEUR EN COTON
Installer d’abord l’applicateur en coton sur l’accessoire de
surface pour vêtements - tissus. Cet accessoire peut être
utilisé pour vaporiser et désinfecter, tout en éliminant les
odeurs des vêtements, tissus, meubles, rideaux, etc.
PUNAISES DES LITS - ALLERGENES
Utiliser cet accessoire sur la literie, les coussins et meubles
en appliquant une pression légère et passant lentement
le nettoyeur vapeur sur la surface pour tuer punaises des
lits, acariens et autres allergènes. (Fig. 22)
ACCESSOIRE / ACCESSOIRE DE SURFACE POUR LES
VETEMENTS – TISSUS
Utiliser cet accessoire sans l’applicateur en coton comme
un grattoir, parfait pour désinfecter cuisines et comptoirs
de salles de bains sans produits chimiques, mais aussi des
surfaces lisses comme la pierre, le granite, le bois, le verre,
le carrelage et l’acier. (Fig. 23)

PUNAISES DES LITS – ACARIENS – ALLERGENES
Aller sur www.vapamore.com pour voir la vidéo d’instructions du MR-100 Primo
POURQUOI UTILISER LA VAPEUR?
Le Vapamore MR-100. Primo produit une vapeur d’une température de 210/220 degrés.
Les insectes tels que punaises des lits, acariens et autres allergènes ainsi que leurs œufs
sont tués au contact d’une température de 180 degrés. La vapeur est un excellent moyen,
et ce, sans produits chimiques, d’exterminer ces insectes ainsi que le E. Coli, la salmonelle,
le H1N1 et autres bactéries et virus sans laisser aucun résidus chimiques nocifs après
utilisation. Les accessoires fournis avec le Vapamore MR-100 Primo vous permettent de
traiter toutes les surfaces où ces insectes se refugient, telles que literies, divans, meubles,
coussins, tapis, ssures.
LITERIE – MEUBLES
Fig. 25
Fig.26
Fig.27
LITS
L’accessoire de surface pour les vêtements - tissus et son
applicateur est idéal pour le traitement de la literie, des
meubles, des coussins, des plinthes, et des surfaces de
tapis autour des lits. Installer d’abord l’applicateur en
coton sur l’accessoire de surface pour vêtements - tissus.
Appliquer une pression légère mais constante en passant
doucement l’appareil sur la surface (2.5cm par seconde)
an de s’assurer que la surface traitée reçoive la
température totale tuant ainsi insectes et œufs. (Fig. 25)
L’accessoire de surface pour les sols avec le chion en
microbre est parfait pour traiter les grandes surfaces
telles que les tapis, la literie et les meubles. Installer
d’abord le chion microbre fourni sur l’accessoire de
surface pour les sols. Le noyau thermique du chion
microbre maintient la température optimale pendant
l’utilisation et permet à l’accessoire de glisser sur les
tissus ou tapis. (Fig. 26)
Appliquer une pression légère mais constante en passant
doucement l’appareil sur la surface (2.5cm par seconde)
an de s’assurer que la surface traitée reçoive la
température optimale tuant ainsi insectes et œufs.
(Fig. 27)
TAPIS
Fig.28
Embout de xation (adaptateur)
Tuyau jet angle à 90 degrés.
L’embout de xation (adaptateur) peut aussi être utilisé
seul pour un jet direct, ou avec le tuyau jet incliné à 90
degrés. Ces accessoires sont parfaits pour les ssures.
Attention de bien concentrer la vapeur directement sur
la surface à traiter en étant le plus près possible
(pas plus 2.5cm de la surface). Si le jet n’est pas dirigé
directement vers la surface, la vapeur refroidit et
condense et ne permettra pas de tuer les insectes ni
leurs œufs. L’adaptateur peut être utilisé seul, attaché
au pistolet à vapeur, ou avec les tubes d’extension.
(Fig. 28)

NETTOYAGE / RANGEMENT
Les chions en microbre et l’applicateur en coton fournis avec l’appareil sont lavables en
fois l’appareil froid (environ 15 minutes), appuyer sur la gâchette de la vapeur pour libérer
IMPORTANT: N’utiliser que de l’eau distillée sans additifs d’aucune sorte tels que parfum
longue période (30 jours ou plus). Pour vider le réservoir,
toute eau restante. Laisser le réservoir ouvert jusqu'à ce
NOTE: Le pistolet à vapeur, les tubes d’extension et l’accessoire pour les sols peuvent être
languette située sur l’accessoire pour les sols dans la fente située sur le coté du Vapamore.
Les pièces détachées, tubes d’extension et accessoires peuvent être aussi rangés dans le
Aller sur www.vapamore.com pour voir la vidéo d’instructions du MR-100 Primo
NETTOYAGE / ENTRETIEN
Toujours s’assurer, avant le nettoyage et l’entretien du Vapamore MR-100 Primo, qu’il
est éteint et débranché de la prise murale. Nettoyer l’extérieur de l’appareil seulement
à l’aide d’un chion légèrement humidié à l’eau. Ne pas utiliser d’agents nettoyants,
d’abrasifs ni d’alcool car ils pourraient endommager la nition extérieure de l’appareil.
Lubrier les joints du bouchon du réservoir avec de l’huile liquide ou du spray lubriant
tel que le WD-40 une fois tous les trois mois ou quand nécessaire.
machine en cycle normal. Utiliser une lessive habituelle.
RANGEMENT
IMPORTANT: Pour ranger le Vapamore, l’éteindre et le débrancher la prise murale. Une
toute vapeur sous pression restante.
ou agents nettoyants. L’utilisation d’eau du robinet annulerait la garantie.
Fig.24
Le réservoir doit être vidé avant de le ranger pour une
s’assurer que l’appareil est totalement froid, retirer le
bouchon du réservoir, retourner le réservoir pour vider
qu’il soit complètement sec. (Fig. 24)
ACCESSOIRES
xés (voir page de garde du manuel de l’utilisateur) au nettoyeur vapeur en insérant la
sac de rangement des accessoires fourni.
Les accessoires de remplacement ainsi que les pièces détachées sont en vente en ligne
sur: www.vapamore.com ou par téléphone au 480-951-8900

PROBLEMES ET DEPANNAGE
R
Garantie À Vie (Avec Limitations) Du Nettoyeur Vapeur
Vapamore Mr-100 Primo
Couverture:
Garantie à vie pièces et main d’œuvre, du chauffe eau, élément de chauffage et toutes pièces
électroniques internes.
Le chauffe eau, l’élément de chauffage et toutes les pièces électroniques internes du Vapamore
MR-100 Primo sont garantis à vie contre les défauts de matière et vices de constructions quand
l’utilisation de l’appareil est pour un usage domestique normal et opéré exclusivement par l’acheteur
original.
Garantie un (1) an pièces et main d’œuvre des accessoires et du boitier extérieur.
Les accessoires et le boitier extérieur du Vapamore MR-100 Primo sont garantis un an à partir de la
date d’achat, contre les défauts de matière et vices de constructions quand l’utilisation de l’appareil
est pour un usage domestique normal et opéré exclusivement par l’acheteur original. Ceci n’inclut pas
le remplacement des articles pour cause d’usure incluant mais ne se limitant pas à la brosse en nylon,
la brosse à joints, la brosse en acier, l‘embout du tuyau jet, les applicateurs en coton, le grattoir.
Pour que la garantie soit validée, l’acheteur original doit retourner le formulaire d’inscription de la
garantie (inclus dans l’emballage original ou disponible en ligne à www.vapamore.com) avec la
preuve d’achat dans les quinze (15) jours suivant l’achat, à Vapamore. 7464 East Tierra Buena Ln.
Suite 108. Scottsdale, AZ 85260. USA.
Toute pièce défectueuse couverte par les termes de cette garantie à vie (avec limitations) sera réparée
ou remplacée par Vapamore, après réception de l’appareil accompagné du formulaire de garantie,
et envoyé par l’acheteur d’origine.
La responsabilité de Vapamore, sous cette garantie, est limitée uniquement au coût du remplacement
des pièces défectueuses ou de l’appareil complet à la discrétion de Vapamore. La garantie est annulée
si les dommages résultent d’un accident, d’une mauvaise utilisation, d’une réparation ou manipulation
non-autorisée, d’une altération, d’une utilisation d’une substance autre que l’eau distillée dans le
réservoir, d’un usage professionnel ou autre qu’un usage domestique, ou, des dommages survenus
pendant le transport. Cette garantie ne couvre pas les frais d’expédition vers ou depuis nos locaux.
Cette garantie s’applique à l’acheteur original seulement et exclut toute autre garantie légale et/ou
conventionnelle. La responsabilité de Vapamore, s’il y a, est limitée aux obligations spécifiées
expressément dans les termes de la garantie (avec limitations) à vie. En aucun cas Vapamore n’est
responsable des dommages directs ou indirects (accessoires ou consécutifs), et ce, de quelque sorte
que ce soit.
Les frais d’expéditions depuis ou vers nos locaux sont à la charge du client. Emballer avec précaution
les articles retournés pour réparation afin d’éviter tout dommage pendant le transport. S’assurer de
joindre dans la boite vos coordonnées incluant, nom, numéro de téléphone, adresse électronique,
adresse postale, ainsi qu’une étiquette UPS ou Fedex prépayée pour le renvoi. Vapamore n’utilise le
service postal ni pour les expéditions, ni pour les réceptions, et n’acceptera pas de produits retournés
par la Poste. Contacter Vapamore au 480-951-8900 ou par courrier électronique à
customersupport@vapamore.com pour organiser les retours de produits à réparer ou à entretenir.
Vapamore n’est responsable d’aucun frais d’expéditions vers ou depuis nos locaux.
Aller sur www.vapamore.com pour voir la vidéo d’instructions du MR-100 Primo
PROBLEME?
Que dois-je faire si l’appareil ou un accessoire est endommagé ou cassé?
Visiter www.vapamore.com pour une liste complète des pièces détachées et des
accessoires disponibles à l’achat, ou simplement nous appeler au +1-480-951-8900, ou
nous envoyer un courrier électronique à info@vapamore.com pour tout achat de pièces de
remplacement ou pour prendre rendez-vous pour une réparation.
NOUS SOMMES LA POUR VOUS AIDER…
IMPORTANT: Ne pas retourner chez votre revendeur pour la garantie ou les réparations.
Seul Vapamore est autorisé à eectuer toute réparation pour garder le plus haut niveau de
qualité et les standards ETL. Toute réparation ou manipulation eectuée par un tiers
annulera la garantie.
DEPANNAGE:
PROBLEME: Le voyant de fonctionnement ne s’allume pas.
Cause: Le nettoyeur vapeur n’est pas branché à la prise murale ou n’est pas allumé.
Solution: Connecter le câble d’alimentation à la prise murale ou mettre en marche le
nettoyeur vapeur.
Cause: La prise de courant est en faute
Solution: Vérier la prise de courant en débranchant le nettoyeur vapeur de la prise de
courant et en branchant un autre appareil électrique.
Cause: Une des protections ETL s’est déclenchée ou le câble d’alimentation a été
endommagé.
Solution: Nous appeler au +1-480-951-8900, ou nous envoyer un courrier électronique à
info@vapamore.com pour prendre rendez-vous pour une réparation.
PROBLEME: Aucune vapeur n’est émise quand on appuie sur la gâchette de la vapeur.
Cause: Le loquet de sécurité enfant est enclenché bloquant l’émission de la vapeur.
Solution: Déverrouiller le loquet de sécurité en poussant la goupille triangulaire vers la
gauche, située sur le coté droit du pistolet à vapeur.
Cause: Le réservoir d’eau est vide.
Solution: Remplir le réservoir avec de l’eau.
PROBLEME: Faible émission de vapeur.
Cause: Le bouton de contrôle de la vapeur est sur minimum.
Solution: Tourner le bouton de contrôle de la vapeur dans le sens inverse des aiguilles
d’une montre jusqu'à ce le nettoyeur émette assez de vapeur.
PROBLEME: Le nettoyeur vapeur prend beaucoup de temps à chauer.
Cause: Le réservoir d’eau peut être entartré dû à l’utilisation d’eau du robinet.
Solution: Le réservoir doit être détartré en utilisant un produit détartrant. Tout produit
chimique doit être éliminé du réservoir d’eau avant d’utiliser l’appareil. L’utilisation du
nettoyeur vapeur avec autre chose que de l’eau pure a 100% dans le réservoir est très
dangereux à l’utilisation et peut causer des dommages permanents.

Garantie À Vie (Avec Limitations) Du Nettoyeur Vapeur
Vapamore Mr-100 Primo
Couverture:
Garantie à vie pièces et main d’œuvre, du chauffe eau, élément de chauffage et toutes pièces
électroniques internes.
Le chauffe eau, l’élément de chauffage et toutes les pièces électroniques internes du Vapamore
MR-100 Primo sont garantis à vie contre les défauts de matière et vices de constructions quand
l’utilisation de l’appareil est pour un usage domestique normal et opéré exclusivement par l’acheteur
original.
Garantie un (1) an pièces et main d’œuvre des accessoires et du boitier extérieur.
Les accessoires et le boitier extérieur du Vapamore MR-100 Primo sont garantis un an à partir de la
date d’achat, contre les défauts de matière et vices de constructions quand l’utilisation de l’appareil
est pour un usage domestique normal et opéré exclusivement par l’acheteur original. Ceci n’inclut pas
le remplacement des articles pour cause d’usure incluant mais ne se limitant pas à la brosse en nylon,
la brosse à joints, la brosse en acier, l‘embout du tuyau jet, les applicateurs en coton, le grattoir.
Pour que la garantie soit validée, l’acheteur original doit retourner le formulaire d’inscription de la
garantie (inclus dans l’emballage original ou disponible en ligne à www.vapamore.com) avec la
preuve d’achat dans les quinze (15) jours suivant l’achat, à Vapamore. 7464 East Tierra Buena Ln.
Suite 108. Scottsdale, AZ 85260. USA.
Toute pièce défectueuse couverte par les termes de cette garantie à vie (avec limitations) sera réparée
ou remplacée par Vapamore, après réception de l’appareil accompagné du formulaire de garantie,
et envoyé par l’acheteur d’origine.
La responsabilité de Vapamore, sous cette garantie, est limitée uniquement au coût du remplacement
des pièces défectueuses ou de l’appareil complet à la discrétion de Vapamore. La garantie est annulée
si les dommages résultent d’un accident, d’une mauvaise utilisation, d’une réparation ou manipulation
non-autorisée, d’une altération, d’une utilisation d’une substance autre que l’eau distillée dans le
réservoir, d’un usage professionnel ou autre qu’un usage domestique, ou, des dommages survenus
pendant le transport. Cette garantie ne couvre pas les frais d’expédition vers ou depuis nos locaux.
Cette garantie s’applique à l’acheteur original seulement et exclut toute autre garantie légale et/ou
conventionnelle. La responsabilité de Vapamore, s’il y a, est limitée aux obligations spécifiées
expressément dans les termes de la garantie (avec limitations) à vie. En aucun cas Vapamore n’est
responsable des dommages directs ou indirects (accessoires ou consécutifs), et ce, de quelque sorte
que ce soit.
Les frais d’expéditions depuis ou vers nos locaux sont à la charge du client. Emballer avec précaution
les articles retournés pour réparation afin d’éviter tout dommage pendant le transport. S’assurer de
joindre dans la boite vos coordonnées incluant, nom, numéro de téléphone, adresse électronique,
adresse postale, ainsi qu’une étiquette UPS ou Fedex prépayée pour le renvoi. Vapamore n’utilise le
service postal ni pour les expéditions, ni pour les réceptions, et n’acceptera pas de produits retournés
par la Poste. Contacter Vapamore au 480-951-8900 ou par courrier électronique à
customersupport@vapamore.com pour organiser les retours de produits à réparer ou à entretenir.
Vapamore n’est responsable d’aucun frais d’expéditions vers ou depuis nos locaux.
R

Vapamore
7464 E. Tierra Buena Lane Suite 108
Scottsdale, AZ 85260
 Loading...