


SAFETY INFORMATION
GO TO VAPAMORE.COM TO SEE THE MR-100 PRIMO INSTRUCTIONAL VIDEO
! |
WHEN USING THE STEAM CLEANER, BASIC SAFETY PRECAUTIONS |
||||||
SHOULD ALWAYS BE OBSERVED INCLUDING THE FOLLOWING |
|||||||
|
|
|
|
|
|
|
around water. |
|
|
|
|
|
|
|
|
|
|
|
|
|
|
|
|
|
|
|
|
|
|
||
|
|
|
|
|
|
||


 use only with a grounded outlet.
 Only use distilled water. Using hard water will void the warranty and cause failure.
Vapamore in order to prevent a fire hazard.
 Do not over pull or drag steam cleaner using the steam gun and hose.
 Steam cleaner must be level and on the floor during use.
listed on the label.
supply cord.
 Do not over extend retractable cord past stopping point.
 Never use additives such as perfumes, stain removers, or other chemicals in the water tank as they will void the warranty, cause permanent damage, and be dangerous.
 Make sure the water tank cap is fully tight and secure before use.


 (See cleaning and storage).
 Do not leave the steam cleaner on and unattended. Always switch the steam cleaner off and remove plug from wall
outlet when unattended.
PARTS OVERVIEW
GO TO VAPAMORE.COM TO SEE THE MR-100 PRIMO INSTRUCTIONAL VIDEO
|
|
|
|
|
|
|
|
|
|
|
|
|
|
|
|
|
|
|
|
|
|
|
|
|
|
|
|
|
|
|
|
|
|
|
|
|
|
|
|
|
|
|
|
|
|
|
|
|
|
|
|
|
|
|
|
|
|
|
|
|
|
|
|
|
|
|
|
|
|
|
|
|
|
|
|
|
|
|
|
|
|
|
|
|
|
|
|
|
|
|
|
|
|
|
|
|
|
|
|
|
|
|
|
|
|
|
|
|
|
|
|
|
|
|
|
|
|
|
|
|
|
|
|
|
|
|
|
|
|
|
|
|
|
|
|
|
|
|
|
|
|
|
|
|
|
|
|
|
|
|
|
|
|
|
|
|
|
|
|
|
|
|
|
|
|
|
|
|
|
|
|
|
|
|
|
|
|
|
|
|
|
|
|
|
|
|
|
|
|
|
|
|
|
|
|
|
|
|
|
|
|
|
|
|
|
|
|
|
|
|
|
|
|
|
|
|
|
|
|
|
|
|
|
|
|
|
|
|
|
|
|
|
|
|
|
|
|
|
|
|
|
|
|
|
|
|
|
|
|
|
|
|
|
|
|
|
|
|
|
|
|
|
|
|
|
|
|
|
|
|
|
|
|
|
|
|
|
|
|
|
|
|
|
|
|
|
|
|
|
|
|
|
|
|
|
|
|
|
|
|
|
|
|
|
|
|
|
|
|
|
|
|
|
|
|
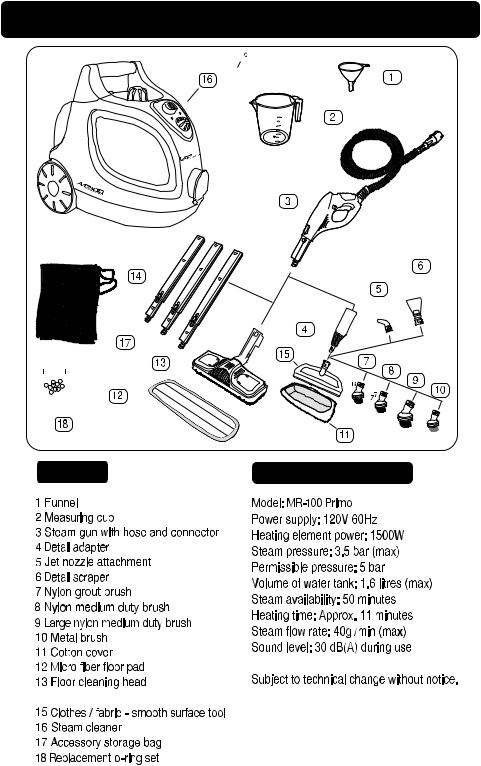
PARTS LIST |
|
|
|
TECHNICAL SPECIFICATIONS |
|||||||||||||||


 10.5lbs

 E
E


STEAM CLEANER ASSEMBLY
GO TO VAPAMORE.COM TO SEE THE MR-100 PRIMO INSTRUCTIONAL VIDEO
!
Fig. 1
Accessory compartment
Fig. 2
Accessories twist lock onto the detail adapter
Fig. 3
Detail adapter attaches to the steam gun or extension tubes.
Fig. 4
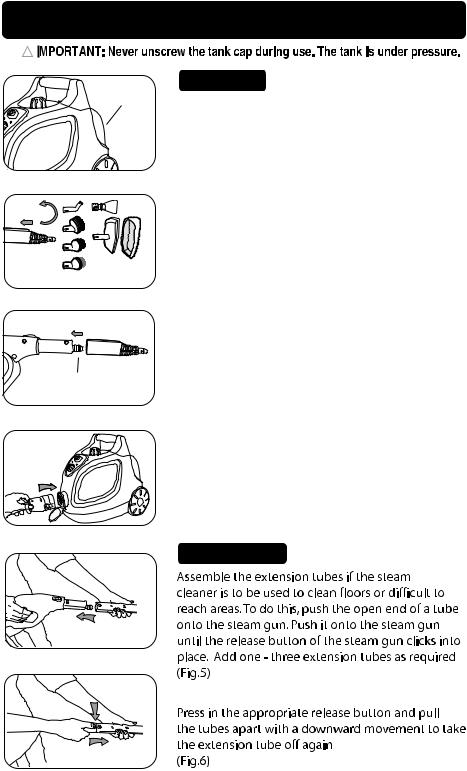
The MR-100 Primo has an accessory compartment that houses the Detail adapter, Jet nozzle attachment, Clothes / fabric - smooth surface tool, and all brushes. Open the accessory compartment by pulling the accessory cover back - away from the machine. Remove the desired accessory from the accessory compartment and close the accessory cover.
(Fig.1)
The detail adaptor is required when using all accessories. Attach by aligning the arrow on the accessory with the arrow on the detail adapter and twisting to lock in place. The detail adapter attaches directly to the steam gun and also can be attached to the extension tubes.
(Fig. 2 and 3)
Connect the steam hose to the steam socket on the front of the steam cleaner. To do this flip down the dust cover door and push the connector on the steam hose firmly into the socket until both tabs click into place. To remove the steam hose, press in both release tabs located on the left and right side of the steam hose connector and pull out to release from the socket.
(Fig. 4)
Fig. 5
Fig. 6
FILLING & OPERATION
GO TO VAPAMORE.COM TO SEE THE MR-100 PRIMO INSTRUCTIONAL VIDEO
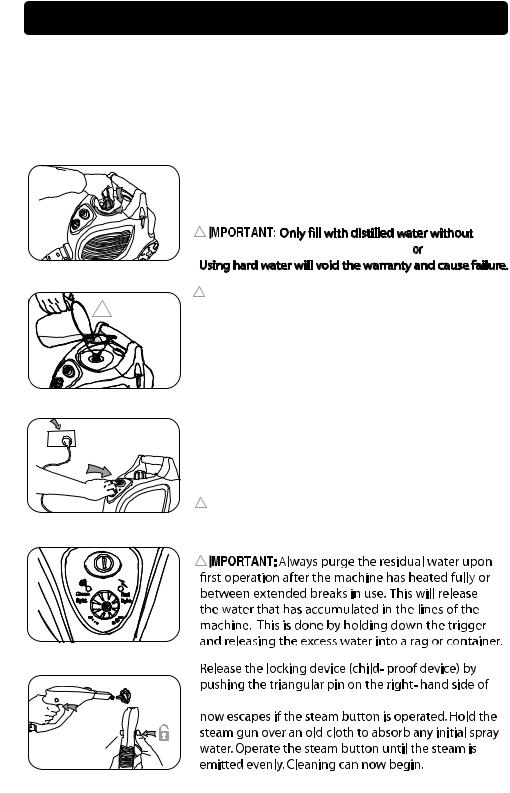
To ll the water tank, switch the steam cleaner o and remove the plug from the wall outlet. Allow steam cleaner to cool down before removing water tank cap. Unscrew the water tank cap (Fig.7) by pressing the cap down and simultaneously turning counter clockwise. Use the supplied funnel and the measuring cup lled to the top line marked 700ml two (2) times to equal 1.4 liters of water. (Fig.8)
Fig. 7
Fig. 8
! |
NOTE: |
Do not over fillll |
Fig. 9
Fig. 10
Green |
Red |
light |
light |
Replace the water tank cap by pressing down on the cap and simultaneously turning it clockwise. Make sure the cap is fully tight to prevent any steam from leaking out. If steam leaks from the cap area turn the Vapamore o and once cooled down tighten cap further.
!


 or
or 


!


 Do not exceed the maximum of 1.4 liters
of water when lling the water tank. 1.4 liters is equal tolling the measuring cup to the 700ml mark tow (2) times.
Plug the Vapamore into a proper wall outlet and switch to the on position by pressing the on / o switch. (Fig.9)
The red light will illuminate when the power button is depressed indicating the unit is heating. The green light will illuminate indicating the unit is fully heated and ready for use (approximately 11 minutes). The green light will cycle on and o with the heater to maintain full temperature during use. (Fig.10)
!


 Never aim steam directly at people,
animals, plants, or electrical systems. There is a risk of scalding or electrical shock.
!
Fig. 11


 Fig. 11


handle safety latch.
 Loading...