


Mode d’emploi et manuel de l’utilisateur

FAILURE TO FOLLOW SAFETY INFORMATION AND WARNINGS MAY
CAUSE PERMANENT DAMAGE AND VOID PRODUCT WARRANTY.
SAFETY INFORMATION
Steam cleaner must be level and on the floor during use.
listed on the label.
supply cord.
!
GO TO VAPAMORE.COM TO SEE THE MR-750 OTTIMO INSTRUCTIONAL VIDEO
around water.
Do not leave the steam cleaner on and unattended. Always
switch the steam cleaner off and remove plug from wall
outlet when unattended.
use only with a grounded outlet.
Vapamore in order to prevent a fire hazard.
Only use distiled water. Using hard water can cause
calcium or mineral build up and void the warranty.
Never use additives such as perfumes, stain removers, or
other chemicals in the water tank as they will void the
warranty, cause permanent damage, and be dangerous.
Make sure the water tank cap is fully secured
before use.
(See cleaning and storage).
Do not pull or drag steam cleaner using the
steam gun and hose.
Drain water tank prior to shipping, transporting.
storage.
TECHNICAL SPECIFICATIONS
PARTS LIST
PARTS OVERVIEW
GO TO VAPAMORE.COM TO SEE THE MR-750 OTTIMO INSTRUCTIONAL VIDEO
Measuring cup 700ml
Accessory tool adapter
Metal brush small brass
Nylon brush large
Nylon brush medium
Nylon brush grout
Metal brush large brass
Metal brush large stainless steel
Floor head smooth surface
Extension tubes x 2
Cotton cover
Bed bug / fabric tool
19
18
Model: MR-750 Ottimo
Power supply: 120V 60Hz
Heating element: 1600w - 13AMP
Steam Pressure: 5.2BAR - 75PSI MAX
20
21
22
23
20
Large elbow adapter
19
21
Detail jet tool
22
23
Boiler capacity: 4LTR - 1GAL
Heating time full: 20 MIN.
Boiler temp: 160C - 320F
Steam temp at tip: 140C - 284F PEAK
Power cord length: 15’
Steam hose length: 8’
Gross weight: 9KG - 20LBS
16
24
Horse hair brush small
25
Horse hair brush large
24
25
Water level dip stick
MR-750 Ottimo Main Unit

GETTING STARTED
Vapamore
if over pressure or over temperature is detected.
!
!
!
!
GO TO VAPAMORE.COM TO SEE THE MR-750 OTTIMO INSTRUCTIONAL VIDEO
CORD HOOKS
Once unpacked the only items that need to be installed are the cord hooks and the
storage basket. All the necessary tools and hardware are included to install these items.
Fig.1
STORAGE BASKET
Fig.2
The basket is secured to the main steamer body using
the 4 supplied Allen head style screws and rubber
washers. Align the basket screw hole locations and
with the rubber washer betwwen the basket and the
steamer housing, insert the Allen head screws loosely
until all screws are in place. Once all screws are in place
(Fig.2)
There are two supplied cord hooks that are mounted
by threading the cord hooks onto the threaded studs
located on the back of the steamer housing. The cord
hooks rotate by pulling outward from the steamer
then twisting to rotate. Use this rotate function to
easily remove the power cord and to position the
hooks for cord storage. Use the Velcro cord strap to
secure the cord during transport. (Fig.1)
!
If the storage basket is not being installed make sure to use the 4 supplied
Allen head screws to plug the storage basket mounting holes in the steamer housing.
This will prevent water or debris from entering the steamer housing.
!
operation. Do not tip or tilt the steam cleaner during use.
The Ottimo
Allen
Screw
Storage
Basket
Rubber
washer
machine to cool down before removing tank cap or when changing accessories.
Cord
Hook
The accessory tool adaptor (#4 on parts overview
page) is required when using the jet nozzle
attachment, detail scraper, and all round detail
brushes. Align the accessory with the arrow on the
accessory tool adapter and twist to lock into place.
The accessory tool adapter can be used directly on
the steam gun or can be used with the extension
tubes.
(Fig.2 & 3)
Accessory
storage
basket
The MR-750 Ottimo has an accessory storage
basket and storage bag. Once all the accessories
have been unpacked use the accessory storage bag
and basket to carry all the accessories. The storage
bag can be hung on the loop on the back of the
storage basket. (Fig.1)
Accessories twist lock onto
the accessory tool adapter
Accessory tool adapter
attaches to the steam
gun or extension tubes.
ACCESSORIES AND TOOLS
Fig.1
Fig.2
Fig.3
Fig.4
Fig.5
Fig.6
GO TO VAPAMORE.COM TO SEE THE MR-750 OTTIMO INSTRUCTIONAL VIDEO
Steam
hose
socket
The large elbow adaptor (#14 on parts overview
page) is required when using the floor head (#15 on
parts overview page). With the large elbow adapter
facing down, insert into the floor head until
completely inserted then rotate up. The adapter will
only insert when facing down and then locks into
position and allows the adapter to rotate when in
use. The large elbow adapter can be used directly
on the steam gun or with the extension tubes. Always
use the micro fiber pad with the floor head. Wrap the
micro fiber pad around the ends of the floor head and
hold in place under the spring clips.
(Fig.4)
Use large
elbow
adapter for
floor head.
The detail jet tool and the bed bug / fabric tool (19 &
20 on parts overview page) can be connected
directly to the steam gun or the extension tubes.
(Fig.5)
Use with steam gun
or extension tubes
STEAM GUN / EXTENSION TUBES
The steam gun connects to the steam socket located
on the front panel of the machine. Flip the dust cover
open and push the hose connector firmly into the
socket until both tabs click into place. Remove the
steam hose by pressing in both release tabs while
pulling out.
(Fig.1)
The steam gun has a trigger (ON) lock located just
behind the trigger. This lock can be used for
continuous steam without having to hold the trigger.
To set the lock, push down the trigger, then while the
trigger is down slide the lock to hold the trigger.
Extension tubes can be used for floors or difficult to
reach areas. The extension tubes push and lock into
place on the steam gun. (Fig.6)
Trigger lock
Extension tubes
lock and release
Storage
bag hook
Use micro
fiber pad
with floor
head.

FILLING & OPERATION
Fig.1
er
Do not ov
GO TO VAPAMORE.COM TO SEE THE MR-750 OTTIMO INSTRUCTIONAL VIDEO
(Fig.3)
Turn the controller knob clockwise to
increase the steam output and counter clockwise to
reduce the steam output.
Fig.2
Fig.3
Tank
fill cap
OUTPUT
+
_
Use steam controller
knob to adjust steam
output level
Status lights
On/off
switch
!
!
!
outlet. Allow steam cleaner to cool down before removing water tank cap. Unscrew the
water tank cap (Fig. 1) by pressing the cap down and simultaneously turning counter
Replace the water tank cap by pressing down on the cap and simultaneously turning it
Always use the dipstick to check the
or
Once the green light illuminates the steamer is ready for use. The green
clockwise. Check the water level with the supplied dipstick. Use the supplied funnel
Dip
stick
2800ml. If so drain excess water by removing the drain
plug to achieve desired water level.
!
Make sure steamer is completely cooled
the cap while the steamer is hot can cause scalding
and severe burns.
The dipstick has
4 marks, 100% - 2800ml, 75% - 2100ml, 50% -1400ml,
25% - 700ml. This allows options for working time and
heating wait time.
Fill chart for working and heatimg times (water amount -working time - heating time):
700ml - 30-45min. - 5-7 min. / 1400ml - 60-80 min. - 10-12min. / 2100ml - 90-120 min.
- 15-17min. / 2800ml - 150-180min. - 20-22min. (Measuring cup has a 700ml full mark)
clockwise. Make sure the cap is fully tight to prevent any steam from leaking out. If
cap fully.
“on” position. The red status light will illuminate when the power switch is on indicating
the water is heating. The green status light will illuminate indicating the water is fully
light will cycle on and o as the heater turns on and o during use. Continue to use the
steamer as you normally would as the green status light cycles on and o.
OPERATION
extension tube (use 1 to 2 tubes as desired). Ensure
Fig.1
Fig.2
Fig.3
The detail jet tool can be attached directly to the
steam gun or to any of the extension tubes. The jet
nozzle attachment is used with the accessory tool
adapter.
These tools are great for removing soap scum in the
bath, shower, and faucets. Also for cleaning tight
areas such as toilet seat hinges where high pressure
steam can reach and blow out dirt and debris. These
surface being cleaned. The steam temperature will
condense and cool within 1’’ of the tool tip. (Fig.4)
DETAIL JET TOOL / JET NOZZLE
GO TO VAPAMORE.COM TO SEE THE MR-750 OTTIMO INSTRUCTIONAL VIDEO
overhanging material under the clips located on each
walls and any hard surface. It can also be used to
sanitize, deodorize, kill allergens, bed bugs and dust
cleaning head to glide when using on carpet. (Fig.3)
Carpets
‘
’
CLICK
Floor head clicks
into extension
tubes
Micro
fiber pad
Fig.4
Detail jet tool
Jet nozzle on accessory tool adapter

BRUSHES
There are 8 brush types supplied with the Vapamore
MR-750 Ottimo. The brushes attach to the accessory
tool adapter by aligning the arrows and twisting to lock.
Suggested uses (Metal brushes), Oven grills, BBQ grates,
cement stains, machinery, and metal surfaces. (Nylon
medium duty and large nylon brush), used for more
sensitive materials such as blinds, carpet, furniture, air
brush is used for harder less sensitive areas such as
IMPORTANT : With all brushes it is important to not
apply excessive pressure or force. This can cause failure
of the detail adaptor or related parts. When using the
brushes let the steam do the work and the brush to
help agitate the stain or area being cleaned. (Fig.1/2)
OPERATION
Fig.1
BED BUG / FABRIC TOOL
Fig.2
Fig.4
SCRAPER TOOL
The scraper tool can be used to defrost freezers, on
oven walls and cook top surfaces to remove stuck on
food. This tool is also good for removing wall paper,
paint and shelve paper and gum. (Fig.3)
Start by installing the supplied cotton cover on the
Bed bug / fabric tool. Now this tool can
be used for
GO TO VAPAMORE.COM TO SEE THE MR-750 OTTIMO INSTRUCTIONAL VIDEO
Bed bugs, allergens and mold:
Use this tool on bedding, pillows, and furniture by
applying light pressure and slowly passing it along the
surface to kill Bedbugs, dust mites and other allergens.
(See bed bug - dust mite - allergens page for details)
(Fig.4)
Fig.3
steaming and sanitizing along with eliminating odors
in garments, fabrics, furniture, curtains, drapes, etc.
(Fig.4)
(Horse hair brushes) These brushes are used for sensitive
surfaces such as delicate materials, car interiors, and
fabrics. (Fig.1/2)
BEDBUG - DUST MITES - ALLERGENS
Fig.2
Fig.3
The accessory tool adaptor or the detail jet tool can be
used on their own. These tools are great for cracks and
crevices. Make sure to concentrate the steam directly on
the area to be treated with as minimal distance as
not kill pests and their eggs if the jet tip is not directly on
the surface being treated.
The accessory tool adaptor or the detail jet tool can be
attached directly to the steam gun or to any of the
extension tubes. (Fig.4)
WHY USE STEAM?
GO TO VAPAMORE.COM TO SEE THE MR-750 OTTIMO INSTRUCTIONAL VIDEO
The Vapamore MR-750 Ottimo produces steam with an output temperature between 210˚
to 240˚ degrees. Pests such as bedbugs, dust mites and other allergens along with their
eggs are killed on contact at a temperature of 180˚ degrees. Using steam is an extremely
other bacteria or viruses without leaving any harmful chemical residue behind. The tools
supplied with the Vapamore MR-750 Ottimo allow you to treat all areas where these pests
can hide such as bedding, sofas, furniture, pillows, carpet, cracks and crevices that are
ideal hiding places for pests.
BEDDING / FURNITURE
Fig.1
The bed bug / fabric tool with cotton cover is ideal for
treating bedding, furniture, pillows, and carpet areas
around bed posts and base boards. Start by installing
the supplied cotton cover on the clothes - fabric /
smooth surface tool. Apply light consistent pressure and
slowly pass it along the surface (1” per second) to ensure
the area being treated has a chance to come to full
temperature killing pests and their eggs. (Fig.1)
great for treating large surface areas such as bedding,
furniture, and carpet areas. Start by installing the
head to glide over fabric or carpet. (Fig.2)
Apply light consistent pressure and slowly pass it along
the surface (1’’ per second) to ensure the area being
treated has a chance to come to full temperature, thereby
killing
pests and their eggs. (Fig.3)
Accessory tool
adaptor
Detail jet tool
Fig. 4
Use clips for
Carpet
BEDS
CLEANING / MAINTENANCE
CLEANING /STORAGE
Always ensure before cleaning or maintaining the Vapamore MR-750 Ottimo that it is
switched o and unplugged from the wall outlet and cooled down completely.
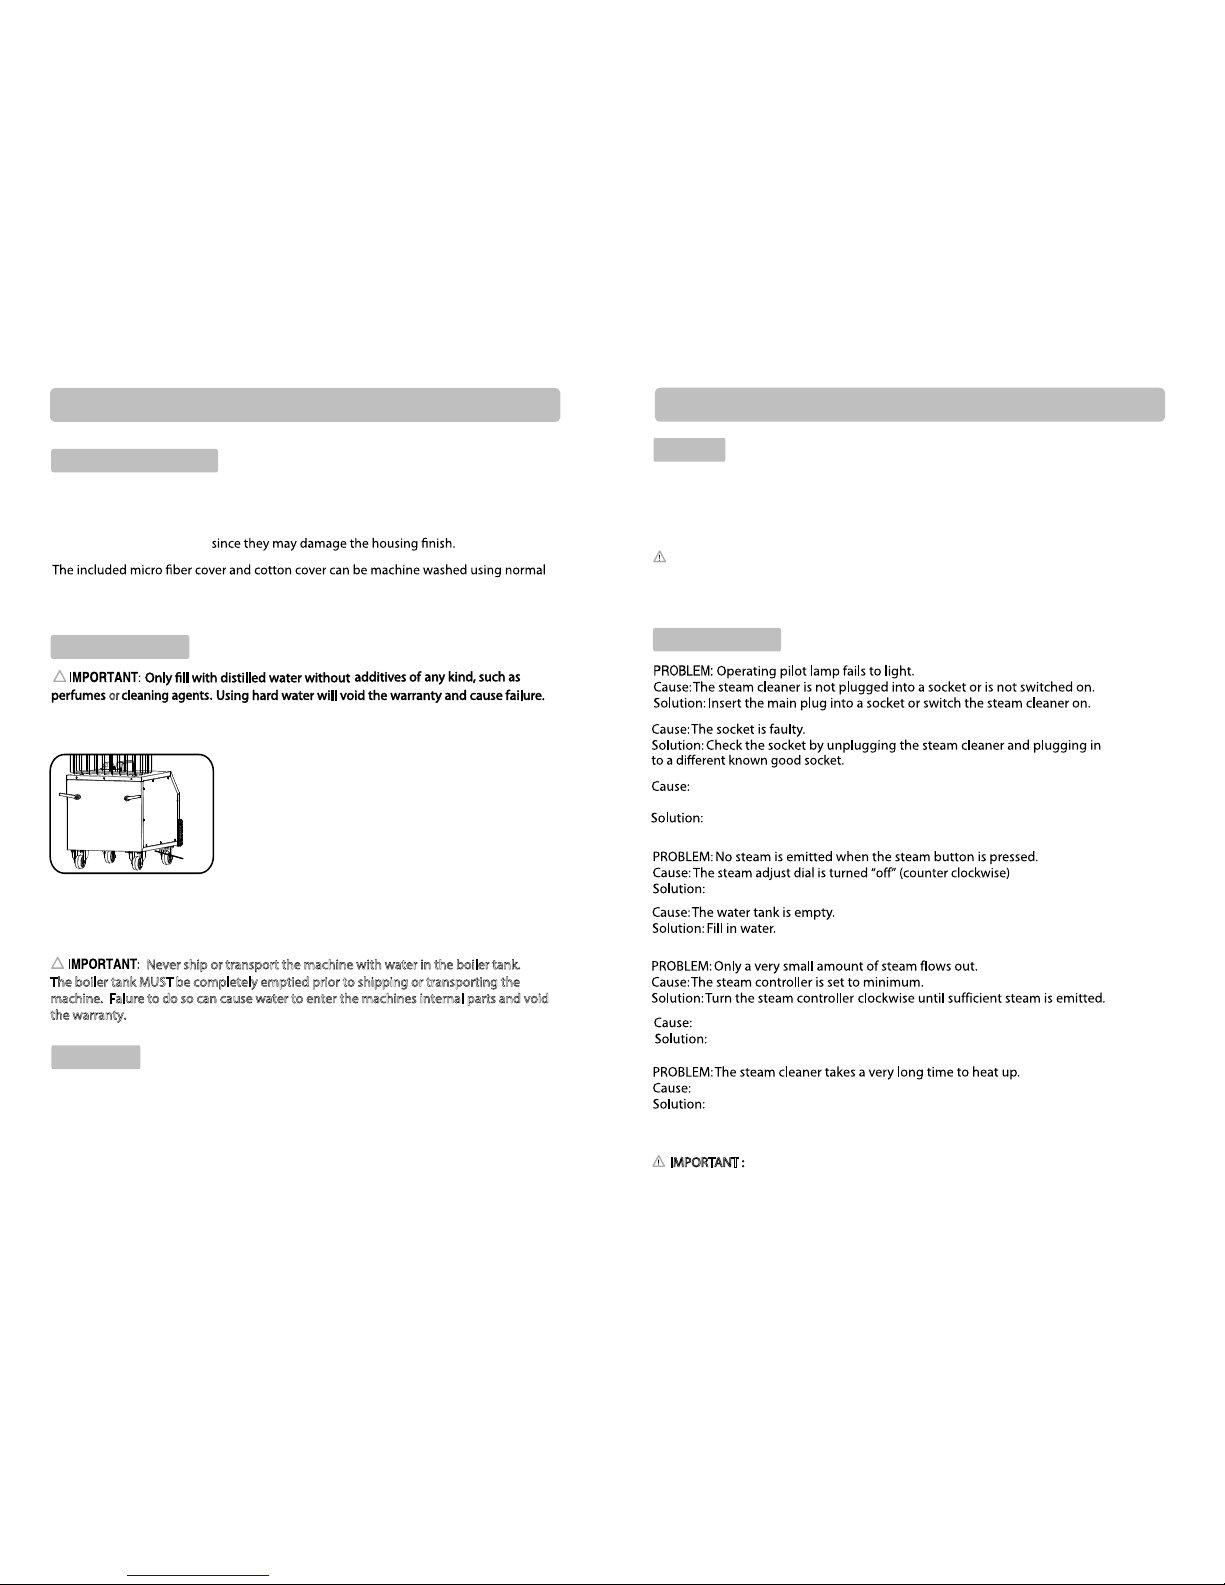
Only clean the outer surface with a water moistened cloth. Do not use any cleaning
agents, abrasives or alcohol
Fig.1
ACCESSORIES
The boiler should be emptied before storing for any
extended period of time (30 days or more) or emptied
every 3 months of use to help ush out and remove any
debris that may have collected in the boiler. Make sure
the steamer is unplugged and completely cooled down
before emptying the boiler. The boiler drain is located on
the underside of the steamer. The steamer MUST be
100% cooled down and have no pressure stored in the
boiler to remove this cap. With the supplied tool, remove
the drain cap to drain the boiler then replace and tighten
the cap. Do not overtighten the cap as you may damage
the seal. (Fig.1)
GO TO VAPAMORE.COM TO SEE THE MR-750 OTTIMO INSTRUCTIONAL VIDEO
Parts, extension tubes and accessories can be stored in the supplied accessory storage
bag and the storage basket located on the back of the steamer. The steam gun and hose
can remain plugged into the steamer and also be stored in the storage basket.
Replacement accessories and parts are available to order online at vapamore.com or by
calling Vapamore at 480-951-8900.
Boiler
drain
!
Never ship or transport the machine with water in the boiler tank.
The boiler tank MUST be completely emptied prior to shipping or transporting the
machine. Falure to do so can cause water to enter the machines internal parts and void
the warranty.
Make sure all the o-rings are in place on the accessory tools and adapters. A silicon lube
can be used on these o-rings to help maintain a long use life.
!
or
detergents and wash cycle. *Air dry dry only, do not use any fabric softners as these will
leave a residue on the pad and cause cleaning issues when using the pad.
BOILER TANK & DRAIN
PROBLEM?
TROUBLESHOOTING
GO TO VAPAMORE.COM TO SEE THE MR-750 OTTIMO INSTRUCTIONAL VIDEO
What do I do if the machine or an accessory becomes damaged or broken?
Visit www.vapamore.com for a complete list of parts and accessories available for
purchase or simply call us at 480-951-8900 or e-mail us at info@vapamore.com to
purchase replacement parts or schedule a repair. “WE ARE HERE TO HELP.”
The internal parts have been clogged by debris or hard water build up.
Call us at 480-951-8900 or e-mail us at info@vapamore.com to schedule a repair.
IMPORTANT :
TROUBLESHOOTING
One of the ETL protection devices has been triggered or the power cord has been
Call us at 480-951-8900 or E-mail us at info@vapamore.com to schedule a repair.
Do not return to the place of purchase for warranty or repairs. Only
damaged.
The tank could have a build up of lime scale due to the use of hard water.
The tank will need to be replaced due to hard water damage. Contact Vapamore
Vapamore is authorized to facilitate all repairs to keep the highest quality and ETL
standards. Repairs or tampering by any other party will void the Warranty.
at 480-951-8900 or info@vapamore.com to schedule service.
IMPORTANT :
TANK. The tank uses high heat and presure, this combined with a chemical of any type can
be explosive and destroy the machine and can cause personal injury or death.
DO NOT ATTEMPT TO USE ANY CHEMICALS OR CLEANERS INSIDE THE
Turn the steam adjust dial to “on” (clockwise)

TIPS
GO TO VAPAMORE.COM TO SEE THE MR-750 OTTIMO INSTRUCTIONAL VIDEO
APPLICATIO
N
STEAM VOLUME
ATTACHMEN
T
TECHNIQUE
FLOORS / CHEMICAL FREE CLEANING WITH NO RESIDUE LEFT BEHIND
Vinyl Tile Or Vinyl Sheet Medium - High
Floor Cleaning Head +
Micro fiber + Extension
Tubes + Nylon Brush.
Sweep or vacuum first. Steam mop with
floor cleaning head and micro fiber cover.
Corners and baseboards with nylon brush.
Stone Tile, Slate, Ceramic Tile, Grout High
Floor Cleaning Head +
Micro Fiber + Extension
Tubes + Nylon Brush +
Grout Brush + Nylon Brush
Jet Nozzle
Sweep or vacuum first. Steam mop with
floor cleaning head, heavy stains use
without micro fiber cover. Corners and
baseboards with nylon brush. Grout lines
use grout brush and / or jet nozzle. Finish
with floor cleaning head / micro fiber cover.
Smooth Surface Concrete High
Floor Cleaning Head +
Micro Fiber + Extension
Tubes + Grout Brush +
Nylon Brush + Metal Brush +
Jet Nozzle
Sweep or vacuum first. Steam mop with
floor cleaning head, heavy stains use
without micro fiber cover. Corners and
baseboards with nylon brush. Joint lines
use grout or metal brush and / or jet nozzle.
Finish with floor cleaning head / micro fiber.
w - MediumoLdoowdraH
Floor Cleaning Head +
Micro Fiber + Extension
Tubes
Sweep or vacuum first. Steam mop with
floor cleaning head and micro fiber cover.
CARPETS / SPOT TREATMENT
Wall To Wall, Rugs, Spot Care High
Nylon Brush + Jet Nozzle +
Paper Or White Cotton Towel
Vacuum area first then steam using brush
or jet. Use towels to blot stain away.
Chemical cleaner can be used prior to
steam treatment.
WALLS, CEILING
S
Painted, Wood Paneling, Wallpaper Low - Medium
Painted, wood paneling, wallpaper walls
are heat sensitive. Always test small area
first and be careful not to over heat finish.
Use Floor Cleaning head with micro fiber
cover or clothes steamer with cotton cover.
Use nylon brush for corners and stains.
hgiHlavomeR repapllaW
Nylon Brush, Jet Nozzle,
Extension Tubes + Smooth
Surface Tool + Scraper
Use at full power to soften glue and
remove wallpaper. Wallpaper stripper can
be applied first.
hgiH- muideMstneV riA
Nylon Brush, Jet Nozzle,
Extension Tubes, Cotton
Towel
Clean using brush and jet tip. Wipe down
with clean cotton towel.
UPHOLSTERY / SPOT TREATMENT
Vinyl, Synthetic, Cotton Medium - High
Nylon Brush, Jet Nozzle,
Clothes Steamer, Cotton
Cover
,
Cotton Towel
Test a small area first. Some synthetic
materials will not handle high heat. Use
n
y
lon brush with soft pressure for larger
stains and jet tip for small stains. Blot with
cotton towel. Use clothes steamer with cotton
cloth to go over all surfaces to deoterize.
woLrehtaeL
Clothes Steamer, Cotton
Cover, Cotton Towel
Test a small area first. Steam over stained
area and then blot with cotton towel. Use
clothes steamer with cotton cloth to go
over all surfaces to deoterize.
CARPETS / DEOTERIZE + KILL BEDBUGS - DUST MITES AND ALLERGENS
Wall To Wall, Rugs High
Floor Cleaning Head +
Extension tubes + Micro
Fiber + Jet Nozzle
Vacuum area first then steam using floor
cleaning head with micro fiber cover. Pass
slowley over area to allow heat to kill pests.
Use jet nozzle for corners and cracks.
Floor Cleaning Head +
Extension tubes + Micro
Fiber + Nylon Brush +
Clothes / Fabric tool
with cotton cover.
UPHOLSTERY / KILL BEDBUGS - DUST MITES AND ALLERGENS
Vinyl, Synthetic, Cotton Medium - High
Jet Nozzle, Clothes
Steamer, Cotton Cover
Test a small area first. Some synthetic
materials will not handle high heat. Use
clothes steamer with cotton cover and
slowley pass over area to allow heat to
kill pests. Use jet nozzle for cracks and
corners.
TIPS
GO TO VAPAMORE.COM TO SEE THE MR-750 OTTIMO INSTRUCTIONAL VIDEO
APPLICATIO
N
STEAM VOLUME
ATTACHMEN
T
TECHNIQUE
WINDOW BLINDS
Levolor, Venetian, Horizontal, Vertical Low-Medium
Nylon Brush, Jet Nozzle,
Detail Nozzle, Extension
Tubes, Cotton Towel
Dust area first. Thin plastic blinds may not
be able to handle heat from the steam.
Test a small area first. Use jet or detail
nozzle from 4'' away. Wipe off with cotton
towel.
GLASS
muideMsrorriM ,swodniW
Smooth Surface Squeegee,
Extension Tubes, Nylon
Brush, Paper Towels
Pre-steam glass from 6'' away to heat
glass. Use brush for edges and bases.
Finish with window cleaner squeegee. Do
not use if temperature is under 32 degrees
to prevent cracking.
Window Screens, Window Frames Medium -High
Detail Nozzle, Nylon Brush,
Extension Tubes
Steam area with detail nozzle. Use brush
for edges and corners.
KITCHENS
hgiH - muideMsnevO ,spoT evotS
Nylon Brush, Brass Brush,
Extension Tubes, Paper
towels
Use nylon brush over all surfaces and
brass brush for interior oven grates. Wipe
down with paper towels
muideMsecnailppA llamS
Nylon Brush, Detail Nozzle,
Paper towels
Use brush over all areas and detail nozzle
for small corners and seems. Wipe down
with paper towels.
Sinks, Faucets, Drains Medium - High
Nylon Brush, Detail Nozzle,
Paper towels
Use brush over all areas and detail nozzle
for small corners and seems. Wipe down
with paper towels.
Counter Tops Low- Medium
Smooth Surface Sqeegee,
Nylon Brush, Detail Nozzle,
Paper towels
Use brush over all areas and detail nozzle
for small corners and seems. Use smooth
surace squeege to sanitize counter tops
by slowly passing over area then wipe area
with paper towel for chemical free cleaning.
BATHROOM
hgiH - muideMtuorG ,eliT
Floor Cleaning Head +
Micro Fiber + Extension
Tubes + Grout Brush + Jet
Nozzle
Sweep or vacuum first. Steam mop with
floor cleaning head, heavy stains use
without cotton cover. Corners and
baseboards with nylon brush. Grout lines
use grout brush and / or jet nozzle .Finish
with floor cleaning head with micro fiber.
Porcelain Toilets, Chrome Fixtures Medium - High
Nylon Brush, Detail Nozzle,
Paper towels
Use brush over all areas and detail nozzle
for small corners, hinges, and seems. Wipe
down with paper towels.
Shower, Tubs, Doors Medium
Nylon Brush, Detail Nozzle,
Extension Tubes, Paper
towels
Use brush over all areas and detail nozzle
for small corners and seems. Wipe down
with paper towels.
AUTO, MOTORCYCLE, MARINE
hgiH - muideMsaerA roiretnI
Nylon Brush, Jet Nozzle,
Clothes Steamer, Cotton
Cover, Cotton Towel
Test a small area first. Some synthetic
materials will not handle high heat. Use
nylon brush with soft pressure for larger
stains and jet tip for small stains. Blot with
cotton towel.
Detailing, Exterior, Engine Medium - High
Nylon Brush, Detail Nozzle,
Jet Nozzle
Use brush over all areas and detail nozzle
for small detail areas.
NEED HELP?
Visit www.vapamore.com to see video demonstrations and tips along with full details
or simply call us at 480-951-8900 or E-mail us at info@vapamore.com
WE ARE HERE TO HELP...
(NOTE: HARD WATER AND CALCIUM STAINS CAN ONLY BE REMOVED WITH CHEMICALS.

Coverage:
1: Lifetime parts and labor on the boiler, heating element and all internal electronics.
The Vapamore MR-750 Ottimo Steam Cleaner boiler tank, heating element and all internal
electronic parts are lifetime warranted to be free from defects in material and workmanship when
utilized by the original purchaser only. This warranty does not cover damage due to hard water
calcium or mineral build up on internal parts including but not limited to the boiler, heating element,
solenoid, pump, internal valves and fittings.
2: One (1) year parts and labor on accessories and housing.
The Vapamore MR-750 Ottimo Steam Cleaner accessories and housing are warranted to be free
from defects in material and workmanship for a period of one (1) year from the date of purchase when
utilized by the original purchaser only. This does not include replacement of items due to wear
including but not limited to the Floor Brush, Nylon Brush, Grout Brush, Metal Brush, Jet tip, Clothes
Steamer Cotton Cover, Floor Brush Cotton / Micro Fiber Cover.
For this warranty to apply the original purchaser must return the warranty registration form (included
in the original packaging or available online at vapamore.com) along with a copy of the original
purchase receipt to Vapamore 7343 E. Adobe Drive Suite 140, Scottsdale, AZ 85255 within
15 days from the original purchase date.
Should any defect covered by the terms of this lifetime limited warranty be discovered, Vapamore
will repair or replace any defective part provided the unit is returned by the original purchaser listed
on the warranty form on file.
The liability under this warranty is limited solely to the cost of the replacement parts or the complete
unit at the discretion of Vapamore. This warranty is void if damage is resulting from accident, misuse,
improper operation, unauthorized repair or alteration, tampering, substance other than clean water
used in the boiler tank, hard water calcium or mineral build up, or damages accuring in transit. This
warranty does not cover any shipping fees to or from our facility.
This warranty is extended to the original purchaser only and excludes all other legal and / or
conventional warranties. The responsibility of Vapamore, if any, is limited to the specific obligations
expressly assumed by it under the terms of the lifetime limited warranty. In no event is Vapamore
liable for incidental or consequential damages of any kind whatsoever.
Customer is responsible for all shipping fees to and from our facility. Carefully pack returning items for
repair to avoid damage in transit. Main water tank must be empty of all water before shipping. Failure
to do so will void this warranty. Be sure to include in the box all your contact information including
name, phone number, e-mail address and shipping address along with a prepaid return ship tag from
UPS or Fed Ex. Vapamore does not ship and will not accept items sent via USPS. Contact
Vapamore at 480-951-8900 or e-mail customersupport@vapamore.com for making arrangements to
return items for repair or service. Vapamore is not responsible for any shipping cost to or from our
facility.
Lifetime Limited Warranty for the
Vapamore MR-750 Ottimo Steam Cleaner
(Overview and terms of the Limited Lifetime Warranty)
Vapamore
tel. 480-951-8900 / fax. 480-951-8902
www.vapamore.com
R
Vapamore
7343 East Adobe Drive, Suite 140
Scottsdale, AZ 85255
 Loading...