

Page 1
Page 2

Package Contents:
NexStar MX – Dual 3.5” SATA HDD Enclosure
1
NexStar MX Dual Bay HDD Enclosure
2
Power Adapter
3
Arcsoft Totalmedia Backup™ Software
4
USB Cable
5
1394a Cable
6
1394b Cable
7
Enclosure Stand
8
Installation Screws
9
User’s Manual
1
3
Arcsoft Totalmedia
Backup™ Software
2
4
5
7
8
9
U SE R ’ S M AN U AL
TRADEMARKS
MS-DOS,Microsoft, Windows NT/2000/ME/XP/Vista are trademarks of Microsoft Corporation.
Apple, Macintosh and Mac are trademarks of Apple Computer
*All other third-party brands and names are the property of their respective owners.
6
Page 3

Table of Contents:
1. Introduction ............................................................................................................... 02
2. Features/Specifications
NexStar MX – Dual 3.5” SATA HDD Enclosure ...............................................................03
3. System Requirements ......................................................................................04
4. Interface Information
NexStar MX – Dual 3.5” SATA HDD Enclosure ............................................................... 05
5. Installation .................................................................................................................. 06
6. Driver Installation
NexStar MX – Dual 3.5” SATA HDD Enclosure ............................................................... 10
7. Creating A New Partition/ Formatting The Hard Drive
FOR Windows Me/ 2000/ XP/ Vista Users ..........................................................................11
7.1 Individual Mode ......... ...................................................................................................12
7.2 JBOD Mode .................................................................................................................... ..12
7.3 RAID 0 Mode ...................................................................................................................12
FOR Mac OS Users ................................................................................................................15
8. RAID Mode Selection
8.1 Individual Mode .............................................................................................................18
8.2 JBOD Mode .....................................................................................................................19
8.3 RAID 0 ............................................................................................................................. ..20
9. Disconnecting The NexStar MX DUAL ...............................................21
10. Troubleshooting/ FAQ/ Warranty...........................................................22
11. Contact ...........................................................................................................................24
Table of Contents
1
Page 4
1. Introduction:
Vantec N exSt ar M X Du al B ay E xter nal HDD
Enclosure now in the F ir eWir e 800/ 40 0 and
USB 2.0 interface is a quick and si mp le way
to expand storage capacity to your computer.
It comes without the hassle of diving inside
the PC and messing with all those wires, cables
and connections. It provides maximum storage
with the increased capacity of two spanning hard
drives for your precious family photos, music,
video, and games. It supports Individual, JBOD,
RAID 0 modes for effective storage management.
The sturdy drive cage protects your hard drive
while the aluminum case effectively draws away
the heat; the front vents and the rear fan keep
your hard drive(s) cool and improve performance.
The Vantec NexStar MX is a high performance,
high capacity, and durable portable storage
solution and lets you store your personal data
in an enclosure with style!
NST-400MX-UFB
Introduction
2
Page 5

2. Features/Specifications:
NexStar MX – Dual 3.5” SATA HDD Enclosure :
Features:
• Supports Dual SATA I/II Hard Drives Up to 2.0 TB of Storage
• USB 2.0 External Interface Allows You to Transfer Data Up to 480 Mbps
• FireWire 400 (1394a) External Interface Allows You to Transfer Data Up to 400Mbps
• FireWire 800 (1394b) External Interface Allows You to Transfer Data Up to 800Mbps
• Front Ventilation and Rear Fan for Better Air Circulation and Cooling
• Stylish Aluminum Case to Draw Away the Heat
• Support 3 Different Configuration Modes: Individual / JBOD / RAID 0
• Simple Plug & Play Connection; Does Not Require Drivers
• Arcsoft Totalmedia Backup™, Archive Photos, Music, Video and Data with Three Easy Clicks
Specifications:
• Model: NST-400MX-UFB
• Device Support: 3.5” SATA I/II Hard Drive (2)
• Internal Interface: Serial ATA
• External Interface: USB 2.0 / 1394a /1394b
• HD Capacity: Up to 2TB
• Transfer Rate: USB 2.0 (Up to 480Mbps)
FireWire400 (Up to 400Mbps)
FireWire800 (Up to 800Mbps)
• Material: Plastic and Aluminum Alloy
• Dimensions: 197x123x72mm
Power connection
USB 2.0 port
Power switch
1394a
IE E E
1394b
FireWire 400 (1394a) Port
FireWire 800 (1394b) Port
Fan
USB Port
Connect to a computer directly using a USB cable.
FireWire800/400 Port
Connect to a computer directly using a
FireWire800/400 Port cable.
Fan
Automatic fan to keep the hard drives cool.
Features/ Specifications
3
Page 6

3. System Requirements:
Intel Pentium II 266 MHz-compatible
Microsoft Windows 2000/2003/XP/Vista.
1. USB port, FireWire 400(1394a) port,
or FireWire 800 (1394b) port.
2. For USB 2.0 speeds, the system must
support USB 2.0 specifications.
3.For FireWire 800(1394b) speeds, the
system must support 1394b specifications.
4. For FireWire 400(1394a) speeds, the
system must support 1394a specifications.
5. CD Rom drive (if drivers are needed)
6. 64MB RAM or higher.
Mac PowerPC or Intel Core Duo processor
& greater.Mac OS 9.x & greater.
(PowerPC processor) / Mac OS 10.4 &
greater.(Intel Core Duo processor)
1. USB port, FireWire 400(1394a) port,
or FireWire 800 (1394b) port.
2. For USB 2.0 speeds, the system must
support USB 2.0 specifications.
3.For FireWire 800(1394b) speeds, the
system must support 1394b specifications.
4. For FireWire 400(1394a) speeds, the
system must support 1394a specifications.
5. CD Rom drive (if drivers are needed)
6. 64MB RAM or higher.
System Requirements
4
Page 7
4. Interface Information:
NexStar MX – Dual 3.5” SATA HDD Enclosure
Aluminum H ousing
Jumper Swi tch
SATA/Power connector
Har d Drive Caddy
Interface Information
5
Page 8

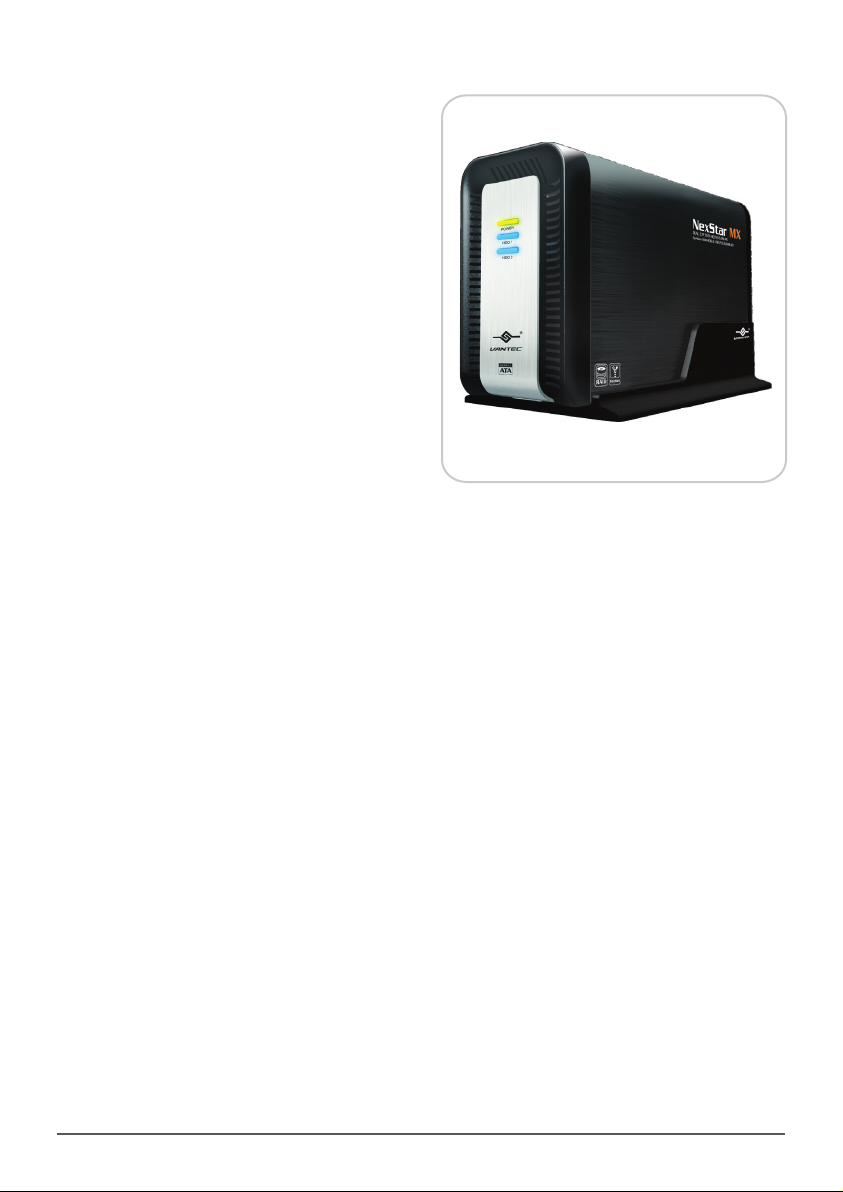
5. Installation:
NexStar MX – Dual 3.5” SATA HDD Enclosure
5.1. Installing two hard drives
into the NexStar MX Dual:
(1) Release the four screws then pull out the rear
panel and tray of the NexStar MX Dual ( Figure 5-A )
(2) Select Operation Mode by switching jumper.
( Figure 5-B )
( Figure 5-A )
Installation
6
Jumper Switch
( Figure 5-B )
1
2
3
Page 9

(3) Slide the first HDD into the drive caddy then
insert the HDD into the SATA connector.
( Figure 5-C )
(4) Slide the second HDD into the drive caddy
then insert the HDD into the SATA connector.
( Figure 5-D )
( Figure 5-C )
( Figure 5-D )
5) Secure the hard drives onto the drive caddy
with the provided screws on both sides in order
to secure the hard drive and the drive caddy.
( Figure 5-E )
Installation
( Figure 5-E )
7
Page 10

(6) Insert the drive caddy back into the aluminum
IE E E
1394a
1394b
housing. Be sure to align and secure with the
provided screws. ( Figure 5-F )
(7) Plug in the power cable along with the necessary
connections to your computer then switch the
power button to power on.( Figure 5-G )
( Figure 5-F )
or
or
POW ER
( Figure 5-G )
Installation
8
Page 11

Connecting the NexStar MX Dual to your computer:
(1) Connect the Type B USB connector to the NexStar MX
Dual and the Type A USB connector to an available
USB 1.1/2.0 port on your system.
(2) Connect the power cable to the NexStar MX Dual
and plug the cable into an available outlet.
(3) Turn on the NexStar MX Dual via the power switch.
(4) Your operating system should detect the NexStar MX
Dual and automatically install the necessary drivers
( if you have Windows 98SE/ MacOS 8.6, you will
need to install drivers). Once your operating system
finishes setting up the NexStar MX Dual, it will
detect your hard drive. On Mac OS systems, the
new volume should appear on the desktop. On a
Windows PC, the new volume will appear under
My Computer.
(5) Your NexStar MX Dual External Hard Drive is now
ready for use.
NOTE :
For new hard drives, you will need to initialize and
partition your hard drive before it will appear in
Windows Explorer or on your Mac desktop. Please
refer to your hard drive manufacturer’s documentation
or read the “Creating a New Partition” section of this
manual.
Installation
9
Page 12

6. Driver Installation:
NexStar MX – Dual 3.5” SATA HDD Enclosure
Win dows 2000/ 2003/ XP/ Vista:
(1) No drivers are necessary when using
Windows ME/ XP/ 2000/ Vista.
If the hard drive does not appear
under My Computer, be sure to partition
your hard drive.
Mac OS 9.0 or later :
1) No drivers are necessary when using Mac
as 9.0 or later. If the hard drive does not
appear on the desktop, be sure to partition
your hard drive.
Driver Installation
10
Page 13

7. Creating a New Partition /
Formatting The Hard Drive:
FOR Windows 2000/2003/ XP/ Vista Users :
STEP1: Right-click on “My Computer” icon and
select the "Manage” column. ( Figure 7-A )
NOTE :
The best way to partition the new hard drive is using the
supplier’s software. Please download the software from
supplier’s website. If the software doesn’t exist, please try
the following way.
The system below Mac OS 9. please check the documents of
the hard disk. There is information about partition the disk.
( Figure 7-A )
WARNING :
Doing the following will erase any existing data on
the drive. If the drive is damaged and you wish to
recover the data, continuing may overwrite the existing
information!
Creating a New Partition / Formatting The Hard Drive
11
Page 14

STEP2 : Select “Disk Management” and you will see
your hard drives show “Unallocated”.
Sample:750GB & 250GB hard drives.
Individual Mode
:
Th is mod e c an sho w each ha rd dis k a s
individual device. ( Figure 7-B )
JBOD Mode :
JBOD MO DE can integrate two different
brands of hard drives with different capacity
to become a larger format hard drive. ( Figure 7-C )
RAID 0 Mode :
Raid 0 Mo de can integrat e two differe nt
brands of hard drives with different capacity
to a larger format hard drive.
>Two hard drives of the same capacity: the total
capacity is the sum of the two hard drives.
>Two hard drives of the different capacity: the
total capacity is the twice volume of the smaller
hard drive.( Figure 7- D )
Figure 7-B )
(
Figure 7-C )
(
Figure 7-D )
(
Creating a New Partition / Formatting The Hard Drive
12
Page 15

STEP3: Right-click the red-squared block and
select "Initialize Disk”.
Take JBOD Mode for example. (one 750GB
HDD & one 250GB hard drives) ( Figure 7-E )
STEP4: Press “OK” button to initialize hard drive.
( Figure 7-F)
( Figure 7-E )
STEP5: The hard drive will show “Online”.
Right-click the “Unallocated” block and
selects “New Partition”. ( Figure 7-G )
( Figure 7-F )
( Figure 7-G )
Creating a New Partition / Formatting The Hard Drive
13
Page 16

STEP6: The “New Partition W iz ard” will appea r.
Please follow the instruction of the wizard to
complete the partition. ( Figure 7-H )
STEP7: When new partition is completed, the hard
drive will be recognized as a “New Volume”.
( Figure 7-I )
( Figure 7-H )
STEP8: Format the other hard drive in the same way.
( Figure 7-J )
Creating a New Partition / Formatting The Hard Drive
( Figure 7-I )
( Figure 7-J )
14
Page 17

FOR Mac Users :
STEP1: When you connect the NexStar MX Dual to a
Mac with a new hard drive, the dialog "Disk
Insertion" will appear. Please select "Initialize".
(A formatted HDD will not display this dialog)
(Figure 7-K)
STEP2: Select whic h HDD you want to erase.
Individual Mode :
Th is mod e c an sho w each ha rd dis k a s
individual device.
( Figure 7-L )
( Figure 7-K )
( Figure 7-L )
JBOD Mode :
JBOD MO DE can integrate two different
brands of hard drives with different capacity
to a larger format hard drive. ( Figure 7-M )
Creating a New Partition / Formatting The Hard Drive
( Figure 7-M )
15
Page 18

RAID 0 Mode :
Raid 0 Mo de can integrat e two differe nt
brands of hard drives with different capacity
to a larger format hard drive.
>Two hard drives of the same capacity: the total
capacity is the sum of the two hard drives.
>Two hard drives of the different capacity: the
total capacity is the twice volume of the smaller
hard drive.( Figure 7- N )
STEP3: Click “Erase” at the upper right side. Select
which kind of format from Volume Format.
Please input the name you wish to name your
new Volume. Click “Erase” at lower right side.
( Figure 7-O )
( Figure 7-N )
( Figure 7-O )
STEP4: After you hit "Enter", the dialog "Erase Disk"
will appear. Please click "Erase" to begin
formatting your hard drive. ( Figure 7-P )
WARNING :
Al l data wil l be e ra sed after the format
Creating a New Partition / Formatting The Hard Drive
( Figure 7-P )
16
Page 19

Select how you want to use your new Volume
or click “Cancel” if you want to use default
settings. ( Figure 7-Q )
( Figure 7-Q )
Creating a New Partition / Formatting The Hard Drive
17
Page 20

Vo lum e A
D rive A
D rive B
Vo lum e B
Vo lum e A
Vo lum e B
NS T-4 00 MX -S R
Po rt 0 P or t 1
D rive B
D rive A
Po rt 0 P or t 1
8. RAID Mode Selection
Jumper Sel ection & Stora ge Policy Definitio ns
Individual Mode:
Th is mod e c an sho w each ha rd dis k a s
individual device. ( Figure 8-A ), ( Figure 8-B )
Individual Mode
1
2
3
( Figure 8-A )
NS T-4 00M X-S R
U neq ua l h ard dr ive sEq ua l h ard dr ive s
( Figure 8-B )
RAID Mode Selection
18
Page 21

JBOD Mode:
Dr ive A
25 0G B
JB O D
500GB
Dr ive A
25 0G B
Dr ive A
25 0G B
Dr ive A
75 0G B
JB O D
This mode combines a series of physical hard drives as a
single large volume; resulting in a seamless expansion
of virtual volumes beyond the physical limitations
of singularly connected hard drives. Hard drive A
and B are combined into a single virtual volume in
the figure below with a s torage capacity that i s
equal to the sum of each of the physical hard drives
A and B. It is also possible to create a JBOD volume
using on ly a single hard disk d rive connected to
Port 0, and then increase the storage capacity of the
volume later by adding another hard disk drive to
Port 1 and pressing reset button. The new disk blocks
of Port 1 will be combined to the end of the disk
blocks of Port 0, and any data that is stored on the
existing JBOD volume will be preserved. However,
it is not possible to expand an existing JBOD volume
by adding another hard disk drive to Port 0 and still
preserve any existing data on that volume.
( Figure 8-C ), ( Figure 8-D )
JBOD Mode
1
2
3
( Figure 8-C )
NS T-4 00 MX -S R
Po rt 0 P or t 1
Eq ua l h ard dr ive s
NS T- 400M X-SR
Po rt 0 P ort 1
U neq ua l h ard dr ive s
( Figure 8-D )
RAID Mode Selection
19
Page 22

RAID 0:
Dr ive A
25 0G B
Raid 0
500 GB
Dr ive B
25 0G B
Dr ive A
25 0G B
Dr ive A
75 0G B
Raid 0
This mode is a combination of two physical partitions,
where the data is striped between them. It presents the
best data speed but no data redundancy.
Two equal hard drives:
The capacity is equal to the sum of both hard drives.
Two unequal hard drives:
The capacity is double of the smaller hard drives.
( Figure 8-E ), ( Figure 8-F )
JBOD Mode
1
2
3
( Figure 8-E )
NS T-4 00 MX -S R
Po rt 0 P or t 1
Eq ual har d dr ives Une qua l har d dr ives
Str ipin g ac ross
NS T- 400M X-SR
Po rt 0 P ort 1
Str ipin g ac ross
( Figure 8-F )
RAID Mode Selection
20
Page 23

9. Disconnecting The NexStar MX DUAL
NexStar MX – Dual 3.5” SATA HDD Enclosure
Windows 2000/ 2003/ XP /Vista:
1) Make sure all operation using the hard
drive within the NexStar MX Dual has ceased.
2) Close any windows and programs pertaining
to the NexStar MX Dual.
3) If connected by USB, double click the green
"Unplug or Eject Hardware" icon in the system
tray and select [Safely Remove Hardware ].
Select the device you wish to remove and click
on [Stop].The system should prompt, "lt is now
safe to remove the USB device”. If not, wait for
any programs still using the device to finish
and try again.
4) Turn off the NexStar MX Dual.
5) Unplug the USB cable from the system.
Mac OS:
1) Make sure all operation using the hard drive
within the NexStar MX Dual has ceased.
2) Close any windows and programs pertaining
to the NexStar MX Dual.
3) From the Desktop, drag the NexStar MX
Dual hard drive to the trash.
4) Turn off the NexStar MX Dual.
5) Unplug the USB cable from the system.
WARNING :
NEVER remove the NexStar MX Dual while the hard
drive is in use. Doing so may corrupt the data on the
hard drive or damage the hard drive, NexStar MX
Dual, or computer.
Disconnecting The NexStar MX DUAL
21
Page 24

10. Troubleshooting/ FAQ/ Warranty :
NexStar MX – Dual 3.5” SATA HDD Enclosure
1. My computer recognizes the NexStar MX
Dual, but it does not assign a drive letter
to it ?
2. My computer sometimes recognizes the
NexStar MX Dual, but sometimes gives me
errors?
3. Why is the data on my hard drive corrupted ?
A: You are probably using a brand new hard drive. If
not, then your computer may not be able to recognize
the partition on the hard drive because it is damaged
or not a valid format. Pl ease refer to the section
"Creating a New Partition" for information on how
to create a useable partition on your drive.
A: If your computer is giving you problems with the
NexStar MX Dual, be sure to connect the USB cable
to a rear port, directly off the motherboard or USB
PCI card. The cables connecting front USB ports are
not always properly shielded and cannot properly
handle USB 2.0 speeds, thereby corrupting the signal
between the NexStar MX Dual and the computer.
A: Connecting your hard drive to the NexStar MX Dual
is just like connecting a hard drive to the inside of your
computer. The NexStar MX Dual itself will not corrupt
your data. If your data has become corrupt, it is likely
caused by the removal of the NexStar MX Dual while
data was still being written to the hard drive.
CAUTION: Never remove the NexStar MX Dual while
data is being written to the hard drive! Doing so may
cause the hard drive to become corrupt. Make sure
all applications being run off the disk and all files in
use are no longer in use before removing the unit.
4. Why is my computer not showing the full
size of my hard drive ?
Troubleshooting / FAQ / Warranty
A: If you are using Windows 98SE, please refer to
Microsoft's Windows 98 Support Center and download
the large capacity drive patch. Else, verify that your
motherboard supports large capacity drives. Some
older motherboards cannot use drives larger than
137 GB. If Windows XP/2000 will not let you create
a partition larger than 32GB, make sure you are using
the NTFS file system, as Windows XP/2000 limits FAT32
partitions to only 32GB.
22
Page 25

5. Why can't Windows 98SE read my hard drive ?
It works with Windows XP /2000 ?
A: Windows 98SE cannot recognize the NTFS file system.
If you wish to use the device with Windows XP/2000
and Windows 98SE, you need to format the drive as
FAT32
6. Why can't I copy files larger than 4GB onto
my NexStar MX Dual ?
WARNING :
The NexStar MX Dual comes with a 1 year limited
warranty (90 day parts). If your unit should become
def ective within that time frame , ple ase g o to
htt p:// www.vantecusa.com for information on
ho w to rec eive warr anty excha nge or rep air.
Cosmetic defects and missing parts are not covered
und er this warranty. P le ase check the contents
of the unit to make sure you re ceive d all parts.
Als o, check for any co smeti c fla ws. If any parts
are missing or if there are cosmetic defects, please
con tact the retailer from w hich you pur chase d
the unit immediately and ask for a replacement.
A: You have probably formatted the hard drive in the
FAT32 file system. FAT32 limits the file sizes to 4GB
maximum. The NTFS file system does not have this
limitation.
Troubleshooting / FAQ / Warranty
23
Page 26

11. Contact :
Vantec Thermal Technologies
43951 Boscell Rd.
Fremont, CA 94538
tel: 510-668-0368
fax: 510-668-0367
website: www.vantecusa.com
Copyright © 2008 Vantec Thermal Technologies. All Right Reserved.
All Registered Trademarks Belong To Their Respective Companies.
Contact
24
 Loading...