

Page 1

Optimist Rigging Guide
Vanguard Sailboats
300 Highpoint Ave
Portsmouth, RI. 02871
www.teamvanguard.com
1.800.966.SAIL
BEFORE YOU BEGIN TO READ THE WIND.
BEFORE YOU BEGIN TO READ THE WATER.
BEGIN BY READING THIS RIGGING GUIDE.
Page 2
Useful knots to
know:
Figure 8 Knot or
Stopper Knot
Square Knot
Bowline
Cleat
Clove Hitch
Luggage Knot
C
ongratulations on the purchase of your new Vanguard Optimist!We suggest that you read
through this guide to better familiarize yourself with the parts and rigging of your new boat. If you
have any questions please contact your dealer or call Vanguard’s customer service at 1-800-966-SAIL.
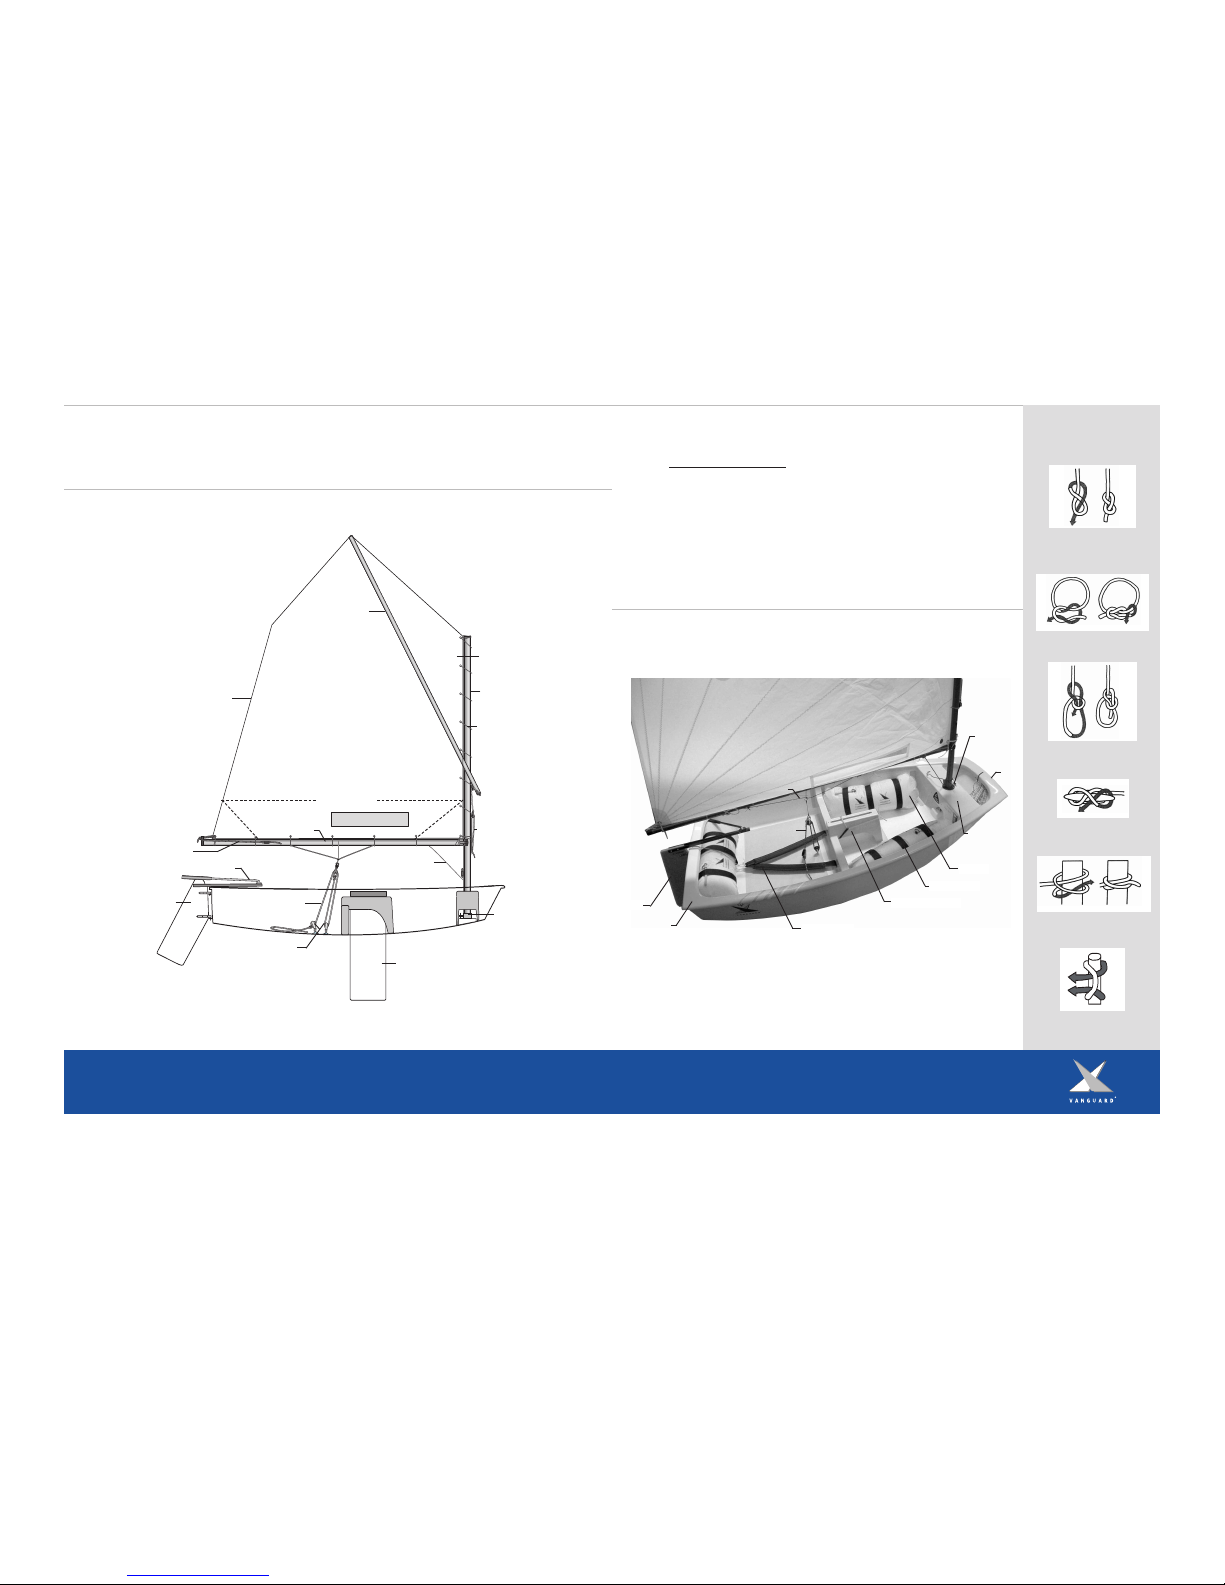
Nautical Terminology:
Port: Left side of the boat when looking forward
Starboard: Right side of the boat when looking forward
Gunwale: Upper edge of a boat’s side
Leeward: Direction away from the wind
Windward: Direction from which the wind is coming
Mast
Halyard
Sprit
Boom
Mast step
Tiller with Extension
Ru
dder
Daggerboard
Sail
L
uff
Leech
M
ainsheet
M
ain
sh
eet Blocks
T
ack
Foot of the Sail
Clew
Airbags
Rudder
Hiking Strap
Airbag straps
M
ainsheet
Mast Thwart
Daggerboard Trunk
M
ainsheet Bridle
Bow
Stern
Mast Collar
Head of the Sail
Sail Tie
Vang
Outhaul
Page 3

Your new Vanguard Optimist will come with three boxes. One box for the spar set, one for the blades and
one for the delivery kit containing the sail, block and lines. Use caution while opening the boxes as to
a
void damaging the contents. Be sure not to cut into the packaging inside of the box.
Locate th
e box containing the spars (Figure ).
Inside you will find :
1. Mast
2. Sprit
3. Boom
Be sure to remove all of the packaging (plastic, bubble wrap,
zip ties) before continuing to rig your Optimist. Use caution
when removing the zip ties so you do not to scratch the spars.
Locate the box labeled delivery kit (Figure 1).
In
side you will find:
1. Lin
e bag
2. USA Sail Letters
3. Hardware
4. Sail with sail bag an
d digital eight sail numbers
Locate the box containing the
blad
es (Fi
gure 4). Inside you will
find:
1. Tiller with extension
2. Rudder
3. Daggerboard
1. Locate the bag from the delivery kit
containing the mainsheet blocks. Remove
t
he mainsheet ratchet block, compression
spring, 1 carbo block and the shackle, pin
a
nd ring (Figure 5).
2
. There are two eyestraps located on the
cockpit floor, aft of the daggerboard thwart
(Figure 6). With the shackle pin and ring,
attach the carbo block to the forward most
e
yestrap (Figure 7).
3. Remove the shackle pin and ring from the
mainsheet ratchet block. Loop the shackle
beneath the aft eyestrap and place the
c
ompression spring over it (figure 8).
4
. While compressing the spring, place the
mainsheet ratchet block at the top of the
spring and align the hole in the bottom of
the block with the holes in the shackle.
Secure the ratchet block to the shackle with
the pin and ring (Figure 9).
Attaching the Mainsheet Blocks:
Pliers
Here is a list of tools that
we recommended you have
to assist you in
assembling your new
O
ptimist:
Utility Knife
Wren
ch
es
Screw Drivers
Electrical T
ape
4. Contents of bag # 3
1. Mi
cro bullet block
2. Carbo block with becket (2)
3. Shackle
, pin and ring
4. Compression spring
5. Mainsheet ratchet block
6. M
ainsheet snap shackle with
strap and ring
7. Daggerboard retainer strap
Attaching the Sail:
1. Retrieve the mast, boom, sail, corner ties
an
d sail ties.
2. A
ttach the boom jaw to the mast right
above the sprit halyard cleat (Figure 10).
When laying the mast and boom down, be
sure that the area is free of sharp objects
that could damage the sail.
3. Unwrap the sail. Lay the sail down over
the mast and boom, aligning the mast with
the luff of the sail and the boom with the
foot of the sail.
4. Locate the sail ties. Starting at the
mast, loop the ties around the mast and
through the grommet in the sail. Secure
with a squ
ar
e knot (figure 11). Tie the sail
ties tight enough that you can slip one
fin
g
er between th
e sail and the mast
(Fi
gur
e 12).
5. Locate th
e corn
er ties. Starting at the
top o
f th
e m
ast, lead one o
f the corner ties
through the top eyestrap then through the
top gr
ommet in the sail. Wrap the corner tie
ar
oun
d twice before securing with a square
knot (Figure 13). Repeat for lower eyestrap.
Figure 5
Figure 7 Figure 8
F
igure 6
Figure 9
Figure 10
Fi
gur
e 11
Fi
gur
e 12
Fi
gur
e 13
Fi
gure 2
Figure 1
Figure 4
Figure 3
1.
3
.
2.
4.
1. 3. 4. 6.
2.
5.
7.
1.
3.2.
3.
2.
1.
Mainsheet Block
Carbo block
Boom Jaw
Sprit H
alyard Cleat
Bow
S
tern
Page 4

6. Using two more corner ties, secure the tack of
the sail to the boom and the mast (Figure 14).
7. Be sure to adjust the corner ties in order to get
the red mark on the luff of the sail to fit between
the two blue stripes on the mast (Figure 15).
8. Continue tying the sail ties onto the boom. Tie
the sail ties tight enough that you can place two
f
ingers between the boom and the sail (Figure 16).
9. Tie off the last corner tie to the clew of the
s
ail.
Rigging the Outhaul:
1. Locate the outhaul line. Tie a stopper knot in one end. Lead the free end of the line through the port hole in the boom end cap
(Fi
gure 17).
2. Continue the line through the clew grommet and back through the open hole in the boom cap (Figure 18).
3. Lead the line forward along the starboard side of the boom and through the v-cleat (Figure 19). Cleat off and tie a stopper knot in the
end of the line.
Stepping the Mast:
1. Lift the mast with sail and boom
attached.
2. Align the mast butt over the mast collar.
Gen
tly slide the mast through the thwart and
into the metal mast step (figure 20).
3. Make sure that the sprit halyard cleat is
facing the bow while the cleat for the vang
cleat is facing the stern (Figure 21).
M
ast Tie-in:
1. Locate the mast tie-in line. The mast tie-in eyestrap is located on the thwart forward of the mast (Figure 22).
2
. Tie a luggage knot with the mast tie-in line around the eyestrap (Figure 22).
3. Lead the ends of the line around the mast. Cross the port line over the starboard line right above the vang cleat (Figure 23).
4
. Lead the two ends back around to the front of the mast and secure with a square knot (Figure 24).
Fi
gur
e 20
Fi
gur
e 21
Fi
gur
e 17
F
igure 22
F
igure 23
F
igure 24
F
igure 14
Figure 15
Figure 16
Fi
gur
e 18
Fi
gur
e 19
Boom Retainer:
1. Locate boom retaining line
from the line bag. Tie a stopper
knot in one end of the line.
Lead the line up through the
starboar
d hole in the boom jaw
(Figure 25).
2. Lead th
e free end of the line
around to the port side hole in
the boom jaw. Thread the line
d
own thr
ough th
e h
ole an
d
secure with a stopper knot
(Figur
e 26).
3. Located just above the boom
jaw, centered on the mast is the
m
ast r
etain
er peg (Fi
gure 27).
4. Twist the boom retainer line
until the line is taught when
placed over the peg (Figure 28).
Fi
gur
e 25
Figure 26
Fi
gure 27
Fi
gure 28
At
taching the Sail Continued:
R
ed sail line
L
ines on
the mast
Thwart
Mast Collar
Mast step
Sprit
Halyard
Cleat
Vang
Cleat
Bow
Mast Peg
Boom Jaw
Grommet
Eyestrap
Bow
Stern
Page 5

Attaching the Sprit:
R
igging the Sprit Halyard:
F
igure 39
Figure 42
1
. Locate the upper and lower sprit
halyard line from the line bag. Retrieve
t
he micro single block from the delivery
kit.
2
. Tie a bowline in one end of the upper
sprit halyard. Making sure to leave a
very small loop that can then be placed
onto the end of the sprit pole
(Figure 38).
3
. Run the free end of the line through
the micro single block that is attached to
the middle of the mast (Figure 39).
4
. Tie a bowline to the micro single
block with the free end of the upper sprit
halyard line (Figure 40).
5. With the lower sprit halyard line tie
a bowline to the top of the halyard cleat
located on the mast below the boom
connection (Figure 41).
6. Lead the line through the micro
single block and then back through the
cleat to secure (Figure 42).
7. Place a stopper kn
ot in the tail o
f the
lower halyard line.
The sprit has two differing ends. One end has a rubber sleeve covering a section of the aluminum. This end will attach to the sprit halyard
as the rubber is used to reduce the chafe against the mast.
1. Locate the sprit loop at the head of
the sail.
2. Place the sprit end without the
rubber sleeve in
to th
e loop in th
e h
ead
of the sail.
3. Place the opposite end of the sprit into
the small loop created by the bowline in the
upper sprit halyard. Pull on the lower sprit
halyard to raise the top of the sail.
As
sembling the Vang:
1. Locate the vang wire
a
ttached to the forward
b
oom button (Figure 29).
2. Retrieve the vang line
from the line bag. With a
b
owline, tie the vang line to
the thimble located at the
e
nd of the vang wire
(Figure 30).
3. Lead the vang line up
t
hrough the clam cleat
located on the mast just
above the thwart
(Figure 31).
4
. Cleat off. Tie a stopper
kn
ot in the end of the vang
line (Figure 32).
Optimist Safety
Here are a few safety products
t
hat we suggest you have to
keep you safe! Refer to the
Optimist class rules as most of
these items are required
for racing.
To keep water out of the boat,
have a bailer handy.
Don’t rely on the breeze,
have a paddle.
Make sure your bailer and
paddle are secured into the
boat and out of your way.
Always wear your lifejacket!
Completed Vang
Figure 29
F
igure 30
F
igure 31
Figure 32
Attaching the Painter:
1. Locate the bow loop and painter line from the line bag. Take the bow loop line and thread both ends
down through the small hole on the topside of the bow (Figure 33 & 34).
2. Tie off the two ends the bow loop with a square knot (Figure 35).
3. Pull up on th
e bow loop so that th
e square knot is snugly secured beneath the rail of the bow.
4. Wrap the painter line around the mast step, underneath the adjustor bolt, and secure it with a
bowline (Figure 36). Lead the line up through the bow loop (Figure 37). Place the remainder of the
painter in the bow of the boat.
Figure 33
Figure 34 Figure 35
Figure 36 Figure 37
Figure 38
Figure 41
Figure 40
Attached
M
icro Single
Block
Micro Single
Block
H
alyard
Cleat
Clam Cleat
Vang
Wire
T
himble
Rubber
Chafe Sleeve
Page 6

R
igging the Mainsheet Bridle:
1
. Locate the mainsheet snap shackle
with pennant from the delivery kit and
t
he mainsheet bridle line from the line
bag (Figure 43).
2
. Find the center of the mainsheet
bridle line and at the midpoint tie a
l
uggage knot onto the ring of the snap
shackle pennant (Figure 44).
3. Located on the topside of the boom
y
ou will find two boom buttons
(Figure 45). Take one end of the
m
ainsheet bridle line and lead it through
on
e of the boom buttons, around the
b
oom and secure with a bowline
(Figure 46). Repeat with the free end of
the line at the other boom button
(Figure 47), tying the line as tight as
p
ossible. Make sure the mainsheet
shackle is suspended evenly between the
two boom buttons (Figure 48) and that
the bridle runs beneath the outhaul line.
Figure 47
Figure 43 Figure 45Figure 44
Figure 48
1. Locate the mainsheet bridle safety
line from the line bag. The mainsheet
bridle safety is used to secure the
mainsheet bridle closer to the boom.
T
ak
e th
e safety lin
e an
d lead it around
the boom and through the ring of the
snap shackle pennant twice. Secure with
a squ
ar
e knot (Fi
gure 49).
Figure 46
Safety Issue: The mainsheet bridle
should not span from the boom further
than 100mm (~ 4”). A qui
ck gui
de
would be th
e width of three fingers
(Fi
gur
e 50). Refer to th
e Optimist class
rules f
or complete d
etails
www.usoda.or
g
Fi
gur
e 49
Fi
gur
e 50
Rigging the Mainsheet Bridle Safety:
Rigging the Mainsheet :
Fi
gur
e 52
1. Locate the carbo block with becket
fr
om th
e delivery kit. The hole located
in the center of the block is the beckett
(Figure 51).
2. Retrieve the mainsheet line from the
line bag. Lead one end of the mainsheet
through the becket (Figure 52) and
secure the end with a stopper knot
(Figure 53).
Boom Button
Fi
gur
e 51
Fi
gur
e 53
R
igging the Mainsheet Continued :
3. Lead the mainsheet from the beckett down to the
forward mainsheet block on the cockpit floor (Figure 54).
Lead the line back up through the carbo block (Figure 55).
C
ontinue the line down through the mainsheet ratchet block
(Figure 56).
N
ote: Make sure while pulling the mainsheet the block
makes a ratcheting noise. If the block does not make a
ratchet sound one of two things could be the problem. First
try running the mainsheet through the block the opposite
way. If this does not work, locate the lever on the
m
ainsheet block and switch it to the ratchet position.
Figure 54
Fi
gure 55
Safety: The mainsheet is connected to the bridle by a snap
shackle configuration. The snap shackle is provided as a
safety device that can quickly be disconnected by pulling on
the shackle pin to release the shackle open (Figure 57 &
58). Press the bottom of the shackle back over the pin to
close.
Figure 56
F
igure 57
Rigging the Rudder:
1. Locate the rudder and tiller from the blade delivery box.
The tiller screws and washers should already be attached to
the tiller. Remove the screws. Align the two holes in the
tiller with the two holes in the top of the rudder
(Figure 59). Make sure that the tiller extension faces
upward (Figure 60).
2. Place one washer over each hole and insert the screw
(Figure 61). On the opposite side place one washer over
each screw. Using pliers or a crescent wrench, secure the
n
ylon lock nuts over the screws (Figure 62). The lock nuts
sh
ould be ti
gh
tened so that the tiller is snug. Do not over
tighten!
3. Align the pintles on the rudder over the holes in the
gu
d
geons on the boat (Figure 63). Press down making sure
the pintles are locked in place (Figure 64).
4. To remove the rudder, press in the retaining clip while
pulling straight up on the rudder (Figure 65). Once the
upper pintle clears the retaining clip the rudder will be
released.
Figure 59 Figure 60
Fi
gur
e 63
Fi
gur
e 64
Fi
gur
e 65
Pintle
Gu
d
g
eon
The rudder in the picture is only to depict what the rudder
attached looks like. Do not attach the rudder to the boat
until the boat is in deep enough water.
Beck
et
Figure 61
Fi
gure 62
Figure 58
Outhaul Line
Mainsheet Bridle
Mainsheet Carbo Block
Max 4”
Ru
dder
Retaining
Clip
Page 7

1. Locate the daggerboard strap, shockcord and
plastic tubing from the line bag (Figure 66). Place
o
ne end of the shockcord into the tubing and slide to
the center of the shockcord (Figure 67).
2. Locate the two holes in the mast thwart
(Figure 68). Take one end of the shockcord and
t
hread it into the starboard hole (figure 69). Tie a
stopper knot in the shockcord on the backside of the
thwart (Figure 70). Make sure that the knot is secure
so that when the shockcord is extended the knot does
not slip loose.
3. Slide the free end of the shockcord into one end
of the daggerboard strap (Figure 71 & 72).
4. Lead the daggerboard strap around the backside of
the daggerboard trunk between the space created by
the daggerboard trunk and cockpit floor (Figure 73).
5. Continue the free end of the shockcord through
the other side of the daggerboard strap. Lead the
shockcord back up to the mast thwart and secure the
fr
ee end in the port hole. Again make sure that the
kn
ot is tigh
t so that it will not r
elease while under
load.
6. Retrieve the daggerboard from the delivery kit.
Locate the hole in the handle of the Daggerboard.
This side should face towards the bow.
Figure 66 Figure 67
Figure 68 Figure 69
Figure 70 Figure 71
Figure 72 Figure 73
N
ote: Do n
ot place the d
agg
erboar
d into the
d
aggerboard slot while th
e boat is on lan
d
. Doin
g
such will damage the bottom of the board. Only
place th
e d
aggerboard into the trunk when the boat
is in th
e water
. Th
e d
agg
erboard should be lowered
gradually as you sail into deeper water.
R
igging the DaggerboardRetainers:
R
igging the DaggerboardRetainers:
7. When the daggerboard is inserted into the trunk,
take the shockcord with the plastic tubbing and bring
it to the aft edge of the board (Figure 74). As the
d
aggerboard is lifted the compression of the
shockcord against the aft edge will keep the board in
the desired lifted position without the board slipping
back into the trunk.
Figure 74
Complete Retaining System
N
ote: Make sure that the plastic tubing is against the
aft edge of the board. Without the plastic tubing the
s
hockcord will wear out faster due to the friction on
the sharp edge of the board.
Figure 76 Figure 77
Attaching the Hiking Strap Lifter:
1. Locate the hikin
g strap lifter shockcord from the line bag.
2. Tak
e on
e en
d o
f th
e hiking strap
shockcord and lead it through the
h
ole located in the stern rail of the
boat.
3. Tie a stopper kn
ot in th
e en
d o
f
the shockcord that will rest beneath
the r
ail of the boat.
4. Draw th
e lin
e over th
e airbag an
d secur
e to the
hiking strap. It is suggested to place a wrap of
electrical tape around the knot to prevent the knot
fr
om slippin
g.
D
aggerboard Retainer
Holes
Cockpit Floor
Aft Edge of
Daggerboard Trunk
Figure 75
Option: The daggerboard shockcord ends can be led
to the eyestrap on the front of the daggerboard trunk
in
s
tead of the holes in the mast thwart. By doing
this it allows for the front of the cockpit to remain
c
lear (Figure 75).
8. Retrieve the daggerboard safety line from the line
bag. Tie with a bowline one end of the line to the
eyestrap located on the front side of the daggerboard
trunk (Figure 76).
9. Lead the free end of the line up to the
d
aggerboard handle. Thread the line through the hole
at th
e front of the daggerboard. Secure with a
bowline (Figure 77).
Page 8

Owner Information
Hull Identification Number: OQT__ __ __ __ __ __ __ __
Purchased From: Date of Purchase:
Contact Name: Phone #:
Address:
City: State: Zip Code:
Hull Color: Sail #:
Registration Information (if applicable)
Trailer VIN #:
License Plate Number: Licensing State:
Registr
ation Number: State of Registration:
Insurance Information:
Maintenance
It is important to take proper care of your sail in order for it to last longer and perform to the standard
t
hat they were designed for. Follow these simple tips to help extend the life of your sail.
1. If you are sailing in salt water, be sure to rinse out your sail with fresh water after every use.
D
acron sails do not absorb water or salt but the salt will dry on the sail making them stiff. The salt in
h
umid weather can attract moisture that may lead to mildew on your sail.
2. To wash your sail, NEVER machine wash them. Doing so will damage the material as well as remove
the finish of the sail. If your sail becomes dirty, clean it with a mild dish detergent and rinse with fresh
water. Do not bleach or use other harsh chemicals on the sail for they can also ruin the finish,
decreasing the life of the sail. It is not recommended to store your sail wet, doing so is an invitation
for mildew to grow.
3. It is not recommended to dry your sail in the sun because other then when in use, over exposure of
UV rays will slowly break down the material of the sail. Be aware of the surface that you are drying your
sail on as asphalt and other parking lot surfaces are very abrasive to the sail material and may contain
chemicals (i. e. oil) that can damage the sail. Avoid unnecessary flapping of the sail for it will greatly
reduce the life of the sail.
4. Rolling your sail is highly recommended. Crumpling a sail will crack the finish of the material which
qui
ckly reduces the life of the sail. Purchasing a Optimist sail and spar bag is highly recommended and
are available through your local dealer.
5. M
ake sur
e to regularly inspect your sail for loose or torn stitching or small tears in the cloth. Have
any stitching or tears repaired by a local sailmaker before they become more of a problem.
Before
Launching:
* Wear your life jacket
*
Make sure that you
are wearing the
a
ppropriate clothing
for the conditions that
you are sailing in
* Be sure to check the
w
eather report before
going sailing
* Stay hydrated and
b
ring plenty of water
* Wear plenty of
s
unscreen
* M
ake sure that all
thr
ee air bags are fully
inflated
* Depending on the
depth of the water,
begin to slide the
daggerboard into the
trunk. Once you are in
deep enough water
lower completely
* H
ave Fun!
Fact or Fiction:
The original design of
the Optimist was
m
odeled after the
popular shape of the
classic soapbox racer?
Visit
www.teamvanguard.com
to submit your answer
to the Optimist “Fact
or Fiction” question
and register to be
entered into a raffle
drawing.
W
hen you approach shallow water, begin to pull up the daggerboard as much as possible without
obstructing the boom and remove the rudder. After hopping out of the boat, detach the mainsheet
shackle from the bridle. Remove the daggerboard and rudder and place it in the cockpit. It is
suggested to rinse your boat and sails with fresh water especially if you are sailing in salt water. It is
also suggested to allow the sail to dry before rolling. After drying, untie the mast retaining line and
release the lower sprit halyard. Remove the sprit. Untie the knot in the end of the vang line, remove
t
he line from the cleat. Untie one end of the boom jaw retainer and secure the free end around one of
the sail ties. Keeping the boom jaw retainer attached to the boom will help reduce the risk of losing the
line. Un-hook the boom from the mast. It is suggested to remove the sail from the mast and boom and
roll separately. A Optimist sail/spar bag is a convenient way to safely store your sail and spars.
It is also highly suggested to purchase covers for both the hull and blades in order to protect your boat
f
rom natural elements. A wide variety of accessories are available for purchase through your local
Vanguard dealer.
D
e-rigging:
Sail Care:
SEITECH dollies are the easy-to-use, light-weight, small boat
transportation solution. The Optimist dolly has been designed
specifically to fit and support the shape of the hull. SEITECH dollies
allow you to spend less time getting your boat to and from the
water and more time on the water.
www
.seitech.com
V
an
gu
ar
d equips our Optimist with th
e hi
gh
est quality parts available from the top suppliers. We partner
with key suppliers such as English Braids, North Sails and Harken to develop top of the line dinghy
equipment so your boat will perform at the highest level with the factory supplied rope, sails, and
har
d
war
e
. Sh
op at an authorized Vanguard Dealer to be sure you are getting genuine Vanguard parts and
accessories. Visit www
.teamvanguard.com to find your local dealer.
 Loading...