

Page 1

USER’S MANUAL
for the
LTCA-10™
LTCA-40™
LOAD TAP CHANGER ANALYZER
Vanguard Instruments Company, Inc.
1520 S. Hellman Ave.
Ontario, California 91761
TEL: (909) 923-9390 October 2011
FAX: (909) 923-9391 Rev. 2.2
Page 2

LTCA-10/LTCA-40 USER’S MANUAL
SAFETY SUMMARY
NOTICE
This manual applies to both the LTCA-10 and LTCA-40. The operating procedures are virtually
the same for both models, and any differences are clearly described within the step-by-step
procedures.
FOLLOW EXACT OPERATING PROCEDURES
Any deviation from the procedures described in this User’s Manual may create one or more
safety hazards, may damage the LTCA-10/40, damage the test transformer, or cause errors in the
test results. Vanguard Instruments Company, Inc. assumes no liability for unsafe or improper use
of the LTCA-10/40.
All safety precautions provided in this manual must be observed during all phases of testing
including test preparation, test lead connection, actual testing, and test lead disconnection.
SAFETY WARNING AND CAUTIONS
The LTCA-10/40 shall be used only by trained operators. All transformers under test shall be
off-line and fully isolated.
DO NOT MODIFY TEST EQUIPMENT
To avoid the risk of introducing additional or unknown hazards, do not install substitute parts or
perform any unauthorized modification to any LTCA-10/40 test unit. To ensure that all designed
safety features are maintained, it is highly recommended that repairs be performed only by
Vanguard Instruments Company factory personnel or by an authorized repair service.
Unauthorized modifications can cause safety hazards and will void the manufacturer’s warranty.
WARNING
Do not remove test leads during a test. Failure to heed this warning can result in electrical shock
to personnel and damage to the equipment.
2
Page 3

LTCA-10/LTCA-40 USER’S MANUAL
TABLE OF CONTENTS
CONVENTIONS USED IN THIS DOCUMENT .......................................................................... 5
1.0 INTRODUCTION ............................................................................................................... 6
1.1 General Description .......................................................................................................... 6
1.2 Functional Description ..................................................................................................... 6
1.3 Furnished Accessories ...................................................................................................... 7
2.0 TECHNICAL SPECIFICATIONS ...................................................................................... 8
2.1 LTCA-10 Technical Specifications .................................................................................. 8
2.2 LTCA-40 Technical Specifications .................................................................................. 9
3.0 CONTROLS AND INDICATORS.................................................................................... 10
3.1 LTCA-10 Controls and Indicators .................................................................................. 10
3.2 LTCA-40 Controls and Indicators .................................................................................. 12
4.0 PRE-TEST SETUP ............................................................................................................ 14
4.1 Operating Voltages ......................................................................................................... 14
4.2 LTCA-10/40 LCD Contrast Control .............................................................................. 14
4.3 LTCA-10/40 Printer Paper Control ................................................................................ 14
4.4 LTCA-10/40 Printer Paper ............................................................................................. 14
5.0 OPERATING PROCEDURES .......................................................................................... 15
5.1 Typical Connections to a Load Tap Changer (LTC) ...................................................... 15
5.2 LTCA-10 Cable Connections ......................................................................................... 15
5.3 LTCA-40 Cable Connections ......................................................................................... 16
5.4 General Procedures ........................................................................................................ 19
5.5 Performing a Resistance Test ......................................................................................... 20
5.5.1. Resistance Test Result Printouts ............................................................................. 27
5.6 Performing a Special Resistance Test ............................................................................ 29
5.6.1. Special Resistance Test Result Printout .................................................................. 34
5.7 Performing a Dynamic LTC Test ................................................................................... 35
5.7.1. Dynamic LTC Test Result Printouts ....................................................................... 40
5.8 Diagnostic Mode ............................................................................................................ 42
5.9 Setup Menu .................................................................................................................... 44
5.9.1. Entering the Transformer ID ................................................................................... 44
5.9.2. Restoring a Test Record .......................................................................................... 47
5.9.3. Printing the Test-Record Directory ......................................................................... 50
5.9.4. Erasing a Test Record ............................................................................................. 52
5.9.5. Enabling the Computer Interface ............................................................................ 54
5.9.6. Setting the Date and Time ....................................................................................... 55
5.9.7. Setting the Test Value Display Font ....................................................................... 56
6.0 LTCA-10/40 SPECIAL FEATURES ................................................................................ 57
6.1 Bypassing the Resistance Value Display Delay ............................................................. 57
6.2 Converting Resistance Measurements ........................................................................... 57
3
Page 4

LTCA-10/LTCA-40 USER’S MANUAL
LIST OF FIGURES
Figure 1.0 LTCA-10 Controls and Indicators ............................................................................... 10
Figure 2.0 LTCA-40 Controls and Indicators ............................................................................... 12
Figure 3.0 Typical Connections to a Load Tap Changer (LTC) ................................................... 15
Figure 4.0 Typical LTCA-10 Connection Diagram (Dynamic Resistance Test) ......................... 15
Figure 5.0 Typical LTCA-40 Connection Diagram (Dynamic Resistance Test) ......................... 16
Figure 6.0 Typical LTCA-40 Connection Diagram (2 Windings) ............................................... 17
Figure 7.0 Typical LTCA-40 Connection Diagram (3 Windings) ............................................... 18
Figure 8.0 Typical Triple Reading Test Report Printout .............................................................. 27
Figure 9.0 Typical Dual Reading Test Report Printout ................................................................ 27
Figure 10.0 Typical Single Reading Test Report Printout ............................................................ 28
Figure 11.0 Typical Single Reading Test Report Printout ............................................................ 34
Figure 12.0 Sample Normal Dynamic LTC Test Plot .................................................................. 40
Figure 13.0 Sample Dynamic LTC Test Expansion Plot .............................................................. 41
Figure 14.0 Typical Test Record Printout ..................................................................................... 49
Figure 15.0 Typical Record Directory Printout ............................................................................ 51
LIST OF TABLES
Table 1.0 LTCA-10 Specifications ................................................................................................. 8
Table 2.0 LTCA-40 Specifications ................................................................................................. 9
Table 3.0 Functional Descriptions of LTCA-10 Controls and Indicators .................................... 11
Table 4.0 Functional Descriptions of LTCA-40 Controls and Indicators .................................... 13
4
Page 5
LTCA-10/LTCA-40 USER’S MANUAL
CONVENTIONS USED IN THIS DOCUMENT
This document uses the following conventions:
• A key or switch on the LTCA-10/40 is indicated as [KEY]
•
Menu options are referenced as (MENU OPTION)
Screen and menu names are referenced as “SCREEN/MENU NAME”
•
• LTCA-10/40 LCD screen output is shown as:
1. OPTION 1
2. OPTION 2
3. OPTION 3
• Warning messages are indicated as:
Warning message
WARNING
• Important notes are indicated as:
Note details
NOTE
5
Page 6

LTCA-10/LTCA-40 USER’S MANUAL
1.0 INTRODUCTION
1.1 General Description
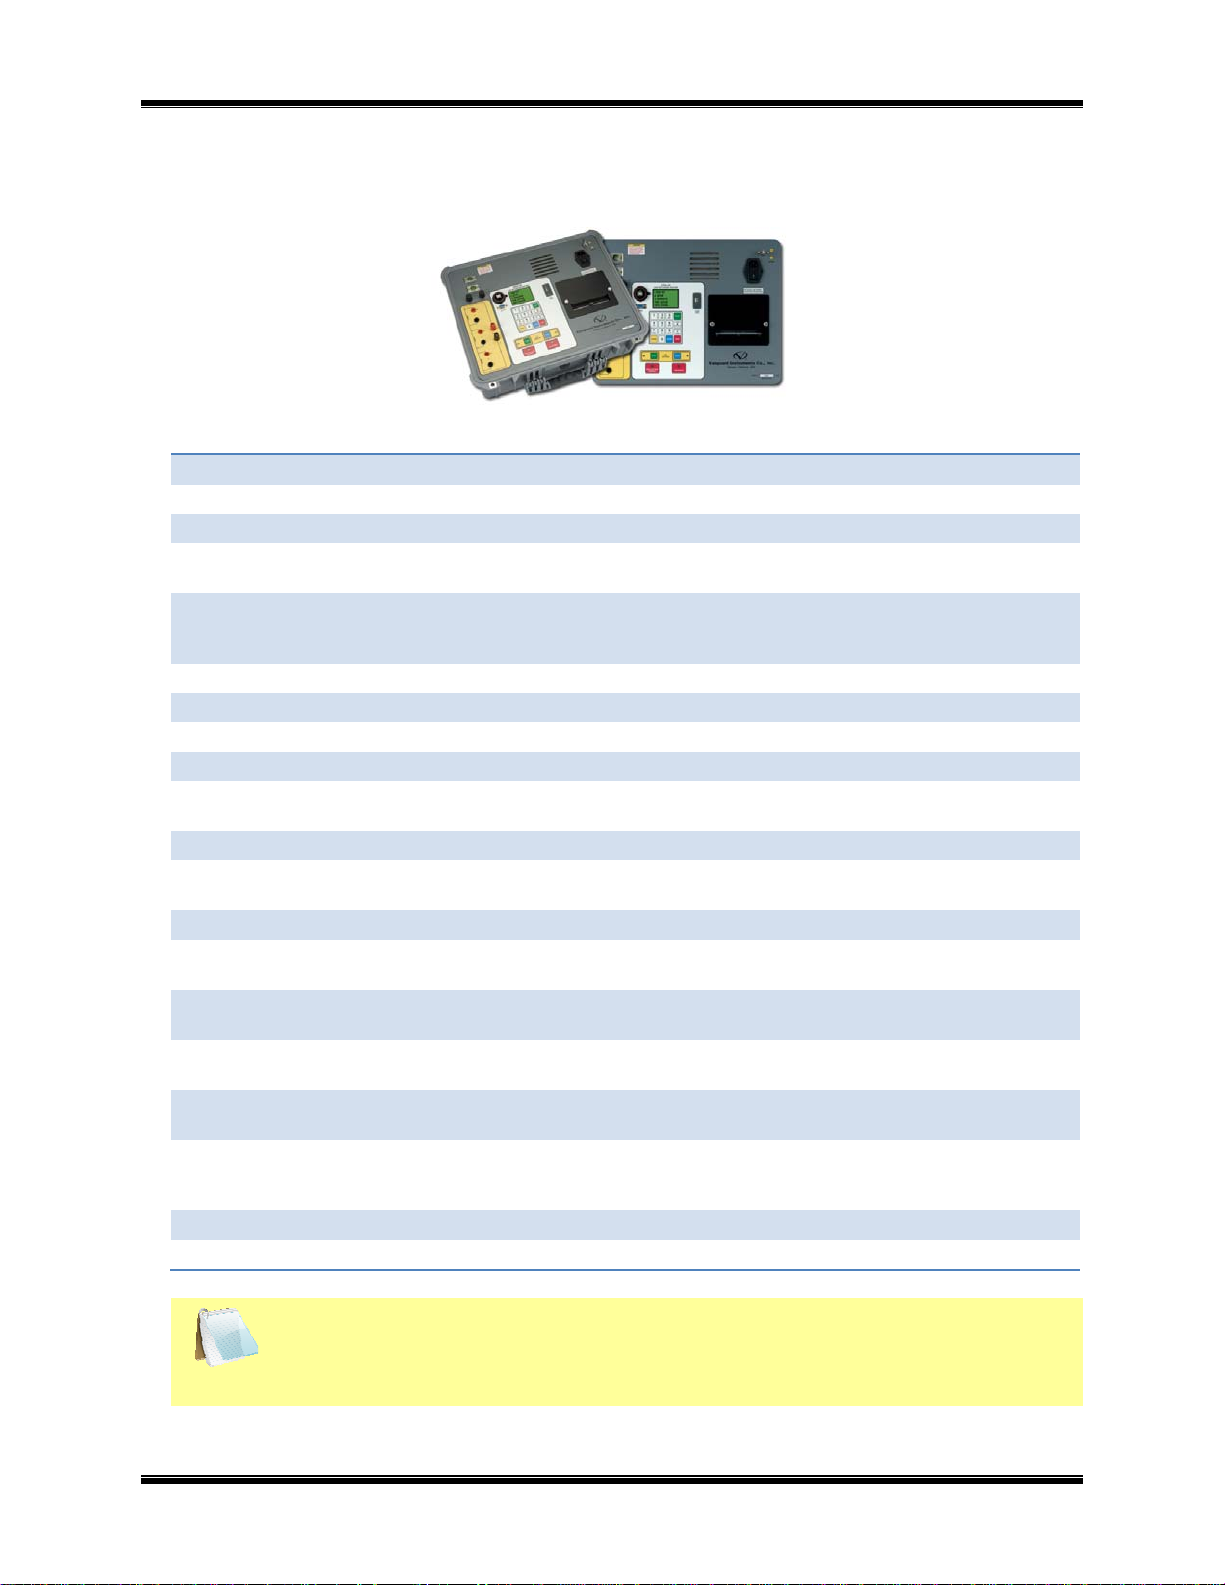
The Vanguard LTCA-10 and LTCA-40 are microprocessor-controlled winding resistance meters.
These devices are designed to accurately measure large transformer winding resistance, motor
winding resistance, or the resistance of large inductive devices. This manual addresses the
LTCA-10 and LTCA-40 as one device. Any differences between the LTCA-10 and LTCA-40 are
addressed separately.
The LTCA-10 uses a 60Vdc/10 Amperes Direct Current (DC) power supply while the LTCA-40
uses a 60VDC/40 Amperes DC power supply. Both devices are capable of reading winding
resistances ranging from 1 micro-ohm to 500 ohms. Three voltage sensing channels allow the
LTCA-10/40 to read three resistance values in the same test. To ensure operator safety, the
LTCA-10/40 automatically discharges the stored energy in the transformer at the end of each
test.
The LTCA-10/40 has one resistance reading channel (V1) dedicated for dynamic resistance
testing. The dynamic resistance test feature can be used to monitor the transformer LTC or
Voltage Regulator contact resistance while changing tap positions. A resistance plot shows the
transformer LTC contact and winding resistance and can be used to detect LTC/Voltage
Regulator contact problems.
The transformer LTC or Voltage Regulator AC motor current can also be monitored by the
LTCA-10/40 using an AC clamp on the current sensor. This feature can be used to monitor the
LTC motor “On-Time” at each tap change operation.
The LTCA-10/40 is rugged, portable, and easy to use, requiring little training for first-time users.
A 16-key membrane keypad is used to control the unit. The LTCA-10/40 features a back-lit LCD
screen (64 x 128 dot graphic) that is viewable in bright daylight as well as low-light conditions.
A built-in thermal printer can print results on 4.5-inch wide thermal paper.
The LTCA-10/40 can store 128 static test records (48 tests per record) and 11 dynamic resistance
test records in Flash EEPROM. Test records can be recalled locally or transferred to a PC via the
available interfaces (RS-232C port, USB port, USB Flash drive port). A built-in USB Flash drive
interface provides a convenient method for transferring test records to or from a USB Flash
drive. Test records can also be transferred directly to a PC via the RS-232C or USB interface
ports. If using a USB Flash drive, test records stored in the LTCA-10/40’s internal memory can
be transferred to the drive, and then the supplied PC software can be used to view the test records
stored on the drive. Up to 999 test records can be stored on a USB Flash drive.
1.2 Functional Description
The LTCA-10/40’s operation is based on the electrical relationship described by Ohm’s law:
R=V/I, where I is a known current and V is the DC voltage measured across the unknown
resistance. The value of the unknown resistance is calculated by dividing the measured voltage
by the current which is calculated by the microprocessor. Calculated resistance readings are then
displayed on the unit’s back-lit LCD screen.
A special current source allows the LTCA-10 to output 1, 5 and 10 Amperes of test current. The
LTCA-40 can output 1, 5, 10 or 40 Amperes of test current. For added safety, the current source
6
Page 7

LTCA-10/LTCA-40 USER’S MANUAL
circuit is thermally protected. Also, a built-in discharge circuit automatically discharges the
stored energy in the transformer at the end of each test.
1.3 Furnished Accessories
The LTCA-10/40 is furnished with eight 50-foot test cables with “quick disconnect” type test
plugs on the unit end and battery-type clamps at the test load end. One power cord, one ground
cable, one current sense cable, one LTC operation cable and a cable-carrying bag is also
included.
7
Page 8
2.0 TECHNICAL SPECIFICATIONS
2.1 LTCA-10 Technical Specifications
Table 1.0 LTCA-10 Specifications
TYPE Load tap changer analyzer
PHYSICAL SPECIFICATIONS 21”W x 9” H x 17”D (53 cm x 24 cm x 43 cm); Weight: 33 lbs (15.4 kg)
OPERATING VOLTAGE 100 – 240 Vac, 50/60 Hz
RESISTANCE READING
RANGE
ACCURACY 1 – 19,999 micro-ohms: ±0.5% reading, ±1 count;
RESISTANCE CHANNELS Three static resistance reading channels, One dynamic resistance channel
TEST VOLTAGE 60 Vdc max
TEST CURRENTS 1 ampere, 5 amperes, 10 amperes
AC CURRENT PROBE Clamp-on current sensor, 1 – 20 Amperes, AEMC model MN106
DISPLAY Back-lit LCD Screen (64 x 128 dot graphic ); viewable in bright sunlight and
PRINTER 4.5-inch wide thermal printer
EXTERNAL DATA STORAGE One USB Flash drive interface port; stores up to 999 test records on a USB
COMPUTER INTERFACES One RS-232C port, One USB port
INTERNAL TEST RECORD
STORAGE
LOAD TAP CHANGER
CONTACT
SAFETY Designed to meet UL 61010A-1 and CAN/CSA C22.2 No. 1010.1-92
ENVIRONMENT Operating: -10˚C to 50˚ C (15˚F to +122˚ F); Storage: -30˚ C to 70˚ C (-
CABLES One 50-foot current cable set, Three 50-foot resistance cable sets, One
OPTIONS Transportation Case
WARRANTY One year on parts and labor
1 micro-ohm – 500 ohms
20 – 999 milli-ohms: ±1% reading, ±1 count;
1 – 500 ohms: ±1.5% reading, ±1 count
low-light levels
Flash drive (not included)
Stores up to 128 static resistance test records (48 tests per record) and 11
dynamic resistance test records
240 Vac, 1A
standards
22˚F to +158˚ F)
ground cable, One USB cable, One RS-232C cable, One current sense
cable, One LTC control cable, power cord, cable bag
LTCA-10/LTCA-40 USER’S MANUAL
NOTE
The above specifications are valid at nominal operating voltage and at a
temperature of 25°C (77°F). Specifications may change without prior notice.
8
Page 9

2.2 LTCA-40 Technical Specifications
Table 2.0 LTCA-40 Specifications
TYPE Load tap changer analyzer
PHYSICAL SPECIFICATIONS 25”W x 8.5”H x 20”D (63.5 cm x 21.6 cm x 50 cm); Weight: 46 lbs (20 kg)
OPERATING VOLTAGE 100 – 240 Vac, 50/60 Hz
RESISTANCE READING
RANGE
ACCURACY 1 – 19,999 micro-ohms: ±0.5% reading, ±1 count;
RESISTANCE CHANNELS Three static resistance reading channels, One dynamic resistance channel
TEST VOLTAGE 60 Vdc max
TEST CURRENTS 1 ampere, 5 amperes, 10 amperes, 40 amperes
AC CURRENT PROBE Clamp-on current sensor, 1 – 20 Amperes, AEMC model MN106
DISPLAY Back-lit LCD Screen (64 x 128 dot graphic ); viewable in bright sunlight and
PRINTER 4.5-inch wide thermal printer
EXTERNAL DATA STORAGE One USB Flash drive interface port; stores up to 999 test records on a USB
COMPUTER INTERFACES One RS-232C port, One USB port
INTERNAL TEST RECORD
STORAGE
LOAD TAP CHANGER
CONTACT
SAFETY Designed to meet UL 61010A-1 and CAN/CSA C22.2 No. 1010.1-92
ENVIRONMENT Operating: -10˚C to 50˚ C (15˚F to +122˚ F); Storage: -30˚ C to 70˚ C (-22˚F
CABLES One 50-foot current cable set, Three 50-foot resistance cable sets, One
OPTIONS Transportation Case
WARRANTY One year on parts and labor
1 micro-ohm – 500 ohms
20 – 999 milli-ohms: ±1% reading, ±1 count;
1 – 500 ohms: ±1.5% reading, ±1 count
low-light levels
Flash drive (not included)
Stores up to 128 static resistance test records (48 tests per record) and 11
dynamic resistance test records
240 Vac, 1A
standards
to +158˚ F)
ground cable, One USB cable, One RS-232C cable, One current sense
cable, One LTC control cable, power cord, cable bag
LTCA-10/LTCA-40 USER’S MANUAL
The above specifications are valid at nominal operating voltage and at a
temperature of 25°C (77°F). Specifications may change without prior notice.
NOTE
9
Page 10
LTCA-10/LTCA-40 USER’S MANUAL
3.0 CONTROLS AND INDICATORS
3.1 LTCA-10 Controls and Indicators
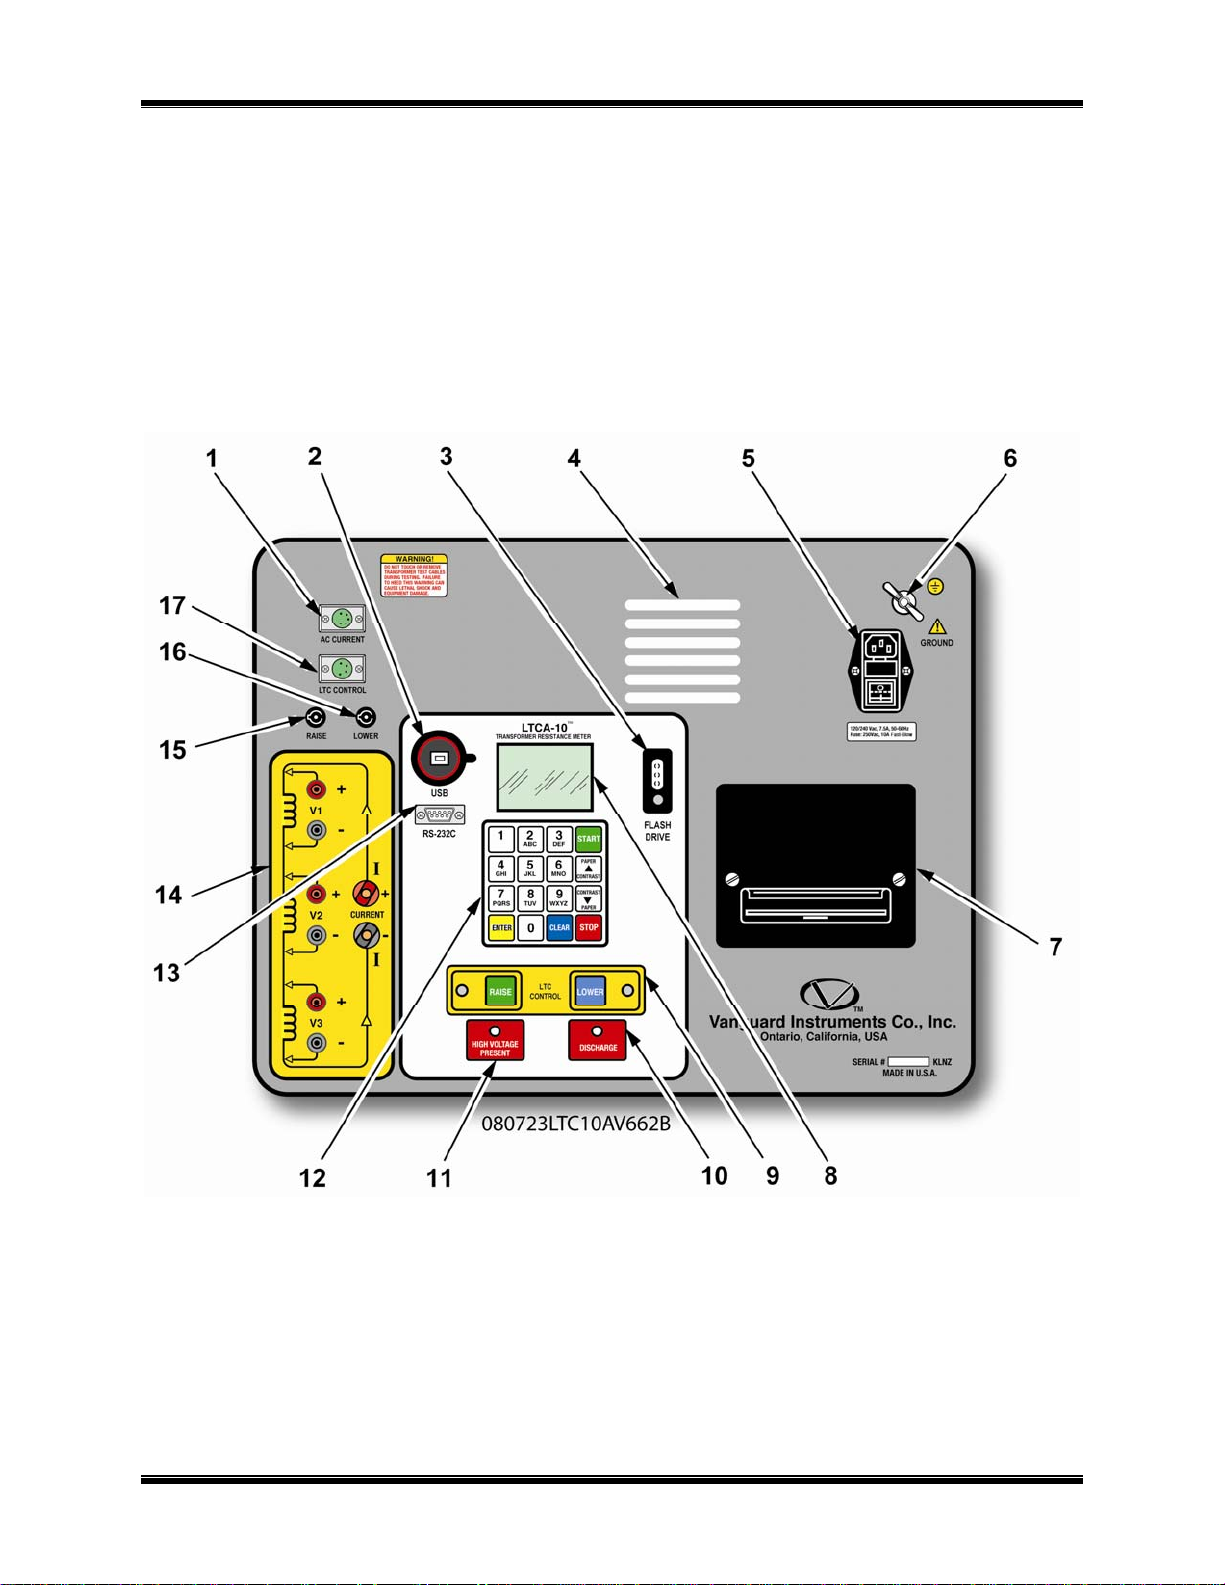
The LTCA-10’s controls and indicators are shown in Figure 1.0 below. A leader line with an
index number points to each control and indicator, which is cross-referenced to a functional
description in Table 3.0. The table describes the function of each item on the control-panel. The
purpose of the controls and indicators may seem obvious, but users should become familiar with
them before using the LTCA-10/40. Accidental misuse of the controls will usually cause no
serious harm. Users should also be familiar with the safety summary found on the front page of
this User’s Manual.
Figure 1.0 LTCA-10 Controls and Indicators
10
Page 11

LTCA-10/LTCA-40 USER’S MANUAL
Table 3.0 Functional Descriptions of LTCA-10 Controls and Indicators
Item
Number
1
2
3
4
5
6
7
8
9
10
11
12
13
14
15
16
17
Panel Markings Functional Description
AC Current Clamp-on AC current probe connector
USB USB Interface Port
Flash Drive USB Flash Drive Interface Port
None Air Vents
120-240 7.5A, 50-60
Hz
Fuse: 250Vac, 1A
Fast-Blow
GROUND
None
None
LTC Control
DISCHARGE
HIGH VOLTAGE
PRESENT
None
RS-232C
V1, V2, V3,
CURRENT (I+, I-)
RAISE Fuse for the LTC Control Raise leads
LOWER Fuse for the LTC Control Lower leads
LTC CONTROL Load Tap Changer controller connector
Input power connector with third-wire safety ground, ON/OFF rocker toggle
switch with built-in fuse protection
5/16-18 threaded stud, with hand-turned wing nut, safety ground. This must be
connected to station ground before connecting LCTA-10 test leads to the
transformer
Built in 4.5-inch wide thermal printer.
NOTE: For best printing results, it is recommended that only VIC thermal
paper be used
Liquid-Crystal Display, 64 x 128 dot graphic display. Back-lit and viewable in
bright sunlight and low-light conditions. Displays menus, user selections,
status readouts and test results
Load Tap Changer Control. Allows the user to change the Load Tap Changer
position using the RAISE and LOWER buttons
Red LED indicator light. When lit, this indicator warns the operator that the
LTCA-10 is discharging the stored energy in the transformer.
Do not disconnect test leads when this light is on. Failure to heed this
warning can result in shock to personnel
Red LED indicator light. Lights to warn operator that there is a possibility that
voltage exists across test leads.
Do not disconnect test leads when this light is on. Failure to heed this
warning can result in shock to personnel
Membrane keypad, 10 alpha-numeric keys and 6 function keys (START,
STOP, CLEAR, ENTER, and CONTRAST/PAPER positioning UP and DOWN)
9-pin RS-232C interface port; female DB type. Data rate is set to 19,200 baud,
1 start bit, 2 stop bits, 8 data bits and no parity bit
Pin Signal
2 RX
3 TX
5 Signal Ground
Voltage sensing input channels 1, 2, and 3. Female test connector jacks for
connecting test current output test leads
11
Page 12

LTCA-10/LTCA-40 USER’S MANUAL
3.2 LTCA-40 Controls and Indicators
The LTCA-40’s controls and indicators are shown in Figure 2.0 below. A leader line with an
index number points to each control and indicator, which is cross-referenced to a functional
description in Table 4.0. The table describes the function of each item on the control-panel. The
purpose of the controls and indicators may seem obvious, but users should become familiar with
them before using the LTCA-10/40. Accidental misuse of the controls will usually cause no
serious harm. Users should also be familiar with the safety summary found on the front page of
this User’s Manual.
Figure 2.0 LTCA-40 Controls and Indicators
12
Page 13

LTCA-10/LTCA-40 USER’S MANUAL
Table 4.0 Functional Descriptions of LTCA-40 Controls and Indicators
Item
Number
1
2
3
4
5
6
7
8
9
10
11
12
13
14
15
16
17
Panel Markings Functional Description
AC Current Clamp-on AC current probe connector
USB USB Interface port
None
120-240 7.5A, 50-60
Hz
Fuse: 250Vac, 1A
Fast-Blow
GROUND
Flash Drive USB Flash Drive Interface Port
None
None
LTC Control
DISCHARGE
HIGH VOLTAGE
PRESENT
None
RS-232C
V1, V2, V3,
CURRENT (I+, I-)
RAISE Fuse for LTC Control Raise leads
LOWER Fuse for LTC Control Lower leads
LTC CONTROL Load Tap Changer controller connector
The air intake cooling fans maintain the internal temperature. There are output
air fans on the sides of the case
Input power connector with third-wire safety ground, ON/OFF rocker toggle
switch with built-in fuse protection
5/16-18 threaded stud, with hand-turned wing nut, safety ground. This must be
connected to station ground before connecting LCTA-40 test leads to the
transformer
Built in 4.5-inch wide thermal printer.
NOTE: For best printing results, it is recommended that only VIC thermal paper
be used
Liquid-Crystal Display, 64 x 128 dot graphic display. Back-lit and viewable in
bright sunlight and low-light conditions. Displays menus, user selections, status
readouts and test results
Load Tap Changer Control. Allows the user to change the Load Tap Changer
position using the RAISE and LOWER buttons
Red LED indicator light. When lit, this indicator warns the operator that the
LTCA-40 is discharging the stored energy in the transformer.
Do not disconnect test leads when this light is on. Failure to heed this
warning can result in shock to personnel
Red LED indicator light. Lights to warn operator that there is a possibility that
voltage exists across test leads.
Do not disconnect test leads when this light is on. Failure to heed this
warning can result in shock to personnel
Membrane keypad, 10 alpha-numeric keys and 6 function keys (START, ST OP,
CLEAR, ENTER, and CONTRAST/PAPER positioning UP and DOWN)
9-pin RS-232C interface port; female DB type. Data rate is set to 19,200 baud,
1 start bit, 2 stop bits, 8 data bits and no parity bit
Pin Signal
2 RX
3 TX
5 Signal Ground
Voltage sensing input channels 1, 2, & 3. Female test connector jacks for
connecting test current output test leads
13
Page 14

LTCA-10/LTCA-40 USER’S MANUAL
4.0 PRE-TEST SETUP
4.1 Operating Voltages
The LTCA-10/40’s operating voltages are 100-240 Vac and 50/60 Hz.
4.2 LTCA-10/40 LCD Contrast Control
To increase the LCD screen contrast, press and hold the [PAPER ∧ Contrast] key for two
seconds.
To decrease the LCD screen contrast, press and hold the [PAPER ∨ Contrast] key for two
seconds.
4.3 LTCA-10/40 Printer Paper Control
To advance the LTCA-10/40 printer paper, press and release the
To retract the LTCA-10/40 printer paper, press and release the
[PAPER ∧ Contrast] key.
[PAPER ∨ Contrast] key.
4.4 LTCA-10/40 Printer Paper
The LTCA-10/40’s built-in thermal printer uses 4.5-inch wide thermal paper for printing test
results. To maintain the highest print quality and to avoid paper jams, the use of thermal paper
supplied by Vanguard Instruments Company is highly recommended. Additional paper can be
ordered from the following sources:
Vanguard Instruments Co, Inc.
1520 S. Hellman Avenue
Ontario, CA 91761
Tel: 909-923-9390
Fax: 909-923-9391
Part Number: VIC TP-4 paper
BG Instrument Co.
13607 E. Trent Avenue
Spokane, WA 99216
Tel: 509-893-9881
Fax: 509-893-9803
Part Number: VIC TP-4 paper
14
Page 15
LTCA-10/LTCA-40 USER’S MANUAL
5.0 OPERATING PROCEDURES
The LTCA-10/40 is simple to operate and only requires the selection of choices from display
menus and responding to displayed prompts. However, first-time operators should review the
following operating procedures to become familiar with all LTCA-10/40 operations and the
logical branching for various test options. More experienced operators may use these procedures
as a handy help and reference guide.
5.1 Typical Connections to a Load Tap Changer (LTC)
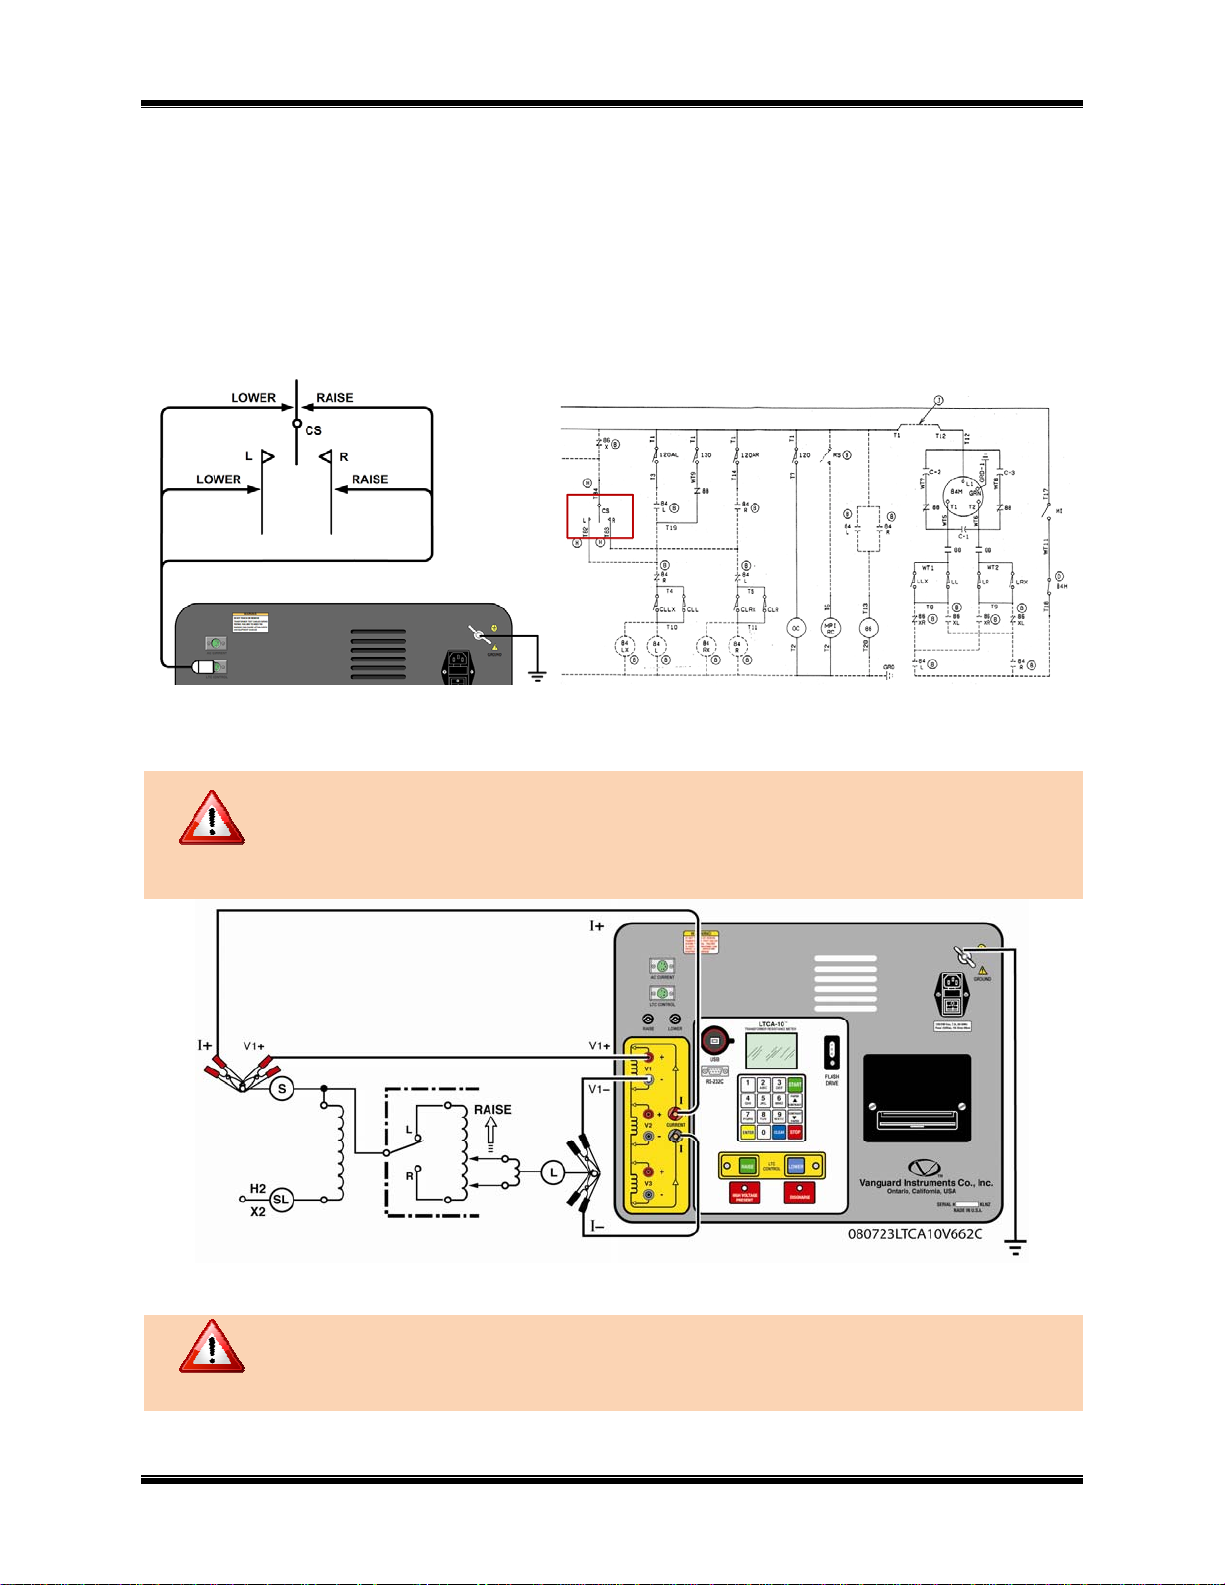
Figure 3.0 Typical Connections to a Load Tap Changer (LTC)
5.2 LTCA-10 Cable Connections
Do not touch or disconnect any test lead that is connected to a transformer
terminal while high current is being conducted during a test. Failure to heed this
warning can result in electrical shock to personnel and/or damage to the
WARNING
equipment.
Figure 4.0 Typical LTCA-10 Connection Diagram (Dynamic Resistance Test)
WARNING
After discharge, always disconnect test clips slowly from transformer bushings
to prevent an accidental flash-over.
15
Page 16
LTCA-10/LTCA-40 USER’S MANUAL
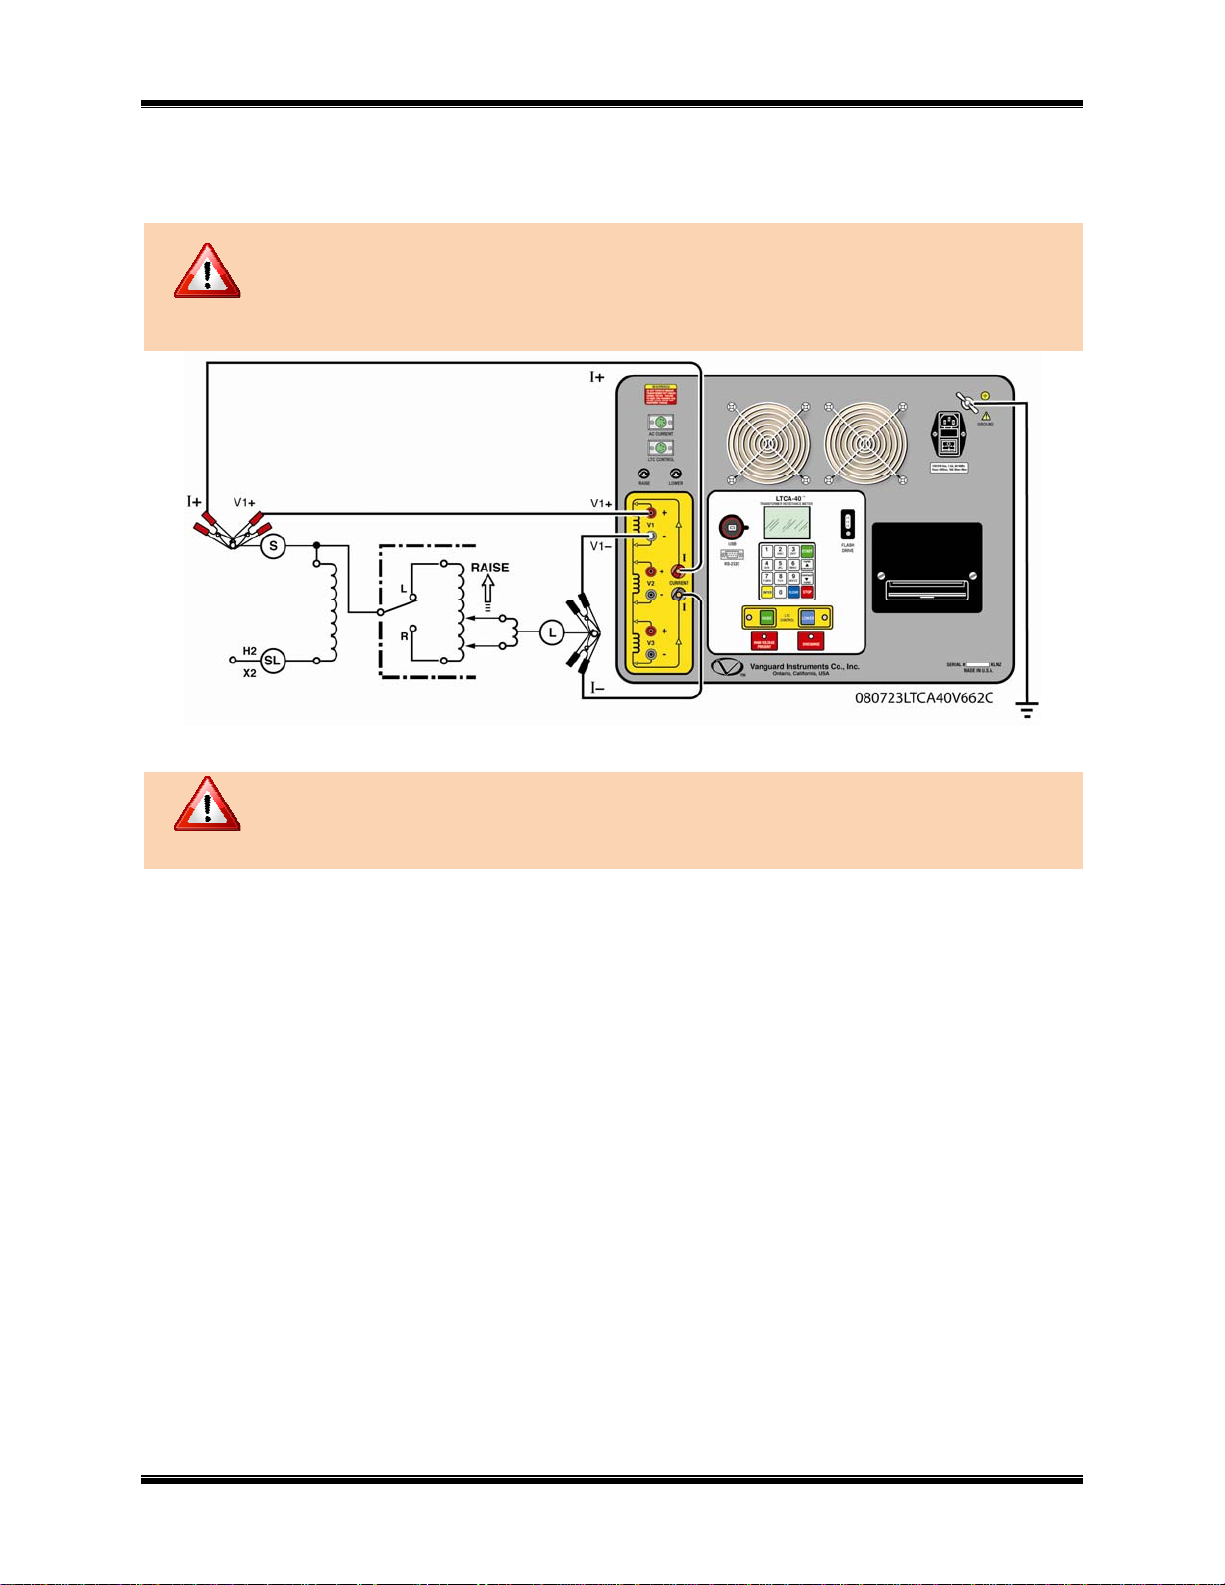
5.3 LTCA-40 Cable Connections
Typical connection diagrams of the LTCA-40 are shown in Figure 4.0, 5.0, and 6.0.
Do not touch or disconnect any test lead that is connected to a transformer
terminal while high current is being conducted during a test. Failure to heed this
warning can result in electrical shock to personnel and/or damage to the
WARNING
equipment.
WARNING
Figure 5.0 Typical LTCA-40 Connection Diagram (Dynamic Resistance Test)
After discharge, always disconnect test clips slowly from transformer bushings to
prevent any accidental flash-over.
16
Page 17

LTCA-10/LTCA-40 USER’S MANUAL
Figure 6.0 Typical LTCA-40 Connection Diagram (2 Windings)
17
Page 18
LTCA-10/LTCA-40 USER’S MANUAL
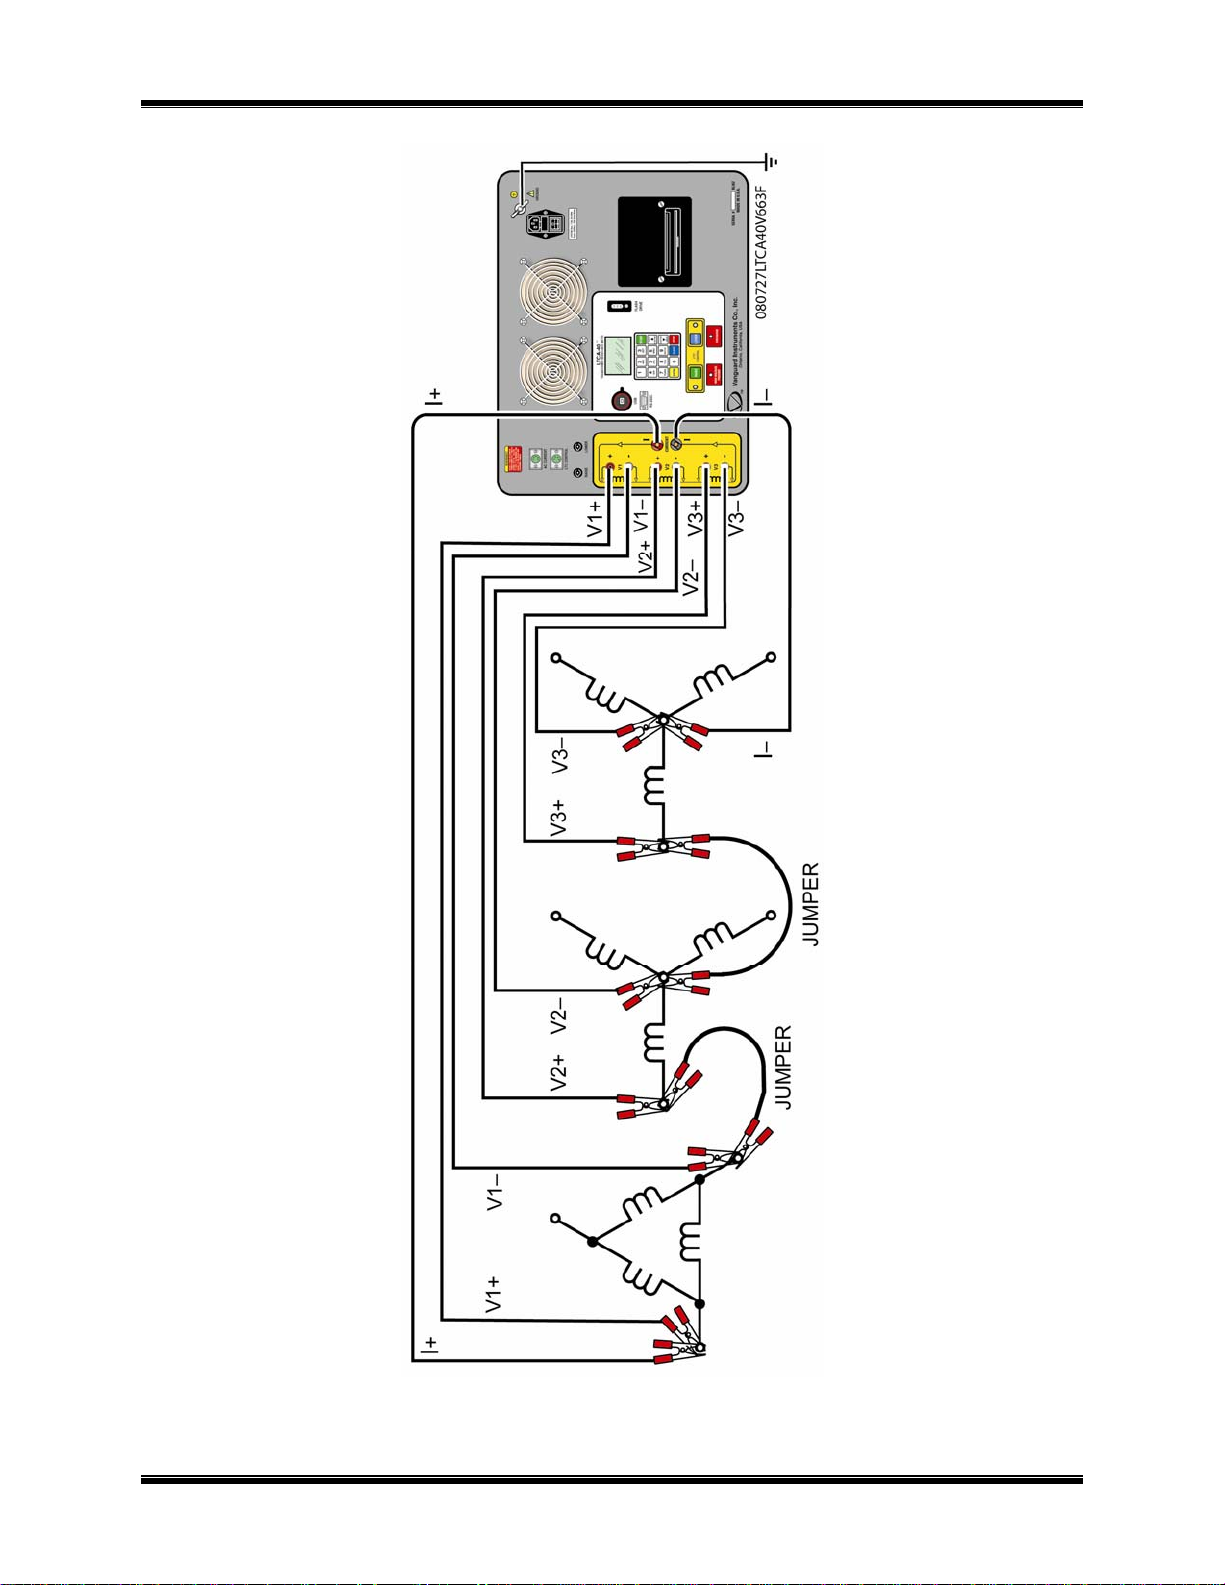
Figure 7.0 Typical LTCA-40 Connection Diagram (3 Windings)
18
Page 19

LTCA-10/LTCA-40 USER’S MANUAL
5.4 General Procedures
a. Ground the LTCA-10/40 to substation ground (Item 6 in Figure 1.0, Item 5 in figure 2.0).
Always connect the LTCA-10/40 to the substation ground before connecting
test leads to any transformer bushing. Failure to follow this procedure may
WARNING
damage the LTCA-10/40.
b. Plug the LTCA-10/40 power cable into a power outlet.
c. Insert current-cable plugs and voltage-sensing cable plugs into their respective control
panel jacks.
d. Attach test-cable clamps to the transformer terminals for the winding that is to be
measured.
e. Turn on the LTCA-10/40 power by pressing [I] on the rocker switch.
f. Once the power is turned on, the unit will perform self-calibration and display a few start-
up messages. Once the short start-up sequence is completed, the “START-UP” menu will
be displayed (date and time will obviously be different):
1. TEST XFMR 03/04/09
2. SETUP 09:28:03
3. USER DIAG
19
Page 20

5.5 Performing a Resistance Test
a. Start from the “START-UP” menu:
1. TEST XFMR 03/04/09
2. SETUP 09:28:03
3. USER DIAG
Press the [1] key (TEST XFMR) to start a test.
b. The following menu will be displayed:
1. RESISTANCE TEST
2. SPECIAL RESISTANCE TEST
3. DYNAMIC LTC TEST
Press the [1] key (RESISTANCE TEST) to start a resistance test.
c. The following menu will be displayed:
1. V1, V2, V3 RES TEST
2. V1, V2 RES TEST
3. V1 ONLY RES TEST
LTCA-10/LTCA-40 USER’S MANUAL
Select the number of channels that will be used to measure resistance by pressing the
corresponding numeric key ([1], [2], or [3]).
d. The “SELECT TEST CURRENT” menu will be displayed:
SELECT TEST CURRENT:
1. 1 AMP
2. 5 AMPS
3. 10 AMPS
LTCA-10 LTCA-40
SELECT TEST CURRENT:
1. 1 AMP
2. 5 AMPS
3. 10 AMPS
4. 40 AMPS
Select the test current by pressing the [1], [2], [3] , or [4] (LTCA-40 only) key.
e. The “CONVERT READINGS TO STANDARD TEMP?” menu will be displayed as
shown below:
CONVERT READINGS TO
STANDARD TEMP?
1. YES
2. NO
1. YES
If you wish to convert readings to standard temperature, press the
[1] key (YES).
The “WINDING MATERIAL” menu will be displayed:
WINDING MATERIAL
1. COPPER, Tk=234.5
2. ALUMINUM, Tk=225.0
3. MANUALLY ENTER Tk
20
Page 21

LTCA-10/LTCA-40 USER’S MANUAL
a. Press the [1] key to select copper as the winding material. Continue to
step f.
b. Press the [2] key to select aluminum as the winding material. Continue to
step f.
c. Press the [3] key to manually enter the Tk value. The following screen
will be displayed:
Tk:
230.0°C
↑↓ to adjust Tk
“ENTER” to accept
You can increase the Tk value by 0.5°C increments by pressing the
[PAPER ∧ Contrast] key. You can decrease the Tk value by 0.5°C
increments by pressing the [PAPER ∨ Contrast] key. Press the
[ENTER] key to confirm your temperature selection. Continue to step f.
2. NO
If you do NOT wish to convert readings to standard temperature, press the
key (NO) and continue to step h.
[2]
f. After the Tk value has been selected, the “D.U.T. TEMP” screen will be displayed:
D.U.T. TEMP
25.0°C 77.0°F
↑↓ to adjust temp
“ENTER” to accept
Use the [PAPER ∧ Contrast] and [PAPER ∨ Contrast] keys to adjust the D.U.T.
temperature. Press the
D.U.T is short for Device Under Test
NOTE
[ENTER] key to confirm the temperature selection.
g. The “REFERENCE TEMP” screen will be displayed:
REFERENCE TEMP:
85.0°C 185.0°F
↑↓ to adjust temp
“ENTER” to accept
Use the
[PAPER ∧ Contrast] and [PAPER ∨ Contrast] keys to adjust the
Reference Temperature. Press the
[ENTER] key to confirm the temperature selection.
21
Page 22

LTCA-10/LTCA-40 USER’S MANUAL
The LTCA-10/40 will calculate the equivalent resistance value at this new
temperature.
NOTE
h. The following “WARNING” screen will be displayed:
*********WARNING*********
DANGEROUS FLASH-OVER
WILL OCCUR IF CABLES
ARE DISCONNECTED!
*************************
This warning reminds the operator that the next sequence of test steps will run current
through the test load.
Press the
[ENTER] key to proceed to the next step.
i. One of the following menus will be displayed (with the relevant test current value)
depending on how many channels were selected in step c.
-V1 TEST ONLY1 AMP TEST
“START” TO RUN TEST
OR
“STOP” TO ABORT
V1 Test Only V1 & V2 Test
-V1 & V2 TEST1 AMP TEST
“START” TO RUN TEST
OR
“STOP” TO ABORT
-V1, V2, & V3 TEST1 AMP TEST
“START” TO RUN TEST
OR
“STOP” TO ABORT
V1, V2, & V3 Test
If you have made any errors or would like to abort the test, press the
[STOP] key, and
you will be returned to the “START-UP” menu.
Press the [START] key to run the test. The following screen will be displayed
momentarily:
CALIBRATING
PLEASE WAIT…
After the LTCA-10/40 finishes its internal calibration, the “XFMR CHARGING” screen
will be displayed:
XFMR CHARGING
PLEASE WAIT...
* XFMR ENERGIZED! *
22
Page 23

LTCA-10/LTCA-40 USER’S MANUAL
This is only an informational screen to remind the operator that a test is in progress. The
display duration of this message depends on the size of the winding’s inductance and the
test current selected.
You can bypass this delay and observe the resistance value immediately. See
section 6.1 for instructions on how to select this option.
NOTE
j. The LTCA-10/40 determines when the resistance reading is stable and displays the
resistance values on the LCD screen as follows:
TEST IN PROGRESS
I = 1.09 AMPS
R1 = 7.272 mΩ
R2 = 358μΩ
* XFMR ENERGIZED! *
The LTCA-10/40 will continue the test and update the resistance values on the LCD
screen. While the test is in progress, the [ENTER] key can be pressed to save the current
reading on the LCD to the LTCA-10/40’s internal working memory.
This feature is very convenient for storing multiple readings during a test. A typical
example of this application is an LTC or Voltage Regulator contact resistance test where
multiple readings are required. For example, the user can start the test at one tap position,
and when the reading is stable, press the [ENTER] key to save the reading. Then, the
user can change the tap position and save the stable reading at the new tap position by
pressing the [ENTER] key. This process can be repeated as needed for a maximum of 48
times per test record.
If the [ENTER] key is pressed, the data is saved and the SAVING TEST message will be
displayed on the LCD as shown below:
TEST IN PROGRESS
====> SAVING TEST <====
I = 1.09 AMPS
R1 = 7.272 mΩ
R2 = 358μΩ
* XFMR ENERGIZED! *
Once the data is saved, the TEST SAVED message will be displayed:
TEST IN PROGRESS
====> TEST SAVED! <====
I = 1.09 AMPS
R1 = 7.272 mΩ
R2 = 358μΩ
* XFMR ENERGIZED! *
k. Press the
[STOP] key to stop running the test. Press the [STOP] key a second time to
continue to the next step.
23
Page 24

LTCA-10/LTCA-40 USER’S MANUAL
l. The “PRINT TEST RESULTS?” menu will be displayed:
PRINT TEST RESULTS?
1. YES
2. NO
1. YES
Press the [1] key (YES) to print the test results on the built-in thermal printer. The
last test results displayed on the LCD screen will be printed. Typical LTCA-10/40
test reports are shown in Figure 7.0, Figure 8.0, and Figure 9.0. Continue to step
m.
2. NO
Press the
[2] key (NO) to bypass the printing of the test results. Continue to step
m.
m. The “KEEP THIS READING?” menu will be displayed:
KEEP THIS READING?
1. YES
2. NO
1. YES
If you wish to save the reading, press the
[1] key (YES). One of the following
screens will be displayed:
The following screen will be displayed if there is no previous data in the memory:
=====> TEST SAVED! <=====
The following screen will be displayed if previous data for the same test type is
stored in the memory:
PREVIOUS DATA IN BUF?
03/01/09 10:30
1. APPEND PREV DATA?
2. CLEAR PREV DATA
The LTCA-10/40 retains the current test results in its working memory. When a
test is finished, the user can append the new test results to the previous test results
in the working memory, as long as the unit’s power has not been turned off
between tests.
If data exists in the working memory, you will be presented with the “PREVIOUS
DATA IN BUF?” menu shown above. Press the [1] key to append the current test
results to the previous test results in the working memory. Press the
[2] key to
24
Page 25

LTCA-10/LTCA-40 USER’S MANUAL
only save the current test results and discard any previous data from the working
memory.
In either case, press the [ENTER] key and continue to step n.
2. NO
If you do not wish to save the reading, press the [2] key (NO) and continue to
step n.
n. The “RUN ANOTHER TEST?” menu will be displayed:
RUN ANOTHER TEST?
1. YES
2. NO
1. YES
If you would like to run another test, press the [1] key (YES) and return to step
c.
2. NO
If you do not wish to run another test, press the [2] key (NO) and continue to
step o.
o. The “SAVE THIS RECORD?” menu will be displayed:
SAVE THIS RECORD?
1. YES
2. NO
The test record must be saved to Flash EEPROM so that it can be recalled and
printed at a later time.
NOTE
1. YES
If you wish to save the record, press the
[1] key (YES) and continue to step p.
2. NO
If you do not wish to save the record, press the [2] key (NO). The following
message will be displayed:
ARE YOU SURE?
DATE WILL BE LOST!
1. DO NOT SAVE RECORD
2. SAVE RECORD
Press the
[1] key (DO NOT SAVE RECORD) if you do not want to save the
record. You will be returned to the “START-UP” menu.
Press the [2] key (SAVE RECORD) to save the record. Continue to step p.
25
Page 26

p. The following message will be displayed:
RECORD NUMBER 01
HAS BEEN SAVED!
The record number is automatically assigned and incremented by the LTCA10/40.
NOTE
Press the [ENTER] key to return to the “START-UP” menu.
LTCA-10/LTCA-40 USER’S MANUAL
26
Page 27

5.5.1. Resistance Test Result Printouts
Figure 8.0 Typical Triple Reading Test Report Printout
LTCA-10/LTCA-40 USER’S MANUAL
Figure 9.0 Typical Dual Reading Test Report Printout
27
Page 28

LTCA-10/LTCA-40 USER’S MANUAL
Figure 10.0 Typical Single Reading Test Report Printout
28
Page 29

LTCA-10/LTCA-40 USER’S MANUAL
5.6 Performing a Special Resistance Test
The Special Resistance Test is used to conduct a resistance test for a pre-defined period ranging
from 1 to 45 minutes. The resistance data is recorded at 1 minute intervals. Use the following
procedures to perform a Special Resistance Test.
a. Start from the “START-UP” menu:
1. TEST XFMR 03/04/09
2. SETUP 09:28:03
3. USER DIAG
Press the [1] key (TEST XFMR) to start a test.
b. The following menu will be displayed:
1. RESISTANCE TEST
2. SPECIAL RESISTANCE TEST
3. DYNAMIC LTC TEST
Press the [2] key (SPECIAL RESISTANCE TEST) to start a special resistance test.
c. The following menu will be displayed:
1. V1, V2, V3 SPEC TEST
2. V1, V2 SPEC TEST
3. V1 ONLY SPEC TEST
Select the number of channels by pressing the corresponding key ([1], [2], or [3])
d. The “ENTER SPECIAL TEST TIME MINUTES” screen will be displayed:
ENTER SPECIAL TEST
TIME MINUTES (1-45):
10
Enter the test time (between 1-45 minutes) using the keypad on the LTCA-10/40 and then
press the
[ENTER] key. Ten (10) minutes is used for the test time in this example.
e. The “SELECT TEST CURRENT” menu will be displayed:
SELECT TEST CURRENT:
1. 1 AMP
2. 5 AMPS
3. 10 AMPS
LTCA-10 LTCA-40
SELECT TEST CURRENT:
1. 1 AMP
2. 5 AMPS
3. 10 AMPS
4. 40 AMPS
Select the test current by pressing the [1], [2], [3] , or [4] (LTCA-40 only) key.
f. The “CONVERT READINGS TO STANDARD TEMP?” menu will be displayed:
CONVERT READINGS TO
STANDARD TEMP?
1. YES
2. NO
29
Page 30

LTCA-10/LTCA-40 USER’S MANUAL
1. YES
If you wish to convert readings to standard temperature, press the [1] key (YES).
The “WINDING MATERIAL” menu will be displayed:
WINDING MATERIAL
1. COPPER, Tk=234.5
2. ALUMINUM, Tk=225.0
3. MANUALLY ENTER Tk
a. Press the [1] key to select copper as the winding material. Continue to
step g.
b. Press the [2] key to select aluminum as the winding material. Continue to
step g.
c. Press the [3] key to manually enter the Tk value. The following screen
will be displayed:
Tk:
230.0°C
↑↓ to adjust Tk
“ENTER” to accept
You can increase the Tk value by 0.5°C increments by pressing the
[PAPER ∧ Contrast] key.
You can decrease the Tk value by 0.5°C increments by pressing the
[PAPER ∨ Contrast]
key.
Press the [ENTER] key to confirm your temperature selection. Continue
to step g.
2. NO
If you do NOT wish to convert readings to standard temperature, press the [2]
key (NO) and continue to step i.
g. After the Tk value has been selected, the “D.U.T. TEMP” screen will be displayed:
D.U.T. TEMP
25.0°C 77.0°F
↑↓ to adjust temp
“ENTER” to accept
Use the [PAPER ∧ Contrast] and [PAPER ∨ Contrast] keys to adjust the D.U.T.
temperature.
Press the [ENTER] key to confirm the temperature selection.
30
Page 31

LTCA-10/LTCA-40 USER’S MANUAL
h. The “REFERENCE TEMP” screen will be displayed:
REFERENCE TEMP:
85.0°C 185.0°F
↑↓ to adjust temp
“ENTER” to accept
Use the [PAPER ∧ Contrast] and [PAPER ∨ Contrast] keys to adjust the
Reference Temperature. Press the
[ENTER] key to confirm the temperature selection.
The LTCA-10/40 will calculate the equivalent resistance value at this new
temperature.
NOTE
i. The following “WARNING” screen will be displayed:
*********WARNING*********
DANGEROUS FLASH-OVER
WILL OCCUR IF CABLES
ARE DISCONNECTED!
*************************
This warning reminds the operator that the next sequence of test steps will run current
through the test load. Press the [ENTER] key to proceed to the next step.
j. One of the following menus will be displayed (with the relevant test current value)
depending on how many channels were selected in step c.
-V1 TEST ONLY1 AMP TEST
“START” TO RUN TEST
OR
“STOP” TO ABORT
V1 Test Only V1 & V2 Test
-V1 & V2 TEST1 AMP TEST
“START” TO RUN TEST
OR
“STOP” TO ABORT
-V1, V2, & V3 TEST1 AMP TEST
“START” TO RUN TEST
OR
“STOP” TO ABORT
V1, V2, & V3 Test
If you have made any errors or would like to abort the test, press the [STOP] key, and
you will be returned to the “START-UP” menu.
31
Page 32

LTCA-10/LTCA-40 USER’S MANUAL
Press the [START] key to run the test. The following screen will be displayed
momentarily:
CALIBRATING
PLEASE WAIT…
After the LTCA-10/40 finishes its internal calibration, the “XFMR CHARGING” screen
will be displayed:
XFMR CHARGING
PLEASE WAIT...
* XFMR ENERGIZED! *
This is only an informational screen to remind the operator that a test is in progress. The
display duration of this message depends on the size of the winding’s inductance and the
test current selected.
You can bypass this delay and observe the resistance value immediately. See
section 6.1 for instructions on how to select this option.
NOTE
k. The LTCA-10/40 determines when the resistance reading is stable and shows the
resistance value on the LCD as follows (the first line shows the remaining test time):
REMAINING TIME=10:00
I = 1.09 AMPS
R1 = 7.272 mΩ
* XFMR ENERGIZED! *
When the pre-defined test time has elapsed, the “TEST RESULTS” screen will be
displayed:
TEST RESULTS
I = 1.09 AMPS
R1 = 7.285 mΩ
The number of resistance values shown will depend on the number of channels
chosen in step c.
NOTE
Press the [ENTER] key.
l. The “SAVE THIS RECORD?” menu will be displayed:
SAVE THIS RECORD?
1. YES
2. NO
32
Page 33

LTCA-10/LTCA-40 USER’S MANUAL
The test record must be saved to Flash EEPROM so that it can be recalled and
printed at a later time.
NOTE
1. YES
If you wish to save the record, press the
[1] key (YES) and continue to step m.
2. NO
If you do not wish to save the record, press the [2] key (NO). The following
message will be displayed:
ARE YOU SURE?
DATE WILL BE LOST!
1. DO NOT SAVE RECORD
2. SAVE RECORD
Press the [1] key (DO NOT SAVE RECORD) if you do not want to save the
record. You will be returned to the “START-UP” menu.
Press the [2] key (SAVE RECORD) to save the record. Continue to step m.
m. The following message will be displayed:
RECORD NUMBER 01
HAS BEEN SAVED!
The record number is automatically assigned and incremented by the LTCA10/40.
NOTE
Press the [ENTER] key to return to the “START-UP” menu.
33
Page 34

5.6.1. Special Resistance Test Result Printout
LTCA-10/LTCA-40 USER’S MANUAL
Figure 11.0 Typical Single Reading Test Report Printout
34
Page 35

LTCA-10/LTCA-40 USER’S MANUAL
5.7 Performing a Dynamic LTC Test
The Dynamic LTC Test is used to conduct a resistance test while the LTC or Regulator is
switching taps. The test time can be selected for a period from 15 to 240 seconds to allow the
LTC or Regulator enough time to switch through all of its taps during the test. The resistance
data is recorded continuously during the test period. The AC current probe can be clamped
around one of the motor leads to monitor the motor current during the test. Use the following
steps to perform a Dynamic LTC Test.
a. Start from the “START-UP” menu:
1. TEST XFMR 03/04/09
2. SETUP 09:28:03
3. USER DIAG
Press the [1] key (TEST XFMR) to start a test.
b. The following menu will be displayed:
1. RESISTANCE TEST
2. SPECIAL RESISTANCE TEST
3. DYNAMIC LTC TEST
Press the [3] key (DYNAMIC LTC TEST) to start a dynamic LTC test.
c. The following menu will be displayed:
SELECT SHOT TIME
1. 15 SECONDS
2. 30 SECONDS
3. 60 SECONDS
4. 120 SECONDS
5. 240 SECONDS
Select the shot time by pressing the corresponding key on the LTCA-10/40’s keypad
([1], [2], [3], [4], or [5])
d. The “SELECT TEST CURRENT” menu will be displayed as shown below. The LTCA-
10 offers a selection of 5 or 10 Amps while the LTCA-10 offers a selection of 10 or 40
AMPS.
SELECT TEST CURRENT:
1. 5 AMPS
2. 10 AMPS
LTCA-10 LTCA-40
SELECT TEST CURRENT:
1. 10 AMPS
2. 40 AMPS
Select the test current by pressing the corresponding key on the LTCA-10/40’s keypad
[1] or [2]).
(
35
Page 36

LTCA-10/LTCA-40 USER’S MANUAL
e. The following “WARNING” screen will be displayed:
*********WARNING*********
DANGEROUS FLASH-OVER
WILL OCCUR IF CABLES
ARE DISCONNECTED!
*************************
This warning reminds the operator that the next sequence of test steps will run current
through the test load.
Press the
[ENTER] key to proceed to the next step.
f. The “LTC TEST” screen will be displayed (with the relevant test current value selected
in step d):
LTC TEST
10 AMP TEST
“START” TO RUN TEST
OR
“STOP” TO ABORT
If you have made any errors or would like to abort the test, press the
[STOP] key, and
you will be returned to the “START-UP” menu.
Press the [START] key to run the test. The following screen will be displayed
momentarily:
CALIBRATING
PLEASE WAIT…
After the LTCA-10/40 finishes its internal calibration, the “XFMR CHARGING” screen
will be displayed:
XFMR CHARGING
PLEASE WAIT...
* XFMR ENERGIZED! *
This is only an informational screen to remind the operator that a test is in progress. The
display duration of this message depends on the size of the winding’s inductance and the
test current selected.
g. The LTCA-10/40 determines when the resistance reading is stable and displays the
“READY TO CAPTURE DATA” screen:
READY TO CAPTURE DATA
PRESS “ENTER”
OR
LTC RAISE/LOWER
TO START TIMING
* XFMR ENERGIZED! *
Press the [ENTER] key to start capturing data for the time period selected in step e. The
LTC must be manually started to begin switching through the taps.
36
Page 37

LTCA-10/LTCA-40 USER’S MANUAL
If the LTC cable is connected, then pressing the [LTC RAISE] key when cycling from
lower to higher taps or pressing the [LTC LOWER] key when cycling from higher to
lower taps will start capturing data.
The following screen will be displayed indicating that the test is in progress:
RUNNING DYNAMIC
LTC TEST T = 15
R1 = 7.369 mΩ
“STOP” KEY TO ABORT
* XFMR ENERGIZED! *
h. When the pre-defined test time has elapsed or the [STOP] key is pressed, the “PRINT
TEST RESULTS?” menu will be displayed:
PRINT TEST RESULTS?
1. YES
2. NO
1. YES
Press the [1] key (YES) to print the test results on the built-in thermal printer. The
following menu will be displayed:
SELECT PLOT TYPE:
1. NORMAL PLOT
2. EXPANDED PLOT
1. NORMAL PLOT
Press the [1] key (NORMAL PLOT) to print a normal plot. The printer will
begin to print. A typical normal (full-scale) plot is shown in figure 11.0.
Continue to step i.
2. EXPANDED PLOT
To print an expanded plot, press the
[2] key (EXPANDED PLOT).
Continue to step i.
2. NO
Press the
[2] key (NO) to bypass the printing of the test results. Continue to step
j.
i. The “PRINT AN EXPANSION PLOT” menu will be displayed:
PRINT AN EXPANSION
PLOT?
1. YES
2. NO
37
Page 38

LTCA-10/LTCA-40 USER’S MANUAL
1. YES
An expansion plot graphs the resistance waveform in more detail by allowing the
selection of a timeframe to be plotted using an appropriate resistance scale. Press
[1] key (YES) to print an expansion plot. The following menu will be
the
displayed:
1. EXPANDED TIME & RES
2. EXPANDED RES ONLY
Press the corresponding key (
[1] or [2]) to select the expansion type. The
“EXPANSION PRINT” menu will be displayed:
EXPANSION PRINT
START TIME: 0 S
END TIME: 0 S
Enter the START time and press the [ENTER] key. Enter the END time and
press the [ENTER] key. The “RESISTANCE PLOT RANGE” menu will be
displayed:
RESISTANCE PLOT RANGE
1. FULL RANGE
2. 100μΩ - 10mΩ
3. 1mΩ - 100mΩ
4. 10mΩ - 1Ω
5. 100mΩ - 10Ω
6. 1Ω - 100Ω
Select the resistance plot range by pressing the corresponding key on the LTCA10/40’s keypad ([1], [2], [3], [4], [5], or [6]). The printer will begin the print the
expansion plot. A time expansion plot from 17.0 seconds to 18.00 seconds and
resistance scale from 100 milli-ohms to 10 ohms is shown in figure 12.0.
When printing is completed, you will be returned to the “PRINT AN
EXPANSION PLOT?” menu and offered the option to print another expansion.
Return to step i.
2. NO
Press the [2] key (NO) if you do not wish to print an expansion. Continue to step
j.
j. The “SAVE THIS RECORD?” menu will be displayed:
SAVE THIS RECORD?
1. YES
2. NO
38
Page 39

LTCA-10/LTCA-40 USER’S MANUAL
The test record must be saved to Flash EEPROM so that it can be recalled and
printed at a later time.
NOTE
1. YES
If you wish to save the record, press the
[1] key (YES) and continue to step k.
2. NO
If you do not wish to save the record, press the [2] key (NO). The following
message will be displayed:
ARE YOU SURE?
DATE WILL BE LOST!
1. DO NOT SAVE RECORD
2. SAVE RECORD
Press the [1] key (DO NOT SAVE RECORD) if you do not want to save the
record. You will be returned to the “START-UP” menu.
Press the [2] key (SAVE RECORD) to save the record. Continue to step k.
k. The following message will be displayed:
RECORD NUMBER 01
HAS BEEN SAVED!
The record number is automatically assigned and incremented by the LTCA10/40.
NOTE
Press the [ENTER] key to return to the “START-UP” menu.
39
Page 40

5.7.1. Dynamic LTC Test Result Printouts
LTCA-10/LTCA-40 USER’S MANUAL
Figure 12.0 Sample Normal Dynamic LTC Test Plot
40
Page 41

LTCA-10/LTCA-40 USER’S MANUAL
Figure 13.0 Sample Dynamic LTC Test Expansion Plot
41
Page 42

LTCA-10/LTCA-40 USER’S MANUAL
5.8 Diagnostic Mode
In diagnostic mode, the LTCA-10/40 can run a resistance test, display the sense voltages, and
test current on the LTCA. This feature can be used to verify the LTCA-10/40’s voltage and
current readings against an external meter. Use the steps below to initiate a diagnostic test.
a. Start from the “START-UP” menu:
1. TEST XFMR 03/04/09
2. SETUP 09:28:03
3. USER DIAG
Press the [3] key (USER DIAG).
b. The “SELECT TEST CURRENT” menu will be displayed:
SELECT TEST CURRENT:
1. 1 AMP
2. 5 AMPS
3. 10 AMPS
LTCA-10 LTCA-40
SELECT TEST CURRENT:
1. 1 AMP
2. 5 AMPS
3. 10 AMPS
4. 40 AMPS
Select the test current by pressing the [1], [2], [3] , or [4] (LTCA-40 only) key.
c. The following “WARNING” screen will be displayed:
*********WARNING*********
DANGEROUS FLASH-OVER
WILL OCCUR IF CABLES
ARE DISCONNECTED!
*************************
This warning reminds the operator that the next sequence of test steps will run current
through the test load.
Press the [ENTER] key to proceed to the next step.
d. The following screen will be displayed:
-USER DIAG TEST-
“START” TO RUN TEST
OR
“STOP” TO ABORT
If you wish to abort the diagnostic test, press the [STOP] key, and you will be returned
to the “START-UP” menu.
Press the [START] key to run the diagnostic test.
42
Page 43

LTCA-10/LTCA-40 USER’S MANUAL
e. The V1, V2, and V3 test currents will be displayed as shown below:
V1 = 07.53mV
V2 = 08.23mV
V3 = 09.12mV
I = 01.091A
Press the [STOP] key to end the diagnostic test and return to the “START-UP” menu.
43
Page 44

LTCA-10/LTCA-40 USER’S MANUAL
5.9 Setup Menu
The setup menu is used to configure the LTCA-10/40 and to also recall and print stored test
records. This section outlines the procedures for accessing and using the Setup Menu options.
5.9.1. Entering the Transformer ID
Transformer information can be entered using the steps outlined below.
Test identification data is entered using the LTCA-10/40’s alpha-numeric
keypad. Keys are pressed for each character position (marked by the cursor) in
NOTE
the identification area. For example, pressing the [2] key once selects the
number “2”. Pressing it a second time selects the letter “A”. A third press
selects the letter “B”. Pressing the key a fourth time selects the letter “C”.
Pressing the key one more time restarts the cycle at the number “2”.
The characters selected are entered at the position of the cursor. Pressing the
[PAPER ∧ Contrast] key advances the cursor by one space while pressing
the [PAPER ∨ Contrast] key moves the cursor back one space. If a
character is erroneously entered, select the new key to get the desired entry.
a. Start from the “START-UP” menu:
1. TEST XFMR 03/04/09
2. SETUP 09:28:03
3. USER DIAG
Press the [2] key (SETUP).
b. The following menu will be displayed:
1. ENTER XFMR ID
2. PRINT RECORD
3. SAVE/RESTORE RECORD
4. SET TIME
5. SET FONT
Press the [1] key (ENTER XFMR ID).
c. The “COMPANY” screen will be displayed:
COMPANY:
↑/↓ TO POSITION
“ENTER TO ACCEPT”
Enter the utility company’s name by using the LTCA-10/40’s alpha-numeric keypad, and
then press the [ENTER] key.
d. The “STATION” screen will be displayed:
STATION:
↑/↓ TO POSITION
“ENTER TO ACCEPT”
44
Page 45

LTCA-10/LTCA-40 USER’S MANUAL
Enter the station name by using the LTCA-10/40’s alpha-numeric keypad, and then press
the [ENTER] key.
e. The “CIRCUIT” screen will be displayed:
CIRCUIT:
↑/↓ TO POSITION
“ENTER TO ACCEPT”
Enter the circuit name by using the LTCA-10/40’s alpha-numeric keypad, and then press
the [ENTER] key.
f. The “MANUFACTURER” screen will be displayed:
MANUFACTURER:
↑/↓ TO POSITION
“ENTER TO ACCEPT”
Enter the transformer manufacturer name by using the LTCA-10/40’s alpha-numeric
keypad, and then press the [ENTER] key.
g. The “MODEL” screen will be displayed:
MODEL:
↑/↓ TO POSITION
“ENTER TO ACCEPT”
Enter the transformer model name/number by using the LTCA-10/40’s alpha-numeric
keypad, and then press the [ENTER] key.
h. The “SERIAL NUMBER” screen will be displayed:
SERIAL NUMBER:
↑/↓ TO POSITION
“ENTER TO ACCEPT”
Enter the transformer’s serial number by using the LTCA-10/40’s alpha-numeric keypad,
and then press the
[ENTER] key.
i. The “KVA RATING” screen will be displayed:
KVA RATING:
↑/↓ TO POSITION
“ENTER TO ACCEPT”
Enter the transformer’s KVA rating by using the LTCA-10/40’s alpha-numeric keypad,
and then press the
[ENTER] key.
45
Page 46

LTCA-10/LTCA-40 USER’S MANUAL
j. The “OPERATOR” screen will be displayed:
OPERATOR:
↑/↓ TO POSITION
“ENTER TO ACCEPT”
Enter the name of the operator by using the LTCA-10/40’s alpha-numeric keypad, and
then press the
[ENTER] key. You will be returned to the “START-UP” menu.
46
Page 47

LTCA-10/LTCA-40 USER’S MANUAL
5.9.2. Restoring a Test Record
Use the following steps to restore a test record from the LTCA-10/40’s Flash EEPROM to the
unit’s working memory.
a. Start from the “START-UP” menu:
1. TEST XFMR 03/04/09
2. SETUP 09:28:03
3. USER DIAG
Press the [2] key (SETUP).
b. The following menu will be displayed:
1. ENTER XFMR ID
2. PRINT RECORD
3. SAVE/RESTORE RECORD
4. SET TIME
5. SET FONT
Press the [3] key (SAVE/RESTORE RECORD)
c. The following menu will be displayed:
1. RESTORE RECORD
2. SAVE RECORD
3. RECORD DIRECTORY
4. ERASE RECORD
Press the [1] key (RESTORE RECORD)
d. The “RESTORE RECORD” menu will be displayed:
RESTORE RECORD
1. ENTER RECORD NUMBER
2. SCROLL TO SELECT
1. ENTER RECORD NUMBER
Press the
[1] key if you know the record number. The following screen will be
displayed:
RESTORE RECORD
NUMBER:
Enter the record number using the LTCA-10/40’s keypad, and then press the
[ENTER] key. “The RESTORING RECORD” screen will be displayed
momentarily:
RESTORING RECORD
Continue to step e.
47
Page 48

LTCA-10/LTCA-40 USER’S MANUAL
2. SCROLL TO SELECT
Press the [2] key if you want to scroll through the LTCA-10/40’s record directory
to find the record number. The “RECORDS DIRECTORY” screen will be
displayed:
RECORDS DIRECTORY
“UP” TO SCROLL FWD
“DWN” TO SCROLL RVS
Press the [PAPER ∧ Contrast] key to show the first record header in memory.
The first record header will be displayed:
#9 03/12/09 15:22
NUM OF TESTS: 3
Continue to press the [PAPER ∧ Contrast] and [PAPER ∨ Contrast] keys
to find the desired record. Press the [ENTER] key to load restore the desired
record. The “RESTORING RECORD” screen will be displayed momentarily:
RESTORING RECORD
Continue to step e.
e. Once a record has been restored, the following screen will be displayed:
RECORD RESTORED:
PRINT RECORD?
1. YES
2. NO
1. YES
Press the [1] key (YES) to print the restored record. The printer will print the
selected record, and the display will return to the “START-UP” menu once
printing is completed. See figure 13.0 for a typical test record printout.
2. NO
Press the
[2] key (NO) if you do not wish to print the restored record. The display
will return to the “START-UP” menu.
48
Page 49

LTCA-10/LTCA-40 USER’S MANUAL
Figure 14.0 Typical Test Record Printout
49
Page 50

LTCA-10/LTCA-40 USER’S MANUAL
5.9.3. Printing the Test-Record Directory
A directory of all the test records stored in the LTCA-10/40’s Flash EEPROM can be printed on
the thermal printer using the steps below.
a. Start from the “START-UP” menu:
1. TEST XFMR 03/04/09
2. SETUP 09:28:03
3. USER DIAG
Press the [2] key (SETUP).
b. The following menu will be displayed:
1. ENTER XFMR ID
2. PRINT RECORD
3. SAVE/RESTORE RECORD
4. SET TIME
5. SET FONT
Press the [3] key (SAVE/RESTORE RECORD)
c. The following menu will be displayed:
1. RESTORE RECORD
2. SAVE RECORD
3. RECORD DIRECTORY
4. ERASE RECORD
Press the [3] key (RECORD DIRECTORY)
d. The following menu will be displayed:
PRINTINT DIRECTORY
1. FULL DIRECTORY
2. SHORT DIRECTORY
1. FULL DIRECTORY
Press the
[1] key (FULL DIRECTORY) to print the entire directory of test
records. After the directory is printed, the display will return to the “START-UP”
menu. A typical directory printout is shown in figure 14.0.
2. SHORT DIRECTORY
Press the
[2] key (SHORT DIRECTORY) to print a short directory listing. This
lists the last 12 records store in the LTCA-10/40’s memory. After the directory is
printed, the display will return to the “START-UP” menu. A typical directory
printout is shown in figure 14.0.
50
Page 51

LTCA-10/LTCA-40 USER’S MANUAL
Figure 15.0 Typical Record Directory Printout
51
Page 52

LTCA-10/LTCA-40 USER’S MANUAL
5.9.4. Erasing a Test Record
Follow the steps below to erase a single test record or the entire directory of test records from the
LTCA-10/40’s Flash EEPROM.
a. Start from the “START-UP” menu:
1. TEST XFMR 03/04/09
2. SETUP 09:28:03
3. USER DIAG
Press the [2] key (SETUP).
b. The following menu will be displayed:
1. ENTER XFMR ID
2. PRINT RECORD
3. SAVE/RESTORE RECORD
4. SET TIME
5. SET FONT
Press the [3] key (SAVE/RESTORE RECORD)
c. The following menu will be displayed:
1. RESTORE RECORD
2. SAVE RECORD
3. RECORD DIRECTORY
4. ERASE RECORD
Press the [4] key (ERASE RECORD)
d. The “ERASE RECORD” menu will be displayed:
ERASE RECORD
1. ERASE SINGLE RECORD
2. ERASE ALL RECORDS
“STOP” TO EXIT
Press the
[STOP] key if you would like to end the process and return to the “START-
UP” menu. Otherwise, select one of the menu options described below:
1. ERASE SINGLE RECORD
Press the [1] key (ERASE SINGLE RECORD) to erase a single record. You will
be presented with the following screen:
ERASE RECORD
NUMBER: XX
52
Page 53

LTCA-10/LTCA-40 USER’S MANUAL
Enter the number of the record to erase and then press the [ENTER] key. The
following screen will be displayed to confirm that the record was deleted:
RECORD NUMBER XX
ERASED!
Press the [ENTER] key and you will be returned to the beginning of step d.
2. ERASE ALL RECORDS
Press the [2] key (ERASE ALL RECORDS) to erase all records stored in the
LTCA-10/40’s memory. The following confirmation screen will be displayed:
ERASE ALL RECORDS!
ARE YOU SURE?
“ENTER” TO CONTINUE
Press the [STOP] key to cancel the process and return to the “START-UP”
menu.
Press the [ENTER] key to erase all test records. The following screen will be
displayed showing a progress bar:
ERASING RECORDS
PLEASE WAIT...
Once all records have been erased, the following screen will be displayed:
RECORDS ERASED!
Press the
[ENTER] key to return to the “START-UP” menu.
53
Page 54

LTCA-10/LTCA-40 USER’S MANUAL
5.9.5. Enabling the Computer Interface
The Computer Interface Mode is used to transfer test records from the LTCA-10/40’s Flash
EEPROM to a PC via the RS-232C or USB port. To use this mode, first run the provided PC
software and then connect the PC to the RS-232C or USB port on the LTCA-10/40. The software
will automatically make the connection to the LTCA-10/40.
54
Page 55

5.9.6. Setting the Date and Time
a. Start from the “START-UP” menu:
1. TEST XFMR 03/04/09
2. SETUP 09:28:03
3. USER DIAG
Press the [2] key (SETUP).
b. The following menu will be displayed:
1. ENTER XFMR ID
2. PRINT RECORD
3. SAVE/RESTORE RECORD
4. SET TIME
5. SET FONT
Press the [4] key (SET TIME)
c. The following screen will be displayed:
ENTER
MM-DD-YY HH:MM:SS
_
LTCA-10/LTCA-40 USER’S MANUAL
Type in the Date and Time using the alpha-numeric keypad. When the complete date and
time has been typed in, the display will immediately return to the “START-UP” menu.
55
Page 56

LTCA-10/LTCA-40 USER’S MANUAL
5.9.7. Setting the Test Value Display Font
The font used to display test values on the screen can be made bold for better visibility. This only
affects the test values displayed during testing and does not affect any other text such as menu
items. Use the steps below to set the test value font.
a. Start from the “START-UP” menu:
1. TEST XFMR 03/04/09
2. SETUP 09:28:03
3. USER DIAG
Press the [2] key (SETUP).
b. The following menu will be displayed:
1. ENTER XFMR ID
2. PRINT RECORD
3. SAVE/RESTORE RECORD
4. SET TIME
5. SET FONT
Press the [5] key (SET FONT)
c. The “SELECT TEST FONT” menu will be displayed:
SELECT TEST FONT
1. NORMAL FONT
2. BOLD FONT
1. NORMAL FONT
Press the [1] key (NORMAL FONT) to select the normal font. The screen will
return to the “START-UP” menu.
2. BOLD FONT
Press the
[2] key (BOLD FONT) to select the bold font. The screen will return to
the “START-UP” menu.
56
Page 57

LTCA-10/LTCA-40 USER’S MANUAL
6.0 LTCA-10/40 SPECIAL FEATURES
6.1 Bypassing the Resistance Value Display Delay
When the LTCA-10/40 first applies the test voltage to the transformers winding, the current is
increased slowly until the transformer’s winding reaches saturation. During this period, the
resistance value varies substantially and the readings may appear unstable to the operator. The
LTCA-10/40 has a built-in 3 minute minimum delay between the start of the test and when the
resistance value is displayed on the LCD. This feature eliminates the possibility of early
erroneous readings. Depending on the transformer size, the delay may be longer than 3 minutes.
The operator can bypass this delay and observe the test results immediately. To bypass this
delay, press the [9] key, the [8] key, and the [7] key from the “START-UP” menu. The LTCA10/40 will then begin displaying resistance values as soon as measurements are made. This
bypass setting will remain active until the unit is turned off. When the unit is turned on again, it
will use the default 3 minute minimum delay before displaying resistance values.
6.2 Converting Resistance Measurements
The LTCA-10/40 can convert the resistance reading of the device under test at its present
temperature to the equivalent resistance value at a different temperature. The conversion is
accomplished by the following formula:
Rs = Rm (Ts + Tk) / (Tm + Tk)
Where:
Rs is the resistance at desired temperature
Rm is the measured resistance
Ts is the desired reference temperature
Tm is the temperature at which the resistance was measured
Tk is the constant used for the winding material
Tk = 234.5 for copper
Tk = 240.0 for aluminum
57
Page 58

LTCA-10/LTCA-40 USER’S MANUAL
1520 S. Hellman Ave • Ontario, CA 91761 • USA
Phone: 909-923-9390 • Fax: 909-923-9391
www.vanguard-instruments.com
LTCA-10/40™ User’s Manual • Version 2.2 • October 3, 2011
Copyright © 2011 by Vanguard Instruments Company, Inc.
58
 Loading...