


Senator
W
f
Vent-free Room Heater
Model 276N - For Natural Gas
Model 276P - For LPG (Propane Gas)
INSTALLATION AND
OPERATION MANUAL
Please read this manual before installing
and operating your heater.
Please keep this manual for future
reference.
This appliance is an unvented gasfired heater. It uses air (oxygen)
from the room in which it is
installed. Provisions for adequate
combustion and ventilation air
must be provided.
ARNING: If the information in this manual is
not followed exactly, a fire or explosion may result
causing property damage, personal injury or loss o
life.
- Do not store or use gasoline or other flammable
vapors and liquids in the vicinity of this or any
other appliance.
- WHAT TO DO IF YOU SMELL GAS
• Do not try to light any appliance.
• Do not touch any electrical switch; do not use
any phone in your building.
• Immediately call your gas supplier from a
neighbor’s phone. Follow the gas supplier’s
instructions.
• If you cannot reach your gas supplier, call the
fire department.
- Installation and service must be performed by a
qualified installer, service agency or the gas
supplier
600A584/06

Safety Information
Appliance Specifications
Installation
• Codes
................................................................................................................................................................................................................................................................................... 4 - 8
....................................................................................................................................................................................................................................................................................... 4
• Clearances
• Venting
................................................................................................................................................................................................................................................................................... 5
• Pre-installation Checks
............................................................................................................................................................................................................................................................ 3
......................................................................................................................................................................................................................................... 4
......................................................................................................................................................................................................................................................................... 4
.................................................................................................................................................................................................................................... 5
• Equipment needed for Installation
• Pack Contents
• Wall Mounting
• Gas Connection
• Gas Pressure Check
• Fitting Cast-iron Mantle
• Control Operation Check
Lighting Instructions
• Safety Warnings
• Lighting
• To turn Off
Flame check
Cleaning
Servicing
....................................................................................................................................................................................................................................................................................... 12
....................................................................................................................................................................................................................................................................................... 13
• Replacement parts
• Notes for Service Engineer
............................................................................................................................................................................................................................................................ 6
........................................................................................................................................................................................................................................................... 6
....................................................................................................................................................................................................................................................... 6
.............................................................................................................................................................................................................................................. 7
............................................................................................................................................................................................................................... 8
........................................................................................................................................................................................................................... 9
.................................................................................................................................................................................................................................................. 10 -11
....................................................................................................................................................................................................................................................... 10
.............................................................................................................................................................................................................................................................................. 11
..................................................................................................................................................................................................................................................................... 11
.............................................................................................................................................................................................................................................................................. 12
.................................................................................................................................................................................................................................................. 13
.................................................................................................................................................................................................................... 13
LIST OF CONTENTS
Page
.................................................................................................................................................................................................... 5
2

SAFETY INFORMATION
IMPORTANT: Please read and understand this manual before installing and operating your heater. Please keep
this manual for reference. It is the basis for safe and proper operation of your heater.
WARNING!
This heater must have fresh air for proper operation. If not, poor fuel combustion could result. Read the venting
section in this manual.
When used without fresh air this heater may give off carbon monoxide, an odorless, poisonous gas.
Early signs of carbon monoxide poisoning resemble the flu, with headaches, dizziness and/or nausea. If you have
these signs the heater may not be working properly. Get fresh air at once! Turn off the heater and have it serviced.
Some people (such as pregnant women, persons with heart or lung disease, anemia, those under the influence of
alcohol, those at high altitudes) are more affected by carbon monoxide than others.
WARNING: Any change to this heater or its controls can be dangerous. Improper installation, adjustment,
alteration, service or maintenance can cause injury or property damage. Refer to this manual. For assistance or
additional information, consult a qualified installer, service agency or your gas supplier.
This appliance must not be installed in a bathroom or bedroom or recreational vehicle
This appliance is a room heater. It is not intended to be used for any other purpose. Do not use this appliance for
hanging clothes etc. to dry or any other purpose except heating the room.
If this heater is for use with propane gas, locate
propane supply tank outdoors.
Young children should be carefully supervised when
in the same room as the heater.
Installation or repair should be performed by a
qualified service person in strict accordance with
local codes and ordinances. The heater should be
inspected before use and at least annually by a
professional service person. More frequent cleaning
may be required due to excessive lint from
carpeting, bedding, furnishing materials, etc. It is
imperative that the control valve compartment,
burners and circulating air passageways of the
heater are kept clean.
Due to high temperatures, locate the heater out of
traffic. Keep curtains, clothing, furniture and all
other flammable materials at least 36ins from all
surfaces of the heater.
Do not locate the heater in an area exposed to high
drafts or winds.
Keep children and adults away from the heater
surfaces which become very hot when in use. The
cast-iron mantle openings, mesh guard and burners
operate at high temperatures. The heater will
remain hot for some time after shutdown. Allow the
heater to cool before touching.
If the cast-iron mantle or mesh guard are removed
for service or cleaning, make sure that they are put
back in place before operating the heater.
Do not use this room heater if any part has been
under water. Immediately call a qualified service
technician to inspect the room heater and to replace
any part of the control system and any gas control
which has been under water.
As with any new gas burning appliance, a slight odor
may be noticeable when first operated due to the
newness of the components. This is harmless and
will disappear after the first few hours of use.
If the heater shuts off automatically, provide fresh
outside air before attempting to relight.
For your safety, the heater has a sensor which
detects a lack of oxygen and will shut off the
appliance is there is not enough fresh air for proper
combustion. If the heater keeps shutting off get
advice from your installer.
Do not use this heater for burning trash. Never
place any garbage or other material on top of the
log or in the flames.
3
APPLIANCE SPECIFICATIONS
FEATURE MODEL
276N 276P
GAS NATURAL PROPANE
INLET PRESSURE MAX 10.5 14
(Ins w.c.) MIN
MANIFOLD PRESSURE MAX 4.2 9.7
(In w.c.) MIN 3.8 9.3
INPUT MAX (Btu/h) 25,000 28,000
HEIGHT (Ins.) 263/8”
WIDTH (Ins.) 25
DEPTH (Ins.) 83/8”
BLOWER ACCESSORY
Notes:
1. For purposes of input adjustment.
2. Contact your dealer for details of the blower accessory.
3. WARNING: Do not use a blower insert, heat exchanger insert or other accessory not approved for use with this heater
This appliance is design certified for use in the USA by International Approval Services to ANS Z21.11.2b - 1998 (Unvented gas fired
room heaters).
2
1
511
VF171 or VFT171
INSTALLATION
CODES
Installation requirements vary with the locality. The installation
must conform with local codes or, in the absence of local codes,
with the latest edition of the National Fuel Gas Code ANSI
Z223.1. This appliance may be installed in an aftermarket
manufactured (mobile) home where not prohibited by state or
local codes.
Aftermarket: Completion of sale, not for purpose of resale, from the
manufacturer.
This appliance is only for use with the type of gas indicated on
the rating plate. This appliance is not convertible for use with
other gases.
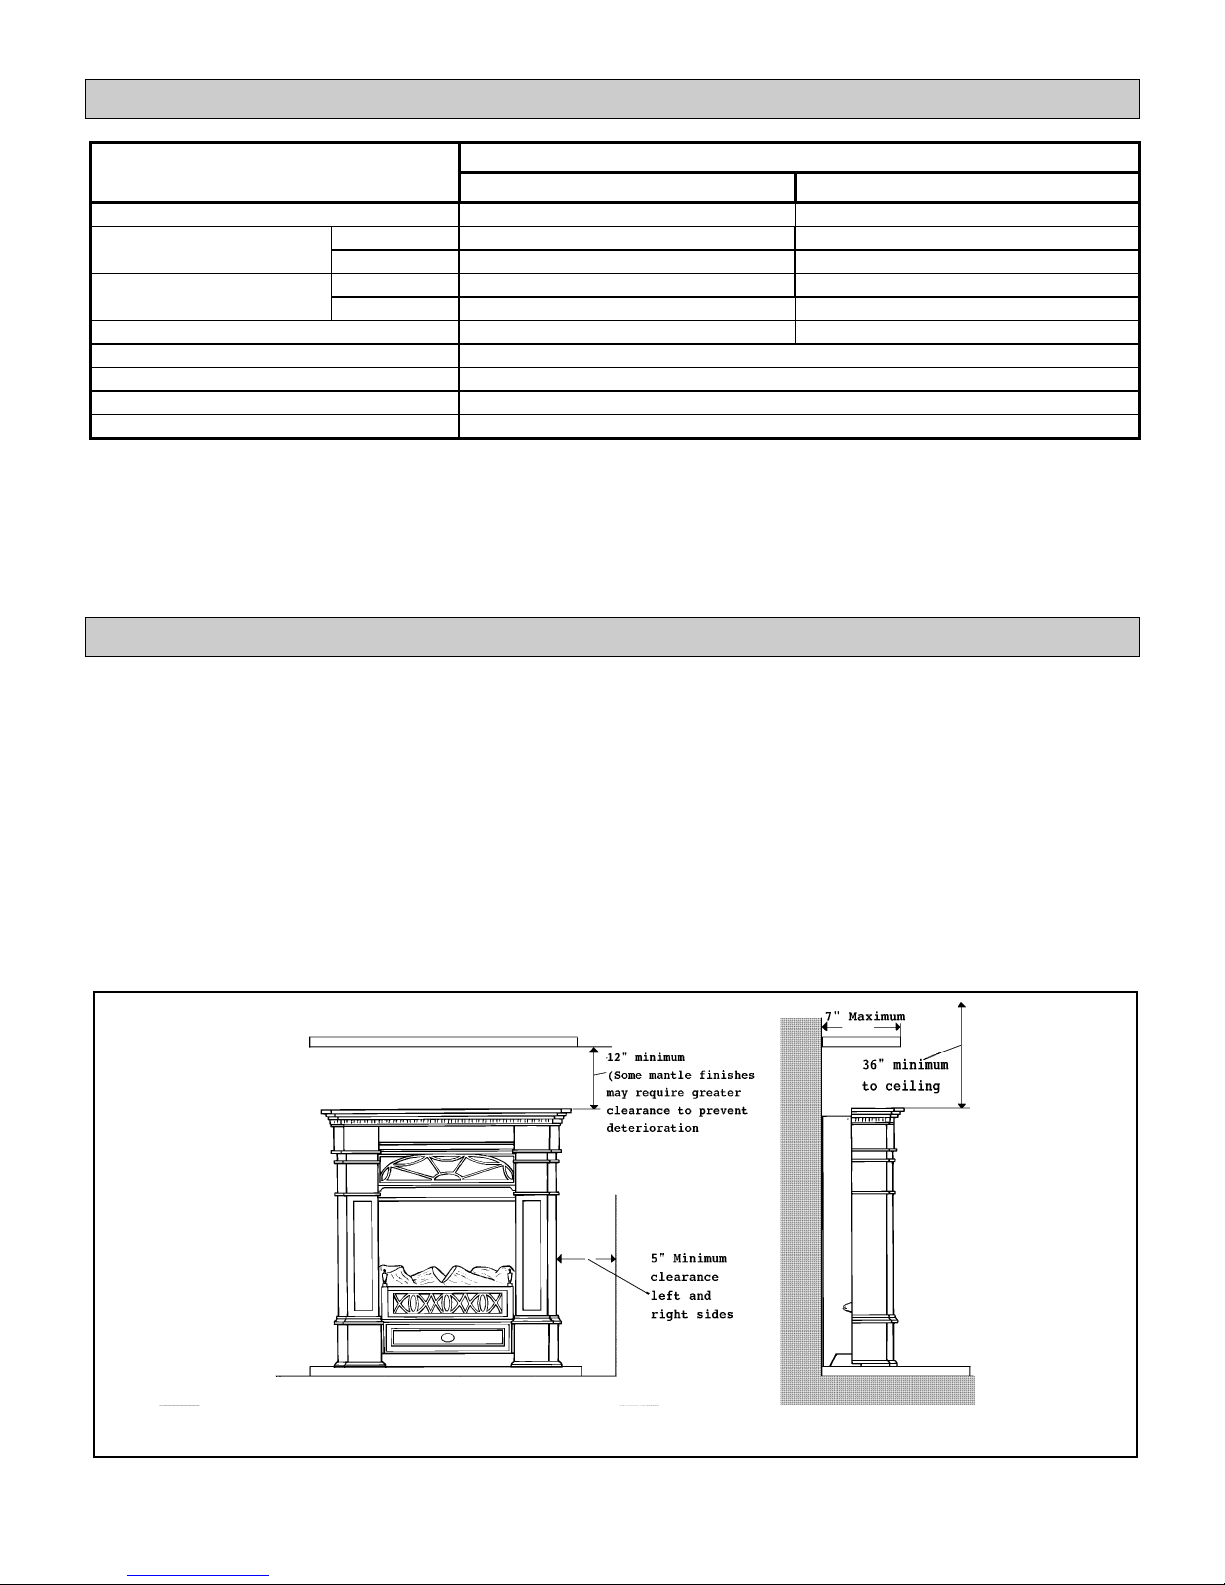
CLEARANCES
The minimum clearances to combustible surfaces are shown in
figure 1.
Allow sufficient clearances for comfortable operation of the
controls and easy access for cleaning and servicing.
If the appliance is intended to be installed on carpeting, tile or
other combustible flooring other than wood, it must be installed
on a metal or wood panel extending the full width and depth of
the appliance.
Fig. 1 Appliance dimensions and clearances to combustible materials
4

VENTING
This heater shall not be installed in a confined space unless
provisions are provided for adequate combustion and ventilation
air.
The National Fuel Gas Code defines a confined space as a space
whose volume is less than 50 cubic feet per 1,000 Btu per hour
3
(4.8m
) of the aggregate input rating of all appliances installed in
that space and an unconfined space as a space whose volume is
not less than 50 cubic feet per 1,000 Btu per hour (4.8m
aggregate input rating of all appliances installed in that space.
Rooms communicating directly with the space in which the
appliances are installed, through openings not furnished with
doors, are considered a part of the unconfined space.
If there are no other appliances in the area, the minimum
volume which can be defined as an unconfined space for the
appliances covered by this manual is as follows:-
Model
276N 1250
276P 1400
If there are other appliances in the area, add 50 cu. ft. to the
above figure for every 1,000Btu/h of total maximum input rating
of these appliances.
Do not include any direct vent appliances in the calculation.
Direct vent appliances draw air from and exhaust combustion
products directly to the outdoors.
WARNING: If the area in which the heater may be operated is
smaller than that defined as an unconfined space, provide
adequate combustion and ventilation by one of the methods
described in the National Fuel Gas Code, ANSI Z223.1, 1992,
Section 5.3.
Minimum unconfined
space (cu. ft)
3
) of the
PRE-INSTALLATION CHECKS
Check gas type. Use only with the gas type indicated on the
appliance rating label. If the gas type indicated on this label is not
your type of gas supply do not install! Contact your dealer for
the proper model.
Check gas line pressure. Check that the pressure is no greater
than the maximum shown in appliance specification table. This
will prevent damage to the regulator fitted to the appliance.
Propane appliances require an external regulator to reduce the
supply tank pressure to the maximum of 14 inches w.c. This is in
addition to the regulator fitted to the appliance.
WARNING: Connecting directly to an unregulated
Propane tank can cause an explosion!
EQUIPMENT NEEDED FOR
INSTALLATION
a) Pipe sealant resistant to the gas used and all its constituents.
Note that natural gas can contain some LP gas during peak
supply periods.
b) Piping. We recommend using only new black iron or steel
pipes. Copper tubing may be acceptable - check local codes.
If copper tubing is used, it must be internally tinned or
equivalently treated to resist corrosion by sulfur compounds.
c) Manual shut-off valve.
d) Union, drip leg and
connection.
e) Pipe wrenches.
f) Pressure test gauge equipment.
(not included with appliance)
1/8"
NPT plugged tap for test gauge
5
 Loading...