

Valor RM-921C User Manual

Welcome
Thank you for buying a Valor Multimedia overhead monitor with media
player. Please read this manual carefully before using the overhead LCD
Monitor with media player in order to get the most out of all the features
and functions. Keep this manual in a safe place, as it can be a valuable
tool in helping you to understand all the features and functions.
Contents
Safety information.............................................................................. 1
DVD player features........................................................................... 3
Setting up your DVD player.............................................................. 9
Using your DVD player...................................................................... 14
Basic Operation ................................................................................ 16
System setup ...................................................................................... 23
Troubleshooting.................................................................................. 27
Specifications...................................................................................... 28
Maintaining.......................................................................................... 29
Safety information
§ Do not operate the unit in any way other than described within this
manual. Failure to follow the instructions within the manual will void your
warranty.
§ SAFETY FIRST! Do not install the display where it may (i) obstruct the
driver’s vision, (ii) impair the performance of any of the vehicle’s
operating systems or safety features, including airbags, or (iii) impair the
driver’s ability to safely operate the vehicle.
§ When using the system, make sure you are firmly secured by your seat
belt to ensure you do not accidentally hit your head on the screen during
sudden braking or other incidents. If you are ever in an accident, injuries
can be more severe if the seat belt is not properly buckled.
§ Do not attempt to install or service your display by yourself. Installation
1

or servicing of the display by persons without training and experience in
electronic equipment and automotive accessories may be dangerous
and could expose you to the risk of electric shock or other hazards.
§ Be careful not to drain the car battery while using the unit with the car
engine stopped. To avoid draining the battery, it is suggested that the
vehicle engine always is running while using the unit.
§ Do not disassemble or alter the unit in any way. Failure to do so can
cause damage to the unit and invalid the warranty.
§ Never clean the surface of the screen with chemical solvent or corrosive
detergent, which may cause permanent damage to the TFT LCD
screen.
§ Avoid installing the unit wherever is under direct sunlight or near hot air
vent. Please note that the normal working temperature of the unit is
between -5℃ to +50℃. If the internal temperature of the vehicle is
extremely high, a short cooling down period is necessary before
operating the unit.
§ If the temperature inside the car is very low and the monitor is used
soon after switching on the heater, moisture may form on the panel of
the unit. Turn off the unit immediately! Failure to do so may cause the
internal components to short. Allow the unit to rest for about one hour to
allow the condensation to disappear before continue operation.
§ In extremely cold temperatures, the movement of the picture may be
slow and the picture may be dark. It is not a malfunction. The unit will
work normally once it reaches its operating temperature.
§ Do not drop or hit the LCD panel with a hard object, as it may cause
permanent damage to the LCD panel. Should LCD panel break, avoid
touching glass and fluid. If you come in contact with the fluid please
ask for medical attention immediately.
§ Due to different car specifications, please ensure that the display
monitor is properly located and not obstructing the air-conditioning vent.
§ Avoid inserting any foreign objects into the slot of the disc Player.
Failure to observe this may cause malfunction due to the precise
mechanism of this unit.
§ Protect your discs. When you leave the car, be sure to eject the disc
from this unit and store it separately away from direct sun light.
§ Heat and humidity may damage the disc and you may not be able to
play it again.
§ Use the supplied screws to fix the monitor metal mounting plate.
2

DVD player features
This player is a Roof Mount 9.2" TFT-LCD Color Display with DVD player
that can be used as a stand-alone display, or can be integrated into a
mobile multimedia system. This player has the following features:
§ 9.2" TFT-LCD color monitor (16:9)
§ Roof Mounting Application
§ Pixel(dots):800RGB(W)x480(H)
§ Wide Viewing angle(up/down/left/right):45/55/65/65
§ NTSC and PAL Compatible
§ Adjustable Color/Contrast/Brightness/Tint
§ Manual Viewing Angle Adjustment
Vertical Adjustable: up/down>1500
§ White LED Dome Light
§ Automotive Startup Protection
§ Built-in IR Transmitter for IR Wireless Headphone
§ IR Remote Control
§ On Screen Display
§ 2xAV Input
§ 1xAV Output
§ Slot-in DVD mechanism
§ USB1.1 Host Mode
§ Memory card port for SD/ MMC/MS
§ Capability to read: DVD Format
/DVD±R/DVD±RW/CD-DA/CD-RW/MP3/VCD/SVCD
Note: Multi-session CDs and 320kbps WMA files can not be played on
this player.
§ FM Transmitter for listening the audio from your car audio system via
FM radio receiver (setting frequency: 88.1, 88.3, 88.5, 88.7, 88.9, 89.1,
89.3, 89.5, 89.7 MHz and 89.9 MHz)
DVD VIDEO FEATURES
This unit provides the following functions in addition to high image quality and
sound quality of DVD video:
Multi-sound Function
DVD audio can store up to 8 languages for one film. This allows for the selection
of language of ones preference.
3
Multi-angle Function
A DVD video that is filmed from multiple angle which allows you choosing to view
from different perspectives.
Subtitle Function
A DVD video can record subtitles for up to 32 languages to choose from.
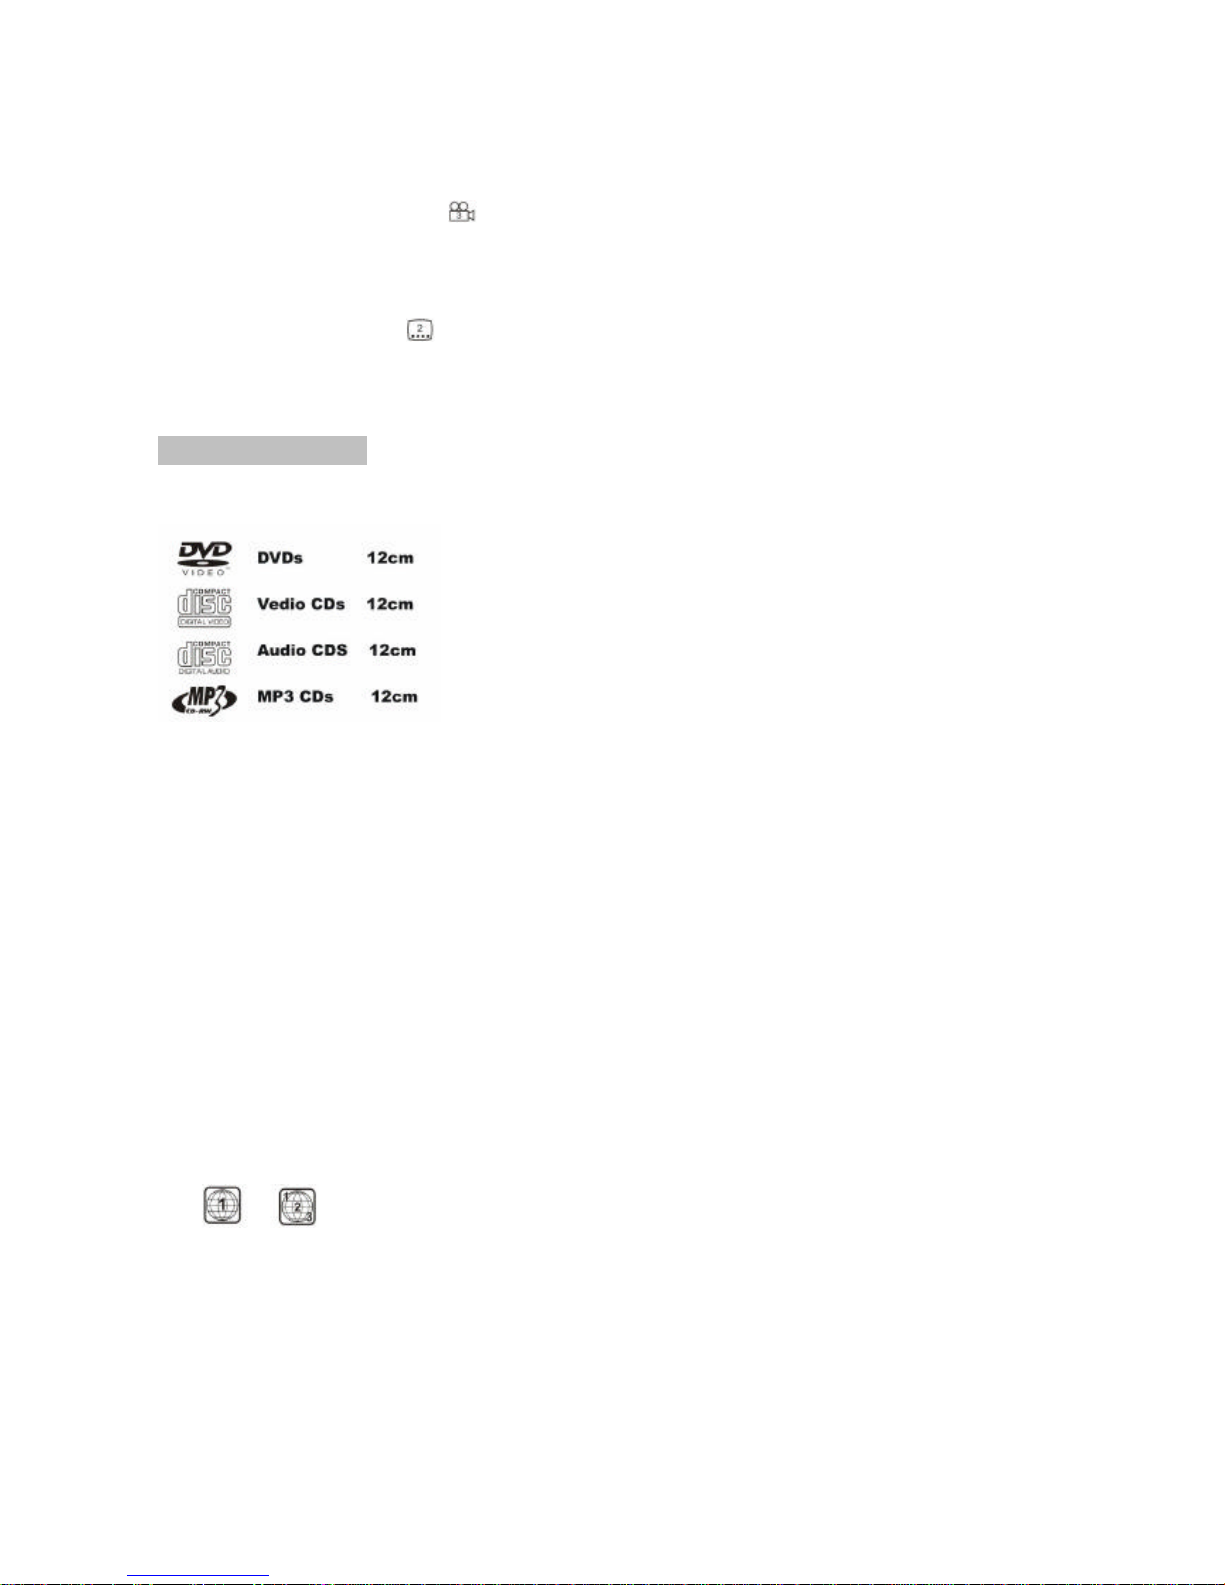
DISC PLAYBACK
This DVD player can play the following formats.
About CD Extra discs
A CD Extra disc is a disc in which a total of two sessions have been recorded.
The first session is Audio session and the second session is the Data session.
Your personally-created CDs with more than 2 data sessions recorded cannot be
played on this DVD Video Player.
MP3 Playback
This unit can play back CD-R/CD-RW discs on which MP3 music data have been
recorded.
Region Numbers
The DVD Video System assigns a region number to DVD video player and DVD
disk by Sales area. The DVD video region number is marked on the disk Jacket
as shown below.
Ex.
4
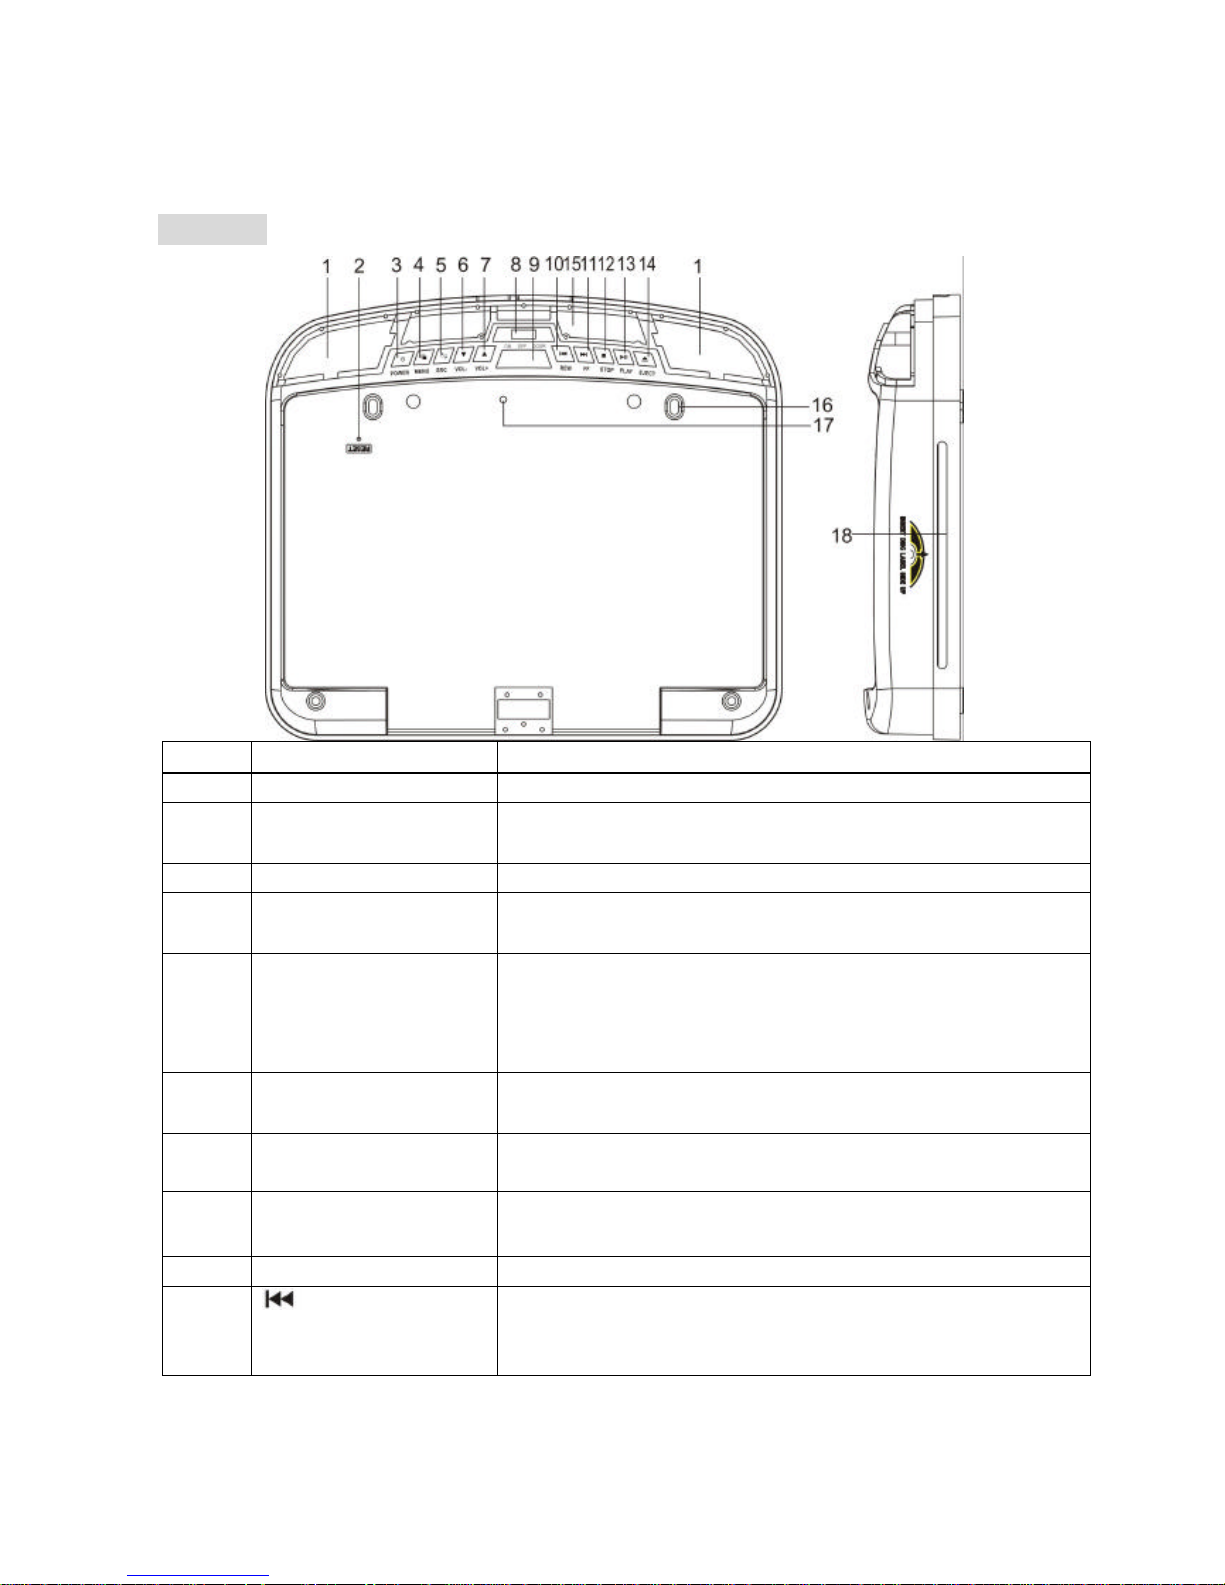
DISPLAY
Item Name Function or Control
1 Dome Light Provides an interior light for the vehicle.
2 Reset button Press with a pencil or other narrow-tipped tool to
rest the player.
3 Power button Press to turn on or turn off the player
4 Menu button Press to open the TFT menu. Press again to select
a menu item.
5 SRC input source
button
Press to select the video input mode (DVD-IN
/USB/ SD/ MMC/ MS, AV IN1, AV IN2,). (When the
units sets in DVD mode, press it can change
USB/SD/MMC/MS mode.)
6
▼(VOL-)button
Press to reduce a value in the menu (such as
decreasing the volume).
7
▲(VOL+) button
Press to increase a value in the menu (such as
increasing the volume).
8 Dome Light switch Move to the ON/OFF position, then press it to turn
the dome light on or off.
9 Panel open button Press to open the LCD panel.
10 (SKIP-) button Press to skip the previous chapter on DVD or track
on CD; Press and hold it to fast reverse playback
at 2x, 4x, 8x, 16x and 32x speeds.
5
Item Name Function or Control
11
(SKIP+) button
Press to skip the next chapter on DVD or track on
CD; Press and hold it to fast forward playback at
2x, 4x, 8x, 16x and 32x speeds
12 Stop button Press to stop playback, press [PLAY] or [ENTER]
button to start playing at the last position; Press
[STOP] button twice to fully stop playback, Press
[PLAY] or [ENTER] button to start playing at the
beginning of DVD.
13
Play or Pause
Press to play or pause a disc.
14 Eject button Press to eject the disc.
15 IR window Receives IR signals from the remote control and
sends IR signals to IR wireless headphone.
16 Fixing holes Connect the player to the mounting plate with
screws inserted into these holes.
17 LCD screen shut off
switch
Press to turn off the LCD screen
18 Disc slot Insert the disc into this slot.
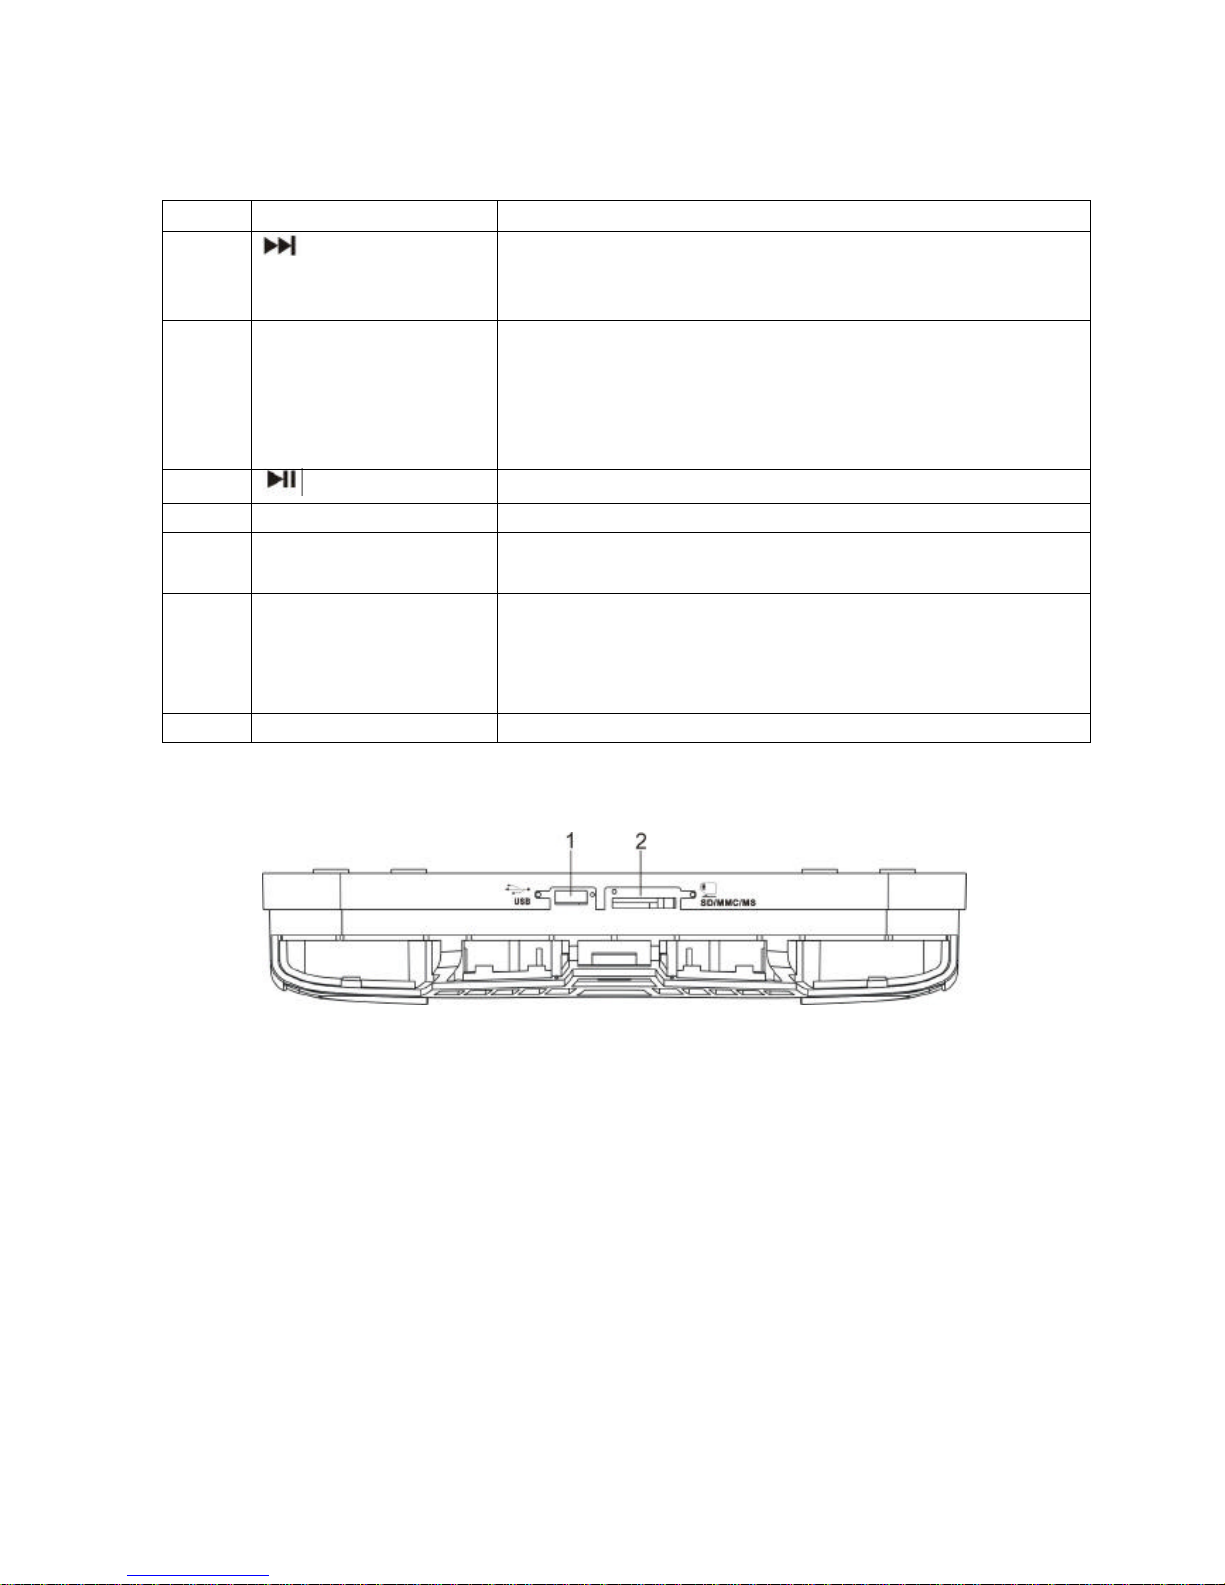
1. USB socket: connect USB storage to the player.
2. Memory card socket: connect the memory card (SD/MMC/MS) to the player.
6
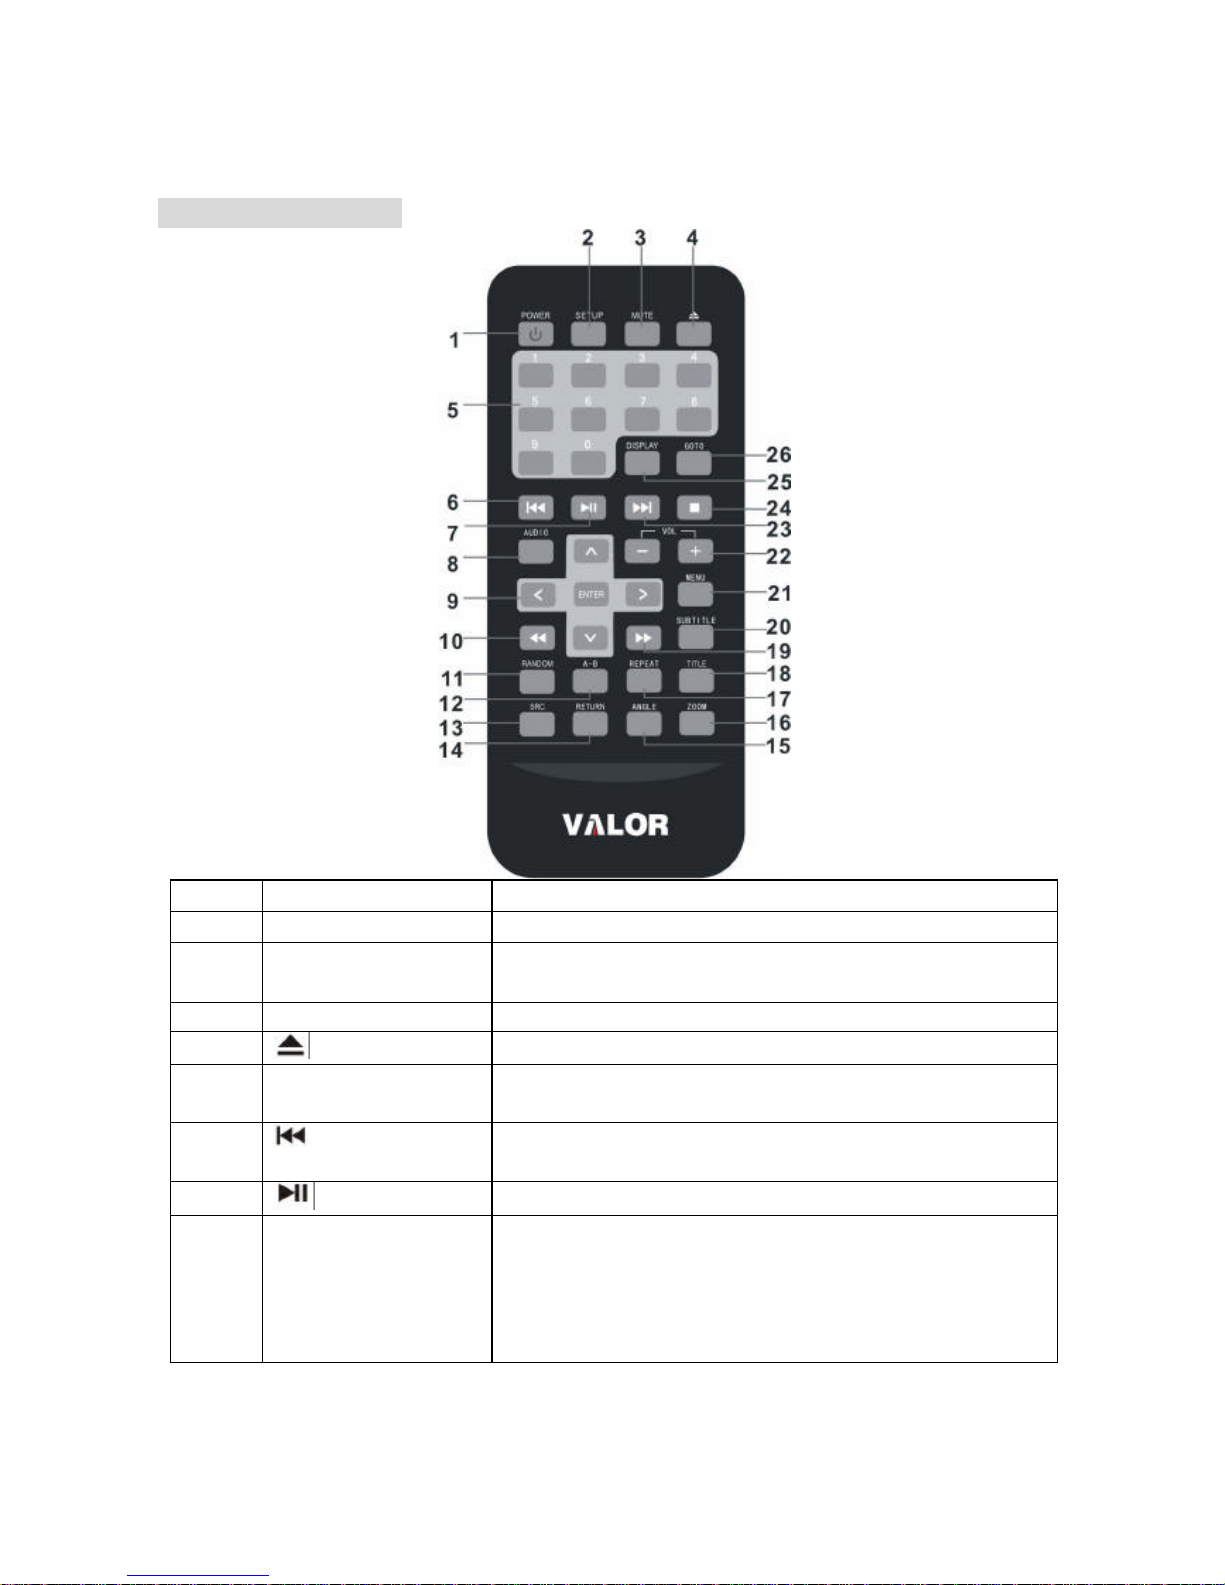
REMOTE CONTROL
Item Name Function or control
1 Power Press to turn the player on or off.
2 Setup
Press to access the setup menu to modify the
DVD player settings.
3 Mute Press to turn the sound on or off.
4
Eject
Press to eject the disc.
5 0-9
Press to enter numbers directly, such as for
settings or track numbers.
6 Previous
Press to go to the previous chapter on DVD or
track on CD.
7
Play or Pause
Press to play or pause the CD or DVD.
8 Audio
DVD: press to change the audio language during
DVD playback.
VCD/CD: press to change the audio chann
el
(Left, Right and stereo) during VCD and
CD
playback.
7

Item Name Function or control
9
Arrow and ENTER
buttons
Press to navigate
in a menu and change setting
values.
10
FR
Press to fast reverse playback at 2x, 4x, 8x,16x
and 32x speeds.
11 Random Press to play chapters or tracks in random order.
12 A-B Press to repeat playback from point A to point B.
13 SRC Press to select the video input mode (DVD-
IN
/USB/ SD/ MMC/ MS, AV IN1, AV IN2,). (When
the units sets in DVD mode, press it can change
USB/SD/MMC/MS mode.)
14 Return
Press to return the main menu, press again to
return the last position of playback.
15 Angle Press to select a different filming angle. T
his
feature only works if the DVD is recorded with
multiple angles.
16 Zoom Press to set the zoom for movie viewing.
17 Repeat Press to repeats the track or the entire disc.
18 Title Press to view the DVD disc’s title menu.
19
(FF)
Press to fast forward playback at 2x, 4x, 8x,16x
and 32x speeds.
20 Subtitle Press to select and turn on subt
itles during
playback.
21 Menu Press to view the DVD disc’s main menu.
22 VOL - / VOL+ Press to decrease / increase the volume.
23
Next
Press to go to the next chapter on DVD or track
on CD.
24 Stop
Press to stop playback, press [PLAY] or
[ENTER] b
utton to start playing at the last
position; Press [STOP ]
button twice to fully stop
playback, Press [PLAY] or [ENTER] button to
start playing at the beginning of DVD.
25 Display
Press to display the playback information (such
as title, chapter, track and time).
26 Goto
Press to start playback at a selected chapter,
track or time.
8
 Loading...