


time SWITCH 130
24 hour time clock
For the user / for the installer
Instructions for Use and Installation
GB
838311_01GB_052005.qxd 23.05.2005 8:49 Uhr Seite 2

Contents
2
GB
GB
24 hour time clock Operating instructions page 4- 9
Installation instructions page 10 -12
figures page 3, 14- 16
EC declaration of conformity page 17
All Vaillant boilers have a built in frost
thermostat. This time clock is not
suitable for use with an external frost
thermostat.
838311_01GB_052005.qxd 23.05.2005 8:49 Uhr Seite 3
1
2
4
2
3
2
2
2
1
2
0
1
9
1
8
1
7
1
6
1
5
1
4
1
3
1
2
1
1
1
0
9
8
7
6
5
4
3
2
9
3
12
6
timeSWITCH
off
on
1
2
3
4a
4b
5
3
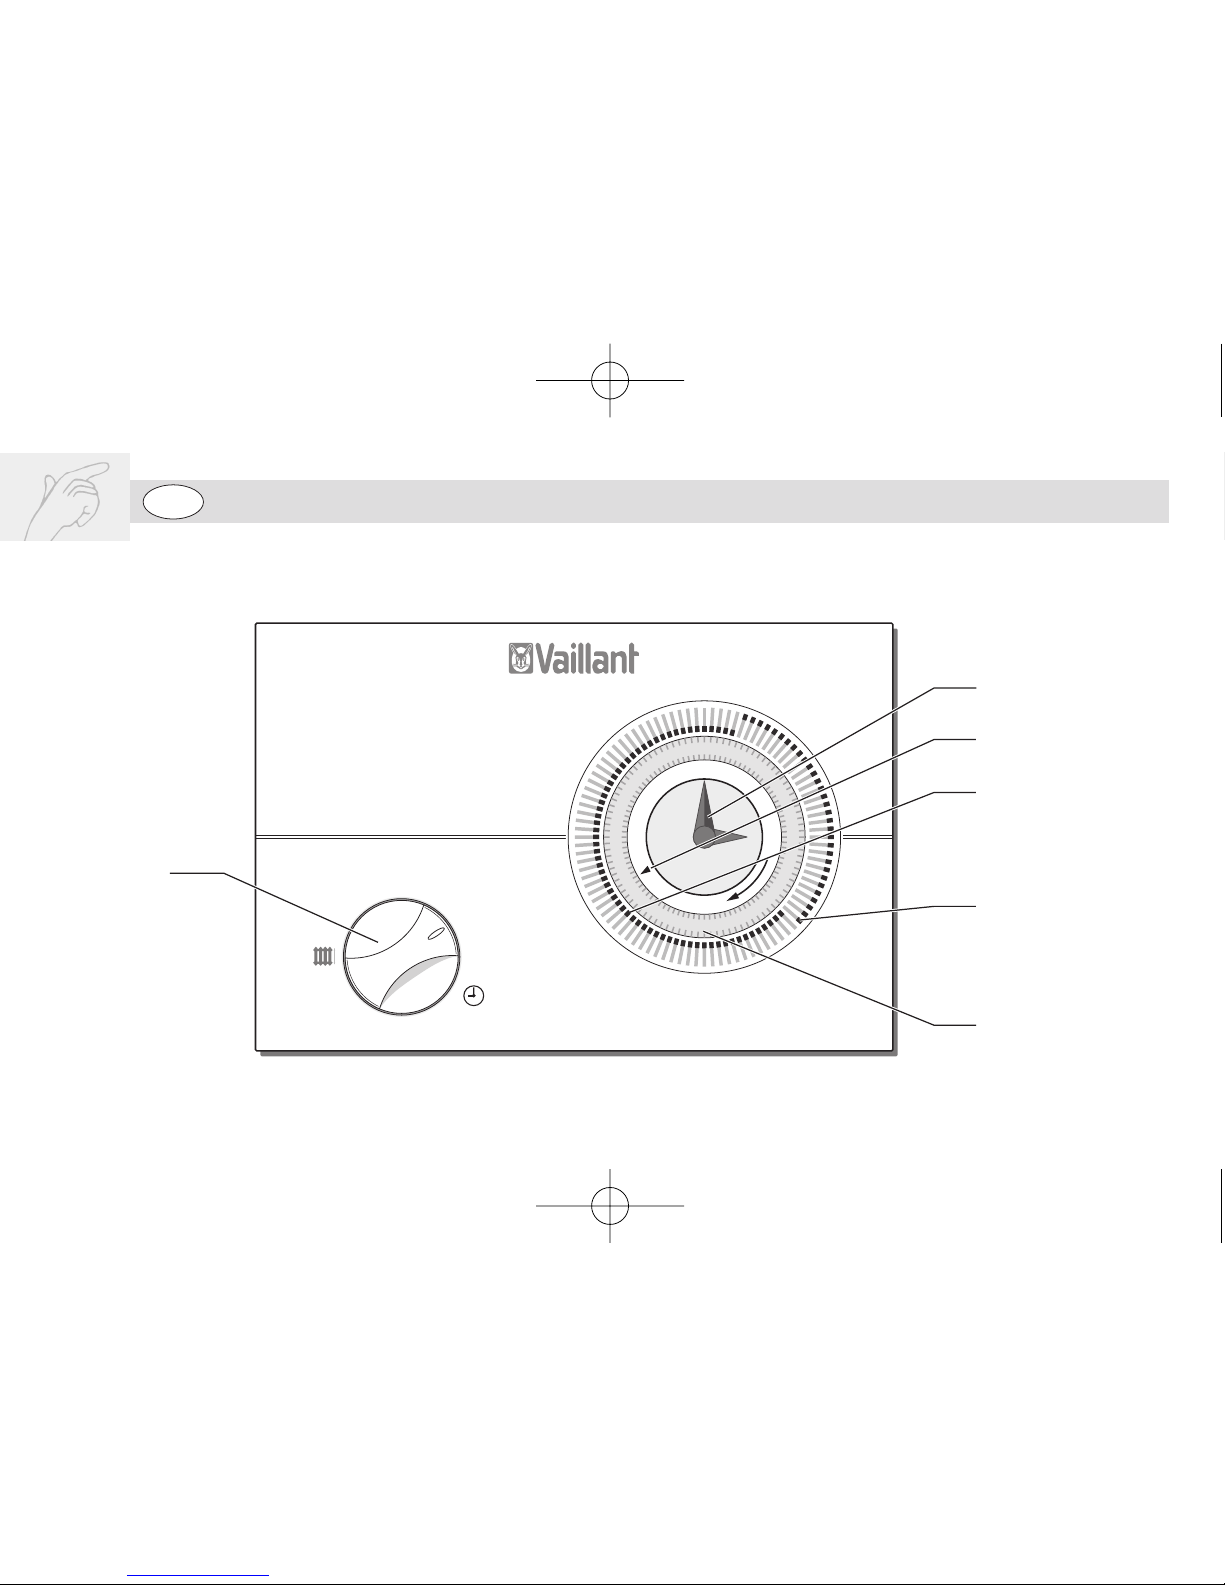
Fig. 1:
GB
Fig. 1
838311_01GB_052005.qxd 23.05.2005 8:49 Uhr Seite 4
GB
1 Operating mode switch
The time is controlled as follows:
Heating constantly off ”off”
Heating constantly on ”on”
Automatic heating programme ” ”
2 Minute hand
*
For showing and setting the time
3 Reference triangle
*
Indicates the time of day
e.g. Fig. 1 ”15.00”
4a Slide in the tappets
Tappet in = ”on” = heating on
4b Slide out the tappets*
Tappet out = ”off” = heating off
5 Time of day
The time of day can be read opposite
the reference triangle (3). Please
note that the time of day is given
using a 24 hour clock.
1 Operating Summary
4
838311_01GB_052005.qxd 23.05.2005 8:49 Uhr Seite 5

Contents
5
1 Operating summary page 4
2 Selecting the
operating mode page 6
3 Setting the timer page 7
4 Programming heating
periods page 8
5 Special operating
conditions page 9
6 Installation instructions page 10
7 Commissioning page 11
8 Technical data page 12
GB
838311_01GB_052005.qxd 23.05.2005 8:49 Uhr Seite 6
GB
2 Selecting of the operating mode
6
2.1 Selecting the operating mode
With the operating mode switch fig. 1
(1), you can change the operating mode
of your heating system according to
your requirements.
In position ”on” , the heating is
constantly on.
In position ”off”, the heating is
constantly off
In position , the heating operates
automatically depending on the setting
of the tappets.
838311_01GB_052005.qxd 23.05.2005 8:49 Uhr Seite 7

GB
3 Setting the timer
7
3.1 Setting the timer
3.1.1 Reading time of day
The time of day can be read on the
clock face below the reference triangle.
Note: The timer uses a 24 hour clock
scale. 3pm is therefore 15:00.
3.1.2 Setting the timer
Turn the minute hand clockwise until
the reference triangle coincides with
the correct time of day.
838311_01GB_052005.qxd 23.05.2005 8:49 Uhr Seite 8

GB
4 Programming heating periods
8
4.1 Setting the tappets
Set the tappets (4a) and (4b) as
follows:
For heating on periods stick the tappets
(4a) inwards.
For heating off periods stick the
tappets (4b) outwards.
4.2 Setting the heating programme
Set the tappets (3) and (4) according to
your heating requirements.
838311_01GB_052005.qxd 23.05.2005 8:49 Uhr Seite 9
GB
9
5 Special operating conditions
5.1 Weekend operation
If the heating is to be switched - on
temporarity, e.g. during the weekend,
turn the operating mode switch (1)
to the position ”on”. To return to
automatic operation, turn the operating
mode switch back to position .
5.2 Summer-time operation
Set the operating mode switch (1) to
the ”off” position. This turns off the
heating system.
5.3 Operating and mains failure
The programmer contains no batteries.
The timer stops if the mains power
fails. However, the programme you have
entered is retained. When the mains
power returns, the heating programme
re-starts automatically.
The time of day must be corrected
accordingly. Using the minutes hand (2)
set the current time of day as
previously described.
838311_01GB_052005.qxd 23.05.2005 8:49 Uhr Seite 10

GB
6 Installation instructions
All electrical work shall be undertaken
by a competent person and shall
comply with BS 7671 (IEE Regulations).
· Turn off the boiler.
· Isolate the electrical supply to
the boiler
6 Installation instructions
10
· Release the time clock blanking plate
from the control box.
· Locate the five pins on the rear of the
programmer and gently push the
programmer until it locks into position.
· Recommission the boiler.
838311_01GB_052005.qxd 23.05.2005 8:49 Uhr Seite 11

GB
7 Commissioning
7 Commissioning
Turn on the electrical supply to the boiler
and timer and commission as detailed in
the instructions for installation supplied
with the boiler.
The CE Mark demonstrates that this
timeclock fulfills the essential
requirements of the Low Voltage
Directive (73/23/EEC) and, in connection with Vaillant heating appliances,
the essential requirements of the Electromagnetic Compatibility Directive
(89/336/EEC).
We do not accept any liability for
damage resulting from non-observance
of these instructions.
11
838311_01GB_052005.qxd 23.05.2005 8:49 Uhr Seite 12

GB
8 Technical data
12
24 hour time clock
24 V DC
35 mA max
approx. 200 g
IP 20
II
–25...+70°C
Appliance type
Operating voltage
Current input
Weight
Protection class
Type of enclosure
Permissible storage temperature
838311_01GB_052005.qxd 23.05.2005 8:49 Uhr Seite 13

13
GB
838311_01GB_052005.qxd 23.05.2005 8:50 Uhr Seite 14

GB
Fig. 2
7 Blanking plate
8 Installation recess
9 24h time clock
14
838311_01GB_052005.qxd 23.05.2005 8:50 Uhr Seite 15

GB
1
2
4
2
3
2
2
2
1
2
0
1
9
1
8
1
7
1
6
1
5
1
4
1
3
1
2
1
1
1
0
9
8
7
6
5
4
3
2
9
3
12
6
timeSWITCH
off
on
8
9
7
Fig. 2
15
Fig. 2:
838311_01GB_052005.qxd 23.05.2005 8:50 Uhr Seite 16

GB
Fig. 3:
10
Fig. 3
10 Pins
16
838311_01GB_052005.qxd 23.05.2005 8:50 Uhr Seite 17

GB
EC declaration of conformity
17
838311_01GB_052005.qxd 23.05.2005 8:50 Uhr Seite 18

838311_01 GB 05 2005 Subject to alteration
838311_01GB_052005.qxd 23.05.2005 8:49 Uhr Seite 1
 Loading...