

Page 1
Use & Care Guide
18V 2-in-1 Cordless Stick Vacuum
MODEL NO. VSD1801
www.vacmaster.com
Cleva North America, Inc.
Greenville, SC 29607
(866) 384-8432
Made in China
Page 2

TABLE OF CONTENTS
SECTION
Important Safety Instructions................................................................................................................3-5
Warranty…………....................................................................................................................................6
Technical Data
Getting To Know Your Vacuum................................................................................................................7
General Assembly Instructions............................................................................................................8-11
Operating Instructions....................................................................................................................... 11-13
Maintaining Your Vacuum................................................................................................................ 14-17
Troubleshooting................................................................................................................................18-19
........................................................................................................................................6
PAGE
Thank you for purchasing this Vacmaster® vacuum cleaner. With it you are
obtaining a high quality product that is engineered for optimal performance.
FOR YOUR SAFETY
Read and understand this manual before use.
Keep this manual and your sales check (receipt) in a safe place for future
reference.
-2-
Page 3

IMPORTANT SAFETY INSTRUCTIONS
When using an electrical appliance, basic precautions should always be
followed, including the following:
READ ALL INSTRUCTIONS BEFORE USING THIS VACUUM CLEANER.
Failure to follow the warnings and instructions may result in electric shock, re
and/or serious injury.
WARNING - To
• Do not use outdoors or on wet surfaces.
• Do not allow to be used as a toy. Close attention is necessary when used by
or near children, pets or plants.
• Use only as described in this manual. Use only manufacturer’s recommended
attachments.
• Do not charge if charging adapter is damaged. If appliance is not working as
it should, has been dropped, damaged, left outdoors, or dropped into water,
return it to a service center.
• Do not pull or carry the charging adapter by cord, use cord as a handle,
close a door on cord, or pull cord around sharp edges or corners. Do not run
appliance over cord. Keep cord away from heated surfaces.
• Do not unplug by pulling on charging cord.
• Do not handle charger, including charger plug, and charger terminals with wet
hands.
• Do not put any object into openings. Do not use with any opening blocked;
keep free of dust, lint, hair, and anything that may reduce air ow.
• Keep hair, loose clothing, ngers, and all parts of body away from openings
and moving parts.
• Use extra care when cleaning on stairs.
• Do not use to pick up ammable or combustible liquids, such as gasoline, or
use in areas where they may be present.
• Do not pick up anything that is burning or smoking, such as cigarettes,
matches, or hot ashes.
• Do not use without dust cup or lter in place.
• Prevent unintentional starting. Ensure the product does not operate before
connecting to hand vacuum, picking up or carrying the appliance. Carrying the
appliance with your nger on the switch invites accidents.
reduce the risk of re, electric shock, or injury:
-3-
Page 4

• Recharge only with the charger specied by the manufacturer. A charger that
is suitable for one type of battery pack may create a risk of re when used with
another battery pack.
• Under abusive conditions, liquid may be ejected from the battery; avoid contact.
If contact accidentally occurs, ush affected area with water. If liquid contacts
eyes, additionally seek medical help. Liquid ejected from the battery may cause
irritation or burns.
• Do not use a battery pack or appliance that is damaged or modied. Damaged
or modied batteries may exhibit unpredictable behavior resulting in re,
explosion or risk of injury.
• Do not expose a battery pack or appliance to re or excessive temperature.
Exposure to re or temperature above 130°C may cause explosion.
• Follow all charging instructions and do not charge the battery pack or appliance
outside of the temperature range specied in the instructions. Charging
improperly or at temperatures outside of the specied range may damage the
battery and increase the risk of re.
• Have servicing performed by a qualied repair person using only identical
replacement parts. This will ensure that the safety of the product is maintained.
• Do not modify or attempt to repair the appliance or the battery pack except as
indicated in the instructions for use and care.
• Always turn off this appliance before connecting or disconnecting any
accessories.
• Do not charge the unit outdoors.
• Do not incinerate the appliance even if it is severely damaged. The batteries
can explode in a re.
• For Household Use Only.
SAVE THESE INSTRUCTIONS
-4-
Page 5
WARNING
Any changes or modications to this unit not expressly approved by the party
responsible for compliance could void the user’s authority to operate the
equipment.
NOTE:
for a Class B digital device, pursuant to Part 15 of the FCC Rules. These limits
are designed to provide reasonable protection against harmful interference in
a residential installation. This equipment generates, uses and can radiate radio
frequency energy and, if not installed and used in accordance with the instructions,
may cause harmful interference to radio communications. However, there is
no guarantee that interference will not occur in a particular installation. If this
equipment does cause harmful interference to radio or television reception, which
can be determined by turning the equipment off and on, the user is encouraged to
try to correct the interference by one or more of the following measures:
• Reorient or relocate the receiving antenna.
• Increase the separation between the equipment and receiver.
• Connect the equipment into an outlet on a circuit different from that to which the
receiver is connected.
• Consult the dealer or an experienced radio/TV technician for help.
This equipment has been tested and found to comply with the limits
Product Disposal
This product contains an internal Lithium-ion battery pack formulated from
environmentally sensitive materials. This product must be disposed of properly
with due care for the environment. Do not dispose of product with household
garbage. Consult your local waste authority for information regarding available
recycling or disposal options.
-5-
Page 6

WARRANTY
FOR ONE YEAR from the date of sale, this product is warranted against defects
in material or workmanship when it is assembled, operated and maintained
according to all supplied instructions.
WITH PROOF OF SALE, a defective appliance will be replaced free of charge.
For warranty coverage details to obtain free replacement, visit the web page:
www.vacmaster.com or call (866) 384-8432.
• This warranty does not cover lters, which are expendable parts that
can wear out from normal use within the warranty period.
• This warranty is void if this product is ever used for other than private
household purposes.
• This warranty gives you specic legal rights, and you may also have other
rights which vary from state to state.
TECHNICAL DATA
Cordless Vacuum Cleaner
Voltage: 18VDC
Battery Charger:
Model: YLS0241A-T210050
Input: 100-240V~50/60Hz 0.8A
Output: 21.0V 500mA
-6-
Page 7
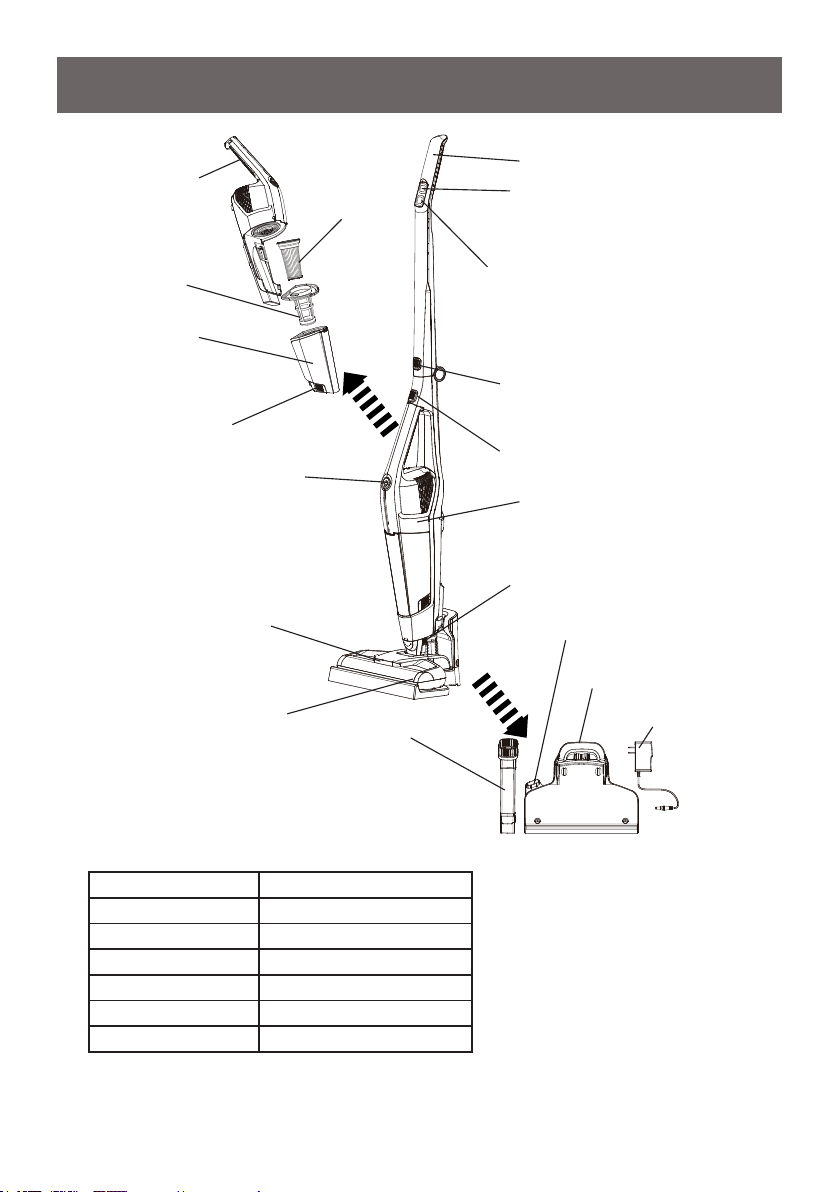
GETTING TO KNOW YOUR VACUUM
Hand Vacuum Handle
Filter Basket
Dust Cup
Dust Cup Release Button
Hand Vacuum On/Off Button
LED Headlights
Motorized Brush Powerhead
Handle
Power Button
Filter
Speed Control Button
Folding Handle Button
Hand Vacuum Release Button
Hand Vacuum
Nozzle Release Button
Combination Tool Storage
Charging Base
Charging Adapter
2-In-1 Combination Tool
REPLACEMENT PARTS
Item Part No.
Filter 561042108
Charging base 561042109
Combination Tool 561042111
Charging Adapter 561005107
Filter Basket 561042107
Brushroll 561042104
Available online at www.vacmaster.com or call (866) 384-8432.
-7-
Page 8
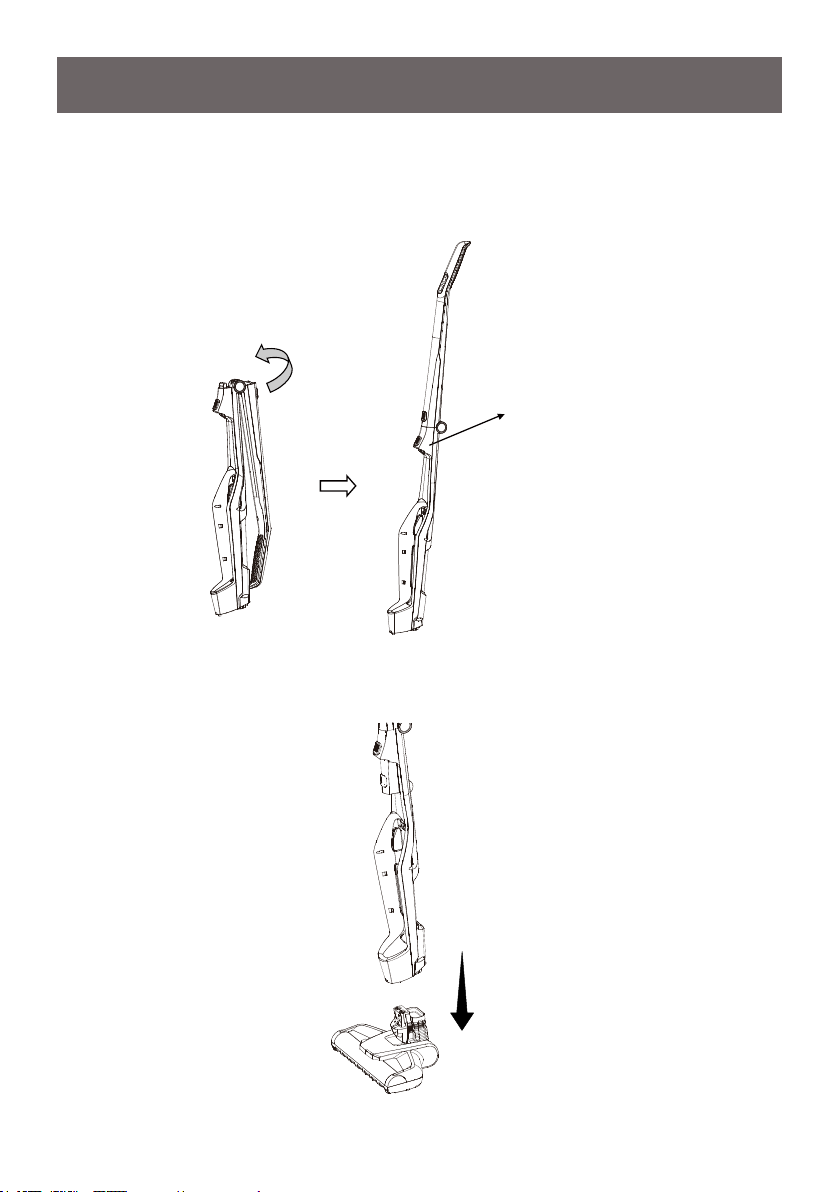
GENERAL ASSEMBLY INSTRUCTIONS
Assembly Instructions
1. Unfold the vacuum folding handle.
Put the vacuum folding handle upward, until there is a click from the folding
handle button.
Click
2. Fit the end of the main body onto the neck of the motorized powerhead and
click into place.
-8-
Page 9
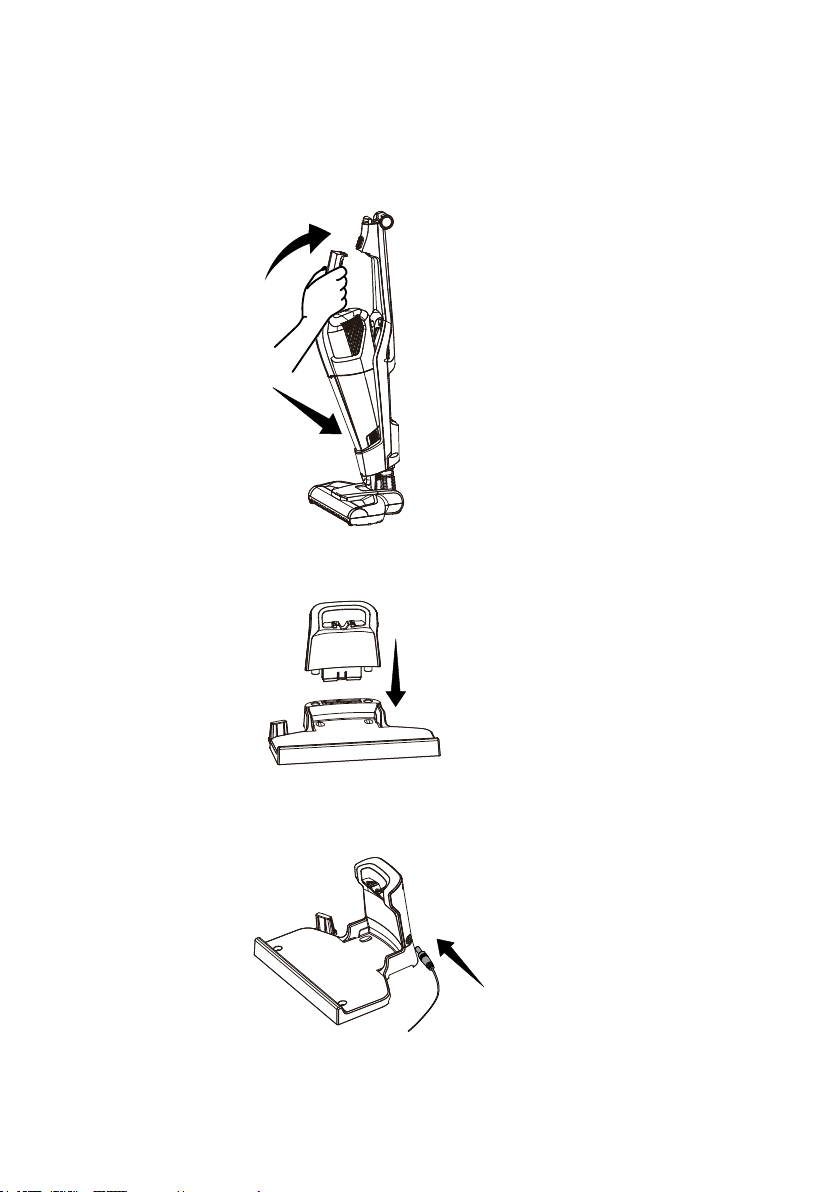
3. Insert the hand vacuum into the slot on the bottom of main body, then press
the handle into locked slot and click into place.
2
1
4. Insert the top of the charging base into the bottom of the charging base and
lock into place.
5. Insert the charging connector into the charging port on the side of charging
base.
-9-
Page 10
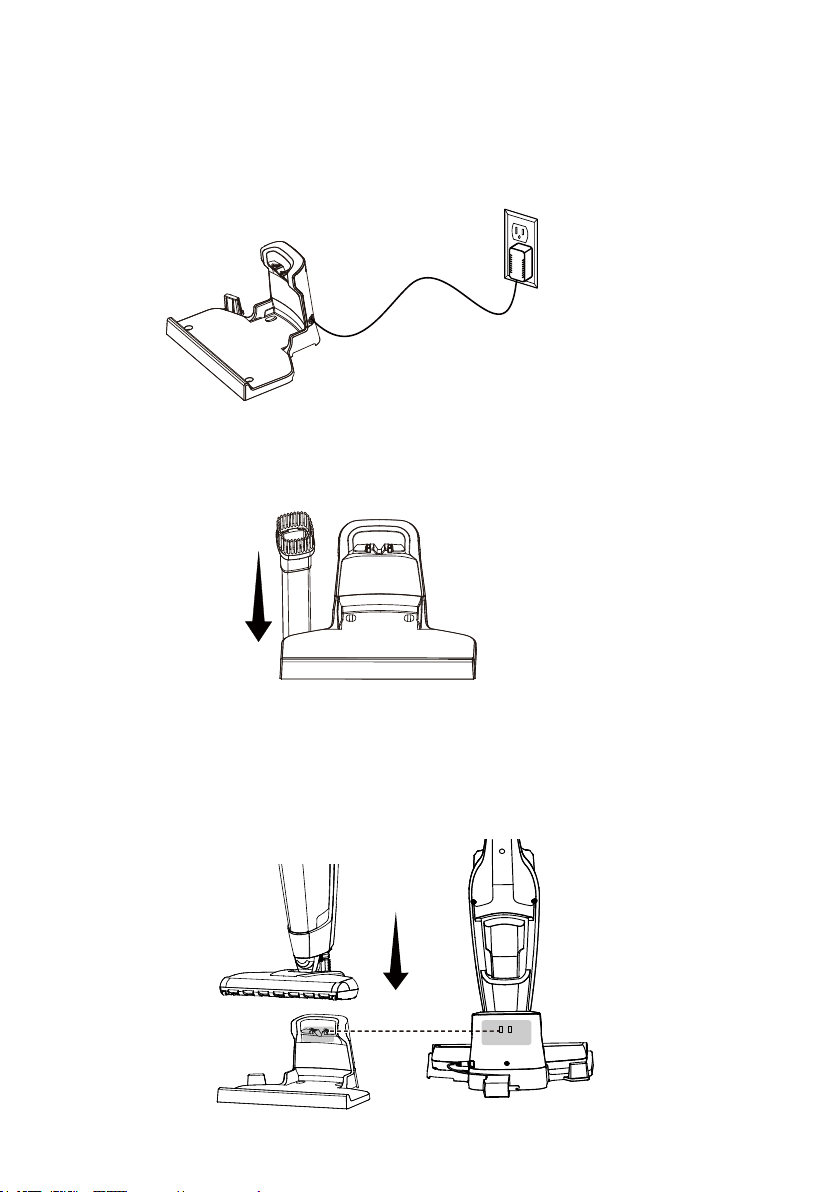
6. Plug the adapter into a wall outlet.
Note:
Use only the charger supplied with your cleaner to recharge.
7. Insert the 2-in-1 combination tool into the slot on the charging base for
convenient storage.
Charging Instructions
1. Before charging, make sure the cordless vacuum is turned OFF. With the
hand vacuum installed in the stick vacuum, insert the vacuum cleaner onto
the charger base as shown. Make sure the charging adapter is plugged into
an outlet.
-10-
Page 11
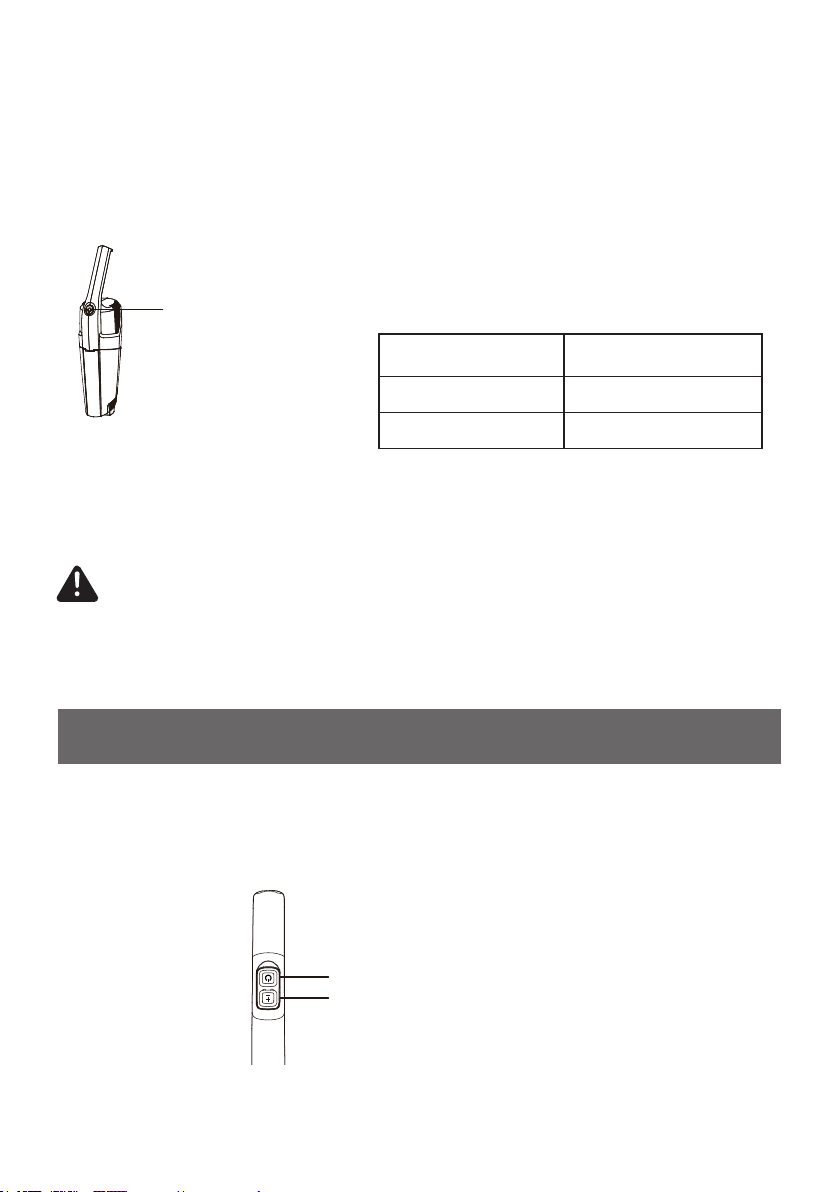
2. The Hand vacuum on/off button will show the progress of the charge. While the
vacuum is being charged, the battery charge indicator will be ashing. Once
fully charged, the indicator will be off.
On/Off Button & Battery Indicator
Battery indicator Status
Flashing light Charging
No light Fully charged
3. For improved battery performance, keep the vacuum cleaner on the charging
base while not in use. Do not start the vacuum cleaner while it is on the
charging base.
Caution
: To optimize the battery longevity, charge the vacuum cleaner for
at least 5 hours before using for the rst time.
Never charge the batteries in temperatures above 98.6°F (37°C) or below
32°F (0°C). It is normal for the charger to become warm when charging.
OPERATING INSTRUCTIONS
Using Your Vacuum Cleaner
When vacuum cleaner is fully charged, lift it off the charging base.
1. To start the vacuum, press the power button. The vacuum automatically starts
in the HIGH speed position.
Power Button
Speed Control Button
-11-
Page 12
2. To switch the speed to LOW, press the speed control button. Press the
1
2
speed control button again to switch back to HIGH speed.
3. To stop the vacuum, press the power button.
Using Your Hand Vacuum
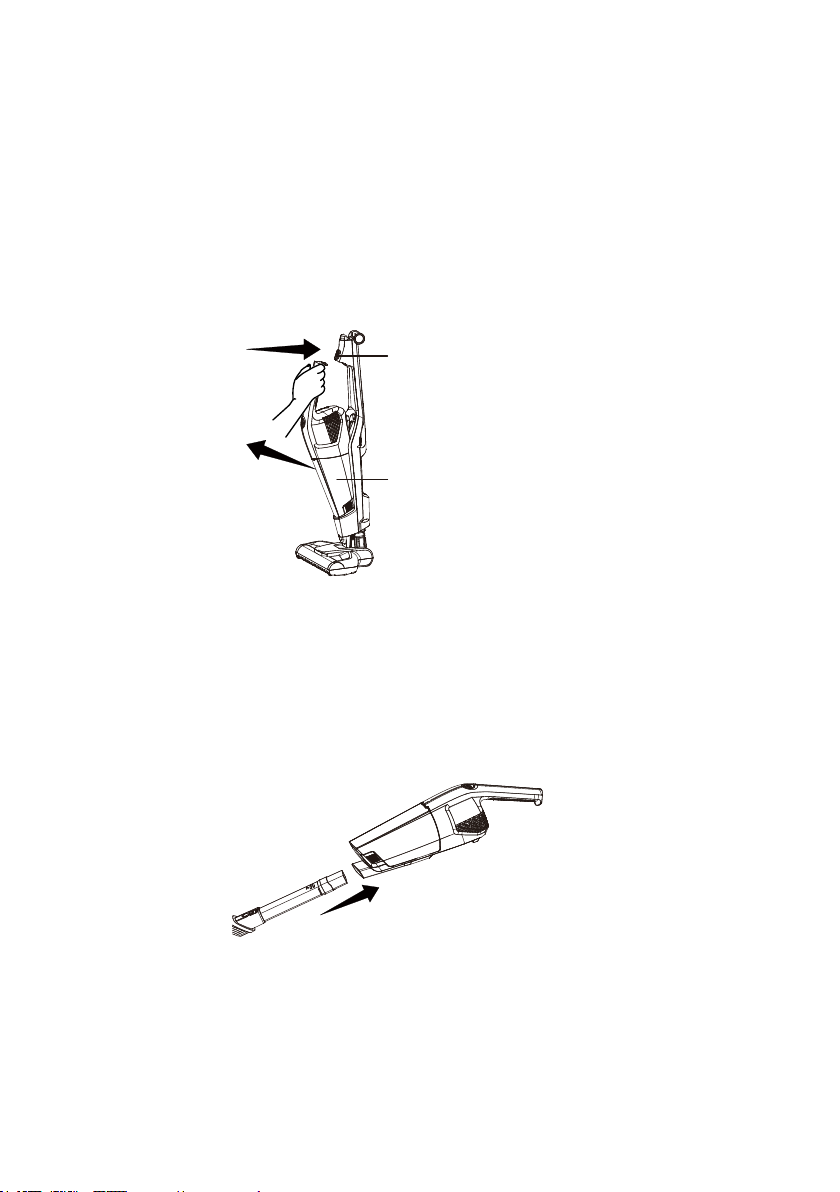
1. To remove the hand vacuum, press the hand vacuum button and detach from
the main body.
Hand vacuum release button
Hand vacuum
2. To turn on, press the power button located on the handle.
3. To clean areas that are difcult to reach, use the 2-in-1 combination tool by
inserting one end of the tool into the hand vacuum.
-12-
Page 13
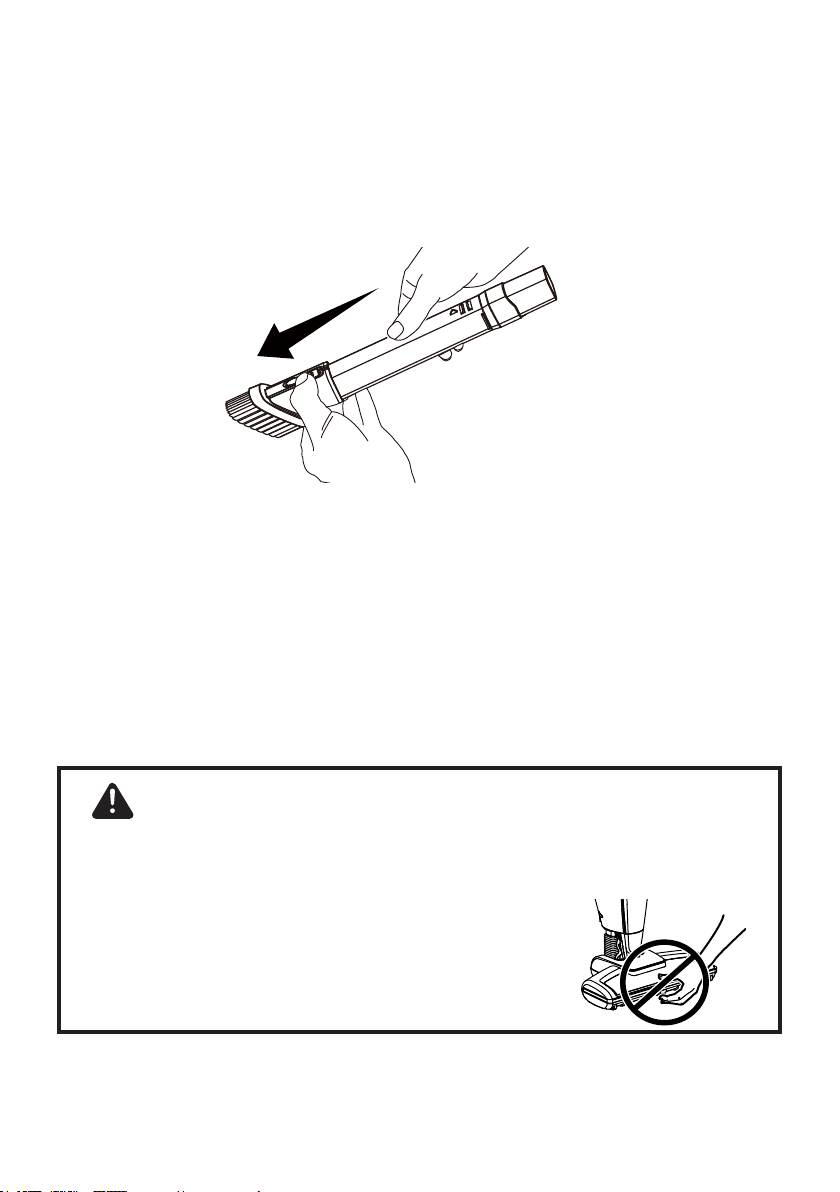
4. The combination tool can be used as a crevice tool or dusting brush. To
transition from crevice to dusting brush, depress the latch on the tool and slide
the part to the top of the tool.
Storing Your Vacuum
1. Fold handle by pressing handle release button and pulling handle backward.
2. To operate vacuum, unfold the handle by moving it upward until you hear a
click.
CAUTION
Moving parts! To reduce the risk of personal injury, DO NOT touch the brush
roll when vacuum is on. Contacting the brush roll while it is rotating can cut
or cause other injuries. Always turn off before servicing. Use caution when
operating near children.
-13-
Page 14
MAINTAINING YOUR VACUUM
CAUTION
To reduce the risk of shock, remove vacuum cleaner from the charging base,
and turn off before performing any service or maintenance.
Emptying the Dust Container & Cleaning the Filter
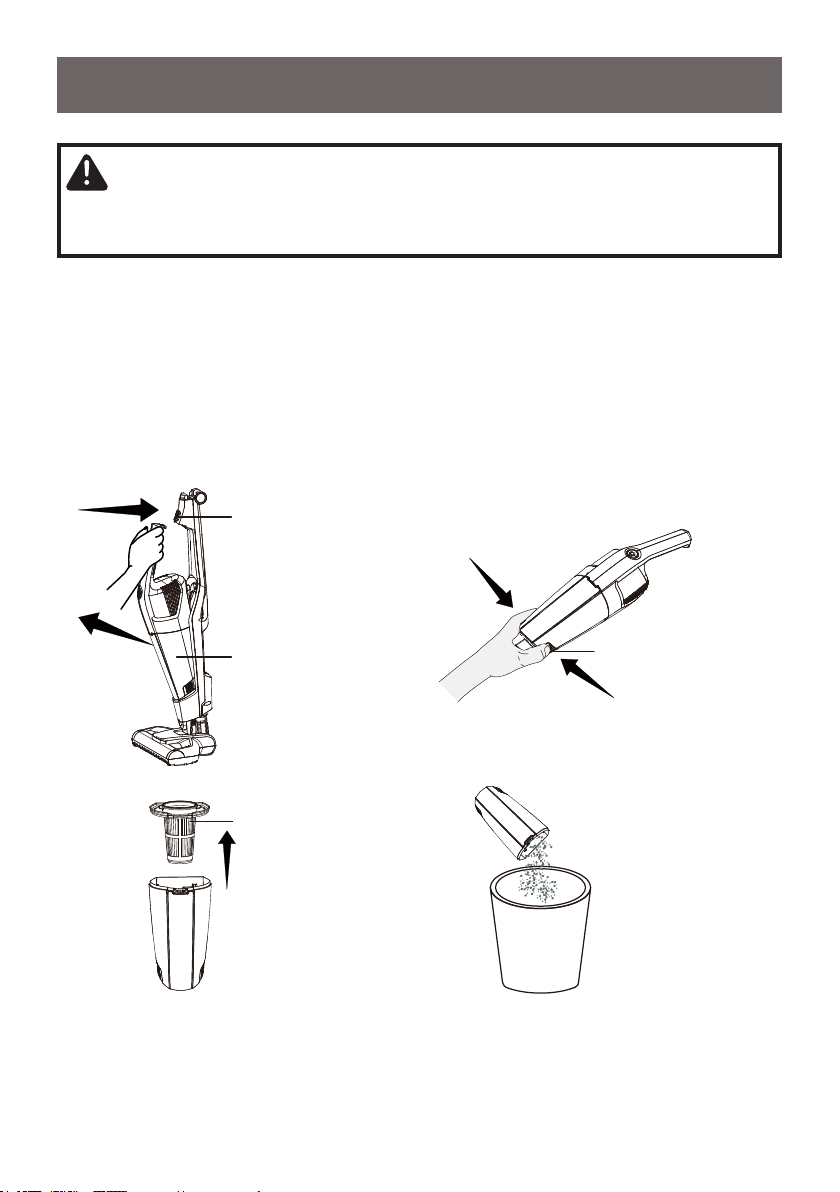
1. Remove the hand vacuum from the main body by pressing the hand vacuum
release button.
2. Hold the unit over a trash bin and use one hand to press the two dust cup
release buttons to separate the dust cup from the hand vacuum body.
3. Remove the lter basket from the dust cup. Empty the contents of the dust cup
into a trash bin.
1
Hand vacuum release button
2
Hand vacuum
Filter Basket
Dust Cup Release Buttons
-14-
Page 15
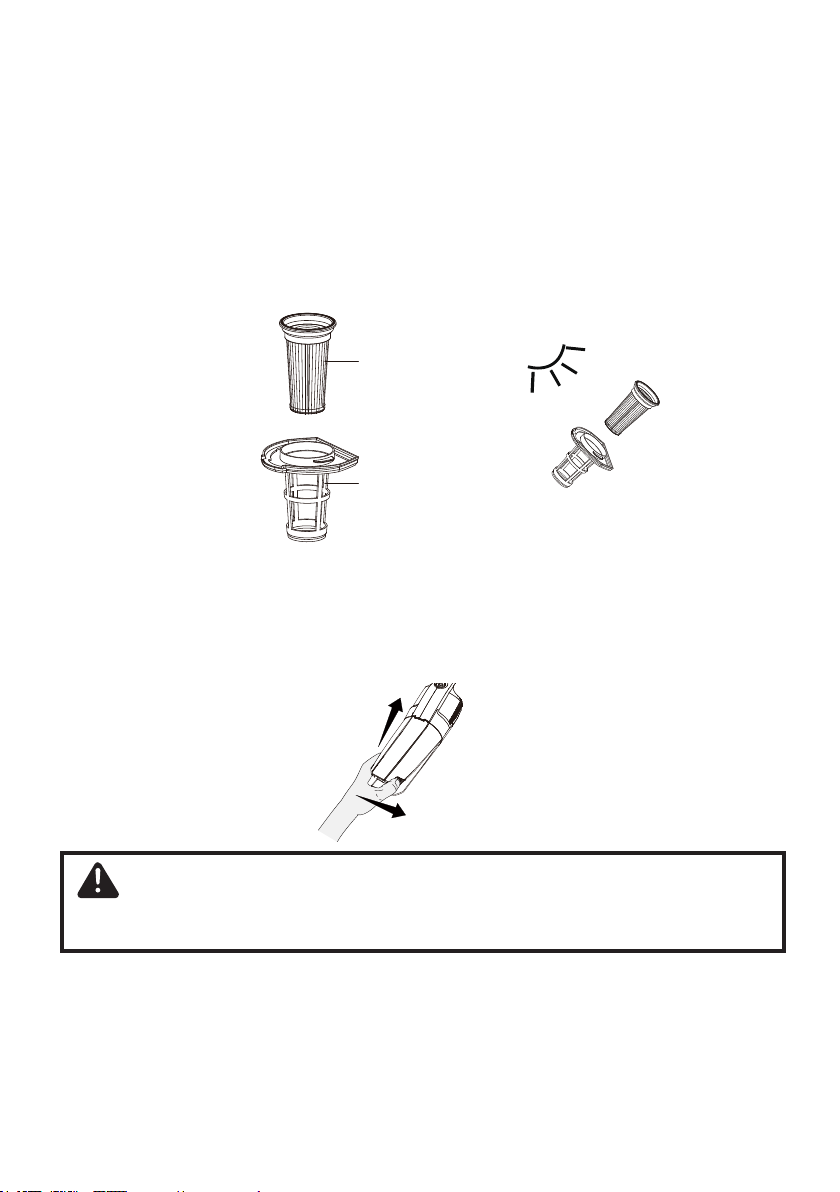
4. Remove the lter from the lter basket. Clean the accumulated debris from the
1
2
lter basket and the lters.
5. After repeated use, it may be necessary to wash the lter basket and lter,
Hand wash in lukewarm water. After washing, set aside and allow to air dry for
24 hours.
24hrs
IMPORTANT:
Filter
Filter Basket
The lter and the lter basket must be completely dry before reuse.
6. Insert the clean and dry lter into the basket. Fit the basket into the dust cup and
reconnect the dust cup to the hand vacuum.
WARNING
Do not operate vacuum cleaner without lter installed.
-15-
Page 16
Cleaning the Motorized Powerhead & Blockages
The brush roll may accumulate debris such as strings, hair and bers. This type of
debris can wrap around the brush and diminish its ability to clean effectively.
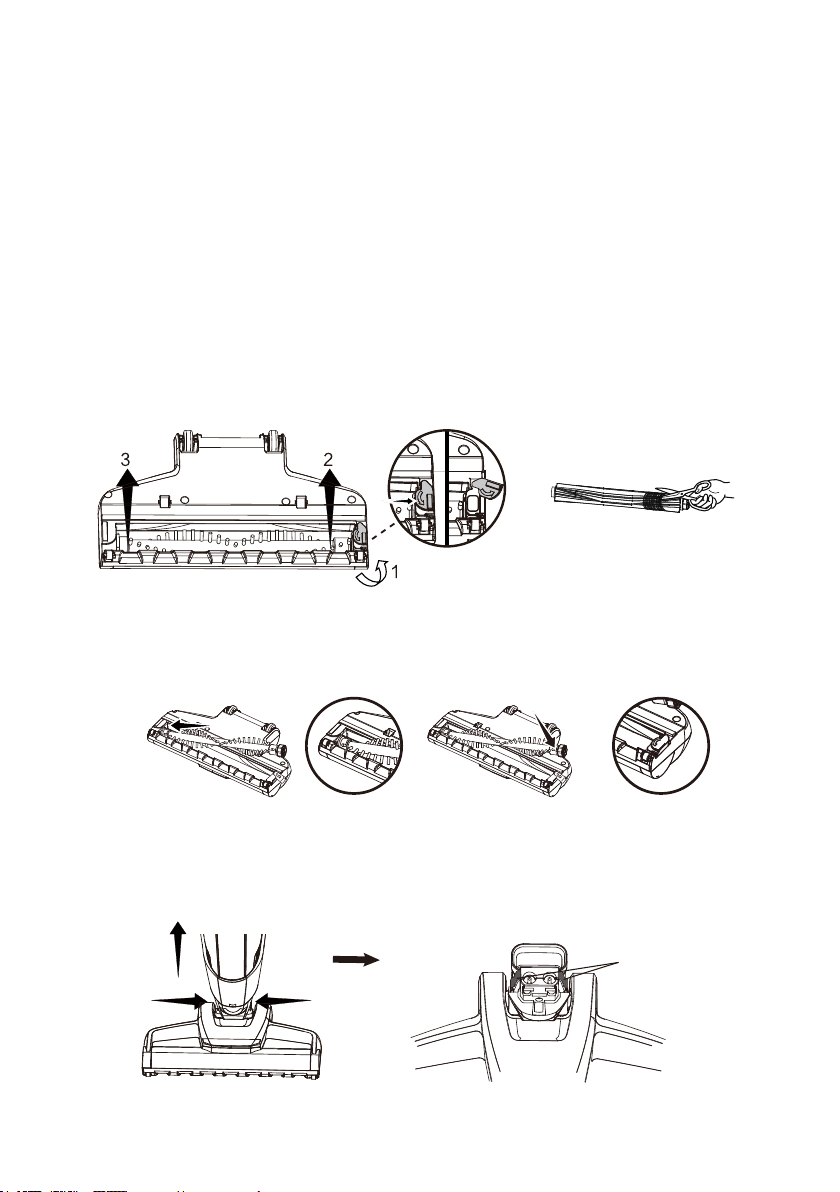
To Remove Brush Roll for Manual Cleaning:
1. Make sure the vacuum cleaner is turned OFF then remove the hand vacuum
and set aside.
2. Turn the unit over to access the brush roll. As shown below,push and slide the
tab to the right to unlock, then lift the brush roll out of housing. Clean off debris
and anything wrapped around the brush. Use a pair of scissors to remove
threads, etc.
3. Place the brush roll back into the housing by aligning the hexagon end to the
powerhead rst, then inserting the other end correctly into place and lock the
tab.
To Remove Powerhead Blockages:
1. To clean out the powerhead, press the two nozzle release buttons, and pull
the powerhead away from the main vacuum body.
2
1
1
-16-
Nozzle Release Button
Page 17
TROUBLESHOOTING
2. Carefully remove any debris or blockage from the inside of the powerhead.
3. Reattach the powerhead onto the vacuum body.
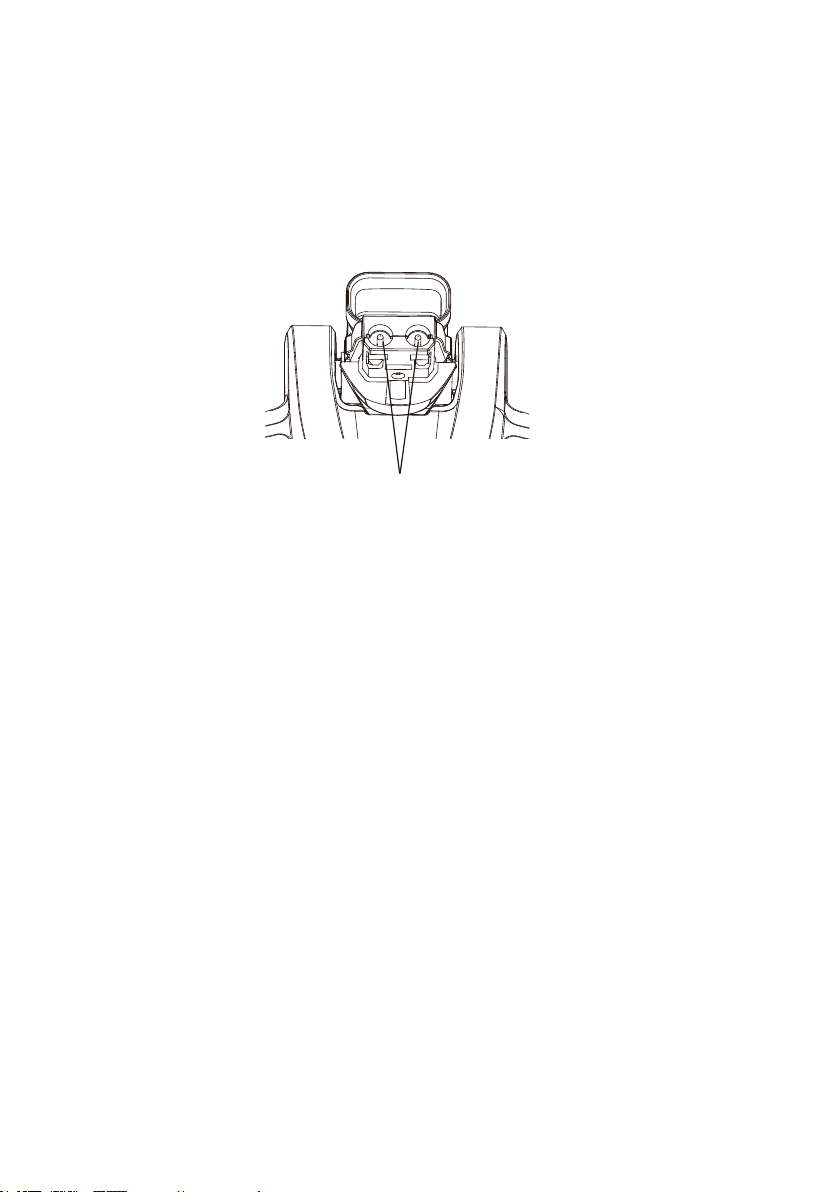
Note:
remove a blockage from the powerhead as these may damage the powerhead.
Do not damage pins; do not use scissors or other sharp objects to
Pins
-17-
Page 18
TROUBLESHOOTING
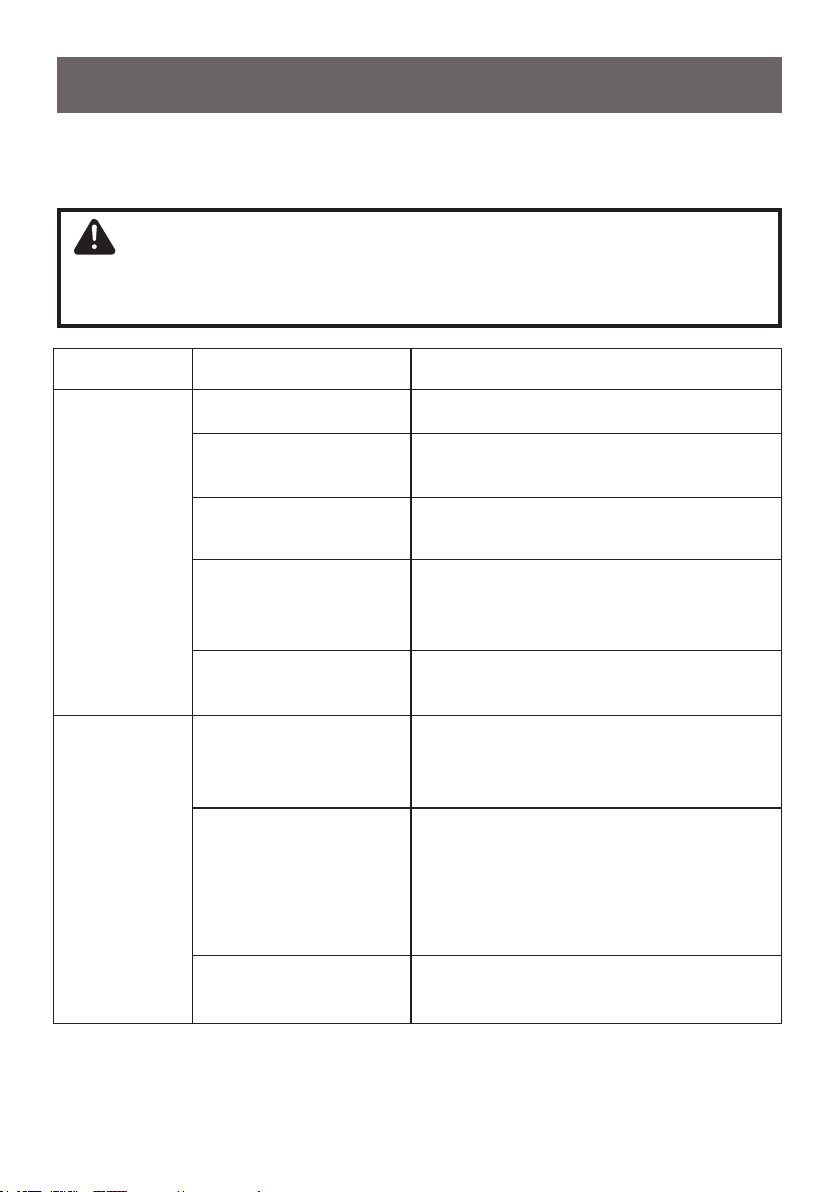
on the hand vacuum, main
Should you have any problem(s) with your vacuum cleaner, review the table
below for solutions to minor performance issues.
WARNING
Disconnect electrical supply before performing maintenance to the vacuum
cleaner. Failure to do so could result in electrical shock or personal injury.
PROBLEM POSSIBLE CAUSE SOLUTION
Battery may be depleted. Charge the battery as instructed.
Vacuum will not
power on.
Battery charge
indicator does
not illuminate.
Wrong charger being
used.
Hand vacuum is
not installed properly.
Charging connector is
not fully plugged into the
charging base.
Charging plug is not
fully plugged into outlet.
Charging adapter is not
plugged in.
Debris accumulated on
the metal charge contacts
body and charging
adapter.
The electrical outlet is out
of power.
Be sure to use only the charger supplied with
your product.
Remove hand vacuum and reattach ensuring
that it is securely in place.
Be sure the charging connector is fully
inserted in the charging base.
Be sure charging plug is fully plugged into
outlet.
Be sure the charging adapter is plugged in
properly to the outlet and to the charging port
on the bottom of the charging adapter.
Be sure no debris is accumulated on the
metal charger contacts on the hand vacuum,
main body and charging adapter.
Ensure that the outlet is supplying power to
the charger.
-18-
Page 19

Brush roll is jammed. Remove obstruction. Follow instructions.
To purchase online at www.vacmaster.com or
To purchase online at www.vacmaster.com or
Vacuum turns off
Motorized brush
not turning.
Vacuum not
picking up or
suction power is
weak.
Dust escapes
from vacuum.
Brush roll needs to be
reset.
Brush roll is not
installed well.
Dust cup is full. Empty dust cup.
Filter needs cleaning. Follow lter cleaning instructions.
Filter needs to be
replaced.
Battery may be depleted. Charge the battery as instructed.
Dust cup is not installed
well.
Filter is missing or
installed incorrectly.
Filter is damaged and
needs to be replaced.
Dust cup installed
incorrectly.
Battery may be depleted. Charge the battery as instructed.
Turn the unit off and remove the obstruction,
then turn back on.
Remove brush roll and reinstall following
instructions.
call (866) 384-8432.
Check dust cup for correct installation and
ensure it is snapped rmly in place.
Check lter for correct installation.
call (866) 384-8432.
Position dust cup correctly and snap rmly
into place.
on its own.
Brush roll is jammed
causing motor protection
system activated.
While off, remove obstruction and then turn
unit on.
For further questions, call our support team at (866) 384-8432.
-19-
 Loading...