

Page 1
Page 2

Welcome
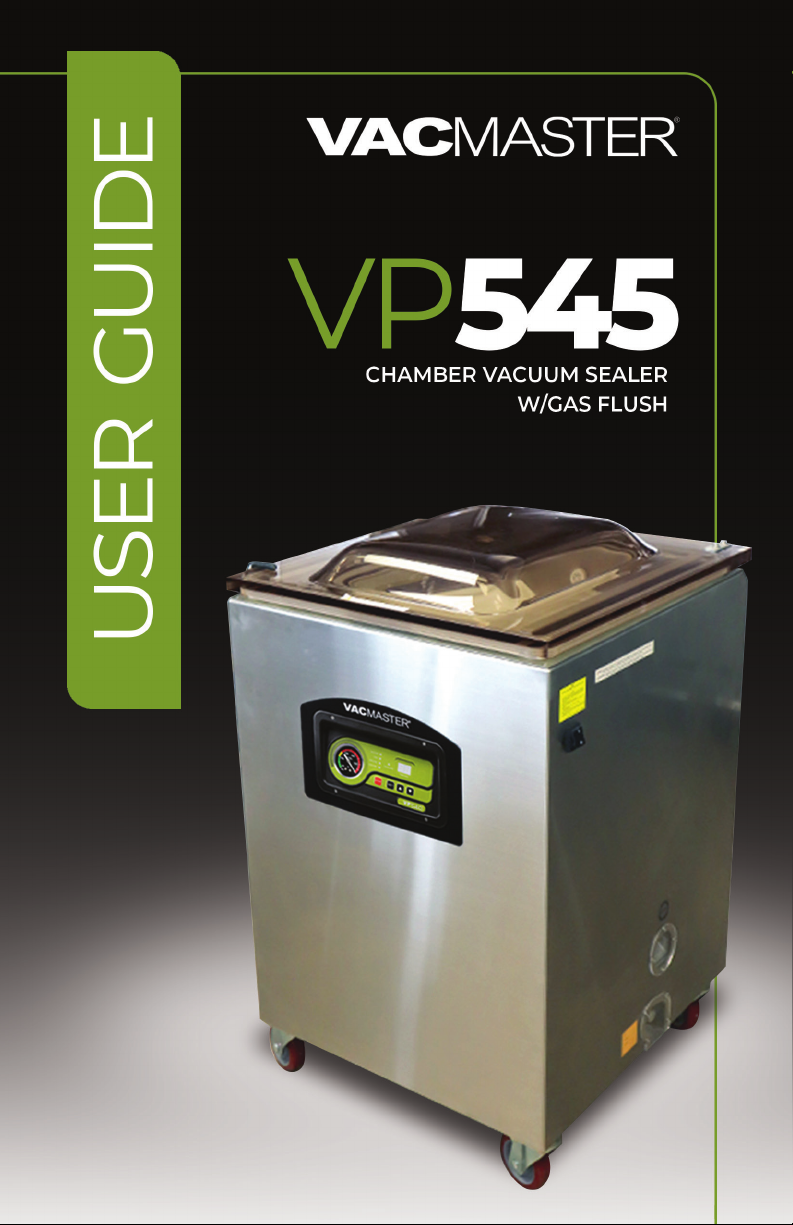
Thank you for purchasing the
You are about to use one of the most powerful vacuum sealers available.
With the help of the VP545, you will now be able to keep food fresh for
longer, deliver consistent portion control, and streamline your operations
with programmable seal and vacuum time settings.
The VP545 is a chamber vacuum system, which offers two distinct
advantages over non-chamber, external suction units. First, a much
higher level of vacuum can be achieved, which means a longer shelf life
for foods that you package. Secondly, liquids and liquid-rich foods can be
marinated vegetables are packaged quickly with ease and no mess. The
VacMaster® VP545 is perfect for storage, cook chill, portion control, sous vide,
processing game and more.
For your safety and protection, carefully read and follow this guide.
For more information, to Register your
please visit us at VacMasterFresh.com
VacMaster® VP545 Chamber Vacuum Sealer.
product or get support
Contents
Safeguards ................................................................................................................................ 4
Features .......................................................................................................................................6
Control Panel ...........................................................................................................................7
How To..........................................................................................................................................8
Troubleshooting ..................................................................................................................14
Cleaning and Storage ......................................................................................................15
Maintenance ......................................................................................................................... 16
Vacuum Packaging Guidelines ................................................................................18
Parts .............................................................................................................................................19
Packaging Info ..................................................................................................................... 22
Specs ........................................................................................................................................... 23
More Resources .................................................................................................................. 24
Warranty and Registration .......................................................................................... 25
Notes ...........................................................................................................................................26
VP545 Chamber Vacuum Sealer |
ARY, Inc. | 11880 College Blvd., Suite 550, Overland Park, KS 66210 | VacMasterFresh.com | 800.821.7849
2
User Guide
Page 3
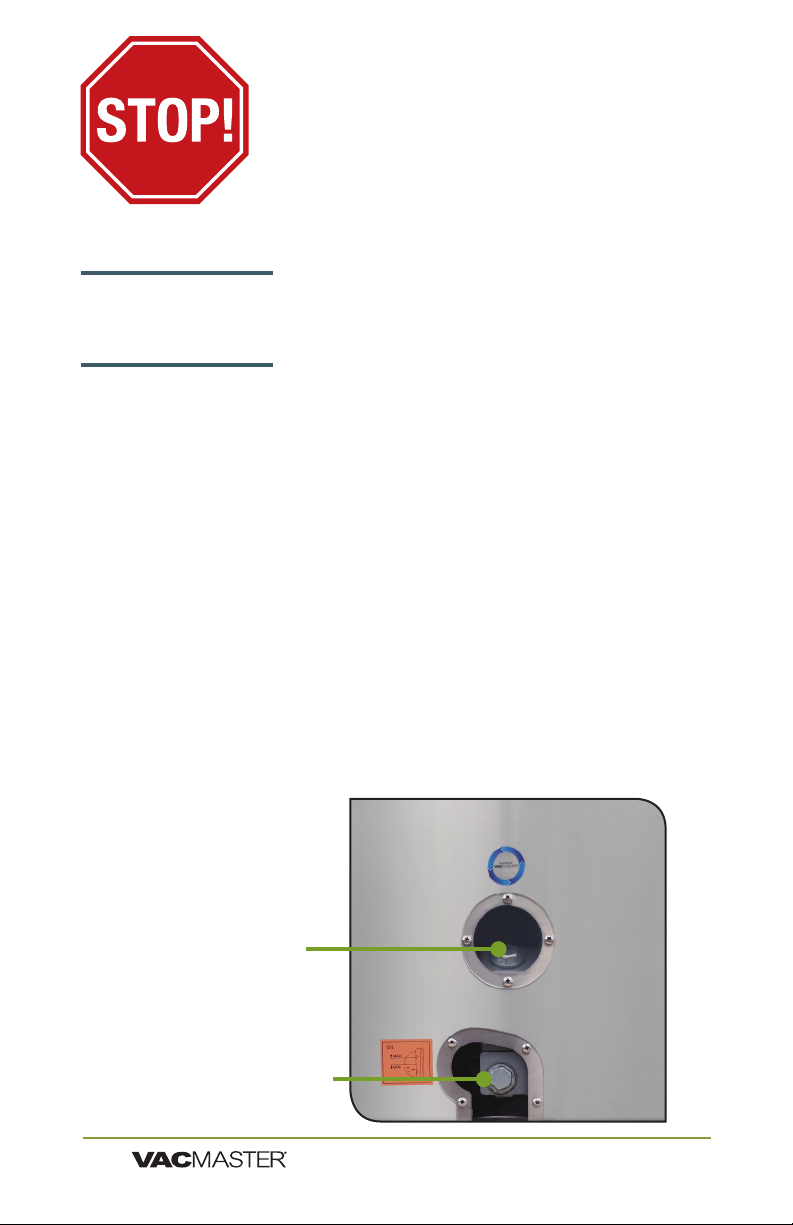
YOU MUST ADD OIL
BEFORE USE!
FAILURE TO DO SO WILL
DAMAGE THE PUMP!
Read and complete the following to prevent any damage.
Oil must be added to the vacuum pump before using.
VacMaster® model VP545 uses an oil vacuum pump.
For shipping purposes there is no oil in the pump.
Oil must be added.
Adding Oil to Vacuum Pump
Turn off and unplug machine to prevent electrocution.
1. Using VacMaster approved 10W non-detergent hydraulic oil ,
2. Locate the oil ll bolt (A) on the top of the vacuum pump.
3.
4. Watching oil site glass (B) insert end of oil bottle into hole.
5. Fill oil level between 1/2 to 3/4 of site glass.
6.
7. Replace and tighten bolt to vacuum pump.
NOTE: Pump requires approximately 8 uid ounces of oil
(approx. 1 cup). Use only approved VacMaster vacuum oil.
Side of
Cabinet
Housing
A. Oil Fill Bolt
B. Oil Site Glass
VP545 Chamber Vacuum Sealer |
ARY, Inc. | 11880 College Blvd., Suite 550, Overland Park, KS 66210 | VacMasterFresh.com | 800.821.7849
User Guide
3
Page 4

VP545 Important Safeguards
WARNING:
precautions should always be followed to reduce the risk of fire,
electric shock, and/or injury to persons, including the following:
1. Read all instructions.
2. This appliance is not intended for use by persons with reduced physical,
sensory, or mental capabilities, or lack of experience and knowledge,
unless they are closely supervised and instructed concerning use of the
appliance by a person responsible for their safety.
3. This appliance is not to be used by children. Close supervision is
necessary when any appliance is used near children. Children should be
supervised to ensure that they do not play with the appliance.
4. Never let the vacuum sealer run unattended. Disconnect the vacuum
sealer from the power source before leaving the work area.
5. To protect against risk of electric shock, do not immerse cord, plug, or
vacuum sealer in water or other liquid.
6. To reduce the risk of electric shock and injury to persons, disconnect
from power supply when not in use, before cleaning and before servicing.
7. To provide continued protection against risk, do not operate any
appliance with a damaged supply cord or plug, or after the appliance
malfunctions or has been dropped or damaged in any manner. Supply
cord replacement and repairs must be conducted by the manufacturer,
hazard. Call the provided customer service number for information on
examination, repair, or adjustment.
8. The use of accessory attachments not recommended by the appliance
manufacturer may cause injuries.
9. Do not use outdoors. Optimal operating temperature range is 65° to 75°.
10. Do not let cord hang over edge of table or counter, or touch hot
surfaces, including stove.
11. Do not disassemble this appliance beyond instructions provided. Doing
so may result in personal injury.
12. Do not place on or near a hot gas or electric burner, or in a heated
oven.
13. Do not use for other than intended purpose.
14. This appliance is designed for a maximum vacuum ON time of 70
seconds and a minimum OFF time of 10 seconds between cycles. Stop the
appliance and allow it to cool to ambient temperature if the appliance has
been in use for 45 minutes.
15. This appliance is for commercial use only.
When using electrical appliances, basic safety
VP545 Chamber Vacuum Sealer |
ARY, Inc. | 11880 College Blvd., Suite 550, Overland Park, KS 66210 | VacMasterFresh.com | 800.821.7849
4
User Guide
Page 5

VP545 Important Safeguards
Vacuum packaging is not a substitute for canning. All
h
perishables still need to be refrigerated or frozen.
Follow all food safety regulations as outlined by the FDA at
h
www.FDA.gov.
This is an ETL certied machine. It conforms to
h
NSF Standard 169 for sanitation.
Use only VacMaster® Vacuum Chamber Pouches and
h
accessories.
Some fruits and vegetables may release gases, known as
h
outgassing. When packaging these fruits and vegetables,
outgassing can cause the vacuum to be gradually lost over
time. Blanching or freezing before vacuum packaging helps
prevent this from occurring.
Delicate foods can be frozen prior to packaging to protect
h
them from getting crushed by the vacuum.
Use VacMaster® Bone Guards to cover an item’s sharp edges
h
to prevent pouch punctures.
Allow foods and liquids to cool to room temperature before
h
vacuum packaging.
Avoidoverllingthepouch.Leaveaminimumof3"ofspace
h
between the contents and the open end of the pouch. This is
called head space. This will prevent spills during the vacuum
sealing process.
To prevent wrinkles from forming in the seal, gently stretch
h
thepouchatalongthesealbarbeforeclosingthelid.
VacMaster® pouches are boilable, freezable, and
h
microwavable. When microwaving, it is important to pierce
or make a small cut in the pouch.
VP545 Chamber Vacuum Sealer |
ARY, Inc. | 11880 College Blvd., Suite 550, Overland Park, KS 66210 | VacMasterFresh.com | 800.821.7849
User Guide
5
Page 6
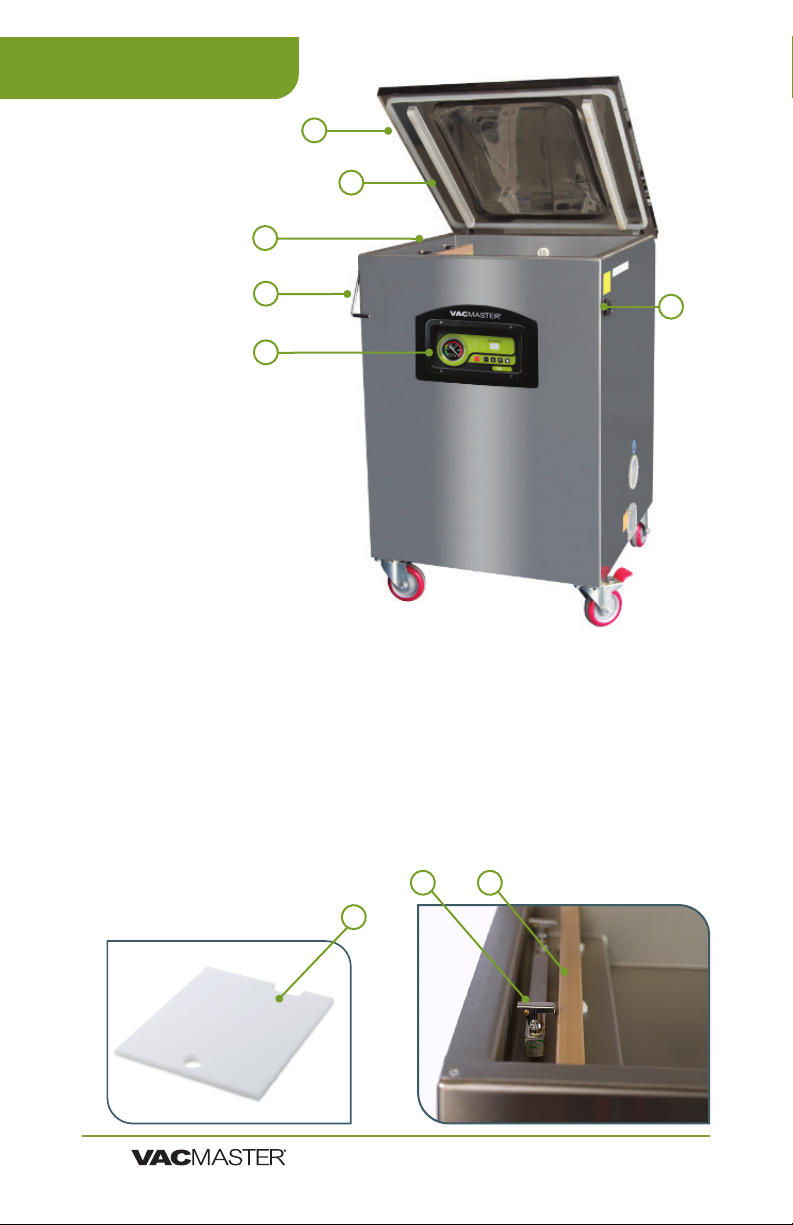
VP545 Features
1
2
3
4
5
1. Lid Gasket
2. Seal Pads
3. Vacuum Chamber
4. Lid Lock -
This feature is used to keep the lid closed while the machine
is in storage. DO NOT USE while the machine is operating.
5. Control Panel
6. Power Switch
7. Filler Plates - The plates allow for faster vacuum. When
more space is occupied, less air needs to be removed from
the chamber.
8. Inating Gas Nozzels (x4)
9. Seal Bars (x2)
8
7
9
6
VP545 Chamber Vacuum Sealer |
ARY, Inc. | 11880 College Blvd., Suite 550, Overland Park, KS 66210 | VacMasterFresh.com | 800.821.7849
6
User Guide
Page 7
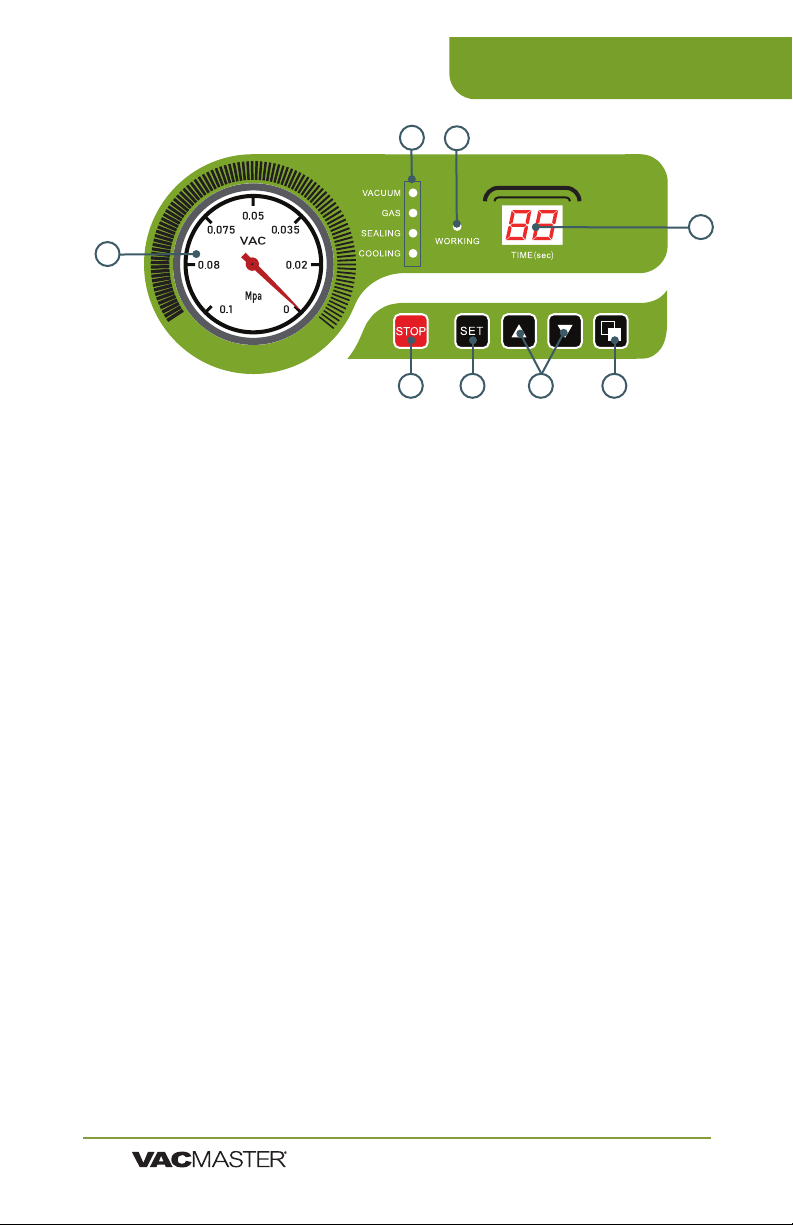
VP545 Control Panel
2
3
4
1
5
6
7
8
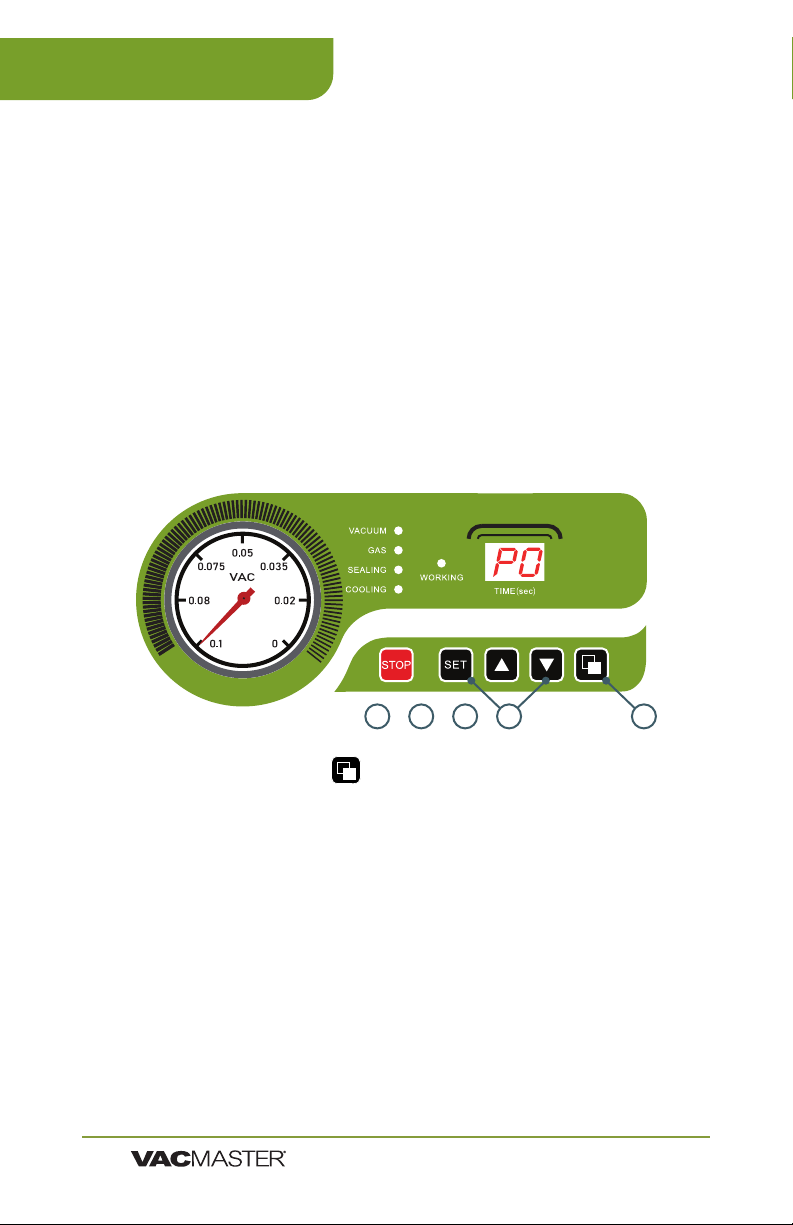
1. Vacuum Gauge - Indicates the vacuum level inside the chamber.
2. Function Lights:
Vacuum - Illuminates to adjust vacuum time as well as during the
vacuum process. During set up, adjust the vacuum time using the
UP/DOWN Buttons.
Gas -
Sealing - Illuminates to adjust vacuum time as well as during the
sealing process. During set up, adjust the sealing time using the
UP/DOWN Buttons.
Cooling - Illuminates to adjust vacuum time as well as during the
cooling process. During set up, adjust the cooling using the UP/
DOWN buttons.
3. Working Indicator Light - Illuminates to indicate the machine is in use.
4. LED Screen (Time) - Displays current function or cycle time,
measured in seconds.
5. STOP Button - Press to stop the cycle and immediately seal the
pouch. This button will only work when the machine is in the
vacuum process.
6. SET Button - Press to select the vacuum time, sealing time, or
cooling time. Use with the UP/DOWN buttons.
7. UP/DOWN Buttons - Press to increase or decrease vacuum time,
sealing time, or cooling time.
8. Program Button - Use to program 10 unique vacuum and seal
time cycles
VP545 Chamber Vacuum Sealer |
ARY, Inc. | 11880 College Blvd., Suite 550, Overland Park, KS 66210 | VacMasterFresh.com | 800.821.7849
User Guide
7
Page 8
VP545 How to Use
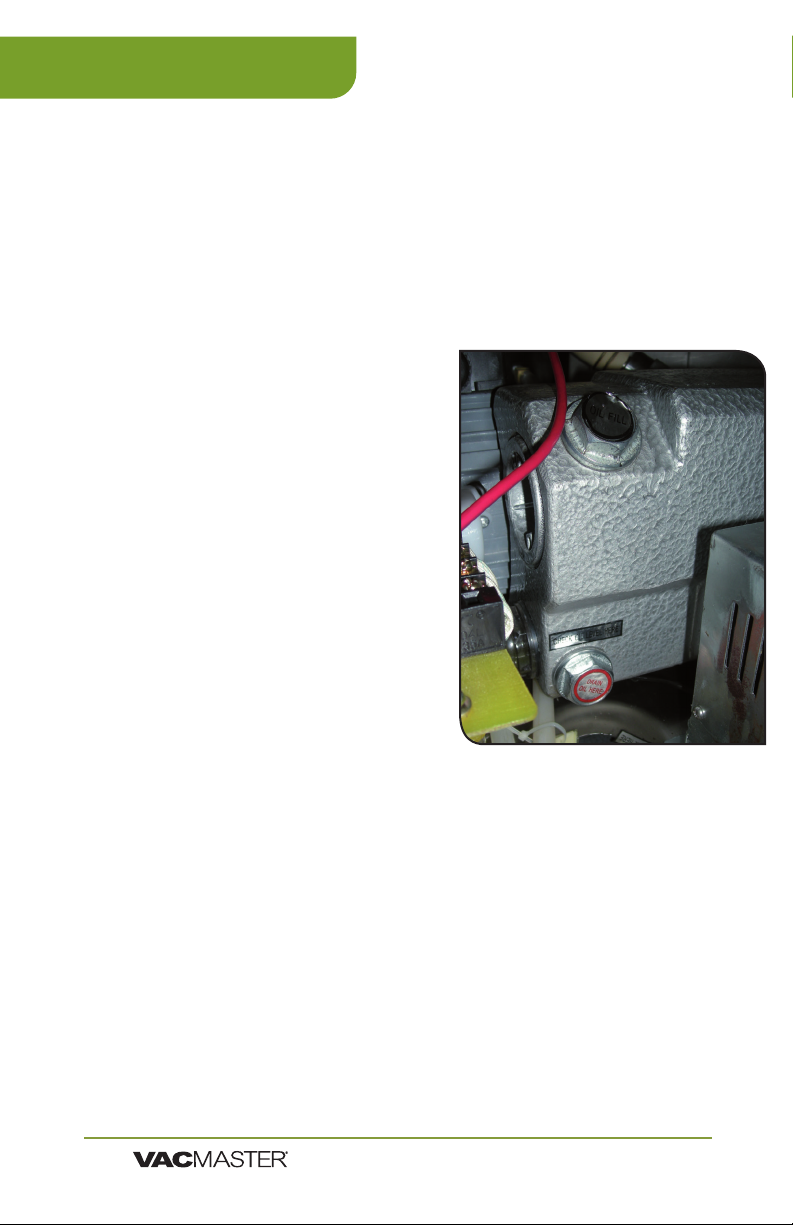
How to Change the Oil
1. Run vacuum process a couple of times to "warm up" the oil.
2. Turn off machine and unplug to prevent electrocution.
3.
4. Locate drain bolt on underneath side of vacuum pump.
5. For access and ease of draining the oil, position machine so the
drain bolt is "clear" and the dirty
oil can be captured.
6.
when bolt is removed. Place
catch cup underneath before
removing drain bolt.
7. Capture oil from pump. When
oil is completely drained,
replace and tighten bolt.
(Dispose of old oil properly,
according to your local and
state regulations.)
8. Follow the "Adding Oil to
Vacuum Pump" instructions at
beginning of manual. Do not
use machine until oil has been
added.
Vacuum Pump Maintenance
The VP545 vacuum pump requires periodic oil changes.
Required oil change schedule:
▫ First oil change: 1 week after use.
▫ Future oil changes: every 3 months or 250 cycles.
Using pump site glass, check the oil level and color frequently.
▫ Oil must remain between
▫ With use, the pump oil will become cloudy, dark or
even "milky". Once oil becomes discolored, change oil
replacing with new VacMaster® vacuum oil.
VP545 Chamber Vacuum Sealer |
ARY, Inc. | 11880 College Blvd., Suite 550, Overland Park, KS 66210 | VacMasterFresh.com | 800.821.7849
8
and
of site glass.
User Guide
Page 9
VP545 How to Use
Set Up - Powering up the VP545
1. Attach the power cord and plug the machine into a
grounded electrical outlet - Properly insert the electrical
cord into the power outlet on the back of the machine
and then plug the cord into the wall outlet.
2. Open the machine lid - Release the lid lock, located on
the right side of the machine, and allow the lid to lift and
remain open.
3. Do not stand over the lid
IMPORTANT: DO NOT turn the machine on until the lid
lock has been released, The lid lock feature is used ONLY
to keep the lid closed while the machine is in storage.
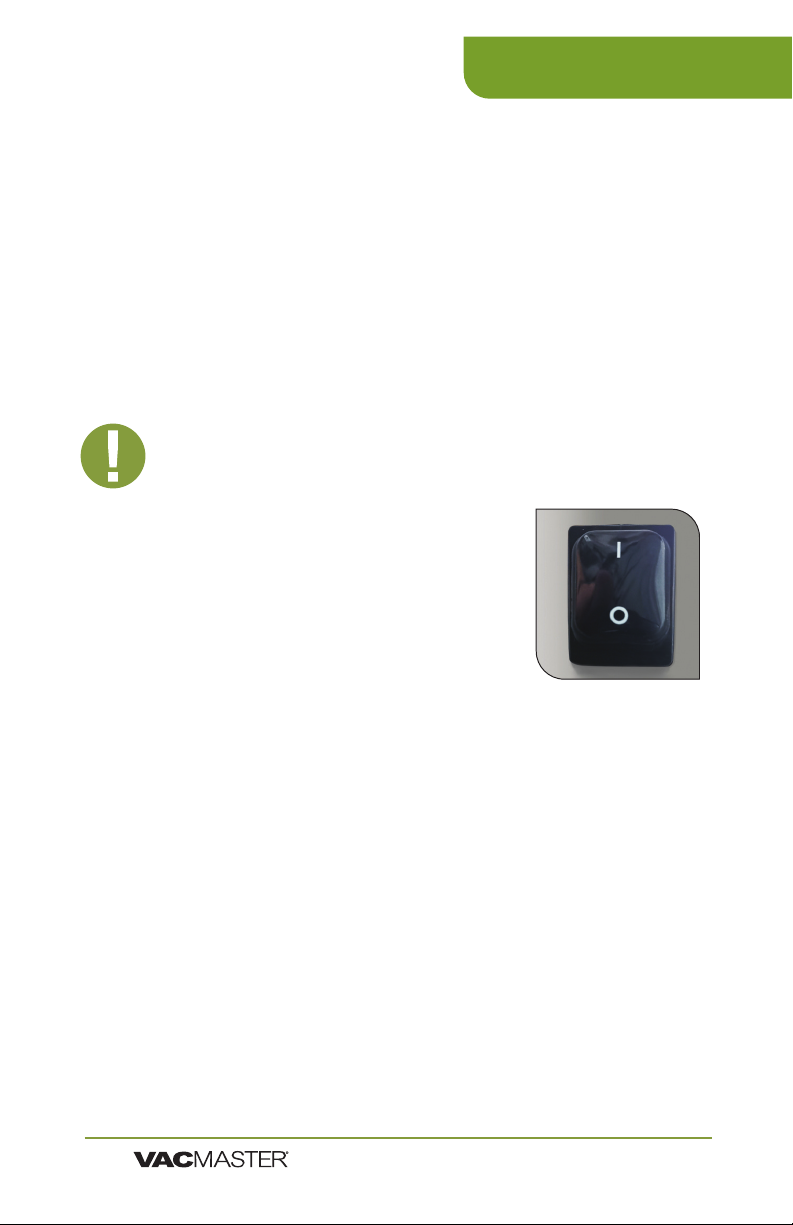
4. To power ON press "I" on the
power switch.
5. To power OFF, press "O" on the
power switch.
Set Up - Adjusting the VP545 Timing Controls
NOTE: All timing adjustments must be
made with the lid lock off and the lid open.
To adjust/set the timing controls, press the SET button on the control panel
until the required label (Vacuum, Sealing or Cooling) is illuminated. For
each selection, the current time setting will show on the LED Screen. All
time settings are displayed in seconds. For initial testing, the time settings
should be:
Vacuum Time - 40 seconds
Sealing Time - 1.2 seconds
Cooling Time - 2.2 seconds
Gas Flush - 0.1 second
To change settings, see instructions for each control on page 7.
VP545 Chamber Vacuum Sealer |
ARY, Inc. | 11880 College Blvd., Suite 550, Overland Park, KS 66210 | VacMasterFresh.com | 800.821.7849
User Guide
9
Page 10

VP545 How to Use
Set Up - Adjusting the VP545 Timing Controls
Vacuum Time: To increase or decrease the vacuum time, press the
SET button until VACUUM is illuminated and then use the UP/DOWN
buttons to adjust the vacuum time accordingly. The time setting will
display on the LED Screen on the control panel.
NOTE: Filler plates can be used to reduce the vacuum time required.
Place the ller plates inside the chamber as desired. Filler plates
occupy space, leaving less air to be removed from the chamber. If
you require more space inside the chamber, remove the ller plates
to accommodate your product.
Sealing Time: To increase or decrease the sealing time, press the
SET button until SEALING is illuminated and then use the UP/DOWN
buttons to adjust the sealing time to accommodate your application. It
is recommended that you make adjustments in 0.2 second increments
to avoid melting the pouch.
NOTE: For thicker pouches, increase the seal time in 0.2 second
increments until the pouch seals completely. In addition, for thinner
pouches, decrease the seal time in 0.2 second increments to avoid
over-sealing the pouch.
Cooling Time: To increase or decrease the cooling time, press the
SET button until COOLING is illuminated and then use the UP/DOWN
buttons to adjust the cooling time accordingly.
NOTE: The VP545 settings will always default to the most recently
used settings on the machine.
TIP: To prolong the life of your seal bar, set the cooling
time to twice the sealing time.
NOTE: After setting the timing controls, press the SET button until
the function lights on the Control Panel are no longer illuminated.
The machine will not start until all function lights are off.
1. Select a vacuum chamber pouch
Select the proper size of vacuum chamber pouch for the
product that you are packaging. Make sure that the mouth
of the pouch does not exceed the length of the seal bar and
of extra headspace at the top of the pouch to ensure a quality,
air-tight seal. The VP545 accepts vacuum chamber pouches
VP545 Chamber Vacuum Sealer |
ARY, Inc. | 11880 College Blvd., Suite 550, Overland Park, KS 66210 | VacMasterFresh.com | 800.821.7849
10
User Guide
Page 11

VP545 How to Use
2. Fill the pouch and place inside the chamber
Fill the pouch with the product to be vacuum packaged and place the
pouch inside the chamber. Keep pouches that contain liquids or wet
chamber, with the opening of the pouch across the seal bar. Make sure
Note: The entire pouch, including the opening, must remain inside the
chamber.
3. Close the machine lid to vacuum and seal
gauge begins to move.
4. Inspect the pouch
When the lid opens, remove and inspect the pouch.
Vacuum conrmation - Check the quality of the vacuum by looking at
the tightness of the pouch and the product. Look for air pockets or air
leaks. If you notice that the product is not vacuum packaged tightly, then
increase the vacuum time by 5 seconds, vacuum and seal again.
Seal conrmation – Inspect the pouch seal. A positive seal will appear
clear upon inspection. If the seal is spotty or incomplete, increase the seal
time by 0.1 second. If the seal appears white or milky, decrease the seal
time by 0.1 second. Once the settings are determined for your application,
vacuum and seal again. If the product is vacuumed and sealed tightly,
then the process is complete.
5. ED Code - stands for end of demonstration. You are ready for a new cycle.
Vacuum Cycle
Runs for a set time - counting down to zero
Mpa
Runs for a set time - counting down to zero
Sealing Cycle
Runs for a set time - counting down to zero
Mpa
VP545 Chamber Vacuum Sealer |
ARY, Inc. | 11880 College Blvd., Suite 550, Overland Park, KS 66210 | VacMasterFresh.com | 800.821.7849
Cooling Cycle
Mpa
Lid Release
Indicates the end of the process
Mpa
User Guide
11
Page 12
VP545 How to Use
Programmable Vacuum Cycle Instructions
This VacMaster chamber vacuum sealer is now equipped with a
new feature that allows you to program and store up to 10 different
seal cycle settings. Changing from liquids to solids to delicate
items has never been easier to get that perfect amount of vacuum
and a double seal for an additional layer of protection.
Also included is an oil change alert that, after 250 uses, reminds
you to change the oil. This reminder is intended to keep your
machine in tip-top shape. As a rule of thumb change your oil at the
CO Code - This stands for change oil.
Once complete, press "Set" " Up" "Down" (all 3) at the same time for
3 seconds. This will reset and clear this code.
Mpa
12345
Instructions
1. Press the program button on the right side of the control panel
to bring up P0 on the LED Display.
2. Press the SET button to change your desired vacuum time. Use up
or down arrows to adjust desired vacuum time.
3. Press SET again to change the seal time. Use up or down arrows to
adjust desired seal time.
4. Press SET button again to change your cool-down time. Use up or
down arrows to adjust desired cool-down time. Add at least 1 Second
more to cooling time over sealing time.
5. Press SET one last time to save the settings.
6. You are now ready to vacuum seal.
7. To create a new preset, press the program button to change to P1
and repeat the process stated above.
8. Set up and save up to 10 unique settings.
9. To change programmed setting, simply press the program button.
VP545 Chamber Vacuum Sealer |
ARY, Inc. | 11880 College Blvd., Suite 550, Overland Park, KS 66210 | VacMasterFresh.com | 800.821.7849
12
User Guide
Page 13

VP545 How to Use
Tips & Suggestions for Program Settings
• The vacuum time can be adjusted to your desired length.
• Suggested vacuum time should be set to
• 18-20 for liquids/powders.
• 35-40 is a good starting point for other products.
All settings are for 3 mil bags. The seal time and cool down time should only
be changed if you move up in thickness of bags. For different thickness
bags, increase both seal and cool down times by .2 seconds
at a time until you get a good seal.
Scan the QR code for an instructional
video on the programmable functions.
Gas Flush System
Products which would be damaged by high pressure must be
subjected to a lower vacuum or the pressure must be counterbalanced
with a mixture of Carbon Dioxide and Nitrogen to extend shelf life and
when packaging items that shouldn’t be compressed. This includes
but is not limited to soft fruits, dried foods, chips, pasta, and precooked meals. By adding a mixture of Carbon Dioxide and Nitrogen,
the food will stay fresh longer while keeping its original shape.
How to Use: Consult your local authorized gas supplier for assistance
in buying, regulating, and connecting the gas to the machine.
Gas Fill Operating Instructions: Connect the required gas cylinder
(complete with regulator), to the machine by hose. The Regulator may
never be set more than atmosphere pressure, approximately 14 psi.
The appropriate level should be between 5 and 12 psi.
seconds to the timer. It may take several adjustments to
Scan the QR code for an instructional
video on the gas ush system.
VP545 Chamber Vacuum Sealer |
ARY, Inc. | 11880 College Blvd., Suite 550, Overland Park, KS 66210 | VacMasterFresh.com | 800.821.7849
User Guide
13
Page 14

VP545 Troubleshooting
VP545 will not turn on -
Make sure the machine is properly plugged into a grounded outlet.
h
Check the power cord for tears and frays. Do not use this machine if the
h
power cord is damaged.
Make sure the power switch is turned on. The LED screen will be
h
illuminated when on.
If you see ‘F1’ displayed on the LED screen and the machine will not
h
function, make sure the lid is open and turn the power off. Turn the
machine back on and it should return to working order.
VP545 does not pull a complete vacuum with pouch -
The vacuum time may not be set high enough. Set the vacuum time
h
higher and vacuum again.
To vacuum and seal properly, the opening of the pouch must be within
h
the vacuum chamber. For detailed instructions, refer to “How To Use the
VacMaster® VP545 Chamber Vacuum Sealer”.
The seal bar, lid gasket and vacuum pouch need to be clean, dry and free
h
of debris for the vacuum process to be successful. Wipe surface of the
seal bar, lid gasket and the inside of the pouch and try again.
Vacuum pouch loses vacuum after being sealed -
Sharp items can poke small holes in pouches. To prevent this, cover sharp
h
edges with VacMaster® Bone Guard and vacuum in a new pouch.
Some fruits and vegetables can release gases (out gassing) if not
h
properly blanched or frozen before packaging. Open the pouch. If you
think food spoilage has begun, discard the food. If food spoilage has
not yet begun, consume immediately. If in doubt, discard the food.
VP545 is not sealing pouch properly -
The seal time may not be long enough. Increase the seal time and try
h
again.
Pouches will not seal if any moisture, food particles or debris are present
h
in the seal area. Wipe the inside of the pouch clean and
try again.
h
Pouches must be properly placed along the seal bar. Make sure the
entire pouch is over the seal bar and there are no wrinkles in the pouch
material.
NOTE:
all the way into the green. You may have to increase
the vacuum time by 5-10 seconds in higher elevation.
High elevation may cause the gauge to not go
If problems persist, contact Customer Service at
(800) 821-7849 or [email protected]
VP545 Chamber Vacuum Sealer |
ARY, Inc. | 11880 College Blvd., Suite 550, Overland Park, KS 66210 | VacMasterFresh.com | 800.821.7849
14
User Guide
Page 15
VP545 Cleaning & Storage
Disconnect the power cord from the electrical outlet by unplugging it.
h
DO NOT disconnect by pulling on the cord.
DO NOT immerse in water or spray directly with liquid.
h
Check the Vacuum Chamber and Gasket, making sure they are clean
h
and free of debris. If needed, use a clean, damp cloth with mild soap.
a. Wipe the vacuum chamber clean.
b. Wipe the gasket clean.
c. Wipe the seal area clean.
DO NOT store the VP545 outside. 65° to 75° recommended.
h
DO NOT use any acetone-based or abrasive cleaners on the lid or other
h
plastic parts. Only clean lid with a damp cloth and mild soap.
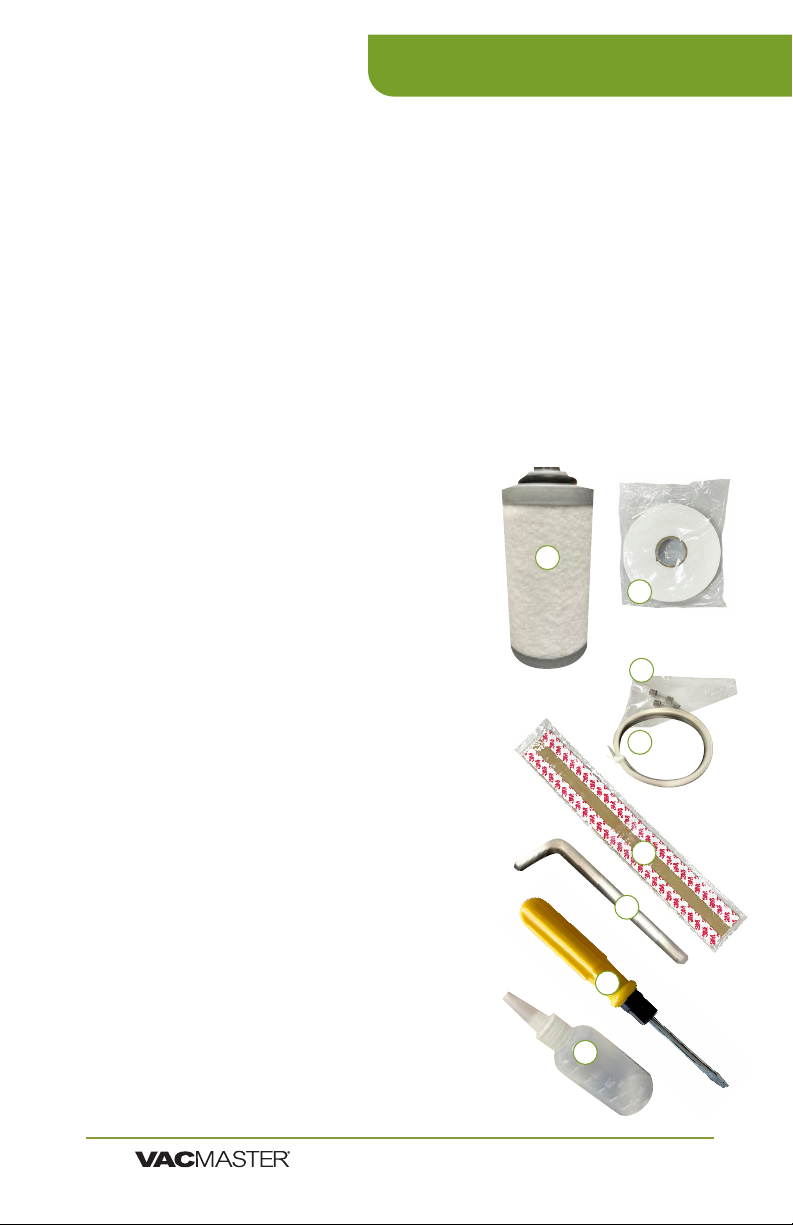
Maintenance Kit
1. Exhaust Filter:
put back into the pump & motor assembly.
2. Double-Sided Tape: Used for adhering the top
bar that holds the seal pad in the lid.
3. 20-AMP Fuses (2x): Used for replacing fuses
located on the heating transformer.
4. Seal Wire: Used to replace seal wire that spans
the wire shows heavy discoloration.
5. Seal Tape: Used to replace seal tape the covers
shows heavy discoloration, is torn, or is starting
to lose the adhesive.
6. Hex/Allen Wrench: Used to remove tension
blocks that hold the seal wire to the base of the
seal bar.
7. Reversible Screwdriver: Used to un-thread
screws on the cabinet of the machine and the
screws to move the chamber.
8. Oil Fill Bottle/Oil:
1
2
3
4
5
6
7
8
VP545 Chamber Vacuum Sealer |
ARY, Inc. | 11880 College Blvd., Suite 550, Overland Park, KS 66210 | VacMasterFresh.com | 800.821.7849
User Guide
15
Page 16
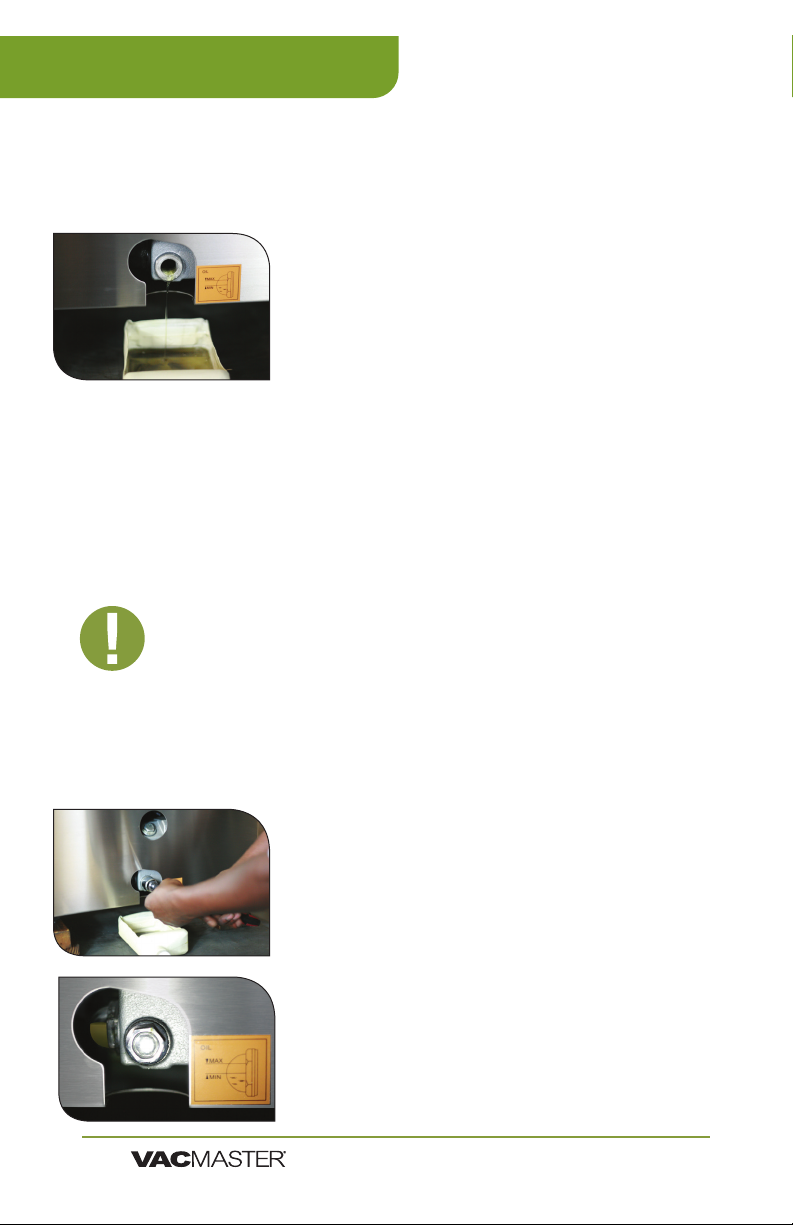
VP545 Maintenance
Maintaining the Vacuum Pump
Using the pump site glass, check the oil level and color frequently.
1. Oil must remain between ½ to ¾ of site glass.
2. With use, the pump oil will become cloudy,
discolored, change the oil using new
VacMaster® vacuum oil.
NOTE:
this oil change schedule to ensure proper maintenance of your VP545.
• First oil change: one week after use.
The VP545 vacuum pump requires periodic oil changes. Follow
Changing/Replacing Oil
IMPORTANT: Make sure the VP545 is turned OFF and
unplugged before adding oil. Do not plug in or use
machine until oil has been properly lled.
NOTE:
a few times. This will warm up the oil, allowing it to drain
freely and remove any contaminants.
Prepare oil in the pump - Run the vacuum process
Remove the oil drain bolt -
on the side of the machine. Place an oil catch cup
remove the oil drain bolt. Oil will immediately
Capture oil - When oil is completely drained,
replace the drain bolt. Dispose of old oil properly,
according to your local and state regulations.
Follow the “Adding Oil to
VP545 Chamber Vacuum Sealer |
ARY, Inc. | 11880 College Blvd., Suite 550, Overland Park, KS 66210 | VacMasterFresh.com | 800.821.7849
16
User Guide
Page 17
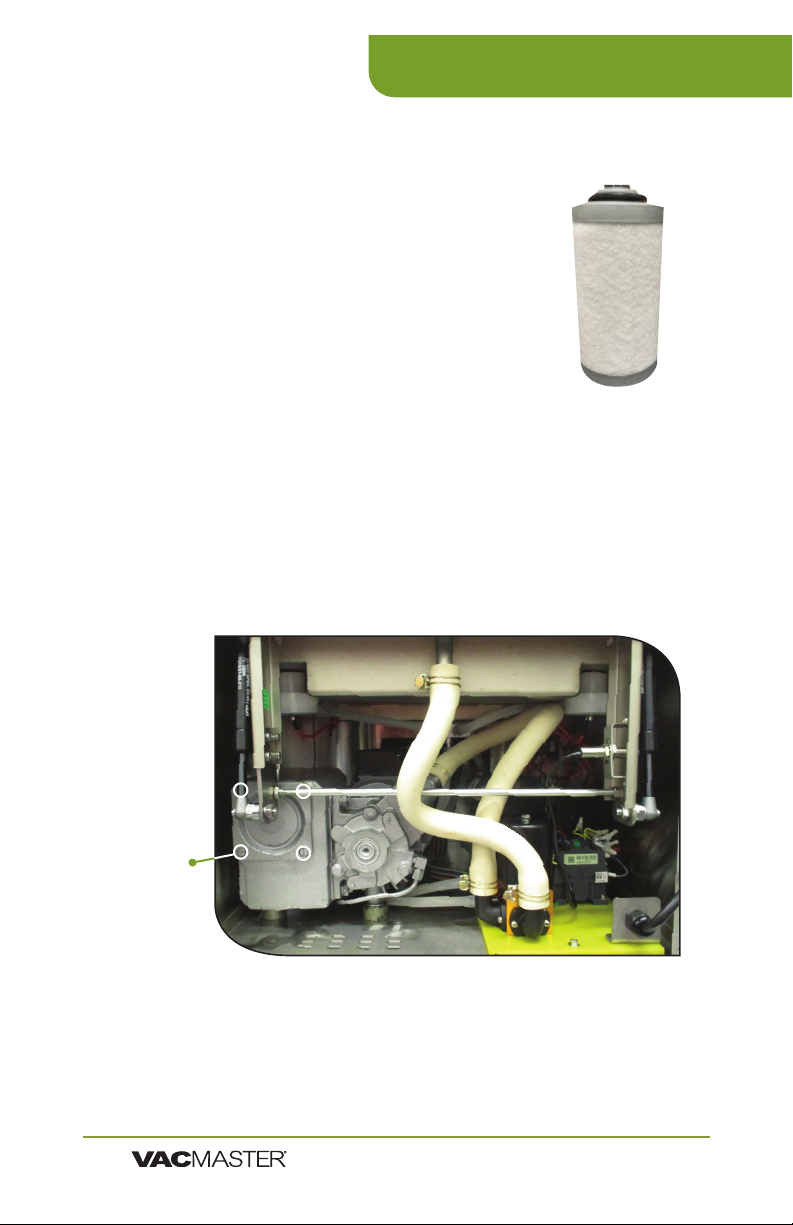
Changing the Filter
1. Remove the back panel
2. Remove the screws that hold the Upper
Chamber in place - Two located on the
front corners and two located on the back.
3. Pull the chamber assembly back about
3-4 inches
4.
plate on the end of the pump
5. Remove the plate and spring
6.
7.
8. Reassemble all of the
pieces in reverse order!
VP545 Maintenance
Plate
Screws
(Step #4)
VP545 Chamber Vacuum Sealer |
ARY, Inc. | 11880 College Blvd., Suite 550, Overland Park, KS 66210 | VacMasterFresh.com | 800.821.7849
User Guide
17
Page 18

VP545 Vacuum Packaging Guidelines
Follow all food safety regulations as outlined by the FDA at
h
www.FDA.gov.
Vacuum packaging is NOT a substitute for canning. All perishables
h
still need to be refrigerated or frozen.
Vacuum packaging cannot reverse the deterioration of foods.
h
Vacuum packaging is NOT a substitute for refrigeration or freezing.
h
Some fruits and vegetables may release gases, known as outgassing.
h
When packaging these fruits and vegetables, outgassing can cause
the vacuum to be gradually lost over time. Blanching or freezing
before vacuum packaging helps prevent this from occurring.
NOTE: Due to the risk of anaerobic bacteria, soft cheeses,
fresh mushrooms, garlic and onions should never be
vacuum packaged.
NOTE: Beef and other proteins may look darker after being
vacuum packaged. This is due to the removal of oxygen and
is not an indication of spoilage.
It is critical that food handling and storage are maintained at low
h
temperatures. You can reduce the growth of microorganisms
at temperatures of 34ºF or less. Freezing at 0ºF will not kill
microorganisms, but reduces the chances of them growing.
For long-term food storage, always freeze foods that have been
vacuumed packaged.
Delicate foods can be frozen prior to packaging to protect them
h
from getting crushed by the vacuum.
Use VacMaster® Bone Guards to cover an item’s sharp edges to
h
prevent pouch punctures.
Allow foods and liquids to cool to room temperature before vacuum
h
packaging.
h
the contents and the open end of the pouch. This is called head
space. This prevents spills during the vacuum sealing process.
To prevent wrinkles from forming in the seal, gently stretch the
h
VacMaster® pouches are boilable, freezable, and microwavable.
h
When microwaving, it is important to pierce the pouch.
VP545 Chamber Vacuum Sealer |
ARY, Inc. | 11880 College Blvd., Suite 550, Overland Park, KS 66210 | VacMasterFresh.com | 800.821.7849
18
User Guide
Page 19
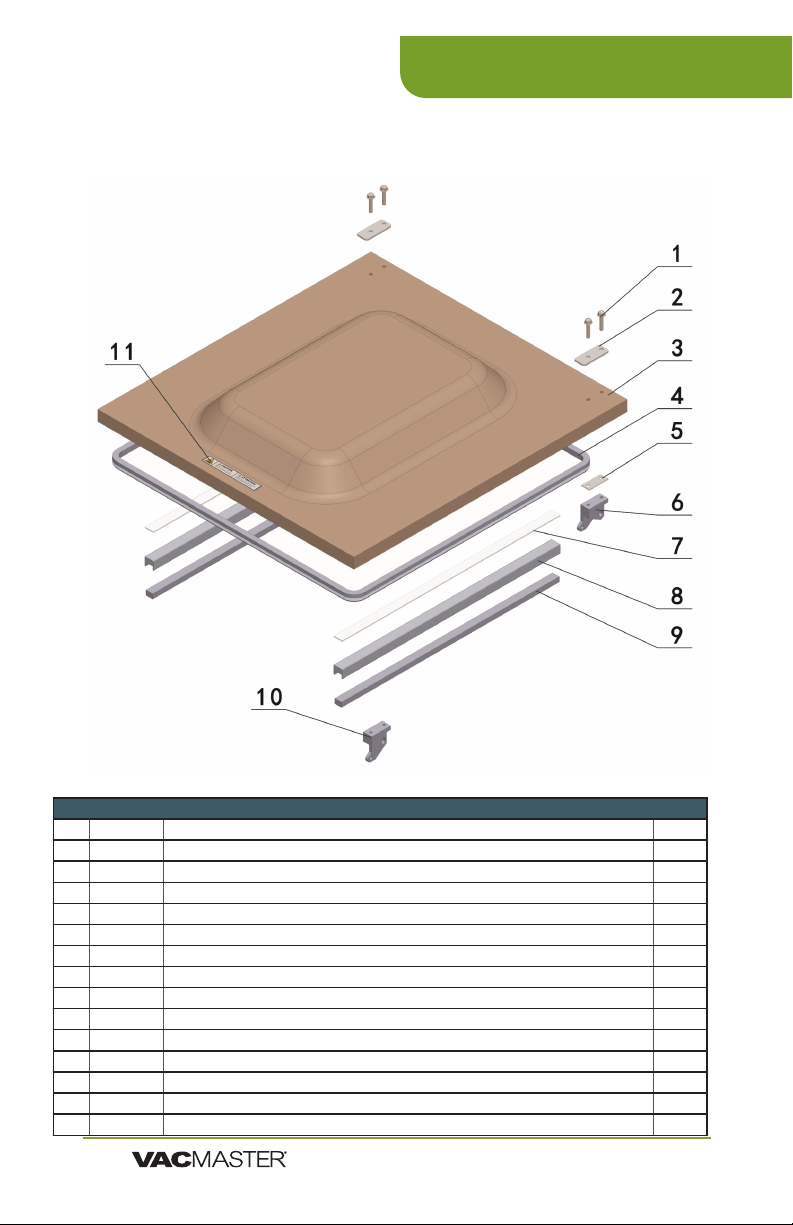
LID ASSEMBLY
VP545 Parts Information
Part # Part Name Qty
1 Hexagon head ange bolts 4
2 Upward Platen for Glass Cover 2
3 979501 Domed Lid 1
4 979429 Lid Gasket 1
5 Lower Platen for Glass Cover 2
6 979552 Hinge Set (Left & Right) 2
979553 Hinge Pin 2
7 979825 Double-sided tape 1
8 977485 Seal Pad / Top Bar Holder (NSF) 2
979505 Seal Pad / Top Bar Holder 2
9 977481 Seal Pad (NSF) 2
979423 Seal Pad 2
10 979552 Hinge Set (Left & Right) 2
979553 Hinge PIn 2
11 Adhesive Tape 1
VP545 Chamber Vacuum Sealer |
ARY, Inc. | 11880 College Blvd., Suite 550, Overland Park, KS 66210 | VacMasterFresh.com | 800.821.7849
User Guide
19
Page 20
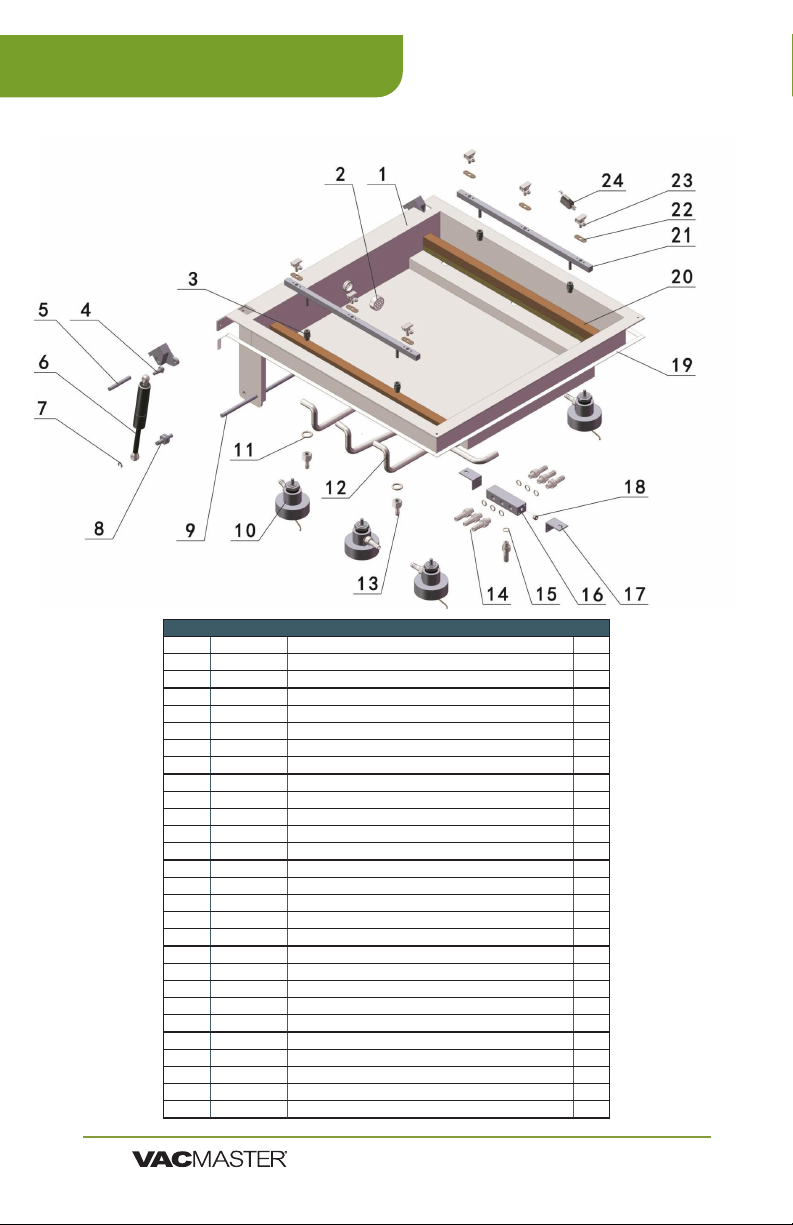
VP545 Parts Information
CHAMBER ASSEMBLY
Part # Part Name Qty
1 Chamber Assembly 1
2 979131 Exhausting hole cover 1
3 979381 Gas-Filling PIPE Joint Nozzle ( Plastic Piece) 4
4 979358-8 Nozzle, Upper Anchor 2
5 979553 Hinge Pin 2
6 979366 Gas Shock 2
7 977216 Retaining Ring / E-clip 2
8 979357 Nozzle, Lower Anchor 2
9 977508 Supporting Rod of Hinge 1
10 978380 Piston Assembly NSF 1
979380 Piston Assembly 1
11 979182 O ring 4
12 979156 Silicon Hose 1
13 979382 Gas Filling Pipe Joint Connector 4
14 979382 M10x1 Solenoid Valve Pipe Connections 7
15 979468 O ring 7
16 979138 Dispenser 1
17 Mounting Foot 2
18 End Cap 1
19 977480 EVA Seal Bar 1
20 979473 Seal Bar Assembly NSF 2
979500 Seal Bar Assembly 2
21 979900 Gas Manifold Assembly: Top, Side bar for gas ush 2
22 977264 Gas nozzle gasket 1
23 977482 Inatable nozzle assembly 1
24 977482 Microswitch NSF 1
979322 Microswitch 1
25 979399 Seat, microswitch 1
VP545 Chamber Vacuum Sealer |
ARY, Inc. | 11880 College Blvd., Suite 550, Overland Park, KS 66210 | VacMasterFresh.com | 800.821.7849
20
User Guide
Page 21
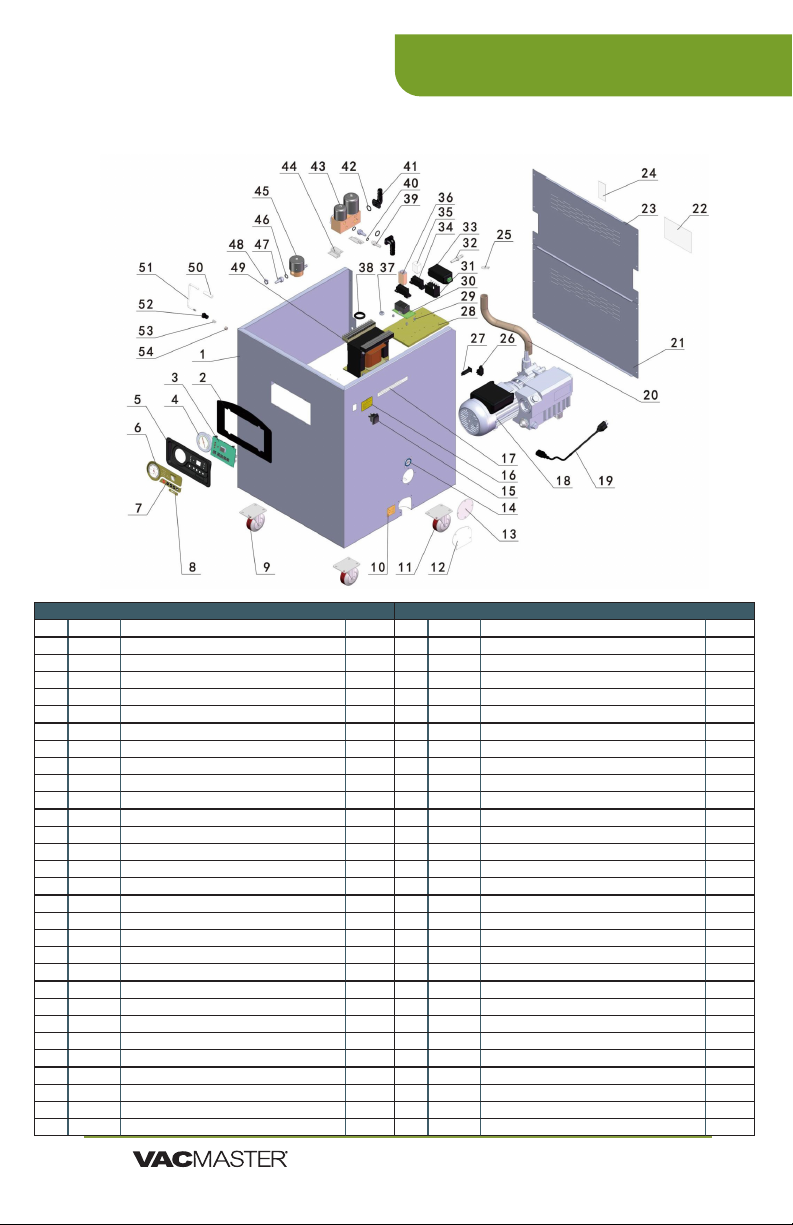
MACHINE HULL
VP545 Parts Information
Part # Part Name Qty
1 Housing 1
2 979131 Face Plate Panel 1
3 977500 Control Board: Green Panel Programmable 1
977483 Control Board: NSF 1
979129 Control Board: Blue Panel 1
4 979126 Gauge 1
5 979125 PC Control Panel Box 1
6-7 977504 Green Panel stickers (2): Display & Setting 1
8 977509 Green Panel sticker: VP545 1
9 979595 Caster Assembly (Non-locking) 2
10 Fill Level Decal 1
11 979595 Caster Assembly (Non-locking) 2
12 976155 Oil Drain Cover 1
13 976156 Fuel Hole Cover 1
14 Add Oil Decal 1
15 979468 Rocker switch (On/o Black Switch) NSF 1
979138 Power switch (On/o Red Switch) 1
16 Yellow Warning Label 1
17 White Warning Label 1
18 977480 Vacuum Pump (Includes motor) NSF 1
979320 Vacuum Pump (Includes motor) 1
19 976148 Power cord NSF 1
979404 Power cord 1
20 977264 Tubing 1
21 Lower back cover 1
22 Adhesive Tape 1
23 Upper back cover 1
24 Gas ush sticker 1
25 Wire Throat 4
26 977491 AC Power Socket NSF 1
VP545 Chamber Vacuum Sealer |
Part # Part Name Qty
27 979100 Fuse Block, 20 AMP 1
28 979467 Electrical mounting plate (2019 model) 1
29 980100 Relay spacer 4
30 979467 Timer Relay NSF 1
31 979475 High Power Relay NSF (GP (Contractor) Relay) 1
32 979688 Gas Flush Connector 1
33 979477 Switching Power Supply NSF 1
34 979476 Relay Holder / Socket 2
35 977484 Small Relay 1
36 977479 Small Relay Timer 1
37 Rubber guard coil 1
38 Rubber guard coil 1
39 M10x1 Solenoid Valve Pipe Connector 1
40 O-ring rubber seal 1
41 979360 Right Angle Fittings 2
42 O-ring rubber seal 2
43 979360 Vacuum solenoid valve NSF 1
44 Solenoid valve feet 2
45 979365 Gas ush solenoid valve 1
46 979540 O-ring rubber seal 3
47 M14x1 Solenoid Valve Pipe Connector 3
48 Iron Throat 2
49 979474 Sealing Transformer NSF 1
979540 Sealing Transformer 1
50 Silicone Rubber Vacuum Tube 0.045
51 Organic Lid Buckle 1
52 Limit Nut 1
53 Lid Limit Spring 1
54 Hexagon Lock Nut 1
User Guide
ARY, Inc. | 11880 College Blvd., Suite 550, Overland Park, KS 66210 | VacMasterFresh.com | 800.821.7849
21
Page 22

VP545 Packaging Information
With the VP545, you can easily package a wide variety of sizes and shapes.
You can also prep and store smaller individual serving portions as well as
bulk items.
▫ Keeps food fresh 3-5 times
longer than conventional
storage bags.
▫ Several sizes available to
meet your packaging needs.
▫
applications in and out of
the kitchen
▫ Safe for freezer, refrigeration,
and microwave use.
The chamber of the VP545 can easily vacuum package the following sizes
of vacuum pouches:
▫ Re-Therm pouches are reinforced to be able
to handle being boiled for up to 30 minutes.
The other bags can be boiled, but not for
that long without being compromised.
When a normal bag becomes compromised,
the pouch will begin to delaminate.
▫ Bag thickness available in standard 3mil or
heavy duty 4mil.
▫ Bags are economically priced, giving you a
better value.
ITEM # DESCRIPTION #
30765 2.5” X 10” Vacuum Chamber Pouches 3-Mil 2000/Box 14x
30766 6” X 7” Vacuum Chamber Pouches 3-Mil - 1000/Box 6x
30742 6” X 8” Vacuum Chamber Pouches 3-Mil - 1000/Box 6x
30608 6” X 8” Vacuum Chamber Pouches 4-Mil - 1000/Box 6x
30720 6” X 8.5” Vacuum Chamber Pouches 3-Mil - 1000 /Box 6x
30750 6” X 8.5” Re-Therm Vacuum Chamber Pouches 3-Mil 1- 000/Box 6x
30721 6” X 10” Vacuum Chamber Pouches 3-Mil - 1000/Box 6x
30610 6” X 10” Vacuum Chamber Pouches 4-Mil - 1000/Box 6x
50717 6” X 10” Zipper Vacuum Chamber Pouches 3-Mil - 1000/Box 6x
40721 6” X 12” Pouches 3-Mil Flat Vacuum Chamber Pouches - 500/Box 6x
30743 6” X 12” Vacuum Chamber Pouches 3-Mil - 1000/Box 6x
30612 6” X 12” Vacuum Chamber Pouches 4-Mil - 1000/Box 6x
50718 6” X 12” Zipper Vacuum Chamber Pouches 3-Mil - 1000/Box 6x
30787 6” X 15” Vacuum Chamber Pouches 3-Mil - 1000/Box 6x
30788 7 X 9 Vacuum Chamber Pouches 3-Mil 1000/Box 4x
30789 7 X 11 Vacuum Chamber Pouches 3-Mil 1000/Box 4x
30791 7 X 12 Vacuum Chamber Pouches 3-Mil 1000/Box 4x
40722 8” X 10” Pouches 3-Mil Flat Vacuum Chamber Pouches 500/Box 4x
30722 8” X 10” Vacuum Chamber Pouches 3-Mil 1000/Box 4x
30614 8 X 10 Vacuum Chamber Pouches 4-Mil 1000/Box 4x
50719 8 X 10 Zipper Vacuum Chamber Pouches 3-Mil 1000/Box 4x
30723 8” X 12” Vacuum Chamber Pouches 3-Mil 1 000/Box 4x
40751 8 X 12 Re-Therm Vacuum Chamber Pouches 3-Mil 1000/Box 4x
30754 8 X 12 Vacuum Chamber Pouches 4-Mil 1000/Box 4x
50720 8 X 12 Zipper Vacuum Chamber Pouches 3-Mil 1000/Box 4x
30744 8” X 15” Vacuum Chamber Pouches 3-Mil 1000/Box 4x
30618 8 X 15 Vacuum Chamber Pouches 4-Mil 1000/Box 4x
50722 8 X 16 Zipper Vacuum Chamber Pouches 3-Mil 1000/Box 4x
ITEM # DESCRIPTION #
30777 9 X 12 Vacuum Chamber Pouches 3-Mil 1000/Box 4x
40731 10 X 8 Horizontal Vacuum Chamber Pouches 3-Mil 250/Box 2x
30724 10” X 10” Vacuum Chamber Pouches 3-Mil 1000/Box 2x
50724 10 X 12 Zipper Vacuum Chamber Pouches 3-Mil 1000/Box 2x
30620 10 X 12 Vacuum Chamber Pouches 4-Mil 1000/Box 2x
40725 10” X 13” Pouches 3-Mil Vacuum Chamber Pouches 250/Box 2x
30725 10” X 13” Vacuum Chamber Pouches 3-Mil 1000/Box 2x
30778 10” X 13” Vacuum Chamber Pouches 4-Mil 1000/Box 2x
30776 10 X 13 Vacuum Chamber Pouches 5-Mil 1000/Box 2x
30726 10” X 15” Vacuum Chamber Pouches 3-Mil 1000/Box 2x
30749 10 X 15 Re-Therm Vacuum Chamber Pouches 3-Mil 1000/Box 2x
50721 10 X 15 Zipper Vacuum Chamber Pouches 3-Mil 1000/Box 2x
30752 10 X 16 Re-Therm Vacuum Chamber Pouches 3-Mil 1000/Box 2x
30755 10 X 16 Vacuum Chamber Pouches 4-Mil 1000/Box 2x
40726 11.5 X 13 Vacuum Chamber Pouches 3-Mil 250/Box 2x
40732 12 X 8 Horizontal Vacuum Chamber Pouches 3-Mil 250/Box 2x
40733 12 X 10 Horizontal Vacuum Chamber Pouches 3-Mil 250/Box 2x
30727 12” X 12” Vacuum Chamber Pouches 3-Mil 1000/Box 2x
40728 12 X 14 Vacuum Chamber Pouches 3-Mil 250/Box 2x
30728 12” X 14” Vacuum Chamber Pouches 3-Mil 1000/Box 2x
30624 12 X 14 Vacuum Chamber Pouches 4-Mil 1000/Box 2x
50726 12 X 14 Zipper Vacuum Chamber Pouches 3-Mil 1000/Box 2x
30746 12” X 15” Vacuum Chamber Pouches 3-Mil 500/Box 2x
30731 12” X 16” Vacuum Chamber Pouches 3-Mil 500/Box 2x
30786 12 X 16 Vacuum Chamber Pouches 4-Mil 500/Box 2x
40796 12” X 16” Re-Therm Vacuum Chamber Pouches 4-Mil 500/Box 2x
30734 14” X 16” Vacuum Chamber Pouches 3-Mil 500 /Box 2x
VP545 Chamber Vacuum Sealer |
ARY, Inc. | 11880 College Blvd., Suite 550, Overland Park, KS 66210 | VacMasterFresh.com | 800.821.7849
22
User Guide
Page 23

VP545 Specs
SKU: Machine Type: Chamber Size: Seal Bar Length:
VP545 Floor Model
Chamber (NSF)
Distance Between Bars:
16.75" 1.5 HP Rotary
Machine Dimensions:
25" x 24" x 41" 315 lbs 18" x 22" Chamber Vacuum
Includes: Gas Flush
100 Assorted Vacuum Chamber Pouches, 25 (8" X 12"),
25 (6" X 10"), 25 (12" X 16") and 25 (14" X 16")
2 Filler Plates
Maintenance Kit
User’s Guide
Vacuum
Pump:
Oil Pump
Weight: Maximum Bag/
21.25" x 20.75" x 7" 2 @ 20"
Cycle Time: Electrical Specs:
20-40 Seconds Single Phase 110 V
20 Amp
Compatible
Pouch Size:
Bags/Pouches:
Sealer Pouches
Yes
VP545 Chamber Vacuum Sealer |
ARY, Inc. | 11880 College Blvd., Suite 550, Overland Park, KS 66210 | VacMasterFresh.com | 800.821.7849
User Guide
23
Page 24

VP545
More Resources
Want Recipes, Tips and Videos?
Check out our Blog or nd us on Online!
Check out our Blog:
vacmasterfresh.com/fresh-bites-blog/
Check out our Channel:
youtube.com/@VacMasterFresh
Or Find Us On Social:
https://twitter.com/VacMasterFresh
ARY, Inc. | 11880 College Blvd., Suite 550, Overland Park, KS 66210 | VacMasterFresh.com | 800.821.7849
24
https://www.facebook.com/vacmasterfresh
https://www.instagram.com/vacmasterfresh
VP545 Chamber Vacuum Sealer |
User Guide
Page 25

VP545
ARY, Inc., a distributor and manufacturer of vacuum packaging and other
machines (collectively, the "Goods"), extends to the purchaser of the Goods a
Limited One Year Warranty, from the receipt of the Goods, under terms and
conditions set out herein.
All Goods sold by ARY, Inc. are warranted to be free from defects in material
and workmanship at the time of delivery to purchaser. Defective material may
be returned to ARY, Inc. after inspection by an agent of ARY, Inc. and upon
authorized by ARY, Inc. to be returned. ARY, Inc. at its sole option, may either
(i) replace or repair any defective materials and workmanship (and return the
Goods to purchaser without charge), (ii) refund the purchase price, or (iii) grant
a reasonable allowance with the foregoing procedure.
This warranty is subject to the following limitations:
i. ARY, Inc.’s responsibility and the purchaser’s exclusive remedy under
this warranty is limited to the repair or replacement of defects in material
and workmanship, refund of the purchase price, or grant of a reasonable
allowance on account of such defects, all as set forth above. ARY, Inc. is not
responsible for any consequential damages resulting from the breach of this
or any other express or implied warranty with respect to the Goods.
ii. This express warranty is the only warranty applicable. It excludes all other
express oral or written warranties and all warranties implied by law with
for a particular purpose.
iii. Every claim under this warranty shall be deemed waived by purchaser
unless made in writing within one (1) year of the receipt of the Goods to which
such claim relates.
iv. This warranty, as to the Goods, is void (a) to repairs made by anyone other
than ARY, Inc. without prior authorization from ARY, Inc., (b) to performance
of any system of which ARY, Inc.’s Goods are a component part, (c) to
deterioration by corrosion or any cause of failure other than defect of material
or workmanship, (d) to any components of the Goods, including, without
parts thereof have been tampered with or altered by someone other than
ARY, Inc., or subjected to misuse, neglect, abuse, or misuse in application.
Limited Warranty
ARY, Inc.’s maximum liability hereunder, arising from any cause whatsoever,
whether based in contract, tort (including negligence), strict liability, or any
other theory of law, shall not exceed the purchase price. A suit based on any
aforementioned cause of action must be commenced within one year from the
date said action accrues.
Register your product and get technical support at:
www.vacmasterfresh.com/product-registration/
vacmasterfresh.com/contact-us/
VP545 Chamber Vacuum Sealer |
ARY, Inc. | 11880 College Blvd., Suite 550, Overland Park, KS 66210 | VacMasterFresh.com | 800.821.7849
User Guide
25
Page 26
VP545
Notes
VP545 Chamber Vacuum Sealer |
ARY, Inc. | 11880 College Blvd., Suite 550, Overland Park, KS 66210 | VacMasterFresh.com | 800.821.7849
26
User Guide
Page 27
VP545
Notes
VP545 Chamber Vacuum Sealer |
ARY, Inc. | 11880 College Blvd., Suite 550, Overland Park, KS 66210 | VacMasterFresh.com | 800.821.7849
User Guide
27
Page 28

A Product of
P.O. Box 412888
Kansas City, MO 64141
VacMasterFresh.com
800.821.7849
All Rights Reserved. VacMaster® is a trademark or registered trademark of ARY, Inc.
in the United States and other countries.
 Loading...