

Page 1
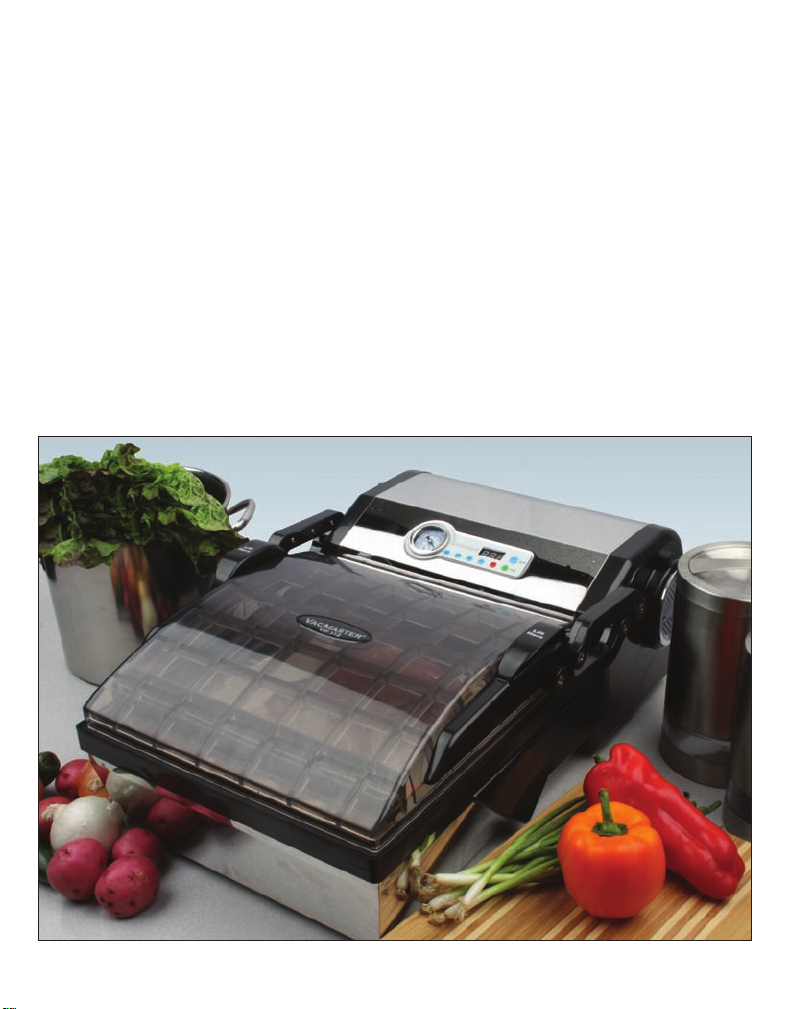
User’s Guide
VAC
MASTER
VP112 (110V Version)
VP112EU (220-240V Version)
®
Page 2

Limited Warranty
ARY, Inc. a distributor and manufacturer of vacuum packaging and other machines
(collectively, the “Goods”), extends to the purchaser of the Goods a Limited One Year
Warranty, from the receipt of the Goods, under terms and conditions set out herein.
All Goods sold by ARY, Inc. are warranted to be free from defects in material and
workmanship at the time of delivery to purchaser. Defective material may be returned to ARY,
Inc. after inspection by an agent of ARY, Inc. and upon receipt from ARY, Inc. of shipping
instructions specic to the defective Goods authorized by ARY, Inc. to be returned. ARY, Inc.
at its sole option, may either (i) replace or repair any defective materials and workmanship
(and return the Goods to purchaser without charge), (ii) refund the purchase price, or (iii) grant
a reasonable allowance with the foregoing procedure.
This warranty is subject to the following limitations:
i. ARY, Inc.’s responsibility and the purchaser’s exclusive remedy under this warranty is
limited to the repair or replacement of defects in material and workmanship, refund of the
purchase price, or grant of a reasonable allowance on account of such defects, all as set forth
above. ARY, Inc. is not responsible for any consequential damages resulting from the breach
of this or any other express or implied warranty with respect to the Goods.
ii. This express warranty is the only warranty applicable. It excludes all other express oral or
written warranties and all warranties implied by law with respect to the Goods, including any
warranties or merchantability or tness for a particular purpose.
iii. Every claim under this warranty shall be deemed waived by purchaser unless made in
writing within one (1) year of the receipt of the Goods to which such claim relates.
iv. This warranty, as to the Goods, is void (a) to repairs made by anyone other than ARY, Inc.
without prior authorization from ARY, Inc., (b) to performance of any system of which ARY,
Inc.’s Goods are a component part, (c) to deterioration by corrosion or any cause of failure
other than defect of material or workmanship, (d) to any components of the Goods, including,
without limitation, Teon tape, lid gaskets and seal wire, or (e) if any of the Good or parts
thereof have been tampered with or altered by someone other than ARY, Inc., or subjected to
misuse, neglect, abuse, or misuse in application.
ARY, Inc.’s maximum liability hereunder, arising from any cause whatsoever, whether based in
contract, tort (including negligence), strict liability, or any other theory of law, shall not exceed
the purchase price. A suit based on any aforementioned cause of action must be commenced
within one year from the date said action accrues.
Page 3

Table of Contents
Vacuum Packaging Overview ........................................4
VP112 Features .........................................................5
VP112 Control Panel ..................................................6
Operating Instructions
Installing the VP112 Seal Bar ............................................7
Using the VP112 Vacuum Packaging Machine .................7
Using a Storage Canister with your VP112 ................. 10
VACMASTER® Pouches ........................................12
VACMASTER® Storage Canisters .........................13
VP112 Uses & Tips ..................................................14
Machine Safety & Maintenance ...................................15
Troubleshooting ...........................................................16
Warranty ......................................................................19
Page 4

Vacuum Packaging Overview
If you are part of either the food processing or food service industry, there is a good
chance that you already know the advantages of vacuum packaging. It has been used
with success for many years as a safe and cost effective method for extending shelf
life and maintaining the quality of food products. If vacuum packaging is new to your
home or business, you will soon wonder how you lived without it!
Whether you are a beginner or expert, there are certain basic guidelines that should
always be followed in order to package foods safely for consumption. Neglecting
these basic guidelines can result in food spoilage, and in some cases, illness or death.
Once you familiarize yourself with the machine procedures, you will feel at ease using
the VACMASTER
stored foods.
Here are a few tips to get you started:
• Package only fresh foods. Do not package old or rancid foods. An already bad
product does not improve with vacuum packaging.
• Fresh foods (meats, vegetables, cheeses, etc.) should be refrigerated at 34˚F or
below or frozen after vacuum packaging.
• Vacuum packaging removes a high percentage of air (which is 21% oxygen). This
slows the growth of most living microorganisms, which degrade food, such as aerobic
bacteria and molds. However, some forms of bacteria, such as clostridium botulinum
(responsible for botulism), are anaerobic and grow in the absence of oxygen.
• The foods susceptible to botulinum should be refrigerated for the short term and frozen for
long-term storage. Consume immediately after heating.
• Vegetables such as cauliower, broccoli and cabbage will emit gasses when vacuum
sealed. To prepare these foods for vacuum packaging, you must blanch them rst and
then freeze.
• All perishable foods must be refrigerated or frozen to prevent spoilage.
• Vacuum packaging is not a substitute for canning.
®
VP112 Vacuum Packaging Machine and enjoy a higher quality of
4
Page 5
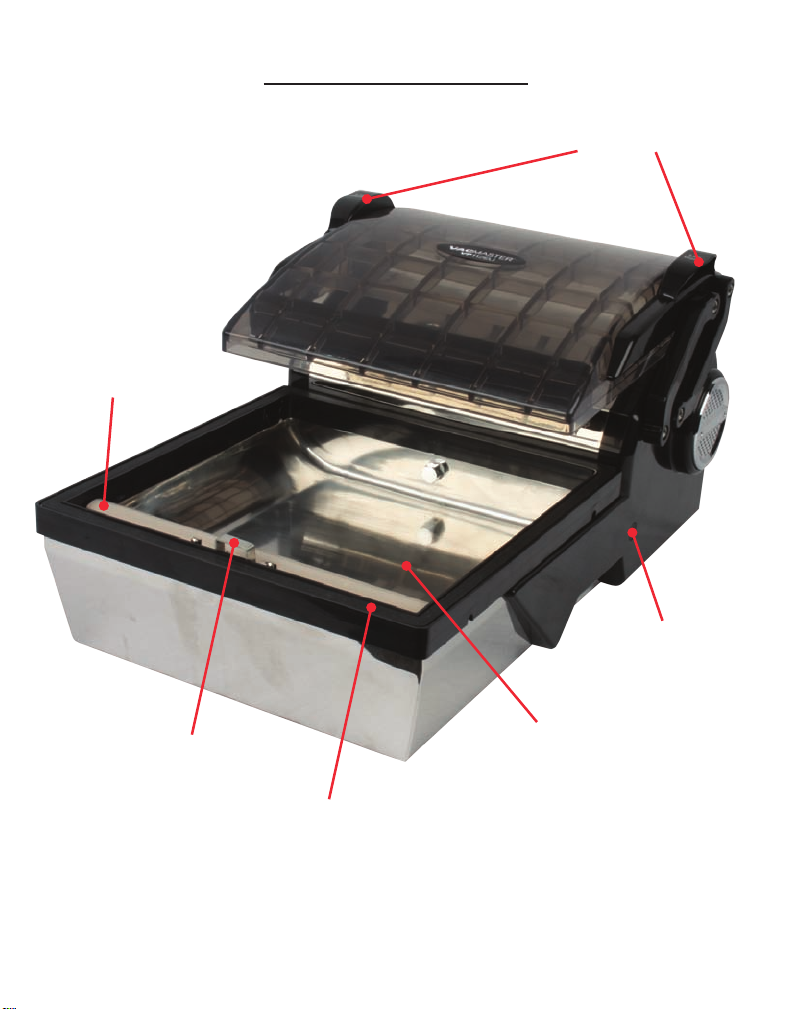
Seal Bar
VP112 Features
Lid Lift Handles
Accessory
Port
Pouch Clip
Vacuum
Chamber
Lid Gasket
5
Page 6
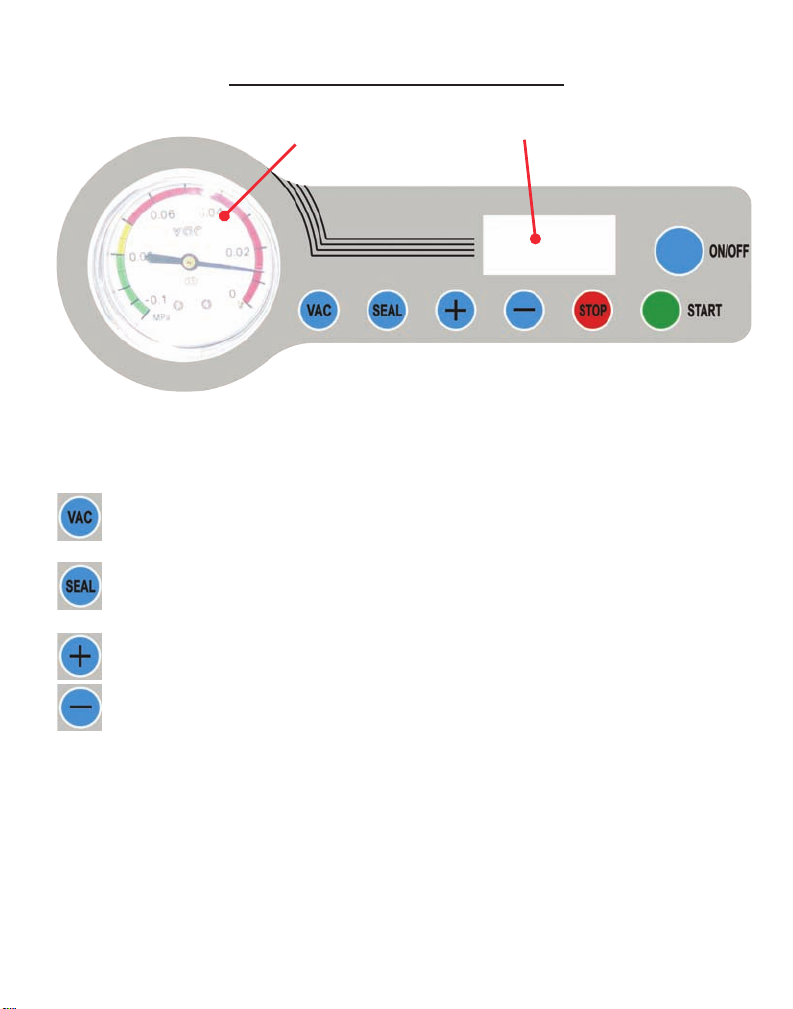
VP112 Control Panel
Vacuum Gauge
Vacuum Gauge: Indicates the vacuum level inside the chamber.
LED Screen: Displays current function or cycle time count.
Button: Press to adjust the vacuum time. Used in conjunction
with the + / - buttons.
Button: Press to adjust the seal time. Used in conjunction with
the + / - buttons.
Button: Press to increase the vacuum time or seal time.
Button: Press to decrease the vacuum time or seal time.
LED Screen
STOP Button: Press to stop the vacuum cycle and immediately seal the
pouch. This button will only work while the machine is in
the vacuum process.
ON/OFF Button: Press to turn the machine ON or OFF. This function is
displayed in the LED Screen.
START Button: With the machine turned ON, press the START button to
begin the vacuum and sealing process.
6
Page 7
Operating Instructions
Please read all instructions before operating the VP112.
INSTALLING THE VP112 SEAL BAR
Before using the VP112 for the rst time, the seal bar must be installed.
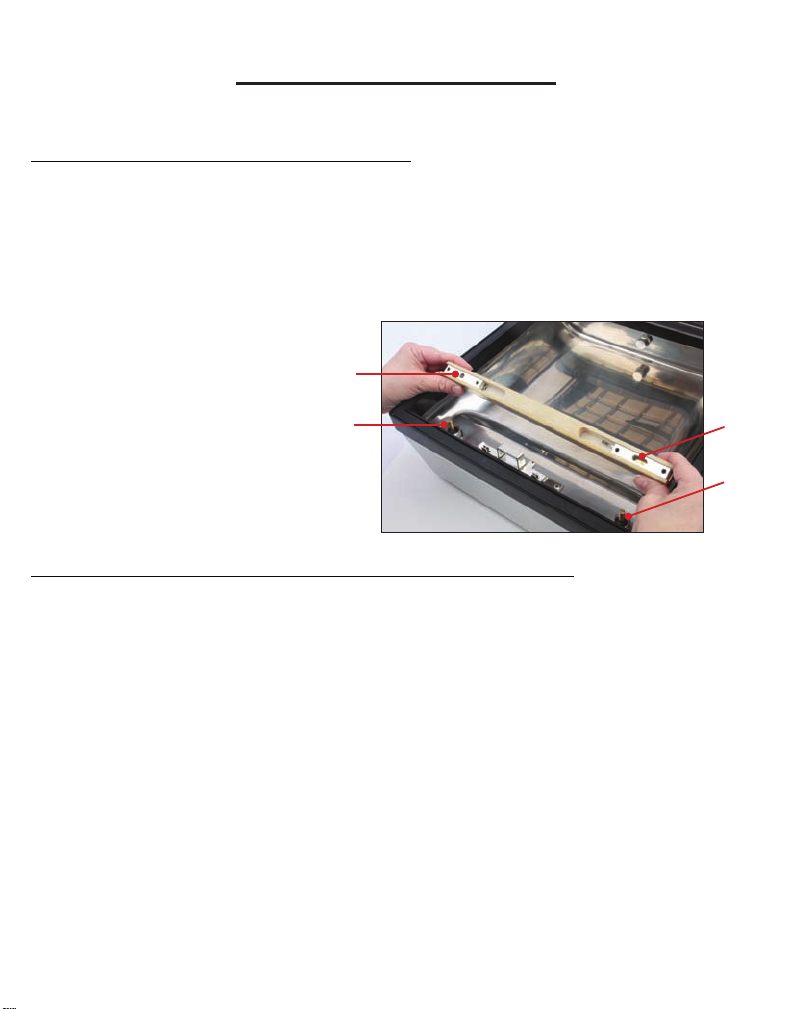
1. Locate the seal bar inside the VP112 box.
2. Open the transparent lid with both hands, using the lid lift handles.
3. At the front of the chamber, locate the two piston rods (labeled “A” in the picture below).
Take the seal bar and align the holes on the bottom of the seal bar (labeled “B” in the
picture below) with the two piston rods.
4. Place the seal bar on the piston
rods, making sure the seal bar
and piston rods are aligned.
Do not push the seal bar down
with force. The seal bar should
rest securely on top of the rods.
5. Once the seal bar is in place,
your VP112 is ready for use.
USING THE VP112 VACUUM PACKAGING MACHINE
1. Select a vacuum chamber pouch
Select the proper size of vacuum chamber pouch for the product that you are packaging. Make
sure that the mouth of the pouch does not exceed the length of the seal bar, and make sure the
entire pouch ts inside of the chamber. Allow 1” to 2” (2.5 cm to 5.1 cm) of extra headspace at
the top of the pouch to ensure a quality, air-tight seal. The VP112 accepts vacuum chamber
pouches up to 12”W x 14”L (30.5 cm x 35.6 cm) in size.
B
A
B
A
2. Attach the power cord and plug the machine into a grounded electrical outlet
VP112 (110V) - Properly insert the electrical cord into the power outlet on the back of the
machine and then plug the cord into the wall outlet. The LED screen on the control panel will
read “OFF”.
VP112EU (220-240V) – Two types of electrical cords have been included with this machine –
UK and EU versions. Select the appropriate electrical cord and properly insert it into the power
outlet on the back of the machine and then plug the cord into the wall outlet. The LED screen
on the control panel will read “OFF”.
7
Page 8
Operating Instructions (Continued)
3. Press the ON/OFF button
The LED screen on the control panel will read “ON”.
4. Adjust/set timing controls
Note:Alltimeadjustmentsmustbemadewithmachinepower“ON”.
Vacuum Time: The default vacuum time setting is 30 seconds, which is appropriate for most applications.
If you require an increase or decrease in vacuum time, you may press the VAC button once and then use the
+ / - button to adjust the vacuum time accordingly. The vacuum time can vary from 5-60 seconds.
Seal Time: The default seal time is 5 seconds, which is appropriate for standard applications. If you wish to
change the seal time, you may press the SEAL button once and then use the + / - button to adjust the seal
time to accommodate your application. It is recommended that you make adjustments in 1 second increments
to avoid melting the pouch. The seal time can vary from 3-9 seconds.
Note:Ifthemachineisunplugged,thevacuumtimeandsealtimewillresettothedefaultsettings.
5. Open the machine lid
Open the lid with both hands, using the lid lift handles.
6. Fill the pouch and place inside the chamber
Fill the pouch with the product to be vacuum packaged, and place the pouch inside the
chamber. Keep pouches that contain liquids or wet product below the height of the seal bar.
Lay the pouch at inside the chamber, with the opening of the pouch across the seal bar.
Make sure that the pouch lies at across the seal bar and is free of wrinkles.
Note:Theentirepouch,includingtheopening,mustremain
insideofthechamber.
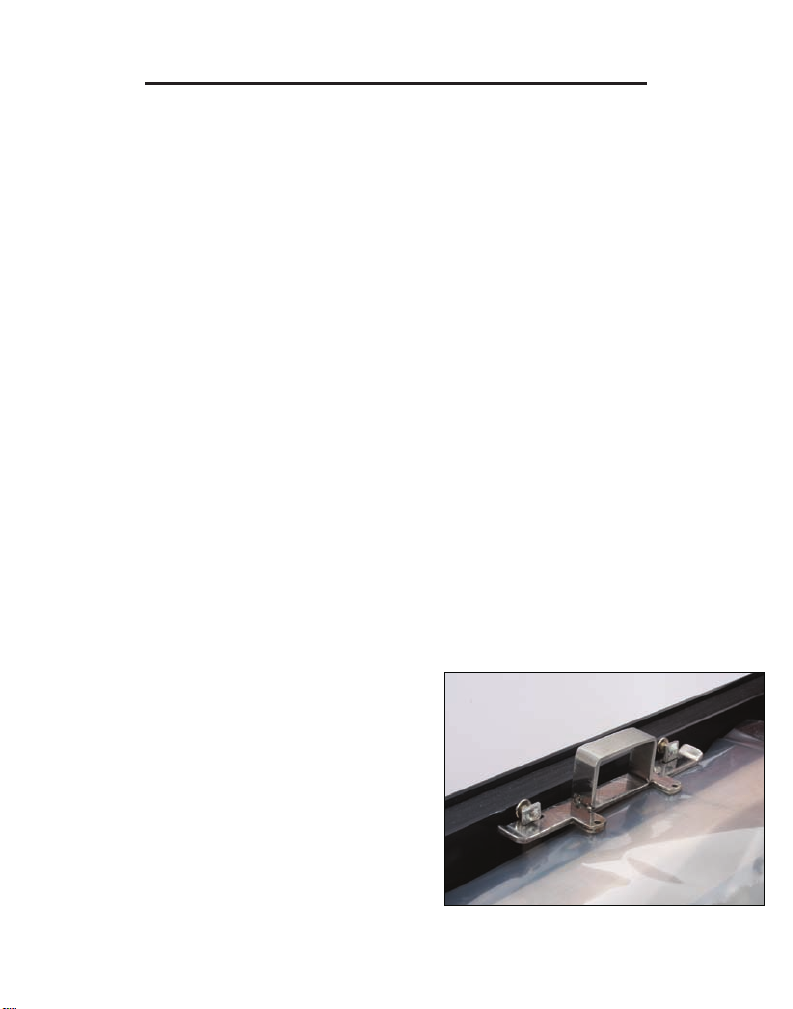
Using the pouch clip - To keep the pouch in
place during the vacuum cycle, you will want
to use the pouch clip accessory at the front of the
chamber. Lift the pouch clip up and insert the open
end of the bag inside the clip (as shown in the picture
to the right). Once the pouch is in position, press the
pouch clip down rmly. The pouch clip will keep the
pouch in place during the vacuum and seal process.
Note:Oncethevacuumandsealcycleiscomplete,lift
thepouchclipuptoremovethepouch.
8
Page 9

Operating Instructions (Continued)
7. Close the machine lid
Close the lid with both hands, using the lid lift handles. Make sure the lid ts rmly against
the lid gasket.
8. Vacuum and seal
Press the START button to begin the vacuum process. The vacuum cycle will begin at the
set vacuum time and count down to zero. Once the vacuum cycle is complete, the seal
process will begin. The seal cycle will begin at the set seal time and count down to zero.
Once the seal cycle is complete, air will be released back into the chamber, and the machine
will give a long beep sound indicating that the vacuum and seal cycle is complete.
Tip:Thevacuumprocessisindicatedbythevacuumgaugeonthecontrolpanelofthemachine.Ifthevacuumlevel
doesnotincreaseinitially,trypushingdownonthelidslightlyatthebeginningofthecycle,makingsurethatthelidseals
completelyagainstthelidgasket.
9. Open the machine lid and inspect the pouch
Open the lid with both hands, using the lid lift handles. Remove the pouch and inspect
the vacuum-packaged product.
Vacuum conrmation: Check the quality of the vacuum by looking at the tightness of the pouch and the
product. Look for air pockets or air leaks. If you notice that the product is not vacuum sealed tightly, then
increase the vacuum time by 5 seconds and vacuum and seal again.
Seal conrmation: Inspect the pouch seal. A positive seal will appear clear upon inspection. If the seal is
spotty or incomplete, increase the seal time by 1 second. If the seal appears white or milky, decrease the
seal time by 1 second. Once the settings are determined for your application, vacuum and seal again.
If the product is vacuumed and sealed tightly, then the process is complete.
9
Page 10
Operating Instructions (Continued)
USING A STORAGE CANISTER WITH YOUR VP112
Note:IftheVP112isnotturnedon,pleasefollowsteps2and3under“USINGTHEVP112VACUUMPACKAGINGMACHINE”
intheprevioussection.
1. Select a canister
Select the proper size canister for your application - either the ½ quart (0.47 L) canister
or 2½ quart (2.37 L) marinator.
2. Fill the canister
Fill the canister with the item(s) to be vacuum packaged. Make sure the lid of the canister is
dry and free of food particles and debris. Leave a minimum of 1” (2.5 cm) headspace
between the top of the product and the canister lid – do not overll.
3. Turn the knob to VACUUM
Turn the knob on the top of the canister to the VACUUM position, and place the lid on top of the
canister. The lid should rest securely on the rim of the canister until the vacuum process begins.
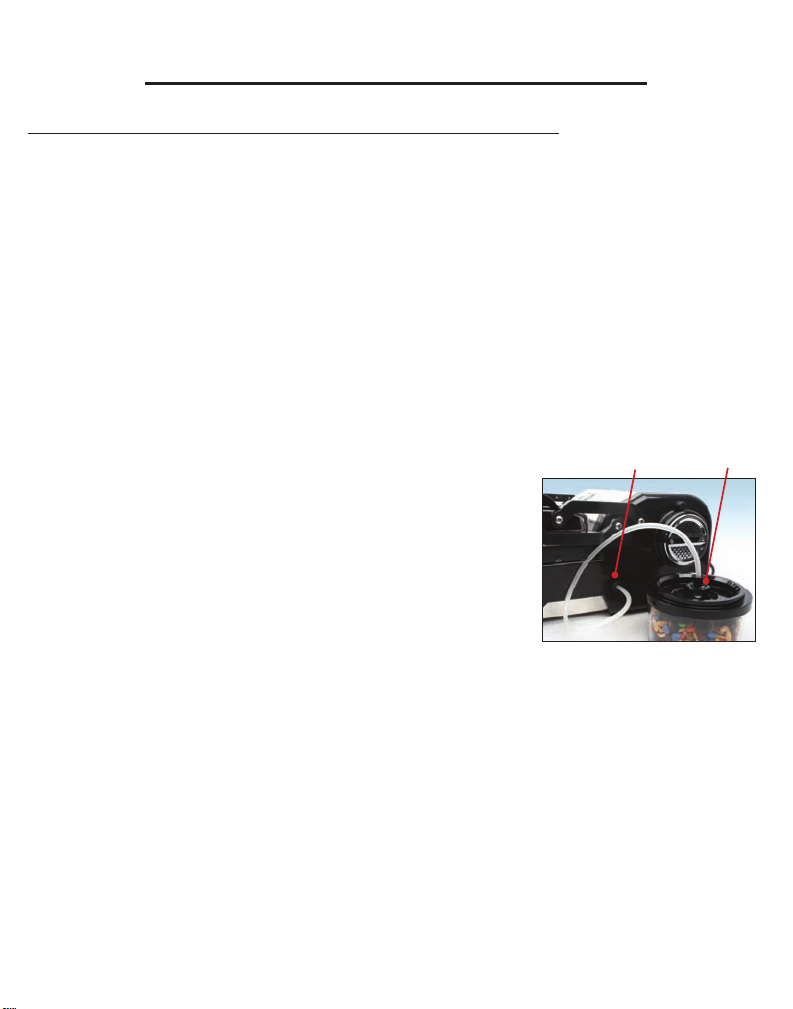
4. Attach the hose
Attach one end of the hose to the accessory port located on
the right side of the VP112 (labeled “A” in the picture to the
right). Attach the opposite end of the hose to the center of the
knob on the canister lid (labeled “B” in the picture to the right).
5. Close the machine lid
Close the VP112 lid with both hands, using the lid lift handles.
6. Vacuum
Press the START button to begin the vacuum process. The machine will count down from
30 seconds to zero and then 5 seconds to zero. Once the vacuum cycle is complete, air will
be released back into the chamber and the machine will give a long beep sound indicating
that the vacuum cycle is complete.
A
B
Tip:Thevacuumprocessisindicatedbythevacuumgaugeonthecontrolpanelofthemachine.Ifthevacuumleveldoesnot
increaseinitially,trypushingdownonthelidslightlyatthebeginningofthecycle,makingsurethatthelidsealscompletely.
7. Turn the knob to LOCK
Turn the knob on the top of the canister to the LOCK position. Then remove the hose from
the canister lid and the VP112 accessory port. Inspect the canister and tug gently on the
canister lid. If the lid is securely attached, then the vacuum process was successful. Store
the canister in the refrigerator or other appropriate storage location.
To remove the lid, turn the knob on the top of the canister to the OPEN position. This will
release the pressure of the vacuum and allow the lid to be removed.
10
Page 11

Guidelines for Canister Use
• Use only canisters designed for vacuum packaging. Other containers can implode under the
pressure of the VP112 vacuum.
• Do not freeze vacuum canisters.
• Food and liquids in the canister should be thawed or at room temperature before heating in the
microwave. The canister lid should be removed prior to microwaving.
• Foods and liquids should be room temperature or cooler prior to vacuum packaging. You can
cool foods and liquids quickly by putting them in the refrigerator.
• The canister base is dishwasher safe. The canister lid must be hand washed – do not put the
canister lid in the dishwasher.
• If liquids should become trapped in the accessory hose, run warm water through the hose. The
hose should be removed from the VP112 accessory port prior to washing. Make sure the hose
is completely dry before use.
• Powdered or granulated food should be covered with a paper towel prior to vacuuming. This will
prevent the food from traveling through the hose and into the vacuum packaging machine.
• Vacuum packaging is not a substitute for canning. Perishable foods still need to be refrigerated
against the lid gasket.
11
Page 12
VACMASTER® Pouches
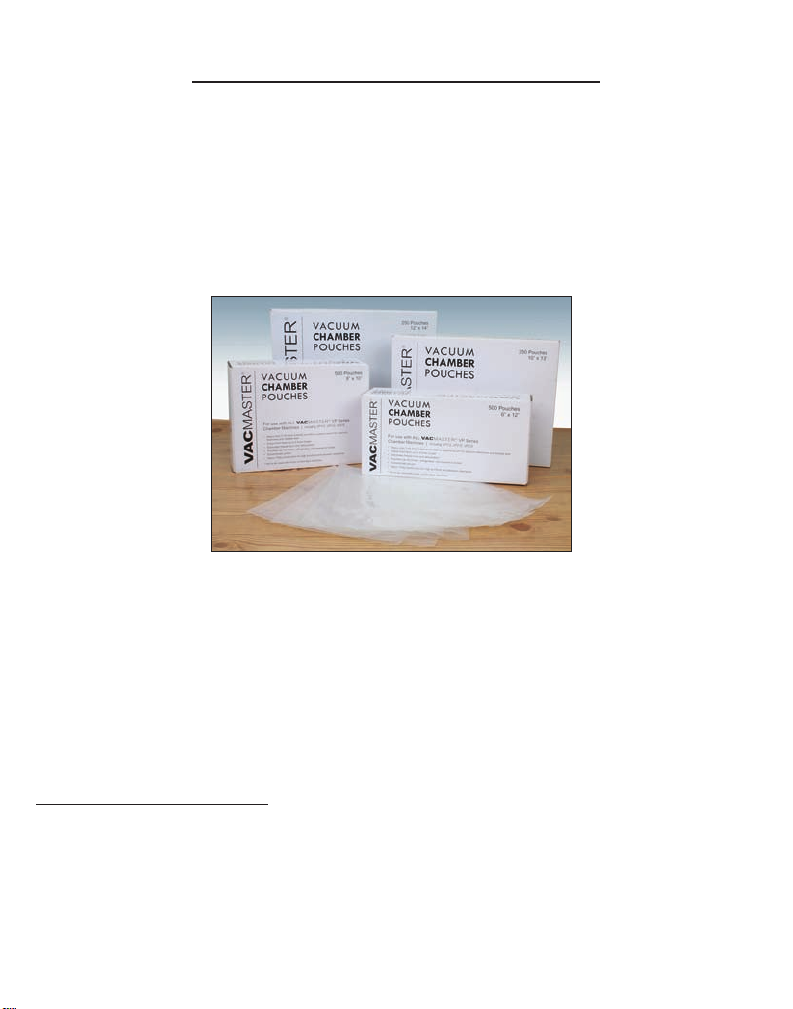
For the best results, use our VACMASTER® Vacuum Chamber Pouches with your VP112.
The VACMASTER® Vacuum Chamber Pouches are constructed of a heavy-duty poly/nylon
combination. This durable pouch provides increased puncture and abrasion resistance. These
pouches are transparent, offering clearly visible product for easy identication. The pouches work
well in conjunction with the VP112 Vacuum Packaging Machine, creating a secure vacuum and a
tight seal, making it a great asset for Sous Vide cooking. The VACMASTER® Vacuum Chamber
Pouches are high quality, larger quantity and incredibly affordable!
• Heavy-duty poly/nylon material
• Eliminates freezer burn and dehydration
• Pouches can be frozen, refrigerated, microwaved or boiled
• Economically priced
• Offered in a wide range of sizes and thickness
• BPA free
VACMASTER® Bone Guard
If you are vacuum packaging meat, sh or items that may puncture or tear the pouch, you may
want to consider using VACMASTER® Bone Guard. Bone Guard is a heavy-duty, 6 mil thick material that is clear for full product visibility and provides the ultimate in pouch protection.
12
Page 13
VACMASTER® Storage Canisters
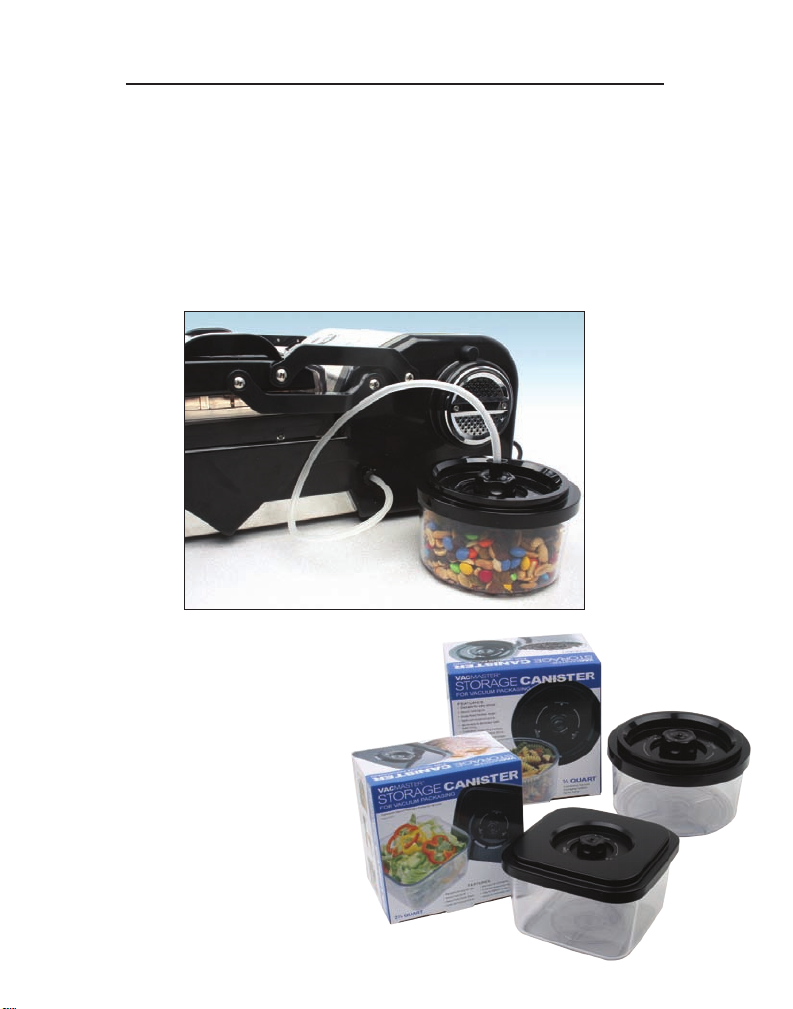
Your VP112 is equipped to vacuum package using VACMASTER® Storage Canisters. Our
VACMASTER® Storage Canisters seal out moisture and air, extending the life of your food.
The durable design and transparent base make them functional and easy to use. The graduated
measuring marks are perfect for portion control and the “Vacuum” and “Lock” features provide a
secure and dependable seal. Our vacuum canisters come in two sizes - ½ Quart (0.47 L) Vacuum
Canister or 2½ Quart (2.37 L) Marinator. VACMASTER® Storage Canisters are the perfect
accessory for your VP112 Vacuum Packaging Machine.
• Stackable for easy storage
• Perfect for marinating or storing
soups and stews
• Ideal for fragile and crushable items
• Graduated measuring marks
for better portion control
• Microwave and dishwasher
(canister base only) safe
• BPA free
13
Page 14

VP112 Uses & Tips
• Vacuum package brown sugar to keep it from getting hard.
• Left over margaritas? Package them for a quick and easy way to enjoy margaritas any time.
• Make smoothies or juices ahead of time and portion out for a quick way to get your daily dose
of vitamins and to save time making them and cleaning up every day.
• Make pre-portioned snacks for the family on the go!
• Package gardening seeds and bulbs to keep fresh until next spring when you can plant them.
• Making homemade frosting and decorating is such a chore. Put frosting into a chamber pouch
and vacuum package it (or just seal). Cut a small corner off and decorate! You won't get your
hands or utensils dirty.
• Keep important documents safe from damage (i.e. passport, birth certicates, marriage license).
• Keep items safe from wet conditions when outdoors (i.e. rst aid kits, cell phones, cameras).
• For a quick wet washcloth for children while on a road trip or while camping, wet some
washcloths and vacuum package them. Use a zipper bag and keep reusing it when needed.
• Not done with that paint project? Don't wash out your brushes every time - keep them wet and
vacuum package them for the following day.
• Hate it when your toiletries expand and leak when ying or driving to higher altitude? Vacuum
package your items to insure you won't encounter a mess when you arrive.
• There are literally hundreds of uses for all your craft projects. Vacuum package your rubber
stamps so they don't dry out, and keep modeling clay and playdough from drying out, too.
• Vacuum package your winter wool hats/gloves/scarves for compact summer storage and to
keep moths and bugs out of them.
• Make camping easy - vacuum package meals in advance, keep your toilet paper dry, make a
camping kit (matches, dry socks, maps, an extra set of shoes or clothes, etc).
• Vacuum package tools to keep them from rusting.
• For a quick ice pack, ll a vacuum bag about half full with water and a few tablespoons of
rubbing alcohol. Seal the bag - don't vacuum it - and place in the freezer. The alcohol keeps
the water from freezing completely, resulting in a exible ice pack to wrap around sore joints and
minor injuries.
14
Page 15

Machine Safety & Maintenance
• Read this manual carefully before using your VP112 for the rst time.
• Do not use the VP112 on a wet or hot surface, or near a heat source.
• Do not immerse machine, or power cord in water, or any other liquid.
• Use grounded power sources only. Do not use extension cord.
• Do not operate appliance with a damaged cord.
• Only use the VP112 for its intended use.
• Only use VACMASTER® vacuum chamber pouches and accessories.
• Vacuum packaging is not a substitute for canning. Any perishable foods
that require refrigeration must still be refrigerated or frozen after packaging.
• Never vacuum package garlic or fungi, like mushrooms. A dangerous
chemical reaction takes place when the air is removed.
• Only use canisters designed for vacuum packaging. Other containers may
implode under pressure.
• Do not freeze storage canisters. Do not heat storage canisters on stovetop
or oven.
• Unplug machine before cleaning.
• Regularly clean your VP112 chamber, lid and exterior with a damp cloth and
mild soap to remove food particles and debris.
15
Page 16

Troubleshooting
VP112 will not turn on -
• Ensure that the machine is properly plugged into a grounded outlet.
• Check the power cord for tears and frays. Do not use machine if power cord
is damaged.
▪ Make sure the ON/OFF button was properly pressed. LED screen will be
illuminated when on.
VP112 does not pull a complete vacuum with pouch -
• Vacuum/seal time may not be set high enough. Set vacuum and seal times
higher and vacuum again.
• To vacuum and seal properly, the opening of pouch must be within the
vacuum chamber. For detailed instructions, refer to “Operating Instructions”.
• VP112 and vacuum pouch need to be clean, dry and free of debris for the
vacuum process to be successful. Wipe surface of seal bar and inside of
pouch and try again.
Vacuum pouch loses vacuum after being sealed -
• Sharp items can puncture small holes in pouches. To prevent this, cover
sharp edges with paper towel and vacuum in a new pouch.
• Some fruits and vegetables can release gases (out-gassing) if not properly
blanched or frozen before packaging. Open pouch. If you think food spoilage
has begun, discard food. If food spoilage has not yet begun, consume
immediately. If in doubt, discard food.
16
Page 17

Troubleshooting
VP112 is not sealing pouch properly -
• Seal time may not be long enough. Increase seal time and try again.
For detailed instructions, refer to “Operating Instructions”.
• Pouches will not seal if any moisture, food particles or debris are present in the seal
area. Wipe the inside of the pouch clean and try again.
• Pouch must be properly placed along the seal bar. Make sure the entire pouch is
over the seal bar and there are no wrinkles in pouch material.
VP112 is not vacuuming canister properly -
• The accessory hose may not be properly attached. Ensure the hose is
completely attached to the lid of the canister and the accessory port, try again.
• Make sure the canister lid is turned to the “vacuum” setting.
• During the vacuum process, it might be necessary to press down on lid to
engage vacuum.
• Leave adequate head space at the top of the canister.
• Make sure there isn’t any damage to the canister and lid. Sometimes hairline
cracks can develop in canisters. When this happens the canister is no longer
air tight and should be discarded.
• Twist knob on lid of canister to make sure it is attached securely.
If problems persist, contact customer support at 800.821.7849 for further
assistance. Thank you for purchasing the VACMASTER
17
®
VP112.
Page 18

Notes
18
Page 19

Thank you for purchasing the VACMASTER® VP112 Vacuum Packaging Machine.
You are about to revolutionize your home with one of the strongest vacuum packaging
systems available. With the help of the VP112, you will now be able to keep food
fresher longer in the refrigerator, freezer or pantry. The VP112 effectively removes air
and extends freshness up to ve times longer than normal preservation methods. Also,
the VP112 can be used to preserve and organize household items like keepsakes,
small toys and easy-to-lose items. You will soon nd your VP112 to be so versatile and
convenient, it will never leave your countertop.
The VP112 is a chamber vacuum system, which offers two distinct advantages over
non-chamber, external suction units. First, a much higher level of vacuum can be
achieved, which means a longer shelf life for foods that you package. Secondly, liquids
and liquid-rich foods can be effectively vacuum packaged. Foods like fresh meats, sh,
soups, stews, etc. are no longer a problem to vacuum package. Marinated vegetables
and meats are packaged quickly with ease, and no mess.
The VP112 Vacuum Packaging Machine uses commercial technology. Simply place
the pouch to be sealed inside the chamber and close the lid. Push start and the
sealing process begins. First, the air is removed from the entire chamber and the
vacuum pouch. Once the preset vacuum level is achieved, the pouch is sealed. Upon
completion of the sealing cycle, air ows back into the chamber. Wait for the beep, and
the process is complete.
To get started, please read and follow all instructions for usage and maintenance
®
carefully before operating the VACMASTER
VP112 Vacuum Packaging Machine.
Page 20

ARY
Inc.
ARY, Inc.
P.O. Box 412888
Kansas City, MO 64141
A leading supplier of commercial
products since 1939.
All Rights Reserved. GameMaster™, VACMASTER®, VacStrip®, Total Freshness System™
and Commercial Culinary Concepts are trademarks or registered trademarks of ARY, Inc. in
the United States and other countries.
**Vacuum packaging is not a substitute for canning.
www.aryvacmaster.com
800.821.7849
 Loading...