

Page 1
VMVK1650SWDC
VMVK1650SWDC / 1600W / 50L
WET & DRY
VACUUM CLEANER
VMVK1660SWDC
VMVK1660SWDC / 1600W / 60L
Page 2

2 3
TABLE OF CONTENTS
SECTION PAGE
Warranty
_______________________________________________________________
3
Safety Instructions and Warnings
_____________________________________________
3
Specifications
___________________________________________________________
4
Unpacking and Checking Carton Contents
______________________________________
4
General Assembly Instructions
_______________________________________________
5
Switching On/Off
_________________________________________________________
6
Dry Vacuum Operation
_____________________________________________________
6
Wet Vacuum Operation
_____________________________________________________
7
Maintenance
_____________________________________________________________
8
Installing & Cleaning Cartridge Filter
___________________________________________
9
Installing & Cleaning Foam Sleeve Filter
_________________________________________
9
Troubleshooting
___________________________________________________________
10
Exploded View and Parts List
_________________________________________________
10
Thank you for purchasing this Vacmaster™ wet/dry vacuum cleaner. Feel confident that with Vacmaster™ you are obtaining a high quality product
engineered for optimal performance. This vacuum is capable of picking up liquids and dry materials.
Page 3

FOR YOUR SAFETY CAREFULLY READ AND UNDERSTAND ALL INSTRUCTIONS.
WARRANTY
Vacmaster™ takes pride in producing a high quality, durable product. This
Vacmaster™ product carries a limited two (2) year warranty against defects
in workmanship and materials from date of purchase under normal household
use.
If product is to be used for commercial, industrial or rental use, a 90 day
limited warranty will apply. Warranty does not apply to defects due to direct
or indirect abuse, negligence, misuse, accidents, repairs or alterations and lack
of maintenance. Please keep your receipt as proof of purchase. This warranty
gives you specific legal rights, and you may have other rights, which vary form
state to state.
SAFETY INSTRUCTIONS & WARNINGS
• This appliance complies with the compulsory safety regulations for electric
appliances. However, improper use can be harmful to people and property. Please
read these operating instructions through carefully and completely before switching
the appliance on. Keep the operating instructions, the receipt, as well as the
packaging and packaging material if at all possible.
• The appliance is designed to vacuum up materials that are not hazardous to your
health and are non flammable.
• Do not vacuum up ashes, hot coals, large fragments of glass, sharp objects or similar
objects.
• Don’t vacuum up any printer or copier toner dust these are electrically conductive
and can short out the motor and voiding the warranty.
• Never vacuum asbestos or asbestos dust.
• Never vacuum flammable or poisonous liquids like petrol, oil, acids, or other volatile
substances.
• Don’t vacuum up liquids that are hotter than 60ºC or any poisonous or flammable
dusts.
• Never hold the hose, nozzles or tools in front of your face (specially your eyes, ears,
hair, etc.) Never direct hose, nozzles or tools etc towards other persons or animals.
• Only use the appliance for its intended purpose only. Any other types of use are at
your own risk and are possibly dangerous.
• The manufacturer / importer cannot be made responsible for damages that are
caused by improper or incorrect use.
• Do not leave the appliance operating and whilst unattended.
• Make sure that the correct dust bag has been inserted securely in its holder before
using the appliance. The wrong dust bag or incorrectly installed dust bags can cause
damage to the appliance and void the warranty.
• Never lay the appliance on its side. Pay particular attention to stability on or near
stairs.
• Always switch off and unplug the appliance after use and before cleaning or
changing the filters or accessories.
• Do not store the appliance directly beside a hot oven or radiator.
• Only store the appliance in a safe and dry location-on outside the reach of children.
• Children, disabled persons, and the aged are often not aware of the dangers that
can result from handling electric appliances. The above-mentioned persons and
untrained persons must never work with this electrical appliance.
• Never pull on the cable to unplug the appliance, rather pull on the plug itself. Also,
remove any special accessories from the appliance.
• Always keep the appliance clean. Don’t use any solvents or cleaners that contain
solvents for cleaning.
• Never leave the appliance switched on unattended. If you leave the work area,
switch the appliance off and unplug it.
• In order to protect children and others, make sure when using the appliance that
the power cord does not cause a trip hazard.
• Never use the appliance when you are under the influence of medication, alcohol or
drugs, if you are currently under medical care, or if you are tired.
• There are no user serviceable parts in this appliance including the power cord. Have
your appliance serviced by a qualified repair person. This will ensure that the safety
of the appliance is maintained.
• Check the appliance and the power cord regularly for any possible damage. Don’t
use damaged appliances. Have your appliance serviced by a qualified repair person.
• Check the float often.
• If you notice liquid leaking from your appliance, switch it off immediately and
unplug it.
• Don’t put the appliance in water. Make sure that water is not spilled on the
appliance.
• When disposing of the wastewater, make sure that you observe any legal
regulations.
Page 4
4 5
• Please also pay particular attention to the following Special Safety Information.
SPECIAL SAFETY INFORMATION
• Never vacuum up hot ashes or pointed or sharp objects.
• For additional protection, it is recommended that this appliance be used in
conjunction with a residual current device (RCD) with a rated residual current of
30mA or less.
• Don’t use the appliance without a dust bag (an exception is wet vacuuming).
Make sure that the dust bag is inserted into the appliance correctly.
• Never hold the hose, nozzles or tools in front of your face (specially your eyes, ears,
hair, etc.) Never direct hose, nozzles or tools etc towards other persons or animals
• Keep the vacuum cleaner away from heat sources such as radiant heaters, ovens,
etc.
• Do not use power tools with a rating greater the 800 Watts on the Power Outlet.
DISPOSAL INFORMATION
The appliance contains electric and electronic components and should not be
disposed of as household garbage. Contact your local authority for the correct
disposal or recycling procedure in your area.
SPECIFICATIONS
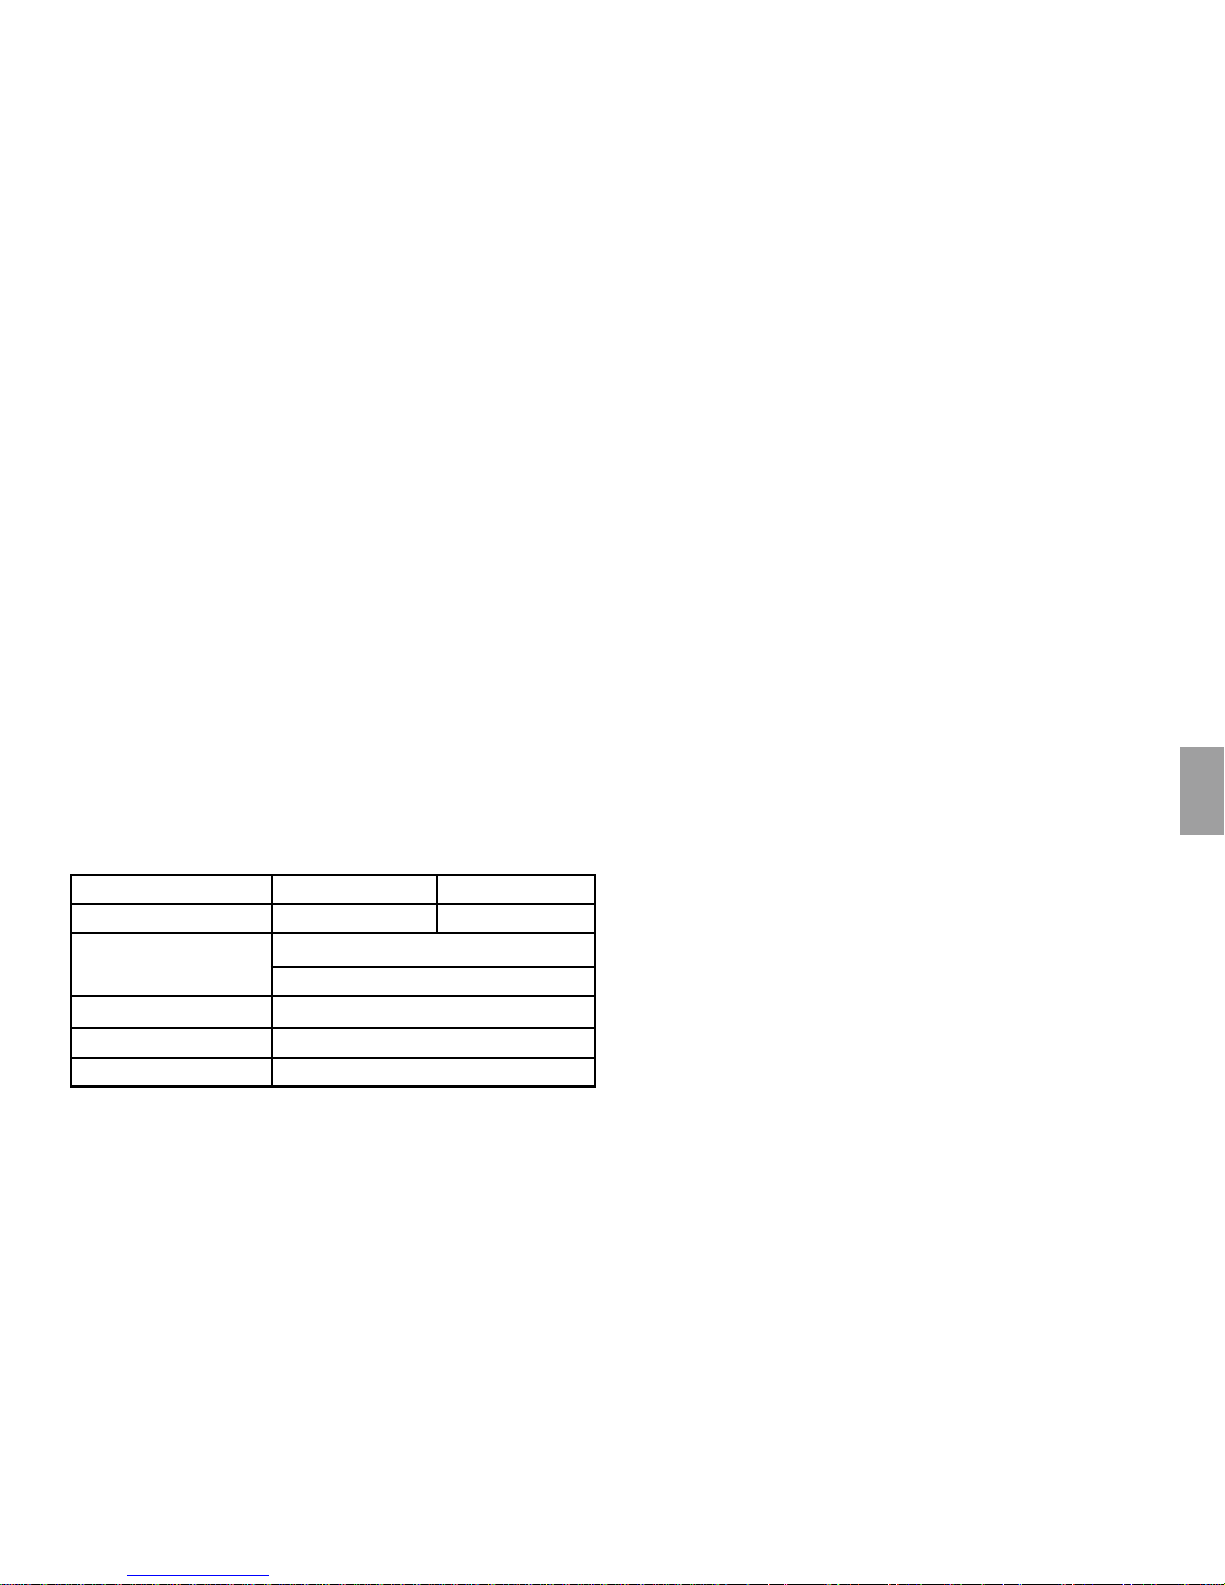
Model VMVK1650SWDC VMVK1660SWDC
Container 50 Litre 60 Litre
Motor
230V ~ 50Hz
1600 W
Dry Filter PET Cartridge Filter & Dust Bag
Wet Filter
Foam Sleeve Filter
Outlet Socket Max Load
800 Watts
UNPACKING AND CHECKING CARTON CONTENTS
Remove entire contents of carton. Check each item against the carton
contents list.
Carton Contents List
Key Description
________________________________
QTY
A Vac Assembly
_____________________________
1
B Hose
____________________________________
1
C PRE Cloth Filter
____________________________
1
D Crevice Car Nozzle
__________________________
1
E Floor Brush/Squeegee
_______________________
1
F Round Dust Brush
__________________________
1
G Combo Nozzle*
____________________________
1
H 3 Coated Tube One Bended
___________________
3
I PET Cartridge Filter
__________________________
1
J Filter Retainer
______________________________
1
K Collection Bag
_____________________________
1
L Foam Sleeve Filter
___________________________
1
M Drain Hose With Holder*
______________________
1
N Rear Wheels
_______________________________
2
O ‘R’ Lock Pins
_______________________________
2
P Washers
__________________________________
2
Q Wheel Shaft
_______________________________
1
R Caster
____________________________________
2
S Hub Caps
_________________________________
2
T Push Handle
_______________________________
1
U Accessory Pouch*
____________________________
1
V Screws (Bag)
_______________________________
8
W Operator’s Manual
___________________________
1
* IMPORTANT: COMBO NOZZLE, DRAIN HOSE WITH HOLDER AND ACCESSORY
POUCH INCLUDED IN MODEL NUMBER VMVK1660SWDC ONLY.
Page 5
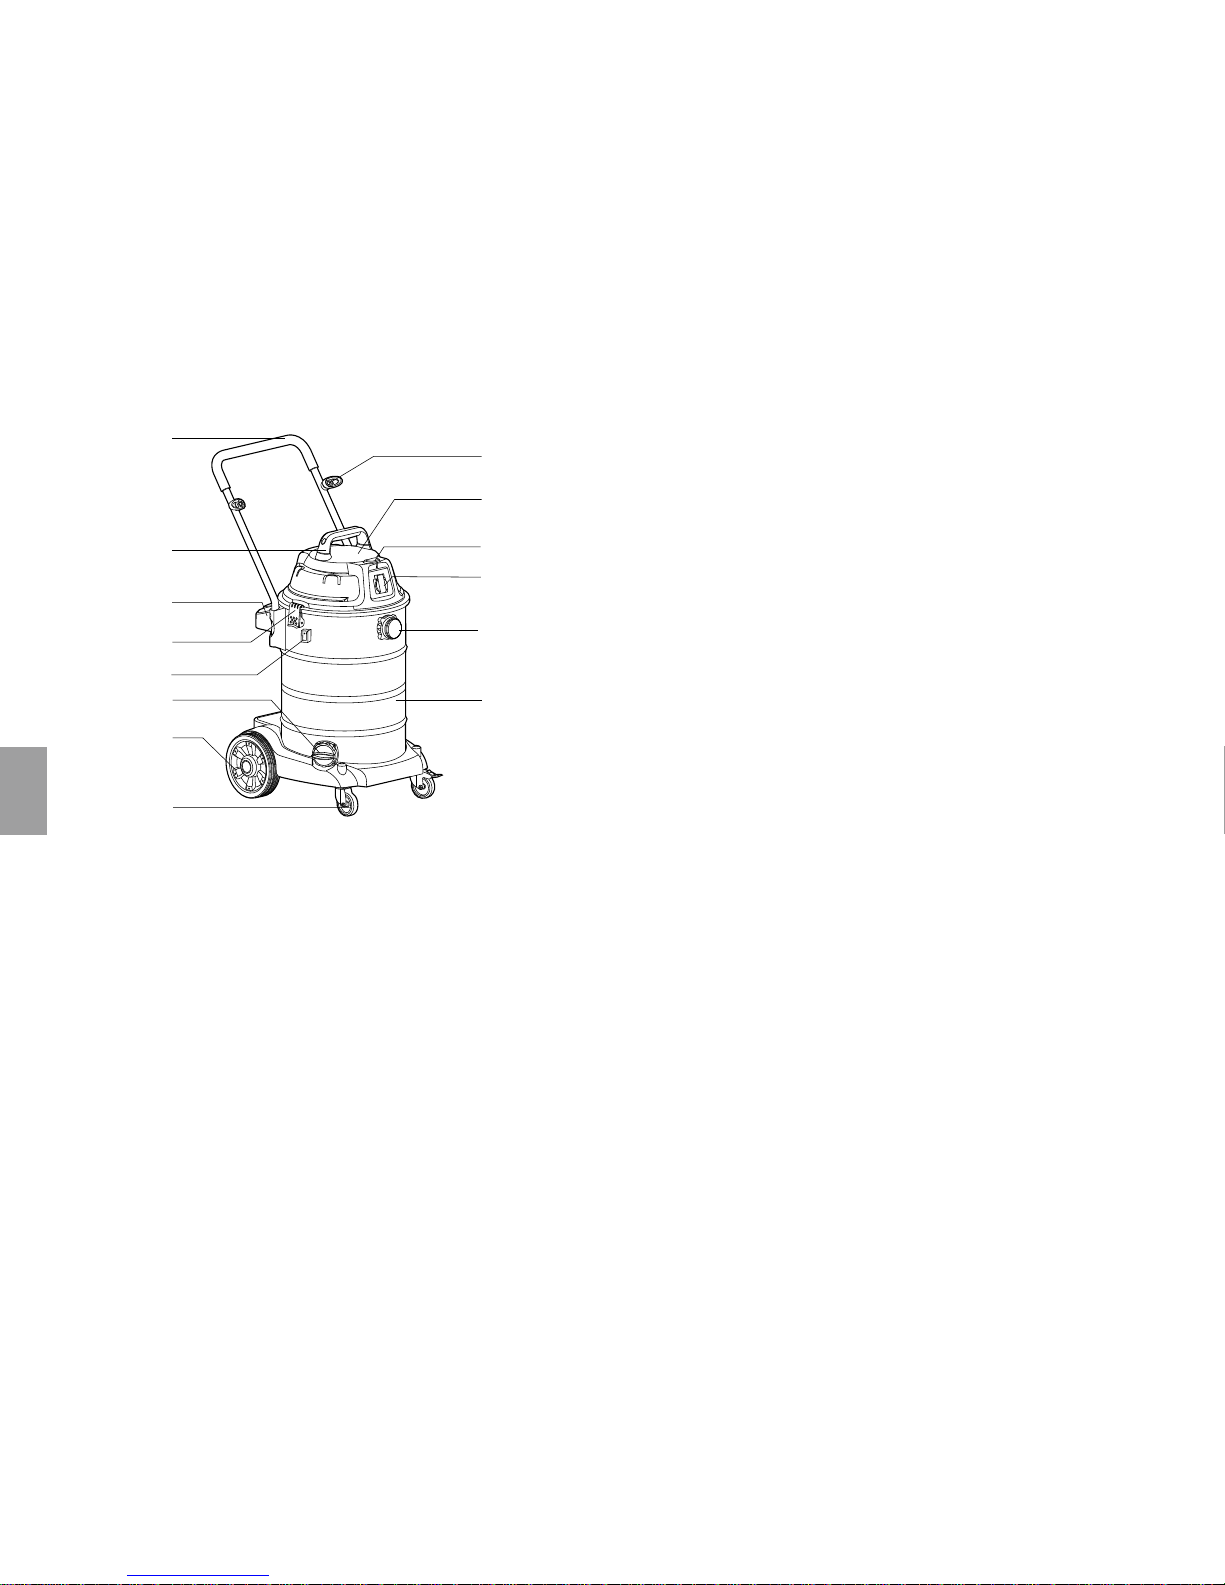
Power Head
Cord Retainer
Vacuum Port
On-Off Switch
Container
Main Handle With Soft Grip
Caster
Handle
Latch
Hose Holder Base
Accessory Shelves
Wheel
Drain
Outlet-Socket
*
GENERAL ASSEMBLY INSTRUCTIONS
WARNING: DO NOT PLUG IN POWER CORD TO POWER OUTLET, MAKE SURE
PLUG IS DISCONNECTED BEFORE ASSEMBLING THE WET/DRY VAC
UNPACKING YOUR WET/DRY VACUUM & GENERAL ASSEMBLY
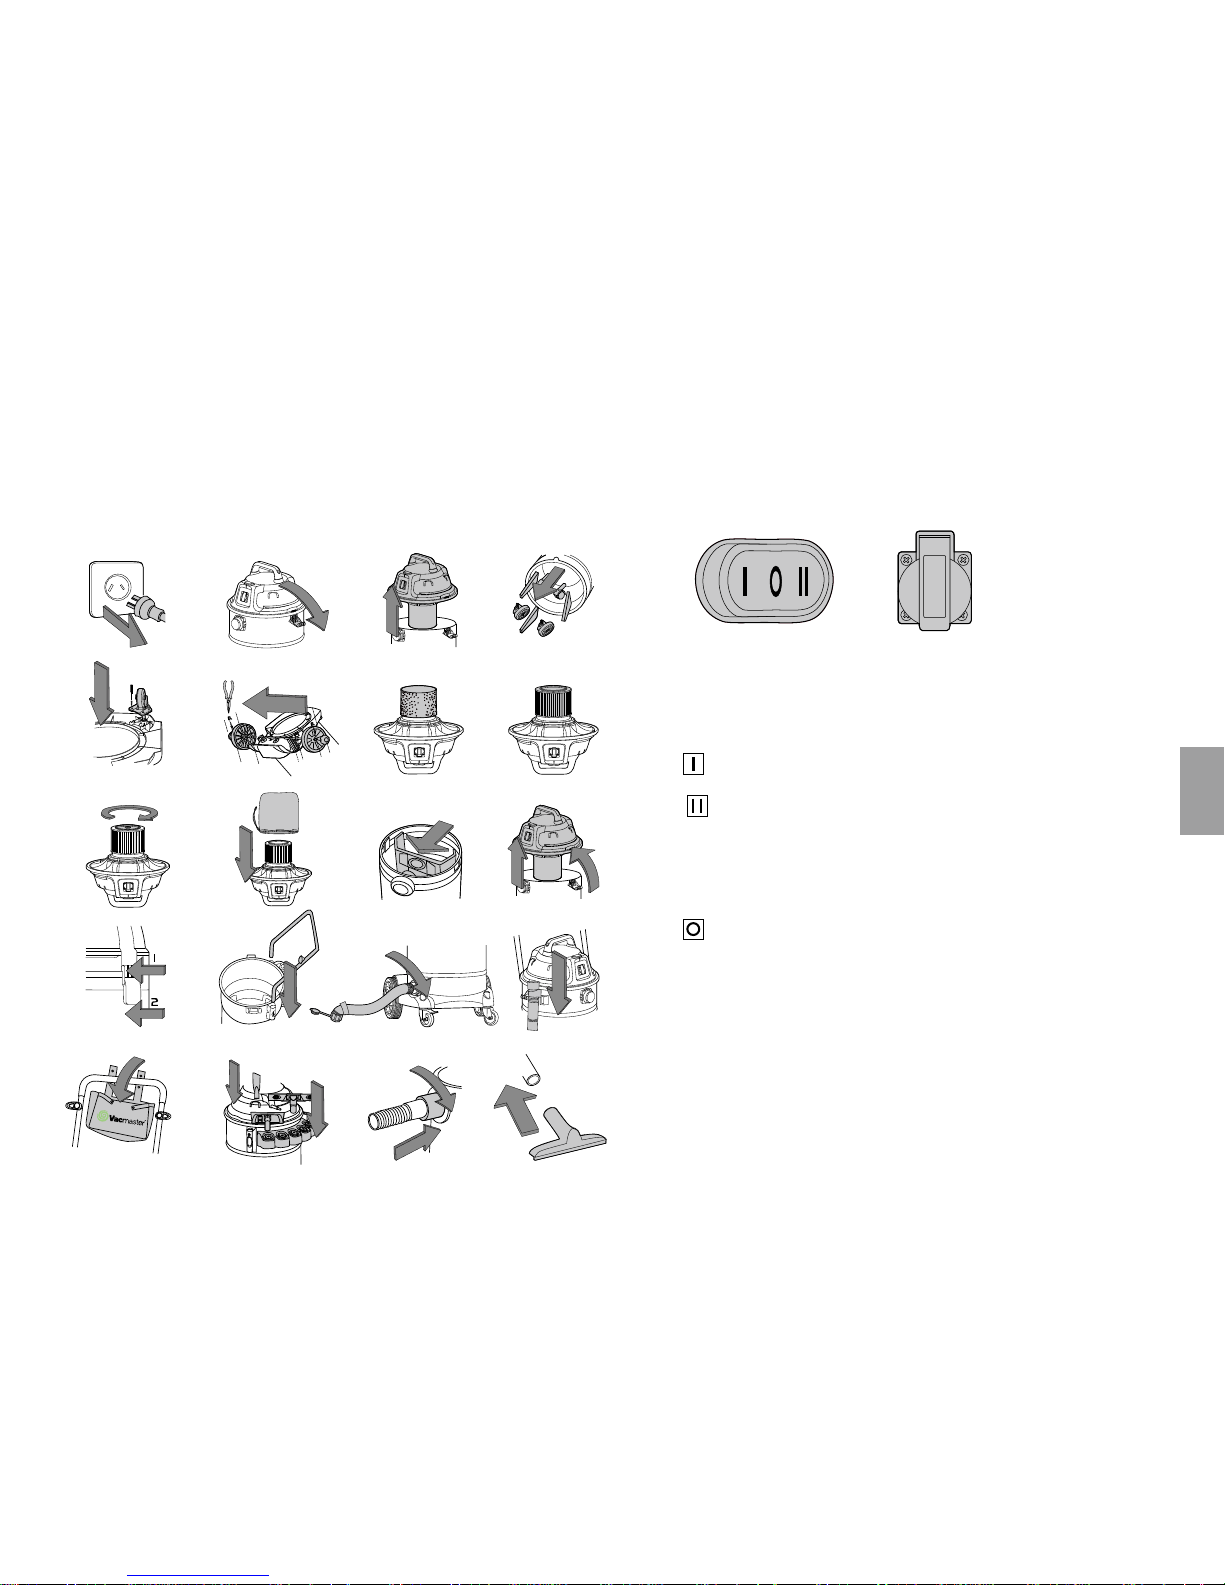
1. Undo the latches. (As show in fig.2)
2. Lift the power head off the container. (fig.3)
3. Remove the contents from inside the container, make sure you have all contents as
listed on page10-11. (fig.4)
4. With the power head removed, turn the container upside down. Insert the two
casters into the socket on the bottom of the base and tighten each caster with
2 screws.(fig.5)
5. Insert the rear wheel shaft (Q) into the rear support block. Insert washer (P) on
the shaft, then insert rear wheel (N) on the shaft. Insert the ‘R’ lock pin (O) into the
hole on the end of the shaft to lock the wheel. Snap the hub cap (S) on to the
wheel. Repeat the same steps at the other end of the shaft. Please notice you must
install the hub cap on to the wheel , otherwise the ‘R’ lock pin will come loose and
cause the wheel do not work .(fig. 6)
6. For wet vacuum cleaning, install the supplied foam filter. (fig. 7) See page 9 for
filter installation.
7. Your vacuum comes ready for dry vacuum cleaning with PET cartridge filter pre installed. If cartridge filter is not installed, refer to page 9 for filter installation.
(fig. 8 & fig. 9)The PET cartridge filter fit for wet & dry vacuum cleaning.
8. Put the PRE cloth filter over the filter tray with the attached PET cartridge filter.
(fig.10)
9. Optional, for improved dust filtering, fit collection bag flange onto the inlet stub,
taking care not to damage the bag. (fig.11)
10. Place the power head back on the container, and secure it by using the 2 side
latches. (fig.12&fig.13)
11. Insert the push handle into the handle sockets mounted on the sides of the tank.
Push down until the lock pin clicks in place. (fig.14)
12. Remove the drain cover first and secure the large end of the drain hose onto the
vacuum drain by screwing into place. (fig.15a) Hang the drain hose by inserting
into hose holder base.(fig.15b) Make suer drain lid is closed. *ONLY AVAILABLE
FOR VMVK1660SWDC
Page 6
6 7
13. Hang the accessory pouch on the push handle.(fig.16) *ONLY AVAILABLE FOR
VMVK1660SWDC
14. You can insert accessoies into the accessory shelves. (fig.17)
15. Secure the large end of the hose into the vacuum port on the container and screw
into place. (fig.18)
16. Choose the desired accessories and extension wands and push onto the suction
tube. (fig.19)
14 15
16
13
1817 19
a b
5
7
6
21
8
43
12
11109
Q
P
P
O
O
N
N
S
S
S
WITCHING ON/OFF
A
B
A: Function switch ON/OFF switch
B: Outlet-socket
CONNECT THE MAINS PLUG.
1. Switching on the vacuum cleaner:
Press
2.Switch on electrical appliance + vacuum cleaner:
Press
Switch on electrical appliance.Only connect electrical appliances with a maximum
power rating of 800W. Switching on the electrical appliance automatically switches
on the vacuum cleaner. Once the electrical appliance has been switched off, the
vacuum cleaner switches off following a time lapse.
3. Switching off the vacuum cleaner:
Press
DRY-VACUUM OPERATION
WARNING: BE SURE TO READ, UNDERSTAND, AND APPLY INFORMATION,
ENTITLED ‘SAFETY INSTRUCTIONS & WARNINGS’. DO NOT VACUUM IN
AREAS WITH FLAMMABLE GASES, VAPORS, OR EXPLOSIVE DUSTS IN THE AIR.
FLAMMABLE GASES OR VAPORS INCLUDE BUT ARE NOT LIMITED TO; LIGHTER
FLUID, SOLVENT TYPE CLEANERS, OIL-BASE PAINTS, GASOLINE, ALCOHOL OR
AEROSOL SPRAYS. EXPLOSIVE DUSTS INCLUDE BUT ARE NOT LIMITED TO;
Page 7
COAL, MAGNESIUM, GRAIN OR GUN POWDER. TO REDUCE THE RISK OF HEALTH
HAZARDS FROM VAPORS OR DUST, DO NOT VACUUM TOXIC MATERIALS.
WARNING: DO NOT PLUG IN POWER CORD TO POWER OUTLET. MAKE SURE
PLUG IS DISCONNECTED BEFORE CHANGING AND CLEANING FILTERS.
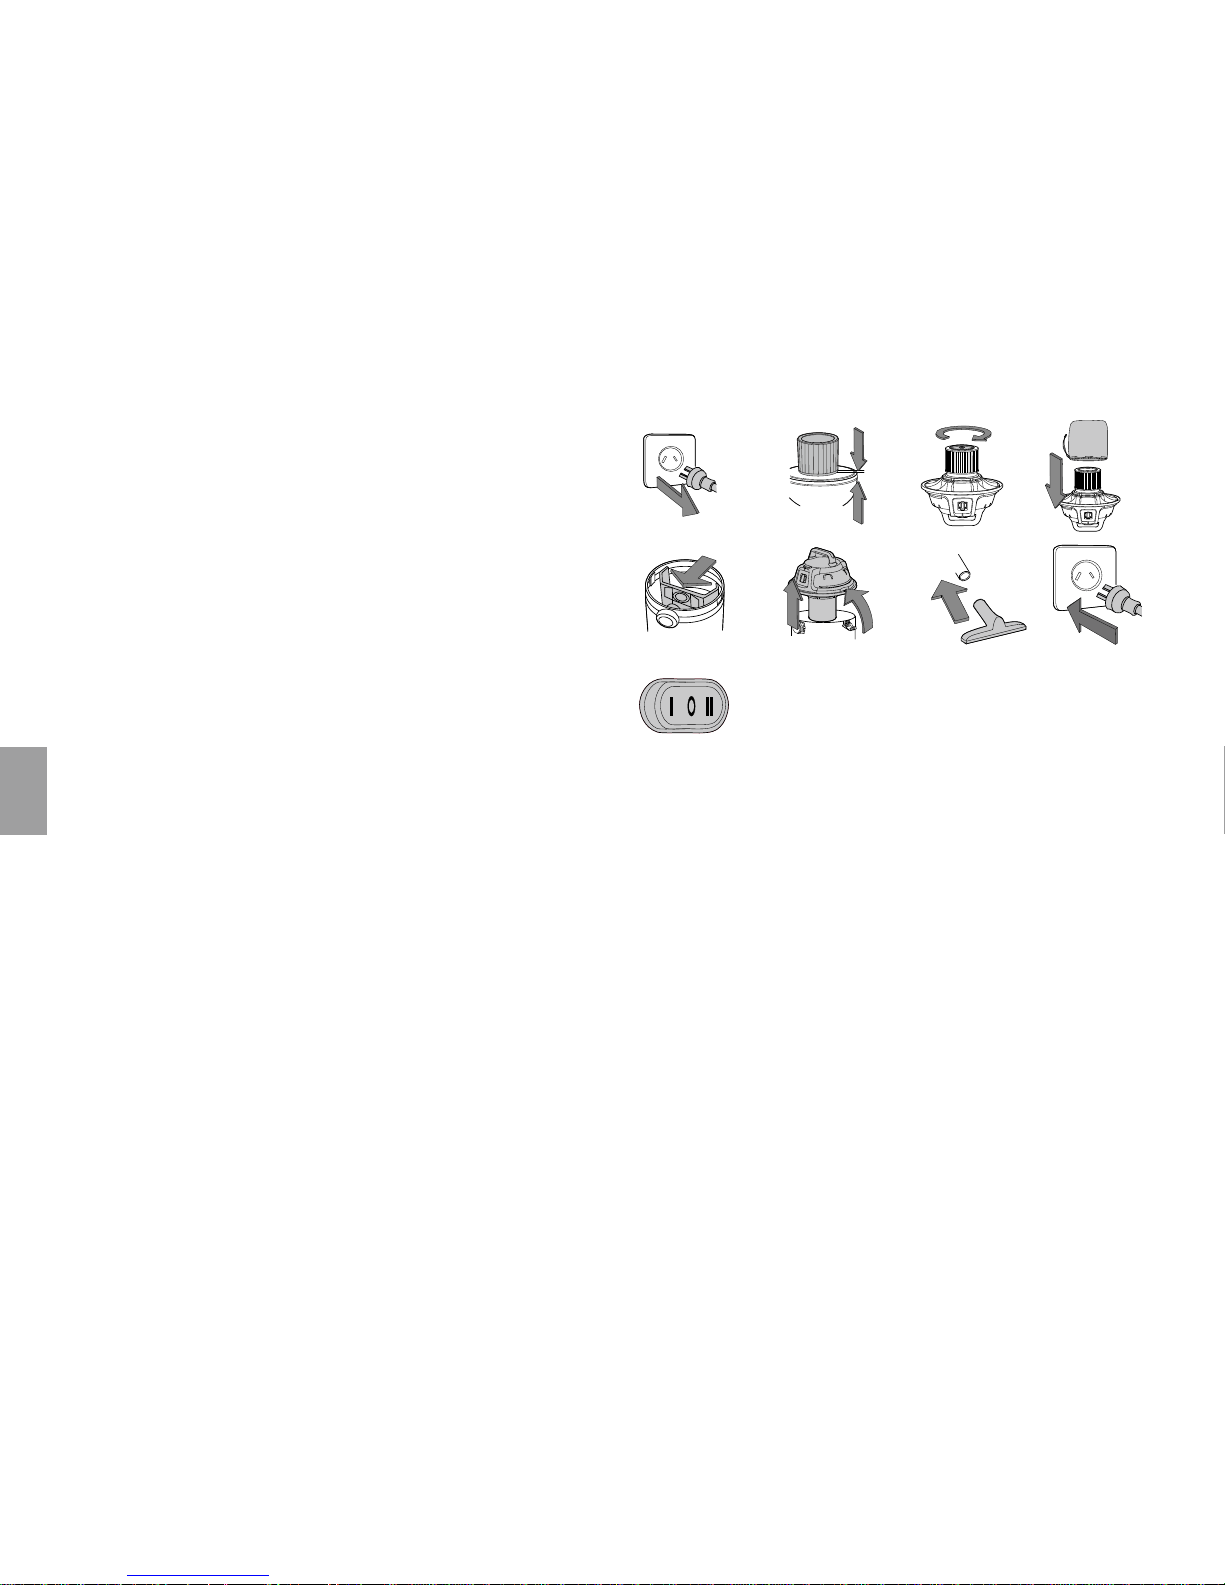
1. Verify that the power cord is disconnected from the outlet. (fig.1)
2. In order to prepare your vacuum for dry vacuuming, verify that the PET cartridge
filter is securely mounted.Make sure the filter is pushed in until it stops against the
power head. (fig.2) (Your Wet/Dry Vac comes ready with the cartridge filter pre-
installed, if not see page 16 for installation instructions.)
3. Place filter retainer on top of PET cartridge filter and tighten down by turning the
retainer handle clockwise. (fig.3)
4. Put the PRE cloth filter over the filter tray with the attached PET cartridge filter.
(fig.4)
5. Optional, for improved dust filtering, fit collection bag flange onto the inlet stub,
taking care not to damage the bag. (fig.5)
6. Place the power head back on the container, and secure it in place
using the latches. (fig.6)
OPERATING INSTRUCTIONS: DRY VACUUMING
7. Insert the locking end of the hose into the vacuum port and screw in place. Push
the required attachment onto the free end of the hose or extension. (fig.7)
8. Plug in the power cord into the outlet. (fig.8)
9. Turn the motor on by flipping the switch to the ‘I’ ON position. (fig.9)
10. Once you have completed vacuuming, flip the switch to the ‘O’ OFF position and
unplug the power cord from the outlet.
0 = OFF I = ON
DO NOT USE COLLECTION BAG FOR LIQUID VACUUMING
1 2 3 4
65 7 8
9
WET-VACUUM OPERATION
WARNING: BE SURE TO READ, UNDERSTAND, AND APPLY INFORMATION,
ENTITLED ‘SAFETY INSTRUCTIONS & WARNINGS’. DO NOT VACUUM IN
AREAS WITH FLAMMABLE GASES, VAPORS, OR EXPLOSIVE DUSTS IN THE AIR.
FLAMMABLE GASES OR VAPORS INCLUDE BUT ARE NOT LIMITED TO; LIGHTER
FLUID, SOLVENT TYPE CLEANERS, OIL-BASE PAINTS, GASOLINE, ALCOHOL OR
AEROSOL SPRAYS. EXPLOSIVE DUSTS INCLUDE BUT ARE NOT LIMITED TO;
COAL, MAGNESIUM, GRAIN OR GUN POWDER. TO REDUCE THE RISK OF HEALTH
HAZARDS FROM VAPORS OR DUST, DO NOT VACUUM TOXIC MATERIALS.
WARNING: DO NOT PLUG IN POWER CORD TO POWER OUTLET. MAKE SURE
PLUG IS DISCONNECTED BEFORE CHANGING AND CLEANING FILTERS.
DO NOT USE THE CARTRIDGE FILTER FOR LIQUID VACUUMING.
DO NOT USE COLLECTION BAG FOR LIQUID VACUUMING.
OPERATING INSTRUCTIONS – WET VACUUMING
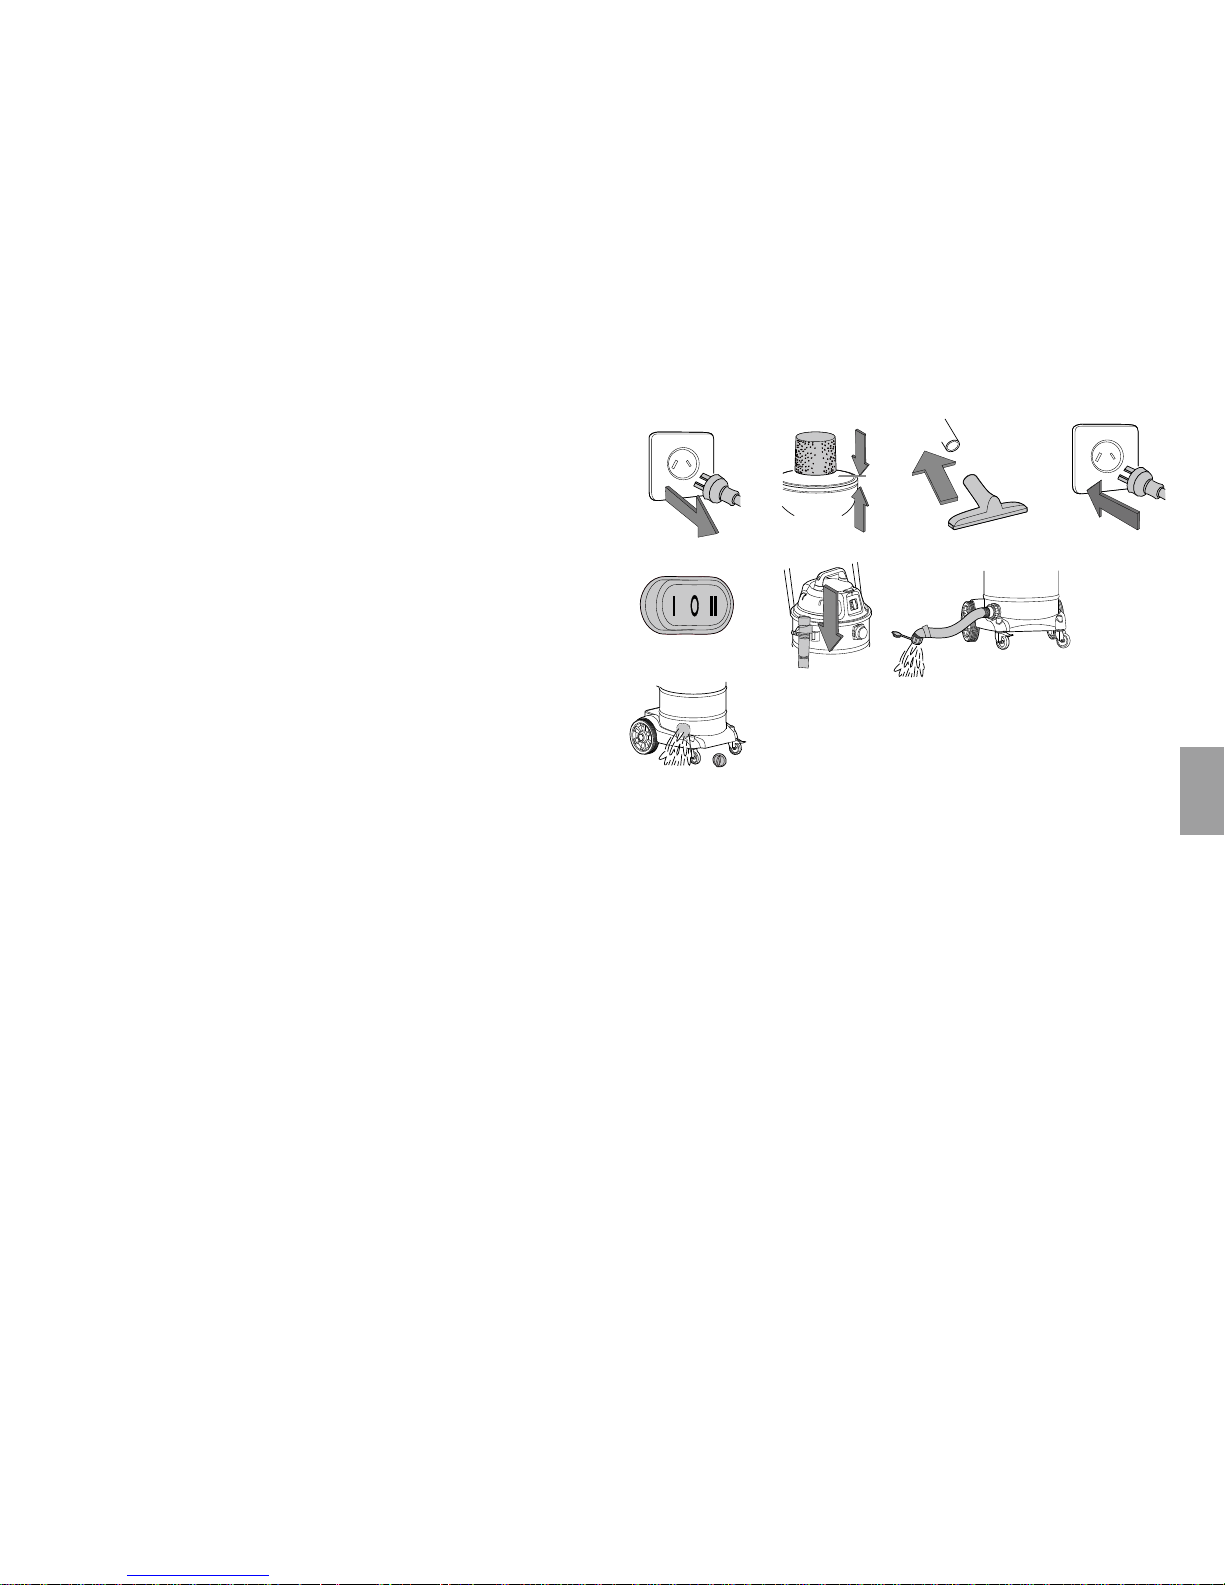
1. Verify that the power cord is disconnected from the outlet. (fig.1) Make sure that
the container is clean and free from dust and dirt.
2. Remove collection bag, cartridge filter & PRE cloth filter, then carefully install the
Page 8
8 9
foam sleeve filter
over the filter cage and place the power head back on the container. (fig. 2) See
filter installing instructions on page 10.
3. Fit the desired nozzle to the vacuum hose. (fig.3)
4. Verify that the switch is in the ‘O’ OFF position before plugging the power cord
into the outlet. (fig.4)
5. Turn the motor on by flipping the switch to the ‘I’ ON position and proceed to
vacuum. (fig.5)
OPERATING INSTRUCTIONS – WET VACUUMING
6. Turn the vacuum off.
7. Lift the drain hose off of the hose holder base and open the hose lid.(fig.6a) Drain
lid into a suitable receptacle or drain.(fig.6b) Rembemer to close the lid and replace
the drain hose to hose holder base after draining is complete. *ONLY AVAILABLE
FOR VMVK1660SWDC
8. After use, empty the container by unscrewing the drain cap and drain liquids into
suitable receptacle or drain. (fig.7) Remember to refit the drain cap to the
container after draining container.
IMPORTANT! When vacuuming large quantities of liquids, do not immerse the
nozzle completely in the liquid; leave a gap at the tip of the nozzle opening
to allow air inflow. The machine is fitted with a float valve that stops the
suction action when the container reaches its maximum capacity. You will
notice an increase in motor speed. When this happens, turn off the machine,
disconnect from power supply, and drain the liquid into a suitable receptacle or
drain. To continue vacuuming, refit the container with the drain cap. After wet
vacuuming, turn the machine off and remove plug from power supply. Empty
the container, clean and dry the inside and outside before storage.
REMEMBER! The collection bag must be removed in wet vacuuming.
1 3
5
2 4
6
a b
7
MAINTENANCE
WARNING: PRIOR TO CARRYING OUT ANY MAINTENANCE ENSURE THAT THE
MAINS PLUG IS DISCONNECTED FROM THE POWER OUTLET.
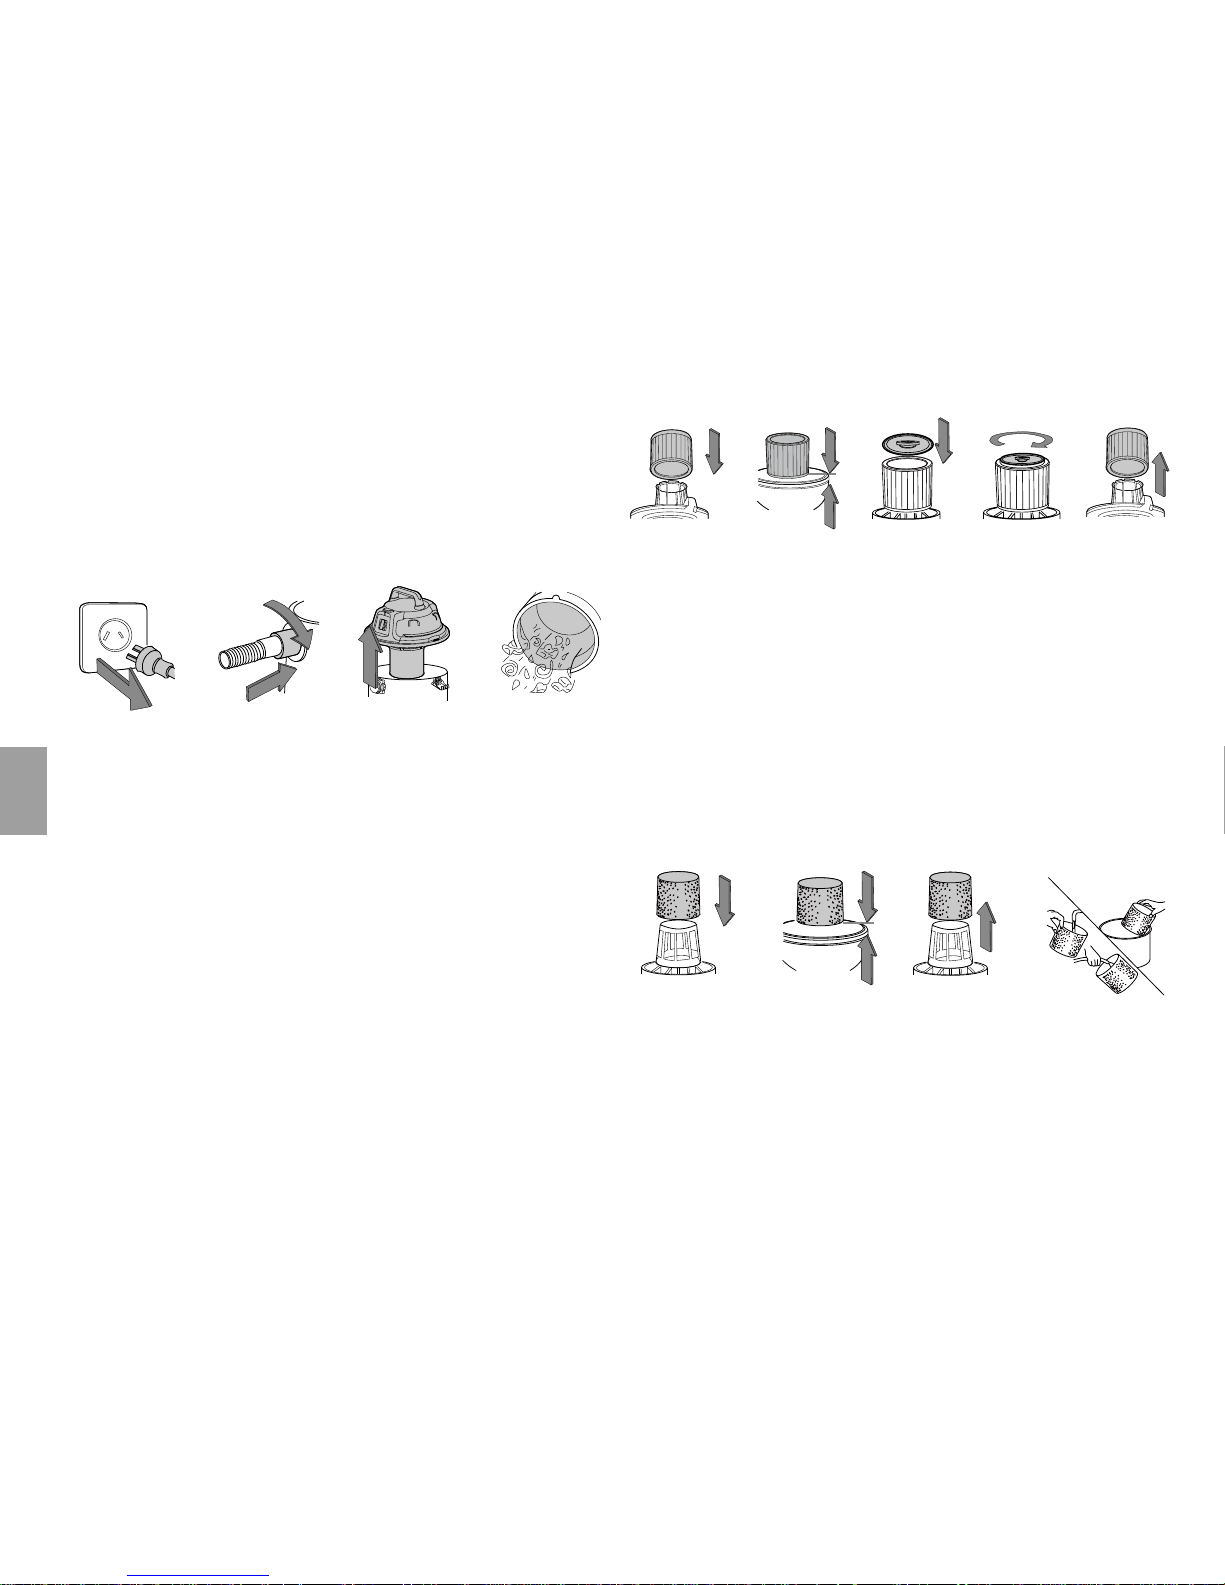
1. Verify that the power cord is disconnected from the outlet. (fig.1)
2. Disconnect the hose from the vacuum, turning large end in counter clockwise
direction. (fig.2)
3. Undo the latches and remove the power head from the container. (fig.3)
4. Clear all dirt or debris from the container and hose. (fig.4)
5. Check the hose, attachments, and power cord to verify that they have not been
damaged.
IMPORTANT! Clean or change the cartridge filter regularly for best
performance. ALWAYS USE CARTRIDGE FILTER FOR DRY VACUUMING. If the
machine is used with out the cartridge filter, the motor will burn out and the
warranty will be voided. Always keep spare filters on-hand.
NOTICE! The filters included are made of high quality materials designed to
Page 9
stop small dust particles. The cartridge filter should be used for dry pick-up
only. A dry cartridge filter is necessary to pick up dust. If the cartridge filter
is wet, it will clog quickly and be very difficult to clean. Handle the filter
carefully when removing it for cleaning and replacing it. Check the filters for
tears or small holes, a small hole can let dust pass through and out of the
cleaner. Do not use a filter with holes or tears, replace it immediately.
WARNING! ALWAYS DISCONNECT THE PLUG FROM THE POWER OUTLET BEFORE
REMOVING THE POWER HEAD FROM CONTAINER.
1 32 4
INSTALLING & CLEANING CARTRIDGE FILTERS
Installing Cartridge Filter
1. Remove power head and place in upside down position.
2. Slide the cartridge filter down over the filter cage and carefully push filter in until it
stops against the power head. (fig.1 & 2)
3. Place filter retainer on top of cartridge filter and tighten down by turning retainer
handle clockwise. (fig.3 & 4)
Removing and Cleaning Cartridge Filter
1. Unlock and remove the filter retainer by tuning retainer handle counter clockwise.
2. Carefully hold and pull the cartridge filter up for removal. (fig.5)
3. Clean the cartridge filter by gently tapping or brushing dirt off. Cleaning should
not be done indoors in living areas. For optimal performance a new filter is
recommended.
4. Install cleaned or new filter into place as instructed above in steps 2 and 3 of
installing Cartridge Filter.
5. Wet filters should be removed and allowed to air dry for 24 hours before installing
onto the filter cage.
1
3
2
54
I
NSTALLING & CLEANING FOAM SLEEVE FILTER
Installing Foam Sleeve Filter
1. Remove power head and place in upside down position. Follow instructions to
remove cartridge filter.
2. Carefully slide foam sleeve filter down over the filter cage making sure the whole
cage is covered.(fig.1 & 2)
3. Replace the power head on to the container.
Cleaning Foam Sleeve Filter
1. With the removed power head in the upside down position, carefully remove foam
sleeve filter. (fig. 3)
2. Use a mild soap and water solution to wash foam sleeve filter and rinse with clean
water. (fig. 4)
3. Allow filter to air dry before installing and using again.
1
3
2
4
Page 10
1011
T
ROUBLESHOOTING
Symptom Possible Causes Corrective Action
Vacuum will not
operate
1) No power supply. 1) Check power supply – cord,
breakers, fuses.
2) Faulty power cord. 2) Unplug and check the
power cord. If damaged,
have it repaired by a
professional.
3) Container full. 3) Empty container.
Dust comes out
from motor cover.
1) The PET cartridge
filter or collection bag
is missing or damaged.
1) Attach or replace PET
cartridge filter or collection
bag.
Reduced
efficiency and
motor/speed
vibration.
1) There is a blockage in
the nozzle or hose,
or the container inlet.
Or dust filter blocked
by fine dust.
1) Check nozzle, hose and
container inlets for
blockage. Take off the filter
and clean it. Or install new
cartridge filter.
PARTS LIST -EXPLODED VIEW
*
*
*
*
*
Page 11

VMVK1650SWDC & VMVK1660SWDC Manual Parts List
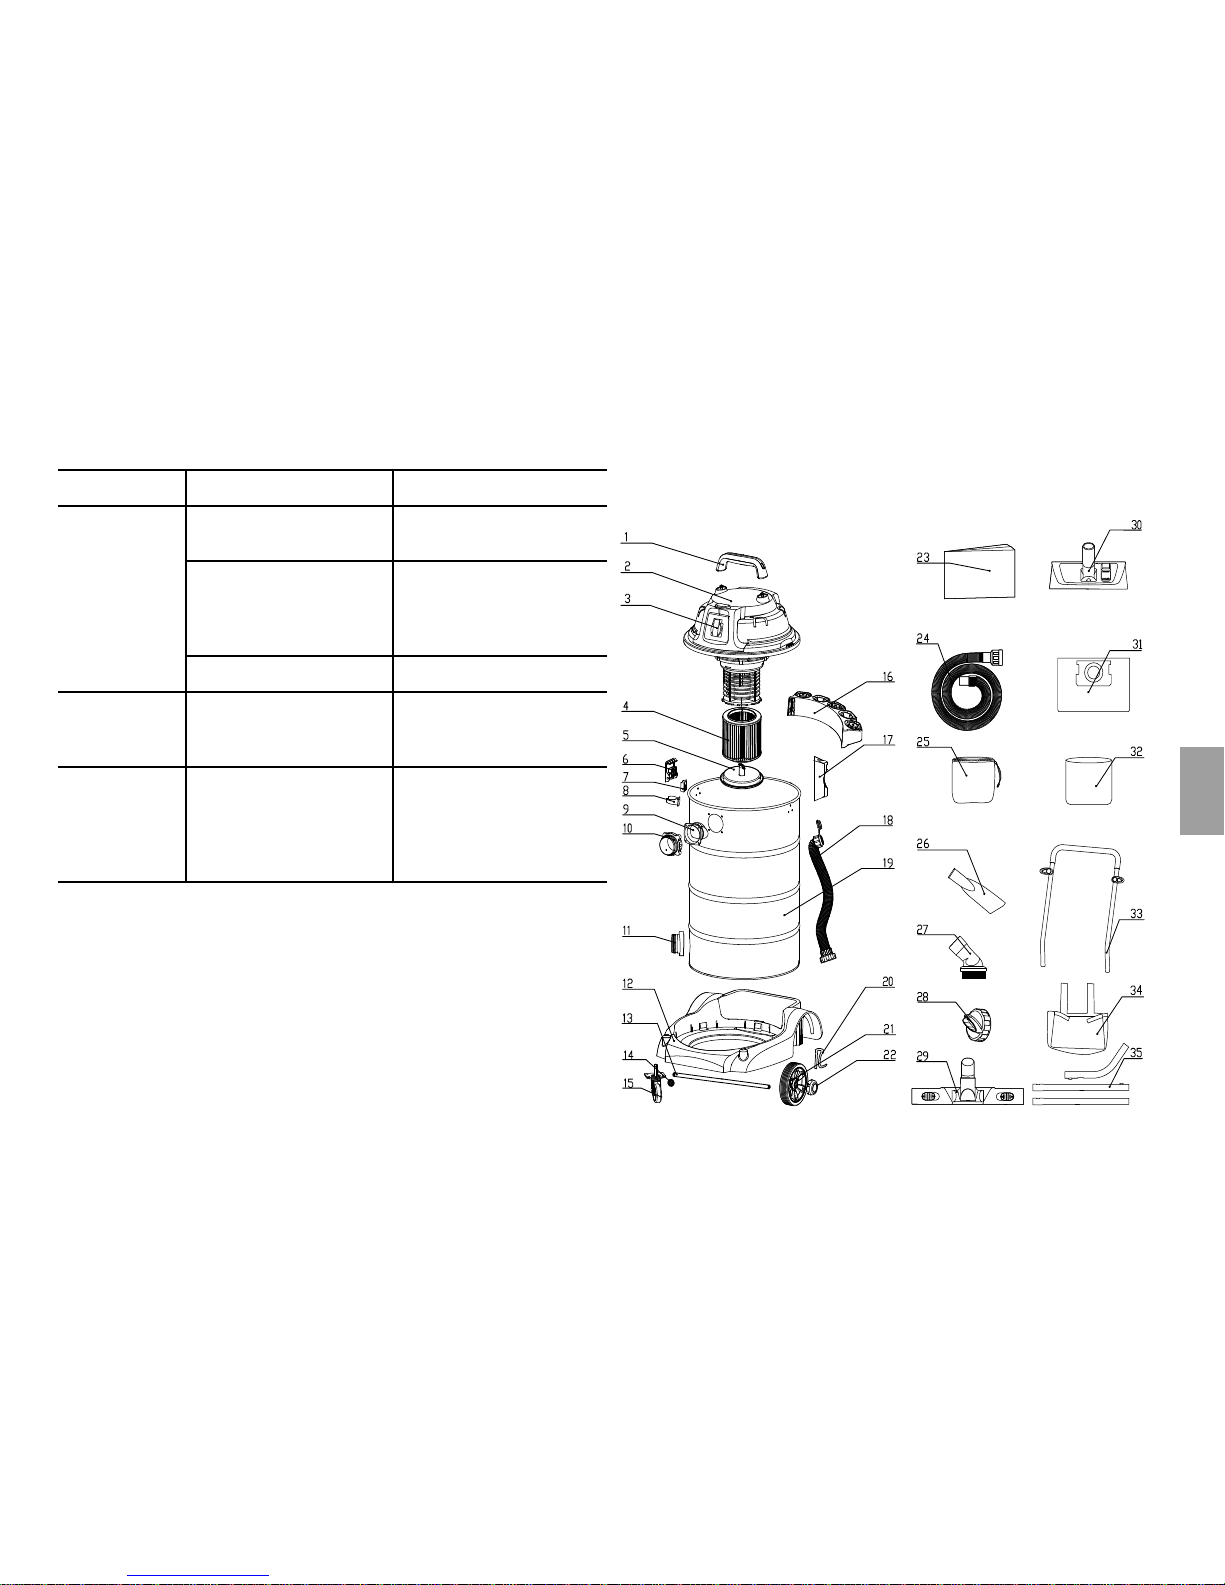
Key Number Drawing Number Description Quantity
1 VK01SR.10.05 Handle 1
2 VK01SR.10.00 Power Head Assembly 1
3 WVDQ20.01.AU Outlet Socket 1
4 FV9563.01.00 Cartridge Filter 1
5 FV9563.01.00 Filter Retainer 1
6 TVQTDK.10.00 Latch Assembly 2
7* VK01SR.20.27 Hose Holder Base 1
8* VK01SR.00.02 Hose Holder 1
9 TVQTXK.05.01 Vacuum Port Deflector 1
10 TVQTXK.05.02 Vacuum Port Assembly 1
11 VF01SR.10.06 Drain Outlet Assembly 1
12 VJ40SR.20.01 Base 1
13 VJ40SR.00.01 Wheel Shaft 1
14 BOC1YX.14.BC Washers 2
15
TVQTJL.21.00
/TVQTJL.20.00
Caster Foot 2
16 FV8201.04.01 Accessory Shelves 1
17 VJ71PW.00.02 Push Handle Base 1
18* FV9161.00.00 Drain Hose 1
19 VK01SR.20.25 Container (50l) 1
19 VK01SR.20.23 Container (60l) 1
20 BOD1ZZ.03.03 ‘R’ Lock Pins 2
21 TVQTGL.13.00 Big Wheel 2
22 TVQTGL.13.03 Hub Caps 2
23 VK01BZ.20.60.01 Operator’s Manual 1
24 FV5801.01.00 Hose 1
25 FV9644.04.00 PRE Cloth Filter 1
26 FV5771.01.01 Crevice Car Nozzle 1
27 FV5773.01 Round Dust Brush 1
28 VB01PF.20.01 Drain 1
29 FV5703.00.00 Floor Brush / squeegee 1
30* FV5721.00.00 Combo Nozzle 1
31 FV9615.01.00 Dust Bag 1
32 F V9503.02.00 Foam Sleeve Filter 1
33 VJ40SR.30.00 Push Handle 1
34* FV9243.01.00 Accessory Pouch 1
35
FV5942.02.10
FV5942.02.20
FV5942.02.30
2 Coated Tube One Bended 3
*ONLY AVAILABLE FOR VMVK1660SWDC
Page 12

VMVK1650SWDC / VMVK1660SWDC
 Loading...