

Page 1
FOR YOUR SAFETY
www.vacmaster.com
Part No. VR09BZ.20.00.01
Wet/Dry Vacuums
Operator’s Manual
Wet/Dry Vacuum
Detachable Blower
14 Gallon
Model No.
Read and understand this manual before use.
Keep this manual for future reference.
VBV1412P
Cleva North America
44 Parkway Commons, G r eer , SC 2 9650
Page 2

2
TABLE OF CONTENTS
Warranty………………………………………………………………………………………………
2
WARRANTY
SAFETY INSTRUCTIONS & WARNINGS
SECTION Page
Safety Instructions and Warnings…………………………………………………………………
Double Insulation Instruct ions....……………………………………………………………………
Extension Cord………………… ………………………………… ………………………………….
Unpacking and Checking Carton Contents………….……………………..………………………
General Assembly Instructions……………………………………………………………………...
Dry Vacuum Operation……………………………………………………………………………….
Liquid Vacuum Operation……………………………………………………………………………
Blowing Operation……………………………………………………………………………………
Maintenance…………………………………………………………………………………………..
Installing & Cleaning Cartridge Filter……………………………...………………..….…………..
Installing & Cleaning Foam Sleeve Filter………………………...………………….…..….……..
Troubleshooting………………………………………………………………………………………
Exploded View and Parts List…………………………………………………………..…………..
Thank you for purchasing this Vacmaster
Vacmaster
vacuum is capa bl e of picking up liqui ds and dry mater ials.
®
you are obtaini ng a high quality product engi nee red for optimal performance. This
®
wet/dry vacuum cleaner. Feel confident that with
FOR YOUR SAFETY CAREFULLY READ AND UNDERSTA ND ALL INSTRUCTIONS
We take pride in producin g a high quality, durable produc t . Thi s Vacmaster® product carries a limited three
(3) year warranty against def ec t s in w orkmanship and materials from date of purchase under normal
household use. If product is to be used for commercial, industrial or rental use, a 90 day limited warranty
will apply. Warranty does not apply to defects due to direct or i ndirect abuse, negligence, m isuse, accidents,
repairs or alterations and lack of maintenance. Pleas e keep your receipt as proof o f purchase. This
warranty gives you speci fic legal rights. For product service call Customer Service at 866- 384-8432.
2
3
4
5
6
7
8
9
9
10
11
11
12
IMPORTANT SAFETY INSTRUCTIONS
READ AND UNDERSTA ND ALL INSTRUCTION S BEFORE USING THIS V ACUUM
Read and understand th is owner’s manual and all la bel s on t he Wet/Dry Vacuum cleaner before operating.
Safety is a combination of com m on sense, staying alert and knowing how your vacuum works. Use this
Wet/Dry Vac only as descr ibed in this manual. To reduce the ri sk of personal injury or damage to your
Wet/Dry Vac, use only Vacmaster
Household Type
®
recommended accessor ies.
SAVE THIS MANUAL FOR FUTURE REFE RENCE.
Page 3

3
When using an el ectrical applia nce, basic preca utions should always be followed including the
DOUBLE INSULATION INSTRUCTIONS
following:
WARNING: TO REDUCE THE RISK OF FIRE, ELECTRIC SHOCK OR INJURY:
• Do not run vac unattend ed.
• Do not vacuum, or use this Wet/Dry Vac near flamma bl e liquids, gases, or explosive vapors like gasoli ne
or other fuels, lighter fluids, cleaners, oil-based paints, natural gas, hydr ogen, or explosive dusts like coal
dust, magnesium dust, grain dust, or gun power. Sparks inside the motor can ignit e f la m m able vapors or
dust.
• Do not vacuum anything that is burning or smoking , such as ci gar et tes, matches, or hot ashe s.
• Keep cord away from heated surfaces.
• Do not expose to rain. Stor e ind oor s .
• Do not unplug by pulling on cor d. To unplug, grasp the plu g, not the cord.
• Do not use with damaged cord, plug or other parts.
• If appliance is not workin g as it should, has been droppe d, damaged, left outdoors, or dr opped into water,
return it to a service center.
• Do not pull or carry by cord, us e cor d as handle, close a door on cor d, or pul l cor d ar ound sharp edges or
corners.
• Do not run Wet/Dry Vac over cord.
• Do not handle plug or the Wet/Dry Vac with wet hands.
• To reduce the risk of health hazards from vapors or dust s , do not vacuum toxic materials.
• Do not use or store near haz ar dous materials.
• Do not use this Wet/Dry Vac w it h a t or n filter or without the filter inst alled except when vacuu m ing li quids
as described in the operation section of this manual.
• Do not allow to be used as a toy. Close attention is necessary when used by or near children.
• To reduce the risk of inju r y from accidental starting, unplug power cord before changing or cleaning filter .
• Do not leave Wet/Dry Va c unat t ended when plugged in. Unpl ug from outlet when not in use an d before
servicing.
• Turn off Wet/Dry Vac bef or e unplugging.
• Do not put any object into v ent ilati on openings. Do not vacuum with any ventilation openings blocked;
keep free of dust, lint, hair or anything that may reduce air flow.
• Keep hair, loose clothing, fingers, and all parts of b ody away from openings a nd m oving parts.
• To reduce the risk of falls, use ext r a care when cleaning on st airs.
When using as bl ower:
• Direct air discharge only at work area.
• Do not use Wet/Dry Vac as a spr ayer.
• Do not direct air at byst ander s.
• Keep children away when blowing.
• Use safety goggles.
This Wet/Dry Vac is double-insulat ed, eliminating the need for a separate grounding system. Use only
identical replacement s parts. Read the instructions for Servicing Double-Insulated Wet/Dry Vacs before
servicing. Use this Wet/Dr y Vac as described in this manual. Observe the following warnings that appear
on the motor housing of your Wet/Dry Vac.
DOUBLE INSULATED - GROUNDI NG NOT R EQUIRED - WH EN SERVICING USE ONLY
IDENTICAL REPLACEMENT PARTS.
WARNING: TO REDUCE THE RISK OF ELECTRIC SHOCK-DO NOT EXPOSE TO RAIN. STORE
INDOORS.
Page 4
4
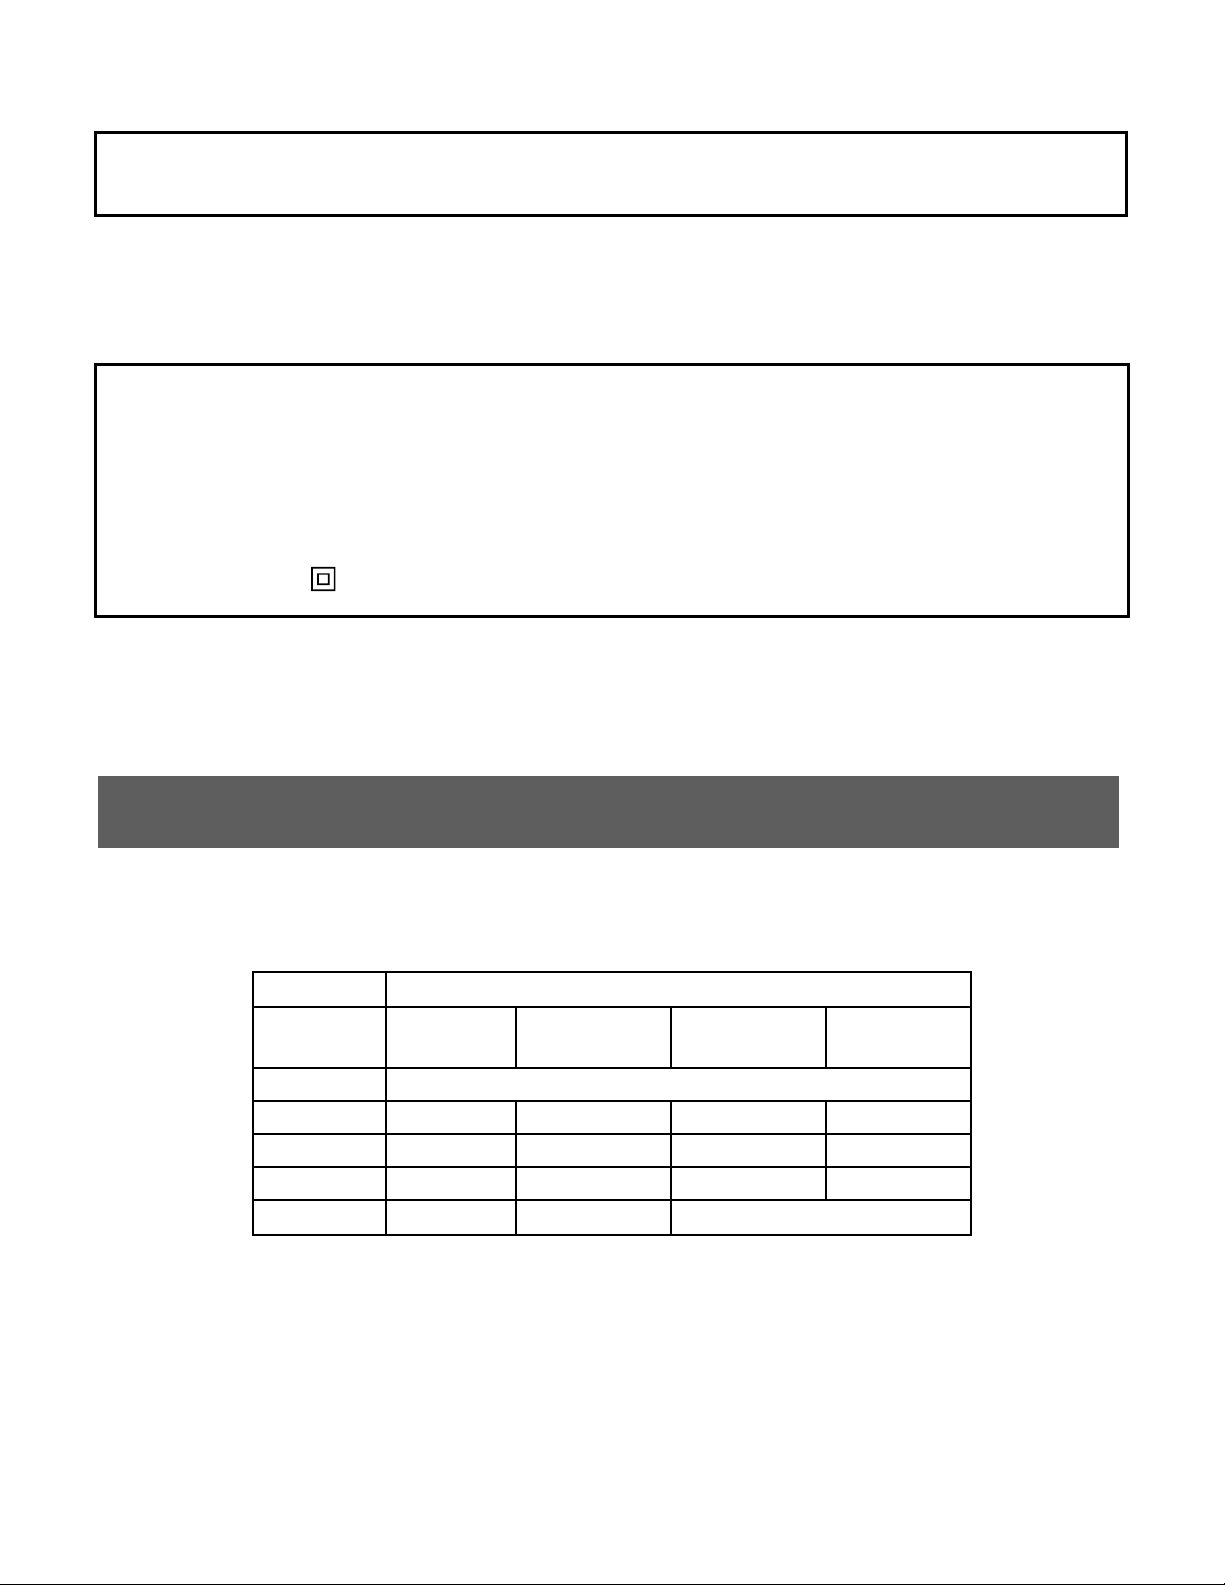
Length of Extension Cord
110V-120V
25 Feet 7.5
50 Feet
100 Feet 30.5
150 Feet
Amps
A.W.G Wire Size
0-6
18
16
16
14
7-10
18
16
14
12
11-12
16
16
14
12
13-16
14
12
Not recommended
EXTENSION CORDS
WARNING: FOR YOUR OW N SAFETY, READ AND UN DERSTAND OPERATO R’S MANUAL. DO NOT
RUN UNA T TE NDED. DO NOT PICK UP HO T ASHES, COALS, TOXI C, FLAMMABLE OR OTHER
HAZARDOUS MATERIALS, DO NOT USE AROU ND EXPLOSIVE LIQUIDS OR VAPO RS.
CAUTION:
• Do not vacuum drywall d ust or fireplace soot or ash with st andard Wet/Dry filter. This is a v er y fine dust
which will not be captured by the filter and may cause damage to motor. When vacuumin g f ine dust use a
fine dust filter (sold separat ely).
WARNING: SERVICING OF DOUBLE-INSULATED WET/DRY VACUUM
WITH A DOUBLE-INSUL ATED WET/ DRY VACUUM, TWO SYSTEMS OF INS ULATIO N ARE PROVIDED
INSTEAD OF GROUNDING. NO GROUNDING MEANS IS PROVIDED ON A DOUBLE-INSULATED
APPLIANCE, NOR SHO ULD A MEA NS FOR GROUNDING BE A DDED. SERVICING A DO UBLE
INSULATED WET/DRY VACUUM R EQUIRES EXTREME CARE AND KNOWLEDGE O F THE SYST EM,
AND SHOULD BE DONE ONLY BY QUALIFIED SER V ICE PERSONNEL. R EPLACEMENT PARTS FOR
A DOUBLE-INSULATED WET/DRY VACUUM MUST BE IDENTICAL TO THE PARTS THE Y REPLACE.
YOUR DOUBLE-INSU LATED WET/DRY VAC IS MARKED WITH THE WO RDS ‘DOUBL E INSULATED’
AND THE SY MB OL (SQUARE WITHIN A SQ UARE) MAY ALSO BE MARKED ON TH E
APPLIANCE.
• To reduce the risk of electric shock-unplug before cle ani ng or ser vicing.
• DO NOT use without filters in place.
CAUTION: TO REDU CE THE RISK OF INJURY FROM MOVING PARTS- UNPLUG BEFORE
SERVICING.
When using an extension cor d with your Wet/Dry Vac r efer t o t he fo llowing table to determine the required
A.W.G. wire size. Before using the cleaner make sure the power cord and extension cord are in good
working conditions. Ma ke r epairs or r eplacements befor e usi ng t he vacuum cleaner. Only use extension
cords that are rated for out door us e.
Meter
15.25 Meters
Meters
45.7 Meters
Page 5
5
UNPACKING AND CHECKING CARTON
1
NOTE: The hose and accessories for these
Z
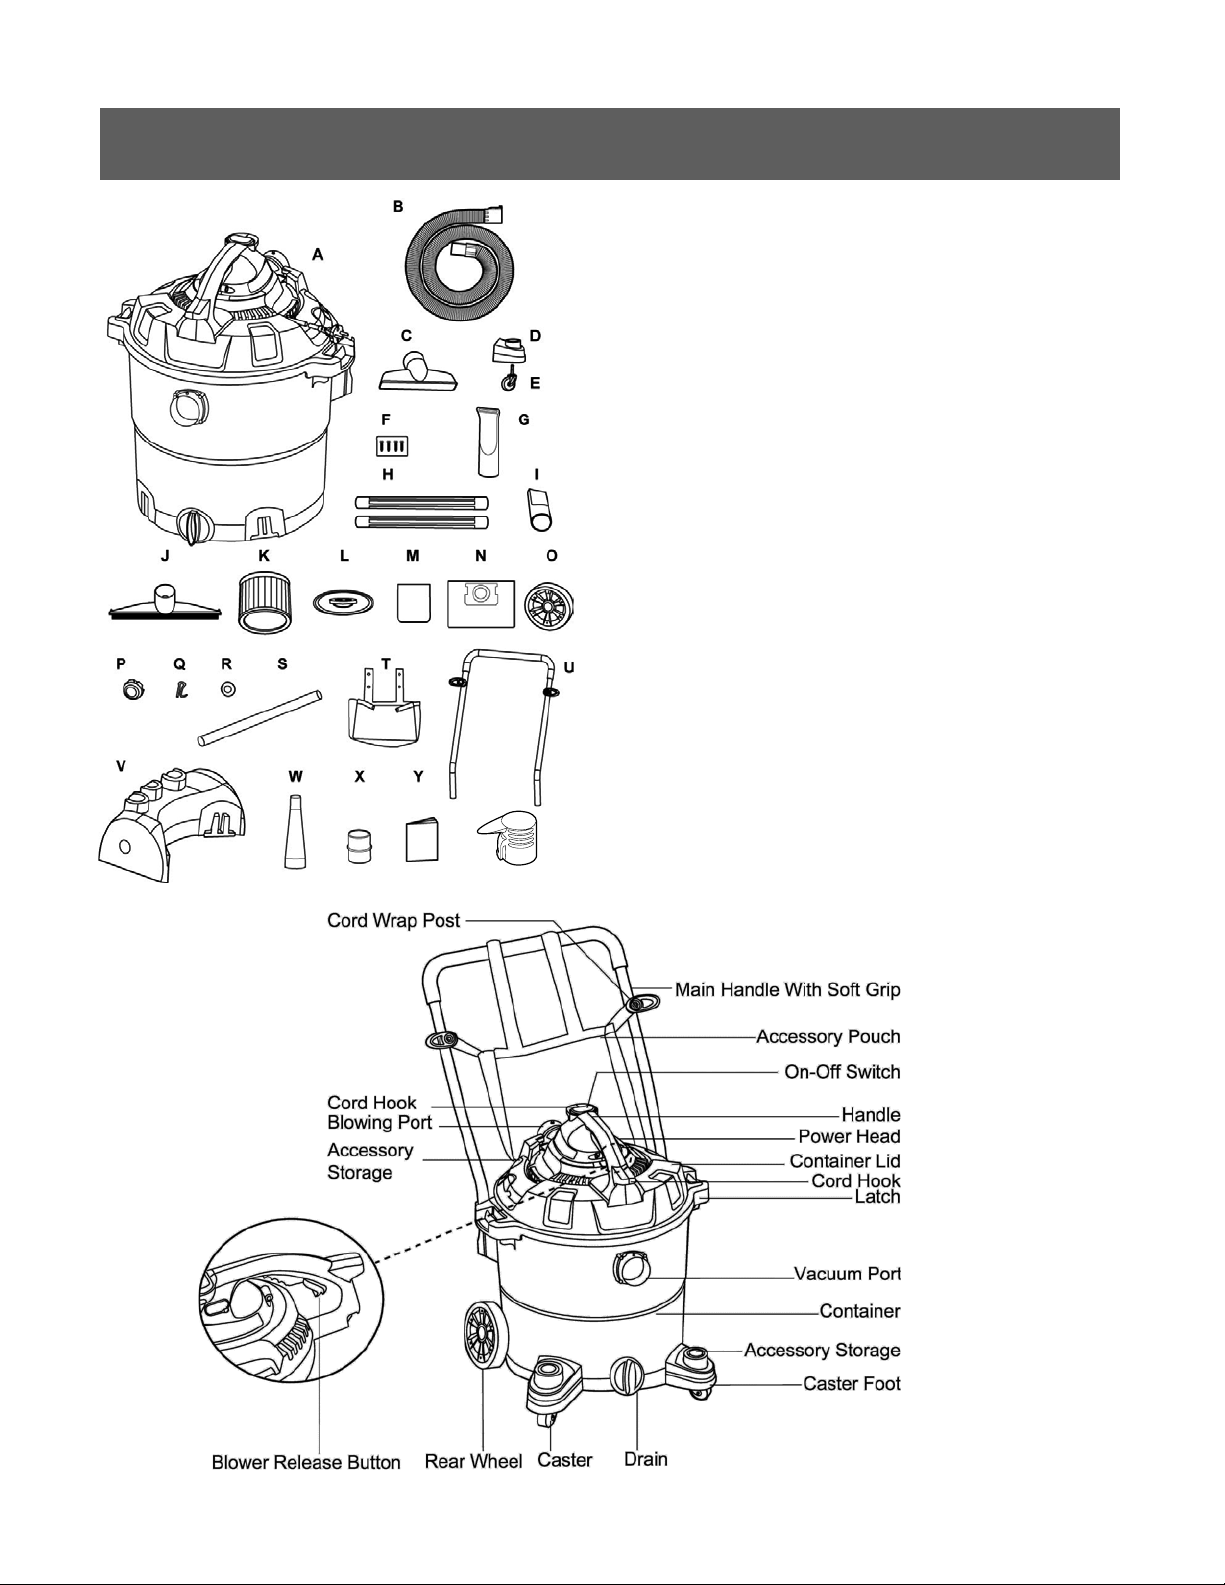
Remove entire contents of carton. Check each
item against the carton contents list.
Carton content s lists
Key Description……………………..………QTY
A Vac Assembly…………………….……..
B Hose……………………………………...
C Utility Nozzle………………………..…...
D Caster F oot W/Accessory Storage…....
E Casters…………………………………...
F 4 Screws (Bag)…………………….……
G Car Nozzle……………………………….
H Extension Wands…..………………..….
I Crevice Nozzle……….……………..…...
J Floor Squeegee………………...............
K Cartridge Filter…………………..……...
L Filter Retainer…………………………...
M Foam Sleeve.......………………………..
N Dust Collection Bag………………………
O Rear Wheel………………………………
P Hub Ca p…………….…………..……….
Q ‘R’ (Lock Pin)………..…………..……...
R Washer……….………………….….……
S Wheel Shaft.………………..……………
T Accessory Pouch..…………………..….
U Push/Pull Handle .……………….……..
V Rear Support Block……………………..
W Blower Nozzle…………………………...
X Blower Adaptor………………………….
Y Operator’s Manual....……………..…….
Z Noise Diffuser……………………………
vacuums are 2.5 inch (6.4 cm) diameter .
CONTENTS
1
1
2
2
1
1
2
1
1
1
1
1
1
2
2
2
4
1
1
1
1
1
1
1
1
Page 6
6
GENERAL ASSEMBLY INSTRUCTIONS
A Philips head screw driver is required.
WARNING: DO NOT PLUG IN POWER CORD TO POWER OUTLET, MAKE SURE PLUG IS
DISCONNECTED BEFORE ASSEMBLING THE WET/DRY VAC.
UNPACKING YOUR WET /DRY VA CUUM & GENERAL ASSE MB L Y
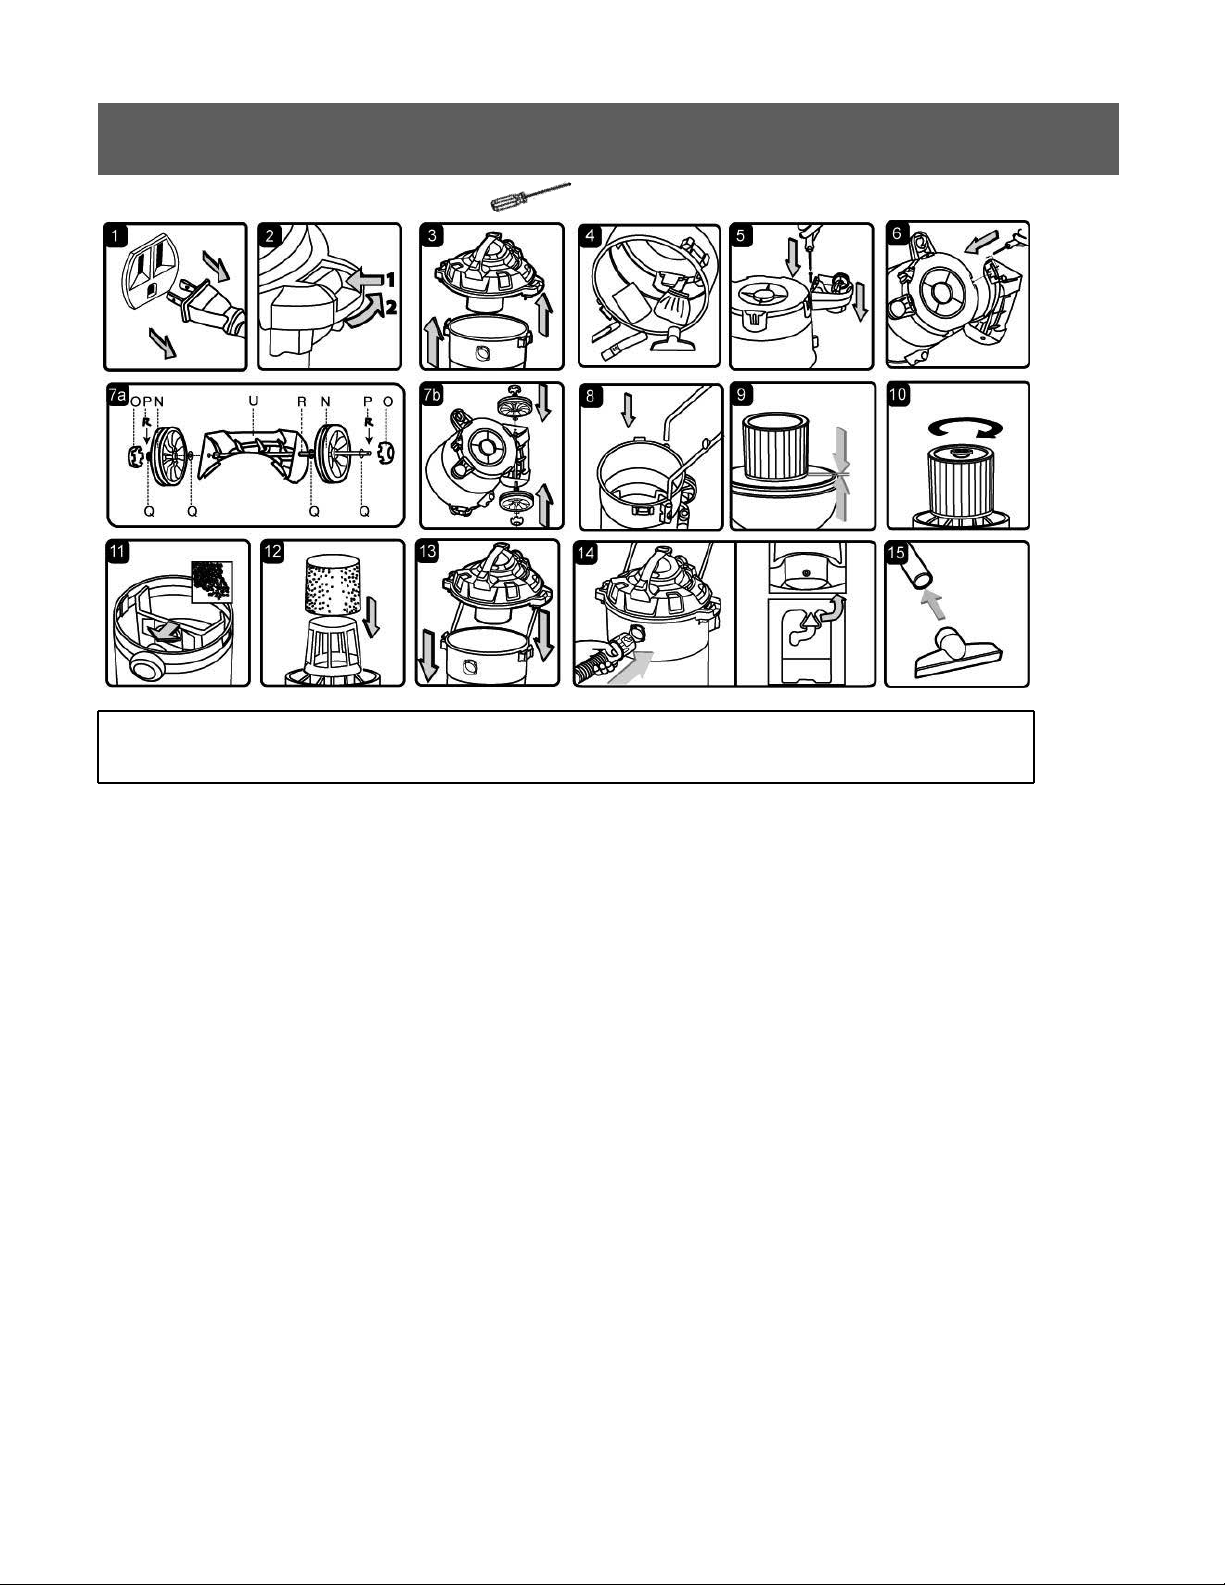
1. Verify that the power cord is d isconnected from the outlet . ( fig. 1)
2. Undo the latches. (fig. 2)
3. Lift the power head off the container. (fig. 3)
4. Remove the contents from inside the container, make s ure you have all contents as listed on page 5.
(fig. 4)
5. Turn the container upside down and insert the two caster feet into the front slots on the container and
tighten with supplied screws. Veri fy t hat the casters are mounted correctly. Do not over-tighten screw.
(fig. 5)
6. Insert the rear support block (U) and secure with the supp li ed screws. Verify t hat they ar e mounted
correctly. Do not over-tighten screws. (fig. 6)
7. Insert the wheel shaft (R) into the r ear support block (U). I nser t washer (Q) onto the shaft followed by
rear wheel (N) and insert washer again. Insert the ‘R’ lockin g pi n ( P) into t he hole on the end of the shaft
to lock the wheel. Snap the hub cap ( O) on to the wheel. Repeat the s ame steps at the other end of th e
shaft. (fig. 7a & 7b)
8. Insert the push/pull main ha ndle into the handle socket mou nt ed on t he t ank body. Push down unt i l t he
locking pins click in place. (fig. 8)
9. Your vacuum comes ready for dry vacuum cleani ng. If cartridge filter is not installed refer to page 10 for
filter installation.(fig. 9 & 10)
10. Optional, for improv ed dust filtering, fit colle ct ion bag flange onto the inlet st ub, taking care not to
damage the bag. (fig. 11)
11. For wet vacuum cleaning, install the supplied foam filter. ( f ig. 12) See page 11 for filter installation.
12.
Page 7
7
DRY-VACUUM OPERATION
LIQUID VACUUM OPERATION
POLARIZED PL UG
To reduce the risk of electr ica l shock, this appliance has a polarized plug (one with t he blade wider than the
other). This plug will fit in a pol ar iz ed outlet only one way. If the plug does not fit fully in the outlet, r everse
the plug. If it still does not fit, contact a qualified electrician t o inst all the proper outlet. Do not c hange the
plug in any way. Double insu lation eliminates the need for the three wire grounded power cord a nd
grounded power supply system.
DRY VACUUM
WARNING: BE SURE TO READ, UNDERSTAND, AND APPLY INFORMATION, ENTITLED ‘SAFETY
INSTRUCTIONS & WARNINGS’. DO NOT VACUUM IN AREAS WITH FLAMMABLE GASES, VAPORS,
OR EXPLOSI VE DUSTS IN T HE AIR. FLAMMABLE GA SE S OR VAPORS I N CLUDE BUT ARE NOT
LIMITED TO; LIGHTER FLUID, SOLVENT TYPE CLEANERS, O IL-BASE PA INTS, GASOLI NE,
ALCOHOL OR AEROSOL SPRAYS. EXPLO SIVE DUSTS I NCLUDE BUT ARE NOT LIMIT ED TO;
COAL, MA GNESIUM, GRAIN OR GUN POWDER. TO REDUCE THE RISK O F HEALTH HAZARDS
FROM VAPORS OR DUST, DO NOT VACUUM TOXIC MATERIALS.
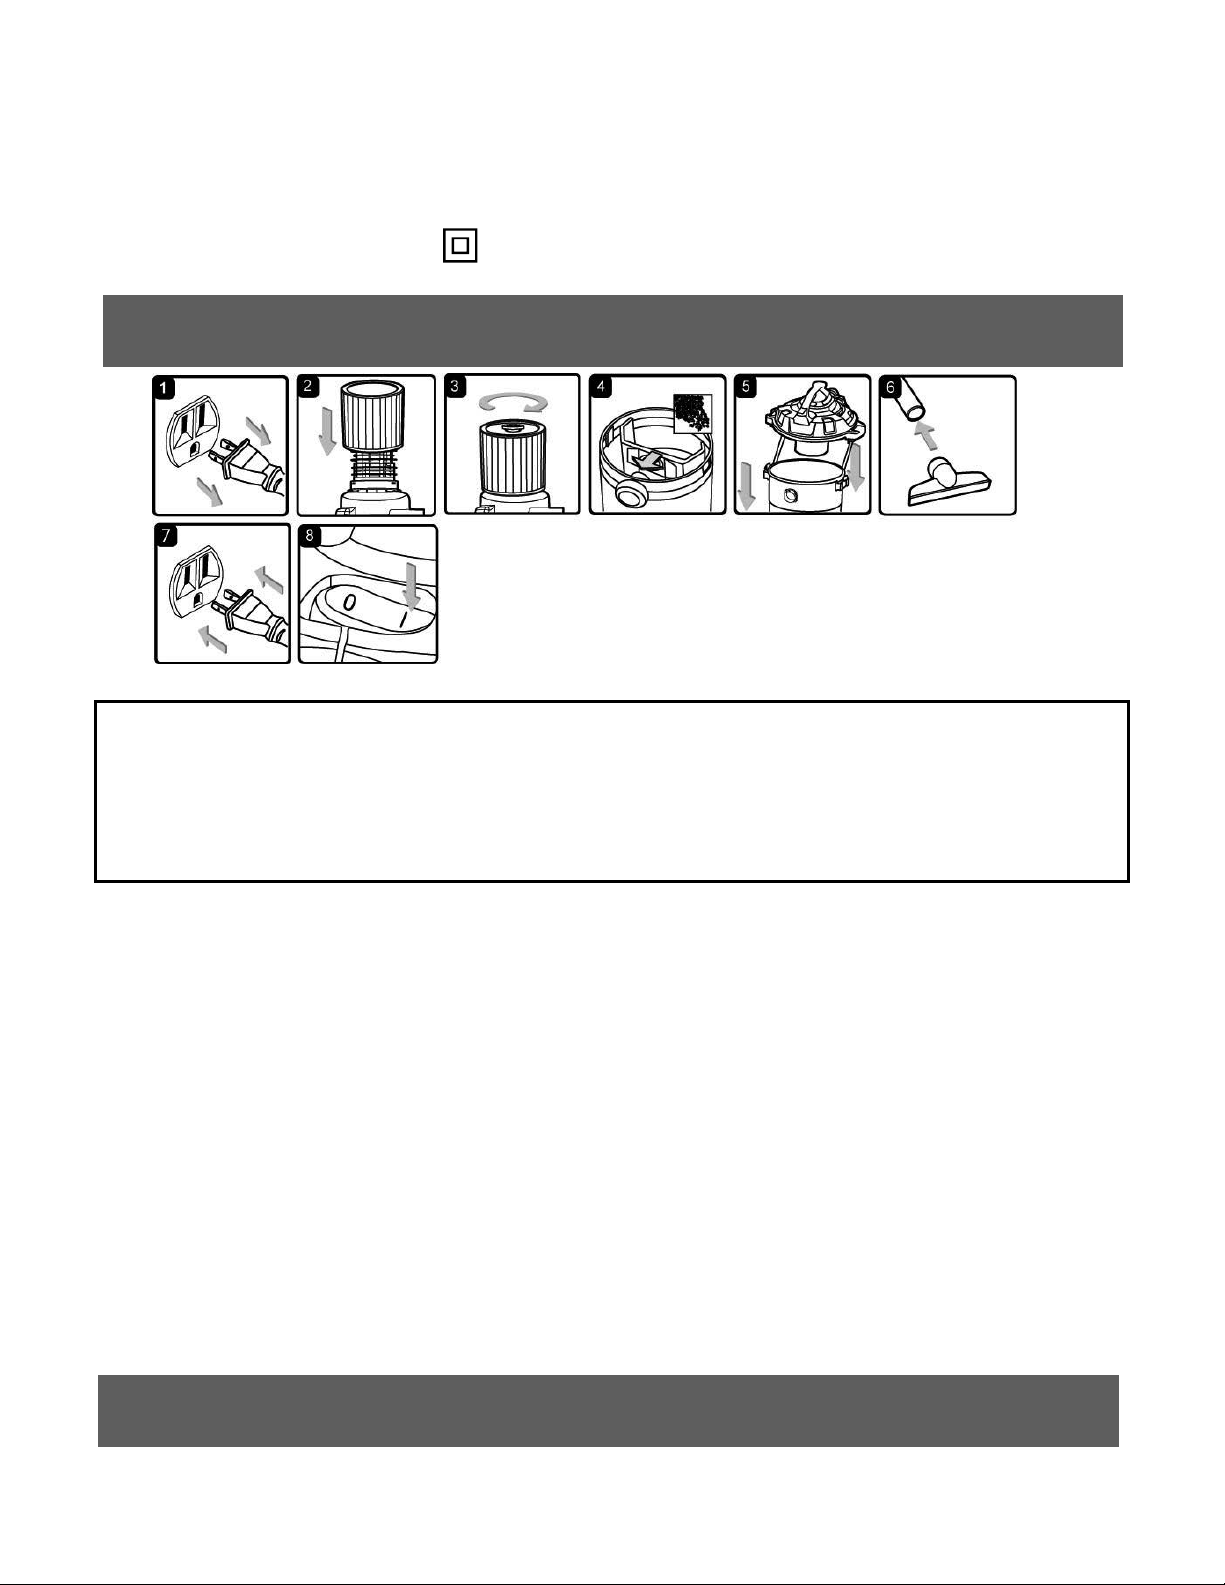
1. Verify that the power cord is disconnected from the out let. ( fig. 1)
2. In order to prepare your v acuum for dr y vacuuming, verify t hat the cartridge filter is securely mo unt ed.
With power head removed and in up side down position, make sure the filter is pushed in until it stops
against the power head and the retainer is installed. (fig. 2 & 3) (Your Wet/Dry Vac comes with the
cartridge filter pre-instal led, i f not , see page 10 for installation instr uct ions.)
3. Optional, for improved dus t f iltering, fit collection bag fla nge onto the inlet stub, taking care not to damage
the bag. (fig. 4)
4. Place the power head back on the container, and secure it in place using the latch es. (fig. 5)
OPERATING INSTRU CTIONS: D RY VACUUMING
6. Insert the locking end of the hose into the vacuum port an d lock in place. Push the requ ired at t achment
onto the free end of the hose or extension. (fig. 6)
7. Plug in the power cord into the out let . ( fig. 7)
8. Turn the motor on by flipping t he sw it ch to the ‘I’ ON position. (fig. 8)
9. Once you have completed v acuuming, flip the switch to t he ‘ O’ OFF position and unplu g the power cord
from the outlet.
O = OFF I = ON
DO NOT USE THE CARTRIDGE FILTER FOR LIQUI D VA CU U MI NG .
Page 8
8
BL
LIQUID VA CUU MI NG
WARNING: BE SURE TO READ, UNDERST AND, AND APPLY INF ORMATION, ENTITLED ‘SAFETY
INSTRUCTIONS & WARNINGS’. DO NOT VACUUM IN AREAS WITH FLAMMABLE GASES, VAPORS,
OR EXPLOSI VE DUSTS IN T HE AIR. FLAMMABLE GA SE S OR VAPORS I NCLUDE BUT ARE NOT
LIMITED TO; LIGHTER FLUID, SOLVENT TYPE CLEANERS, O IL-BASE PA INTS, GASOLI NE,
ALCOHOL OR AEROSOL SPRAYS. EXPLO SIVE DUSTS I NCLUDE BUT ARE NOT LIMIT ED TO;
COAL, MAGNESIUM, GRAIN OR GUN POWDER. TO REDUCE THE RISK OF HEALTH HAZARDS
FROM VAPORS OR DUS T, DO NOT VACUUM TOXIC MATERIALS.
WARNING: DO NOT PLUG IN POWER CORD TO POWER OUTLET, MAKE SURE PLUG IS
DISCONNECTED BEFORE ASSEMBLING THE WET/DRY VAC
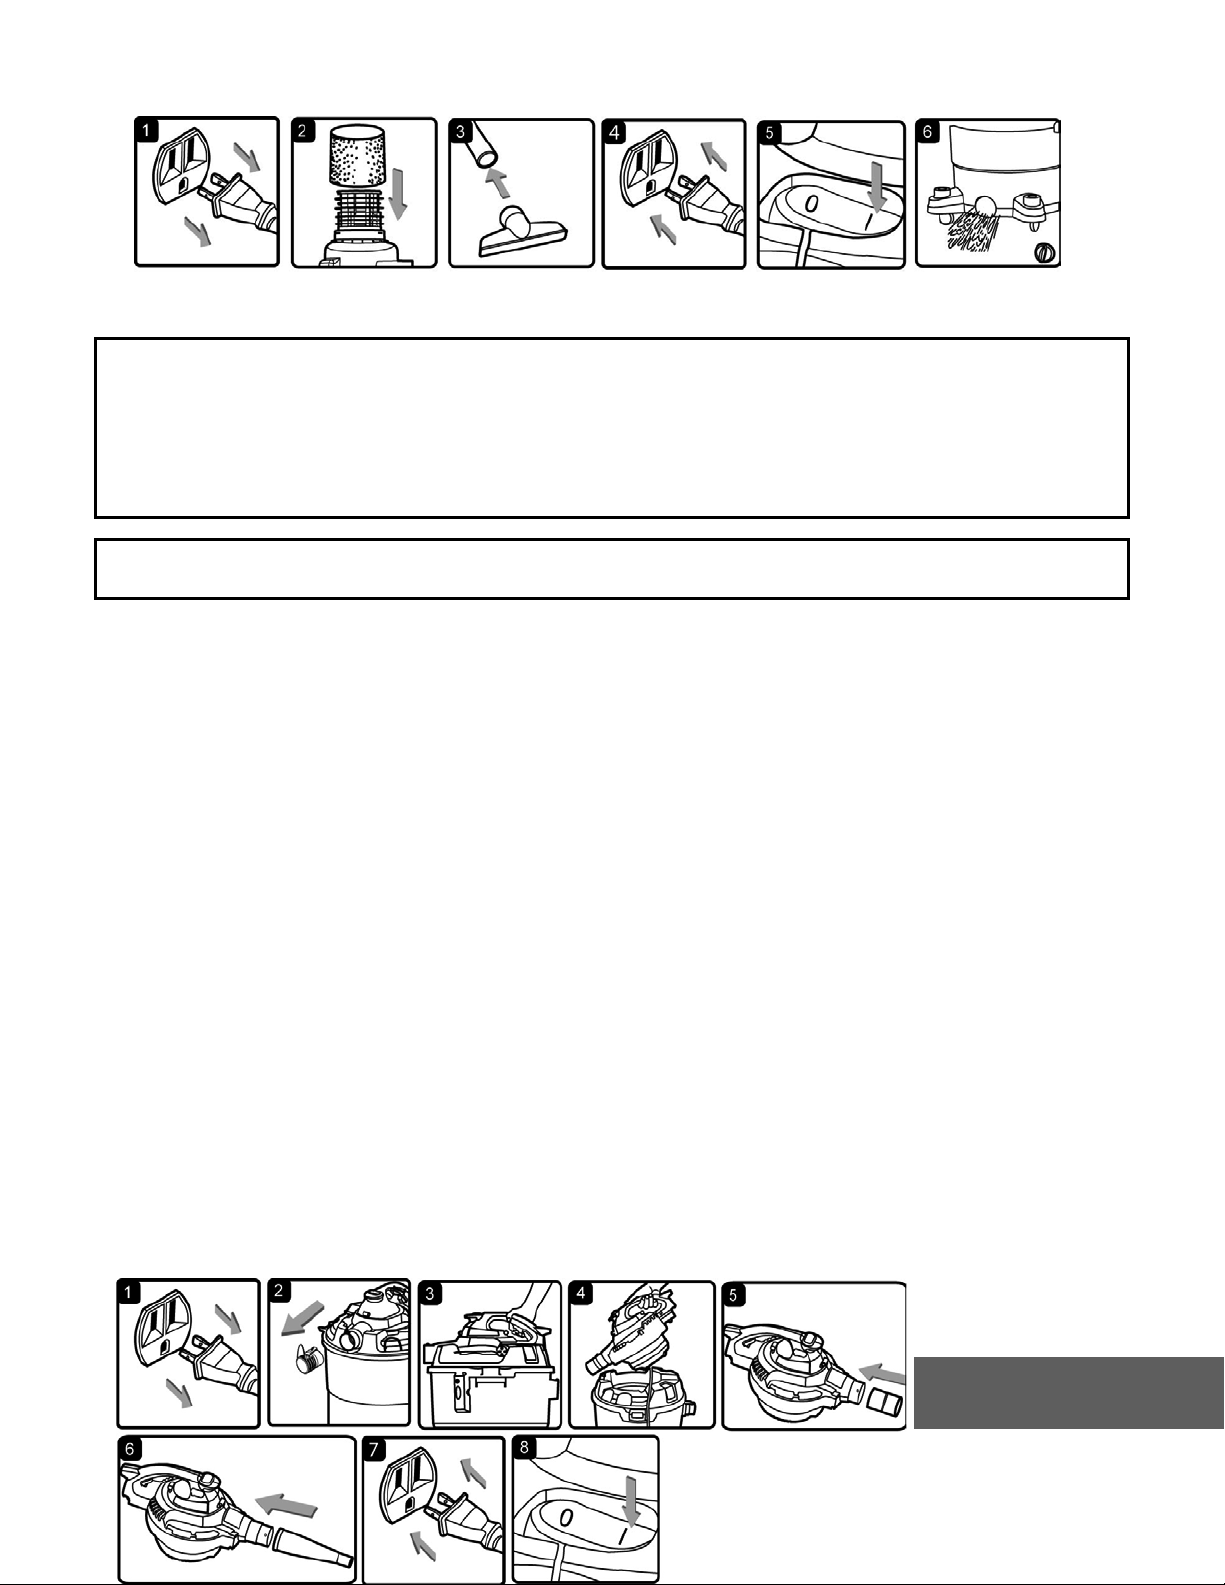
1. Verify that the power cord is d isconnected from the outlet . Ver i fy that the container is c le an and free of
dust and dirt. (fig. 1)
2. Remove cartridge filter , t hen car ef ully install the foam sleeve f ilter over the filter cage and plac e t he
power head back on the container. (fi g. 2) See filter i ns t al ling instructions on page 11.
DO NOT USE THE CARTRIDGE FILTER FOR LIQ UID VACUU MING.
OPERATING INSTRUCTIONS – WET VACUUMING
3. Fit the desired nozzle to the vacuum hose. (fig. 3)
4. Verify that the switch is in the ‘O’ OFF position before plugging the power cord into t he outlet. (fig. 4)
5. Turn the motor on by flipping t he sw it ch to the ‘I’ ON position. (fig. 5)
6. After use, empty the cont ain er by unscrewing the drain cap. Drain liquids into a suitable receptacle or
drain. Remember to refit t he dr ai n cap t o the container after drain ing container. (fig. 6)
IMPORTANT! When vacuuming large quantities of liquids, do not immerse t he nozzle completely in the
liquid; leave a gap at the tip of the noz zle opening to allow air inf low . The machine is fitted with a float valve
that stops the suction acti on when the container reaches its maximum capacity. You will notice an increase
in motor speed. When this happens, turn off the machine, dis c onnect from power supp ly, and drain the
liquid into a suitable recep t acle or dr ain. To continue vacuuming, refit the container wit h t he drain cap. After
wet vacuuming, turn the ma chine off and remove plug from power supply. Empty the container, clean and
dry the inside and outside bef or e st or age.
REMEMBER! The foam filter must be removed after wet vacuuming, and a cartridge filt er must be
installed before dry vacuuming again.
Page 9
9
MAINTENANCE
WARNING!
REMOVING THE POWER H E AD FROM THE CONTAINER.
This Wet/Dry Vac convert s to a detachable blower that can be used for leaf blowing in y ar ds , decks and
patios. To use the detachabl e bl ow er feature follow the instructions listed.
WARNING:
ALWAYS WEAR SAFETY GOGGLES COMPLYING WITH ANSI Z87.1 (OR IN CANADA,
CSAZ94.3) BEFORE USING BLOWER.
CAUTION:
TO REDUCE THE RISK OF HEARI NG DAMAGE, WEAR EAR PROTECTION WHEN USING
THE VAC/BLO WER FOR EX TENDED HOURS OR WH EN USING IT I N NOISY AREAS.
WARNING:
WARNING:
KEEP BYS TANDERS CLEAR FROM BL OWING DE BRIS.
WEAR A DUS T MASK IF BLO W ING CREATES DUST THAT MIGHT BE INHA L ED.
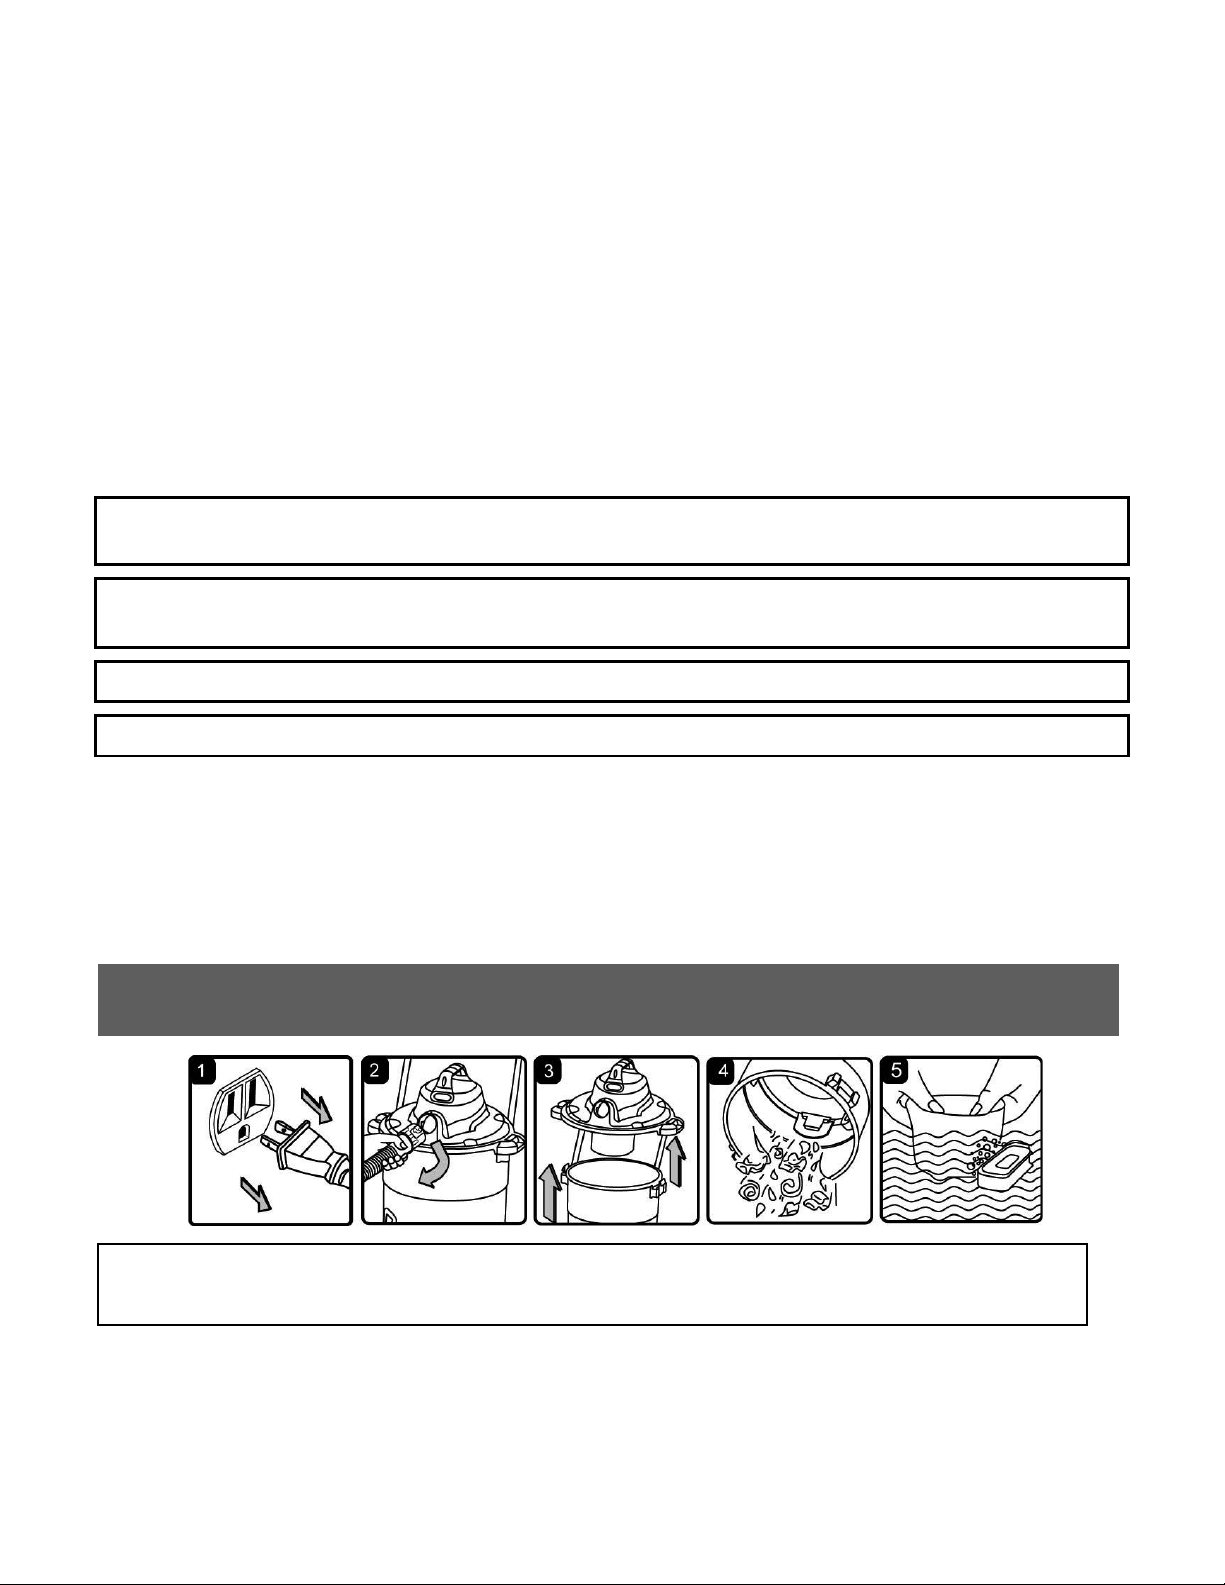
1. Verify that the power cord is d isconnected from the outlet . ( f ig. 1)
2. Remove noise diffuser from the blower port. (fig. 2)
3. While squeezing the locking lever, lift the detach abl e blower from the vacuum lid. (fig. 3 & 4)
4. Insert the adaptor into the blowing port and fit it the desired exte nsion wands and or nozzles. (fig. 5 & 6)
5. Ensure the power switch is t urned off and plug into the power s upply. (fig. 7)
6. Firmly hold the blower before t ur ning it on. Turn the motor on by fl ipp ing t he switch to
the ‘I’ ON position. (fig. 8)
ALWAYS DISCONNECT THE PLUG FROM THE POWER OUTLET BEFORE
1. Verify that the power cord is d isconnected from the outlet. (fig. 1)
2. Disconnect the hose from the vacuum. (fig. 2)
3. Undo the latches and remove the power head from the cont ai ner . (fig. 3)
4. Clear all dirt or debris from the c ont ainer and hose. (fig. 4)
5. Clean the foam filter by w ashing it with water and mild soap. ( fi g. 5)
Page 10
10
6. Check the hose, attachment s, and power cord to verify that t hey have not been damaged.
INSTALLING & CLEANING CARTRIDGE
FILTER
WARNING!
REMOVING THE POWER H E AD FROM THE CONTAINER.
BLOWER IN TAKE
ALWAYS DISCONNECT THE PLUG FROM THE POWER OUTLET BEFORE
After using the blower, ex am ine the bottom of the blower for debris and blockages and remove if found. To
clean the foam pad of the inta ke:
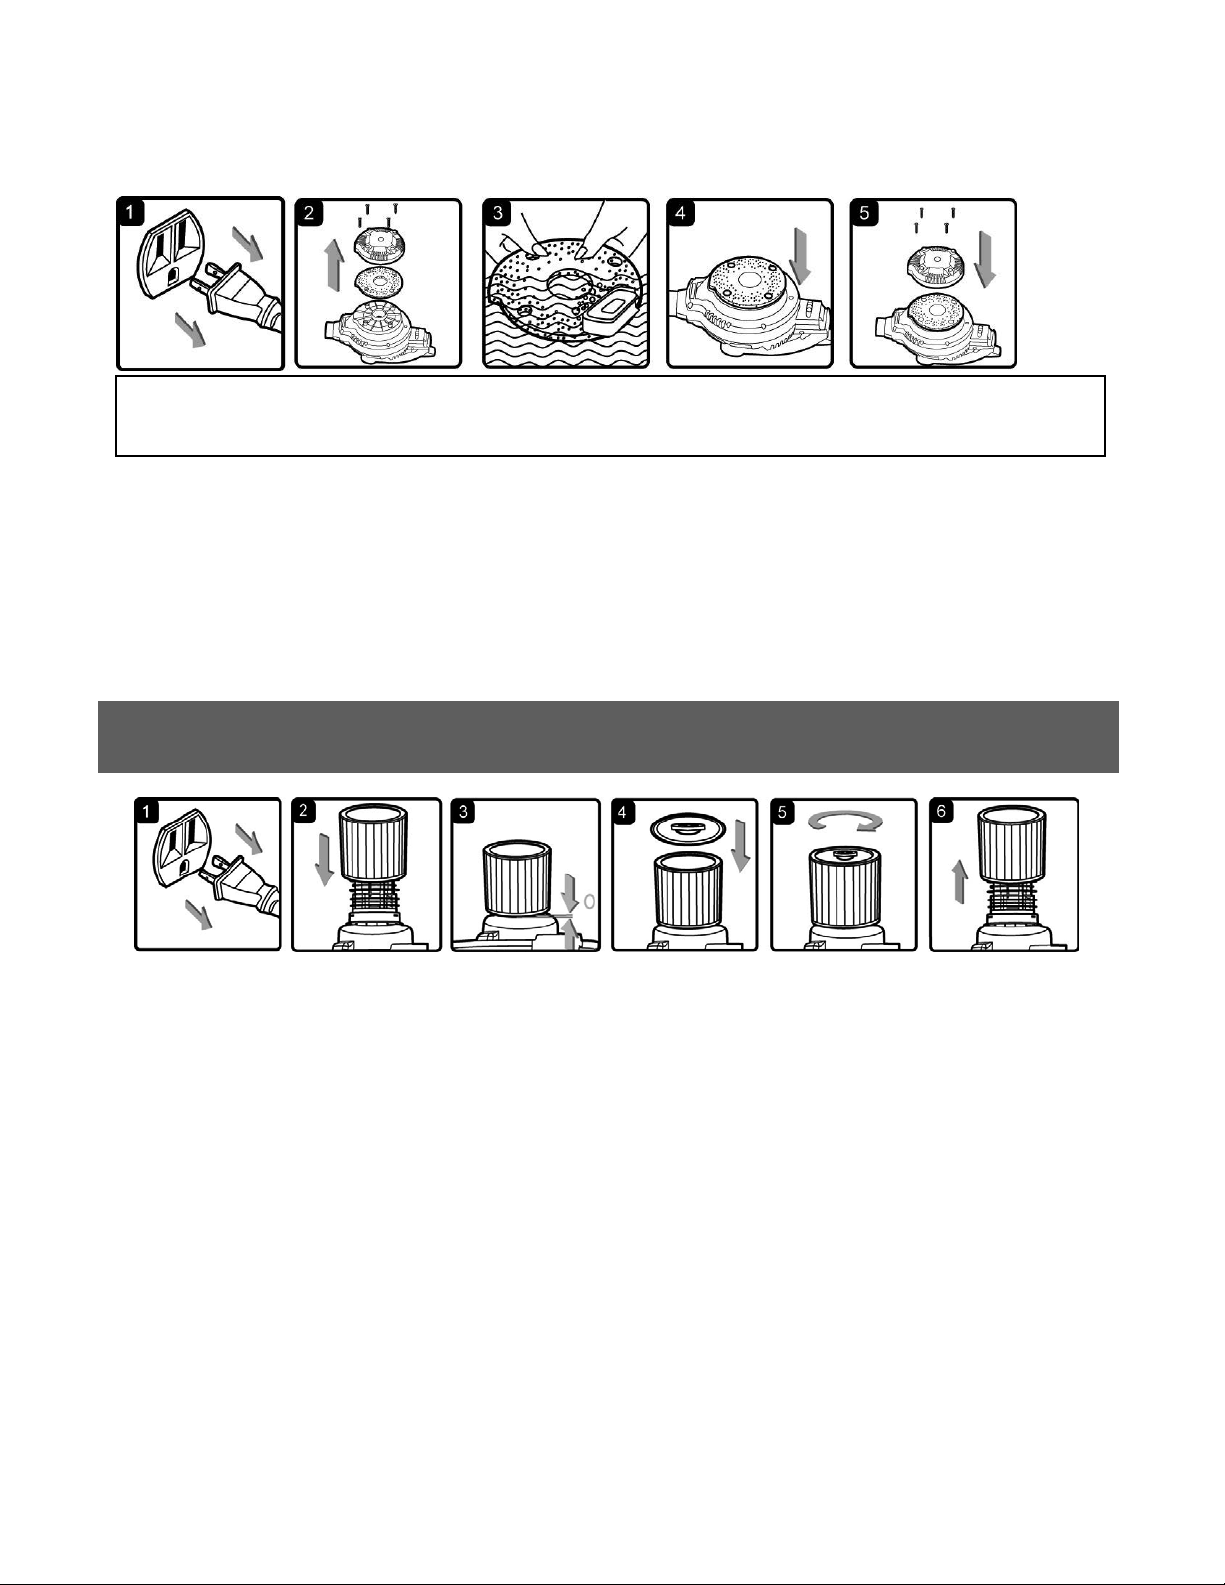
1. Verify that the power cord is disconnected from the outlet. ( fig. 1)
2. Remove the four screws hol ding the intake shield and l ift off the shield. (fig. 2)
3. Remove the foam pad from the blow er and clean the foam pad with s oapy water and allow to dry. ( fig . 3)
4. Check the foam pad for reuse. If you need to replace the foam pa d consult the parts list of the man ual.
5. Replace the foam pad on to t he blower aligning the whol es to the screw tabs. (fig. 4)
6. Reinstall the intake shield and the four screws. (fig. 5)
Installing Cartridge Filter
1. Verify that the power cord is d isconnected from the outlet . (fig. 1)
2. Remove power head and place in upside down position.
3. Install the cartridge filte r over the filter cage with the flat end o f t he f i lt er towards the vacuum power head.
Carefully push filter in until it stops against the power head. (fig. 2 & 3)
4. Place filter retainer on top of cartridge filter over t he r aise lip and tighten down by turning retainer
Clockwise, do not over tighten. (fig. 4 & 5)
Removing and Cleani ng Car tri d ge Filte r
1. Unlock and remove the filt er retainer by tuning retainer handle counter clockw ise.
2. Carefully hold and pull the cartridge filter up for removal. (fig. 6)
3. Clean the cartridge filte r by gently tapping or brushing dirt of f. C leaning should not be done indoor s in
living areas. For optimal performance a new filter is recommended.
4. Install cleaned or new filter int o pl ace as instructed above in steps 2 and 3 of Installing Cartridge Filter.
5. Wet filters should be remov ed and allowed to air dry for 24 hour s before installing ont o t he f ilter cage.
IMPORTANT! Clean or change the cartridge filter regularly for best performance. ALWAYS USE
CARTRIDG E FILTER FOR DRY VACUUMING. If the machine is used for dry vacuu min g w ith out the
cartridge filter and retainer attached, the motor wil l burn out and the warranty will be voided. Always keep
spare filters on-hand.
Page 11
11
NOTICE! The filters included are made of high q uality materials designed to stop small dust particles. The
Symptom
Possible Causes
Corrective Action
Vacuum will not operate
1) No power supply.
1) Check power supply – cord,
breakers, fuses.
2) Faulty power cord.
2) Unplug and check the power
by a professional.
3) Container full.
3) Empty container.
Dust comes out from motor cover.
1) The cartridge filter is missing or
damaged.
1) Attach or replace cartridge filter.
Reduced efficiency and
1) There is a blockage in the
dust.
1) Check nozzle, hose and
new cartridge filter.
INSTALLING & CLEANING FOAM SLEEVE FILTER
TROUBLESHOOTING
WARNING! TO REDUCE THE RISK OF ELECTRIC SHOCK-UNPLUG BEFORE TROUBLESHOOTI NG
cartridge filter should be u sed f or dr y pick-up only. A dry cartridge filter is necessary to pic k up dust. If the
cartridge filter is wet, it will clog quickly and be very difficult to clean. Handle the filter careful ly when
removing it for cleaning and r epl acing it. Check the filters for t ear s or small holes, a small hole can let dust
pass through and out of the cle aner . Do not use a filter with holes or t ear s , r epl ace it i m m ediately.
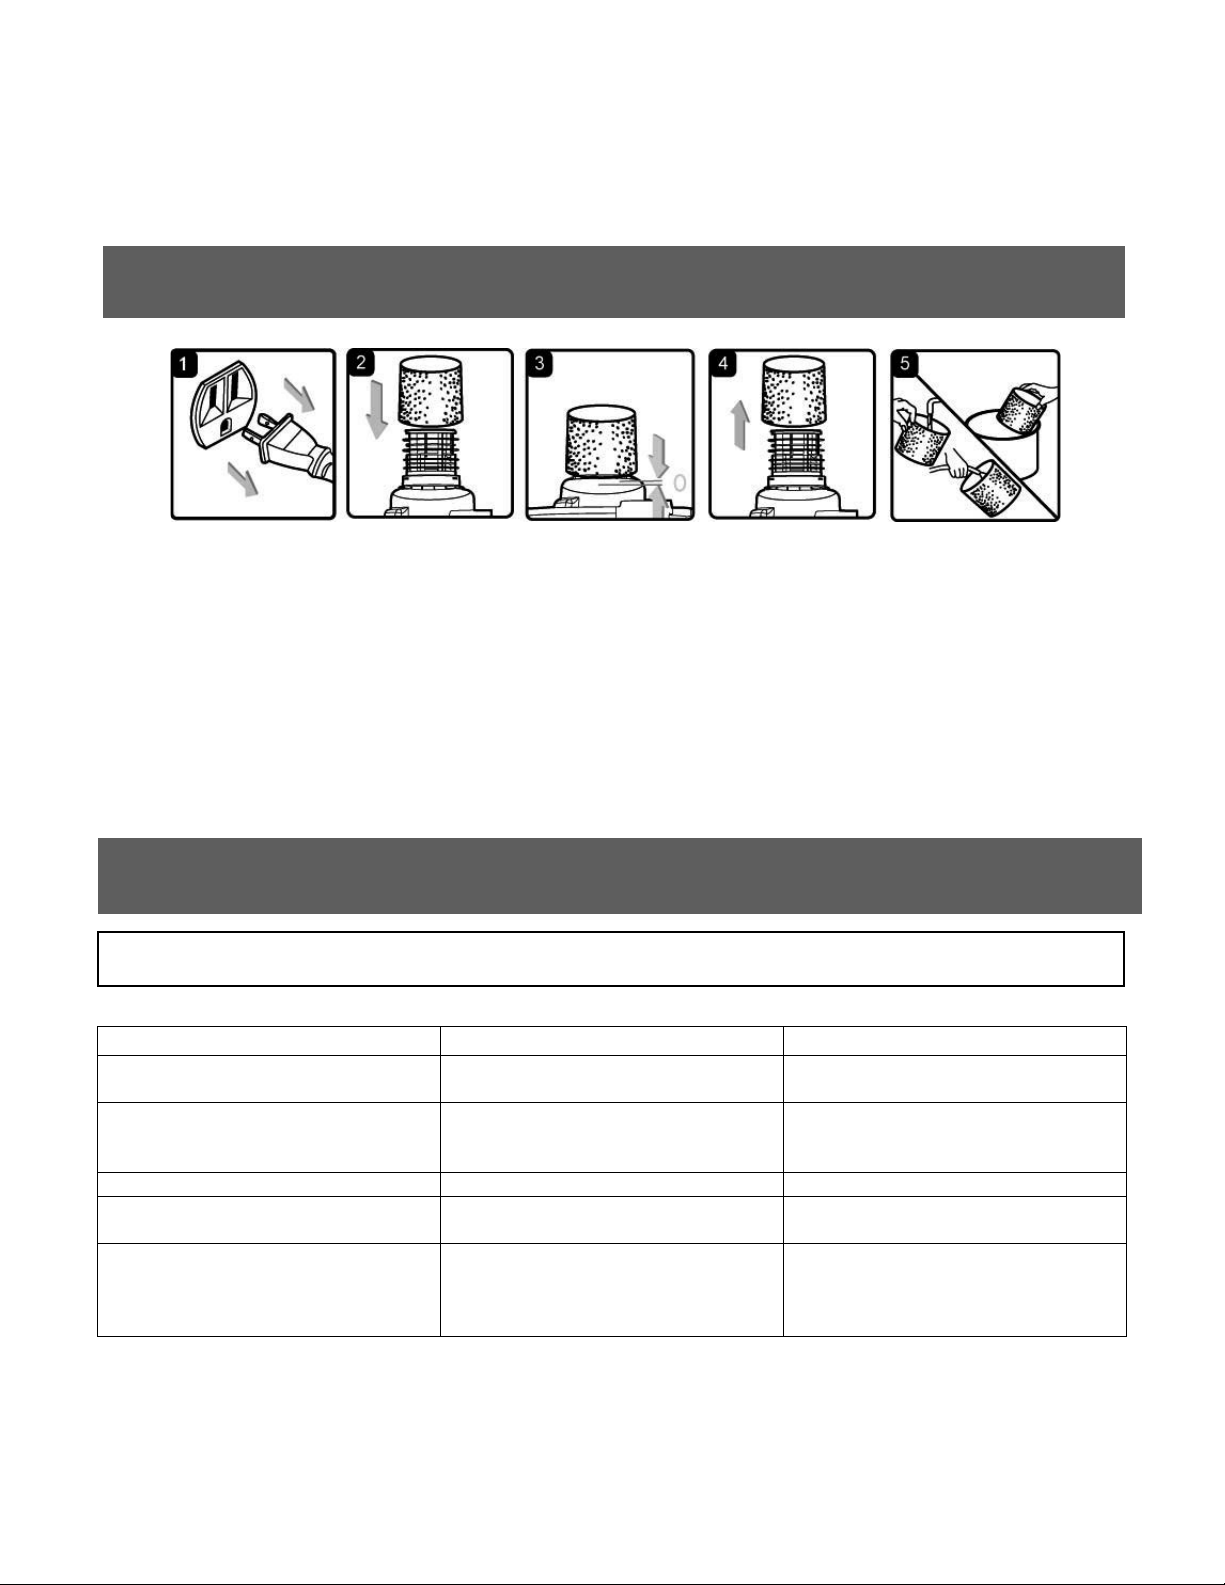
Installing Foam Sleeve Filter
1. Verify that the power cord is d isconnected from the outlet . ( fig. 1)
2. Remove power head and place in upside down position. Follow instructions t o r emov e cloth filter.
3. Carefully slide foam sleeve filter down over the filter cage making sure the whole cage is covered.
(fig. 2 & 3)
4. Replace the power head on to the container.
Cleaning Foam Sleeve F i l t er
1. With the removed power head in the upside down pos ition, carefully remove foam s leeve filter. (fig. 4)
2. Use a mild soap and water solut ion t o w ash foam sleeve filter and rinse with clean water . (fig. 5)
3. Allow filter to air dry before installing and using again.
cord. If damaged, have it repaired
motor/speed vibration.
nozzle, hose, or the container inlet.
The cartridge filter is clogged by fine
container inlets for blockage. Take
off the filter and clean it. Or install a
Page 12
12
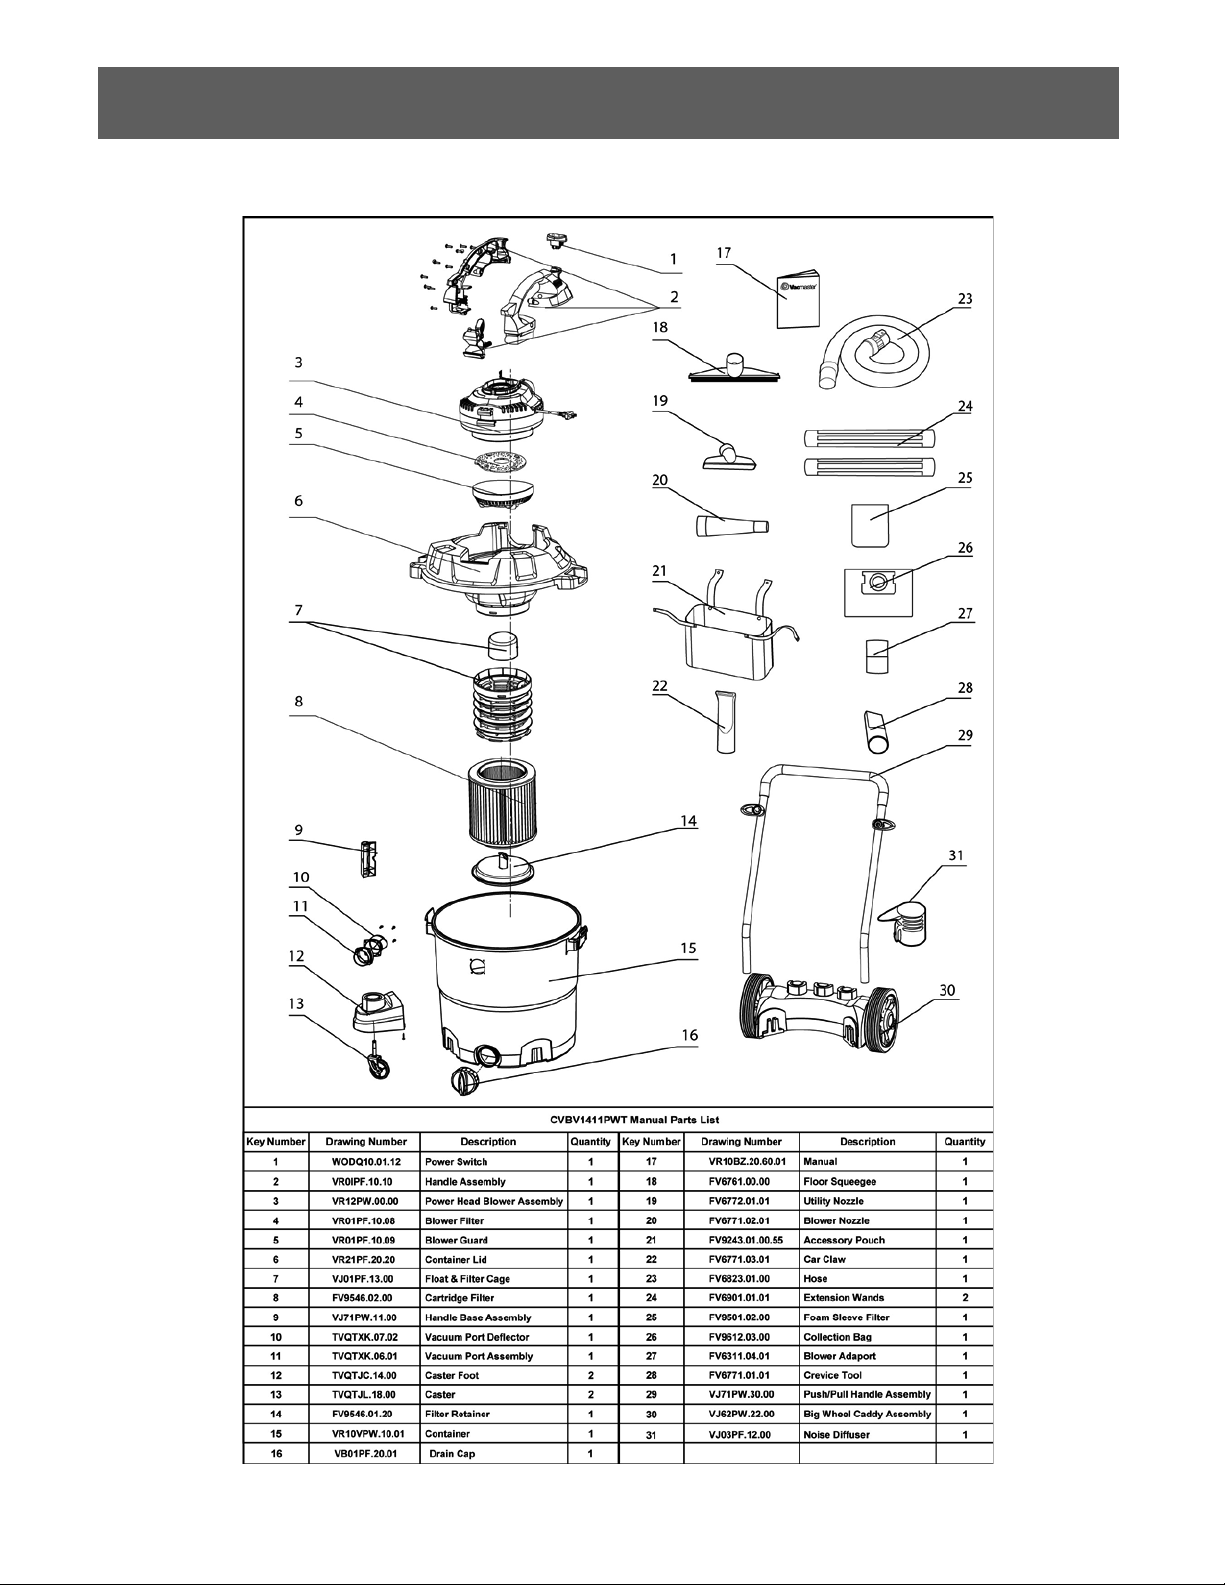
PARTS -EXPLODED VIEW
 Loading...