

Page 1

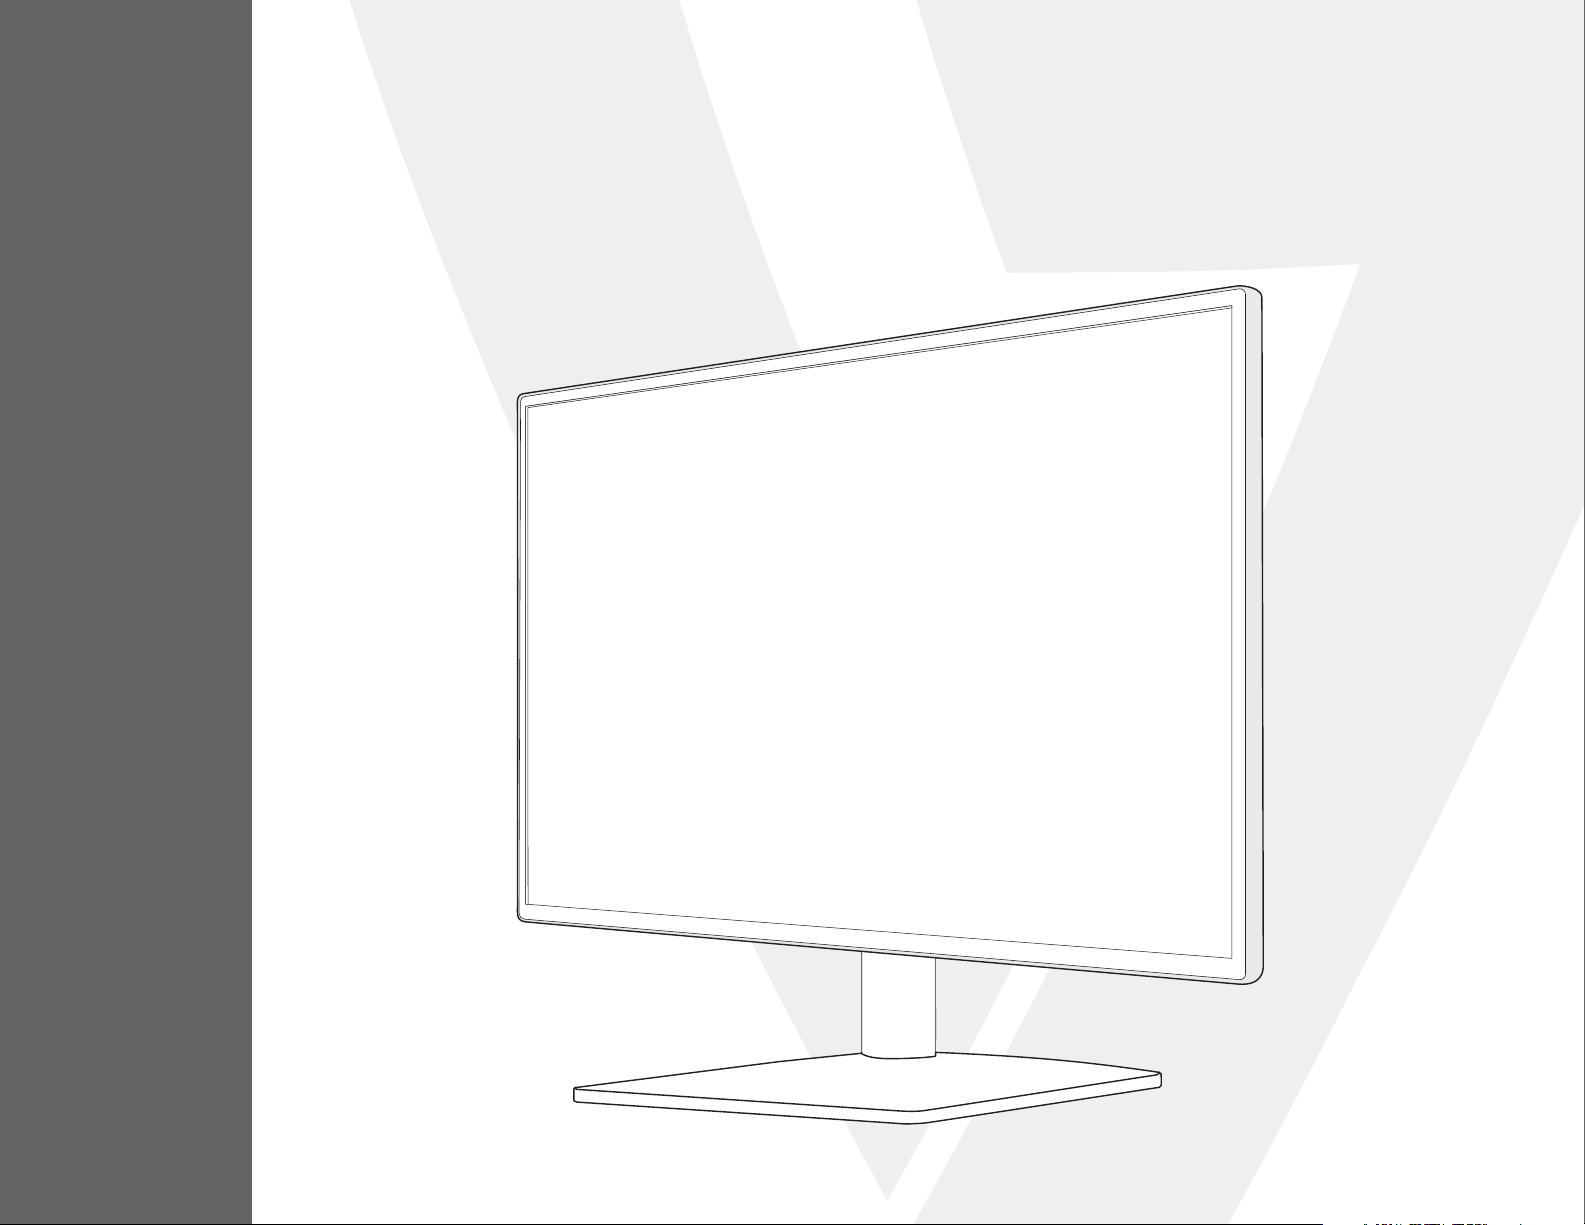
27” Full HD Widescreen LED Monitor
L27ADS
USER MANUAL
Page 2

1 Getting Started
2 Control Panel/ Back Panel
3 On Screen Display
4 Technical Specs
5 Care & Maintenance
6 Troubleshooting
7 Safety info & FCC warning
TABLE OF CONTENTS
Page 3
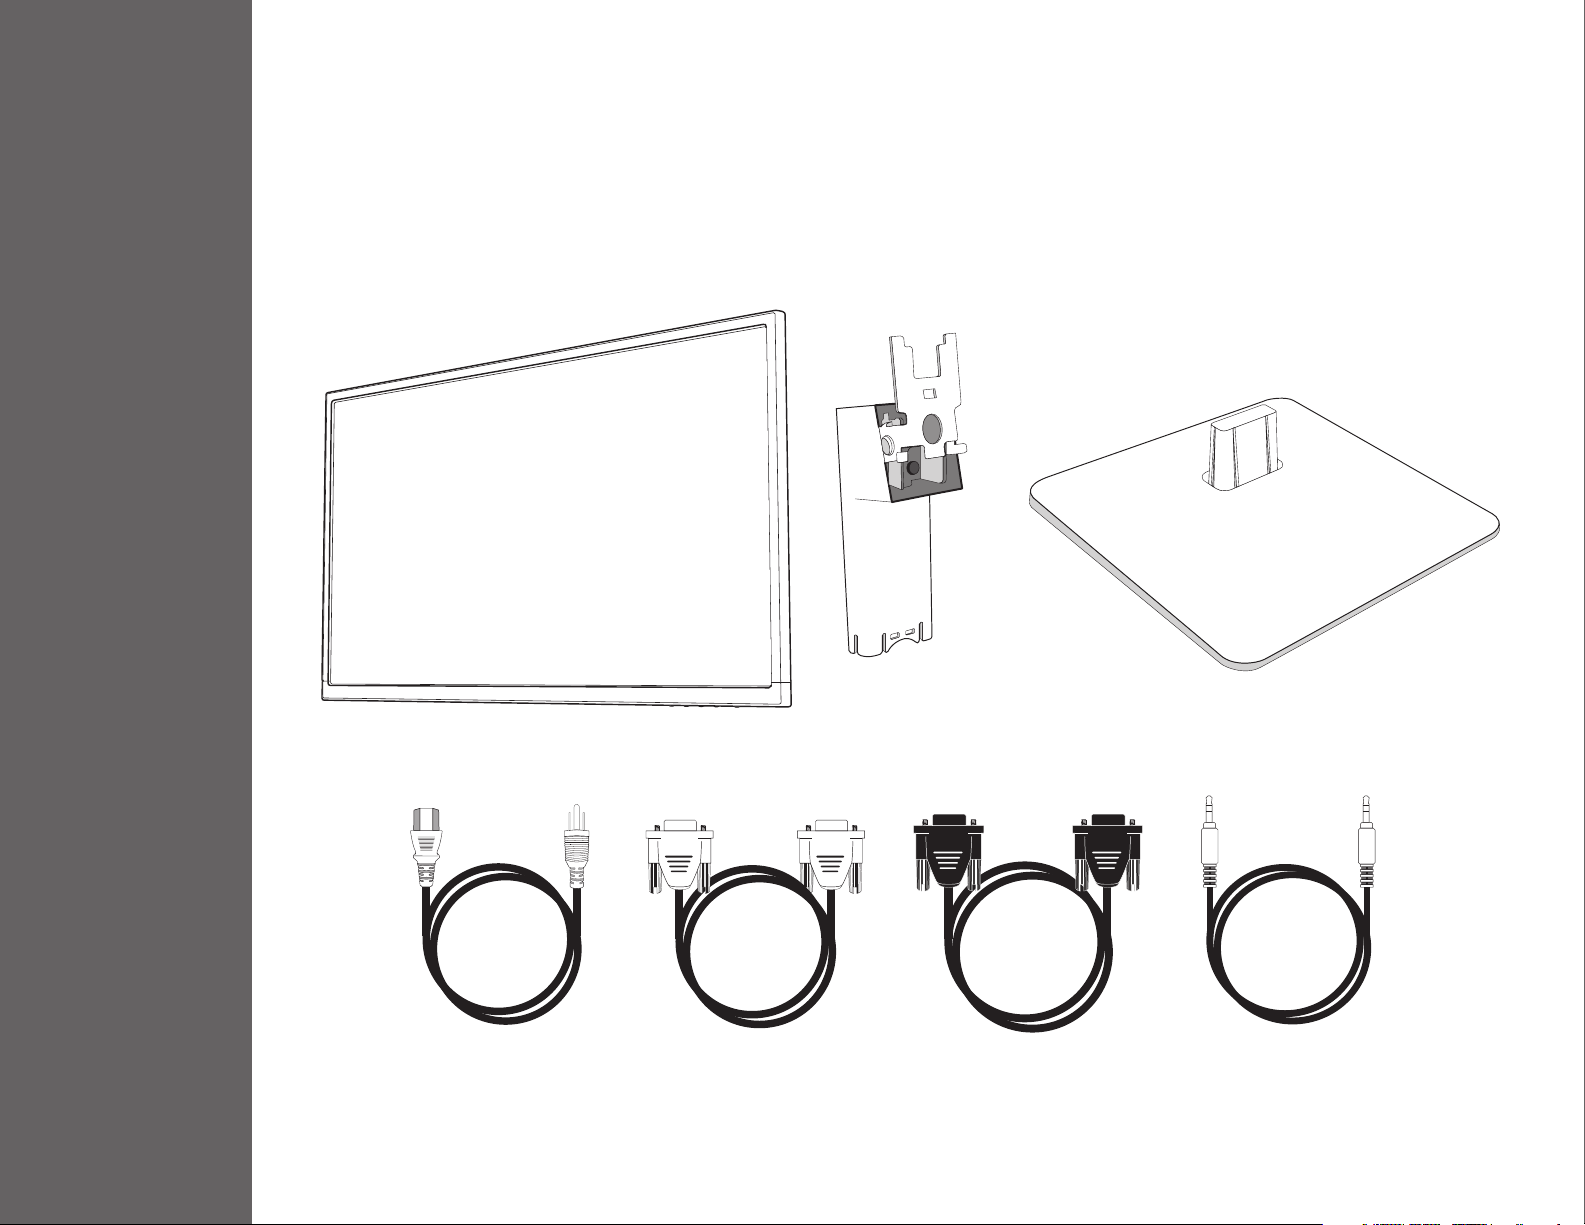
Package includes
• AC power cord
• VGA cable
1
• DVI cable
• Audio cable
• Quick start guide
GETTING STARTED
AC Power Cord VGA Cable DVI Cable Audio Cable
Page 4

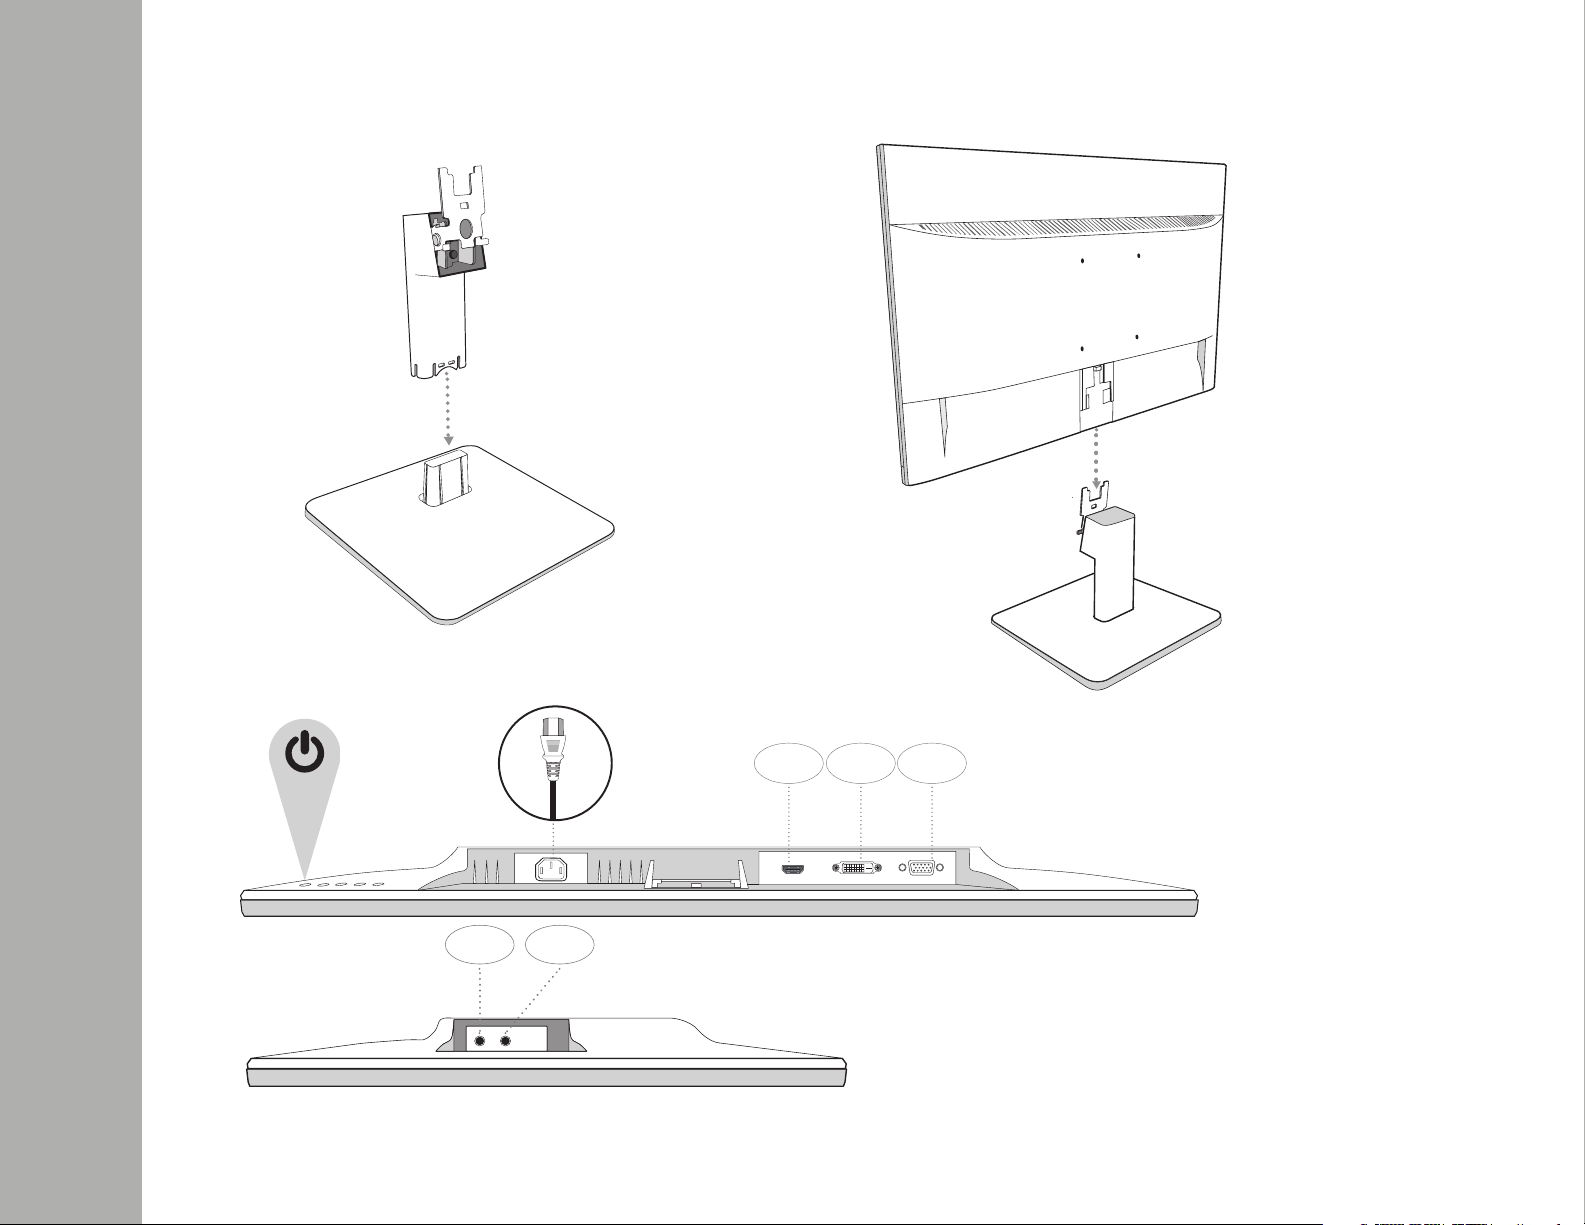
Installation
1. Insert post into base 2. Slide post into monitor slot
3. Connect Video Cable, Connect Power Cord
GETTING STARTED
4. Power on Computer and Monitor
AUDIOINAUDIO
OUT
HDMI DVI VGA
Page 5
2
Audio Out
Audio In
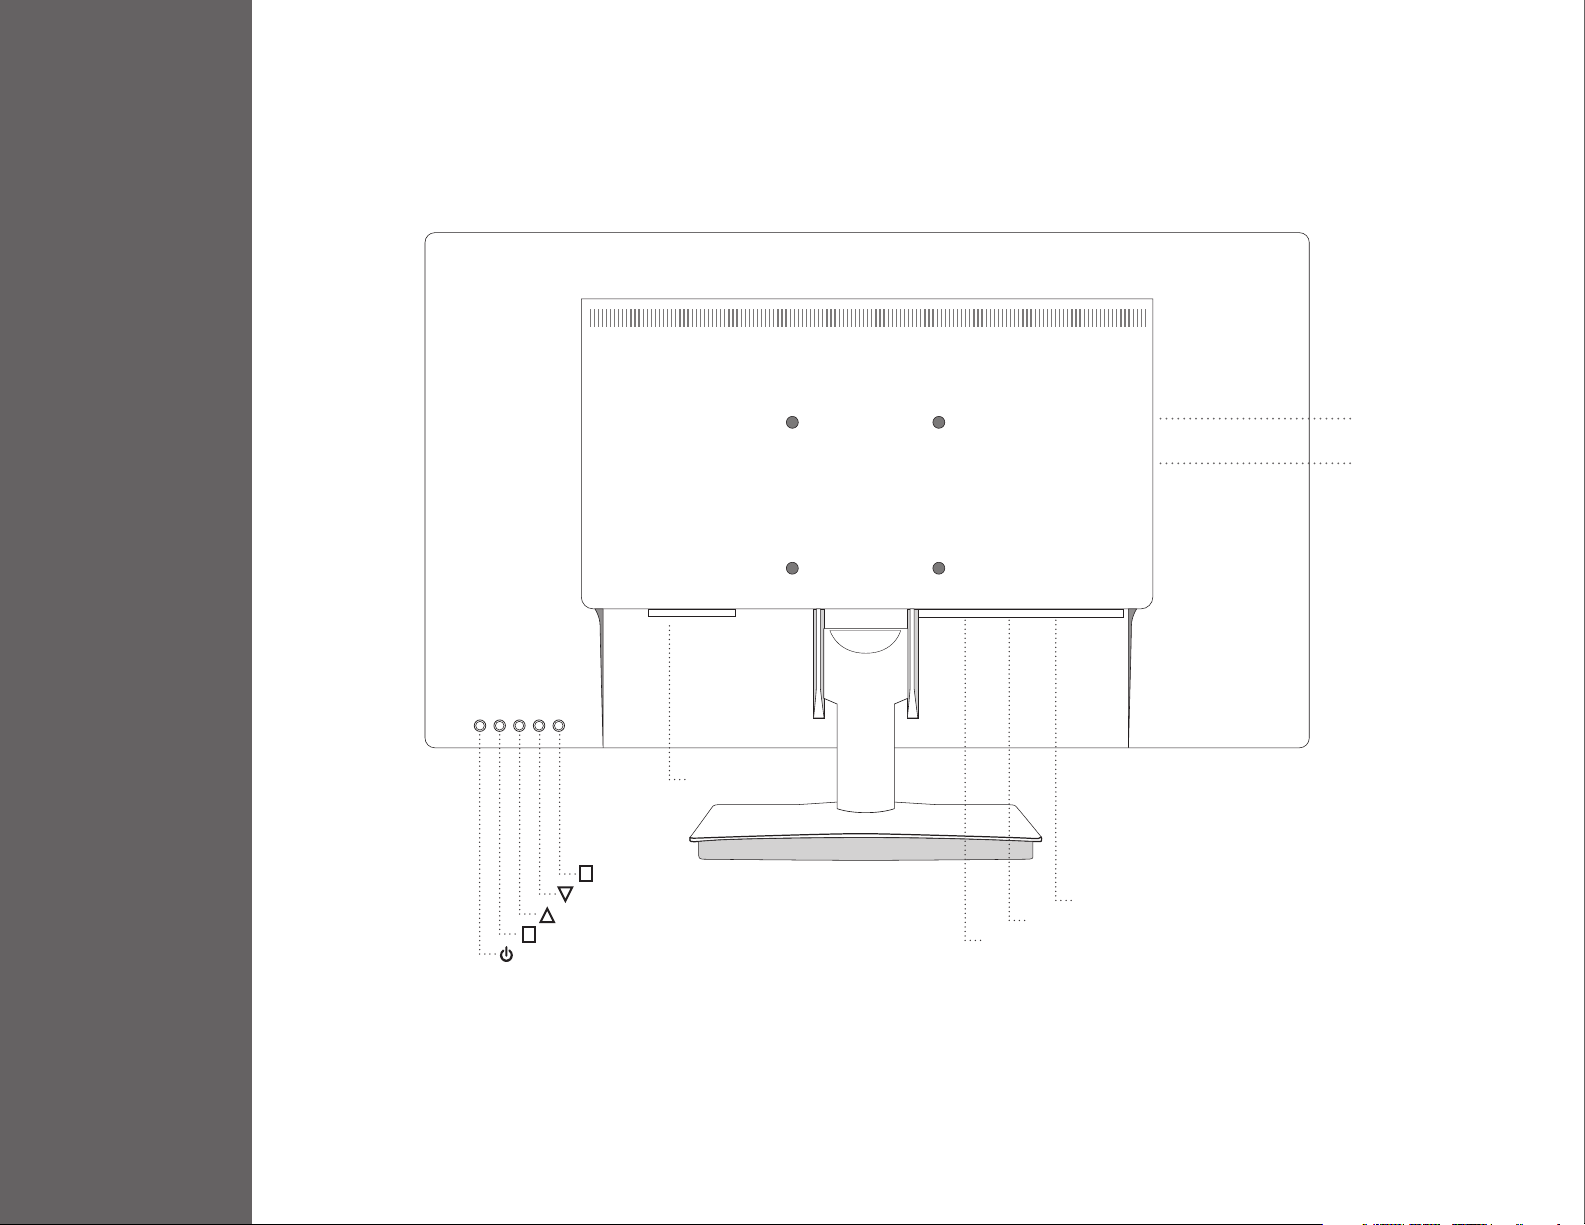
CONTROL PANEL/ BACK PANEL
Scroll Down/Decrease
Scroll Up/Increase
2
Input/Select
Power On/O
Power Cable
OSD Menu On/O1
VGA Port
DVI Port
HDMI Port
Page 6
3
Using On Screen Display (OSD) Functions
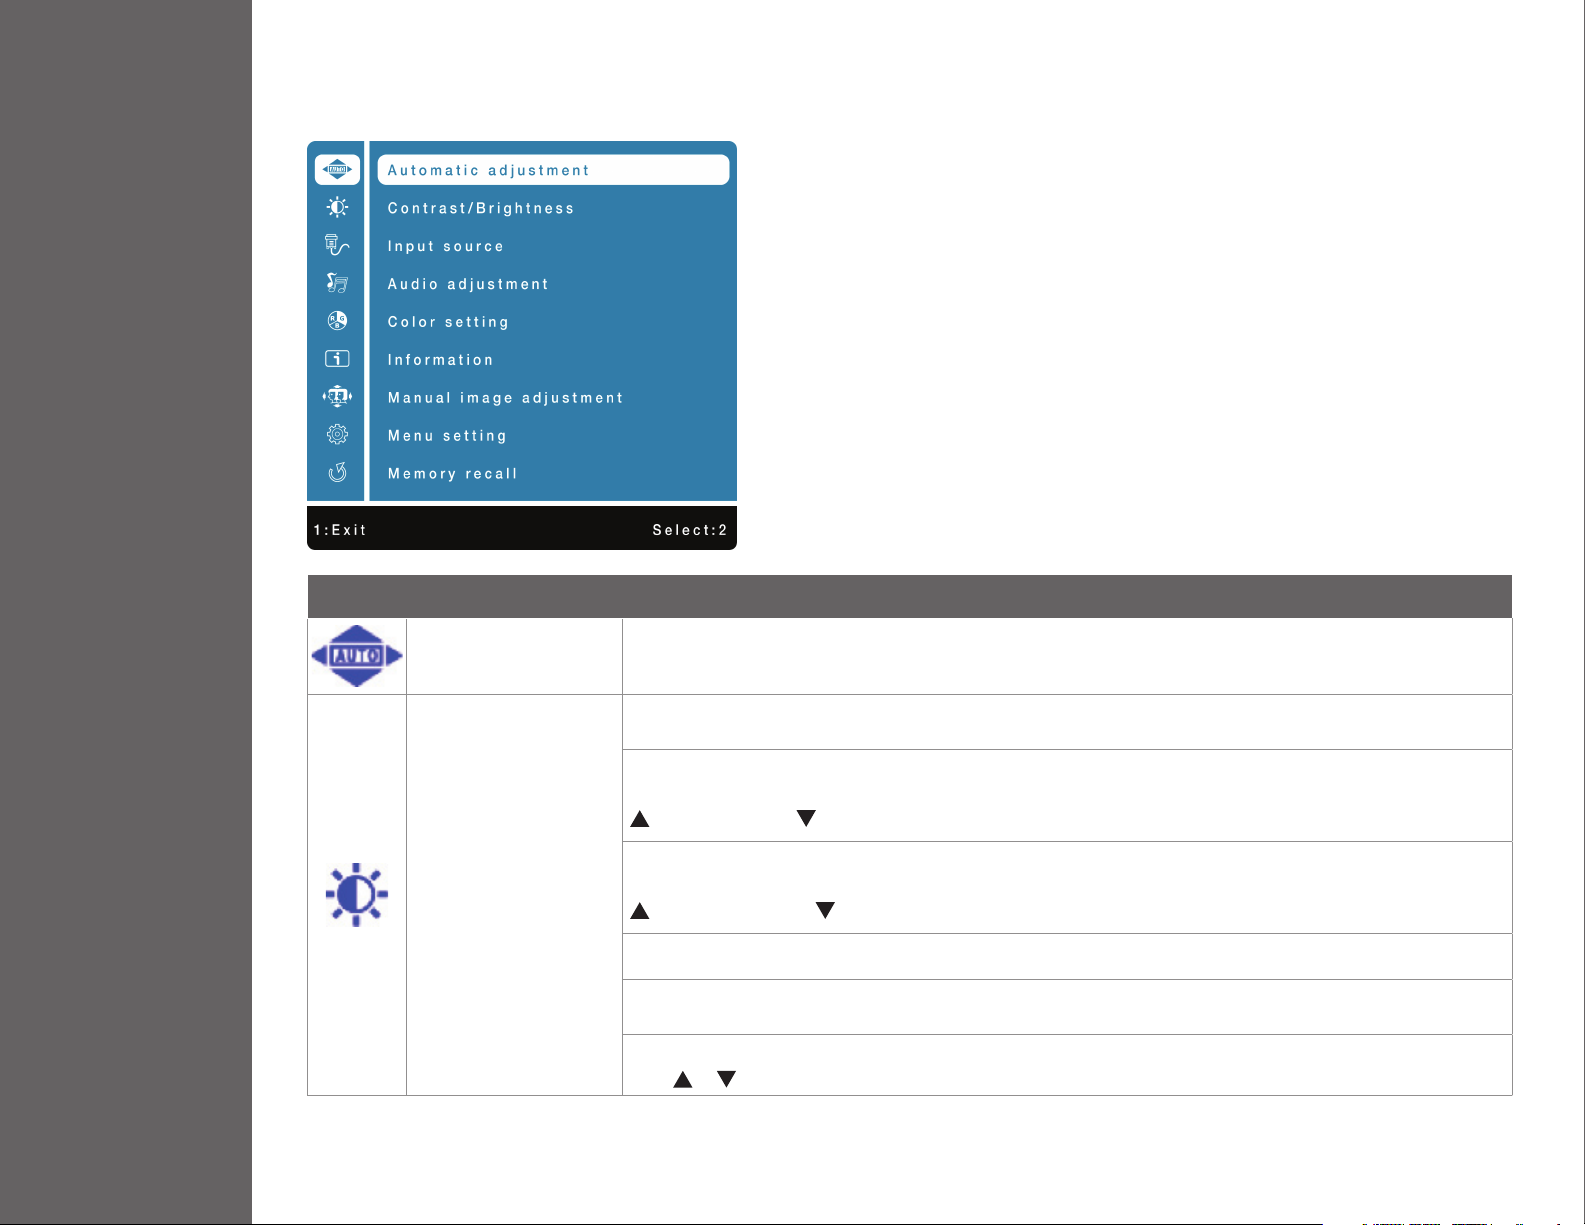
Main Menu
Button Function
ON SCREEN DISPLAY
Automatic Adjustment To auto adjust Horizontal Position, Vertical Position, Phase (Fine Tune) and Clock (H. Size) of the screen.
To manually adjust the Picture Format, Contrast, Brightness, DCR Mode, ECO Mode and Over Drive
of screen image.
Contrast: To adjust the foreground white level of screen image.
increase contrast, decrease contrast.
Brightness: To adjust the luminance of the video.
Contrast/Brightness
increase brightness, decrease brightness.
DCR: To control DCR function ON/OFF.
ECO: Allows the user to change the ECO mode. Contrast, Brightness and DCR adjustment will be disabled
when ECO is active.
Over Drive: Allows the user to change the Over Drive strength. Improve the quality of motion pictures.
Press
or key to adjust the Over Drive strength in ve levels.
Page 7
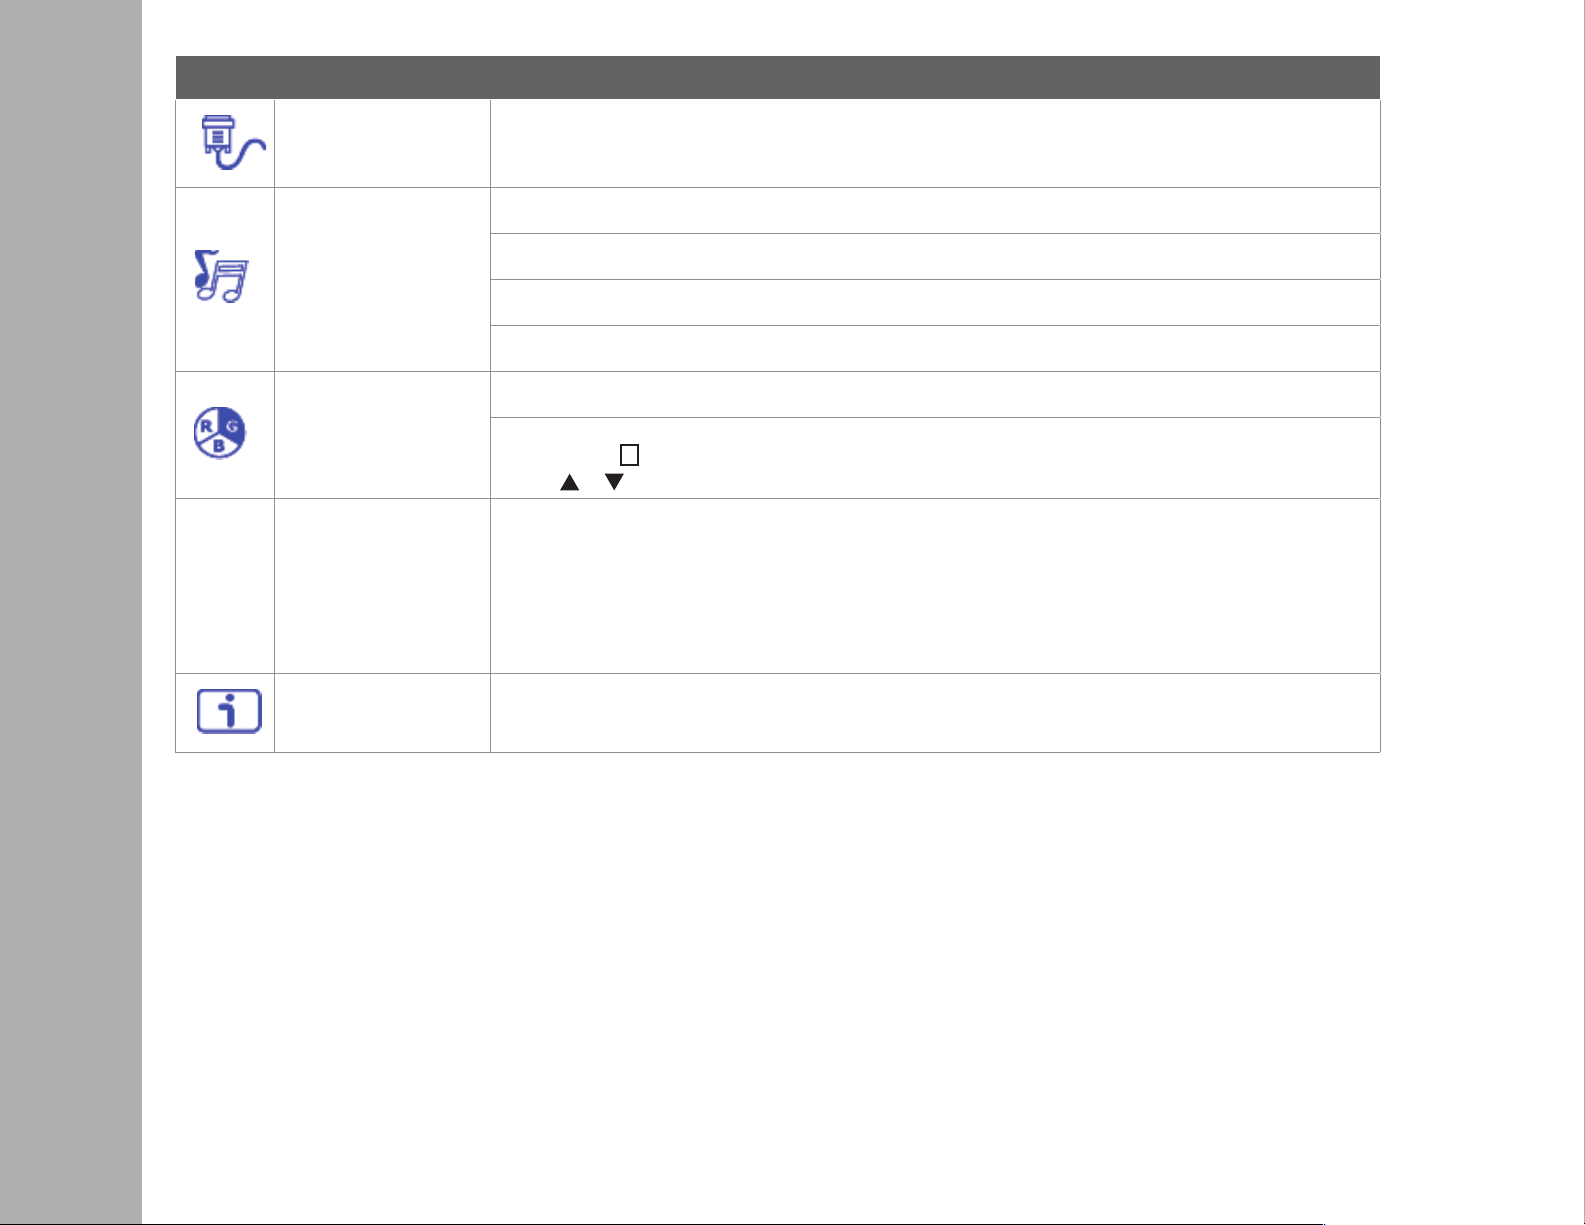
Button Function
Input Source When Input Select is pressed, change Input signal to VGA, DVI and HDMI.
Audio Adjust
To adjust the audio functions.
Volume: To adjust the volume of speaker output.
Mute: To turn the Mute ON/OFF.
Audio input: When in HDMI input, select where the audio source comes from Line-In or HDMI.
Color modes: cool, normal, warm and user color
Color Setting
Information
User color: Individual adjustments for red (R), green (G), blue (B).
1. Press button
2. Press or button to adjust selected color.
Picture mode: Provides an optimum display environment depending on the contents displayed. It contains
5 user-selectable presets.
• Standard is for general windows environment and monitor default setting.
• Game optimized for PC game environment
• Video optimized for movie and video environment
• Scenery optimized for displaying outdoor scenery images.
• Text optimized for text editing and viewing in a word processing environment
To display the information, regarding the current input signal coming from the graphic card in your computer.
Note: See your graphic card user guide for more information about changing the resolution and refresh rate.
2
to select the desired color.
ON SCREEN DISPLAY
Page 8
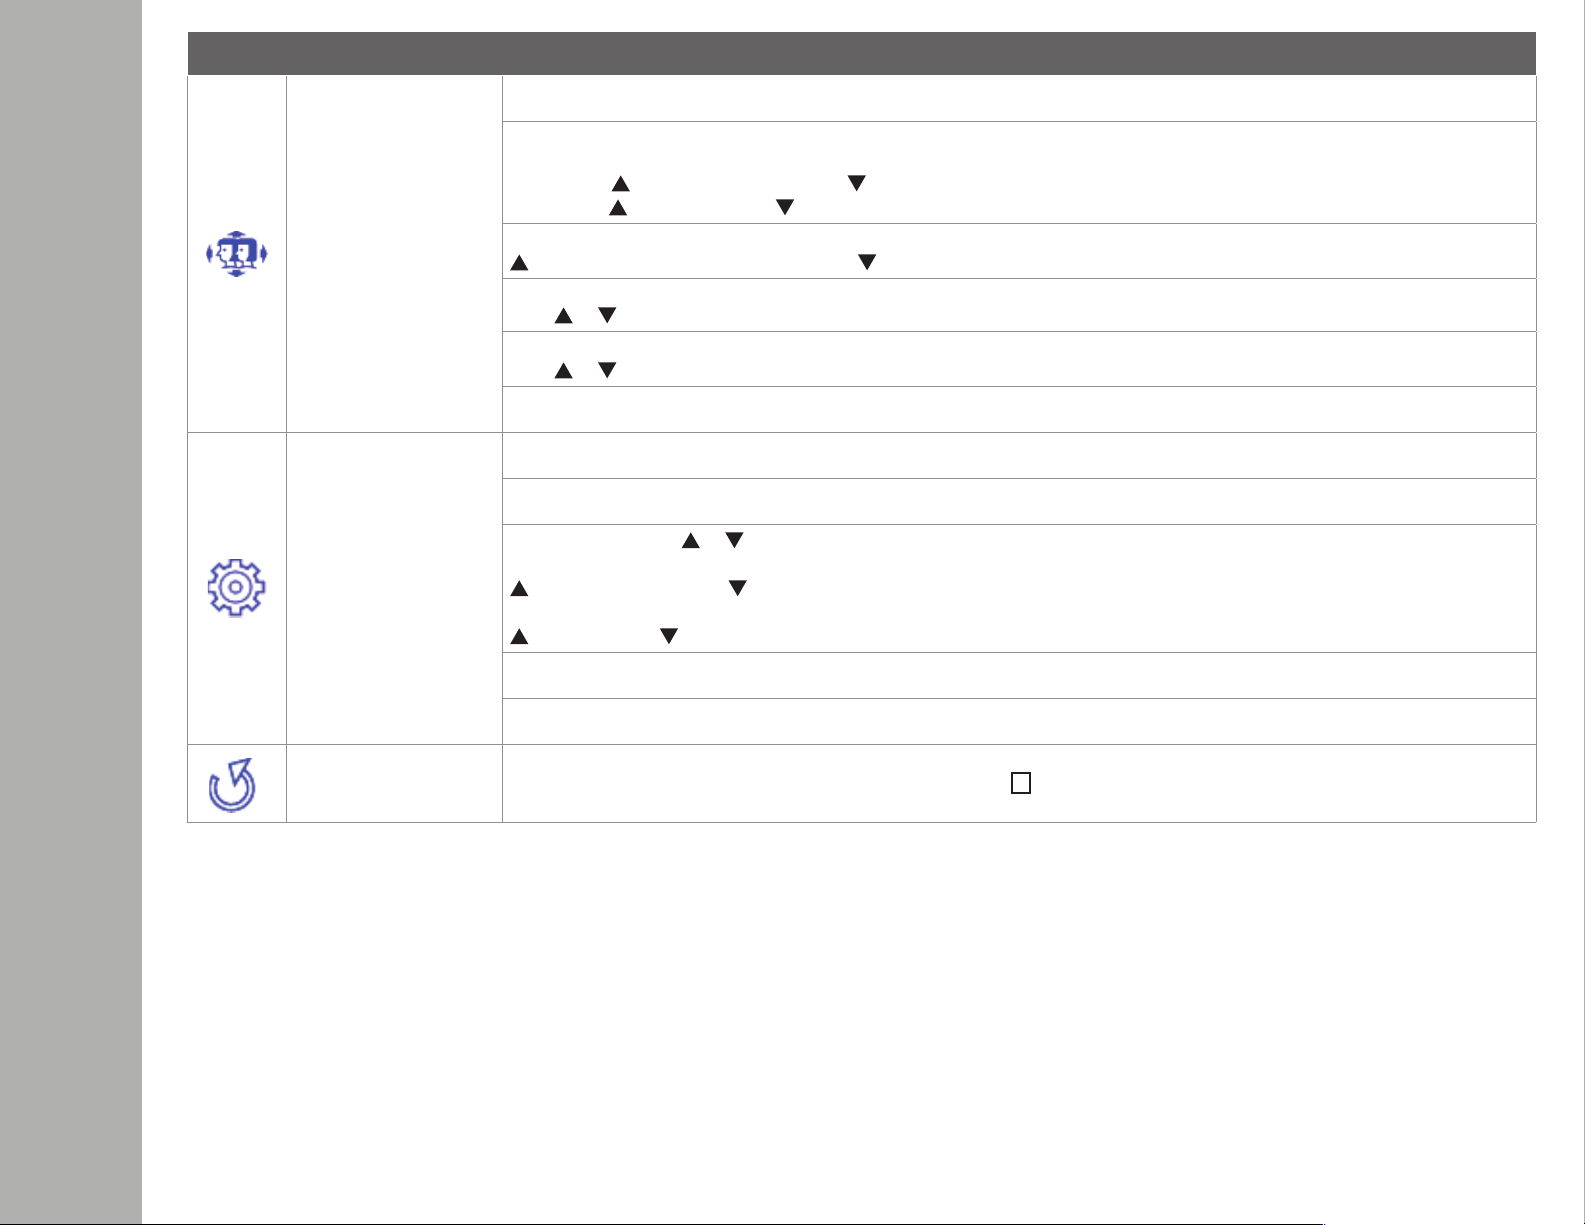
Button Function
To manually adjust the H. /V. Position, Horizontal size, Fine tune, Sharpness and Video Mode Adjustment.
H. / V. Position: To adjust the horizontal and vertical position of the video.
Manual Image
Adjustment
Menu Setting
H. Position:
V. Position: : move screen up, : move screen down.
Horizontal Size: To adjust the width of the screen image.
: increase the width of the screen image, : decrease the width of the screen image
Fine Tune: To adjust the delay time of data and clock.
Press or to adjust to your preference.
Sharpness: To select the picture sharpness of display.
Press or key to adjust the sharpness strength in three levels.
Video mode adjust: To select the video mode from Aspect Ratio 4:3 or Full Screen.
To set up Language select, OSD Position, OSD time out and OSD background.
Language Select: To allow users to choose from available languages
OSD Position: Press
OSD H. Position: To horizontally adjust the OSD Position
: move OSD to the right, : move OSD to the left
OSD V. Position: To vertically adjust the OSD position.
: move OSD up, : move OSD down.
OSD time out: To automatically turn o On Screen Display (OSD) after a preset period of time.
OSD background: Allows the user to turn the OSD background On or O
: move screen to the right, : move screen to the left.
or button to select between horizontal and vertical OSD Position Adjustment.
Memory recall
To recall factory settings for Video & Audio controls. Press button
2
to select the Memory Recall menu option.
ON SCREEN DISPLAY
Page 9
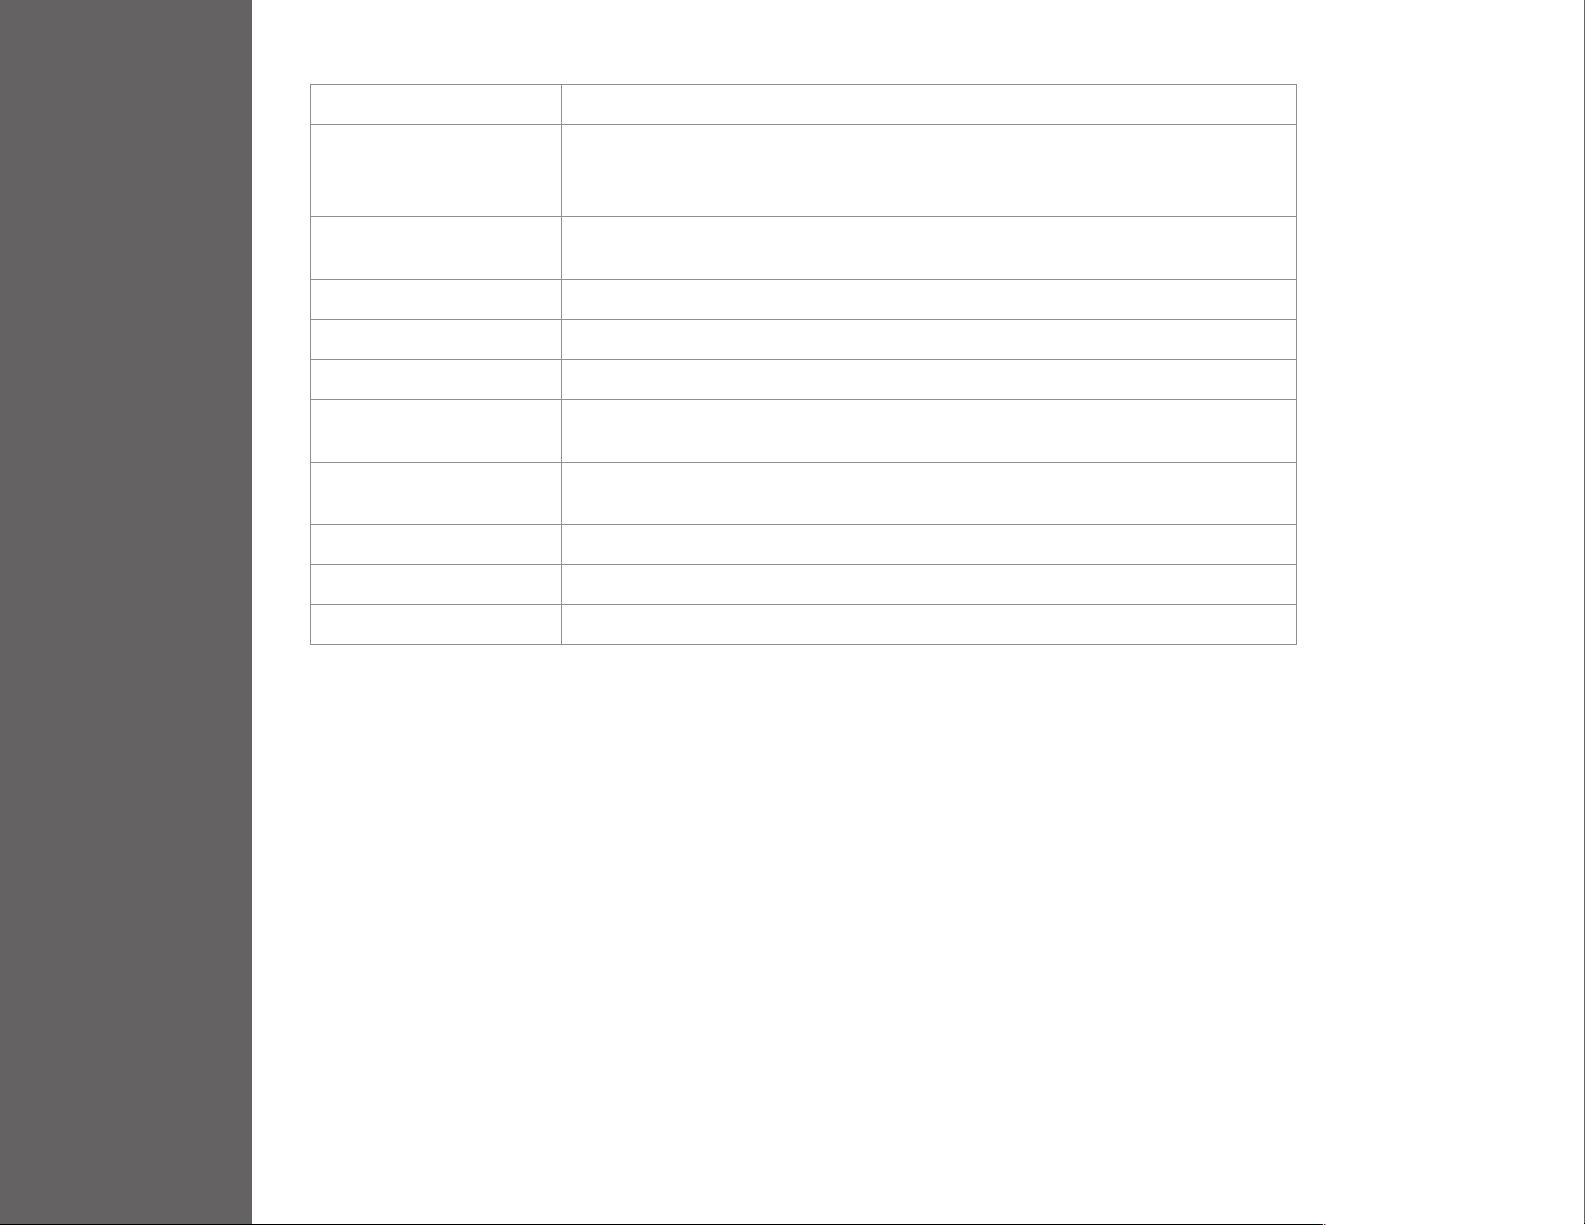
Technical Specication
LCD Panel 68.6 cm (27”) TFT
4
Power
Management
Displayable
Resolution
Pixel Dimension 0.3114 x 0.3114 mm
LCD Display Color 16.7M colors
Tilt -5°~20° (±2°)
Active Display
Area
Temperature
Compliance CE, EnergyStar, FCC
Power Input Voltage AC100-240 V
Speaker 2W x 2
Energy Star
VESA DPMS compatible
O Mode, < 0.5 W
Full HD 1920 x 1080 max.
Vertical Frequency 60Hz max.
597.89 mm x 336.31 mm
Operating: 5°C ~ + 40°C
Storage: -20°C ~ + 60°C
TECHNICAL SPECS
Page 10

Care
• Avoid exposing your monitor directly to sunlight or other heat source. Place your monitor away from the sun to reduce glare.
• Put your monitor in a well ventilated, clean, dry area.
5
• Do not place any heavy things on top of your monitor
• Keep your monitor away from magnets, motors, transformers, speakers, and TV sets.
Safety Tips
• If smoke, abnormal noise or odor came out from your monitor, caution you should remove the power cord immediately and
call your service center.
• Never remove the rear cover of your monitor cabinet. The display unit inside contains high-voltage parts and may cause
electric shock to human bodies.
• Never try to repair your monitor yourself. Always call your service center or a qualied technician to x it.
CARE & MAINTENANCE
Page 11

No Power
• Make sure AC power cord is securely connected to the power adapter and the power supply is rmly connected to the monitor.
• Plug another electrical device into the power outlet to verify that the outlet is supplying proper voltage.
6
• Make sure all signal cables are installed.
Power on but no screen image
• Make sure the video cable supplied with the monitor is tightly secured to the video output port on back of the computer. If
not, tightly secure it.
• Adjust brightness
Wrong or abnormal colors
• If any colors (red, green, blue) are missing, check the video cable to make sure it is securely connected. Loose or broken pins
in the cable connector could cause an improper connection
• Connect the monitor to another computer
TROUBLESHOOTING
Page 12
7
Safety Precautions
This monitor is manufactured and tested on a ground principle that a user’s safety comes rst. However, improper use or installation may result danger to the monitor as
well as to the user. Carefully go over the following WARNINGS before installation and keep this guide handy.
WARNINGS
• This monitor should be operated only at the correct power sources indicated on the label on the rear end of the monitor. If you’re unsure of the power supply in your
residence, consult your local dealer or power company.
• Do not try to repair the monitor yourself as it contains no user-serviceable parts. The monitor should only be repaired by a qualied technician.
• Do not remove the monitor cabinet. There is high-voltage parts inside that may cause electric shock to human bodies, even when the power cord is disconnected.
• Stop using the monitor if the cabinet is damaged. Have it checked by a service technician.
• Put your monitor only in a clean, dry environment. Unplug the monitor immediately if gets wet and consult your service technician.
• Always unplug the monitor before cleaning it. Clean the cabinet with a clean, dry cloth. Apply non-ammonia based cleaner onto the cloth, not directly onto the glass
screen.
• Keep the monitor away from magnetic objects, motors, TV sets, and transformer.
• Do not place heavy objects on the cable or power cord.
• Due to safety concerns, if the VESA mounting kit is purchased separately, please make sure the mounting kit is UL-Listed, and replaceable only by service personnel.
FCC RADIO FREQUENCY INTERFERENCE STATEMENT
WARNING: (FOR FCC CERTIFIED MODELS)
This monitor has been tested and found compliant with the limits for a Class B digital device, pursuant to part 15 of the FCC Rules. These limits are designed to provide
proper protection against harmful interference to a residential installation. This monitor generates, uses, and can radiate radio frequency energy. Harmful interference to
radio communication may be led as a result if it‘s not properly installed and used. However, there is no guarantee that interference will not occur in a particular installation. If
this monitor does cause serious interference to radio or television reception, resetting the monitor may determine it. Moreover, users are encouraged to correct interference
by doing one or more of the following:
• Reorient or relocate the receiving antenna.
• Move the monitor and the receiver further away from each other.
• Connect the monitor into an outlet on a circuit dierent from that to which the receiver is connected.
• Consult your local dealer or an qualied technician.
FCC Warning:
To assure a continued FCC compliance, a user must use a grounded power supply cord and the provided shielded video interface cable with bonded ferrite
cores. Also, any unauthorized changes or modications to this monitor would void the user‘s authority to operate this device.
Each country in the European Union should have its collection centers for electrical and electronic equipment recycling. For information about your recycling
drop o area, please contact your related electrical and electronic equipment waste management authority or the retailer where you bought the product.
Note: If necessary, shielded interface cables and AC power cord must be used to meet the emission level limits.
According to WEEE regulation, this monitor can’t be handled as normal trash in Europe when it is out of usage. Please refer to the recycle information from our
website to handle it.
CAN ICES-3(B)/NMB-3(B)
This device complies with Part 15 of the FCC Rules.
Operation is subject to the following two conditions:
(1) this device may not cause harmful interference, and
(2) this device must accept any interference received, including interference that may cause undesired operation.
SAFETY & FCC WARNING
ID 1419050693
V2-20180116
Page 13
Monitor LED Widescreen Full HD da 27”
L27ADS
MANUALE UTENTE
Page 14

1 Introduzione
2 Pannello di controllo/Pannello posteriore
3 Visualizzazione in sovrimpressione (OSD)
4 Speciche tecniche
5 Cura e manutenzione
6 Risoluzione dei problemi
7 Informazioni di sicurezza e avvertenza FCC
SOMMARIO
Page 15

Contenuto della confezione
• Cavo di alimentazione CA
• Cavo VGA
1
• Cavo DVI
• Cavo audio
• Guida rapida
INTRODUZIONE
Cavo di alimentazione CA Cavo VGA Cavo DVI Cavo audio
Page 16
Installazione
1. Inserire il supporto nella base 2. Far scorrere il supporto nello slot del monitor
INTRODUZIONE
3. Collegare il cavo video e il cavo di alimentazione
AUDIOINAUDIO
4. Accendere il computer e il monitor
OUT
HDMI DVI VGA
Page 17

2
Audio Out
Audio In
2
Acceso/spento
PANNELLO DI CONTROLLO/PANNELLO POSTERIORE
Attivazione/disattivazione menu OSD1
Scorri in basso/Diminuisci
Scorri in alto/Aumenta
Ingresso/Seleziona
Cavo di alimentazione
Porta VGA
Porta DVI
Porta HDMI
Page 18

3
Uso delle funzioni di visualizzazione in sovrimpressione (OSD)
Menu principale
Funzione pulsante
VISUALIZZAZIONE IN SOVRIMPRESSIONE (OSD)
Regolazione automatica
Contrasto/luminosità
Per regolare automaticamente Posizione orizzontale, Posizione verticale, Fase (Sintonizzazione)
eOrologio (Dimensione orizzontale) dello schermo.
Per la regolazione manuale di Formato immagine, Contrasto, Luminosità, Modalità DCR, Modalità
ECO e Over Drive dell’immagine schermo.
Contrasto: per regolare il livello del bianco in primo piano dell’immagine sullo schermo.
aumenta il contrasto, riduce il contrasto.
Luminosità: per regolare la luminosità del video.
aumenta la luminosità, riduce la luminosità.
DCR: per controllare l’attivazione/disattivazione della funzione DCR.
ECO: consente all’utente di modicare la modalità ECO. La regolazione di contrasto, luminosità e DCR viene
disabilitata quando la modalità ECO è attiva.
Over Drive: consente all’utente di cambiare la potenza dell’Over Drive. Migliora la qualità dei video.
Premere il tasto
o per regolare la potenza dell’Over Drive in cinque livelli.
Page 19

Funzione pulsante
Origine di ingresso Una volta premuto Seleziona ingresso, cambiare il segnale ingresso in CGA, DVI E HDMI.
Regolazione audio
Per la regolazione delle funzioni audio.
Volume: per la regolazione del volume dell’altoparlante in uscita.
Silenzioso: per attivare/disattivare l’opzione Silenzioso.
Ingresso audio: quando è stato scelto l’ingresso HDMI, selezionare da dove proviene l’origine audio:
Line-In o HDMI.
Modalità colore: freddo, normale, caldo e colore personalizzato
Impostazione colore
Informazioni
Colore personalizzato: regolazioni individuali per rosso (R), verde (V), blu (B).
1 Premere il pulsante
2 Premere il pulsante o per regolare il colore selezionato.
Modalità immagine: fornisce un ambiente di visualizzazione ideale in base al contenuto rappresentato.
Contiene 5 impostazioni predenite selezionabili dall’utente.
• Standard deve essere utilizzato l’ambiente Windows generico e per le impostazione predenite del monitor.
• Gioco ottimizzato per l’ambiente di gioco del PC
• Video ottimizzato per l’ambiente di lm o video
• Paesaggio ottimizzato per visualizzare immagini di paesaggi naturali.
• Testo ottimizzato per la modica e la visualizzazione del testo in un ambiente di elaborazione testi
Per visualizzare le informazioni relative all’attuale segnale di ingresso proveniente dalla scheda graca
delcomputer.
Nota: per ulteriori informazioni su come modicare la risoluzione e sulla frequenza di aggiornamento,
consultare il manuale della scheda graca in uso.
2
per selezionare il colore desiderato.
VISUALIZZAZIONE IN SOVRIMPRESSIONE (OSD)
Page 20

Funzione pulsante
Per regolare manualmente Posizione orizzontale/Posizione verticale, Dimensione orizzontale, Sintonizzazione,
Nitidezza e Regolazione modalità video.
Posizione orizzontale/Posizione verticale: per regolare la posizione orizzontale e verticale del video.
Regolazione manuale
dell’immagine
Impostazioni menu
Posizione orizzontale:
Posizione verticale: : sposta lo schermo verso l’alto, : sposta lo schermo verso il basso.
Dimensione orizzontale: per regolare la larghezza dell’immagine dello schermo.
: aumenta la larghezza dell’immagine dello schermo, : diminuisce la larghezza dell’immagine dello schermo
Sintonizzazione: per regolare il tempo di ritardo relativo a dati e orologio.
Premere o per regolarlo secondo le proprie preferenze.
Nitidezza: per selezionare la nitidezza dell’immagine dello schermo.
Premere il tasto o per regolare il grado della nitidezza in tre livelli.
Regolazione modalità video: per selezionare la modalità video a partire dalle proporzioni 4:3 o a schermo intero.
Per impostare Selezione lingua, Posizione OSD, Timeout OSD e Sfondo OSD.
Selezione lingua: per consentire agli utenti di scegliere fra le lingue disponibili
Posizione OSD: premere il tasto
Posizione orizzontale OSD: per regolare in senso orizzontale la Posizione OSD
: sposta l’OSD verso destra, : sposta l’OSD verso sinistra
Posizione verticale OSD: per regolare in senso verticale la posizione OSD.
: sposta l’OSD verso l’alto, : sposta l’OSD verso il basso.
Timeout OSD: per lo spegnimento automatico della visualizzazione in sovrimpressione (OSD) dopo un periodo di tempo
predenito.
Sfondo OSD: consente all’utente di disattivare o attivare lo sfondo OSD
: sposta lo schermo verso destra, : sposta lo schermo verso sinistra.
o per selezionare fra la regolazione della Posizione OSD orizzontale o verticale.
2
Richiamo memoria
Per richiamare le impostazioni predenite relative ai controlli Video e Audio. Premere il pulsante
dimenu Richiamo memoria.
per selezionare l’opzione
VISUALIZZAZIONE IN SOVRIMPRESSIONE (OSD)
Page 21

Specica tecnica
Pannello LCD TFT da 68,6 cm (27’’)
4
Gestione
alimentazione
Risoluzione
visualizzabile
Dimensione Pixel 0,3114 x 0,3114 mm
Colore display LCD 16,7 milioni di colori
Inclinazione -5°~20° (±2°)
Dimensioni display
attivo
Temperatura
Conformità CE, EnergyStar, FCC
Alimentazione Tensione d’ingresso 100-240 V CA
Altoparlante 2W x 2
Energy Star
VESA DPMS compatibile
Modalità OFF, < 0,5 W
Full HD 1920 x 1080 max.
Frequenza verticale 60Hz max.
597,89 mm x 336,31 mm
Di funzionamento: 5°C ~ + 40°C
Di conservazione: -20°C ~ + 60°C
SPECIFICHE TECNICHE
Page 22

5
Cura
• Evitare di esporre il monitor direttamente alla luce del sole o a qualsiasi altra fonte di calore. Posizionare il monitor lontano
dalsole per ridurre il bagliore.
• Collocare il monitor in un luogo ben ventilato, pulito e asciutto.
• Non posizionare nessun oggetto pesante sopra il monitor.
• Tenere il monitor lontano da magneti, motori, trasformatori, altoparlanti e televisori.
Consigli di sicurezza
• Nel caso in cui dal monitor fuoriuscissero fumo, rumori od odori anomali, rimuovere immediatamente il cavo di alimentazione
con la massima attenzione e contattare il servizio clienti.
• Non rimuovere mai la copertura posteriore dell’armadio del monitor. L’unità di visualizzazione interna contiene componenti
ad alta tensione e potrebbe causare scosse elettriche ai corpi umani.
• Non tentare di riparare autonomamente il monitor. Rivolgersi sempre al servizio clienti o a un tecnico qualicato per la
riparazione.
CURA E MANUTENZIONE
Page 23

6
Nessuna fonte di alimentazione
• Assicurarsi che il cavo di alimentazione CA sia collegato in modo sicuro all’adattatore di alimentazione e che l’alimentazione
sia collegata saldamente al monitor.
• Innestare un altro dispositivo alla presa elettrica per vericare che la presa fornisca la corretta tensione.
• Assicurarsi che tutti i cavi dei segnali siano installati.
Alimentatore collegato ma nessuna immagine sullo schermo
• Assicurarsi che il cavo video in dotazione al monitor sia collegato correttamente alla porta video in uscita sul retro del
computer. In caso contrario, collegarlo saldamente.
• Regolazione luminosità
Colori erronei o anomali
• Se un colore (rosso, verde, blu) non risulta presente, controllare il cavo video per assicurarsi che sia collegato correttamente.
Pin allentati o rotti nel connettore del cavo potrebbero causare una connessione errata
• Collegare il monitor a un altro computer
RISOLUZIONE DEI PROBLEMI
Page 24

7
Precauzioni di sicurezza
Questo monitor è stato prodotto e testato in modo da garantire la massima sicurezza dell’utente. Tuttavia, l’uso o l’installazione errato/a potrebbe causare seri danni sia al
monitor sia all’utente. Leggere attentamente le AVVERTENZE prima di procedere all’installazione e tenere questo manuale a portata di mano.
AVVERTENZE
• Questo monitor deve essere azionato soltanto se collegato alle fonti di alimentazione corrette indicate nell’etichetta sul lato posteriore del monitor. Se non si dispone di
informazioni certe sulle fonti di alimentazione nella propria sede, consultare il proprio fornitore o l’azienda elettrica prima di procedere.
• Non tentare di riparare autonomamente il monitor: non contiene parti riparabili dall’utente. Il monitor deve essere riparato esclusivamente da un tecnico qualicato.
• Non rimuovere l’armadio del monitor. All’interno sono presenti componenti ad alta tensione che potrebbero causare scosse elettriche a corpi umani, anche quando il cavo di
alimentazione non è collegato.
• Se l’armadio è danneggiato, interrompere l’uso del monitor. Fare controllare il monitor da un tecnico dell’assistenza.
• Collocare il monitor esclusivamente in un ambiente pulito e asciutto. Se il monitor si bagna, scollegarlo immediatamente dalla presa di corrente e consultare il tecnico dell’assistenza.
• Scollegare sempre il monitor prima di pulirlo. Pulire l’armadio con un panno pulito e asciutto. Applicare un detergente privo di ammoniaca al panno e non direttamente sullo schermo.
• Tenere il monitor lontano da oggetti magnetici, motori, televisori e trasformatori.
• Non posizionare oggetti pesanti sul cavo o sulla fonte di alimentazione.
• Per motivi di sicurezza, se il kit di montaggio VESA è stato acquistato separatamente, assicurarsi che sia omologato UL e sostituibile unicamente dal personale dell’assistenza.
DICHIARAZIONE INTERFERENZE DI RADIOFREQUENZA FCC
AVVERTENZE: (PER MODELLI CERTIFICATI FCC)
Questo monitor è stato collaudato e risulta conforme alle limitazioni per un dispositivo digitale Classe B, Parte 15 delle Norme FCC. Queste limitazioni sono previste per
assicurare una corretta protezione contro le interferenze dannose in un ambiente residenziale. Questo monitor genera, usa e può irradiare energia di radiofrequenza. Se non
utilizzato e installato correttamente, potrebbe causare interferenze dannose alla comunicazione radio. Tuttavia, non si garantisce che non si vericheranno interferenze in
un’installazione particolare. Se il monitor dovesse causare gravi interferenze alla ricezione radiotelevisiva, reimpostare il monitor per tentare di correggere il problema. Inoltre,
gli utenti sono invitati a correggere le interferenze eettuando una o più delle seguenti azioni:
• riorientare o riposizionare l’antenna ricevente;
• aumentare la distanza fra il monitor e il ricevitore;
• collegare il monitor a una presa su un circuito diverso rispetto a quello a cui è collegato il ricevitore;
• consultare il proprio fornitore locale o un tecnico qualicato.
Avvertenza FCC:
per assicurare la continuità della conformità FCC, l’utente è tenuto a utilizzare un cavo di alimentazione dotato di messa a terra e il cavo schermato di interfaccia
video in dotazione con nuclei di ferrite legati. Inoltre, qualsiasi cambiamento o modica non autorizzati al monitor rendono nulla l’autorizzazione dell’utente a
utilizzare questo dispositivo.
Ogni paese dell’Unione Europa deve disporre di centri di raccolta per il riciclaggio di apparecchiature elettriche ed elettroniche. Per informazioni sulle aree di
conferimento, contattare l’ente che gestisce la raccolta di apparecchiature elettriche ed elettroniche o il negozio dove è stato acquistato il prodotto.
Nota: se necessario, i cavi schermati di interfaccia e i cavi di alimentazione CA devono essere utilizzati per soddisfare i limiti del livello di emissione.
In base alla regolamentazione WEEE, quando è fuori uso, questo monitor non può essere trattato come un riuto normale in Europa. Si prega di far riferimento
alle informazioni sul riciclaggio contenute sul nostro sito web.
CAN ICES-3(B)/NMB-3(B)
Questo dispositivo è conforme alla Parte 15 delle Norme FCC.
L'utilizzo è soggetto alle seguenti due condizioni:
(1) questo dispositivo non deve causare interferenze dannose e
(2) questo dispositivo deve accettare qualsiasi tipo di interferenza ricevuta, incluse le interferenze che potrebbero causare un funzionamento indesiderato.
SICUREZZA E AVVERTENZA FCC
V1-20170630
Page 25

Moniteur LED wide Full HD 27pouces
(68,6cm)
L27ADS
MANUEL DE L'UTILISATEUR
Page 26

1 Démarrage rapide
2 Panneau de conguration/Panneau arrière
3 Achage à l’écran
4 Spécications techniques
5 Entretien et maintenance
6 Résolution des problèmes
7 Informations de sécurité et avertissement de la FCC
TABLE DES MATIÈRES
Page 27

Contenu du paquet
• Cordon d'alimentation
• Câble VGA
1
• Câble DVI
• Câble audio
• Guide de démarrage rapide
Cordon d'alimentation Câble VGA Câble DVI Câble audio
DÉMARRAGE RAPIDE
Page 28

Installation
1. Insérer le montant dans la base 2. Insérer le montant dans la fente du moniteur
3. Connecter le câble vidéo, connecter le cordon d’alimentation
DÉMARRAGE RAPIDE
ENTRÉE
AUDIO
4. Allumer l’ordinateur et le moniteur
SORTIE
AUDIO
HDMI DVI VGA
Page 29

2
Sortie audio
Entrée audio
PANNEAU DE CONFIGURATION/PANNEAU ARRIÈRE
Activer/Désactiver le menu à l’écran1
Délement vers le bas/Descendre
Délement vers le haut/Monter
2
Entrée/Sélectionner
Marche/Arrêt
Cordon d’alimentation
Port VGA
Port DVI
Port HDMI
Page 30

3
Utilisation des fonctions d’achage à l’écran
Menu principal
Fonction du bouton
Ajustement
automatique
Contraste/Luminosité
AFFICHAGE À L’ÉCRAN
Pour ajuster automatiquement la position horizontale, la position verticale, la phase (réglage n)
et l’horloge (taille horizontale) de l’écran.
Pour ajuster automatiquement le format de l’image, le contraste, la luminosité, le mode DCR, le
mode ECO et l’Over Drive de l’image à l’écran.
Contraste: pour ajuster le niveau de blanc au premier plan de l’image.
augmenter le contraste, diminuer le contraste.
Luminosité: pour ajuster la luminosité de la vidéo.
augmenter la luminosité, diminuer la luminosité.
DCR: pour contrôler l’activation/la désactivation de la fonction DCR.
ECO: permet à l’utilisateur de modier le mode ECO. L’ajustement du contraste, de la luminosité et de la
fonction DCR est désactivé si le mode ECO est activé.
Over Drive: permet à l’utilisateur de modier la force de l’Over Drive. Améliore la qualité des vidéos.
Appuyez sur la touche
ou pour ajuster la force de l’Over Drive selon cinq niveaux.
Page 31

Fonction du bouton
Source d'entrée
Réglage audio
Réglage des couleurs
Information
Lorsque vous appuyez sur Input Select, vous changez la source d’entrée pour passer au signal VGA,
DVI et HDMI.
Pour ajuster les fonctions audio.
Volume: pour ajuster le volume de la sortie audio.
Mute: pour activer/désactiver le mode silencieux.
Entrée audio: lorsque l’entrée HDMI est sélectionnée, choisissez Line-In ou HDMI pour la sortie audio.
Modes couleurs: froid, normal, chaud et déni par l’utilisateur.
Réglage manuel des couleurs: ajustements individuels pour le rouge (R), le vert (G) et le bleu (B).
1. Appuyer sur le bouton
2. Appuyer sur les boutons ou pour ajuster la couleur sélectionnée.
Réglage du mode image: ore un achage optimal pour l’environnement en fonction des contenus
achés. Vous pouvez choisir l’un des 5préréglages.
• Le mode Standard utilise les paramètres d’environnement et de moniteur par défaut.
• Le mode Game est optimisé pour le mode jeu
• Le mode Video est optimisé pour les lms
• Le mode Scenery est optimisé pour l’achage de paysages extérieurs.
• Le mode Tex t est optimisé pour la saisie de texte et l’achage d’un environnement de traitement de texte
Pour acher les informations concernant le signal d’entrée issu de la carte graphique de l’ordinateur.
Remarque: référez-vous au guide de l'utilisateur de votre carte graphique pour plus amples informations
relatives à la résolution et à la fréquence de rafraichissement.
2
pour sélectionner la couleur désirée.
AFFICHAGE À L’ÉCRAN
Page 32

Fonction du bouton
Pour ajuster la position horizontale/verticale, la taille horizontale, le réglage n, le contraste et le mode vidéo.
Position H. / V.: pour ajuster la position horizontale et verticale de la vidéo.
Ajustement manuel
del’image
Réglage menu
Position H. :
Position V. : : déplacer l’écran vers le haut, : déplacer l’écran vers le bas.
Taille horizontale : pour ajuster la largeur de l’image.
: augmente la taille de l’écran, : diminue la largeur de l’écran.
Aner réglage: pour ajuster le temps de réponsede l’horloge.
Appuyer sur ou pour ajuster à votre convenance.
Netteté: pour sélectionner le contraste des images achées.
Appuyer sur ou pour ajuster le contraste selon trois niveaux.
Réglage du mode vidéo: pour sélectionner le mode de vidéo entre un rapport larg./haut.4:3 et plein écran.
Pour congurer la sélection de la langue, la position d’achage, la durée d’achage et l’arrière-plan d’achage.
Sélection de la langue: pour permettre à l’utilisateur de sélectionner parmi les langues disponibles.
OSD Position: Appuyer sur les boutons
OSD Position H.: pour ajuster la position horizontale d’achage
: déplacer l’achage vers la droite, : déplacer l’achage vers la gauche
OSD Position V.: pour ajuster la position verticale d’achage.
: déplacer l’achage vers le haut, : déplacer l’achage vers le bas.
OSD time out: pour éteindre automatiquement l’achage après une période de temps dénie.
OSD background: permet à l’utilisateur d’activer ou de désactiver l’arrière-plan d’achage.
: déplacer l’écran vers la droite, : déplacer l’écran vers la gauche.
ou pour sélectionner l’ajustement de la position d’achage horizontale et verticale.
2
Réglage d'usine
Pour utiliser les paramètres d’usine pour les réglages vidéo et audio. Appuyer sur
dans le menu.
pour sélectionner l’option Memory Recall
AFFICHAGE À L’ÉCRAN
Page 33

Spécications techniques
Dalle LCD 68,6cm (27”) TFT
4
Gestion de
l’alimentation
Résolution achable
Dimension des pixels 0,3114x0,3114mm
Couleur d’achage LCD 16,7millions de couleurs
Inclinaison -5°~20° (±2°)
Zone d’achage active 597,89mmx336,31mm
Température
Certications CE, EnergyStar, FCC
Alimentation Tension d’entrée CA 100-240V
Haut-parleur 2Wx2
Energy Star
Compatible VESA DPMS
Veille, < 0,5W
Full HD 1920x1080 max.
Fréquence verticale 60Hz max.
Fonctionnement: 5°C ~+40°C
Stockage: -20°C ~+60°C
SPÉCIFICATIONS TECHNIQUES
Page 34

5
Entretien
• Ne pas exposer le moniteur à la lumière directe du soleil ou à toute autre source de chaleur. Ne pas placer le moniteur en
plein soleil pour éviter l’éblouissement.
• Placer le moniteur dans un endroit bien ventilé, propre et sec.
• Ne pas placer d’objets lourds sur le moniteur.
• Ne pas approcher d’aimants, de moteurs, de transformateurs, de haut-parleurs et de téléviseurs près du moniteur.
Conseils de sécurité
• Si de la fumée, une odeur ou un bruit anormaux émanent du moniteur, vous devez débrancher le cordon d’alimentation et
appeler le centre de services.
• Ne jamais retirer la protection arrière de votre moniteur. L’unité d’achage intérieure contient des parties sous haute tension
et peut entraîner une électrocution.
• Ne jamais essayer de réparer le moniteur par ses propres moyens. Toujours appeler votre centre de services ou un technicien
qualié pour le réparer.
ENTRETIEN ET MAINTENANCE
Page 35

6
Aucune alimentation
• S’assurer que le cordon d’alimentation est raccordé de façon sûre à l’adaptateur secteur et que la source d’alimentation est
bien raccordée au moniteur.
• Brancher un autre appareil électrique sur la prise électrique pour vérier le fonctionnement de cette dernière.
• S’assurer que tous les câbles de transmission de signal sont installés.
L’alimentation fonctionne mais aucune image ne s’ache
• S’assurer que le câble vidéo fourni avec le moniteur est correctement raccordé au port de sortie vidéo à l’arrière de votre
ordinateur. Si tel n’est pas le cas, le raccorder fermement.
• Ajuster la luminosité.
Couleurs incorrectes ou anormales
• Si une couleur (rouge, vert, bleu) manque, vérier que le câble vidéo est bien raccordé. Des broches lâches ou cassées au
niveau du connecteur du câble peuvent altérer la connexion.
• Connecter le moniteur à un autre ordinateur
RÉSOLUTION DES PROBLÈMES
Page 36

7
Mesures de sécurité
Ce moniteur est fabriqué et testé avec la sécurité de l’utilisateur pour principe fondamental. Cependant, une utilisation ou une installation inappropriée peuvent mettre en
péril le moniteur et l’utilisateur. Il convient de passer en revue les diérents AVERTISSEMENTS avant l’installation et de conserver ce manuel à portée de main.
AVERTISSEMENTS
• Ce moniteur doit uniquement être utilisé avec la source d’alimentation adéquate indiquée sur l’étiquette à l’arrière du moniteur. Si vous ne savez pas de quelle source
d’alimentation dispose votre logement, consultez votre revendeur local ou votre fournisseur d’énergie.
• N’essayez pas de réparer le moniteur par vous-même car il contient des parties ne pouvant être traitées par l’utilisateur. Le moniteur doit uniquement être réparé un technicien qualié.
• N’essayez pas de retirer le couvercle du moniteur. Des pièces sont soumises à haute tension, ce qui peut entraîner une électrocution, même lorsque le cordon d’alimentation est
débranché.
• Arrêtez d’utiliser le moniteur si le couvercle est abîmé. Faites-le examiner par un technicien.
• Placez le moniteur dans un environnement propre et sec. Débranchez le moniteur s’il est mouillé et consultez un technicien.
• Débranchez toujours le moniteur lors de son nettoyage. Nettoyez le couvercle avec un chion propre et sec. Appliquez un produit d’entretien sans ammoniac sur le chion, pas
directement sur l’écran en verre.
• Gardez les objets magnétiques, moteurs, téléviseurs et transformateurs à distance du moniteur.
• Ne placez pas d’objets lourds sur le câble ou le cordon d’alimentation.
• Pour des raisons de sécurité, si le kit de montage VESA est acheté séparément, veuillez vous assurer que le kit est homologué UL et ne peut être remplacé que par un personnel de service.
DÉCLARATION FCC D’INTERFÉRENCE DE RADIOFRÉQUENCE
AVERTISSEMENT: (POUR LES MODÈLES CERTIFIÉS FCC)
D’après les normes établies pour un dispositif numérique de classeB à la section15 des règlements de la FCC, ce moniteur a été testé et déclaré conforme. Ces limites sont destinées
à fournir une protection appropriée contre les interférences nuisibles dans des installations résidentielles. Ce moniteur génère, utilise et peut émettre une énergie de radiofréquence.
Des interférences nuisibles à la communication radio peuvent être causées s’il n’est pas installé et utilisé de façon appropriée. Cependant, il est possible que des interférences se
produisent sur une installation particulière. Si le moniteur entraîne eectivement de sérieuses interférences vis-à-vis de la réception radio ou télévisuelle, une restauration du moniteur
peut le déterminer. De plus, les utilisateurs sont encouragés à corriger l’interférence en réalisant l’une ou plus des actions suivantes:
• Réorienter ou déplacer l’antenne de réception.
• Éloigner le moniteur et le récepteur l’un de l’autre.
• Brancher le moniteur sur la prise d’un circuit diérent de celui du récepteur.
• Consulter votre revendeur local ou un technicien qualié.
Avertissement FCC:
An d’assurer la conformité FCC continue, un utilisateur doit utiliser un cordon d’alimentation relié à la terre et le câble blindé d’interface vidéo équipé
de noyaux de ferrite lié et fourni avec le moniteur. Par ailleurs, tout changement et toute modication non autorisés eectués sur ce moniteur entraîne
l’annulation du droit de l’utilisateur à utiliser cet appareil.
Chaque pays de l’Union européenne doit disposer de ses propres centres de collecte pour le recyclage des équipements électriques et électroniques. Pour de
plus amples informations relatives à votre lieu de dépôt, veuillez contacter l’autorité de gestion des déchets d’équipements électriques et électroniques dont
vous dépendez, ou le revendeur à qui vous avez acheté le produit.
Remarque: si nécessaire, des câbles d’interface et un cordon d’alimentation blindés doivent être utilisés an de respecter les limites en termes de niveau d’émission.
Conformément à la réglementation DEEE, ce moniteur ne peut être traité comme des déchets ménagers en Europe lorsqu’il est hors d’usage. Veuillez vous
référer aux informations de recyclage disponibles sur notre site internet pour gérer le recyclage.
CAN ICES-3(B)/NMB-3(B)
Cet appareil est conforme à la partie15 des réglementations de la FCC.
Son fonctionnement est soumis aux deux conditions suivantes:
(1) Cet appareil ne peut causer d’interférences nuisibles ,et
(2) cet appareil doit accepter toute interférence reçue, y compris des interférences qui peuvent provoquer un fonctionnement non désiré.
AVERTISSEMENT DE SÉCURITÉ ET DE LA FCC
V1-20170630
Page 37

Pantalla LED panorámica Full HD
de27 pulgadas
L27ADS
MANUAL DEL USUARIO
Page 38

1 Inicio
2 Panel de control/Panel trasero
3 Menú en pantalla
4 Especicaciones técnicas
ÍNDICE
5 Cuidado y mantenimiento
6 Solución de problemas
7 Información de seguridad y advertencias de la FCC
Page 39

El paquete incluye:
• Cable de alimentación CA
• Cable VGA
1
• Cable DVI
• Cable de audio
• Guía de inicio rápido
INICIO
Cable de alimentación CA Cable VGA Cable DVI Cable de audio
Page 40

Instalación
1. Inserte el poste en la base 2. Deslice el poste en la ranura del monitor
INICIO
3. Conecte el cable de vídeo; conecte el cable de alimentación
HDMI DVI VGA
ENTRADA
DE AUDIO
4. Encienda el ordenador y el monitor
SALIDA
DE AUDIO
Page 41

2
Salida de audio
Entrada de audio
2
Encendido/Apagado
PANEL DE CONTROL/PANEL TRASERO
Cable de alimentación
Menú en pantalla encendido/apagado
1
Bajar/Disminuir
Subir/Aumentar
Entrada/Selección
Puerto VGA
Puerto DVI
Puerto HDMI
Page 42

3
Uso de las funciones del menú en pantalla
Menú principal
Función de los botones
MENÚ EN PANTALLA
Ajuste automático
Contraste/brillo
Permite ajustar la posición horizontal, la posición vertical, la fase (ajuste preciso) y el reloj (tamaño
horizontal) de la pantalla.
Permite ajustar manualmente el formato de imagen, contraste, brillo, modo DCR, modo ECO y la
transición de la imagen de la pantalla.
Contrast (Contraste): permite ajustar el nivel de blancos de la imagen en pantalla.
aumenta el contraste, disminuye el contraste.
Brightness (Brillo): permite ajustar la intensidad luminosa del vídeo.
aumenta el brillo, disminuye el brillo.
DCR: permite encender/apagar la función DCR.
ECO: permite al usuario cambiar al modo ECO. Los ajustes de contraste, brillo y DCR se desactivan con el
modo ECO activado.
Over Drive (Transición): permite al usuario cambiar la intensidad de la transición. Mejora la calidad de las
imágenes en movimiento.
Pulse la tecla
o para ajustar la intensidad de la transición en cinco niveles.
Page 43

Función de los botones
Fuente de entrada
Ajuste de audio
Ajuste de color
Información
Cuando se pulsa Input Select (Selección de entrada), podrá cambiar la señal de entrada a VGA, DVI
y HDMI.
Permite ajustar las funciones de audio.
Volume (Volumen): permite ajustar el volumen de los altavoces.
Mute (Silencio): permite encender/apagar el modo de silencio.
Audio input (Entrada de audio): si la entrada es HDMI, seleccione de dónde procede la fuente de audio:
Entrada de línea o HDMI.
Modos de color: frío, normal, cálido y color del usuario.
User color (Color del usuario): ajustes individuales para rojo (R), verde (G), azul (B).
1. Pulse el botón
2. Pulse el botón o para ajustar el color seleccionado.
Modo Picture (Imagen): ofrece un entorno de visualización óptima según el contenido que se reproduce.
Contiene 5 ajustes predenidos que el usuario puede seleccionar.
• Standard (Estándar): para entorno general de Windows y ajustes predeterminados del monitor.
• Game (Juego): optimizado para entorno de juego en PC.
• Video (Vídeo): optimizado para entorno de vídeo y películas.
• Scenery (Paisaje): optimizado para imágenes de exterior.
• Text (Texto): optimizado para edición de texto y visualización en un entorno de procesamiento Word.
Permite consultar la información sobre la señal de entrada procedente de la tarjeta gráca del ordenador.
Nota: Consulte en la guía de usuario de su tarjeta gráca cómo cambiar la resolución y frecuencia de actualización.
2
para seleccionar el color deseado.
MENÚ EN PANTALLA
Page 44

Función de los botones
Permite ajustar manualmente la posición horizontal/vertical, el tamaño horizontal, el ajuste preciso, la nitidez y el
ajuste del modo de vídeo.
H. / V. Position (Posición horizontal/vertical): permite ajustar la posición horizontal y vertical del vídeo.
Ajuste de imagen
manual
Ajustes del menú
H. Position (Posición horizontal):
V. Position (Posición vertical): : sube la pantalla, : baja la pantalla.
Horizontal Size (Tamaño horizontal): permite ajustar la anchura de la imagen en pantalla.
: aumenta la anchura de la imagen en pantalla, : disminuye la anchura de la imagen en pantalla.
Fine Tune (Ajuste preciso): permite ajustar el retardo de los datos y el reloj.
Pulse o para ajustar conforme preera.
Sharpness (Nitidez): permite seleccionar la nitidez de las imágenes.
Pulse la tecla o para ajustar la intensidad de la nitidez en tres niveles.
Ajuste del modo de vídeo: puede seleccionar el modo de vídeo entre la relación de aspecto 4:3 o pantalla completa.
Permite seleccionar el idioma y congurar la posición, el tiempo de espera y el fondo del menú en pantalla.
Language Select (Selección de idioma): permite al usuario seleccionar entre los idiomas disponibles.
OSD Position (Posición del menú en pantalla): Pulse el botón
y vertical para el menú en pantalla.
OSD H. Position (Posición horizontal del menú en pantalla): permite ajustar en horizontal la posición del menú en pantalla
: mueve el menú en pantalla a la derecha, : mueve el menú en pantalla a la izquierda.
OSD V. Position (Posición vertical del menú en pantalla): permite ajustar en vertical la posición del menú en pantalla.
: sube el menú en pantalla, : baja el menú en pantalla.
OSD time out (Tiempo de espera del menú en pantalla): permite apagar automáticamente el menú en pantalla una vez
que transcurre un período de tiempo predenido.
OSD background (Fondo del menú en pantalla): permite al usuario encender y apagar el fondo del menú en pantalla.
: mueve la pantalla a la derecha, : mueve la pantalla a la izquierda.
o para seleccionar entre el ajuste de posición horizontal
Recuperación
de la memoria
Permite recuperar los ajustes originales para los controles de vídeo y audio. Pulse el botón
menú de recuperación de la memoria.
2
para seleccionar la opción del
MENÚ EN PANTALLA
Page 45

Especicaciones técnicas
Panel LCD TFT de 68,6 cm (27”)
4
Administración
deenergía
Resolución de
visualización
Dimensión de píxeles 0,3114 x 0,3114 mm
LCD en color 16,7 millones de colores
Inclinación -5°~20° (±2°)
Área de visualización
activa
Temperatura
Cumplimiento CE, EnergyStar, FCC
Alimentación Tensión de entrada CA100-240 V
Altavoz 2 W x 2
Energy Star
Compatible con VESA DPMS
Modo de apagado, < 0,5 W
Full HD 1920 x 1080 máx.
Frecuencia vertical 60Hz máx.
597,89 mm x 336,31 mm
Funcionamiento: 5°C ~ + 40°C
Almacenamiento: -20°C ~ + 60°C
ESPECIFICACIONES TÉCNICAS
Page 46

Cuidados
• No exponga el monitor a la luz solar directa ni a otras fuentes de calor. Coloque el monitor alejado del sol para reducir los reejos.
• Coloque el monitor en un área seca, limpia y bien ventilada.
5
• No coloque objetos pesados sobre el monitor.
• Mantenga el monitor alejado de imanes, motores, transformadores, altavoces y sistemas de televisión.
Consejos de seguridad
• Si advierte humo, ruidos extraños u olores procedentes del monitor, debe desconectar el cable de alimentación de inmediato
y llamar a su centro técnico.
• Nunca retire la tapa trasera de la carcasa del monitor. El interior de la unidad de visualización contiene piezas de alta tensión
ypodrían causar descargas eléctricas si las toca.
• No intente reparar el monitor. Acuda a un centro técnico o a un técnico profesional.
CUIDADO Y MANTENIMIENTO
Page 47

6
No llega la alimentación
• Conrme que el cable de alimentación CA está bien conectado al adaptador de corriente y que la fuente de alimentación
está bien conectada al monitor.
• Enchufe otro dispositivo eléctrico en la toma de corriente para vericar que la toma suministra la tensión correcta.
• Asegúrese de que se han instalado todos los cables de señal.
El monitor se enciende pero no aparece ninguna imagen
• Asegúrese de que el cable de vídeo incluido con el monitor está bien conectado al puerto de salida de vídeo de la parte
trasera del ordenador. Si no es así, conéctelo rmemente.
• Ajuste el brillo.
Colores incorrectos o extraños
• Si faltan colores (rojo, verde, azul), compruebe que el cable de vídeo esté bien conectado. Las patillas sueltas o rotas del
conector del cable podrían ser la causa de una mala conexión.
• Conecte el monitor a otro ordenador.
SOLUCIÓN DE PROBLEMAS
Page 48

7
Precauciones de seguridad
Este monitor está fabricado y probado con el principio básico de que la seguridad del usuario es la máxima prioridad. No obstante, una instalación o un uso incorrectos podrían provocar
daños en el monitor y también en el usuario. Repase detenidamente las siguientes ADVERTENCIAS antes de instalar y tenga este manual a mano para consultarlo cuando lo necesite.
ADVERTENCIAS
• Este monitor solo debe usarse con las fuentes de alimentación correctas indicadas en la etiqueta situada detrás del monitor. Si no está seguro de las especicaciones de la fuente
de alimentación de su hogar, consulte a su distribuidor o a la empresa eléctrica.
• No intente reparar el monitor, ya que contiene piezas que el usuario no puede reparar. La reparación del monitor solo debe quedar a cargo de un técnico profesional.
• No retire la carcasa del monitor. Contiene piezas de alta tensión que podrían causar descargas eléctricas si llega a tocarlas, incluso con el cable de alimentación desconectado.
• Deje de usar el monitor si la carcasa está dañada. Encargue su revisión a un técnico.
• Coloque el monitor exclusivamente en entornos secos y limpios. Desenchufe el monitor de inmediato si se moja y consulte a un técnico.
• Desenchufe siempre el monitor antes de limpiarlo. Limpie la carcasa con un paño seco y limpio. Aplique limpiador sin amoniaco en el paño, no directamente en el cristal de la pantalla.
• Mantenga el monitor alejado de objetos magnéticos, motores, sistemas de televisión y transformadores.
• No coloque objetos pesados sobre los cables.
• Por cuestiones de seguridad, si el kit del soporte VESA se adquiere por separado, compruebe que este kit está homologado por UL y encargue su instalación a un técnico.
DECLARACIÓN DE LA FCC SOBRE INTERFERENCIAS DE RADIOFRECUENCIA
ADVERTENCIA: (PARA MODELOS CON CERTIFICACIÓN FCC)
Este monitor se ha sometido a diferentes pruebas y cumple con los límites de los dispositivos digitales de clase B, conforme a la Parte 15 de las normas de la FCC. Estos límites se
han diseñado para proporcionar una protección razonable frente a interferencias perjudiciales en instalaciones residenciales. Este monitor genera, usa y puede irradiar energía de
radiofrecuencia. Podrían producirse interferencias perjudiciales para las comunicaciones por radio como resultado de una instalación y uso incorrectos. No obstante, no hay garantías
de que las interferencias no vayan a producirse en una instalación determinada. Si este monitor causa interferencias en la recepción de radio o televisión, reiniciar el monitor podría ser
una solución. Además, los usuarios pueden realizar lo siguiente para corregir las interferencias:
• Cambiar la orientación o ubicación de la antena receptora.
• Separar más el monitor y el receptor.
• Conectar el monitor a una toma o circuito diferente al que está conectado el receptor.
• Consultar a su distribuidor o a un técnico profesional.
Advertencia de la FCC:
Para garantizar el cumplimiento de las normas de la FCC, el usuario debe usar un cable de alimentación con puesta a tierra y el cable de interfaz de vídeo apantallado
incluido con núcleos de ferrita enlazados. Además, las modicaciones o los cambios no autorizados realizados en este monitor anulan el derecho del usuario a usar este
dispositivo.
Cada país de la Unión Europea debe tener sus centros de recogida para el reciclaje de equipo electrónico y eléctrico. Para obtener información sobre su área de reciclaje,
consulte al responsable de tratamiento de residuos eléctricos y electrónicos o al establecimiento donde adquirió el producto.
Nota: Si es necesario, deben usarse el cable de alimentación CA y los cables de interfaz apantallados para cumplir los límites de emisiones.
Según la normativa WEEE, este monitor no puede tratarse como residuo normal en Europa cuando ya no está operativo. Consulte cómo desecharlo en la información
sobre reciclaje de nuestro sitio web.
CAN ICES-3(B)/NMB-3(B)
Este dispositivo cumple la Parte 15 de las normas de la FCC.
Su funcionamiento está sujeto a las dos condiciones siguientes:
(1) este dispositivo no podrá causar interferencias perjudiciales y
(2) este dispositivo deberá aceptar las interferencias recibidas, incluidas las interferencias que puedan provocar un funcionamiento no deseado.
SEGURIDAD Y ADVERTENCIAS DE LA FCC
V1-20170630
Page 49

27Zoll Full-HD Widescreen LED Monitor
L27ADS
BENUTZERHANDBUCH
Page 50

1 Erste Schritte
2 Systemsteuerung/Rückseite
3 Bildschirmanzeige
4 Technische Daten
5 Pege und Wartung
6 Fehlerbehebung
7 Sicherheitsinformationen und FCC-Warnung
INHALTSVERZEICHNIS
Page 51

Paket beinhaltet:
• AC-Netzkabel
• VGA-Kabel
1
• DVI-Kabel
• Audiokabel
• Kurzanleitung
ERSTE SCHRITTE
AC-Netzkabel VGA-Kabel DVI-Kabel Audiokabel
Page 52

Installation
1. Befestigen Sie den Ständer am Fuß 2. Schieben Sie den Ständer in die Monitorhalterung
3. Schließen Sie Videokabel und Netzkabel an
ERSTE SCHRITTE
4. Schalten Sie Computer und Monitor ein
AUDIOEINGANG
HDMI DVI VGA
AUDIOAUSGANG
Page 53

2
Bildschirmmenü Ein/Aus1
Herunterscrollen/Reduzieren
Hochscrollen/Erhöhen
2
Eingabe/Auswahl
Ein/Aus
Audioausgang
Audioeingang
Netzkabel
VGA-Port
DVI-Port
HDMI-Port
SYSTEMSTEUERUNG/RÜCKSEITE
Page 54

3
Verwendung der Bildschirmanzeigefunktionen (On Screen Display, OSD)
Hauptmenü
Schaltknopunktion
Automatische
Anpassung
Kontrast/Helligkeit
Zur automatischen Anpassung von horizontaler und vertikaler Position, Phase (Feintuning) und
Taktfrequenz (H. Size) des Bildschirms.
Zur manuellen Anpassung von Format, Kontrast, Helligkeit, DCR-Modus, ECO-Modus und
Overdrive des Bildschirmbildes.
Kontrast: Zur Anpassung der Weißstufe im Vordergrund des Bildschirmbildes.
Kontrast erhöhen, Kontrast reduzieren.
Bildhelligkeit: Zur Anpassung der Leuchtdichte der Anzeige.
Helligkeit erhöhen, Helligkeit reduzieren.
DCR: Zur Steuerung der DCR-Funktion EIN/AUS.
ECO: Ermöglicht dem Benutzer die Änderung des ECO-Modus. Kontrast, Helligkeit und DCR-Anpassung
werden deaktiviert, wenn ECO aktiv ist.
OD: Ermöglicht dem Benutzer die Änderung der Overdrive-Stärke. Verbessert die Qualität von bewegten Bildern.
Drücken Sie die Tasten
oder , um die Overdrive-Stärke in fünf Stufen anzupassen.
BILDSCHIRMANZEIGE
Page 55

Schaltknopunktion
Eingangsquelle Durch Drücken der Eingangsauswahl ändern Sie das Eingangssignal auf VGA, DVI oder HDMI.
Audioanpassung
Zur Anpassung der Audiofunktionen.
Lautstärke: Zur Anpassung der Lautstärke des Lautsprecherausgangs.
Stummschaltung: Zum Ein- bzw. Ausschalten der Stummschaltung.
Audioeingang: Wenn der HDMI-Eingang ausgewählt ist, können Sie wählen, ob das Audiosignal über Line-In
oder HDMI eingeht.
Farbmodi: kühl, normal, warm und benutzerdeniert
Farbeinstellung
Information
Benutzerdeniert: Individuelle Einstellungen für Rot (R), Grün (G) und Blau (B).
1. Drücken Sie Schaltäche
2. Drücken Sie Schaltäche oder , um die ausgewählte Farbe anzupassen.
Bildmodus: Bietet je nach angezeigtem Inhalt eine optimierte Anzeigeumgebung. Dieser Modus enthält
fünf vom Benutzer auswählbare Voreinstellungen.
• Standard: für allgemeine Windows-Umgebungen und Monitor-Standardeinstellungen.
• Game: optimiert für PC-Spiele-Umgebungen.
• Video: optimiert für Kino- und Videoumgebungen.
• Scenery: optimiert für die Anzeige von Landschaftsbildern.
• Text: optimiert für die Textbearbeitung und Anzeige in einer Textverarbeitungsumgebung
Zur Anzeige von Informationen zum aktuellen Eingangssignal, das von der Grakkarte in Ihrem Computer kommt.
Hinweis: Weitere Informationen zur Änderung der Auösung und der Aktualisierungsrate entnehmen Sie
dem Benutzerhandbuch der Grakkarte.
2
, um die gewünschte Farbe auszuwählen.
BILDSCHIRMANZEIGE
Page 56

Schaltknopunktion
Zur manuellen Anpassung von H./V. Position, horizontaler Größe, Phase, Schärfe und Videomodusanpassung.
H. / V. Position: Zur Anpassung der horizontalen und vertikalen Position der Anzeige.
Manuelle
Bildanpassung
Menüeinstellung
H. Position:
V. Position: : Bildschirm nach oben bewegen, : Bildschirm nach unten bewegen.
Horizontale Größe: Zur Anpassung der Breite des Bildschirmbildes.
: Breite des Bildschirmbildes erhöhen, : Breite des Bildschirmbildes reduzieren
Phase: Zur Anpassung der Verzögerungszeit von Daten und Takt.
Zur Anpassung der Voreinstellung oder drücken.
Schärfe: Zur Auswahl der Bildschärfe der Anzeige.
Drücken Sie oder , um die Schärfe in drei Stufen anzupassen.
Videomodusanpassung: Zur Auswahl des Videomodus zwischen Vollbild und Seitenverhältnis 4:3.
Zur Einrichtung von Sprachauswahl, OSD-Position, OSD-Zeitlimit und OSD-Hintergrund.
Sprachauswahl: Ermöglicht Benutzern die Auswahl einer verfügbaren Sprache
OSDPosition: Drücken Sie
H. OSD-Position: Zur horizontalen Anpassung der OSD-Position
: OSD nach rechts bewegen, : OSD nach links bewegen
V. OSD-Position: Zur vertikalen Anpassung der OSD-Position.
: OSD nach oben bewegen, : OSD nach unten bewegen.
OSD-Zeitlimit: Zur automatischen Abschaltung von OSD nach einem voreingestellten Zeitraum.
OSD-Hintergrund: Ermöglicht Benutzern das Ein- bzw. Ausschalten des OSD-Hintergrunds
: Bildschirm nach rechts bewegen, : Bildschirm nach links bewegen.
oder , um zwischen horizontaler und vertikaler OSD-Positionsanpassung zu wechseln.
Speicherabruf
Zum Abruf der Werkseinstellungen für Video- und Audio-Steuerelemente. Zur Auswahl der Menüoption „Speicherabruf“ die
2
Schaltäche
drücken.
BILDSCHIRMANZEIGE
Page 57

4
Technische Daten
LCD-Anzeige 68,6cm (27Zoll) TFT
Energy Star
Energiemanagement
VESA DPMS-kompatibel
OFF-Modus, <0,5W
Darstellbare
Auösung
Pixelgröße 0,3114x 0,3114mm
LCD-Bildschirmfarbe 16,7Mio. Farben
Neigung -5°~20° (±2°)
Aktiver
Anzeigebereich
Temperatur
Konformität CE, EnergyStar, FCC
Stromversorgung Eingangsspannung AC 100-240V
Lautsprecher 2Wx2
Full-HD, max. 1920x1080
Vertikale Frequenz max. 60Hz
597,89mmx 336,31mm
Betrieb: 5°C~ +40°C
Lagerung: -20°C~ +60°C
TECHNISCHE DATEN
Page 58

5
Pege
• Setzen Sie Ihren Monitor nicht direktem Sonnenlicht oder anderen Wärmequellen aus. Zum Blendschutz sollte der Monitor
ohne direkte Sonneneinstrahlung aufgestellt werden.
• Stellen Sie den Monitor in einem gut durchlüfteten, sauberen und trockenen Bereich auf.
• Legen Sie keine schweren Gegenstände auf dem Monitor ab.
• Der Monitor darf nicht in unmittelbarer Nähe von Magneten, Motoren, Transformatoren, Lautsprechern und Fernsehgeräten
aufgestellt werden.
Sicherheitshinweise
• Wenn der Monitor Rauch, ungewöhnliche Geräusche oder Gerüche von sich gibt, ist Vorsicht geboten. Ziehen Sie das
Netzkabel sofort heraus und wenden Sie sich an Ihr Servicecenter.
• Entfernen Sie niemals die rückwärtige Abdeckung des Monitorgehäuses. Das Anzeigegerät enthält Teile, die unter
Hochspannung stehen und Menschen einen Stromschlag versetzen können.
• Versuchen Sie niemals, den Monitor selbst zu reparieren. Wenden Sie sich für Reparaturen an Ihr Servicecenter oder an einen
qualizierten Techniker.
PFLEGE UND WARTUNG
Page 59

6
Kein Strom
• Stellen Sie sicher, dass das AC-Netzstromkabel fest im Netzteil eingesteckt und die Stromversorgung fest mit dem Monitor
verbunden ist.
• Stecken Sie ein anderes elektronisches Gerät in die Steckdose ein, um zu überprüfen, ob die Steckdose die richtige Spannung liefert.
• Stellen Sie sicher, dass alle Signalkabel angebracht sind.
Eingeschaltet, aber kein Bild
• Stellen Sie sicher, dass das im Lieferumfang enthaltene Videokabel fest im Videoausgang auf der Rückseite des Computers
eingesteckt ist. Falls dies nicht der Fall ist, stecken Sie es fest ein.
• Passen Sie die Helligkeit an.
Falsche oder ungewöhnliche Farben
• Falls irgendwelche Farben (Rot, Grün, Blau) fehlen, überprüfen Sie das Videokabel, um sicherzustellen, dass es fest eingesteckt
ist. Lockere oder abgebrochene Stifte im Steckverbinder des Kabels können zu einer fehlerhaften Verbindung führen.
• Verbinden Sie den Monitor mit einem anderen Computer.
FEHLERBEHEBUNG
Page 60

7
Sicherheitsvorkehrungen
Dieser Monitor wurde so hergestellt und getestet, dass die Benutzersicherheit sichergestellt ist. Eine unsachgemäße Verwendung oder Installation kann jedoch zu einer
Beschädigung des Monitors führen und eine Gefahr für Benutzer darstellen. Lesen Sie sich die nachfolgenden Warnhinweise vor der Installation aufmerksam durch und
bewahren Sie dieses Benutzerhandbuch auf.
WARNHINWEISE
• Dieser Monitor sollte nur über die ordnungsgemäßen Stromquellen betrieben werden, die auf dem Etikett auf der Rückseite des Monitors aufgeführt sind. Falls Sie sich mit der
Stromversorgung vor Ort nicht auskennen, wenden Sie sich an Ihren Händler oder Ihr Stromversorgungsunternehmen.
• Versuchen Sie nicht, den Monitor selbst zu reparieren, da dieser keine von Benutzern reparierbaren Teile enthält. Der Monitor sollte nur von einem qualizierten Techniker repariert werden.
• Önen Sie niemals das Monitorgehäuse. Es enthält unter Hochspannung stehende Teile, die selbst bei ausgezogenem Netzkabel einen elektrischen Stromschlag verursachen können.
• Verwenden Sie den Monitor nicht, wenn das Gehäuse beschädigt ist. Lassen Sie den Monitor von einem Servicetechniker überprüfen.
Stellen Sie den Monitor nur an einem sauberen, trockenen Ort auf. Sollte der Monitor nass werden, ziehen Sie sofort das Netzkabel heraus und wenden Sie sich an Ihren Servicetechniker.
•
• Ziehen Sie das Netzkabel stets vor der Reinigung des Monitors heraus. Reinigen Sie das Gehäuse mit einem sauberen, trockenen Tuch. Sprühen Sie ein ammoniakfreies
Reinigungsmittel auf das Tuch und niemals direkt auf den Monitor.
• Stellen Sie den Monitor nicht in unmittelbarer Nähe von magnetischen Gegenständen, Motoren, Fernsehgeräten und Transformatoren auf.
• Legen Sie keine schweren Gegenstände auf dem Kabel oder dem Netzstromkabel ab.
• Wenn der VESA-Montagesatz getrennt erworben wurde, sollten Sie aus Sicherheitsgründen überprüfen, dass dieser UL-gelistet ist und nur durch Servicepersonal ersetzt wird.
FCC-ERKLÄRUNG ZU HOCHFREQUENZSTÖRUNGEN
WARNUNG: (FÜR FCC-ZERTIFIZIERTE MODELLE)
Dieser Monitor wurde getestet und entspricht den Grenzwerten für digitale Geräte der Klasse B gemäß Teil 15 der FCC-Bestimmungen. Diese Grenzwerte sind so ausgelegt,
dass sie einen angemessenen Schutz gegen schädliche Störungen in einer Wohnanlage bieten. Dieser Monitor erzeugt, verwendet und strahlt Hochfrequenzenergie aus.
Bei unsachgemäßer Installation und Verwendung kann es daher zu Störungen des Rundfunkempfanges kommen. Es besteht jedoch keine Garantie dafür, dass in einer
bestimmten Installation keine Störung auftritt. Wenn dieser Monitor schwerwiegende Störungen im Rundfunk- oder Fernsehempfang verursacht, kann dies durch eine
Zurücksetzung des Monitors festgestellt werden. Darüber hinaus können Benutzer zur Behebung von Störungen eine oder mehrere der folgenden Maßnahmen ergreifen:
• Neuausrichten oder Neupositionieren der Empfangsantenne.
• Vergrößerung des Abstandes zwischen dem Monitor und dem Empfänger.
• Verbinden des Monitors mit einem Anschluss an einem anderen Stromkreis als dem Stromkreis, mit dem der Empfänger verbunden ist.
• Konsultierung eines Händlers oder Servicetechnikers vor Ort.
FCC-Warnung:
Zur Gewährleistung fortgesetzter FCC-Konformität muss der Benutzer ein geerdetes Netzstromkabel und das im Lieferumfang enthaltene abgeschirmte
Schnittstellenkabel mit gebundenen Ferritkernen verwenden. Außerdem erlischt durch eigenmächtige Veränderungen und Umbauten dieses Monitors die
Befugnis des Benutzers zum Betrieb dieses Geräts.
Jedes Land in der Europäischen Union sollte über Annahmestellen für das Recycling von elektrischen und elektronischen Geräten verfügen. Informationen
über Annahmestellen in Ihrer Nähe erhalten Sie von der für die Entsorgung elektrischer und elektronischer Geräte zuständigen Behörde oder von dem Händler,
bei dem Sie das Produkt erworben haben.
Hinweis: Sofern erforderlich, sind abgeschirmte Kabel und AC-Netzkabel zu verwenden, um die Emissionsgrenzwerte einzuhalten.
Gemäß WEEE-Regulierungen darf dieser Monitor in Europa nach Außerbetriebnahme nicht als normaler Abfall behandelt werden. Bitte beachten Sie
diesbezüglich die Recycling-Informationen auf unserer Webseite.
CAN ICES-3(B)/NMB-3(B)
Dieses Gerät ist konform mit Teil 15 der FCC-Regeln.
Für den Betrieb gelten folgende zwei Bedingungen:
(1) Das Gerät darf keine schädlichen Störungen verursachen.
(2) Das Gerät muss den Empfang von Interferenzen zulassen, einschließlich von Interferenzen, die einen ungewünschten Betrieb verursachen können.
SICHERHEITSINFORMATIONEN UND FCC-WARNUNG
V1-20170630
 Loading...