

Page 1

24" Class Slim HD Widescreen Monitor
L238E
USER MANUAL
Page 2

1 Getting Started
Package includes
Installation
2 Control Panel/ Back Panel
Control Panel
Back Panel
3 On Screen Display
4 Technical Specs
5 Care & Maintenance
6 Troubleshooting
TABLE OF CONTENTS
No Power
Power on but no screen image
Wrong or Abnormal Colors
7 Safety info & FCC warning
Page 3

Package includes
• AC Power Cord
• HDMI Cable
1
• Quick start guide
GETTING STARTED
AC Power Cord HDMI Cable
Page 4

Installation
Connect video cable, Connect power cord, Connect Audio cable
GETTING STARTED
Power on computer and monitor
POWER
DVI HDMI
DisplayPort
VGA
Audio
In
Audio
Out
Page 5

2
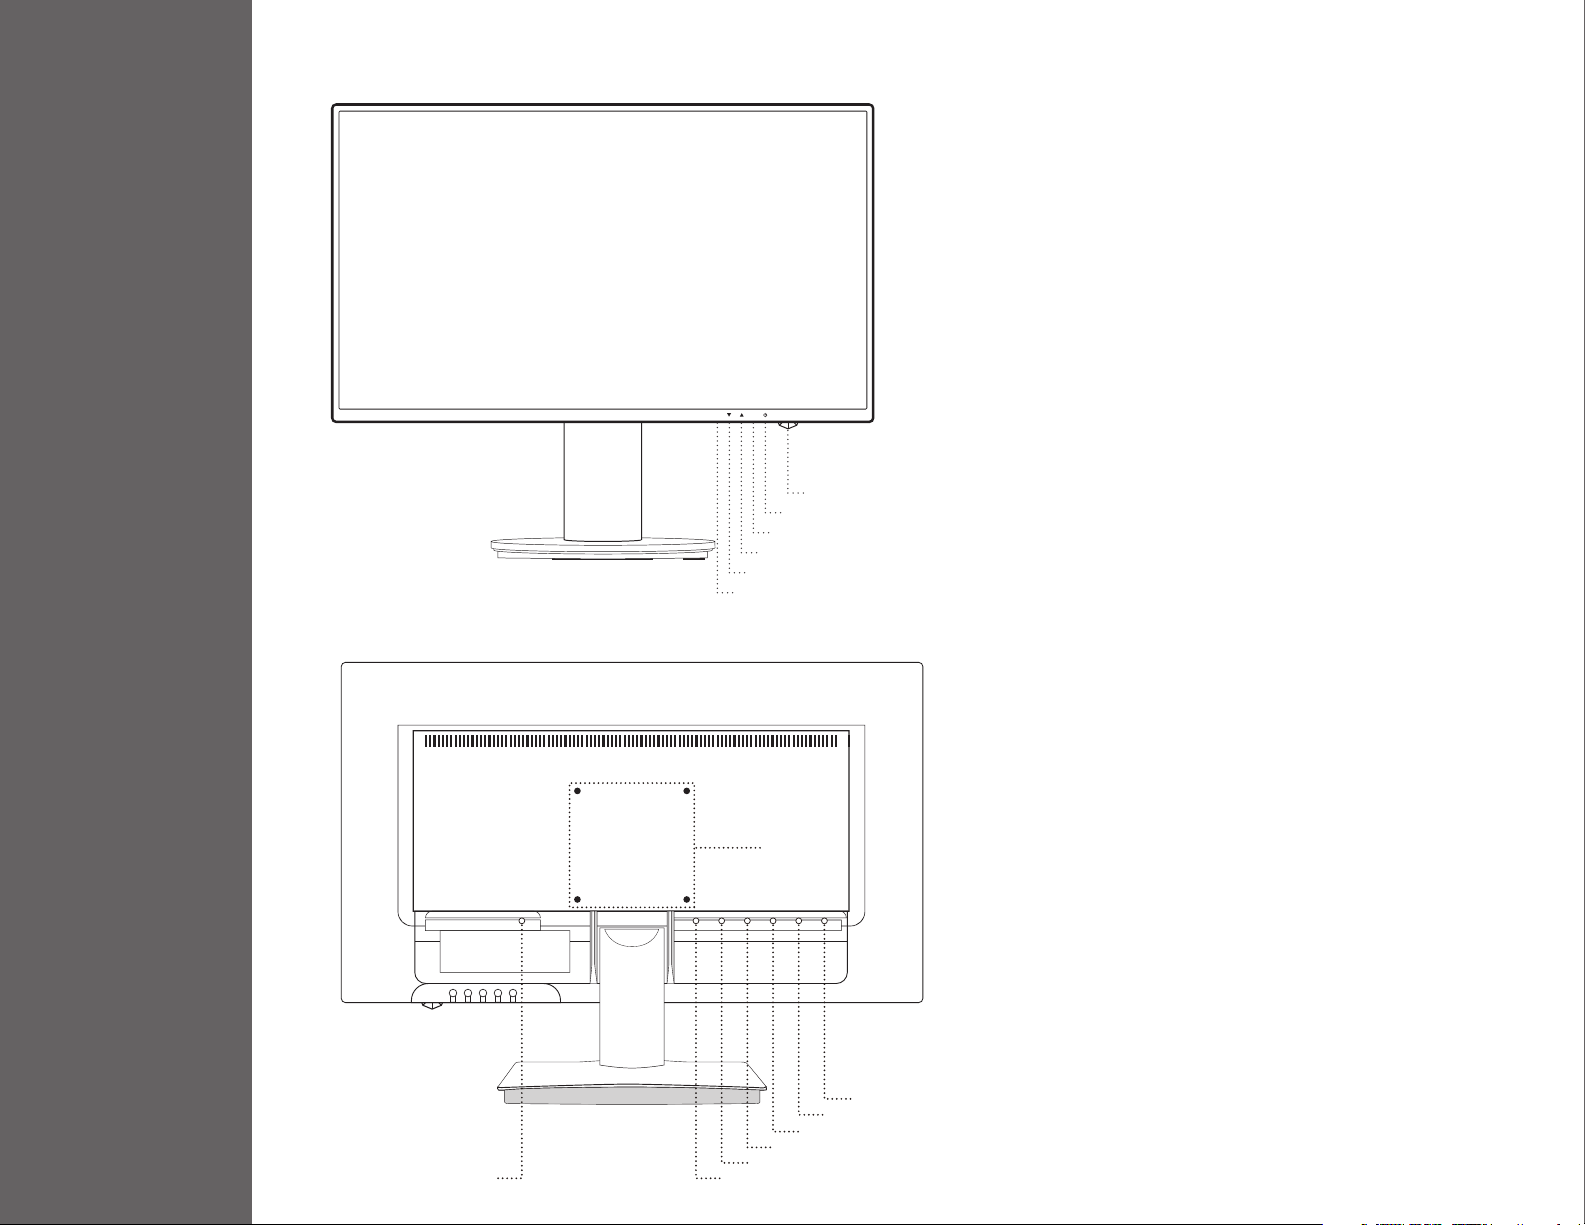
Control Panel
Back Panel
1 2
LED Indicator
Power On/O
Conrm Select
Scroll Up/Increase
Scroll Down/Decrease
OSD Menu On/O
CONTROL PANEL/ BACK PANEL
Power Cable
Display
VESA 100x100
HDMI
DVI
Audio Output
Audio Input
VGA
Page 6

3
Using On Screen Display (OSD) Functions
Display main menu
1
Exit from OSD menu
2 Manual adjust mode select for VGA, DVI, HDMI, DisplayPort, Auto mode
Select the desired item when in OSD menu
When not in OSD menu, directly enters Contrast/Brightness menu
Select the desired item when in OSD menu
When not in OSD menu, directly enters Picture mode
ON SCREEN DISPLAY
+
1 +
2 +
Main Menu
Recall both of Contrast and Brightness (when not in OSD menu)
Power Lock (when not in OSD menu)
OSD Lock (when not in OSD menu)
Page 7

Short Cuts Function from the button(s)
Auto Image Adjust To auto adjust Horizontal Position, Vertical Position, Phase (Fine Tune) and Clock (H. Size) of the screen.
To manually adjust the Contrast, Brightness, DCR, ECO and OD of screen image.
Contrast: To adjust the foreground white level of screen image.
increase contrast, decrease contrast.
Brightness: To adjust the luminance of the video.
Contrast/Brightness
Input Source When Input Select is pressed, change Input signal to VGA, DVI, HDMI, DisplayPort or Auto.
increase brightness, decrease brightness.
DCR: To detect the distribution of the visual signals inputs, and create an optimized contrast. Brightness and ECO adjustment will be
disabled when DCR is active.
ECO: Allows the user to change the ECO mode. Contrast, Brightness and DCR adjustment will be disabled when ECO is active.
OD: Allows the user to change the Over Drive strength. Improve the quality of the motion pictures.
To adjust the audio functions.
Volume: To adjust the volume of speaker output.
Audio Adjust
Color Adjust
ON SCREEN DISPLAY
Mute: To turn the Mute ON/OFF.
Audio input: When in HDMI input, select where the audio source comes from Line-In or HDMI.
When in DisplayPort input, select where the audio source comes from Line-in or DisplayPort.
To select the color for improving brightness and color saturation between Cool, Normal, Warm and User colour and
Picture mode.
Cool: Adds blue to screen image for cooler white.
Normal: Adds red to screen image for warmer white and richer red.
Warm: Adds green to screen image for a darker color.
User colour: Individual adjustments for red (R), green (G), blue (B).
1. Press button 2 to select the desired color.
2. Press or button to adjust selected color.
Page 8

Short Cuts Function from the button(s)
Picture mode: Provides an optimum display environment depending on the contents displayed. It contains 5 user-selectable
presets.
• Standard is for general windows environment and monitor default setting.
• Game optimized for PC game environment
• Video optimized for movie and video environment
• Landscape optimized for displaying outdoor scenery images.
• Text optimized for text editing and viewing in a word processing environment
Information
Manual Image
Adjustment
To display the information, regarding the current input signal coming from the graphic card in your computer.
Note: See your graphic card user guide for more information about changing the resolution and refresh rate.
To manually adjust the H. /V. Position, Horizontal size, Fine tune and Sharpness.
H. / V. Position: To adjust the horizontal and vertical position of the video.
H. Position: : move screen to the right, : move screen to the left.
V. Position: : move screen up, : move screen down.
Horizontal Size: To adjust the width of the screen image.
: increase the width of the screen image, : decrease the width of the screen image
Phase: To adjust the delay time of data and clock.
Press or to adjust to your preference.
Sharpness: To adjust the clarity of a non-Full HD Resolution (1920x1080) signal with or button
Video mode adjust: To select the video mode from Aspect Ratio 4:3 or Full Screen.
Aspect Ratio 4:3: To select 4:3 image size.
Full Screen: To select full-screen size image.
To set up Language select, OSD Position, OSD time out and OSD background.
Language Select: To allow users to choose from available languages
OSD Position: Press or button to select between horizontal and vertical OSD Position Adjustment.
OSD H. Position: To horizontally adjust the OSD Position
Menu Setting
ON SCREEN DISPLAY
Memory recall To recall factory settings for Video & Audio controls. Press button 2 to select the Memory Recall menu option.
: move OSD to the right, : move OSD to the left
OSD V. Position: To vertically adjust the OSD position.
: move OSD up, : move OSD down.
OSD time out: To automatically turn o On Screen Display (OSD) after a preset period of time.
OSD background: Allows the user to turn the OSD background On or O
Page 9

Technical Specication
LCD Panel 60.4 cm (23.8”) TFT (with LED back light)
4
Power
Management
Displayable
Resolution
Pixel Dimension 0.2745 x 0.2745 mm
LCD Display Color 16.7M
Tilt -5°~22° (±2°)
Active Display
Area
Temperature
Compliance FCC, CE, Energy Star
Power Input Voltage AC100-240 V
Energy Star
VESA DPMS compatible
O Mode, < 0.5 W
Full HD 1920 x 1080 max.
Vertical Frequency 60Hz max.
527.0 mm x 296.4 mm
Operating: 0°C ~ + 40°C
Storage: -20°C ~ + 60°C
TECHNICAL SPECS
Page 10

Care
• Avoid exposing your monitor directly to sunlight or other heat source. Place your monitor away from the sun to reduce glare.
• Put your monitor in a well ventilated area.
5
• Do not place any heavy things on top of your monitor
• Make certain your monitor is installed in a clean and moisture-free area.
• Keep your monitor away from magnets, motors, transformers, speakers, and TV sets.
Safety Tips
• If smoke, abnormal noise or odor came out from your monitor, caution you should remove the power cord immediately and
call your service center.
• Never remove the rear cover of your monitor cabinet. The display unit inside contains high-voltage parts and may cause
electric shock to human bodies.
• Never try to repair your monitor yourself. Always call your service center or a qualied technician to x it.
CARE & MAINTENANCE
Page 11

No Power
• Make sure A/C power cord is securely inserted to both the AC-INLET socket on the monitor and wall outlet.
• Plug another electrical device into the power outlet to verify that the outlet is supplying proper voltage.
6
• Make sure all signal cables are installed.
Power on but no screen image
• Make sure the video cable supplied with the monitor is tightly secured to the video output port on back of the computer. If
not, tightly secure it.
• Adjust brightness
Wrong or abnormal colors
• If any colors (red, green, blue) are missing, check the video cable to make sure it is securely connected. Loose or broken pins
in the cable connector could cause an improper connection
• Connect the monitor to another computer
TROUBLESHOOTING
Page 12

7
Safety Precautions
This monitor is manufactured and tested on a ground principle that a user’s safety comes rst. However, improper use or installation may result danger to the monitor as
well as to the user. Carefully go over the following WARNINGS before installation and keep this guide handy.
WARNINGS
• This monitor should be operated only at the correct power sources indicated on the label on the rear end of the monitor. If you’re unsure of the power supply in your residence, consult your local dealer or power
company.
• Do not try to repair the monitor yourself as it contains no user-serviceable parts. The monitor should only be repaired by a qualied technician.
• Do not remove the monitor cabinet. There is high-voltage parts inside that may cause electric shock to human bodies, even when the power cord is disconnected.
• Stop using the monitor if the cabinet is damaged. Have it checked by a service technician.
• Put your monitor only in a clean, dry environment. Unplug the monitor immediately if gets wet and consult your service technician.
• Always unplug the monitor before cleaning it. Clean the cabinet with a clean, dry cloth. Apply non-ammonia based cleaner onto the cloth, not directly onto the glass screen.
• Keep the monitor away from magnetic objects, motors, TV sets, and transformer.
• Do not place heavy objects on the cable or power cord.
• Due to safety concerns, if the VESA mounting kit is purchased separately, please make sure the mounting kit is UL-Listed, and replaceable only by service personnel.
FCC RADIO FREQUENCY INTERFERENCE STATEMENT
WARNING: (FOR FCC CERTIFIED MODELS)
This monitor has been tested and found compliant with the limits for a Class B digital device, pursuant to part 15 of the FCC Rules. These limits are designed to provide proper protection against harmful interference to a
residential installation. This monitor generates, uses, and can radiate radio frequency energy. Harmful interference to radio communication may be led as a result if it‘s not properly installed and used. However, there is no
guarantee that interference will not occur in a particular installation. If this monitor does cause serious interference to radio or television reception, resetting the monitor may determine it. Moreover, users are encouraged to
correct interference by doing one or more of the following:
• Reorient or relocate the receiving antenna.
• Move the monitor and the receiver further away from each other.
• Connect the monitor into an outlet on a circuit dierent from that to which the receiver is connected.
• Consult your local dealer or an qualied technician.
FCC Warning:
To assure a continued FCC compliance, a user must use a grounded power supply cord and the provided shielded video interface cable with bonded ferrite cores. Also, any unauthorized changes or modications to this monitor would void the user‘s authority to operate this device.
Each country in the European Union should have its collection centers for electrical and electronic equipment recycling. For information about your recycling drop o area, please contact your related
electrical and electronic equipment waste management authority or the retailer where you bought the product.
Note: If necessary, shielded interface cables and AC power cord must be used to meet the emission level limits.
Regulatory Information: Disposal of Waste Electrical and Electronic Equipment (WEEE) The Waste Electrical and Electronic Equipment (WEEE) Directive aims to minimize the impact of electrical and elec tronic goods on the environment, by
increasing re-use and recycling and by reducing the amount of WEEE going to landll. The symbol on your V7 product or its packaging signies that this product must be disposed separately from ordinary household wastes at its end of life.
Please kindly be aware that this is your responsibility to dispose electronic equipment at recycling centers so as to help conserve natural resources.
Each country in the European Union should have its collection centers for electrical and electronic equipment recycling. For information about your recycling drop o area, please contact your related electrical and electronic equipment
waste management authority or the retailer where you bought the product.
SAFETY & FCC WARNING
ID 1419050639
Page 13

Höhenverstellbarer
23,8-Zoll-LED-Monitor mit Full HD
L238DPH
BENUTZERHANDBUCH
Page 14

1 Erste Schritte
Paket beinhaltet
Installation
2 Systemsteuerung/Rückseite
Systemsteuerung
Rückseite
3 Bildschirmanzeige
4 Technische Daten
5 Pege und Wartung
6 Fehlerbehebung
Kein Strom
Eingeschaltet aber kein Bildschirmbild
Falsche oder ungewöhnliche Farben
7 Sicherheitsinformationen und FCC-Warnung
INHALTSVERZEICHNIS
Page 15

1
Paket beinhaltet:
• AC-Netzkabel
• HDMI-Kabel
ERSTE SCHRITTE
AC-Netzkabel HDMI-Kabel
Page 16

Installation
Videokabel anschließen, Netzkabel anschließen, Audiokabel anschließen
ERSTE SCHRITTE
Computer und Monitor einschalten
POWER
DVI HDMI
DisplayPort
VGA
Audio
In
Audio
Out
Page 17

2
Systemsteuerung
1 2
Power-LED Leuchtet, wenn das Gerät Strom hat
Power Ein- / Ausschalter
Eingabe
Pfeil nach oben
Pfeil nach unten
OSD Menü Ein- / Ausschalter
Rückseite
SYSTEMSTEUERUNG/RÜCKSEITE
Stromkabel
VESA 100x100
HDMI Anschluss
DVI Anschluss
Display Anschluss
Kopfhörer Anschluss
Audio Anschluss
VGA Anschluss
Page 18

3
Verwendung der Bildschirmanzeigefunktionen (OSD)
Hauptmenü anzeigen
1
OSD-Menü beenden
2 Manuelle Anpassung der Modusauswahl für VGA, DVI, HDMI, DisplayPort, Automatischer Modus
Wählen Sie das gewünschte Element im OSD-Menü aus
Wenn Sie sich nicht im OSD-Menü benden, wird direkt Kontrast/Helligkeit eingegeben
Wählen Sie das gewünschte Element im OSD-Menü aus
Wenn Sie sich nicht im OSD-Menü benden, wird direkt Bildmodus eingegeben
+
1 +
2 +
Hauptmenü
Abruf sowohl von Kontrast als auch Helligkeit (wenn Sie sich nicht im OSD-Menü benden)
Powerlock (wenn Sie sich nicht im OSD-Menü benden)
OSD-Sperre (wenn Sie sich nicht im OSD-Menü benden)
BILDSCHIRMANZEIGE
Page 19

Verknüpfungsfunktion über die Schaltäche(n)
Automatische
Anpassung
Kontrast/Helligkeit
Eingangsquelle
Zur automatischen Anpassung der horizontalen Position, der vertikalen Position, der Phase (Feineinstellung) und des
Takts (H. Größe) des Bildschirms.
Zur manuellen Einstellung von Kontrast, Helligkeit, DCR, ECO und OD des Bildschirmbildes.
Kontrast: Zur Anpassung der Weißstufe im Vordergrund des Bildschirmbildes.
Kontrast erhöhen, Kontrast reduzieren.
Helligkeit: Zur Anpassung der Leuchtdichte des Videos.
Helligkeit erhöhen, Helligkeit reduzieren.
DCR: Zur Erfassung der Verteilung der optischen Signaleingänge und für einen optimierten Kontrast. Helligkeitsanpassung und
ECO werden deaktiviert, wenn DCR aktiv ist.
ECO: Ermöglicht Benutzern den Wechsel des ECO-Modus. Kontrast, Helligkeitsanpassung und DCR-Anpassung werden
deaktiviert, wenn ECO aktiv ist.
OD: Ermöglicht Benutzern die Änderung der Overdrive-Stärke. Verbessert die Qualität von bewegten Bildern.
Wenn Eingangsauswahl gedrückt ist, ändern Sie das Eingangssignal auf VGA, DVI, HDMI, DisplayPort oder
Automatisch.
Zur Anpassung der Audiofunktionen
Lautstärke: Zur Anpassung der Lautstärke des Lautsprecherausgangs.
Audio-Anpassung
Farbanpassung
Stummschaltung: Zum Ein- bzw. Ausschalten der Stummschaltung.
Audioeingang: Wenn der HDMI-Eingang ausgewählt ist, können Sie wählen, ob die Audioquelle von Line-In oder HDMI
kommt. Wenn der DisplayPort-Eingang ausgewählt ist, können Sie wählen, ob die Audioquelle von Line-In oder DisplayPort
kommt.
Wenn Eingangsauswahl gedrückt ist, ändern Sie das Eingangssignal auf VGA, DVI, HDMI, DisplayPort oder Automatisch.
Kühl: Fügt dem Bildschirmbild Blau hinzu, um ein kühleres Weiß zu erzeugen.
Normal: Fügt dem Bildschirmbild Rot hinzu, um ein wärmeres Weiß und ein satteres Rot zu erzeugen.
Warm: Fügt dem Bildschirmbild Grün hinzu, um eine dunklere Farbe zu erzeugen.
Benutzerdeniert: Individuelle Einstellungen für Rot (R), Grün (G), Blau (B).
1. Zur Auswahl der gewünschten Farbe auf die Schaltäche 2 drücken.
2. Zur Anpassung der ausgewählten Farbe oder drücken.
BILDSCHIRMANZEIGE
Page 20

Verknüpfungsfunktion über die Schaltäche(s)
Bildmodus: Bietet je nach angezeigtem Inhalt eine optimierte Anzeigeumgebung. Dieser Modus enthält fünf vom Benutzer
auswählbare Voreinstellungen.
• Standard: für allgemeine Windows-Umgebungen und Monitor-Standardeinstellungen
• Game: für PC-Spiel-Umgebungen
• Video: für Kino- und Videoumgebungen
• Landscape: für die Anzeige von Landschaftsbildern
• Text: für die Bearbeitung und Anzeige von Text und Textverarbeitungsumgebungen.
Zeigt Informationen zum aktuellen Eingangssignal an, das von der Grakkarte in Ihrem Computer kommt.
Informationen
Manuelle Bildanpassung
Hinweis: Siehe Benutzerhandbuch der Grakkarte für weitere Informationen zur Änderung der Auösung und der
Aktualisierungsrate.
Zur manuellen Anpassung von H. /V. Position, horizontale Größe, Schärfe und Videomodusanpassung.
H. /V. Position: Zur Anpassung der horizontalen und vertikalen Position des Videos.
H. Position: Bildschirm nach rechts bewegen, Bildschirm nach links bewegen.
V. Position: Bildschirm nach oben bewegen, Bildschirm nach unten bewegen.
Horizontale Größe: Zur Anpassung der Breite des Bildschirmbildes.
Breite des Bildschirmbildes erhöhen, Breite des Bildschirmbildes reduzieren.
Phase: Zur Anpassung der Verzögerungszeit von Daten und Takt.
Zur Anpassung der Voreinstellung oder drücken.
Schärfe: Zur Anpassung der Klarheit eines Signals ohne Full-HD-Auösung (1.920 x 1.080) oder drücken.
Videomodusanpassung: Zur Auswahl des Videomodus zwischen Vollbild oder Seitenverhältnis.
Seitenverhältnis: Zur Auswahl einer Bildgröße von 4:3.
Vollbild: Zur Auswahl der Bildgröße Vollbild.
Zur Einrichtung von Sprachauswahl, OSD-Position, OSD-Zeitlimit und OSD-Hintergrund.
Sprachauswahl: Ermöglicht Benutzern die Auswahl einer verfügbaren Sprache.
OSD-Position: Zur Auswahl zwischen horizontaler und vertikaler OSD-Position oder drücken.OSD
H. OSD-Position: Zur horizontalen Anpassung der OSD-Position.
Menüeinstellung
Memory recall
BILDSCHIRMANZEIGE
OSD nach rechts bewegen, OSD nach links bewegen.
V. OSD-Position: Zur vertikalen Anpassung der OSD-Position.
OSD nach oben bewegen, OSD nach unten bewegen.
OSD-Zeitlimit: Zur automatischen Abschaltung von OSD nach einem voreingestellten Zeitraum.
OSD-Hintergrund: Ermöglicht Benutzern das Ein- bzw. Ausschalten des OSD-Hintergrundes.
Speicherabruf: Zum Abruf der Werkseinstellungen für Video- und Audio-Steuerelemente.
Zur Auswahl der Menüoption „Speicherabruf“ auf die Schaltäche 2 drücken.
Page 21

4
Technische Daten
LCD Panel 60,4 cm (23,8 Zoll) TFT (mit LED-Hintergrundbeleuchtung)
Energieverwaltung
Energy Star
VESA DPMS-kompatibel
OFF-Modus, < 0,5 W
Darstellbare
Auösung
Größe in Pixel 0,2745 x 0,2745 mm
LCD-Bildschirmfarbe LCD-Bildschirmfarbe
Kippen -5°~22° (±2°)
Aktiver
Anzeigebereich
Temperatur
Konformität FCC, CE, Energy Star
Stromversorgung Eingangsspannung AC 100-240 V
Full-HD, max. 1.920 x 1.080
Vertikale Frequenz max. 60 Hz
527,0 mm x 296,4 mm
Betrieb: 0° C ~ + 40° C
Lagerung: -20° C ~ + 60° C
TECHNISCHE DATEN
Page 22

5
Pege
• Vermeiden Sie eine direkte Einwirkung durch Sonnenstrahlen oder andere Wärmequellen auf den Monitor. Zum Blendschutz
sollte der Monitor ohne direkte Sonneneinstrahlung aufgestellt werden.
• Stellen Sie den Monitor in einem gut durchlüfteten Bereich auf.
• Legen Sie keine schweren Gegenstände auf dem Monitor ab.
• Stellen Sie den Monitor in einem sauberen und trockenen Bereich auf.
• Der Monitor darf nicht in unmittelbarer Nähe von Magneten, Motoren, Transformatoren, Lautsprechern und Fernsehgeräten
aufgestellt werden.
Sicherheitshinweise
• Wenn der Monitor Rauch, ungewöhnliche Geräusche oder Gerüche von sich gibt, ist Vorsicht geboten. Ziehen Sie das Netzkabel sofort heraus und wenden Sie sich an Ihr Servicecenter.
• Entfernen Sie niemals die rückwärtige Abdeckung des Monitorgehäuses. Das Anzeigegerät enthält Teile, die unter Hochspannung stehen und Menschen einen Stromschlag versetzen können.
• Versuchen Sie niemals, den Monitor selbst zu reparieren. Wenden Sie sich für Reparaturen an Ihr Servicecenter oder an einen
qualizierten Techniker.
PFLEGE UND WARTUNG
Page 23

6
Kein Strom
• Stellen Sie sicher, dass das AC-Netzstromkabel fest im Netzteil eingesteckt und die Stromversorgung fest mit dem Monitor
verbunden ist.
• Stecken Sie ein anderes elektronisches Gerät in die Steckdose ein, um zu überprüfen, ob die Steckdose die richtige Spannung liefert.
• Stellen Sie sicher, dass alle Signalkabel angebracht sind.
Eingeschaltet aber kein Bildschirmbild
• Stellen Sie sicher, dass das im Lieferumfang enthaltene Videokabel fest im Videoausgang auf der Rückseite des Computers
eingesteckt ist. Falls dies nicht der Fall ist, stecken Sie es fest ein.
• Passen Sie die Helligkeit an.
Falsche oder ungewöhnliche Farben
• Falls irgendwelche Farben (Rot, Grün, Blau) fehlen, überprüfen Sie das Videokabel, um sicherzustellen, dass es fest eingesteckt
ist. Lockere oder abgebrochene Stifte im Steckverbinder des Kabels können zu einer fehlerhaften Verbindung führen.
• Verbinden Sie den Monitor mit einem anderen Computer.
FEHLERBEHEBUNG
Page 24

Sicherheitsvorkehrungen
Dieser Monitor wurde so hergestellt und getestet, dass die Benutzersicherheit sichergestellt ist. Eine unsachgemäße Verwendung oder Installation kann jedoch zu einer
Beschädigung des Monitors führen und eine Gefahr für Benutzer darstellen. Lesen Sie sich die nachfolgenden Warnhinweise vor der Installation aufmerksam durch und
bewahren Sie dieses Benutzerhandbuch auf.
7
WARNHINWEISE
• Dieser Monitor sollte nur über die ordnungsgemäßen Stromquellen betrieben werden, die auf dem Etikett auf der Rückseite des Monitors aufgeführt sind. Falls Sie sich
mit der Stromversorgung vor Ort nicht auskennen, wenden Sie sich an Ihren Händler oder Ihr Stromversorgungsunternehmen.
• Versuchen Sie nicht, den Monitor selbst zu reparieren, da dieser keine von Benutzern reparierbaren Teile enthält. Der Monitor sollte nur von einem qualizierten
Techniker repariert werden.
• Önen Sie niemals das Monitorgehäuse. Es enthält unter Hochspannung stehende Teile, die selbst bei ausgezogenem Netzkabel einen elektrischen Stromschlag
verursachen können.
• Verwenden Sie den Monitor nicht, wenn das Gehäuse beschädigt ist. Lassen Sie den Monitor von einem Servicetechniker überprüfen.
• Stellen Sie den Monitor nur an einem sauberen, trockenen Ort auf. Sollte der Monitor nass werden, ziehen Sie sofort das Netzkabel heraus und wenden Sie sich an Ihren
Servicetechniker.
• Ziehen Sie das Netzkabel stets vor der Reinigung des Monitors heraus. Reinigen Sie das Gehäuse mit einem sauberen, trockenen Tuch. Sprühen Sie ein ammoniakfreies
Reinigungsmittel auf das Tuch und niemals direkt auf den Monitor.
• Stellen Sie den Monitor nicht in unmittelbarer Nähe von magnetischen Gegenständen, Motoren, Fernsehgeräten und Transformatoren auf.
• Legen Sie keine schweren Gegenstände auf dem Kabel oder dem Netzstromkabel ab.
• Wenn der VESA-Montagesatz getrennt erworben wurde, sollten Sie aus Sicherheitsgründen überprüfen, dass dieser UL-gelistet ist und nur durch Servicepersonal
ersetzt wird.
Behördliche Informationen: Entsorgung von Elektro- und Elektronikaltgeräten (Waste Electrical and Electronic Equipment – WEEE) Die Verordnung für Elektro- und
Elektronikaltgeräte (WEEE) zielt darauf ab, die negativen Auswirkungen von elektrischen und elektronischen Produkten auf die Umwelt so gering wie möglich zu halten, indem die
Anzahl von Altgeräten, die auf Müllhalden entsorgt werden, durch eine verstärkte Wiederverwendung und vermehrtes Recycling reduziert wird. Das Symbol auf Ihrem V7-Produkt
bzw. seine Verpackung weist darauf hin, dass dieses Produkt am Ende seiner Nutzungsdauer separat von gewöhnlichem Haushaltsmüll entsorgt werden muss. Sie sollten sich
dessen bewusst sein, dass Sie für die Entsorgung von Elektronikgeräten in Recycling-Zentren zur Schonung von natürlichen Rohstoressourcen verantwortlich sind.
Jedes Land in der Europäischen Union sollte über eigene Sammelzentren für das Recycling von Elektro- und Elektronikgeräte verfügen. Informationen über die Abgabe von
Geräten zwecks Recycling erhalten Sie von Ihrer zuständigen Behörde für Elektro- und Elektronikaltgeräte oder vom Einzelhändler, bei dem Sie das Produkt gekauft haben.
ID 1419050639
SICHERHEITSINFORMATIONEN UND FCC-WARNUNG
V3-20190128
Page 25

Ecran LED 23.8” Full HD
L238E
MANUEL DE L’UTILISATEUR
Page 26

1 Démarrage
Contenu du paquet
Installation
2 Panneau de conguration et panneau arrière
Panneau de conguration
Panneau arrière
3 Achage à l’écran
4 Spécication technique
5 Entretien et maintenance
6 Guide de dépannage
Absence d’alimentation
Mise en marche eectuée mais pas d’image à l’écran
Couleurs incorrectes ou anormales
7 Informations de sécurité et mise en garde FCC
TABLE DES MATIÈRES
Page 27

Contenu du paquet
• Cordon d’alimentation secteur
• Câble HDMI
1
• Guide de démarrage rapide
DÉMARRAGE
Cordon d’alimentation
secteur
Câble HDMI
Page 28

Installation
Connectez le câble vidéo, Connectez le cordon d’alimentation, Connectez le câble audio
DÉMARRAGE
Mettez en marche l’unité centrale et le moniteur
POWER
DVI HDMI
DisplayPort
VGA
Audio
In
Audio
Out
Page 29
2
Panneau de conguration
1 2
LED Indicator
Power On/O
Conrm Select
Scroll Up/Increase
Scroll Down/Decrease
OSD Menu On/O
Panneau arrière
PANNEAU DE CONFIGURATION ET PANNEAU ARRIÈRE
Power Cable
Display
VESA 100x100
HDMI
DVI
Audio Output
Audio Input
VGA
Page 30

3
Utilisation des fonctions d’achage OSD
Acher le menu principal
1
Sortie du menu d’achage
2 Mode de réglage manuel pour la sélection des options VGA, DVI, HDMI, DisplayPort et Automatique
À partir du menu d’achage OSD, sélectionnez l’élément concerné
S’il ne gure pas dans le menu d’achage, accédez directement au menu Contraste/Luminosité
À partir du menu d’achage OSD, sélectionnez l’élément concerné
Si vous êtes hors du menu d’achage OSD, entrez directement dans le mode Image
+
1 +
2 +
Menu principal
Retour aux fonctions contraste et luminosité (si elles ne gurent pas dans le menu d’achage OSD)
Verrouillage de l’alimentation (si absent du menu d’achage OSD)
Verrouillage de l’achage (si absent du menu)
AFFICHAGE À L’ÉCRAN
Page 31

Fonctions de raccourci de(s) bouton(s)
Réglage automatique
Contraste/Luminosité
Source d’entrée Après avoir appuyé sur le bouton de sélection, modiez le signal d’entrée par l’une des options VGA, DVI, HDMI, DisplayPort ou Auto.
Pour le réglage automatique des positions horizontale et verticale, le phasage (réglage n) et l’horloge (taille horizontale) de l’écran
Pour le réglage manuel des fonctionnalités suivantes de l’achage : CONTRASTE, LUMINOSITE, DCR, ECO et OD.
Contraste : Pour le réglage du niveau de blanc d’avant-plan de l’écran.
augmente le contraste, diminue le contraste.
Luminosité : Pour le réglage de la luminosité de la vidéo
augmente la luminosité, diminue la luminosité.
DCR : Pour la détection de la répartition des entrées des signaux visuels et la création d’un contraste optimisé. Le réglage de la luminosité et le mode ECO est désactivé lorsque le mode DCR est activé.
ÉCO : Permet à l’utilisateur d’activer le mode ECO. Le réglage de la luminosité est désactivé lorsque le mode ECO est opérationnel.
OD : Permet à l’utilisateur d’activer le mode accéléré. Améliorer la qualité des images animées.
Permet le réglage des fonctionnalités audio.
Volume : Ajuste le volume du haut-parleur.
Réglage audio
Réglage des couleurs
Muet : Pour l’activation ou la désactivation du mode silence du haut-parleur.
Entrée audio : A partir de l’option d’entrée HDMI, sélectionnez l’emplacement d’origine de la source audio : Entrée ligne ou
HDMI. A partir de l’option d’entrée DisplayPort, sélectionnez l’emplacement d’origine de la source audio : Entrée ligne ou DisplayPort.
Pour la sélection de la couleur permettant d’améliorer la luminosité et la saturation entre les options COOL, NORMAL, CHAUD, COULEUR PERSONNALISÉE.
Cool : Ajoute du bleu à l’achage pour obtenir un blanc plus agréable.
Normal : Ajoute du rouge à l’écran pour un blanc plus chaud et un rouge plus riche.
Chaud : Ajoute du vert à l’écran pour une couleur plus foncée.
Couleurs personnalisées : Réglages personnalisés pour le rouge (R), le vert (G) et le bleu (B).
1. Appuyez sur le bouton 2 pour choisir la couleur désirée.
2. Appuyez sur les boutons ou pour régler la couleur choisie.
AFFICHAGE À L’ÉCRAN
Page 32

Fonctions de raccourci de(s) bouton(s)
Mode photo : Assure une qualité optimale d’achage en fonction du contenu. Il dispose de 5 présélections programmables
par l’utilisateur.
• Standard : pour les paramètres généraux d’achage et les réglages par défaut du moniteur.
• Jeu : Optimisé pour des environnements ludiques sur PC.
• Cinéma : Optimisé pour le visionnage des lms et des vidéos.
• Paysage : Optimisé pour l’achage des scènes extérieures.
• Texte : Optimisé pour l’édition et la visualisation dans un environnement de traitement de texte
Pour l’achage des informations relatives au signal d’entrée actuel de la carte graphique de votre ordinateur.
Information
Réglage manuel
de l’image
Remarque : Consultez le mode d’emploi de votre carte graphique pour plus d’informations sur le changement de la résolution
et la fréquence de rafraîchissement.
Pour le réglage manuel des positions horizontale et verticale, de la taille horizontale, de la phase, de la netteté, du
rapport de forme et du mode vidéo
Position H. /V. : Pour le réglage des positions horizontale et verticale de la vidéo.
Position horizontale : déplace l’achage vers la droite, déplace l’achage vers la gauche.
Position verticale: déplace l’achage vers le haut, déplace l’achage vers le bas.
Taille horizontale : Pour le réglage de la largeur de l’achage.
augmente la largeur de l’achage, diminue la largeur de l’achage.
Phase : Pour le réglage du délai d’achage des données et l’horloge.
Appuyez sur le bouton ou pour personnaliser votre réglage.
Netteté : Pour le réglage de la netteté d’un signal qui n’est pas de la norme WXSGA pour une résolution d’achage de 1366 x
768 pixels, grâce aux boutons et
Réglage du mode vidéo : Pour la sélection du mode vidéo depuis plein écran ou rapport de forme.
Rapport de forme : Pour le choix de l’image au rapport de forme 4:3.
Plein écran : Pour le choix de l’image en mode plein écran.
Pour le réglage de la langue, de la position, du délai et de l’arrière-plan de l’achage.
Paramètre linguistique : Permet aux utilisateurs de dénir la langue de leurs choix à partir d’une liste disponible.
Position de l’achage : Appuyez sur les boutons ou pour choisir la position de réglage horizontal ou vertical de l’achage.
Position horizontale : Pour le réglage de la position horizontale de l’achage.
Menu de réglage
ON SCREEN DISPLAY
Rappel de mémoire
déplace l’achage vers la droite, déplace l’achage vers la gauche.
Position verticale de l’achage: Pour le réglage de la position verticale de l’achage.
déplace l’achage vers le haut, déplace l’achage vers le bas.
Délai d’achage : Pour l’arrêt automatique de l’achage après une période de temps prédénie.
Arrière-plan de l’achage : Permet à l’utilisateur d’activer ou de désactiver l’arrière-plan de l’achage à l’écran.
Réinitialise les fonctionnalités audio et vidéo aux paramètres d’usine.
Appuyez sur le bouton 2 pour sélectionner l’option de rappel de la mémoire.
Page 33

Spécications techniques
Panneau à DEL 60,45 cm (23,8 pouces) TFT (avec rétroéclairage DEL)
4
Gestion de
l’alimentation
Résolution
Dimensions en pixels 0,2745 x 0,2745 mm
Couleur d’achage
DEL
Étirement -5°~22° (±2°)
Zone d’achage
active
Températures
Conformité FCC, CE, Energy Star
Alimentation Tension d’entrée : 100-240 Volts CA
Energy Star
Compatible VESA DPMS
Mode arrêt : < 0,5 W
Full HD 1920 x 1080 pixels max.
Fréquence verticale : 60Hz max.
16,7 millions de couleurs
527,0 mm x 296,4 mm
Fonctionnement : 0°C ~ + 40°C
Entreposage : - 20°C ~ + 60°C
SPÉCIFICATIONS TECHNIQUES
Page 34

5
Entretien
• Évitez d’exposer votre moniteur directement à la lumière du soleil ou à toute autre source de chaleur. Eloignez votre moniteur
du soleil pour réduire l’éblouissement.
• Placez votre moniteur dans un espace bien ventilé.
• Ne placez pas d’objets lourds sur la partie supérieure de votre moniteur.
• Assurez-vous que votre moniteur est installé dans un espace propre et exempt d’humidité.
• Eloignez votre moniteur des aimants, des moteurs, des transformateurs, des haut-parleurs, et des téléviseurs.
Conseils de sécurité
• Si votre moniteur laisse échapper de la fumée, un bruit ou une odeur inhabituelle, retirez immédiatement le cordon
d’alimentation par précaution et appelez votre centre de maintenance.
• Ne jamais retirer le couvercle arrière du boîtier de votre moniteur. L’intérieur de l’écran est composé de pièces de haute
tension pouvant provoquer des chocs électriques au corps humain.
• Ne jamais essayer de réparer votre moniteur vous-même. Faites toujours appel à votre centre d’entretien ou à un technicien
qualié pour le faire.
ENTRETIEN ET MAINTENANCE
Page 35

6
Absence d’alimentation
• Assurez-vous que le cordon d’alimentation électrique est correctement branché à l’adaptateur secteur et l’alimentation
électrique fermement connectée au moniteur.
• Connectez un autre appareil électrique sur la prise de courant pour vérier que celle-ci fournit la tension appropriée.
• Assurez-vous que tous les câbles sont connectés.
Mise en marche eectuée mais pas d’image à l’écran
• Assurez-vous que le câble vidéo fourni avec le moniteur est bien connecté au port de sortie vidéo à l’arrière de l’ordinateur. Si
ce n’est pas le cas, xez-le solidement.
• Réglez la luminosité.
Couleurs incorrectes ou anormales
• Si l’une des couleurs (rouge, vert, bleu) est manquante, vériez le câble vidéo pour vous assurer qu’il est correctement
connecté. Les broches desserrées ou cassées dans le connecteur du câble peuvent entrainer une mauvaise connexion.
• Connectez le moniteur à un autre ordinateur.
GUIDE DE DÉPANNAGE
Page 36

7
Consignes de sécurité
Ce moniteur est fabriqué et contrôlé en vue de garantir la sécurité des utilisateurs. Cependant, une mauvaise installation ou utilisation pourrait être dangereuse tant pour le
moniteur que pour ses utilisateurs. Lisez soigneusement les mises en garde suivantes avant l’installation et conservez ce guide à portée de main.
MISES EN GARDE
• Ce moniteur doit être utilisé uniquement sur les sources d’alimentation correctes indiquées sur l’étiquette à l’extrémité arrière du moniteur. Si vous avez des doutes sur
la qualité de l’alimentation électrique de votre résidence, consultez le revendeur de votre région ou votre compagnie d’électricité.
• N’essayez pas de réparer le moniteur vous-même, il ne contient aucune pièce pouvant être réparée par l’utilisateur. Le moniteur ne doit être réparé que par un technicien qualié.
• Ne pas retirer le boîtier du moniteur. Il contient des éléments à haute tension pouvant provoquer des chocs électriques même si le cordon d’alimentation est
débranché.
• Cessez d’utiliser le moniteur si son boîtier est endommagé. Faites-le vérier par un technicien de maintenance.
• Placez votre moniteur dans un environnement propre et sec. Débranchez le moniteur immédiatement s’il est humide et consultez votre technicien de maintenance.
• Débranchez toujours le moniteur avant de le nettoyer. Nettoyez le boîtier avec un chion propre et sec. Appliquez un nettoyant sans ammoniaque sur le tissu, et non
directement sur le verre de l’écran.
• Éloignez le moniteur des objets magnétiques, des moteurs, des téléviseurs et des transformateurs.
• Ne posez aucun objet lourd sur le câble ou sur le cordon d’alimentation.
• Pour des raisons de sécurité, si le kit de montage VESA est acheté séparément, assurez-vous qu’il est certié UL et remplaçable par un personnel de maintenance.
Informations réglementaires: Mise au rebut des déchets composés d’équipements électriques et électroniques (WEEE) La directive sur la mise au rebut des déchets composés
d’équipements électriques et électroniques a pour but de minimiser l’impact créé par les biens électriques et électroniques sur l’environnement en augmentant la réutilisation et
le recyclage et en diminuant la quantité de ces appareils dans les décharges. Le symbole sur votre produit V7 ou sur son emballage signie que ce produit doit être mis au rebut
séparément des déchets ordinaires ménagers lorsqu’il arrive en n de vie. Veuillez être conscient qu’il vous incombe de mettre au rebut les équipements électroniques dans des
déchetteries an d’aider à préserver les ressources naturelles.
INFORMATIONS DE SÉCURITÉ ET MISE EN GARDE FCC
Chaque pays de l’union européenne possède un grand nombre de déchetteries pour le recyclage des équipements électriques et électroniques. Pour des informations sur la
déchetterie la plus proche, veuillez contacter l’autorité de gestion des déchets d’équipements électriques et électroniques ou le revendeur chez lequel vous avez acheté le produit.
ID 1419050639
Page 37

Monitor LED da 23.8” Full HD
L238E
MANUALE UTENTE
Page 38

1 Per iniziare
Il pacchetto include
Installazione
2 Pannello di controllo/ Pannello posteriore
Panello di controllo
Panello posteriore
INDICE
3 Visualizzazione su schermo
4 Speciche tecniche
5 Cura e manutenzione
6 Risoluzione dei problemi
Assenza di alimentazione
Alimentazione corretta ma nessuna immagine su schermo
Colori errati o anomali
7 Informazioni sulla sicurezza e avvertenza FCC
Page 39

Il pacchetto include
• Cavo di alimentazione CA
• Cavo HDMI
1
• Guida di avvio rapido
PER INIZIARE
Cavo di alimentazione CA Cavo HDMI
Page 40

Installation
Collegare il cavo video, Collegare il cavo di alimentazione, Collegare il cavo audio
PER INIZIARE
POWER
Accendere il computer e il monitor
DVI HDMI
DisplayPort
VGA
Audio
In
Audio
Out
Page 41

2
Panello di controllo
1 2
LED Indicator
Power On/O
Conrm Select
Scroll Up/Increase
Scroll Down/Decrease
OSD Menu On/O
Panello posteriore
PANNELLO DI CONTROLLO/ PANNELLO POSTERIORE
Power Cable
Display
VESA 100x100
HDMI
DVI
Audio Output
Audio Input
VGA
Page 42

3
Utilizzo delle funzioni OSD (On Screen Display, visualizzazione su schermo)
Visualizza menu principale
1
Esci dal menu OSD
2
+
1 +
2 +
Menu principale
Selezionare la modalità di regolazione manuale per le modalità VGA,
DVI, HDMI, DisplayPort, Auto
Nel menu OSD, selezionare la voce desiderata
Fuori dal menu OSD viene inserito direttamente Contrast/Brightness
Nel menu OSD, selezionare la voce desiderata
Fuori dal menu OSD viene inserita direttamente la modalità Picture
Richiamare sia Contrasto che Luminosità (fuori dal menu OSD)
Blocco alimentazione (fuori dal menu OSD)
Blocco OSD (fuori dal menu OSD)
VISUALIZZAZIONE SU SCHERMO
Page 43

Funzione di collegamento rapido dai pulsanti
Auto Image Adjust
Contrast/Brightness
Input Source Quando si preme Input Select, il segnale in ingresso cambia in VGA, DVI, HDMI, DisplayPort o Auto.
Per regolare in maniera automatica Posizione orizzontale, Posizione verticale, Fase (ottimizzazione) e Orologio (dimensione orizzontale) dello schermo.
Per regolare manualmente le funzioni Contrast, Brightness, DCR, ECO e OD dell’immagine su schermo.
Contrast: Per regolare il livello del bianco in primo piano dell’immagine sullo schermo.
aumenta il contrasto, riduce il contrasto.
Brightness: Per regolare la luminosità del video.
aumenta la luminosità, riduce la luminosità.
DCR: per regolare la distribuzione degli ingressi dei segnali visivi e creare un contrasto ottimizzato. Con funzione ECO attiva, la regolazione di luminosità ed ECO verrà disattivata.
ECO: permette all’utente di modicare la modalità ECO. Con funzione ECO attiva, la regolazione di contrasto, luminosità e DCR
verrà disattivata.
OD: Permette all’utente di modicare la potenza della funzione over Drive. Migliora la qualità delle immagini in movimento.
Per regolare le funzioni audio.
Volume: Per regolare il volume di uscita degli altoparlanti.
Audio Adjust
Color Adjust
Mute: Per attivare/disattivare l’audio.
Audio Input: Con ingresso HDMI, indicare se la sorgente audio proviene da Line-In o HDMI.
Con ingresso DisplayPort, indicare se la sorgente audio proviene da Line-In o DisplayPort.
Per selezionare il colore per aumentare la luminosità e la saturazione del colore tra Cool, Normal, Warm, User Color
e modalità Picture.
Cool: Aggiunge il blu all’immagine sullo schermo per un bianco più freddo.
Normal: Aggiunge il rosso all’immagine sullo schermo per un bianco più caldo e un rosso più intenso.
Warm: Aggiunge il verde all’immagine sullo schermo per scurire i colori.
User colour: Regolazioni individuali di rosso (R), verde (G), blu (B).
1. Premere il pulsante 2 per selezionare il colore desiderato.
2. Premere il pulsante o per regolare il colore selezionato.
VISUALIZZAZIONE SU SCHERMO
Page 44

Funzione di collegamento rapido dai pulsanti
Picture mode: Ore un ambiente di visualizzazione ottimale in base ai contenuti visualizzati. Contiene 5 preset selezionabili
all’utente.
• Standard per gli ambienti delle nestre generali e per l’impostazione predenita del monitor.
• Game ottimizzato per l’ambiente di gioco su PC.
• Video ottimizzato per l’ambiente di lm e video.
• Landscape ottimizzato per la visualizzazione delle immagini di panorami esterni
• Text ottimizzato per la modica e la visualizzazione in un ambiente di elaborazione dei testi.
Per visualizzare le informazioni relative al segnale di ingresso corrente proveniente dalla scheda graca del computer.
Information
Manual Image
Adjustment
Nota: Consultare la guida per l’utente della scheda graca per ulteriori informazioni sulla modica della risoluzione e la
frequenza di aggiornamento.
Per regolare manualmente H. /V. Position, Horizontal size, Phase, Sharpness e Video mode adjustment.
Language select: Per permettere agli utenti di scegliere tra le lingue disponibili.
Posizione H.: sposta la schermata a destra, sposta lo schermo a sinistra.
V. Position: sposta la schermata su, sposta la schermata giù.
Horizontal size: Per regolare la larghezza dell’immagine sullo schermo.
aumenta la larghezza dell’immagine sullo schermo, riduce la larghezza dell’immagine sullo schermo.
Phase: Per regolare il ritardo di data e orologio.
Premere o per regolare le preferenze.
Sharpness: Per regolare la nitidezza di un segnale di risoluzione diverso da Full HD (1920 x 1080) con il pulsante o
Video mode adjustment: Per scegliere la modalità video tra Full screen o Aspect ratio.
Aspect ratio: Per selezionare il formato immagine 4:3.
Full Screen: Per selezionare il formato immagine a schermo intero.
Per congurare la lingua selezionare, OSD position, OSD time out e OSD background.
Language select: Per permettere agli utenti di scegliere tra le lingue disponibili.
OSD position: Premere il pulsante o per scegliere tra la regolazione della posizione OSD orizzontale e verticaPosizione
OSD H.: Per regolare in orizzontale la posizione OSD.
Menu Setting
VISUALIZZAZIONE SU SCHERMO
Memory recall
sposta l’OSD a destra, sposta l’OSD a sinistra.
Posizione OSD V.: Per regolare in verticale la posizione OSD.
sposta l’OSD su, sposta l’OSD giù.
OSD time out: Per disattivare automaticamente l’OSD (On Screen Display, visualizzazione sullo schermo) dopo un periodo
predenito.
OSD background: Permette all’utente di attivare e disattivare lo sfondo OSD.
Memory recall: Per richiamare le impostazioni di fabbrica dei comandi Video e Audio.
Premere il pulsante 2 per selezionare l’opzione Memory Recall.
Page 45

4
Speciche tecniche
LCD Panel 60,45 cm (23.8”) TFT (con retroilluminazione LED)
Energy Star
Risparmio energetico
Risoluzione
visualizzabile
Dimensione in pixel 0,2745 x 0,2745 mm
Colori display LCD 16,7 milioni
Inclinazione -5°~22° (±2°)
Area display attiva 527,0 mm x 296,4 mm
Compatibile con VESA DPMS
Modalità O, < 0,5 W
Full HD max. 1920 x 1080
Frequenza verticale max. 60 Hz
Temperatura
Conformità FCC, CE, Energy Star
Accensione Tensione in ingresso CA 100-240 V
Operativa: 0°C ~ + 40°C
Stoccaggio: -20°C ~ + 60°C
SPECIFICHE TECNICHE
Page 46

5
Cura
• Non esporre il monitor alla luce diretta del sole o altra fonte di calore. Posizionareil monitor lontano dalla luce solare per
ridurre i riessi.
• Posizionare il monitor in una zona ben ventilata.
• Non posizionare oggetti pesanti sulla parte superiore del monitor.
• Assicurarsi che il monitor sia installato in un luogo pulito e asciutto.
• Tenere il monitor lontano da calamite, motori, trasformatori, altoparlanti e TV.
Suggerimenti per la sicurezza
• In caso di fumo, rumori anomali o odori anomali provenienti dal monitor, rimuovere con cautela il cavo di alimentazione e
contattare il centro di assistenza.
• Non rimuovere mai il coperchio posteriore dell’involucro del monitor. L’unità di visualizzazione all’interno contiene
componenti da alta tensione che possono causare scosse elettriche.
• Non tentare mai di riparare il monitor da soli. Contattare sempre il centro di assistenza o un tecnico qualicato.
CURA E MANUTENZIONE
Page 47

6
Assenza di alimentazione
• Vericare che il cavo di alimentazione CA sia inserito correttamente nell’alimentatore e che l’alimentatore sia collegato saldamente al monitor.
• Collegare un altro dispositivo elettrico alla presa per vericare che venga fornita la tensione corretta.
• Vericare che i cavi di segnale siano installati.
Alimentazione corretta ma nessuna immagine su schermo
• Vericare che il cavo video in dotazione con il monitor sia saldamente ssato alla porta di uscita video sulla parte posteriore
del computer. Se così non fosse, ssarlo.
• Regolare la luminosità.
Colori errati o anomali
• Se mancano alcuni colori (rosso, verde, blu), controllare il cavo video per vericare che sia collegato correttamente. Pin allentati o rotti all’interno del connettore del cavo potrebbero causare un collegamento errato.
• Collegare il monitor a un altro computer.
RISOLUZIONE DEI PROBLEMI
Page 48

7
Precauzioni di sicurezza
Questo monitor è costruito e testato per garantire la sicurezza dell’utente. Tuttavia, l’uso improprio o un’installazione errata possono comportare un pericolo per il monitor e
per l’utente. Prima dell’installazione, leggere attentamente le seguenti avvertenze e tenere questa guida a portata di mano.
AVVERTENZE:
• utilizzare solo con le tensioni indicate sull’etichetta posta sull’etichetta sul lato posteriore del monitor. Se non si conosce con certezza la tensione disponibile, consultare
il rivenditore locale e il fornitore di corrente.
• Non riparare il monitor da soli in quanto contiene parti non riparabili dall’utente Il monitor dovrebbe essere riparato solo da un tecnico qualicato.
• Non rimuovere l’involucro del monitor. All’interno sono presenti parti che possono causare scosse elettriche, anche quando il cavo di alimentazione è scollegato.
• Se l’involucro è danneggiato, non utilizzare il monitor. Far controllare il monitor da un tecnico dell’assistenza.
• Posizionare il monitor solo in ambienti puliti e asciutti. Se il monitor viene a contatto con l’acqua, scollegarlo immediatamente e contattare un tecnico dell’assistenza.
• Scollegare sempre il monitor prima di pulirlo. Pulire l’involucro con un panno pulito e asciutto. Utilizzare detergenti privi di ammoniaca sul panno e non direttamente
sul vetro dello schermo.
• Tenere il monitor lontano da oggetti magnetici, motori, TV e trasformatori.
• Non posizionare oggetti pesanti sul cavo o sul cavo di alimentazione.
• Per motivi di sicurezza, se il kit di montaggio VESA è stato acquistato separatamente, vericare che sia omologato UL e sostituibile solo dal personale dell’assistenza.
Informazioni normative: Smaltimento di Riuti di apparecchi elettrici ed elettronici (WEEE dall’inglese Waste Electrical and Electronic Equipment) La Direttiva sui Riuti di
apparecchi elettrici ed elettronici (WEEE) intende ridurre al minimo l’impatto dei prodotti elettrici ed elettronici sull’ambiente, aumentando il riutilizzo e il riciclo e riducendo la
quantità di riuti di apparecchi elettrici ed elettronici che niscono nelle discariche. Il simbolo sul prodotto V7 o sulla sua confezione indica che alla ne della sua vita utile questo
prodotto deve essere smaltito separatamente dai riuti ordinari. Spetta all’utilizzatore eliminare apparecchi elettronici nei centri di riciclaggio in modo da contribuire a preservare le
risorse ambientali.
INFORMAZIONI SULLA SICUREZZA E AVVERTENZA FCC
Ogni nazione dell’Unione europea dovrebbe disporre di centri di raccolta per il riciclaggio di apparecchi elettrici ed elettronici. Per informazioni sui centri di raccolta di zona,
contattare le autorità competenti o il rivenditore da cui si è acquistato il prodotto.
ID 1419050639
Page 49

23.8″ Full HD Monitor LED
L238E
MANUAL DEL USUARIO
Page 50

1 Para empezar
El paquete incluye
Instalación
2 Panel de control/Panel trasero
Panel de control
Panel trasero
3 Visualización en pantalla
4 Especicaciones técnicas
5 Cuidado y mantenimiento
6 Solución de problemas
No hay alimentación eléctrica
El monitor está encendido pero no hay ninguna imagen en la pantalla
Colores equivocados o anormales
7 Información de seguridad y advertencias de la FCC
TABLA DE CONTENIDOS
Page 51

El paquete incluye
• Cable de alimentación CA
• Cable HDMI
1
• Guía rápida
PARA EMPEZAR
Cable de alimentación CA Cable HDMI
Page 52

Instalación
Conectar el cable de vídeo, Conectar el cable de alimentación, Conectar el cable del audio
PARA EMPEZAR
Encender el ordenador y el monitor
POWER
DVI HDMI
DisplayPort
VGA
Audio
In
Audio
Out
Page 53

2
Panel de control
1 2
LED Indicator
Power On/O
Conrm Select
Scroll Up/Increase
Scroll Down/Decrease
OSD Menu On/O
Panel trasero
PANEL DE CONTROL/PANEL TRASERO
Power Cable
Display
VESA 100x100
HDMI
DVI
Audio Output
Audio Input
VGA
Page 54

3
Usar las funciones de visualización en pantalla (OSD)
Desplegar el menú principal
1
Salir del menú OSD
2 Selección del modo de ajuste manual para VGA, DVI, HDMI, DisplayPort, Auto mode
Seleccione el elemento deseado cuando esté en el menú OSD
Cuando no esté en el menú OSD, entra directamente en Contraste/Brillo
Seleccione el elemento deseado cuando esté en el menú OSD
Cuando no esté en el menú OSD, entra directamente en Modo de imagen
Menú principal
VISUALIZACIÓN EN PANTALLA
1 +
2 +
+
Vuelva a Contraste y Brillo (cuando no esté en el menú OSD)
Bloqueo de encendido/apagado (cuando no esté en el menú OSD)
Bloqueo de OSD (cuando no esté en el menú OSD)
Page 55

Funciones de atajos en el (los) botón(es)
Ajuste automático Para ajustar la posición horizontal, posición vertical, Fase (Ajuste idóneo) y Reloj (tamaño H) de la pantalla.
Para ajustar manualmente el contraste, brillo, DCR y ECO de una imagen.
Contraste: Para ajustar el nivel de fondo blanco de la imagen en pantalla.
aumentar contraste, disminuir contraste.
Brillo: Para ajustar la iluminación del vídeo.
Contraste/Brillo
Fuente de entrada Cuando presion Fuente de entrada, cambie la señal de entrada a VGA, DVI, HDMI, DisplyPort o Automático.
aumentar brillo, disminuir brillo.
DCR: Para detectar la distribución de la información visual entrante y crear un contraste optimizado. El brillo y los ajuste ECO serán
deshabilitados cuando DCR esté activado.
ECO: Permite al usuario cambiar el modo ECO. El ajuste del brillo, contraste y DCR será deshabilitado cuando ECO esté activado.
OD: Permite al usuario cambiar la intensidad de la sobrecarga. Mejora la calidad de las películas.
Para ajustar la funciones de audio.
Volumen: Para ajustar el volumen se salida de un altavoz.
Ajuste de audio
Ajuste de color
VISUALIZACIÓN EN PANTALLA
Silencio: Para ENCENDER/APAGAR el modo de ‘silencio’.
Entrada de audio: Dentro de la opción entrada HDMI, seleccione la fuente de audio de Línea o DisplayPort.
Dentro de la opción DisplayPort, seleccione la fuente de audio de Línea o DisplayPort
Para seleccionar el color y mejorar el brillo y la saturación de color entre Frío, Normal, Cálido y Personalizado y
Modo de imagen.
Frío: Añade azul a la imagen de la pantalla para lograr un blanco más frío.
Normal: Añade rojo a la imagen de la pantalla para lograr un blanco más cálido y rojos más vivos.
Cálido: Añade verde a la imagen de la pantalla para lograr un color más oscuro.
Personalizado: Ajustes individuales para rojo (R), verde (G), azul (B).
1. Presione el botón de 2 para seleccionar el color deseado.
2. Presione el botón o para ajustar el color deseado.
Page 56

Funciones de atajos en el (los) botón(es)
Modo de imagen: Le proporciona un entorno de visualización óptimo, dependiendo de los contenidos que se muestren.
Contiene 5 preselecciones entre las que puede elegir el usuario.
• Standard es para un entorno general de Windows, y es el ajuste del monitor por defecto.
• Juego, optimizado para los juegos de un PC.
• Video, optimizado para videos y películas.
• Paisaje, optimizado para visualizar imágenes de paisajes y exteriores.
• Texto, optimizado para la edición y visualización de texto en un procesador de textos.
Para visualizar la información acerca de la señal proveniente de la tarjeta de grácos de su ordenador.
Información
Ajuste manual
de imagen
Nota: Consulte la guía de su tarjeta de grácos para obtener más información acerca de la resolución y frecuencia de
actualización.
Para ajustar manualmente la Posición H./V., Tamaño horizontal, Fase, Denición y Ajuste de modo de vídeo.
Posición H./V.: Para ajustar la posición horizontal y vertical del vídeo.
Posición H: mueve la pantalla hacia la derecha, mueve la pantalla hacia la izquierda.
Position V: mueve la pantalla hacia arriba, mueve la pantalla hacia abajo.
Tamaño horizontal: Para ajustar el ancho de la imagen en pantalla.
incrementa el ancho de la imagen, disminuye el ancho de la imagen.
Fase: Para ajustar el tiempo de retraso de la información y el reloj.
Presione o para ajustar su preferencia.
Denición: Para ajustar la claridad de una resolución que no sea Full HD (1920x 768) use el botón o
Modo de ajuste de vídeo: Para seleccionar el modo de video de pantalla completa o Relación de aspecto.
Relación de aspecto: Para seleccionar una tamaño de imagen de 4:3.
Pantalla Completa: Para seleccionar un tamaño de imagen de pantalla completa.
Para ajustar la selección del idioma, posición de la OSD, tiempo de visualización de la OSD y fondo de la OSD.
Selección del idioma: Permite a los usuarios escoger entre los idiomas disponibles.
Posición de la OSD: Presione el botón o para seleccionar entre un ajuste en la posición horizontal o vertical de la OSD.
Posición H de la OSD: Para ajustar horizontalmente la posición de la OSD.
Menú de ajustes
VISUALIZACIÓN EN PANTALLA
Recuperar memoria
mueve la OSD a la derecha, mueve la OSD a la izquierda.
Posición V de la OSD: Para ajustar verticalmente la posición de la OSD.
mueve la OSD hacia arriba, mueve la OSD hacia abajo.
Tiempo de visualización de la OSD: Para apagar automáticamente la OSD después de un tiempo predeterminado.
Fondo de la OSD: Permite al usuario apagar o encender el fondo de la OSD.
Para restablecer los valores de fábrica de los controles de Audio y Video.
Presione el botón de 2 para seleccionar la opción de Recuperar memoria del menú.
Page 57

Especicaciones técnicas
Panel LCD 60,45 cm (23,8”) TFT (con luz trasera LED)
4
Gestión de la
alimentación eléctrica
Resolución de
visualización
Dimensión de los
píxeles
Color de visualización
LCD
Inclinación -5°~22° (±2°)
Área activa de
visualización
Temperatura
Cumplimiento de
directivas
Alimentación eléctrica Tensión de entrada CA100-240 V
Certicación Energy Star
Compatible con VESA DPMS
Modo apagado, < 0,5 W
HD completo 1920 x 1080 máx.
Frecuencia vertical 60Hz máx.
0,2745 x 0,2745 mm
16,7M
527,0 mm x 296,4 mm
Funcionamiento: 0°C ~ + 40°C
Almacenamiento: -20°C ~ + 60°C
FCC, CE, Energy Star
ESPECIFICACIONES TÉCNICAS
Page 58

Cuidado
• Evite exponer el monitor directamente a la luz solar u otra fuente de calor. Coloque el monitor alejado del sol para reducir el reejo.
• Ubique el monitor en un área bien ventilada.
5
• No coloque objetos pesados encima del monitor.
• Asegúrese de que el monitor está instalado en un área limpia y bien ventilada.
• Mantenga el monitor alejado de imanes, motores, transformadores, altavoces, y televisores.
Consejos de seguridad
• Si hubiera presencia de humo, ruidos u olores anormales procedentes del monitor, desconecte con cuidado e inmediatamente el cable de alimentación y llame al centro de servicio.
• Nunca retire la cubierta trasera del gabinete de su monitor. El monitor contiene piezas expuestas a alta tensión que pueden
causar descargas eléctricas.
• Nunca trate de reparar su monitor por su cuenta. Siempre llame a su centro de servicio o a un técnico cualicado para arreglarlo.
CUIDADO Y MANTENIMIENTO
Page 59

6
No hay alimentación eléctrica
• Asegúrese de que el cable de alimentación está rmemente conectado al adaptador de corriente y que el suministro de
alimentación está rmemente conectado al monitor.
• Conecte otro dispositivo electrónico a la toma de corriente para vericar que la toma suministra la tensión adecuada.
• Verique que todos los cables de señal están instalados.
El monitor está encendido pero no hay ninguna imagen en la pantalla
• Verique que el cable de vídeo suministrado con el monitor está rmemente conectado al puerto de salida de vídeo en la
parte trasera del ordenador. Si no es así, conéctelo.
• Ajuste el brillo.
Colores equivocados o anormales
• Si falta algún color (rojo, verde, azul), examine el cable de vídeo para vericar que está bien conectado. Los pins estropeados
o rotos en el conector del cable pueden causar una mala conexión.
• Conecte el monitor a otro ordenador.
SOLUCIÓN DE PROBLEMAS
Page 60

7
Precauciones de seguridad
Este monitor ha sido fabricado y probado para proporcionar seguridad al usuario. Sin embargo, una instalación o uso inapropiados pueden ser peligrosos para el monitor así
como para el usuario. Repase detenidamente las siguientes advertencias antes de la instalación y mantenga esta guía a mano.
ADVERTENCIAS
• Este monitor únicamente debe usarse con las fuentes de alimentación correctas que se indican en las etiquetas de la parte trasera del monitor. Si no está seguro del
suministro de alimentación del lugar donde reside, consulte a su proveedor local o compañía eléctrica.
• No intente reparar el monitor por su cuenta, puesto que no contiene piezas que sean manipulables por parte del usuario. El monitor solo debe ser reparado por un
técnico cualicado.
• No retire el gabinete del monitor. Hay piezas internas sujetas a alta tensión que pueden causar descargas eléctricas incluso si el cable de alimentación está desconectado.
• Deje de usar el monitor si el gabinete está dañado. Solicite a un técnico que lo revise.
• Coloque el monitor en un área despejada y bien ventilada. Desconecte el monitor inmediatamente si se moja y consulte a su técnico de servicio.
• Siempre desconecte el monitor antes de limpiarlo. Limpie el gabinete con un paño limpio y seco. Coloque un poco de limpiador sin amoníaco en el paño, nunca
directamente en la supercie de la pantalla.
• Mantenga el monitor alejado de objetos magnéticos, motores, televisores y transformadores.
• Nunca coloque objetos pesados encima del cable de alimentación.
• Por motivos de seguridad, si se adquiere el kit de montaje VESA por separado, asegúrese de que el kit de montaje posea la certicación UL y que la sustitución sea
realizada solo por personal de servicio.
Información reglamentaria: Eliminación de residuos de aparatos eléctricos y electrónicos (WEEE) La directiva de residuos de aparatos eléctricos y electrónicos (WEEE) tiene por
objeto reducir al mínimo el impacto de los artículos eléctricos y electrónicos en el medio ambiente mediante un aumento de la reutilización y el reciclaje, y mediante la reducción
de la cantidad de WEEE que se llevan a vertederos controlados. El símbolo en nuestro producto V7 o en su embalaje signica que este producto debe eliminarse aparte de otros
residuos domésticos corrientes al nal de su vida útil. Le recordamos que es su responsabilidad eliminar los aparatos electrónicos en centros de reciclaje para así ayudar a conservar
los recursos naturales.
Cada país en la Unión Europea debe contar con sus centros de recogida de aparatos eléctricos y electrónicos para su reciclaje. Para obtener información sobre centros de reciclaje
próximos a usted, póngase en contacto con el organismo encargado de la gestión de residuos de equipos eléctricos y electrónicos o con la tienda dónde compró el producto.
INFORMACIÓN DE SEGURIDAD Y ADVERTENCIAS DE LA FCC
ID 1419050639
 Loading...