

Page 1
USER MANUAL
L236E
23.6” Full HD Widescreen LED Monitor
Page 2

TABLE OF CONTENTS
1 Getting Started
2 Control Panel/ Back Panel
3 On Screen Display
4 Technical Specs
5 Care & Maintenance
6 Troubleshooting
7 Safety Info & FCC warning
Page 3
1
GETTING STARTED
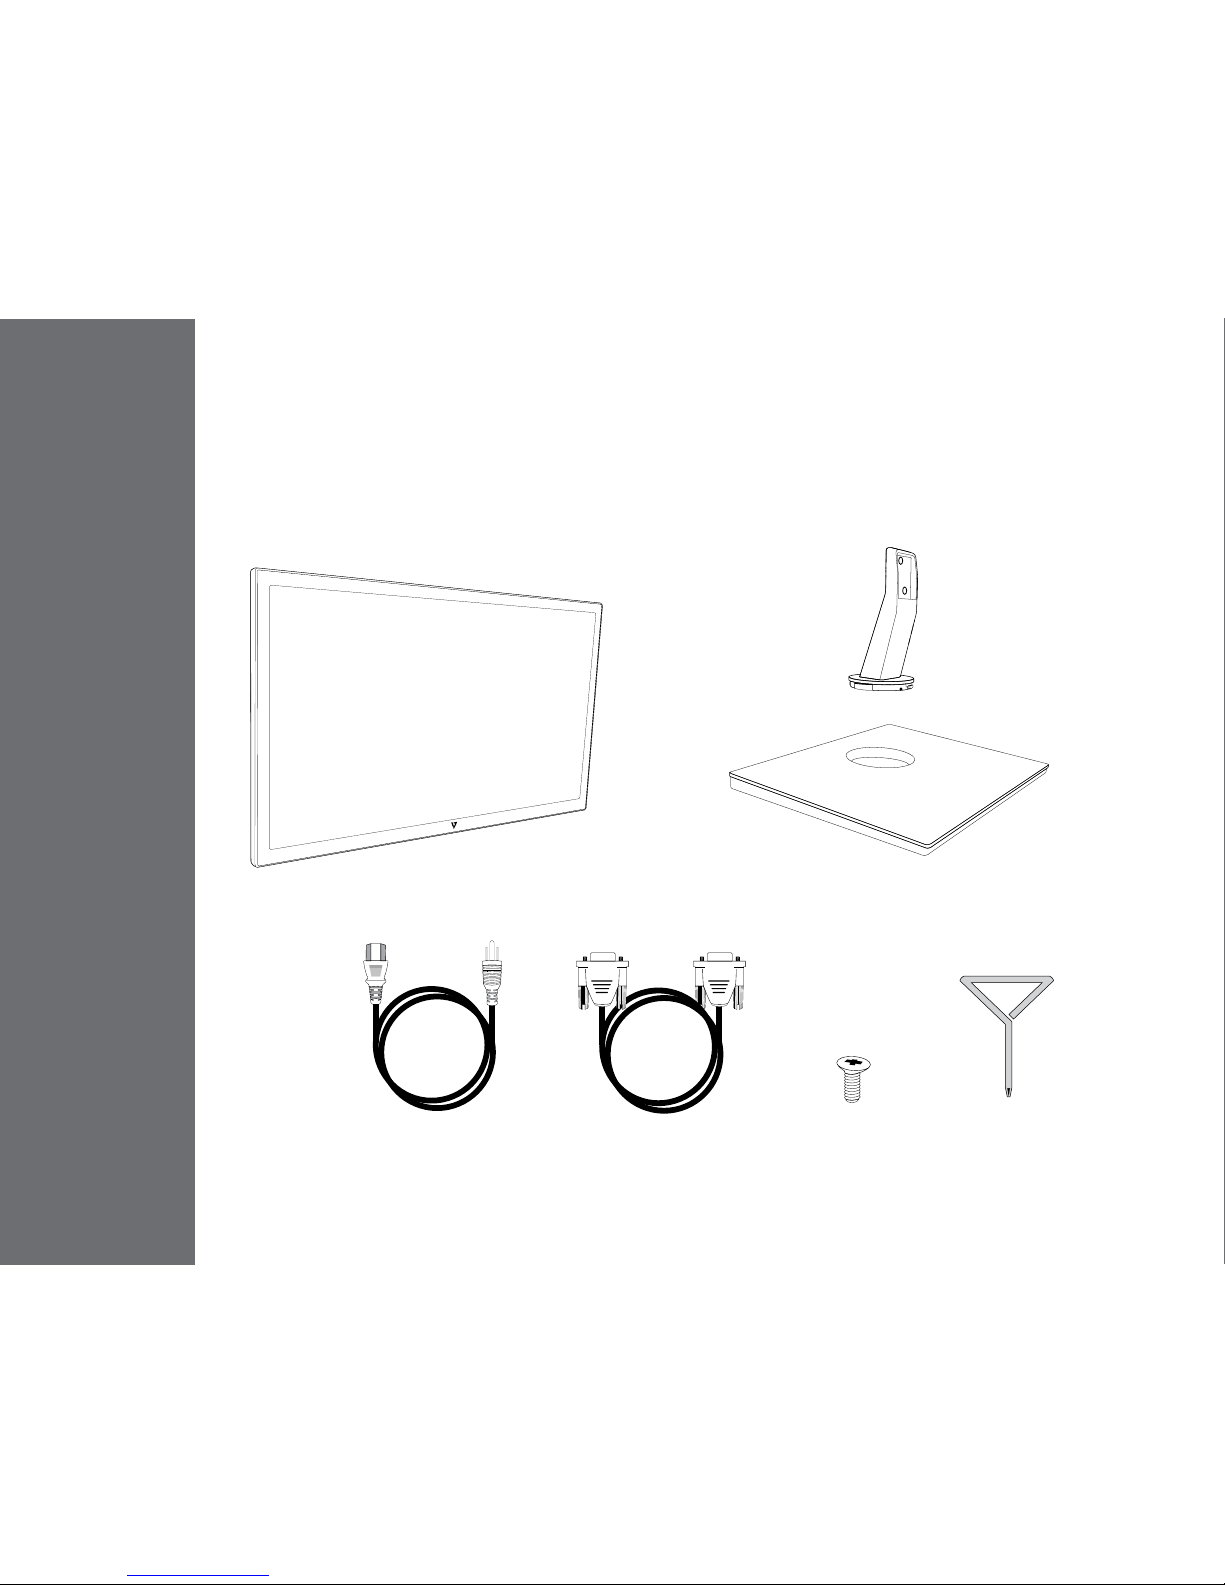
Package includes
• AC power cord
• VGA cable
• Quick Start Guide
• Tool Kit
AC Power Cord VGA Cable x3
Page 4
GETTING STARTED
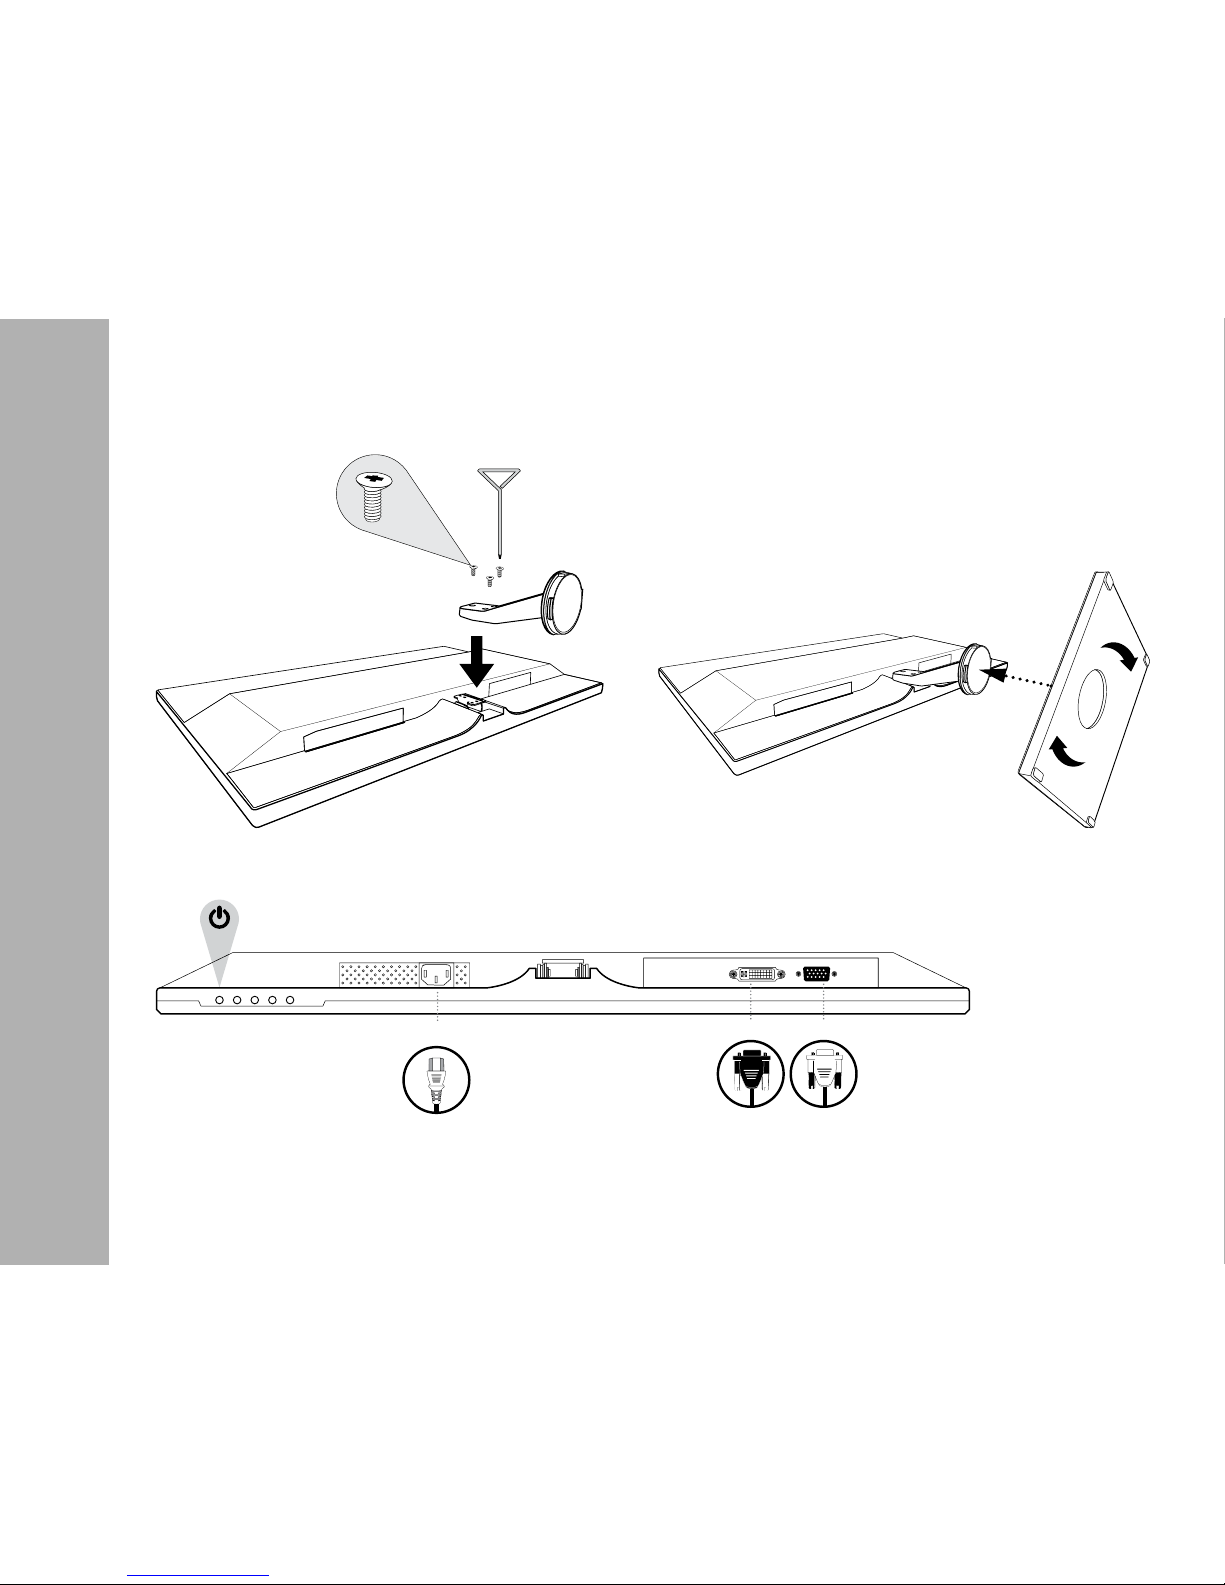
Installation
Power on Computer and Monitor
1
2
VGADVI
Power
Connect power and video cables
Page 5

CONTROL PANEL/ BACK PANEL
Control Panel/Back Panel
2
100x100mm VESA
Menu Scroll Up Scroll Down
Enter/Select Pow er
DVIAC Power VGA
Page 6

ON SCREEN DISPLAY
3
Using On Screen Display (OSD) Functions
Main Menu
Button Function
Brightness / Contrast
Brightness
To adjust the luminance of the video.
increase brightness, decrease brightness
adjust brightness (Between 1-100)
Contrast
To adjust the foreground white level of screen image.
increase contrast, decrease contrast.
adjust contrast (Between 1-100)
Active Contrast
To detect the distribution of the visual signals inputs, and create
an optimized contrast.
to switch On/O
Preset Mode
Provides an optimum display environment depending on the
contents displayed. It contains 4 user-selectable presets. PC /
MOVIE / GAME / ECO
to switch between PC, Move, Game
and ECO
Input Setting
Input Setting
When Input Setting is pressed, change Input signal to VGA or
DVI
to switch between VGA and DVI
Auto Search
Auto search input
to switch On/O
Page 7

ON SCREEN DISPLAY
Button Function
Color Setting
Warm
Nature
Cool
User
User color: Individual adjustments for red
(R), green (G), blue (B).
1. Press button
to select the desired
color.
2. Press
button to adjust selected
color.
Image Setting
Auto Adjust
Optimize the H-Position, V-Position, Clock, and Phase (For VGA
Input only)
to switch On/O
Aspect Ratio
Select between full and t aspect ratios
to switch between full and t
aspect ratios
H-Position
move screen left and right
move image left and right
(Between 1-100)
V-Position
move screen up and down
move image up and down (Between
1-100)
Clock
Reduce the vertical icker of character on the screen (For VGA
Only)
to adjust vertical icker of characters
on the screen (Between 1-100)
Phase
Reduce the horizontal icker of character on the screen (For
VGA Only)
to adjust horizontal icker of
characters on the screen (Between 1-100)
Sharpness
option to adjust the sharpness of the display. Set the value from
-2 to 2.
adjust sharpness up and down
(Between 1-100)
View Mode
Switch between Video and PC Mode
to switch between Video and PC
Mode
Response Time
Available settings are Minimum, Intermediate, and Maximum
to switch between Minimum,
Intermediate and Maximum
Page 8

ON SCREEN DISPLAY
Button Function
OSD Setting
Language
to change OSD language
H-Position
moves menu left and right (Between 1-100)
V-Position
moves menu up and down (Between 1-100)
Transparency
to
adjust transparency (between 0-100%)
OSD Time-Out
to adjust time OSD appears on screen (1-100)
OSD Color
to scroll through three OSD color modes
System
DDC / CI
A collection of protocol which operates over the DDC channel to
provide interactive control of a display and, optional associated
devices.
to switch On/O
Factory Reset
Reset Monitor to Factor Defaults
to switch On/O
Information
Displays Monitor information: Display horizontal frequency, Vertical
Frequency, Resolution information
to switch On/O
Page 9

TECHNICAL SPECS
4
Technical Specication
LCD Panel 59.9cm (23.6”) TFT (with LED back light)
Power
Management
VESA DPMS compatible
O Mode, < 0.5 W
Displayable
Resolution
Full HD 1920 x 1080 max.
Vertical Frequency 60Hz max.
Pixel Dimension 0.2715(H) ×0.2715(V ) mm
LCD Display Color 16.7M colors
Tilt -5°~20° (±3°)
Active Display
Area
521.28(H) × 293.22(V )mm
Temperature
Operating: 0°C ~ + 40°C
Storage: -20°C ~ + 60°C
Compliance CE, FCC, EPA7.0
Power Input Voltage AC100-240 V
Page 10

CARE & MAINTENANCE
5
Care
• Avoid exposing your monitor directly to sunlight or other heat source. Place your monitor away from the sun to reduce glare.
• Put your monitor in a well ventilated, clean, dry area.
• Do not place any heavy things on top of your monitor.
• Keep your monitor away from magnets, motors, transformers, speakers, and TV sets.
Safety Tips
• If smoke, abnormal noise or odor came out from your monitor, caution you should remove the power cord immediately and
call your service center.
• Never remove the rear cover of your monitor cabinet. The display unit inside contains high-voltage parts and may cause
electric shock to human bodies.
• Never try to repair your monitor yourself. Always call your service center or a qualied technician to x it.
Page 11

TROUBLESHOOTING
6
No Power
• Make sure AC power cord is securely connected to the power adapter and the power supply is rmly connected to the monitor.
• Plug another electrical device into the power outlet to verify that the outlet is supplying proper voltage.
• Make sure all signal cables are installed.
Power on but no screen image
• Make sure the video cable supplied with the monitor is tightly secured to the video output port on back of the computer. If
not, tightly secure it.
• Adjust brightness
Wrong or abnormal colors
• If any colors (red, green, blue) are missing, check the video cable to make sure it is securely connected. Loose or broken pins
in the cable connector could cause an improper connection
• Connect the monitor to another computer
Page 12

SAFETY & FCC WARNING
7
Safety Precautions
FCC RADIO FREQUENCY INTERFERENCE STATEMENT
WARNING: (FOR FCC CERTIFIED MODELS)
This monitor is manufactured and tested on a ground principle that a user’s safety comes rst. However, improper use or installation may result danger to the monitor as
well as to the user. Carefully go over the following WARNINGS before installation and keep this guide handy.
This monitor has been tested and found compliant with the limits for a Class B digital device, pursuant to part 15 of the FCC Rules. These limits are designed to provide
proper protection against harmful interference to a residential installation. This monitor generates, uses, and can radiate radio frequency energy. Harmful interference to
radio communication may be led as a result if it‘s not properly installed and used. However, there is no guarantee that interference will not occur in a particular installation. If
this monitor does cause serious interference to radio or television reception, resetting the monitor may determine it. Moreover, users are encouraged to correct interference
by doing one or more of the following:
FCC Warning:
To assure a continued FCC compliance, a user must use a grounded power supply cord and the provided shielded video interface cable with bonded ferrite
cores. Also, any unauthorized changes or modications to this monitor would void the user‘s authority to operate this device.
Each country in the European Union should have its collection centers for electrical and electronic equipment recycling. For information about your recycling
drop o area, please contact your related electrical and electronic equipment waste management authority or the retailer where you bought the product.
Note: If necessary, shielded interface cables and AC power cord must be used to meet the emission level limits.
According to WEEE regulation, this monitor can’t be handled as normal trash in Europe when it is out of usage. Please refer to the recycle information from our
website to handle it.
CAN ICES-3(B)/NMB-3(B)
This device complies with Part 15 of the FCC Rules.
Operation is subject to the following two conditions:
(1) this device may not cause harmful interference, and
(2) this device must accept any interference received, including interference that may cause undesired operation.
CONSUMO DE ENERGÍA:
1) En OPERACIÓN: 16.0Wh
2) En modo de ESPERA: 0.152Wh
WARNINGS
• This monitor should be operated only at the correct power sources indicated on the label on the rear end of the monitor. If you’re unsure of the power supply in your
residence, consult your local dealer or power company.
• Do not try to repair the monitor yourself as it contains no user-serviceable parts. The monitor should only be repaired by a qualied technician.
• Do not remove the monitor cabinet. There is high-voltage parts inside that may cause electric shock to human bodies, even when the power cord is disconnected.
• Stop using the monitor if the cabinet is damaged. Have it checked by a service technician.
• Put your monitor only in a clean, dry environment. Unplug the monitor immediately if gets wet and consult your service technician.
• Always unplug the monitor before cleaning it. Clean the cabinet with a clean, dry cloth. Apply non-ammonia based cleaner onto the cloth, not directly onto the glass
screen.
• Keep the monitor away from magnetic objects, motors, TV sets, and transformer.
• Do not place heavy objects on the cable or power cord.
• Due to safety concerns, if the VESA mounting kit is purchased separately, please make sure the mounting kit is UL-Listed, and replaceable only by service personnel.
• Reorient or relocate the receiving antenna.
• Move the monitor and the receiver further away from each other.
• Connect the monitor into an outlet on a circuit dierent from that to which the receiver is connected.
• Consult your local dealer or an qualied technician.
V1-20190305
 Loading...