

Page 1

ENERGY SAVING
HD LED MONITOR
The V7 LED Monitor provides superior image
quality with vivid colors and lifelike images.
Our LED backlight technology saves you up to
40% energy and yields blacker blacks, pure white
and more clearly de ned grays for a vivid picture.
USER’S MANUAL
Page 2
2
Safety Precautions and Maintenance
1. Use a clean, soft cloth to clean the screen.
2. Do not use ammonia based liquids.
3. Do not cover the ventilation holes on the back.
4. Avoid placing the monitor near a heater.
5. Place the monitor in a secure position to avoid falling.
6. Do not place heavy items on the monitor or power cord.
7. Do not open the back panel.
Contents
• Power cord
• Warranty card
• User’s manual CD
Features
• 16.7 million colors
• On-Screen Display (OSD) is easy to use with a simple layout.
•
ned, it will auto adjust to optimum settings.
Basic Setup
1. Insert the desired cable into the matching connector on your computer.
2. Connect the power cord from the monitor power supply to an outlet.
3. To turn on the monitor, press the power button.
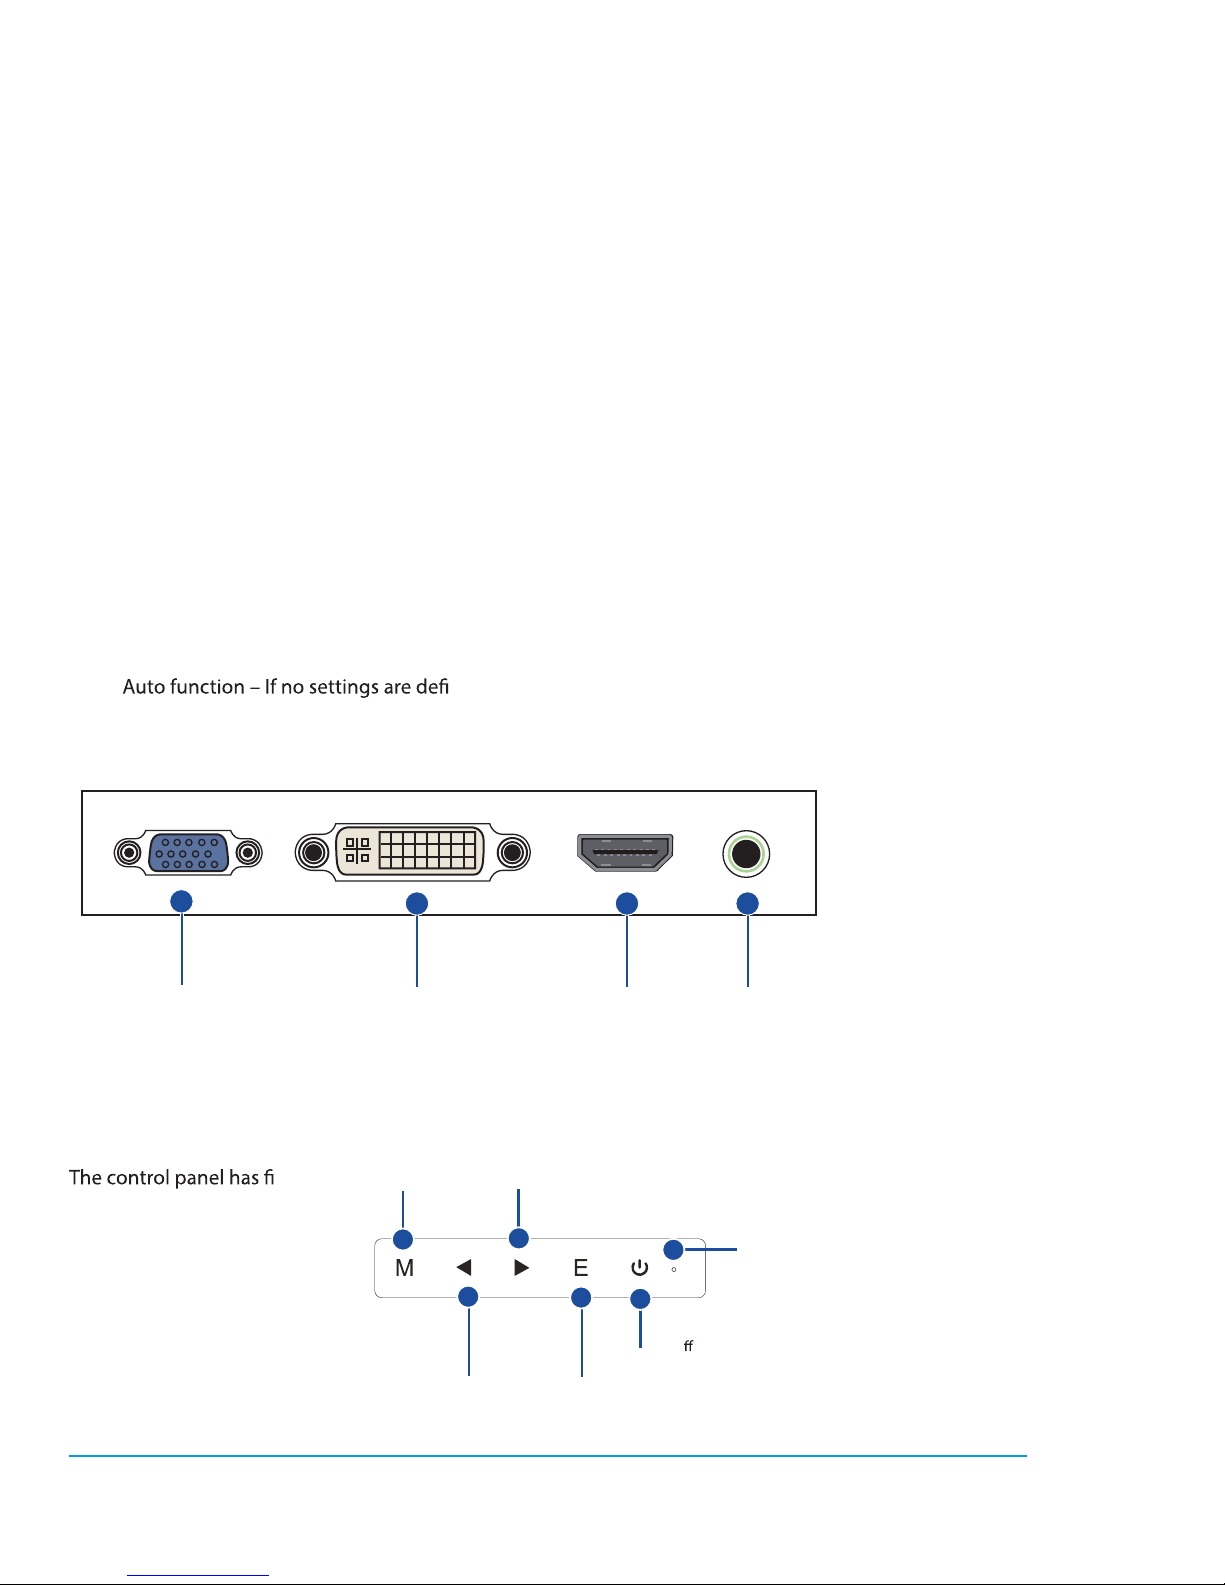
Monitor Controls
ve
buttons to adjust
the monitor settings.
Up Arrow
Adjust the option up
Down Arrow
Adjust the option down
Exit
Exit the menu
Power
On/O
Menu/Enter
Shows main menu
Power LED
Lights when power is on
All specifi cations and information are subject to changes without further notice.
VGA connector
DVI connector
Audio
connector
HDMI
connector
Page 3
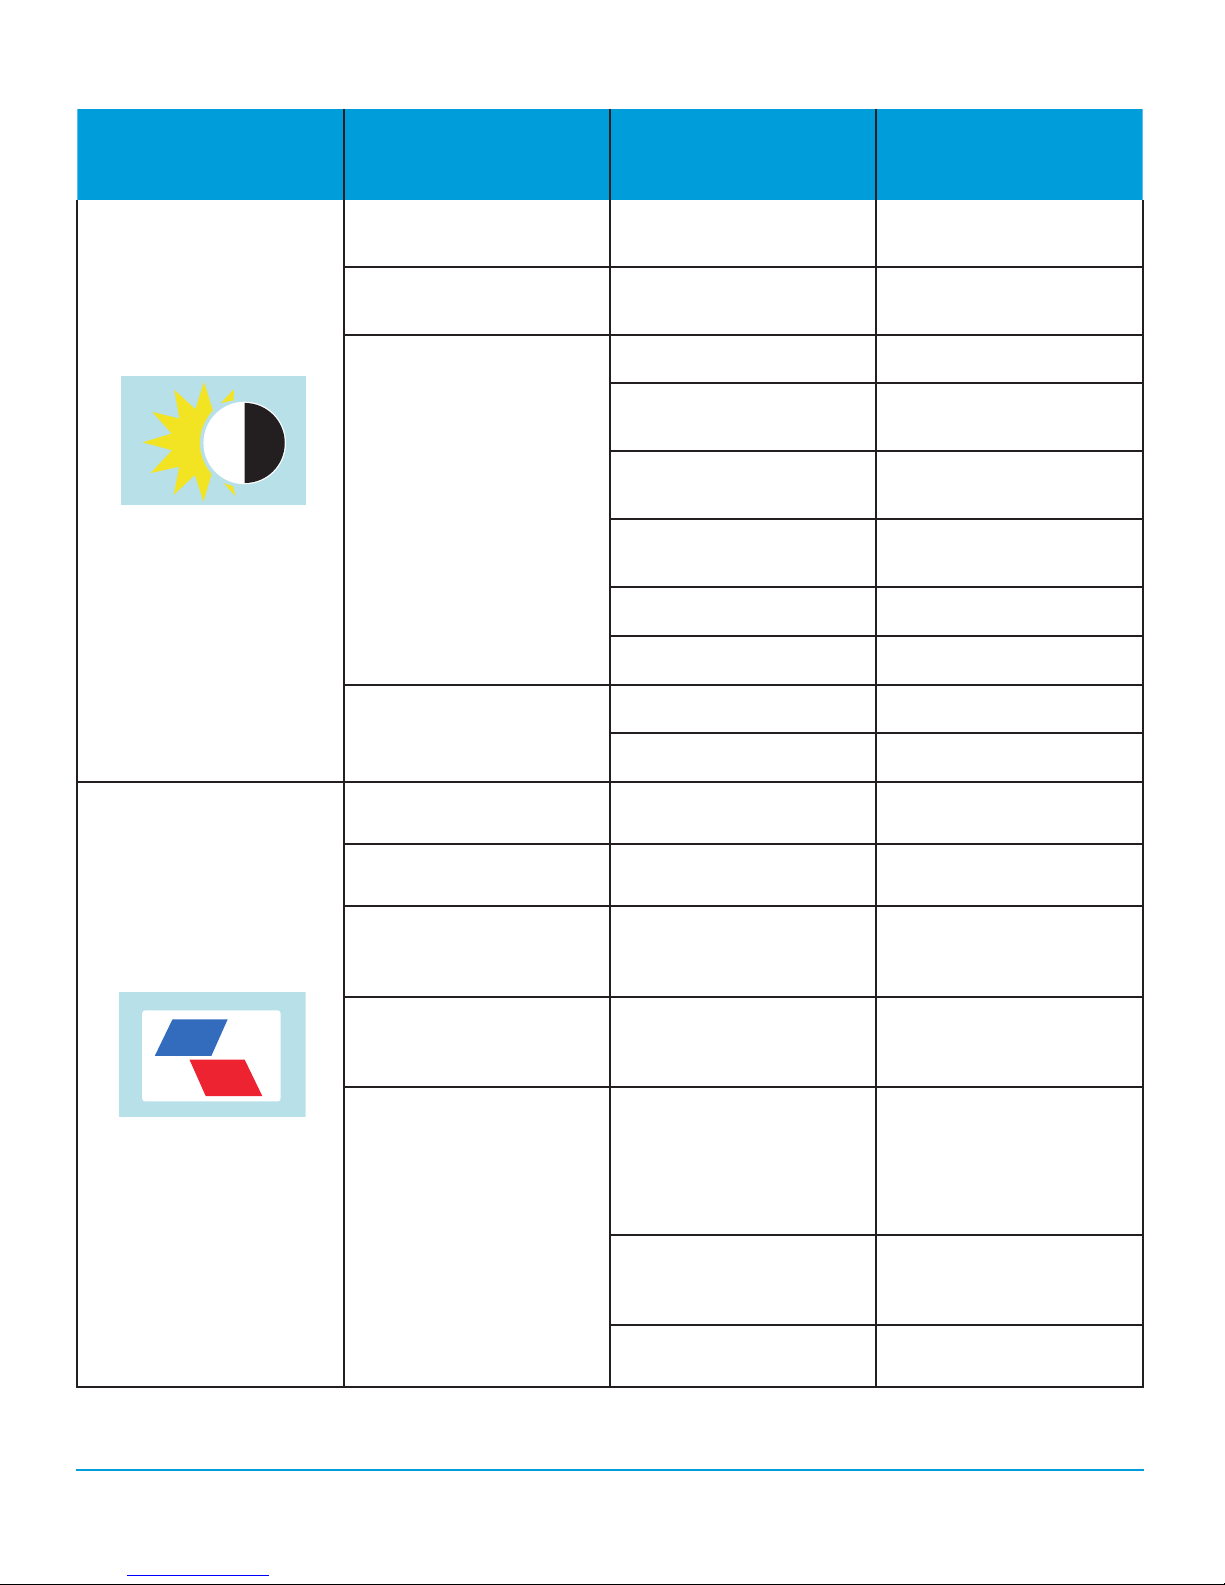
Adjustment Settings
Main menu item Secondary level Submenu Description
BRIGHTNESS
BRIGHTNESS -
CONTRAST -
STANDARD Normal use mode
TEXT Text application mode
GAME Game application mode
ECO
MOVIE
USER 1 29” User Set 1
USER 2 29” User Set 2
ON Enables DCR
DCR
OFF Disables DCR
Adjusts display
brightness
Adjusts display contrast
ratio
Movie playing
application mode
IMAGE
H.POSITION -
V.POSITION -
CLOCK -
PHASE -
AUTO
ASPECT
WIDE
4:3
Adjusts the picture’s
horizontal position
Adjusts the picture’s
vertical position
Adjusts the picture clock
to reduce the vertical
noise
Adjusts the picture phase
to reduce the horizontal
noise
Auto checks and adjusts
the image display
aspect ratio: 1920x1090,
1680x1050 1:1 output
(29”)
Adjusts the image aspect
ratio to wide-screen
mode
Adjusts the image aspect
ratio to 4:3 mode
All specifi cations and information are subject to changes without further notice.
3
Page 4

Main menu item Secondary level Submenu Description
COLOR TEMP.
OSD SETTING
WARM
COOL
COLOR TEMP.
SRGB (29”)
RED -
GREEN -
BLUE -
LANGUAGE -
OSD H.POS. -
OSD V.POS. -
USER
Set as warm color
temperature
Set as cold color
temperature
Set as SRGB color
temperature
Set as USER color
temperature
Finely tunes red color
temperature
Finely tunes green color
temperature
Finely tunes blue color
temperature
Selects the language
displayed by OSD
menu (English, French,
German, Simpli ed
Chinese, Italian, Spanish,
Portuguese, Turkish,
Polish, Dutch, Russian,
Korean)
Adjust OSD horizontal
position
Adjusts OSD vertical
position
TRANSPARENCY -
RESET
IMAGE AUTO ADJUST -
COLOR AUTO
ADJUSTMENT
AUTO POWER DOWN -
All specifi cations and information are subject to changes without further notice.
OSD TIMER - Adjusts OSD display time
Adjusts OSD
transparency
Auto adjusts the
horizontal/vertical
position, focus and clock
of the image
- Adjusts white balance
RESET - Restore to factory setting
Select energy-saving,
automatic shutdown
4
Page 5

Main menu item Secondary level Submenu Description
VGA VGA (analog) signal input
MISC
SIGNAL SOURCE
DVI DVI (digital) signal input
HDMI (29”) HDMI signal input
ON Sound OFF
MUTE
OFF
Sound ON (only available
for the model w/audio)
Adjusts speaker volume
VOLUME* -
(only available for the
model w/audio)
*Note: For VOLUME function, please ensure the audio is connected to the sound card of the computer or
to the output source of any media player with a 3.5 mm stereo socket.
Troubleshooting
No Image on Screen
• Check if the power button has been switched on.
• Verify the brightness and contrast of the monitor is within the normal setting.
• Check if the power indicator is ashing. If so, this indicates that the monitor is not receiving the input
signal.
• If the signal indicator is a notebook or laptop, make sure that the signal has been switched to screen
mode.
• Make sure that the computer is turned on and is not sleeping.
• Make sure that the correct input is selected.
• Make sure that your cable connections are correct and secure.
Out Of Focus
• Check if the image signal cable is inserted properly (upright position).
Flashing Screen
• The power is insu cient to connect the monitor or is too weak.
• To avoid a magnetic eld around the monitor, move devices like speakers, uorescent lights, AC trans-
formers, table fans, etc. farther away.
• By pressing the Exit key, the Auto Adjust Image function will automatically apply optimized settings to
the display.
Wrong or Unusual Color
• If red, green, blue, or any of the color disappears, check to see if the signal cord is connected properly.
If the plug is loose it might cause a bad connection.
• Try connecting to another PC for comparison.
Horizontal Screen Rolling
• Retighten the signal cable.
All specifi cations and information are subject to changes without further notice.
5
Page 6

Cleaning the monitor
• Make sure that the monitor power has been switched o .
• Do not spray any liquid on the screen or on the plastic panel directly.
Cleaning the screen
• Use a clean, soft cloth to clean the screen.
• If needed, dampen a soft cloth with non-ammonia/non-alcohol glass cleaner to clean the screen.
Cleaning the plastic panel
• Use a soft, dry cloth. If needed, dampen a soft cloth with non-ammonia/non-alcohol glass cleaner.
All specifi cations and information are subject to changes without further notice.
6
Page 7

English 14-0241
Made in China
 Loading...