

Page 1

Webcam
CS0300
English User’s Manual . .. .. .. .. .. .. .. .. .. .. .. .. .. .. .. .. .. .. .. .. .. .. .. .. .. . 1
Español Guía del Usuario . .. .. .. .. .. .. .. .. .. .. .. .. .. .. .. .. .. .. .. .. .. .. .. . 3
Français Manuel de l'utilisateu . .. .. .. .. .. .. .. .. .. .. .. .. .. .. .. .. .. .. .. .. .. . 5
Deutsch Bedienungsanleitung . .. .. .. .. .. .. .. .. .. .. .. .. .. .. .. .. .. .. .. .. .. .. . 7
Italiano Manuale per l'utente . .. .. .. .. .. .. .. .. .. .. .. .. .. .. .. .. .. .. .. .. .. .. . 9
Nederlands Gebruikershandleiding . .. .. .. .. .. .. .. .. .. .. .. .. .. .. .. .. .. .. .. .. . 11
Português Manual do usuário . .. .. .. .. .. .. .. .. .. .. .. .. .. .. .. .. .. .. .. .. .. . 13
www.V7-world.com
User’s Manual
Guía del Usuario • Guide de l’utilisateur • Bedienungsanleitung •
Manuale per l’utente • Gebruikershandleiding • Manual do usuário
Page 2

3
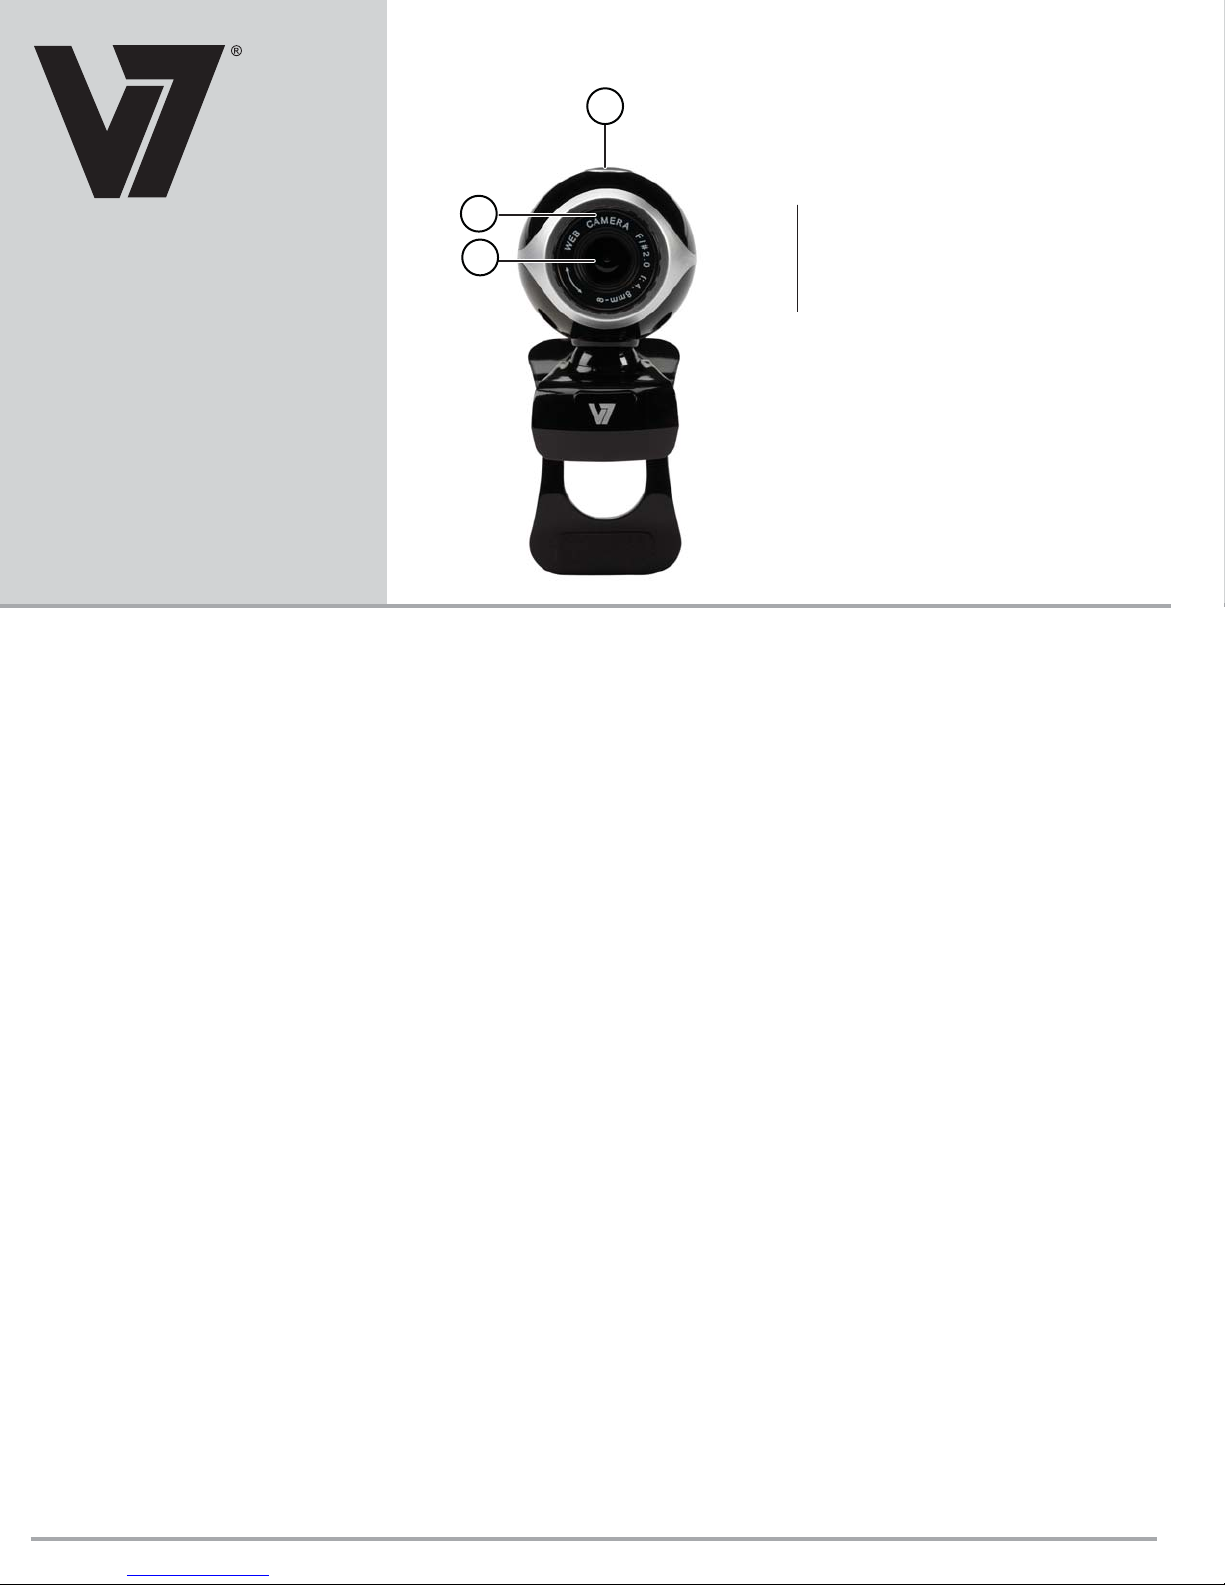
Webcam Features
2
CS0300
1
User’s Manual
English
Installing the software
Note: Additional features will be available once you install the
software.
1. Connect the webcam to an available USB port.
2. After the hardware is found, insert the disc into your CD/DVD
drive.
3. Follow the on-screen instructions to install the software.
4. Double-click the Webcam VideoCap icon on your desktop and
then select Device. Make sure that USB 2.0 Webcam is
selected.
Note: The webcam software can also be found online at
www.V7-world.com under the Products and/or Support tabs.
Using the webcam
Important: If you have more than one webcam, set the CS0300
as the default. Double-click the Webcam VideoCap icon on
your desktop and then select Device. Select USB 2.0 Webcam.
Finding the proper location for your webcam
• For best eye contact, put your webcam in the middle of your
monitor.
• Make sure the microphone on the webcam is no more than 3
feet (1 m) away from you and is pointing towards you.
• If you use computer speakers, put them at least 12 inches (30
cm) away from your microphone to reduce feedback and then
angle the speakers away from the microphone.
Focusing your webcam
Firmly grip the black dial on the front of the webcam with your
fingers and turn the dial to the right and left until the webcam is in
focus.
Recording video
1. Double-click the Webcam VideoCap icon on your desktop and
then click Capture.
2. In the drop-down menu select Start Capture.
3. To stop capturing video select Capture again and then Stop
1 Camera lens
2 Focus adjustment dial
3 Snapshot button
Plug and play
Connect the webcam to an available USB
port. The computer recognizes the webcam
and you are ready to start using the webcam.
Capture. The video is automatically saved to My Videos or to
the location you specified.
Recording video with audio
1. Double-click the Webcam VideoCap icon on your desktop and then
click Capture.
2. In the drop-down menu select Record Audio. A checkmark will
appear.
3. Click Capture and select Start Capture.
4. To stop capturing video select Capture again and then Stop Capture.
The video is automatically saved to My Videos or to the location you
specified.
Taking a picture using the webcam
Press the silver snapshot button on top of the camera. The picture is
automatically saved to My Pictures or to the location you specified.
Taking a picture using the software
1. Double-click the Webcam VideoCap icon on your desktop and then
click Capture.
2. In the drop-down menu select Snap Shot. The picture is automatically saved to My Pictures or to the location you specified.
Changing webcam settings
Saving videos and pictures
Pictures and videos automatically save to My Pictures or My
Videos. To change the location:
1. Double-click the Webcam VideoCap icon on your desktop and
then select Device. Make sure that USB 2.0 Webcam is
selected.
2. Click File.
3. Select the file type you wish to save (for pictures select Set
snapshot file Folder, for video select Set capture file Folder)
4. In the Browse for Folder window select where you would like
your pictures to be saved.
Note: To reset where pictures and videos are saved, click File,
then File index reset. The files will now be saved to the original
default location.
1
Page 3

Adjusting video format
1. Select Option then Video Capture Pin… The Properties window
will open.
2. Adjust the Output Size using the drop down menu.
3. Click OK when finished.
Safety and Maintenance Information
• Do not touch the lens with fingers or any sharp or coarse items.
• Use a soft cotton cloth to clean the lens.
• Do not use this product in extreme hot, cold, or dusty environments.
• Avoid dropping the webcam, as it may cause it to not work correctly.
Setting the frame rate
1. Select Capture, then Set frame rate.
2. Enter the desired frames per second and check the Enable Frame
Rate box.
3. Click OK when finished.
Adjusting the preview screen size
1. Select Preview, then Distinguish Settings. The Properties window
opens.
2. Select the desired display size.
3. Click OK when finished.
Adjusting the maximum video length
1. Select Capture, then Record time limit.
2. Check the Use Time Limit box and enter a time limit (in seconds) in
the Time Limit box.
3. Click OK when finished.
Setting the snapshot file size
Select Capture, then the desired file size from the drop-down menu.
English: FCC Statement
This device complies with Part 15 of the FCC Rules. Operation is subject to the
following two conditions: (1) This device may not cause harmful interference, and (2)
This device must accept any interference received, including interference that may
cause undesired operation.
This equipment has been tested and found to comply with the limits of a Class B digital
device, pursuant to Part 15 of the FCC Rules. These limits are designed to provide
reasonable protection against harmful interference in a residential installation. This
equipment generates, uses, and can radiate radio frequency energy and if not installed
and used in accordance with the instructions, may cause harmful interference to radio
communications. However, there is no guarantee that interference will not occur in a
particular installation. If this equipment does cause harmful interference to radio or
television reception, which can be determined by turning the equipment off and on, the
user is encouraged to try to correct the interference by one or more of the following
measures:
• Reorient or relocate the receiving antenna;
• Increase the separation between the equipment and receiver;
• Connect the equipment into an outlet on a circuit different from that to which the
receiver is connected;
• Consult the dealer or an experienced radio/TV technician for help
Changes or modifications not authorized by the party responsible for compliance could
void the user’s authority to operate this product.
Specifications
• Video capture: up to 640x480 pixel
• Transmission Speed: 30 FPS
• Interface: USB 2.0
• Focus: Manual Focus
• Distance: 5cm /1.9in to infinity
• Cable Length: 1.5 m / 4.9 ft
• Software upgrade for up to 16-mega pixel (optional)
• Automatic white balance (AWB)
• Automatic color compensation (ACC)
moisture. Clean only with dry cloth. Do not use the device outside the specified
operating temperature range of 5°C (41°F) to 35°C (95°F). If the device is exposed to
environment outside of its prescribed operation, turn off the device and allow
temperature to stabilize within the specified operating range before using the device.
Regulatory Information: Disposal of Waste Electrical and Electronic Equipment (WEEE)
The Waste Electrical and Electronic Equipment (WEEE) Directive aims to
minimize the impact of electrical and electronic goods on the environment, by
increasing re-use and recycling and by reducing the amount of WEEE going to
landfill. The symbol on your V7 product or its packaging signifies that this
product must be disposed separately from ordinary household wastes at its end
of life. Please kindly be aware that this is your responsibility to dispose electronic
equipment at recycling centers so as to help conserve natural resources.
Each country in the European Union should have its collection centers for electrical and
electronic equipment recycling. For information about your recycling drop off area, please
contact your related electrical and electronic equipment waste management authority or
the retailer where you bought the product. Authorized Representative in European
Community: Ingram Micro Pan Europe GmbH, Heisenbergbogen 3, D-85609 Dornach /
Munich, Germany. (www.V7-world.com)
the
Product Safety Instructions:
Read this guide for important safety and health information and for regulatory
information.
Warning: Failure to properly set up, use, and care for this product can increase the risk
of serious injury or death, or damage to the device or devices. Read this instruction
and keep all printed manuals, instruction for future references. This Product Safety
Instructions includes important information about many V7 products. Refer to sections
that apply to the feature of your device.
USB Powered Devices: Do not connect the USB power cable until all other cable
connections are made.
All Devices:
Do not attempt repairs. Do not attempt to take apart, disassemble, service, or modify
the hardware device or power supply. Doing so could present risk of electronic shock or
other hazard. Any evidence of any attempt to dissemble and/or modify the device,
including peeling, puncturing, or removal of any of the labels, will void the Limited
Warranty.
Do not abuse the device: Do not immerse the device to any liquid or expose to
2
Page 4

3
Funciones de la webcam
CS0300
Guía del
Usuario
Español
Instalación del software
Nota: Dispondrá de funciones adicionales una vez que instale el
software.
1. Conecte la webcam a un puerto USB disponible
2. Una vez detectado el hardware, inserte el disco en la unidad de
CD/DVD.
3. Siga las instrucciones en la pantalla para instalar el software.
4. Haga doble clic en el icono Webcam VideoCap en el escritorio
y seleccione Device (Dispositivo). Asegúrese de que USB 2.0
Webcam esté seleccionada.
Nota: Puede encontrar el software de la webcam también en
línea en www.V7-world.com bajo las fichas Products
(Productos) y/o Support (Soporte técnico).
Uso de la webcam
Importante: Si tiene más de una webcam, configure la CS0300
como la predeterminada. Haga doble clic en el icono Webcam
VideoCap en el escritorio y seleccione Device (Dispositivo).
Seleccione USB 2.0 Webcam.
Encontrar el lugar correcto para la webcam
• Para un contacto óptimo con el ojo, ponga la webcam en el
centro del monitor.
• Asegúrese de que el micrófono de la webcam no esté a más
de 1 m (3 pies) de usted y de que esté apuntando hacia usted.
• Si utiliza altavoces de PC, colóquelos como mínimo a 30 cm
(12 pulgadas) del micrófono para reducir la retroalimentación y
orientados en dirección contraria al micrófono.
Enfocar la webcam
Sujete firmemente el selector negro en la parte delantera de la
cámara con los dedos y gírelo a la derecha y a la izquierda hasta
que la webcam esté enfocada.
Grabar video
1. Haga doble clic en el icono Webcam VideoCap en el escritorio
y luego haga clic en Capture (Captura).
2
1
1 Lente de la cámara
2 Selector de enfoque
3 Botón de instantánea
Plug and play
Conecte la webcam a un puerto USB
disponible. El equipo reconoce la webcam de
forma que puede empezar a utilizarla
inmediatamente.
2. En el menú desplegable, seleccione Start Capture (Iniciar
captura).
3. Para detener la captura de video, seleccione Capture (Captura)
otra vez y luego Stop Capture (Detener captura). El video se
guarda en My Videos (Mis videos) o en la ubicación que usted
especificó.
Grabar video con audio
1. Haga doble clic en el icono Webcam VideoCap en el escritorio y
luego haga clic en Capture (Captura).
2. En el menú desplegable, seleccione Record Audio (Grabación
de audio). Aparecerá una marca de verificación.
3. Haga clic en Capture (Captura) y seleccione Start Capture (Iniciar
captura).
4. Para detener la captura de video, seleccione Capture (Captura)
otra vez y luego Stop Capture (Detener captura). El video se
guarda en My Videos (Mis videos) o en la ubicación que usted
especificó.
Tomar una foto con la webcam
Oprima el botón plateado de instantáneas en la parte superior de
la cámara. La foto se guarda en My Pictures (Mis fotos) o en la
ubicación que usted especificó.
Hacer una foto con el software
1. Haga doble clic en el icono Webcam VideoCap en el escritorio y
luego haga clic en Capture (Captura).
2. En el menú desplegable, seleccione Snap Shot (Instantánea).
La foto se guarda en My Pictures (Mis fotos) o en la ubicación
que usted especificó.
Cambio de la configuración de la webcam
Guardar videos y fotografías
Las fotos y los videos se guardan automáticamente en My
Pictures (Mis fotos) o My Videos (Mis videos). Para cambiar la
ubicación:
1. Haga doble clic en el icono Webcam VideoCap en el escritorio y
seleccione Device (Dispositivo). Asegúrese de que USB 2.0
Webcam esté seleccionada.
2. Haga clic en File (Archivo).
3
Page 5

3. Seleccione el tipo de archivo que desea guardar (para fotos
seleccione Set snapshot file Folder (Definir carpeta de archivos
de instantáneas), para video seleccione Set capture file Folder
(Definir carpeta de archivos de captura)
4. En la ventana Browse for Folder (Buscar carpeta), seleccione
dónde desea guardar sus fotos.
Nota: Para restablecer la ubicación en la que se guardan las fotos
y los videos, haga clic en File (Archivo) y luego en File index
reset (Restablecer índice de archivos). Los archivos se
guardarán ahora en la ubicación predeterminada original.
Ajustar el formato de video
1. Seleccione Option (Opción) y luego Video Capture Pin… (Pin
de captura de video…). Se abrirá la ventana Properties
(Propiedades).
2. Ajuste el valor de Output Size (Tamaño de salida) utilizando el
menú desplegable.
3. Haga clic en OK (Aceptar) cuando haya terminado.
(Tiempo límite de grabación).
2. Marque la casilla Use Time Limit (Usar límite de tiempo) e
introduzca un límite de tiempo (en segundos) en el cuadro Time
Limit (Límite de tiempo).
3. Haga clic en OK (Aceptar) cuando haya terminado.
Ajustar el tamaño del archivo de instantáneas
Seleccione Capture (Captura), y luego el tamaño de archivo
deseado del menú desplegable.
Información de seguridad y mantenimiento
• No toque la lente con los dedos ni con objetos cortantes o
burdos.
• Utilice un paño de algodón suave para limpiar la lente.
• No utilice este producto en ambientes de calor, frío o polvo
extremos.
• No deje que la webcam se caiga ya que podría dejar de funcionar
correctamente.
Definir la frecuencia de trama
1. Seleccione Capture (Captura), y luego Set frame rate (Definir
frecuencia de trama).
2. Introduzca el valor deseado de tramas por segundo y marque la
casilla Enable Frame Rate (Habilitar frecuencia de tramas).
3. Haga clic en OK (Aceptar) cuando haya terminado.
Ajustar el tamaño de la pantalla de vista previa
1. Seleccione Preview (Vista previa), y luego Distinguish Settings
(Distinguir ajustes). Se abre la ventana Properties
(Propiedades).
2. Seleccione el tamaño de pantalla deseado.
3. Haga clic en OK (Aceptar) cuando haya terminado.
Ajustar la duración máxima de video
1. Seleccione Capture (Captura), y luego Record Time Limit
Español: Declaración de la FCC
Este dispositivo cumple con la Parte 15 del reglamento de la FCC. Su operación está
sujeta a las dos condiciones siguientes: (1) este dispositivo no debe causar
interferencia perjudicial, y (2) este dispositivo debe aceptar toda interferencia que
reciba, incluida la que pueda causar un funcionamiento no deseado.
Este equipo ha sido sometido a pruebas y se ha determinado que cumple los límites
de un dispositivo digital de Clase B, de conformidad con la Parte 15 del reglamento de
la FCC. Estos límites están diseñados para proporcionar una protección razonable
frente a las interferencias perjudiciales en una instalación residencial. Este equipo
genera, usa y puede emitir energía de radiofrecuencia, y si no se instala y usa de
acuerdo con las instrucciones podría causar interferencias perjudiciales a las
comunicaciones por radio. Sin embargo, no se garantiza que no se producirán
interferencias en una instalación en particular. Si este equipo causa interferencias
perjudiciales en la recepción de la señal de radio o de televisión, lo cual puede
comprobarse encendiendo y apagando el equipo, se insta al usuario a que intente
corregir dicha interferencia tomando una o más de las medidas siguientes:
• Reoriente o cambie de lugar la antena receptora;
• Aumente la distancia de separación entre el equipo y el receptor;
• Conecte el equipo en un tomacorriente de un circuito diferente de aquél al que está
conectado el receptor;
• Solicite ayuda al distribuidor o a un técnico experto en radio/TV
Todo cambio o modificación no autorizados por la parte responsable del cumplimiento
puede anular la autoridad del usuario para utilizar este producto.
Instrucciones para la seguridad del producto:
Lea esta guía. Contiene importante información sobre seguridad y salud, e información
normativa.
Advertencia: La instalación, uso y cuidado incorrectos de este producto puede
aumentar el riesgo de lesiones graves o de muerte, o causar daños al dispositivo o los
dispositivos. Lea estas instrucciones y conserve todos los manuales e instrucciones
impresos para su posterior consulta. Estas Instrucciones de seguridad del producto
incluyen información importante sobre muchos productos V7. Consulte las secciones
correspondientes a la función de su dispositivo.
Dispositivos accionados por USB: No conecte el cable de USB hasta haber conectado
Especificaciones
• Captura de vídeo: hasta 640x480 píxeles
• Velocidad de transmisión: 30 FPS
• Interfaz: USB 2.0
• Enfoque: Manual
• Distancia: 5 cm /1,9 pulg. a infinito
• Longitud de cable: 1,5 m / 4,9 pies
• Actualización de software hasta 16 megapíxeles (opcional)
• Balance automático de blancos (AWB)
• Compensación automática de color (ACC)
todos los demás cables.
Todos los dispositivos:
No trate de repararlos: No trate de abrir, desmontar, reparar o modificar el dispositivo
de hardware o la fuente de alimentación. Tal acción podría constituir un riesgo de
choque electrónico u otro tipo de peligro. Cualquier señal de que se ha intentado
desmontar o modificar el dispositivo, incluido despegado, perforación o etiquetas
quitadas, anulará la garantía limitada.
No use indebidamente el dispositivo: No sumerja el dispositivo en ningún líquido ni lo
exponga a la humedad. Límpielo únicamente con un paño seco. No use el dispositivo
fuera del rango de temperaturas de operación especificado de 5 °C (41 °F) a 35 °C (95
°F). Si el dispositivo se expone a un ambiente fuera de los límites de funcionamiento
prescritos, apague el dispositivo y espere a que la temperatura se estabilice dentro del
rango de funcionamiento especificado antes de volverlo a utilizar.
Información reglamentaria: Eliminación de residuos de aparatos eléctricos y
electrónicos (WEEE) La directiva de residuos de aparatos eléctricos y
electrónicos (WEEE) tiene por objeto reducir al mínimo el impacto de los
artículos eléctricos y electrónicos en el medio ambiente mediante un
aumento de la reutilización y el reciclaje, y mediante la reducción de la
cantidad de WEEE que se llevan a vertederos controlados. El símbolo en
nuestro producto V7 o en su embalaje significa que este producto debe eliminarse
aparte de otros residuos domésticos corrientes al final de su vida útil. Le recordamos
que es su responsabilidad eliminar los aparatos electrónicos en centros de reciclaje
para así ayudar a conservar los recursos naturales.
Cada país en la Unión Europea debe contar con sus centros de recogida de aparatos
eléctricos y electrónicos para su reciclaje. Para obtener información sobre centros de
reciclaje próximos a usted, póngase en contacto con el organismo encargado de la
gestión de residuos de equipos eléctricos y electrónicos o con la tienda dónde compró
el producto. Representante autorizado en la Comunidad Europea: Ingram Micro Pan
Europe GmbH, Heisenbergbogen 3, D-85609 Dornach / Munich,
Alemania.(www.V7-world.com)
4
Page 6
3
Caractéristiques de la webcam
2
CS0300
1
Manuel de
l'utilisateur
Français
Installation de l’application
Remarque : des fonctionnalités supplémentaires sont disponibles
une fois que vous avez installé le logiciel.
1. Connectez la webcam sur un port USB disponible.
2. Une fois le matériel trouvé, insérez le disque dans votre lecteur
de CD/DVD.
3. Suivez les instructions d'installation à l'écran pour installer les
logiciels.
4. Double-cliquez sur l’icône Capuchon vidéo de webcam sur le
bureau et sélectionnez Device (Appareil). Assurez-vous que
USB 2.0 Webcam est sélectionné.
Remarque : le logiciel de la webcam se trouve en ligne sur
www.V7-world.com, dans les onglets Products et/ou Support.
Utilisation de la webcam
Important : si vous disposez de plusieurs webcams, réglez la
CS0300 comme celle par défaut. Double-cliquez sur l’icône
Capuchon vidéo de webcam sur le bureau et sélectionnez
Device (Appareil). Sélectionnez USB 2.0 Webcam.
L’emplacement correct de votre webcam
• Pour le meilleur contact visuel, placez votre webcam au milieu
de votre écran.
• Assurez-vous que le microphone sur la webcam se trouve à
moins d’un mètre de vous et qu’il pointe vers vous.
• Si vous utilisez des haut-parleurs, placez-les à au moins 30 cm
(12 po) de votre microphone pour réduire l’effet de boucle et
orientez-les à l’écart du microphone.
1 Objectif de la caméra
2 Commande de réglage de la mise au
point
3 Bouton pour photo instantanée
Plug and play
Connectez la webcam sur un port USB
disponible. L'ordinateur reconnaît la webcam
et vous êtes prêt à utiliser cette dernière.
2. Dans le menu déroulant, sélectionnez Start Capture (Démarrer
la capture).
3. Pour arrêter la capture de la vidéo, sélectionnez Capture à
nouveau et ensuite Stop Capture (Arrêter la capture). La vidéo
est enregistrée dans Mes vidéos ou dans l'emplacement que
vous avez spécifié.
Enregistrement d'une vidéo avec audio
1. Double-cliquez sur l’icône Capuchon vidéo de webcam sur le
bureau et cliquez sur Capture.
2. Dans le menu déroulant, sélectionnez Record Audio
(Enregistrement audio). Une coche apparaît.
3. Cliquez sur Capture et sélectionnez Start Capture (Démarrer la
capture).
4. Pour arrêter la capture de la vidéo, sélectionnez Capture à
nouveau et ensuite Stop Capture (Arrêter la capture). La vidéo
est enregistrée dans Mes vidéos ou dans l'emplacement que
vous avez spécifié.
Prise d'une photo avec la webcam
Appuyez sur le bouton Snapshot (Instantané) de couleur argent
sur la caméra. L’image est enregistrée dans Mes images ou sur
l'emplacement que vous avez spécifié.
Prise d'une photo avec le logiciel
1. Double-cliquez sur l’icône Capuchon vidéo de webcam sur le
bureau et cliquez sur Capture.
2. Dans le menu déroulant, sélectionnez Image instantanée (Snap
Shot). L’image est enregistrée dans Mes images ou sur
l'emplacement que vous avez spécifié.
Mise au point de la webcam
Saisissez fermement l'arrière de la commande noire sur l'avant
de la caméra avec les doigts et tournez-la vers la droite ou vers
la gauche jusqu'à obtention de la mise au point.
Enregistrement d'une vidéo
1. Double-cliquez sur l’icône Capuchon vidéo de webcam sur le
bureau et cliquez sur Capture.
Modifications des réglages de la webcam
Enregistrement de vidéos et d'images
Les images et les vidéos sont enregistrées automatiquement dans
Mes images ou Mes vidéos. Pour modifier l’emplacement :
1. Double-cliquez sur l’icône Capuchon vidéo de webcam sur le
bureau et sélectionnez Device (Appareil). Assurez-vous que
USB 2.0 Webcam est sélectionné.
2. Cliquez sur File (Fichier).
5
Page 7

3. Sélectionnez le type de fichier que vous souhaitez enregistrer
(pour les images, sélectionnez Set snapshot file Folder (Définir
le dossier de fichiers d'images), pour la vidéo : Set capture file
Folder (Définir le dossier de fichiers vidéo)
4. Dans la fenêtre Browse for Folder (Parcourir les dossiers),
sélectionnez l'emplacement d'enregistrement de vos images.
Remarque : pour réinitialiser l'emplacement d'enregistrement des
images et des vidéos, cliquez sur File (Fichier) et sur File index
reset (Réinitialiser l'index des fichiers). Les fichiers seront
dorénavant enregistrés sur l'emplacement par défaut d'origine.
Réglage du format de la vidéo
1. Sélectionnez Options, puis Capture Pin... (Onglet de capture...).
La fenêtre Properties (Propriétés) s'ouvre.
2. Réglage de la Output Size (Taille de sortie) à l'aide du menu
déroulant.
3. Cliquez sur OK une fois terminé.
d'enregistrement).
2. Cochez la case Use Time Limit (Utiliser la limite de la durée) et
entrez une durée limitée (en secondes) dans la zone correspondante.
3. Cliquez sur OK une fois terminé.
Réglage de la taille des fichiers des photos instantanées
Sélectionnez Capture, puis la taille des fichiers souhaitée dans le
menu déroulant.
Informations de sécurité et de maintenance
• Ne touchez pas l'objectif avec les doigts ou avec tout autre objet
coupant ou à gros grain.
• Utilisez un chiffon doux pour nettoyer l'objectif.
• N'utilisez pas ce produit dans des conditions extrêmement
chaudes, froides ou poussiéreuses.
• Évitez de faire tomber la webcam car elle risquerait de ne plus
fonctionner correctement.
Réglage de la fréquence trame
1. Sélectionnez Capture, puis Set frame rate (Régler la fréquence
trame).
2. Saisissez la fréquence trame par seconde et cochez la case
Enable Frame Rate (Activer la fréquence trame).
3. Cliquez sur OK une fois terminé.
Réglage de la taille de l'écran de prévisualisation
1. Sélectionnez Preview (Prévisualisation) et Distinguish Settings
(Réglages de distinction). La fenêtre Properties (Propriétés)
s’ouvre.
2. Sélectionnez la taille d'affichage souhaitée.
3. Cliquez sur OK une fois terminé.
Réglage la durée vidéo maximum
1. Sélectionnez Capture, puis Record time limit (Limite de la durée
Français : Déclaration de la FCC
Cet appareil est conforme à l’article 15 du règlement de la FCC. Son fonctionnement
est soumis aux deux conditions suivantes : (1) cet appareil ne doit pas provoquer
d’interférence dangereuses et (2) il doit accepter toute interférence reçue, y compris
celles risquant d’engendrer un fonctionnement indésirable. Cet équipement a été testé
et déclaré conforme aux limites prévues dans le cadre de la catégorie B des appareils
numériques, définies par l'article 15 du règlement de la FCC. Ces limites ont été
établies pour fournir une protection raisonnable contre les interférences préjudiciables
dans un environnement résidentiel. Cet équipement génère, utilise et peut émettre des
ondes radio et s’il n’est ni installé ni utilisé conformément aux instructions en vigueur, il
peut provoquer des interférences préjudiciables aux communications radio. L'absence
d'interférences dans une installation particulière ne peut cependant pas être garantie.
Si cet équipement provoque des interférences préjudiciables à la réception radio ou
télévision, ce qui peut être déterminé en mettant sous et hors tension l’équipement, il
est recommandé à l’utilisateur d’essayer de corriger l’interférence en appliquant une ou
plusieurs des mesures suivantes :
• réorienter ou déplacer l'antenne réceptrice ;
• augmenter la distance entre l'équipement et le récepteur ;
• raccorder l'équipement à une prise dont le circuit est différent de celui auquel le
récepteur est raccordé ;
• consulter le revendeur ou un technicien radio/TV expérimenté pour obtenir de l'aide.
Tous changements ou modifications non autorisés par la partie responsable des
normes pourraient rendre nul le droit de l’utilisateur d’utiliser ce produit.
Instructions de sécurité du produit:
Veuillez lire ce guide pour d'importantes informations de sécurité, de santé et de
réglementation.
Avertissement: l'incapacité à configurer, utiliser et prendre soin correctement de ce
produit peut augmenter le risque de blessures graves, voire mortelles, ou
d'endommagement du ou des appareils. Veuillez lire ces instructions et conserver tous
les imprimés des manuels et autres instructions pour vous y référer ultérieurement.
Ces instructions de sécurité du produit comprennent d'importantes informations à
propos de nombreux produits V7. Reportez-vous aux sections qui s'appliquent aux
caractéristiques de votre appareil.
Périphérique alimenté en USB: Ne branchez pas le câble d'alimentation USB avant
Spécifications
• Capture vidéo : Jusqu'à 640x480 pixels
• Vitesse de transmission : 30 FPS
• Interface : USB 2.0
• Mise au point : Mise au point manuelle
• Distance : de 5 cm/1,9 po jusqu'à l'infini
• Longueur du câble : 1,5 m/4,9 pi
• Mise à jour logicielle pour obtenir jusqu’à 16 mégapixels (en option)
• Balance des blancs automatique (AWB)
• Compensation automatique de la couleur (ACC)
d'avoir réalisé toutes les autres connexions par câble.
Tous les appareils:
N'essayez pas de les réparer vous-même: N'essayez pas de démonter, d'entretenir ou
de modifier le matériel composant l'appareil ou l'alimentation. Ceci pourrait présenter
des risques de décharge électrique, voire d'autres dangers. Toute évidence d'une
tentative de démontage et/ou de modifications de l'appareil, y compris des rayures,
des perforations ou le retrait des étiquettes, annuleront la garantie limitée.
Ne maltraitez pas l'appareil: N'immergez pas l'appareil dans un liquide ni ne l'exposez
à l'humidité. Nettoyez-le seulement avec un chiffon sec. N'utilisez pas l'appareil en
dehors de la fourchette de température de fonctionnement spécifiée de 5 °C (41 °F) à
35 °C (95 °F). Si l'appareil est exposé à un environnement en dehors de son
fonctionnement prescrit, mettez-le hors tension et laissez la température se stabiliser
et revenir dans la fourchette de fonctionnement spécifiée avant d'utiliser l'appareil.
Informations réglementaires:
Mise au rebut des déchets composés d'équipements électriques et
électroniques (WEEE)
La directive sur la mise au rebut des déchets composés d'équipements
électriques et électroniques a pour but de minimiser l'impact créé par les
biens électriques et électroniques sur l'environnement en augmentant la
réutilisation et le recyclage et en diminuant la quantité de ces appareils dans les
décharges. Le symbole sur votre produit V7 ou sur son emballage signifie que ce
produit doit être mis au rebut séparément des déchets ordinaires ménagers lorsqu'il
arrive en fin de vie. Veuillez être conscient qu'il vous incombe de mettre au rebut les
équipements électroniques dans des déchetteries afin d'aider à préserver les
ressources naturelles.
Chaque pays de l'union européenne possède un grand nombre de déchetteries pour le
recyclage des équipements électriques et électroniques. Pour des informations sur la
déchetterie la plus proche, veuillez contacter l'autorité de gestion des déchets
d'équipements électriques et électroniques ou le revendeur chez lequel vous avez
acheté le produit. Représentants autorisés dans la Communauté européenne: Ingram
Micro Pan Europe GmbH, Heisenbergbogen 3, D-85609 Dornach / Munich,
Allemagne.(www.V7-world.com)
6
Page 8

3
Funktionen der Webcam
2
CS0300
1
Bedienungsanleitung
Deutsch
Installieren der Software
Hinweis: Nach dem Installieren der Software stehen zusätzliche
Funktionen zur Verfügung.
1. Schließen Sie die Webcam an einem verfügbaren USB-Port an.
2. Nachdem die Hardware erkannt wurde, legen Sie die CD in das
CD/DVD-Laufwerk ein.
3. Befolgen Sie die Bildschirmanweisungen, um die Software zu
installieren.
4. Doppelklicken Sie auf das Symbol Webcam VideoCap auf
Ihrem Desktop und wählen Sie Device (Gerät). Stellen Sie
sicher, dass USB 2.0 Webcam (USB 2.0-Kamera) ausgewählt
ist.
Hinweis: Die Webcam-Software finden Sie auch online auf
www.V7-world.com unter den Registerkarten „Produkte“
und/oder „Kundenservice“.
Webcam verwenden
Wichtig: Wenn Sie mehr als eine Webcam besitzen, legen Sie
die CS-0300 als Standard fest. Doppelklicken Sie auf das
Symbol Webcam VideoCap auf Ihrem Desktop und wählen Sie
Device (Gerät). Wählen Sie USB 2.0 Webcam (USB
2.0-Kamera).
Den richtigen Platz für Ihre Webcam finden
• Den besten Augenkontakt erhalten Sie, wenn Sie die Webcam
in der Mitte des Monitors positionieren.
• Stellen Sie sicher, dass das Mikrofon auf der Webcam höchstens 1 m (3 ft) von Ihnen entfernt ist und auf Sie weist.
• Wenn Sie Computer-Lautsprecher verwenden, positionieren
Sie diese mindestens 30 cm (12 in.) vom Mikrofon entfernt, um
Feedback zu verringern. Außerdem sollten die Lautsprecher in
einem leichten Winkel vom Mikrofon weg weisen.
Webcam scharf stellen
Greifen Sie das schwarze Einstellrad auf der Vorderseite der
Kamera fest mit den Fingern, und drehen Sie das Rad nach
rechts und links, bis die Webcam scharf gestellt ist.
1 Kameraobjektiv
2 Einstellrad für Fokus
3 Schnappschusstaste
Plug and play
Schließen Sie die Webcam an einem verfügbaren
USB-Port an. Der Computer erkennt die Webcam,
und sie ist einsatzbereit.
Video aufzeichnen
1. Doppelklicken Sie auf das Symbol Webcam VideoCap auf Ihrem
Desktop und wählen Sie Capture (Aufzeichnen).
2. Wählen Sie im Dropdown-Menü Start Capture (Aufzeichnung
starten).
3. Um die Aufzeichnung der Videoaufnahme zu beenden, wählen
Sie erneut Capture (Aufzeichnen) und dann Stop Capture
(Aufzeichnung stoppen). Das Video wird automatisch im Ordner
Videos oder am von Ihnen angegebenen Ort gespeichert.
Video mit Audio aufzeichnen
1. Doppelklicken Sie auf das Symbol Webcam VideoCap auf Ihrem
Desktop und wählen Sie Capture (Aufzeichnen).
2. Wählen Sie im Dropdown-Menü Record Audio (Audio aufzeichnen). Ein Häkchen wird eingeblendet.
3. Klicken Sie auf Capture (Aufzeichnen), und wählen Sie Start Capture
(Aufzeichnung starten).
4. Um die Aufzeichnung der Videoaufnahme zu beenden, wählen
Sie erneut Capture (Aufzeichnen) und dann Stop Capture
(Aufzeichnung stoppen). Das Video wird automatisch im Ordner
Videos oder am von Ihnen angegebenen Ort gespeichert.
Mit der Webcam Fotos aufnehmen
Drücken Sie auf die silberne Schnappschusstaste oben auf der
Kamera. Das Bild wird automatisch im Ordner Bilder oder am von
Ihnen angegebenen Ort gespeichert.
Mithilfe der Software Fotos aufnehmen
1. Doppelklicken Sie auf das Symbol Webcam VideoCap auf Ihrem
Desktop und wählen Sie Capture (Aufzeichnen).
2. Wählen Sie im Dropdown-Menü Snap Shot (Schnappschuss).
Das Bild wird automatisch im Ordner Bilder oder am von Ihnen
angegebenen Ort gespeichert.
Webcam-Einstellungen ändern
Videos und Bilder speichern
Bilder und Videos werden automatisch unter Bilder oder Videos
gespeichert. So ändern Sie den Speicherort:
1. Doppelklicken Sie auf das Symbol Webcam VideoCap auf Ihrem
7
Page 9

Desktop und wählen Sie Device (Gerät). Stellen Sie sicher, dass
USB 2.0 Webcam (USB 2.0-Kamera) ausgewählt ist.
2. Klicken Sie auf File (Datei).
3. Wählen Sie den Dateityp, den Sie speichern möchten (für Bilder
wählen Sie Set snapshot file Folder [Ordner für Schnappschussdatei festlegen], für Video wählen Sie Set capture file Folder
[Ordner für Aufzeichnungsdatei festlegen]).
4. Wählen Sie im Fenster Browse for Folder (Nach Ordner suchen)
den Speicherort, an dem Sie Ihre Bilder speichern möchten.
Hinweis: Um den Speicherort für Bilder und Videos zurückzuset-
zen, klicken Sie auf File (Datei) und anschließend auf File index
reset (Dateiindex zurücksetzen). Die Dateien werden jetzt am
ursprünglichen Standardspeicherort gespeichert.
3. Klicken Sie auf OK, wenn Sie fertig sind.
Größe der Schnappschussdatei festlegen
Wählen Sie Capture (Aufzeichnen) und dann die gewünschte
Dateigröße aus dem Dropdown-Menü.
Sicherheits- und Wartungsinformationen
• Berühren Sie das Objektiv nicht mit den Fingern oder einem
scharfen oder groben Objekt.
• Verwenden Sie ein weiches Tuch zum Reinigen des Objektivs.
• Verwenden Sie das Produkt nicht bei extremer Hitze oder Kälte
oder in staubigen Umgebungen.
• Vermeiden Sie es, die Webcam fallen zu lassen, da sie dann
eventuell nicht mehr richtig funktioniert.
Videoformat anpassen
1. Wählen Sie Option, dann Video Capture Pin… (PIN für
Aufnahme...). Das Fenster „Properties“ (Eigenschaften) wird
geöffnet.
2. Passen Sie mithilfe des Dropdown-Menüs die Output Size
(Ausgabegröße) an.
3. Klicken Sie auf OK, wenn Sie fertig sind.
Framerate einstellen
1. Wählen Sie Capture (Aufzeichnen), dann Set frame rate
(Framerate einstellen).
2. Geben Sie den gewünschten Wert für Frames pro Sekunde ein,
und markieren Sie das Feld Enable Frame Rate (Framerate
aktivieren).
3. Klicken Sie auf OK, wenn Sie fertig sind.
Größe des Vorschaubildschirms anpassen
1. Wählen Sie Preview (Vorschau), dann Distinguish Settings
(Einstellungen unterscheiden). Das Fenster Properties
(Eigenschaften) wird geöffnet.
2. Wählen Sie die gewünschte Displaygröße.
3. Klicken Sie auf OK, wenn Sie fertig sind.
Maximale Videolänge anpassen
1. Wählen Sie Capture (Aufzeichnen), dann Record time limit
(Zeitlimit für Aufzeichnung).
2. Markieren Sie das Feld Use Time Limit (Zeitlimit verwenden),
und geben Sie im Feld Time Limit (Zeitlimit) ein Zeitlimit (in
Sekunden) ein.
Technische Daten
• Video-Capture: bis zu 640x480 Pixel
• Übertragungsgeschwindigkeit: 30 fps
• Schnittstelle: USB 2.0
• Fokus: manueller Fokus
• Abstand: 5 cm /1,9 in bis unendlich
• Kabellänge: 1,5 m/4,9 ft
• Software-Upgrade für bis zu 16 Megapixel (optional)
• Automatischer Weißabgleich (AWB)
• Automatischer Farbausgleich (ACC)
Anweisungen zur Produktsicherheit:
Lesen Sie diese Anleitung mit wichtigen Sicherheits- und Gesundheitsangaben und
Informationen zu behördlichen Auflagen.
Achtung: Eine nicht sachgemäße Einrichtung, Verwendung und Pflege dieses Produkts
kann das Risiko einer ernsthaften Verletzung oder des Todes oder von Schäden am
Gerät oder an Geräten erhöhen. Lesen Sie diese Anweisung und bewahren Sie alle
gedruckten Handbücher und Anweisungen für zukünftige Nachschlagezwecke auf.
Diese Anweisungen zur Produktsicherheit enthalten wichtige Informationen zu
zahlreichen V7-Produkten. Beziehen Sie sich auf Abschnitte, die auf das jeweilige
Leistungsmerkmal Ihres Geräts zutreffen.
Per USB-Anschluss betriebene Geräte: Schließen Sie das USB-Stromkabel erst dann
an, nachdem alle anderen Kabelverbindungen hergestellt wurden.
Alle Geräte:
Keine Reparaturen versuchen: Versuchen Sie nicht, Geräte oder Netzteile
auseinanderzunehmen, zu demontieren, zu warten oder zu modifizieren, da Sie sich
dadurch dem Risiko eines Stromschlags oder sonstigen Gefahren aussetzen können.
Alle Anzeichen von Versuchen, das Gerät auseinanderzunehmen und/oder zu
modifizieren, u. a. das Abziehen, Durchstechen oder Entfernen von Aufklebern, führen
zum Erlöschen der eingeschränkten Garantie.
Das Gerät nicht unsachgemäß gebrauchen: Das Gerät darf nicht in irgendwelche
Flüssigkeiten getaucht oder Feuchtigkeit ausgesetzt werden. Es darf nur mit einem
trockenen Tuch gereinigt werden. Das Gerät darf nicht außerhalb des vorgegebenen
Temperaturbereichs von 5 °C (41 °F) bis 35 °C (95 °F) eingesetzt werden. Wenn das
Gerät einer Umgebung ausgesetzt ist, die diese Betriebsangaben überschreiten,
schalten Sie es aus und warten Sie, bis sich die Temperatur innerhalb des vorgegebenen Betriebsbereichs stabilisiert hat, bevor Sie das Gerät benutzen.
Behördliche Informationen: Entsorgung von Elektro- und Elektronikaltgeräten
(Waste Electrical and Electronic Equipment – WEEE) Die Verordnung für
Elektro- und Elektronikaltgeräte (WEEE) zielt darauf ab, die negativen
Auswirkungen von elektrischen und elektronischen Produkten auf die
Umwelt so gering wie möglich zu halten, indem die Anzahl von Altgeräten,
die auf Müllhalden entsorgt werden, durch eine verstärkte Wiederverwendung und
vermehrtes Recycling reduziert wird. Das Symbol auf Ihrem V7-Produkt bzw. seine
Verpackung weist darauf hin, dass dieses Produkt am Ende seiner Nutzungsdauer
separat von gewöhnlichem Haushaltsmüll entsorgt werden muss. Sie sollten sich
dessen bewusst sein, dass Sie für die Entsorgung von Elektronikgeräten in RecyclingZentren zur Schonung von natürlichen Rohstoffressourcen verantwortlich sind.
Jedes Land in der Europäischen Union sollte über eigene Sammelzentren für das
Recycling von Elektro- und Elektronikgeräte verfügen. Informationen über die Abgabe
von Geräten zwecks Recycling erhalten Sie von Ihrer zuständigen Behörde für Elektround Elektronikaltgeräte oder vom Einzelhändler, bei dem Sie das Produkt gekauft
haben. Autorisierter Vertreter in der Europäischen Union: Ingram Micro Pan Europe
GmbH, Heisenbergbogen 3, D-85609 Dornach / München, Deutschland.(www.V7world.com)
8
Page 10

3
Funzionalità della webcam
2
CS0300
1
Manuale per
l'utente
Italiano
Installazione del software
Nota: ulteriori funzionalità saranno disponibili dopo l’installazione
del software.
1. Collegare la webcam a una porta USB disponibile.
2. Dopo aver individuato l’hardware, inserire il disco nell’unità
CD/DVD.
3. Seguire le istruzioni sullo schermo per installare il software.
4. Fare doppio clic sull’icona Webcam VideoCap (Cattura video
Webcam) sul desktop e poi selezionare Device (Dispositivo).
Accertarsi di avere selezionato USB 2.0 Webcam.
Nota: il software della webcam è anche disponibile nel sito
www.V7-world.com nelle schede Products e/o Support.
Uso della webcam
Importante: se si usano diverse webcam, selezionare il modello
CS0300 come impostazione predefinita. Fare doppio clic
sull’icona Webcam VideoCap (Cattura video Webcam) sul
desktop e poi selezionare Device (Dispositivo). Selezionare
USB 2.0 Webcam.
Come individuare la posizione adatta per la webcam
• Per ottenere il migliore contatto visivo, sistemare la webcam al
centro del monitor.
• Accertarsi che il microfono della webcam sia rivolto verso
l’utente e non sia a una distanza superiore a 1 m (3 piedi).
• Se si usano gli altoparlanti del computer, sistemarli a una
distanza minima di 30 cm (12 pollici) dal microfono per ridurre il
feedback e poi girarli in direzione opposta al microfono.
Messa a fuoco della webcam
Afferrare saldamente con le dita la rotellina nera sul lato anteriore
della webcam e farla girare verso destra e verso sinistra fino a
ottenere la messa a fuoco della webcam.
Registrazione dei video
1. Fare doppio clic sull’icona Webcam VideoCap (Cattura video
1 Lente della webcam
2 Rotellina per la messa a fuoco
3 Pulsante Snapshot (Istantanea)
Plug and play
Collegare la webcam a una porta USB
disponibile. Il computer riconosce la webcam
e si può procedere a usarla.
Webcam) sul desktop e poi fare clic su Capture (Cattura).
2. Nel menu a discesa, selezionare Start Capture (Avvia cattura).
3. Per interrompere la cattura dei video, selezionare di nuovo
Capture (Cattura) e poi Stop Capture (Interrompi cattura). Il
video viene memorizzato automaticamente in My Videos (Video)
o nella posizione specificata.
Registrazione di video con audio
1. Fare doppio clic sull’icona Webcam VideoCap (Cattura video
Webcam) sul desktop e poi fare clic su Capture (Cattura).
2. Nel menu a discesa, selezionare Record Audio (Registrazione
audio). Appare un segno di spunta.
3. Fare clic su Capture (Cattura) e selezionare Start Capture (Avvia
cattura).
4. Per interrompere la cattura dei video, selezionare di nuovo
Capture (Cattura) e poi Stop Capture (Interrompi cattura). Il
video viene memorizzato automaticamente in My Videos (Video)
o nella posizione specificata.
Come scattare una fotografia usando la webcam
Premere il pulsante di colore argento in alto sulla webcam.
L’immagine viene memorizzata automaticamente in My Pictures
(Immagini) o nella posizione specificata.
Come scattare una fotografia usando il software
1. Fare doppio clic sull’icona Webcam VideoCap (Cattura video
Webcam) sul desktop e poi fare clic su Capture (Cattura).
2. Nel menu a discesa, selezionare Snap Shot (Istantanea).
L’immagine viene memorizzata automaticamente in My Pictures
(Immagini) o nella posizione specificata.
Cambiamento delle impostazioni della webcam
Memorizzazione di video e immagini
Immagini e video sono memorizzati automaticamente in My
Pictures (Immagini) o My Videos (Video). Per cambiare
posizione:
1. Fare doppio clic sull’icona Webcam VideoCap (Cattura video
Webcam) sul desktop e poi selezionare Device (Dispositivo).
Accertarsi di avere selezionato USB 2.0 Webcam.
9
Page 11

2. Fare clic su File.
3. Selezionare il tipo di file da memorizzare (per le immagini,
selezionare Set snapshot file Folder (Imposta cartella file
istantanea); per i video, selezionare Set capture file Folder
(Imposta cartella file cattura).
4. Nella finestra Browse for Folder (Cerca cartella), selezionare
dove si desidera memorizzare le immagini.
Nota: per ripristinare la posizione in cui le immagini e i video sono
memorizzati, fare clic su File e poi su File index reset (Ripristino
indice file). I file saranno ora memorizzati nella posizione
predefinita originale.
Impostazione delle dimensioni del file dell'istantanea
Selezionare Capture (Cattura) e poi le dimensioni del file desiderate
nel menu a discesa.
Informazioni per la manutenzione e la sicurezza
• Non toccare la lente con le dita o con oggetti appuntiti o ruvidi.
• Usare un panno di cotone morbido per pulire la lente.
• Non usare questo prodotto in condizioni ambientali molto calde,
fredde o in ambienti polverosi.
• Evitare di far cadere la webcam per non comprometterne il
funzionamento.
Regolazione del formato del video
1. Selezionare Option (Opzione) e poi Video Capture Pin…(Pin
cattura video). La finestra Properties (Proprietà) si apre.
2. Regolare Output Size (Dimensioni output) nel menu a discesa.
3. Fare clic su OK al termine della procedura.
Impostazione della frequenza dei fotogrammi
1. Selezionare Capture (Cattura) e poi Set frame rate (Imposta
frequenza fotogrammi).
2. Immettere il numero di fotogrammi al secondo desiderato e poi
selezionare la casella Enable Frame Rate (Attiva frequenza
fotogrammi).
3. Fare clic su OK al termine della procedura.
Regolazione delle dimensioni dello schermo di anteprima
1. Selezionare Preview (Anteprima) e poi Distinguish Settings
(Distingui impostazioni). La finestra Properties (Proprietà) si
apre.
2. Selezionare le dimensioni di visualizzazione desiderate.
3. Fare clic su OK al termine della procedura.
Regolazione della lunghezza massima del video
1. Selezionare Capture (Cattura) e poi Record time limit (Limite
durata registrazione).
2. Selezionare la casella Use Time Limit (Usa limite tempo) e
immettere un limite di tempo (in secondi) nella casella Time Limit
(Limite tempo).
3. Fare clic su OK al termine della procedura.
Specifiche
• Acquisizione video: fino a 640x480 pixel
• Velocità di trasmissione: 30 FPS
• Interfaccia: USB 2.0
• Messa a fuoco: manuale
• Distanza: Da 5 cm /1,9 pollici fino all’infinito
• Lunghezza del cavo: 1,5 m / 4,9 piedi
• Aggiornamento del software fino a 16 megapixel (opzionale)
• Bilanciamento automatico del bianco (AWB)
• Compensazione automatica del colore (ACC)
Istruzioni per la sicurezza d’uso del prodotto:
Leggere questa guida per importanti informazioni di sicurezza e per la salute e per
informazioni sulla normativa.
Avvertenza: se non si installa, usa e mantiene correttamente questo prodotto, si
aumenta il rischio di infortuni gravi o morte, o di danni al o ai dispositivi. Leggere
queste istruzioni e conservare tutti i manuali stampati per riferimento futuro. Queste
istruzioni per la sicurezza d’uso del prodotto includono informazioni importanti su molti
prodotti V7. Consultare le sezioni pertinenti alla funzione del dispositivo in questione.
Dispositivi USB: Collegare il cavo di alimentazione USB solo dopo aver effettuato tutti
gli altri collegamenti elettrici.
Tutti i dispositivi:
Non tentare riparazioni. Non tentare di smontare, disassemblare, riparare o modificare
il dispositivo hardware o l’alimentatore, per evitare il rischio di scossa elettrica o altro
pericolo. Eventuali segni di tentativi di smontaggio e/o modifica del dispositivo, fra cui
pelatura, foratura o distacco di qualsiasi etichetta, rendono nulla la Garanzia limitata.
Non maltrattare il dispositivo. Non immergere il dispositivo in liquidi o esporlo
all’umidità. Pulire solamente con un panno asciutto. Non usare il dispositivo fuori della
gamma di temperatura di servizio specificata di 5 °C - 35 °C. Se il dispositivo è esposto
a un ambiente al di fuori delle condizioni di servizio prescritte, prima di usarlo
spegnerlo e attendere che la temperatura si stabilizzi rientrando nella gamma
specificata.
Informazioni normative: Smaltimento di Rifiuti di apparecchi elettrici ed elettronici
(WEEE dall’inglese Waste Electrical and Electronic Equipment) La Direttiva sui Rifiuti
di apparecchi elettrici ed elettronici (WEEE) intende ridurre al minimo l’impatto dei
prodotti elettrici ed elettronici sull’ambiente, aumentando il riutilizzo e il riciclo
e riducendo la quantità di rifiuti di apparecchi elettrici ed elettronici che
finiscono nelle discariche. Il simbolo sul prodotto V7 o sulla sua confezione
indica che alla fine della sua vita utile questo prodotto deve essere smaltito
separatamente dai rifiuti ordinari. Spetta all'utilizzatore eliminare apparecchi
elettronici nei centri di riciclaggio in modo da contribuire a preservare le risorse
ambientali.
Ogni nazione dell’Unione europea dovrebbe disporre di centri di raccolta per il
riciclaggio di apparecchi elettrici ed elettronici. Per informazioni sui centri di raccolta di
zona, contattare le autorità competenti o il rivenditore da cui si è acquistato il prodotto.
Rappresentante autorizzato nella Comunità europea: Ingram Micro Pan Europe GmbH,
Heisenbergbogen 3, D-85609 Dornach / Monaco, Germania. (www.V7-world.com)
10
Page 12

3
Webcamfuncties
CS0300
Gebruikershandleiding
Nederlands
De software installeren
Opmerking: Er zijn verdere functies beschikbaar wanneer u de
software eenmaal hebt geïnstalleerd.
1. Sluit de webcam aan op een beschikbare USB-poort.
2. Nadat de hardware is gevonden, plaatst u de schijf in het
cd/dvd-station.
3. Volg de instructies op het scherm om de software te installeren.
4. Dubbelklik op het pictogram Webcam VideoCap op uw
bureaublad en selecteer Device (Apparaat). Zorg dat USB 2.0
Webcam is geselecteerd.
Opmerking: De software voor de webcam kunt u ook online
vinden op www.V7-world.com onder de tabs Products
(Producten) en/of Support (Ondersteuning).
De webcam gebruiken
Belangrijk: Als u meer dan één webcam hebt, stelt u de CS0300
in als standaardapparaat. Dubbelklik op het pictogram Webcam
VideoCap op uw bureaublad en selecteer Device (Apparaat).
Selecteer USB 2.0 Webcam.
De juiste plaats voor de webcam vinden
• Voor het beste oogcontact plaatst u de webcam in het midden
van de monitor.
• Zorg dat de microfoon op de webcam op niet meer dan 1 m (3
ft.) afstand van u is en dat hij naar u toe wijst.
• Als u de luidsprekers van de computer gebruikt, plaatst u ze
ten minste 30 cm (12 inch) van de microfoon af om feedback te
verminderen; plaats de luidsprekers dan onder een hoek van
de microfoon af.
De webcam scherpstellen
Pak de zwarte knop op de voorkant van de camera stevig vast
met uw vingers en draai de knop naar rechts en links totdat de
webcam is scherpgesteld.
Video's opnemen
1. Dubbelklik op het pictogram Webcam VideoCap op uw
bureaublad en klik dan op Capture (Opnemen).
2
1
1 Cameralens
2 Scherpstelknop
3 Snapshotknop
Plug and play
Sluit de webcam aan op een beschikbare
USB-poort. De computer herkent de webcam
en u kunt de webcam direct gaan gebruiken.
2. Selecteer in het vervolgkeuzemenu Start Capture (Opname
starten).
3. Om het opnemen van de video te stoppen, selecteert u Capture
(Opnemen) opnieuw en dan Stop Capture (Opname stoppen).
De video wordt automatisch opgeslagen op My Videos (Mijn
video's) of op de door u opgegeven locatie.
Video's opnemen met audio
1. Dubbelklik op het pictogram Webcam VideoCap op uw
bureaublad en klik dan op Capture (Opnemen).
2. Selecteer in het vervolgkeuzemenu Record Audio (Audio
opnemen). Er verschijnt een vinkje.
3. Klik op Capture (Opnemen) en selecteer Start Capture (Opname
starten).
4. Om het opnemen van de video te stoppen, selecteert u Capture
(Opnemen) opnieuw en dan Stop Capture (Opname stoppen).
De video wordt automatisch opgeslagen op My Videos (Mijn
video's) of op de door u opgegeven locatie.
Een foto maken met de webcam
Druk op de zilverkleurige snapshotknop boven op de camera. De
video wordt automatisch opgeslagen op My Pictures (Mijn
foto's) of op de door u opgegeven locatie.
Een foto maken met de software
1. Dubbelklik op het pictogram Webcam VideoCap op uw
bureaublad en klik dan op Capture (Opnemen).
2. Selecteer in het vervolgkeuzemenu Snap Shot. De video wordt
automatisch opgeslagen op My Pictures (Mijn foto's) of op de
door u opgegeven locatie.
Webcaminstellingen veranderen
Video's en foto's opslaan
Foto's en video's worden automatisch opgeslagen op My Pictures
(Mijn foto's) of My Videos (Mijn video's). De locatie veranderen:
1. Dubbelklik op het pictogram Webcam VideoCap op uw
bureaublad en selecteer Device (Apparaat). Zorg dat USB 2.0
Camera is geselecteerd.
2. Klik op File (Bestand).
11
Page 13

3. Selecteer het bestandstype dat u wilt opslaan (voor foto's
selecteert u Set Snapshot File Folder (Snapshot-bestandsmap
instellen), voor video selecteert u Set Capture file folder
(Opname-bestandsmap instellen))
4. Selecteer in het venster Browse for Folder (Zoeken naar map)
waar u uw foto's wilt opslaan.
Opmerking: Om opnieuw in te stellen waar foto's en video's
worden opgeslagen, klikt u op File (Bestand), dan op File Index
reset (Bestandsindex opnieuw instellen). De bestanden worden
nu op de oorspronkelijke standaardlocatie opgeslagen.
Videoformaat aanpassen
1. Selecteer Option (Optie) en dan Video Capture Pin… (Videoopnamepin…) Het venster Properties (Eigenschappen) gaat
open.
2. Pas de Output Size (Uitvoergrootte) aan met het vervolgkeuzemenu.
3. Klik op OK wanneer u klaar bent.
De framesnelheid instellen
1. Selecteer Capture (Opnemen) en dan Set frame rate
(Framesnelheid instellen).
2. Voer het gewenste aantal frames per seconde in en schakel het
vakje Enable Frame Rate (Framesnelheid inschakelen) in.
3. Klik op OK wanneer u klaar bent.
De grootte van het voorbeeldscherm aanpassen
1. Selecteer Preview (Voorbeeld) en dan Distinguish Settings
(Instellingen onderscheiden). Het venster Properties
(Eigenschappen) gaat open.
2. Selecteer de gewenste weergavegrootte.
3. Klik op OK wanneer u klaar bent.
2. Activeer het vakje Use Time Limit (Tijdslimiet gebruiken) en typ
een tijdslimiet (in seconden) in het vakje Time Limit (Tijdslimiet).
3. Klik op OK wanneer u klaar bent.
De grootte van het snapshotbestand instellen
Selecteer Capture (Opnemen) en dan de gewenste bestands-
grootte uit het vervolgkeuzemenu.
Informatie over veiligheid en onderhoud
• Raak de lens niet aan met uw vingers of met scherpe of ruwe
voorwerpen.
• Gebruik een zachte katoenen doek om de lens schoon te maken.
• Gebruik dit product niet in extreem warme, koude of stoffige
omgevingen.
• Zorg dat de webcam niet valt, want het is mogelijk dat hij dan niet
langer goed werkt.
Specificaties
• Video-capture: tot 640x480 pixel
• Transmissiesnelheid: 30 FPS
• Interface: USB 2.0
• Focus: Handmatig scherpstellen
• Afstand: 5 cm /1,9 inch tot oneindig
• Kabellengte: 1,5 m / 4,9 ft
• Software-upgrade voor maximaal 16 megapixel (optioneel)
• Automatische witbalans (AWB)
• Automatische kleurcompensatie (ACC)
De maximale videolengte aanpassen
1. Selecteer Capture (Opnemen) en dan Record time limit
(Tijdslimiet opname).
Instructies voor productveiligheid:
Lees deze handleiding door voor belangrijke informatie over veiligheid, gezondheid en
wet- en regelgeving.
Waarschuwing: Als dit product niet op de juiste wijze wordt opgesteld, gebruikt en
verzorgd, kan het risico op ernstig of dodelijk letsel of beschadiging van het apparaat of
de apparaten toenemen. Lees deze instructies door en bewaar alle gedrukte
handleidingen en instructies voor later. Deze instructies voor productveiligheid bevatten
belangrijke informatie over vele V7-producten. Raadpleeg de paragrafen die van
toepassing zijn op de functie van uw apparaat.
Via USB werkende apparaten: Sluit de USB-stroomkabel pas aan wanneer alle andere
kabels zijn aangesloten.
Alle apparaten:
Niet proberen te repareren: Probeer niet het apparaat of de voedingseenheid uit elkaar
te nemen, te demonteren, te wijzigen of er onderhoud aan uit te voeren. Dit kan risico
op elektrische schokken of ander gevaar tot gevolg hebben. Wanneer blijkt dat
pogingen zijn gedaan om het apparaat te demonteren en/of te wijzigen, zoals
lostrekken, doorboren of verwijderen van etiketten, vervalt de beperkte garantie.
Misbruik het apparaat niet: Dompel het apparaat niet onder in vloeistof en stel het niet
bloot aan vocht. Maak het uitsluitend schoon met een droge doek. Gebruik het
apparaat niet buiten de opgegeven bedrijfstemperaturen van 5 °C (41 °F) tot 35 °C (95
°F). Als het apparaat wordt blootgesteld aan een omgeving buiten de voorgeschreven
bedrijfstemperaturen, schakel het dan uit en laat de temperatuur zich stabiliseren tot
binnen het opgegeven temperatuurbereik voordat u het apparaat gebruikt.
Wet- en regelgeving: Afvoer van afgedankte elektrische en elektronische apparatuur
(AEEA) De richtlijn betreffende afgedankte elektrische en elektronische
apparatuur (AEEA) streeft ernaar de impact van elektrische en elektronische
producten op het milieu te verminderen door meer hergebruik en recycling
van AEEA en minder afval op stortterreinen. Het symbool op het V7-product
of de verpakking betekent dat dit product aan het einde van zijn levensduur
gescheiden van gewoon huishoudelijk afval moet worden verwijderd. Houd er a.u.b.
rekening mee dat het uw verantwoordelijkheid is om elektronische apparatuur bij een
recyclingcentrum in te leveren om natuurlijke hulpbronnen te helpen bewaren.
Elk land in de Europese Unie moet verzamelcentra voor recycling van elektrische en
elektronische apparatuur hebben. Voor informatie over recycling-verzamelpunten kunt
u contact opnemen met de betreffende instantie voor het beheer van afgedankte
elektrische en elektronische apparatuur of de winkelier waar u het product hebt
gekocht. Gemachtigde vertegenwoordiger in de Europese Gemeenschap: Ingram
Micro Pan Europe GmbH, Heisenbergbogen 3, D-85609 Dornach / München,
Duitsland. (www.V7-world.com)
12
Page 14

3
Recursos da webcam
2
CS0300
1
Manual do
usuário
Português
Instalação do software
Observação: Ao instalar o software, outros recursos estarão
também disponíveis.
1. Conectar a webcam a uma porta USB disponível.
2. Após o hardware ser encontrado, inserir o disco na unidade de
CD/DVD.
3. Seguir as instruções na tela para instalar o software.
4. Dar um duplo clique no ícone Webcam VideoCap em seu
desktop e selecionar Device (Dispositivo). Certificar-se de que
USB 2.0 Webcam esteja selecionado.
Observação: O software da webcam pode ser encontrado
on-line em www.V7-world.com sob a aba Products e/ou
Support.
Uso da webcam
Importante: Caso tenha mais de uma webcam, defina a CS0300
como padrão. Dar um duplo clique no ícone Webcam VideoCap
em seu desktop e selecionar Device (Dispositivo). Selecionar
Câmara USB 2.0.
Encontrar o local adequado para a webcam
• Para um melhor contato com os olhos, coloque a webcam no
centro do monitor.
• Verifique se o microfone da webcam não está a mais de 1 m
de distância e que esteja apontado em sua direção.
• Caso use os alto-falantes do computador, coloque-os a pelo
menos 30 cm de distância do microfone para reduzir o retorno
e posicione-os a um ângulo em relação ao microfone.
Focalizar a webcam
Segurar firmemente o aro preto na frente da câmera com os
dedos e girar para a direita e para a esquerda até que a
webcam esteja focalizada.
Gravação de vídeo
1. Dar um duplo clique no ícone Webcam VideoCap em seu
1 Lente da câmara
2 Botão de ajuste de foco
3 Botão snapshot
Plug and play
Conectar a webcam a uma porta USB
disponível. O computador reconhece a
webcam e ela está pronta para ser usada.
desktop e selecionar Capture (Captura).
2. No menu suspenso, selecionar Start Capture (Iniciar captura).
3. Para parar a captura de vídeo selecionar Capture (Capturar)
novamente e depois Stop Capture (Parar captura). O vídeo é
salvo em My Videos (Meus vídeos) ou no local que foi especificado.
Gravação de vídeo com áudio
1. Dar um duplo clique no ícone Webcam VideoCap em seu
desktop e selecionar Capture (Captura).
2. No menu suspenso selecionar Record Audio (Gravar áudio).
Será exibida uma marca de verificação.
3. Clicar em Capture (Capturar) e selecionar Start Capture (Iniciar
captura).
4. Para parar a captura de vídeo selecionar Capture (Capturar)
novamente e depois Stop Capture (Parar captura). O vídeo é
salvo em My Videos (Meus vídeos) ou no local que foi especificado.
Tirar uma foto usando a webcam
Pressionar o botão snaphot prata na parte superior da câmera. O
vídeo é salvo em My Pictures (Minhas Fotos) ou no local que foi
especificado.
Tirar uma foto usando o software
1. Dar um duplo clique no ícone Webcam VideoCap em seu
desktop e selecionar Capture (Captura).
2. No menu suspenso, selecionar Snap Shot. O vídeo é salvo em
My Pictures (Minhas Imagens) ou no local que foi especificado.
Alterar as configurações da webcam
Salvar vídeos e fotos
Fotos e vídeos são salvos automaticamente nas pastas My
Pictures ou My Videos (Minhas imagens ou Meus vídeos). Para
mudar o local:
1. Dar um duplo clique no ícone Webcam VideoCap em seu
desktop e selecionar Device (Dispositivo). Certificar-se de que
USB 2.0 Webcam esteja selecionado.
2. Clicar em File (Arquivo).
13
Page 15

3. Selecionar o tipo de arquivo que deseja salvar (para fotografias
selecionar Set snapshot file Folder (Pasta Ajustar arquivo de
snapshot), para vídeo selecionar Set capture file Folder (Past
Ajustar arquivo de captura)
4. Na janela Browse for Folder (Buscar Pasta), selecionar onde
deseja que suas fotos ou vídeos sejam salvos.
Observação: Para redefinir onde as imagens e vídeos são
salvos, clicar em File (Arquivo), depois em File index reset
(Reajustar índice de arquivo). Os arquivos passarão a ser
salvos no local padrão original.
Ajustar o formato do vídeo
1. Selecionar Option (Opção) e em seguida, Video Capture Pin…
(Pino de captura de vídeo) A janela Properties (Propriedades)
abrirá.
2. Ajustar Output Size (Tamanho de saída) usando o menu
suspenso.
3. Clicar em OK quando terminar.
Ajustar o ritmo de exibição
1. Selecionar Capture (Capturar), em seguida, Set frame rate
(Ajustar ritmo de exibição).
2. Digitar o ritmo de exibições desejado por segundo e assinalar a
caixa Enable Frame Rate (Ativar ritmo de exibição).
3. Clicar em OK quando terminar.
Ajustar o tamanho da tela de previsualização
1. Selecionar Preview (Previsualização), e em seguida, Distinguish Settings (Distinguir configurações). A janela Properties
(Propriedades) abrirá.
2. Selecionar o tamanho de exibição desejado.
3. Clicar em OK quando terminar.
(Gravar limite de tempo).
2. Assinalar a caixa Time Limit (Limite de tempo) e inserir um limite
de tempo (em segundos) na caixa Time Limit (Limite de tempo).
3. Clicar em OK quando terminar.
Configurar o tamanho do arquivo de snapshot
Selecionar Capture (Capturar), e em seguida, o tamanho do
arquivo desejado no menu suspenso.
Informações sobre segurança e manutenção
• Não tocar nas lentes com os dedos nem com nenhum objeto
pontiagudo ou áspero.
• Usar um tecido de algodão macio para limpar as lentes.
• Não usar esse produto em ambientes extremamente quentes,
frios ou empoeirados.
• Evitar deixar a webcam cair, uma vez que isso poderá danificá-la.
Especificações
• Captura de vídeo: até 640 x 480 pixeis
• Velocidade de transmissão: Interface 30 FPS: USB 2.0
• Foco: foco manual
• Distância: de 5 cm /1,9 pol até infinito
• Comprimento do cabo: 1,5 m / 4,9 pés
• Atualização de software para até 16 megapixeis (opcional)
• Balanço de branco automático (AWB)
• Compensação automática de cor (ACC)
Ajustar o comprimento máximo de vídeo
1. Selecionar Capture (Capturar), e em seguida, Record time limit
Português : Declaração de cumprimento das normas do FCC
Este aparelho cumpre a seção 15 das normas do FCC. Seu funcionamento está
sujeito às seguintes duas condições: (1) Este dispositivo não pode causar
interferências prejudiciais e (2) este aparelho deve tolerar qualquer interferência que
seja recebida, inclusive interferência que possa causar problemas de funcionamento.
Este aparelho foi testado e considerado de acordo com os limites impostos a parelhos
digitais de Classe B, segundo os termos da seção 15 das normas do FCC. Esses
limites são projetados para criar proteção razoável contra interferência prejudicial em
uma instalação residencial. Este aparelho gera, use e pode irradiar energia de
freqüência de rádio e, se não for instalado e usado de acordo com as instruções, pode
causar interferência prejudicial em comunicações via rádio. Entretanto, não há arantias
de que não haverá interferência em uma determinada instalação. Se este aparelho
causar interferência prejudicial para a recepção de rádios ou televisores, o que pode
ser comprovado com o ligamento e desligamento do aparelho, o usuário deve tentar
corrigir a interferência tomando uma ou várias das seguintes medidas:
• Mudar a antena de recepção de lugar ou apontá-la em outra direção;
• Aumentar o espaço de separação entre o aparelho e o receptor;
• Ligar o aparelho a uma tomada de um circuito diferente daquele em que o receptor
esteja conectado;
• Consultar a loja ou uma oficina de rádio e TV qualificada.
Toda mudança ou alteração feita sem autorização dos responsáveis pelo cumprimento
das normas pode resultar na perda do direito de se usar o aparelho.
Instruções de segurança do produto:
Leia este guia para obter informações importantes de segurança e saúde e
informações normativas.
Advertência: Caso este produto não seja usado e mantido adequadamente, o risco de
ferimentos sérios ou morte, ou de dano ao dispositivo ou dispositivos pode ser maior.
Leia esta instrução e guarde todos os manuais e instruções impressos para referência
futura. Estas instruções de segurança do produto incluem informações importantes
sobre muitos produtos V7. Consulte as seções que se aplicam às características do
seu dispositivo.
Dispositivos alimentados por USB: Não conecte o cabo de alimentação USB até que
sejam feitas todas as outras conexões do cabo.
Todos os dispositivos:
Não tente fazer reparos: Não tente desmontar, fazer a manutenção ou modificar o
dispositivo ou a fonte de alimentação. pois pode apresentar risco de choques elétricos
ou outros perigos. Qualquer evidência de tentativas de desmontar e/ou modificar o
dispositivo, inclusive descolamento, perfuração ou remoção de qualquer etiqueta,
cancelará a garantia limitada.
Não abuse do dispositivo: Não mergulhe o dispositivo em nenhum líquido ou
exponha-o à umidade. Limpe apenas com um pano seco. Não use o dispositivo fora
da faixa de temperatura operacional especificada de 5°C (41°F) a 35°C (95°F). Caso o
dispositivo seja exposto a ambiente fora da sua operação prescrita, desligue-o e
permita que a temperatura se estabilize dentro da faixa operacional especificada antes
de usá-o.
Informação normativa: Descarte de resíduos de equipamentos eletroeletrônicos
(REEE) A diretriz de resíduos de equipamentos eletroeletrônicos (REEE)
objetiva minimizar o impacto de produtos eletroeletrônicos no ambiente ao
aumentar a reutilização e a reciclagem e ao reduzir a quantidade de REEE
destinados aos aterros sanitários. O símbolo no seu produto V7 ou na
embalagem significa que esse produto deve ser descartado no final de sua
vida útil separadamente dos resíduos domésticos comuns. Saiba que é sua
responsabilidade descartar equipamentos eletrônicos em centros de reciclagem para
ajudar a conservar os recursos naturais.
Cada país na União Europeia deve ter seus centros de coleta para reciclagem de
equipamentos elétricos e eletrônicos. Para obter informações a cerca da sua área de
coleta para reciclagem, contate as autoridades de gestão do descarte de equipamentos eletroeletrônicos ou o varejista onde você comprou o produto. Representante
autorizado na Comunidade Européia: Ingram Micro Pan Europe GmbH, Heisenbergbogen 3, D-85609 Dornach / Munich, Germany.(www.V7-world.com)
14
Page 16

www.V7-world.com
 Loading...