

Page 1
Page 2

Table of Contents
Safety Precautions ................3
Unpacking ..............................6
Your Phone ............................7
Your Phone’s parts ...................7
Display ....................................11
Keypad Backlight ....................14
LED Select ...............................15
Getting Started ....................16
Installing a SIM Card ..............16
Charging the Battery ..............19
Switching the Phone On or Off
Your Phone’s Modes ..............22
Locking the Keys ....................23
Using the Soft Keys ............24
Call Functions .......................28
Making a Call .........................28
Making an International Call ..29
Making a Call from Phonebook
Redialing the Last Number .....29
Adjusting the Volume ............30
Answering a Call ....................31
Viewing Missed Calls ..............32
Quickly Switching to Manner
Mode ......................................33
Options During a Call .............33
Using the Ear-microphone .....39
...21
..29
Entering Text .......................40
Changing Text Input Language
eZi English Mode ....................44
ALPHABET Mode ...................47
Using the Menus .................50
Accessing a Menu Function by
Scrolling ........................................50
Accessing a Menu Function by Using
Its Shortcut ...................................51
List of Menu Functions .................52
Message ...............................61
SMS ........................................61
MMS ......................................61
Write Message (Menu 1-1) ....61
Inbox (Menu 1-2) ...................64
Outbox (Menu 1-3) ................67
Draft (Menu 1-4) ....................68
Templates (Menu 1-5) ............68
Voice Mail (Menu 1-6) ...........69
Info Message (Menu 1-7) .......70
Settings (Menu 1-8) ...............72
Call Register .........................75
Call History (Menu 2-1) ..........75
Call Duration (Menu 2-2) .......78
Call Costs (Menu 2-3) ............79
GPRS Counter (Menu 2-4) .....80
..41
Profile ....................................81
General (Menu 3-1) ................81
Setting ..................................83
Time/Date Set (Menu 4-1) ......83
Alarm Set (Menu 4-2) ............84
Call Setting (Menu 4-3) ..........87
Phone Settings (Menu 4-4) ....95
Security Settings (Menu 4-5) .....
GPRS Setting (Menu 4-6) .....102
Network Select (Menu 4-7)
Factory Set (Menu 4-8) .........104
Organizer ...........................105
Phonebook (Menu 5-1) ........105
Scheduler (Menu 5-2) ..........117
File Manager (Menu 5-3) .....123
Camera ...............................125
Take Photo (Menu 6-1) ........125
Record Video (Menu 6-2) .....126
Photo Album (Menu 6-3) .....127
Video Album (Menu 6-4) .....127
Phonebook Album (Menu 6-5)
Configuration (Menu 6-6) ....128
Application .........................129
MP3 (Menu 7-1) ...................129
Othello (Menu 7-2) ..............130
Calculator (Menu 7-3) ..........131
Unit Converter (Menu 7-4) ..132
World Time (Menu 7-5) .......133
Voice Memo (Menu 7-6) .....133
....103
.128
Java .....................................135
Downloads (Menu 8-1) ........135
Memory Status (Menu 8-2)
Network
(Menu 8-3)
Internet ...............................137
Homepage ...........................138
Bookmarks ...........................139
97
Recent pages ........................139
Enter address ........................140
Resume ................................140
Settings ................................141
Push .....................................143
Reference Information .....144
Access Codes .......................144
Safety Information ...............146
Care and Maintenance ........154
Warranty ............................155
....135
.............136
Table of Contents
1 2
Page 3
Safety Precautions
Read these simple guidelines. Failure to comply with them may be
dangerous or illegal. For more detailed safety information, see
“Reference Information” on page 144.
Road safety comes first
Do not use a hand-held mobile phone while driving; park the
vehicle first. Remember that in some countries, it is illegal to
use a mobile phone while driving.
Switch off when refueling
Do not use the phone at a refueling point (service station) or
near fuels or chemicals.
Switch off on aircraft
Mobile phones can cause interference. Using them on aircraft
is both illegal and dangerous.
Switch off in hospital
Follow any regulations or rules. Switch phone off near
medical equipment.
Respect special regulations
Follow any special regulations in force in any area and always
switch off your phone whenever it is forbidden to use it, or
when it may cause interference or danger (in a hospital for
example).
Interference
All wireless phones may be subject to radio interference,
which may affect their performance.
Use qualified service
Only qualified service personnel must repair equipment.
Use sensibly
Use only in the normal position (to the ear). Do not touch the
antenna unnecessarily when the phone is switched on.
Accessories and batteries
Use only approved accessories and batteries.
Safety Precautions
3 4
Page 4
Safety Precautions
Unpacking
Radio frequency exposure information
In August 1996, the Federal Communications Commission
(FCC) of the U.S. adopted an updated safety standard for
human exposure to radio frequency electromagnetic energy
emitted by FCC regulated transmitters. These guidelines are
consistent with the safety standard previously set by both
U.S. and international standards bodies. The design of this
phone complies with the FCC guidelines and these
international standards.
To maintain compliance with FCC RF exposure guidelines, if
you wear a handset on your body, use the supplied or
approved carrying case, holster, or other body-worn
accessory.
If you do not use a body-worn accessory, ensure the antenna
is at least one inch (2.5cm) from your body when
transmitting. Use of non-approved accessories may violate
FCC RF exposure guidelines.
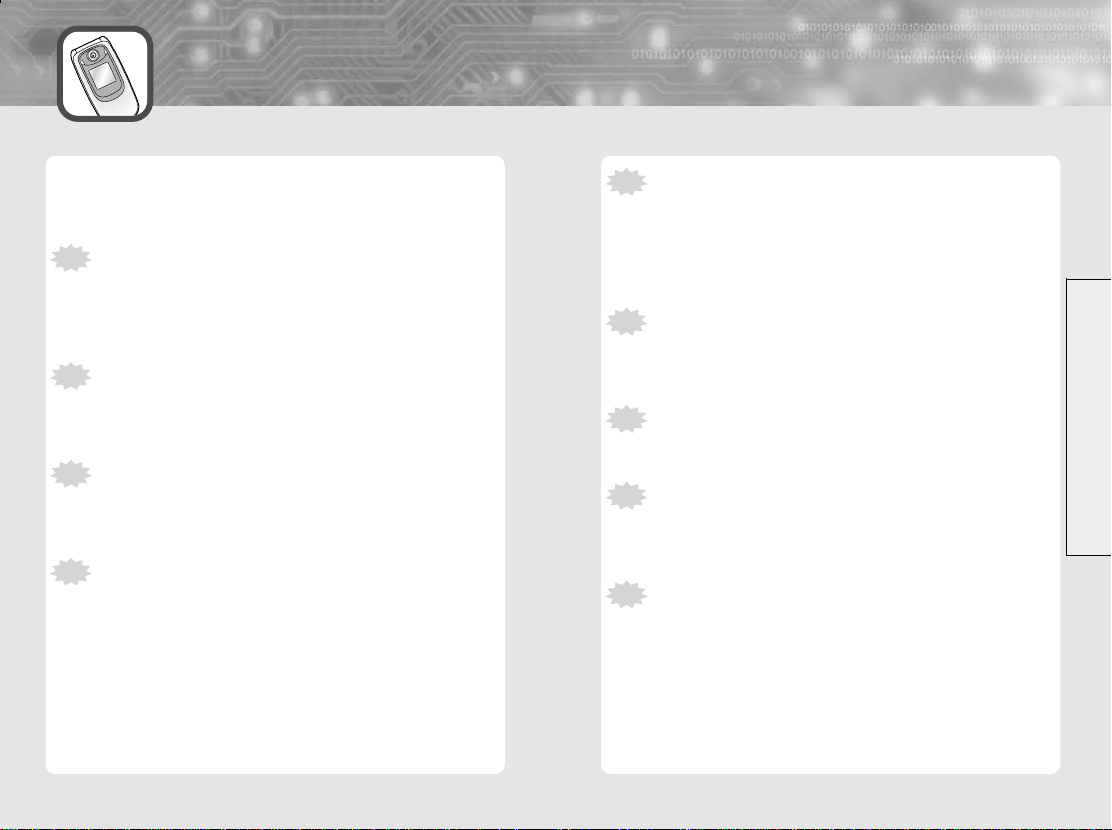
Your package contains the following items:
Phone Battery
Data cable
User manual
*
The shape of the plug varies according to each country’s specification.
Battery cover
Travel adapter *
Ear-microphone
Unpacking
5 6
Page 5
Your Phone
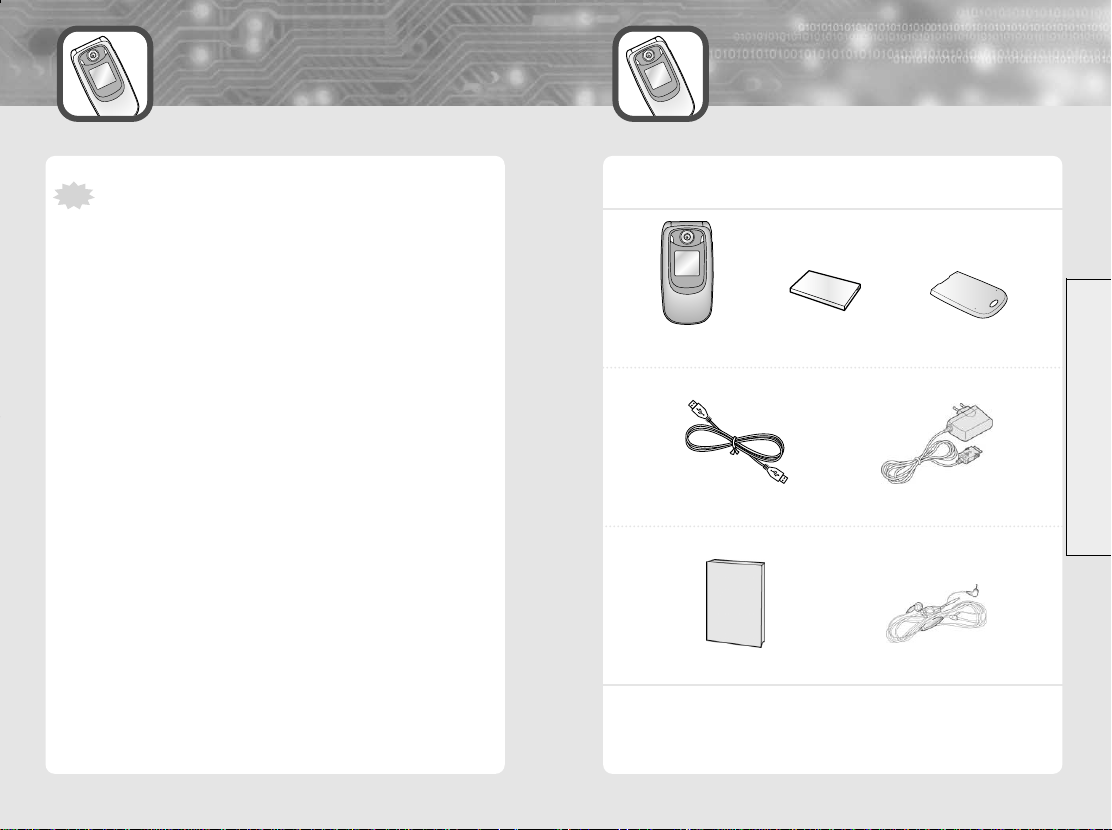
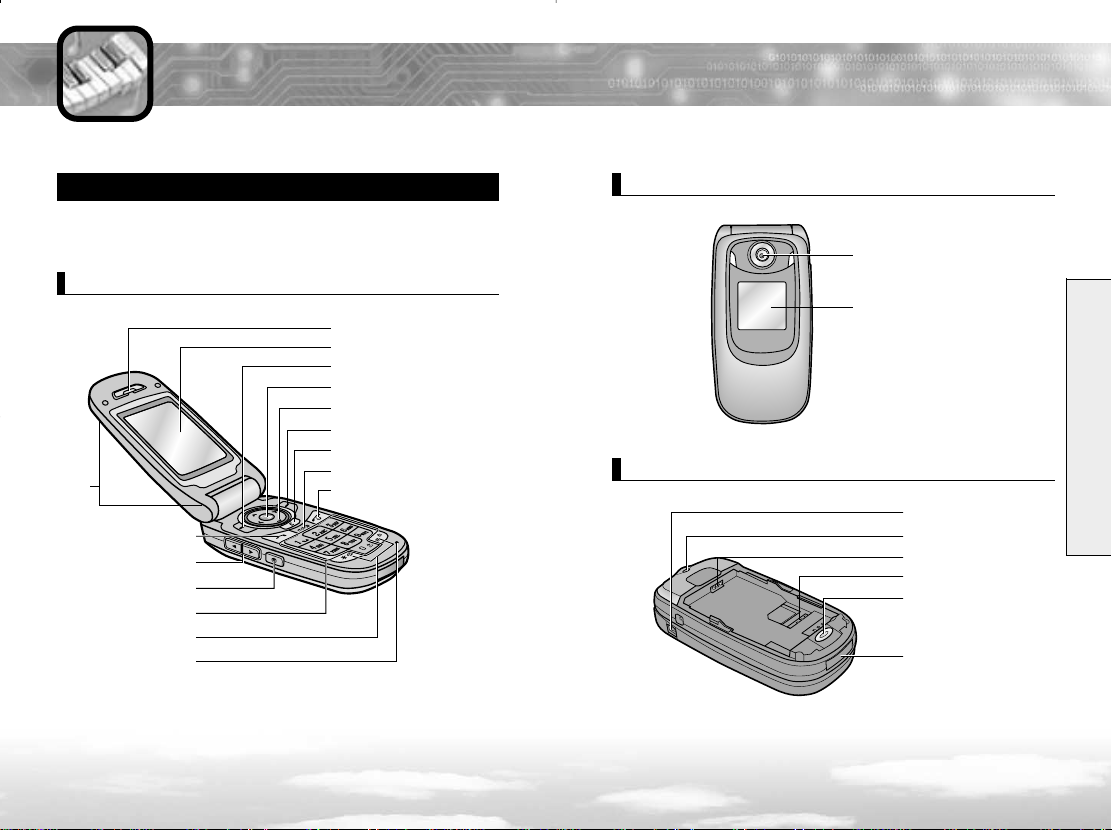
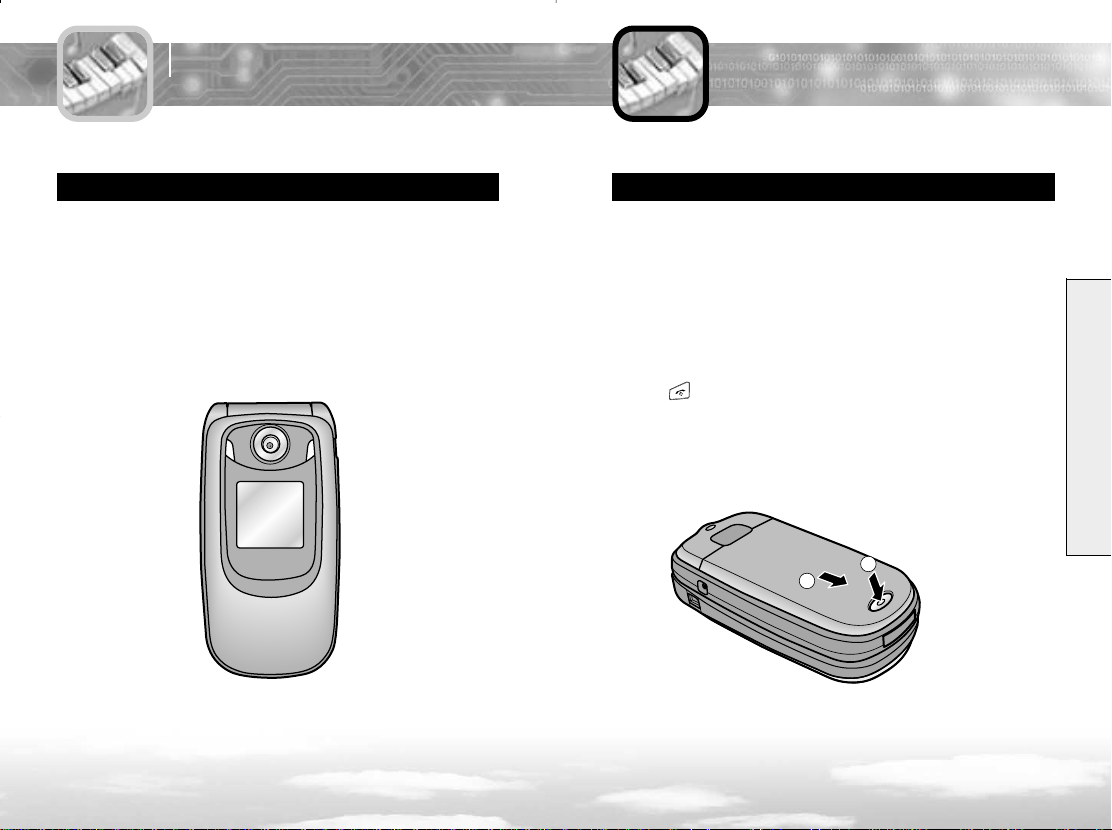
Your Phone’s parts
The following illustrations show the main elements of your phone :
Open View
Earpiece
Display
Left soft key
Internet service/Confirmation key
Navigation/Hot keys
Right soft key
Clear key
Folder
Send key
Volume keys
Camera key
Alphanumeric keys
Special function keys
Microphone
MP3 key
End/Power on-off key
Closed View
Camera
Sub LCD
Your Phone
Rear View
Earset hole
Hand strap hole
Battery terminals
SIM card socket
Battery lock
Cable connector slot
7 8
Page 6
Y our Phone
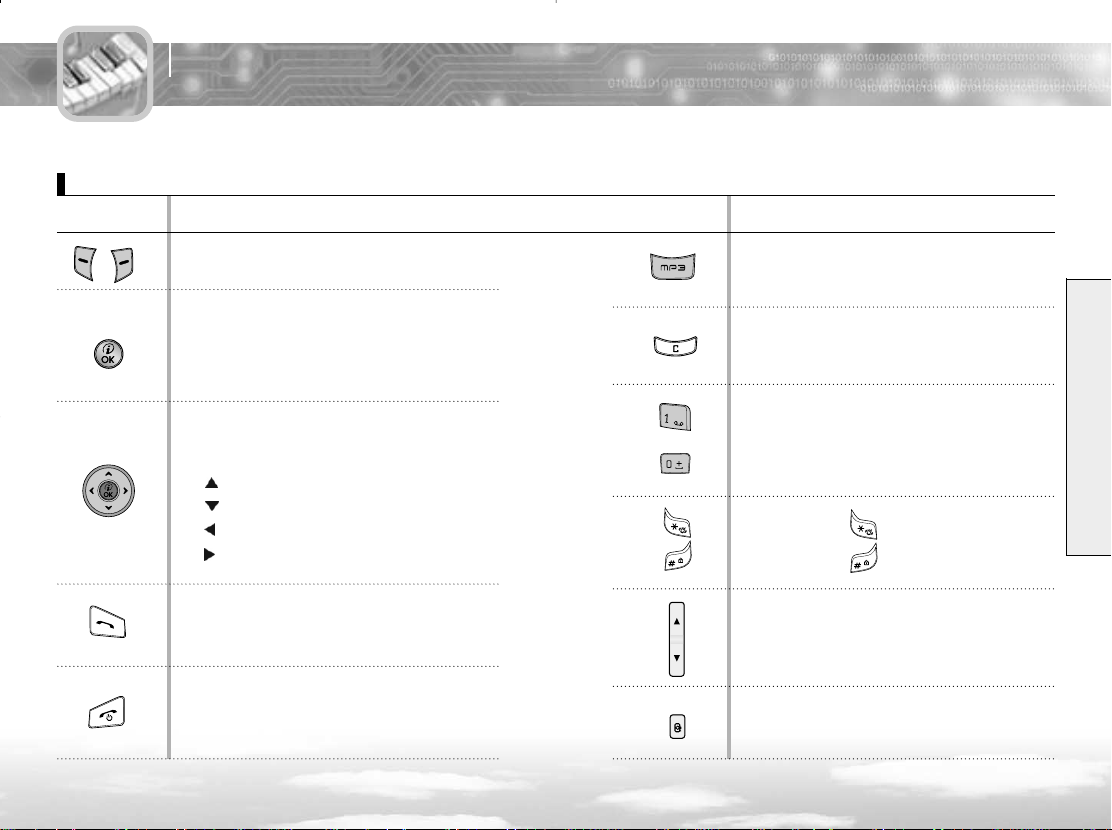
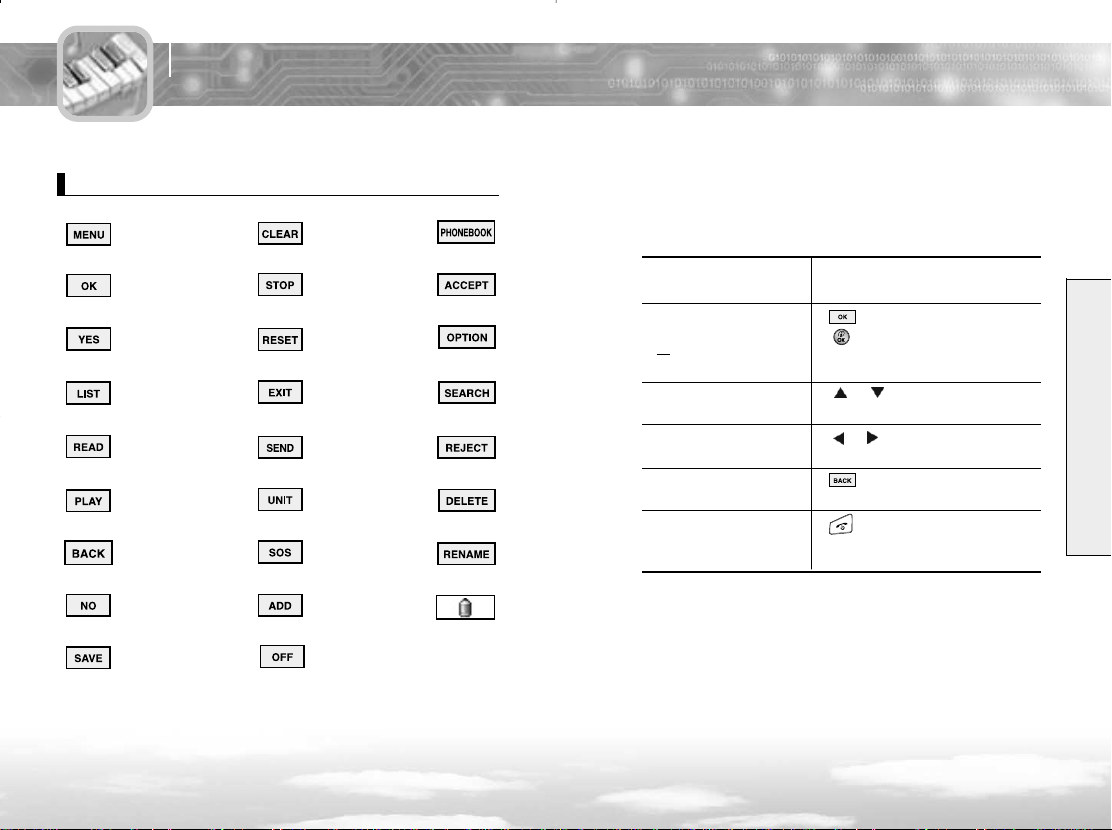
Key(s)
Key(s) Description
Performs the functions indicated by the text above
them, on the bottom line of the display.
Key(s) Description
Press the MP3 key on the center of
keypad to directly access MP3 player mode.
In Standby Mode, this key can be used to access
the Internet browser. In some features, this key
also can be used as a confirmation key or a soft
key.
In Menu Mode, scrolls through the menu
options.
In Standby Mode, accesses the following menus:
• : Java
• : Profile
• : Monthly View
• : Message
Press to make or answer a call.
In Standby Mode, recalls the last dialed number.
Ends a call. Also switches the phone on and off
when pressed and held.
910
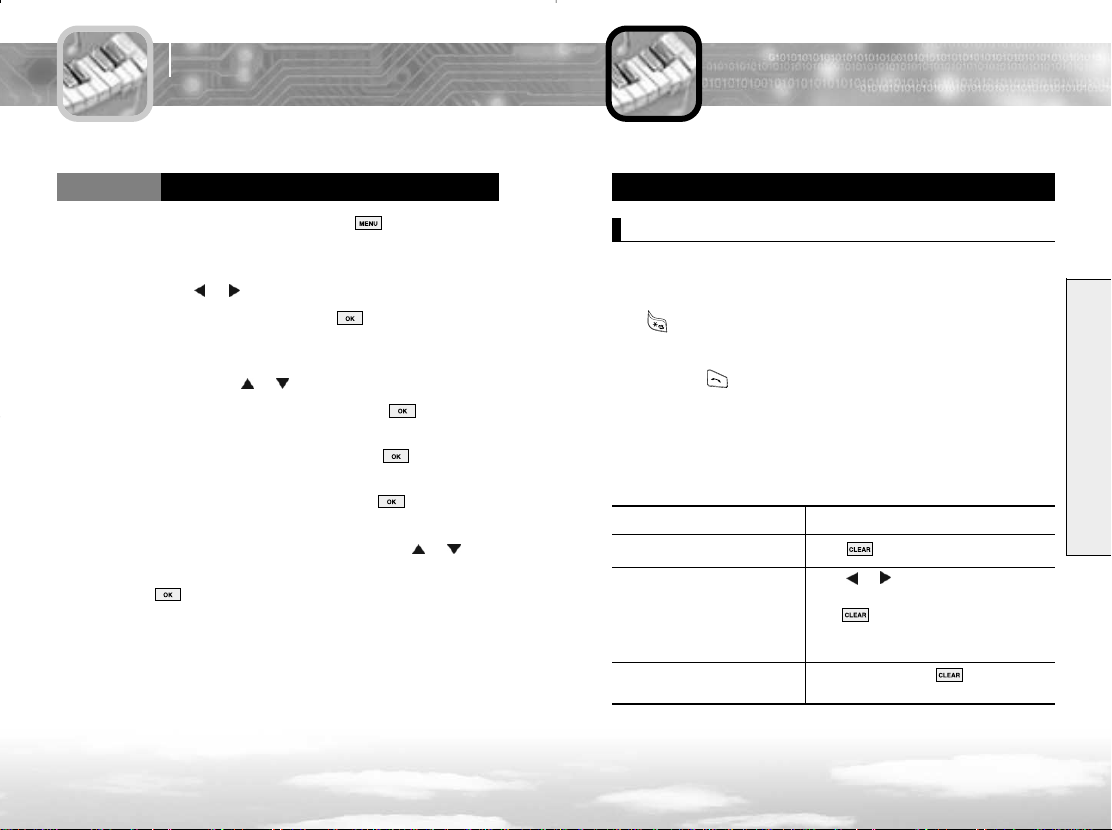
In Menu Mode, cancels your input and returns
to Standby Mode.
Enters numbers, letters and some special
~
characters.
In Standby Mode, the 1 key immediately
connects you to the Voice Mail server.
Press and hold to activate Etiquette Mode.
Press and hold to activate Key Lock Mode.
(on the side of the phone)
During a call, adjusts the voice volume.
In Standby Mode, adjusts the key tone volume.
(on the side of the phone)
Enters into the Camera Menu.
Your Phone
Page 7
Y our Phone
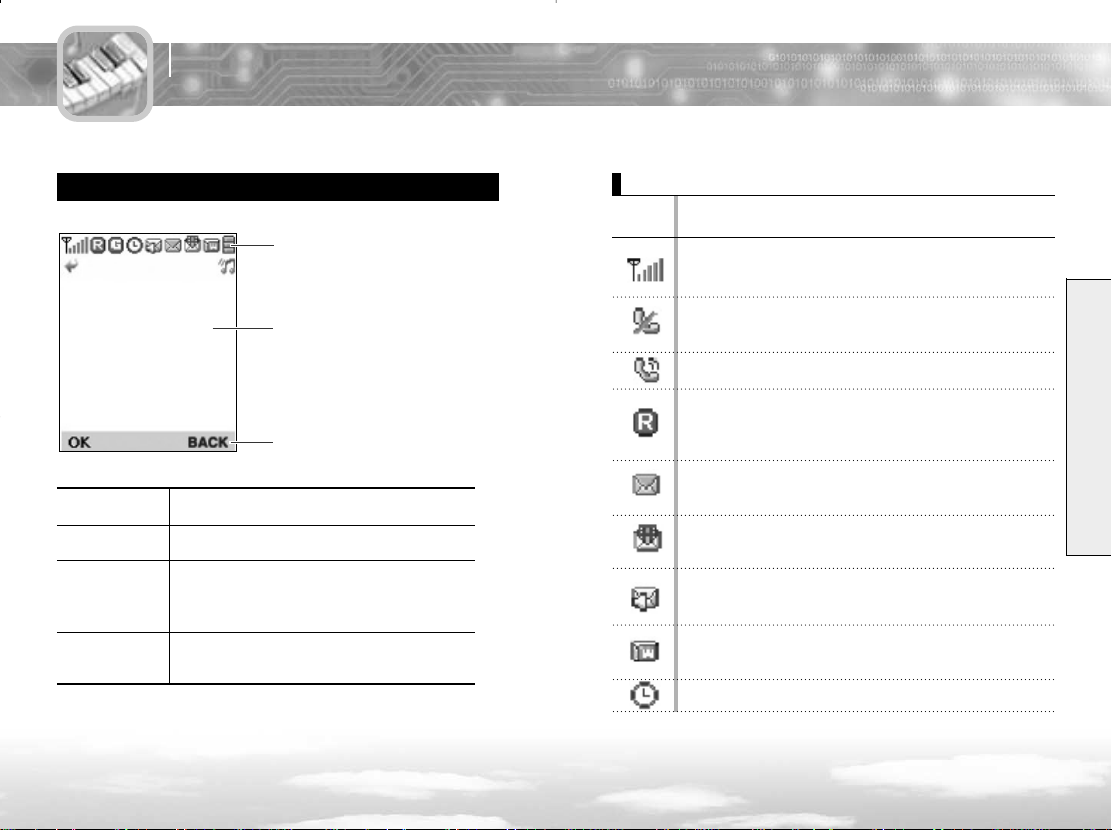
Display
The display has three areas.
Icon area
Text and graphic area
Soft key indications area
Area Description
Icon area Displays various icons (see page 12~13).
Displays messages, instructions and
Text and area any information that you enter.
(number to be dialed, for example)
Soft key Shows the functions currently indications area
indications area assigned to two soft keys.
Icons
Icons Description
Signal Strength : Shows the received signal strength.
The greater the number of bars, the stronger the signal.
No Service : Appears when you are outside a service area.
When it is displayed, you cannot make or receive calls.
Service : Appears when a call is in progress.
Roaming : Appears when you are out of your home area
and have registered onto a different network; for example,
when traveling in other countries.
New Text Message : Indicates that there is a new message
waiting to be checked.
New MMS Icon : Indicates that there is a new MMS
message waiting to be checked.
New Voice Mail : Indicates that there is a new voice mail
waiting to be checked.
Push Message : Indicates that there is a new Push Message
waiting to be checked.
Alarm : Appears when you set an alarm.
Your Phone
11 12
Page 8
Y our Phone
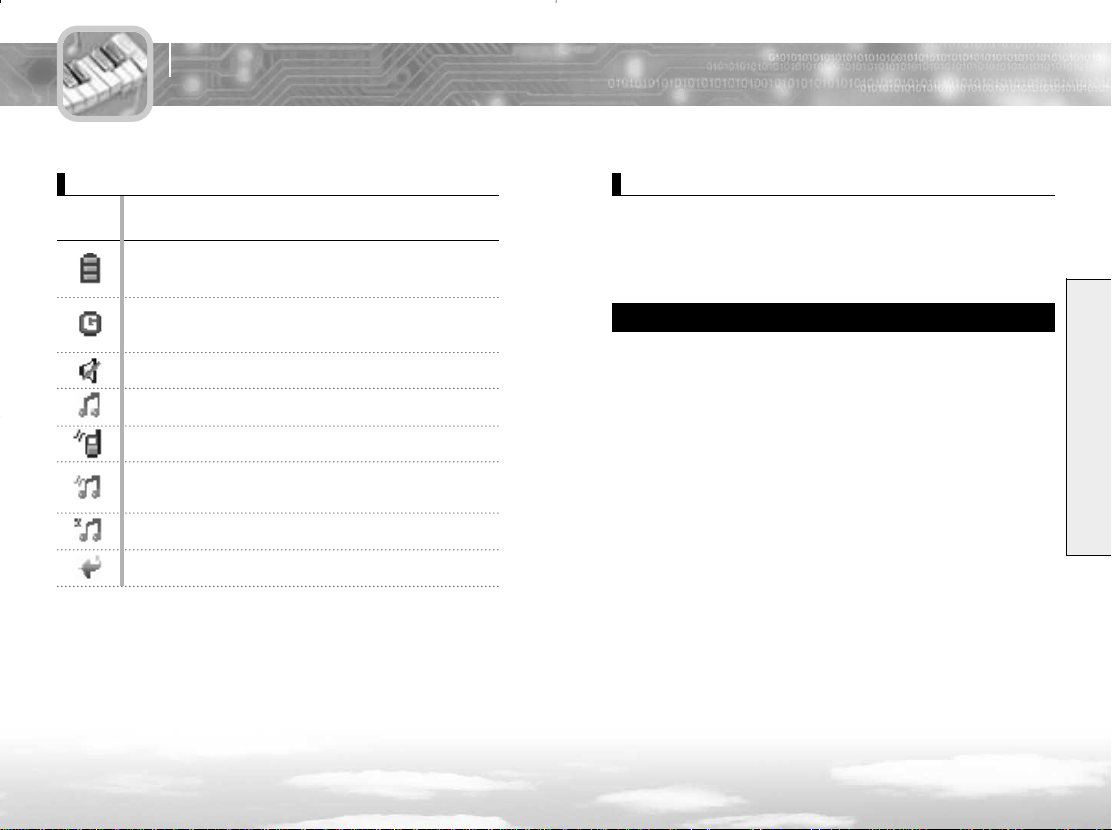
Icons
Icons Description
Battery Status : Shows the level of your battery.
The more black area you see, the more power you have left.
GPRS : Shows the status that data can be received and sent
using the packet.
Manner : Indicates that all tones are off.
Ring : The phone is set to ring when a call comes in.
Vibrator : The phone is set to vibrate when a call comes in.
Vib+Ring : The phone is set to ring and vibrate when a call
comes in.
Silent : The phone is set to blink LED when a call comes in.
Divert : The call divert for calls is set by user.
Sub LCD
Your phone has an external LCD screen on the folder. When the folder is
closed, it indicates that you have an incoming call or message. It also
alerts you when you have set an alarm at the specified time by flashing
its backlight and displaying the corresponding icon.
Keypad Backlight
The backlight illuminates the display and keypad. When you press
a key or open the folder, the backlight turns on. The keypad turns off
if no key is pressed within a given period of time, depending on the
Back light menu option under the Phone Settings menu.
To specify the length of time the phone waits before the key backlight
turns off, set the
96 for further details.
Key back light menu option (Menu 4-4-4); see page
Your Phone
13 14
Page 9
Y our Phone
Getting Started
LED Select
When you do not charge your phone, the LED blinks red once every
15 seconds if it is in Network No Service status, and blinks blue if it is
in Network Service status. The LED blinks violet once every 8 seconds
if you missed an incoming call.
It also blinks for a few seconds when you turn the phone on or off.
You can specify if you want to use this LED or not via the
menu (Menu 4-4-6). See page 96 for further details.
LED Select
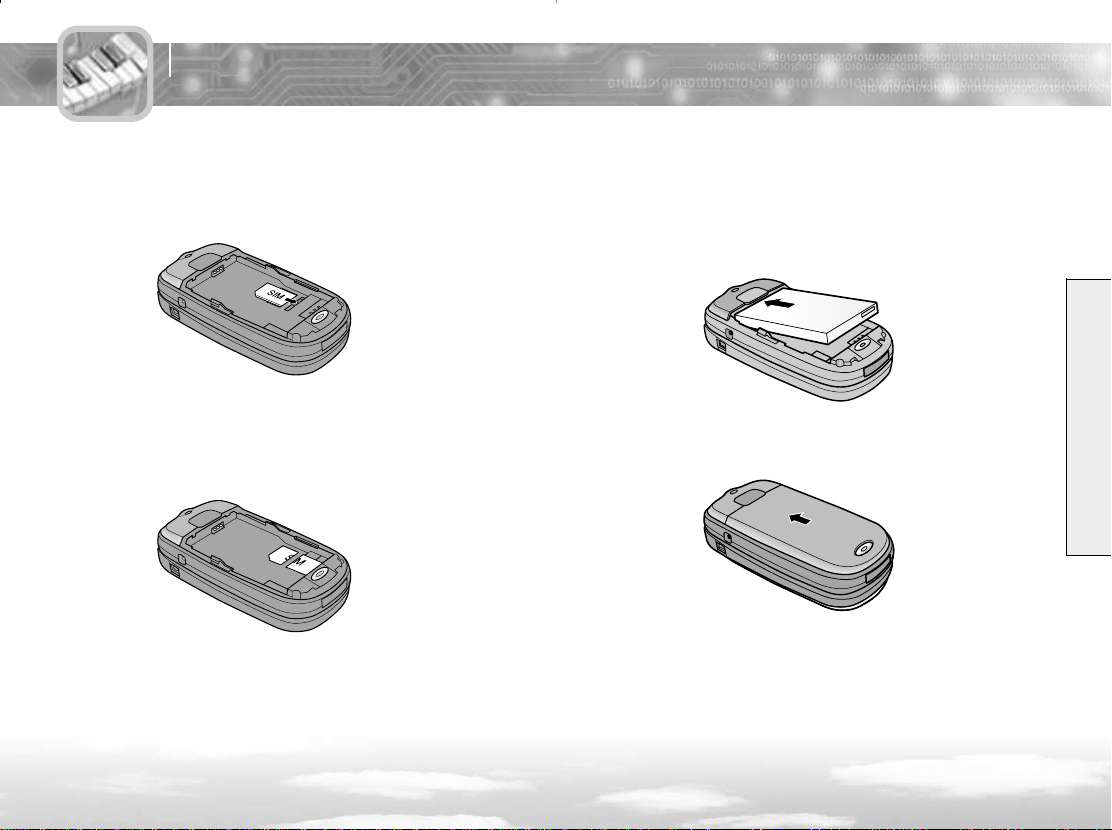
Installing a SIM Card
When you subscribe to a mobile network, you are provided with a plugin SIM card loaded with your subscription details, such as PIN, optional
services available and so on.
���Note : The plug-in SIM card and its contacts can be easily
damaged by scratches or bending, so be careful when handling,
inserting or removing the card. Follow the instructions supplied with
the SIM card. Keep all SIM cards out of the reach of small children.
If necessary, switch the phone off by pressing and holding
1
the key.
Remove the battery. To do so :
2
① Push the battery cover lock at the bottom of the phone
and hold it.
② Pull the battery cover down and lift up the cover.
2
1
Getting Started
15 16
Page 10
Getting Started
Install a SIM card. To do so :
3
① Insert the SIM card into the SIM card socket.
② Make sure that the notched corner is at the top right and the
golden contact area on the card is facing downwards.
Reinstall the battery. To do so :
4
① Place the battery on the back of the phone them slide on the
back cover. Before turning the phone on, make sure the battery
is properly installed.
② Push the cover up until it clicks into the right place.
Getting Started
17 18
Page 11
Getting Started
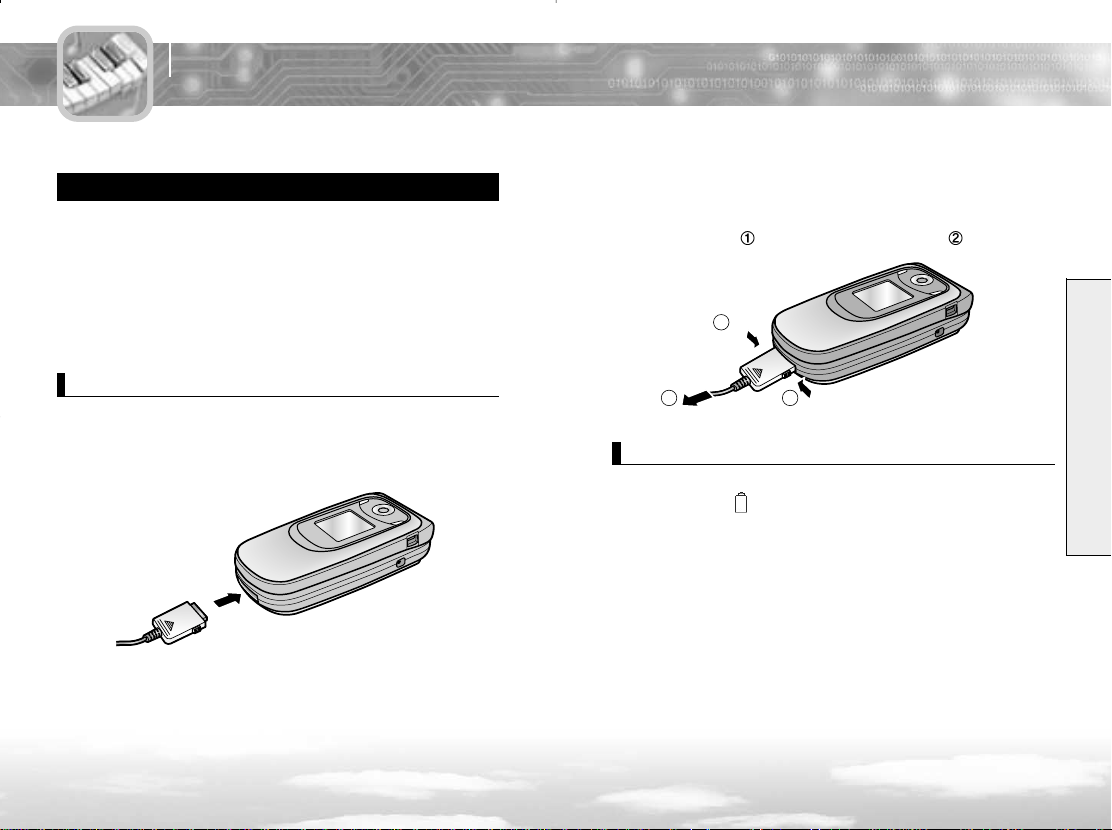
Charging the Battery
Your phone is powered by a rechargeable Li-ion battery.
A travel adapter comes with your phone. Use only approved batteries
and chargers. Ask your local dealer for further details.
���Note : You must fully charge the battery before using your
phone for the first time. You can use the phone while the battery is
charging.
Charging the Battery with the Travel Adapter
You can use the phone while charging the battery attached to the phone.
With the battery in position on the phone, plug the connector of
1
the travel adapter into the connector slot at the bottom of the
phone.
Plug the adapter into a standard AC wall outlet.
2
When charging is finished the LED turns blue. Unplug the
3
adapter from the outlet and the phone. To remove the adapter
from the phone, press the buttons on both sides of the
connector (see
) and pull the adapter out (see ).
1
12
Low Battery Indicator
When the battery charge level is low, a text message and an empty
battery status icon appears at the top right of the display.
When the battery level gets too low, the phone turns off automatically.
Unfortunately, if this happens, you lose whatever you are doing and
your phone call cuts off. Watch the battery status icon and make sure
your battery is adequately charged.
Getting Started
19 20
Page 12
Getting Started
Switching the Phone On or Off Your Phone’s Modes
Open the folder.
1
Press and hold the key for more than one second to switch
2
the phone on.
���Note : If you switch the phone on without a SIM card,
the phone prompts you to insert the card. You can only make
emergency calls by pressing the soft key.
When the PIN code of your SIM card is enabled, your phone asks
3
you to enter the PIN (see page 144). Enter the code, and press
the soft key. Your phone connects to the GSM network.
���Notes :
●
When your phone locates services, you can see the idle screens on
both the main and sub LCD.
●
If the phone is out of the service area, No Service appears on the
display and you cannot place and receive calls. Wait a little while for a
better signal or move into an open area to regain service.
To turn off the phone, press and hold .
4
WARNING!
Do not switch the phone on when mobile phone use is prohibited or
when it may cause interference or danger.
���Note : Do not touch the antenna on the phone unnecessarily
when the phone is switched on. Contact with the antenna affects the
call quality and may cause the phone to operate at a higher power
level than otherwise needed.
Standby Mode
Standby is the most basic state of your phone. The phone goes into
Standby Mode after you turn it on, or whenever you briefly press
the key. When your phone is in Standby Mode, you will typically
see the current date and time. If you enter a phone number, you can
press the key to dial it, or press the soft key to save it in the
internal Phonebook.
Press the key at any time to return to Standby Mode. Be careful;
if you are on a call when you press the key, your phone disconnects
the call and returns to Standby Mode. Press the or soft key
several times or hold it down to return to Standby Mode without
ending the call.
Talk Mode
You can place and answer calls only when your phone is turned on.
During a call, the phone is in Talk Mode. While you are in the talk
mode, pressing the soft key displays a list of options.
See page 34 for details.
Getting Started
21 22
Page 13
Getting Started
Using the Soft Keys
Locking the Keys
Use the Key Lock feature to make sure that the keys are not pressed
accidentally, such as when the phone slips around inside a briefcase.
In Standby Mode, press and hold the key. “Key Locked”
appears on the display and the keys are immediately locked.
Note that you can switch the phone off then on by pressing and
holding the key.
To unlock the keys, press and hold the key again.
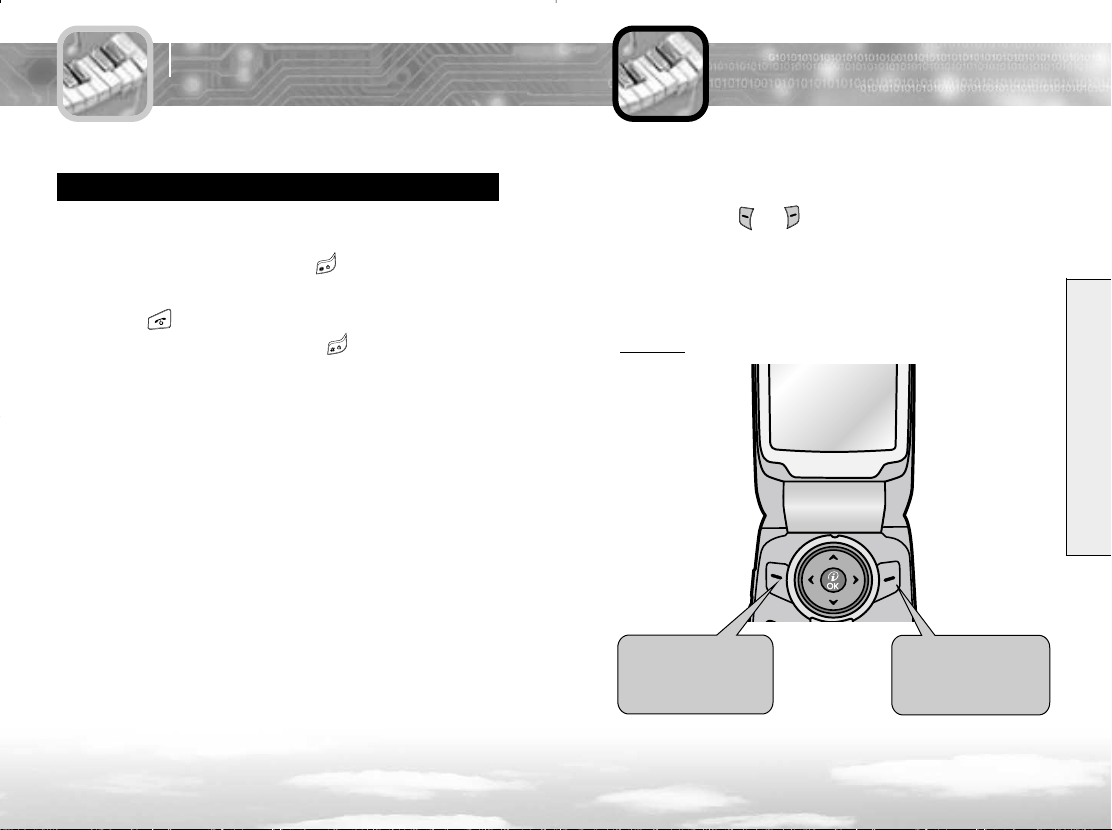
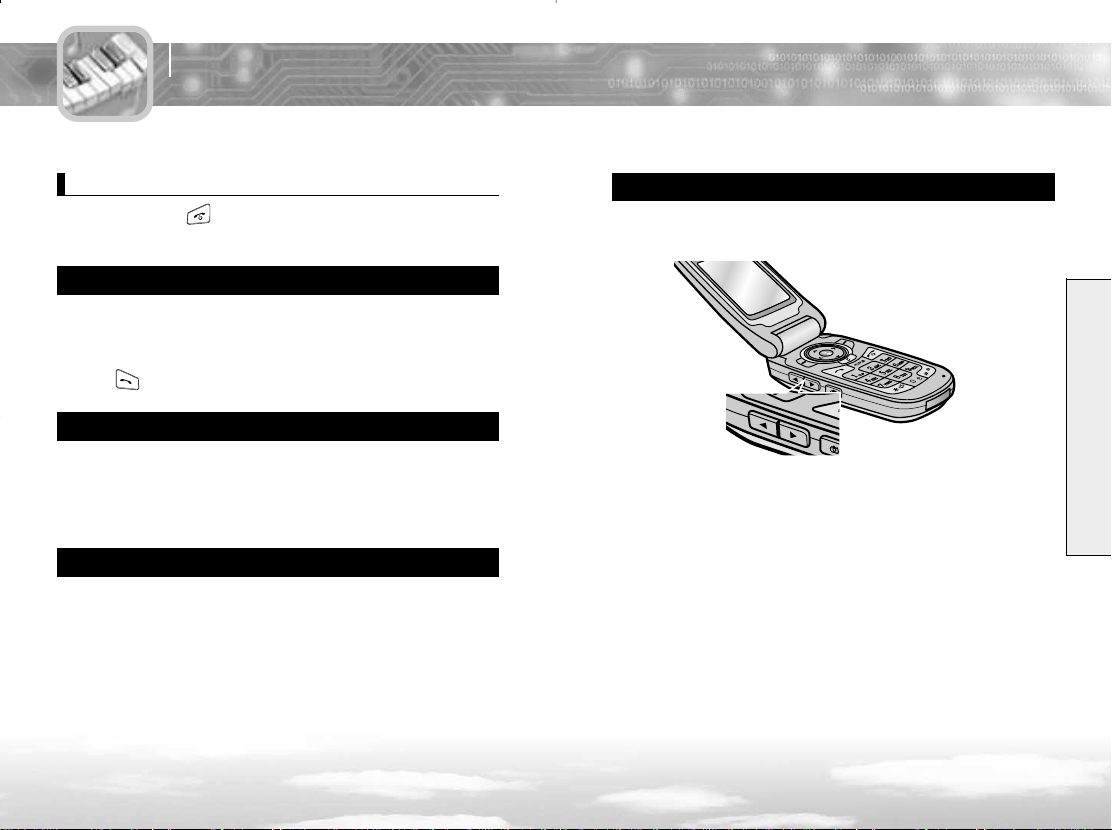
Your phone offers a set of functions that allows you to customize it.
These functions are arranged in menus and sub-menus, accessed via
the two soft keys ( and ). Each menu and sub-menu allows you
to view and alter the settings of a particular function.
The roles of the soft keys vary according to the current context;
the label on the bottom line of the display just above each key indicates
its current role.
Example :
Press the left soft
key to enter Menu
Mode.
Press the right soft
key to enter the
Phonebook feature.
Using the Soft Keys
23 24
Page 14
Using the Soft Keys
Using the Soft Keys
Edit
To view the various functions/options available and select the one
required :
Press the appropriate soft key.
1
To Press the
2
Select the: soft key or the
• Function displayed key.
or
• Option highlighted
Move up or down or key.
in the menu
Move right or left or key.
in the menu
Move back up one soft key.
level in the menu
Exit the menu key.
without changing
the settings
Using the Soft Keys
25 26
Page 15
Using the Soft Keys
Call Functions
Example Setting the Display LanguageExample
When the idle screen displays, press the soft key to
1
enter Menu Mode.
Scroll through the menus until you reach the Setting menu,
2
by pressing the or key repeatedly.
To enter the Setting menu, press the soft key.
3
Scroll through the menus until you reach the Phone Settings
4
menu, by pressing the or key repeatedly.
To enter the Phone Settings menu, press the soft key.
5
To enter the Language sub-menu, press the soft key.
6
To view the languages available, press the soft key.
7
●
The display shows the current setting.
Select the appropriate language by pressing the or key.
8
Press the soft key to confirm your selection.
9
●
The phone returns to Standby Mode.
Making a Call
To make a call
In Standby Mode, enter the area code and phone number.
1
���Note : While entering the number, pressing and holding down
the key inserts a pause, indicated by “P.” The number after a
pause is sent a few seconds after dialing the first number.
Press the key.
2
●
The phone places the call to the entered number.
���Note : If you set the Auto Redial menu(Menu 4-3-6) to On,
the phone automatically retries to make the call when no one answers
or the line is busy. For further details, see page 91.
Correcting the Number
To clear Press
The last digit displayed The soft key
The
or
key until the cursor is to
Any other digit in the number
The whole display
the right of the digit to be cleared. Press
the soft key. You can also insert a
missing digit in the cursor position simply
by pressing the appropriate key.
And hold down the soft key
for more than one second.
Call Functions
27 28
Page 16
Call Functions
Ending a Call
To end a call, press or simply close the phone.
Making an International Call
Press and hold the 0 key for the international prefix.
1
●
The + appears on the display.
Enter the country code, area code, and phone number, then press
2
the key to begin dialing.
Making a Call from Phonebook
You can store the phone numbers that you use regularly in the
Phonebook.
Simply select a name to recall the associated number to dial. For further
details about the Phonebook features, see page 105.
Redialing the Last Number
The last 30 numbers you dialed are stored in the Call Records.
Your phone stores up to 30 of the last numbers you dialed in Call
Records. To recall any of these numbers, refer to “Dialed Numbers” on
page 77.
Adjusting the Volume
To adjust the volume during a call, press the volume keys on the side of
the phone.
Call Functions
In Standby Mode, you can adjust the key tone volume using the volume
keys.
29 30
Page 17
Call Functions
Answering a Call
When someone calls you, the phone alerts you by ringing, blinking the
color LED and displaying the call alert screen.
If you are subscribed to the Caller Line Identification service and the
caller can be identified, the caller’s phone number or name and image if
stored in your Phonebook, displays. Contact your service provider for
availability.
You can reject the call by pressing and holding the volume keys before
opening the folder.
If the Answer Mode menu (Menu 4-3-4) is set to Any Key, open the
1
folder or press any key except the key and the soft key
to answer the call.
If the menu is set to Send Key, you must press the key or
the soft key to answer the call.
To reject the call, press the key or the soft key.
To end a call, press or simply close the phone.
2
���Notes :
●You can answer a call while using the Phonebook or Menu features.
●You will see the name and image (if they exist in your phonebook)
when you get a phone call or make a phone call.
Viewing Missed Calls
If you miss a call, you can view a list of Missed Calls. This is system
dependent feature – contact your service provider for availability.
The number of missed calls displays on the idle screen immediately after
the call was missed.
To immediately view missed calls :
If the folder is Then
Closed Look at the sub LCD screen.
Open Press the soft key.
If available, the number corresponding to the
most recent missed call displays.
To Press the
Scroll through the
missed calls
Call the number
displayed
Save or delete a soft key.
missed call number
or key
key.
.
Call Functions
31 32
Page 18

Call Functions
Quickly Switching to Manner Mode
To quickly switch your phone to Manner Mode, press and hold .
In Manner Mode, all sounds are turned off and the phone alerts you to
an incoming call by vibrating instead of ringing.
Press and hold the key until the Manner icon appears on
the top right of the display. Your phone goes to the manner
mode immediately.
To return to the normal mode, press and hold the key again.
Options During a Call
Your phone provides a number of functions that you can use during a
call. As many of the functions are network services, you may not be
able to use all of them at all times.
Putting a Call on Hold
You can place the current call on hold whenever you want.
By doing this, you can make or receive another call while you have
a call in progress if your network supports this service.
To make a call while you have a call in progress:
During a call, press the key.
1
Or, press the soft key and press the soft key when
Hold highlights.
The current call is put on hold.
2
If there is a waiting call, press the key to answer the call.
3
If you want to make a call, dial the number in the normal
way.
Disconnecting the Calls
When you have an active call and a call on hold, you can disconnect
both calls at one time.
Press the soft key to enter In-call Options.
1
Press the or key to scroll to Disconnect and press
2
the soft key.
Press the or key to scroll to call you want to disconnect.
3
Press the soft key.
4
Call Functions
33 34
Page 19
Call Functions
Muting the Microphone
You can temporarily mute your phone so the other person cannot hear
you.
Example : You wish to say something to another person in the room
but do not want the other person to hear you.
To temporarily switch the microphone off :
During a call, press the soft key to enter In-call Options.
1
Press the or key to scroll to Mute On.
2
Press the soft key.
3
●
The other person can no longer hear you.
To switch the microphone back on:
Press the soft key to enter In-call Options.
1
Press the or key to scroll to Mute Off.
2
Press the soft key.
3
●
The other person can hear you again.
Using the Scratch Pad
Your phone has a convenient feature for entering a phone number
while you are on a call as if it were a note pad:
During a call, just key in a phone number.
1
●
The phone number displays as you enter it.
Press the soft key to save the entered number.
2
When the call ends, you can check the saved number via the
3
Scratch Pad option in PB Manage of the Phonebook menus.
See page 115.
Call Functions
35 36
Page 20
Call Functions
Sending DTMF Tones
Each time you press the keys, your phone sends out DTMF (Dual Tone
Multi-Frequency) which are set at the factory. DTMF tones are required
to use electronic phone services, such as bank-by-phone or Voice Mail.
To mute DTMF tones during a call:
During a call, press the soft key.
1
Press the or key to scroll to DTMF Off.
2
Press the soft key.
3
To reactivate your DTMF tones:
During a call, press the soft key.
1
Press the or key to scroll to DTMF On.
2
Press the soft key.
3
Using the Message Service
If you receive an incoming message during a call, you can immediately
read it without ending the call. You can also send a message during a
call.
During a call, press the soft key.
1
Select the Message option and press the soft key.
2
The phone enters the Message menu. For details about using the
message service, see page 61.
Call Functions
37 38
Page 21
Call Functions
Entering T ext
Using the Ear-microphone
Using the ear-microphone supplied with your phone, you can answer
an incoming call without holding the phone.
Connect the ear-microphone to the jack on the top of the phone.
To answer a call, press and hold the button on the ear-microphone for
more than one second.
To end the call, press and hold the button for more than 1 second.
���Note : If you receive a second call during a call, pressing and
holding the button for more than 1 second will put the first call on hold
and answer the second call.
At many times when using your phone, you will need to enter text,
such as when storing a name in Phonebook, creating a greeting note,
writing a text message or scheduling events on your calendar.
The following text input modes are available :
���Note : eZi text input method allows you to enter text easily
and quickly. Simply pressing each key once for each character, you
can get the words you want. The word is predicted along with other
words that match the letters you have typed. You do not need to
input entire characters to make a word.
English : Allows you to enter the English letters by pressing each key
once for each character.
Alphabet : Allows you to enter letters by pressing the key labeled with
the letter you want once, twice or three times until the letter appears on
the display.
All Mode : Allows you to use all of the text input modes by pressing
the key one or more times until you find the mode.
Digit : Allows you to enter the digits 0~9.
Symbol : Allows you to enter symbols or punctuation marks.
Entering Text
39 40
Page 22
Entering Text
Changing Text Input Language
This mode allows you to change text input language.
To change to another text input language :
Press the key to access the eZi Sub Menu screen.
1
Press the or key until you find the Entry mode you
2
want from the list.
Press the soft key.
3
●
You will see the text input mode indicator on the top line of the
display. Directions for using each of the text input modes appear
later in this chapter.
Press the or key to scroll to find a language you want.
4
Press the soft key.
5
Insert text template
The Template mode enables you to enter simple sentences into your
text.
Press the soft key and select 'Insert text template' to enter
1
into it.
Press the
2
select the text you want to insert.
Insert Symbol
The symbol mode enables you to enter symbols into your text.
Press the key to enter into the symbol mode.
Press the and keys to scroll through the symbols.
and
keys to scroll through the templates and
1
When you find the symbol you want to insert, Press the
2
Number key corresponding to the symbol you want.
Entering Text
6241 42
Page 23
Entering Text
Insert EMS content
This mode enables you to enter EMS contents into your text.
Press the soft key and select 'Insert EMS content' to enter
1
into it.
You can insert animation, Image and Sound contents into
2
your text.
The following text input modes are available :
Fix Animation/Fix Sound : You can send EMS messages with
Animation and Sound using this mode. If the receiver has the same
handset as you, he/she can see or hear the same Animation and Sound
you sent. If not, the receiver will see or hear his/her own Animation or
Sound that corresponds with the information you sent.
Own Animation/Own Image/Own Sound : You can send EMS
messages with your own Animation and Sound.
eZi English Mode
This mode allows you to enter English words with only one key press
per letter. Each key on a keypad has more than one letter - a single
press on the 5 key could be J, K, or L. The eZi English mode
automatically compares your key presses to an internal linguistic
database to determine the correct word.
This mode requires far fewer keystrokes than the traditional multi-tap
method, the ABC mode.
Entering Text
43 44
Page 24
Entering Text
Typing English Words
To type a word, press the keys corresponding to the letters you need.
Remember the following as you are typing :
Press keys on the phone just once per one letter.
1
●
For example, to enter “hello”, press the following keystrokes :
4, 3, 5, 5, 6.
The word you are typing appears in the display.
2
●
It may change with each key you press.
If the word that appears on the display is not the word that
3
you desire, press the or key one or more times to
display alternative word choices for the keys you pressed.
●
For example, "of" and "me" share the sequence of 6 and 3.
The phone displays the most commonly used choice first.
Press 0 key to select the word choice that appears on the
4
display.
���Note : The phone displays all of the words containing the letters
you have entered. The eZi mode allows you to enter text quickly using
fewer key presses.
Shifting the Case
To change the case of the word, repeatedly press the key when the
word highlights. Lower Case, Capital Lock and Initial Capital are
available. You can also insert periods between letters for abbreviations.
Scrolling
● The or key scrolls to the alternative characters corresponding to
the key press.
●To move the cursor left or right through your text message, press
the or key.
●To scroll up or down one line of your text, press the and key.
Clearing Characters
Press the key one or more times to remove characters from the
Text Area.
Quickly Switching to Another Mode
●In Ezi mode, you can quickly switch to the ABC mode and then to
digit mode by pressing the key.
●When you press the key, you can access the symbol mode.
Entering Text
45 46
Page 25

Entering Text
ALPHABET Mode
When typing in the ABC mode, press the key labeled with a character:
- Once for the first character.
- Twice for the second character and so on.
This method is called Multi-tap Typing.
For example, quickly press the 2 key three times to display the letter “C”
or quickly press the 5 key twice to display the letter “K”.
The cursor moves to the right when you press a different key. When
entering the same character twice or a different character on the same
key, just wait for a few seconds for the cursor to move to the right
automatically, and then select the next character.
Refer to the table on the next page for the list of characters assigned to
each key.
List of available characters :
Key Characters in the Order Displayed
. , ? ! 1 \ : '
@ + - ( ) _
A B C 2 Á
D E F 3 É
G H I 4 Í
J K L 5
M N O 6 Ñ Ó
P Q R S 7
T U V 8 Ú Ü
W X Y Z 9
Space 0
Entering Text
(Caps Lock mode)
61 6247 48
Page 26

Entering Text
Using the Menus
Shifting the Case
To change the case of words, press the key.
There are two cases:
Lower Case is indicated by
indicated by ABC.
abc on the display, and Capitals Lock is
Scrolling
●To move the cursor to the left or right through your text,
press the or key.
●To scroll up or down one line of your text, press the and key.
Clearing Characters
Press the soft key one or more times to remove characters from
the Text Area.
Quickly Switching to the Symbol Mode
●In ALPHABET mode, you can quickly switch to digit mode by pressing
the key.
●When you press the key, you can access the symbol mode.
The phone offers a range of functions that allows you to tailor it to your
needs. These functions are arranged in menus and submenu.
The menus and submenu can be accessed by scrolling or by using the
shortcuts.
Accessing a Menu Function by Scrolling
In Standby Mode, press the soft key to access Menu
1
Mode.
Scroll with the navigation keys to reach the main menu,
Call Register. Press the key to enter the menu.
If the menu contains any sub-menus, use the
2
Press key to enter the submenu.
If the menu you have selected contains submenu, repeat this
step.
Scroll with the navigation keys to find the setting of your
3
choice. Press the soft key to confirm the chosen setting.
���Notes :
●When you use the navigation keys for setting options, refer to the
direction of the triangle at the bottom of the display.
●
You can return to the previous menu level by pressing the soft key.
●You can exit the menu without changing the menu settings by
pressing the key.
and
keys.
Using the Menus
61 6249 50
Page 27

Using the Menus
Accessing a Menu Function by Using Its Shortcut
The menu items, menu, submenu and setting options are numbered
and can be accessed quickly by using their shortcut numbers. The
shortcut number is shown in front of each menu item.
���Note : The numbers assigned to each menu function are
indicated on the list on page 48. They may not match the menu number
on the phone, depending on the services supported by your SIM.
In Standby Mode, press the soft key.
1
Enter the first digit of the shortcut number. Repeat this for
2
each digit of the shortcut number.
Example
Press the soft key, and key in 4, 3, 6.
Menu enters the menu, 4 selects Setting, 3selects the Call Setting
menu, and 6selects the Auto Redial menu function.
3
: Setting the Auto Redial function to On.
Press the or key to highlight On and press
the soft key.
List of Menu Functions
The list shows the menu structure available and indicates the number
assigned to each option.
���Note : If you use a SIM ToolKit card that provides additional
services, the SIM ToolKit menu appears instead of 9. Internet Menu.
The other
9.Internet
For details on the SIM ToolKit menu, refer to your SIM card instructions.
menus aren't changed. If it does not provide SIM ToolKit card,
Menu appears.
Using the Menus
51 52
Page 28

Using the Menus
1. Message
1-1 : Write Message
1-1-1 : SMS
1-1-2 : MMS
1-2 : Inbox
1-2-1 : SMS
1-2-2 : MMS
1-3 : Outbox
1-3-1 : SMS
1-3-2 : MMS
1-4 : Draft
1-4-1 : SMS
1-4-2 : MMS
1-5 : Templates
1-6 : Voice Mail
1-6-1 : Call Voicemail
1-6-2 : Voice Center
1-7 : Info Message
1-7-1 : Read
1-7-2 : Receive
1-7-3 : Topics
1-7-4 : Languages
1-7-5 : Alert
1. Message
2. Call Register
53 54
1-8 : Settings
1-8-1 : SMS
1-8-2 : MMS
1-8-3 : EMS
1-8-4 : Memory Status
2-1 : Call History
2-1-1 : Missed No.
2-1-2 : Received No.
2-1-3 : Dialed No.
2-2 : Call Duration
2-2-1 : Last Incoming
2-2-2 : Last Outgoing
2-2-3 : Total Incoming
2-2-4 : Total Outgoing
2-2-5 : Reset
2-3 : Call Costs (SIM dependent)
2-3-1 : Last Call’s Cost
2-3-2 : All Call’s Cost
2-3-3 : Cost Reset
2-3-4 : View Max Cost
2-3-5 : Set Max Unit
2-3-6 : Price/Unit
2-4 : Data Counters
2-4-1 : Last Sent
2-4-2 : Last Received
2-4-3 : Total Sent
2-4-4 : Total Received
2-4-5 : Reset
Using the Menus
Page 29

Using the Menus
3. Profile
3-1 : General
3-1-1 : Activate
3-1-2 : Personalise
3-1-2-1 : Alert Type
3-1-2-2 : Ring Tone
3-1-2-3 : Ring Volume
3-1-2-4 : Message Tone
3-1-2-5 : Key Volume
3-1-2-6 : Key Tone
3-1-2-7 : Folder Tone
3-1-2-8 : Connect Alert
3-1-2-9 : Power On/Off Melody
3-1-3 : Rename
3-2 : Silent
3-3 : Vibration Only
3-4 : Outdoor
3-5 : Other1
3-6 : Other2
3-7 : Other3
4. Setting
4-1 : Time/Date Set
4-1-1 : Time Set
4-1-2 : Date Set
4-2 : Alarm Set
4-2-1 : Set Alarm
4-2-2 : Alarm Sound
4-2-3 : Power Off Alarm
4-3 : Call Setting
4-3-1 : Call Divert
4-3-1-1 : All Voice Calls
4-3-1-2 : If Busy
4-3-1-3 : If not Answered
4-3-1-4 : If out of Reach
4-3-1-5 : If not Available
4-3-1-6 : All Data Calls
4-3-1-7 : All Fax Calls
4-3-1-8 : Cancel Divert
4-3-2 : Call Waiting
4-3-2-1 : Status
4-3-2-2 : Activate
4-3-2-3 : Deactivate
4-3-3 : Send My Caller ID
4-3-4 : Answer Mode
4-3-5 : Min Minder
4-3-6 : Auto Redial
4-3-7 : Auto Answer
4-3-8 : Data Transfer Mode
Using the Menus
55 56
Page 30

Using the Menus
4. Setting
4-4 : Phone Settings
4-4-1 : Language
4-4-2 : Main LCD
4-4-3 : Sub LCD
4-4-4 : Key back light
4-4-5 : Screen Saver
4-4-6 : LED Select
4-5 : Security Settings
4-5-1 : PIN Code
4-5-2 : Phone Lock
4-5-3 : Call Barring
4-5-4 : Fixed Dial Number
4-5-5 : Change Codes
4-6 : GPRS Setting
4-7 : Network Select
4-8 : Factory Set
5. Organizer
5-1 : Phonebook
5-1-1 : Name Search
5-1-2 : Group Search
5-1-3 : Add Entry
5-1-4 : Speed Dials
5-1-5 : Caller Groups
5-1-6 : PB Manage
5-1-6-1 : Own Number
5-1-6-2 : Scratch Pad
5-1-6-3 : Memory Status
5-1-6-4 : Copy All
5-1-6-5 : Delete All
5-1-6-6 : Memory In Use
5-2 : Scheduler
5-2-1 : Daily View
5-2-2 : Weekly View
5-2-3 : Monthly View
5-2-4 : Make
5-2-5 : Delete All
5-2-6 : Setting
5-2-7 : To do
Using the Menus
57 58
Page 31

Using the Menus
5. Organizer
6. Camera
5-3 : File Manager
5-3-1 : Memory Status
5-3-2 : File List
5-3-3 : Connect USB To Computer
5-3-4 : Format Memory
���Note : If your SIM cars supports the
“Service Numbers” function, its menu will appear
between 5-1-6-2 and 5-1-6-3 in the Phonebook
menu.
6-1 : Take Photo
6-2 : Record Video
6-3 : Photo Album
6-4 : Video Album
6-5 : Phonebook Album
6-6 : Configuration
7. Application
8. Java
7-1 : MP3
7-1-1 : Music player
7-1-2 : Configuration
7-1-2-1 : Folder Action
7-1-2-2 : Equalizer Set
7-2 : Othello
7-3 : Calculator
7-4 : Unit Converter
7-4-1 : Length
7-4-2 : Weight
7-4-3 : Volumes
7-4-4 : Surface
7-4-5 : User Define
7-5 : World Time
7-6 : Voice Memo
7-6-1 : Record
7-6-2 : Play
8-1 : Downloads
8-2 : Memory Status
8-3 : Network
Using the Menus
59 60
Page 32

Message
SMS
The Messages option is a network service and may not be supported by
your network. You can send a message by a text messaging system,
provided that the service is supported by your network.
To send messages by your phone, you must obtain the number of the
SMS center from your local service provider.
The memory capacity for incoming and outgoing messages depends on
your SIM card. If the memory is full, an error message displays and you
cannot receive or save any new messages. Delete obsolete messages.
MMS
Multimedia message (Multimedia Message Service(MMS)) is message
service similar to text message(Short Message Service(SMS) and delivers
multimedia messages from phone to phone. Multimedia message can
contain image and sound. You can send or receive multimedia messages
using this function. This function is available only if it is supported by
your local service provider and your phone offers multimedia message
function.
Write Message
1. Message
1 Write Message
2 Inbox
3 Outbox
4 Draft
5 Templates
6 Voice Mail
In this menu, you can write and send a text message.
Menu 1-1
SMS
Creating and Sending a New Message
You can write and send a text message of up to 160 alphanumeric
characters within the limits of the maximum 5 pages.
In Standby Mode, press the soft key twice to enter
1
the Message menu.
●
You can directly enter the Message menu by pressing key once.
Press the soft key to enter Write Message mode.
Menu 1-1-1
2
Press the soft key to enter SMS mode.
3
Enter a message. For further details about how to enter text,
4
see page 40.
When you press the key to exit from this menu,
5
the message is automatically saved and displayed when you
enter this menu again.
When you finish entering the message, press the soft
6
key.
Enter the recipient's phone number and send the message.
7
●
If you want to recall the number from your phonebook,
press the soft key and search for the number.
Message
61 62
Page 33

Message
MMS
You can write and send a multimedia message using the New
Multimedia Message option.
In Standby Mode, press the soft key twice to enter
1
the
Message menu.
●
You can directly enter the Message menu by pressing key once.
Press the soft key to enter Write Message mode.
Menu 1-1-2
2
Use the or key to scroll through the contents and select
3
the MMS mode. Then, press the soft key to enter MMS
mode.
You can write and send messages with text, image and audio.
4
���Caution : You cannot attach a photo you took and stored in
your phonebook to an MMS message.
Inbox
1. Message
1 Write Message
2 Inbox
3 Outbox
4 Draft
5 Templates
6 Voice Mail
In this menu, you can view SMS/MMS messages
you received.
SMS
In this menu, you can view the messages you received and reply,
forward or delete them.
Menu 1-2
Menu 1-2-1
Viewing an Incoming Message:
When you receive a new text message, the New Text Message icon
appears on the display.
To read the message immediately press the soft key and use
the or
Your phone stores the received messages in the Inbox on your phone.
In Standby Mode, you can access the received messages any time by
using the Inbox.
key to scroll through the contents when the folder is opened.
Message
63 64
Page 34

Message
MMS
In this menu, you can view the messages you received and reply,
forward or delete them.
While viewing a multimedia message, press the option menu. Or, access
the Multimedia Message and select the Inbox.
You can choose the following options.
Viewing a Incoming Message:
Upon receiving a new multimedia message, the New Multimedia
Message icon ( ) appears on the display.
To access the Message menu, press the soft key
1
in Standby Mode.
Select the Inbox.
Menu 1-2-2
2
Scroll to MMS and press the soft key.
3
●
The list of the received messages displays.
The screen shows the:
●
Sender's phone number.
●
Icon on the left of each multimedia message to show whether or
not you read it; (Read) or (Unread).
Scroll to a multimedia message you want to view by pressing
4
the or key and press the soft key.
Use the or key to scroll through the contents.
5
You can also use the volume keys on the left side of the
phone to scroll up or down one line of the message.
Press the soft key to use the options.
To return to Standby Mode, press the key.
6
Message
65 66
Page 35

Message
Outbox
1. Message
1 Write Message
2 Inbox
3 Outbox
4 Draft
5 Templates
6 Voice Mail
In this menu, you can send and delete the messages
saved in the outbox.
SMS
You can view the SMS messages you sent.
To view the messages:
To access the Message menu, press the soft key
1
in Standby Mode.
Press the key to enter Message menu and
2
press the or key to scroll to the Outbox and
press the soft key.
●
The list of the sent messages displays.
The screen shows the :
●
Sender’s phone number.
Scroll to a message by pressing the or key and press
3
the soft key.
Menu 1-3
Menu 1-3-1
Use the or key to scroll through the contents.
4
Press the soft key to edit the message text or use
the options.
To return to Standby Mode, press the key.
5
MMS
In this menu, you can view the MMS messages you tried to send.
Draft
1. Message
1 Write Message
2 Inbox
3 Outbox
4 Draft
5 Templates
6 Voice Mail
If you write a message and do not send it, it will be
saved in the Draft folder. Messages that failed to send
are also stored in this folder. You can choose to edit or
delete these messages by selecting the Options menu
in the Draft folder.
Templates
1. Message
1 Write Message
2 Inbox
3 Outbox
4 Draft
5 Templates
6 Voice Mail
In this menu you can access frequently used
messages. Scroll through the template list using the
or keys. Select the desired item then press
the key.
Menu 1-3-2
Menu 1-4
Menu 1-5
Message
67 68
Page 36

Message
Voice Mail
1. Message
1 Write Message
2 Inbox
3 Outbox
4 Draft
5 Templates
6 Voice Mail
Voice Mail is a network feature. If the Voice Mail is
provided by your network, you can access the Voice
Mail box with one key press.
Before activating this feature on your phone, you
must enter the voice center number obtained from
your service provider.
When you receive a new voice message, the New
Voice Mail icon ( ) appears on the display.
Menu 1-6
Access the Voice Mail to listen to the voice
message :
Access the Message menu, scroll to Voice Mail and press
1
the soft key.
The voice center number is automatically dialed.
2
When the center answers, follow the voice prompts to listen
to the message.
���Note : When you use this feature, if the Voice Mail center
number is not currently stored in your phone, the phone alerts you that
the center number is not stored and asks you to enter the number now.
To enter the number, press the soft key and enter the number.
For further details about the Voice Mail feature, please contact your
service provider.
Voice Center
Allows you to store or change the number of your voice message center.
You must obtain this number from your service provider.
Info Message
1. Message
2 Inbox
3 Outbox
4 Draft
5 Templates
6 Voice Mail
7 Info Message
An Info Message is text message broadcasted by the
network. Previously called Cell Broadcasts,
these messages provide general information,
such as weather reports, traffic news, and stock
market prices. Each type of information has an
associated information type number.
When you receive a 'CB Message', it is automatically
displayed on the screen. If the message is long,
you can scroll up/down the message. In case of
'Location CB', it is displayed on the user text area.
If the text is too long to be displayed on the screen,
it would be automatically scrolled.
Menu 1-6-2
Menu 1-7
To access the Info Message option:
To access the Message menu, press the soft key in Standby
1
Mode.
Press the key.
2
Press the or key to scroll to Info Message, and press
3
the soft key.
Message
69 70
Page 37

Message
The following options are available :
Read : Allows you to read CB messages.
Receive : Lets you view the last received messages.
Topics : Allows you to receive broadcast messages about a particular
topic by adding the info message category in the phone or SIM
memory.
-
Manual : Use to manually enter the ID and title for a new topic.
You can also add a new topic to the list and remove a topic from
the list.
-
All Channel : Allows you to receive all broadcast messages. You can
use this option to automatically enter the ID and title for a new
channel.
Languages : Allows you to select your preferred languages to display
Info messages.
Alert : Allows you to select whether you are notified when you receive
the broadcast messages.
Settings
1. Message
3 Outbox
4 Draft
5 Templates
6 Voice Mail
7 Info Message
8 Settings
SMS
You can set several features for the message service
on your phone.
Menu 1-8
Menu 1-8-1
To customize your phone for the message service :
To access the Message menu, and
1
the soft Key in Standby Mode.
Select the SMS and press the or key to scroll to Settings,
2
and press the soft key.
Press the or key to scroll to the option you want to use
3
and press the soft key.
Settings
menu press
Message
71 72
Page 38

Message
The following options are available:
SMS Center : Allows you to store or change the number of your SMS
center required when sending and receiving messages. You must obtain
this number from your service provider.
Status Report : Allows you to see the current status of SMS.
Message Type : Allows you to select the message type.
Validity Period : Allows you to set the length of time for which your
text messages will be stored at the message center while attempts are
made to deliver them. The times available are 1 hour, 6 hours, 12 hours,
24 hours, 2 days, 1 week, and maximum.
Reply Path : Allows you to set up the reply path.
MMS
Menu 1-8-2
To customize your phone for the message service :
To access the Message menu, press the soft key in Standby
1
Mode.
Select the Write Message and press the or key to scroll
2
to the MMS, and press the soft key.
Press the or key to scroll to the option you want to use
3
and press the soft key.
The following options are available:
Validity period : Allows you to set validity period.
Delayed delivery : Allows you to set the time you want to send a
message.
Delivery report : Allows you to set whether you see the delivery report.
Read report : Allows you to set whether you see the read report.
Priority : Allows you to set priority of the message.
Auto download : Allows you to set the regulation receiving message.
Message class : Allows you to preset your message in 3 class such as
Personal/Advertisement/Informational.
EMS
This mode enables you to enter EMS contents into your text. See p.43
for more details.
Memory Status
Lets you view the current amount of memory used in your phone and
SIM card.
Menu 1-8-3
Menu 1-8-4
Message
73 74
Page 39

Call Register
Call History
2. Call Register
1 Call History
2 Call Duration
3 Call Costs
4 Data Counters
Your phone keeps track of calls made from your
phone, received calls and missed calls. When you
access the CALL Register menu, you can view the list
of calls.
The numbers are continually updated as new numbers
are added to the beginning of the list and the oldest
entries are removed from the bottom of the list.
Missed No.
If you subscribe to a Caller Identification Service, your phone will record
information about the last 30 missed calls.
To view the missed numbers :
From Standby Mode, press the soft key, select the
1
“Call Register” menu, then select “Call History”.
With the Missed No. option selected press the soft key.
2
●
The Missed Number list displays.
Press the or key to scroll to the number you want to
3
view on the list.
When the number displays, press the key to dial the
4
number.
Menu 2-1
Menu 2-1-1
Received No.
If you subscribe to a Caller Identification Service, your phone will record
information about the last 30 incoming calls.
To view the received numbers :
From Standby Mode, press the soft key, select the
1
“Call Register” menu, then select “Call History”.
With the Received No. option selected, press the soft key.
2
●
The Received Number list displays.
Press the or key to scroll to the number you want to
3
view on the list.
When the number displays, press the key to dial the
4
number.
Menu 2-1-2
Call Register
7675
Page 40

Call Register
Dialed No.
If you subscribe to a Caller Identification Service, your phone will record
information about the last 30 outgoing calls.
To view the dialed numbers :
From Standby Mode, press the soft key, select the
1
“Call Register” menu, then select “Call History”.
With the Dialed No. option selected, press the soft key.
2
●
The Dialed Number list displays.
Press the or key to scroll to the number you want to
3
view on the list.
When the number displays, press the key to dial the
4
number.
To exit the call record, press the key.
Menu 2-1-3
5
Call Duration
2. Call Register
1 Call History
2 Call Duration
3 Call Costs
4 Data Counters
This menu allows you to view the timers for
calls that you made and received.
The following timers are available :
Last Incoming
Shows the time of the last incoming call.
Last Outgoing
Shows the time of the last outgoing call.
Total Incoming
Shows the time of all incoming calls.
Total Outgoing
Shows the time of all outgoing calls.
Reset
You can use the Reset option to reset the call timers; when the phone
prompts you to confirm, press the soft key. The timers are reset.
���Note : The actual time invoiced for calls by your service provider
may vary, depending on network features, rounding-off for billing
purposes, etc.
Menu 2-2
Menu 2-2-1
Menu 2-2-2
Menu 2-2-3
Menu 2-2-4
Menu 2-2-5
Call Register
7877
Page 41

Call Register
Call Costs
2. Call Register
1 Call History
2 Call Duration
3 Call Costs
4 Data Counters
This mode allows you to see and set up the cost
related stuff.
���Note : This menu is available once your
SIM card supports this function.
Last Call’s Cost
Allows you to see the cost for the last call you made.
All Call’s Cost
Allows you to see the total cost you made.
Cost Reset
Allows you to reset all cost.
View Max Cost
Allows you to see the maximum cost you can make calls.
Set Max Cost
Allows you to set the maximum available unit to calculate the maximum
cost.
Price/Unit
Allows you to set the price per unit.
Menu 2-3
Menu 2-3-1
Menu 2-3-2
Menu 2-3-3
Menu 2-3-4
Menu 2-3-5
Menu 2-3-6
GPRS Counter
2. Call Register
1 Call History
2 Call Duration
3 Call Costs
4 Data Counters
Using this menu, you can check the volume of
packets sent or received.
Access the Personal menu, and select the GPRS
Counter.
Menu 2-4
Following options are available :
Last Sent
Displays the volume last sent data.
Last Received
Displays the volume last received data.
Total Sent
Displays the total volume of all sent data.
Total Received
Displays the total volume of all received data.
Reset
You can use the Reset option to reset the GPRS counter; when the
phone prompts you to confirm, press the soft key.
The GPRS Counter is reset.
���Note : GPRS is the abbreviation of General Packet Radio Service,
and enables to connect to the data network and to use information and
multimedia service. In GPRS technology, the data is sent in 'packets' and
is well suited to the sporadic nature of data application. The counter unit
is byte.
Menu 2-4-1
Menu 2-4-2
Menu 2-4-3
Menu 2-4-4
Menu 2-4-5
Call Register
8079
Page 42

Profile
General
3. Profile
1 General
2 Silent
3 Vibration Only
4 Outdoor
5 Other1
6 Other2
This menu allows you to control the sound settings.
Activate
Activates the General mode and the options you selected.
Personalise
Allows you to select sound options for Alert Type, Ring Tone and Ring
Volume.
Rename
Allows you to change the mode name.
Menu 3-1
Menu 3-1-1
Menu 3-1-2
Menu 3-1-3
The following options are available : (Menu 3-1-2)
Alert Type : You can select an alert mode for incoming calls.
Press the or key to scroll through the available modes.
Ring Tone : This menu allows you to select the built-In melody
and downloaded MP3 file to be played when you receive a call.
Press the or key to select a melody category and the
or key to scroll through the available melodies. You can
adjust the volume level by pressing the side volume key.
Ring Volume : You can adjust the volume level of the ring
volume.
Message Tone : This menu allows you to select the melody to
be played when you receive a message. Press the or key
to scroll through the available melodies.
Key Volume : You can adjust the key volume level of the key
volume.
Key Tone : This menu allows you to select the keypad sound
each time you press a key.
Folder Tone : This menu allows you to select the folder tone
that sounds when you open and close the folder.
Connect Alert : The phone sounds a connect tone when your
call is connected to the system.
Power on/off Melody : When this option is selected, the
phone will sound a melody whenever it is turned on/off.
Profile
8281
Page 43

Setting
Many different features of your phone can be customized to suit your
preferences.
Time/Date Set
4. Setting
1 Time/Date Set
2 Alarm Set
3 Call Setting
4 Phone Settings
5 Security Settings
6 GPRS Setting
Time Set
Menu 4-1
Menu 4-1-1
This option enables you to set the current time in the format you prefer.
When you select the Time Set, two fields are displayed. First, you can
select the time format of 24 hours or 12 hours. Use the or key
to toggle between 24 hours and 12 hours for time format.
If you select 24 hour format, go to the next field to enter the number for
the time you want directly. Use the or key to move between the
fields.
If you select a 12 hour format, AM and PM will be added and a total of
three field options will appear. Select AM or PM then move to the next
field to directly enter the time.
Date Set
Menu 4-1-2
This option enables you to set the current date in the format you prefer
in one screen.
The following options are available :
Date Format : Select a date format. The following formats are
available :
• YYYY/MM/DD (year/month/day)
• DD/MM/YYYY (day/month/year)
• MM/DD/YYYY (month/day/year)
Select a date format in the upper bar and enter the date in the low
bar. press the
Set Date :
digit. Enter the date using the number keypad and press the soft
key.
Alarm Set
4. Setting
1 Time/Date Set
2 Alarm Set
3 Call Setting
4 Phone Settings
5 Security Settings
6 GPRS Setting
and
key to move between the fields.
You can use the and key to move the cursor to the
Menu 4-2
This feature allows you to :
• Set the alarm to ring at a specific time.
• Set the phone to ring the alarm at the specified time
even while the phone is switched off (Power Off
Alarm is enabled).
Setting
8483
Page 44

Setting
Set Alarm
To set an alarm :
Press the soft key when Set Alarm is highlighted.
Menu 4-2-1
1
Select an alarm and press the soft key.
2
●
If you selected 24 hour mode in Time Set, 2 fields are displayed :
upper field is to enter alarm time and the lower field is to select
frequency option.
●
If you selected 12 hour mode in Time Set, 3 fields are displayed :
the first field is to select AM/PM, the second field is to enter alarm
time, and the third field is to select frequency option.
Choose the AM/PM using the or keys.
3
Enter the required time using the number keypad.
4
Choose an alarm frequency option using the or keys.
5
●One Time : The alarm rings only once and is then deactivated.
●Daily: The alarm rings every day at the specified time.
●Morning Call :
●Delete : Delete the alarm.
Press the soft key to save the setting.
6
●
An alarm check mark displays on the right of the alarm you
set among Alarm 1/Alarm 2/Alarm 3 once you finish setting the
alarm.
To stop the alarm when it rings, open the folder and press
the soft key.
The alarm rings Monday to Friday at the specified time.
Alarm Sound Menu 4-2-2
Allows you to select an alarm sound.
Power Off Alarm Menu 4-2-3
To set the alarm to ring when the phone is off :
From the Alarm Set menu, press the or key to scroll to
1
Power Off Alarm, and press the soft key.
If necessary, press the
2
●
If you want to cancel setting a power off alarm, select Off.
Press the soft key to save the setting.
or
key to select On.
3
���Note : If the phone is turned off at the specified alarm time,
it automatically turns on and sounds the alarm alert. You can stop the
alarm when it rings by pressing the volume key. Then, the phone turns
off automatically.
Setting
8685
Page 45

Setting
Call Setting
4. Setting
1 Time/Date Set
2 Alarm Set
3 Call Setting
4 Phone Settings
5 Security Settings
6 GPRS Setting
Call Divert
Some of the following menu functions are network
services. Please contact your service provider to check
their availability and subscribe to them.
Menu 4-3
Menu 4-3-1
This network service enables incoming calls to be rerouted to the
number that you specify. This feature may be unavailable depending
on the network.
Call diverting can be set up in the following ways :
All Voice Calls : All voice calls are diverted.
If Busy : Calls are diverted if you are already on another line.
If Not Answered : Calls are diverted if you do not answer the
phone.
If Out Of Reach : Calls are diverted if you are not in an area covered
by our service provider.
If Not Available : Calls are diverted if you are not available.
All Data Calls : All data calls are diverted.
All Fax Calls : All fax calls are diverted.
Cancel Divert : All call diverting options are cancelled.
Example : You can :
●
Divert fax calls to your office fax machine.
●
Divert voice calls to your colleague if you are already using the phone.
Setting
8887
Page 46

Setting
To set your call diverting options :
Select the situation when you want to divert a call.
1
Select the type of calls to be diverted by pressing
2
the or key and then press the soft key.
●
Voice, Fax and Data are available.
Select the type of call diverting required by pressing
3
the or key and then press the soft key.
●
Check Status, Set Divert and Cancel Divert are displayed.
To Select
4
Display current status Check Status
Activate call diverting Set Divert
Deactivate call diverting Cancel Divert
Enter the number to which the calls are to be diverted and
5
press the soft key.
●
To enter an international code, press the 0 key until the +
sign displays.
The phone sends your settings to the network and the
6
network’s acknowledgement displays.
You can deactivate all call diverting settings by selecting the Cancel
All option.
Call Waiting
This network service enables you to be informed when someone is
trying to reach you during another call.
You can specify the call waiting option for voice calls only.
To set your call waiting options :
Select the Call Waiting option in the Call Set menu and press
1
the soft key.
●The screen displays Status, Activate and Deactivate.
You can activate or deactivate the call waiting feature as necessary
2
using the Activate or Deactivate soft key respectively.
Send My Caller ID
When this menu is set to On, you can send your phone number to the
designated phone when making a call so that the recipient can see your
phone number.
���Note : Some networks do not allow the user to change this
setting.
Upon accessing this menu :
On:
Your number displays on the other person’s phone.
Off:
Your number does not appear on the other person’s phone.
Set by Network :
The setting is determined by your network.
Menu 4-3-2
Menu 4-3-3
Setting
9089
Page 47

Setting
Answer Key
This menu allows you to select how you answer when an incoming call
comes in. Your phone is preset to answer when you press the key
or soft key.
Min Minder
This menu allows you to specify whether or not the phone beeps during
an outgoing call to keep you informed of the length of your call.
Auto Redial
When the Auto Redial function is On, the phone makes up to ten
attempts to redial the phone number after an unsuccessful call.
���Note : The interval between two call attempts varies.
Auto Answer
You can set the phone to answer an incoming call. When this menu
option is activated, the phone automatically answers calls after a
predefined time.
Menu 4-3-4
Menu 4-3-5
Menu 4-3-6
Menu 4-3-7
Data Transfer Mode
Your phone is capable of sending and receiving digital data and fax calls
when connected to a computing device, such as a laptop, desktop,
handheld, or palmtop running Windows NT, Windows 95 or later
versions. The phone functions just like a typical modem on your PC,
enabling you to use wireless data involving a wide variety of Windows
software applications.
To use digital data or fax services with your phone, you need a digital
data/fax kit. This kit contains the necessary cables and software required
for you to connect and use your phone with your computing device.
���Note : The phone must be on a digital network to receive or
send fax and data.
In the Data Transfer Mode menu, you can set up the call mode to use
data or fax calls as well as normal voice calls.
Menu 4-3-8
The following options are available :
(Single No.) Voice :
if your SIM card allows this option.
(Single No.) Fax :
if your SIM card allows this option.
(Single No.) Data :
if your SIM card allows this option.
Your phone sends or receives the voice call,
Your phone sends or receives the Fax call,
Your phone receives the Data call,
Setting
9291
Page 48

Setting
Using a Data or Fax Call
To be able to use data or fax services, you need application
software such as a data or a fax program. Before using these
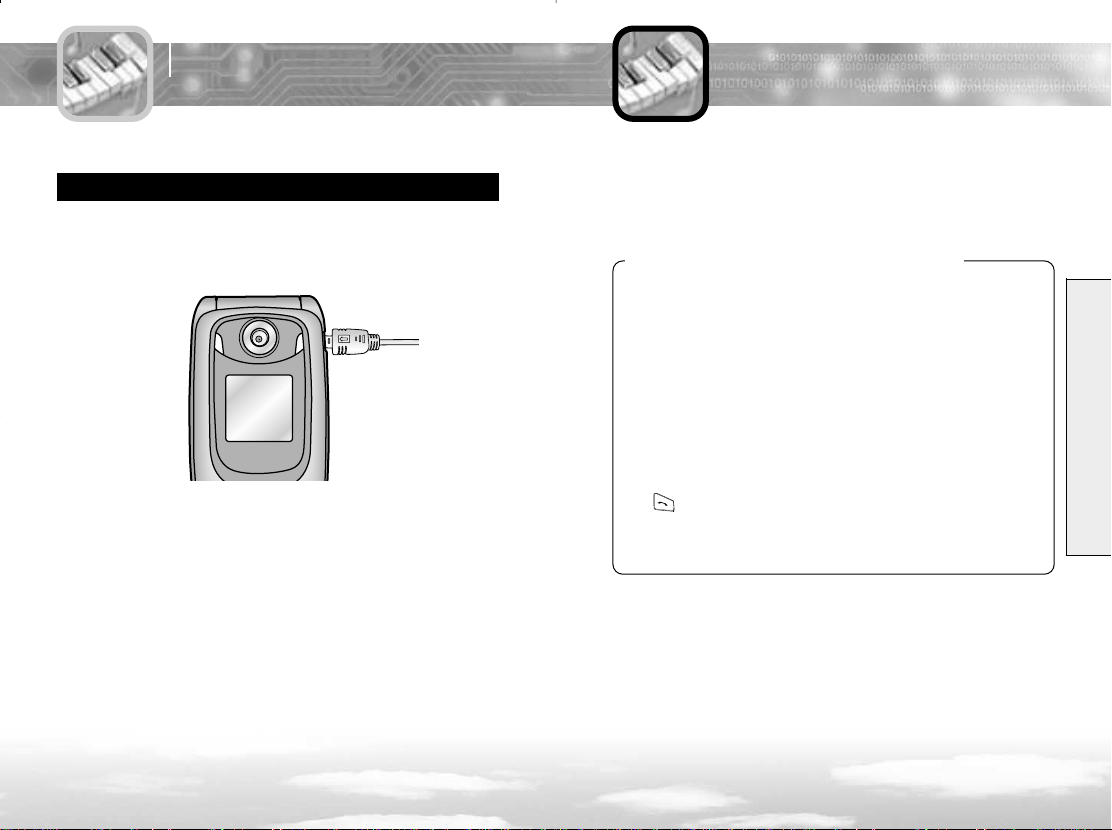
functions, you need to connect your phone to the computer and
make sure that your phone is registered as a modem in your system.
Making a Data or Fax Call
Using a Data Call
Choose "(Single No.) Data" item in phone menu.
1
Connect the phone to your computer with the cable.
2
After starting the software for network connecting (built in
3
Windows System), make the data service using the browser of
Windows System.
After using the Data Call, set the mode to "(Single No.) Voice".
Usage : Prior to using Data Call, you must first set your phone as a
modem in the Windows system(Start > Settings > Control Panel >
Modem or Telephone/Modem Option). Register your phone as a
"standard 19200 bps modem" and set the COM port number to
which the cable is connected. ( Set the port 115200 bit/sec)
Data Call : You set the software using the Widows system (Start >
Settings > network connect), and use the data service. ( This service
is related to net-work services. For more information, please
contact your service provider )
Using a Fax Call
Choose "(Single No.) Fax" item in phone menu.
1
Connect the phone to your computer with the cable.
2
After starting the software for Fax, use the Fax services.
3
After using the Fax Call, set the mode to "(Single No.) Voice".
Example : Fax Call :
1. Connect the phone to the computer using the cable.
2. Open WinFax 10.0 in Windows.
3. Check that configuration is set to 19200 bps modem with the compatible
COM port.
4. Set the Receive Mode to AUTO RECEIVE.
Otherwise, set MANUAL RECEIVE when the incoming animation plays.
Setting
9493
Page 49

Setting
Phone Settings
4. Setting
1 Time/Date Set
2 Alarm Set
3 Call Setting
4 Phone Settings
5 Security Settings
6 GPRS Setting
Language
You can set the display language.
The available languages are English, Spanish and Automatic.
���Note : This setting does not affect the Web Browser.
Main LCD
You can set an image to be displayed on the main LCD in Standby
Mode.
Select an image from the categories such as the built-in or download
which store images that you shot.
User Text (Menu 4-4-2-3)
You can display your own greetings in Standby Mode. Create your own
message of up to 40 English characters. For further details on how to
enter text, see page 40.
Menu 4-4
Menu 4-4-1
Menu 4-4-2
Sub LCD
You can set an image to be displayed on the front LCD in Standby
Mode.
Sub LCD Contrast (Menu 4-4-3-3)
Your Sub LCDs have contrast settings that can help you see the screen
better in different lighting conditions.
Key Back Light
When the phone is attached to the optional Hands-Free Car Kit, the key
back light remains on while the phone is on. At other times, you can set
how long the key back light of the keypad remains on after the last key
is pressed. Key back light drains your battery faster.
Screen Saver
The Screen Saver feature allows you to conserve your battery power by
turning off the LCD screens when you do not use the phone.
���Notes :
●When you press a key or receive a call or message, the screen
automatically turns on.
●When you press and hold the lower volume key with the folder closed,
the sub LCD screen turns on.
●The screen saver will not work when you use the camera function.
LED Select
Using this menu, you can set the LED on or off.
Menu 4-4-3
Menu 4-4-4
Menu 4-4-5
Menu 4-4-6
Setting
9695
Page 50

Setting
Security Settings
4. Setting
1 Time/Date Set
2 Alarm Set
3 Call Setting
4 Phone Settings
5 Security Settings
6 GPRS Setting
Using this menu, you can activate use of the password
for the personal menu and change the password.
PIN Code
Using this menu, you can activate the use of the PIN (Personal
Identification Number) code provided by your SIM card and change the
code if possible.
Menu 4-5
Menu 4-5-1
The following options are available :
Enable PIN : When this option is selected, you must enter your PIN
code each time you switch the phone on. Consequently, any person
who does not have your PIN code cannot use your phone features
without your approval, except to make emergency calls by pressing
the soft key.
Disable PIN : When the option is selected, you don't have to enter
your PIN code when you switch the phone on. Your phone connects
directly to the network when you switch it on.
Phone Lock
Using this menu, you can lock your phone to keep it from being used by
unauthorized people. When the phone is locked, you cannot use any
function.
You are prompted to enter the password when you try to enter the
menu or make a call after turning the phone on. The password is preset
to “0000.” To change the password, refer to “Change Password” on
the next page.
Menu 4-5-2
The following options are available :
Power on : You can lock/unlock the phone when the power is on or
the SIM card is changed.
Immediately : You can immediately lock the phone.
Setting
9897
Page 51

Setting
Call Barring
The call barring network service allows you to restrict your calls.
When you select this option, you are prompted to enter a password.
Menu 4-5-3
Following options are displayed :
All Outgoing : Calls cannot be made.
International : International calls cannot be made.
Incoming When Roam : Calls cannot be received when you are
using your phone outside of your home service area.
International Exc. Home : When abroad, calls can be made only to
numbers within the current country and to your home country,
which is the country where your home network provider is located.
All Incoming : Calls cannot be received.
For each of the above options, you can check the status, set barring
and cancel barring.
To set your call barring options :
Select the Call Barring, and you will be requested to enter
1
current barring password.
●
Outgoing, International Calls, International Exc.Home, Incoming
Call, Incoming When Roam and Cancel All Bars will appear.
Select the type of calls to be barred by pressing the or
2
key and then press the soft key.
To activate call barring, select Set Barring.
3
To deactivate call barring, select Cancel Barring.
4
●
The phone sends your setting to the network and the
network's acknowledgement displays.
You can also deactivate all call barring settings by selecting the
Cancel All Bars option.
Fixed Dial Number
Allows you to only call numbers in the Fixed Dial Number list.
The following options are available :
On/Off :
Allows you to activate/deactivate this function.
List :
Allows you to see the FDN list.
Add :
Allows you to add phone numbers in the FDN list.
���Note : This menu is available only if your SIM card supports
the FDN function.
Menu 4-5-4
Setting
10099
Page 52

Setting
Change Codes
The Change Code feature allows you to change your current phone
password to a new one.
Enter the current password and press the soft key.
Menu 4-5-5
1
Enter a new password and press the soft key.
2
To clear the last entry, if necessary, press the soft key.
Press and hold the soft key to clear all entries.
Pin code/PIN2 code(Menu 4-5-5-1/4-5-5-2)
This option allows you to change your current PIN to a new one,
provided that the Enable PIN feature is enabled.
1. Enter the current PIN and press the soft key.
2. Enter a new PIN and press the soft key.
To clear the last entry, if necessary, press the soft key.
Press and hold the soft key to clear all entries.
The following options are available :
Barring code :
obtained from your service provider by using this option.
You must enter the current password before you can specify a new one.
Once you have entered a new password, you are asked to confirm it
by entering it again.
You can set and change the call barring password
GPRS Setting
4. Setting
1 Time/Date Set
2 Alarm Set
3 Call Setting
4 Phone Settings
5 Security Settings
6 GPRS Setting
This menu allows you to set GPRS options.
���Note : This menu is available only when your
phone is connected with GPRS network.
Menu 4-6
Following options are displayed :
Always online : Allows your phone to always be connected with
GPRS service.
When needed : Allows you to use GPRS as needed.
Setting
102101
Page 53

Setting
Network Select
4. Setting
2 Alarm Set
3 Call Setting
4 Phone Settings
5 Security Settings
6 GPRS Setting
7 Network Select
The Network Selection feature enables you to
automatically or manually select the network used
when roaming outside of your home area.
���Note : You can select a network other than
your home network only if it has a valid roaming
agreement with your home network.
Menu 4-7
To automatically or manually select the network when
roaming :
Press the or key until the appropriate option
1
highlights and then press the soft key.
●
If you select Automatic, you are connected to the first available
network on the preferred list when roaming.
●
If you select Manual, the phone scans for the available networks.
Go to Step 2.
Press the
2
then press the soft key.
●
You are connected to that network.
or
key until the preferred network highlights and
Factory Set
4. Setting
3 Call Setting
4 Phone Settings
5 Security Settings
6 GPRS Setting
7 Network Select
8 Factory Set
Menu 4-8
This menu allows you to reset the phone. Resetting
the phone restores the default value of all of the
menu settings.
When you select the factory set, the message “Are
You Sure?” will be displayed. Select soft key and
your phone will ask you to enter the password. Enter
the 4-digit password and press the soft key.
The default value is set.
The default phone password is “0000.” For further
details about the password, see page 97.
Setting
104103
Page 54

Organizer
Phonebook
5. Organizer
1 Phonebook
2 Scheduler
3 File Manager
You can store up to 1,000 entries and their
corresponding names and numbers in the Phonebook.
Name Search
In Standby Mode, press the soft key.
1
●
The PHONEBOOK options display.
Press the or key to scroll to Name Search and press
2
the soft key.
●
When you enter the Name Search mode, Quick Search Edit Box is
displayed. When you key any alphabet the phone shows you the
search list.
���Note : If you don't press any key for 10 seconds, Quick Search
Edit Box will be disappeared.
Enter the name and press the soft key.
Menu 5-1
Menu 5-1-1
3
���Note : For information on how to enter text, see page 40.
The phone searches for the names on the list containing that
4
character(s), and then displays the first name in that section of
the list.
If you want another entry, press the
5
the list.
Press the key to dial the number of the entry.
6
●
If you press the soft key when you select a Phonebook entry,
you can use the following options - Edit, Add Entry, Call, Send SMS,
Send MMS, Copy, Delete.
Group Search
Allows you to view the list of phone numbers assigned to many groups.
In Standby Mode, press the soft key.
1
Press the
the soft key.
Press the or key to scroll to a group you are looking for
2
and press the soft key.
or
key to scroll to Group Search and press
or
key to scan through
Menu 5-1-2
Organizer
106105
Page 55

Organizer
Add Entry
You can store a phone number in the internal Phonebook in two
different ways.
To store a phone number in Standby Mode without
accessing the Phonebook menu :
Enter the number you want to store.
Menu 5-1-3
1
Press the soft key to go to the Add Entry menu of the
2
Phonebook directly.
●
If you selected 'Phone and SIM' option in 'Memory in use' option,
the Selection menu window appears for you to select where you
are going to store the phone number. You can select either Phone
or SIM to store the number. Please, refer to page 116 for more
information regarding 'Memory in use' option.
Press the or key to select the image you want.
3
Press the or key to move to the fields you want such as
4
Name field, Phone Number field and E-mail Field.
●
To enter the name for the phone number you entered, press the
key to go to the Name field.
●
Press the key to activate this field. Enter the name and press
the soft key.
●
For information about how to Enter the name you want to store,
see page 40.
Press the key to move to the next field.
5
●
4 Phone Number fields and 1 E-mail field are available.
●
Press the key to activate the field.
●
Press the key to delete the number one by one and
press the soft key to save.
●
Press the key to go to the next Phone Number field.
●
Repeat the steps shown above to save other phone numbers
including home phone, office phone, mobile phone and fax
number.
Press the key to go to the E-mail field.
6
●
Press the key to activate the field and enter the e-mail address.
Press the key to go to the Group Select field.
7
●
Press the or key to change to the caller group you want.
Press the soft key. The Save popup window appears and
8
the number is automatically saved in the first available
location in the phone.
●
The phone automatically returns to Standby mode.
Organizer
108107
Page 56

Organizer
To store a phone number by using the Phonebook menu :
In Standby Mode, press the soft key.
1
●
The PHONEBOOK options display.
Enter the contact’s name. Press the or key to scroll to
2
Add Entry and press the soft key.
Press the or key to change to the image you want.
3
Press the or key to move to the fields you want such as
4
Name field, Phone Number field and E-mail Field.
●Press the key to activate this field. Enter the name and press
the soft key.
●For information about how to enter text, see page 40.
Press the key to move to the next field.
5
●4 Phone Number fields and 1 E-mail field are available.
●Press the key to activate the field.
●Press the soft key to delete the number one by one and
press the soft key to save.
●Press the key to go to the next Phone Number field.
●Repeat the steps shown above to save other phone numbers
including hone phone, office phone, mobile phone and fax
number.
Press the key to go to the E-mail field.
6
●Press the key to activate the field and enter the e-mail address.
●For more information about how to enter an e-mail address,
see page 40.
Press the key to go to the Group Select field.
7
●Press the or key to select the caller group you want.
Press the soft key.
8
●The Save popup window appears and the number is automatically
saved in the first available location in the phone.
SIM add entry:
Press the or key to move to the fields you want such as
1
Name Field, Phone Number Field, Group Select Field,
SIM Address Select Field.
You can select the Caller Group or SIM Address you want by
2
pressing or key in Group Select Field and the SIM Address
Select Field.
In Standby Mode, when you key SIM Address + #,
3
the corresponding number appears.
Organizer
110109
Page 57

Organizer
Speed Dials
Once you have created Phonebook entries, you can assign a speed dial
number to a selected Phonebook entry. Then, you can speed-dial the
Phonebook entry with one key press. You can assign up to 8 speed
dials.
To assign a speed dial number :
In Standby Mode, press the soft key.
1
●
The PHONEBOOK options display.
Press the or key to scroll to Speed Dials and press
2
the soft key.
●
The Speed Dials list displays.
Press the or key to select an empty location from 2 to 9
3
and press the soft key.
���Note : Speed Dial location 1 is reserved for your Voice Center
number.
Search the phonebook entry by entering the first few letters
4
of the name and press the soft key.
●
For information on how to enter the name, see page 40.
●
The list of the names beginning with the characters you entered
displays.
Press the or key to scroll through the names on the list.
Menu 5-1-4
5
When you find the name, press the soft key.
6
●
The name displays on the Speed Dials list.
To return to Standby Mode, press the key.
7
To speed-dial a number :
In Standby Mode, press and hold the speed dial number from
1
2 to 9 for about 2 seconds.
The phone number that was stored in the speed dial location
2
dials.
Organizer
112111
Page 58

Organizer
To change or delete the speed dial assignment :
In Standby Mode, press the soft key.
1
●
The PHONEBOOK options display.
Press the or key to scroll to Speed Dials and press
2
the soft key.
●
The Speed Dials list displays.
Press the or key to select the speed dial location and
3
press the soft key.
If there is no entry in the location you selected, Name Search
4
screen will appear.
●
Enter the name you’re searching for. All matching entries will
appear.
●
If there is an entry in the location you selected, the phone shows
the name and phone number stored in the location.
Press the soft key.
Press the or key to select the option and press
5
the soft key.
To return to Standby Mode, press the key.
6
Caller Groups
You can use caller groups to add Phonebook entries to a caller group so
that the phone alerts you in a particular ring when the person in the
group calls you.
6 groups are available with your phone and you can change the name
of each group.
PB Manage
The PB Manage option in the Phonebook menu allows you to
manage your phonebook.
To access the PB Manage option :
In Standby Mode, press the soft key.
1
●
The PHONEBOOK options display.
Press the or key to scroll to PB Manage and press
2
the soft key.
3
Press the
key.
or
key to select an option and press the soft
Menu 5-1-5
Menu 5-1-6
Organizer
114113
Page 59

Organizer
You can use the following PB Manage
options :
Own Number
This option allows you to :
●Store your own phone numbers with a name.
●Edit the names and number.
Once you store the numbers, you can see the number list when
you access the Own Number menu.
Scratch Pad
This option allows you to view the number saved using the
Scratch Pad feature during a call. For details about using the
Scratch Pad, see page 36.
To save the displayed number, press the soft key.
You can make a call directly using this function directly.
Service Numbers
This menu is available only when your SIM card supports
'Service Numbers' function. The SIM card contains several sets
of numbers – the main one is the subscriber’s phone book.
However, network operator can put his own service numbers
(message box, customer service etc.) into a special directory
called.
Memory Status
This option allows you to check how many entries are currently
stored in Phonebook;
SIM card and Phone memories. You can also see the capacity of
both memories.
Copy All
This option allows you to copy or move all contents of the phonebook
from either your phone memory or SIM card to the other.
Delete All
This option allows you to delete all contents of the phonebook in your
phone memory or SIM card.
Memory In Use
This option allows you to select which storage you are going to access
for the Phonebook contents. You can select either Phone, SIM or both
of them.
Organizer
116115
Page 60

Organizer
Scheduler
5. Organizer
1 Phonebook
2 Scheduler
3 File Manager
Daily View Menu 5-2-1
This menu can show you the information about the daily event.
Press soft key to show more detailed information.
You can store fifty events that occur between 1,
January, 2000 to 31, December, 2040.
Menu 5-2
1
Press soft key to edit the content and to transfer to
2
weekly view or monthly view.
Weekly View Menu 5-2-2
This Menu can show you the information about the weekly event.
The and key are used to select the date and the and
1
key are used to select the time.
Press soft key to show more detailed information after
2
selecting a date by using the or key.
When you search for a date, a scheduled event is highlighted
3
with a colored bar.
If you want to edit or delete the event, press the soft
4
key after selecting the date by pressing the key.
Organizer
118117
Page 61

Organizer
Monthly View Menu 5-2-3
This Menu can show you the information about the monthly event.
In this menu, Today is marked in violet.
When you search the date by pressing the
1
and
or
a color bar appears.
If you press the key at the date you want to make the
2
event, you can see the more detailed information.
If you want to edit or delete the event, press the key and
3
then press the soft key after operating step 2.
key, if the selected date has a scheduled event,
or
Make Menu 5-2-4
To add a new event, you should select Category first by pressing
key .
You can set up Subject, Location, Start time, End Time,
1
Repeat, Description or Alarm information by pressing
key after selecting a category.
If you select Call in the Category setting value, you are
2
allowed to set up Subject, Call Time or Call Number.
Press soft key to select a phone number from your
3
Phonebook when you set up a Call Number.
or
or
Organizer
120119
Page 62

Organizer
Delete All Menu 5-2-5
This menu allows you to delete all Schedule events you stored at the same
time. Once you select this menu, a confirmation window appears.
Press the soft key to delete all Schedule events.
Setting Menu 5-2-6
This menu allows you to view saved events.
Press
or
1
You can change the setting value by pressing
You can change the date format displayed at the upper part of
2
Scheduler by changing the Date Format setting value.
You can make Monday or Sunday start a week in your
3
Monthly View and Weekly View by changing Week Start
setting value.
key to select Date Format or Week Start.
or
key.
ToDo Menu 5-2-7
You can store up to 50 ToDo tasks.
You can view, store or delete ToDo data by pressing
View ToDo List (Menu 5-2-7-1)
This menu allows you to view all ToDo lists.
1. Select a ToDo item by pressing or Key and
press soft key to view its detailed information.
2. You are allowed to view, add, edit or sort ToDo data by
pressing soft key.
Add ToDo (Menu 5-2-7-2)
This menu allows you to add a new ToDo item.
You can set up Subject, Due Date, Status and Priority information
by pressing or key.
Delete All (Menu 5-2-7-3)
This menu allows you to delete all ToDo items at once.
Once you select this menu, confirm window appears.
Then, press the soft key to delete all ToDo data.
or
key.
Organizer
122121
Page 63

Organizer
File Manager
5. Organizer
1 Phonebook
2 Scheduler
3 File Manager
Menu 5-3
Memory Status Menu 5-3-1
Displays the total size, used size and remaining size of your phone’s
memory.
File List Menu 5-3-2
You can manage and view the information of the contents
and also set image file as a wallpaper and a mp3 file as a ringtone.
Connect USB To Computer Menu 5-3-3
Using a USB Cable can help you to manage your phone memory.
Once you press , the connect icon will be displayed on the
1
screen.
'Portable Disk' image will be displayed on your computer.
2
You can easily move and manage your data.(mp3, 3gp, mp4,
3
mmf, AMR, mid, jpg, gif, bmp, png)
To disconnect your phone from the computer, remove the
4
'Portable Disk' on your computer and press key on the
phone.
���Notes :
●
When your phone is connected to your computer via USB Cable, you
cannot use Incoming Call and Outgoing Call. SMS, MMS, EMS and Alarm
messages are not displayed.
●
Refer to the table below for directions on properly storing and playing
files. Supported file formats can change without any pre-notification.
●
The phone supports the video files outlined below, up to 15 frames per
second. 3gp and mp4 formats must be synchronized with AMR voice
codec.
●
Please only use Baseline format in JPEG image.
Folder Name Supported File Format
PHOTO *.jpg
PBIMAGE *.jpg
VIDEO *.3gp, *.mp4
AUDIO *.mp3
IMAGE *.bmp, *.jpg, *.png, *.gif
SOUND *.mmf, *.mid
VOICE *.AMR *.aac
●
If the message says the connectivity between your phone and computer is
unstable, please check your cable.
Format Memory Menu 5-3-4
Memory will be formatted.
���
Note : All the data saved will be gone.
124123
Organizer
Page 64

Camera
In this menu, you can take a photo, save it as an image photo or PBook
photo.
You can access the camera menu by 2 ways.
If you press the key or select the Camera menu in the Standby mode,
the camera menu will be displayed.
Take Photo
6. Camera
1 Take Photo
2 Record Video
3 Photo Album
4 Video Album
5 Phonebook Al..
6 Configuration
In this menu, you can take a photo and save it as
an image or PB Photo. The following options are
available :
Menu 6-1
- Zoom : Use the or to adjust the zoom from 1 to 5 level.
- Exposure : Use the or to adjust the contrast from 1 to 7
level.
Effect : Use the or to select various effects to the image.
-
Size : Use the or to define the size of the image.
-
Quality : Use the or to adjust the quality of the image
-
among good, normal and fine.
Selftimer : Use the or to select the time to take a photo
-
from 0, 2 or 10 seconds.
- White Balance : Use the or to adjust the white Balance
among sunlight, fluorescent, incandescent.
Night Mode : Use the or to adjust the Night Mode
among Normal, InDoor, Night.
After shooting the image, press the key to save it into Image
Album. Press the "Rename" to change the name of the image.
���Note : If you select the "PBook photo" in the Size Option and
take a photo, you can save the image into the PBook Album
automatically by pressing( )
Record Video
6. Camera
1 Take Photo
2 Record Video
3 Photo Album
4 Video Album
5 Phonebook Al..
6 Configuration
In this menu, you can take a video and save it.
Following options are available.
.
Menu 6-2
- Zoom : Use the or to adjust the zoom from 1 to 5 level.
This functions is only available before you start taking a video.
- Effect : Use the or to select various effects to the image.
- Quality : Use the or to adjust the quality of the image
among good, normal and fine.
- White Balance : Use the or to adjust the White Balance
among sunlight, fluorescent, incandescent.
- Night Mode : Use the or to adjust the Night Mode among
Normal, Indoor, Night.
���Note : This feature may not be available when memory is low.
Camera
126125
Page 65

Camera
Photo Album
6. Camera
1 Take Photo
2 Record Video
3 Photo Album
4 Video Album
5 Phonebook Al..
6 Configuration
You can review the image photos that you saved.
If you select the Menu on the left side of each
image in the Photo Album, Send, Delete, Rename and
Details will display.
If you select “Details”, information including file size
and file format will appear.
Video Album
6. Camera
1 Take Photo
2 Record Video
3 Photo Album
4 Video Album
5 Phonebook Al..
6 Configuration
You can play video files that you saved or copied.
���Note : You can play video files WITHIN VIDEO
folder.
Menu 6-3
Menu 6-4
Phonebook Album
6. Camera
1 Take Photo
2 Record Video
3 Photo Album
4 Video Album
5 Phonebook Al..
6 Configuration
You can review the phonebook photos that you
saved. If you select the Menu on the left side of each
image in the Phonebook Album, Delete and Rename
will be displayed. If you select Rename, you can
change the file name of it.
Configuration
6. Camera
1 Take Photo
2 Record Video
3 Photo Album
4 Video Album
5 Phonebook Al..
6 Configuration
In this menu, you can select Shutter Sound, Set Save
Name, Auto Save or Album Lock function.
Menu 6-5
Menu 6-6
Shutter Sound : You can select shutter sound for Camera Shooting,
Video Recording or Video Stopping.
Auto Save : If you enable Auto Save, as soon as you take a photo, the
image will be automatically saved. However, if you disable this, you can
save the image by pressing the soft key.
Album Lock : The password will be asked to either Enable or to Disable
the Album Lock.
Camera
128127
Page 66

Application
This menu allows you to use your phone as your assistant providing you
with various convenient features, such as Scheduler and Calculator.
MP3
7.Application
1 MP3
2 Othello
3 Calculator
4 Unit Converter
5 World Time
6 Voice Memo
You can listen to MP3 music on your phone.
You can access the MP3 menu by 2 ways.
By pressing the key or by selecting the MP3
menu in the Standby mode, the Music Player and
Configuration options will appear.
���Note : You can play MP3 files WITHIN
Menu 7-1
AUDIO folder.
Music Player Menu 7-1-1
While playing an MP3 file, you can view current play time, total play time,
play file name, progressive bar, MP3 file information and Equalizer values.
You can execute basic functions such as Play, Pause, FF, REW and Repeat.
And you can change equalizer setting through the OPTION menu.
Play List : If you select Music player, you can review play lists.
To play an MP3 file, press the “confirm” key or select “Play” in the
Option menu.
To use the following options, press OPTION soft key.
Set ringtone : Set the MP3 file as ringtone.
Play : Play the MP3 file.
ADD : Add file(s) MP3 file to the play list.
Delete : Delete the MP3 file from play list.
Delete All : Delete all the MP3 files from play list.
Configuration Menu 7-1-2
Folder Action(Menu 7-1-2-1) : If you select ON, mp3 files will continue to
play even if you close the folder.
Equalizer User Setting(Menu 7-1-2-2) : You can select equalizer such as
None(Normal), Classic, Jazz, Pop, Rock, Bass3 and Bass9.
Othello
7.Application
1 MP3
2 Othello
3 Calculator
4 Unit Converter
5 World Time
6 Voice Memo
You can play “Othello” on your phone.
To stop playing a game, press the key or close
the folder.
When you enter the game again, the game asks you
whether you want to continue the previous game or
not.
Menu 7-2
Application
130129
Page 67

Application
Calculator
7.Application
1 MP3
2 Othello
3 Calculator
4 Unit Converter
5 World Time
6 Voice Memo
You can use your phone as a calculator,
which provides the basic arithmetic functions;
addition, subtraction, multiplication and division.
Menu 7-3
Performing a Calculation
Enter the first number using the numeric keys.
1
●The number displays in the upper box.
���Notes :
●To clear the last entry, press the soft key. Press and hold the key
to clear all of the entries from the display.
●To enter a decimal point, press the key.
●To enter a ‘+’ or ‘-’ in front of a number, press the key after you
enter a number.
Press the navigation key to set the operation for your
2
calculation referring to the screen; + (add), - (subtract),
x (multiply), ÷ (divide).
Enter the second number.
3
To calculate the result, press the = soft key.
4
To reset the calculator, press and hold the soft key.
5
Unit Converter
7.Application
1 MP3
2 Othello
3 Calculator
4 Unit Converter
5 World Time
6 Voice Memo
To use the unit converter :
Press the or key to scroll to the unit category.
1
Length, Weight, Volumes, Surface, and User Define are
available.
●
The User Define option allows you to set the specified rate as
required.
Press the soft key.
This menu allows you to convert a unit into another
unit, such as inches to centimeters.
Menu 7-4
2
Enter the value to be converted using the number keypad.
3
●
The number appears in the In box.
●
If necessary, press the soft key to clear the last entry.
Press the key to move down to the first unit box.
4
Press the or key to select the original unit.
Press the key to move down to the second unit box.
5
Press the or key to select the required unit to convert
the value with.
The converted value automatically displays in the Out box.
6
To reset the converter, move up to the In box and press and hold
7
the soft key.
Application
132131
Page 68

Application
World Time
7.Application
1 MP3
2 Othello
3 Calculator
4 Unit Converter
5 World Time
6 Voice Memo
To select your time zone :
Select the city corresponding to your time zone by pressing
1
the or key one or more times.
●
The local date and time display.
If you want to know other cities in the time zone, press
the or key one or more times.
When you find your time zone, press the soft key.
This feature allows you to check the current time for 59
major cities around the world. You can also set your time
zone for displaying the date and time in Standby Mode.
When you access the World Time menu,
the display shows the:
●
Current date and time ●City name
2
Voice Memo
7.Application
1 MP3
2 Othello
3 Calculator
4 Unit Converter
5 World Time
6 Voice Memo
This menu allows you to make a memo with your
voice or any sound.
Following options are available
Record : This option allows you to record your
voice for 60 seconds.
Play : This option allows you to play the voice
memo. You can select one of the memos you
recorded by pressing or key.
Menu 7-5
Menu 7-6
Record Menu 7-6-1
This menu allows you to make a memo with your voice or any sound.
To use the recording :
Press the soft key.
●
Record the voice memo by speaking into the microphone.
●
When you are recording, a timer displays to show you the elapsed time.
Press the soft key.
●
Recording pause.
Press the soft key.
●
Press the soft key to save recorded audio data.
●
Press the soft key to change file name.
If you want to cancel recording, press the key.
Play Menu 7-6-2
This menu allows you to play a voice memo file.
To use the Voice Memo Play :
Press the key to pause or play a voice memo.
1
Press the or key to play next or previous voice memo.
2
Press the key to select play time, once or repeat.
3
Press the key to stop playing.
4
To see a file list, press soft key.
5
Press the or key long to F/F or F/R.
6
134133
Application
Page 69

Java
Downloads
You can download Java contents from network.
8.Java
1 Downloads
2 Memory Status
3 Network
Contents you downloaded are added to the list.
���Note : Before you use this menu, you must
confirm that your service provider supports it.
Using Java Midlet menu
On the Midlets menu, press the menu soft key to show the
following options.
Launch : Launches the selected Midlet.
Info : Show the Midlet information.
Remove : Allows you to remove the Midlet.
Memory Status
In this menu, you can view the total and used
8.Java
1 Downloads
2 Memory Status
4 Network
memory amounts for Java contents.
Menu 8-1
Menu 8-2
Network
In this menu, you can store the following information
8.Java
1 Downloads
2 Memory Status
3 Network
Using Network menu
APN : Operator's Access Point Name.
User name : User Identification.
Password : Password
for Java application to use Network(Data Service)
function.
Menu 8-3
Java
136135
Page 70

Internet
Your phone comes equipped with a WAP (Wireless Application Protocol)
Browser, making it possible for you to access the Wireless Web.
Note that this feature may be unavailable or vary depending on your
network.
The WAP Browser allows you to access up-to-the-minute information
via your phone and view specially designed text versions of popular
Internet sites, including Yahoo!
®
Channel
.
Browsing the Wireless Web using your phone is unlike using your
computer, in that site providers select only the critical aspects of their
sites for wireless phone users and remove most graphics.
Each time you start the WAP Browser, the phone connects to the
Wireless Web. You are billed, after you are connected to the Wireless
Web.
The WAP Browser ends the network connection after a certain period
of inactivity and automatically reconnects as necessary. For this reason,
you may find that you are billed for several network connections within
a single session. This is normal and is designed to minimize your bill.
To quickly access the
press the key.
®
, CNN MobileSMand the Weather
Internet menu from Standby Mode,
Homepage
9. Internet
Homepage
Bookmarks
Recent Pages
Enter Address
Resume
Settings
���Note : To access the startup homepage from any other screen in
the WAP Browser, use the key.
This menu connects your phone to the Internet.
A connection is established with your service provider
and the corresponding homepage displays.
The content of the WAP browser’s startup homepage
depends on your Wireless Web service provider.
To scroll through the screen, use the and keys.
Navigating the WAP Browser
To Press the
or key until the
Scroll through and item is indicated by the cursor,
select browser items and then press the key to
confirm the selection.
Select a numbered item Corresponding numeric key.
Return to the previous page soft key.
Return to the startup
homepage
soft key, and then select Home
Exiting the WAP Browser
To exit the browser, press the key at any time.
Internet
138137
Page 71

Internet
Bookmarks
You can set a bookmark for most pages so that they
can then be accessed directly from any web page.
Bookmarks save you time by reducing the number of
steps required to access a given page.
Homepage
Bookmarks
Recent Pages
Enter Address
Resume
Settings
9. Internet
Add Bookmark
In this menu, you can mark the site you’re currently visiting, or you can
access a Bookmark which is already set.
Create new folder
In this menu, you can edit the name of directory and add the appropriate
directory to manage Bookmark by a directory.
Recent Pages
Press the key to access the Internet menu
1
and press the soft key to select Recent
Pages.
In the Recent Pages Menu, press the
2
or key until you locate the recent page
you want to view. Press the soft key to
select it. Your phone will be connected to the
recent site.
Homepage
Bookmarks
Recent Pages
Enter Address
Resume
Settings
9. Internet
Enter Address
In this menu, you can manually enter the address of a
web page and go there immediately.
1
Homepage
Bookmarks
Recent Pages
Enter Address
Resume
Settings
9. Internet
2
3
4
Resume
In this menu, you can resume the previous browsing
session by loading the page last visited. Note that the
Back option will be available for pages visited during
this session.
Homepage
Bookmarks
Recent Pages
Enter Address
Resume
Settings
9. Internet
Press the key to access the Internet menu
and press the soft key to select the
Enter Address.
Press the or key to select a URL prefix,
and press the soft key.
Enter the address of the web page.
●
For details on how to enter text, see page 40.
Press the soft key to go to the page.
Internet
140139
Page 72

Internet
Settings
In this menu, you can configure the browser with
different connection type, proxy address and browser
options.
Press the key to access the Internet menu
1
and press the soft key to select the
Settings.
Press the or key to select one of the
2
following options.
Homepage
Bookmarks
Recent Pages
Enter Address
Resume
Settings
9. Internet
Edit Homepage
In this menu, you can edit the homepage.
Select Profile
In this menu, you can select profile for WAP browser. You should select
the profile first before starting browsing. If you try to change any setting
or to load a page without selecting a profile first, an alarm dialogue is
displayed, informing that you should select a profile first.
Connection
In this menu, you can set the connection.
You should select a profile before using this function.
Following options are available :
Bearer : Allows you to set bearer by selecting CSD or GPRS.
GPRS setting : Allows you to edit APN, User name and Password.
Connection Type : Allows you to set Connection type by selecting
HTTP or WSP Connection-oriented.
Timeout : Enables you to set the timeout value to wait for a
response in the number of seconds.
Proxy Address : Enables you to specify a proxy gateway to be used
for connecting.
Proxy Port : Enables you to specify proxy port number.
Proxy Secure Port : Enables you to change the port number.
Rename Profile
In this menu, you can change the name of the currently selected
profile.
Internet
142141
Page 73

Internet
Reference Information
Cache
In this menu, you can decide whether you use cache or not and clear
information in cache.
Cookies
In this menu, you can check the Address, ID and Password you
connected with before.
Clear Recent Page List
In this menu, you can clear the recent page saved in your browser.
Push
This menu allows you to view WAP Push Messages.
Inbox : WAP Push Messages you receive are stored in
this box.
Bookmarks
Recent Pages
Enter Address
Resume
Settings
Push
9. Internet
Access Codes
There are several access codes that are used by your phone and its SIM
card. These codes help you protect the phone against unauthorized
use.
Phone Password
The phone password can be used to avoid unauthorized use of your
phone. The password “0000” is usually supplied with the phone.
Change the password before you start using your phone.
Keep the new password secret and in a safe place, which is separate
from the phone.
PIN code
The PIN (Personal Identification Number) code protects your SIM card
against unauthorized use. The PIN code is usually supplied with the SIM
card. When the PIN code request is enabled (Menu 4-4-1), the code is
asked each time the phone is switched on.
If you key in an incorrect PIN code three times in succession, key in the
PUK code and press the soft key. Key in a new PIN code and press
the soft key. Key in the new code again and press the soft
key.
Reference Information
144143
Page 74

Reference Information
PIN2
The PIN2, supplied with some SIM cards, is required to access some
functions, such as changing unit counts. These functions are only
available if supported by your SIM card.
If you key in an incorrect PIN2 three times in succession, key in the
PUK2 and press the soft key to unlock the phone. Key in a new
PIN2 and press the soft key. key in the new PIN2 again and press
the soft key.
PUK code
The PUK (PIN Unblocking Key) code is required to change a blocked PIN
code. The PUK code may be supplied with the SIM card. If not, contact
your local service provider for the code.
If you key in an incorrect PUK code ten times in succession, the SIM card
cannot be used anymore. Contact your service provider for a new card.
You cannot change the PUK code. If you lose the code, contact your
service provider.
PUK2 code
The PUK2 code, supplied with some SIM cards, is required to change a
blocked PIN2 code.
If you key in an incorrect PUK2 code ten times in succession, you cannot
use the functions requiring the PIN2 code. Contact your service provider
for a new card.
You cannot change the PUK2 code. If you lose the code, contact your
service provider.
Safety Information
Read this information before using your handheld portable Cellular
Telephone.
PRECAUTIONS
Your Handheld Portable Telephone is a high quality piece of equipment.
Before operating, read all instructions and cautionary markings on the
product, battery and adapter/charger.
Failure to follow the directions below could result in serious bodily injury
and/or property damage due to battery liquid leakage, fire or rupture.
DO NOT use or store this equipment in a place where it will be exposed
to high temperatures, such as near an open flame or heat-emitting
equipment.
DO NOT drop your device or subject it to severe shock. When not using,
lay down the unit to avoid possible damage due to instability.
DO NOT expose this equipment to rain or spilled beverages.
DO NOT use unauthorized accessories.
DO NOT disassemble the phone or its accessories. If service or repair is
required, return unit to an authorized UTStarcom cellular service center.
If unit is disassembled, the risk of electric shock or fire may result.
Reference Information
146145
Page 75

Reference Information
DON’Ts
●Don’t attempt to disassemble the battery, it is a sealed unit with no
serviceable parts.
●Don’t expose the battery terminals to any other metal object (e.g., by
carrying it in your pocket or purse with other metallic objects such as
coins, clips and pens). This can short circuit and critically damage the
battery.
●Don’t leave the battery in hot or cold temps. Otherwise, it could
significantly reduce the capacity and lifetime of the battery.
●Don’t dispose of the battery into a fire.
Lithium ion batteries are recyclable. When you replace your built-in
battery, please request the repair center to recycle the battery in
accordance with RBRC standards. When disposing of the battery by
yourself, please call RBRC at (800) 822-8837 for proper disposal tips.
Never touch any fluid that might leak from the built-in battery.
Such liquid when in contact with the eyes or skin, could cause injury to
the skin or eyes. Should the liquid come into contact with the eyes,
irrigate the eyes thoroughly with clean water and immediately seek
medical attention. In the event the liquid comes into contact with the
skin or clothing, wash it away immediately with clean water.
DRIVING SAFETY
Talking on the phone while driving is extremely dangerous and is illegal
in some states. Remember, safety comes first. Check the laws and
regulations on the use of phones in the areas where you drive. Always
obey them.
If you must use your phone while driving, please :
Give full attention to driving. Driving safely is your first responsibility.
Use hands-free operation and/or one-touch, speed dialing, and auto
answer modes.
Pull off the road and park before making or answering a call.
An air bag inflates with great force. DO NOT place objects, including
either installed or portable wireless equipment, in the area over the air
bag or in the air bag deployment area. If in-vehicle wireless equipment
is improperly installed and the air bag inflates, serious injury could result.
���WARNING : Failure to follow these instructions could lead to serious
personal injury and possible property damage.
OPERATING ENVIRONMENT
Remember to follow any special regulations in force in any area and
always switch off your phone whenever it is forbidden to use it,
or when it may cause interference of danger.
When connecting the phone or any accessory to another device,
read its user’s guide for detailed safety instructions. Do not connect
incompatible products.
As with other mobile radio transmitting equipment, users are advised
that for the satisfactory operation of the equipment and for the safety
of personnel, it is recommended that the equipment should only be
used in the normal operating position (held to your ear with the
antenna pointing over your shoulder).
Reference Information
148147
Page 76

Reference Information
ELECTRONIC DEVICES
Your wireless handheld portable telephone is a low power radio
transmitter and receiver. When it is ON, it receives and also sends out
radio frequency (RF) signals.
Most modern electronic equipment is shielded from RF energy.
However, certain electronic equipment may not be shielded against
the RF signals from your wireless phone.
Therefore, use of your phone must be restricted in certain situations.
PACEMAKERS
The Health Industry Manufacturers Association recommends that a
minimum separation of six (6°±) inches be maintained between a
handheld wireless phone and a pacemaker to avoid potential
interference with the pacemaker. These recommendations are
consistent with the independent research by and recommendations of
Wireless Technology Research.
Never come closer than six (6) inches to a person with a heart
pacemaker implant when using your phone. Doing so could result in
interference with the function of the pacemaker.
Persons with pacemakers :
●ALWAYS keep the phone more than six inches from your pacemaker
when the phone is turned on.
●Do not carry the phone in a breast pocket.
●Use the ear opposite the pacemaker to minimize the potential for
interference.
●If you have any reason to suspect that interference is taking place,
turn your phone OFF immediately.
HEARING AIDS
Some digital wireless phones may interfere with some hearing aids.
In the event of such interference, you may want to consult your service
provider (or call the customer service line to discuss alternatives).
���Note : For phones complying with the ANSI HAC standard, use
FCC-approved language.
OTHER MEDICAL DEVICES
If you use any other personal medical device, consult the manufacturer
of your device to determine if they are adequately shielded from
external RF energy. Your physician may be able to assist you in
obtaining this information.
HOSPITALS AND HEALTH CARE FACILITIES
Turn your phone OFF in health care facilities when any regulations
posted in these areas instruct you to do so. Hospitals or healthcare
facilities may be using equipment that could be sensitive to external RF
energy.
VEHICLES
RF signals may affect improperly installed or inadequately shielded
electronic systems in motor vehicles. Check with the manufacturer or
its representative regarding your vehicle. You should also consult the
manufacturer of any equipment that has been added to your vehicle.
POSTED FACILITIES
Turn your phone OFF where posted notices so require.
Reference Information
150149
Page 77

Reference Information
POTENTIALLY EXPLOSIVE ATMOSPHERES
Turn your phone OFF when in any area with a potentially explosive
atmosphere and obey all signs and instructions. Sparks in such areas
could cause an explosion or fire resulting in bodily injury or even death.
Areas with a potentially explosive atmosphere are often, but not always,
clearly marked. They include fueling areas such as gas stations; below
deck on boats; fuel or chemical transfer or storage facilities; vehicles
using liquefied petroleum gas (such as propane or butane); areas where
the air contains chemicals or articles, such as grain, dust, or metal
powders; and any other area where you would normally be advised to
turn off your vehicle’s engine.
AIRCRAFT
FCC regulations prohibit using your phone while in the air. Turn your
phone OFF before boarding an aircraft. Always request and obtain prior
consent and approval of an authorized airline representative before using
your phone aboard an aircraft. Always follow the instructions of the
airline representative whenever using your phone aboard an aircraft,
to prevent any possible interference with airborne electronic equipment.
Radio Frequency (RF) Signals
Your wireless phone is a radio transmitter and receiver.
It is designed and manufactured not to exceed the emission limits for
exposure to radio frequency (RF) energy set by the Federal
Communications Commission (FCC) of the U.S. Government. These
limits are part of comprehensive guidelines and establish permitted level
of RF energy for the general population. The guidelines are based on
the safety standards that were developed by independent scientific
organizations though periodic and through evaluation of scientific
studies studies.
The standards include a substantial safety margin designed to assure
the safety of all persons, regardless of age and health.
The exposure standard for wireless phones employs a unit of
measurement known as Specific Absorption Rate (SAR). The SAR limit
set by the FCC is 1.6W/kg.
In the U.S. and Canada, the SAR limit for mobile phones used by the
public is 1.6 watts/kg (W/kg) averaged over one gram of tissue. The
standard incorporates a substantial margin of safety to give addition
protection for the public and to account for any variations in
measurements.
SAR tests are conducted using standard operating positions specified by
the FCC with the phone transmitting at its highest certified power level
in all tested frequency bands.
Although the SAR is determined at the highest certified power level, the
actual SAR level of the phone while operating can be well below the
maximum value. This is because the phone is designed to operate at
multiple power level so as to use only the power required to reach the
network. In general, the closer you are to a wireless base station
antenna, the lower the power output of the phone.
Reference Information
152151
Page 78

Reference Information
Before a new model phone is available for sale to the public, it must be
tested and certified to the FCC that it does not exceed the limit
established by the government-adopted requirement for safe exposure.
The tests are performed in positions and locations (e.g., at the ear and
worm on the body) as required by the FCC for each model. While there
may be differences between the SAR levels of various phones and at
various positions, they all meet the government requirement.
The FCC has granted an Equipment Authorization for this model phone
with all reported SAR levels evaluated as in compliance with the FCC RF
exposure guidelines.
SAR information on this model phone is on file with the FCC and can
be found under the Display Grant section of http://fcc.gov/cet/fccid after
searching on FCC ID printed in the label on the phone. FCC certification
information for this model phone is attached separation paper.
For body worn operation, this model phone has been tested and meets
the FCC RF exposure guidelines when used with a supplied approved
accessory designated for this product or when used with and accessory
that contains no metal and that positions the handset a minimum from
the body.
The minimum distance for this model phone is written in the FCC
certification information from the body. None compliance with the
above conditions may violate FCC RF exposure guidelines.
For more Information concerning exposure to radio frequency signals,
see the following websites:
Federal Communications Commission (FCC)
http://www.fcc.gov/rfsafety
Cellular Telecommunications Industry Association (CITA)
http://www.wow-com.com
U.S. Food and Drug Administration (FDA)
http://www.fda.gov/cdth.consumer
World Health Organization (WHO)
http://www.who.int/peh-emf/en
Care and Maintenance
Your phone is a product of superior design and craftsmanship and
should be treated with care. The suggestions below will help you to
fulfill any warranty obligations and allow you to enjoy this product for
many years. When using your phone:
●Keep it and all its parts and accessories out of small children’s reach.
●Keep it dry. Precipitation, humidity and liquids contain minerals that
will corrode electronic circuits.
●Do not use or store it in dusty, dirty areas as its moving parts can be
damaged.
●Do not store it in hot areas. High temperatures can shorten the life of
electronic devices, damage batteries, and warp or melt certain
plastics.
●Do not store it in cold areas. When the phone warms up (to its
normal operating temperature), moisture can form inside the phone,
which may damage the phone’s electronic circuit boards.
●Do not drop, knock or shake it. Rough handling can break internal
circuit boards.
●Do not use harsh chemicals, cleaning solvents, or strong detergents
to clean it. Wipe it with a soft cloth slightly dampened in a mild soapand-water solution.
●Do not paint it. Paint can clog the device’s moving parts and prevent
proper operation.
●Use only the supplied or an approved replacement antenna.
Unauthorized antennas, modifications of attachments could damage
the phone and may violate regulations governing radio devices.
●If the phone, battery, charger, or any accessory is not working
properly, take it to your nearest qualified service facility. The
personnel there will assist you, and if necessary, arrange for service.
154153
Reference Information
Page 79

Warranty
12 MONTH LIMITED WARRANTY
UTStarcom Personal Communications (the Company) warrants
to the original retail purchaser of this UTStarcom handheld
portable cellular telephone, that should this product or any part
thereof during normal consumer usage and conditions, be
proven defective in material or workmanship that results in
product failure within the first twelve (12) month period from
the date of purchase, such defect(s) will be repaired or replaced
(with new or rebuilt parts) at the Company’s option, without
charge for parts or labor directly related to the defect(s).
The antenna, keypad, display, rechargeable battery and battery
charger, if included, are similarly warranted for twelve (12)
months from date of purchase.
This Warranty extends only to consumers who purchase the
product in the United States or Canada and it is not transferable
or assignable.
This Warranty does not apply to :
(a) Product subjected to abnormal use or conditions, accident,
mishandling, neglect, unauthorized alteration, misuse, improper
installation or repair or improper storage;
(b) Product whose mechanical serial number or electronic serial number
has been removed, altered or defaced.
(c) Damage from exposure to moisture, humidity, excessive
temperatures or extreme environmental conditions;
(d) Damage resulting from connection to, or use of any accessory or
other product not approved or authorized by the Company;
(e) Defects in appearance, cosmetic, decorative or structural items such
as framing and non-operative parts;
(f) Product damaged from external causes such as fire, flooding, dirt,
sand, weather conditions, battery leakage, blown fuse, theft or
improper usage of any electrical source.
The Company disclaims liability for removal or reinstallation of
the product, for geographic coverage, for inadequate signal
reception by the antenna or for communications range or
operation of the cellular system as a whole.
When sending your wireless device to UTStarcom Personal
Communications for repair or service, please note that any
personal data or software stored on the device may be
inadvertently erased or altered. Therefore, we strongly
recommend you make a back up copy of all data and software
contained on your device before submitting it for repair or
service. This includes all contact lists, downloads (i.e. third-party
software applications, ringtones, games and graphics) and any
other data added to your device. In addition, if your wireless
device utilizes a SIM or Multimedia card, please remove the card
before submitting the device and store for later use when your
device is returned, UTStarcom Personal Communications is not
responsible for and does not guarantee restoration of any thirdparty software, personal information or memory data contained
in, stored on, or integrated with any wireless device, whether
under warranty or not, returned to UTStarcom Personal
Communications for repair or service.
To obtain repairs or replacement within the terms of this
Warranty, the product should be delivered with proof of
Warranty coverage (e.g. dated bill of sale), the consumer’s
return address, daytime phone number and/or fax number and
complete description of the problem, transportation prepaid, to
the Company at the address shown below or to the place of
purchase for repair or replacement processing. In addition, for
reference to an authorized Warranty station in your area, you
may telephone in the United States (800) 229-1235, and in
Canada (800) 465-9672 (in Ontario call 416-695-3060).
Warranty
155 156
Page 80

Warranty
THE EXTENT OF THE COMPANY’S LIABILITY UNDER THIS
WARRANTY IS LIMITED TO THE REPAIR OR REPLACEMENT
PROVIDED ABOVE AND, IN NO EVENT, SHALL THE COMPANY’S
LAIBILITY EXCEED THE PURCHASE PRICE PAID BY PURCHASER
FOR THE PRODUCT.
ANY IMPLIED WARRANTIES, INCLUDING ANY IMPLIED
WARRANTY OF MERCHANTABILITY OR FITNESS FOR A
PARTICULAR PURPOSE, SHALL BE LIMITED TO THE DURATION OF
THIS WRITTEN WARRANTY. ANY ACTION FOR BREACH OF ANY
WARRANTY MUST BE BROUGHT WITHIN A PERIOD OF 18
MONTHS FROM DATE OF ORIGINAL PURCHASE. IN NO CASE
SHALL THE COMPANY BE LIABLE FOR AN SPECIAL
CONSEQUENTIAL OR INCIDENTAL DAMAGES FOR BREACH OF
THIS OR ANY OTHER WARRANTY, EXPRESS OR IMPLIED,
WHATSOEVER. THE COMPANY SHALL NOT BE LIABLE FOR THE
DELAY IN RENDERING SERVICE UNDER THIS WARRANTY OR
LOSS OF USE DURING THE TIME THE PRODUCT IS BEING
REPAIRED OR REPLACED.
No person or representative is authorized to assume for the
Company any liability other than expressed herein in connection
with the sale of this product.
Some states or provinces do not allow limitations on how long
an implied warranty lasts or the exclusion or limitation of
incidental or consequential damage so the above limitation or
exclusions may not apply to you. This Warranty gives you
specific legal rights, and you may also have other rights, which
vary from state to state or province to province.
IN USA : UTStarcom Personal Communications
555 Wireless Blvd.
Hauppauge, NY 11788
(800) 229-1235
IN CANADA : UTStarcom Canada Company
5535 Eglinton Avenue West
Suite# 234
Toronto, ON M9C 5K5
(800) 465-9675
Warranty
158157
 Loading...