

Page 1

USER MANUAL
UTOK 400Q
Page 2

Table of Contents
ALL RIGHTS RESERVED
POINTS OF ATTENTION ON SAFETY. . 13
1.1SAFETY ALERT AND CAUTIONS............................................... 13
1.2PROTECTING YOUR BATTERY............................................... 18
1.3 CLEANING AND MAINTENANCE............................................... 21
Page 3

2. GETTING STARTED................................. 22
2.1. PHONE OVERVIEW............................................................. 22
2.2. OPEN THE BATTERY DOOR...................................................... 23
2.3. INSTALL SIM CARDS............................................................. 24
2.4. INSTALL MEMORY CARD...................................................... 25
2.5. POWER ON/OFF................................................................... 25
2.6. BATTERY CHARGING............................................................. 26
2.7. SECURITY.......................................................................... 26
3. BASIC OPERATION & KNOWLEDGE.. 30
3.1USING TOUCH SCREEN...................................................... 30
3.2USING KEYS................................................................... 31
3.3HOME & MAIN MENU SCREEN............................................... 32
3.4DUAL ON SETTINGS............................................................. 33
3.5SCREEN LOCK & DISPLAY OFF............................................... 33
3.6USING THE ON SCREEN KEYBOARD........................................ 34
3.7STATUS BAR................................................................... 35
4. USING SENSORS
38
Page 4

5. CONNECTIVITY....................................... 39
5.4STORAGE.......................................................................... 43
6. CONTACT............................................. 44
7. CALL................................................... 45
8. MESSAGING
47
9. MULTIMEDIA
48
10. APPLICATIONS
49
11. GPS
52
12. Specifications
53
13.Declaration of conformity.................... 55
1.SIGURANTA............................................. 68
1.1.MASURI DE SIGURANTA...................................................... 68
Page 5

1.2.PROTEJAREA ACUMULATORULUI
NOTA IN PRIVINTA ACUMULATORULUI............................................... 73
1.3. CURATAREA SI MENTENANTA ............................................... 77
2.INTRODUCERE....................................... 78
2.1 ASPECTUL TELEFONULUI...................................................... 78
1. MUFA CASTI.......................................................................... 79
2. DIFUZOR.......................................................................... 79
3. TASTE VOLUM................................................................... 79
4. ECRAN 79
5. BUTON MENIU................................................................... 79
6. TASTA ACASA.......................................................................... 79
7. TASTA “INAPOI”................................................................... 79
8. CAMERA FRONTALA............................................................. 79
9. PORT USB.......................................................................... 79
10. BUTON PORNIT/OPRIT............................................................. 79
11. CAMERA PRINCIPALA............................................................. 79
12. BLIT 79
13. CAPAC BATERIE................................................................... 79
Page 6

14. DIFUZOR.......................................................................... 79
2.2. DESCHIDEREA CAPACULUI BATERIEI........................................ 79
2.3 INSTALAREA CARTELELOR SIM ............................................... 80
2.4 INSTALAREA CARDULUI DE MEMORIE........................................ 81
2.5 PORNIREA / OPRIREA
IN MODUL OPRIT APASATI LUNG BUTONUL PORNIRE PENTRU DOUA SECUNDE
PENTRU A PORNI TELEFONUL. IN MODUL PORNIT APASATI LUNG BUTONUL PORNIRE
/ OPRIRE PENTRU A OPRI TELEFONUL................................................ 82
2.6 INCARCAREA ACUMULATORULUI............................................... 82
2.7 SECURITATE................................................................... 82
3.OPERATIUNI DE BAZA SI INFORMATII
GENERALE............................................. 85
3.1UTILIZAREA ECRANULUI TACTIL............................................... 85
3.2BUTOANELE DE UTILIZARE...................................................... 87
3.3ACASA & MENIUL PRINCIPAL...................................................... 88
3.4SETARILE DUAL ON (RO. DUAL PORNIT)................................. 89
3.5BLOCAREA ECRANULUI & INACTIVITATE........................................ 89
3.6UTILIZAREA TASTATURII DE ECRAN............................................... 90
Page 7

3.7BARA DE NOTIFICARI............................................................. 90
4.UTILIZAREA SENZORILOR.................... 93
5.CONECTIVITATE
94
5.1CONECTAREA CU COMPUTERUL PERSONAL................................. 94
5.2BLUETOOTH.......................................................................... 95
5.3WI-FI 97
5.4STOCARE.......................................................................... 98
6.CONTACT............................................. 99
7.APELAREA............................................. 100
7.1PENTRU A EFECTUA UN APEL...................................................... 100
7.2PRELUAREA / RESPINGEREA UNUI APEL........................................ 101
8.MESAJE................................................... 101
9.MULTIMEDIA....................................... 102
10.APLICATII............................................. 103
11.GPS.......................................................... 106
12.SPECIFICATII TEHNICE.................... 107
13.DECLARATIE DE CONFORMITATE.. 109
Page 8

BEZBEDNOSNE INSTRUKCIJE............. . 120
UPOZORENJA I MERE OPREZA...................................................... 120
ZAŠTITE VASU BATERIJU............................................................. 122
ČIŠĆENJE I ODRŽAVANJE............................................................. 124
2. Početak................................................... 125
2.1. PREGLED TELEFONA............................................................. 125
2.2. OTVARANJE POKLOPCA BATERIJE............................................... 126
2.3. INSTALACIJA SIM KARTICE...................................................... 126
2.4. INSTALACIJA MEMORIJSKE KARTICE........................................ 127
2.5. UKLJUČIVANJE/ISKLJUČIVANJE............................................... 127
2.6. PUNJENJE BATERIJE............................................................. 128
2.7. BEZBEDNOST................................................................... 128
3. OSNOVNE OPERACIJE & ZNANJA.. 129
3.8KORIŠĆENJE EKRANA NA DODIR (TOUCH SCREEN)........................... 129
3.9UPOTREBA TASTERA............................................................. 130
3.10GLAVNI MENI I POČETNI EKRAN............................................... 131
3.11DUAL ON PODEŠAVANJA...................................................... 131
3.12ZAKLJUČAVANJE I GAŠENJE EKRANA........................................ 131
Page 9

3.13UPOTREBA TASTATURE NA EKRANU........................................ 132
3.14STATUSNA TRAKA (STATUS BAR)............................................... 132
4. UPOTREBA SENZORA
134
5. POVEZIVANJE....................................... 135
5.5SKLADIŠTE.......................................................................... 137
6. KONTAKTI............................................. 138
7. POZIVANJE............................................. 138
8. PORUKE
139
9. MULTIMEDIA
140
10. APLIKACIJE
140
11. GPS
142
12. Specifikacija
142
Page 10

14.Deklaracija o usklađenosti.................... 145
ALL RIGHTS RESERVED
©2013. All rights are reserved. No part of this document can be
reproduced without permission. All trademarks and brand
names mentioned in this publication are property of their
respective owners. While all the efforts have been made to
ensure the accuracy of contents in this manual, we presume no
responsibility for errors or omissions or statements of any kind,
Page 11

whether such errors are omissions or statements resulting from
negligence, accidents, or any other cause. We operate a policy
of continuous development and reserve the right to make
changes and improvements to the device, device
features/specifications or any of its parts without prior notice.
Your device may have preinstalled bookmarks and links for third
party internet sites and may allow you to access third party
sites. These are not affiliated with us, and we do not endorse or
assume liability for them. If you access such sites, take
precautions for security or content. The warranty does not cover
any third party software, settings, content, data or links,
whether included/ downloaded in the product, whether
included during installment, assembly, shipping or any other
time in the delivery chain or otherwise and in any way acquired
by you. To the extent permitted by applicable law(s), we do not
warrant that any of our software will meet your requirements,
will work in combination with any hardware or software
applications provided by a third party, that the operations of the
Page 12

software will be uninterrupted or error free or that any defects
in the software are correctable or will be corrected.
User’s Manual is provided just to guide the user about
•
the functionality of the device. The user manual is not a
certificate of technology. Some functions may vary due to
modifications and upgrades of software or due to printing
mistake. We take the right to have updates on the manual
without prior notification. For updated version of the user
manual, please access www.utok.com.
Page 13
POINTS OF ATTENTION ON SAFETY
1.1 Safety Alert and Cautions
IMPORTANT! Please read these instructions
carefully and follow them implicitly, in case of any
dangerous or illicit situations.
Note driving safety
It is strongly recommended that you do not use a mobile
phone when driving. Please use the personal hand free
package when a call is inevitable.
Please put your mobile phone in the mobile phone holder
safely, and don’t put it at a passenger’s seat or any other
place that may risk a drop of your mobile phone, in the
case of collision or emergency brake.
Switch off your mobile phone on the airplane
Page 14
Interference caused by mobile phones affects aviation
safety, and thus it is illegal to use it on the airplane. Please
make sure your mobile phone is switched off when you are
on a plane.
Switch off your mobile phone in blasting operation area
You should strictly obey relevant laws and regulations, and
switch off your mobile phone in or near blasting operation
area.
Switch off your mobile phone near dangerous area
Your cell phone is not allowed to switch on when the
refueling and chemical substance area is nearby.
In a hospital
When using it in a hospital, you should be subject to the
relevant rules specified by the hospital. Make sure your
mobile phone is switched off when medical equipment is
14
Page 15
nearby. Any wireless transmission equipment, mobile
phones included, will affect its performance. Other
electronic equipment may be affected as well. If you have
any question in this regard, please consult relevant doctor
or equipment supplier directly.
Interference
Any interference caused by wireless equipment can do
damage to its performance.
Qualified services
Only qualified services are allowed to install or repair
mobile phones. If you install or repair it by yourself, you
may break the guarantee rules.
Accessories and batteries
Only manufacturer recognized accessories and battery can
be used.
15
Page 16
Reasonable use
It should be used normally. It is absolutely forbidden to put
on the condition with an extremely high temperature (over
60 Celsius degrees). For example, do not put it under the
window where it can be exposed to the sunshine directly.
Remember to use wet or antistatic cloth, instead of using
any cloth with static electricity to clean it.
Emergency call
Make sure your mobile phone is powered on and on the
service area, if you would like to make an emergency call
number such as 911, press the dial key and confirm your
location, simply explain what has happened, and don’t
terminate the call without any permission.
Note: Like any mobile phone, emergency call may not be
supported due to the network coverage and wireless signal
transmission. Some networks even don’t support the 112
16
Page 17

emergency call services. Therefore, the communication
under emergent situations (such as first aid) should not be
completely depended on mobile phones. You can consult
and check with you local network providers.
Notes:
·
All screenshots in this guide are simulated, Actual displays
maybe different.
·
Instructions to perform tasks in this guide maybe different,
depending on the software version on your phone.
·
Unless it’s specified, all instructions to perform tasks in this
guide assume that you are starting from the home
screen.
17
Page 18

1.2 Protecting Your Battery
Warn reminders about battery:
Please don’t store your mobile phone at a place with
extremely high or low temperature, for it will affect the
service life of the battery, and shorten the standby time.
The service life of the mobile phone battery is subject to a
certain limit. It is recommended that to change a battery
from the original supplier if the performance of the battery
has declined, after using it for certain period of time.
Points of attention on battery:
·
The battery is non-removable.
·
Don’t throw the phone with a built-in battery into the fire,
or use it under an extremely high temperature
condition.
·
18
Page 19

Don’t dismantle or modify the battery.
·
Don’t expose battery in an occasion with strong mechanical
impact, or use a hard object to penetrate the battery.
·
Phone should be put in a cool and dry place to keep battery
away from the direct sunlight. It should not be placed
with a high temperature (over 60 Celsius degrees)
environment.
·
If battery gives out any peculiar smell or getting
overheated, you should stop using the phone.
·
If the battery is found to have any crack, deformation,
damage of other type, or electrolyte leakage, the
phone should be stopped using immediately.
·
Please clean your skin or clothes immediately with soap
19
Page 20

and clear water if any contact electrolyte leaking, and
wash your eyes completely with clear water if any
electrolyte splashes occurs.
·
In case of any injury caused by incorrect charge, only
original battery integrated in the phone is allowed to be
charged.
·
Don’t use the phone with built-in li-ion battery when the
temperature is extremely low, for the maximum
standby/call time is not available at a low temperature.
·
Don’t clean the phone with water or organic solvent, or
immerse the phone into the water, for the battery may
be damaged.
·
Make sure the battery is fully charged if it has been out of
use for a long period.
20
Page 21

·
It is recommended that the rejected battery is returned to
the mobile phone manufacturer or placed in a
designated public area for rejected battery recycling.
Don’t mix it with any other garbage or throw it freely.
1.3 Cleaning and Maintenance
·
Please don’t leave the phone and the charger in the
bathroom and other high humidity places, and prevent
them from rain.
·
Please clean the phone and the charger using soft and dry
cloth.
·
Please don’t wipe the phone using alcohol, thinner, or
benzene and other chemical reagents.
21
Page 22
·
The socket with dirt may cause poor contact and power-off.
Please clean it regularly.
2. GETTING STARTED
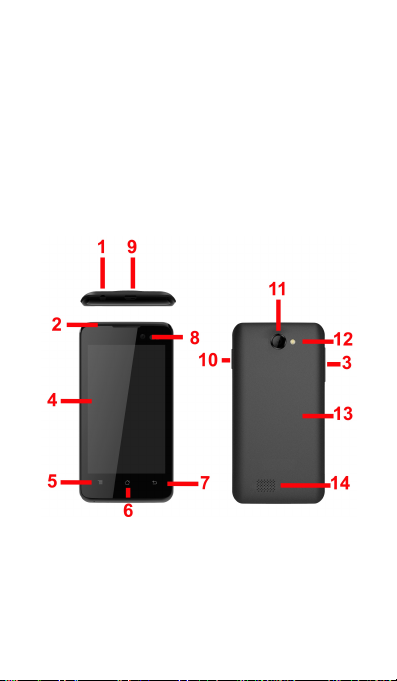
2.1. Phone Overview
1. Earphone Jack
2. Earpiece
22
Page 23

3. Volume control key
4. Touch Screen
5. Menu Key
6. Home Key
7. Back Key
8. Front camera lens
9. USB port
10. Power Key
11. Camera lens
12. Torch
13. Battery cover
14. Speaker
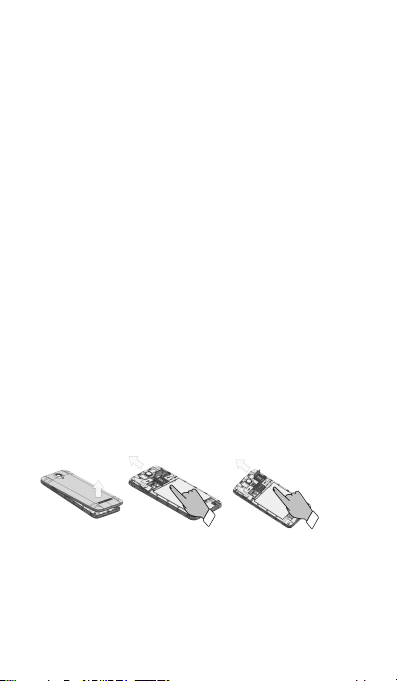
2.2. Open the battery door
Push the battery cover upwards.
23
Page 24
2.3. Install SIM Cards
This phone supports dual SIM/USIM cards standby, before
you power on the phone, make sure there is at least one
SIM/USIM is inserted in either USIM/SIM slot.
Note:
∙ Dual SIM/USIM in standby will shorten the standby time
compared to single SIM.
· If you want to insert or remove the SIM/USIM card, please
make sure the phone is power off.
24
Page 25
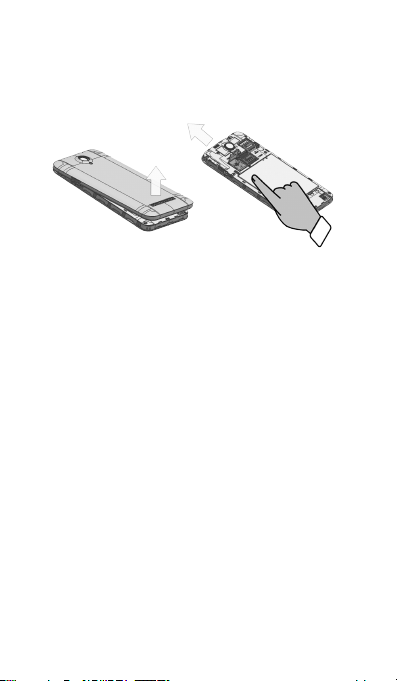
2.4. Install Memory Card
t the SD card slot and push the SD card gently, and the card
will be inserted correctly.
Note:
Please insert or remove the SD card when the phone is power
·
off, or the SD-Card or the phone might get damaged and the
data on the SD-Card could be lost
.
2.5. Power on/off
In power off status, long press the power key on top of the
phone for about 2 seconds to power on your phone. In
power on status, long press power key for about 2 seconds
to power off your phone.
25
A
i
m
a
Page 26

2.6. Battery Charging
You can charge the battery by connecting the phone either
to a pc USB port or to the provided standard charger. Use
the provided standard USB cable.
Note: In order to ensure normal operation of the phone,
please make sure to use the designated charger.
2.7. Security
A series of passwords have been set in your mobile phone
and SIM card, to prevent any unauthorized use of your
mobile phone and SIM card.
PIN code:
The PIN code (personal identification number, 4~8 digits) is
used to prevent unauthorized use of your SIM card. If the
PIN verification function is activated, the PIN code will be
26
Page 27

required to start the mobile phone each time. If you have
entered the PIN code incorrectly for three times, the SIM
card will be locked. The following instructions indicate you
how to unlock the card:
·
Enter the correct PUK code in line with the prompt on the
screen to unlock the SIM card.
·
Then enter a new PIN code and press the OK soft key.
·
When you are prompted to reenter the new PIN code,
please reenter the new PIN code and press the OK key.
·
If the PUK code is correct, the SIM card will be unlocked,
and the PIN code is reset.
Warning: If you have entered the PIN code incorrectly for
three times, the SIM card will be locked automatically, in
27
Page 28

that case you need to use the PUK code to unlock the card.
The PUK code is generally kept by the network operator.
PUK code:
The PUK code (the PIN unlocking password, 8 digits) is used
to unlock the locked PIN code. The PUK code is provided by
the manufacturer together with the SIM card. If you have
entered the PUK code incorrectly for ten times, the SIM
card will be invalidated. You need to ask your network
operator for a new card.
The correct PUK2 code. The operations are as follows:
·
Enter the correct PUK2 code in line with the prompt on the
screen to unlock the PIN2 code.
·
Then enter a new PIN2 code and press the OK soft key.
·
When you are prompted to reenter the new PIN2 code,
28
Page 29

please reenter the new PIN2 code and press the OK
key.
29
Page 30

3. BASIC OPERATION & KNOWLEDGE
3.1
Using Touch Screen
Tap To act on items on the screen, such as application,
settings, icons and options, to type letters and symbols
using the onscreen keyboard, or to press onscreen buttons.
Simply touch down your finger on the screen and then lift
your finger without change the touchdown position in a
short time.
Tap&hold Touch down your finger on the screen without
lifting up or moving for about 2 seconds. This action will
trigger a pop-up with special options list or activate some
special actions.
Drag Touch down your finger on the screen and move
30
Page 31

without lifting up to scroll options, switch screens, and
other contents displayed on screen.
Flick Drag quickly and release, to scroll through a list or
move quickly, flick across the touch screen. When you flick
a long list, tap the screen to stop the scrolling.
Pinch In some applications (such as Maps, Browser, and
Gallery), you can zoom in and zoom out by placing two
fingers on the screen at once and pinching them together
(to zoom out), or spreading them apart (to zoom in).
3.2 Using Keys
Power key: Press and hold Power key to open the power
key menu, where you can turn off the phone (Power off), or
Restart, or switch to General Mode, Silent mode, Vibration
mode.
Volume key: Press the volume keys to change the ring
31
Page 32

volume or the earpiece volume (during a call).
Menu key: Open a menu with items that affect the current
screen or application. When you want to quit from an
application or do other operations, if there is no option
button displayed on screen, try this menu key.
Home key: Press Home to close any menu or apps and
return to the home screen. On the home screen, long press
and hold Home key to show the last few apps you used,
then tap an app to open it.
Back key: Opens the previous screen you were working in.
If the onscreen keyboard is open, it will close the keyboard.
3.3
Home & Main menu screen
When you sign in, the Home screen opens. It is your
starting point to access all the features on your
phone,displays application icons, widgets, shortcuts,
32
Page 33

and other features. You can customize the Home screen
with different wallpaper and display the items you want.
In Home screen, tap the menu button to enter Manage
apps where displays all the apps which have been installed
in your phone.
3.4
Dual ON settings
This cellphone can support both WCDMA and GSM cellular.
Please insert your WCDMA or GSM SIM card according to
the hints written on the phone or prompt reference.
Click System settings->Dual ON settings. When utilizing two
sim cards, click default phone to set WCDMA or GSM card
as the master card, which some apps will give priority to
call or Data connection.
3.5
Screen Lock & Display off
You can customize the phone’s display off time in menu
Settings ->Display ->Sleep, without any operation to the
33
Page 34

phone in the set time. The LCD display will go off, short
press Power key will wake up the display from the off
mode.
If you wake up the display in more than 5 seconds after the
LCD auto going off, it will be in the screen lock screen
position. There are 5 different ways to unlock the screen
according to your settings, under the menu Settings
->Security ->Screen lock, by default Slide option is
activated, with this option.
3.6
Using the on Screen Keyboard
Enter text using the onscreen keyboard. Some applications
open the keyboard automatically. In others, you touch a
text field where you want to enter text to open the
keyboard.
34
Page 35

If you have installed the 3rd party input method application,
before you apply this input method, you should firstly
enable it under menu Settings -> Language &input. When
you need to input text, tap & hold in the text input filed, an
option list will pop-up for you selection.
3.7
Status bar
The Status bar appears at the top of every screen. It
displays icons indicating that you’ve received notifications
(on the left), icons indicating the phone’s status (on the
right), and programs which run in the background, along
with the current time.
35
Page 36
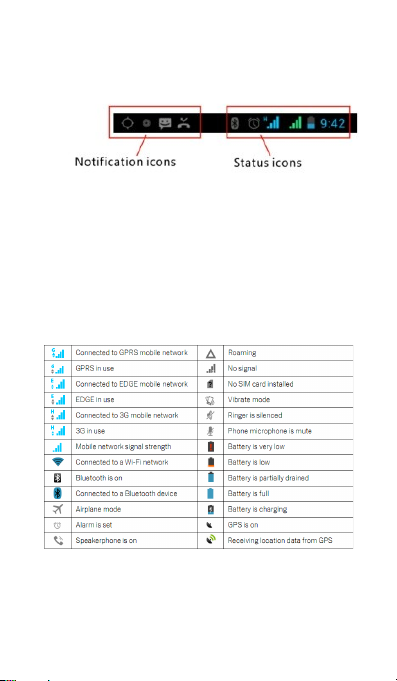
Notification icons
36
Page 37
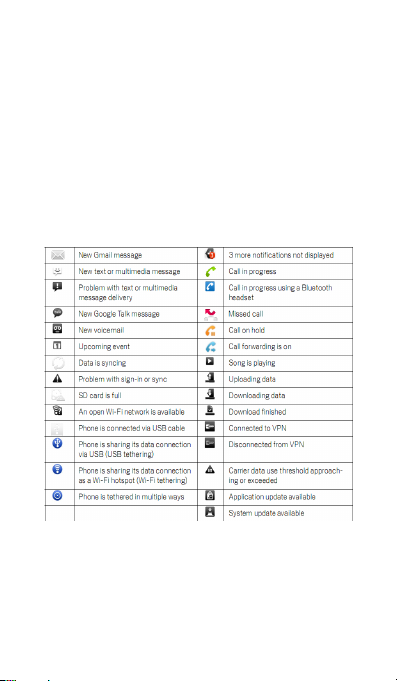
Received notification icons
The applications you installed in your phone may use their
own notification icons while running in the background.
37
Page 38

To open the Notifications panel:
·
Drag the Status bar down from the top of the screen.
·
OR press menu key on Home screen.
4. USING SENSORS
Proximity Sensor detects how close an object is to the
surface of the screen. This is typically used to detect when
your face is pressed up against the screen, such as during a
phone call. (While talking on the phone, the sensor detects
talk activity and locks the keypad to prevent accidental key
presses).
Light Sensor lets you use the ambient light level to adjust
the screen brightness/contrast.
38
Page 39

Accelerometer sensor detects your phone’s acceleration
direction and takes responding actions according to the
running application.
·
Rotate the screen display when you rotate the device while
using some features. To set the interface to keep the
orientation when you rotate the device, select Settings-
>Display->Auto-rotate screen.
·
Take actions according to the gravity’s real time orientation
angle, typically used in games.
·
Responding to your actions such swing the device in some
applications.
5. CONNECTIVITY
5.1 PC connections:
39
Page 40

You can connect your phone to a computer with a USB
cable, to transfer files between your phone's SD card and
the computer. To use this feature, you should follow the 2
steps below:
∙ Use the USB cable that came with your phone to
connect the phone to the USB port on your computer
(then you will see a popup USB menu on the phone
screen).
∙ On the popup USB menu, tap USB MTP/STORAGE to
enable transferring files between your phone’s SD card
and the computer
You can also make your computer via USB tethering to the
Internet through the data connection.
5.2 Bluetooth:
Bluetooth technology allows you to connect your phone
40
Page 41

using radio waves, to a compatible Bluetooth device within
10 meters (32 feet). With this feature on your device you
can:
·
Transfer files to or from other Bluetooth available devices.
·
Share multimedia files with other Bluetooth available
devices.
·
Share this phone's internet connection.
·
Remote control another Bluetooth available devices.
·
Connect to computers and access the Internet.
Before using the Bluetooth, you should first turn it on by
selecting Settings-> Bluetooth, and you may also have to
pair your phone with other Bluetooth devices by steps
41
Page 42

Settings -> Bluetooth settings -> Scan for devices, and then
select the device you want to connect to.
5.3 Wi-Fi:
Using Wi-Fi™ you can access the Internet wirelessly with
your phone. You can browse the Internet at home (personal
networks) or in public access zones (hot spots):
·
Personal networks – usually protected. A pass phrase or a
key is required from the owner.
·
Hot spots – usually non-protected but tends to require a
simple log on the operator’s service before you get
Internet access.
Follow the following steps to use your Wi-Fi:
·
Select Settings ->Wi-Fi to turn it on. (The phone scans for
available Wi-Fi networks and displays the name of
42
Page 43

available networks. Secured networks are indicated
with a Lock icon. If the phone finds a network that you
connected previously, it will automatically do the
connection.)
·
If you want to connect to a newly found Wi-Fi network, tap
on the network name under Settings -> Wi-Fi.
You can set your preferred network mode while surf on
internet by selecting options under menu Settings ->
More…> Mobile networks -> Network Settings.
5.4 Storage
There are 2 kinds of user storage memory on your phone,
phone built-in storage and SD card storage.
The phone built-in storage is only used for installing
application space (see install applications section) and
other information data.
43
Page 44

User data can be stored in SD card.
Application programs and other data which you download
from the internet or transfer from other devices, camera
captured photos, recorded videos, or recording are all
stored in SD card. Some files which need to be accessed by
applications such as music, images, videos etc must be
stored in SD card memory. You can also make your
application installed in SD card (see install applications
section).
6. CONTACT
Contact gives you quick and easy access to the people you
want to reach. When you firstly turn on your phone and
sign into your Google Account, any existing Google contacts
are downloaded to your phone. After that, your contacts
are synchronized. Any changes you make to your contacts
44
Page 45

on the phone or the web are made in both places on next
time you do the synchronization. Contacts from Exchange
ActiveSync accounts are also synced in this way.
Information about your contacts is shared with other
applications, such as Gmail, Google Talk, Messaging, Gallery
(for sharing photos and videos), etc.
If you have more than one account with contact
information, Contacts will join the duplicates into a single
entry. You can also manage that process manually.
7. CALL
Make a call:
·
Tap on dial button on Home screen or on menu screen
to enter dial board screen. Enter the phone number
and tap send out button to make a call.
45
Page 46
·
In contact list, select a contact, and click a phone number.
·
In other applications such as message or call log, there are
also options to make a call.
Answer/Reject a call:
When a call comes in, drag on the left to the right until
it reaches the green dot to answer a call. Or drag on
the right to the left until it reaches the red dot to reject the
incoming call.
During a call conversation, press the side volume key to
adjust volume, click Dialpad to open dial pad, press
menu key to adopt other options
46
Page 47

8. MESSAGING
You can use Messaging to exchange text messages (SMS)
and multimedia messages (MMS) with your friends on their
mobile phones.
Multimedia (MMS) messages can contain text and a
picture, a recorded voice, an audio file, a video, or a picture
slideshow.
Messaging automatically converts a message into a
multimedia message if you send it to an email address
instead of a phone number, add a subject, or attach a
media file.
Press on Main menu screen to access message.
When new message received, the message
47
Page 48

notification icon will be shown on the notification
bar, drag down the bar and tap on the message to read.
9. MULTIMEDIA
Camera is a combination camera and camcorder that you
use to shoot and share pictures and videos. Pictures and
videos are stored on the phone’s SD card, so you must
install one to use Camera.
Gallery is used to view pictures and play videos that you’ve
taken with Camera, downloaded, or copied onto your SD
card or phone. You can perform basic editing tasks on
pictures and set them as your wallpaper or contact picture.
Music collects all audio files from your SD card or phone to
play.
48
Page 49

Videos collects all video files from your SD card or phone to
play.
10. APPLICATIONS
Based on the Android platform, your device’s functionality
can be extended by installing additional applications, These
applications can be downloaded from internet such as
Android Market or Google Play Store.
Three ways to install applications in your phone:
·
Direct download from the internet. When the downloading
task is completed, select Install option in your
download list to install.
·
49
Page 50

Note: The way of installing apps l may depend on the
browser that you use, Before downloading, make sure
there is an inserted available SD card.
·
Download applications to your PC local disk, and install
from PC by running the phone suite.
·
If you have a file manager installed in your phone, you can
transfer or download applications to your SD card, find
out the application you want to install under path and
tap on it.
Note: To install applications downloaded from websites
other than Android Market, you must select Settings->
Security -> Unknown sources.
Warning: Applications downloaded from internet can be
from unknown sources. To protect your phone and personal
data, please download applications only from trusted
50
Page 51

sources such as Android Market or Google Play Store.
To manage applications:
Enter System Settings -> Apps -> Manage apps to access all
the applications.
Tap on an application under each tag list, which will enter
the Application info screen, along with manage buttons.
Force stop to close a running application, it will be stopped
without confirmation.
Uninstall to uninstall applications that you don’t want to
use anymore, and free the storage space which occupied by
the installed apps.
Clear data to delete user application data such as accounts,
databases, settings, etc..
51
Page 52

Move to SD card/phone to move applications installed in
internal phone storage to internal SD card.
Clear cache to delete temporary application data which is
stored in your phone.
11. GPS
With the global positioning system (GPS) receiver in your
phone, you can find your location with the level of
accuracy: about 50 meters.
To use this facility, you should install supported
applications, such as Google Map.
52
Page 53
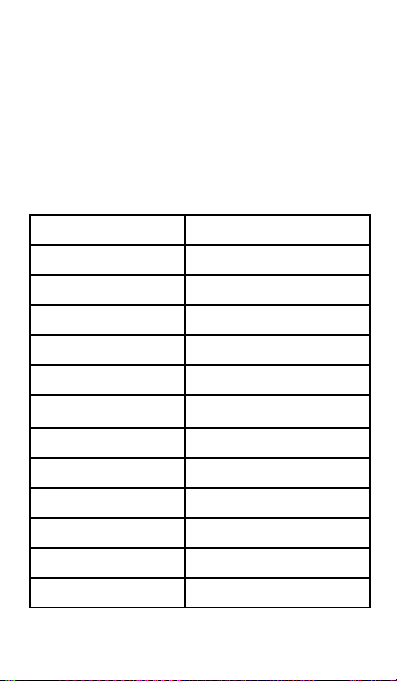
12. Specifications
Name UTOK 400Q
OS Android 4.4
Front / Back panel color Black / Black
Dual Sim Yes
2G Network 850/900/1800/1900
3G Network 900/2100
CPU Quad Core Qualcomm
MSM8210 1,2 GHz
Display 4”
Display type Capacitive multitouch
Resolution WVGA 480 x 800
RAM 512 MB
Flash memory 4 GB
Speaker 1 W
53
Page 54
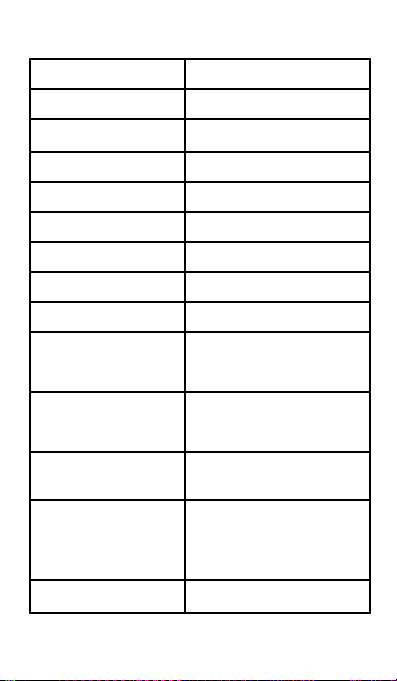
Front camera 2 MP
Back camera 8 MP
Ports Micro USB, Micro SD (up to 32
GB), Audio Jack
Dimensions 125 x 65 x 10.5 mm
Weight 129 g
Wi-Fi Yes
Bluetooth Yes, 3.0
Battery 1500 mAh
Video Formats MP4, 3GP, AVI
Audio Formats MP3, M4A ,WAV, AMR, MIDI,
OGG
Photo Formats JPG, BMP, PNG
Others FM Radio, Light sensor,
Proximity sensor,
Accelerometer, E-compass
SAR value 0,752 W/Kg (highest limit
stated in the international
guidelines is 2.0 W/Kg)
Package contains 1 x UTOK 400Q Smartphone;
1 x Battery;
54
Page 55

1 x USB Cable;
1 x Charger;
1 x Earphones;
1 x User Manual.
13. Declaration of conformity
Declaration of conformity for UTOK product, model 400Q is
available online at www.utok.com
55
Page 56

MANUAL DE UTILIZARE
UTOK 400Q
56
Page 57

CUPRINS
57
Page 58

Toate d repturile rezervate
POINTS OF ATTENTION ON SAFETY.. 13
1.1SAFETY ALERT AND CAUTIONS............................................... 13
1.2PROTECTING YOUR BATTERY............................................... 18
1.3 CLEANING AND MAINTENANCE............................................... 21
2. GETTING STARTED................................. 22
2.1. PHONE OVERVIEW............................................................. 22
2.2. OPEN THE BATTERY DOOR...................................................... 23
2.3. INSTALL SIM CARDS............................................................. 24
2.4. INSTALL MEMORY CARD...................................................... 25
2.5. POWER ON/OFF................................................................... 25
2.6. BATTERY CHARGING............................................................. 26
2.7. SECURITY.......................................................................... 26
3. BASIC OPERATION & KNOWLEDGE.. 30
3.1USING TOUCH SCREEN...................................................... 30
3.2USING KEYS................................................................... 31
58
Page 59

3.3HOME & MAIN MENU SCREEN............................................... 32
3.4DUAL ON SETTINGS............................................................. 33
3.5SCREEN LOCK & DISPLAY OFF............................................... 33
3.6USING THE ON SCREEN KEYBOARD........................................ 34
3.7STATUS BAR................................................................... 35
4. USING SENSORS
38
5. CONNECTIVITY....................................... 39
5.4STORAGE.......................................................................... 43
6. CONTACT............................................. 44
7. CALL................................................... 45
8. MESSAGING
47
9. MULTIMEDIA
48
10. APPLICATIONS
49
59
Page 60

11. GPS
52
12. Specifications
53
13.Declaration of conformity.................... 55
1.SIGURANTA............................................. 68
1.1.MASURI DE SIGURANTA...................................................... 68
1.2.PROTEJAREA ACUMULATORULUI
NOTA IN PRIVINTA ACUMULATORULUI............................................... 73
1.3. CURATAREA SI MENTENANTA ............................................... 77
2.INTRODUCERE....................................... 78
2.1 ASPECTUL TELEFONULUI...................................................... 78
1. MUFA CASTI.......................................................................... 79
2. DIFUZOR.......................................................................... 79
3. TASTE VOLUM................................................................... 79
4. ECRAN 79
5. BUTON MENIU................................................................... 79
6. TASTA ACASA.......................................................................... 79
60
Page 61

7. TASTA “INAPOI”................................................................... 79
8. CAMERA FRONTALA............................................................. 79
9. PORT USB.......................................................................... 79
10. BUTON PORNIT/OPRIT............................................................. 79
11. CAMERA PRINCIPALA............................................................. 79
12. BLIT 79
13. CAPAC BATERIE................................................................... 79
14. DIFUZOR.......................................................................... 79
2.2. DESCHIDEREA CAPACULUI BATERIEI ........................................ 79
2.3 INSTALAREA CARTELELOR SIM ............................................... 80
2.4 INSTALAREA CARDULUI DE MEMORIE........................................ 81
2.5 PORNIREA / OPRIREA
IN MODUL OPRIT APASATI LUNG BUTONUL PORNIRE PENTRU DOUA SECUNDE
PENTRU A PORNI TELEFONUL. IN MODUL PORNIT APASATI LUNG BUTONUL PORNIRE
/ OPRIRE PENTRU A OPRI TELEFONUL................................................ 82
2.6 INCARCAREA ACUMULATORULUI............................................... 82
2.7 SECURITATE................................................................... 82
3.OPERATIUNI DE BAZA SI INFORMATII
61
Page 62

GENERALE............................................. 85
3.1UTILIZAREA ECRANULUI TACTIL............................................... 85
3.2BUTOANELE DE UTILIZARE...................................................... 87
3.3ACASA & MENIUL PRINCIPAL...................................................... 88
3.4SETARILE DUAL ON (RO. DUAL PORNIT)................................. 89
3.5BLOCAREA ECRANULUI & INACTIVITATE........................................ 89
3.6UTILIZAREA TAS TATURII DE ECRAN............................................... 90
3.7BARA DE NOTIFICARI............................................................. 90
4.UTILIZAREA SENZORILOR.................... 93
5.CONECTIVITATE
94
5.1CONECTAREA CU COMPUTERUL PERSONAL................................. 94
5.2BLUETOOTH.......................................................................... 95
5.3WI-FI 97
5.4STOCARE.......................................................................... 98
6.CONTACT............................................. 99
7.APELAREA............................................. 100
7.1PENTRU A EFECTUA UN APEL...................................................... 100
62
Page 63

7.2PRELUAREA / RESPINGEREA UNUI APEL........................................ 101
8.MESAJE................................................... 101
9.MULTIMEDIA....................................... 102
10.APLICATII............................................. 103
11.GPS.......................................................... 106
12.SPECIFICATII TEHNICE.................... 107
13.DECLARATIE DE CONFORMITATE. . 109
BEZBEDNOSNE INSTRUKCIJE............. . 120
UPOZORENJA I MERE OPREZA...................................................... 120
ZAŠTITE VASU BATERIJU............................................................. 122
ČIŠĆENJE I ODRŽAVANJE............................................................. 124
2. Početak................................................... 125
2.1. PREGLED TELEFONA............................................................. 125
2.2. OTVARANJE POKLOPCA BATERIJE............................................... 126
2.3. INSTALACIJA SIM KARTICE...................................................... 126
2.4. INSTALACIJA MEMORIJSKE KARTICE........................................ 127
2.5. UKLJUČIVANJE/ISKLJUČIVANJE............................................... 127
2.6. PUNJENJE BATERIJE............................................................. 128
63
Page 64

2.7. BEZBEDNOST................................................................... 128
3. OSNOVNE OPERACIJE & ZNANJA.. 129
3.8KORIŠĆENJE EKRANA NA DODIR (TOUCH SCREEN)........................... 129
3.9UPOTREBA TAS TERA............................................................. 130
3.10GLAVNI MENI I POČETNI EKRAN............................................... 131
3.11DUAL ON PODEŠAVANJA...................................................... 131
3.12ZAKLJUČAVANJE I GAŠENJE EKRANA........................................ 131
3.13UPOTREBA TASTATURE NA EKRANU........................................ 132
3.14STATU SNA TRAKA (STATUS BAR)............................................... 132
4. UPOTREBA SENZORA
134
5. POVEZIVANJE....................................... 135
5.5SKLADIŠTE.......................................................................... 137
6. KONTAKTI............................................. 138
7. POZIVANJE............................................. 138
8. PORUKE
139
9. MULTIMEDIA
64
Page 65

140
10. APLIKACIJE
140
11. GPS
142
12. Specifikacija
142
14.Deklaracija o usklađenosti.................... 145
TOATE DREPTURILE REZERVATE
65
Page 66

©2014. Toate drepturile sunt rezervate. Nicio parte a acestui
document nu poate fi reprodusa fara permisiune. Toate marcile
inregistrate si numele de brand mentionate in acest document
apartin proprietarilor acestora. Desi au fost depuse toate
eforturile pentru a asigura acuratetea continutului acestui
manual, nu ne asumam responsabilitatea pentru erori, omiteri
sau afirmatii de orice fel, daca acestea rezulta din neglijenta,
accidente sau orice alta cauza. Desfasuram o politica a
dezvoltarii continue si ne rezervam dreptul de a aduce modificari
si imbunatatiri pentru dispozitiv, functiile, specificatiile sau a
oricarei parti a acestuia, fara no tificare prealabila. Dispozitivul
poate contine marcaje, link-uri catre terte site-uri Internet si va
poate permite sa accesati website-uri terte. Acestea nu sunt
afiliate cu noi, iar noi nu le sprijinim si nu ne asumam
raspunderea pentru acestea. Daca accesati astfel de site-uri,
luati masuri de precautie pentru siguranta si continut. Garantia
cu raspundere limitata nu acopera manuale de utilizare sau alt
66
Page 67

software tert, setari, continut, date sau link-uri, fie
incluse/descarcate in produs, fie incluse in timpul instalarii,
asamblarii, livrarii sau in alt moment al lantului de livrare sau in
alt mod si in orice fel achizitionat de dumneavoastra. In masura
permisa de legislatia aplicabila, nu garantam ca oricare din
software-urile noastre va va satisface certintele, va functiona cu
orice hardware sau aplicatii software puse la dispozitie de terte
parti, ca operatiunile soft-ului vor fi neintrerupte, fara erori sau
ca orice defect din software este corectabil.
Manualul de utilizare este pus la dispozitie pentru a
ghida utilizatorul cu privire la functionalitatea dispozitivului.
Acesta nu este un certificat al tehnologiei. Unele functii pot
varia datorita modificarilor, software-ului sau greselilor de
printare. Ne rezervam dreptul de a aduce modificari asupra
manualului, fara o notificare prealabila. Pentru varia nta
actualizata a manualului va rugam accesati www.utok.com
67
Page 68
1. SIGURANTA
1.1. Masuri de siguranta
IMPORTANT! Va rugam sa cititi cu atentie aceste
instructiuni si sa le urmati in cazul unor situatii periculoase
sau ilicite.
Siguranta in timpul condusului
Este recomandat sa nu folositi un telefon mobil atunci cand
conduceti. Va rugam sa folositi hands free atunci cand un
apel este inevitabil. Va rugam sa puneti telefonul mobil in
suportul de telefon mobil. Nu il puneti pe locul pasagerului
sau intr-un loc in care telefonul ar putea cadea, in caz de
coliziune sau frana de urgenta.
Opriti telefonul mobil in avion
68
Page 69

Interferentele cauzate de telefoanele mobile afecteaza
siguranta aviatiei, de aceea este ilegal sa le folositi intr-un
avion. Va rugam asigurati-va ca telefonul mobil este oprit
atunci cand sunteti intr-un avion.
Opriti telefonul mobil in zone de detonare
Va rugam sa va supuneti cu strictete legilor si
reglementarilor relevante, oprind telefonul intr-o zona sau
in apropierea unei zone de detonare.
Opriti telefonul mobil in apropierea zonelor
periculoase
Nu porniti telefonul mobil in apropierea unor zone de schimbare
a combustibilului sau atunci cand o zona cu substante chimice
este in apropiere.
In spital
69
Page 70

Atunci cand folositi telefonul intr-un spital, trebuie sa va
supuneti regulilor relevante specificate de spital. Asigurati-
va ca telefonul mobil este oprit atunci cand echipamente
medicate sunt in apropiere. Orice echipament cu transmisie
wireless, inclusiv telefoane mobile, vor fi afectate. Alte
echipamente electronice vor fi afectate, de asemenea.
Daca aveti intrebari in aceasta privinta, va rugam sa
consultati un medic sau producatorul echipamentului.
Interferenta
Orice interferente cauzate de echipamente wireless pot
dauna performantelor sale.
Servicii calificate
Actualizati software-ul sau reparati telefonul mobil doar cu
ajutorul unor servicii calificate. Daca il actualizati sau il
reparati pe cont propriu, puteti incalca regulile garantiei.
Accesorii si acumulator
70
Page 71

Doar accesorii si acumulatori recunoscute de producator
pot fi utilizate.
Utilizarea rezonabila
Utilizati telefonul in mod normal. Este stric interzis sa
mentineti telefonul intr-un mediu cu temperaturi ridicate
(peste 60 de grade Celsius). De exemplu, nu puneti
telefonul pe fereastra, unde poate fi expus direct razelor
solare. Pentru a-l curata, folositi o carpa umeda sau
antistatica, in loc de a folosi orice panza cu electricitate
statica.
Apeluri de urgenta
Daca doriti sa efectuati un apel de urgenta, asigurati-va ca
telefonul este pornit si ca sunteti intr-o zona cu semnal.
Tastati numarul (de exemplu 112), apasati butonul de
apelare si confirmati locatia. Explicati ce s-a intamplat si nu
71
Page 72

inchideti pana nu primiti confirmare.
Nota: Ca in cazul oricarui telefon mobil, e posibil ca
apelurile de urgenta sa nu fie suportate datorita zonei de
acoperire a retelei sau a semnalului de transmisie wireless.
Unele retele, de exemplu, nu suporta servicii de urgenta
112. De aceea, comunicarea in cazurile de urgenta (cum ar
fi primul ajutor) nu depind in totalitate de telefoanele
mobile. Pentru mai multe detalii consultati furnizorii locali
de retea.
Precizari
·
Toate capturile de ecran din acest manual sunt simulate.
Aspectul real poate fi diferit.
·
Instructiunile din acest manual pot fi diferite, in functie de
72
Page 73

versiunea software de pe telefonul dumneavoastra.
·
Daca nu este specificat altfel, toate instructiunile pentru a
efectua operatiuni pleaca de la premisa ca porniti de la
ecranul de start.
1.2.
Nota in privinta acumulatorului
Va rugam sa nu stocati telefonul mobil intr-un loc cu
temperaturi ridicate sau scazute, intrucat durata de viata a
acumulatorului va fi afectata si timpul de standby scazut.
Durata de viata a acumulatorului unui telefon mobil este
supusa unei anumite limite. In cazul in care performanta
acumulatorului a scazut dupa utilizare intr-o anumita
perioada de timp, este recomandat sa il schimbati cu un
acumulator original, oferit de producator.
Protejarea acumulatorului
73
Page 74

Puncte de atentie referitoare la acumulator
·
Acumulatorul nu este detasabil
·
Nu aruncati un telefon cu acumulator incorporat in foc si nu
il utilizati in conditii de temperatura extrema.
·
Nu demontati si nu modificati acumulatorul
·
Nu expuneti acumulatorul in zona unui impact mecanic
puternic si nu folositi obiecte grele pentru a perfora
bateria
·
Telefonul trebuie pastrat intr-un loc rece si uscat pentru a
feri acumulatorul de razele directe ale soarelui. Nu
trebuie mentinut intr-un mediu cu temperaturi de
peste 60 de grade Celsius.
·
74
Page 75

Daca acumulatorul emana un miros ciudat sau daca se
supraincalzeste, trebuie sa opriti utilizarea telefonului.
·
In cazul in care constatati ca acumulatorul are fisuri, este
deformat sau are daune de orice fel, sau scurgeri de
electrolit, trebuie sa opriti imediat utilizarea lui.
·
In cazul in care ati luat contact cu scurgeri de electrolit, va
rugam sa curatati imediat pielea sau hainele, cu sapun
si apa curata. Spalati ochii complet, cu apa curata, in
cazul in care ati luat contact cu stropi de electrolit.
·
In cazul unor prejudicii cauzate de incarcarea incorecta
trebuie sa stiti ca doar acumulatorul original integrat
poate fi incarcat.
·
Folositi cu atentie telefonul in cazul unor temperaturi
extrem de scazute, intrucat timpul maxim de
75
Page 76

asteptare / convorbire este scazut.
·
Nu curatati telefonul cu apa sau cu solvent organic si nu
scufundati telefonul in apa, intrucat bateria poate fi
deteriorata.
·
Asigurati-va ca acumulatorul este complet incarcat daca nu
a fost utilizat pentru o lunga perioada.
·
Este recomandat ca acumulatorul folosit sa fie returnat
producatorului telefonului mobil sau plasat intr-o zona
publica destinata reciclarii acumulatorilor folositi.
·
Nu amestecati acumulatorul cu alte deseuri si nu il aruncati
oriunde.
76
Page 77

1.3.
Curatarea si mentenanta
·
Va rugam sa nu lasati telefonul mobil si incarcatorul in baie
sau in alte locuri cu umiditate crescuta. Feriti-le de
ploaie.
·
Va rugam sa curatati telefonul si incarcatorul folosind o
carpa moale si uscata.
·
Va rugam sa nu stergeti telefonul cu alcool, diluant sau
benzen sau cu alti reactivi chimici.
77
Page 78
2. INTRODUCERE
2.1 Aspectul telefonului
78
Page 79

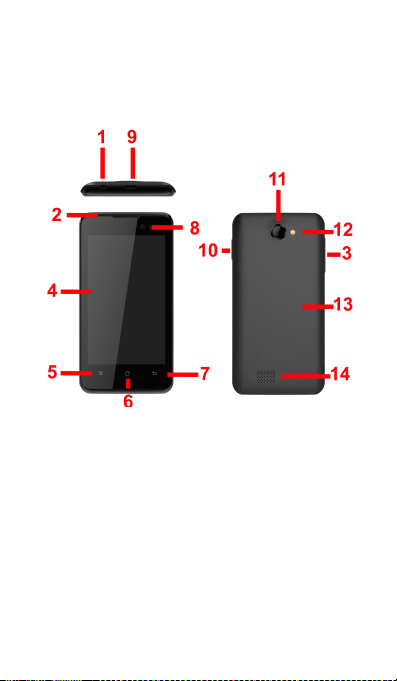
1. Mufa casti
2. Difuzor
3. Taste volum
4. Ecran
5. Buton meniu
6. Tasta acasa
7. Tasta “inapoi”
8. Camera frontala
9. Port USB
10. Buton pornit/oprit
11. Camera principala
12. Blit
13. Capac baterie
14. Difuzor
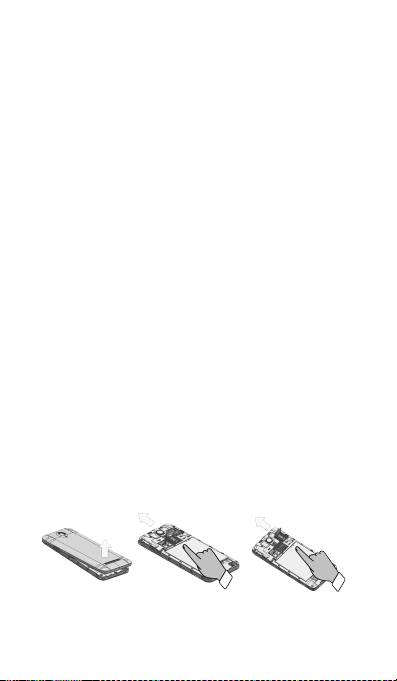
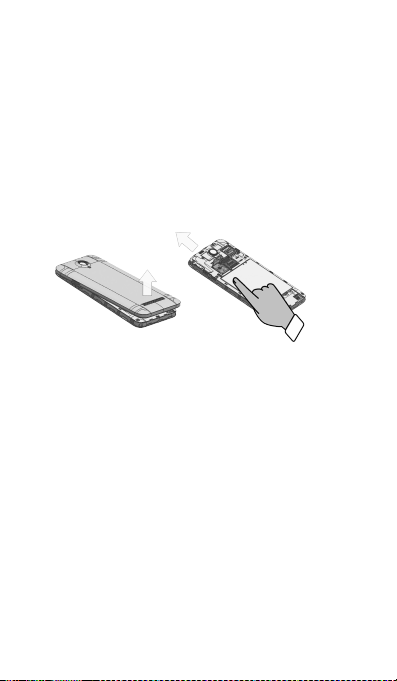
2.2. Deschiderea capacului bateriei
Impingeti capacul acumulatorului in sus.
79
Page 80
2.3 Instalarea cartelelor SIM
Acest telefon suporta card dual SIM/USIM in asteptare.
Inainte de a porni telefonul, asigurati-va ca cel putin un
SIM/USIM este introdus in slot-ul USIM/SIM.
Nota:
∙ Dual SIM/USIM in asteptare va scurta timpul de asteptare,
comparativ cu un single SIM.
· Daca doriti sa introduceti sau sa inlaturati cartela
SIM/USIM, va rugam sa va asigurati ca telefonul este oprit.
80
Page 81
2.4 Instalarea cardului de memorie
In slot-ul pentru SD card impingeti usor cardul SD si acesta
va fi introdus corect.
Nota:
oduceti sau sa indepartati cardul SD atunci cand telefonul este
oprit. In caz contrar telefonul se poate deteriora si datele de pe
cardul SD ar putea fi pierdute.
81
·
rug
intr
Va
am
sa
Page 82

2.5 Pornirea / Oprirea
In modul oprit apasati lung butonul Pornire
pentru doua secunde pentru a porni telefonul.
In modul Pornit apasati lung butonul Pornire /
Oprire pentru a opri telefonul.
2.6 Incarcarea acumulatorului
Puteti incarca acumulatorul conectand telefonul fie la un
computer prin portul USB, fie la incarcatorul standard din
pachet. Utilizati cablul USB standard.
Nota: Pentru a asigura functionarea normal a telefonului,
asigurati-va ca utilizati incarcatorul dedicat.
2.7 Securitate
O parola poate fi folosita atat pentru telefonul mobil cat si
pentru cartela SIM pentru a preveni utilizarea neautorizata
82
Page 83

a acestora.
Codul PIN
Codul PIN (numar personal de identificare 4-8 cifre) este
utilizat pentru a preveni utilizarea neautorizata a cardului
SIM. Daca functia de verificare a PIN-ului este activata,
codul PIN va fi cerut la fiecare pornire a telefonului. Daca
ati introdus incorect codul PIN, de trei ori, cartela SIM va fi
blocata. Urmatoarele instructiuni va pot ajuta pentru a o
debloca:
·
Introduceti codul PUK corect, in conformitate cu solicitarea
de pe ecran, pentru a debloca cartela SIM.
·
Introduceti un nou cod PIN si apasati OK
·
Daca codul PUK este corect, cartela SIM va fi deblocata, iar
83
Page 84

codul PIN resetat.
Avertisment: Daca ati introdus codul PIN incorect de trei
ori, cartela SIM se va bloca automat. In acest caz este
necesar sa introduceti codul PUK pentru a debloca. Codul
PUK este, in general, pastrat de operator.
Codul PUK
Codul PUK (parola de deblocare a PIN-ului, 8 cifre) este
folosit pentru a debloca codul PIN. Codul PUK este pus la
dispozitie, impreuna cu cartela SIM, de catre operator. Daca
ati introdus codul PUK gresit, de 10 ori, cartela SIM va fi
invalidata. Va trebui sa solicitati operatorului o noua
cartela.
Codul PUK2 corect. Instructiuni:
·
Introduceti codul PUK2 corect, in conformitate cu
84
Page 85

solicitarea de pe ecran, pentru a debloca codul PIN2.
·
Introduceti un nou cod PIN2 si apasati OK.
·
Cand vi se solicita sa introduceti noul cod PIN2, introduceti
un nou cod PIN2 si apasati OK.
3. OPERATIUNI DE BAZA SI INFORMATII
GENERALE
3.1 Utilizarea ecranului tactil
Apasati usor. Pentru a interactiona cu elementele de pe
ecran, cum ar fi aplicatii, setari, pictograme si optiuni,
pentru a introduce litere si simboluri utilizand tastatura de
pe ecran, sau pentru a apasa butoanele de pe ecran. Este
suficient sa atingeti cu degetul in jos pe ecran si apoi sa
ridicati degetul, fara a schimba pozitia atingerii intr-un timp
scurt.
85
Page 86

Apasati usor si tineti apasati. Atingeti cu degetul in jos pe
ecran, fara a ridica sau deplasa, timp de aproximativ doua
secunde. Aceasta actiune va declansa un pop-up sau va
activa anumite actiuni speciale.
Trageti. Atingeti cu degetul in jos pe ecran si miscati fara sa
ridicati pentru a trage, schimba ecrane si pentru alte
optiuni de afisare pe ecran.
Rasfoiti. Trageti rapid si eliberati pentru a derula o lista sau
pentru a muta, deplasati de-a lungul ecranului. Cand
parcurgeti o lista lunga, atingeti ecranul pentru a opri
derularea.
Ciupiti. In unele aplicatii (cum ar fi Harti, Browser, Galerie)
puteti mari si micsora punand doua degete pe ecran in
acelas timp si alaturandu-le (pentru a mari) sau
86
Page 87

departandu-le (pentru a micsora).
3.2 Butoanele de utilizare
Butonul pornit/oprit: Apasati si tineti apasat butonul de
Pornire/Oprire. Va aparea meniul pentru inchiderea
telefonului, resetare sau trecerea in modul General,
Silentios sau Vibratii.
Butonul Volum: Apasati butonul Volum pentru a schimba
volumul soneriei sau volumul in casca (in timpul unui apel).
Butonul Meniu: Deschide un meniu cu elemente
referitoare la ecranul curent sau la aplicatia care este rulata
la momentul respectiv. Cand vreti sa iesiti dintr-o aplicatie
sau sa efectuati alte operatiuni, daca respectiva aplicatie nu
afiseaza un buton pe ecran, incercati butonul meniu.
Butonul Acasa: Apasati Acasa pentru a inchide meniul sau
aplicatia si pentru a reveni in ecranul principal. Pe ecranul
principal, apasati lung si tineti apasata tasta Acasa pentru a
87
Page 88

vedea ultimele cateva aplicatii folosite, apoi atingete o
aplicatie pentru a o deschide.
Butonul Inapoi: Deschide ecranul anterior. Daca tastatura
de ecran este activata, acest buton o va inchide.
3.3
Acasa & Meniul principal
Atunci cand va conectati, va aparea ecranul Acasa. Acesta
este punctul de plecare pentru a accesa toate
caracteristicile telefonului, pictogramele aplicatiilor, widget-
uri, comenzi rapide si altele. Puteti personaliza ecranul
Acasa cu diferite imagini de fundal si puteti plasa pe el
elementele dorite.
In meniul Acasa, apasati butonul Meniu pentru a accesa
lista aplicatiilor care afiseaza toate aplicatiile instalate in
telefon.
88
Page 89

3.4
Setarile Dual ON (ro. Dual Pornit)
Acest telefon mobil poate suporta atat WCDMA cat si GSM.
Va rugam introduceti cartela WCDMA sau SIM in
conformitate cu indicatiile scrise pe telefon.
Accesati Setari – Setari Dual ON. Atunci cand utilizati doua
cartele SIM, selectati WCDMA sau GSM ca si cartela
principala. Unele aplicatii vor acorda prioritate pentru
apeluri sau pentru conexiunea de date.
3.5
Blocarea ecranului & Inactivitate
Puteti personaliza timpul de intrare in inactivitate al
ecranului mergand in meniul Setari -> Afisare ->
Inactivitate. Pentru a reactiva ecranul dupa ce acesta se
stinge, apasati scurt butonul Pornit/Oprit.
Daca veti activa ecranul in mai mult de 5 secunde dupa
oprirea automata a LCD-ului, ecranul va fi in modul blocat.
Sunt 5 metode diferite de a debloca ecranul. Le veti gasi in
Setari -> Securitate -> Blocare ecranului. Optiunea Glisare
89
Page 90

este activata implicit.
3.6 Utilizarea tastaturii de ecran
Introduceti textul folosind tastatura de pe ecran. Anumite
aplicatii activeaza tastatura automat. In alte aplicatii,
Dumneavoastra trebuie sa atingeti campul in care trebuie
introdus textul si abia atunci tastatura se va activa.
In cazul in care aveti instalata o aplicatie speciala, inainte de
a aplica aceasta metoda de introducere date, va trebui sa o
activati in meniul Setari -> Limba si metode de intrare.
Cand aveti nevoie sa introduceti textul, va aparea o lista de
optiuni unde veti putea face selectiile dorite.
3.7 Bara de notificari
Bara de notificari apare in partea superioara a ecranului. Ea
afiseaza pictograme de notificari (in partea stanga),
pictograme referitoare la statusul telefonului (in partea
dreapta) si programe care ruleaza in background.
90
Page 91
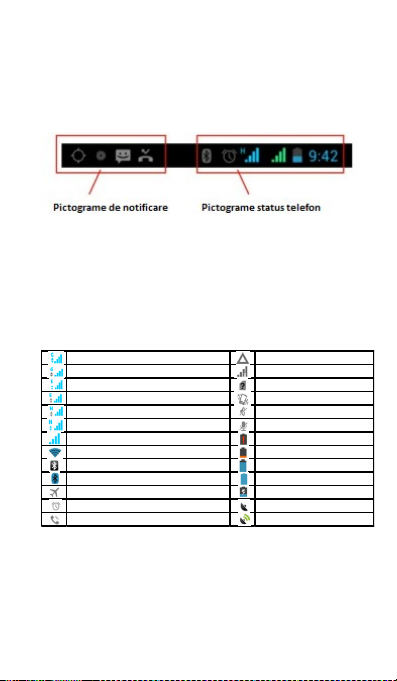
Pictograme status
Conectat la reteaua mobila GPRS Roaming
GPRS in functiune Lipsa semnal
Conectat la reteaua mobila EDGE Cartela SIM lips a
EDGE in functiune Mod vibratii
Conectat la reteaua mobila 3G Mod si lentios
3G in f unctiune Microfonul este inactiv
Putere semnal pentru retea mobila Baterie descarcata
Conectat la o retea Wi-Fi Baterie aproape descarcata
Bluetooth este activ Baterie partial descarcata
Conectat la un echipament Bluetooth Baterie incarcata la maxim
Mod avi on Bateria se incarca
Alarma este acti va Optiunea GPS este activa
Difuzorul extern este pornit Primire informatii GPS
91
Page 92
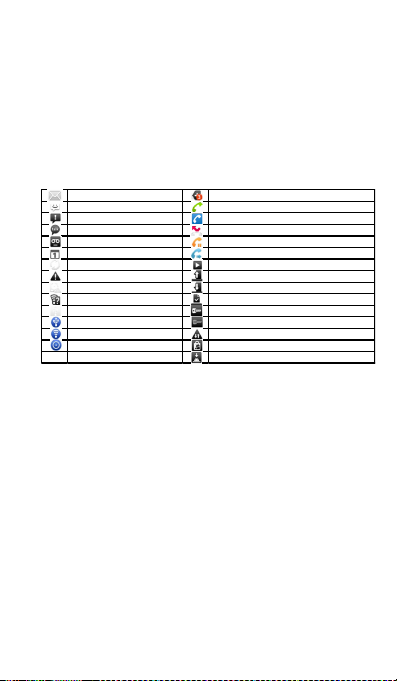
Pictograme pentru notificari primite
Mesaj nou Gmail Inca 3 notificari neaf isate
Mesaj te xt sau multimedia nou Apel in desfasurare
Probleme cu l ivrarea mesajului Apel cu casca Bluetooth in desfasurare
Mesaj nou Google Talk Apel ratat
Mesaj vocal nou Apel in asteptare
Eveniment nou Redirectare apeluri activa
Sincronizare date Redare de melodii activa
Probleme cu sincronizarea Upload de date
Cardul SD este plin Download de date
O retea WiFi este disponibila Download incheiat
Telefonul este conectat USB Conectat la VPN
Conexiune date prin USB Deconectat de l a VPN
Conexiune date prin WiFi Atingere limita maxima trafic date
Conexiune date mul tipla Update pe ntru aplicatii disponibil
Update pentru ap licatie de s istem disponi bil
Aplicatiile pe care le-ati instalat in telefon pot folosi
notificari proprii in momentul in care ruleaza in
background.
Pentru a deschide caseta de Notificari
Glisati bara de notificari din partea de sus a ecranului sau
apasati pictograma meniu de pe ecranul de start.
92
Page 93

4. UTILIZAREA SENZORILOR
Senzorul de proximitate detecteaza cat de aproape se
gaseste un obiect de suprafata ecranului. Este folosit pentru
a detecta apropierea ecranului de ureche in timpul unei
convorbiri. (In timp ce vorbiti la telefon, senzorul ajuta la
blocarea tastaturii pentru a preveni atingerea accidentala a
unor taste).
Senzorul de lumina va permite sa folositi nivelul de lumina
ambientala pentru a ajusta luminozitatea sau contrastul
ecranului.
Senzorul accelerometru detecteaza miscarea telefonului
precum si directia acestuia si transmite aceste informatii
catre aplicatiile folosite, cum ar fi de exemplu aplicatia
pentru alergare.
Roteste ecranul in momentul rotirii aparatului in
o
93
Page 94

timp ce folositi anumite aplicatii. Pentru a seta
interfata sa pastreze aceeasi orientare, selectati
Setari->Afisare->Rotirea automata a ecranului .
Ia anumite masuri in directa legatura cu unghiul de
o
inclinare, miscari folosite in special in jocuri.
o
Raspunde la actiunile Dumneavoastra precum
rotirea sau miscarea aparatului, miscari de
asemenea cerute de anumite aplicatii.
5.
5.1 Conectarea cu computerul personal
Puteti conecta telefonul Dumneavoastra la un computer cu
ajutorul unui cablu USB, pentru a transfera fisiere intre
cardul SD (din telefon) si computer. Pentru a folosi aceasta
CONECTIVITATE
94
Page 95

optiune, trebuie sa urmati pasii de mai jos:
o
Folositi cablul USB primit o data cu telefonul, pentru a-l
conecta la portul USB al computerului (apoi veti
vedea meniul USB care va fi activat pe ecranul
telefonului).
o
In meniul USB apasati Stocare USB pentru a activa
transferul de fisiere intre cardul SD si computer.
Puteti de asemenea transmite conexiunea de date de la
telefon catre computer, prin optiunea USB tethering.
5.2 Bluetooth
Tehnologia Bluetooth va permite sa conectati telefonul la
un aparat cu tehnologie Bluetooth pe o raza de 10 metri,
folosind undele radio. Prin intermediul acestei optiuni
puteti:
95
Page 96

o
Transfera fisiere de la sau catre alte aparate
cu tehnologie Bluetooth.
o
Partaja fisiere multimedia cu alte aparate
cu tehnologie Bluetooth.
o
Partaja conexiunea la Internet a telefonului.
o
Controla de la distanta alta aparate cu
tehnologie Bluetooth.
o
Sa va conectati la alte computere si sa
accesati Internetul.
Inainte de a folosi optiunea Bluetooth, va trebui sa o
activati, selectand Setari -> Bluetooth si va trebui de
asemenea sa conectati telefonul cu un alt aparat cu
tehnologie Bluetooth, urmand pasii din meniul Setari ->
Setari Bluetooth -> Dispozitive disponibile, apoi selectati
dispozitivul la care doriti sa va conectati.
96
Page 97

5.3 Wi-Fi
Folosind Wi-Fi™ puteti accesa Internetul pe telefonul
Dumneavoastra prin tehnologia fara fir. Puteti naviga pe
Internet acasa (prin reteaua personala) sau in zone cu acces
pentru public (hot spot).
o
Retelele personale sunt de obicei parolate. Va
trebui sa introduceti o parola pentru a va putea
conecta.
o
Hot spots – de obicei neparolate dar telefonul
trebuie sa se autentifice inainte de folosirea
Internetului.
Folositi urmatorii pasi pentru a folosi reteaua Wi-Fi
personala:
Selectati Setari->Wi-Fi pentru activare (telefonul
o
cauta retelele Wi-Fi disponibile si le afiseaza.
Retelele cu parola sunt afisate cu o pictograma
speciala. Daca telefonul gaseste o retea la care a
97
Page 98

mai fost conectat, se va conecta automat).
Daca doriti sa va conectati la o retea Wi-Fi nou
o
descoperita, apasati pe numele acesteia, sub
meniul Setari -> Wi-Fi.
Puteti seta modul preferat de conectare la Internet
selectand optiunile din meniul urmator: Setari -> Mai
multe -> Retele mobile -> Setari retele.
5.4 Stocare
Exista 2 tipuri de memorii de stocare in telefonul
Dumneavoastra, memoria interna a telefonului si cardul SD.
Memoria interna este folosita doar pentru sistemul de
operare si pentru aplicatiile de sistem.
Datele utilizatorului pot fi stocate pe cardul de memorie SD.
Aplicatiile si alte fisiere pe care le descarcati de pe Internet
sau le transferati de pe alte dispozitive, poze facute cu
98
Page 99

camera, filmele inregistrate, toate sunt stocate pe cardul
SD. Anumite fisiere care trebuie sa fie accesate de aplicatii,
precum imagini, melodii, filme, trebuie stocate pe cardul
SD.
6. CONTACT
Aplicatia Contact va permite accesarea rapida a
persoanelor pe care doriti sa le contactati. Cand deschideti
pentru prima oara telefonul si accesati contul Google, toate
contactele din acest cont Google sunt descarcate in
telefonul Dumneavoastra. Dupa aceasta, contactele sunt
sincronizate. Orice modificare operati la orice contact pe
telefon, va fi replicata automat la urmatoarea sincronizare.
Informatiile referitoare la contactele Dumneavoastra sunt
disponibile si pentru alte aplicatii, cum ar fi Gmail, Google
Talk, Mesagerie, Galerie.
Daca aveti mai mult de un cont cu informatii referitoare la
99
Page 100

contacte, aplicatia va muta automat contactele duble intr-o
singura inregistrare. Puteti de asemenea administra acest
proces manual.
7. APELAREA
7.1 Pentru a efectua un apel
·
Apasati pe butonul de apelare pe ecranul principal
sau in meniu pentru a intra in modul de apelare.
Introduceti numarul de telefon si apasati pentru a
efectua apelul.
·
In lista de contacte, selectati contactul dorit si apasati pe
numarul de telefon.
·
In alte aplicatii, cum ar fi cea pentru mesaje sau in lista de
apeluri exista de asemenea optiunea de apelare prin
100
 Loading...