

Page 1
CD 1435/1445/1455/1465/1480
Manual
user
CDC 1930/1935/1945/1950
Faxsystem (V)
Page 2

Page 3
i
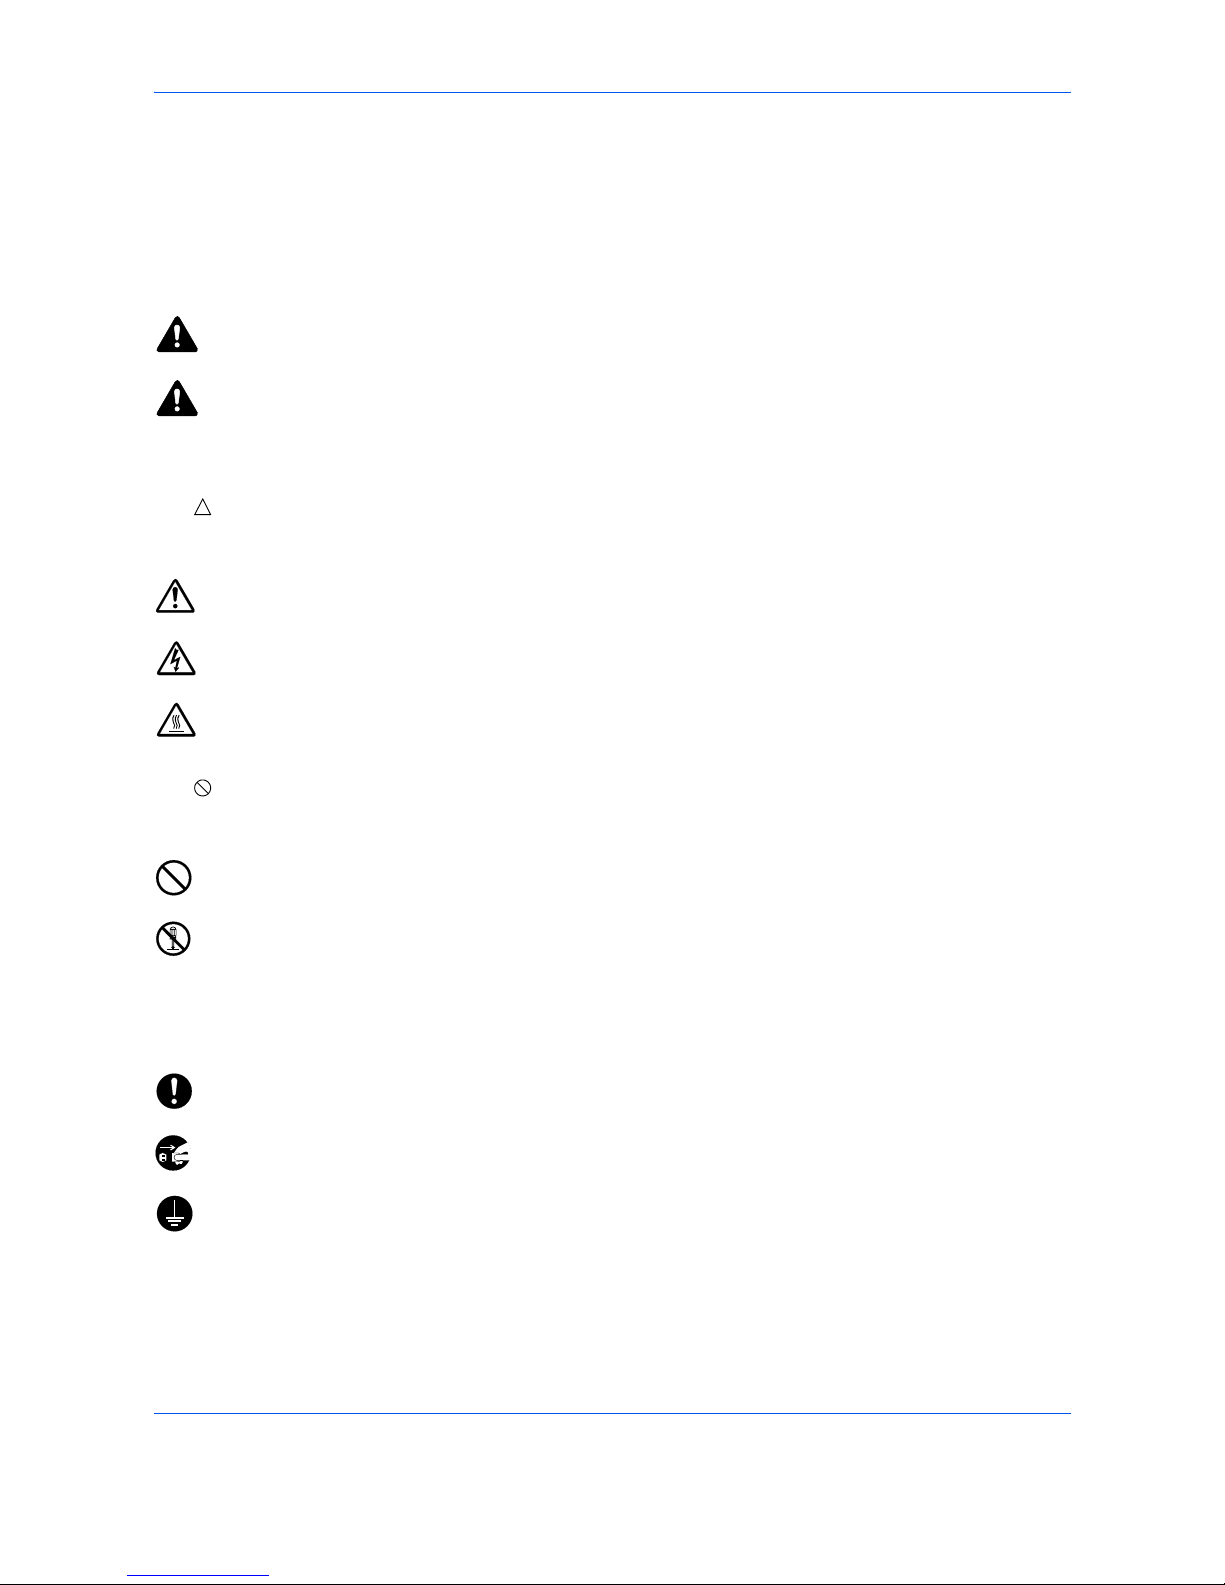
Safety Conventions in This Guide
Please read the Operation Guide before using the facsimile. Keep it close to the facsimile for easy reference.
The sections of this handbook and parts of the facsimile marked with symbols are safety warnings meant to
protect the user, other individuals and surrounding objects, and ensure correct and safe usage of the facsimile.
The symbols and their meanings are indicated below.
WARNING: Indicates that serious injury or even death may result from insufficient attention to or
incorrect compliance with the related points.
CAUTION: Indicates that personal injury or mechanical damage may result from insufficient attention to
or incorrect compliance with the related points.
Symbols
The symbol indicates that the related section includes safety warnings. Specific points of attention are
indicated inside the symbol.
The symbol indicates that the related section includes information on prohibited actions. Specifics of the
prohibited action are indicated inside the symbol.
The
z symbol indicates that the related section includes information on actions which must be performed.
Specifics of the required action are indicated inside the symbol.
Please contact your service representative to order a replacement if the safety warnings in this Operation Guide
are illegible or if the guide itself is missing. (fee required)
.... [General warning]
.... [Warning of danger of electrical shock]
.... [Warning of high temperature]
.... [Warning of prohibited action]
.... [Disassembly prohibited]
.... [Alert of required action]
.... [Remove the power plug from the outlet]
....
[Always connect the machine to an outlet with a ground
connection]
Page 4

ii
<Note>
Due to performance updating, information in this Operation Guide is subject to change without notice.
Page 5

iii
Contents
1 Part Names and Functions
Operation Panel . . . . . . . . . . . . . . . . . . . . . . . . . . . . . . . . . . . . . . . . . . . . . . . . . . . . . . . . . . . . . 1-2
Machine . . . . . . . . . . . . . . . . . . . . . . . . . . . . . . . . . . . . . . . . . . . . . . . . . . . . . . . . . . . . . . . . . . . 1-4
2 Preparation Before Use
Quick Setup Wizard (Fax Setup) . . . . . . . . . . . . . . . . . . . . . . . . . . . . . . . . . . . . . . . . . . . . . . . . 2-2
Date and Time Entry . . . . . . . . . . . . . . . . . . . . . . . . . . . . . . . . . . . . . . . . . . . . . . . . . . . . . . . . . 2-4
Using the Address Book . . . . . . . . . . . . . . . . . . . . . . . . . . . . . . . . . . . . . . . . . . . . . . . . . . . . . . 2-5
Using One-touch Keys . . . . . . . . . . . . . . . . . . . . . . . . . . . . . . . . . . . . . . . . . . . . . . . . . . . . . . . 2-14
3 FAX Operation (Basic)
Enter key and Quick No. Search key . . . . . . . . . . . . . . . . . . . . . . . . . . . . . . . . . . . . . . . . . . . . . 3-2
Automatic Send . . . . . . . . . . . . . . . . . . . . . . . . . . . . . . . . . . . . . . . . . . . . . . . . . . . . . . . . . . . . . 3-4
FAX Automatic Reception . . . . . . . . . . . . . . . . . . . . . . . . . . . . . . . . . . . . . . . . . . . . . . . . . . . . 3-12
Canceling Communication . . . . . . . . . . . . . . . . . . . . . . . . . . . . . . . . . . . . . . . . . . . . . . . . . . . . 3-14
Changing/Deleting Registration Contents . . . . . . . . . . . . . . . . . . . . . . . . . . . . . . . . . . . . . . . . 3-19
Selecting a Destination by One-touch Key . . . . . . . . . . . . . . . . . . . . . . . . . . . . . . . . . . . . . . . 3-21
Using the Speed Dial key . . . . . . . . . . . . . . . . . . . . . . . . . . . . . . . . . . . . . . . . . . . . . . . . . . . . . 3-22
Dialing the Same Receiving System (Redial) . . . . . . . . . . . . . . . . . . . . . . . . . . . . . . . . . . . . . 3-23
Previewing Images . . . . . . . . . . . . . . . . . . . . . . . . . . . . . . . . . . . . . . . . . . . . . . . . . . . . . . . . . . 3-24
Quick Setup Screen . . . . . . . . . . . . . . . . . . . . . . . . . . . . . . . . . . . . . . . . . . . . . . . . . . . . . . . . . 3-26
Registering Shortcuts . . . . . . . . . . . . . . . . . . . . . . . . . . . . . . . . . . . . . . . . . . . . . . . . . . . . . . . . 3-28
4 FAX Operation (Advanced)
Long Originals . . . . . . . . . . . . . . . . . . . . . . . . . . . . . . . . . . . . . . . . . . . . . . . . . . . . . . . . . . . . . . 4-2
Delayed Transmission . . . . . . . . . . . . . . . . . . . . . . . . . . . . . . . . . . . . . . . . . . . . . . . . . . . . . . . . 4-3
Broadcast Transmission . . . . . . . . . . . . . . . . . . . . . . . . . . . . . . . . . . . . . . . . . . . . . . . . . . . . . . . 4-6
Standby Transmission . . . . . . . . . . . . . . . . . . . . . . . . . . . . . . . . . . . . . . . . . . . . . . . . . . . . . . . . 4-9
Interrupt Send . . . . . . . . . . . . . . . . . . . . . . . . . . . . . . . . . . . . . . . . . . . . . . . . . . . . . . . . . . . . . 4-10
Chain Dial . . . . . . . . . . . . . . . . . . . . . . . . . . . . . . . . . . . . . . . . . . . . . . . . . . . . . . . . . . . . . . . . 4-11
Manual Send . . . . . . . . . . . . . . . . . . . . . . . . . . . . . . . . . . . . . . . . . . . . . . . . . . . . . . . . . . . . . . 4-13
Manual Reception . . . . . . . . . . . . . . . . . . . . . . . . . . . . . . . . . . . . . . . . . . . . . . . . . . . . . . . . . . 4-14
Remote Switch Function . . . . . . . . . . . . . . . . . . . . . . . . . . . . . . . . . . . . . . . . . . . . . . . . . . . . . 4-16
Printing/Sending Received Faxes by Requirements (Memory Forwarding) . . . . . . . . . . . . . . 4-18
FAX Box Function . . . . . . . . . . . . . . . . . . . . . . . . . . . . . . . . . . . . . . . . . . . . . . . . . . . . . . . . . . 4-38
Sub Address Communication . . . . . . . . . . . . . . . . . . . . . . . . . . . . . . . . . . . . . . . . . . . . . . . . . 4-45
Program Dial . . . . . . . . . . . . . . . . . . . . . . . . . . . . . . . . . . . . . . . . . . . . . . . . . . . . . . . . . . . . . . 4-47
Polling Communication . . . . . . . . . . . . . . . . . . . . . . . . . . . . . . . . . . . . . . . . . . . . . . . . . . . . . . 4-49
Account Management . . . . . . . . . . . . . . . . . . . . . . . . . . . . . . . . . . . . . . . . . . . . . . . . . . . . . . . 4-60
Other Convenient Functions . . . . . . . . . . . . . . . . . . . . . . . . . . . . . . . . . . . . . . . . . . . . . . . . . . 4-64
5 Checking Transmission Results and Registration Status
Various Tools for Checking Transmission Results and Registration Status . . . . . . . . . . . . . . . . 5-2
Checking FAX Job History . . . . . . . . . . . . . . . . . . . . . . . . . . . . . . . . . . . . . . . . . . . . . . . . . . . . . 5-3
Printing Administrative Reports . . . . . . . . . . . . . . . . . . . . . . . . . . . . . . . . . . . . . . . . . . . . . . . . . 5-7
Reporting FAX Receipt Result by E-mail . . . . . . . . . . . . . . . . . . . . . . . . . . . . . . . . . . . . . . . . . 5-11
Confirmation Screen of Destinations . . . . . . . . . . . . . . . . . . . . . . . . . . . . . . . . . . . . . . . . . . . . 5-12
Page 6

iv
6 Setup and Registration
Selection of Telephone Line (Inch version only) . . . . . . . . . . . . . . . . . . . . . . . . . . . . . . . . . . . . 6-2
Selection of Transmit Terminal Identification (TTI) . . . . . . . . . . . . . . . . . . . . . . . . . . . . . . . . . . . 6-3
Setting the TTI information . . . . . . . . . . . . . . . . . . . . . . . . . . . . . . . . . . . . . . . . . . . . . . . . . . . . . 6-4
FAX/TEL Auto Switch Reception . . . . . . . . . . . . . . . . . . . . . . . . . . . . . . . . . . . . . . . . . . . . . . . . 6-7
FAX/Answering Machine Auto Switch Reception . . . . . . . . . . . . . . . . . . . . . . . . . . . . . . . . . . . . 6-9
Rings . . . . . . . . . . . . . . . . . . . . . . . . . . . . . . . . . . . . . . . . . . . . . . . . . . . . . . . . . . . . . . . . . . . . 6-11
Volume Adjustment . . . . . . . . . . . . . . . . . . . . . . . . . . . . . . . . . . . . . . . . . . . . . . . . . . . . . . . . . 6-12
Retry Times . . . . . . . . . . . . . . . . . . . . . . . . . . . . . . . . . . . . . . . . . . . . . . . . . . . . . . . . . . . . . . . 6-13
Receiving Mode . . . . . . . . . . . . . . . . . . . . . . . . . . . . . . . . . . . . . . . . . . . . . . . . . . . . . . . . . . . . 6-14
Reception Date/Time . . . . . . . . . . . . . . . . . . . . . . . . . . . . . . . . . . . . . . . . . . . . . . . . . . . . . . . . 6-15
Media Type for Print Output . . . . . . . . . . . . . . . . . . . . . . . . . . . . . . . . . . . . . . . . . . . . . . . . . . . 6-16
MP Tray Paper Output . . . . . . . . . . . . . . . . . . . . . . . . . . . . . . . . . . . . . . . . . . . . . . . . . . . . . . . 6-18
DRD Reception (Available for inch versions only) . . . . . . . . . . . . . . . . . . . . . . . . . . . . . . . . . . 6-19
Transmission Restriction . . . . . . . . . . . . . . . . . . . . . . . . . . . . . . . . . . . . . . . . . . . . . . . . . . . . . 6-21
Encryption . . . . . . . . . . . . . . . . . . . . . . . . . . . . . . . . . . . . . . . . . . . . . . . . . . . . . . . . . . . . . . . . 6-29
Reduced Reception . . . . . . . . . . . . . . . . . . . . . . . . . . . . . . . . . . . . . . . . . . . . . . . . . . . . . . . . . 6-34
Duplex Print Output . . . . . . . . . . . . . . . . . . . . . . . . . . . . . . . . . . . . . . . . . . . . . . . . . . . . . . . . . 6-35
2 in 1 Reception . . . . . . . . . . . . . . . . . . . . . . . . . . . . . . . . . . . . . . . . . . . . . . . . . . . . . . . . . . . . 6-36
Remote Diagnostics . . . . . . . . . . . . . . . . . . . . . . . . . . . . . . . . . . . . . . . . . . . . . . . . . . . . . . . . . 6-37
Prohibiting FAX Printing at Specified Times (Unusable Time) . . . . . . . . . . . . . . . . . . . . . . . . . 6-38
Setting the Paper Output . . . . . . . . . . . . . . . . . . . . . . . . . . . . . . . . . . . . . . . . . . . . . . . . . . . . . 6-39
7 Optional Equipment
Internet FAX Kit (A) . . . . . . . . . . . . . . . . . . . . . . . . . . . . . . . . . . . . . . . . . . . . . . . . . . . . . . . . . . 7-2
Expansion Memory . . . . . . . . . . . . . . . . . . . . . . . . . . . . . . . . . . . . . . . . . . . . . . . . . . . . . . . . . . 7-3
Dual FAX . . . . . . . . . . . . . . . . . . . . . . . . . . . . . . . . . . . . . . . . . . . . . . . . . . . . . . . . . . . . . . . . . . 7-3
8 Internet Faxing (i-FAX) (Option)
What is i-FAX? . . . . . . . . . . . . . . . . . . . . . . . . . . . . . . . . . . . . . . . . . . . . . . . . . . . . . . . . . . . . . . 8-2
i-FAX Settings . . . . . . . . . . . . . . . . . . . . . . . . . . . . . . . . . . . . . . . . . . . . . . . . . . . . . . . . . . . . . . 8-4
i-FAX Transmission . . . . . . . . . . . . . . . . . . . . . . . . . . . . . . . . . . . . . . . . . . . . . . . . . . . . . . . . . . 8-8
i-FAX Reception . . . . . . . . . . . . . . . . . . . . . . . . . . . . . . . . . . . . . . . . . . . . . . . . . . . . . . . . . . . . 8-13
9 About Network FAX
What is Network FAX? . . . . . . . . . . . . . . . . . . . . . . . . . . . . . . . . . . . . . . . . . . . . . . . . . . . . . . . . 9-2
Setup . . . . . . . . . . . . . . . . . . . . . . . . . . . . . . . . . . . . . . . . . . . . . . . . . . . . . . . . . . . . . . . . . . . . . 9-4
10 Troubleshooting
Indicators During Sending/Receiving Operation . . . . . . . . . . . . . . . . . . . . . . . . . . . . . . . . . . . 10-2
Precautions When Turning Power OFF . . . . . . . . . . . . . . . . . . . . . . . . . . . . . . . . . . . . . . . . . . 10-3
Error Messages . . . . . . . . . . . . . . . . . . . . . . . . . . . . . . . . . . . . . . . . . . . . . . . . . . . . . . . . . . . . 10-4
Troubleshooting . . . . . . . . . . . . . . . . . . . . . . . . . . . . . . . . . . . . . . . . . . . . . . . . . . . . . . . . . . . . 10-6
Appendix
Character Entry Method . . . . . . . . . . . . . . . . . . . . . . . . . . . . . . . . . . . . . . . . . . . . . . . . .Appendix-2
Specifications . . . . . . . . . . . . . . . . . . . . . . . . . . . . . . . . . . . . . . . . . . . . . . . . . . . . . . . . .Appendix-5
Menu List . . . . . . . . . . . . . . . . . . . . . . . . . . . . . . . . . . . . . . . . . . . . . . . . . . . . . . . . . . . .Appendix-6
Received FAX Sizes and Paper Priority (Inch Model) . . . . . . . . . . . . . . . . . . . . . . . . .Appendix-10
Received FAX Sizes and Paper Priority (Metric Model) . . . . . . . . . . . . . . . . . . . . . . . .Appendix-13
Error Code List . . . . . . . . . . . . . . . . . . . . . . . . . . . . . . . . . . . . . . . . . . . . . . . . . . . . . . .Appendix-16
Page 7

v
Safety Information
About this Operation Guide
This Operation Guide contains information on using the facsimile functions of this machine. Please read the
Operation Guide before you start using the machine. Keep it close to the machine for easy reference.
During use, refer to the Operation Guide for your machine for information regarding the sections listed below.
• Cautionary Labels
• Installation Precautions
• Precautions for Use
• Loading Paper
• Toner Container and Waste Toner
Box Replacement
• Clearing Paper Jams
• Solving Malfunctions
• Cleaning
Page 8

vi
General Notice
Legal Notice
WE SHALL HAVE NO LIABILITY FOR LOSS, WHETHER OR PARTIAL, OF RECEIVED DOCUMENTS WHEN
SUCH LOSS IS CAUSED BY DAMAGES TO THE FAX SYSTEM, MALFUNCTIONS, MISUSE, OR EXTERNAL
FACTORS SUCH AS POWER OUTAGES; OR FOR PURELY ECONOMIC LOSSES OR LOST PROFITS
RESULTING FROM MISSED OPPORTUNITIES ATTRIBUTABLE TO MISSED CALLS OR RECORDED
MESSAGES RESULTING THEREFROM.
Trademark Information
• Microsoft, Windows, Windows NT, and Internet Explorer are registered trademarks of Microsoft Corporation
in the U.S. and other countries.
• Windows ME and Windows XP are trademarks of Microsoft Corporation.
• Ethernet is a registered trademark of Xerox Corporation.
• IBM and IBM PC-AT are trademarks of International Business Machines Corporation.
• Adobe and Acrobat are registered trademarks of Adobe Systems Incorporated.
All other company and product names in this Operation Guide are trademarks or registered trademarks of their
respective companies. The designations™ and ® are omitted in this guide.
FCC PART 68 REQUIREMENTS
1 This equipment complies with Part 68 of the FCC rules and the requirements adopted by the ACTA. On
the left side of the equipment to install FAX System (V) is a label that contains, among other information, a
product identifier in the format US:AAAEQ##TXXXX. If requested, this number must be provided to the
telephone company.
2 This equipment connects to the network via USOC RJ11C.
3 A plug and jack used to connect this equipment to the premises wiring and telephone network must
comply with the applicable FCC Part 68 rules and requirements adopted by the ACTA. A compliant
telephone cord and modular plug is provided with this product. It is designed to be connected to a
compatible modular jack that is also compliant. See installation instructions for details.
4 The REN is used to determine the number of devices that may be connected to a telephone line.
Excessive RENs on a telephone line may result in the devices not ringing in response to an incoming call.
In most but not all areas, the sum of RENs should not exceed five (5.0). To be certain of the number of
devices that may be connected to a line, as determined by the total RENs, contact the local telephone
company. For products approved after July 23, 2001, the REN for this product is part of the product
identifier that has the format US:AAAEQ##TXXXX. The digits represented by ## are the REN without a
decimal point (e.g., 03 is a REN of 0.3). For earlier products, the REN is separately shown on the label.
5 If this equipment causes harm to the telephone network, the telephone company will notify you in advance
that temporary discontinuance of service may be required. But if advance notice isn't practical, the
telephone company will notify the customer as soon as possible. Also, you will be advised of your right to
file a complaint with the FCC if you believe it is necessary.
Page 9
vii
6 The telephone company may make changes in its facilities, equipment, operations or procedures that
could affect the operation of the equipment. If this happens the telephone company will provide advance
notice in order for you to make necessary modifications to maintain uninterrupted service.
7 If trouble is experienced with this equipment, please contact the following company for repair and (or)
warranty information:
If the equipment is causing harm to the telephone network, the telephone company may request that you
disconnect the equipment until the problem is resolved.
8 This equipment cannot be used on public coin service provided by the telephone company. Connection to
Party line service is subject to state tariffs. Contact the state public utility commission, public service
commission or corporation commission for information.
9 If your home has specially wired alarm equipment connected to the telephone line, ensure the installation
of this equipment does not disable your alarm equipment. If you have questions about what will disable
alarm equipment, consult your telephone company or a qualified installer.
10 The Telephone Consumer Protection Act of 1991 makes it unlawful for any person to use a computer or
other electronic device, including FAX machines, to send any message unless such message clearly
contains in a margin at the top or bottom of each transmitted page or on the first page of the transmission,
the date and time it is sent and an identification of the business or other entity, or other individual sending
the message and the telephone number of the sending machine or such business, other entity, or
individual. (The telephone number provided may not be a 900 number or any other number for which
charges exceed local or long-distance transmission charges.)
In order to program this information into your FAX machine, you should complete the following
steps:(Insure that it will be transmitted, see Local FAX Name Registration on page 6-4, Local FAX
Information Entry on page 6-4, Date and Time Entry on page 2-4, and Selection of Transmit Terminal
Identification (TTI) on page 6-3.)
IMPORTANT SAFETY INSTRUCTIONS
When using your telephone equipment, basic safety precautions should always be followed to reduce the risk
of fire, electric shock and injury to persons, including the following:
CAUTION: To reduce the risk of fire, use only No.26 AWG or larger UL listed or CSA certified telecommunication
line cord.
1 Do not use this product near water, for example, near a bath tub, wash bowl, kitchen sink or laundry tub, in
a wet basement or near a swimming pool.
2 Avoid using a telephone (other than a cordless type) during an electrical storm. There may be a remote
risk of electric shock from lightning.
3 Do not use the telephone to report a gas leak in the vicinity of the leak.
4 Use only the power cord and batteries indicated in this manual. Do not dispose of batteries in a fire. They
may explode. Check with local codes for possible special disposal instructions.
SAVE THESE INSTRUCTIONS
Page 10

viii
IMPORTANTES MESURES DE SECURITE
Certaines mesures de sécurité doivent être prises pendant l'utilisation de matériel téléphonique afin de réduire
les risques d'incendie, de choc électrique et de blessures. En voici quelques unes:
ATTENTION: Pour réduire le risque d'incendie, utiliser uniquement un cordon de ligne de télécommunication
de calibre 26 AWG ou supérieur de la liste UL ou bien certifié CSA.
1 Ne pas utiliser l'appareil près de l'eau, p. ex., près d'une baignoire, d'un lavabo, d'un évier de cuisine, d'un
bac à laver, dans un sous-sol humide ou près d'une piscine.
2 Eviter d'utiliser le téléphone (sauf s'il s'agit d'un appareil sans fil) pendant un orage électrique. Ceci peut
présenter un risque de choc électrique causé par la foudre.
3 Ne pas utiliser l'appareil téléphonique pour signaler une fuite de gaz s'il est situé près de la fuite.
4 Utiliser seulement le cordon d'alimentation et le type de piles indiqués dans ce manuel. Ne pas jeter les
piles dans le feu: elles peuvent exploser. Se conformer aux règlements pertinents quant à l'élimination
des piles.
CONSERVER CES INSTRUCTIONS
CANADIAN IC REQUIREMENTS
"This product meets the applicable Industry Canada technical specifications"
"The Ringer Equivalence Number is an indication of the maximum number of devices allowed to be connected
to a telephone interface. The termination on an interface may consist of any combination of devices subject only
to the requirement that the sum of the RENs of all the devices does not exceed five."
The REN (CANADA) of this product is 0.4.
CONDITIONS DE L'IC CANADIENNE
"Le présent matériel est conforme aux spécifications techniques applicables d’Industrie Canada."
"L'indice d'équivalence de la sonnerie (IES) sert à indiquer le nombre maximal de terminaux qui peuvent être
raccordés à une interface téléphonique. La terminaison d'une interface peut consister en une combinaison
quelconque de dispositifs, à la seule condition que la somme d'indices d'équivalence de la sonnerie de tous les
dispositifs n'excède pas 5."
Le IES (CANADA) pour ce produit est 0.4.
Page 11

ix
Declarations to European Directives
DECLARATION OF CONFORMITY TO 2004/108/EC, 2006/95/EEC, 93/68/EEC and 1999/5/EC
We declare under our sole responsibility that the product to which this declaration relates is in conformity with
the following specifications.
Limits and methods of measurement for immunity
characteristics of information technology
equipment
EN55024
Limits and methods of measurement for radio
interference characteristics of information
technology equipment
EN55022 Class B
Limits for harmonic currents emissions for
equipment input current 16A per phase
EN61000-3-2
Limitation of voltage fluctuations and flicker in lowvoltage supply systems for equipment with rated
current 16A
EN61000-3-3
Safety of information technology equipment,
including electrical business equipment
EN60950-1
Terminal Equipment (TE);
Attachment requirements for pan-European
approval for connection to the analogue Public
Switched Telephone Networks (PSTNs) of TE
(excluding TE supporting the voice telephony
service) in which network addressing, if provided,
is by means of Dual Tone Multi Frequency (DTMF)
signalling
TBR 21
Page 12

x
Technical regulations for terminal equipment
This terminal equipment complies with:
• TBR21 • DE 08R00 National AN for D
• AN 01R00 AN for P • DE 09R00 National AN for D
• AN 02R01 AN for CH and N • DE 12R00 National AN for D
• AN 05R01 AN for D, E, GR, P and N • DE 14R00 National AN for D
• AN 06R00 AN for D, GR and P • ES 01R01 National AN for E
• AN 07R01 AN for D, E, P and N • GR 01R00 National AN for GR
• AN 09R00 AN for D • GR 03R00 National AN for GR
• AN 10R00 AN for D • GR 04R00 National AN for GR
• AN 11R00 AN for P • NO 01R00 National AN for N
• AN 12R00 AN for E • NO 02R00 National AN for N
• AN 16R00 General Advisory Note • P 03R00 National AN for P
• DE 03R00 National AN for D • P 04R00 National AN for P
• DE 04R00 National AN for D • P 08R00 National AN for P
• DE 05R00 National AN for D
Page 13

xi
Network Compatibility Declaration
The manufacturer declares that the equipment has been designed to operate in the public switched telephone
networks (PSTN) in the following countries:
Austria France Liechtenstein Slovakia
Belgium Germany Lithuania Slovenia
Bulgaria Greece Luxembourg Spain
Cyprus Hungary Malta Sweden
Czech Iceland Norway Switzerland
Denmark Ireland Poland The Netherlands
Estonia Italy Portugal United Kingdom
Finland Latvia Romania
Page 14

xii
Introduction
About This Guide
This guide consists of the following chapters.
Chapter 1 - Part Names and Functions
Explains the parts of the machine and keys on the operation panel.
Chapter 2 - Preparation Before Use
Explains the settings required before using fax.
Chapter 3 - FAX Operation (Basic)
Explains general usage of the fax function such as sending originals and receiving originals.
Chapter 4 - FAX Operation (Advanced)
Explains convenient fax functions such as setting the transmission time, continuous sending of the same
originals to multiple recipients and scheduling the next transmission. Also explains advanced fax communication
such as limiting the destinations and systems from which you receive originals, as well as forwarding, saving,
and printing the received originals for each requirement. Furthermore, explains sub address communication
functions of the machine that are compatible with other makers’ systems and job accounting functions
convenient for checking the communication status of fax.
Chapter 5 - Checking Transmission Results and Registration Status
Explains how to check the status of recent transmissions on the touch panel. Also, explains how to print
administrative reports to check communication results and settings and registration status of the machine.
Chapter 6 - Setup and Registration
Explains various settings and registration pertaining to functions, such as adjusting the volume of the alarm
sound.
Chapter 7 - Optional Equipment
Introduces the optional Internet FAX Kit(A), Expansion Memory and Dual FAX and explains how to use the
machine when optional features are installed.
Chapter 8 - Internet Faxing (i-FAX) (Option)
Explains how to use the i-FAX function and the settings required for Internet faxing.
Chapter 9 - About Network FAX
Explains how to use Network FAX functions. Read the Network FAX Driver Operation Guide in the included DVD
(online manual) as well.
Page 15

xiii
Chapter 10 - Troubleshooting
Explains how to respond to error indications and trouble.
Appendix
Explains character entry and the specifications of the machine.
NOTE: This Operation Guide contains information for using both the inch and metric versions of this machine.
The inch version of this machine is shown in the screens in this guide. If you are using the metric version, you
should use the messages provided for the inch version as reference only.
Page 16
xiv
Conventions in This Guide
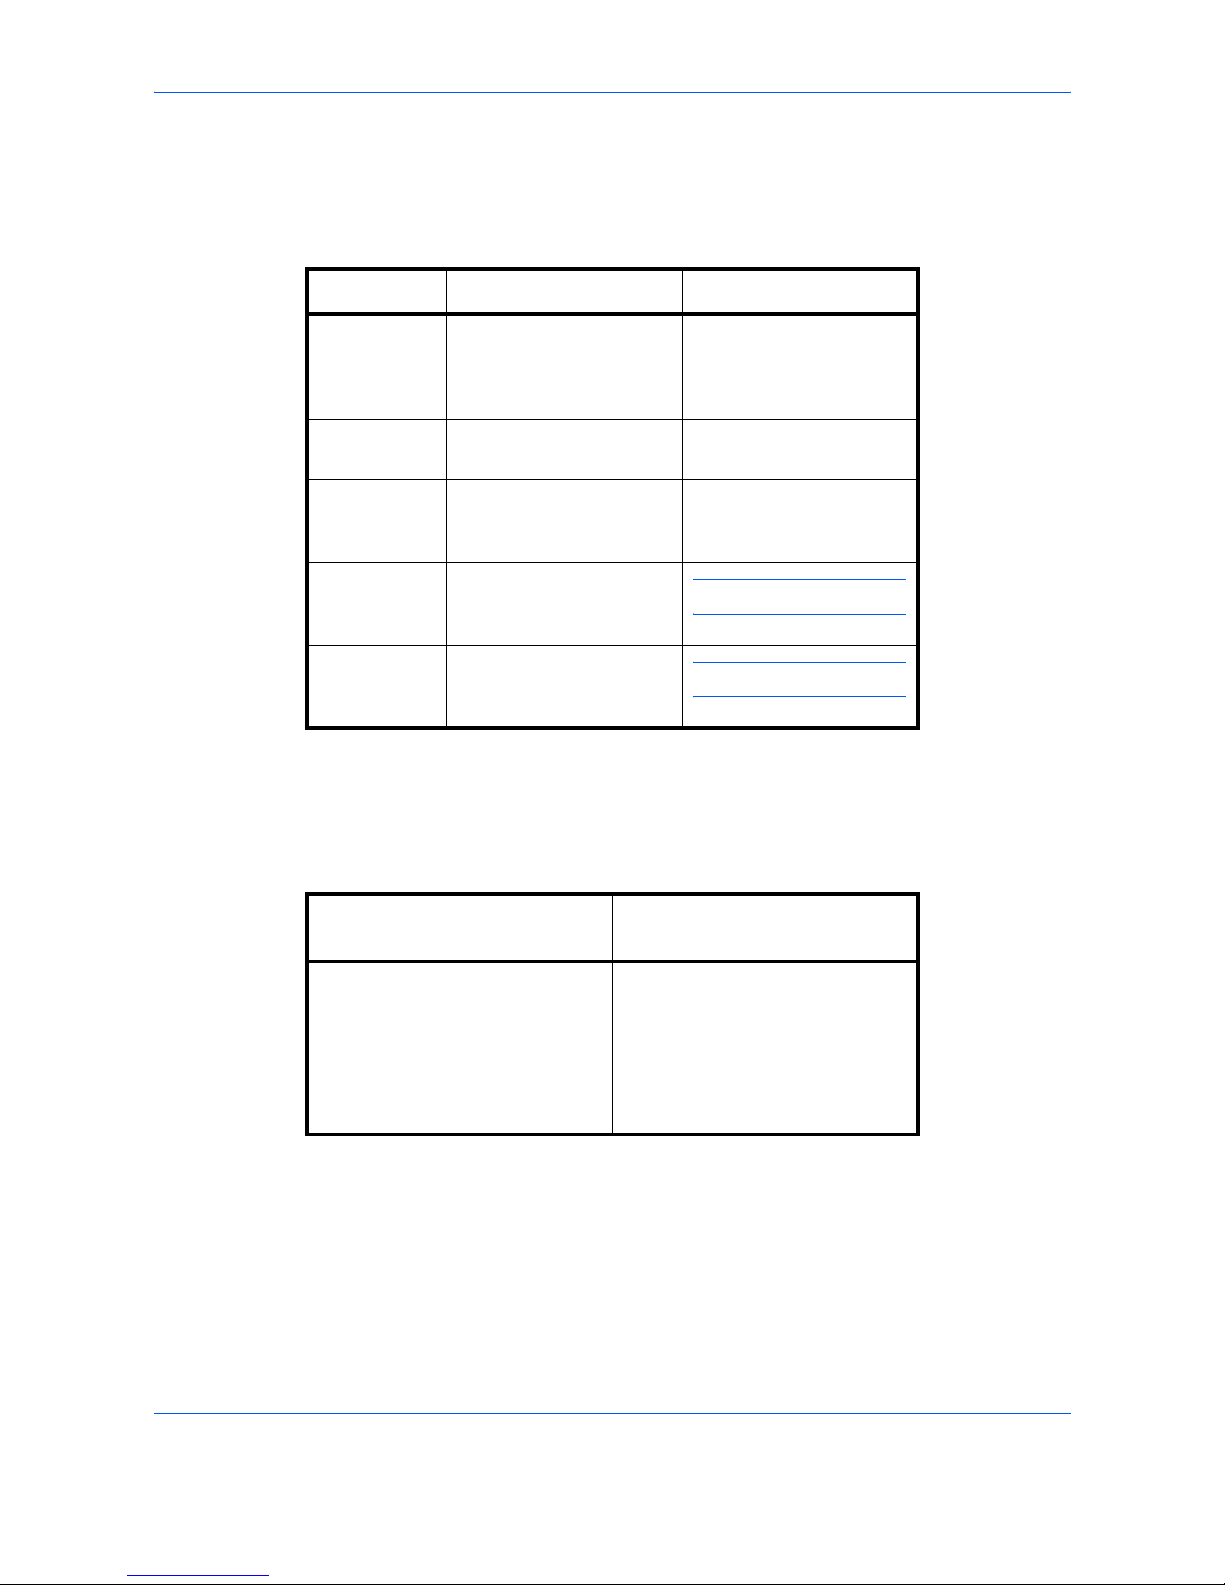
The following conventions are used depending on the nature of the description.
Description of Operation Procedure
In this Operation Guide, the continuous operation of the keys on the touch panel is as follows:
Convention Description Example
Bold Indicates the operation
panel keys, the buttons
and messages displayed
on the PC screen.
Press the Start key.
[Regular] Indicates the touch panel
keys.
Press [OK].
Italic Indicates the messages
displayed on the touch
panel.
Ready to copy is
displayed.
Note Indicates supplemental
information or operations
for reference.
NOTE: —
Important Indicates items that are
required or prohibited so
as to avoid problems.
IMPORTANT: —
Actual procedure
Description in this
Operation Guide
Press [FAX].
T
Press [Next] of Transmission.
T
Press [Next] of Basic.
T
Press [Change] of TTI.
Press [FAX], [Next] of
Transmission, [Next] of Basic, and
then [Change] of TTI.
Page 17
xv
Originals and Paper Sizes
This section explains the notation used in this guide when referring to sizes of originals or paper sizes.
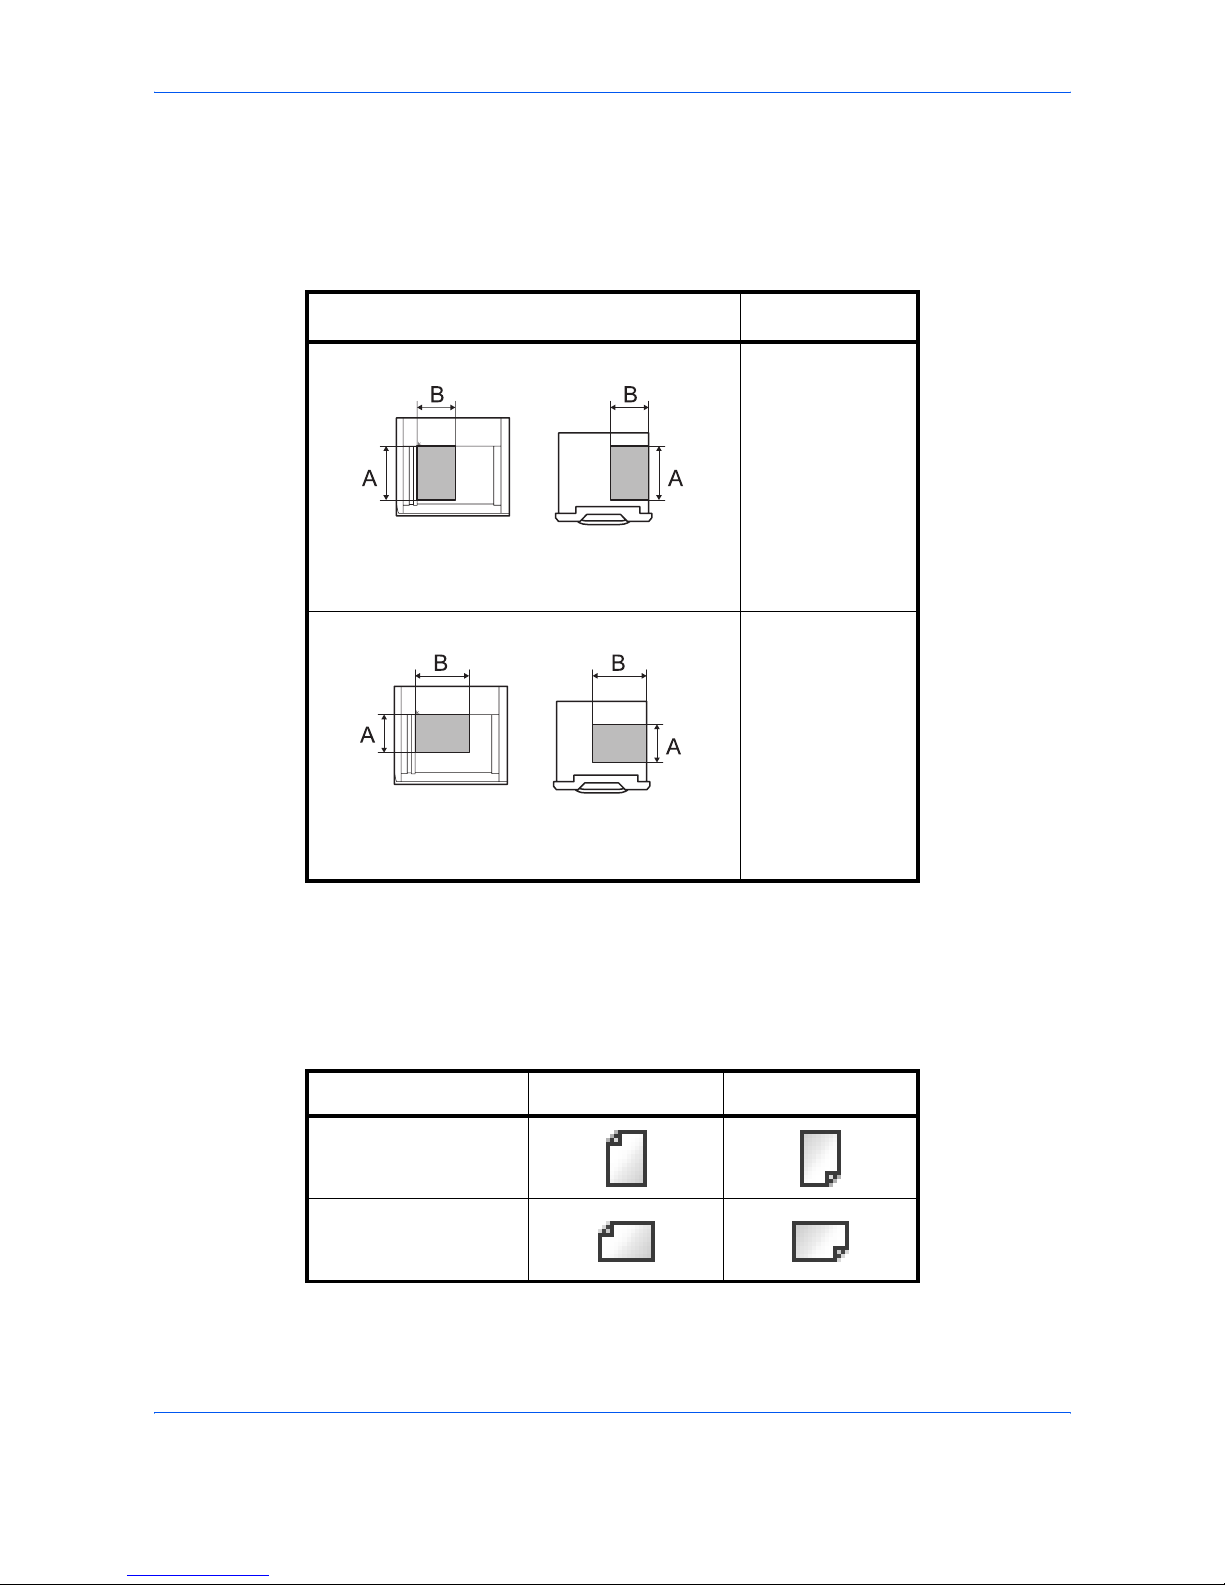
As with A4, B5 and Letter, which may be used either in the horizontal or vertical direction, horizontal direction is
indicated by an additional letter R in order to indicate the orientation of the originals/paper.
Icons on the Touch Panel
The following icons are used to indicate originals and paper placement directions on the touch panel.
Placement direction
Indicated size
†
†. The size of the originals/paper that can be used depends on the
function and source tray. For details, refer to the appropriate pages
of the function or source tray.
Vertical direction
For the originals/paper, dimension A is longer
than B.
A4, B5, A5, B6,
A6, Letter,
Statement
Horizontal direction
For the originals/paper, dimension A is shorter
than B.
A4-R, B5-R, A5-R,
B6-R, A6-R,
Letter-R,
Statement-R
Placement direction Originals Paper
Vertical direction
Horizontal direction
Original Paper
Original Paper
Page 18

xvi
Page 19

1-1
1
Part Names and Functions
This chapter explains the names of parts when the machine is used as a fax machine after
installing the FAX kit.
For other parts, refer to the machine’s Operation Guide.
• Operation Panel...................................................................................................... 1-2
• Machine .................................................................................................................. 1-4
Page 20
Part Names and Functions
1-2
Operation Panel
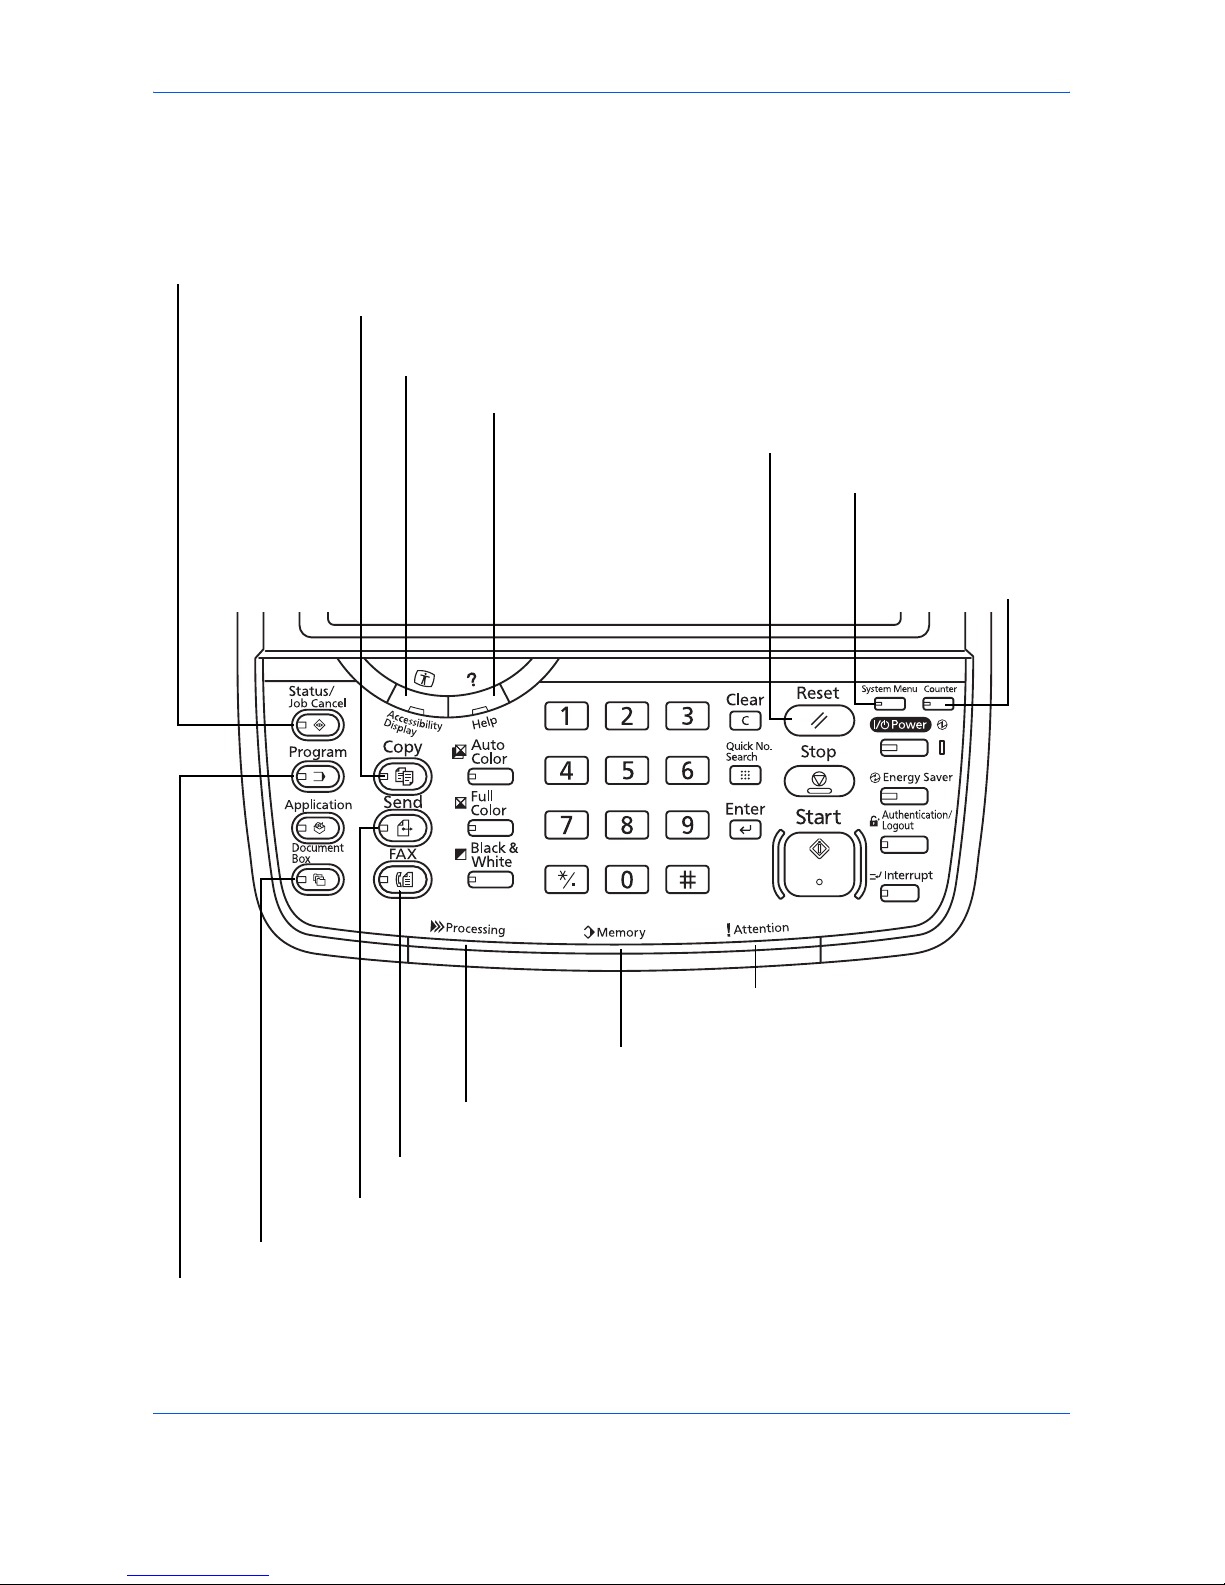
For the names of keys and indicators required when functions other than FAX are used, refer to the machine’s
Operation Guide.
* The operation panel may differ from the above illustration depending on the type of your machine.
Displays the Copy screen.
Displays the screen for sending.
Switches the touch panel display to enlarged display in the
Copy screen, Send screen or FAX screen.
Displays the Document Box screen.
Blinks during printing, fax sending and receiving,
scan send, and print data receiving.
Displays help guidance.
Displays the Status/Job Cancel screen.
Displays the FAX screen.
Blinks while the machine is accessing the hard disk,
fax memory or USB memory (general-purpose item).
Lights or blinks when an error occurs
and a job is stopped.
Displays the System Menu.
Returns settings to their default states.
Displays number
of sheets printed
and number of
pages scanned.
Displays the Program screen.
Page 21
Part Names and Functions
1-3
1
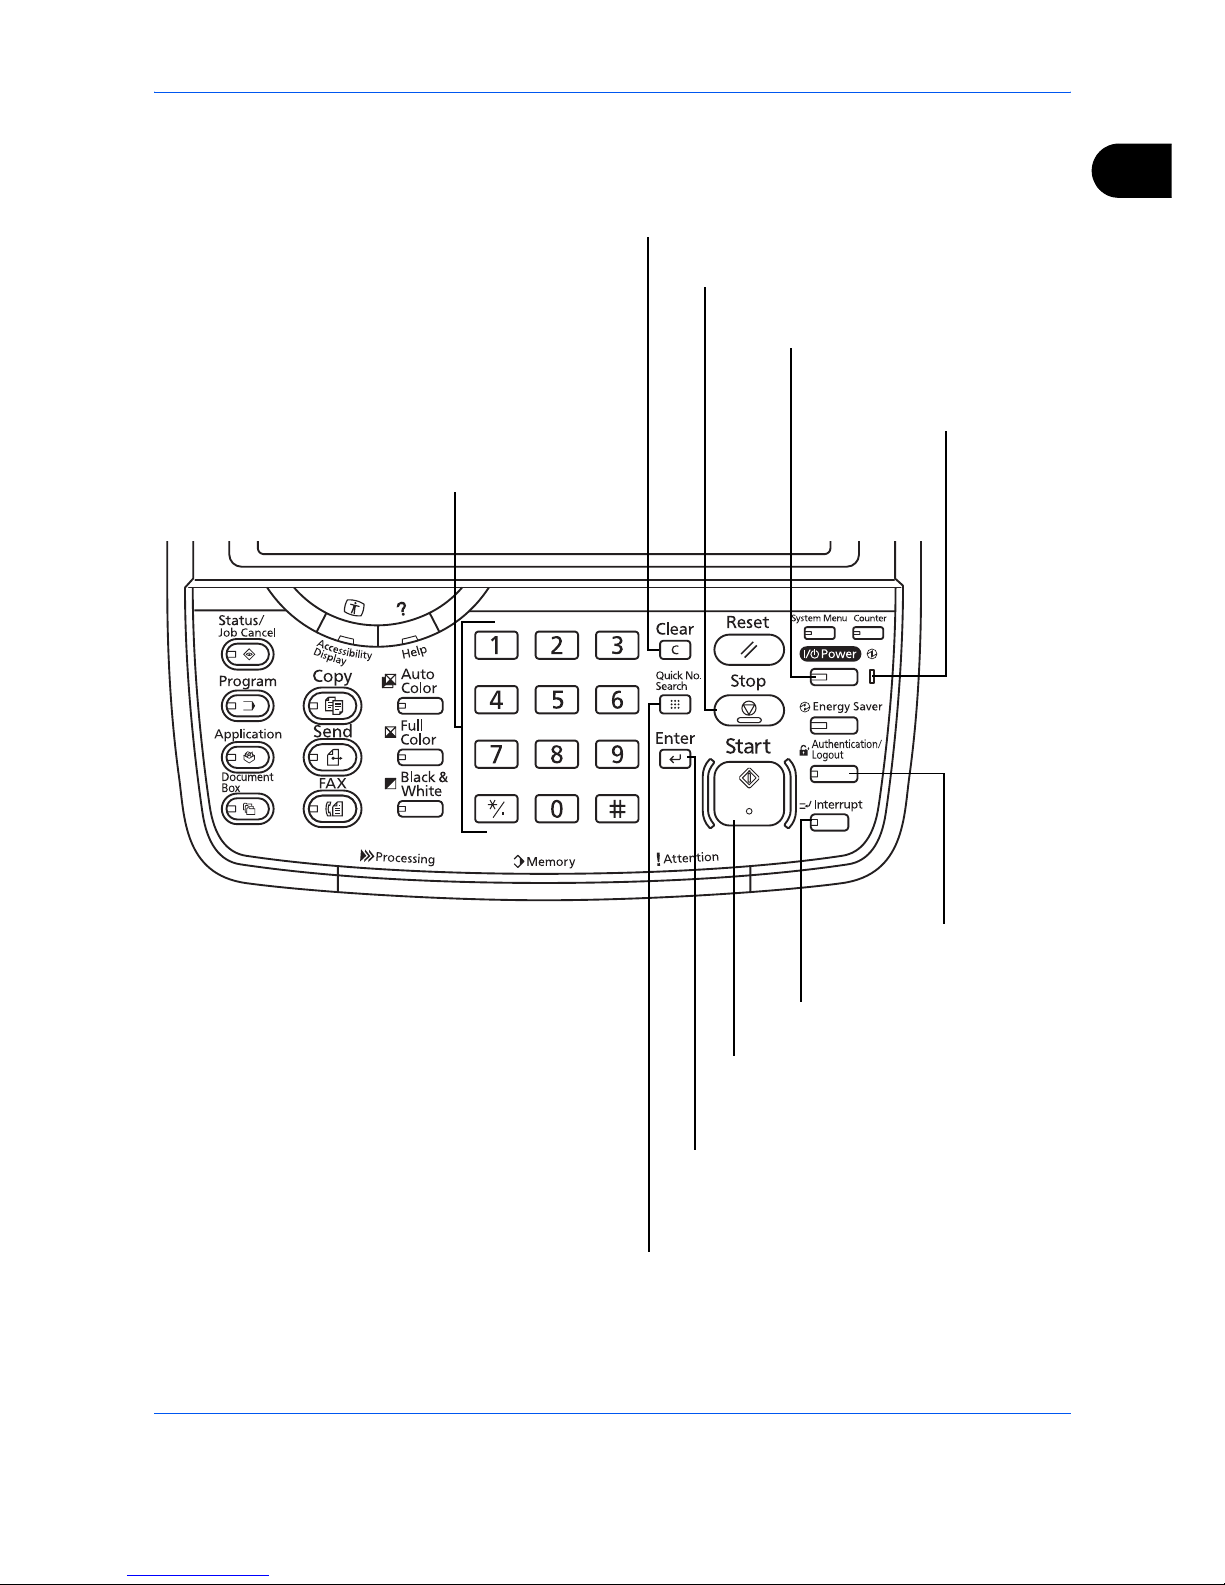
* The operation panel may differ from the above illustration depending on the type of your machine.
Lit when the machine's
main power is on.
Perform user switching
authentication and logout.
Displays the Interrupt Copy screen.
Pauses the printing job in progress.
Starts faxing, copying and scanning
operations and processing for setting
operations.
Finalizes numeric key entry, and finalizes screen
during setting of functions. Operates linked with
the on-screen [OK].
Recalls already registered destinations
and programs for sending.
Clears entered numbers and characters.
Numeric keys.
Enter numbers and symbols.
Puts the machine into Sleep Mode.
Recovers from Sleep if in Sleep Mode.
Page 22
Part Names and Functions
1-4
Machine
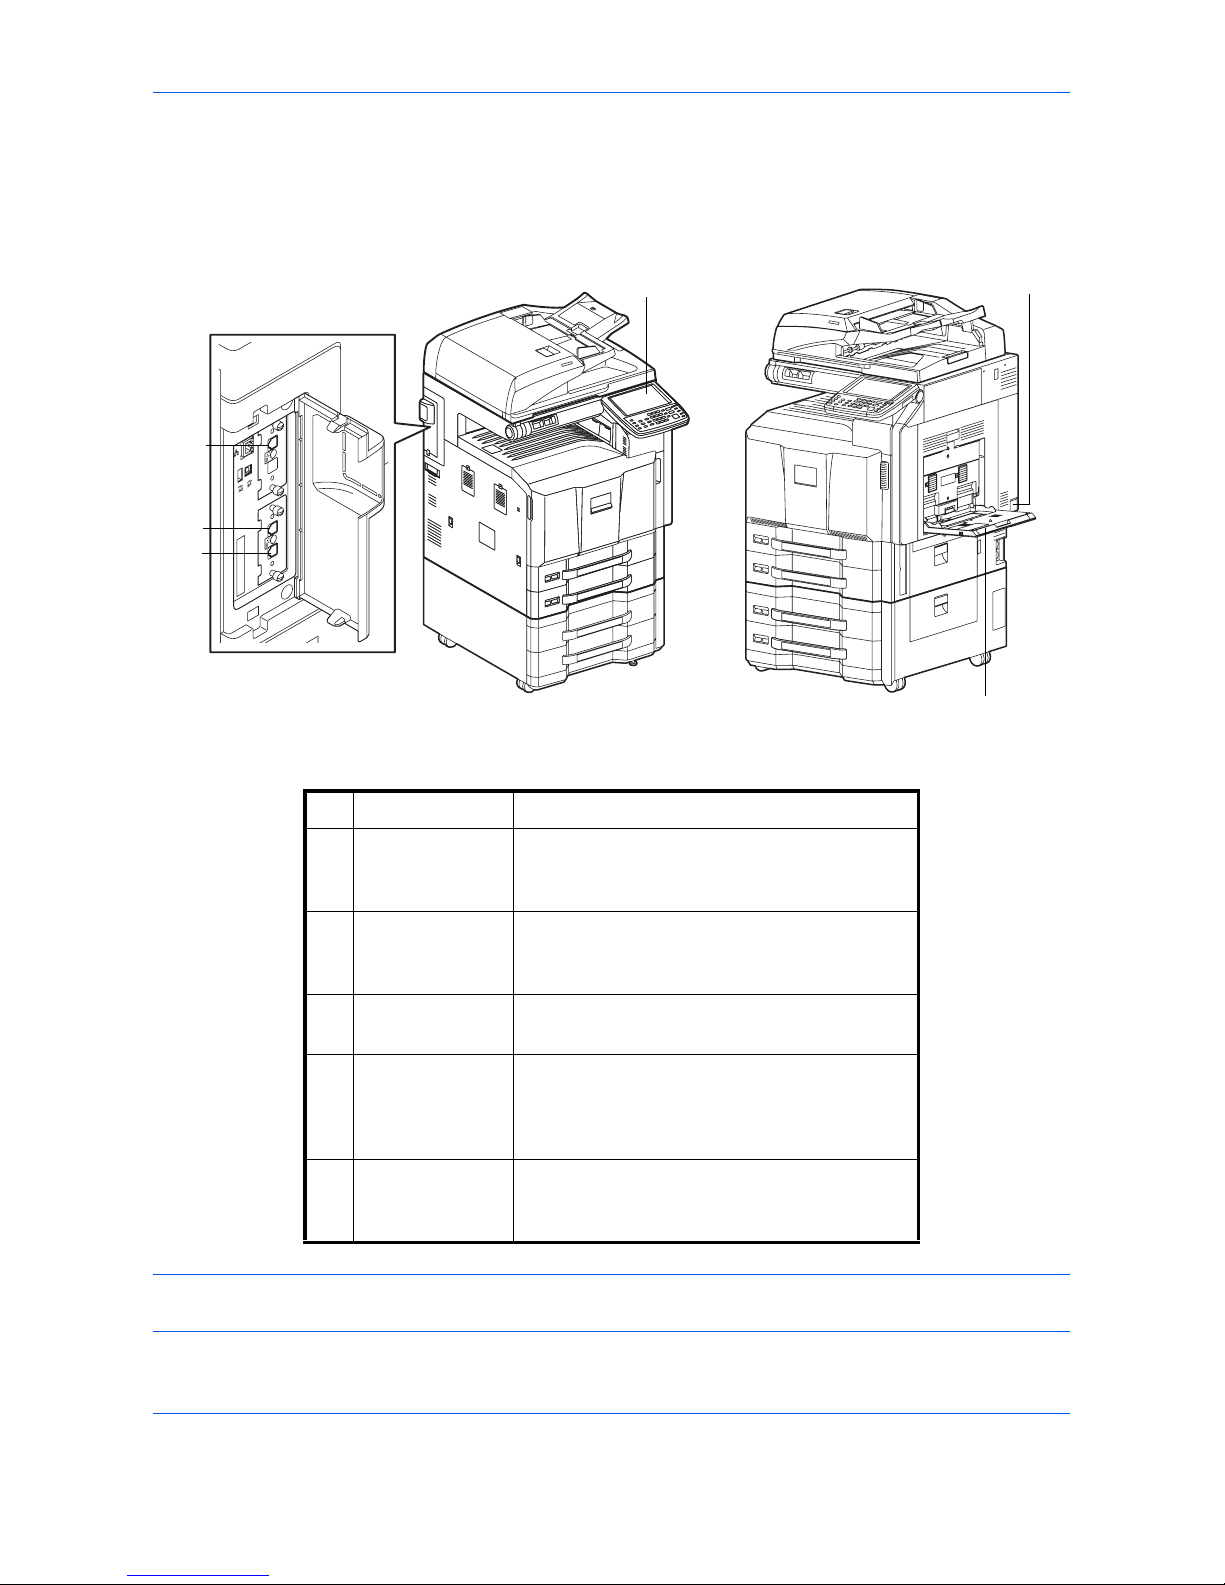
This chapter explains the names of parts when the machine is used as a fax machine.
For the parts required when functions other than FAX are used, refer to the machine’s Operation Guide.
* The machine may differ from the above illustration depending on the type of your machine.
IMPORTANT: You cannot receive a fax when the main power switch is turned off. To receive faxes with the
power turned off, press the Power key on the operation panel.
1
5
4
6
3
2
1 Operation panel Perform the fax operation with this panel.
2 Main power
switch
Set this switch to the ON (|) side when
performing the fax or copier operation. The
touch panel lights to enable operation.
3MP (Multi
Purpose) tray
Set the paper in this tray when using a type of
paper other than the cassette (e.g., when
using special paper).
4 LINE connector
(L1)
Connect the modular cord for the telephone
line to this connector. This connector is Port 1.
5 LINE connector
(L2)
If you install 2 optional FAX Kits (Dual FAX
option), you can use Port 2. Connect the
modular cord for the telephone line to this
connector.
6 TEL connector
(T1)
When using a commercially available
telephone set, connect the modular cord to
this connector.
Page 23
Part Names and Functions
1-5
1
Document Processor (optional)
* The machine may differ from the above illustration depending on the type of your machine.
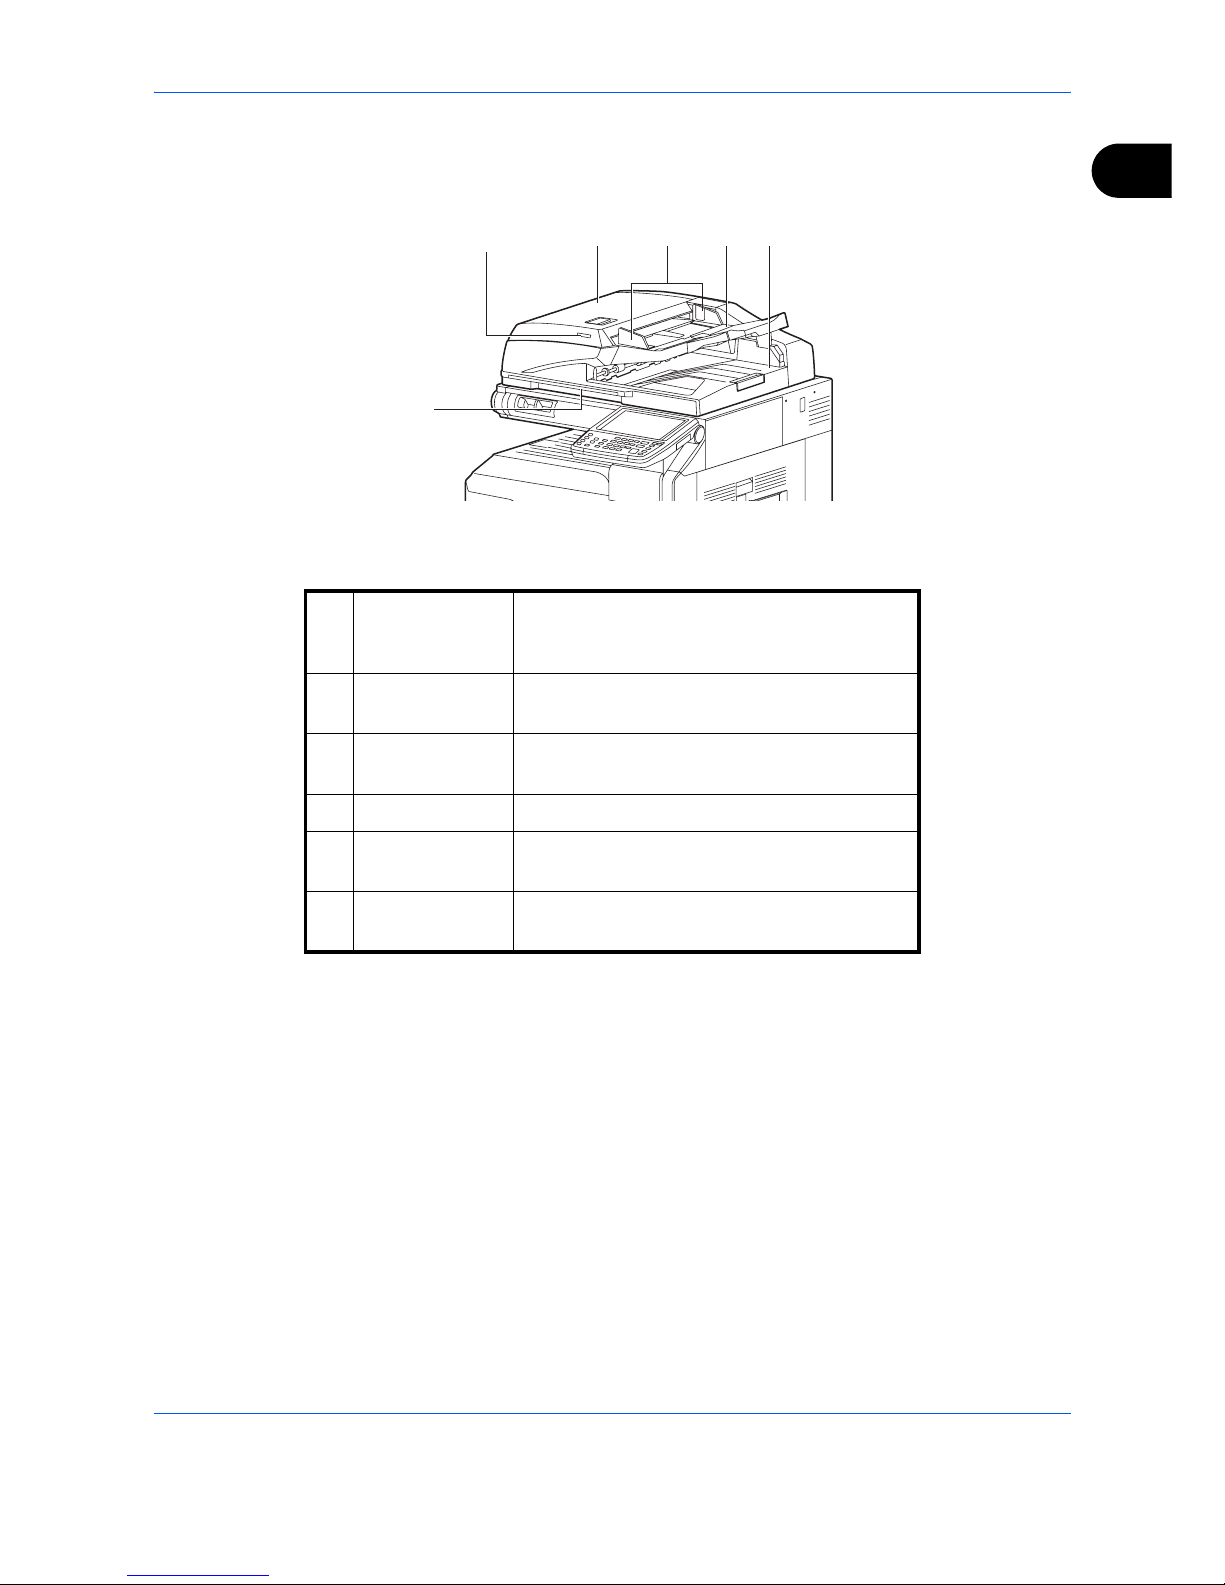
8910117
12
7Original
placement
indicator
Indicates the original status in the Document
Processor. The indicator lights in green when
the original is correctly set.
8 Top cover Open this cover when the original jammed in
the Document Processor.
9 Original width
guides
Adjust these guides according to the original
width.
10 Original table Stack the sheet originals on this table.
11 Original eject
table
Read originals are ejected onto this table.
12 Opening handle Hold this handle when opening or closing the
Document Processor.
Page 24

Part Names and Functions
1-6
Page 25

2-1
2 Preparation Before Use
This chapter explains the preparation necessary before the machine is used.
There is no need for the customer to undertake this preparation if it has already been carried
out by a service representative.
• Quick Setup Wizard (Fax Setup) ............................................................................ 2-2
• Date and Time Entry ............................................................................................... 2-4
• Using the Address Book ......................................................................................... 2-5
• Using One-touch Keys.......................................................................................... 2-14
Page 26

Preparation Before Use
2-2
Quick Setup Wizard (Fax Setup)
In quick setup mode, a wizard is used to configure the following settings Be sure to complete the settings before
using the fax system.
Fax setup items
NOTE: The settings can be changed in the system menu.
Step Setting item Description
Reference
Page
1.Dialing/RX
Mode
Dialing Mode(Port 1)
Dialing Mode(Port 2)
Select the dialing mode according to the line
type.
6-2
Reception Mode Select the reception mode. 6-14
Auto (DRD) Select the reception pattern. 6-19
2.Local FAX
info.
Local FAX Name(Port 1)
Local FAX Name(Port 2)
Register the local fax name printed on the fax
on the receiving system.
6-4
Local FAX Number(Port 1)
Local FAX Number(Port 2)
Enter the local fax number to be printed on the
fax on the receiving system.
6-5
Local FAX ID Enter the local fax ID. The local fax ID can limit
other parties with which you can communicate.
Enter the four-digit local FAX ID number.
6-5
TTI Select whether or not to print the local fax
information on the fax on the receiving system.
6-3
3.Sound
Volume
FAX Speaker Volume Set the volume when pressing [On Hook].
Speaker Volume: Volume of the built-in
speaker when the line is connected by
pressing [On Hook].
6-12
FAX Monitor Volume Set the monitor volume.
Monitor Volume: Volume of the built-in speaker
when the line is connected without pressing
[On Hook] such as in memory transmission.
6-12
4.Rings Rings(Normal) Set number of times to let phone ring before
answering a call.
6-11
Rings(TAD) Set number of times to let phone ring before
switching to the answering machine.
6-9
Rings(FAX/TEL) Set number of times to let phone ring before
switching the FAX and the phone.
6-11
5.Output Paper Output (Port 1)
Paper Output (Port 2)
Select paper output for the received FAX. 6-39
Reduced RX Size Reduces the received FAX size before printing
if the size is larger than the current paper size.
6-34
6.Redial Retry Times Set the number of redials. 6-13
Page 27
Preparation Before Use
2-3
2
Fax setup procedure
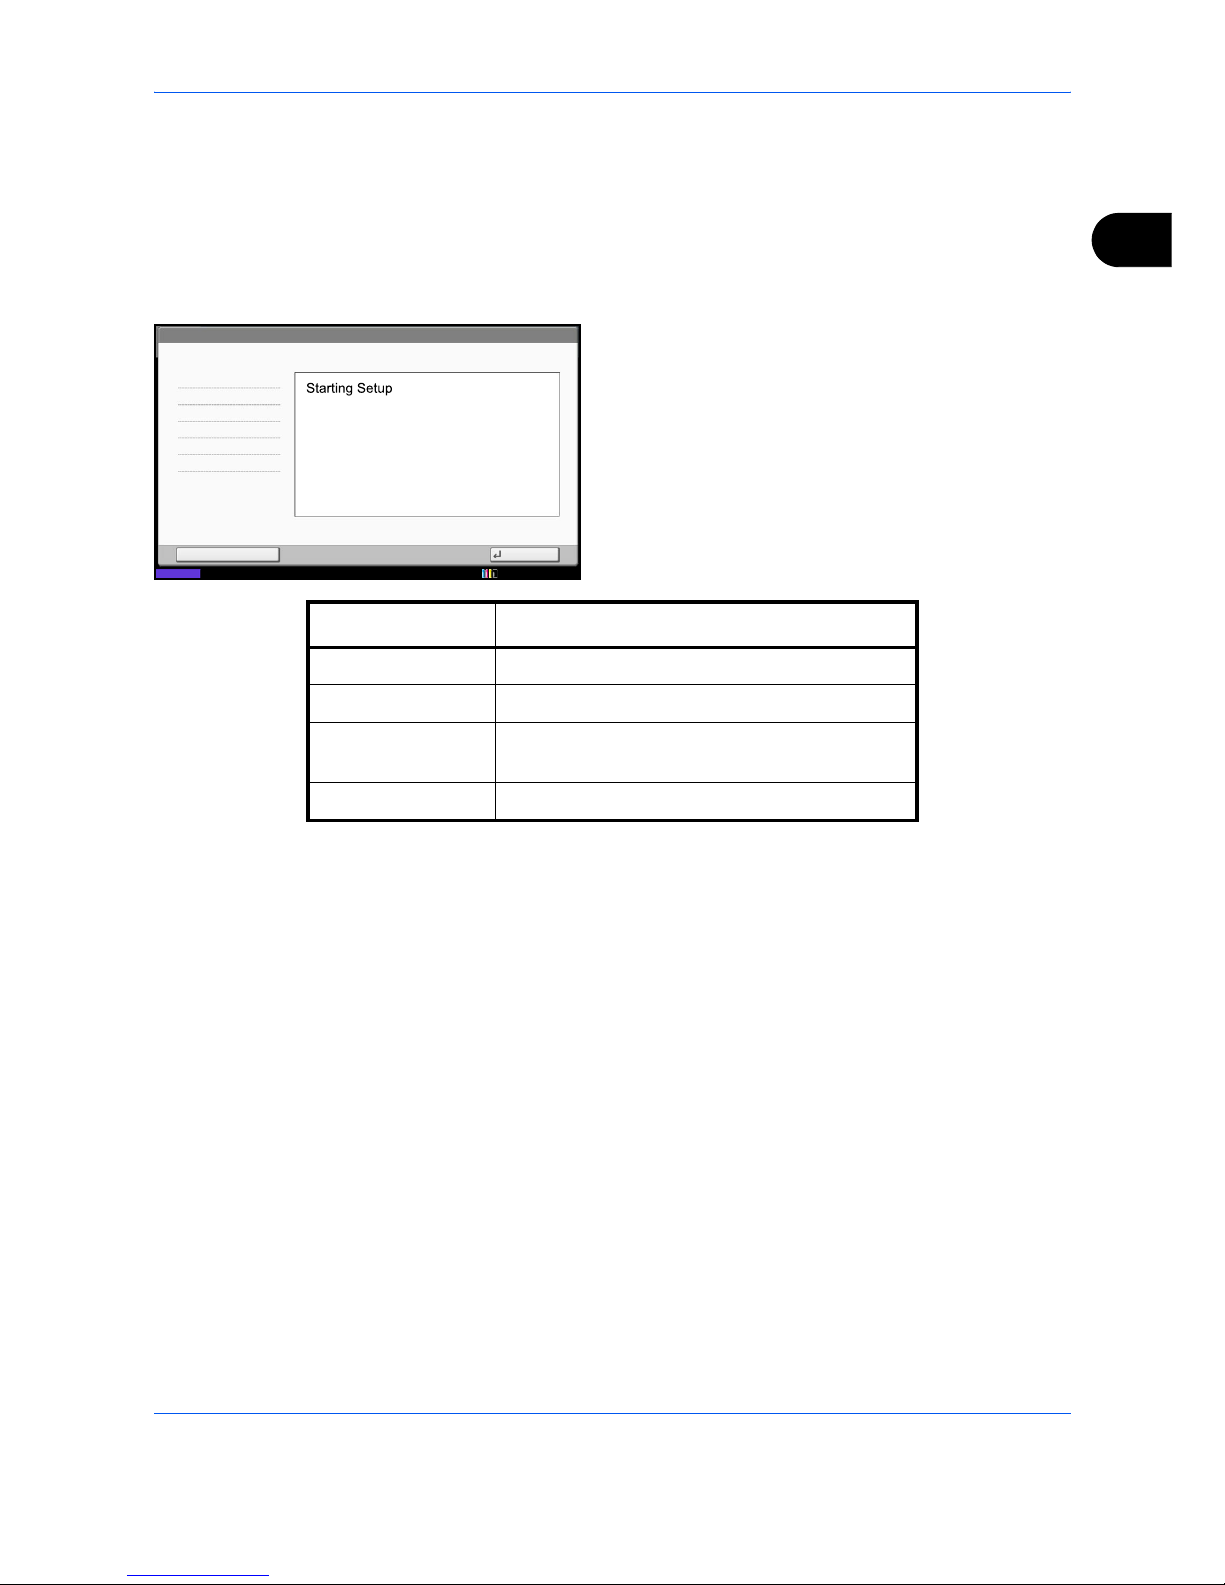
1 Press the System Menu key.
2 Press [Quick Setup Wizard], [FAX Setup], and then
[Next].
Start the wizard.
3 Select the region and press [OK].
4 When setup is finished, press [Finish].
End Next
FAX - Quick Setup Wizard
1. Dialing/RX Mode
This wizard will help you set the basic settings
to use the fax.
10/10/2010
Status
2. Local FAX info.
3. Sound Volume
4. Rings
5. Output
6. Redial
Key Description
End Exits the wizard.
<< Previous Returns to the previous item.
Skip >> Advances to the next item without setting the
current item.
Next > Advances to the next item.
Page 28
Preparation Before Use
2-4
Date and Time Entry
Register the date and time of the machine’s built-in clock. Because the FAX delayed transmission is conducted
based on the time registered here, be sure to register the correct date and time.
IMPORTANT: Correct the time displayed on the touch panel of the operation panel regularly. Otherwise, the
time displayed may eventually deviate from the current time.
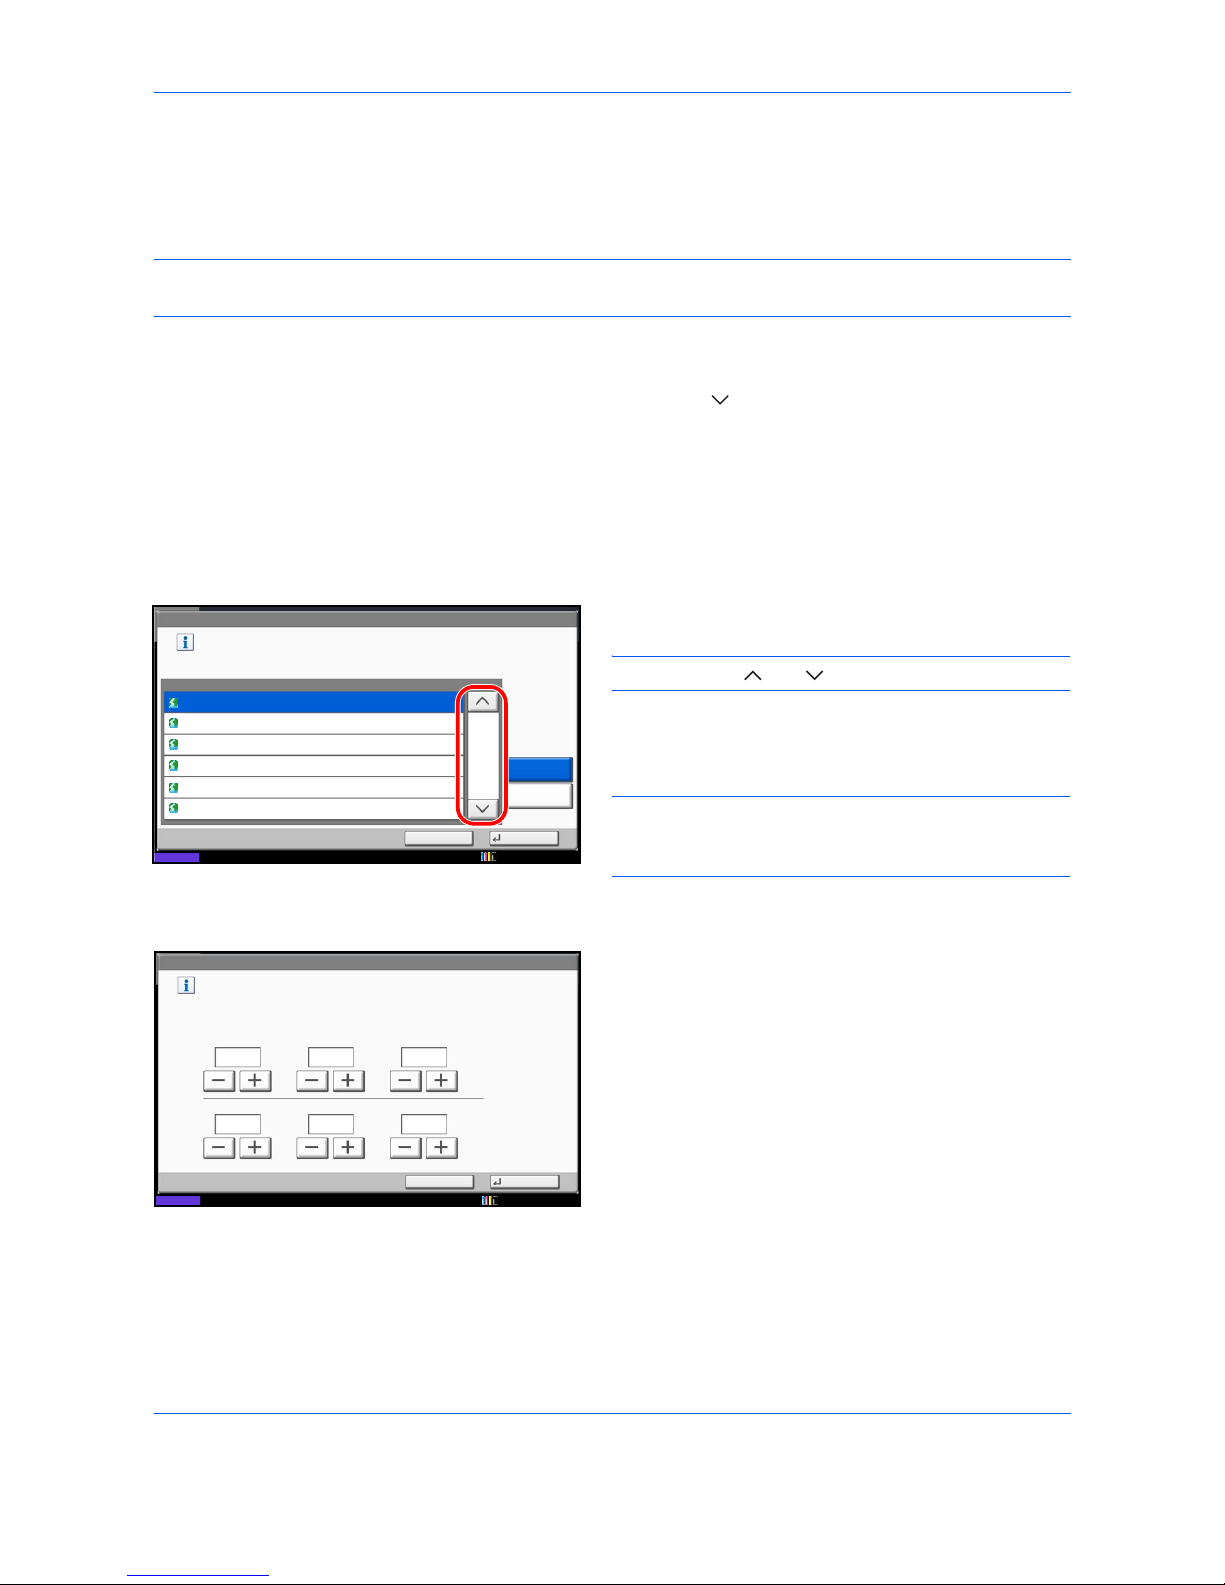
1 Press the System Menu key.
2 Press [ ], and then [Date/Timer].
The user authentication screen is displayed. Enter
a login user name and password, and press
[Login].
The factory default settings for the login user name
and password are both ‘Admin’.
3 Press [Change] of Time Zone.
4 Select the region and press [OK].
NOTE: Press [ ] or [ ] to view the next region.
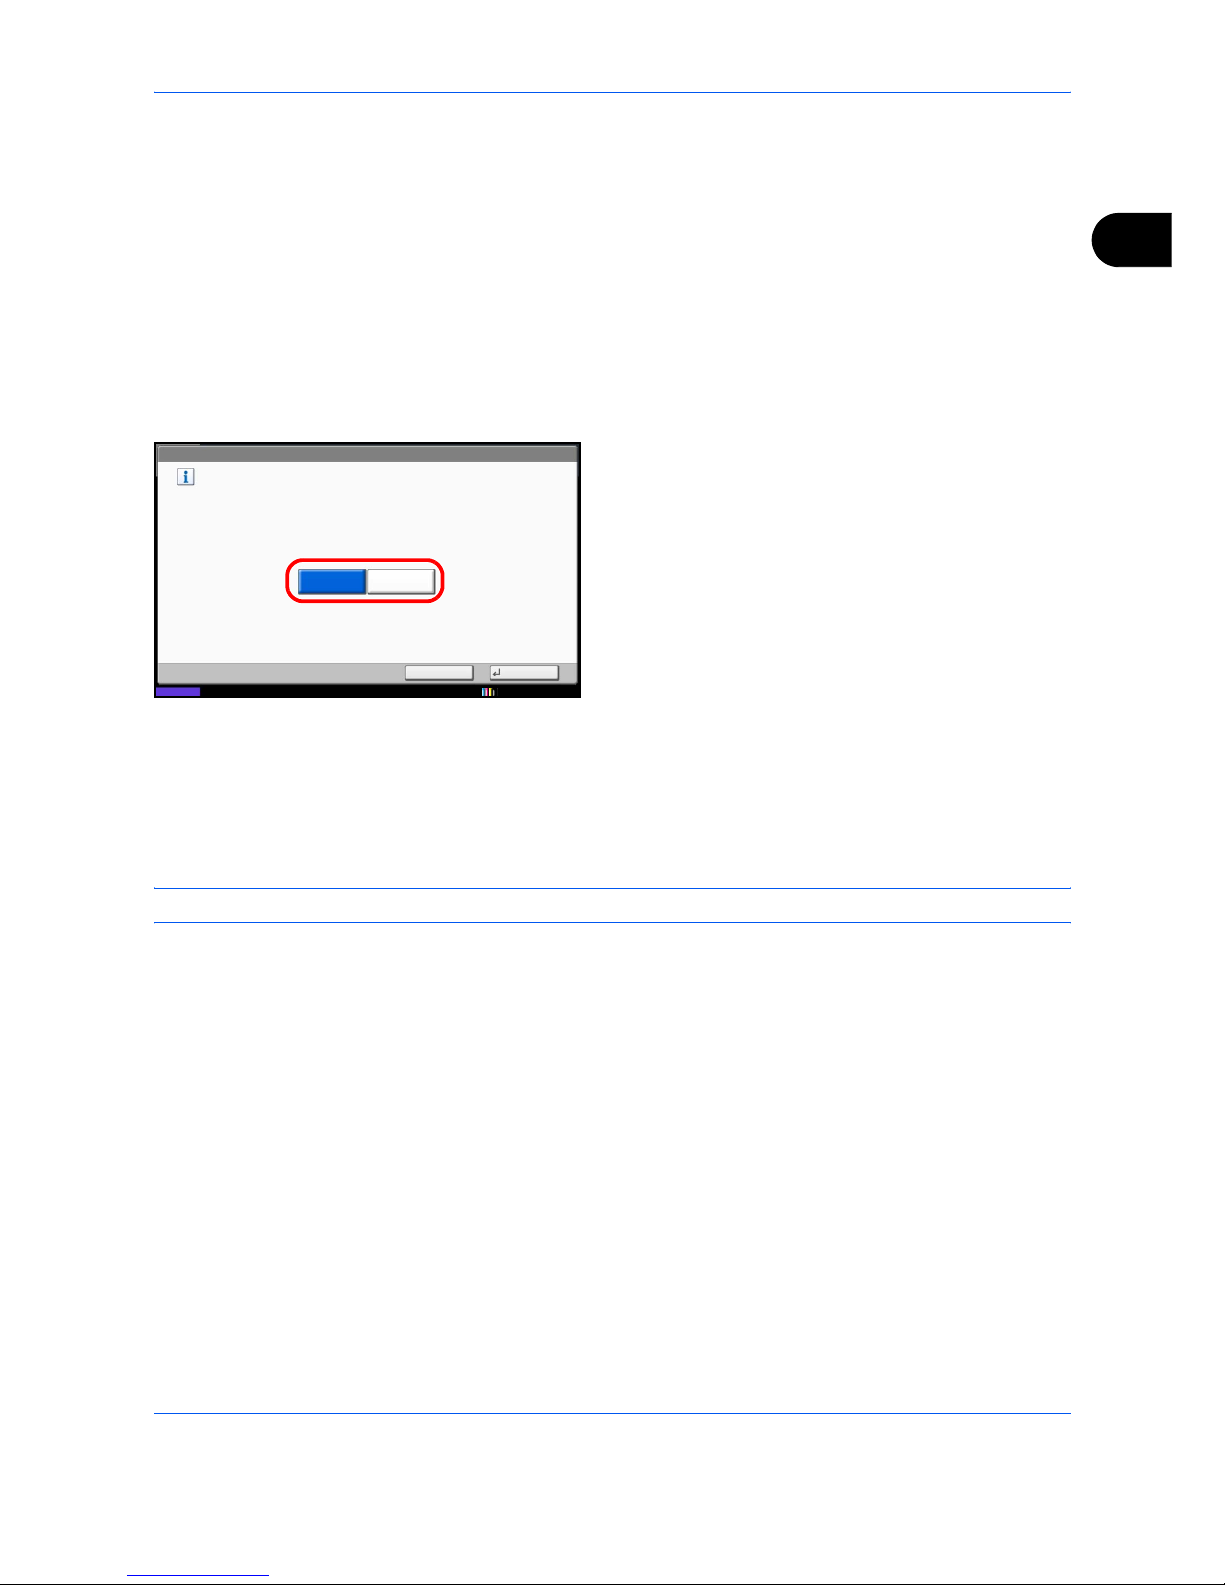
5 Press [Off] or [On] of Summer Time and then press
[OK].
NOTE: If you select a region that does not utilize
summer time, the summer time setting screen will not
appear.
6 Press [Change] of Date/Time.
7 Enter the date and time using [+]/[-]. Enter the time
by a 24-hour system.
8 Press [OK].
Date/Timer - Time Zone
Set time zone.
Select the location nearest you.
Zone
-12:00 International Date Line West
1/13
-11:00 Samoa
-10:00 Hawaii
-09:00 Alaska
-11:00 UTC-11
-08:00 Baja California
Summer Time
Off
On
Status 10/10/2010 10:10
Cancel
OK
Date/Timer - Date/Time
Set the date and time.
Off
DayMonthYear
SecondMinuteHour
2010
10 10 31
10 10
Status 10/10/2010 10:10
Cancel
OK
Page 29
Preparation Before Use
2-5
2
Using the Address Book
You can select the destination for a fax or i-FAX from the Address Book.
You can select [Ext Address Book] to use an LDAP address book.
Changing the initially displayed address book
Set the initially displayed address book to [Machine Address Book] or [Ext Address Book] (LDAP address book).
1 Press the System Menu key.
2 Press [Edit Destination], [Next] of Address Book
Defaults, and then [Change] of Address Book Type.
3 Select the items that you want to set from [Machine
Address Book] or [Ext Address Book], and press
[OK].
Registering a New Destination
You can register new destinations to the Address Book. There are two registration methods - contact
registration; and, group registration for registering several contact registrations as a unit.
NOTE: To register an i-FAX address as a contact, refer to Contact Registration (i-FAX) on page 2-8.
Contact Registration (fax)
Up to 2,000 destinations can be registered. Destination name, fax number, sub address communication,
encryption, transmission start speed, and ECM communication can be registered for each destination.
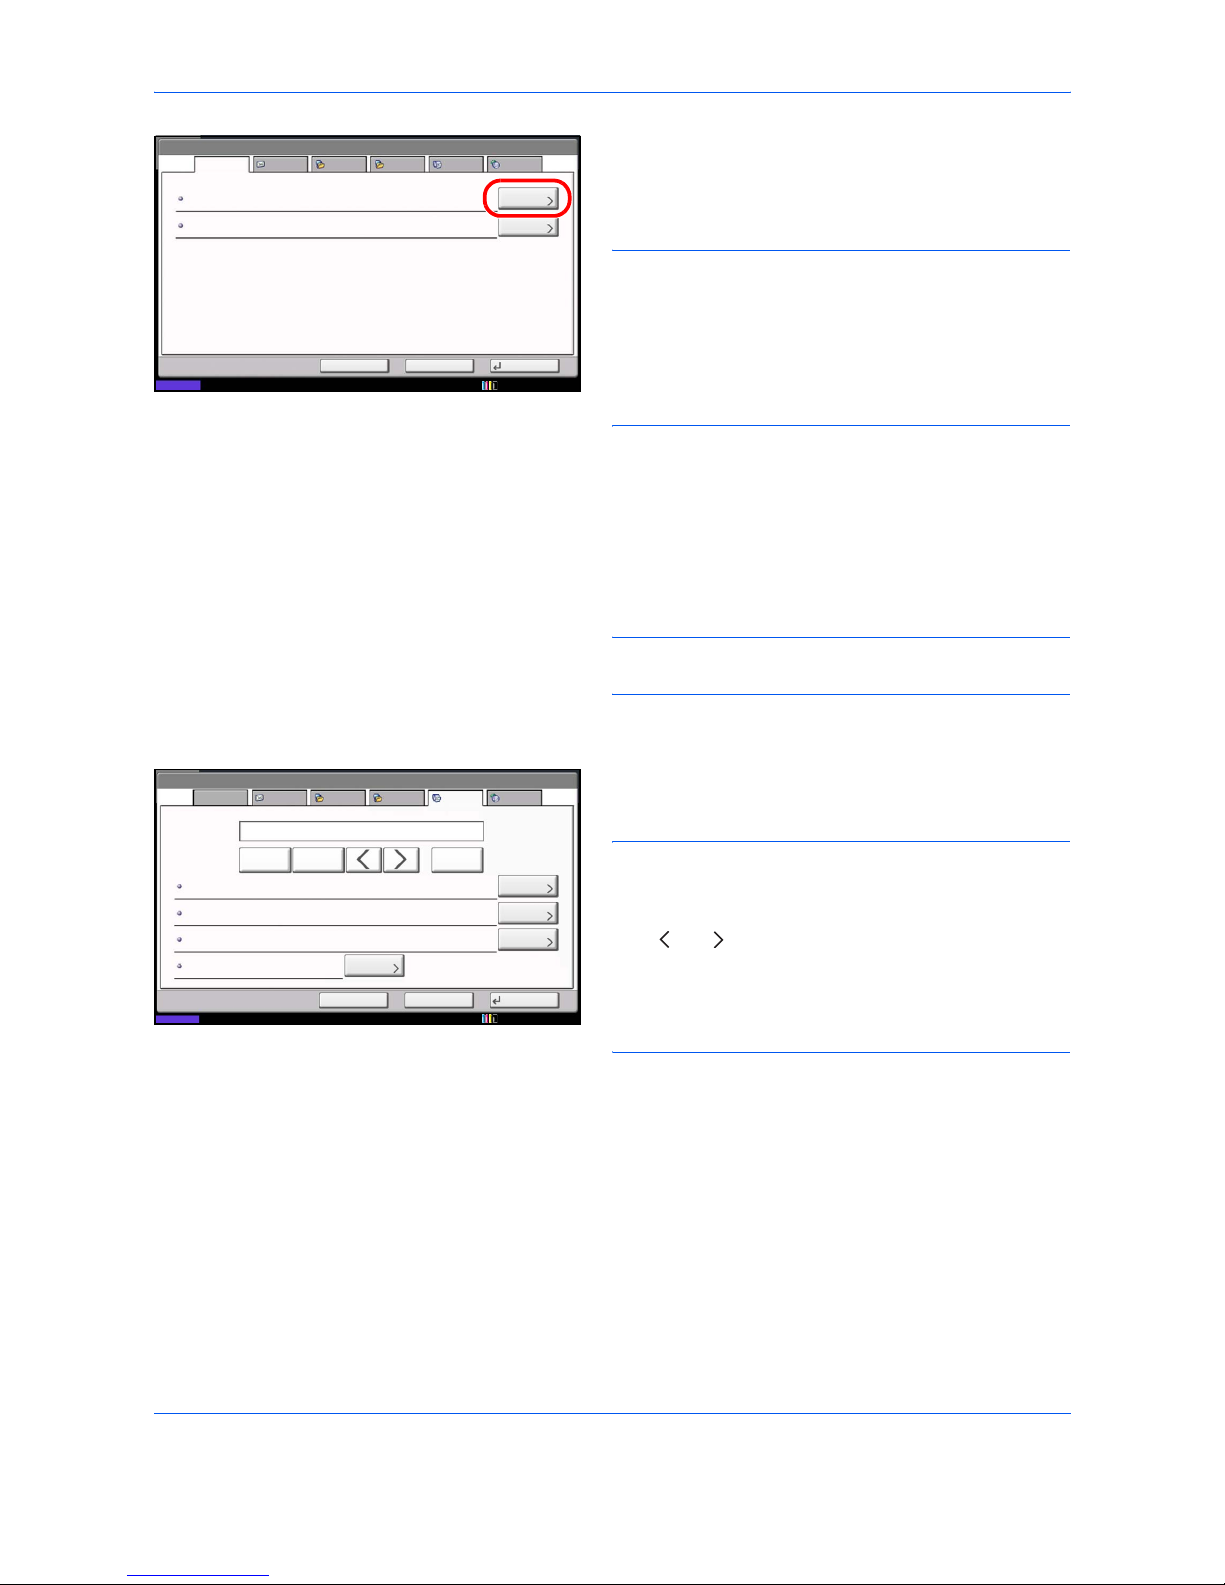
1 Press the System Menu key.
2 Press [Edit Destination], [Register/Edit] of Address
Book, [Add], [Contact], and then [Next].
Select the default Address Book Type setting.
Cancel OK
Edit Destination - Address Book Type
Machine
Address Book
Ext
Address Book
10/10/2010 10:10
Status
Page 30
Preparation Before Use
2-6
3 Press [Change] of Address Number.
4 Using [+]/[-] or the numeric keys, enter the custom
address number (0001 to 2,500).
NOTE: The address number is the identification
number for each destination. You can select a number
available from a total of 2,500 numbers for registration 2,000 numbers for contact registration and 500
numbers for group registration.
When ‘0000’ is displayed, an available number is
automatically assigned.
5 Press [OK].
6 Press [Change] of Name.
7 Enter the destination name to be displayed on the
Address Book, and press [OK]. Up to 32 characters
can be entered.
NOTE: For details on character entry, refer to
Character Entry Method on page 2 of the Appendix.
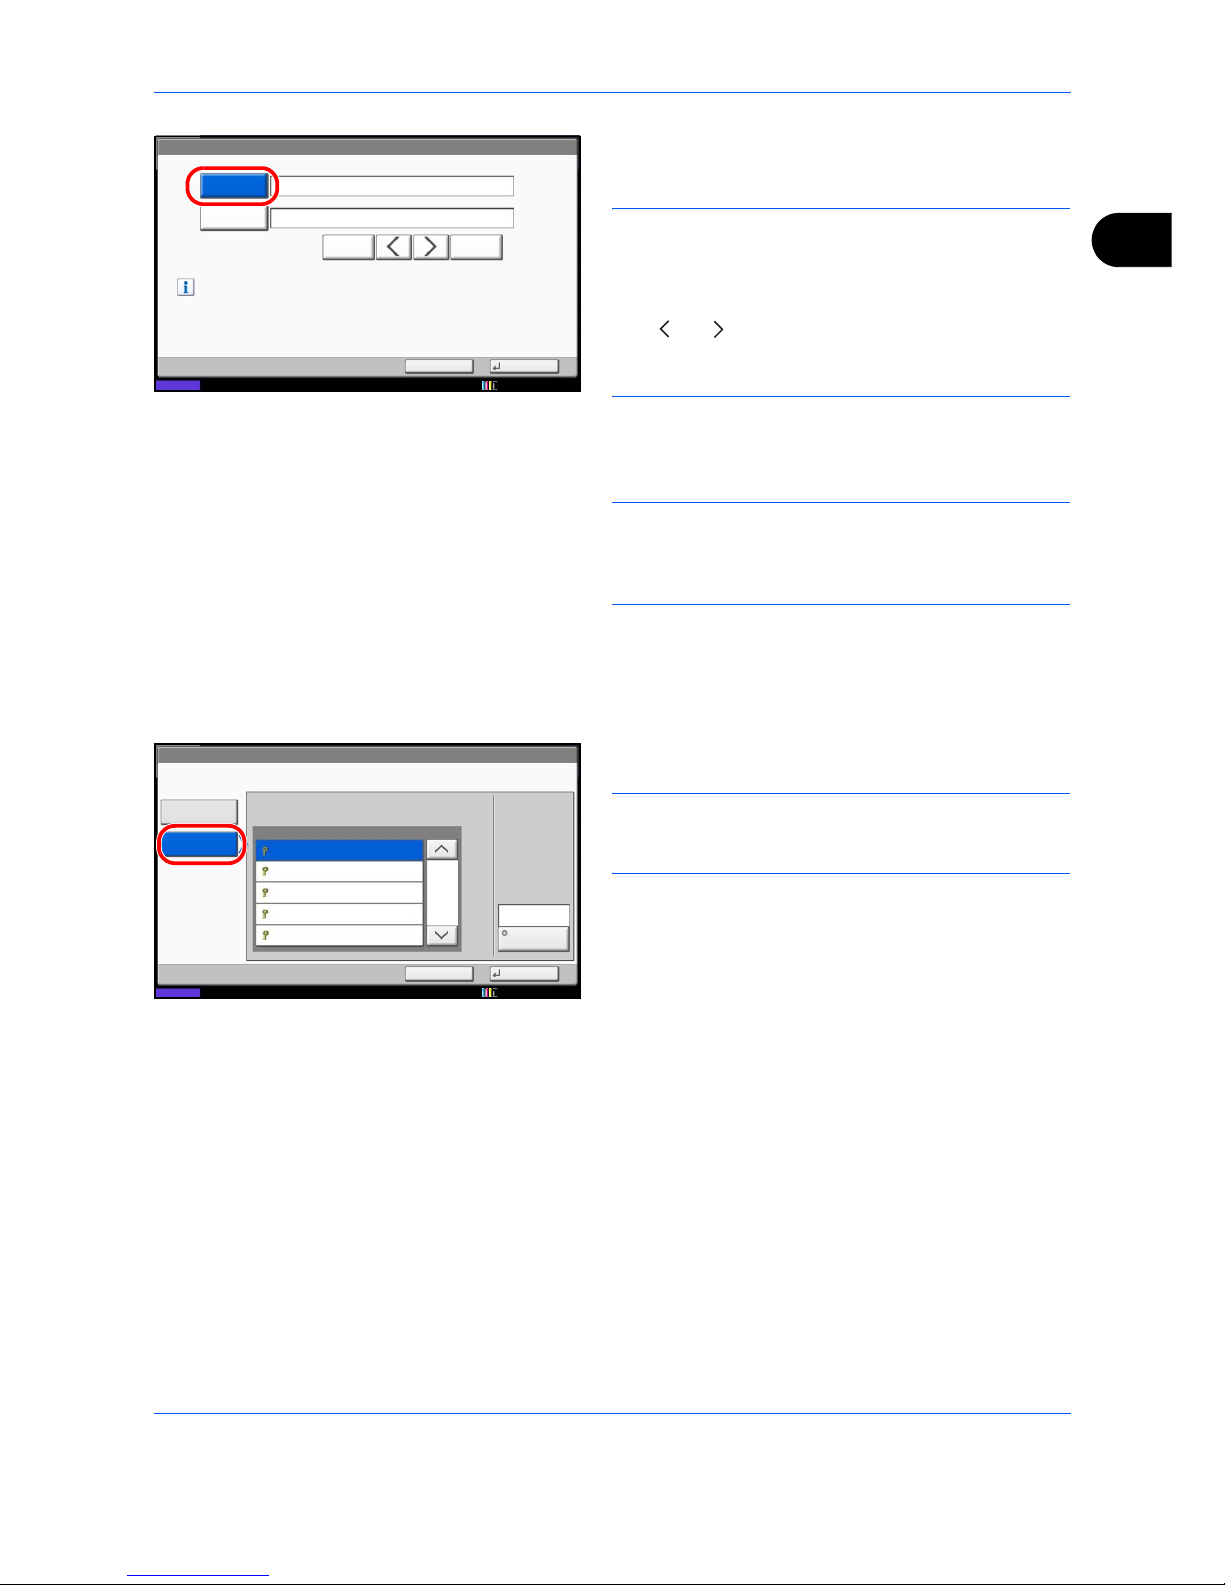
8 Press [FAX].
9 Use the numeric keys to enter the number of the
receiving system.
NOTE: Up to 32 digits can be entered as the number
of the receiving system.
Press [Space] to enter a space.
Use [ ] or [ ] to move the cursor.
To correct the fax number, press [Backspace] on the
touch panel, and delete the digits one by one before
reentering the fax number. To delete the number
entirely, press the Clear key on the operation panel.
[Pause]
Pressing this key adds about three seconds of waiting
time during dialing. For example, when dialing the
receiving system on an external line, you can use this
method to insert a pause before resuming dialing after
you dial a specific number.
10 Press [Change] of Sub Address. When you do not
use sub address communication, go to step 14.
Address:
Change
Register
Address Number
Name
0033
BackCancel
Name Mike
E-mail SMB FTP FAX i-FAX
Status
10/10/2010 10:10
:
Change
:
Cancel Register
Address:
ECM
Change
Pause BackspaceSpace
Name E-mail SMB FTP FAX i-FAX
Back
TX Start Speed
Encryption Key No.
Sub Address :
:
:
:
Change
Change
Change
10/10/2010
Status
On
33600bps
Off
Page 31
Preparation Before Use
2-7
2
11 Press [Sub Address] and enter the sub address
using the numeric keys.
NOTE: You can use up to 20 digits including the
numbers from 0 to 9, ‘ (space)’, ‘#’ and ‘*’ characters to
enter a sub address.
Press [Space] to enter a space.
Use [ ] or [ ] to move the cursor.
Pressing [Backspace] deletes the character to the left of
the cursor.
12 Press [Password] and enter the sub address
password using the numeric keys.
NOTE: You can use up to 20 digits including the
numbers from 0 to 9, ‘ (space)’, ‘#’ and ‘*’ characters to
enter a sub address password. When the machine
receives originals, a sub address password is not used.
13 Press [OK].
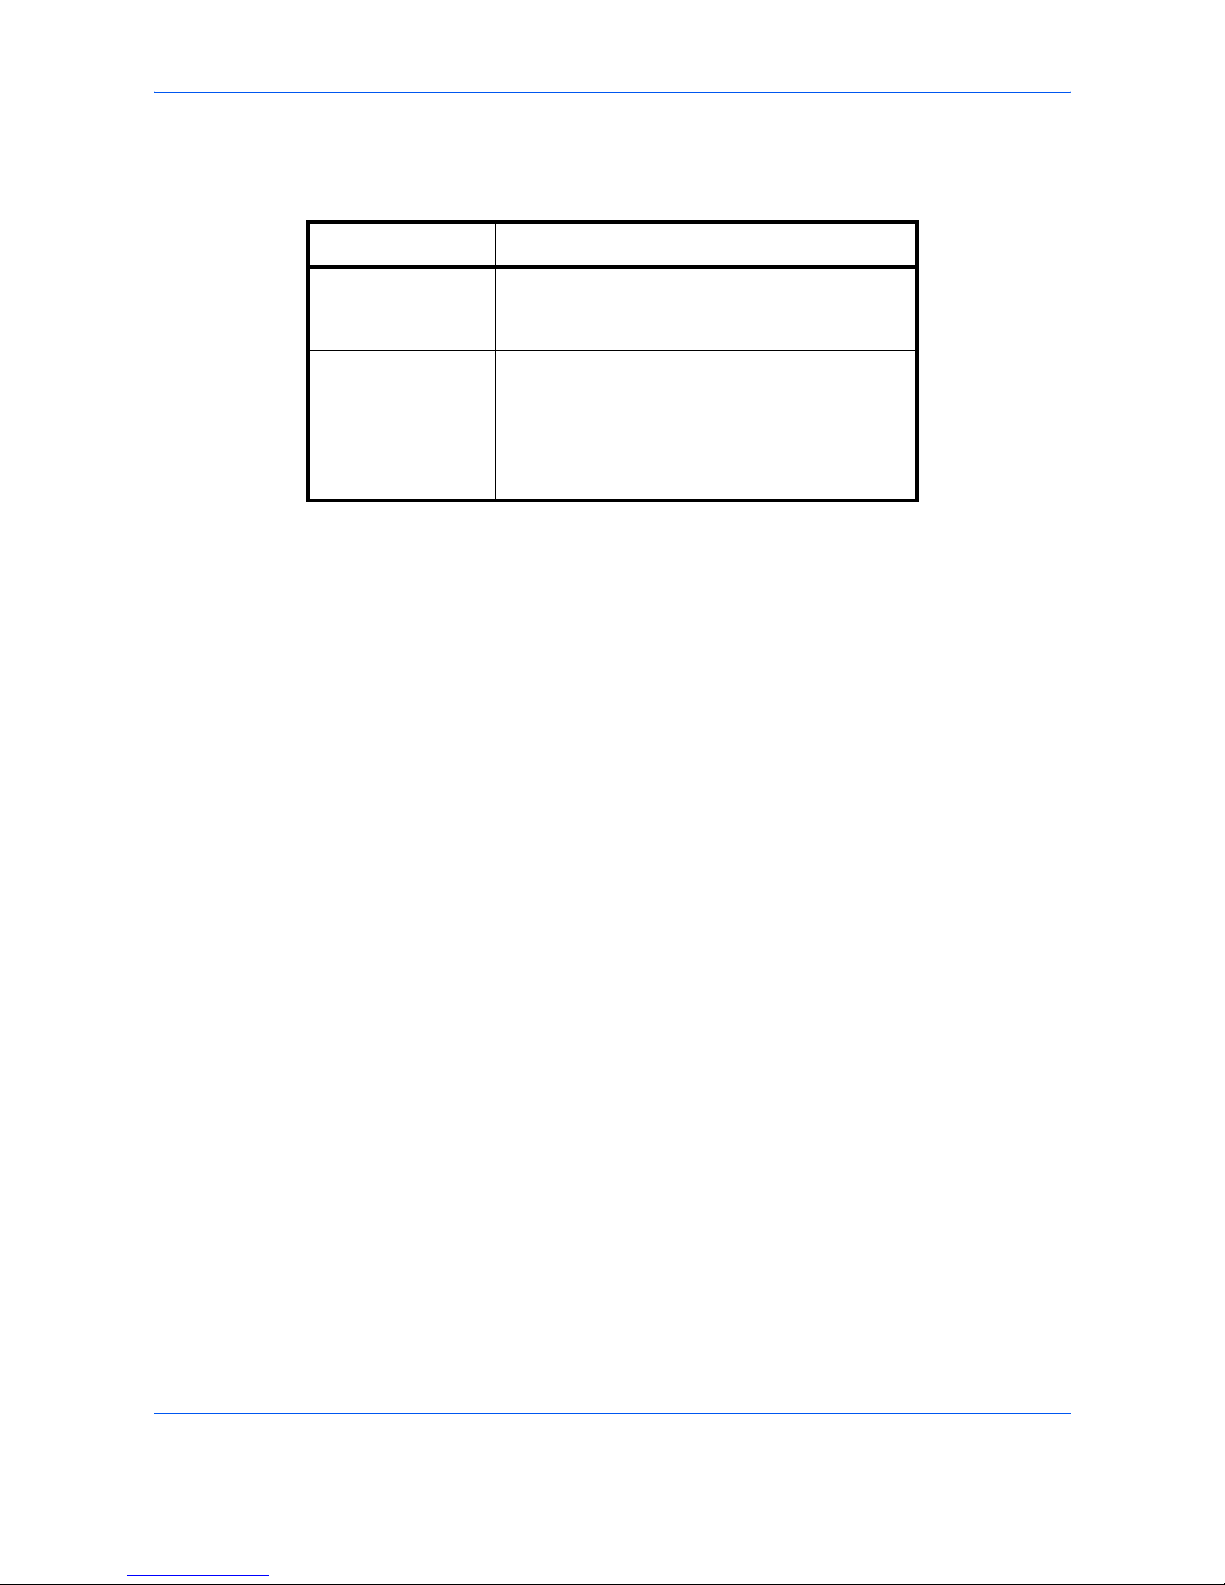
14 Press [Change] of Encryption Key No. If you are
not using encryption, go to step 19.
15 Press [On], and select Encryption Key No.
NOTE: Register the encryption key in advance. For
details, refer to Registering an Encryption Key on
page 6-30.
16 To specify the FAX Box of the receiving system,
press [Encryption Box], and go to the next step.
To print originals in the receiving system, select
[Off], press [OK], and go to Step 19.
17 Press [On], and enter the encryption FAX Box
number (four digits) with the numeric keys, and
press [OK].
18 Press [OK].
Address: - Sub Address
Cancel OK
Sub Address
Password
Set sub address.
Enter sub address and password
using numeric keys. (Max. 20 digits)
1234567890
BackspaceSpace
10/10/2010 10:10
Status
Cancel OK
Address: - Encrypted Transmission
Off
On
Off
Key 01
1/1
Encryption
Box
Encryption Key No.
10/10/2010 10:10
Status
Key 04
Key 05
Key 03
Key 02
Page 32
Preparation Before Use
2-8
19 If necessary, press [TX Start Speed] and [ECM] to
change the settings. Press [Change] of each key to
change the settings, and press [OK].
20 Check if each item has been entered correctly.
21 Check if the destination has been set correctly, and
press [Register]. The destination is added to the
Address Book.
22 The one-touch key registration confirmation screen
appears. Select [Yes] or [No].
If you selected [Yes], the one-touch key registration
screen appears. Go to the next step.
If you selected [No], registration ends.
23 Select the One-touch key number to which to
register the destination, and Press [Next].
24 Select the destination to which to register, and
Press [Next].
The destination details can be changed by
selecting the destination and pressing [Detail].
25 Press [Change] for [Display Name] and
[Destination] to change the settings as needed.
26 Press [Register].
If the one-touch key has already been registered,
the overwrite registration confirmation screen
appears. Press [Yes] or [No].
Contact Registration (i-FAX)
Up to 2,000 contacts can be registered. Contact name, i-FAX address, transmission mode and the conditions
for the destination machine can be registered for each contact.
1 Press the System Menu key.
Key Description
TX Start Speed To change the transmission start speed, press
this key. Select the speed from 33,600 bps,
14,400 bps, and 9,600 bps.
ECM ECM (error correction mode) prevents distortion
of the fax image by automatically resending any
parts of the data that were not correctly sent due
to the effects of noise on the telephone line
during transmission. To change the ECM
communication setting, press this key.
Page 33
Preparation Before Use
2-9
2
2 Press [Edit Destination], [Register/Edit] of Address
Book, [Add], [Contact], and then [Next].
3 Press [Change] of Address Number.
4 Using [+]/[-] or the numeric keys, enter the custom
address number (0001 to 2,500).
NOTE: The address number is the identification
number for each destination. You can select numbers
available from a total of 2,500 numbers for registration 2,000 numbers for contact registration and 500
numbers for group registration.
When ‘0000’ is displayed, the number available is
automatically assigned.
5 Press [OK].
6 Press [Change] of Name.
7 Enter the destination name to be displayed on the
Address Book, and press [OK]. Up to 32 characters
can be entered.
NOTE: For details on character entry, refer to
Character Entry Method on page 2 of the Appendix.
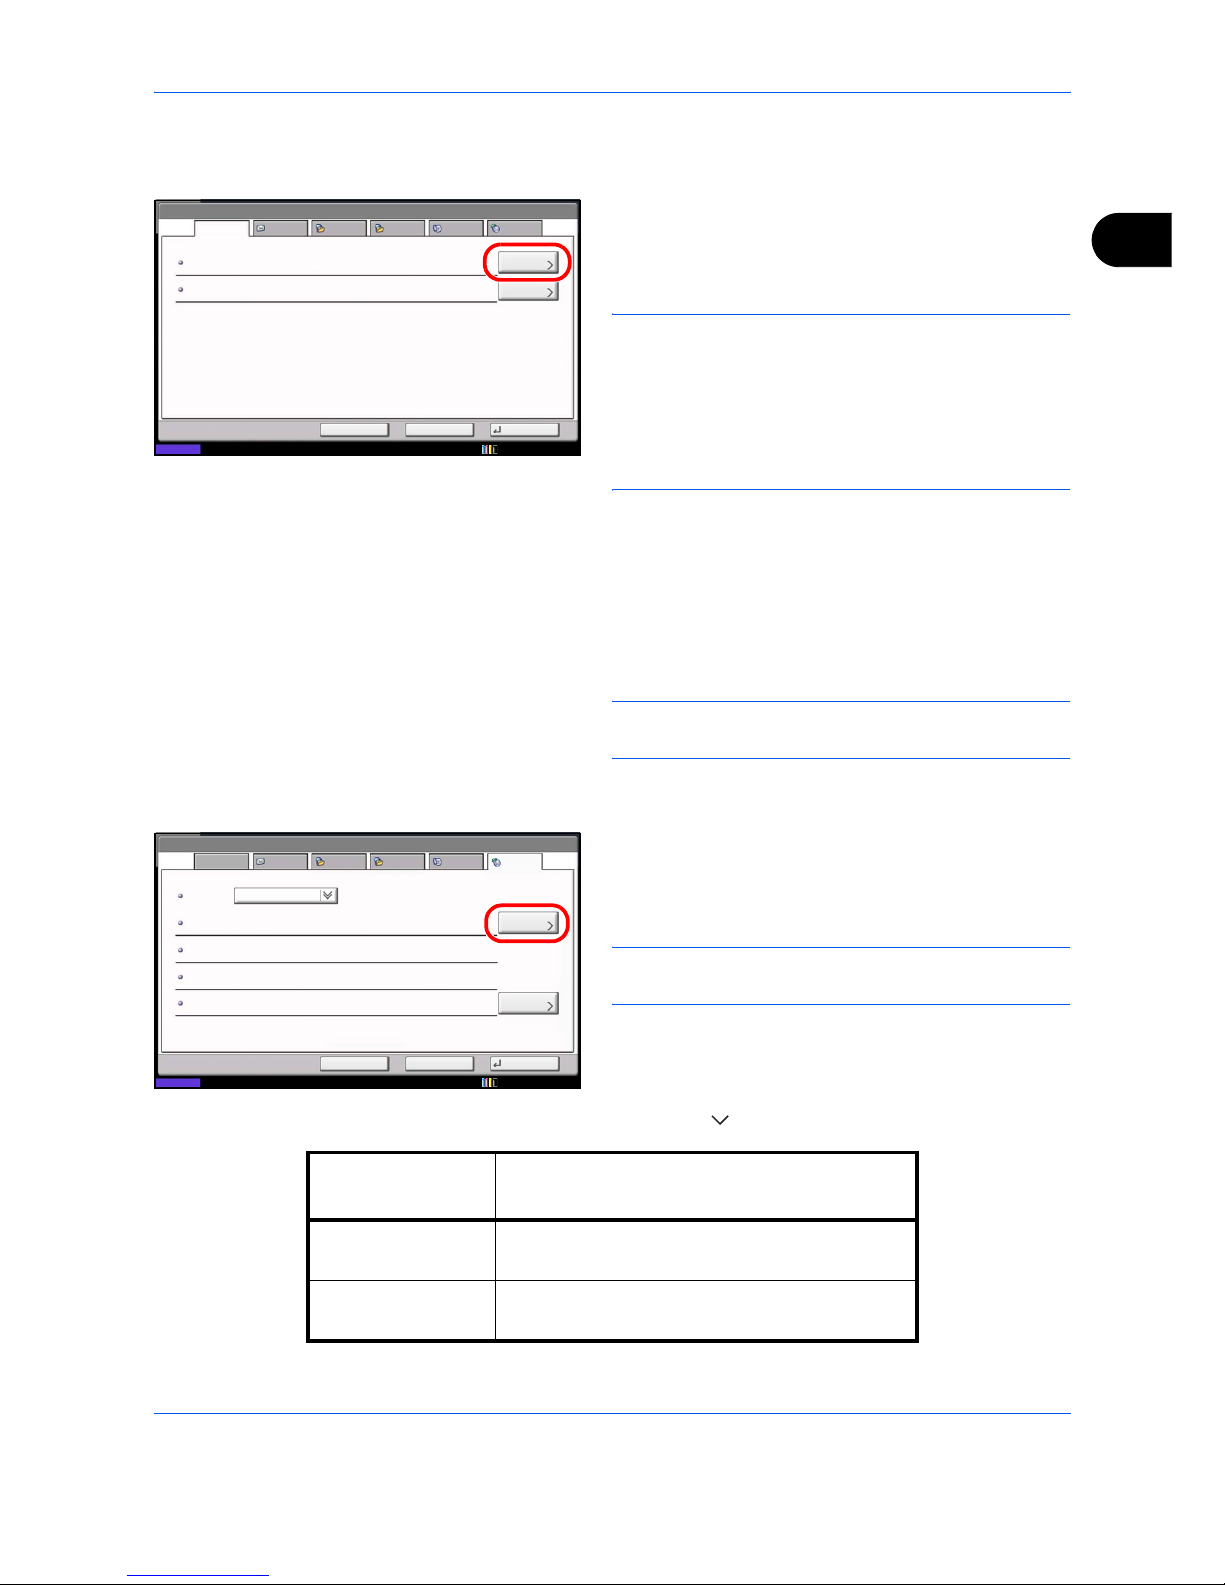
8 Press [i-FAX].
9
Press [Change] of i-FAX Address.
10
Enter the destination address and press [OK]. Up
to 128 characters can be entered.
NOTE: For details on character entry, refer to
Character Entry Method on page 2 of the Appendix.
11
Press [ ] of Mode and select Simple or Full.
Address:
Change
Register
Address Number
Name
0033
BackCancel
Name Mike
E-mail SMB FTP FAX i-FAX
Status
10/10/2010 10:10
:
Change
:
i-FAX Address
Simple
Address:
Name E-mail SMB FTP FAX i-FAX
10/10/2010
Status
Cancel
Register
Back
Change
Change
Mode
Resolution
Compression
Paper Size
:
:
:
:
200x200dpi
MH
A4/Letter
Transmission
mode
Description
Simple mode Transmission confirmation is not sent to the
destination machine.
Full mode Transmission confirmation is sent to the
destination machine.
Page 34

Preparation Before Use
2-10
12
Press [Change] of Paper Size.
13
Specify the destination conditions and press [OK].
14
Check if the destination has been set correctly, and
press [Register].The destination is added to the
Address Book.
15 The one-touch key registration confirmation screen
appears. Select [Yes] or [No].
If you selected [Yes], the one-touch key registration
screen appears. Go to the next step.
If you selected [No], registration ends.
16 Select the One-touch key number to which to
register the destination, and Press [Next].
17 Select the destination to which to register, and
Press [Next].
The destination details can be changed by
selecting the destination and pressing [Detail].
Item Description
Resolution Specify the resolutions that can be received by
the destination fax machine.
If you try to send an i-FAX using a prohibited
resolution, it is automatically changed to a
permitted resolution and then sent.
• 200 × 100 dpi: Permitted (fixed)
• 200 × 200 dpi: Permitted (fixed)
• 200 × 400 dpi: Permitted or prohibited
• 400 × 400 dpi: Permitted or prohibited
• 600 × 600 dpi: Permitted or prohibited
To permit a resolution setting, press the key for
that resolution so that it is highlighted.
To prohibit a resolution, press the key again so
that it is no longer highlighted.
Compression Select a suitable file format for the destination
fax machine.
MH, MR, MMR or JBIG
Paper Size Specify the suitable document size options for
the destination fax machine.
• A4/Letter: Permitted (fixed)
• B4: Permitted or prohibited
• A3/Ledger: Permitted or prohibited
To permit a document size setting, press the key
for that size so that it is highlighted.
To prohibit a setting, press the key again so that
it is no longer highlighted.
Page 35
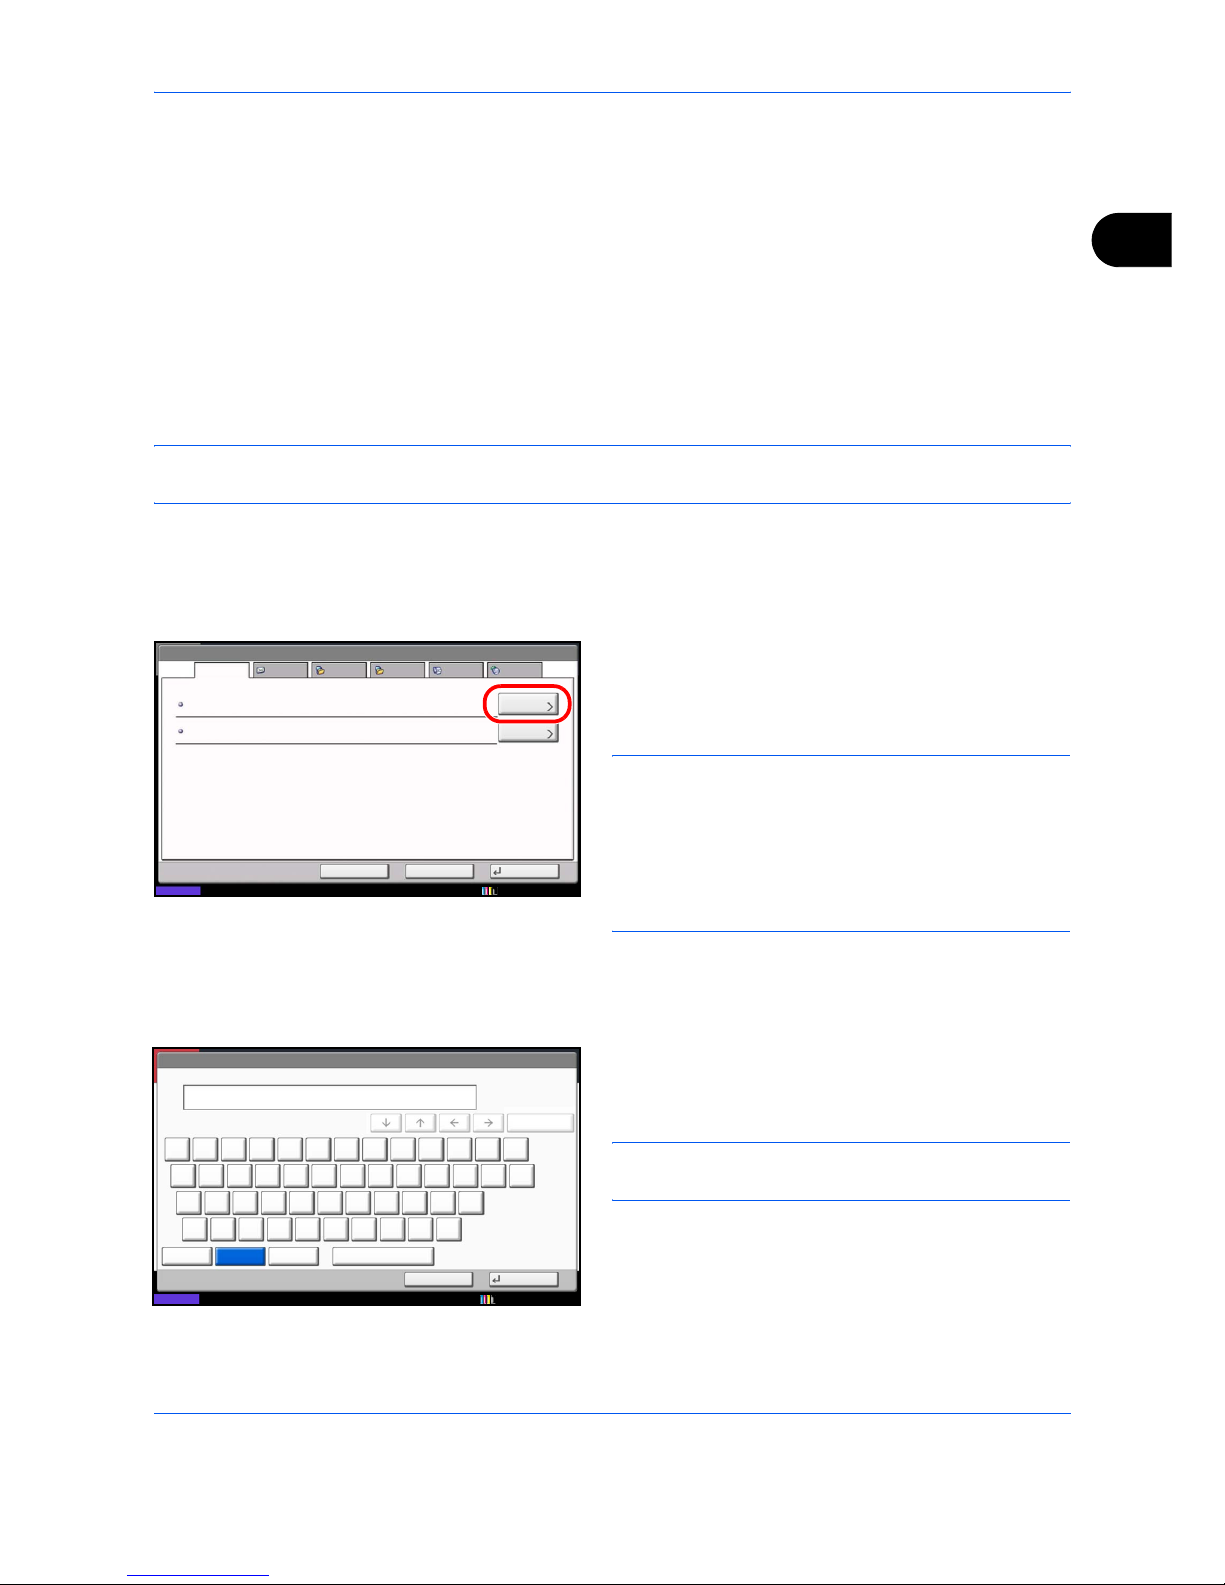
Preparation Before Use
2-11
2
18 Press [Change] for [Display Name] and
[Destination] to change the settings as needed.
19 Press [Register].
If the one-touch key has already been registered,
the overwrite registration confirmation screen
appears. Press [Yes] or [No].
Group Registration
You can register several destinations that have been registered to be contacted as a unit. This method is
convenient because several destinations can be designated at one time. Up to 500 groups can be registered.
NOTE: Group registration requires destinations that have been registered as contact registration. Perform the
necessary contact registration in advance.
1 Press the System Menu key.
2 Press [Edit Destination], [Register/Edit] of Address
Book, [Add], [Group], and then [Next].
3 Press [Change] of Address Number.
4 Use the numeric keys or [+]/[-] to enter the address
number (0001 to 2,500).
NOTE: The address a number is the identification
number for each group. You can select a number
available from a total of 2,500 numbers for registration 2,000 numbers for contact registration and 500
numbers for group registration.
When ‘0000’ is displayed, an available number is
automatically assigned.
5 Press [OK].
6 Press [Change] of Name.
7 Enter the group name to be displayed on the
Address Book, and press [OK]. Up to 32 characters
can be entered.
NOTE: For details on character entry, refer to
Character Entry Method on page 2 of the Appendix.
Address:
Change
Register
Address Number
Name
0033
BackCancel
Name Mike
E-mail SMB FTP FAX i-FAX
Status
10/10/2010 10:10
:
Change
:
Status
Use the keyboard to enter.
Backspace
Upper-case No./Symbol Space
Cancel OK
Input: characters
Limit: characters
0
128
Lower-case
1 2 3 4 5 6 7 8 9 0 != ^
q w e r t y u i o p [ ]
a s d f g h j k l ; :
z x c v b n m , . /
\
10/10/2010 10:10
Page 36
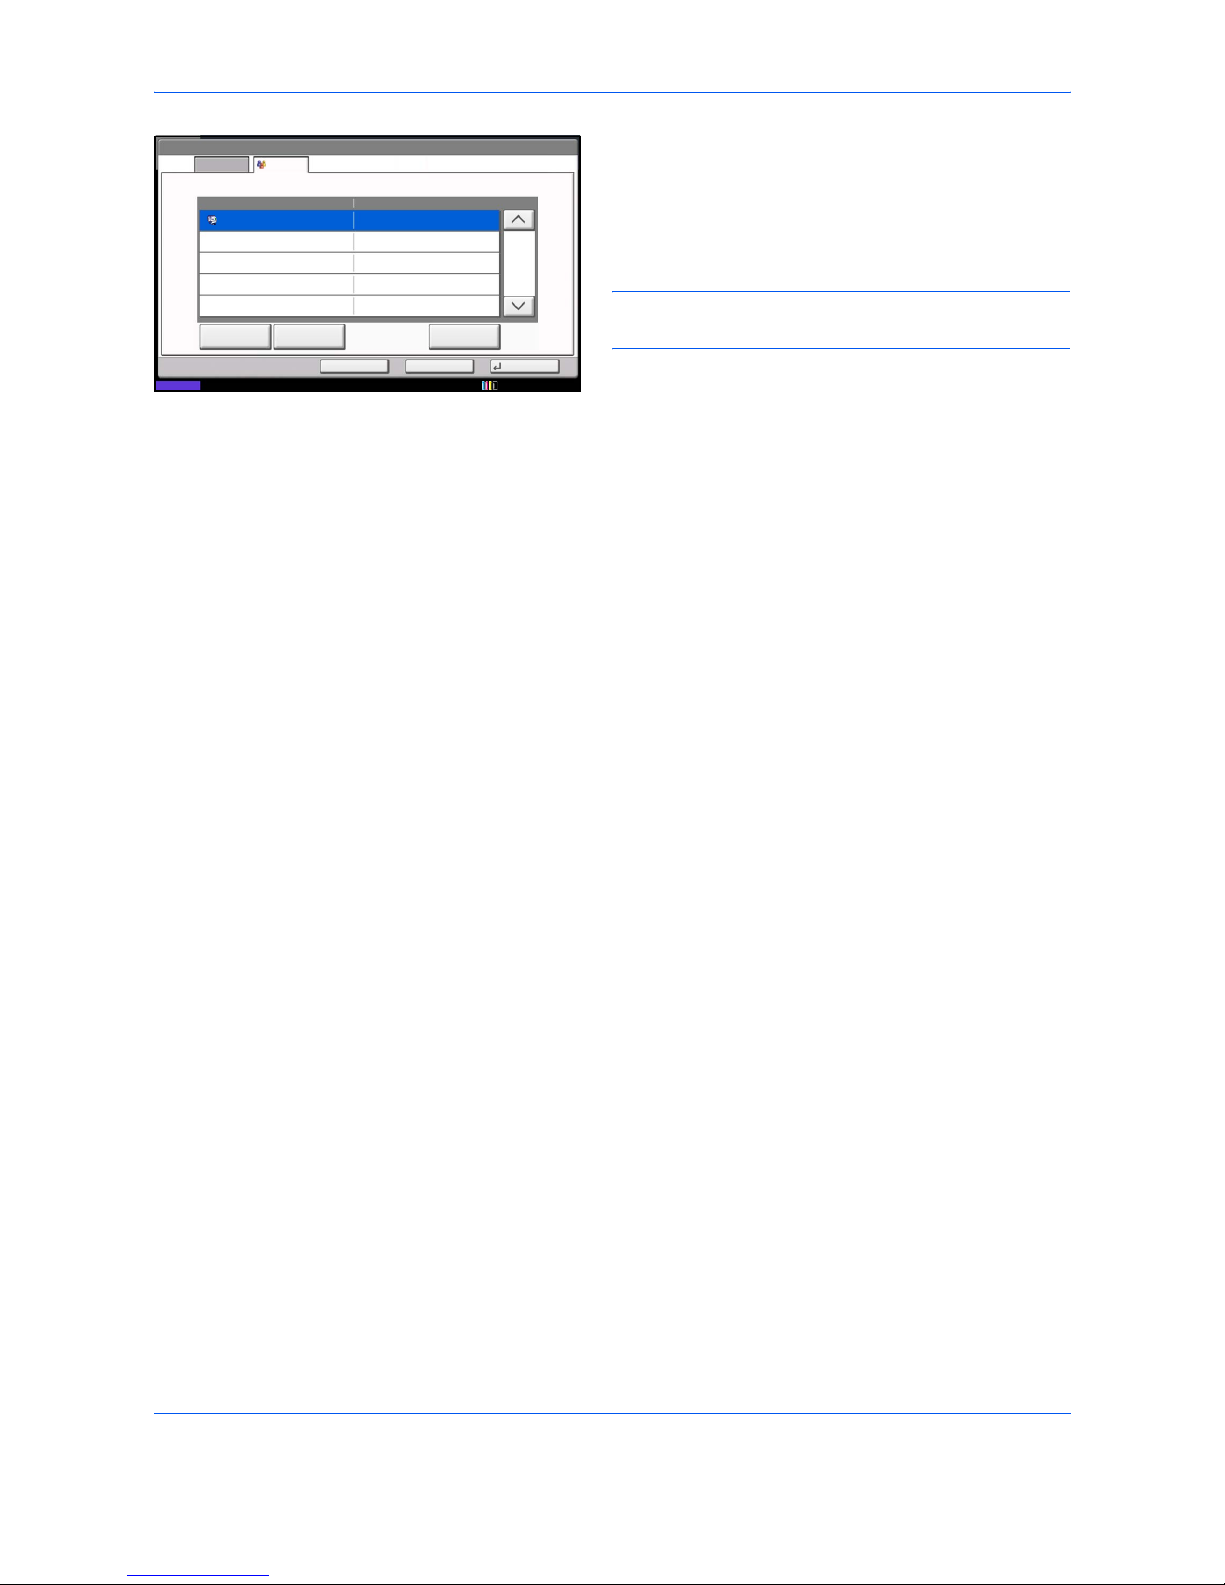
Preparation Before Use
2-12
8 Press [Member].
9 Press [Add].
10
Select the destination (contact) to be registered to
the group.
NOTE: You can search for destinations by name or
address number.
11
Press [OK].
12
To add a destination, repeat steps 8 to 11.
Check that the destination you selected has been
added to the group and press [Register]. The group
is added to the Address Book.
13 The one-touch key registration confirmation screen
appears. Select [Yes] or [No].
If you selected [Yes], the one-touch key registration
screen appears. Go to the next step.
If you selected [No], registration ends.
14 Select the One-touch key number to which to
register the destination, and Press [Next].
15 Select the destination to which to register, and
Press [Next].
The destination details can be changed by
selecting the destination and pressing [Detail].
16 Press [Change] for [Display Name] and
[Destination] to change the settings as needed.
17 Press [Register].
If the one-touch key has already been registered,
the overwrite registration confirmation screen
appears. Press [Yes] or [No].
Address:
Name Member
Destination Detail
CCC
0123456789
1/1
Detail Delete Add
Back
Register
Member: dest.
Cancel
10/10/2010 10:10
Status
1
Page 37
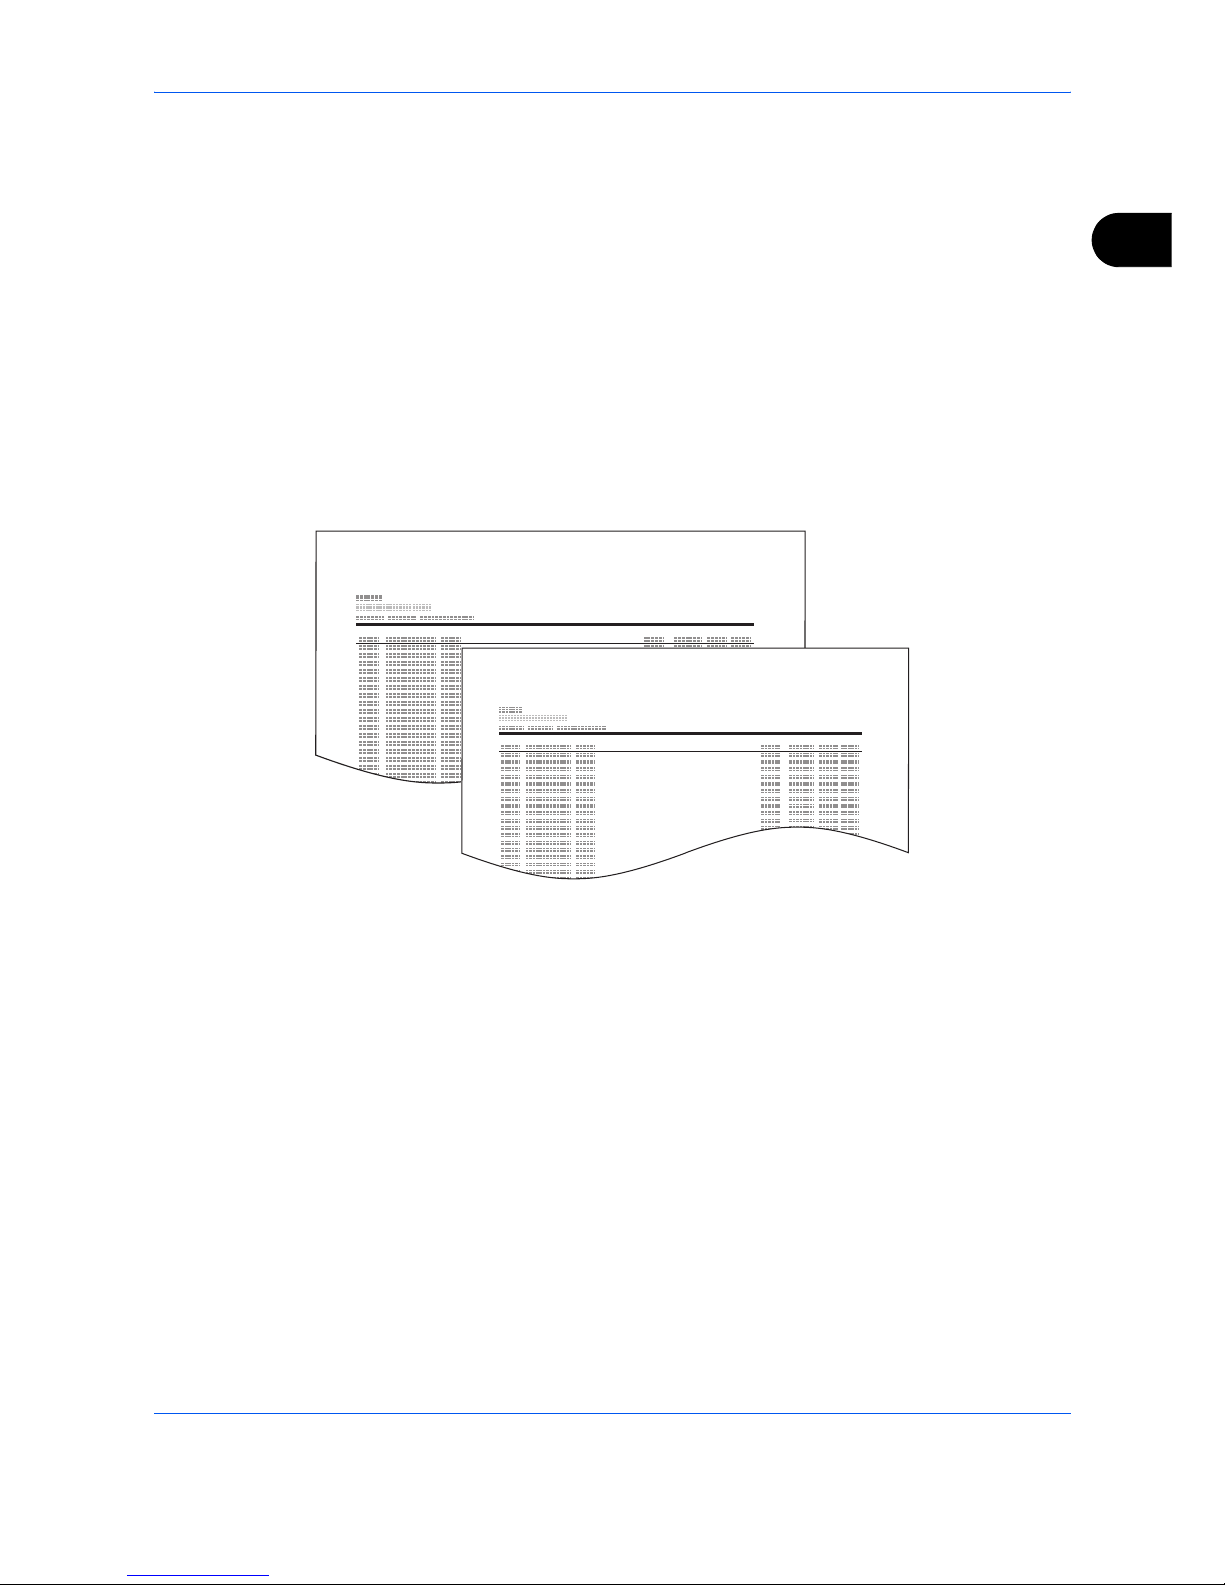
Preparation Before Use
2-13
2
Printing Address List
You can print the list of destinations registered in the Address Book.
You can sort the list in the order of index or address numbers of the destinations.
1 Press the System Menu key.
2 Press [Edit Destination], and then [Next] of List
Print.
3 Press [Print] of FAX List (Index) or FAX List (No.).
4 When the printing confirmation screen appears,
press [Yes]. The machine prints a list.
FAX Address List (Index)
FAX Address List (No.)
Page 38
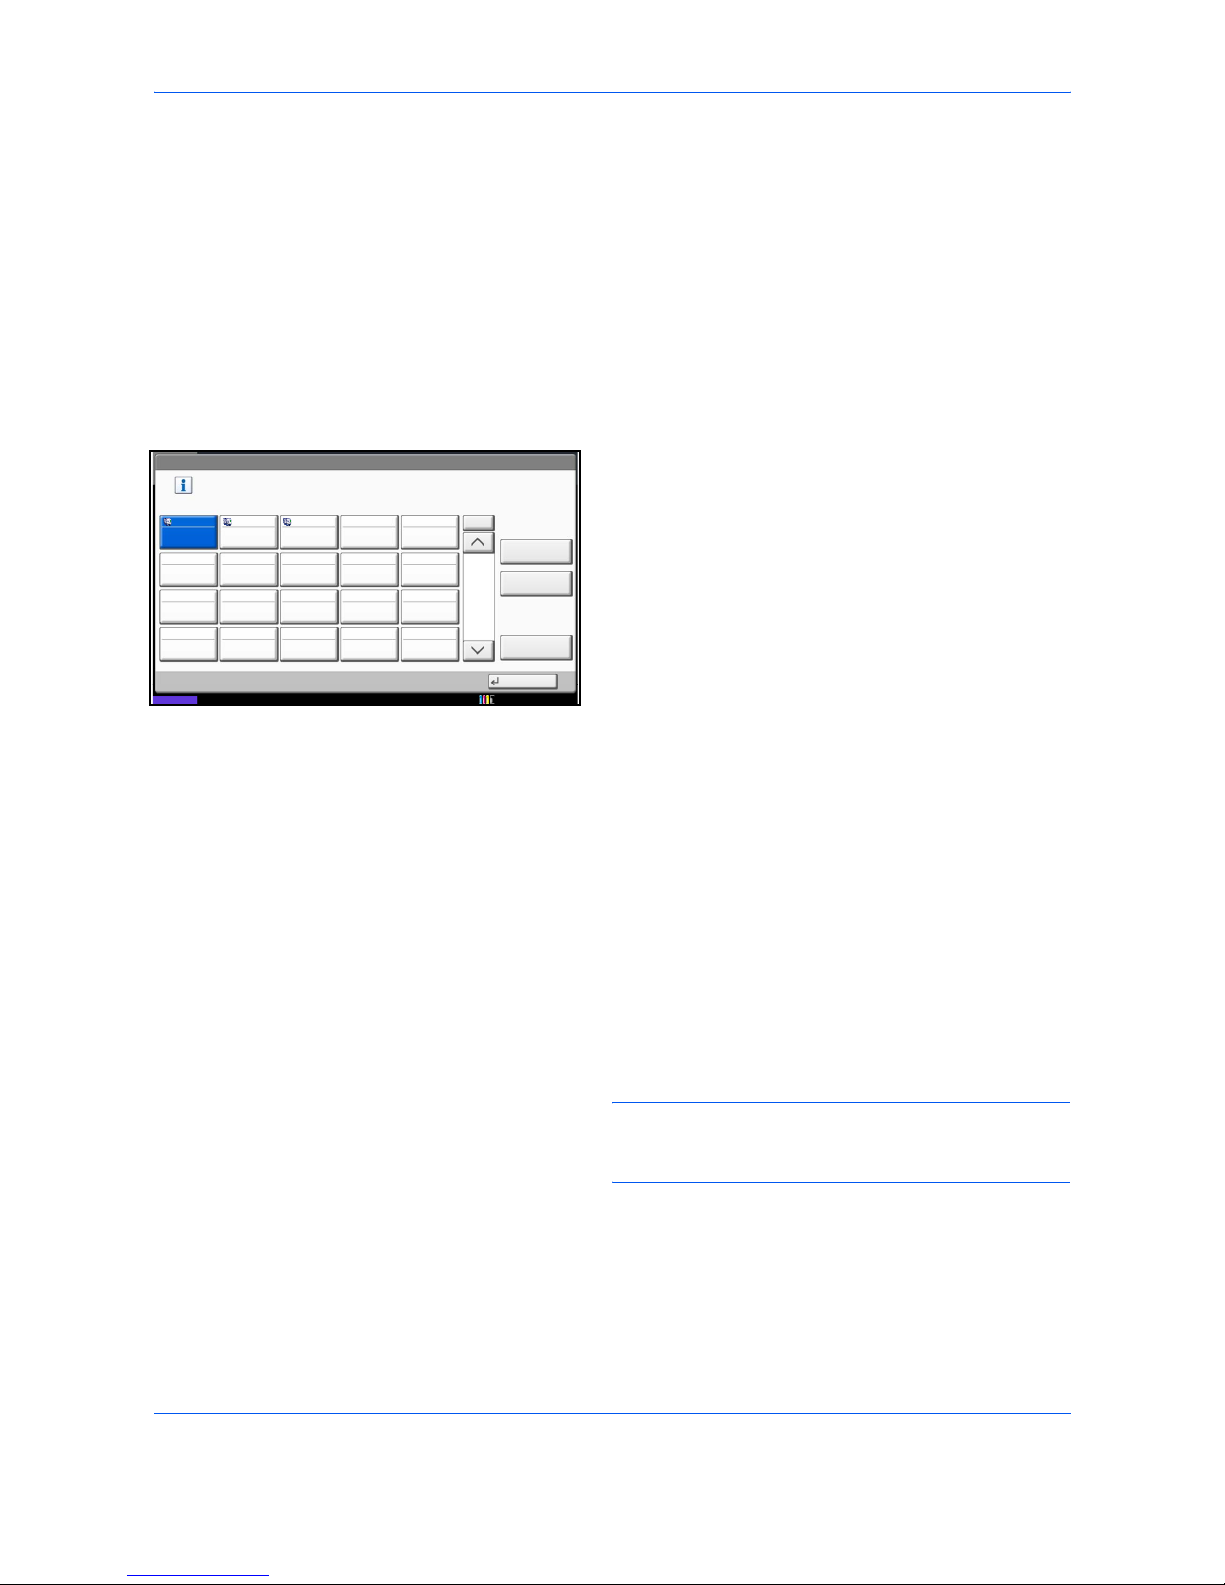
Preparation Before Use
2-14
Using One-touch Keys
With One-touch keys on the [Destination] screen, you can access destinations in the Address Book.
Registering a New One-touch Key
You can register the destination (contact or group) in the Address Book to a One-touch key. Up to 1,000
destinations can be registered.
1 Press the System Menu key.
2 Press [Edit Destination] and then [Register/Edit] of
One-touch Key.
3 Select the One-touch key number to which to
register the destination (0001 to 1000). Pressing
Quick No. Search key or [No.] directly selects the
One-touch key number.
4 Press [Register/Edit].
5 Press [Change] in [Display Name] and enter the
display name. Up to 24 characters can be entered.
If a destination is selected without entering a
display name, the selected destination's registered
name in the address book will be entered. Press
[Change] and change the display name.
6 Press [Change] in [Destination] and select the
destination (contact or group) to be registered in
the One-touch key from the Address Book.
Pressing [Detail] shows the detailed information of
the destination you have selected.
NOTE: You can rearrange or search for the
destination by destination name, group name, or
address number.
7 Press [OK].
8 Press [Register]. The destination is registered to
the One-touch key.
Edit Destination - One Touch Key
Register One Touch key.
Register
/Edit
No.
Delete
Detail
1/5
Close
001 002 003 004 005
006 007 008 009 010
011 012 013 014 015
016 017 018 019 020
AAA BBB CCC
10/10/2010 10:10
Status
Page 39

Preparation Before Use
2-15
2
Changing/Deleting Registration Contents
You can change the destination registered to a One-touch key to another destination, or delete the registration
contents of the One-touch key.
NOTE: When changing the destination information in the Address Book, the information registered to the One-
touch key is updated.
1 Press the System Menu key.
2 Press [Edit Destination] and then [Register/Edit] of
One-touch Key.
3 Select the One-touch key number to edit (0001 to
1000). Pressing Quick No. Search key or [No.]
selects the One-touch key number by direct input.
4 Change Registration Contents.
When changing the display name
1 Press [Register/Edit].
2 Press [Change] in [Display Name] and enter
the new display name.
When changing the destination to another
destination
1 Press [Register/Edit].
2 Press [Change] of Destination, and select the
new destination (contact or group).
Press [Change] for the display name and clear
the entered name with [Backspace]. When
[Change] is pressed for the destination and a
new destination is selected, the display name
is automatically entered.
Pressing [Detail] shows the detailed
information of the destination you have
selected.
NOTE: You can rearrange or search for the
destinations by destination name, group name, or
address number.
3 Press [OK].
4 Press [Save].
Page 40

Preparation Before Use
2-16
5 Pressing [Yes] on the change confirmation
screen registers the destination to the Onetouch key.
When deleting registration contents
1 Press [Delete].
2 Pressing [Yes] on the deletion confirmation
screen deletes the registration contents of the
One-touch key.
Page 41

3-1
3 FAX Operation (Basic)
This chapter explains the following basic operations.
• Enter key and Quick No. Search key...................................................................... 3-2
• Automatic Send....................................................................................................... 3-4
• FAX Automatic Reception ..................................................................................... 3-12
• Canceling Communication.................................................................................... 3-14
• Changing/Deleting Registration Contents............................................................. 3-19
• Selecting a Destination by One-touch Key ........................................................... 3-21
• Using the Speed Dial key...................................................................................... 3-22
• Dialing the Same Receiving System (Redial) ....................................................... 3-23
• Previewing Images................................................................................................ 3-24
• Quick Setup Screen.............................................................................................. 3-26
• Registering Shortcuts............................................................................................ 3-28
Page 42
FAX Operation (Basic)
3-2
Enter key and Quick No. Search key
This section explains how to use the Enter key and Quick No. Search key on the operation panel.
Using the Enter ( ) key
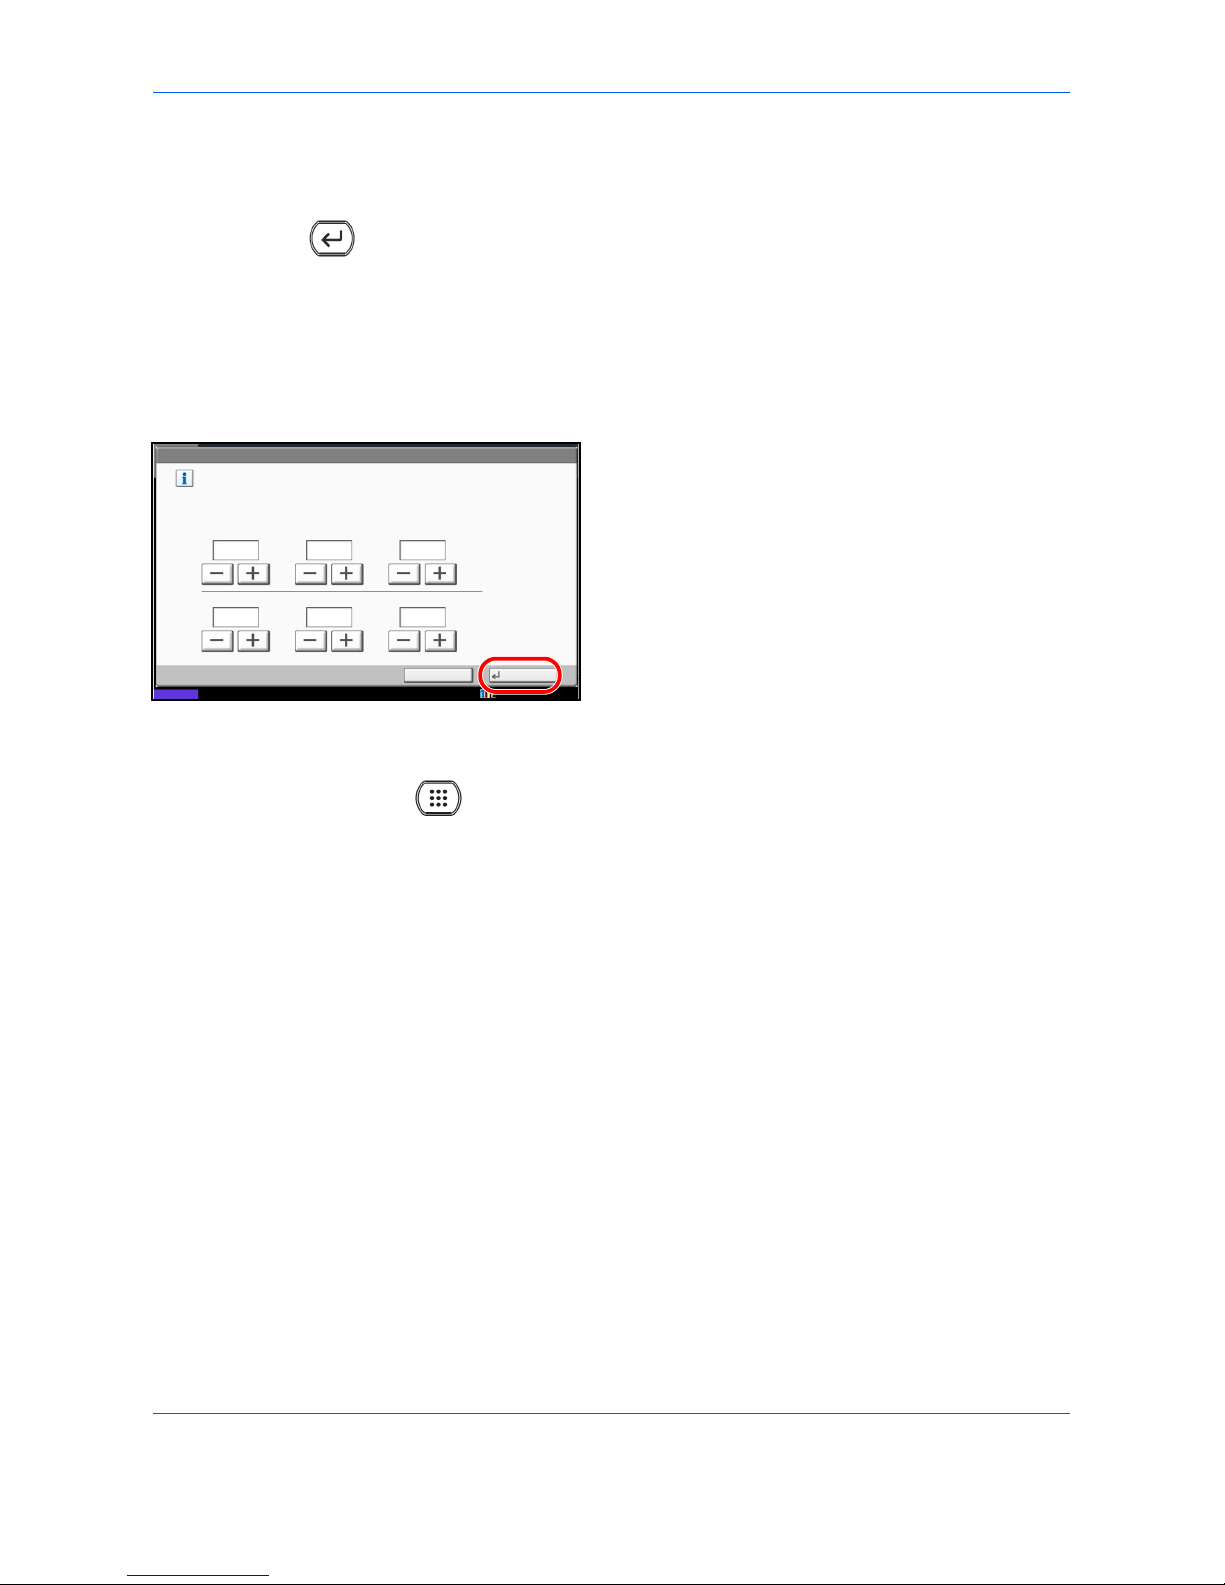
The Enter key works in the same way as keys displayed on the touch panel, such as [OK] and [Close].
The Enter symbol ( ) is displayed next to the keys whose operations are carried out by the Enter key (e.g.
[ OK], [ Close]).
The operation of the Enter key is explained below using the time and date settings as an example. For details
of the procedure, refer to Date and Time Entry on page 2-4.
1 In the Date/Time settings screen, press [+] or [-] to
enter the date and time.
The Enter ( ) symbol appears on the [OK] on the
touch panel, indicating that the Enter key performs
the same action as [OK].
2 Once you have set the date and time, press the
Enter (or [OK]) key.
Using the Quick No. Search ( ) key
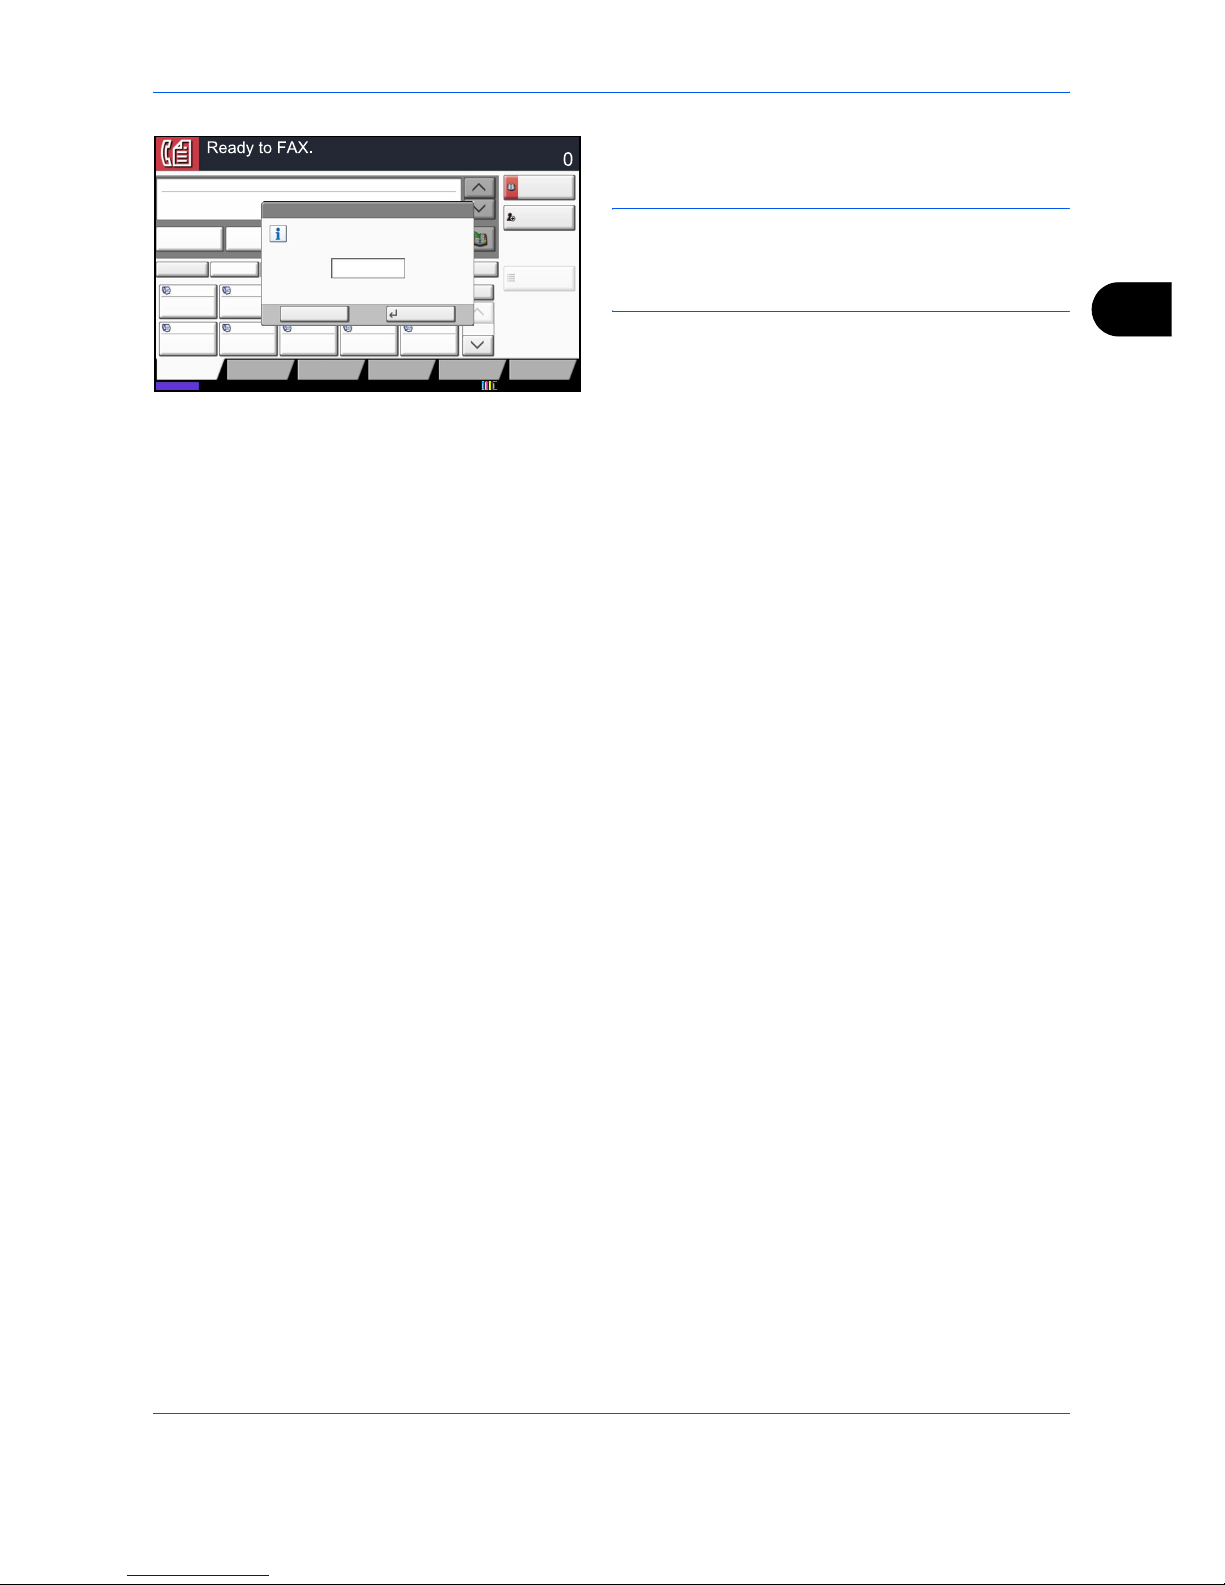
Use the Quick No. Search keys to perform an action by simply entering a number directly using the numeric
keys. For example, you can specify the speed dial for a transmission destination or recall a stored program by
its program number.
The Quick No. Search key performs the same action as the [No.] displayed on the touch panel.
The use of the Quick No. Search key is explained below using an example in which a speed dial number is
specified and used to select a destination. For more information on speed dialing, refer to Using the Speed Dial
key on page 3-22.
1 Press the Quick No. Search key (or [No.]) in the
basic FAX screen.
Date/Timer - Date/Time
Set the date and time.
Off
DayMonthYear
SecondMinuteHour
2010
10 10 31
10 10
Status 10/10/2010 10:10
Cancel
OK
Page 43
FAX Operation (Basic)
3-3
3
2 In the number entry screen, use the numeric keys
to enter the speed dial number.
NOTE: If you enter a 4-digit speed dial number, the
operation in step 3 can be omitted. The basic send
screen appears and the specified destination appears
in the destinations list.
3 If you entered speed dial number between 1 and 3
digits long, press the Enter key (or [OK]).
The specified destination appears in the
destination list.
Status 10/10/2010
ABCD [email protected]
Address
Book
FAX No.
Entry
No.
1/100
AAA BBB CCC DDD
FFF GGG HHH III JJJ
00040003 00050001 0002
0006 0007 0008 0009 0010
Check
Destinations
Destination
Pause
Backspace
EEE
Space
Detail Delete RecallChainDirectOn Hook
Org./Sending
Data Format
Quick SetupDestination Image Quality Advanced
Setup
Program
Enter One Touch key number
using # keys.
0011
Cancel OK
(0001 - 1000)
Enter Destination.
Page 44
FAX Operation (Basic)
3-4
Automatic Send
General transmission using the numeric keys is explained.
NOTE: To send an Internet FAX (i-FAX), refer to i-FAX Transmission on page 8-8.
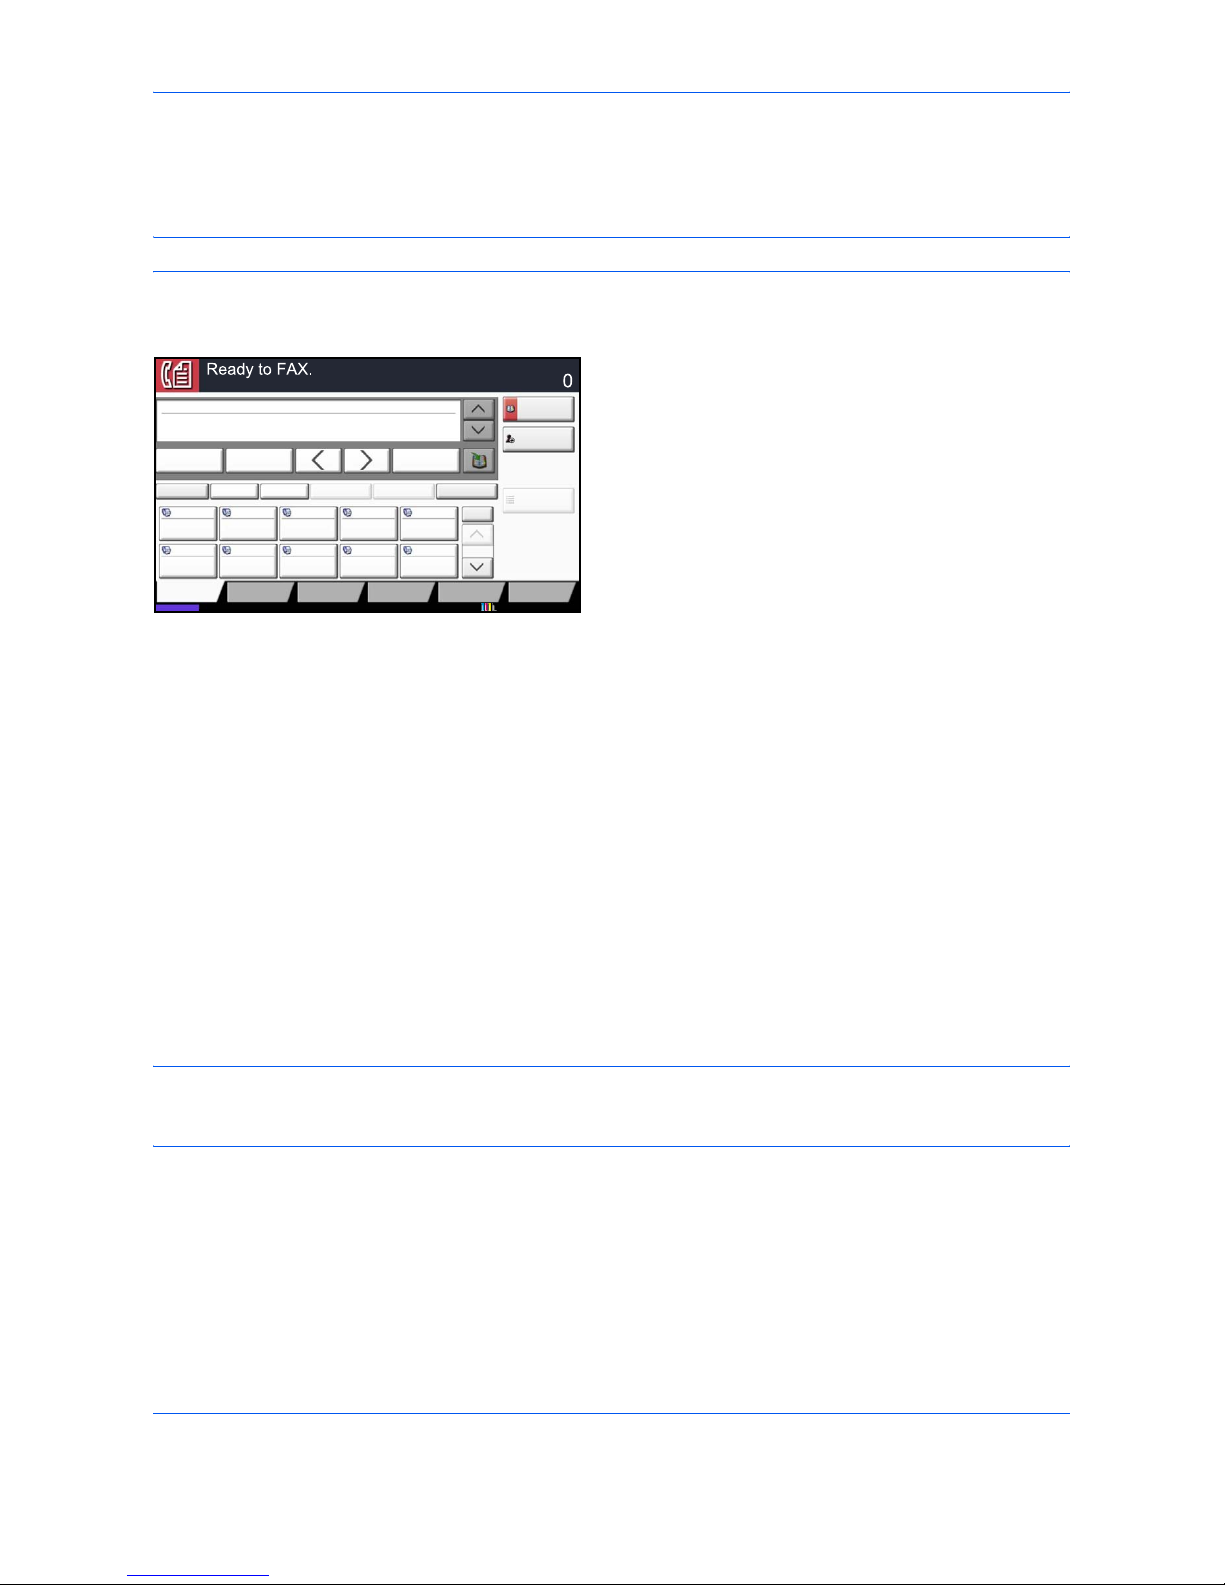
Switching to the FAX Screen
Check that the basic FAX screen is displayed.
If the basic FAX screen is not displayed, press the
FAX key. The screen for FAX appears.
Selection of Transmission Method
There are two transmission methods - memory transmission and direct transmission. The default is memory
transmission.
Memory Transmission
After originals are scanned into memory, the communication starts. Scans all originals into memory, then dials
and sends.
Memory Transmission (When originals are placed in the document processor):
After originals placed in the document processor are scanned and stored in the memory, the receiving system
is dialed. This method is very convenient because you can have originals returned to you without waiting for
sending of the originals to be completed. It is suitable for sending multiple-page sheet originals.
Memory Transmission (When originals are placed on the glass surface):
This method is suitable for sending book originals that cannot be placed in the document processor. After
originals placed on the glass surface are scanned and stored in the memory, the receiving system is dialed.
NOTE: When continuous scan is set, you can continue with scanning of a next original after an original on the
glass surface has been stored in memory. Every time one page is scanned, you perform an operation to allow
continued scanning, and after all the originals have been stored in memory, the receiving system is dialed.
Direct Transmission
Dials the receiving system, and after the communication has started, originals are scanned. In direct
transmission, you can designate only one destination for one transmission. You cannot use direct transmission
when the optional Printed Document Guard Kit is installed.
Direct Transmission (When originals are placed in the document processor):
After the telephone line has connected with the receiving system, scanning of the originals placed in the
Status 10/10/2010 10:10
ABCD [email protected]
Address
Book
FAX No.
Entry
No.
1/100
AAA BBB CCC DDD
FFF GGG HHH III JJJ
00040003 00050001 0002
0006 0007 0008 0009 0010
Check
Destinations
Destination
Pause
Backspace
EEE
Space
Detail Delete RecallChainDirectOn Hook
Org./Sending
Data Format
Quick SetupDestination Image Quality Advanced
Setup
Program
Enter Destination.
Page 45
FAX Operation (Basic)
3-5
3
document processor starts. When multiple-page originals are placed, each page is scanned after the previous
one is sent.
Direct Transmission (When originals are placed on the glass surface):
This method is suitable for sending book originals that cannot be placed in the document processor. After the
telephone line has connected with the receiving system, the originals placed on the glass surface are scanned
and sent.
NOTE: When continuous scan is set, you can continue with scanning of a next original after an original on the
glass surface has been sent. Every time one page is scanned, you perform an operation to allow continued
scanning.
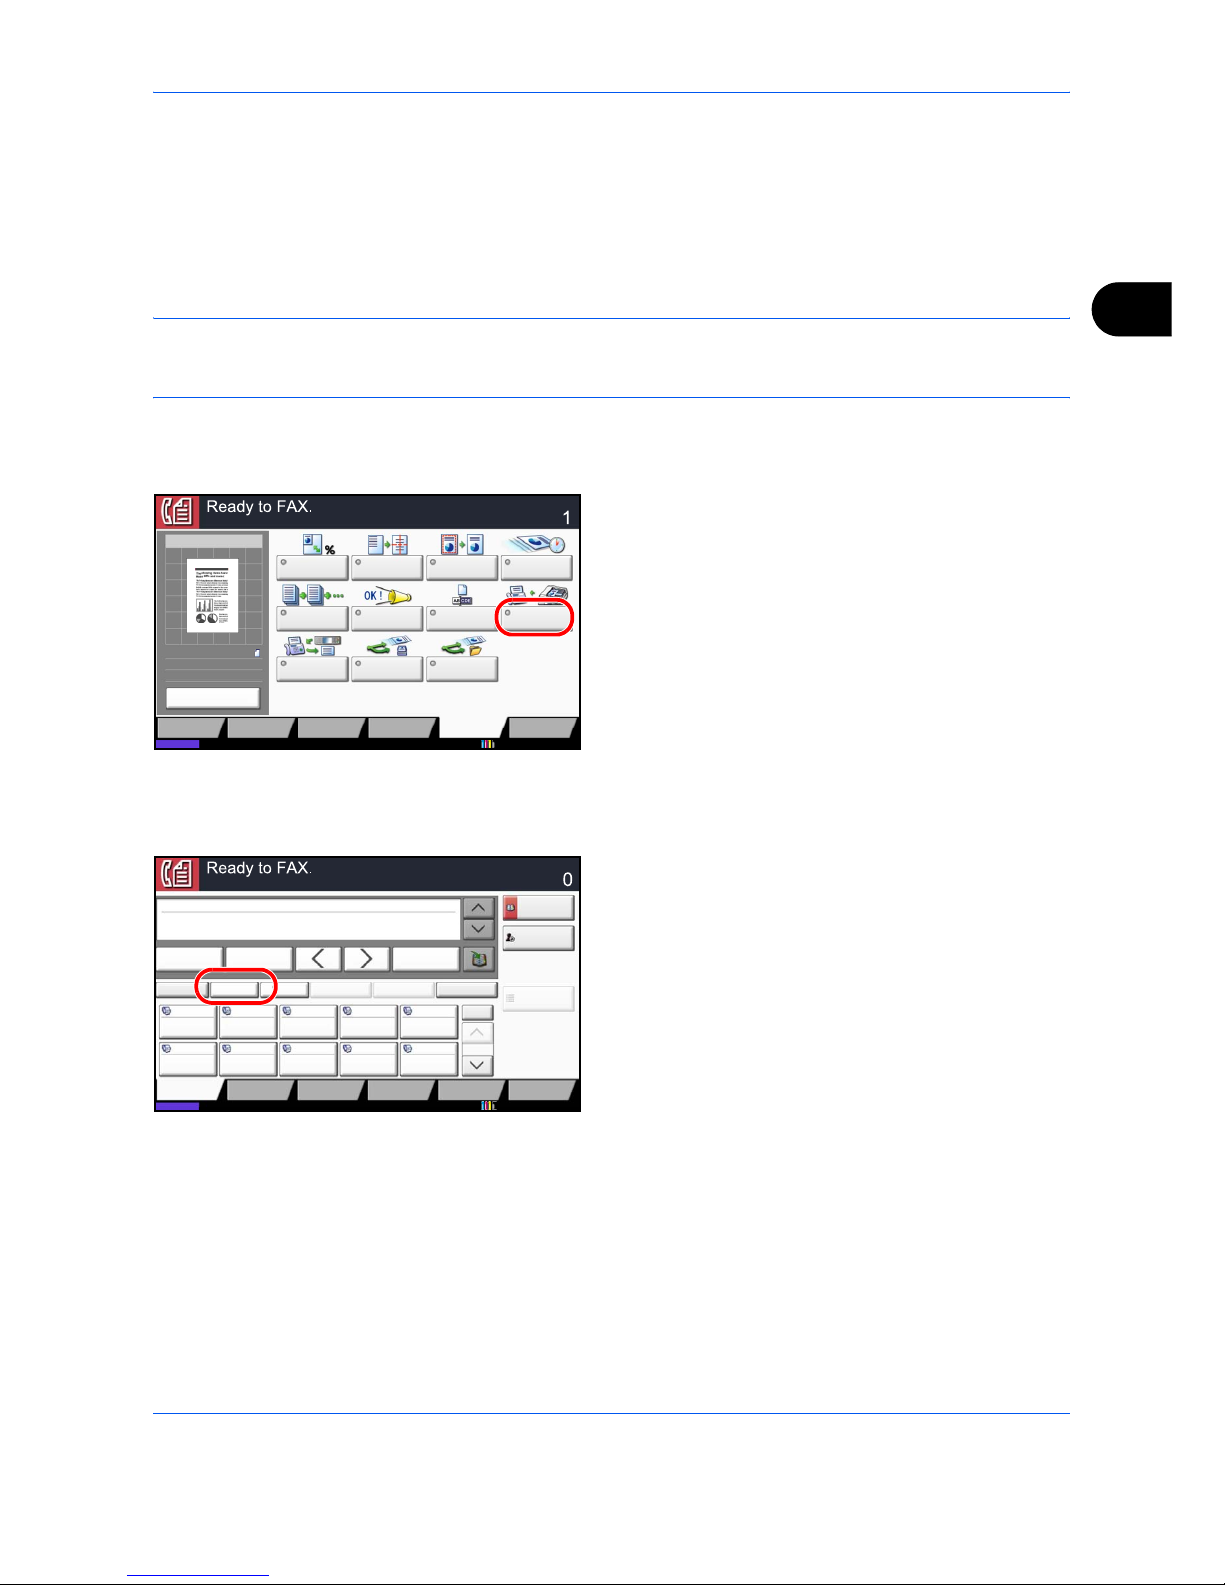
To select direct transmission, use the following
procedure.
1 Press [Advanced Setup], and then [FAX Direct
Transmission].
2 Press [On].
3 Press [OK].
You can also select the transmission method on the
basic FAX screen. In the basic screen for FAX, press
[Direct].
This selects the direct transmission method and the
keys on the touch panel are highlighted.
Press the highlighted [Direct] key to change the
transmission method to memory transmission.
Destination
Zoom Centering Border Erase FAX Delayed
Transmission
Continuous
Scan
Job Finish
Notice
File Name
Entry
FAX Direct
Transmission
FAX
Polling RX
Send and
Print
10/10/2010
Status
Org./Sending
Data Format
Quick SetupDestination Image Quality Advanced
Setup
Program
Send and
Store
Preview
100%
A4
A4
Preview
Original
Zoom::
:
Sending Image
Send
Status 10/10/2010 10:10
ABCD [email protected]
Address
Book
FAX No.
Entry
No.
1/100
AAA BBB CCC DDD
FFF GGG HHH III JJJ
00040003 00050001 0002
0006 0007 0008 0009 0010
Check
Destinations
Destination
Pause
Backspace
EEE
Space
Detail Delete RecallChainDirectOn Hook
Org./Sending
Data Format
Quick SetupDestination Image Quality Advanced
Setup
Program
Enter Destination.
Page 46
FAX Operation (Basic)
3-6
Placing Originals
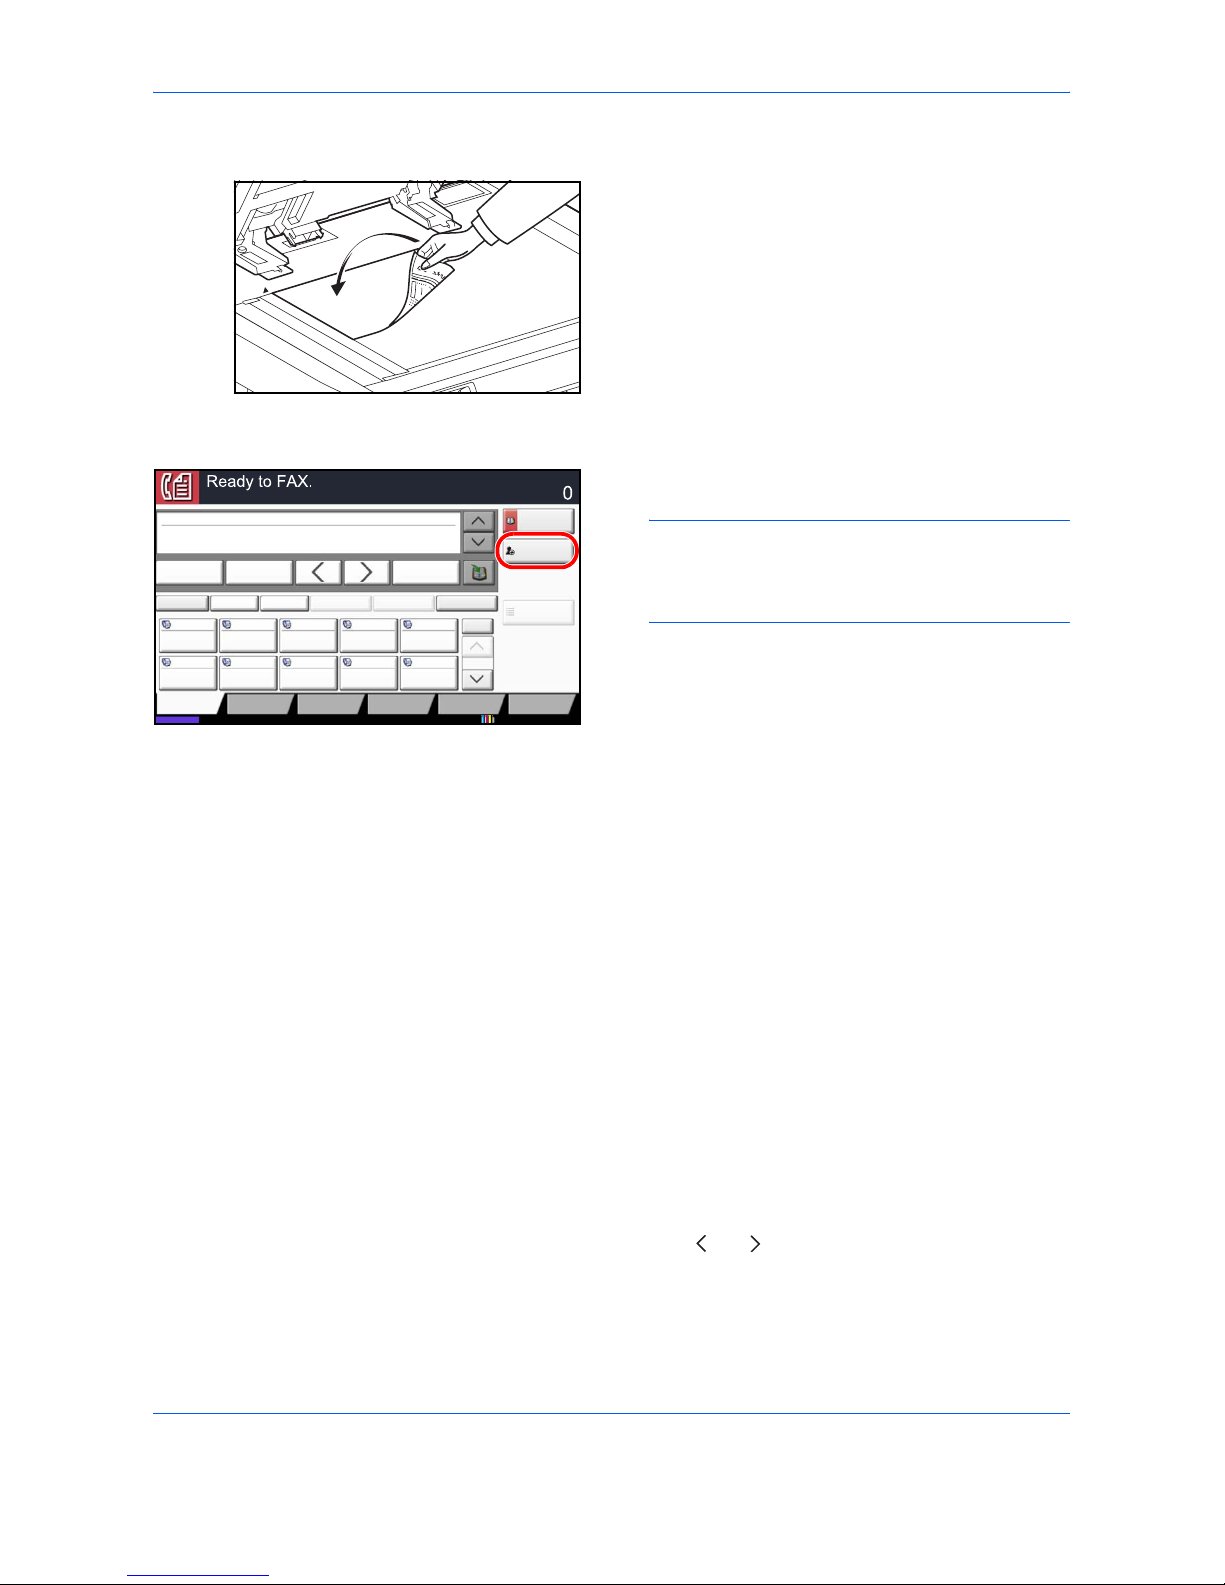
Place the originals on the glass surface or in the
optional document processor. Refer to the
machine’s Operation Guide for placing originals.
Dial the Receiving System
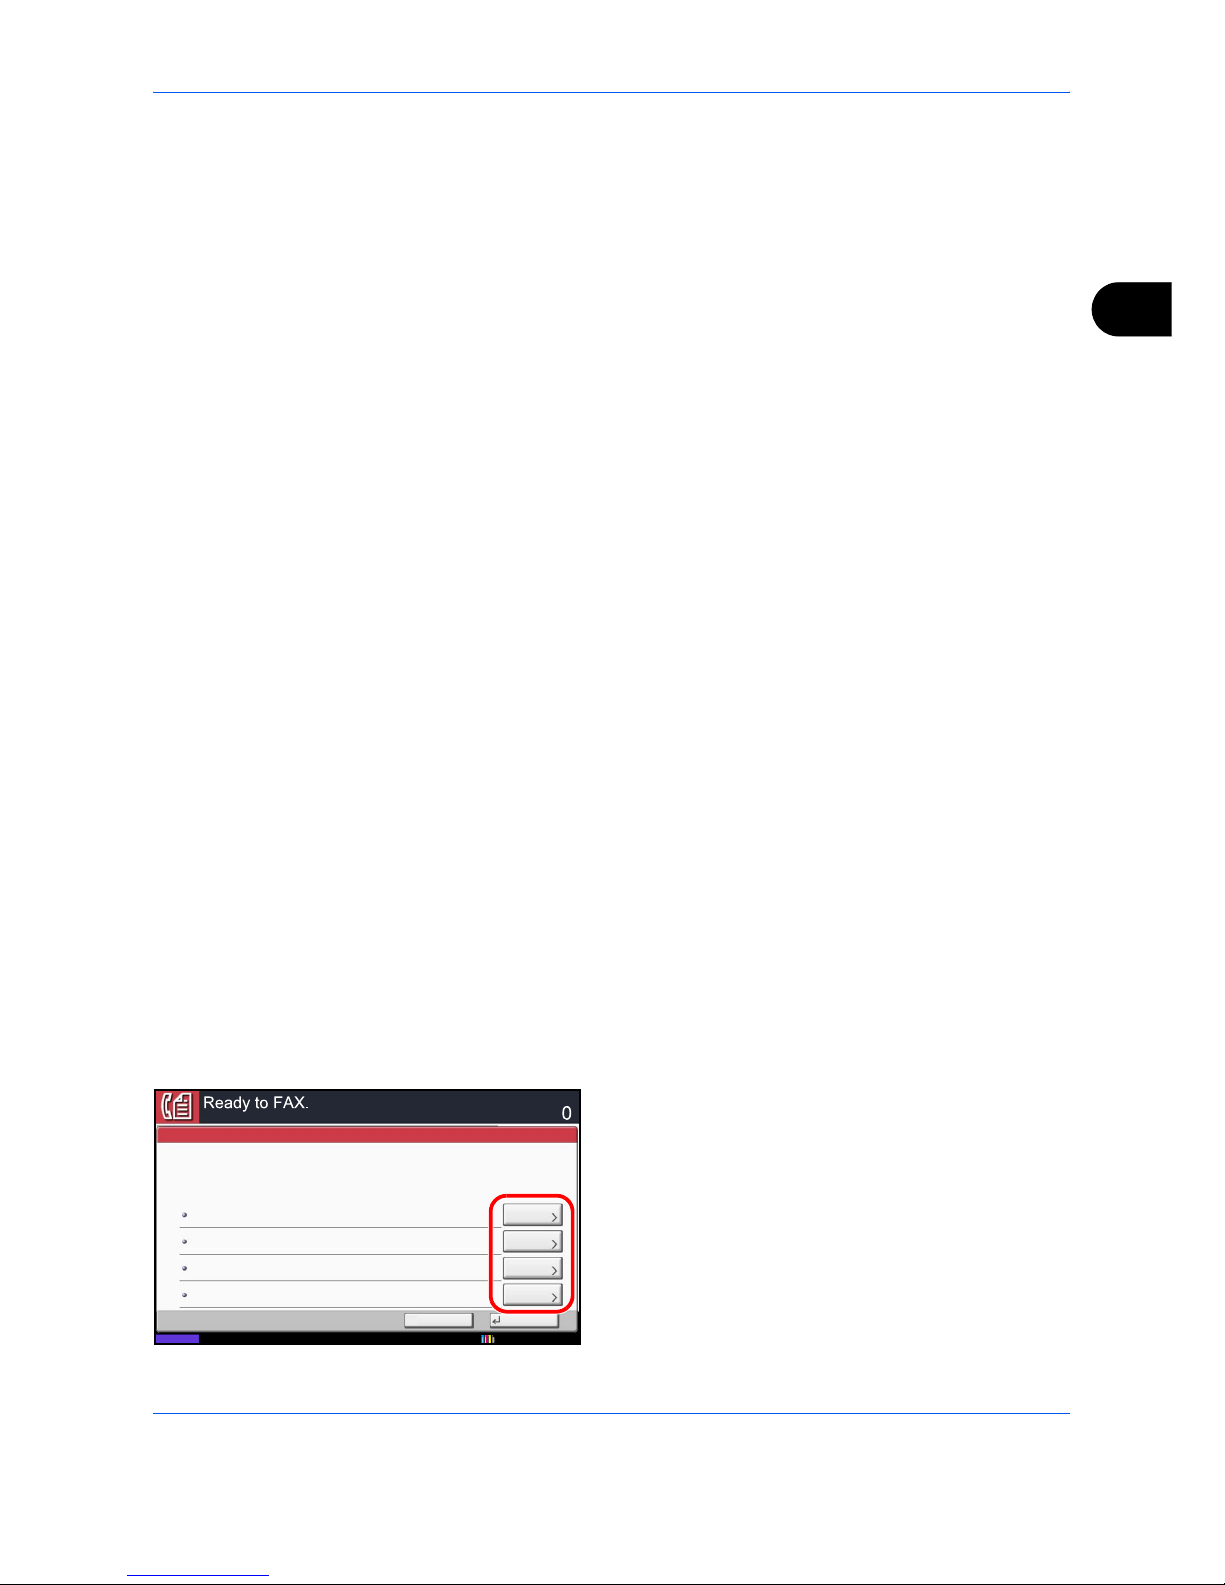
1 Press [FAX No. Entry].
NOTE: When you press the numeric keys to enter
numbers, the screen changes to the entry screen
for the fax number (the screen shown in the next
step).
2 Enter the fax number of the receiving system using
the numeric keys.
•If Entry Check for New Destination is Off, press
[OK] to complete entering the number.
•If Entry Check for New Destination is On, press
[OK] and you are prompted to confirm the FAX
number is correct. Re-enter the same FAX number
and press [OK] to complete the entry.
For details, refer to Entry Check for New
Destination in the machine’s Operation Guide.
To continue entering a new number, press [FAX No.
Entry] and repeat the above procedure.
To correct the FAX number, press [Edit].
Up to 64 digits can be entered as the fax number of
the receiving system.
Press [Space] to enter a space.
Use [ ] or [ ] to move the cursor.
To correct the fax number, press [Backspace] on the
touch panel, and delete the digits one by one before
Status 10/10/2010 10:10
ABCD [email protected]
Address
Book
FAX No.
Entry
No.
1/100
AAA BBB CCC DDD
FFF GGG HHH III JJJ
00040003 00050001 0002
0006 0007 0008 0009 0010
Check
Destinations
Destination
Pause
Backspace
EEE
Space
Detail Delete RecallChainDirectOn Hook
Org./Sending
Data Format
Quick SetupDestination Image Quality Advanced
Setup
Program
Enter Destination.
Page 47
FAX Operation (Basic)
3-7
3
reentering the fax number. To delete the number
entirely, press the
Clear
key on the operation panel.
When [Add to Addr Book] is displayed, you can
register entered contents to the Address Book.
When [New Destination Entry] is set to [Prohibit], the
numeric keys cannot be used to enter a fax number.
For details, refer to Sending faxed documents to a
specified additional address on page 4-63.
[Pause]
Pressing this key adds about three seconds of
waiting time during dialing. For example, when
dialing the receiving system on an external line,
you can use this method to insert a pause before
resuming dialing after you dial a specific number.
[On Hook]
Press this key to connect to the telephone line.
When the FAX number has been entered, the
machine starts dialing to the receiving system.
After pressing this key, you can dial the number of
the receiving system using the numeric keys. For
details, refer to Manual Send on page 4-13.
Dialing methods without using the numeric keys
• Using the Address Book (Refer to page 3-16.)
• Using One-touch keys (Refer to page 3-21.)
• Using the Speed Dial key (Refer to page 3-22.)
• Manual Redial (recall) (Refer to page 3-23.)
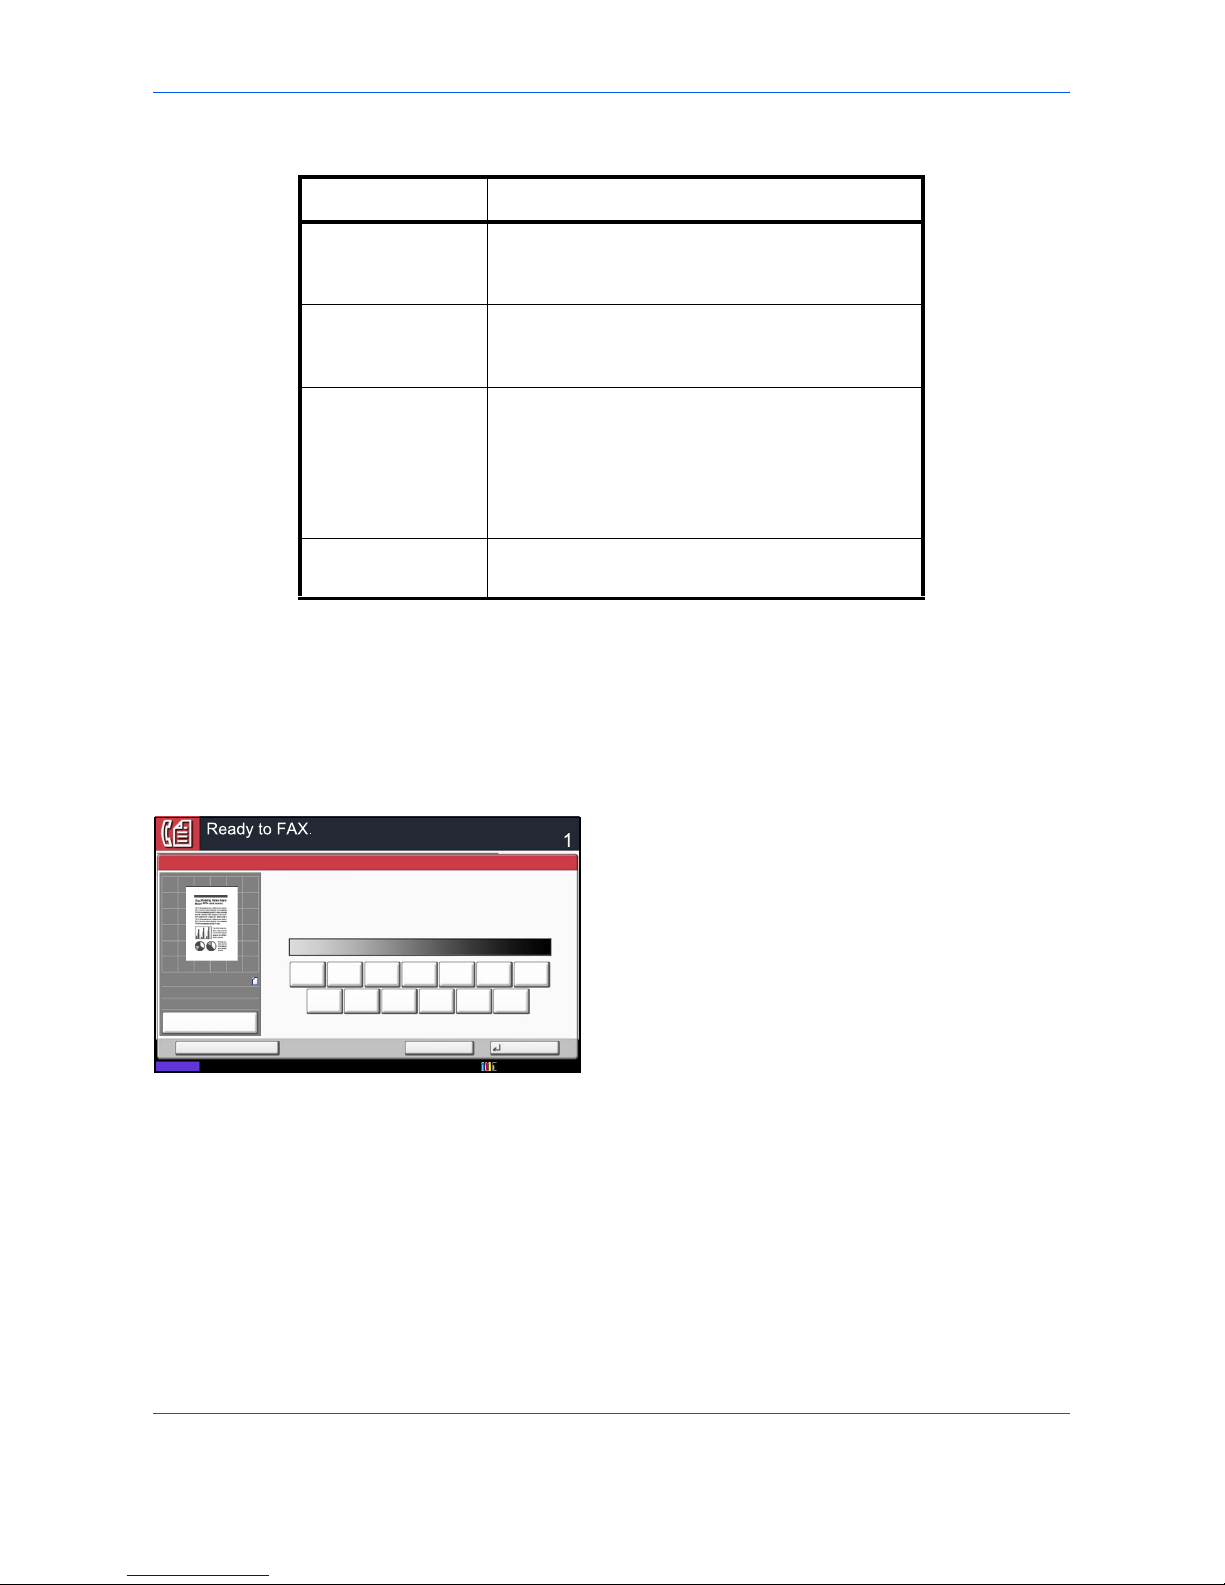
Detailed Settings
Detailed settings allow you to use sub-address, select transmission start speed, ECM, and encryption. These
settings must be made in accordance with those of the destination. In addition, you can change the FAX density,
image quality, resolution and select the size of originals.
Press [Detail]. Press [Change] in each setting,
change the setting, and press [OK].
When you have finished changing settings, press
[OK] and then [Close].
10/10/2010
Cancel
OK
FAX No. Entry - Detail
Destination
Status
ECM
Change
Transmission Start Speed
Encrypted Transmission
Sub Address
Change
Change
Change
:
:
:
:
On
33600bps
Off
Page 48
FAX Operation (Basic)
3-8
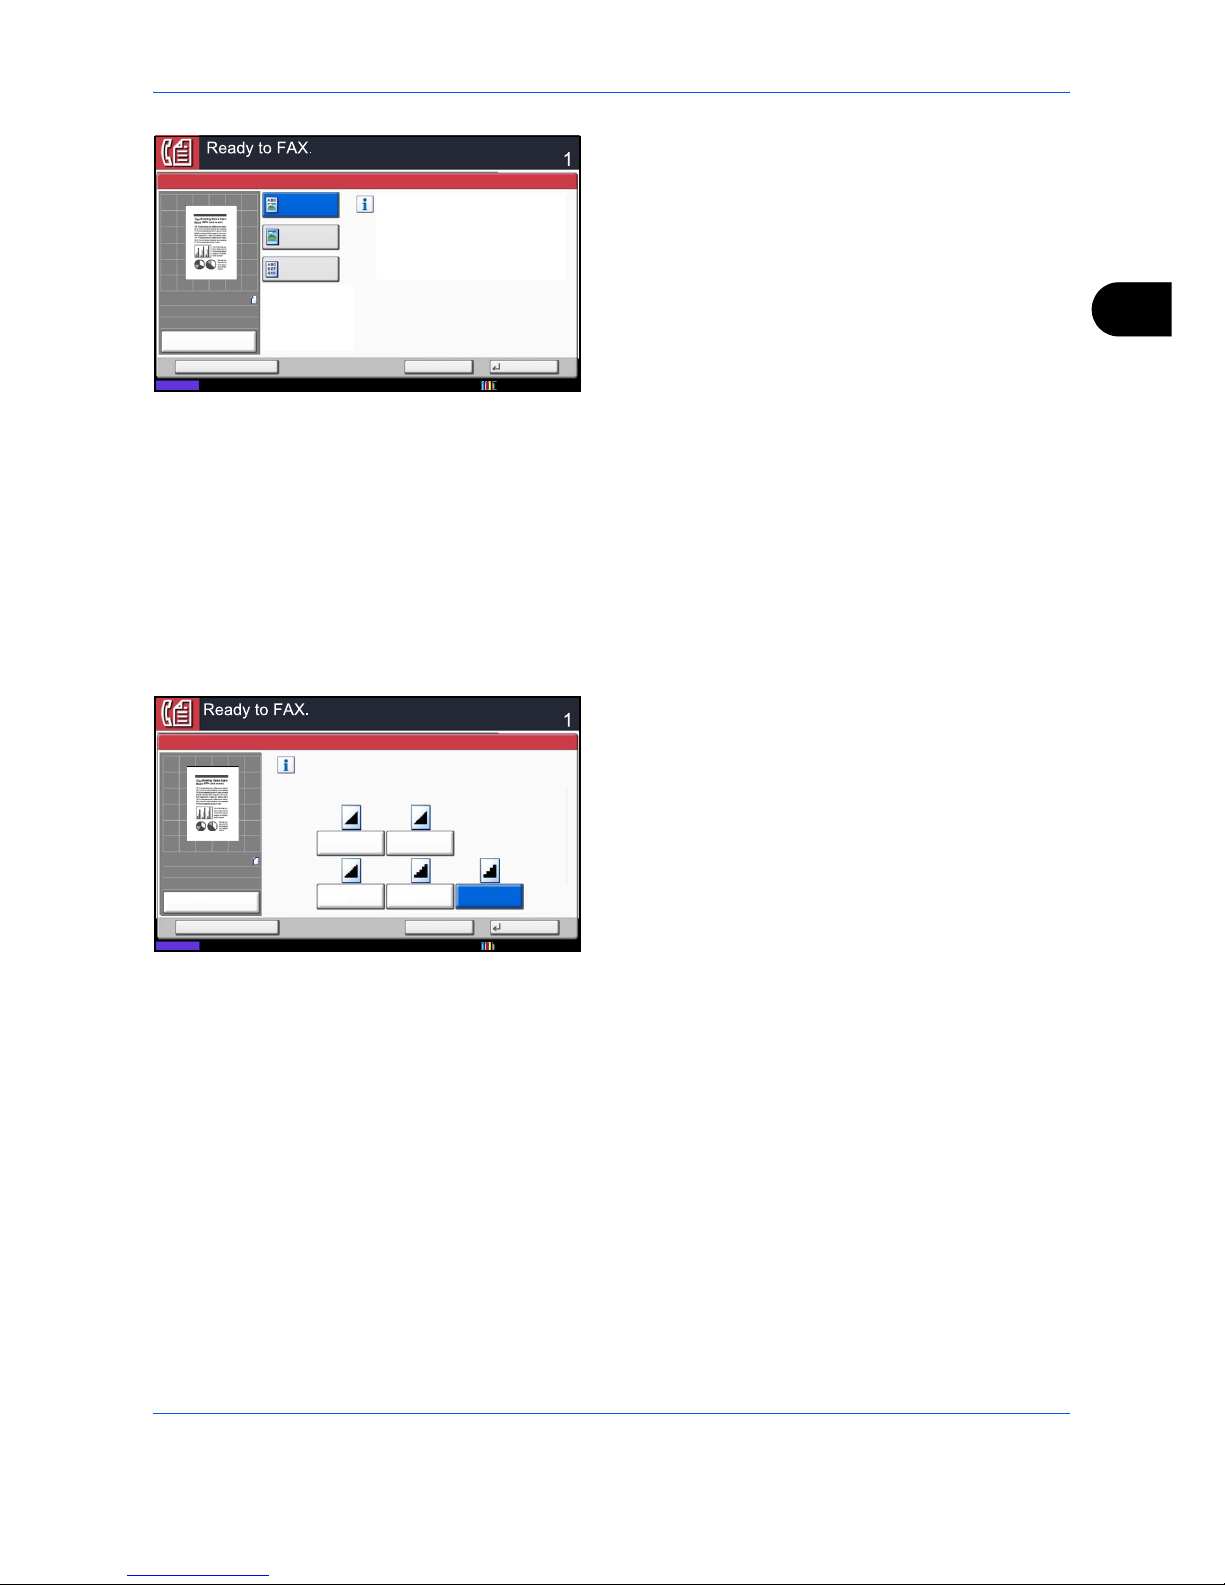
Selecting the Density
Adjust the density when scanning originals.
1 Press [Color/Image Quality], and then [Density].
You can see a preview of the image to be sent by
pressing [Preview]. For details, refer to Previewing
Images on page 3-24.
2 Select the density.
The density can be selected in 13 levels from -3
(lighter) to +3 (darker). In Quick Setup, the density
is in seven levels. To adjust the density in 13 levels,
press [More].
3 Press [OK].
Select of Original Image
Select the original image.
1 Press [Image Quality], and then [Original
Image].You can see a preview of the image to be
sent by pressing [Preview]. For details, refer to
Previewing Images on page 3-24.
Key Description
Sub Address To communicate using the sub address, press
this key. For details, refer to Sub Address
Communication on page 4-45.
Transmission Start
Speed
To change the transmission start speed, press
this key. Select the speed from 33,600 bps,
14,400 bps, and 9,600 bps.
ECM ECM (error correction mode) prevents distortion
of the fax image by automatically resending any
parts of the data that were not correctly sent due
to the effects of noise on the telephone line during
transmission. To change the ECM communication
setting, press this key.
Encrypted
Transmission
To send faxes using encryption, press this key.
For details, refer to Encryption on page 6-29.
Darker
Density
NormalLighter
Cancel OKAdd Shortcut
Status 10/10/2010
Destination
0+1+2+3
-1
-2-3
-2.5 -1.5 -0.5 +0.5 +1.5 +2.5
100%
A4
A4
Preview
Original
Zoom
Send
:
:
:
Page 49
FAX Operation (Basic)
3-9
3
2 Select the original image.
• Text + Photo: Suitable for originals containing a
mixture of text and photos.
• Photo: For enhanced copies of photographs.
• Text: Sharply renders pencil text and fine lines.
When text is selected, the OCR screen appears. If
you need an image quality suitable for OCR
software (applications that convert images into text
data), press [On]. Otherwise, press [Off].
3 Press [OK].
Selecting the Resolution
Select the resolution suitable for sending originals. The default setting is 200 × 100 dpi (Normal). The higher the
scan resolution, the clearer the image. However, higher resolution also means longer send times. Normally, up
to 400 × 400 dpi (Ultra Fine) is recommended.
1 Press [Image Quality], and then [Scan Resolution].
You can see a preview of the image to be sent by
pressing [Preview]. For details, refer to Previewing
Images on page 3-24.
2 Select the resolution.
• 200 × 100 dpi (Normal): when sending originals
with standard size characters
Typical character size: 10.5 point (example:
Resolution Resolution)
• 200 × 200 dpi (Fine): when sending originals
with relatively small characters and thin lines
Typical character size: 8 point (example:
Resolution Resolution)
• 200 × 400 dpi (Super Fine): when sending
originals with minute characters and lines
Typical character size: 6 point (example:
Resolution
Resolution)
• 400 × 400 dpi (Ultra Fine): when sending
originals with minute characters and lines more
finely
Typical character size: 6 point (example:
Resolution
Resolution)
• 600 × 600 dpi (600dpi): when sending originals
with minute characters and lines as finely as
possible
Typical character size: 6 point (example:
Resolution
Resolution)
When you send originals at a resolution of 200 ×
400 dpi (Super Fine) or higher, the fax machine on
the receiving system needs to be capable of
Select original image type
for best results.
Original Image
Text+Photo
Photo
Text
Cancel OKAdd Shortcut
Status 10/10/2010 10:10
Destination
100%
A4
A4
Preview
Original
Zoom
Send
:
:
:
Select fineness of scanning resolution.
The larger the number, the better the
image resolution.
400x400dpi
Ultra Fine
FAX TX Resolution
200x200dpi
Fine
200x100dpi
Normal
200x400dpi
Super Fine
600x600dpi
Cancel OKAdd Shortcut
Status 10/10/2010
Destination
100%
A4
A4
Preview
Original
Zoom
Send
:
:
:
Page 50

FAX Operation (Basic)
3-10
receiving the originals at such image quality. When
the receiving system does not have such capability,
originals are sent at an image quality of 200 × 200
dpi (Fine).
3 Press [OK].
Selecting the original size
Set the size of the original to be faxed.
1 Press [Org./Sending Data Format], and then
[Original Size]. The original size setting screen
appears.
NOTE: If the Start key is pressed without setting
the original size, the original size setting screen
will appear prior to transmission.
2 Select the original size.
* The input units can be changed in the System menu. Refer to the machine’s Operation Guide.
3 Press [OK].
Item How to Select Detail
Standard
Sizes 1
Have the size of original
detected automatically, or
select from the standard
sizes.
Inch models: Auto, Ledger, Letter-R, Letter, Legal
Statement-R, 11x15" and Oficio II
Metric models: Auto, A3, A4-R, A4, A5, B4-R, B5-R,
B5, Folio and 216
x340mm
Standard
Sizes 2
Select from the standard
sizes not included in the
Standard Sizes 1.
Inch models: A3, A4-R, A4, A5-R, B4-R, B5-R, B5,
Folio, 8K, 16K-R, 16K and 216
x340mm
Metric models: Ledger, Letter-R, Letter, Legal,
Statement-R, 11x15", Oficio II, 8K, 16K-R and 16K
Others Select from envelope,
postcard or the custom
sized originals.
Hagaki, Oufuku Hagaki
Size Entry Enter the size not
included in the standard
sizes 1 and 2*.
Inch models
Horizontal: 2 to 17" (in 0.01" increments), Vertical: 2
to 11.69" (in 0.01" increments)
Metric models
Horizontal: 50 to 432 mm (in 1 mm increments),
Vertical: 50 to 297 mm (in 1 mm increments)
Page 51
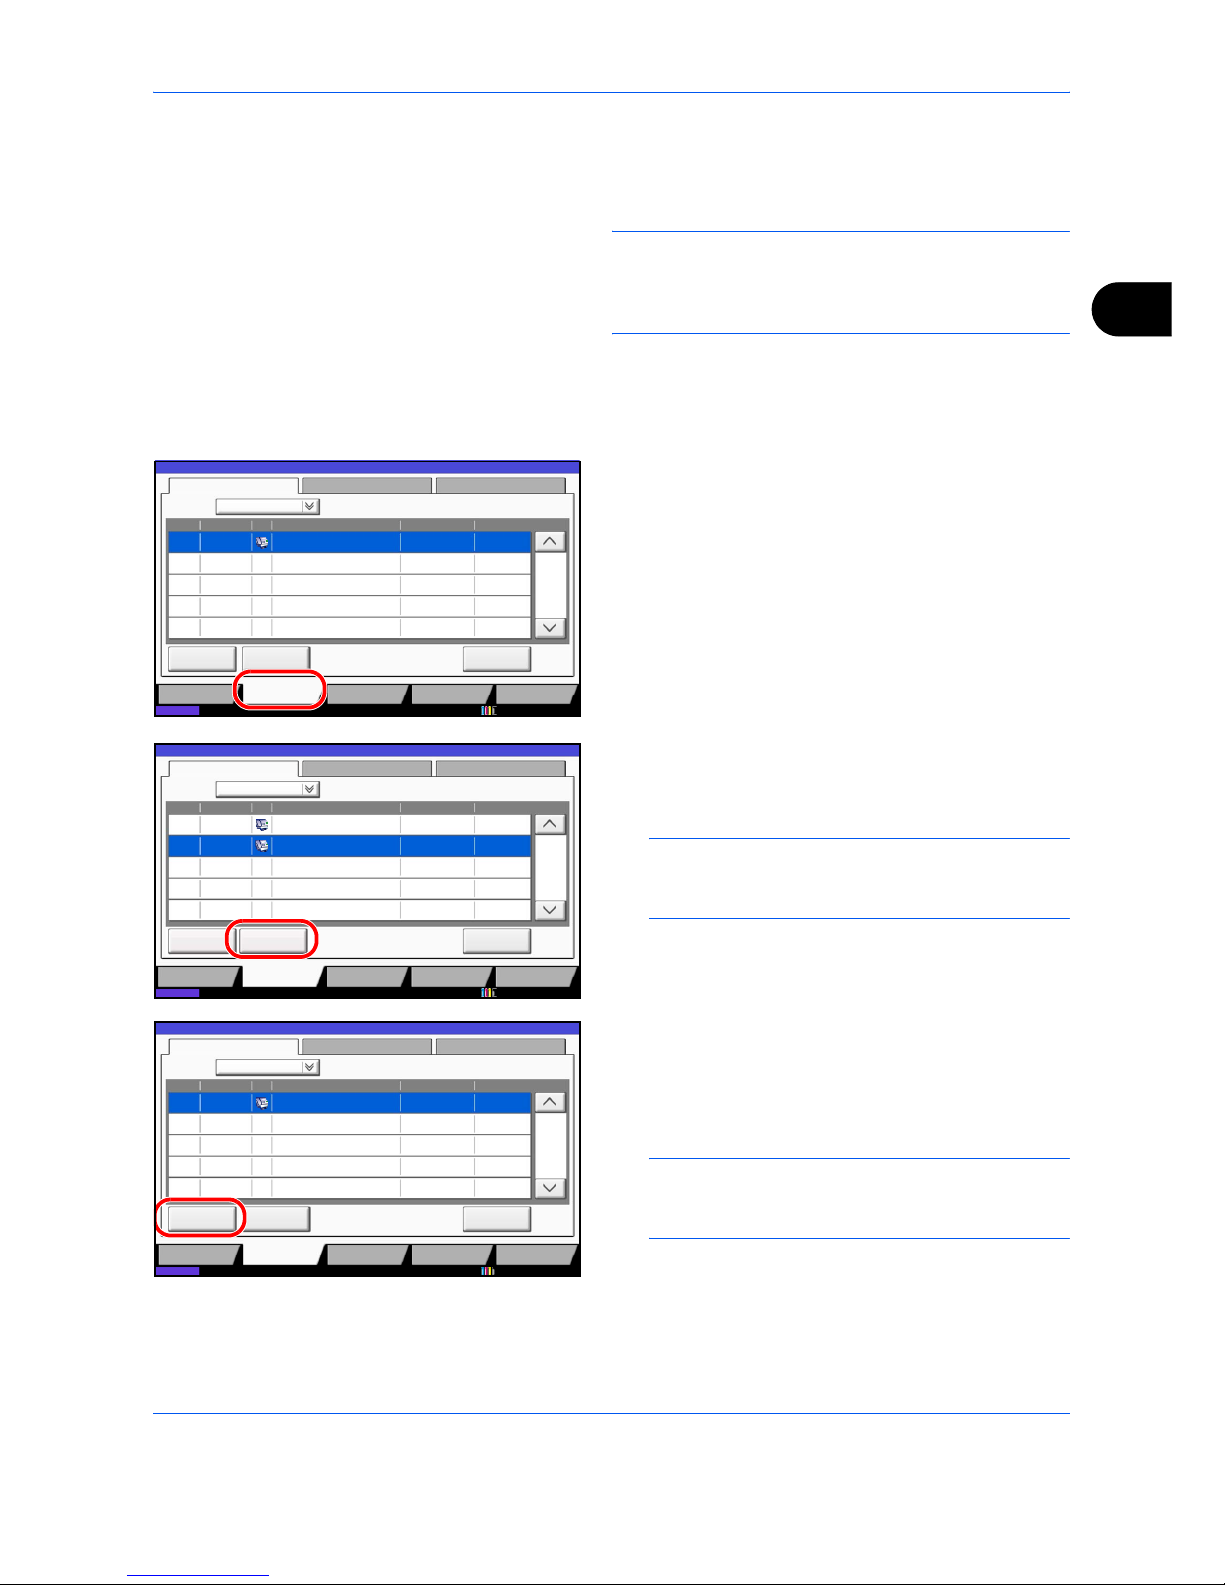
FAX Operation (Basic)
3-11
3
Send Start
Press the Start key. Transmission begins.
NOTE: When On is selected in Dest. Check before
Send, a destination confirmation screen is displayed
when you press the Start key. For details, refer to
Confirmation Screen of Destinations on page 5-12.
Checking the Send Status
1 Press the Status/Job Cancel key.
2 Press [Sending Jobs].
The list of accepted time, destination, and status
are displayed for each job.
To send a job by priority override that is waiting,
select the job and press [Priority Override] in the
Sending Jobs screen, and press [Yes].
NOTE: If there is a fax transmission job that is in
progress, transmission of the priority override fax
job will start after the job in progress is finished.
To cancel the Transmission, on the Sending Jobs
screen above, select the job, and press [Cancel].
When the cancel confirmation screen appears,
press [Yes].
NOTE: Pressing the Stop key on the operation
panel while originals are being scanned cancels
the transmission.
Log
0123456789
438
14:47
1/1
10/10/2010 10:10
Status
Printing Jobs Sending Jobs Storing Jobs
Device/
Communication
Paper/Supplies
Detail
InProcess
Status
User NameJob NameType
Accepted Time
Job No.
Cancel
Job Type All
Status
Status
Scheduled Job
Priority
Override
Log
0123456789
438
14:47
1/1
10/10/2010 10:10
Status
Printing Jobs Sending Jobs Storing Jobs
Device/
Communication
Paper/Supplies
Detail
InProcess
Status
User NameJob NameType
Accepted Time
Job No.
Cancel
Job Type All
Status
Status
Scheduled Job
Priority
Override
0123456779
439
14:50 Waiting
Log
0123456789
438
14:47
1/1
10/10/2010 10:10
Status
Printing Jobs Sending Jobs Storing Jobs
Device/
Communication
Paper/Supplies
Detail
InProcess
Status
User NameJob NameType
Accepted Time
Job No.
Cancel
Job Type All
Status
Status
Scheduled Job
Priority
Override
Page 52

FAX Operation (Basic)
3-12
FAX Automatic Reception
When using this machine as a FAX-dedicated machine that does not receive telephone calls, set the machine
to FAX-dedicated reception. No special operation is required when receiving faxes.
NOTE: When you are receiving DRD service from a telephone company, change the reception method to
[Auto (DRD)]. For details, refer to DRD Reception (Available for inch versions only) on page 6-19.
Reception Method
This machine allows the following five reception methods.
• Auto (Normal)
• Auto (FAX/TEL) (Refer to page 6-7.)
•Auto (TAD) (Refer to page 6-9.)
• Auto (DRD) (Refer to page 6-19.)
• Manual (Refer to page 4-14.)
Checking and Changing the Reception Method
1 Press the System Menu key.
2 Press [FAX], [Next] of Reception, [Next] of FAX ,
and then [Change] of RX Setting.
3 Select [Auto (Normal)].
4 Press [OK].
Reception Starts
1 When a fax has been sent to you, the machine
rings the registered number of times, and then
starts receiving the fax.
After reception has started, the Processing
indicator blinks.
NOTE: You can change the number of times the
ringing tone rings. (Refer to Rings on page 6-11.)
To cancel the reception, refer to Cancelling
Transmission (Disconnection of Communication) on
page 3-15.
Memory Reception
When the machine cannot print a fax due to paper
running out or a paper jams, it temporarily stores
originals that have been sent in the image memory.
When the machine returns to the printable state,
printing starts.
Page 53
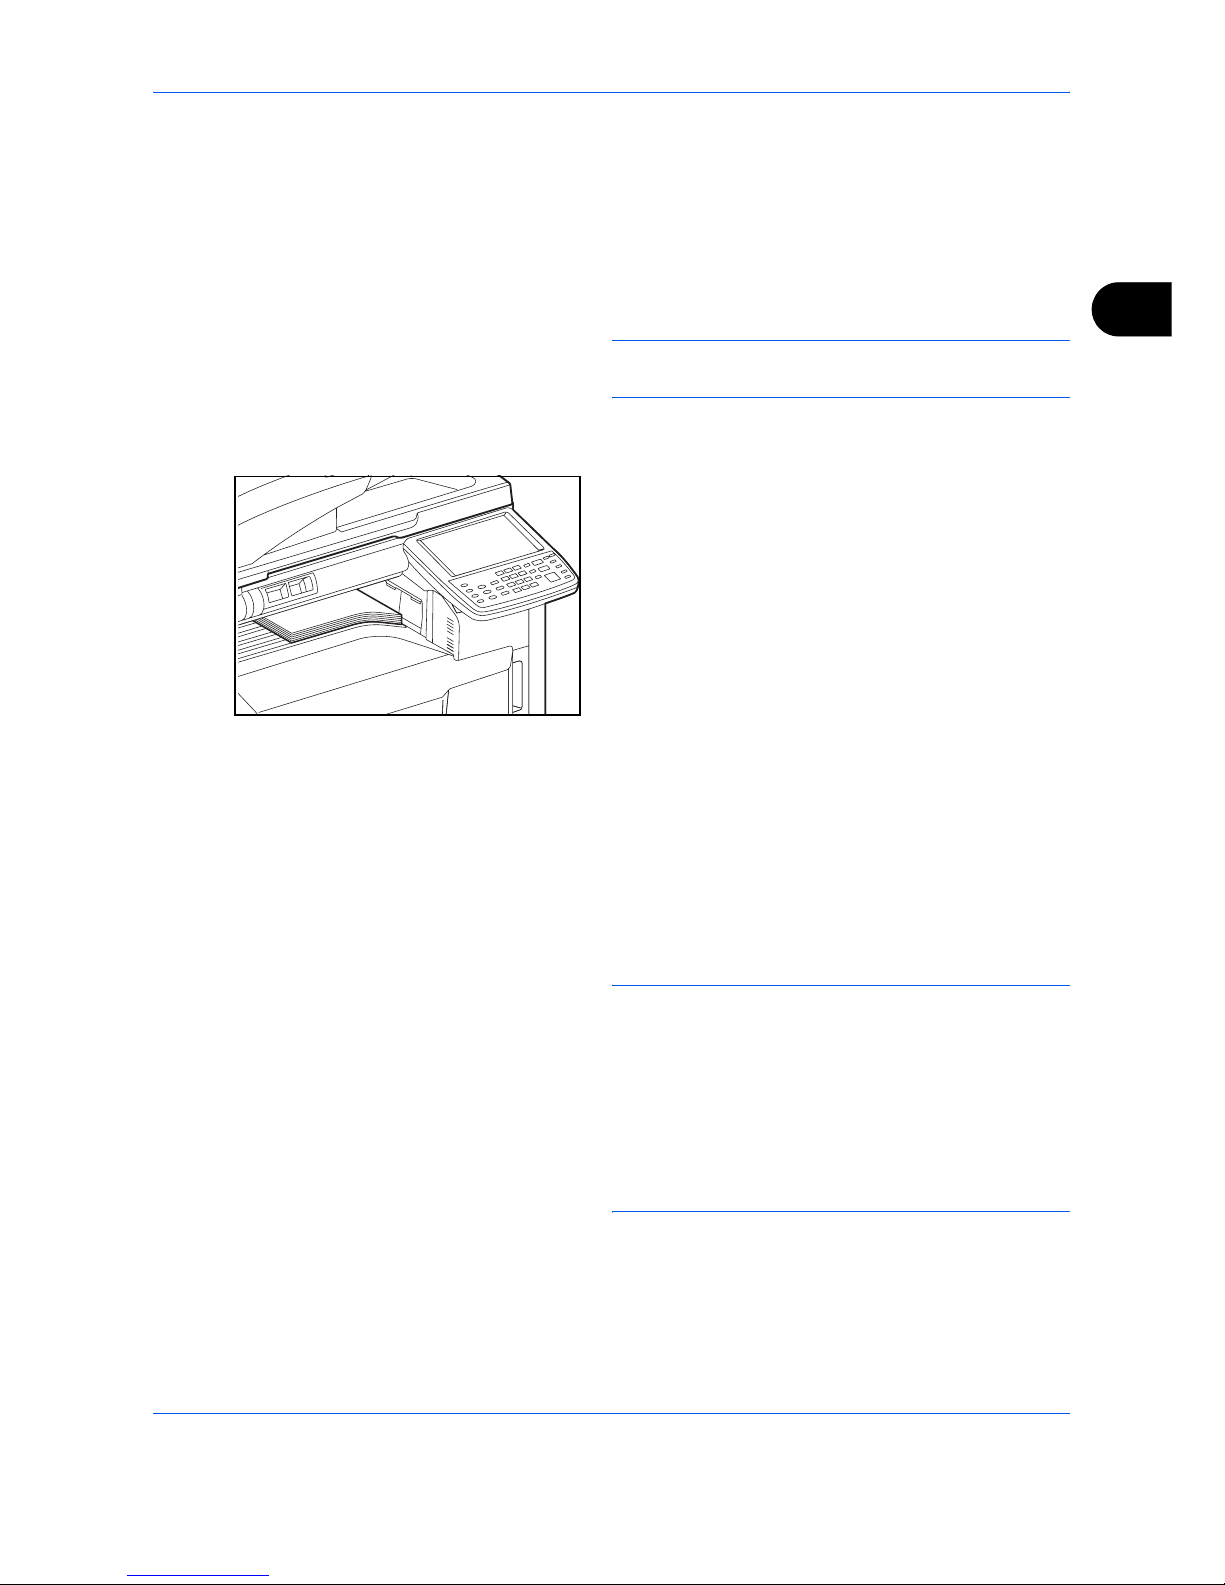
FAX Operation (Basic)
3-13
3
The number of pages that can be stored depends on the
pages. As a general guideline, about 700 A4 size pages
at normal resolution can be stored.
During memory reception, FAX Reception Printing Jobs
are displayed on Printing Jobs of the Status screen. To
print the received originals, supply paper or remove
jammed paper.
NOTE: For the Status screen, refer to the machine’s
Operation Guide.
Reception Print
2 Received originals are output on the top tray with
the print side facing downward. Up to 250 sheets of
plain paper (80 g/m²) can be held on the top tray.
However, the number of sheets varies with the
condition of the paper to be used.
When an optiopnal finisher or mailbox is attached
to the machine, received originals are output with
the print side facing downward.
Paper can also be placed in the multi-purpose tray
to print a fax. The multi-purpose tray can be used
to print faxes on paper sizes and types that cannot
be loaded in the cassette.
For the setting for printing faxes on paper in the
multi-purpose tray, refer to MP Tray Paper Output
on page 6-18.
For paper types that can be placed in the multipurpose tray, refer to Media Type for Print Output
on page 6-16.
IMPORTANT:
• The number of sheets that can be held varies with
the output tray. Refer to the machine’s Operation
Guide. When the number of sheets to be printed
exceeds the number of sheets that can be held,
remove all the paper on the top tray.
• Even if the machine is not capable of printing due to
paper running out or a paper jam, it can still receive
faxes (memory reception).
Page 54
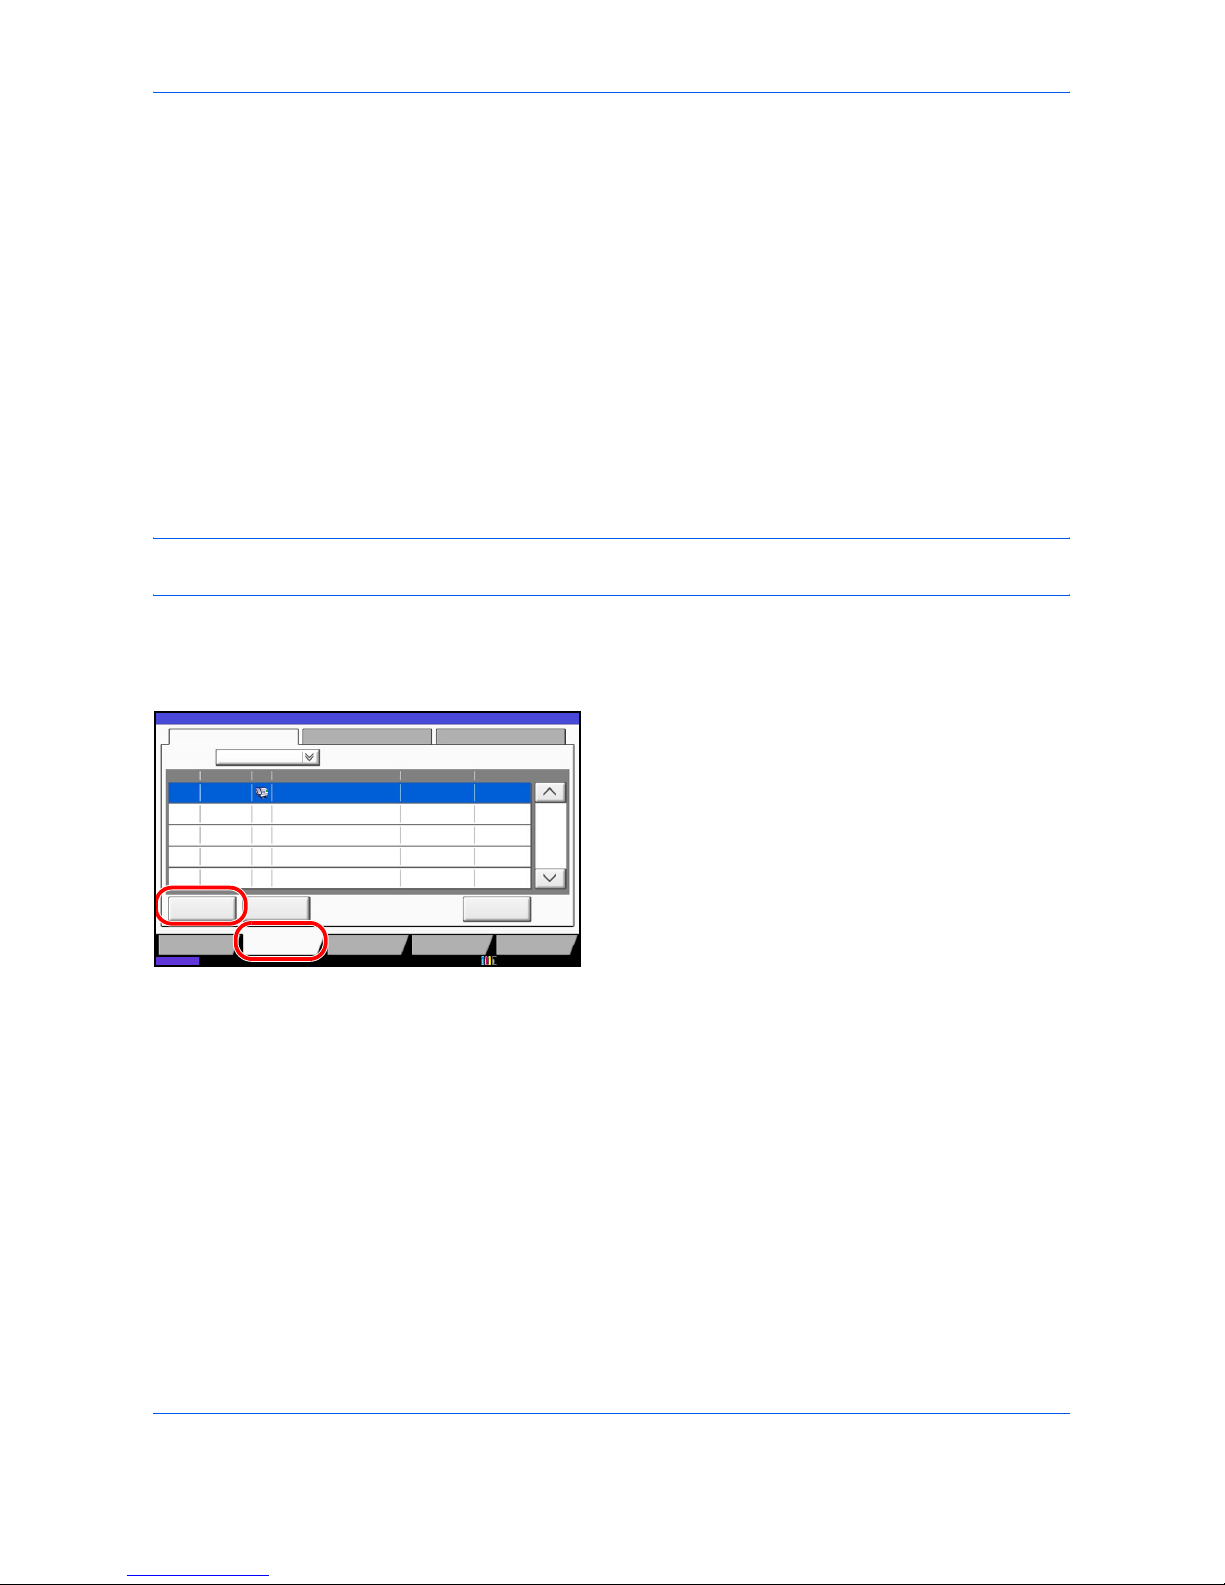
FAX Operation (Basic)
3-14
Canceling Communication
The method for cancelling communication with this machine differs depending on the transmission method
(memory transmission or direct transmission) and communication form. Methods of cancelling in various cases
are explained here.
Cancelling Memory Transmission (while originals are being scanned)
During memory transmission, to cancel scanning while originals are being scanned, press the Stop key on the
operation panel, or press [Cancel] on the touch panel. Scanning of originals is canceled, and the originals are
ejected. When originals remain in the document processor, take them out from the original output table.
Cancelling Memory Transmission (during communication)
During memory transmission, to cancel communication after it has started following the completed scanning of
originals, use the following procedure.
NOTE: You can cancel transmission by disconnecting the telephone line. For details, refer to Cancelling
Transmission (Disconnection of Communication) on page 3-15.
1 Press the Status/Job Cancel key.
2 Press [Sending Jobs].
3 Select the job you want to cancel, and press
[Cancel].
When the cancel confirmation screen appears,
press [Yes].
Communication is canceled.
Cancelling and Sending Delayed Transmissions (Queued)
To cancel delayed transmissions that are queued, or to send delayed transmissions immediately rather than
waiting for the specified time, use the procedure below.
1 Press the Status/Job Cancel key.
2 Press [Sending Jobs], and then [Scheduled Job].
Log
0123456789
438
14:47
1/1
10/10/2010 10:10
Status
Printing Jobs Sending Jobs Storing Jobs
Device/
Communication
Paper/Supplies
Detail
InProcess
Status
User NameJob NameType
Accepted Time
Job No.
Cancel
Job Type All
Status
Status
Scheduled Job
Priority
Override
Page 55
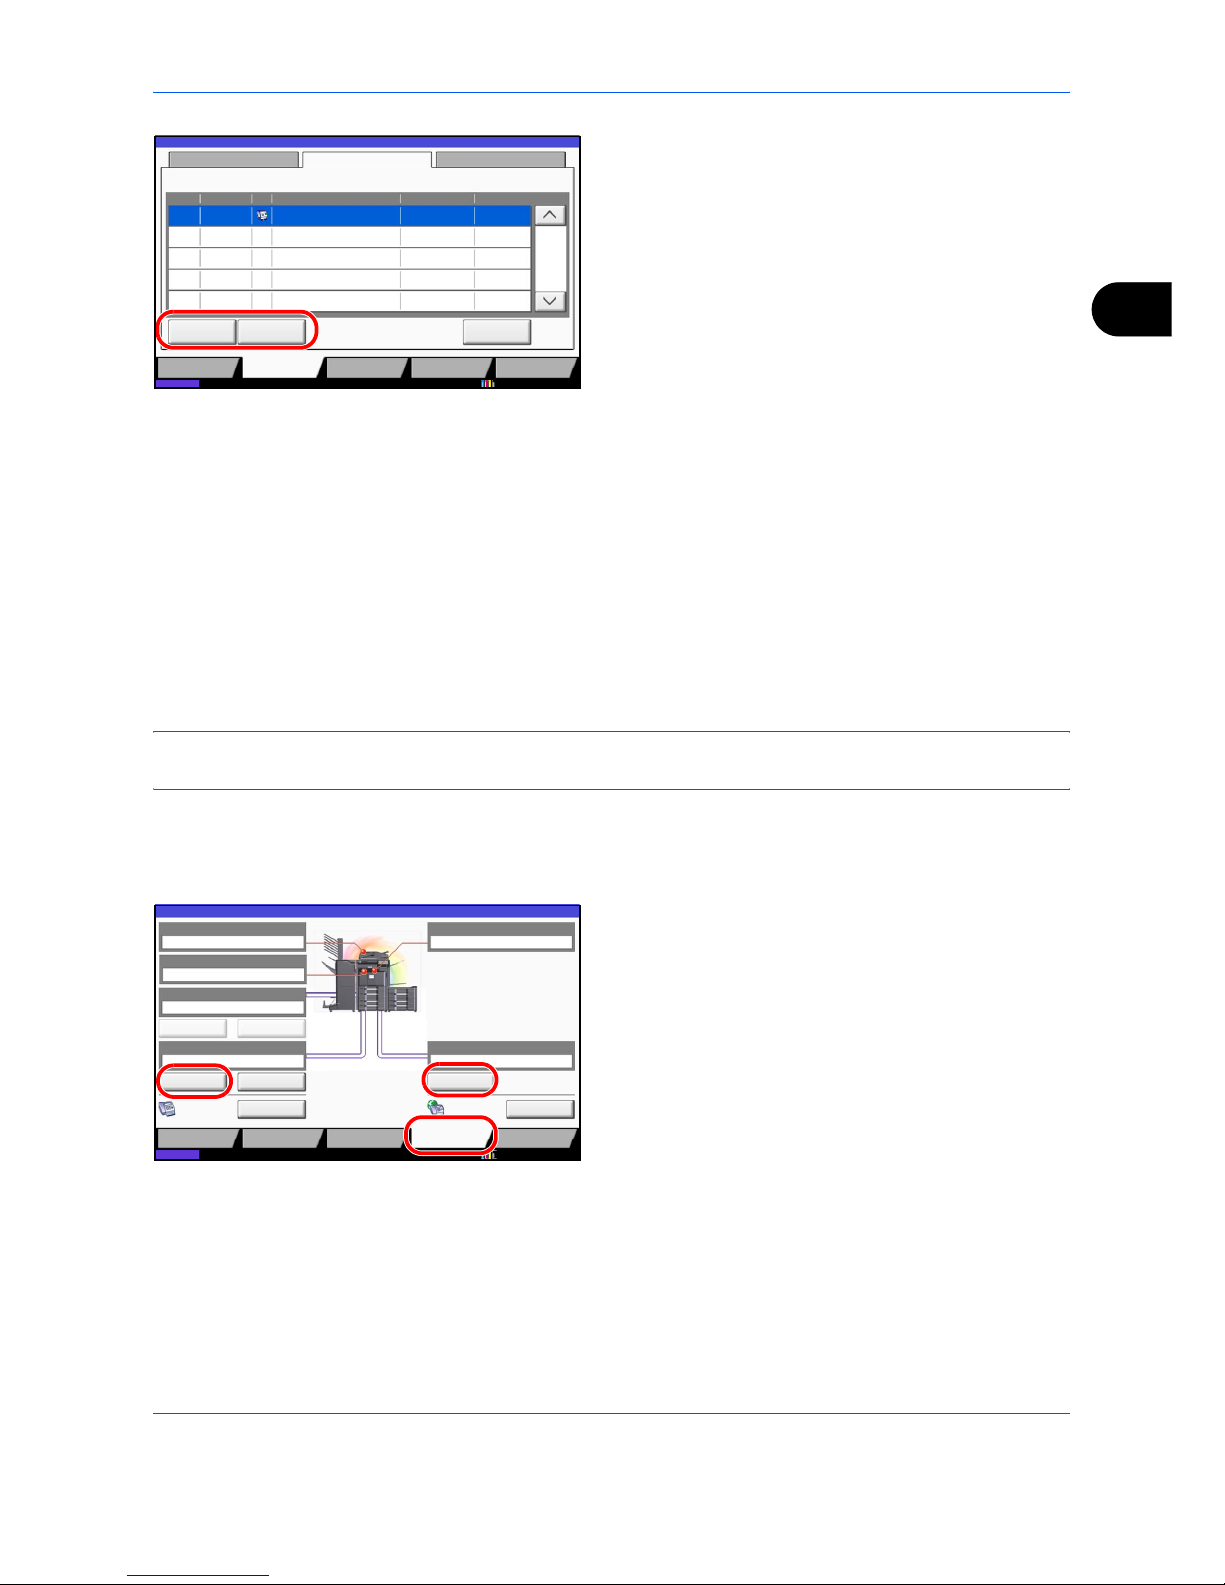
FAX Operation (Basic)
3-15
3
3 To cancel a delayed transmission, select the job to
be cancelled and press [Cancel].
When the cancel confirmation screen appears,
press [Yes].
Transmission is canceled.
To send delayed transmission immediately, select
the job to be sent and press [Start Now].
When the send confirmation screen appears, press
[Yes].
Transmission begins.
Cancelling Direct Transmission
During direct transmission, to cancel communication during transmission, press the Stop key on the operation
panel or [Cancel] on the touch panel. The originals that have been scanned are ejected, and the screen returns
to the send default screen. When originals remain in the document processor, take them out.
Cancelling Transmission (Disconnection of Communication)
When you cancel sending or receiving by disconnecting the telephone line during communication, use the
following procedure.
NOTE: When 2 optional FAX Kits (Dual FAX option) are installed, disconnect the line currently being used for
communication.
1 Press the Status/Job Cancel key.
2 Press [Device/Communication].
3 Press [Line Off] of FAX Port 1 or FAX Port 2
(option).
When the cancel confirmation screen appears,
press [Yes].
The line in transmission is disconnected.
Cancelling Polling or Sub Address Bulletin Board Transmissions
To cancel a polling or sub address bulletin board transmission, delete the polling transmission original saved in
the polling box. For information on how to delete the saved original, refer to Deleting Originals in a Polling Box
on page 4-57.
Printing Jobs Sending Jobs Storing Jobs Device/
Communication
Paper/Supplies
Status Scheduled Job Log
Job No.
Accepted Time
Type Destination User Name Start Time
Cancel
Detail
1/1
Status
12:000007 9:30 A OFFICE
Start Now
10/10/2010
Status
Ready.
Scanner
Ready.
Printer
Not connected.
Removable Memory
Hard Disk
Format Remove
Line Off Manual RX
FAX Port 1
LogFAX
Check New FAX
i-FAX
FAX Port 2
Line Off
10/10/2010 10:10
Status
Printing Jobs Sending Jobs Storing Jobs
Device/
Communication
Paper/Supplies
Status
Dialing... Receiving...
Overwriting...
Page 56
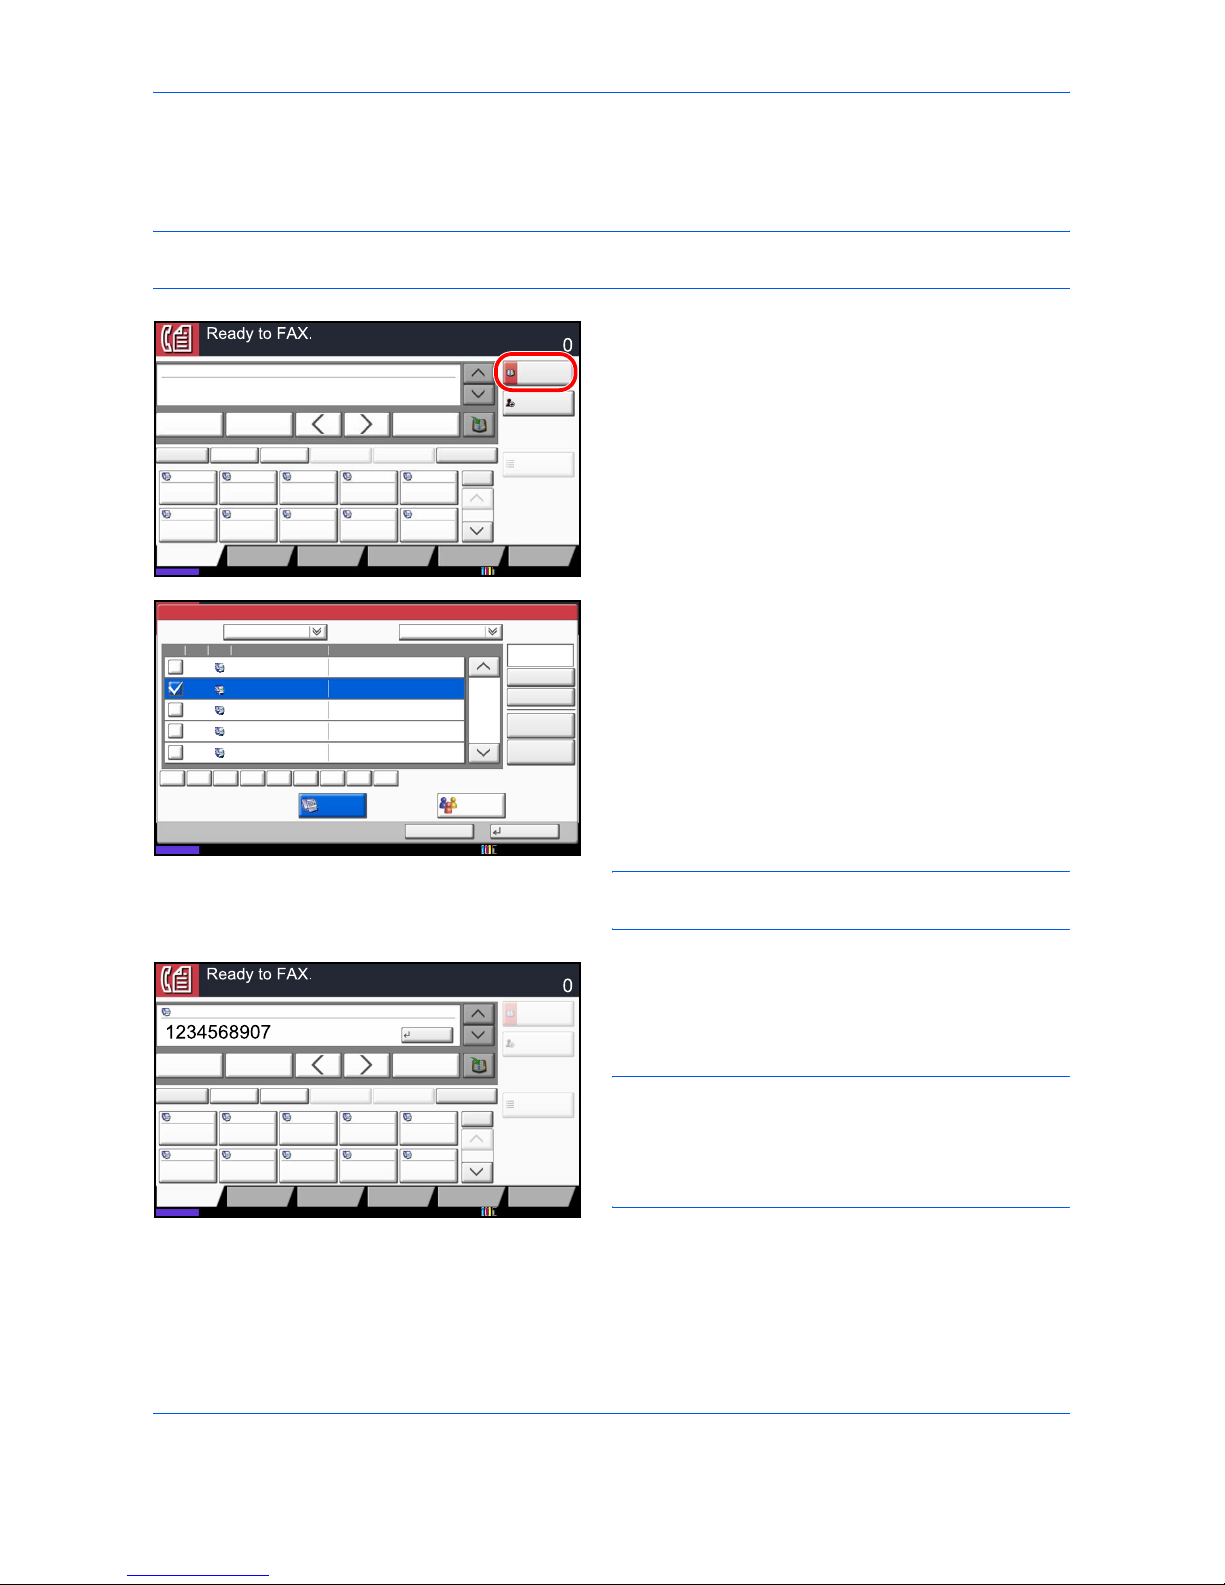
FAX Operation (Basic)
3-16
Selecting a Destination from the Address Book
Select a destination registered in the Address Book.
NOTE: You can set the machine up so that the address book screen appears when you press the Send key.
For details, refer to Setting the Default Send Screen in the Operation Guide for the machine.
1 Press [Address Book] on the basic FAX screen.
2 Select the destination from the list. You can select
several destinations. The checkbox of the
destination selected is checked.
To use an LDAP address book, select [Ext Address
Book] in [Addr Book].
NOTE: To cancel the selection, press the checkbox to
erase the checkmark.
3 Press [OK].
The destination you have selected is registered in
the destination list.
NOTE: To delete the destination that has been
registered, select the destination, and press [Delete].
You can also change the default Sort order. For details,
refer to Sort Settings in the Operation Guide for the
machine.
Status 10/10/2010 10:10
ABCD [email protected]
Address
Book
FAX No.
Entry
No.
1/100
AAA BBB CCC DDD
FFF GGG HHH III JJJ
00040003 00050001 0002
0006 0007 0008 0009 0010
Check
Destinations
Destination
Pause
Backspace
EEE
Space
Detail Delete RecallChainDirectOn Hook
Org./Sending
Data Format
Quick SetupDestination Image Quality Advanced
Setup
Program
Enter Destination.
Status 10/10/2010 10:10
Address Book
Cancel OK
Group
Dest.
Search(No.)
No. Type Name Detail
Detail
Address Book SortAddr Book
0001
0002
0005
0004
0003
D OFFICE
E OFFICE
Register/Edit
Address Book
1/2
FAX
ABC DEF JKL MNO PQRS TUV WXYZGHI 0-9
1234568790
1234568860
A OFFICE 1234567890
B OFFICE 1234568907
C OFFICE 1234569078
Search(Name)
Name
Status 10/10/2010 10:10
ABCD [email protected]
Address
Book
FAX No.
Entry
No.
1/100
AAA BBB CCC DDD
FFF GGG HHH III JJJ
00040003 00050001 0002
0006 0007 0008 0009 0010
Check
Destinations
Destination
Pause
Backspace
EEE
Space
Detail Delete RecallChainDirectOn Hook
Org./Sending
Data Format
Quick SetupDestination Image Quality Advanced
Setup
Program
Enter Destination.
OK
OFFICE 001/001
Page 57
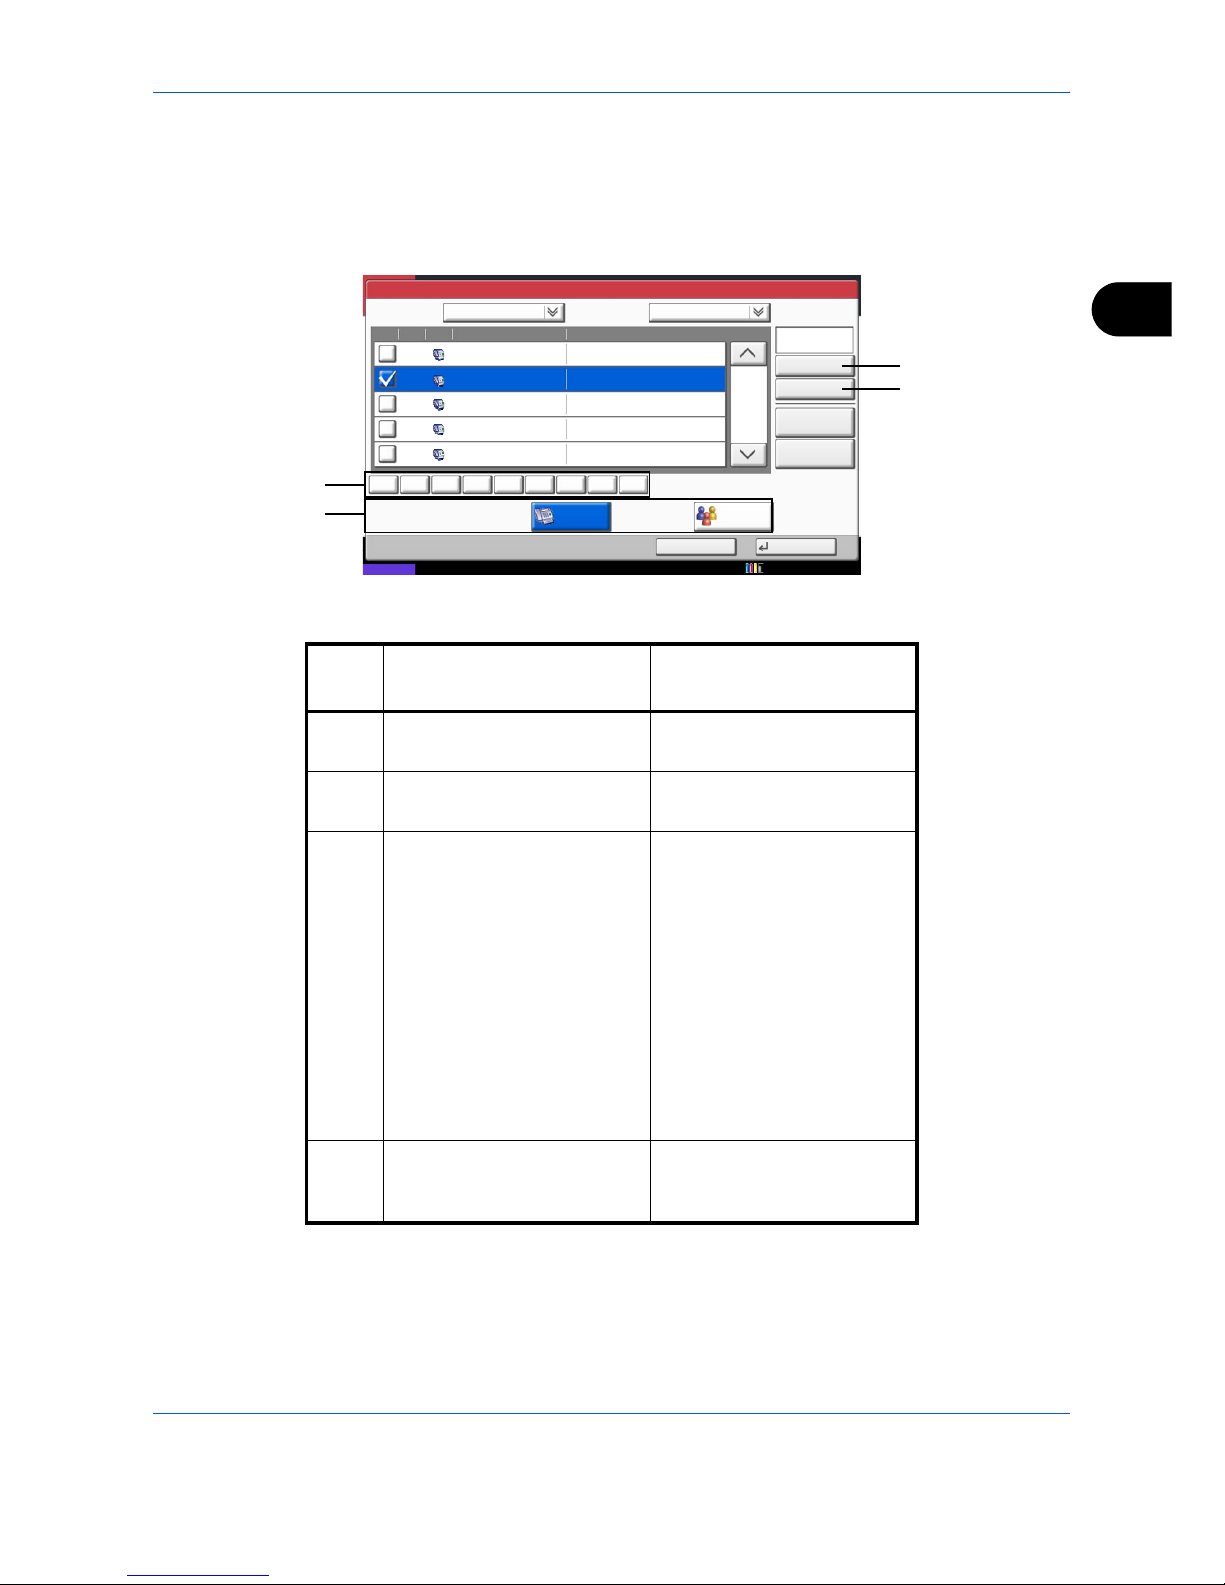
FAX Operation (Basic)
3-17
3
Searching for a Destination
You can search for a destination registered in the Address Book, and further refine your search if necessary.
Status 10/10/2010 10:10
Address Book
Cancel OK
Group
Dest.
Search(No.)
No. Type Name Detail
Detail
Address Book SortAddr Book
0001
0002
0005
0004
0003
D OFFICE
E OFFICE
Register/Edit
Address Book
1/2
FAX
ABC DEF JKL MNO PQRS TUV WXYZGHI 0-9
1234568790
1234568860
A OFFICE 1234567890
B OFFICE 1234568907
C OFFICE 1234569078
Search(Name)
Name
2
1
4
3
Keys
used
Search method Search words, etc.
1 Search (Name) Search by the registered
name.
2 Search (No.) Search by the registered
address number.
3 Destination type search
refinement
Refine your search by using
the type of destination
registered (e-mail, folder
(SMB/FTP), FAX, Internet
FAX, and group)
You can set this function up
so that destination types are
selected when the address
book is displayed. For
details, refer to Destination
Filter Settings in the
Operation Guide for the
machine.
4 Capital letter search
refinement
Refine your search by the
capital letters of the
registered name.
Page 58

FAX Operation (Basic)
3-18
Search (Name)
Press [Search (Name)] and enter the name you want to search.
Search (No.)
Press [Search (No.)] and enter the address number you want to search.
Destination type search refinement
Press [FAX] or [Group]. The destination by the destination type is displayed.
Capital letter search refinement
Press the key of the capital letter you want to search.
Page 59
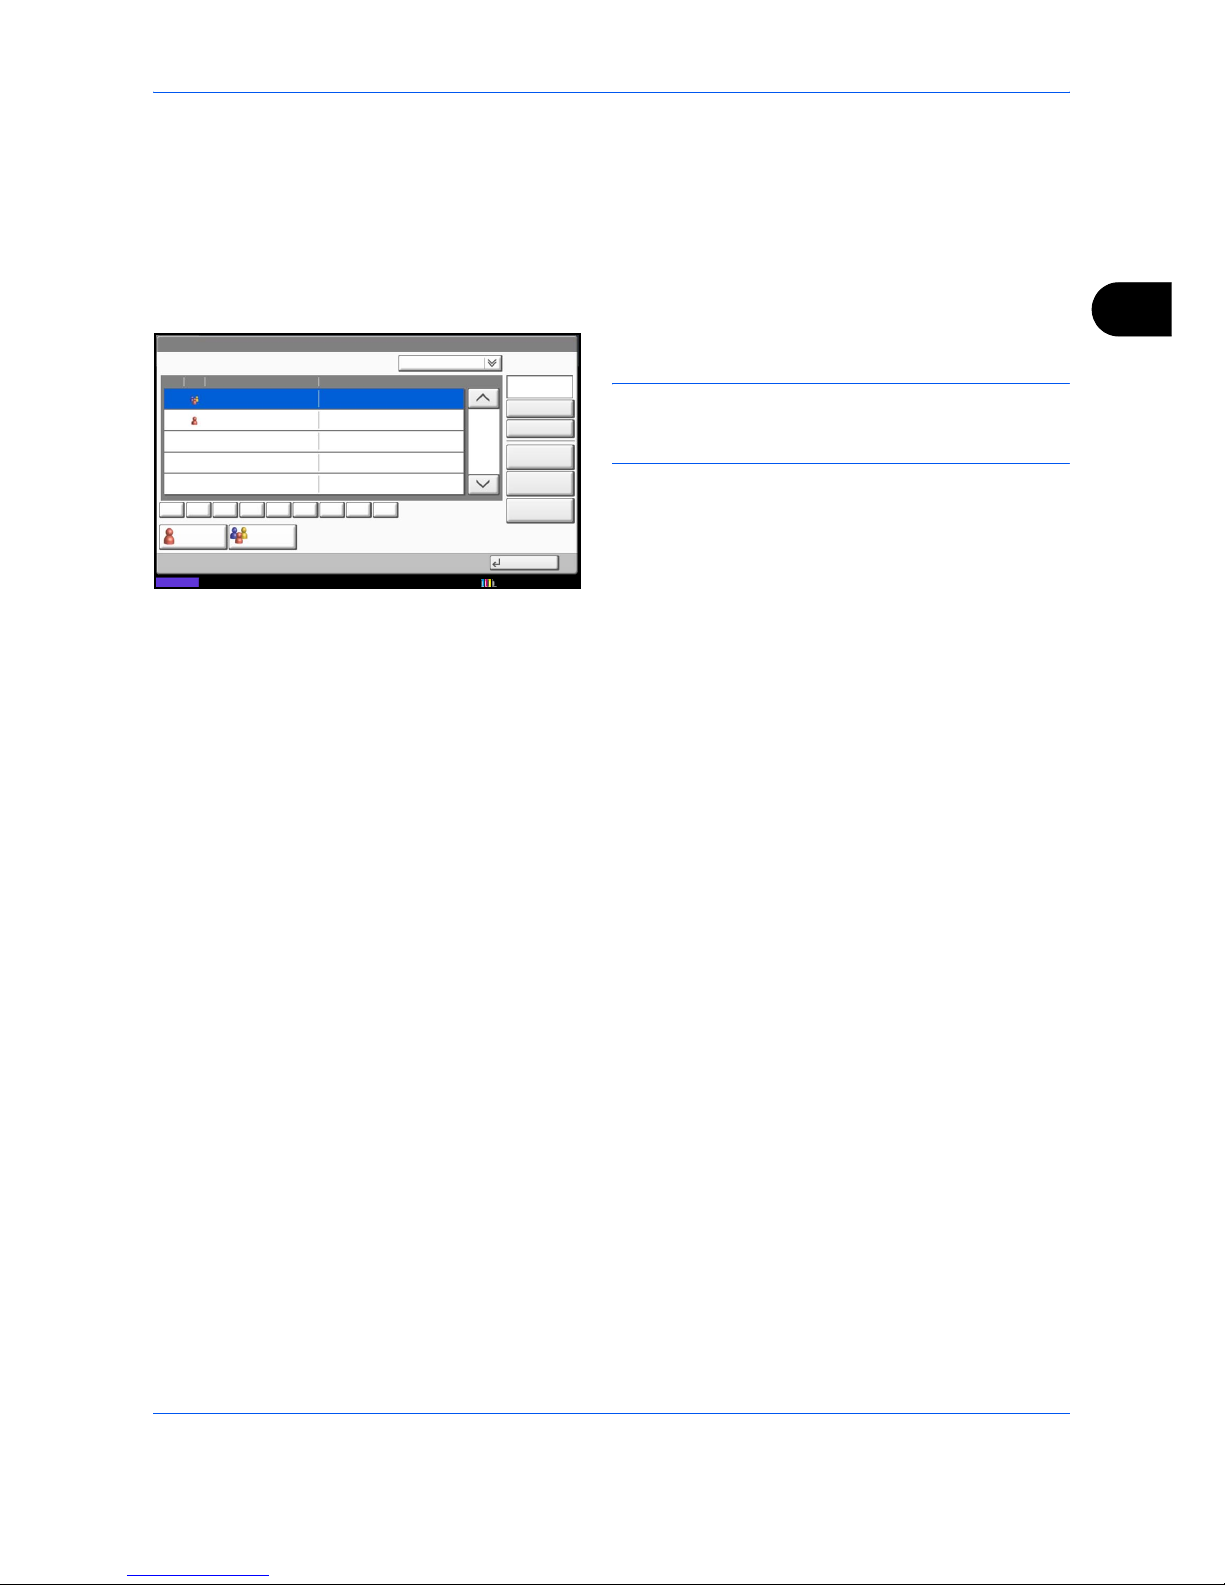
FAX Operation (Basic)
3-19
3
Changing/Deleting Registration Contents
You can change or delete the contents of destinations (contact) or groups.
1 Press the System Menu key.
2 Press [Edit Destination] and then [Register/Edit] of
Address Book.
3 Select the destination or group to edit.
NOTE: The destinations and groups can be
rearranged and searched by destination name, group
name, and address number.
4 Press [Detail].
5 Edit/delete the destination of a contact registration
or a group.
When editing the destination of a contact
registration
Change Address Number, Name, the fax number of
the destination, and the send details setting. For
details, refer to steps 3 to 21 in Contact Registration
(fax) or steps 3 to 16 in Contact Registration (i-FAX).
When editing a group
1
Change Address Number and Name. For
details, refer to Group Registration steps 3 to 7.
2 Press [Member].
3 To add a contact to a group, press [Add]. Refer
to steps 10 and 11 in Group Registration for
information how to add contacts.
To remove a contact from a group, select the
contact to be removed and press [Delete].
Press [Yes] in the confirmation screen to
remove the contact.
You can view detailed information on the
selected contact by pressing [Detail].
Edit Destination - Address Book
Sort
Search(Name)
No. Type
0001
Name Detail
1/1
Contact Group
Detail
Close
Search(No.)
ABCDE
Add
Delete
CCCCC0003
ABC DEF JKL MNO PQRS TUVGHI WXYZ 0-9
Status
Name
Member: 3
CCCCC
10/10/2010 10:10
Page 60

FAX Operation (Basic)
3-20
When deleting the destination of a contact
registration or group
Press [Delete]. Press [Yes] in the confirmation
screen to delete the destination or group.
6 Press [Register]. When the change confirmation
screen appears, press [Yes]. Changes or deletions
made to the registered details are applied in the
Address Book.
Page 61
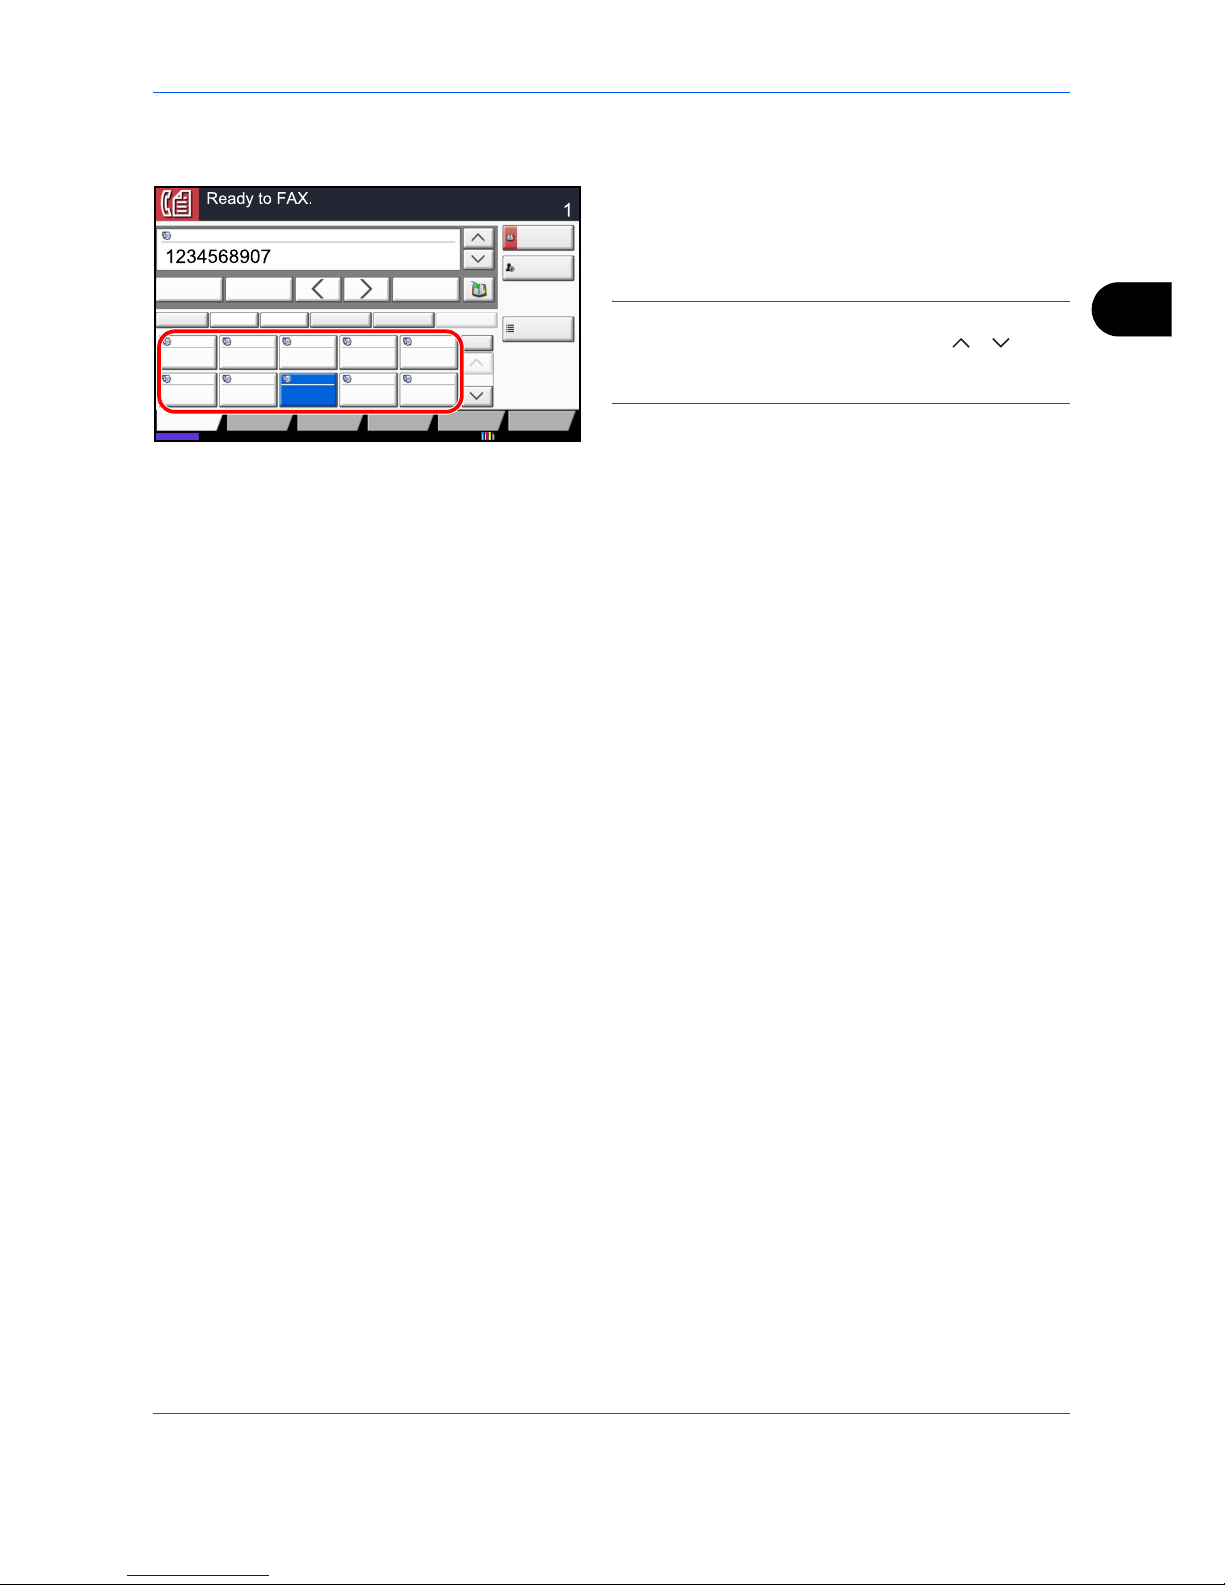
FAX Operation (Basic)
3-21
3
Selecting a Destination by One-touch Key
Select a destination by a One-touch key.
On the [Destination] screen, press the One-touch key to
which the destination is registered.
NOTE: When the One-touch key for the destination is
not displayed on the touch panel, press [ ]/[ ] on
the right side. The next/previous One-touch keys are
displayed.
Status 10/10/2010 10:10
ABCD [email protected]
Address
Book
FAX No.
Entry
No.
1/100
AAA BBB CCC DDD
FFF GGG HHH III JJJ
00040003 00050001 0002
0006 0007 0008 0009 0010
Check
Destinations
Destination
Pause
Backspace
EEE
Space
Detail Delete RecallChainDirectOn Hook
Org./Sending
Data Format
Quick SetupDestination Image Quality Advanced
Setup
Program
HHH
001/001
Page 62
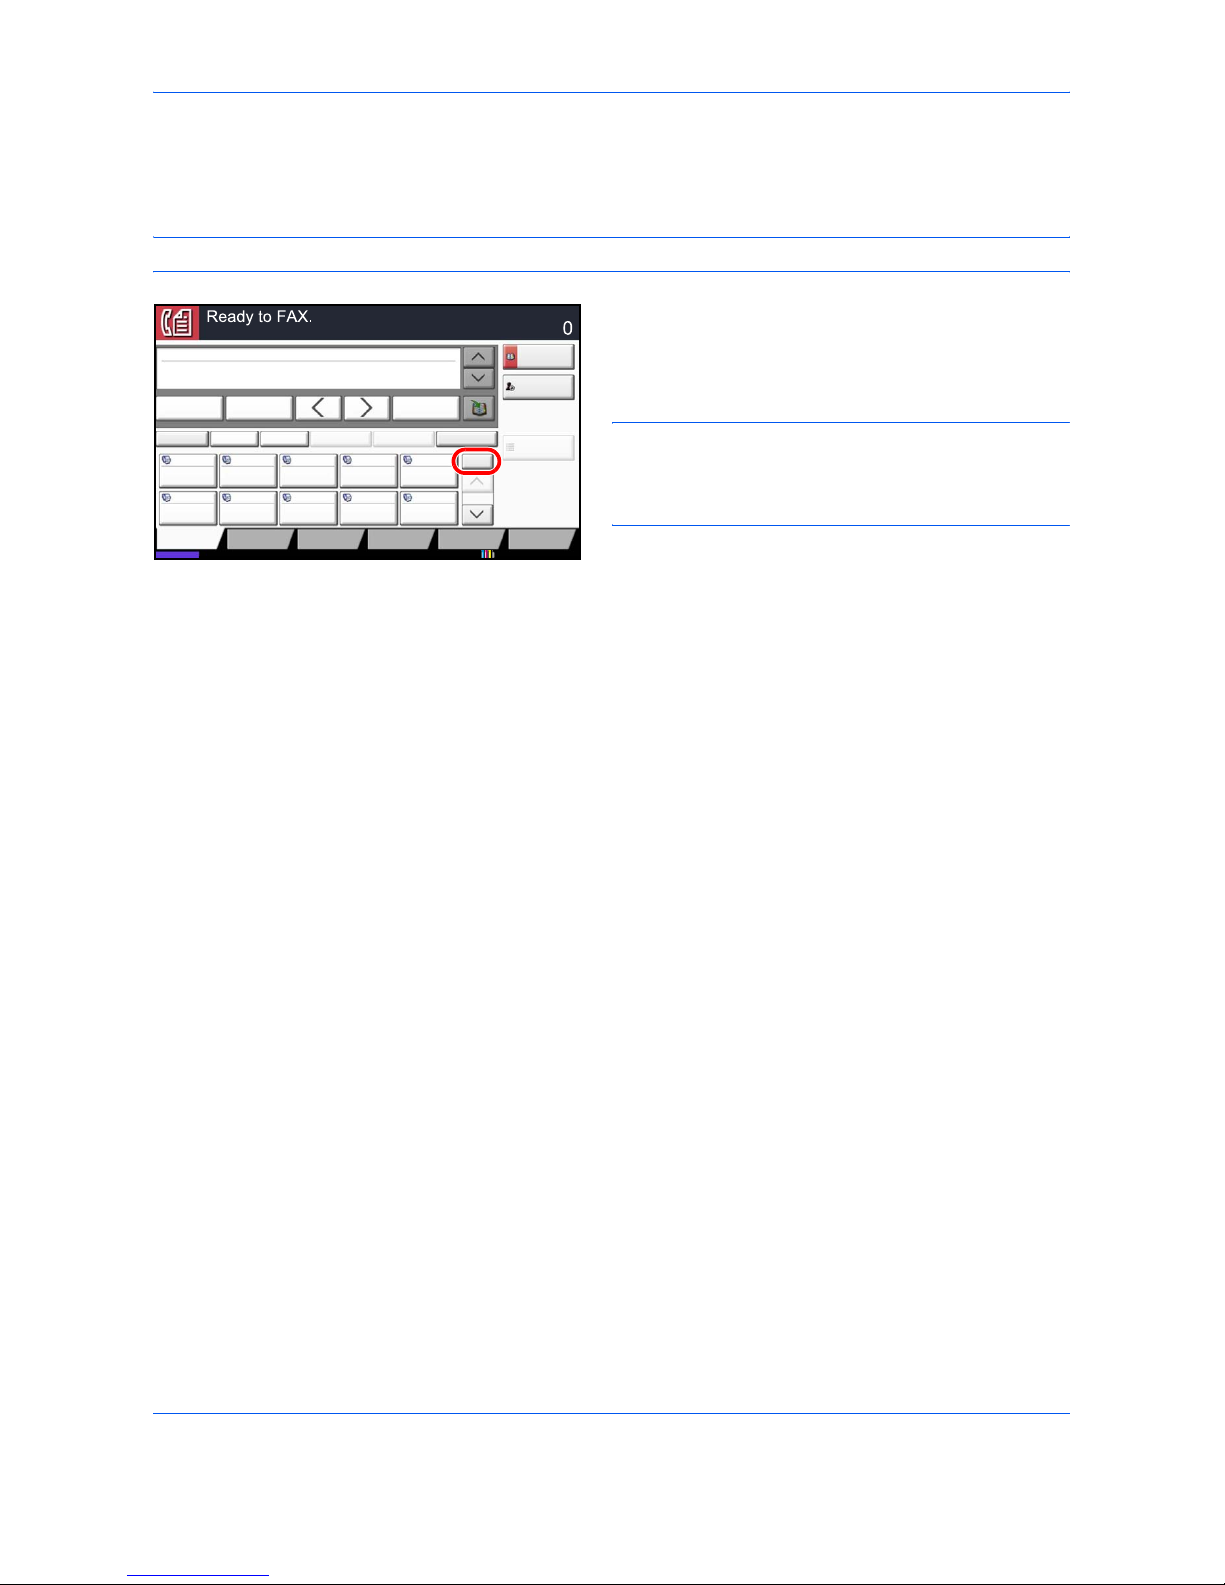
FAX Operation (Basic)
3-22
Using the Speed Dial key
You can designate a four-digit (0001 to 1000) One-touch key number (speed dial) to select the destination.
NOTE: For details, refer to Using One-touch Keys on page 2-14.
Press Quick No. Search key or [No.] in the
[Destination] screen, enter one-touch key number in the
number entry screen using the numeric keys, and then
press [OK].
NOTE: When entering a one, two, or three digits One-
touch key number, you don't need to enter zero (0) at
the beginning. (For example, you can enter as 1 for
One-touch key number 1.)
Status 10/10/2010 10:10
ABCD [email protected]
Address
Book
FAX No.
Entry
No.
1/100
AAA BBB CCC DDD
FFF GGG HHH III JJJ
00040003 00050001 0002
0006 0007 0008 0009 0010
Check
Destinations
Destination
Pause
Backspace
EEE
Space
Detail Delete RecallChainDirectOn Hook
Org./Sending
Data Format
Quick SetupDestination Image Quality Advanced
Setup
Program
Enter Destination.
Page 63
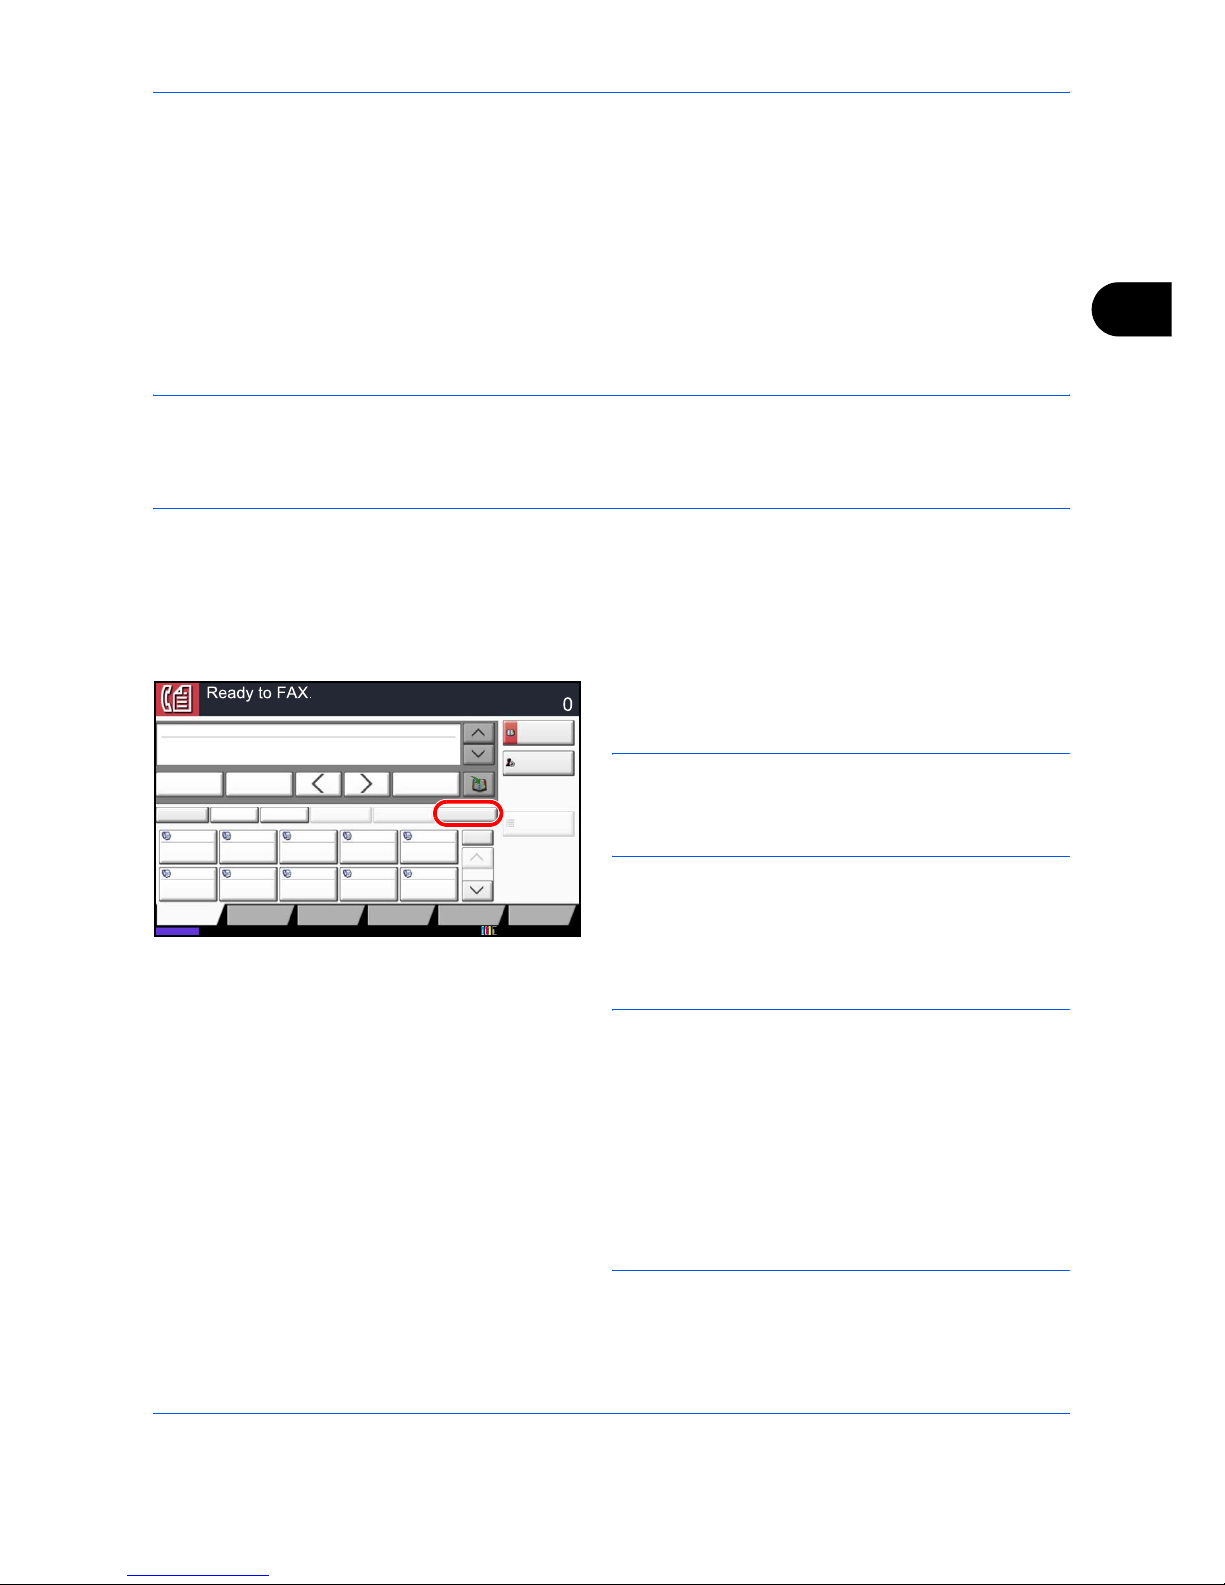
FAX Operation (Basic)
3-23
3
Dialing the Same Receiving System (Redial)
Redial is a function allowing you to dial the last entered number once again.
Automatic Redial
This function automatically redials a receiving system that does not respond when you try to send fax.
No particular setting is required for automatic redial. Because the machine redials repeatedly at a regular
interval, you do not need to worry even when the communication by the receiving system is prolonged.
NOTE: When using direct transmission, the machine does not automatically redial.
You can change the number of automatic redials from between 0 and 14. For details, refer to Retry Times on
page 6-13.
You cannot send delayed transmission immediately while the machine is waiting for redial.
Manual Redial (Recall)
Use this when the receiving system does not respond when you have tried to send a fax. When you want to send
the fax to the same receiving system, press [Recall], and you can call the receiving system you dialed on the
destination list.
1 Press [Recall]. The receiving system you dialed is
displayed on the destination list.
NOTE: When the last transmission included multi-
address transmissions and computers and e-mail
destinations, they are also displayed. If necessary, add
or delete the receiving system.
2 Press the Start key. The transmission will start.
NOTE: When On is selected in Dest. Check before
Send, a destination confirmation screen is displayed
when you press the Start key. For details, refer to
Confirmation Screen of Destinations on page 5-12.
Recall information is canceled in the following
conditions.
• When you turn the power off
• When you send a next fax (new recall information is
registered)
• When you log out
Status 10/10/2010 10:10
ABCD [email protected]
Address
Book
FAX No.
Entry
No.
1/100
AAA BBB CCC DDD
FFF GGG HHH III JJJ
00040003 00050001 0002
0006 0007 0008 0009 0010
Check
Destinations
Destination
Pause
Backspace
EEE
Space
Detail Delete RecallChainDirectOn Hook
Org./Sending
Data Format
Quick SetupDestination Image Quality Advanced
Setup
Program
Enter Destination.
Page 64
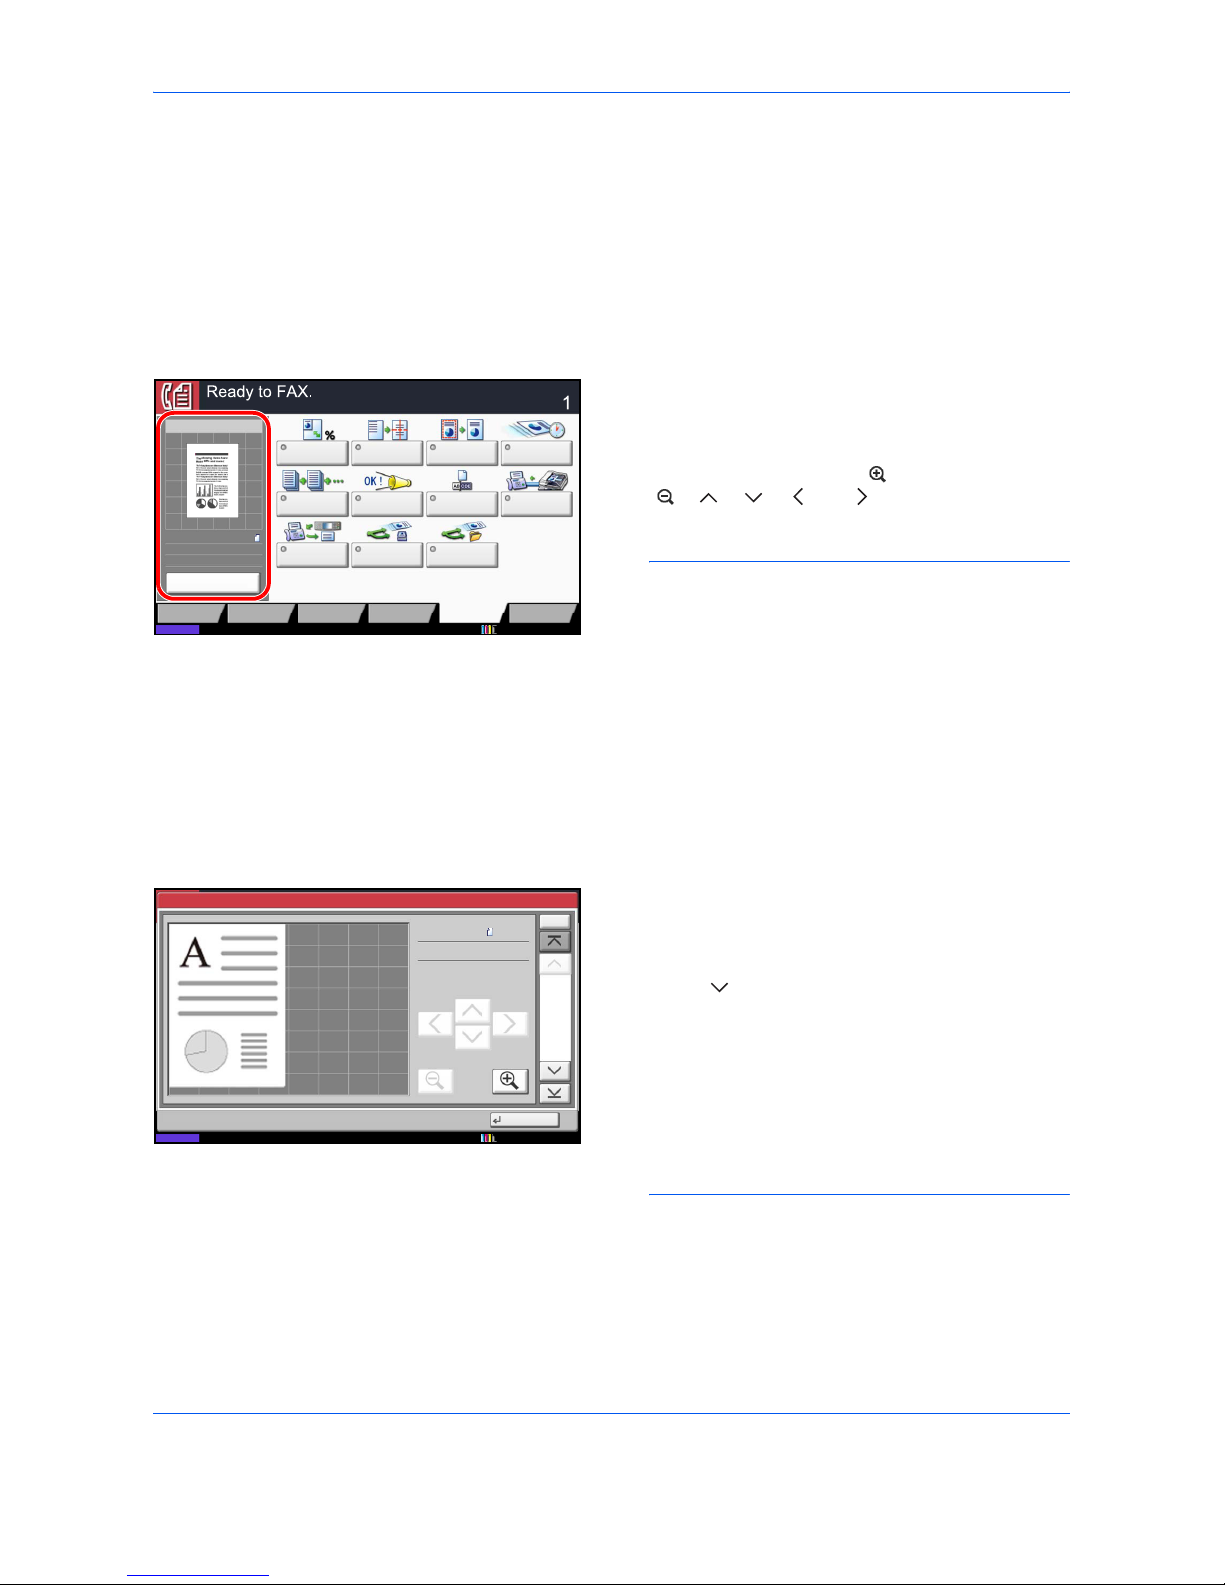
FAX Operation (Basic)
3-24
Previewing Images
You can display a preview image of a scanned original on the panel to check the image to be sent.
1 Prepare to send the image as described in
Automatic Send on page 3-4.
2 Press [Preview] on the left side of the [Quick
Setup], [Type of Original/Transmission], [Image
Quality] or [Advanced Setup] screen.
The machine scans the original and displays a
preview image.
Press [Detail] to display a preview image. To
enlarge the image, press [ ]. To reduce, press
[ ]. [ ], [ ], [ ], or [ ] can be pressed in the
enlarged image to move the part that is displayed.
NOTE: If the transmission functions below are
modified, the results are applied in the preview
image. For more information on the transmission
functions, refer to Automatic Send on page 3-4 or
FAX Operation (Advanced) on page 4-1.
If you have placed a multiple-page original in the
optional document processor, the machine scans
all the originals but only the first page is previewed.
[Detail] can be pressed to view all preview images.
Press [ ] to move through the preview images in
the order they were scanned.
You cannot change the transmission functions
while the preview image is displayed.
To change any of the transmission functions, press
the Stop key or press [Cancel]. The preview image
disappears and the destination is cancelled. To see
the preview again, make the transmission function
changes and select the destination.
3 Press the Start key to send the fax. Transmission
begins.
Destination
Zoom Centering Border Erase FAX Delayed
Transmission
Continuous
Scan
Job Finish
Notice
File Name
Entry
FAX Direct
Transmission
FAX
Polling RX
Send and
Print
10/10/2010
Status
Org./Sending
Data Format
Quick SetupDestination Image Quality Advanced
Setup
Program
Send and
Store
Preview
100%
A4
A4
Preview
Original
Zoom::
:
Sending Image
Send
• Scan Resolution
• Scan Density
•Original Size
Selection
• Sending Size
Selection
•Zoom
• Original Orientation
• Selection of Image
Quality
• Border Erase
Close
Preview:
No.
1/6
2007040410574501
Status
Size
Resol.:: 200x100dpi
A4
10/10/2010 10:10
Page 65

FAX Operation (Basic)
3-25
3
NOTE: When On is selected in Destination Check
before Send, a destination confirmation screen is
displayed when you press the Start key. For details,
refer to Confirmation Screen of Destinations on
page 5-12.
To see a preview image when you are using the
optional document processor, place the originals in the
document processor again.
You can also see a preview image in the same way with
polling transmissions. When you press the Start key for
a polling transmission, the machine scans the originals
and saves the images in the polling box. For more
information on polling transmissions, refer to Using
Polling Transmission on page 4-50.
You cannot preview images in the following situations:
• When the original is a non-standard document size
• When you are using Mixed Sized Originals mode
• During a direct transmission
• During polling reception
• When On is selected in the Long Original setting
Page 66
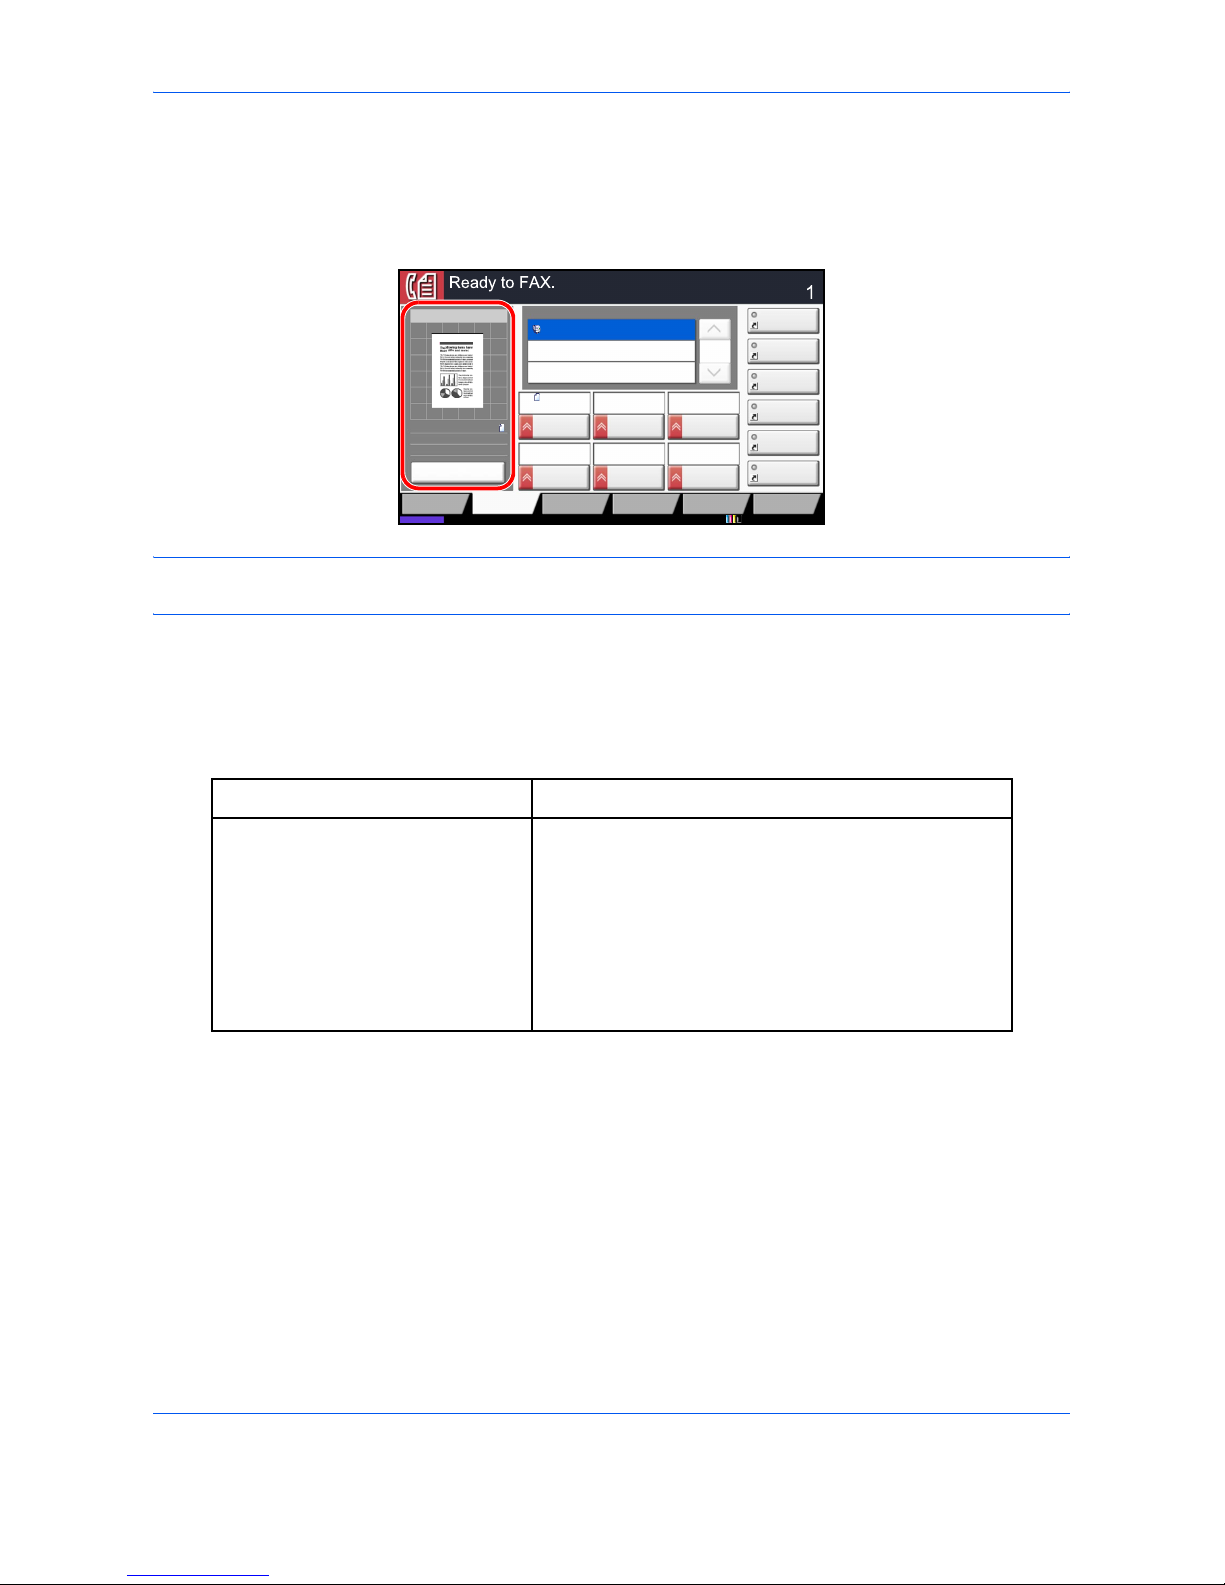
FAX Operation (Basic)
3-26
Quick Setup Screen
To display the Quick Setup Screen, which shows frequently used fax send settings, press [Quick Setup] in the
fax base screen.
NOTE: The settings that can be configured in the Quick Setup Screen are basic settings. To configure
advanced settings, use the [Org./Sending Data Format], [Image Quality], and [Advanced Setup] screens.
Functions Available for Registration in the Quick Setup Screen
Default registrations and the functions available for registration are as follows.
Default Registration Functions Available for Registration
1: Original Size
2: FAX TX Resolution
3: Density
4: 2-sided/Book Original
5: Continuous Scan
6: Original Image
•Original Size
• Sending Size
•Density
• FAX TX Resolution
• Continuous Scan
• 2-sided/Book Original
• Original Orientation
• Original Image
•Zoom
Status 10/10/2010 10:10
Destination
Destination
1/1
0123456789
Shortcut 1
Shortcut 2
Shortcut 3
Shortcut 4
Shortcut 5
Shortcut 6
Org./Sending
Data Format
Quick SetupDestination Image Quality Advanced
Setup
Program
Original
Size
A4
FAX TX
Resolution
200x100dpi
Normal
Preview
100%
A4
A4
Preview
Original
Zoom::
:
Sending Image
Send
Original
Image
Text+Photo
Density
Normal 0
Continuous
Scan
Off
2-sided/Book
Original
1-sided
Page 67
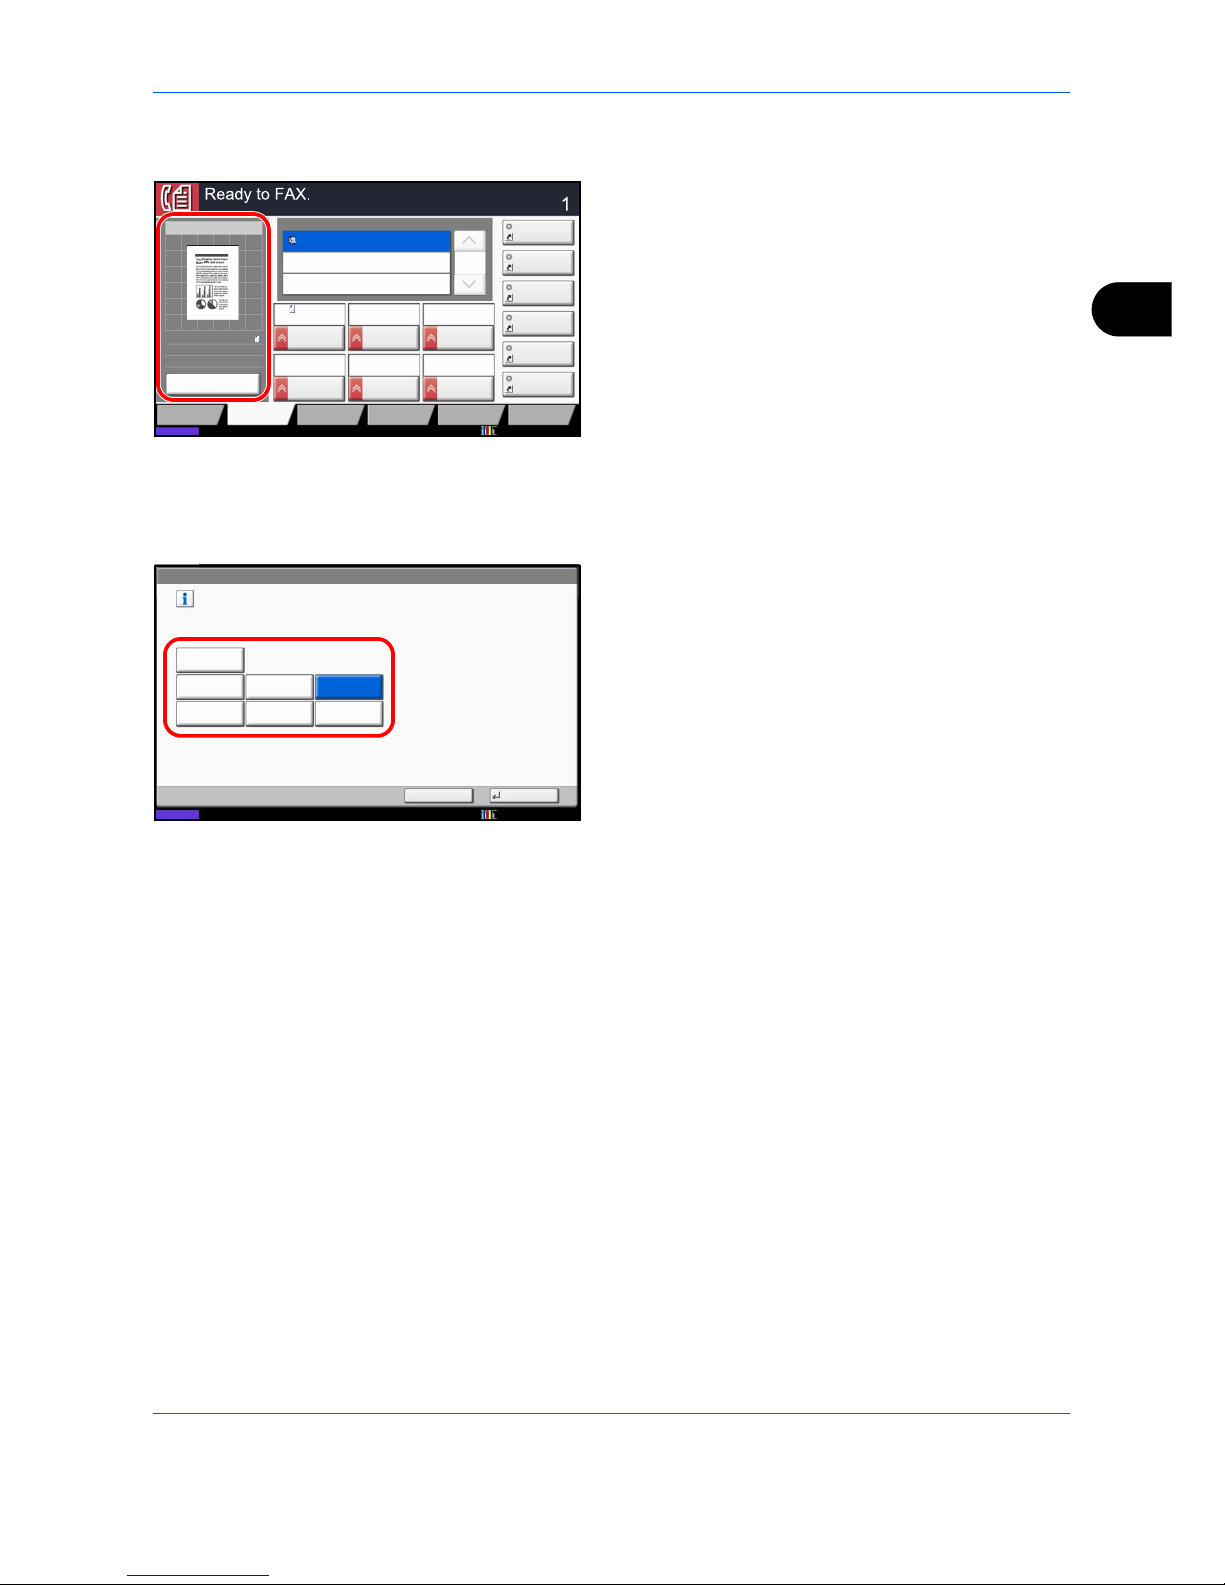
FAX Operation (Basic)
3-27
3
Changing Registration
The following procedure is one example for replacing
the registration of Density with Zoom in the Quick Setup
Screen for faxing.
1 Press the System Menu key.
2 Press [FAX], [Next] of Quick Setup Registration,
and then [Change] of Zoom.
3 Press [Key 3] here as the key to set replacement
location.
4 Press [OK]. A confirmation screen appears. Press
[Yes]. The Zoom Quality function will be Key 3
newly registered.
Status 10/10/2010 10:10
Destination
Destination
1/1
0123456789
Shortcut 1
Shortcut 2
Shortcut 3
Shortcut 4
Shortcut 5
Shortcut 6
Org./Sending
Data Format
Quick SetupDestination Image Quality Advanced
Setup
Program
Original
Size
A4
FAX TX
Resolution
200x100dpi
Normal
Preview
100%
A4
A4
Preview
Original
Zoom::
:
Sending Image
Send
Original
Image
Text+Photo
Density
Normal 0
Continuous
Scan
Off
2-sided/Book
Original
1-sided
Add Zoom to the Quick Setup screen.
Cancel OK
FAX - Zoom
Off
Key 1
10/10/2010 10:10
Status
Key 2 Key 3
Key 4 Key 5 Key 6
Page 68
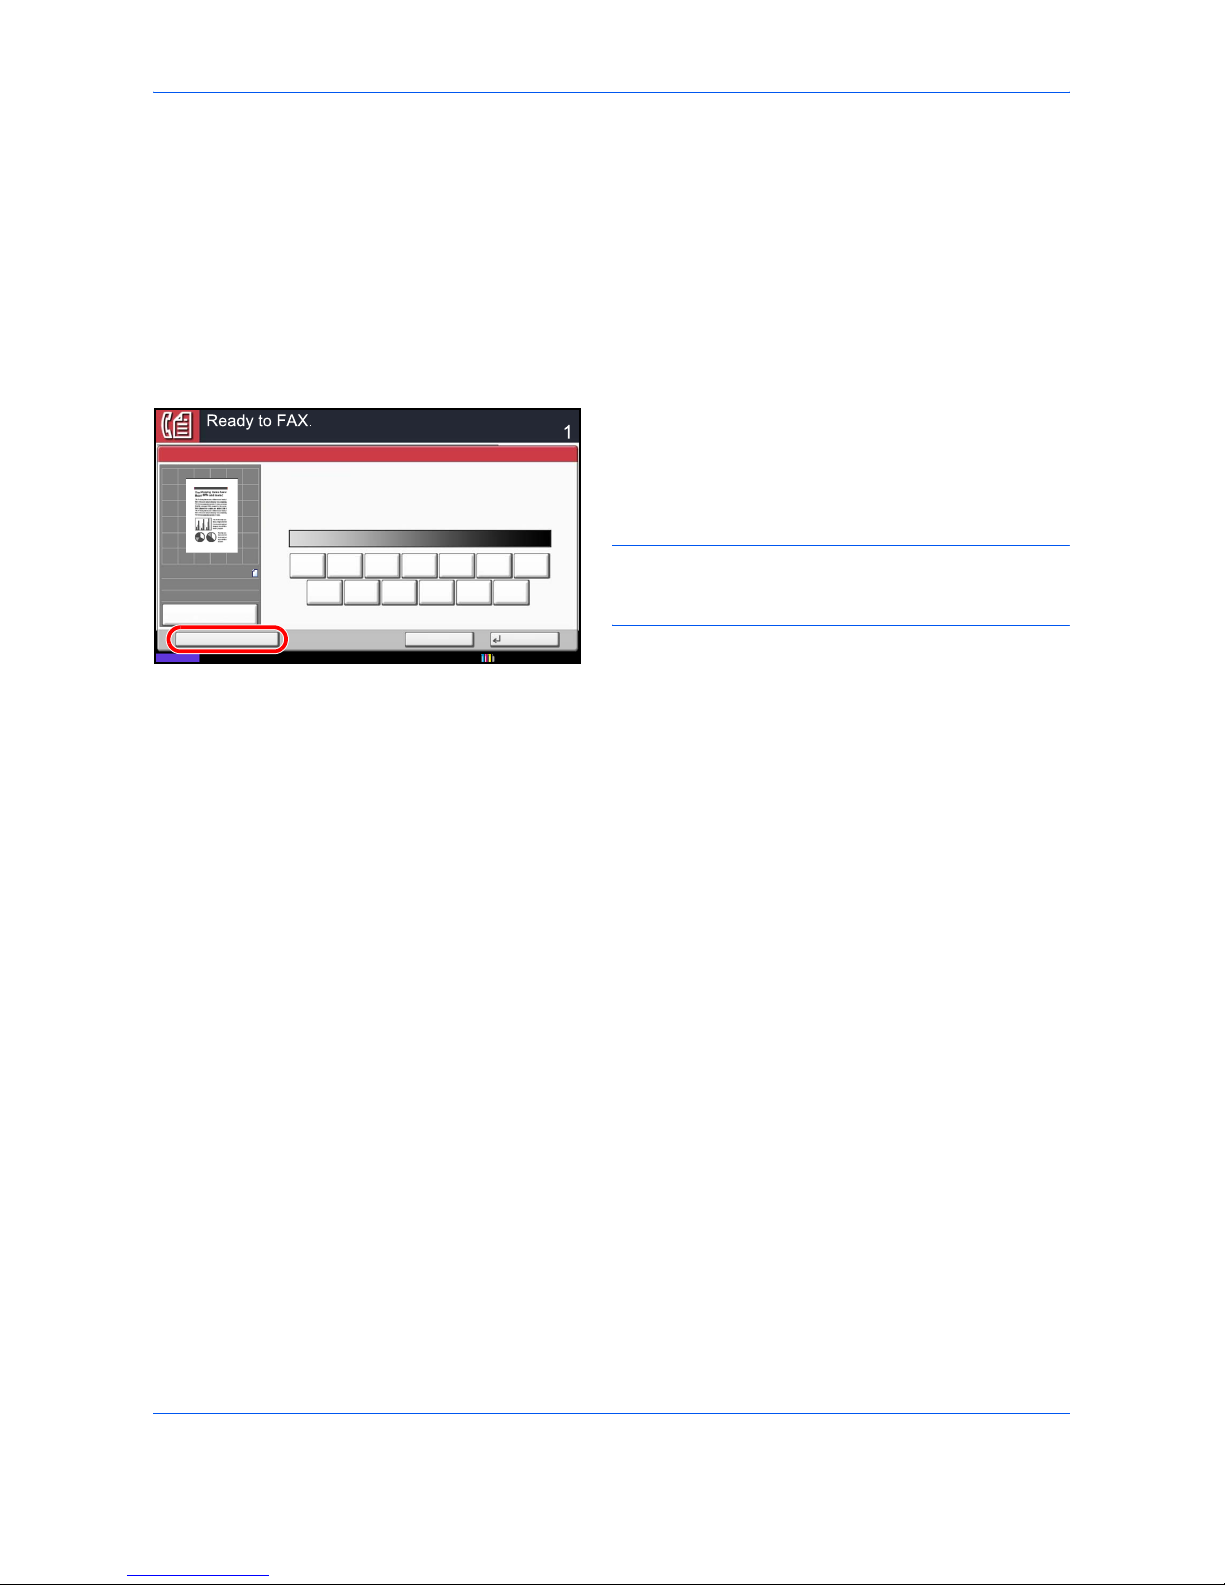
FAX Operation (Basic)
3-28
Registering Shortcuts
Add shortcuts in the Quick Setup screen for easy access to the frequently used functions. A function name linked
to a registered shortcut can be changed as necessary. You can register up to 6 shortcuts.
Adding Shortcuts
Shortcut registration is performed in the setup screen of each function. Shortcuts can be registered for all
functions in which [Add Shortcut] appears on the screen.
Use the procedure below to register a shortcut.
1 After making the desired settings in the setup
screen of each function, press [Add Shortcut].
2 Press the keys corresponding to the shortcut
number (01 to 06) to register.
NOTE: If you select a shortcut number already
registered, the currently registered shortcut can be
replaced with a new one.
3 Enter the shortcut name and press [Save] to add
the shortcut.
Editing and Deleting Shortcuts
Follow the steps shown below to change a shortcut number/name or delete a shortcut.
1 In the setup screen of each function, press [Add
Shortcut] in the bottom of the screen.
2 Press [Edit] and press the keys corresponding to
the shortcut number (01 to 06) to change or delete.
3 To edit a shortcut, press [Change] to change the
shortcut button number and name and press [OK]
and then [Save]. Choose [Yes] in the confirmation
screen to change the shortcut.
To delete the shortcut, press [Delete this Shortcut].
Choose [Yes] in the confirmation screen to delete
the shortcut.
Darker
Density
NormalLighter
Cancel OKAdd Shortcut
Status 10/10/2010
Destination
0+1+2+3
-1
-2-3
-2.5 -1.5 -0.5 +0.5 +1.5 +2.5
100%
A4
A4
Preview
Original
Zoom
Send
:
:
:
Page 69

4-1
4 FAX Operation (Advanced)
This chapter explains the method to effectively use FAX.
• Long Originals......................................................................................................... 4-2
• Delayed Transmission ............................................................................................ 4-3
• Broadcast Transmission ......................................................................................... 4-6
• Standby Transmission............................................................................................. 4-9
• Interrupt Send ....................................................................................................... 4-10
• Chain Dial ..............................................................................................................4-11
• Manual Send......................................................................................................... 4-13
• Manual Reception................................................................................................. 4-14
• Remote Switch Function....................................................................................... 4-16
• Printing/Sending Received Faxes by Requirements (Memory Forwarding) ......... 4-18
• FAX Box Function ................................................................................................. 4-38
• Sub Address Communication ............................................................................... 4-45
• Program Dial......................................................................................................... 4-47
• Polling Communication ......................................................................................... 4-49
• Account Management........................................................................................... 4-60
• Other Convenient Functions ................................................................................. 4-64
Page 70

FAX Operation (Advanced)
4-2
Long Originals
Use the optional document processor to scan long originals (originals that are longer in the paper feeding
direction).
NOTE: Only a single side of a long original can be sent.
Originals of up to 1,600 mm/63" long can be scanned.
1 Press the FAX key.
2 Place the originals in the optional document
processor.
3 Press [Original/Sending Data Format], and then
[Long Original].
4 To scan long originals, press [On], and to scan
standard size originals, press [Off].
5 Press [OK].
6 Set the destination, and press the Start key.
Transmission begins.
NOTE: When On is selected in Destination Check
before Send, a destination confirmation screen is
displayed when you press the Start key. For details,
refer to Confirmation Screen of Destinations on
page 5-12.
Page 71

FAX Operation (Advanced)
4-3
4
Delayed Transmission
When you have set a transmission start time, this function automatically sends originals at the preset time. You
can use delayed transmission together with the broadcast transmission function, etc.
The method for sending originals to one destination after setting the start time is explained here.
IMPORTANT: If the current time displayed on the touch panel is not correct, you cannot send originals correctly
at the preset time. In this case, adjust the time. For details, refer to Date and Time Entry on page 2-4.
NOTE: You cannot select direct transmission.
Set the time from between 00:00 and 23:59 in one-minute increments.
Together with standby transmission and interrupt send, you can set up to 200 destinations for delayed transmission.
When two or more delayed transmissions are set for the same time, the transmissions will take place in the order
they were set. However, transmissions to the same destination will take place together, regardless of the setting
order.
You can cancel a delayed transmission any time before the specified transmission time. You can also send a
delayed transmission before the specified time. (Refer to Cancelling and Sending Delayed Transmissions
(Queued) on page 3-14.)
You can change destinations of a delayed transmission any time before the specified transmission time. (Refer
to Changing/Deleting Delayed Transmission on page 4-4.)
If you use delayed transmission when sending documents stored in the Custom Box by fax, you cannot move
documents until sending is finished. For details on using Custom Boxes, refer to the machine’s Operation Guide.
Batch Transmission Function
When fax originals to be sent to the same destination are set to the same transmission start time with delayed
transmission, you can send up to 10 groups of originals using batch transmission. This function prevents
repeated communication to the same destination and reduces the communication cost.
NOTE: You cannot send originals as a batch transmission in the case of direct transmission.
If the destinations include both numbers entered with the numeric keys and One-touch keys, batch transmission
is not possible.
In the case of broadcast transmission, when you have set two or more groups of originals to the same
transmission start time, and each group includes the same receiving system fax number, you cannot send the
originals as a batch transmission.
When the transmission start time has come, and there are fax originals waiting for redial to the same receiving
system, the waiting originals are also sent together as a batch transmission.
When job accounting is ON, only the originals with the same account ID set using delayed transmission are sent
as a batch transmission.
1 Press the FAX key.
2 Place the originals.
3 Press [Advanced Setup], and then [FAX Delayed
Transmission].
Page 72
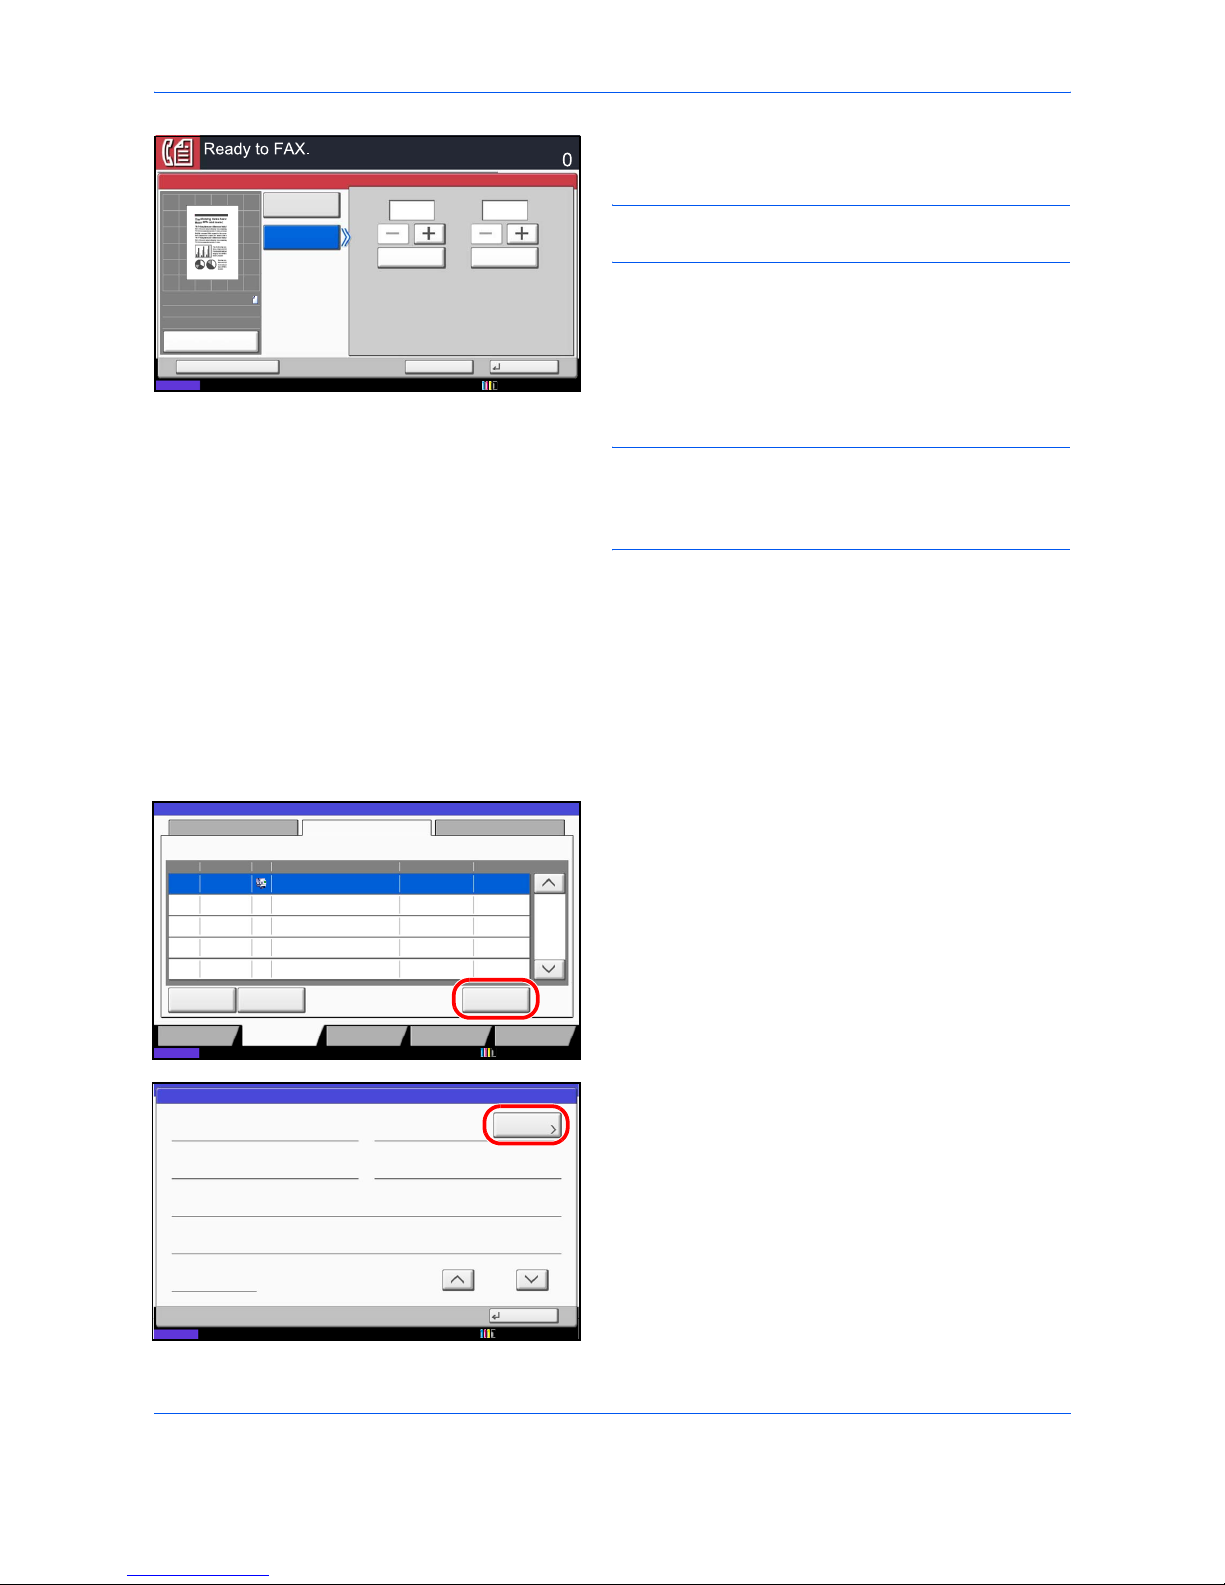
FAX Operation (Advanced)
4-4
4 Press [On] and use [+]/[-] to enter the transmission
start time.
NOTE: You can also press [# Keys] and use the
numeric keys to enter the transmission start time.
5 Press [OK].
6 Set the destination, and press the Start key.
Originals are scanned, and transmission begins at
the preset time.
NOTE:
When On is selected in Destination Check
before Send, a destination confirmation screen is
displayed when you press the
Start
key. For details, refer
to Confirmation Screen of Destinations on page 5-12.
Changing/Deleting Delayed Transmission
You can change or delete the destinations of delayed transmission.
Use the procedure below to check a job's information.
1 Press the Status/Job Cancel key.
2 Press [Sending Jobs] and then [Scheduled Job].
3 Select the job you want to change or delete from
the list, and press [Detail].
Detailed information of the selected job is
displayed.
Press [Detail/Edit] in Status/Destination.
Cancel
OKAdd Shortcut
On
FAX Delayed Transmission
Off
Start Time
# Keys
00
# Keys
00
10/10/2010
Status
Destination
Enter Destination.
100%
A4
A4
Preview
Original
Zoom
Send
:
:
:
Printing Jobs Sending Jobs Storing Jobs Device/
Communication
Paper/Supplies
Status Scheduled Job Log
Job No.
Accepted Time
Type Destination User Name Start Time
Cancel
Detail
1/1
Status
12:000007 9: 30 A OFFICE
Start Now
10/10/2010
Status
Detail Job No.:
Close
Job No.:
Result/Destination:
Job Type:
Destination:
User Name:
Job Name:
Start Time
1/2
Sending Job - FAX
Processing000080
User1
ABCDE
doc2008101005151
10:10:10
000080
Detail
10/10/2010 10:10
Status
Page 73
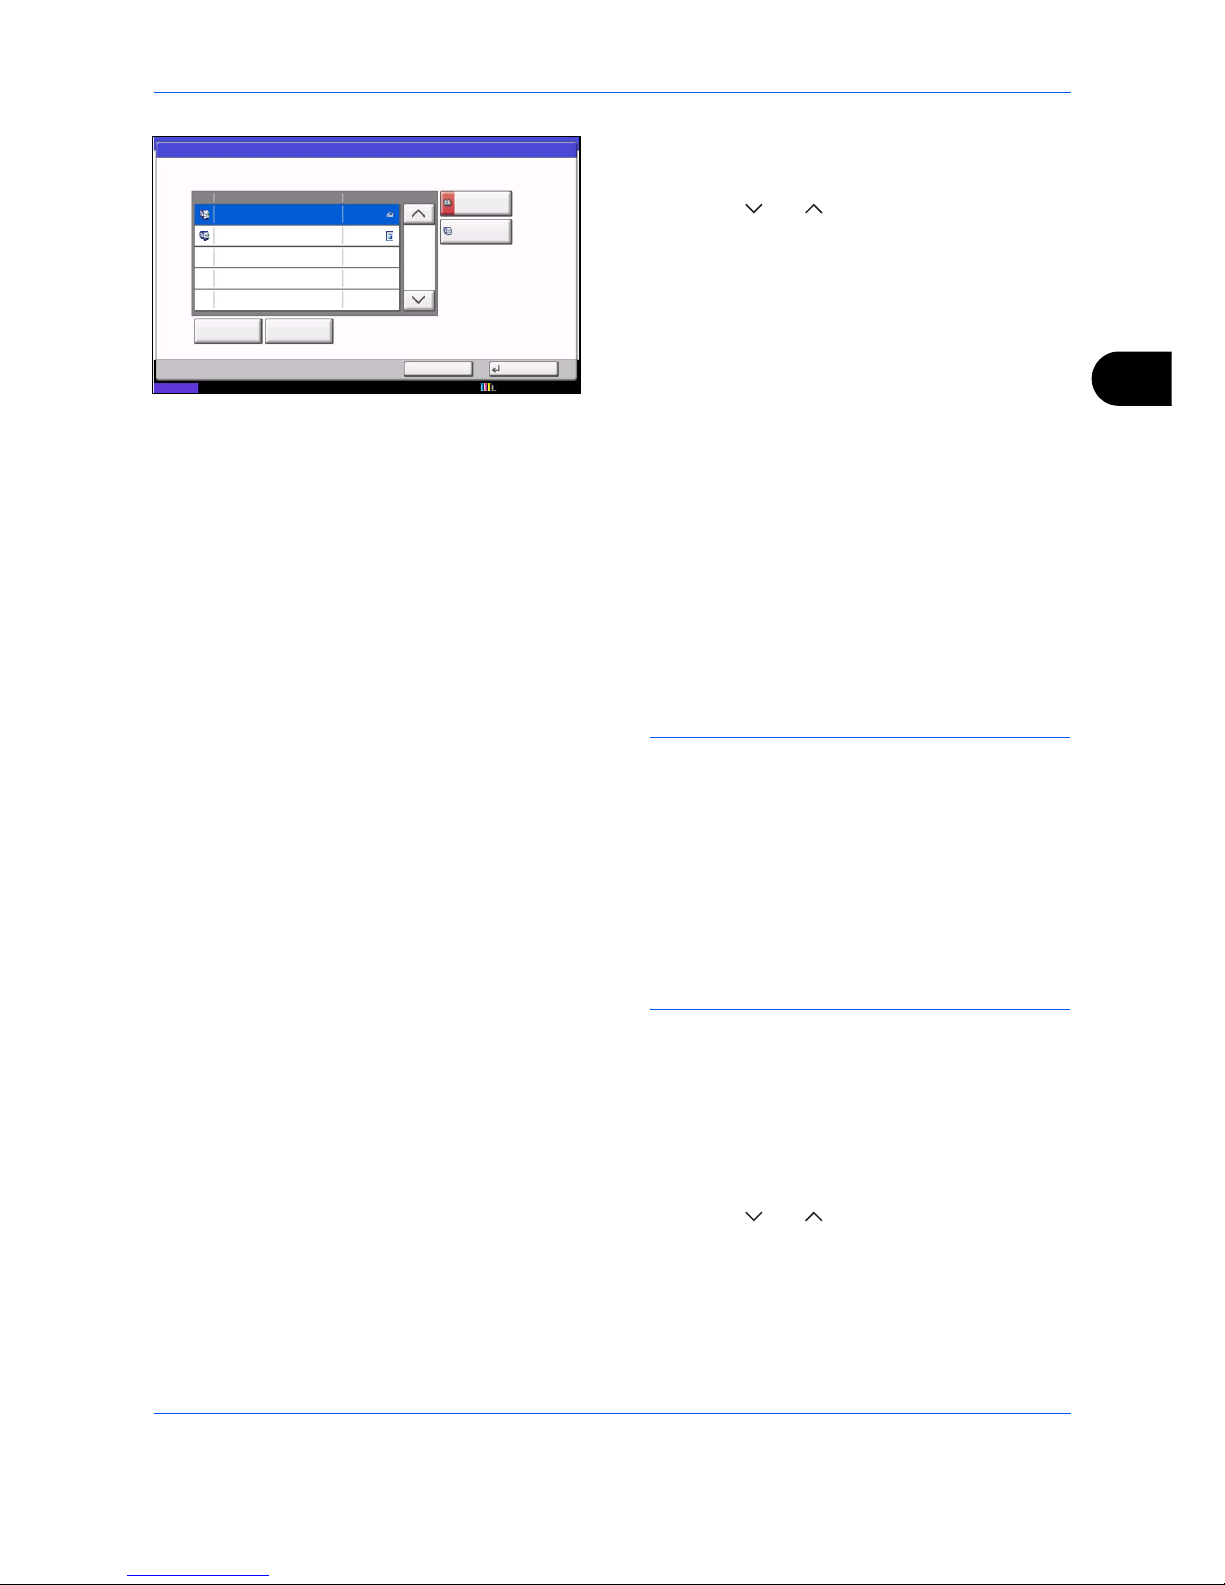
FAX Operation (Advanced)
4-5
4
4 When changing the destination to another
destination
1 Press [ ] or [ ] to select the destination you
want to change.
When pressing [Address Book]
1 Press [Delete].
2 Select the destination you want to change
in the list.
When entering the fax number using the
numeric keys
1 Enter the fax number using the numeric
keys.
2 Press [OK].
2
Select the address to be added from the
Address Book or enter the fax number using the
numeric keys.
Pressing [Detail/Edit] shows the detailed
information of the destination you have selected.
NOTE: If Entry Check for New Destination is Off,
press [OK] to complete entering the number.
If Entry Check for New Destination is On, press
[OK] and you are prompted to confirm the FAX
number is correct. Re-enter the same FAX number
and press [OK] to complete the entry.
When [New Destination Entry] is set to [Prohibit],
the numeric keys cannot be used to enter a fax
number. For details, refer to Sending faxed
documents to a specified additional address on
page 4-63.
3 Press [OK].
4 Press [Yes] in the confirmation screen to
change the destination.
When deleting the destination or deleting the
job
1 Press [ ] or [ ] to select the destination you
want to delete.
2 Press [Delete].
5
After checking the list, press [Check] and then [OK].
Detail Job No.:
OK
DestinationType Status
1/1
User01
12345678907
000081
Detail/Edit
Sending
Waiting
10/10/2010 10:10
Status
Delete
Close
Address
Book
FAX No.
Entry
Page 74

FAX Operation (Advanced)
4-6
Broadcast Transmission
This function allows you to send the same originals to several destinations in one operation. The machine stores
(memorizes) originals to send in memory temporarily, and automatically repeats dialing and transmission to the
set destination afterwards.
NOTE:
When using a group for the destination, you can send originals to up to 500 destinations in one operation.
You can use this function together with sub address communication and delayed transmission.
When direct transmission has been selected, it changes to memory transmission at the time of transmission.
Sending using FAX Address
1 Press the FAX key.
2 Place the originals.
3 Select the destination.
Enter the fax number
1 Press [FAX No. Entry], and use the numeric
keys to enter the fax number. Press [Next
Dest.] to enter the next fax number.
•If Entry Check for New Destination is Off, press
[OK] to complete entering the number.
•If Entry Check for New Destination is On, press
[OK] and you are prompted to confirm the FAX
number is correct. Re-enter the same FAX
number and press [OK] to complete the entry.
• When [New Destination Entry] is set to
[Prohibit], the numeric keys cannot be used to
enter a fax number. For details, refer to
Sending faxed documents to a specified
additional address on page 4-63.
For details, refer to Entry Check for New
Destination in the machine’s Operation Guide.
To continue entering a new number, press [FAX No.
Entry] and repeat the above procedure.
To correct the FAX number, press [Edit].
2 After entering all the destinations, press [OK].
Select the destination from the Address Book
1 Press [Address Book].
Page 75

FAX Operation (Advanced)
4-7
4
2 Select the check boxes beside the
destinations to select from the list.
To use an LDAP address book, select [Ext
Address Book] in [Destination].
3 Press [OK].
Select the destination from the One-touch keys
Press all the One-touch keys to which necessary
destinations are registered.
NOTE: For details of the Address Book, refer to
Selecting a Destination from the Address Book on
page 3-16. For details of the One-touch keys, refer to
Using One-touch Keys on page 2-14.
You can select destinations using a combination of
direct entry, the Address Book and One-touch keys.
4 After selecting all the destinations, press the Start
key. Transmission begins.
NOTE:
When On is selected in Dest. Check before
Send, a destination confirmation screen is displayed
when you press the
Start
key. For details, refer to
Confirmation Screen of Destinations on page 5-12.
Sending using I-FAX Address
NOTE: For more information on sending an Internet FAX (i-FAX), refer to i-FAX Transmission on page 8-8.
1 Press the Send key.
2 Place the originals.
3 Select the destination.
Enter the i-FAX address
1 Press [i-FAX Address Entry].
2 Press [i-FAX Address], enter the i-FAX
address and then press [OK].
•If Entry Check for New Destination is Off, press
[OK] to complete entering the number.
• If Entry Check for New Destination is On, press
[OK] and you are prompted to confirm the i-FAX
number is correct. Re-enter the same i-FAX
number and press [OK] to complete the entry.
Page 76

FAX Operation (Advanced)
4-8
For details, refer to Entry Check for New
Destination in the machine’s Operation Guide.
To continue entering a new address, press [i-FAX
Address Entry] and repeat the above procedure.
To correct the i-FAX number, press [Detail/Edit].
3 After entering all the destinations, press [OK].
Select the destination from the Address Book
1 Press [Address Book].
2 Select the check boxes beside the
destinations to select from the list.
To use an LDAP address book, select [Ext
Address Book] in [Destination].
3 Press [OK].
Select the destination from the One-touch keys
Press all the One-touch keys to which necessary
destinations are registered.
NOTE: For details of the Address Book, refer to
Selecting a Destination from the Address Book on
page 3-16. For details of the One-touch keys, refer to
Using One-touch Keys on page 2-14.
You can select destinations using a combination of
direct entry, the Address Book and One-touch keys.
4 After selecting all the destinations, press the Start
key. Transmission begins.
NOTE:
When On is selected in Destination Check
before Send, a destination confirmation screen is
displayed when you press the
Start
key. For details, refer
to Confirmation Screen of Destinations on page 5-12.
Page 77

FAX Operation (Advanced)
4-9
4
Standby Transmission
During a communication, you can scan originals and schedule a next transmission. When the first
communication is completed, the machine automatically starts the scheduled next transmission. When using
standby transmission, you do not need to wait when a communication has prolonged due to broadcast
transmission.
NOTE: Together with delayed transmission and interrupt send, up to 200 transmissions can be scheduled.
You can use other functions such as broadcast transmission.
1 Press the FAX key.
2 Place the originals.
3 Select the destination, and set transmitting
functions if you want to use any.
4 Press the Start key. Scanning of the originals
starts, and the next transmission is scheduled.
NOTE: When On is selected in Destination Check
before Send, a destination confirmation screen is
displayed when you press the Start key. For details,
refer to Confirmation Screen of Destinations on
page 5-12.
5 When the communication is completed, the
scheduled transmission will begin.
Page 78

FAX Operation (Advanced)
4-10
Interrupt Send
During communication, when you scan originals by selecting direct transmission, you can use interrupt send.
Even when the communication is prolonged due to broadcast transmission or a next transmission being
scheduled, the machine will first send originals for which interrupt send has been set.
NOTE: When the number of standby transmissions and delayed transmissions has already reached 200, you
cannot use interrupt send.
Depending on the timing of the interruption, you may not be able to interrupt transmission immediately.
1 Press the FAX key.
2 Load the originals to be sent using Interrupt Send.
3 Press [Advanced Setup], and then [FAX Direct
Transmission].
4 Press [On].
5 Press [OK].
6 Set the destination, and press the Start key. The
originals are left in queue, and the transmission will
start when transmission becomes possible.
NOTE: When On is selected in Destination Check
before Send, a destination confirmation screen is
displayed when you press the Start key. For details,
refer to Confirmation Screen of Destinations on
page 5-12.
For operation of direct transmission, refer to Selection
of Transmission Method on page 3-4.
To cancel transmission while waiting for interrupt send,
press the Stop key on the operation panel or [Cancel]
on the touch panel. For details, refer to Canceling
Communication on page 3-14.
7 When the interrupt send is completed, the canceled
communication and standby transmission will
automatically resume.
Page 79
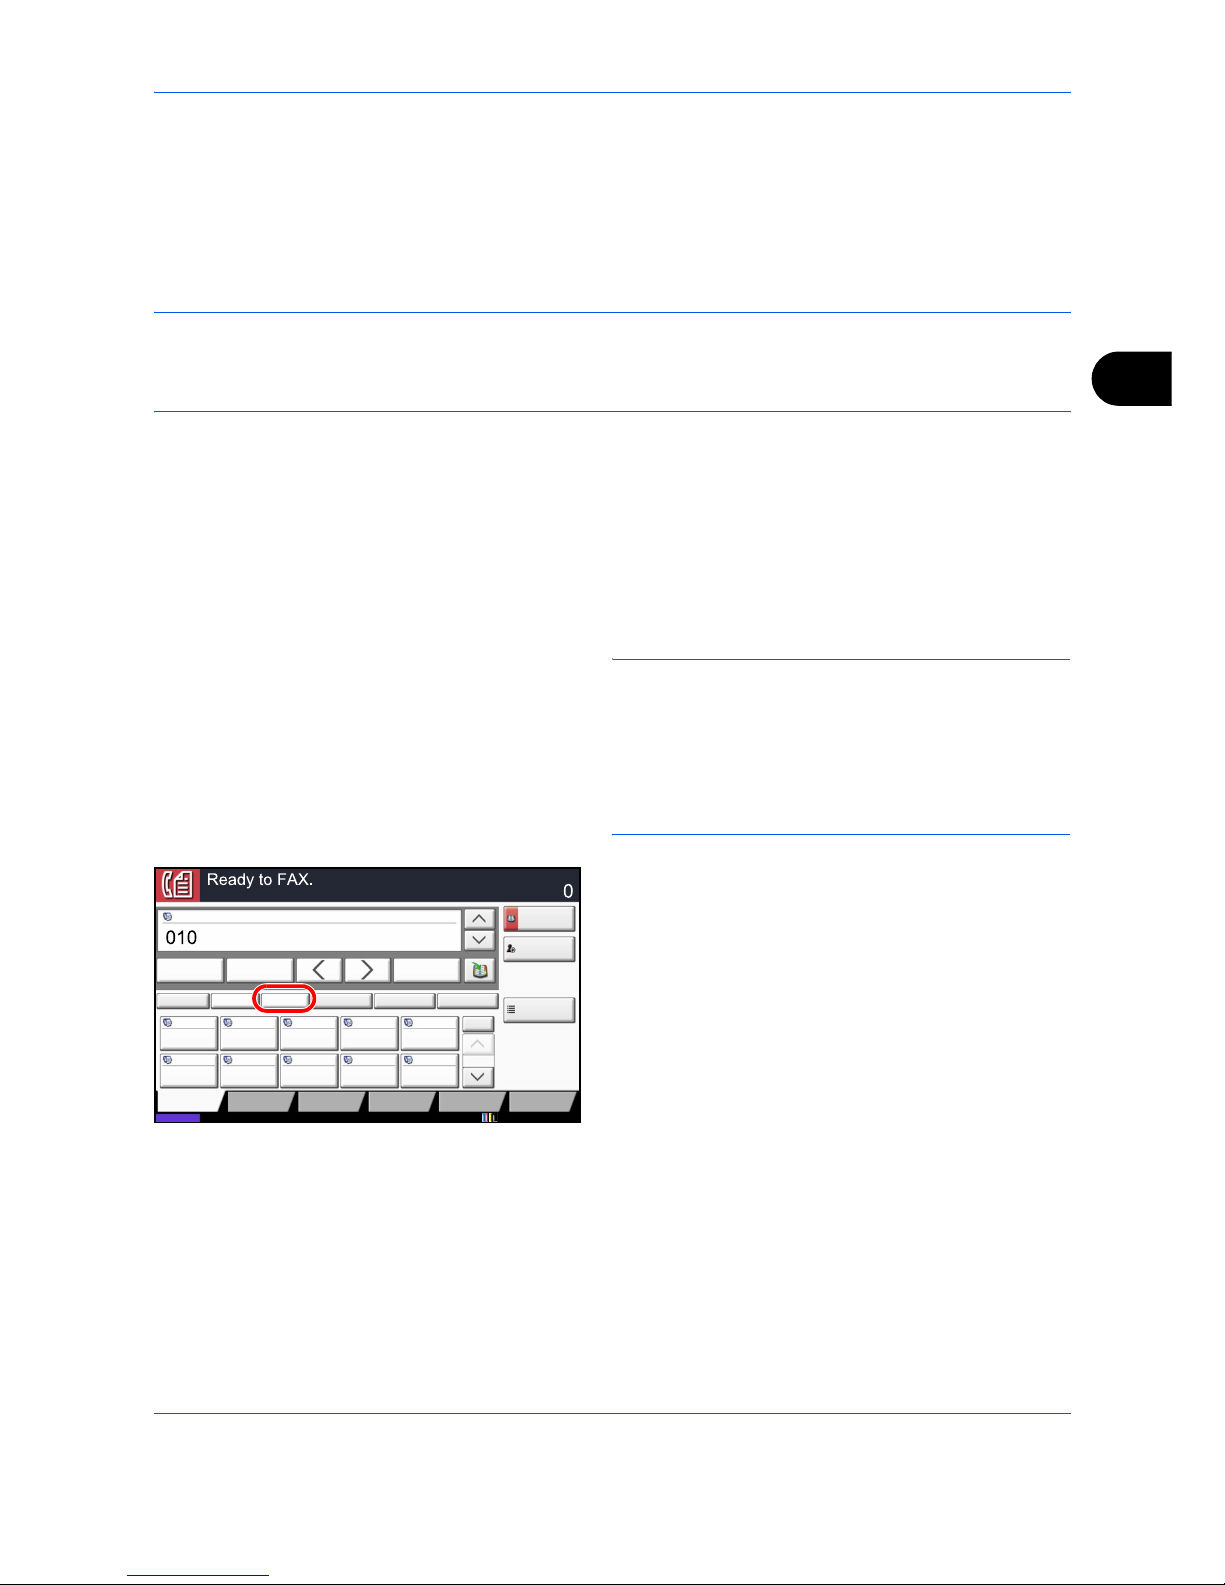
FAX Operation (Advanced)
4-11
4
Chain Dial
Chain dial is a function that allows you to dial by linking fax numbers of the receiving systems with a chain
number created with a number common to several destinations.
By setting multiple phone numbers from several telephone companies to a chain number, you can later choose
the one that costs the least to send the fax to a remote or international destination.
NOTE: You can use the chain number at the head of the fax number of the receiving system.
It is convenient to register chain numbers that are used frequently to the Address Book or One-touch keys. For
registration to the Address Book, refer to Registering a New Destination on page 2-5. For registration to Onetouch keys, refer to Registering a New One-touch Key on page 2-14.
As an example, when using ‘010’ as the chain number
1 Press the FAX key.
2 Place the originals.
3 Press [FAX No. Entry], and enter ‘010’ using the
numeric keys. To use the Address Book or Onetouch keys, select the destinations to which ‘010’
has been registered.
NOTE: For the Address Book and One-touch keys,
refer to Using the Address Book on page 2-5 and Using
One-touch Keys on page 2-14.
When [New Destination Entry] is set to [Prohibit], the
numeric keys cannot be used to enter a fax number. For
details, refer to Sending faxed documents to a specified
additional address on page 4-63.
4 Press [Chain].
5 Enter the fax number to connect to the chain
number.
Use the numeric keys to enter a fax number
Enter the fax number using the numeric keys.
Status 10/10/2010
ABCD [email protected]
Address
Book
FAX No.
Entry
No.
1/100
AAA BBB CCC DDD
FFF GGG HHH III JJJ
00040003 00050001 0002
0006 0007 0008 0009 0010
Check
Destinations
Destination
Pause
Backspace
EEE
Space
Detail Delete RecallChainDirectOn Hook
Org./Sending
Data Format
Quick SetupDestination Image Quality Advanced
Setup
Program
HHH
0008
Enter Destination.
Page 80

FAX Operation (Advanced)
4-12
• If Entry Check for New Destination is Off, press
[OK] to complete entering the number.
• If Entry Check for New Destination is On, press
[OK] and you are prompted to confirm the FAX
number is correct. Re-enter the same FAX number
and press [OK] to complete the entry.
• When [New Destination Entry] is set to [Prohibit], the
numeric keys cannot be used to enter a fax number.
For details, refer to Sending faxed documents to a
specified additional address on page 4-63.
For details, refer to Entry Check for New
Destination in the machine’s Operation Guide.
To continue entering a new number, press [FAX No.
Entry] and repeat the above procedure.
To correct the FAX number, press [Edit], and then
re-enter the chain number.
Select fax number from the Address Book
1 Press [Address Book].
2 Select the destination from the list. You can
select several destinations.
3 Press [OK]. The chain number ‘010’ is
automatically added to all the destinations.
Select fax number from One-touch key
Select the destination from One-touch keys. The
chain number ‘010’ is automatically added to the
destinations.
To enter another fax number with a one-touch key,
re-enter the chain number.
6 Press the Start key. Transmission begins.
NOTE: When On is selected in Destination Check
before Send, a destination confirmation screen is
displayed when you press the Start key. For details,
refer to Confirmation Screen of Destinations on
page 5-12.
Page 81

FAX Operation (Advanced)
4-13
4
Manual Send
This method allows you to send originals by pressing the Start key after confirming that the telephone line has
connected to the receiving system. Connecting a telephone set (commercially available product) to this machine
enables you to talk with the person at the receiving system before sending originals.
Using after Confirming the Connection to the Receiving System
You can send originals after confirming that the telephone line has connected to the receiving system.
1 Press the FAX key.
2 Set the originals.
3 Press [On Hook].
4 Use the numeric keys to enter the number of the
receiving system.
NOTE: To cancel the operation, press [Line Off].
5 When you hear the fax tone, the telephone line has
connected to the receiving system. Press the Start
key. Transmission begins.
NOTE: When On is selected in Destination Check
before Send, a destination confirmation screen is
displayed when you press the Start key. For details,
refer to Confirmation Screen of Destinations on
page 5-12.
Using a Telephone to Send
When you want to talk to the person at the receiving system or the receiving system needs to switch to fax, use
this method to send originals.
1 Set the originals.
2 Lift the handset, and dial the number of the
receiving system.
3 Check if the telephone line has connected to the
fax of the receiving system.
When you hear the fax tone
The receiving system is on fax.
1 Press the FAX key.
2 Press [On Hook].
3 Press the Start key. Transmission begins.
When you hear a voice from the receiving
system
The telephone line has connected to the telephone
of the receiving system. When the conversation is
over, follow steps 1 to 3 above.
4 When sending starts (when the Processing
indicator on the operation panel starts blinking),
return the handset to its original position.
Page 82
FAX Operation (Advanced)
4-14
Manual Reception
This method allows you to receive faxes by pressing [Manual RX] after confirming that the telephone line has
connected to the sending system. Connecting a telephone set (commercially available product) to this machine
enables you to receive originals after talking to the person at the sending system.
NOTE: FAX Automatic Reception has been preset for the receiving mode of this machine. To use Manual
Reception, you need to change the receiving mode to Manual Reception. To change to manual mode, refer to
Receiving Mode on page 6-14.
When 2 optional FAX Kits (Dual FAX option) are installed, the only receiving mode available on port 2 is FAX
Automatic reception.
Receiving after Confirming Connection to the Sending System
You can receive originals after confirming by sound that the telephone line has connected to the sending system.
1 When there is an incoming call, the machine makes
a ringing tone.
2 Press the FAX key.
3 Press [On Hook], and then [Manual RX].
4 After the sending side has started transmission, the
machine starts receiving the originals.
Using the Telephone to Receive
Use this method when you want to receive originals after talking to the person at the sending system.
1 When there is an incoming call, the telephone
connected to the machine makes a ringing tone.
2 Lift the handset of the telephone.
3 Check if the telephone line has connected to the
fax of the sending system.
When you hear the fax tone
The sending system is on fax.
1 Press the Status/Job Cancel key.
Page 83
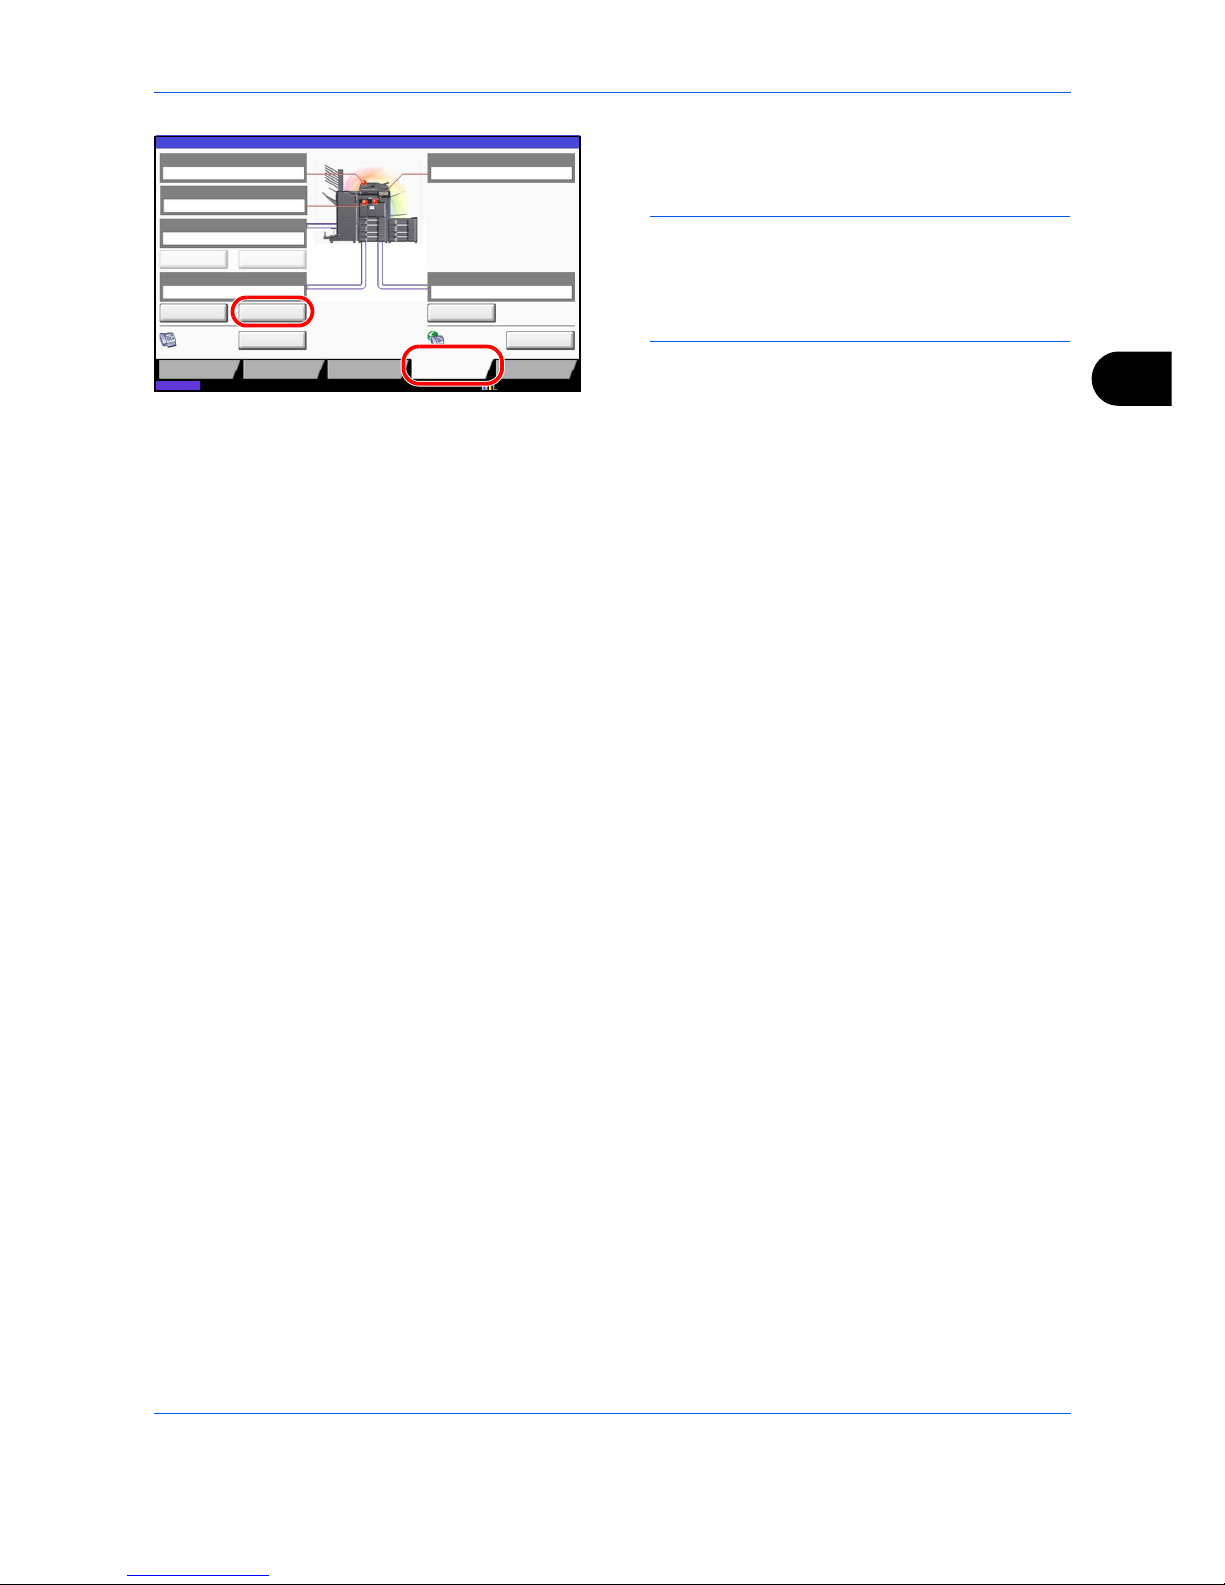
FAX Operation (Advanced)
4-15
4
2 Press [Device/
Communication
], and then
[Manual RX]. Reception will start.
NOTE: When using a telephone set that can send
tone signals, use the telephone to start the
reception of originals with the remote switch
function. (Refer to Remote Switch Function on
page 4-16.)
When you hear a voice from the receiving
system
The telephone line has connected to the telephone
of the sending system. When the conversation is
over, follow steps 1 to 2 above.
After the sending system has started transmission,
the machine starts receiving originals.
4 When reception starts (when the Processing
indicator on the operation panel starts blinking),
return the handset to its original position.
Ready.
Scanner
Ready.
Printer
Not connected.
Removable Memory
Hard Disk
Format Remove
Line Off Manual RX
FAX Port 1
LogFAX
Check New FAX
i-FAX
FAX Port 2
Line Off
10/10/2010 10:10
Status
Printing Jobs Sending Jobs Storing Jobs
Device/
Communication
Paper/Supplies
Status
Dialing... Receiving...
Overwriting...
Page 84

FAX Operation (Advanced)
4-16
Remote Switch Function
You can start fax reception by operation from the connected telephone set. This function is convenient for using
this machine and a telephone set (commercially available product) in combination installed at places distant
from each other.
To start fax reception by operation from the connected telephone set, use the following operation.
NOTE: In order to use remote switch, it is necessary to connect the tone signal-sending telephone set
(commercially available product) to the machine. However, even if it is a tone signal-sending telephone set, this
function may not be used satisfactorily depending on the type of telephone set. For details, contact our agent or
the store where you purchased this machine.
How to Register Remote Switch Dial
Remote switch dial is set to 55 at the factory, but you can change the dial number.
1 Press the System Menu key.
2 Press [FAX], [Next] of Reception, [Next] of FAX,
and then [Change] of Remote SW Dial.
3 Press [+]/[-] or the numeric keys to enter the
number you newly register. (00 to 99)
4 Press [OK].
Page 85
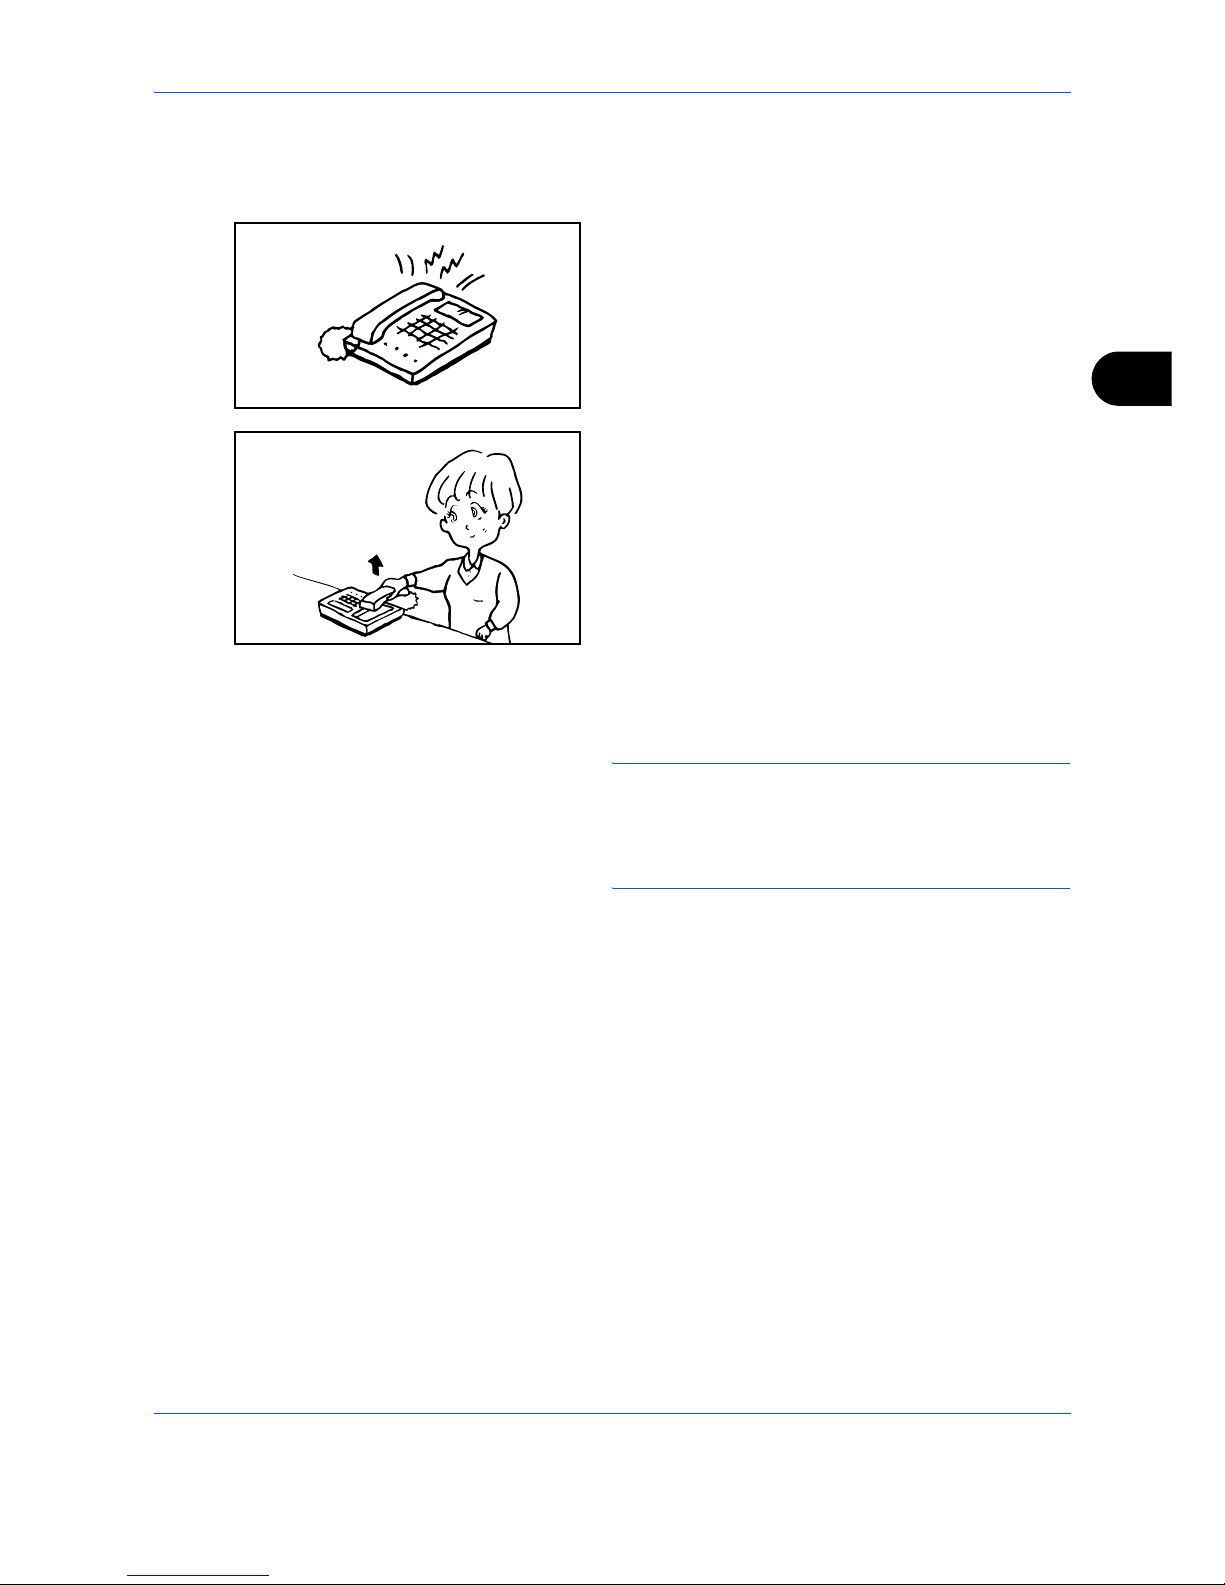
FAX Operation (Advanced)
4-17
4
Using the Remote Switch Dial
To start fax reception by operation from the connected telephone set, use the following operation.
1 The connected telephone set makes a ringing tone.
2 Lift the handset of the telephone.
3 When you hear the fax tone from the handset, enter
the two-digit remote switch dial number using the
dial button on the telephone set.
NOTE: The remote switch dial is set to 55 at the
factory.
When entering the 2-digit remote switch dial number,
press the numbers slowly. If the numbers are pressed
too quickly, the line may not switch to the machine.
4 The telephone line switches to the machine, and
reception starts.
Page 86
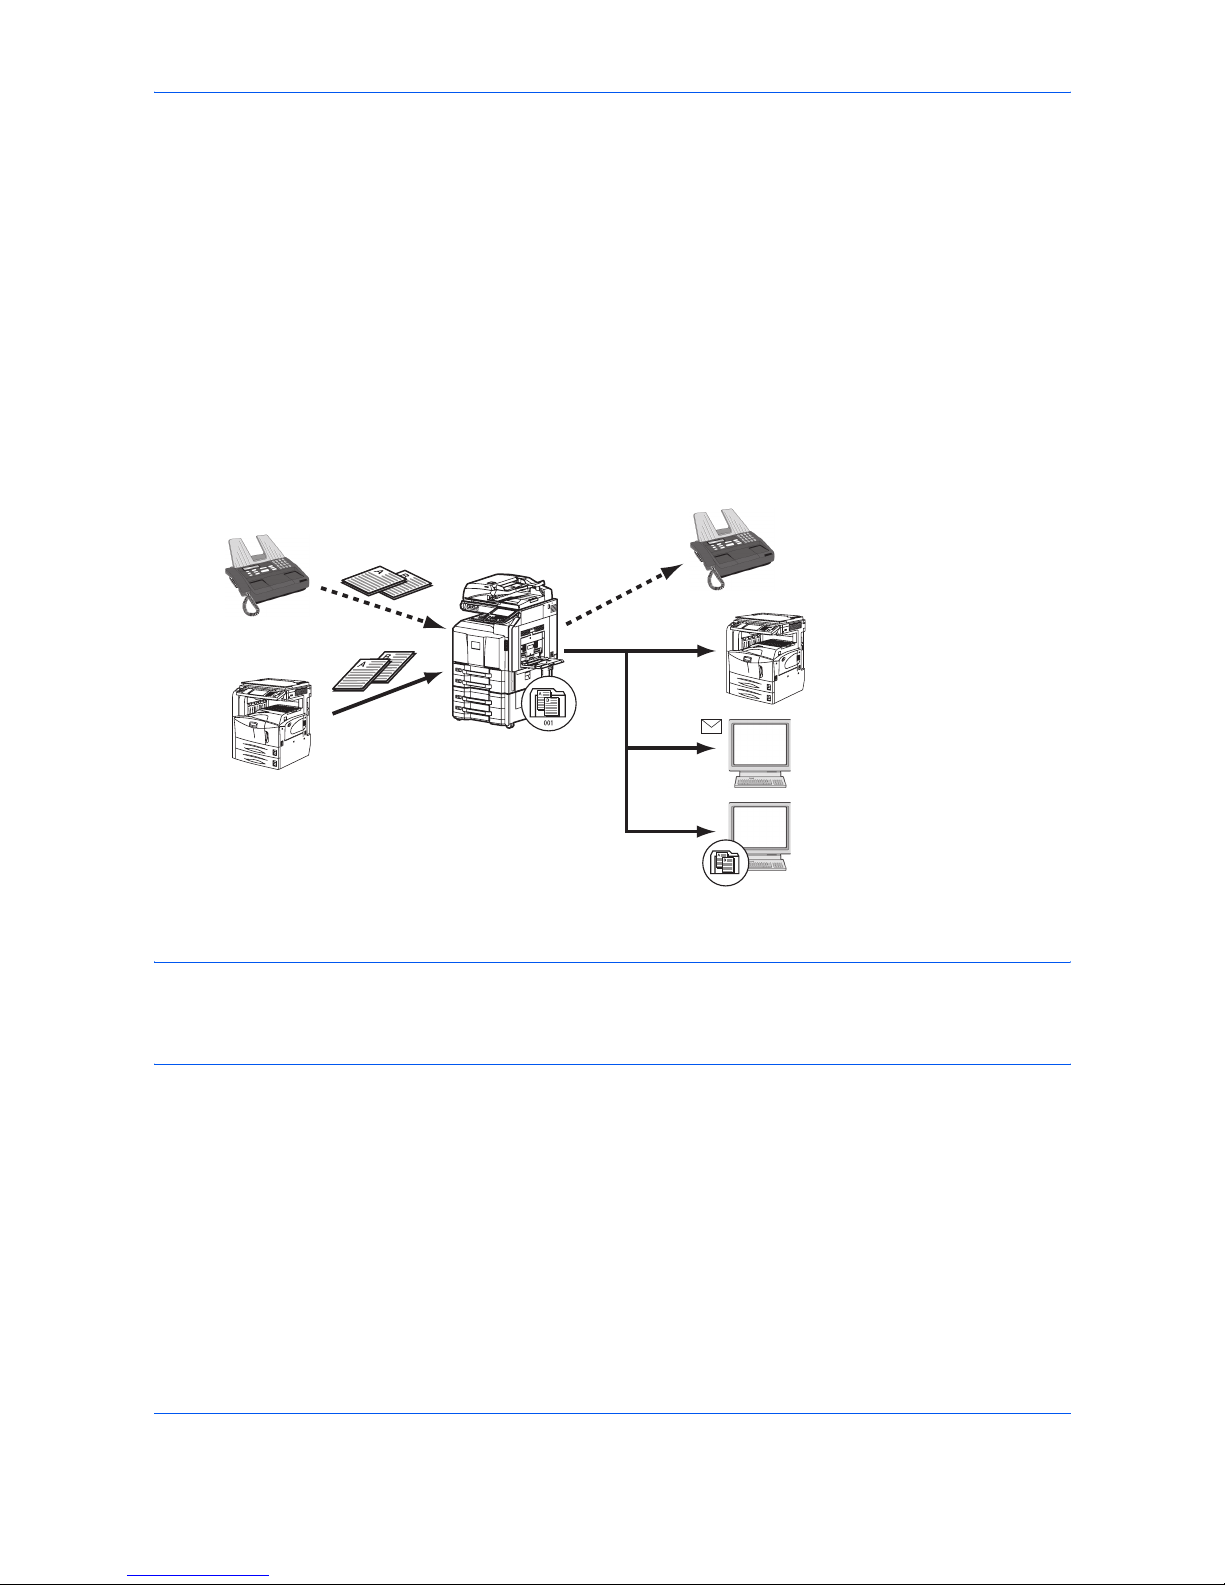
FAX Operation (Advanced)
4-18
Printing/Sending Received Faxes by Requirements (Memory Forwarding)
When you have received a fax, you can forward the received image to other faxes, computers, and FAX Boxes
or specify a number of copies.
Type of Forwarding Destination and Requirements for Forwarding
You can set forwarding destinations and requirements for forwarding.
Type of Forwarding Destination
You can forward the received fax to other fax machines or FAX Boxes, send it as an i-FAX or E-mail attachment
or transfer it to a folder (SMB or FTP).
Requirements for Forwarding
IMPORTANT: A fax that meets one of the specified forwarding requirements will be forwarded to one
destination. If the fax meets multiple forwarding requirements, the forwarding requirement that was registered
first is given priority. The forwarding requirements are shown in 1 to 5 below. To change the order of priority of
the forwarding requirements, refer to Raising the Priority of Settings by Requirement on page 4-27.
The forwarding requirements are as follows:
1 Sub address
2 Sender fax number
3 Port (when 2 optional FAX Kits (Dual FAX option) are installed)
4 Recipient’s address (i-FAX)
By using the memory forwarding function, you can perform the following communication.
External FAX
External FAX
External i-FAX
External i-FAX
E-mail transmission
Folder (SMB) transmission
Folder (FTP) transmission
Network
Network
FAX Box
Telephone
line
Telephone line
Page 87
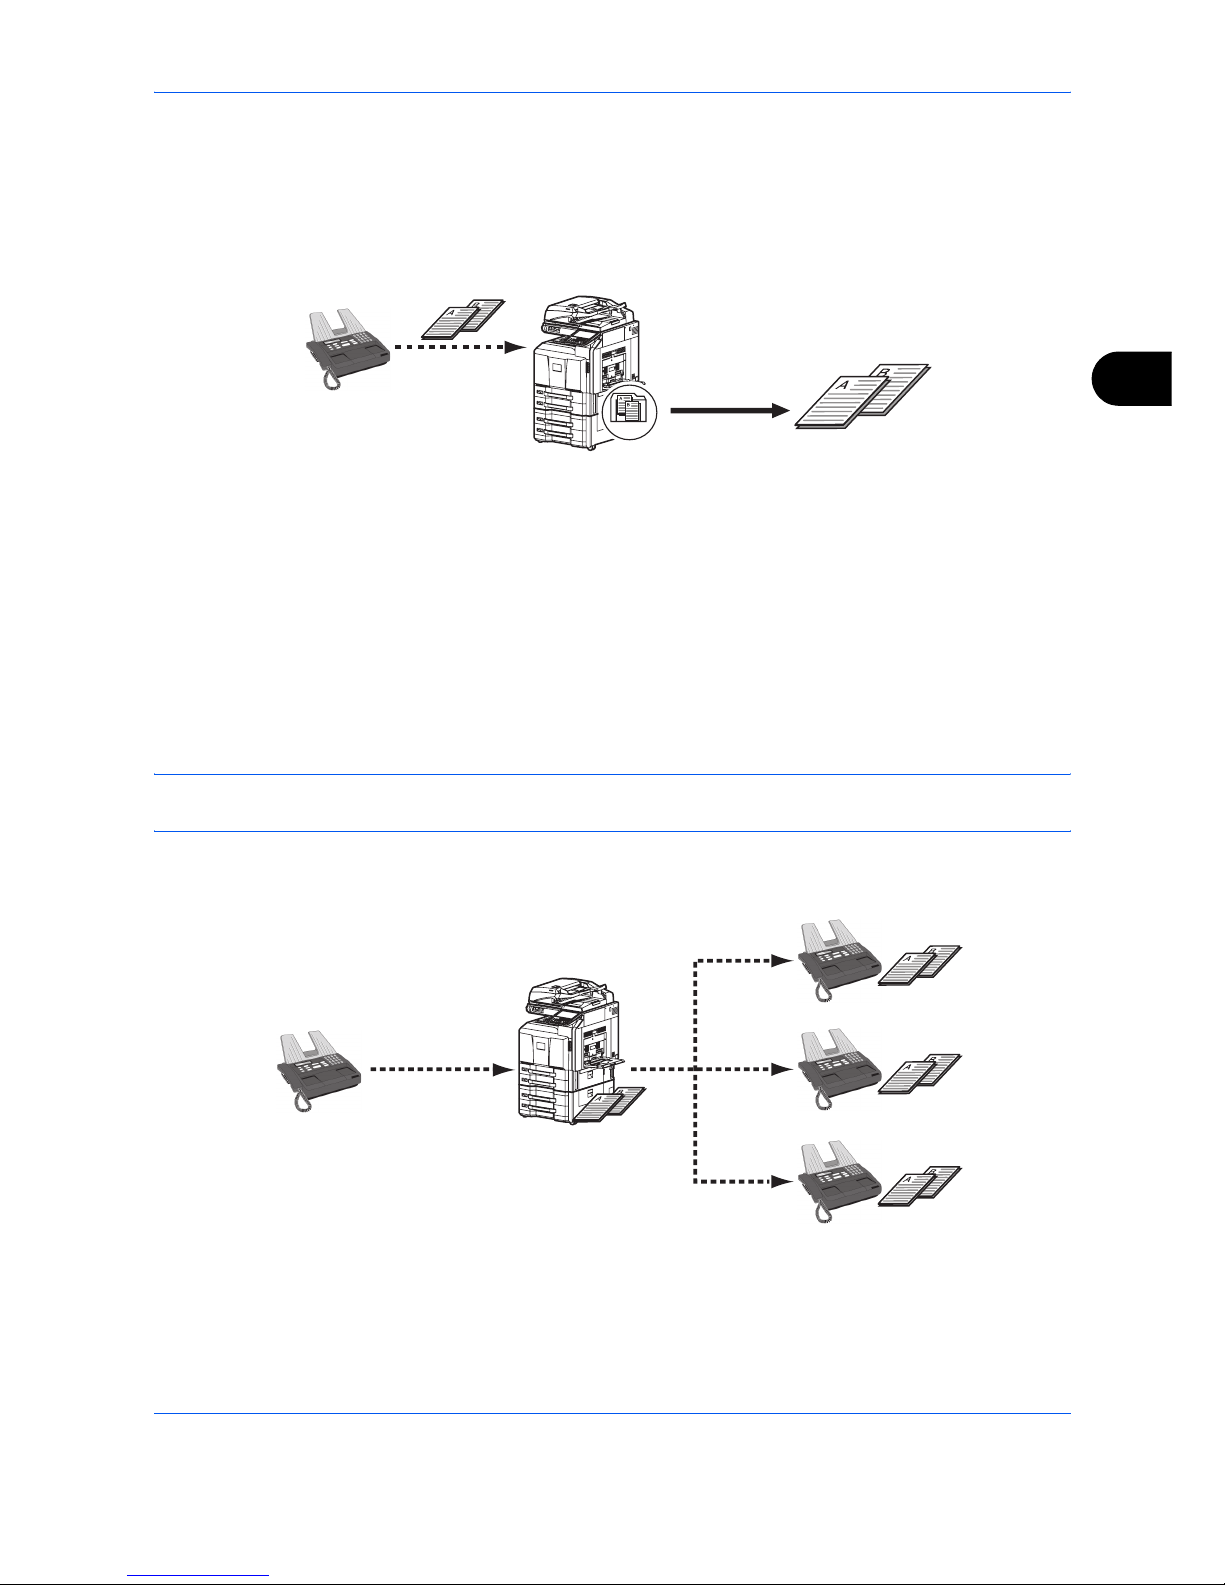
FAX Operation (Advanced)
4-19
4
Sub address confidential delivery
You can store the received originals in the FAX Box registered in advance without printing them, and output the
originals without anyone seeing them.
Setting example
1 Register the FAX Box. (Refer to page 4-38.)
2 Perform sub address transmission.
3 Store originals in the FAX Box with memory forwarding.
4 Print originals from the FAX Box. (Refer to page 4-40.)
Sub address relay broadcast communication
Received originals are forwarded to multiple fax machines. By setting a sub address as the forwarding
requirement, you can restrict relay broadcasting to a specific communication.
NOTE: When forwarding is used, you can select whether to print or not to print the received originals. Also,
you can specify a number of copies when printing. Refer to Setting a Number of Copies on page 4-30.
Setting example
1 Perform sub address transmission.
2 Use memory forwarding to forward received originals to multiple fax machines.
3 Each forwarding destination receives the fax.
1
FAX Box
registration
2
Sub Address transmission
Sub Address:1234
3
Memory forwarding
Sub Address:1234
4
Print
001
1
Sub Address
transmission
3
FAX reception
3
FAX reception
3
FAX reception
2
Memory forwarding
Sub Address: 3333
Sub Address:
3333
Page 88
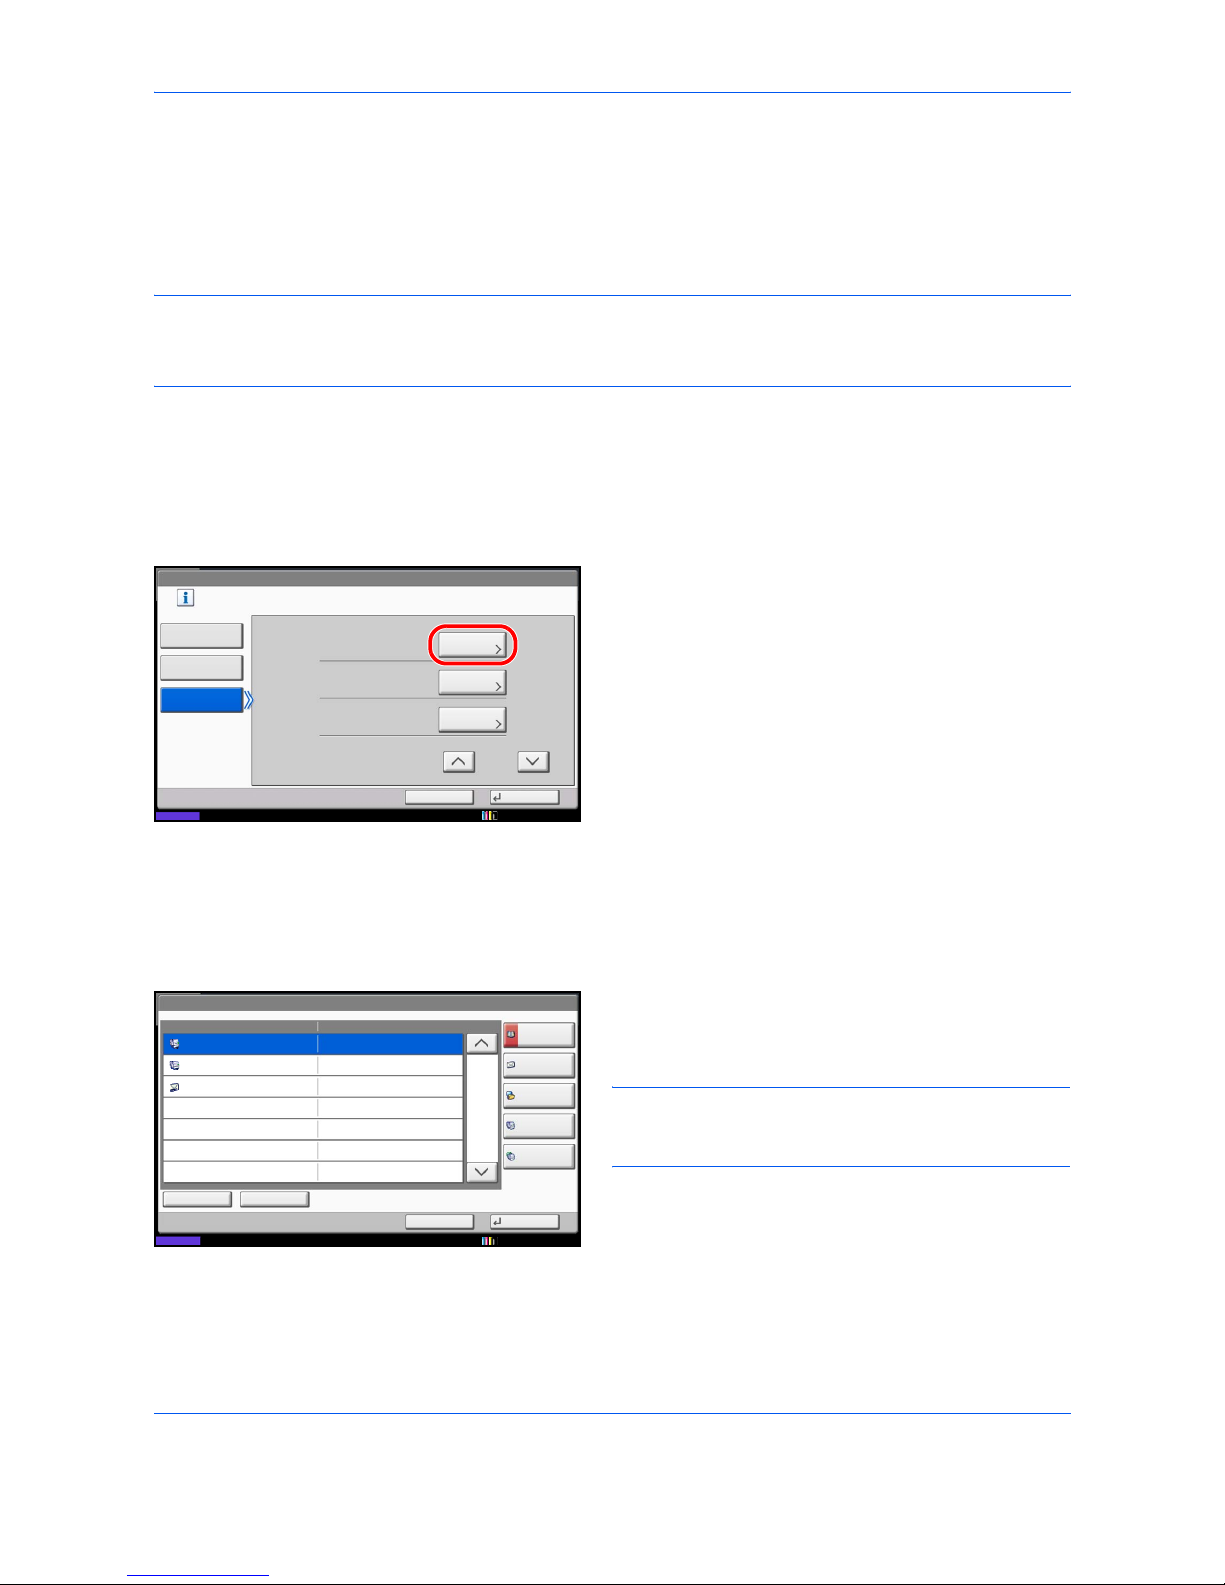
FAX Operation (Advanced)
4-20
Using Requirements for All Receptions
By applying the requirements to all receptions, you can have all faxes that you receive be printed or forwarded
based on the requirements.
To use requirements for all receptions, use the following procedure.
NOTE: To register setting by each reception requirement, refer to Using Rule for Specific RX on page 4-22.
To change the entry contents, follow the same operation.
When using requirments for all receptions, received documents can not be stored in the FAX Box.
1 Press the System Menu key.
2 Press [FAX], and then [Next] of RX/Forward
Requirements.
3 Press [Use Requirements for All RX].
4 Press [Next] of Forward Setting.
5 Press [Change] of Forwarding.
6 Select [On] or [Off] whether to forward or not to
forward the received documents and press [OK].
7 Press [Change] of Forward Destination.
8 Set the Forwarding Destination. Select the other
party by pressing one of the following keys, and
press [OK] to add the other party to the list.
NOTE: You can register multiple destinations. By
setting a group as the destination, you can specify up
to 500 recipients.
FAX - RX/Forward Requirements
Print or forward the received file according to
requirements.
Cancel OK
Off
Change Setting
by Requirement
Use Rule for
All RX
Forward Settings:
Print:
Off
Activating Time:
Next
Change
Change
1/2
All Day
10/10/2010 10:10
Status
FAX - Forward Destination
Cancel OK
Address
Book
E-mail Addr
Entry
Folder Path
Entry
FAX No.
Entry
Detail/Edit Delete
Dest
Detail
1/1
i-FAX Addr
Entry
10/10/2010 10:10
Status
ABC
012345678
GHI
DEF
9876543210
abc@efg
Page 89
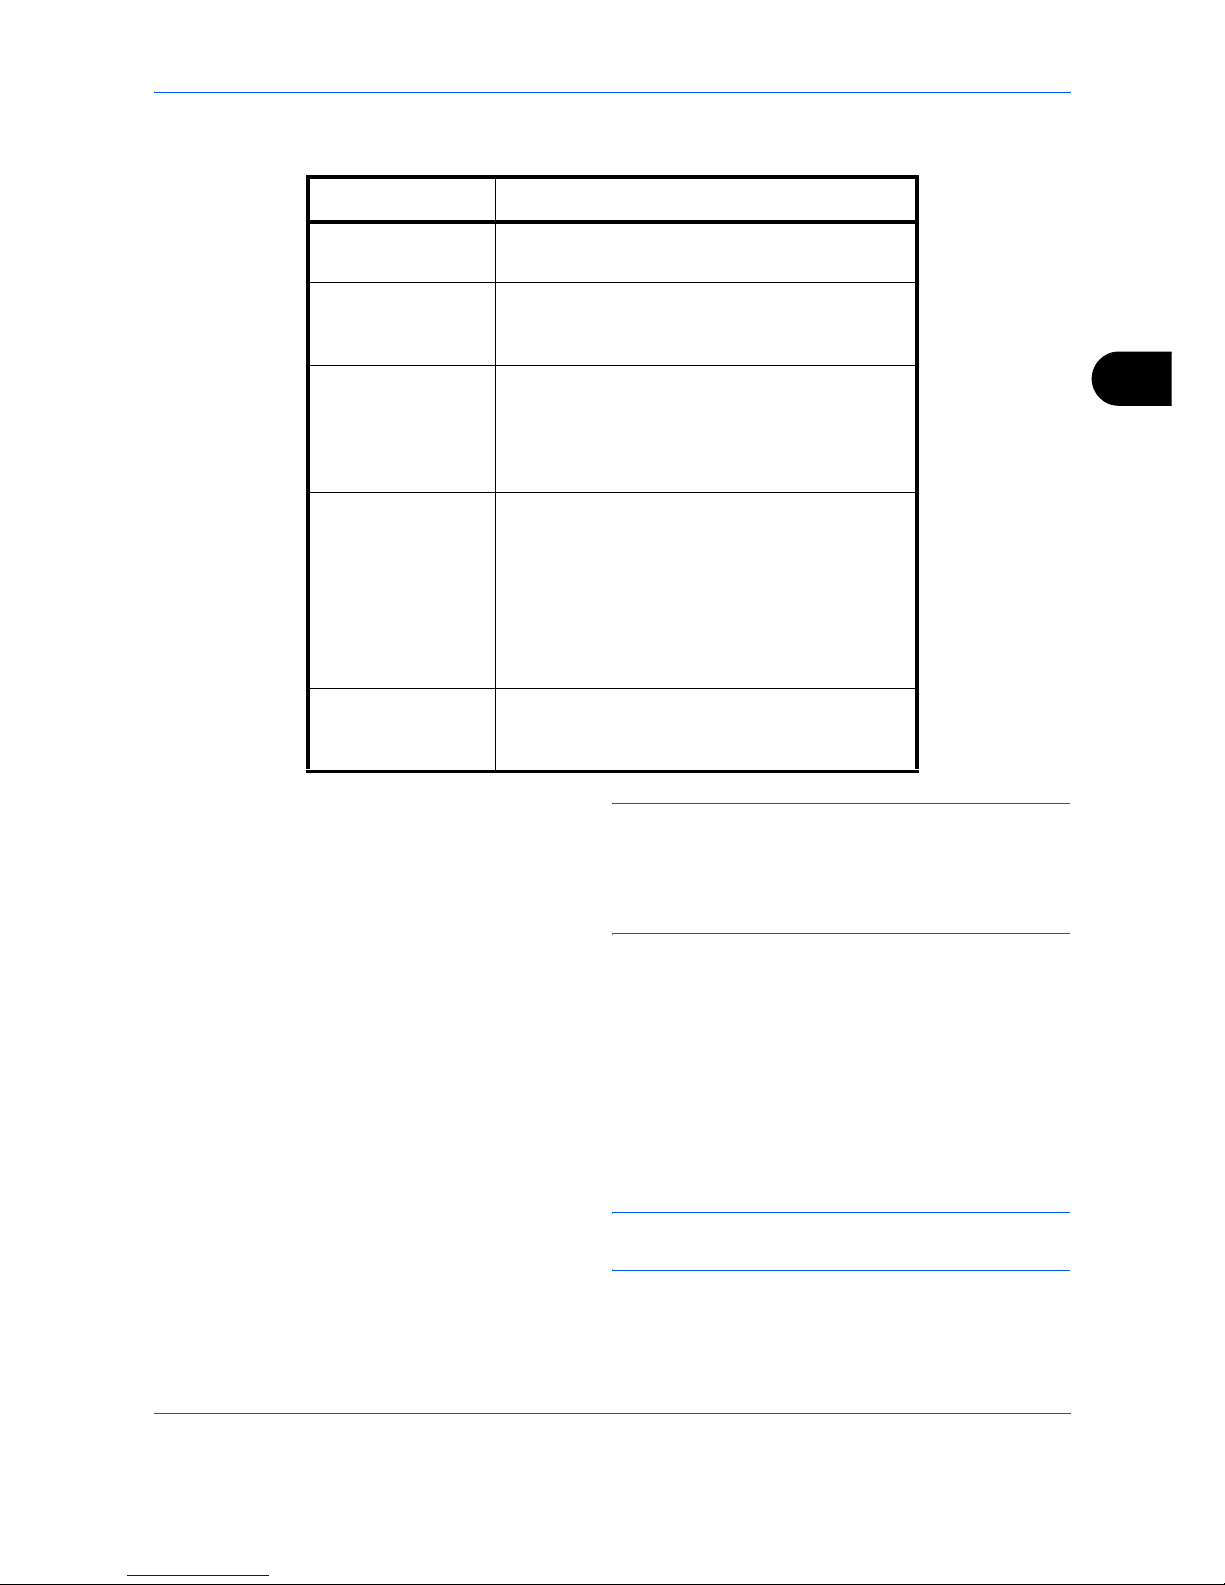
FAX Operation (Advanced)
4-21
4
NOTE: To edit a registered destination, select the
destination to be edited from the list, press [Detail/Edit]
and edit the information.
To remove a registered destination, select the destination
to be removed from the list and press [Delete].
9 Press [OK].
10 You can change the following settings as
necessary.
• File format setting
• E-mail Subject Add. Info setting
• FTP Encrypted TX setting
• File Separation
NOTE: For details on above settings, refer to
Forwarding Detail Settings on page 4-28.
11 Press [OK].
Key Description
Address Book Select the destination registered in the Address
Book or Ext Address Book
E-mail Addr Entry Forward originals in e-mail transmission. Enter
the e-mail address of the other party to which
you will forward the received originals.
Folder Path Entry Forward originals with folder (SMB)
transmission or folder (FTP) transmission. Enter
the Host Name, Path, Login User Name, and
Login Password of the other party to which you
will forward the received originals.
FAX No. Entry Forward originals to another fax. Enter the
recipient’s fax number using the numeric keys
and set the transmission details.
When [New Destination Entry] is set to
[Prohibit], the numeric keys cannot be used to
enter a fax number. For details, refer to Sending
faxed documents to a specified additional
address on page 4-63.
i-FAX Addr Entry Forward originals using i-FAX. Enter the Internet
FAX address of the recipient and set the
conditions for the destination machine.
Page 90
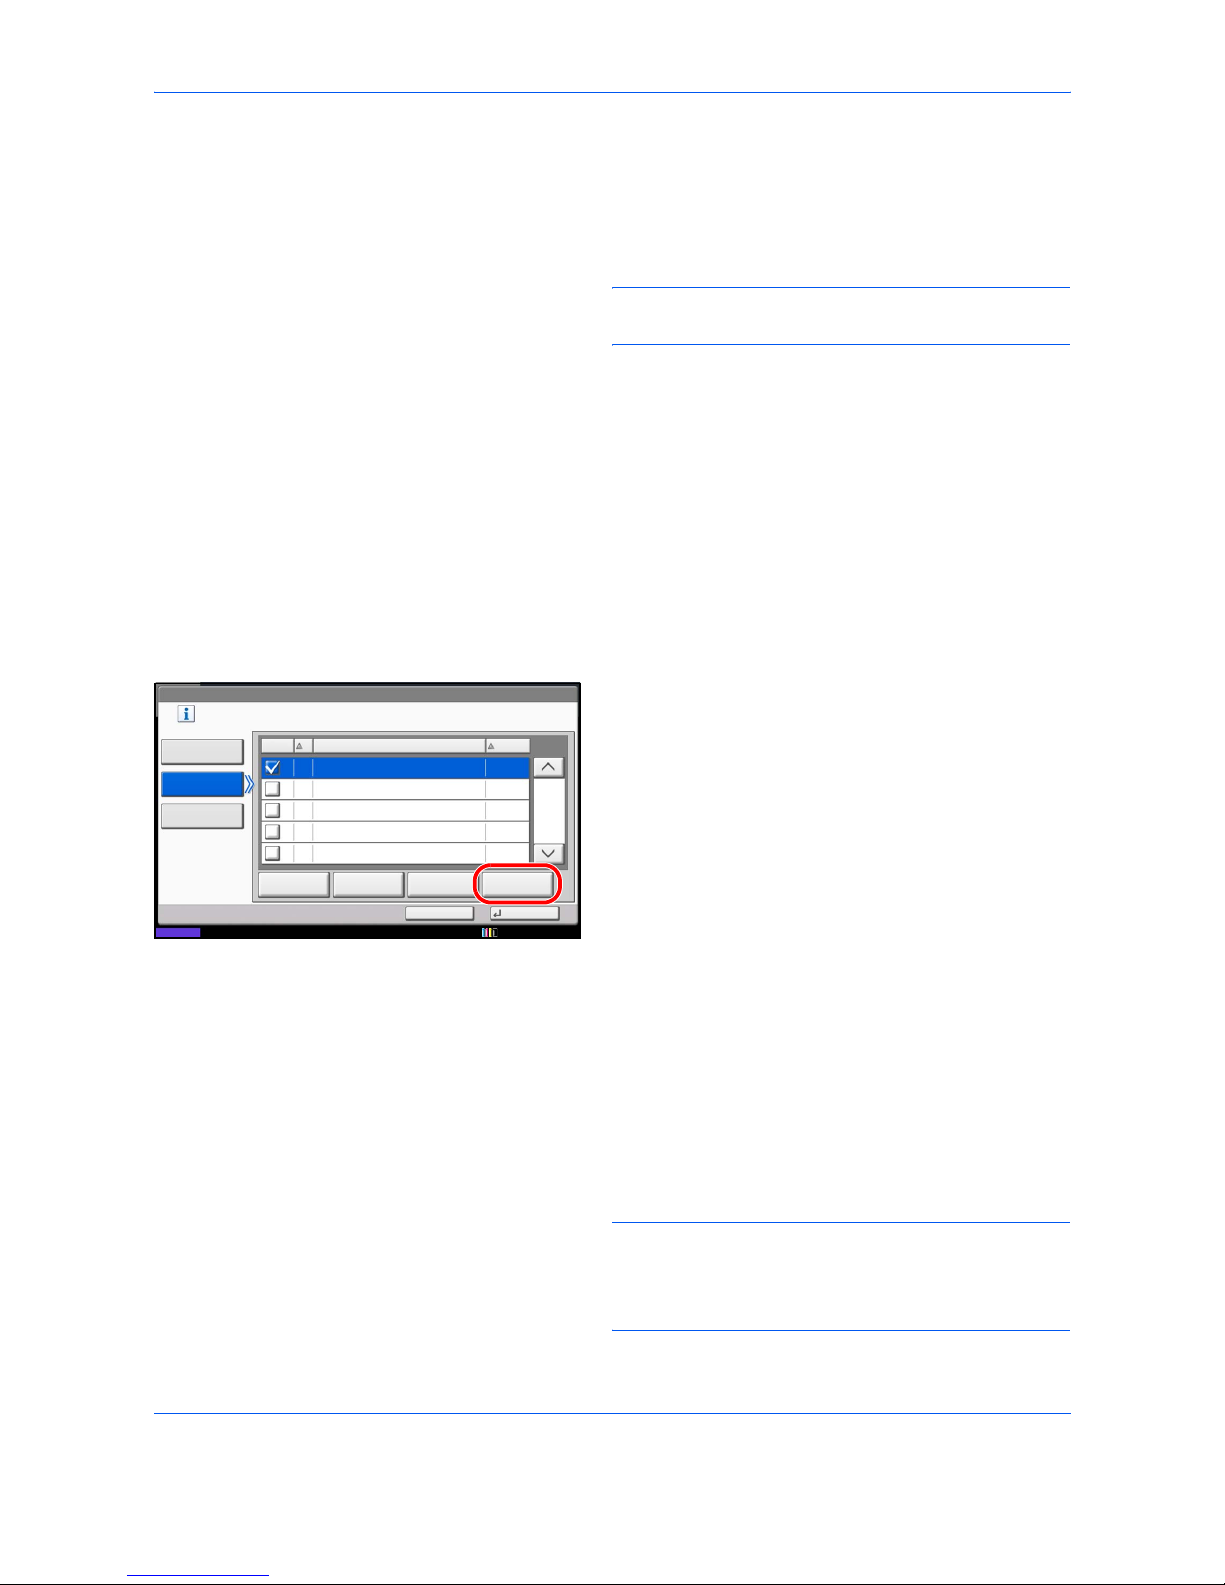
FAX Operation (Advanced)
4-22
12
You can change the following settings.
• Number of Copies
• Enable time setting
• File name registration
NOTE: For details on above settings, refer to
Forwarding Detail Settings on page 4-28.
13
Press [OK].
Using Rule for Specific RX
To register settings by each reception requirement, follow the steps below. Up to 100 requirements can be
registered.
1 Press the System Menu key.
2 Press [FAX], and then [Next] of RX/Forward
Requirements.
3 Press [Use Rule for Specific RX].
4 Press [Add].
5 Press [Change] of Requirement Number.
6 Press [+] or [-] or use the numeric keys to enter the
requirement number. You can enter the
requirement number between 001 and 100.
7 Press [OK].
8 Press [Change] of Requirement Name.
9 Enter the requirvement name, and press [OK].
NOTE: For details on character entry, refer to
Character Entry Method on page 2 of the Appendix.
Up to 32 characters can be entered for the requirement
name.
FAX - RX/Forward Requirements
Cancel
OK
Print or forward the received file according to
requirements.
Raise Priority
Priority
Add
Use Rule for
Specific RX
Off
Use Rule for
All RX
On
Requirement Name
Delete
Detail
FAX A
ID
1/1
10/10/2010
Status
01
1
others
Page 91
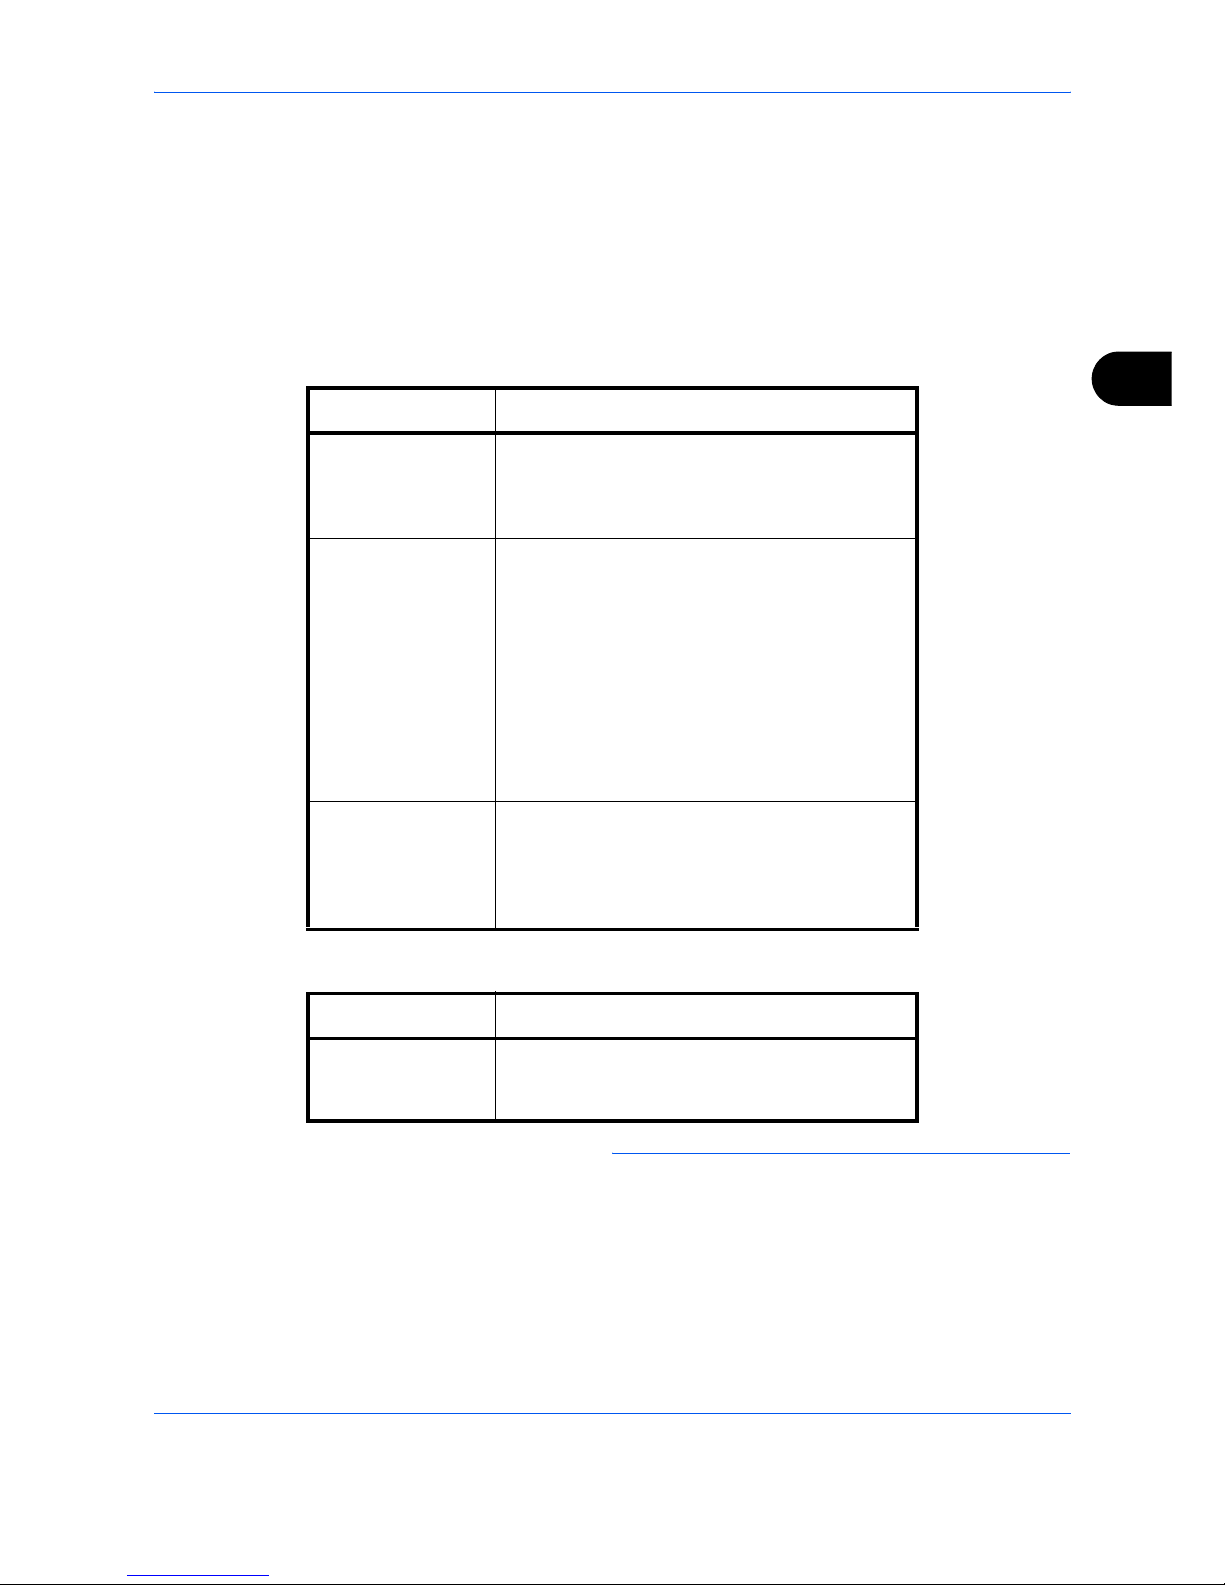
FAX Operation (Advanced)
4-23
4
10 Press [Change] of Requirement.
11 To forward fax reception, select [FAX] and press
[Next].
To forward i-FAX reception, select [i-FAX] and
press [Next].
12 Register the requirements.
When FAX was selected in step 11.
When i-FAX was selected in step 11.
NOTE: When setting a forwarding condition by
selecting a sender’s FAX number (a local FAX
information entry of the destination machine) but leaving
blank to the sender’s FAX number, you can forward a
FAX that is received from a sender whose number is not
registered in the sender's FAX number entries.
Requirements Registration method
Sub Address Press [Sub Address] and enter the sub address
using the numeric keys. You can use up to 20
digits including the numbers from 0 to 9, ‘ (space)’,
‘#’ and ‘*’ characters to enter a sub address.
Sender FAX
Number
Press [Sender FAX Number] and enter the
sender’s fax number using the numeric keys.
You can enter up to 20 characters.
A maximum of only 9 conditions for which
sender fax number is selected as the forwarding
condition can be registered.
When [New Destination Entry] is set to
[Prohibit], the numeric keys cannot be used to
enter a fax number. For details, refer to Sending
faxed documents to a specified additional
address on page 4-63.
Port Press [Port] and select [Port 1] or [Port 2]. If the
port is selected, fax box forwarding will not be
possible.
This setting only appears when 2 optional FAX
Kits (Dual FAX option) are installed.
Requirements Registration method
i-FAX Address Press [i-FAX Address]. Enter the destination
Internet FAX address. You can enter up to 128
characters.
Page 92

FAX Operation (Advanced)
4-24
When you set the sender fax number as a forwarding
requirement, select the search requirement from
Search by pull-down menu.
• Same as
•Starts with
• Ends with
• Includes
13
Press [OK].
14
Press [Next] of Forward Setting.
15 Press [Change] of Forwarding.
16 Select [On] or [Off] whether to forward or not to
forward the received documents and press [OK].
17
Press [Change] of Forward Destination.
18
Set the Forward Destination. Select the other party
by pressing one of the following keys, and press
[OK] to add the other party to the list.
Key Description
Address Book Select the destination registered in the Address
Book or Ext Address Book.
E-mail Addr Entry Forward originals with e-mail transmission.
Enter the e-mail address of the other party to
which you forward the received originals.
Folder Path Entry Forward originals with folder (SMB)
transmission or folder (FTP) transmission. Enter
the Host Name, Path, Login User Name, and
Login Password of the other party to which you
will forward the received originals.
FAX No. Entry Forward originals to another fax. Enter the
recipient’s fax number using the numeric keys
and set the transmission details.
When [New Destination Entry] is set to
[Prohibit], the numeric keys cannot be used to
enter a fax number. For details, refer to Sending
faxed documents to a specified additional
address on page 4-63.
i-FAX Addr Entry Forward originals using i-FAX. Enter the Internet
FAX address of the recipient and set the
conditions for the destination machine.
Page 93

FAX Operation (Advanced)
4-25
4
NOTE: To edit a registered destination, select the
destination to be edited from the list, press [Detail/Edit]
and edit the information.
To remove a registered destination, select the
destination to be removed from the list and press
[Delete].
19
Press [OK].
20
You can change the following settings as
necessary.
• File format
• E-mail Subject Add. Info
• FTP Encrypted TX
• File Separation
NOTE: For details on above settings, refer to
Forwarding Detail Settings on page 4-28.
21
Press [OK].
22
Press [Change] of Storing in FAX Box.
23
To store the originals in the FAX Box, press [On]. If
you do not want to store the originals in the FAX
Box, select [Off], press [OK] and proceed to step
25.
NOTE: To set the FAX Box as the Forward
Destination, register the FAX Box in advance. For
details, refer to FAX Box Function on page 4-38.
24
Select the FAX Box to be used to store the originals
and press [OK].
If you set the password to FAX Box, enter the
password and press [OK].
25
You can change the following settings.
• Number of Copies
• Activating time setting
• File name registration
• Priority setting
NOTE: For details on above settings, refer to
Forwarding Detail Settings on page 4-28.
Page 94

FAX Operation (Advanced)
4-26
26
Press [Register]. The forwarding settings is
registered.
27
To register another forwarding settings, repeat
steps 4 to 26.
28
To set forwarding of received faxes that do not
meet the conditions, select other, press [Detail],
and change the settings.
NOTE: If other is not selected, received faxes that do
not meet the conditions will be printed.
Save to FAX Box cannot be set in other settings.
29
Select the checkbox beside the forwarding settings
to be enabled from the list. The checkbox beside
the forwarding setting to be enabled is checked.
NOTE: To disable the setting, press the checkbox to
delete the checkmark.
30
Press [OK] to save the settings by each
requirement.
Page 95

FAX Operation (Advanced)
4-27
4
Changing/Deleting Settings by Requirement
To change or delete the settings by requirement, follow the steps below.
1 Follow steps 1 to 3 of Using Rule for Specific RX on
page 4-22.
2 Select the requirement name to be deleted or
changed.
To delete the requirement name, go to the next
step. To change the requirement name, go to step
4.
3 Press [Delete]. When the confirmation screen is
displayed, press [Yes] and go to step 6.
4 Press [Detail].
5 Refer to steps 5 to 26 of Using Rule for Specific RX
on page 4-22 to change the settings.
6 When the deletion or change is completed, press
[OK].
Raising the Priority of Settings by Requirement
To raise the priority of the settings by requirement, follow the steps below.
1 Follow steps 1 to 3 of Using Rule for Specific RX on
page 4-22.
2 Select the requirement name to be reprioritized.
3 Press [Raise Priority].
The priority of the selected requirement is raised.
Page 96
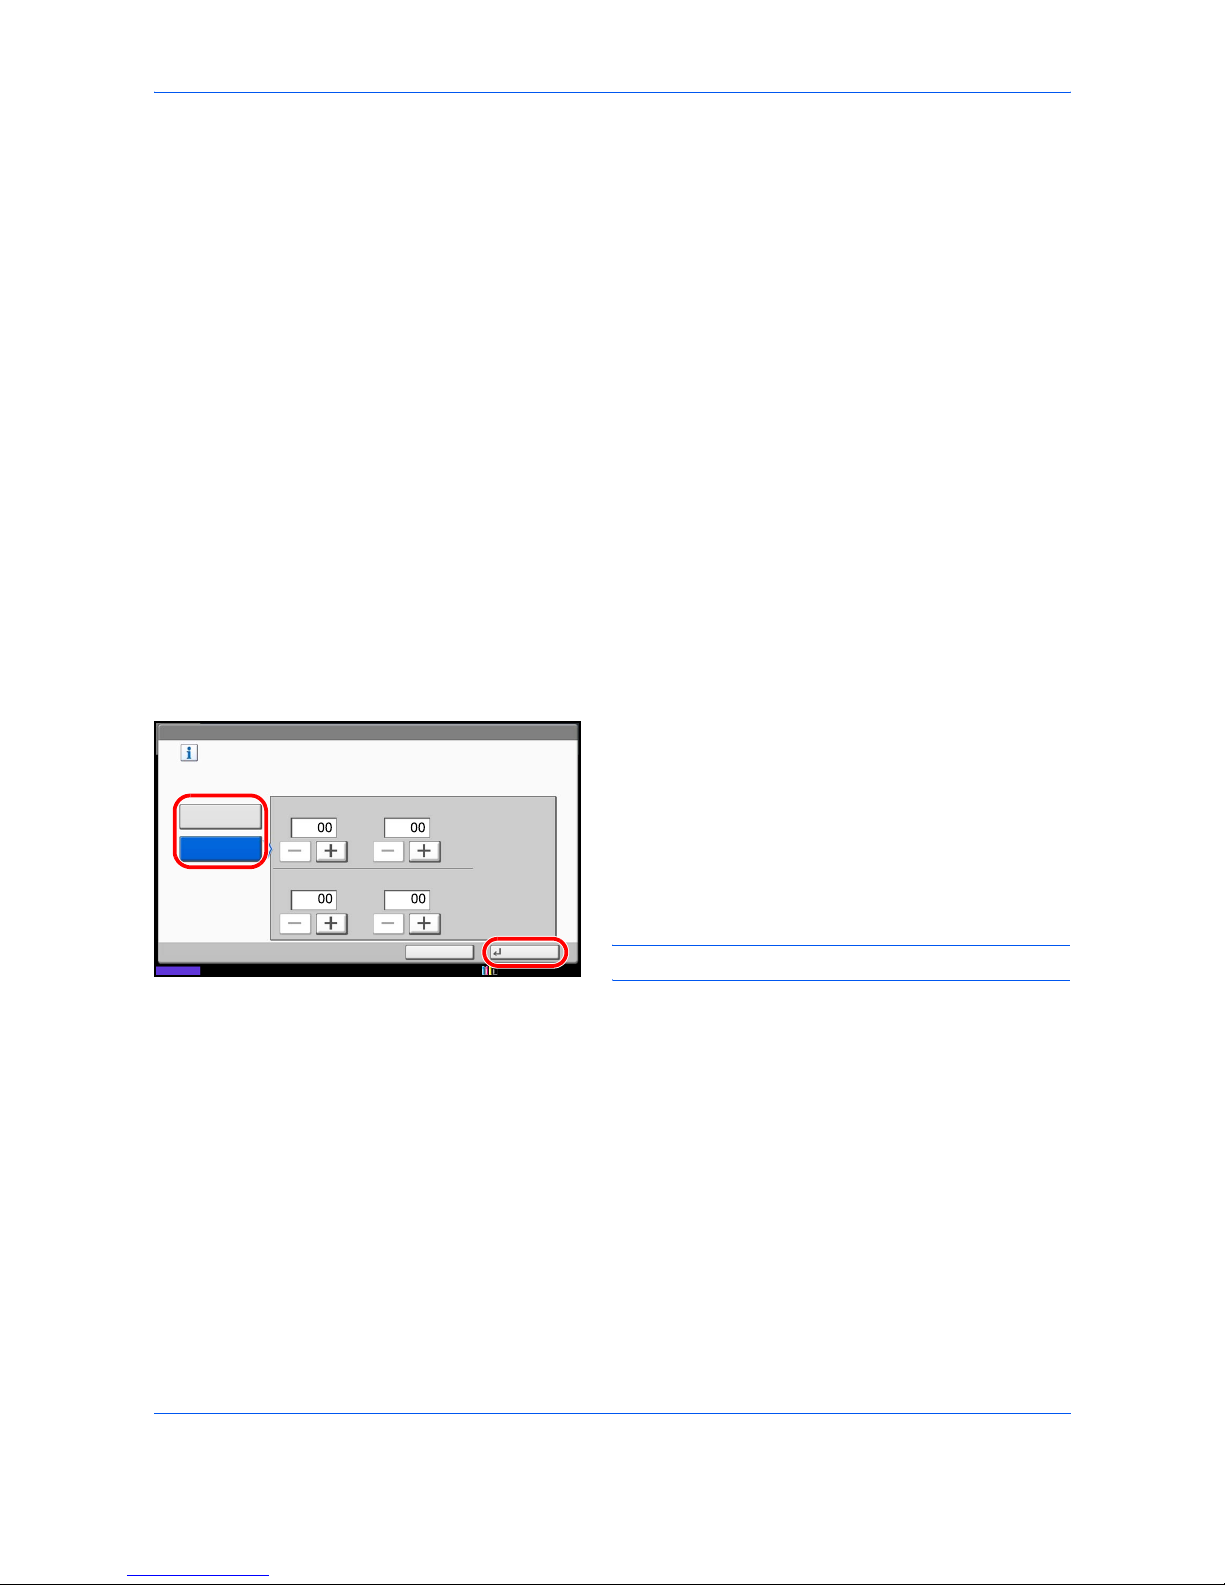
FAX Operation (Advanced)
4-28
Cancelling the Setting of RX/Forward Requirements
To cancel the memory forwarding, follow the steps below.
1 Press the System Menu key.
2 Press [FAX] and then [Next] of RX/Forward
Requirements.
3 Press [Off] and then [OK].
Forwarding Detail Settings
With the forwarding settings, you can change the following detail settings.
Activating Time Setting
Specify the times when the preset requirements are activated and deactivated.
1 Follow steps 1 to 3 of Using Requirements for All
Receptions on page 4-20.
Follow steps 1 to 3 of Using Rule for Specific RX on
page 4-22.
2 Select the requirement and press [Detail].
3 Press [Change] of Activating Time.
4 Select [All Day] or [Preset Time].
To forward received originals all day, select [All
Day], press [OK] and then go to step 5.
To set the forwarding time, select [Preset Time] and
go to the next step.
5 Press [+]/[-] to enter Start Time and End Time, and
then press [OK].
NOTE: Enter the time on the 24 hours system.
Priority Setting
Set the priority of a registered forwarding requirement.
1 Follow steps 1 to 3 of Using Rule for Specific RX on
page 4-22.
2 Select the requirement and press [Detail].
3 Press [Change] of Priority.
4 Press [+] or [-] or use the numeric keys to enter the
priority.
5 Press [OK].
Requirement: - Activating Time
Specify the time for activating the requirements.
Print or forward the faxes received during the preset
time according to the requirements.
Cancel OK
All Day
Preset Time
Start
:
:
End
10/10/2010 10:10
Status
Page 97

FAX Operation (Advanced)
4-29
4
File Format Setting (for Each Requirement)
If you are sending the file as an E-mail attachment or transferring it to a folder (SMB or FTP), select PDF, TIFF
or XPS as the file format.
1 Follow steps 1 to 4 of Using Requirements for All
Receptions on page 4-20.
Follow steps 1 to 3 and 14 of Using Rule for
Specific RX on page 4-22.
2 Select the requirement and press [Detail].
3 Press [Change] of File Format.
4 Press [PDF], [TIFF] or [XPS] and then [OK].
NOTE: If you have selected PDF for file format, PDF
Encryption functions are available. For details, refer to
the machine's Operation Guide.
5 Press [OK].
E-mail Subject Add. Info Setting
Specify whether any information will be added to the subject of the E-mail. When adding information, you can
select either Sender Name or Sender.
1 Follow steps 1 to 4 of Using Requirements for All
Receptions on page 4-20.
Follow steps 1 to 3 and 14 of Using Rule for
Specific RX on page 4-22.
2 Select the requirement and press [Detail].
3 Press [Change] of E-mail Subject Add. Info..
4 Press [Sender Name], [Sender FAX No./Address]
or [Off] and then press [OK].
FTP Encrypted TX Setting
Specify whether to use FTP encryption when you send data.
1 Follow steps 1 to 4 of Using Requirements for All
Receptions on page 4-20.
Follow steps 1 to 3 of Using Rule for Specific RX on
page 4-22.
2 Select the requirement and press [Detail].
3 Press [Change] of FTP Encrypted TX.
4 Press [On] or [Off].
5 Press [OK].
Page 98

FAX Operation (Advanced)
4-30
NOTE: To enable FTP Encrypted TX setting, be sure
that SSL of Secure Protocol is On. For details, refer to
the machine's Operation Guide.
File Separation
If transmission is by e-mail or to a folder (SMB) or folder (FTP), set whether page division is performed.
1 Follow steps 1 to 4 of Using Requirements for All
Receptions on page 4-20.
Follow steps 1 to 3 and 14 of Using Rule for
Specific RX on page 4-22.
2 Select the requirement and press [Detail].
3 Press [Change] of File Separation
4 Press [Off] or [Each Page].
To have one file created for each page, select
[Each Page].
5 Press [OK].
Setting a Number of Copies
You can set whether the machine should print received originals when forwarding them. You can specify the
number of copies.
1 Follow steps 1 to 3 of Using Requirements for All
Receptions on page 4-20.
Follow steps 1 to 3 of Using Rule for Specific RX on
page 4-22.
2 Select the requirement and press [Detail].
3 Press [Change] of Print.
4 Press [On] or [Off].
If you selected [On], press [+]/[-] or numeric keys to
set the number of copies.
5 Press [OK].
Page 99

FAX Operation (Advanced)
4-31
4
File Name Registration
You can set the file name to be created when forwarding. You can append information such as the date/time
and the job number or fax number (address for an i-FAX).
1 Follow steps 1 to 3 of Using Requirements for All
Receptions on page 4-20.
Follow steps 1 to 3 of Using Rule for Specific RX on
page 4-22.
2 Select the requirement and press [Detail].
3 Press [Change] of File Name.
4 Press [File Name].
5 Enter the file name and press [OK].
6 To insert additional information into the file name,
press [Job No.], [Date and Time], [Add No./Addr to
Front] or [Add No./Addr to Back].
NOTE: For details on character entry, refer to
Character Entry Method on page 2 of the Appendix.
Please note that when you have not add any additional
information, file names become the same, and,
therefore, old files are overwritten when received
originals are forwarded with folder (SMB) transmission
and folder (FTP) transmission.
7 Press [OK].
Page 100
FAX Operation (Advanced)
4-32
Settings for Forwarding from (PEHGGHG:HE6HUYHU RX (RX/Forward Requirements)
You can use Embedded Web Server RX on a computer connected to the network to specify the forwarding settings
on this machine.
Refer to the machine’s Operation Guide for information on the network settings.
Accessing (PEHGGHG:HE6HUYHU RX
1 Open the web browser.
2 In the Address or Location bar, enter the machine’s
IP address as the URL, e.g. http://192.168.48.21/.
The web page displays basic information about the
machine and Embedded Web Server RX as well as the
current status of the machine.
3 Enter the user name and password of the
administrator, and click Login.
Setting Administrator User Name, and Password
restricts general users' access to pages other than
the Start page. For security purposes, setting the
Administrator password is highly recommended.
The default Administrator password is factory-set
as ‘Admin’.
4 Click ‘Setting’ from the navigation bar on the left to
view and set values for that particular category.
5 Click ‘FAX / i-FAX’.
The Transmit Settings dialog box will appear.
For details, refer to the (PEHGGHG:HE6HUYHU RX
Operation Guide.
 Loading...