

Page 1

INSTRUCTION HANDBOOK
FAX SYSTEM
FAX SYSTEM (M)
Page 2

Introduction
In this Operation Guide, CD 1325 / CD 1330 and CD 1230 / CD 1240 and
CD 1250 are referred to as 25/30 ppm model and 30/40/50 ppm model
respectively.
Page 3
OPERATION GUIDE i
Safety Conventions in This Guide
Please read the Operation Guide before using the facsimile. Keep it close
to the facsimile for easy reference.
The sections of this handbook and parts of the facsimile marked with
symbols are safety warnings meant to protect the user, other individuals
and surrounding objects, and ensure correct and safe usage of the
facsimile. The symbols and their meanings are indicated below.
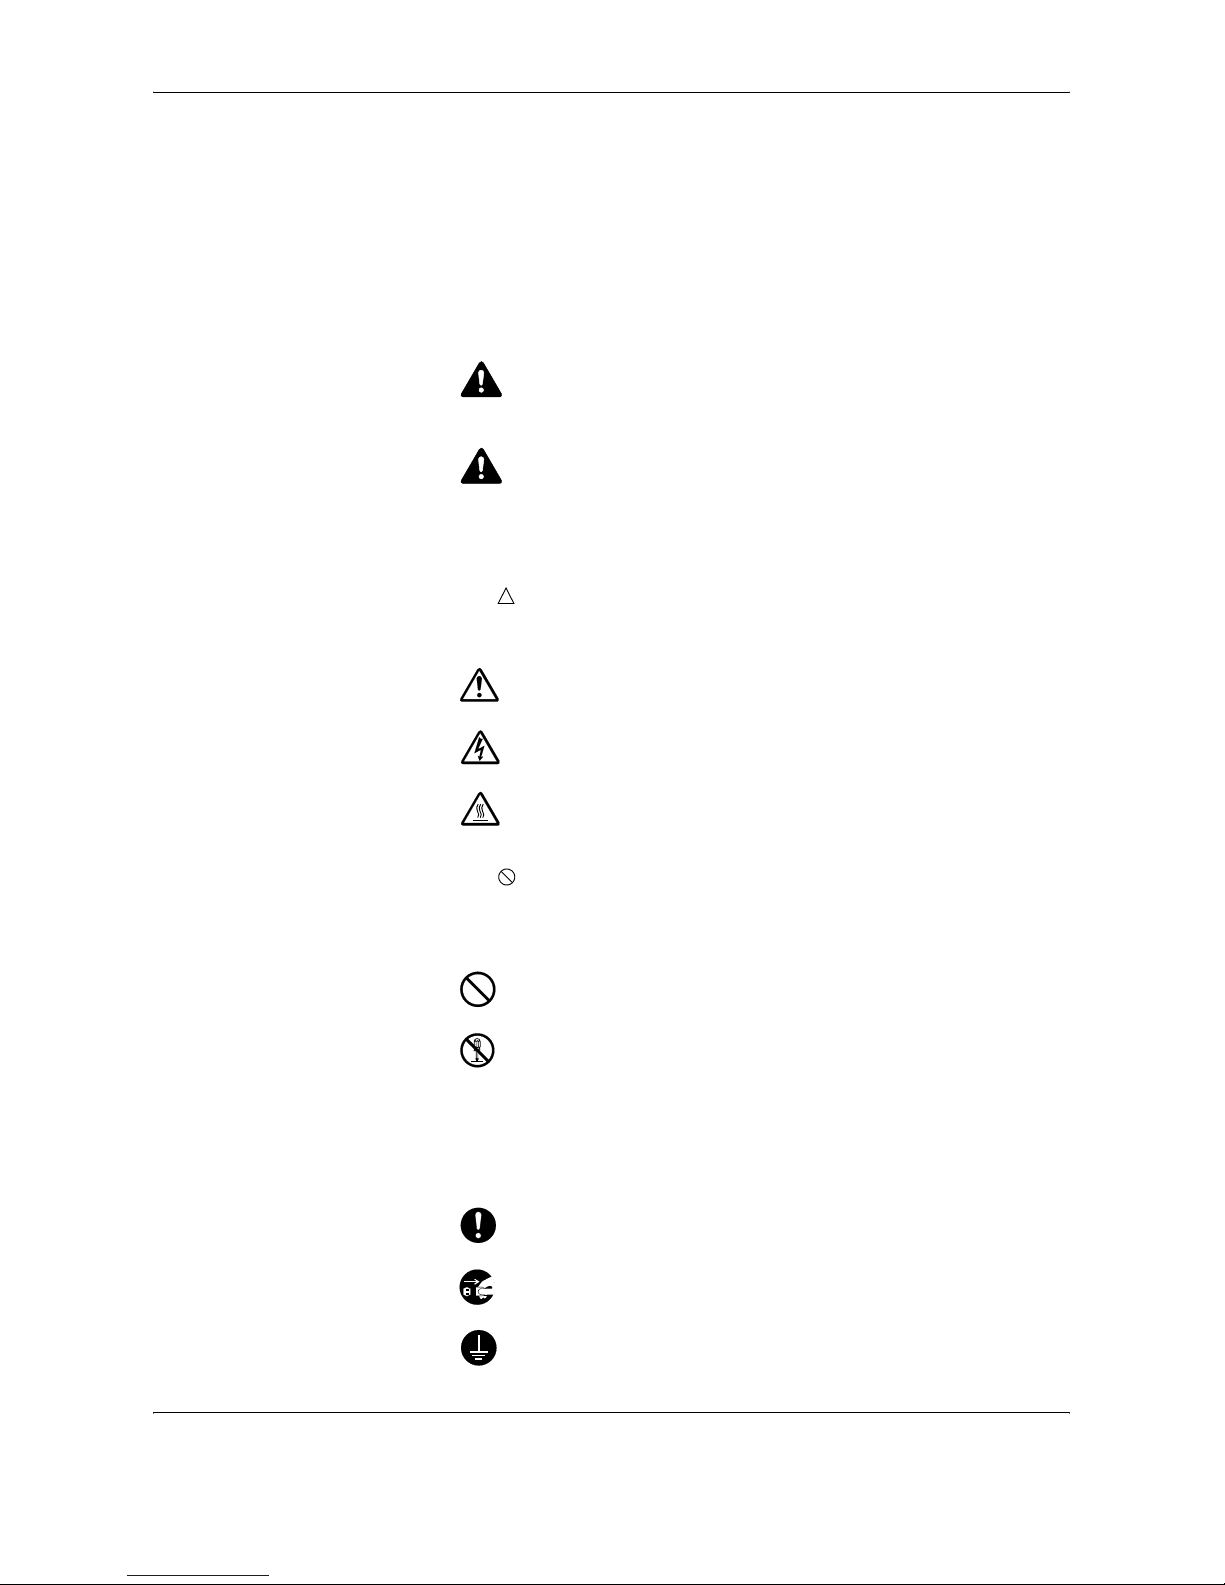
WARNING: Indicates that serious injury or even death may result
from insufficient attention to or incorrect compliance with the related
points.
CAUTION: Indicates that personal injury or mechanical damage
may result from insufficient attention to or incorrect compliance with
the related points.
Symbols
The symbol indicates that the related section includes safety warnings.
Specific points of attention are indicated inside the symbol.
The symbol indicates that the related section includes information on
prohibited actions. Specifics of the prohibited action are indicated inside
the symbol.
The
z symbol indicates that the related section includes information on
actions which must be performed. Specifics of the required action are
indicated inside the symbol.
.... [General warning]
.... [Warning of danger of electrical shock]
.... [Warning of high temperature]
.... [Warning of prohibited action]
.... [Disassembly prohibited]
.... [Alert of required action]
.... [Remove the power plug from the outlet]
....
[Always connect the machine to an outlet with a ground
connection]
Page 4

ii OPERATION GUIDE
Please contact your service representative to order a replacement if the
safety warnings in this Operation Guide are illegible or if the guide itself is
missing. (fee required)
<Note>
Due to performance updating, information in this Operation Guide is
subject to change without notice.
Page 5

OPERATION GUIDE iii
Contents
1 Part Names and Functions
Machine . . . . . . . . . . . . . . . . . . . . . . . . . . . . . . . . . . . . . . . . . . . . . . . . . . . . . . . . . . . . . . . . . . . 1-2
Operation Panel . . . . . . . . . . . . . . . . . . . . . . . . . . . . . . . . . . . . . . . . . . . . . . . . . . . . . . . . . . . . . 1-4
Touch Panel . . . . . . . . . . . . . . . . . . . . . . . . . . . . . . . . . . . . . . . . . . . . . . . . . . . . . . . . . . . . . . . . 1-7
2 Preparation Before Use
Selection of Telephone Line (Inch version only) . . . . . . . . . . . . . . . . . . . . . . . . . . . . . . . . . . . . . 2-2
Selection of Transmit Terminal Identification (TTI) . . . . . . . . . . . . . . . . . . . . . . . . . . . . . . . . . . . 2-3
Setting the TTI information . . . . . . . . . . . . . . . . . . . . . . . . . . . . . . . . . . . . . . . . . . . . . . . . . . . . . 2-4
Date and Time Entry . . . . . . . . . . . . . . . . . . . . . . . . . . . . . . . . . . . . . . . . . . . . . . . . . . . . . . . . . 2-6
3 FAX Operation (Basic)
Automatic Send . . . . . . . . . . . . . . . . . . . . . . . . . . . . . . . . . . . . . . . . . . . . . . . . . . . . . . . . . . . . . 3-2
FAX Automatic Reception . . . . . . . . . . . . . . . . . . . . . . . . . . . . . . . . . . . . . . . . . . . . . . . . . . . . 3-11
Cancelling Communication . . . . . . . . . . . . . . . . . . . . . . . . . . . . . . . . . . . . . . . . . . . . . . . . . . . 3-13
Using the Address Book . . . . . . . . . . . . . . . . . . . . . . . . . . . . . . . . . . . . . . . . . . . . . . . . . . . . . . 3-16
Using One-touch Keys . . . . . . . . . . . . . . . . . . . . . . . . . . . . . . . . . . . . . . . . . . . . . . . . . . . . . . . 3-28
Using the Speed Dial key . . . . . . . . . . . . . . . . . . . . . . . . . . . . . . . . . . . . . . . . . . . . . . . . . . . . . 3-31
Dialing the Same Receiving System (Redial) . . . . . . . . . . . . . . . . . . . . . . . . . . . . . . . . . . . . . 3-32
Previewing Images . . . . . . . . . . . . . . . . . . . . . . . . . . . . . . . . . . . . . . . . . . . . . . . . . . . . . . . . . . 3-33
4 FAX Operation (Advanced)
Long Originals . . . . . . . . . . . . . . . . . . . . . . . . . . . . . . . . . . . . . . . . . . . . . . . . . . . . . . . . . . . . . . 4-2
Delayed Transmission . . . . . . . . . . . . . . . . . . . . . . . . . . . . . . . . . . . . . . . . . . . . . . . . . . . . . . . . 4-3
Broadcast Transmission . . . . . . . . . . . . . . . . . . . . . . . . . . . . . . . . . . . . . . . . . . . . . . . . . . . . . . . 4-5
Standby Transmission . . . . . . . . . . . . . . . . . . . . . . . . . . . . . . . . . . . . . . . . . . . . . . . . . . . . . . . . 4-7
Interrupt Send . . . . . . . . . . . . . . . . . . . . . . . . . . . . . . . . . . . . . . . . . . . . . . . . . . . . . . . . . . . . . . 4-8
Chain Dial . . . . . . . . . . . . . . . . . . . . . . . . . . . . . . . . . . . . . . . . . . . . . . . . . . . . . . . . . . . . . . . . . . 4-9
Manual Send . . . . . . . . . . . . . . . . . . . . . . . . . . . . . . . . . . . . . . . . . . . . . . . . . . . . . . . . . . . . . . 4-11
Manual Reception . . . . . . . . . . . . . . . . . . . . . . . . . . . . . . . . . . . . . . . . . . . . . . . . . . . . . . . . . . 4-12
Remote Switch Function . . . . . . . . . . . . . . . . . . . . . . . . . . . . . . . . . . . . . . . . . . . . . . . . . . . . . 4-14
Memory Forwarding . . . . . . . . . . . . . . . . . . . . . . . . . . . . . . . . . . . . . . . . . . . . . . . . . . . . . . . . . 4-16
FAX Box Function . . . . . . . . . . . . . . . . . . . . . . . . . . . . . . . . . . . . . . . . . . . . . . . . . . . . . . . . . . 4-43
Sub Address Communication . . . . . . . . . . . . . . . . . . . . . . . . . . . . . . . . . . . . . . . . . . . . . . . . . . 4-50
Program Dial . . . . . . . . . . . . . . . . . . . . . . . . . . . . . . . . . . . . . . . . . . . . . . . . . . . . . . . . . . . . . . 4-53
Polling Communication . . . . . . . . . . . . . . . . . . . . . . . . . . . . . . . . . . . . . . . . . . . . . . . . . . . . . . 4-55
Account Management . . . . . . . . . . . . . . . . . . . . . . . . . . . . . . . . . . . . . . . . . . . . . . . . . . . . . . . 4-64
Other Convenient Functions . . . . . . . . . . . . . . . . . . . . . . . . . . . . . . . . . . . . . . . . . . . . . . . . . . 4-68
5 Checking Transmission Results and Registration Status
Various Tools for Checking Transmission Results and Registration Status . . . . . . . . . . . . . . . . 5-2
Checking FAX Job History . . . . . . . . . . . . . . . . . . . . . . . . . . . . . . . . . . . . . . . . . . . . . . . . . . . . . 5-3
Printing Administrative Reports . . . . . . . . . . . . . . . . . . . . . . . . . . . . . . . . . . . . . . . . . . . . . . . . . 5-8
Reporting FAX Receipt Result by E-mail . . . . . . . . . . . . . . . . . . . . . . . . . . . . . . . . . . . . . . . . . 5-13
Page 6

iv OPERATION GUIDE
6 Setup and Registration
FAX/TEL Auto Switch Reception . . . . . . . . . . . . . . . . . . . . . . . . . . . . . . . . . . . . . . . . . . . . . . . . 6-2
FAX/Answering Machine Auto Switch Reception . . . . . . . . . . . . . . . . . . . . . . . . . . . . . . . . . . . . 6-4
Rings . . . . . . . . . . . . . . . . . . . . . . . . . . . . . . . . . . . . . . . . . . . . . . . . . . . . . . . . . . . . . . . . . . . . . 6-7
Volume Adjustment . . . . . . . . . . . . . . . . . . . . . . . . . . . . . . . . . . . . . . . . . . . . . . . . . . . . . . . . . . 6-8
Retry Times . . . . . . . . . . . . . . . . . . . . . . . . . . . . . . . . . . . . . . . . . . . . . . . . . . . . . . . . . . . . . . . . 6-9
Receiving Mode . . . . . . . . . . . . . . . . . . . . . . . . . . . . . . . . . . . . . . . . . . . . . . . . . . . . . . . . . . . . 6-10
Reception Date/Time . . . . . . . . . . . . . . . . . . . . . . . . . . . . . . . . . . . . . . . . . . . . . . . . . . . . . . . . 6-11
Media Type for Print Output . . . . . . . . . . . . . . . . . . . . . . . . . . . . . . . . . . . . . . . . . . . . . . . . . . . 6-12
MP Tray Paper Output . . . . . . . . . . . . . . . . . . . . . . . . . . . . . . . . . . . . . . . . . . . . . . . . . . . . . . . 6-13
DRD Reception (Available for inch versions only) . . . . . . . . . . . . . . . . . . . . . . . . . . . . . . . . . . 6-14
Transmission Restriction . . . . . . . . . . . . . . . . . . . . . . . . . . . . . . . . . . . . . . . . . . . . . . . . . . . . . 6-16
Encryption . . . . . . . . . . . . . . . . . . . . . . . . . . . . . . . . . . . . . . . . . . . . . . . . . . . . . . . . . . . . . . . . 6-26
Reduced Reception . . . . . . . . . . . . . . . . . . . . . . . . . . . . . . . . . . . . . . . . . . . . . . . . . . . . . . . . . 6-31
Duplex Print Output . . . . . . . . . . . . . . . . . . . . . . . . . . . . . . . . . . . . . . . . . . . . . . . . . . . . . . . . . 6-32
2 in 1 Reception . . . . . . . . . . . . . . . . . . . . . . . . . . . . . . . . . . . . . . . . . . . . . . . . . . . . . . . . . . . . 6-33
Remote Diagnosis . . . . . . . . . . . . . . . . . . . . . . . . . . . . . . . . . . . . . . . . . . . . . . . . . . . . . . . . . . 6-34
7 Optional Equipment
FAX Backup Kit . . . . . . . . . . . . . . . . . . . . . . . . . . . . . . . . . . . . . . . . . . . . . . . . . . . . . . . . . . . . . 7-2
Dual FAX . . . . . . . . . . . . . . . . . . . . . . . . . . . . . . . . . . . . . . . . . . . . . . . . . . . . . . . . . . . . . . . . . . 7-3
8 Internet Faxing (i-FAX)
What is i-FAX? . . . . . . . . . . . . . . . . . . . . . . . . . . . . . . . . . . . . . . . . . . . . . . . . . . . . . . . . . . . . . . 8-2
i-FAX Settings . . . . . . . . . . . . . . . . . . . . . . . . . . . . . . . . . . . . . . . . . . . . . . . . . . . . . . . . . . . . . . 8-5
i-FAX Transmission . . . . . . . . . . . . . . . . . . . . . . . . . . . . . . . . . . . . . . . . . . . . . . . . . . . . . . . . . 8-10
i-FAX Reception . . . . . . . . . . . . . . . . . . . . . . . . . . . . . . . . . . . . . . . . . . . . . . . . . . . . . . . . . . . . 8-15
9 About Network FAX
What is Network FAX? . . . . . . . . . . . . . . . . . . . . . . . . . . . . . . . . . . . . . . . . . . . . . . . . . . . . . . . . 9-2
Setup . . . . . . . . . . . . . . . . . . . . . . . . . . . . . . . . . . . . . . . . . . . . . . . . . . . . . . . . . . . . . . . . . . . . . 9-4
10 Troubleshooting
Indicators During Sending/Receiving Operation . . . . . . . . . . . . . . . . . . . . . . . . . . . . . . . . . . . 10-2
Precautions When Turning Power OFF . . . . . . . . . . . . . . . . . . . . . . . . . . . . . . . . . . . . . . . . . . 10-3
Error Messages . . . . . . . . . . . . . . . . . . . . . . . . . . . . . . . . . . . . . . . . . . . . . . . . . . . . . . . . . . . . 10-4
Troubleshooting . . . . . . . . . . . . . . . . . . . . . . . . . . . . . . . . . . . . . . . . . . . . . . . . . . . . . . . . . . . . 10-6
Appendix
Character Entry Method . . . . . . . . . . . . . . . . . . . . . . . . . . . . . . . . . . . . . . . . . . . . . . . . .Appendix-2
Specifications . . . . . . . . . . . . . . . . . . . . . . . . . . . . . . . . . . . . . . . . . . . . . . . . . . . . . . . . .Appendix-5
Menu List . . . . . . . . . . . . . . . . . . . . . . . . . . . . . . . . . . . . . . . . . . . . . . . . . . . . . . . . . . . .Appendix-6
Received FAX Sizes and Paper Priority (Inch Model) . . . . . . . . . . . . . . . . . . . . . . . . . .Appendix-9
Received FAX Sizes and Paper Priority (Metric Model) . . . . . . . . . . . . . . . . . . . . . . . .Appendix-12
Error Code List . . . . . . . . . . . . . . . . . . . . . . . . . . . . . . . . . . . . . . . . . . . . . . . . . . . . . . .Appendix-15
Page 7
OPERATION GUIDE v
Safety Information
About this Operation Guide
This Operation Guide contains information on using the facsimile functions
of this machine. Please read the Operation Guide before you start using
the machine. Keep it close to the machine for easy reference.
During use, refer to the Operation Guide for your machine for information
regarding the sections listed below.
Installation Precautions
Environment
Avoid installing this machine in locations where the top or upper rear
portion of the unit will be exposed to direct sunlight. Such conditions might
adversely effect the unit’s ability to detect the correct size of originals and
documents. When such a location cannot be avoided, change the direction
the unit is facing in order to eliminate exposure to direct sunlight.
Power supply/Grounding the machine
Do not connect this machine to the same outlet as an air conditioner or
copier, etc.
Precautions for Use
CAUTION
Do not leave the document processor open as there is a danger of
personal injury.
Other precautions
Do not open the front cover or left cover, turn off the main power switch, or
pull out the power plug while transmitting, receiving, or copying.
• Caution Labels
• Installation Precautions
• Precautions for Use
• Loading Paper
• Toner Container and Waste Toner
Box Replacement
• Clearing Paper Jams
• Solving Malfunctions
• Cleaning
Page 8

vi OPERATION GUIDE
This machine may only be used within the country of purchase due to the
different safety and communication standards in each country.
(International communication standards, however, make the
communication between countries possible.)
This machine may be inoperable in areas with poor telephone lines or
communication conditions.
‘CALL WAITING’ or other telephone company optional services that
produce audible tones or clicks on the line can disrupt or cause termination
of facsimile communications.
No matter what the status of the unit, if the sound of the motor within the
unit is audible, never open either the front cover or the left cover, nor turn
off the main power switch.
Using the optional FAX Backup Kit allows you to store fax reception data
from your HDD (hard disk drive) onto the FAX Backup Kit, ensuring that
you do not lose any data.
Page 9

OPERATION GUIDE vii
General Notice
Legal Notice
WE SHALL HAVE NO LIABILITY FOR LOSS, WHETHER OR PARTIAL,
OF RECEIVED DOCUMENTS WHEN SUCH LOSS IS CAUSED BY
DAMAGES TO THE FAX SYSTEM, MALFUNCTIONS, MISUSE, OR
EXTERNAL FACTORS SUCH AS POWER OUTAGES; OR FOR PURELY
ECONOMIC LOSSES OR LOST PROFITS RESULTING FROM MISSED
OPPORTUNITIES ATTRIBUTABLE TO MISSED CALLS OR RECORDED
MESSAGES RESULTING THEREFROM.
Trademark Information
• Microsoft, Windows, Windows NT, and Internet Explorer are registered
trademarks of Microsoft Corporation in the U.S. and other countries.
• Windows ME and Windows XP are trademarks of Microsoft
Corporation.
• Ethernet is a registered trademark of Xerox Corporation.
• IBM and IBM PC-AT are trademarks of International Business
Machines Corporation.
• Adobe and Acrobat are registered trademarks of Adobe Systems
Incorporated.
All other company and product names in this Operation Guide are
trademarks or registered trademarks of their respective companies. The
designations™ and ® are omitted in this guide.
Page 10

viii OPERATION GUIDE
Declarations to European Directives
DECLARATION OF CONFORMITY TO 2004/108/EC, 2006/95/EEC, 93/
68/EEC and 1999/5/EC
We declare under our sole responsibility that the product to which this
declaration relates is in conformity with the following specifications.
Limits and methods of measurement for immunity
characteristics of information technology equipment
EN55024
Limits and methods of measurement for radio
interference characteristics of information
technology equipment
EN55022 Class B
Limits for harmonic currents emissions for
equipment input current 16A per phase
EN61000-3-2
Limitation of voltage fluctuations and flicker in lowvoltage supply systems for equipment with rated
current 16A
EN61000-3-3
Safety of information technology equipment,
including electrical business equipment
EN60950-1
The common technical regulation for the attachment
requirements for connection to the analogue public
switched telephone networks (PSTNs) of terminal
equipment (excluding terminal equipment supporting
the voice telephony justified case service) in which
network addressing, if provided, is by means of dual
tone multi-frequency (DTMF) signaling
CTR 21
Page 11

OPERATION GUIDE ix
Technical regulations for terminal equipment
This terminal equipment complies with:
• TBR21 • DE 08R00 National AN for D
• AN 01R00 AN for P • DE 09R00 National AN for D
• AN 02R01 AN for CH and N • DE 12R00 National AN for D
• AN 05R01 AN for D, E, GR, P and N • DE 14R00 National AN for D
• AN 06R00 AN for D, GR and P • ES 01R01 National AN for E
• AN 07R01 AN for D, E, P and N • GR 01R00 National AN for GR
• AN 09R00 AN for D • GR 03R00 National AN for GR
• AN 10R00 AN for D • GR 04R00 National AN for GR
• AN 11R00 AN for P • NO 01R00 National AN for N
• AN 12R00 AN for E • NO 02R00 National AN for N
• AN 16R00 General Advisory Note • P 03R00 National AN for P
• DE 03R00 National AN for D • P 04R00 National AN for P
• DE 04R00 National AN for D • P 08R00 National AN for P
• DE 05R00 National AN for D
Page 12

x OPERATION GUIDE
Network Compatibility Declaration
The manufacturer declares that the equipment has been designed to
operate in the public switched telephone networks (PSTN) in the following
countries:
Austria Germany Liechtenstein Slovakia
Belgium Greece Lithuania Slovenia
Cyprus Hungary Luxembourg Spain
Czech Iceland Malta Sweden
Denmark Ireland Norway Switzerland
Estonia Italy Poland The Netherlands
Finland Latvia Portugal United Kingdom
France
Page 13

OPERATION GUIDE xi
Introduction
About This Guide
This guide consists of the following chapters.
Chapter 1 - Part Names and Functions
Explains the parts of the machine and keys on the operation panel.
Chapter 2 - Preparation Before Use
Explains the settings required before using fax.
Chapter 3 - FAX Operation (Basic)
Explains general usage of the fax function such as sending originals and
receiving originals.
Chapter 4 - FAX Operation (Advanced)
Explains convenient fax functions such as setting the transmission time,
continuous sending of the same originals to multiple recipients and
scheduling the next transmission. Also explains advanced fax
communication such as limiting the destinations and systems from which
you receive originals, as well as forwarding, saving, and printing the
received originals for each requirement. Furthermore, explains sub
address communication functions of the machine that are compatible with
other makers’ systems and job accounting functions convenient for
checking the communication status of fax.
Chapter 5 - Checking Transmission Results and Registration Status
Explains how to check the status of recent transmissions on the touch
panel. Also, explains how to print administrative reports to check
communication results and settings and registration status of the machine.
Chapter 6 - Setup and Registration
Explains various settings and registration pertaining to functions, such as
adjusting the volume of the alarm sound.
Chapter 7 - Optional Equipment
Introduces the optional FAX Backup Kit and Dual FAX and explains how to
use the machine when optional features are installed.
Chapter 8 - Internet Faxing (i-FAX)
Explains how to use the i-FAX function and the settings required for
Internet faxing.
Page 14

xii OPERATION GUIDE
Chapter 9 - About Network FAX
Explains how to use Network FAX functions. Read the Network FAX Driver
Operation Guide in the included CD-ROM (online manual) as well.
Chapter 10 - Troubleshooting
Explains how to respond to error indications and trouble.
Appendix
Explains character entry and the specifications of the machine.
NOTE: This Operation Guide contains information for using both the inch
and metric versions of this machine.
The inch version of this machine is shown in the screens in this guide. If
you are using the metric version, you should use the messages provided
for the inch version as reference only.
Page 15
OPERATION GUIDE xiii
Conventions in This Guide
The following conventions are used depending on the nature of the
description.
Description of Operation Procedure
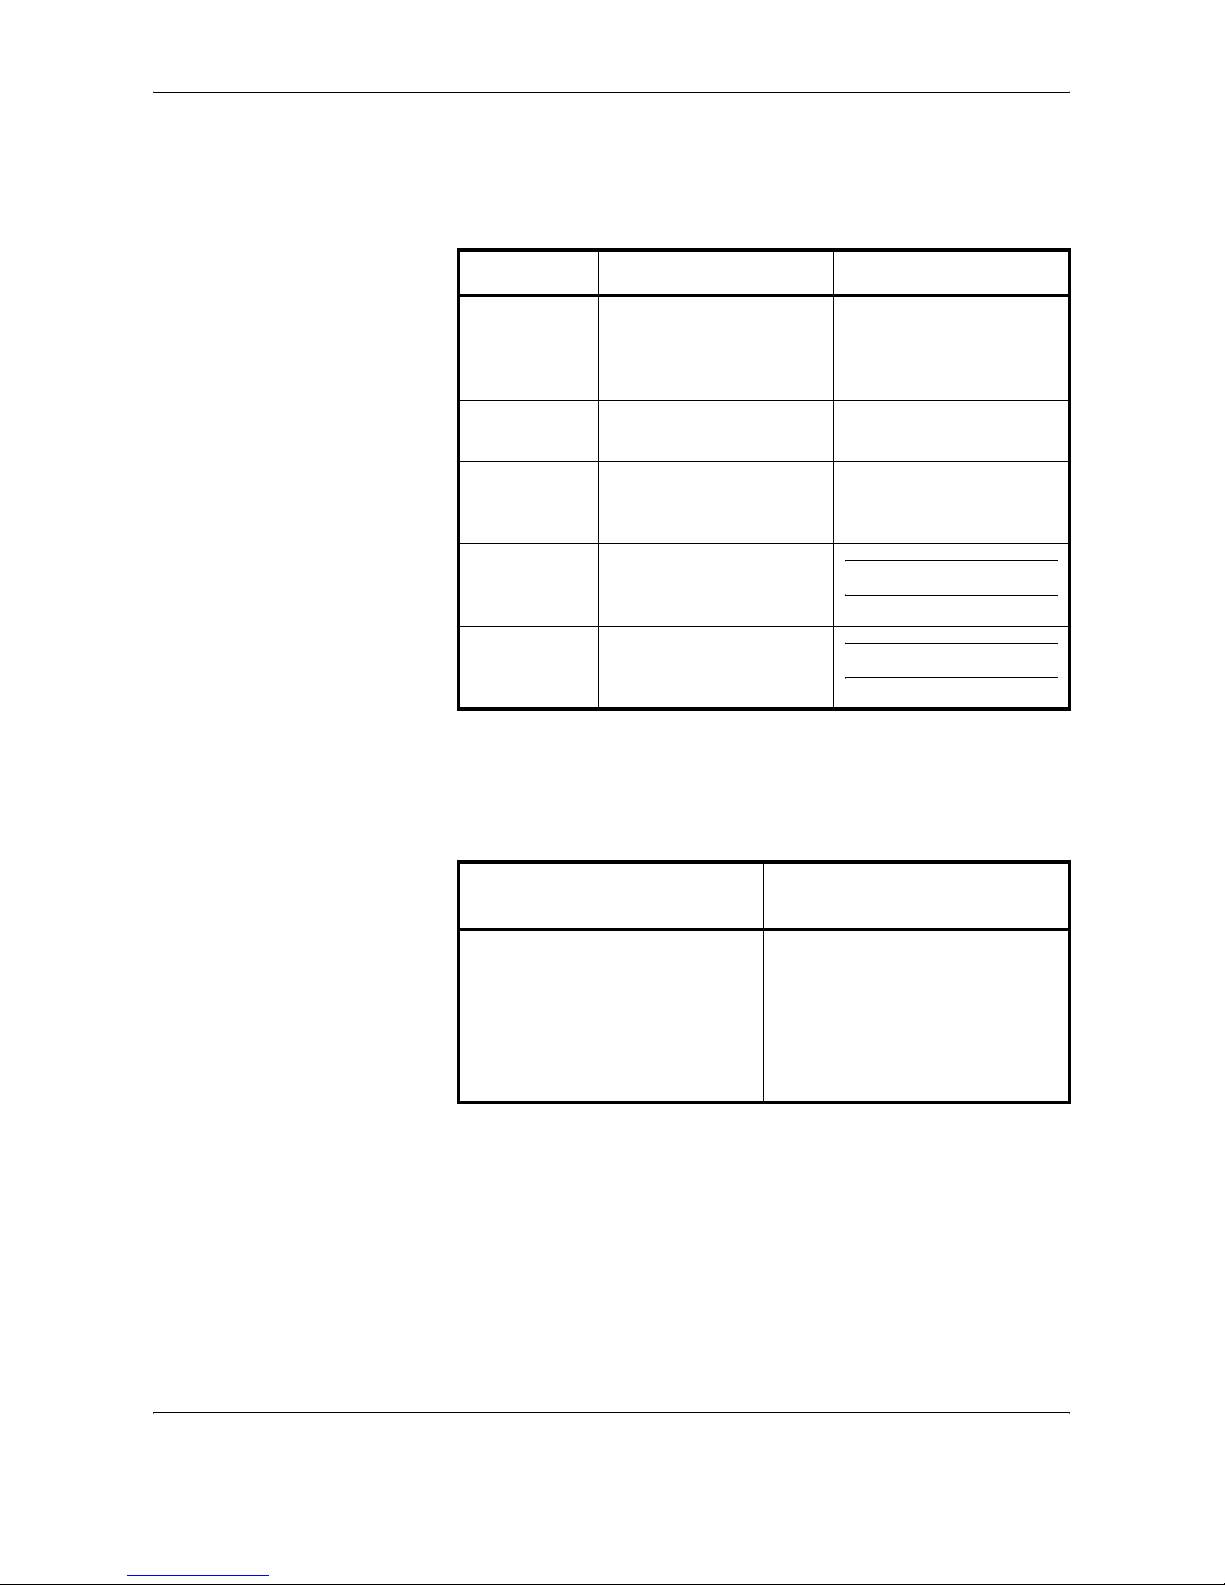
In this Operation Guide, the continuous operation of the keys on the touch
panel is as follows:
Convention Description Example
Bold Indicates the operation
panel keys, the buttons
and messages displayed
on the PC screen.
Press the Start key.
[Regular] Indicates the touch panel
keys.
Press [OK].
Italic Indicates the messages
displayed on the touch
panel.
Ready to copy is
displayed.
Note Indicates supplemental
information or operations
for reference.
NOTE: —
Important Indicates items that are
required or prohibited so
as to avoid problems.
IMPORTANT: —
Actual procedure
Description in this
Operation Guide
Press [FAX/i-FAX].
T
Press [Next] of Transmission.
T
Press [Next] of FAX .
T
Press [Change] of TTI.
Press [FAX/i-FAX], [Next] of
Transmission, [Next] of FA X, and
then [Change] of TTI.
Page 16
xiv OPERATION GUIDE
Originals and Paper Sizes
This section explains the notation used in this guide when referring to sizes
of originals or paper sizes.
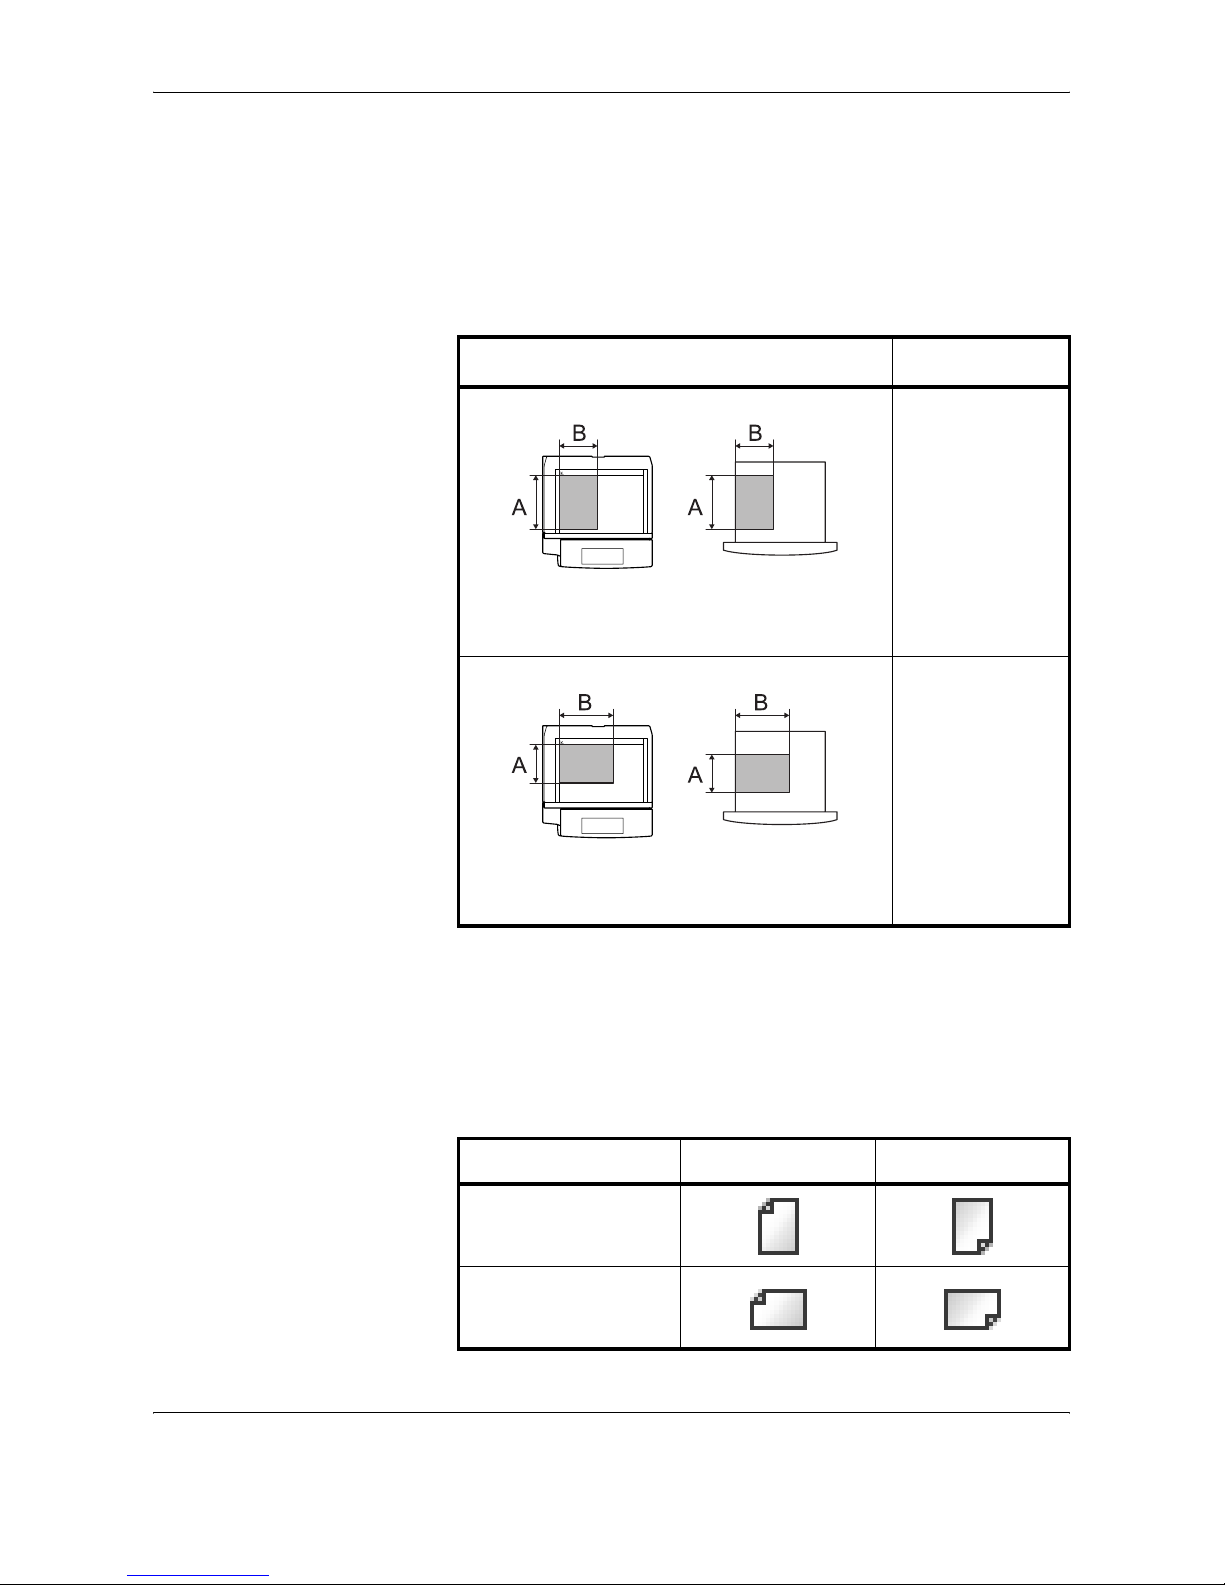
As with A4, B5 and Letter, which may be used either in the horizontal or
vertical direction, horizontal direction is indicated by an additional letter R
in order to indicate the orientation of the originals/paper.
Icons on the Touch Panel
The following icons are used to indicate originals and paper placement
directions on the touch panel.
Placement direction
Indicated size
†
†. The size of the originals/paper that can be used depends on the
function and source tray. For details, refer to the appropriate pages
of the function or source tray.
Vertical direction
For the originals/paper, dimension A is longer
than B.
A4, B5, A5, B6,
A6, Letter,
Statement
Horizontal direction
For the originals/paper, dimension A is shorter
than B.
A4-R, B5-R, A5-R,
B6-R, A6-R,
Letter-R,
Statement-R
Original Paper
Original Paper
Placement direction Originals Paper
Vertical direction
Horizontal direction
Page 17

OPERATION GUIDE 1-1
1
Part Names and Functions
This chapter explains the names of parts when the machine is
used as a fax machine after installing the FAX kit.
For other parts, refer to the machine’s Operation Guide.
• Machine........................................................................ 1-2
• Operation Panel ........................................................... 1-4
• Touch Panel.................................................................. 1-7
Page 18
Part Names and Functions
1-2 OPERATION GUIDE
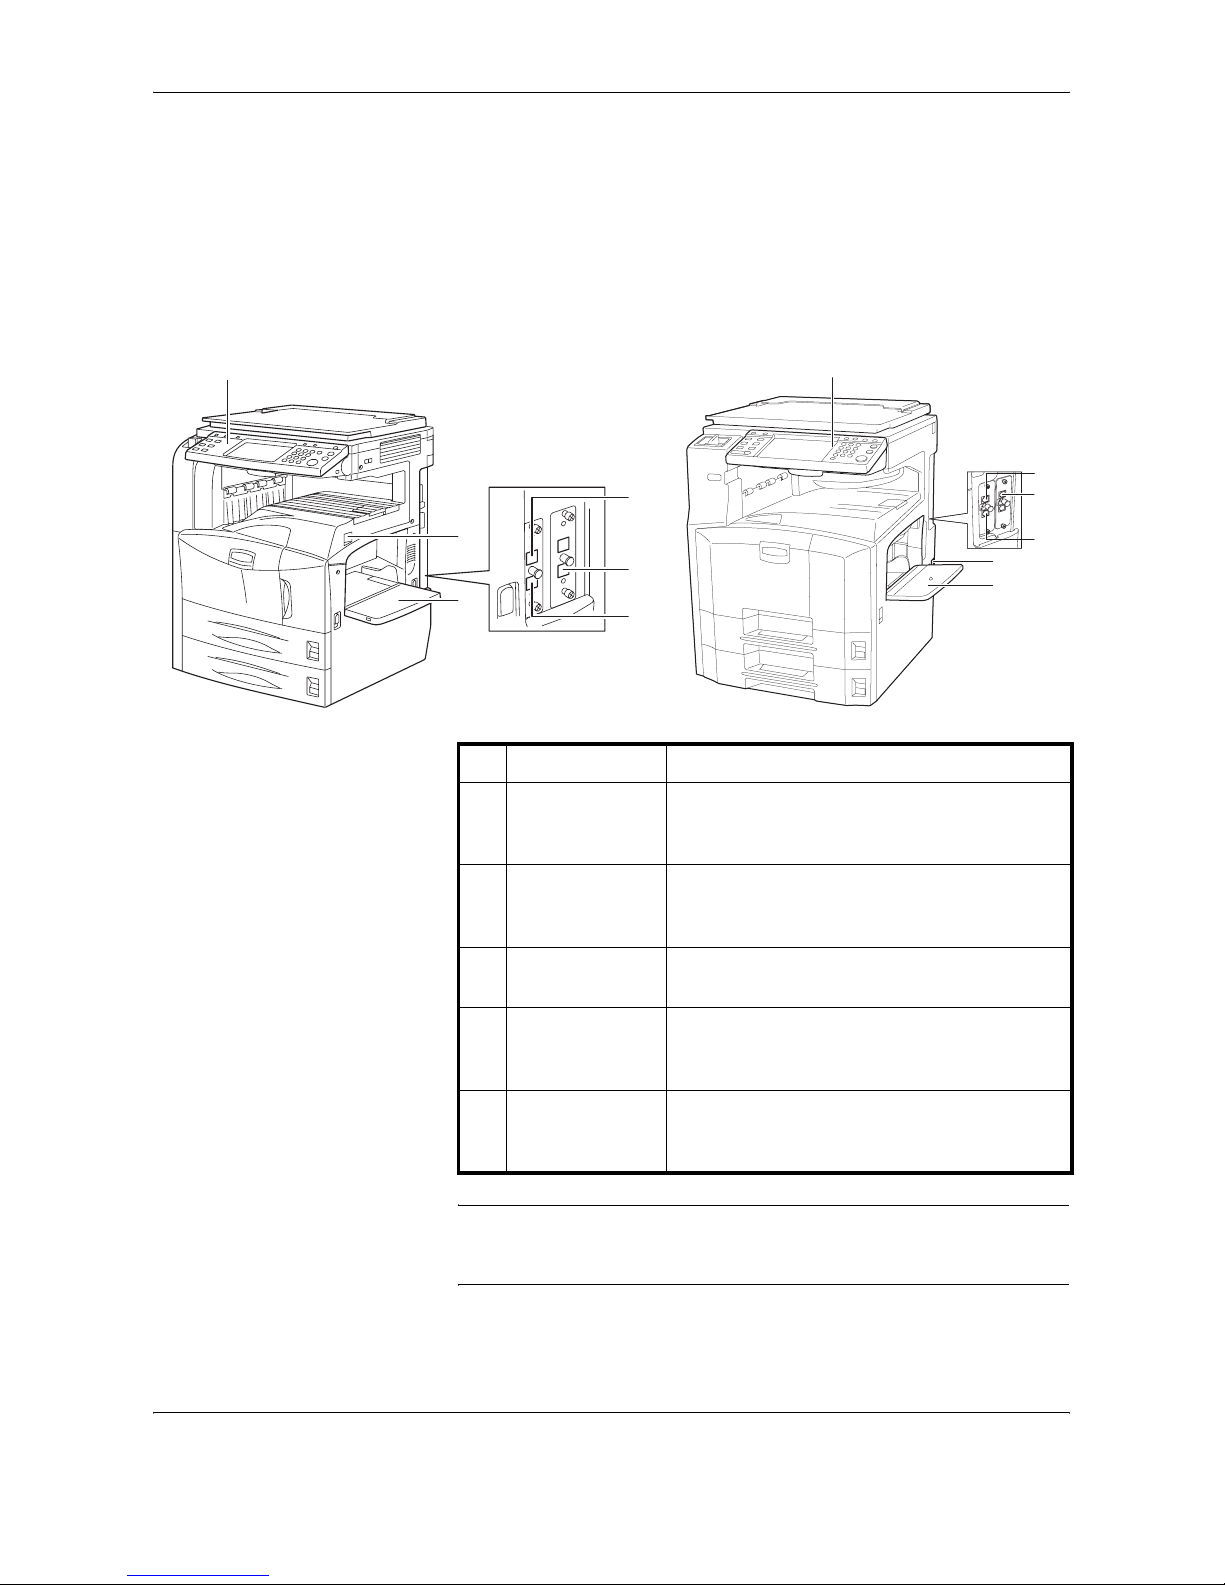
Machine
This chapter explains the names of parts when the machine is used as a
fax machine.
For the parts required when functions other than FAX are used, refer to the
machine’s Operation Guide.
IMPORTANT: You cannot automatically receive a fax when the main
power switch is turned off. To receive faxes with the power turned off,
press the Power key on the operation panel.
2
3
6
4
11
2
3
6
4
5
5
30/40/50 ppm model 25 ppm model
1 Operation panel Perform the fax operation with this panel.
2 Main power
switch
Set this switch to the ON (|) side when
performing the fax or copier operation. The
touch panel lights to enable operation.
3 MP (Multi
Purpose) tray
Set the paper in this tray when using a type of
paper other than the cassette (e.g., when
using special paper).
4 LINE connector
(L1)
Connect the modular cord for the telephone
line to this connector. This connector is Port 1.
5 LINE connector
(L2)
If you install the Dual FAX option, you can use
Port 2. Connect the modular cord for the
telephone line to this connector.
6 TEL connector
(T1)
When using a commercially available
telephone set, connect the modular cord to
this connector.
Page 19
Part Names and Functions
OPERATION GUIDE 1-3
1
Document Processor (optional)
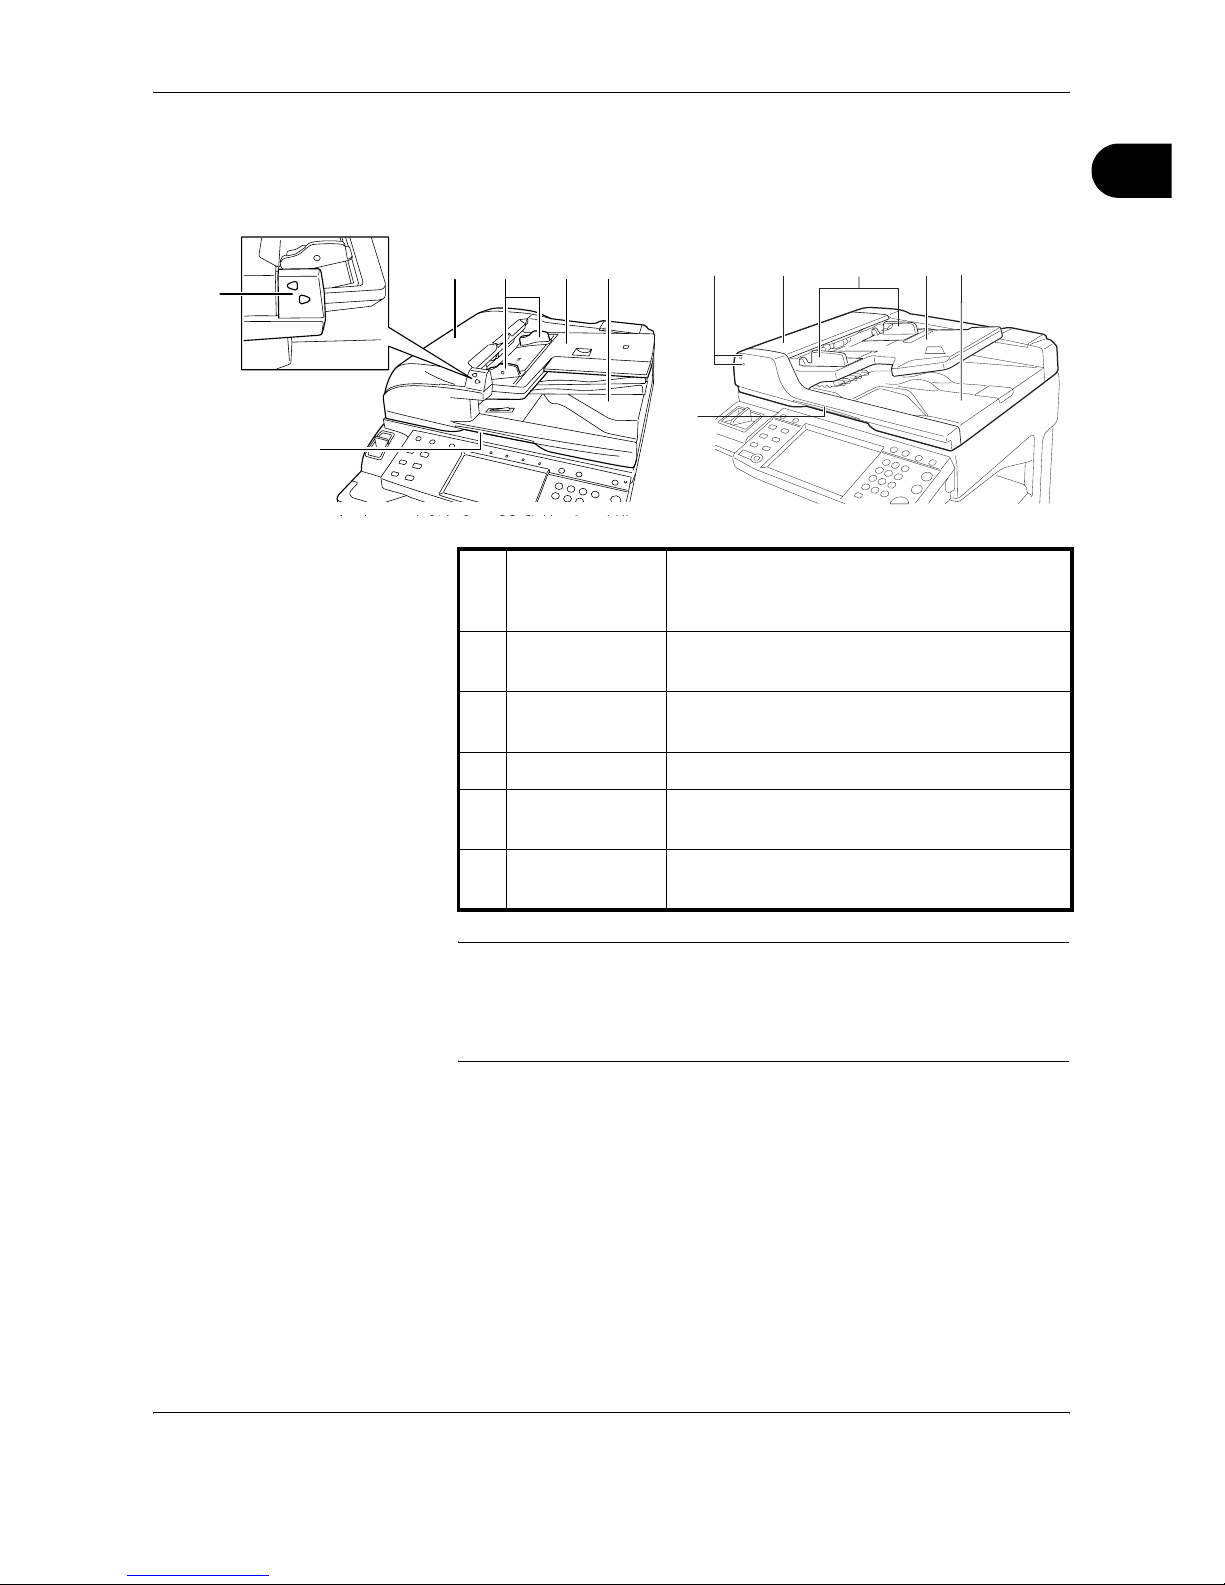
NOTE: The Original placement indicator shows the original status.
Upper indicator is lit in green: Originals are set correctly.
Upper indicator is blinking in green: Place the originals correctly.
Lower indicator is blinking in red: The original jammed.
910 1112
8
13
8
9
10
11
12
13
30/40/50 ppm model 25 ppm model
8Original
placement
indicator
Indicates the original status in the Document
Processor. The upper indicator lights in green
when the original is correctly set.
9 Top cover Open this cover when the original jammed in
the Document Processor.
10 Original width
guides
Adjust these guides according to the original
width.
11 Original table Stack the sheet originals on this table.
12 Original eject
table
Read originals are ejected onto this table.
13 Opening handle Hold this handle when opening or closing the
Document Processor.
Page 20
Part Names and Functions
1-4 OPERATION GUIDE
Operation Panel
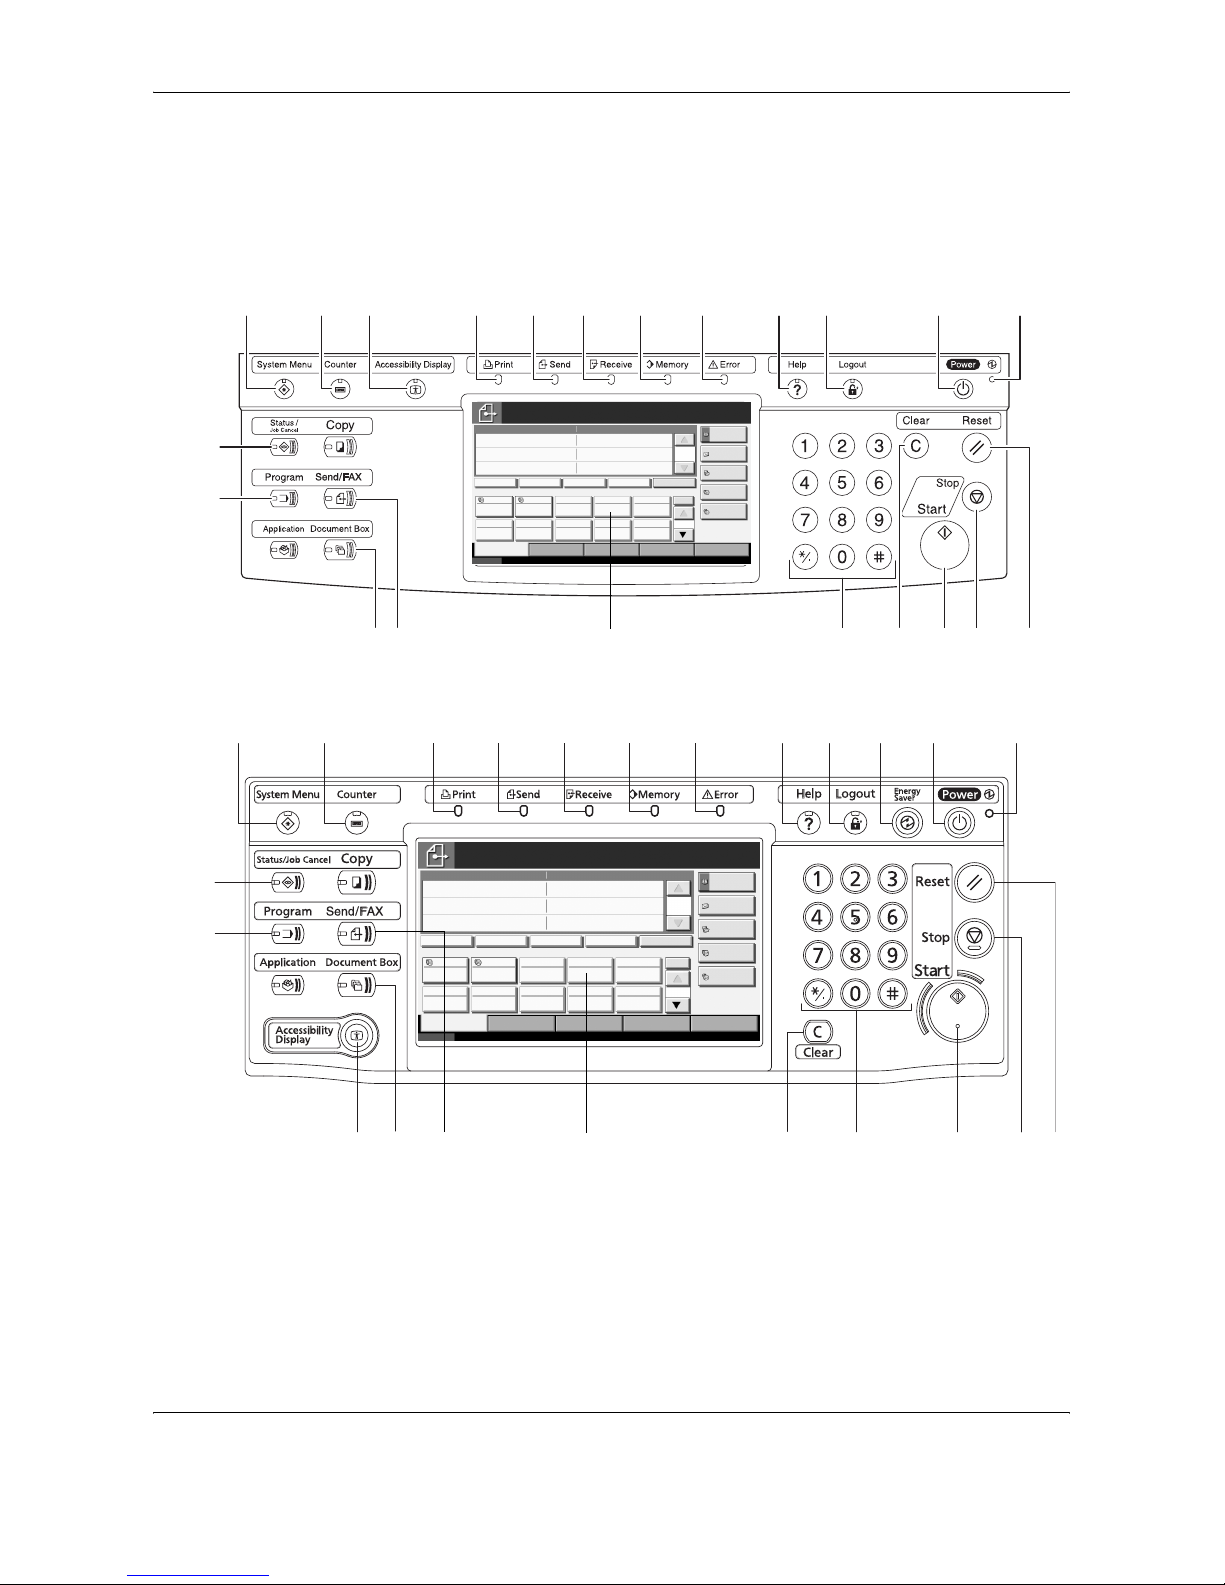
For the names of keys and indicators required when functions other than
FAX are used, refer to the machine’s Operation Guide.
30/40/50 ppm model
25 ppm model
Status
10/10/2007 10:00
Enter Destination.
Ready to send.
Destination
Destination
Detail
Address Book
FAX No.
Entry
Folder Path
Entry
E-mail
Addr Entry
Chain Detail/Edit Delete Recall
Destination Quick Setup Type of Original/
Transmission
Color/Image Advanced
Setup
No.
0
1/1
1/10
001 002 003 004 005
006 007 008 009 010
Free
A OFFICE
i-FAX
Addr Entry
OnHook
215 3 4 5 9 11 1267
16 17
13
21 2220 19 23
14
81
18
24
9
11 1267
16 17
13
222120 23
14
8135 10
19
15
Status
10/10/2007 10:00
Enter Destinat ion.
Ready to send.
Dest inat ion
Dest inat ion
Detail
Addres s Book
FAX No.
Entry
Folder Path
Entry
E-ma il
Addr Ent ry
Chain Detail/Edit Delete Recall
Destination Quick Setup Type of Original/
Transmission
Color/Image Advanced
Setup
No.
0
1/1
1/10
001 002 003 004 005
006 007 008 009 010
Free
A OFFICE
i-FAX
Addr Ent ry
On Hook
18
Page 21
Part Names and Functions
OPERATION GUIDE 1-5
1
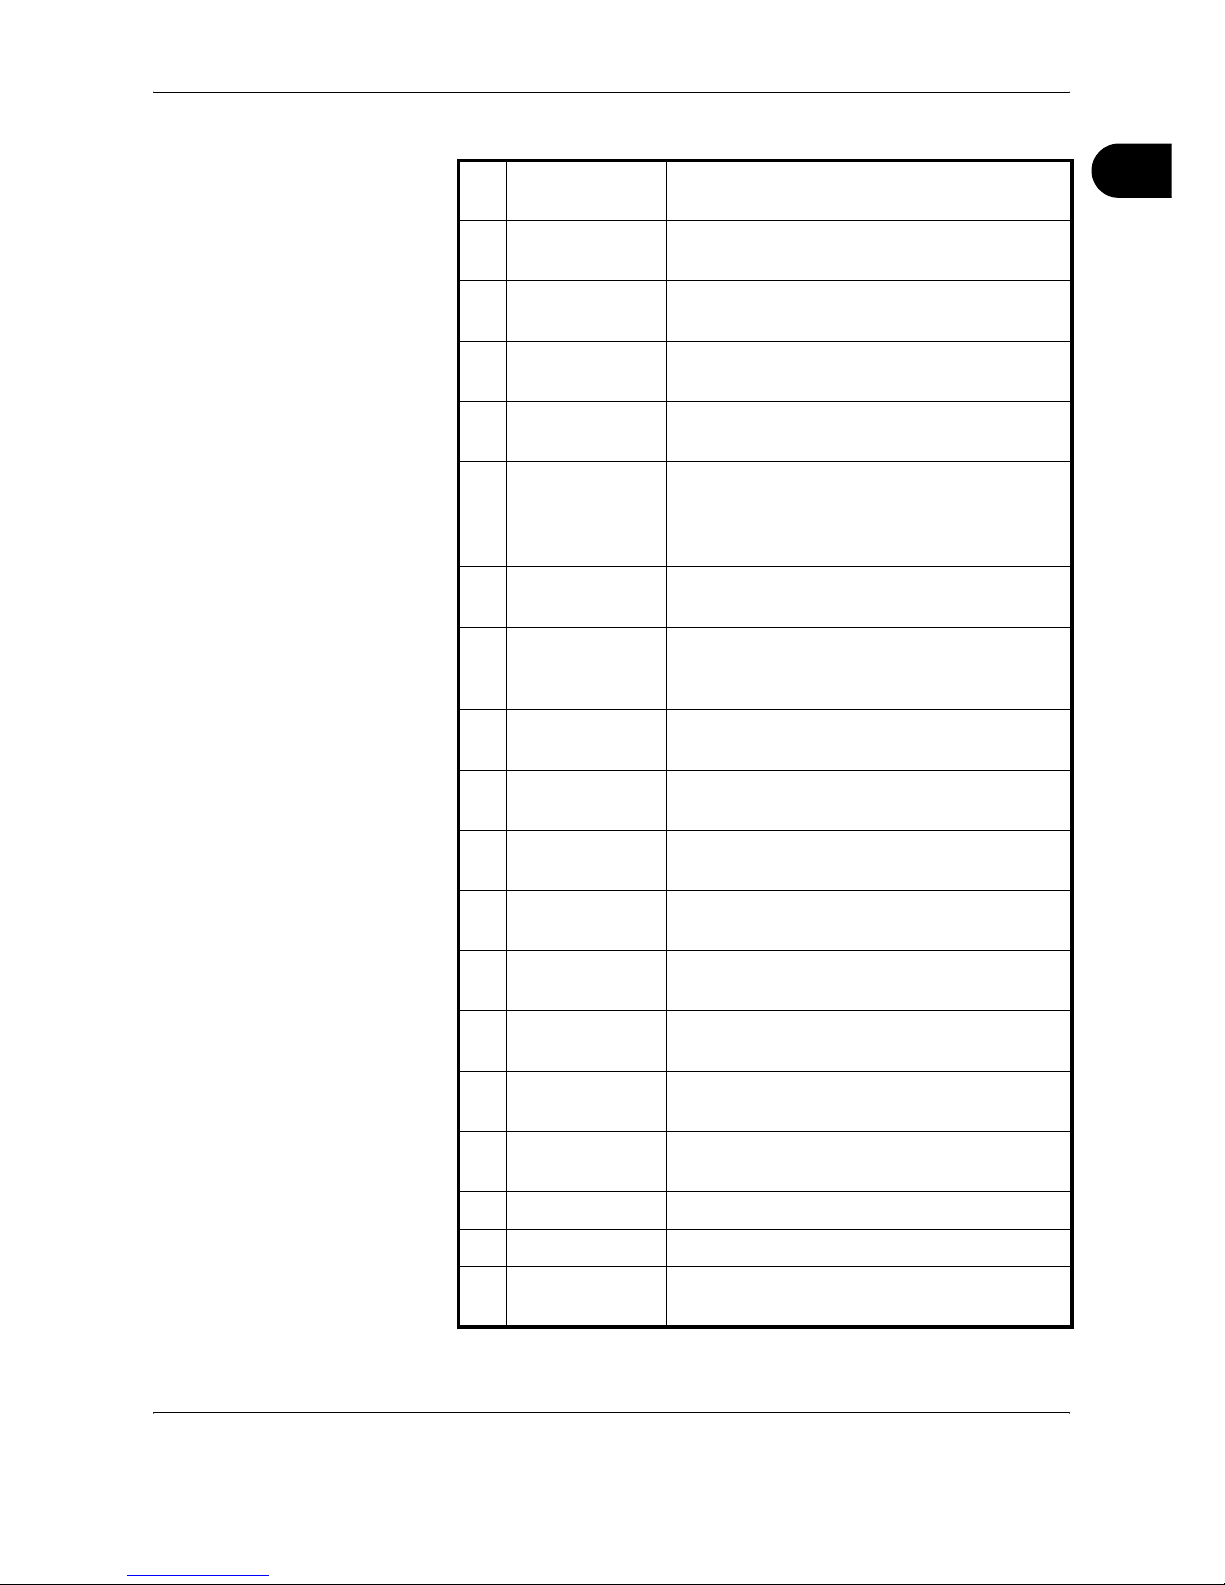
1 System Menu
key
Press this key when operating the System
Menu.
2 Counter key Press this key when checking the number of
copies to print or number of originals to read.
3 Print indicator The Print indicator blinks when the machine is
printing.
4 Send indicator The Send indicator blinks when the machine
is sending a fax.
5 Receive
indicator
The Receive indicator blinks when the
machine is receiving a fax.
6 Memory
indicator
The Memory indicator blinks when the
machine is accessing to the hard disk, FAX
memory, optional FAX Backup kit, or USB
memory (generally available product).
7 Error indicator The Error indicator blinks when an error
occurs and the job stops.
8 Help key Press this key when you are not sure how to
use the machine.
The Help screen will appear.
9 Logout key Press this key to terminate (log out) of the
Account management screen.
10 Energy Saver
key
Press this key to place the machine in the low
power mode.
11 Power key Press this key to place the machine in the
sleep mode or to turn off the main power.
12 Main power
indicator
The Main power indicator lights when the
main power of the machine is turned ON.
13 Status/Job
Cancel key
Press this key to check the send status or job
log, or to stop the current job.
14 Program key Press this key to program transmission
contents.
15 Accessibility
Display key
Press this key to enlarge the touch panel
display.
16 Document Box
key
Press this key to use the FAX Box.
17 Send/FAX key Press this key to use the machine as FAX.
18 Touch panel Touch the touch panel to operate the FAX.
19 Clear key Press this key to clear entered destination,
number, or text.
Page 22
Part Names and Functions
1-6 OPERATION GUIDE
20 Numeric keys Use these keys when entering the destination
number of sub addresses.
21 Start key Press this key to start sending a FAX or
reading an original.
22 Stop key Press this key to stop direct transmission or
reading an original.
23 Reset key Press this key to reset the settings.
Page 23
Part Names and Functions
OPERATION GUIDE 1-7
1
Touch Panel
For the screens required when functions other than FAX are used, refer to
the machine’s Operation Guide.
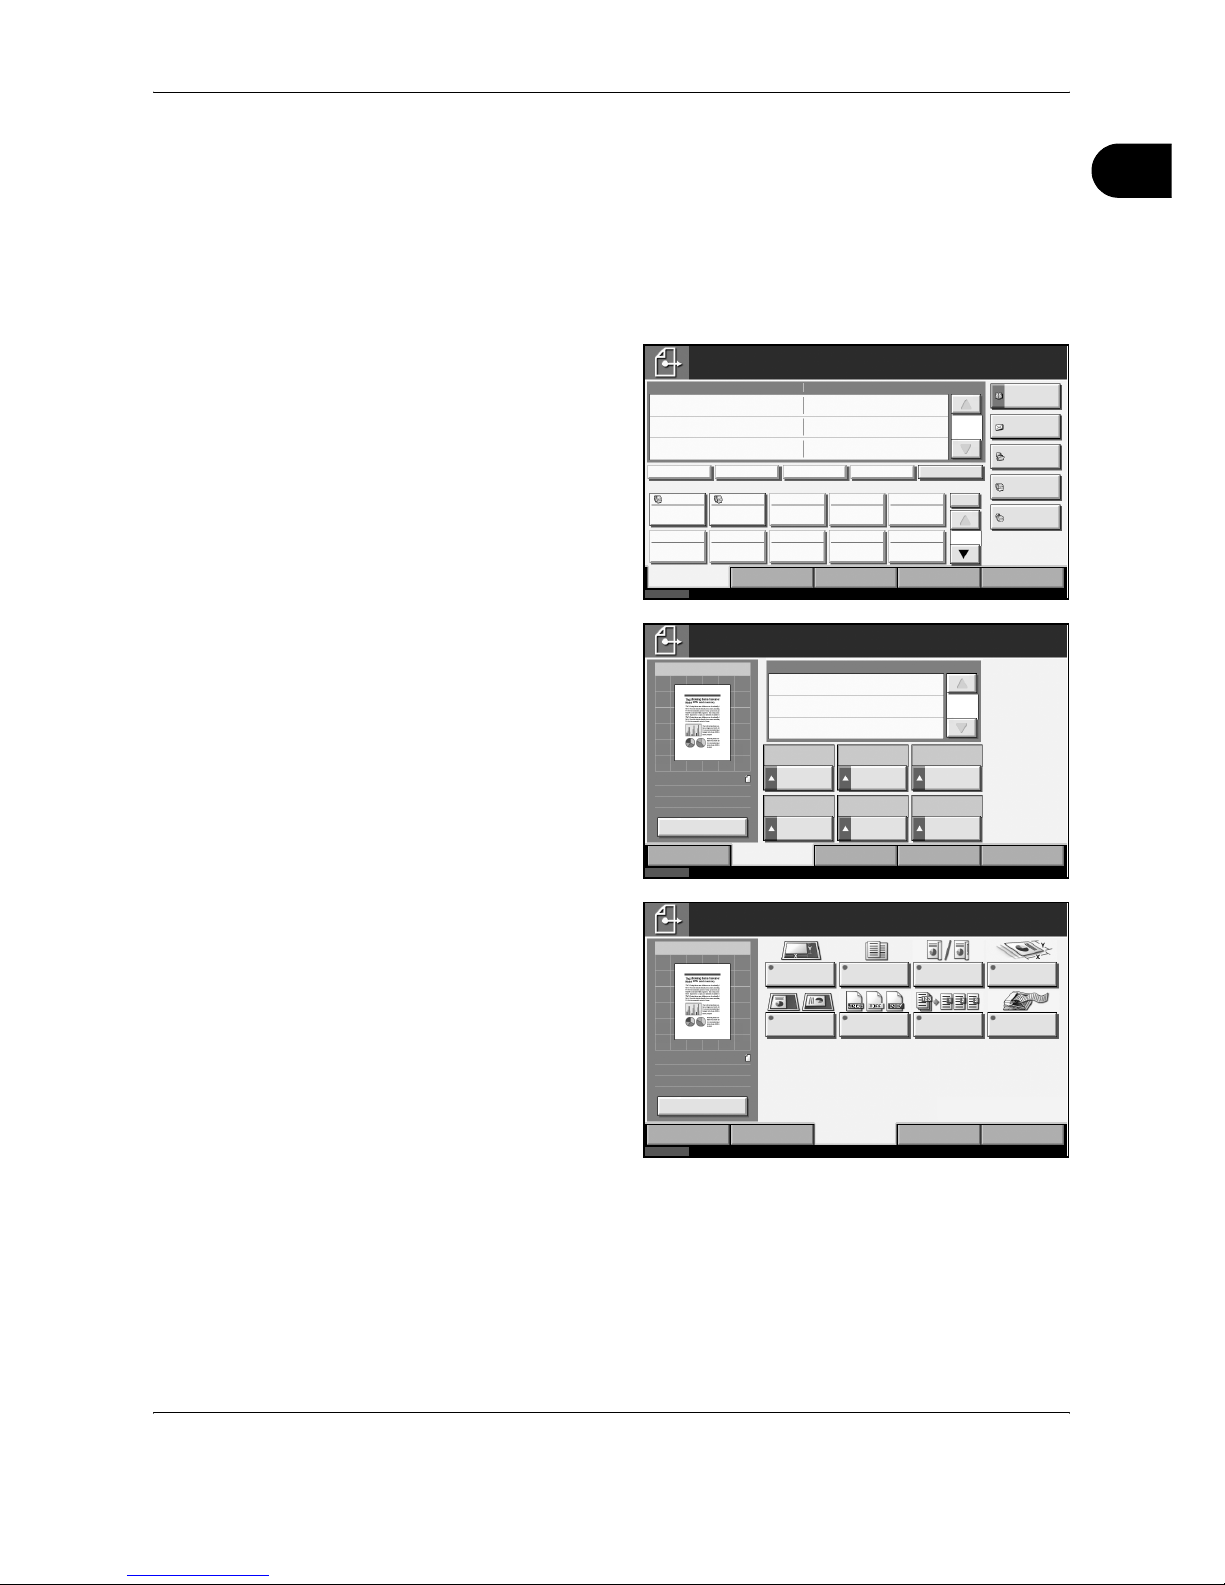
Send Screen
Appears when pressing the Send/FAX key.
1
[Destination] screen
2
[Quick Setup] screen
3
[Type of Original/
Transmission]
screen
Status
10/10/2007 10:00
Enter Destination.
Ready to send.
Destination
Destination
Detai l
Addres s B ook
FAX No.
Entr y
Folder Path
Entr y
E-mail
Addr Entry
Chain Det ail/Edit Delete Recall
Destination Quick Setup Type of Original/
Transmission
Color/Im age Advanced
Setup
No.
0
1/1
1/10
001 002 003 004 005
006 007 008 009 010
Free
A OFFIC E
i-FAX
Addr Entry
On Hook
Status
10/10/2007 10:00
Enter Destination.
Color/Im age Advanced
Setup
Type of Original/
Transmission
Ready to send.
Original
Zoom
Send
Sending Im age
Destination
Quick SetupDestination
Destination
100 % Normal 0 200 x200 dpi
Fine
1-s ided T ext+Phot o Monoc hrome
Zoom Dens ity Sca n
Resolution
2-s ided/Boo k
Original
Original
Image
Color
Selection
0
:
:
:
1/1
Change Setting
100%
Letter
Letter
Status
10/10/2007 10:00
Enter Destination.
Color/Image
Advanced
Setup
Type of Original/
Transmission
Ready to send.
Original
Zoom
Send
Sending Im age
Destination
Quick SetupDestination
Original
Siz e
Mixed Sized
Originals
2- sided/ Book
Original
Sending Si ze
Original
Orientation
File Format File
Separat ion
Long
Original
0
100%
Letter
:
:
:
Letter
Previ ew
Page 24
Part Names and Functions
1-8 OPERATION GUIDE
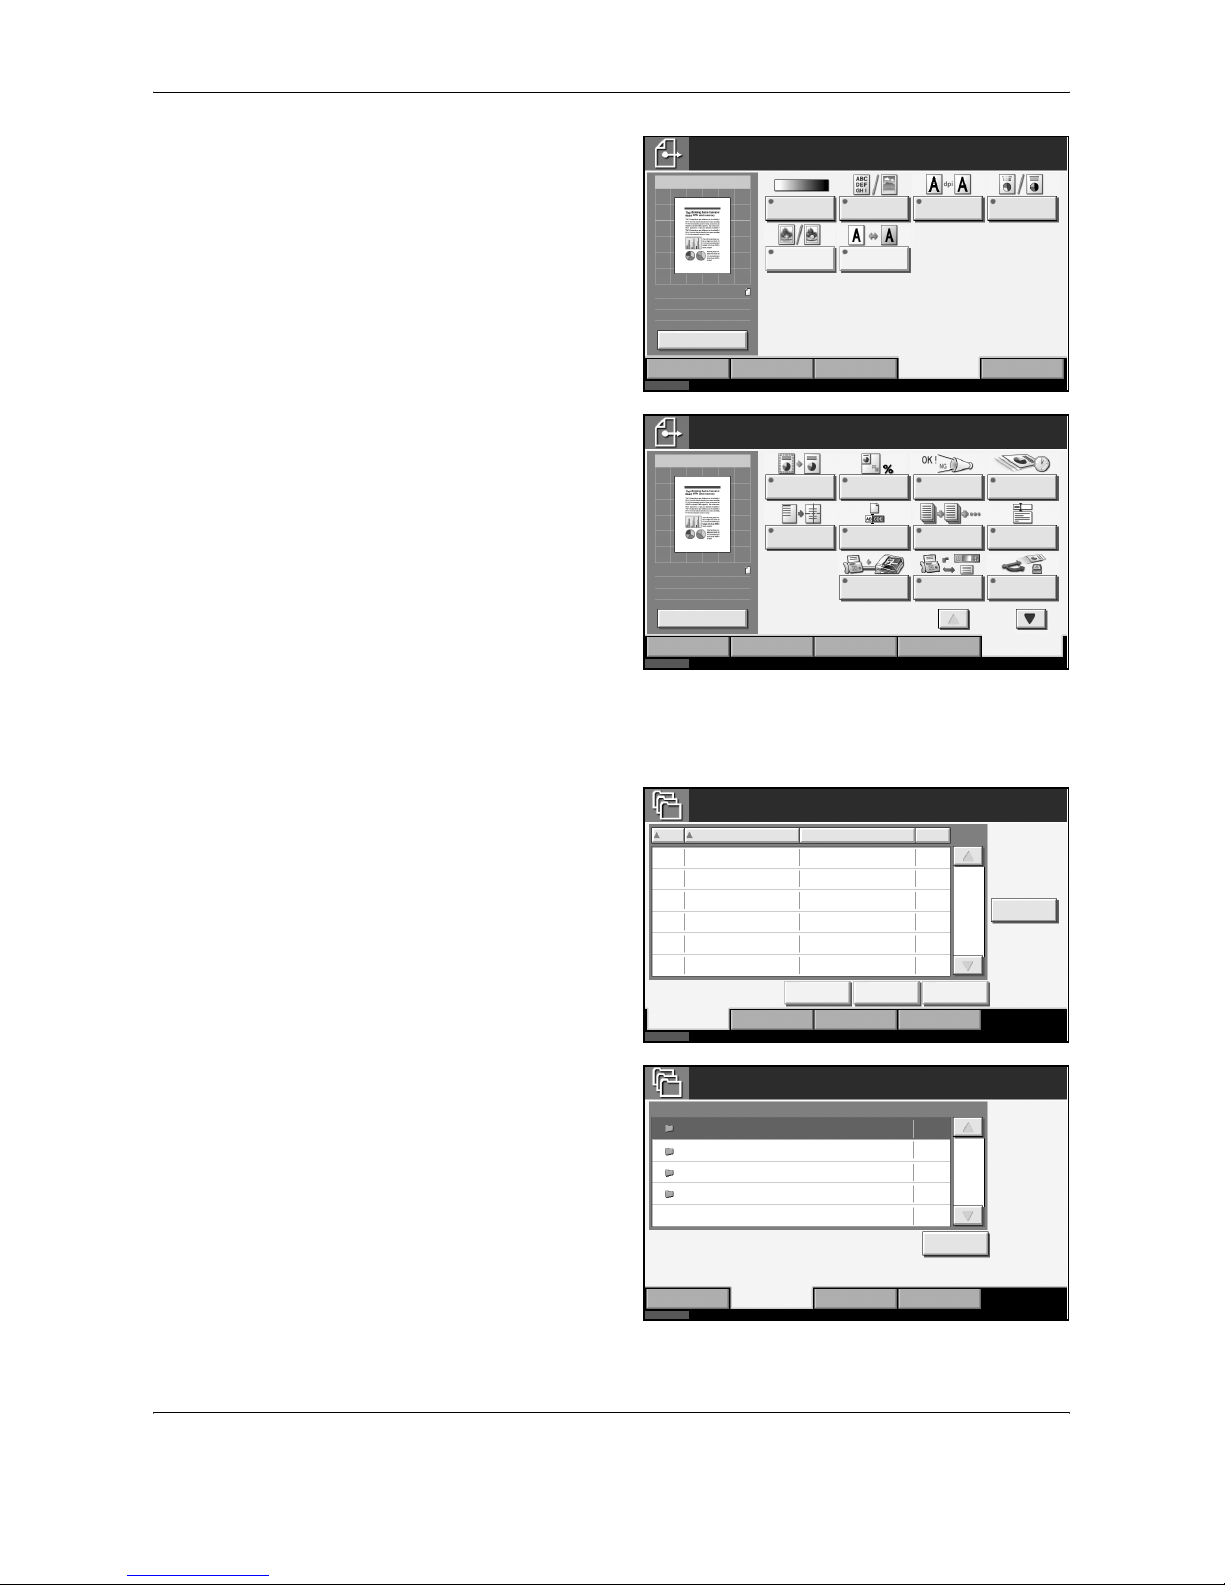
4
[Color/Image]
screen
5
[Advanced Setup]
screen
Document Box Screen
Appears when pressing the Document Box key.
1
[Custom Box] screen
2
[Job Box] screen
Status
10/10/2007 10:00
Enter Destination.
Color/Im age Advanced
Setup
Type of Original/
Transmission
Ready to send.
Original
Zoom
Send
Sending Im age
Destination
Quick SetupDestination
Densi ty Ori ginal
Image
Scan
Resolution
Color
Selection
Sharpness B ackground
Densi ty Adj.
0
:
::100%
Letter
Letter
Change Setting
Status
10/10/2007 10:00
Enter Destination.
Color/Im age Advanced
Setup
Type ofOriginal/
Transmission
Ready to send.
Original
Zoom
Send
Sending Ima ge
Destination
Quick SetupDestination
Border Erase Zoom JobFinish
Notic e
FAX Delayed
Transmission
Centering File Name
Entr y
Cont inuous
Scan
E-m ail
Subject /B ody
FAX Direc t
Transmission
0
100%
Letter
:
:
:
Letter
Previ ew
FAX
Polling RX
Send and
Print
1/2
Status
10/10/2007 10:00
FAX B oxRemovable Memory
Custom Box
No.
Job BoxCustom Box
Edit Box
Store File Detail Open
Box Name Owner
Use(%)
1/1
Status 10/10/2007 10:00
FAX B oxRemovable Memory
Job Box
Job BoxCustom Box
Open
Box Name
Quic k Copy/Proof and Hold
Repeat Copy
Form for Form Overlay(Copy)
Priv ate Print /Stored Job
Files
0
0
0
0
Page 25
Part Names and Functions
OPERATION GUIDE 1-9
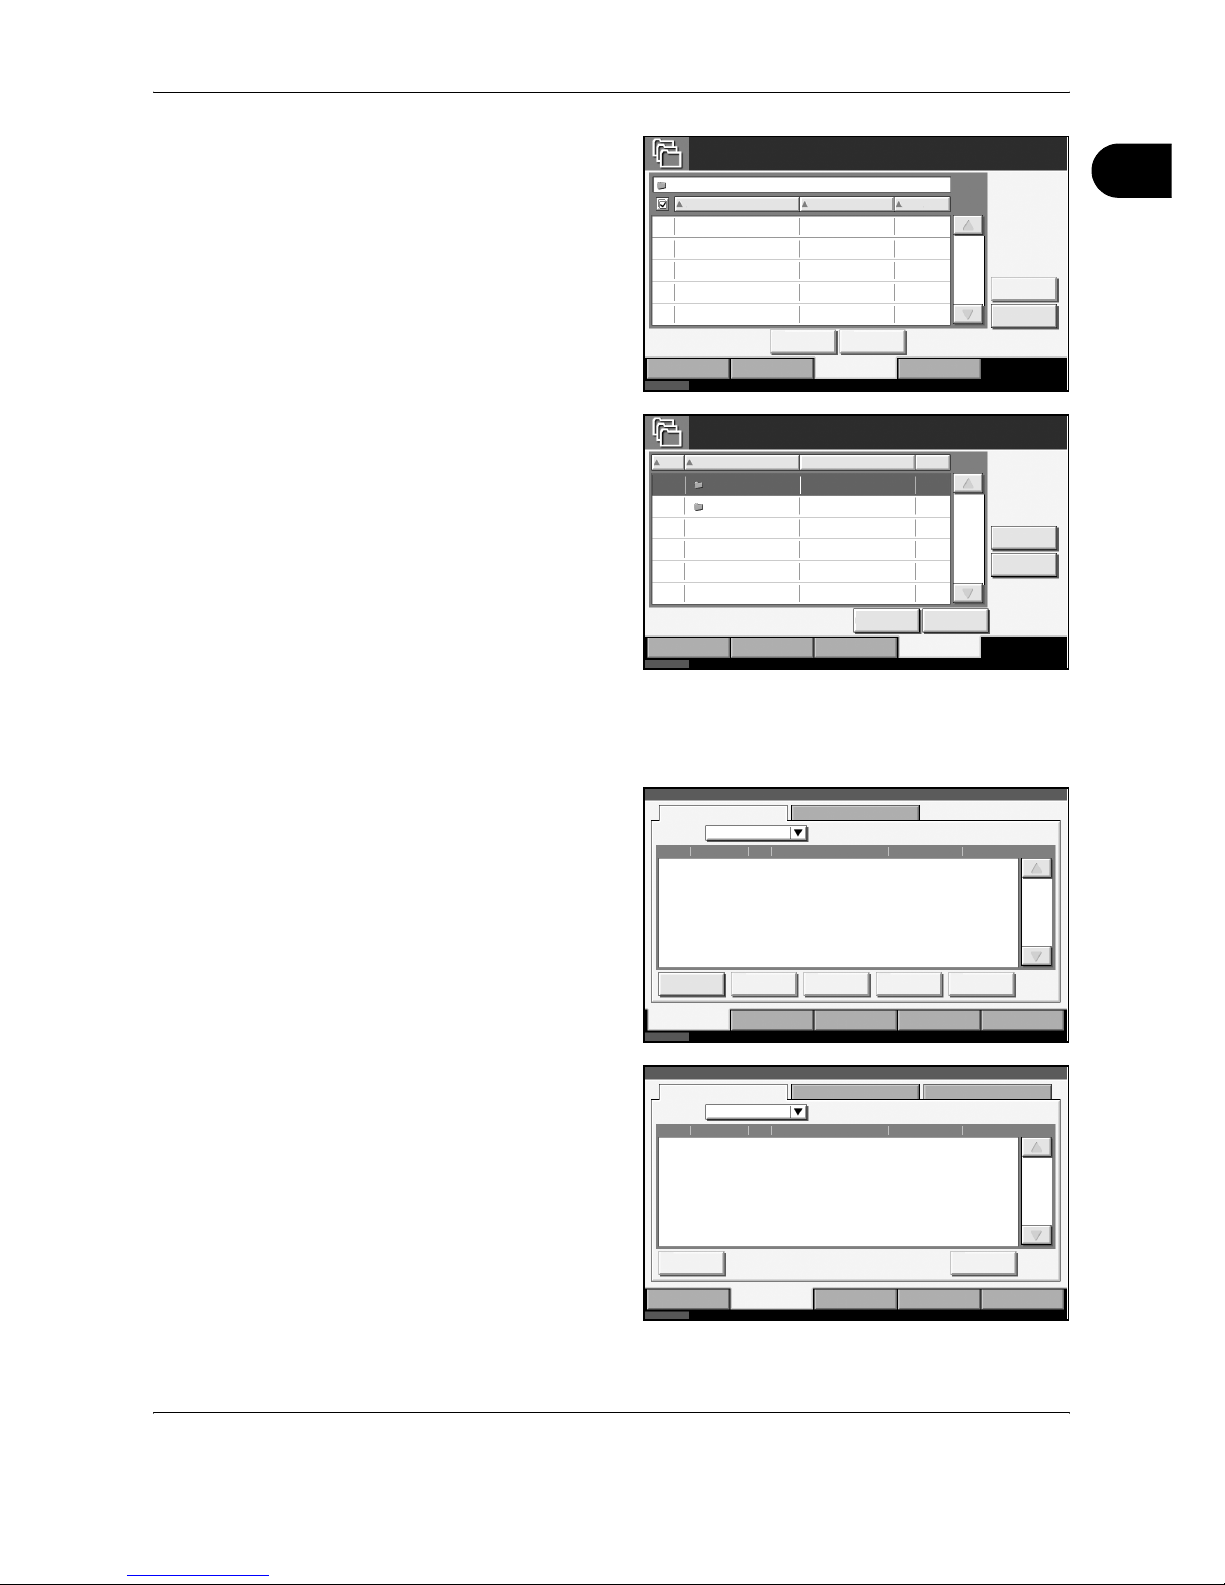
1
3
[Removable
Memory] screen
4
[FAX Box] screen
Status/Job Cancel Screen
Appears when pressing the Status/Job Cancel key.
1
[Printing Jobs]
screen
2
[Sending Jobs]
screen
Status
10/10/2007 10:00
FAX B oxRemovable Memory
Removable Memory
Name
Job BoxCustom Box
Memory
Detai l
Delet e Detai l
Removable Memory
Date Siz e
Remove
Memory
1/1
Status
10/10/2007 10:00
FAX B oxRemovable Memory
FAX Box
Box Name
Job BoxCustom Box
Edit Box
Detai l
No. Owner Use(%)
Open
1/1
BO X 1 Anony mous0001
BO X 2 Anony mous0002
-----
-----
Polling Box
Status
10/10/2007 10:00
Print ing Jobs Sending Jobs Stor ing Jobs Devic e/
Com munic atio n
Paper /Suppli es
Stat us Log
Job Ty pe A ll
Job No . Acc epted T ime Type J ob Name Us er Name Stat us
Pause A ll
Print Jobs
Detai l
Stat us
Cancel Priority
Override
1/1
Move Up
Status
10/10/2007 10:00
Print ing Jobs Sending Jobs Stor ing Jobs Devic e/
Com munic atio n
Paper /Suppli es
Stat us Sche duled Job
All
Job No . Acc epted T ime Type De st ination User Nam e St atus
Cancel Detai l
Stat us
Log
1/1
Job Ty pe
Page 26
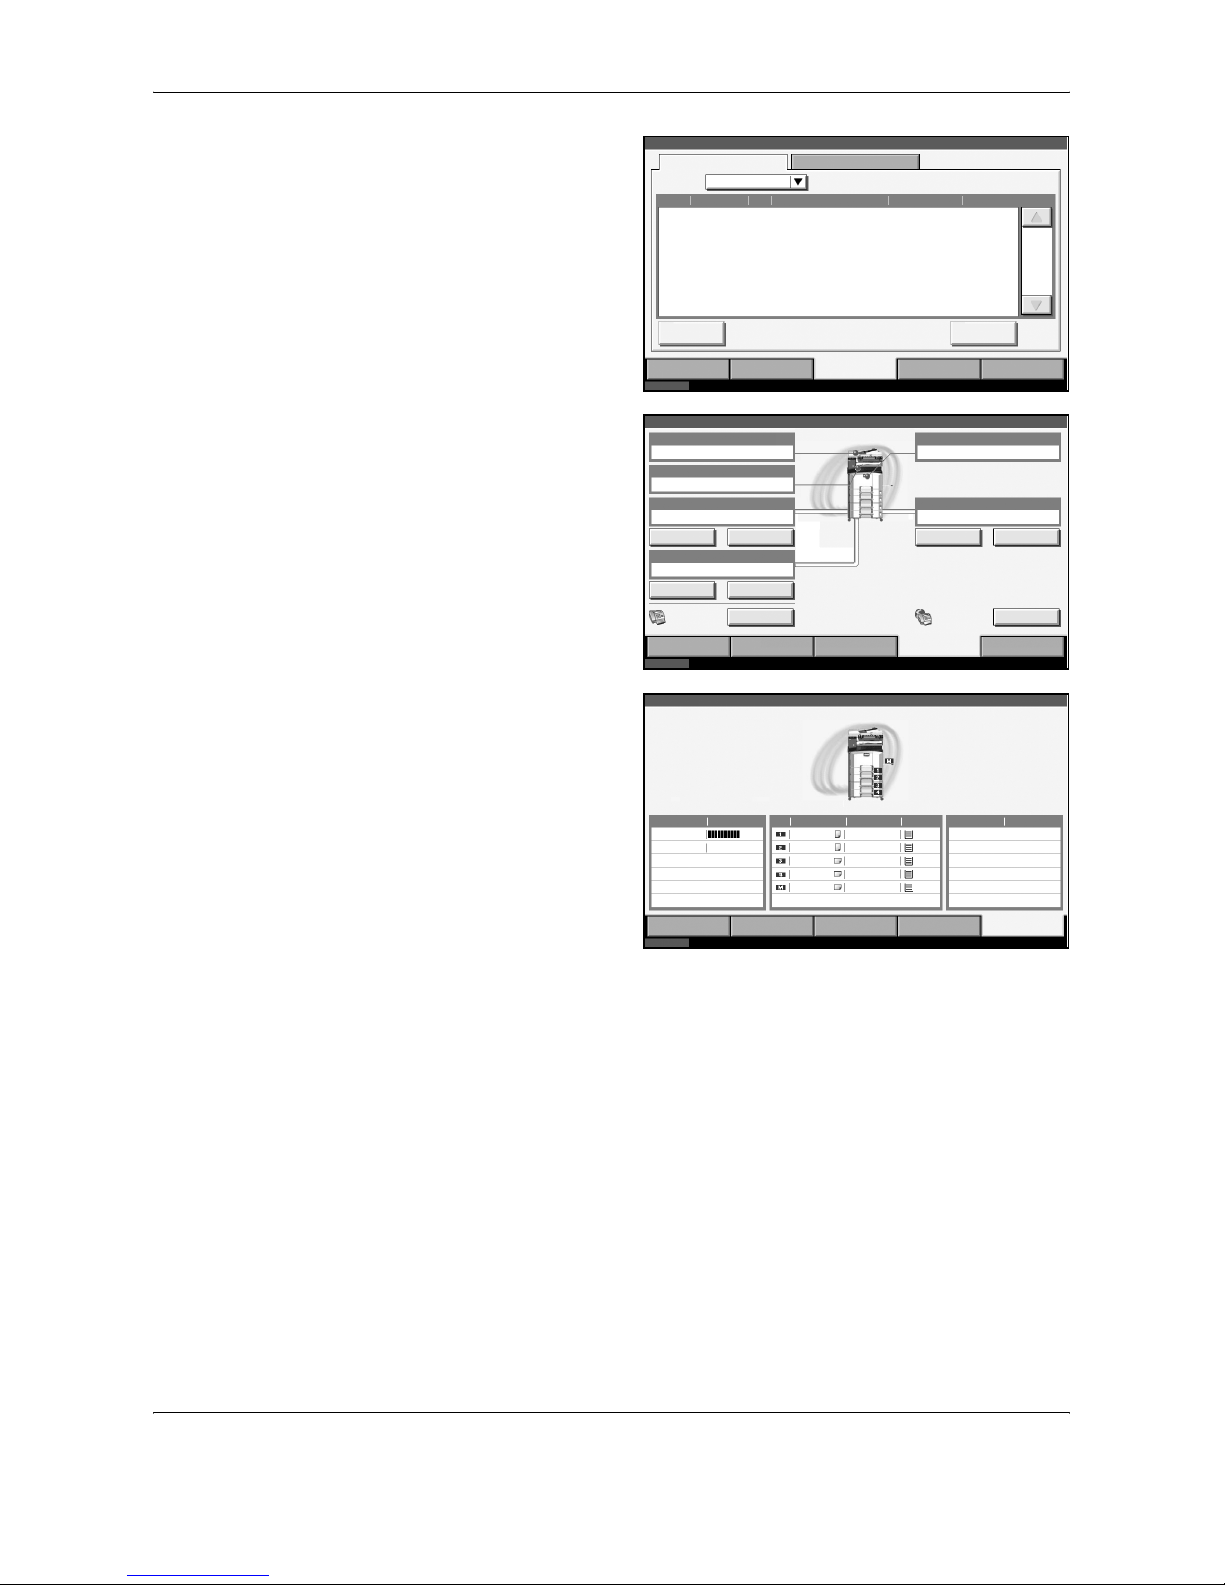
Part Names and Functions
1-10 OPERATION GUIDE
3
[Storing Jobs]
screen
4
[Device/
Communication]
screen
5
[Paper/Supplies]
screen
Status
10/10/2007 10:00
Print ing Jobs Sending Jobs Stor ing Jobs Devic e/
Com munic atio n
Paper /Suppli es
Stat us Log
All
Job No . Ac cept ed Tim e Ty pe Job Nam e User Nam e St atus
Cancel Detai l
Stat us
1/1
Job Ty pe
Stat us
Scanner
Print er
Removable Memory
Hard Di sk
Memory Card
Ready.
Format Remove Format Print ing list
FAX Li ne 1
Ready.
Manual RX
Log
Print ing Jobs Sending Jobs Stor ing Jobs
Devic e/
Com munic atio n
Paper /Suppli es
10/10/2007 10:00Status
Not connected.
Ready.
Not connected.
FAX
Line Off
Check New FAXFAX/ i-FAX
Stat us
Toner Inform ation Paper Ot hers
Toner Status Size Type Status Type Status
Black(K)
Waste T oner OK
Letter
Ledger
Plai n
Plai n
Plai n
Plai n
Plai n
100%
100%
100%
100%
100%
Print ing Jobs Sending Jobs St oring Jobs Devi ce/
Com munic atio n
Paper /Suppli es
10/10/2007 10:00
Status
Ledger
Ledger
Letter
100%
Page 27

OPERATION GUIDE 2-1
2 Preparation Before Use
This chapter explains the preparation necessary before the
machine is used for the first time after the FAX kit is installed
in the machine.
There is no need for the customer to undertake this
preparation if it has already been carried out by a service
representative.
• Selection of Telephone Line (Inch version only) ........... 2-2
• Selection of Transmit Terminal Identification (TTI) ....... 2-3
• Setting the TTI information........................................... 2-4
• Date and Time Entry .................................................... 2-6
Page 28
Preparation Before Use
2-2 OPERATION GUIDE
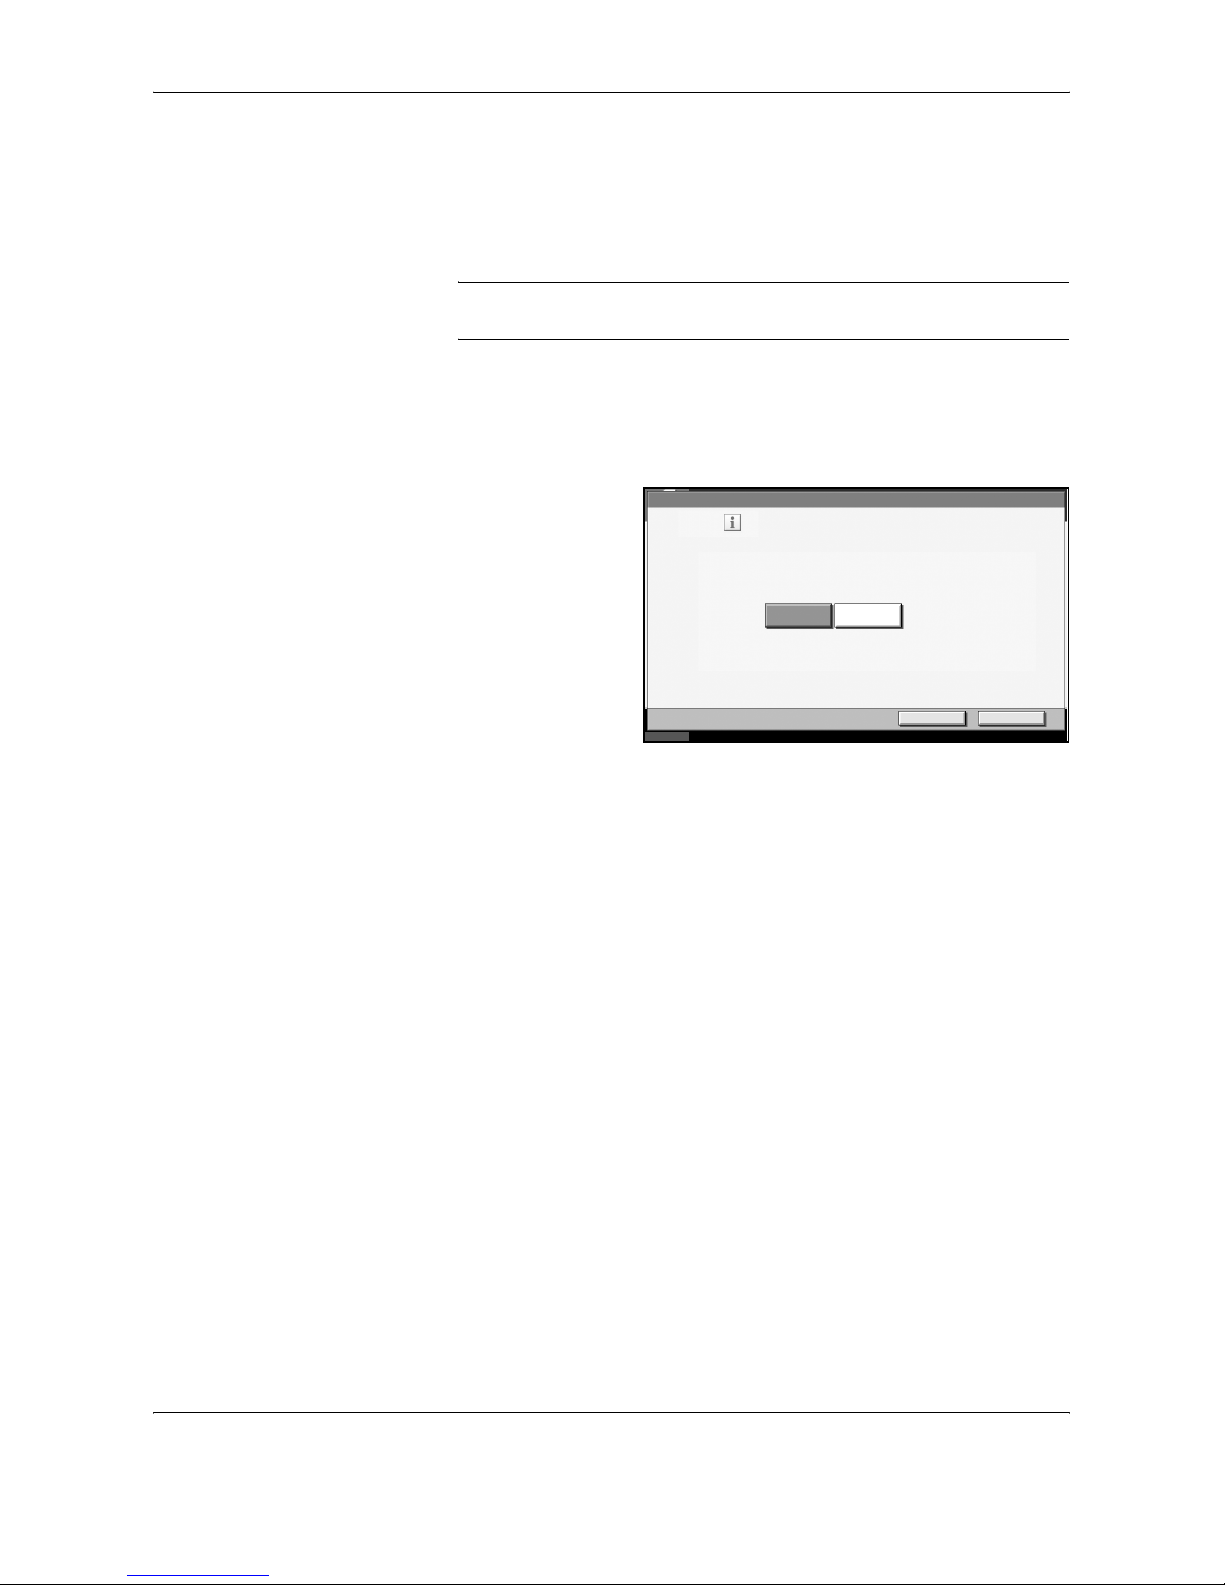
Selection of Telephone Line (Inch version only)
Select the telephone line according to the type you are contracted with.
Please note that selecting a wrong telephone line will prevent you from
sending fax.
NOTE: If you install the Dual FAX option and then use 2 phone lines,
select the option for each line.
1
Press the System Menu key.
2
Press [FAX/i-FAX], [Next] of Transmission, [Next] of FAX, and then
[Change] of FAX Port 1 or FAX Port 2 (option).
3
According to the type
of telephone line you
are contracted with,
press [Tone (DTMF)]
or [Pulse (10PPS)].
4
Press [OK].
5
To exit from this setup, press [Close] several times until the System Menu
default screen is displayed.
Status
FAX - FA X Port
Set FA X port.
Cancel OK
10/10/2007 10:00
Tone(DTMF) Pulse(10 PPS)
Page 29
Preparation Before Use
OPERATION GUIDE 2-3
2
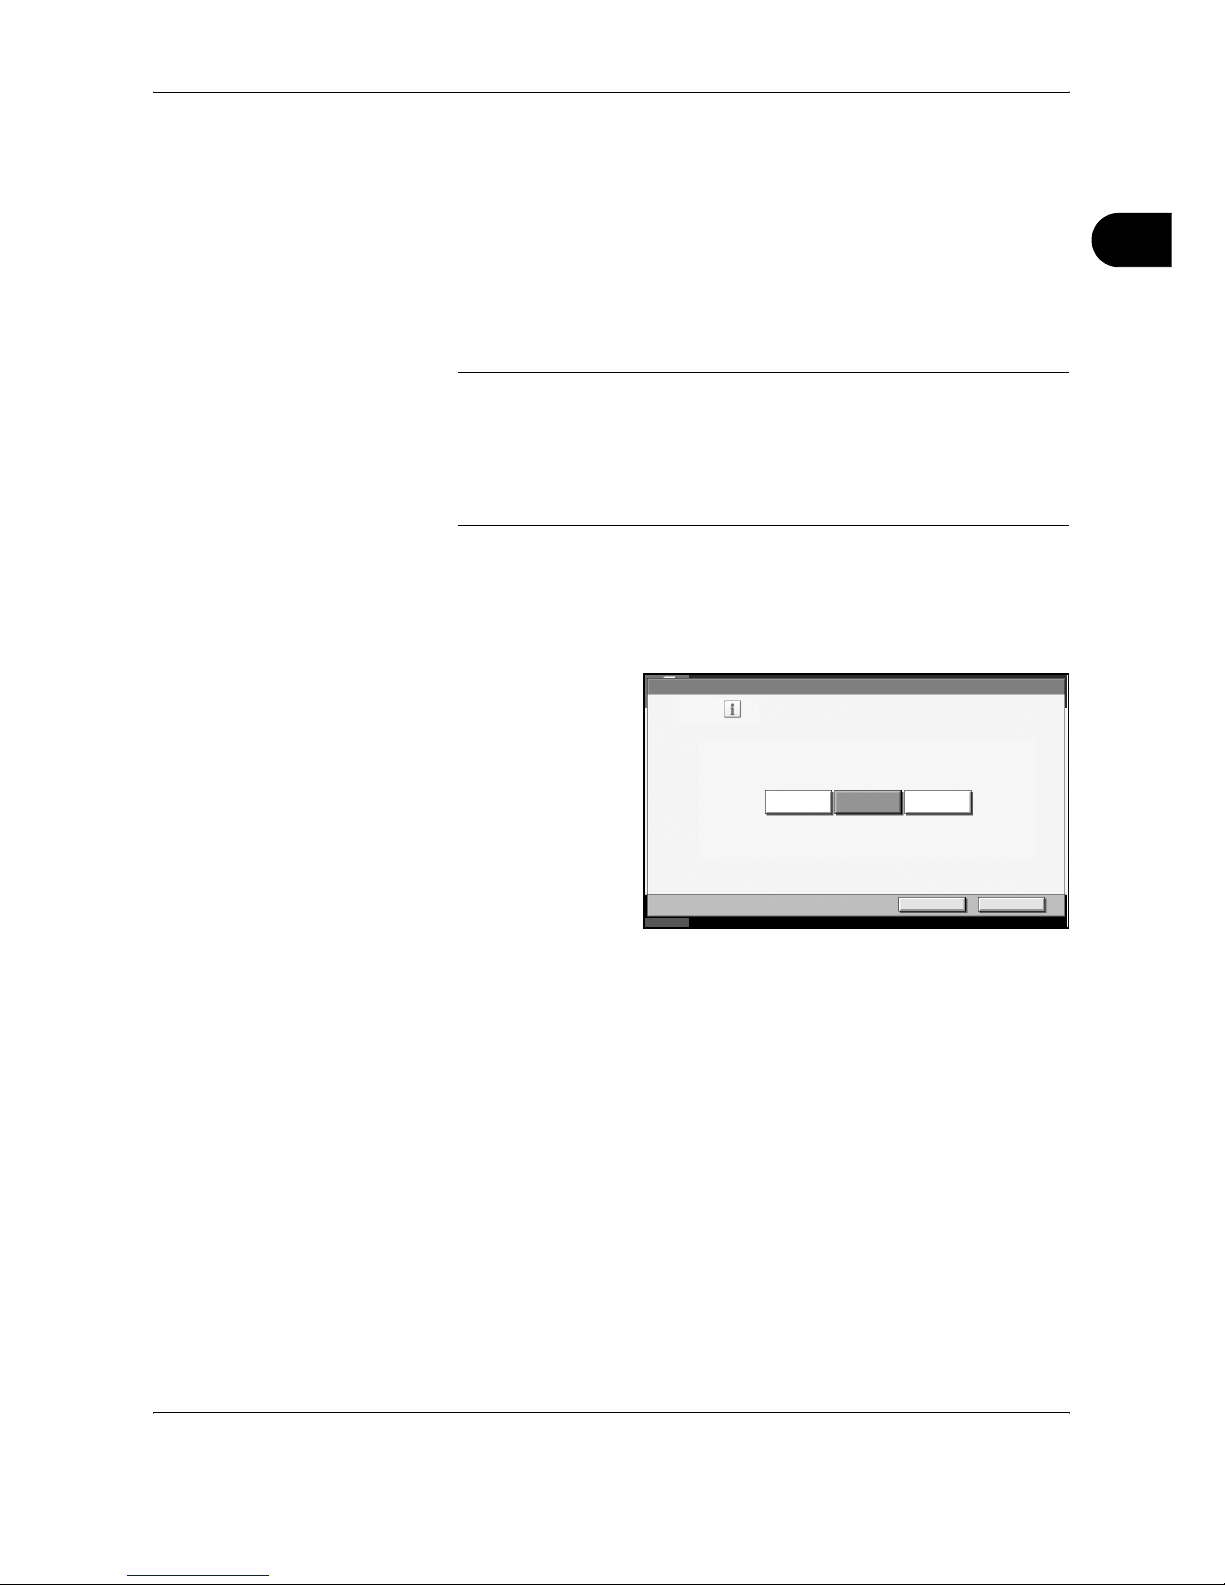
Selection of Transmit Terminal Identification (TTI)
The transmit terminal identification (TTI) is the information about the
machine (transmit terminal) to be printed out on the fax on the receiving
system. The information includes transmission date and time, the number
of transmission pages, and the fax number. This machine enables the user
to select if the TTI is printed out on the fax on the receiving system.
Regarding the location of the information to be printed, you can select
inside or outside of the page image being sent.
NOTE: You can specify a separate TTI for fax transmissions and Internet
fax transmissions.
Normally, the Local FAX Name is printed in the transmit terminal
identification (TTI). However, when job accounting has been enabled, and
you send originals after entering an Account ID, the Account Name is
printed.
1
Press the System Menu key.
2
Press [FAX/i-FAX], [Next] of Transmission, [Next] of FAX (Send Fax) or iFAX (Send i-FAX) and then press [Change] of TTI.
3
Press the location for
printing the
information on the
fax. If you don’t want
to print, press [Off].
4
Press [OK].
5
To exit from this setup, press [Close] several times until the System Menu
default screen is displayed.
Status
FAX -TTI
Attach TTI (Transmit Terminal Identification)
in transmitted documents.
Cancel OK
10/10/2007 10:00
Outside InsideOff
Page 30
Preparation Before Use
2-4 OPERATION GUIDE
Setting the TTI information
Register the name (local FAX name), fax number, and local FAX ID printed
in the transmit terminal identification (TTI) area.
By registering the TTI data, the receiver can easily find out where the FAX
came from.
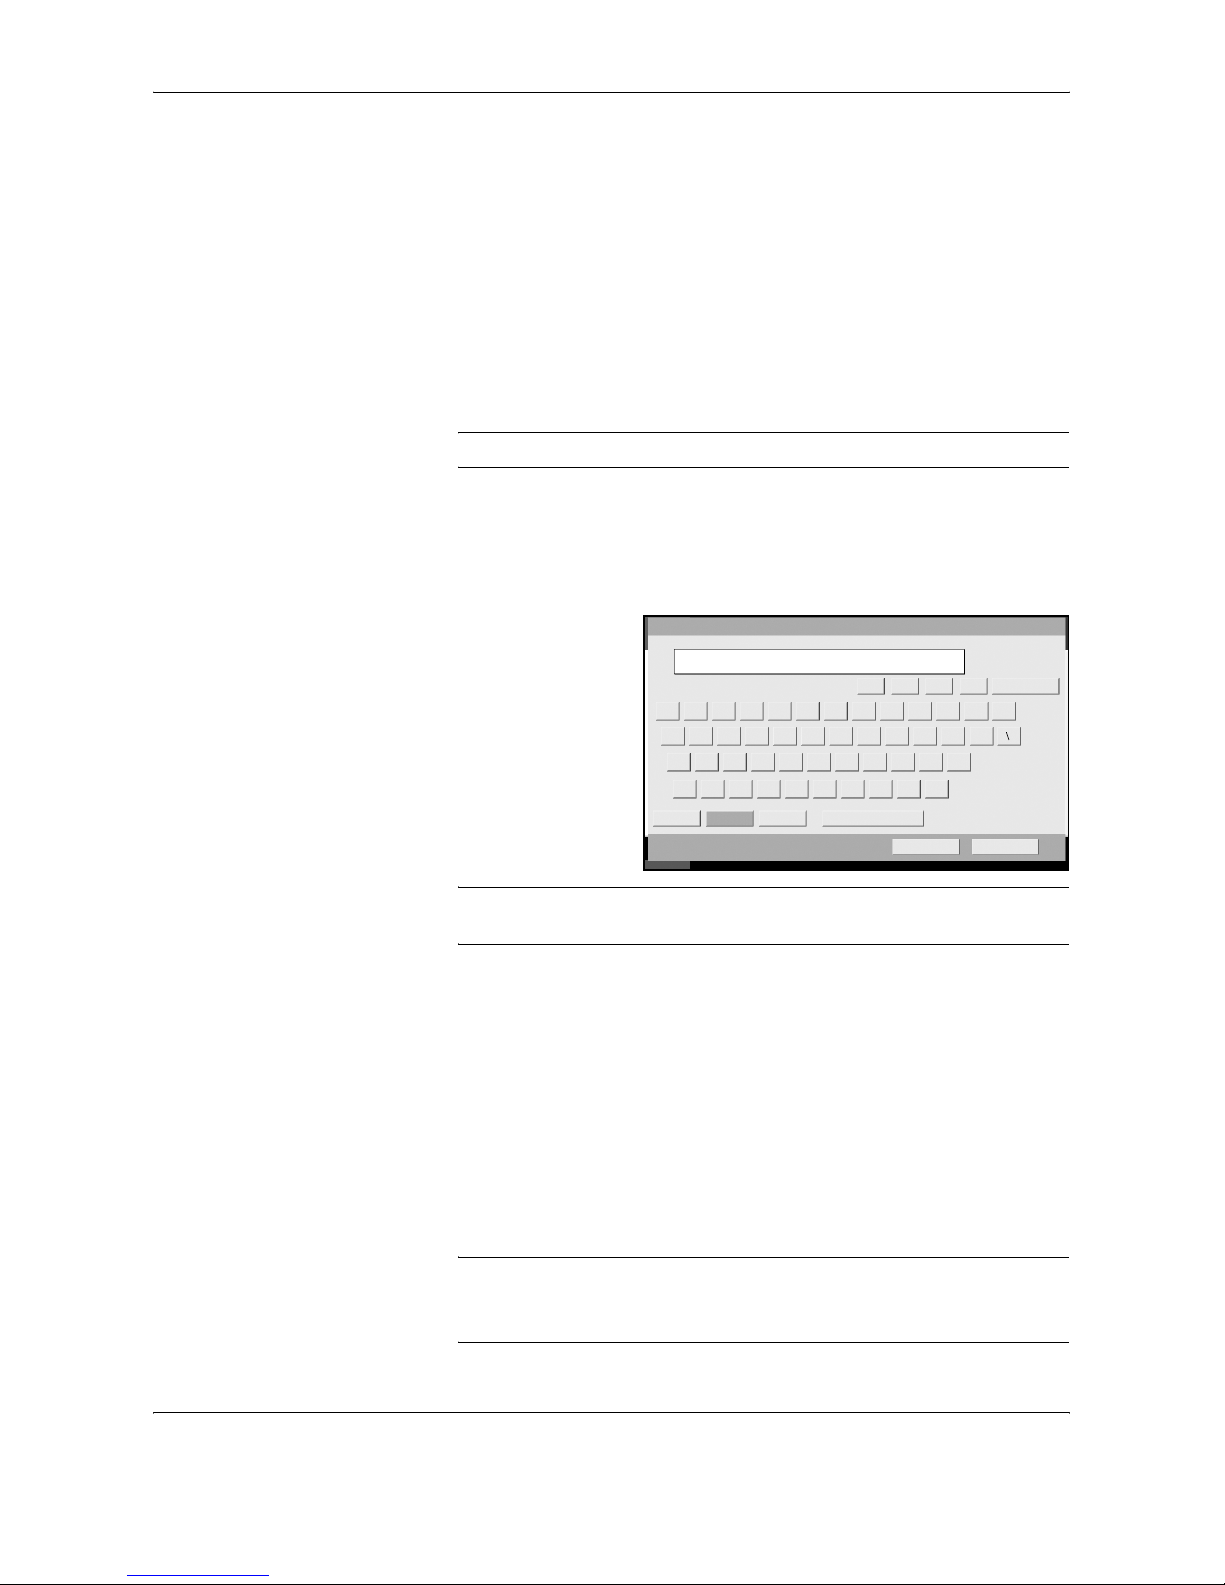
Local FAX Name Registration
Register the local FAX name printed on in the transmit terminal
identification.
NOTE: To change the entry, follow the same operation.
1
Press the System Menu key.
2
Press [FAX/i-FAX], [Next] of Transmission, [Next] of Basic, and then
[Change] of Local FAX Name Entry. The entry screen will be displayed.
3
Enter the Local FAX
Name to be
registered. Up to 16
characters can be
entered.
NOTE: For details on character entry, refer to Character Entry Method on
page 2 of the Appendix.
4
Press [OK].
5
To exit from this setup, press [Close] several times until the System Menu
default screen is displayed.
Local FAX Information Entry
Register the local FAX information (local FAX number/ID) printed on in the
transmit terminal identification (TTI) area. The Local FAX ID is used for
transmission limit purposes. (Refer to Transmission Restriction on page 6-
16.)
NOTE: If you install the Dual FAX option and then use 2 phone lines, you
can register Local Fax Numbers for each of the lines.
To change the registration contents, follow the same operation.
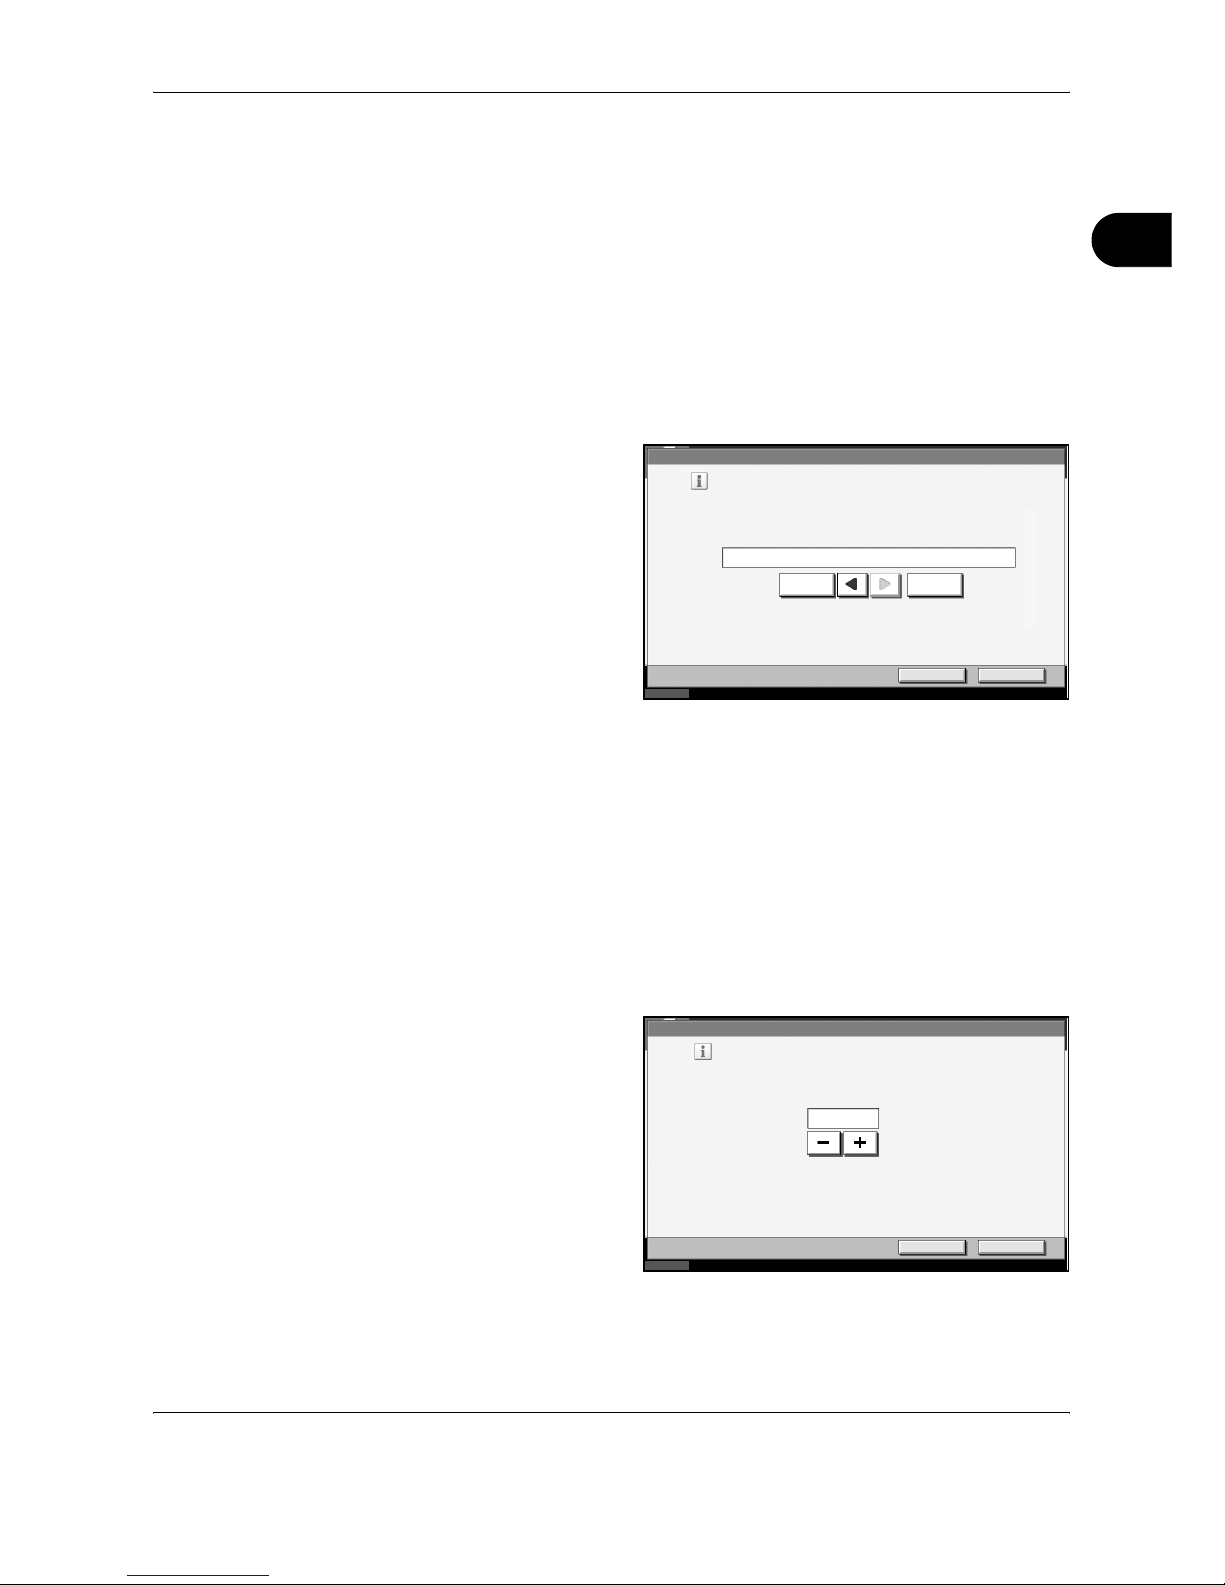
Us e the k eybo ard to enter .
Limit : charact ers
Backspace
z
Lower-case No./Symbol Space
Cancel OK
xcvbnm . /
;l
,
·kjhfdgsa
po[iuyretwq ]
09-87643521 =`
Upper-case
Status
6/6/2006 10:00
Inp ut: ch aracters0
16
Local FAX N ame Entry
LKIJ
Page 31
Preparation Before Use
OPERATION GUIDE 2-5
2
1
Press the System Menu key.
2
Press [FAX/i-FAX], [Next] of Transmission, and then [Next] of FAX.
When you register the Local FAX Number, go to next step. When you
register the Local FAX ID, go to step 6.
Local FAX Number Entry
3
Press [Change] of Local FAX Number 1 or Local FAX Number 2 (option).
If you have already registered a number, the current registered number is
displayed.
4
Using the numeric
keys, enter the local
number to register.
• Up to 20 digits can be entered.
• Press [Space] to enter a space.
• Use [W] or [X] to move the cursor.
• Pressing [Back Space] deletes the character to the left of the cursor.
5
Press [OK].
Local FAX ID Entry
6
Press [Change] of Local FAX ID.
The entry screen is displayed.
7
Using the numeric
keys or [+]/[-], enter
the four-digit Local
FAX ID number to
register.
8
Press [OK].
9
To exit from this setup, press [Close] several times until the System Menu
default screen is displayed.
Status
FAX - Local FAX Number
Cancel OK
10/10/2007 10:00
12345678
Regist er or edit l ocal FA X number.
Use the numeri c keys to enter the number.
Back SpaceSpace
Status
FAX - Local FAX ID
Set local FAX ID.
Use [-]/[+] or the numeric keys to enter a number.
Cancel OK
0001
10/10/2007 10:00
(0000- 9999)
Page 32
Preparation Before Use
2-6 OPERATION GUIDE
Date and Time Entry
Register the date and time of the machine’s built-in clock. Because the
FAX delayed transmission is conducted based on the time registered here,
be sure to register the correct date and time.
IMPORTANT: Correct the time displayed on the touch panel of the
operation panel regularly. Otherwise, the time displayed may eventually
deviate from the current time.
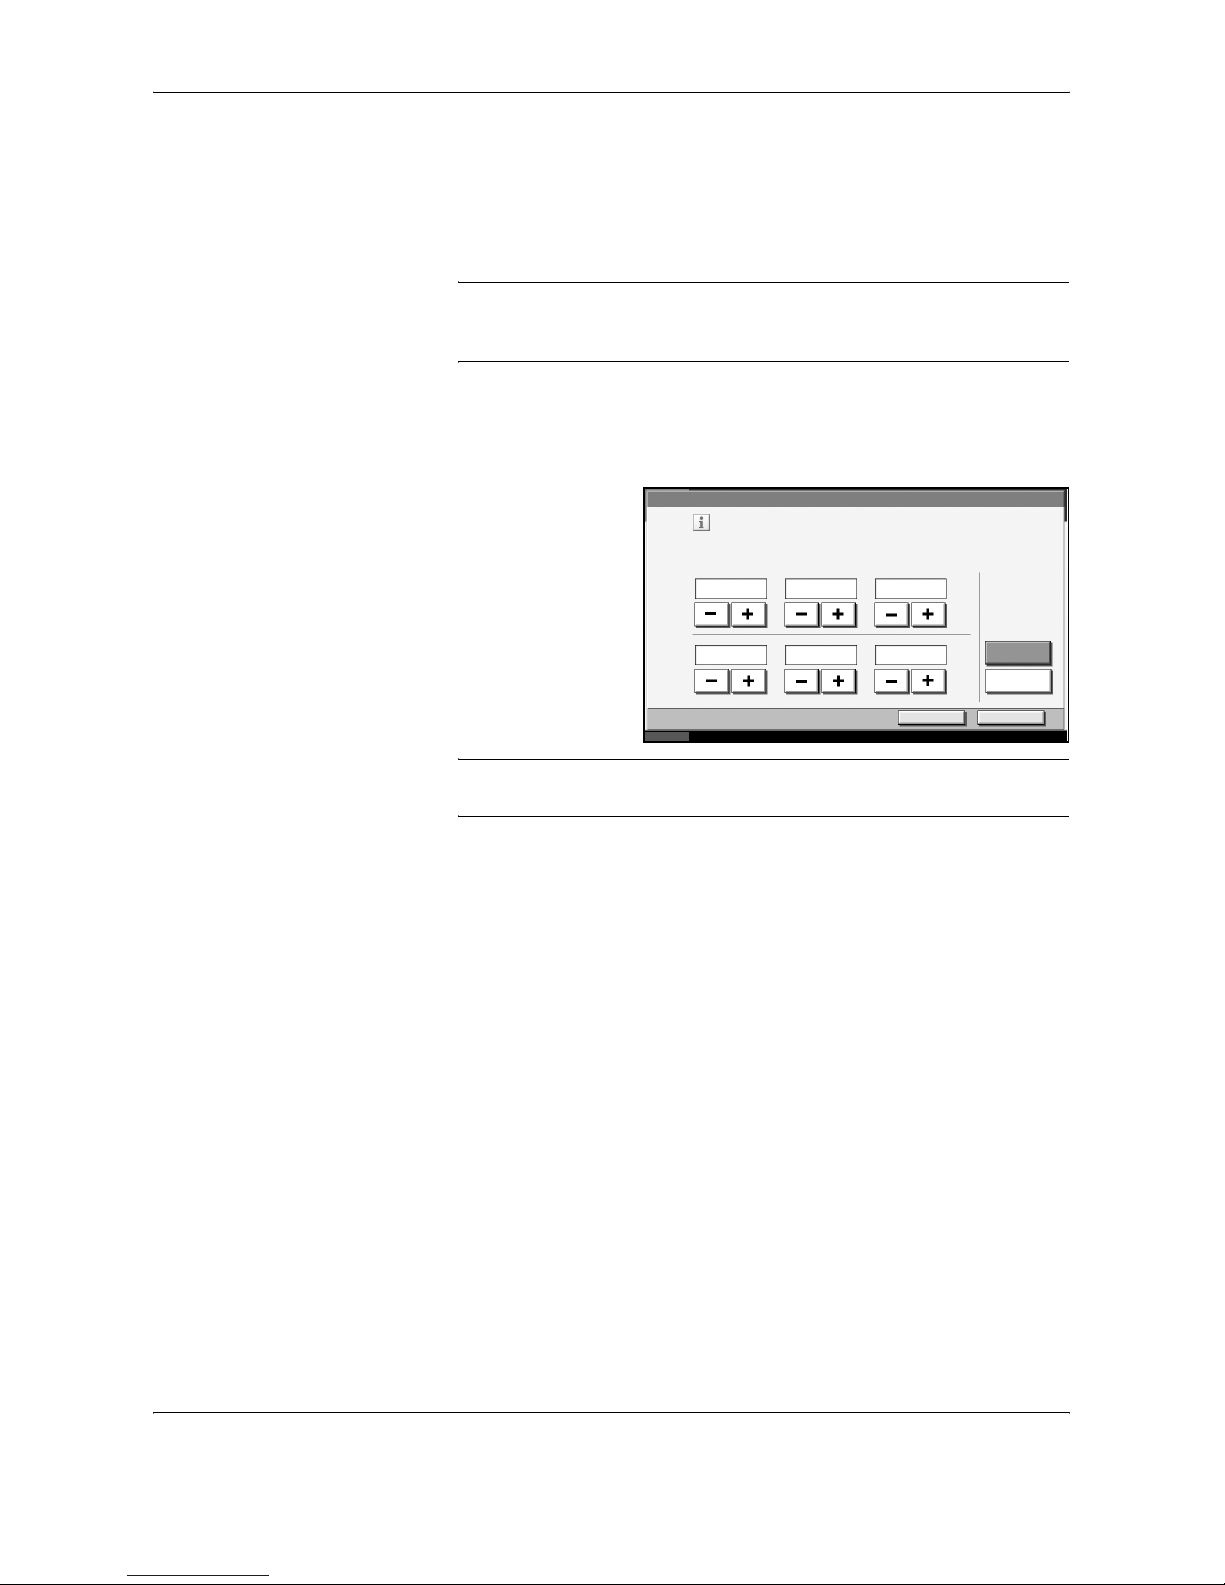
1
Press the System Menu key.
2
Press [T], [Date/Timer], and then [Change] of Date /Time.
3
Enter the date and
time using [+]/[-].
Enter the time by a
24-hour system.
NOTE: Settings include Year (Y), Month (M), Date (D), Hour (H), Minute
(M) and Second (S).
4
Select Summer Time if appropriate.
5
Press [OK].
6
To exit from this setup, press [Close] several times until the System Menu
default screen is displayed.
Date/Ti mer - Date/Ti me
Set the date and time.
2007
Cancel OK
Status 10/10/2007 10:00
10
Off
D
10
MY
10 0
S
0
MH
On
Summer Time
Page 33

OPERATION GUIDE 3-1
3 FAX Operation (Basic)
This chapter explains the following basic operations.
• Automatic Send............................................................ 3-2
• FAX Automatic Reception ...........................................3-11
• Cancelling Communication......................................... 3-13
• Using the Address Book............................................. 3-16
• Using One-touch Keys ............................................... 3-28
• Using the Speed Dial key ........................................... 3-31
• Dialing the Same Receiving System (Redial)............. 3-32
• Previewing Images..................................................... 3-33
Page 34
FAX Operation (Basic)
3-2 OPERATION GUIDE
Automatic Send
General transmission using the numeric keys is explained.
NOTE: To send an Internet fax (i-FAX), refer to i-FAX Transmission on
page 8-10.
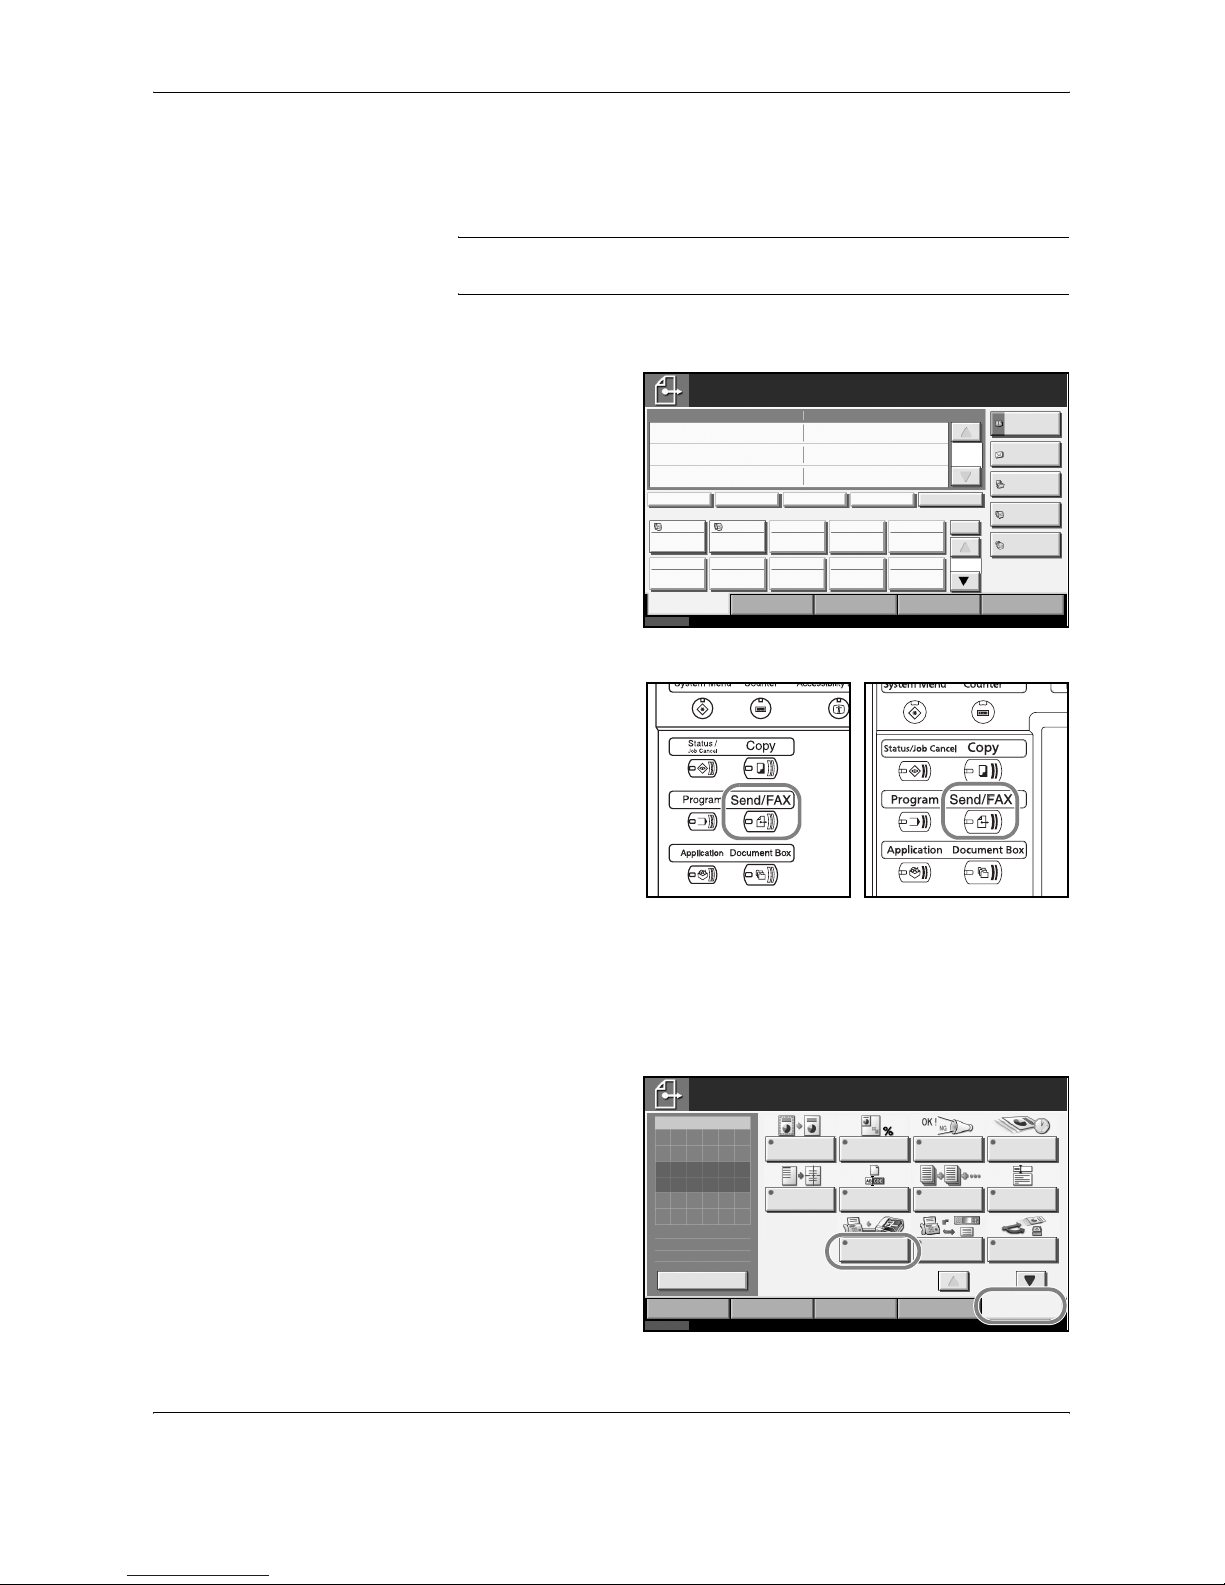
Switching to the Send Screen
1
Check that the basic
send screen is
displayed on the
touch panel. (Refer
to page 1-7.)
If the basic send
screen is not
displayed, press the
Send/FAX key.
Selection of Transmission Method
2
There are two transmission methods - memory transmission and direct
transmission. The default is memory transmission.
To select direct transmission, use the following procedure.
1 Press
[Advanced
Setup], and
then [FAX
Direct
Transmission].
Status
10/10/2007 10:00
Enter Destination.
Ready to send.
Destination
Destination
Detai l
Addres s B ook
FAX No.
Entr y
Folder Path
Entr y
E-mail
Addr Entry
Chain Det ail/Edit Delete Recall
Destination Quick Setup
Type of Original/
Transmission
Color/Im age A dvanced
Setup
No.
0
1/1
1/10
001 002 003 004 005
006 007 008 009 010
Free
A OFFIC E i-FAX
Addr Entry
On Hook
30/40/50 ppm model 25 ppm model
Status
10/10/2007 10:00
Enter Destination.
Color/Image
Advanced
Setup
Type ofOriginal/
Transmission
Ready to send.
Original
Zoom
Send
Sending Image
Destination
Border Erase
QuickSetupDestination
Zoom Job Finish
Notic e
FAX Delayed
Transmission
Centering File Name
Entr y
Cont inuous
Scan
E-mail
Subject / Body
FAX Direc t
Transmission
100%
---
:
:
:
---
0
Set O rigina l.
FAX
Polling RX
Send and
Print
Previ ew
1/2
Page 35
FAX Operation (Basic)
OPERATION GUIDE 3-3
3
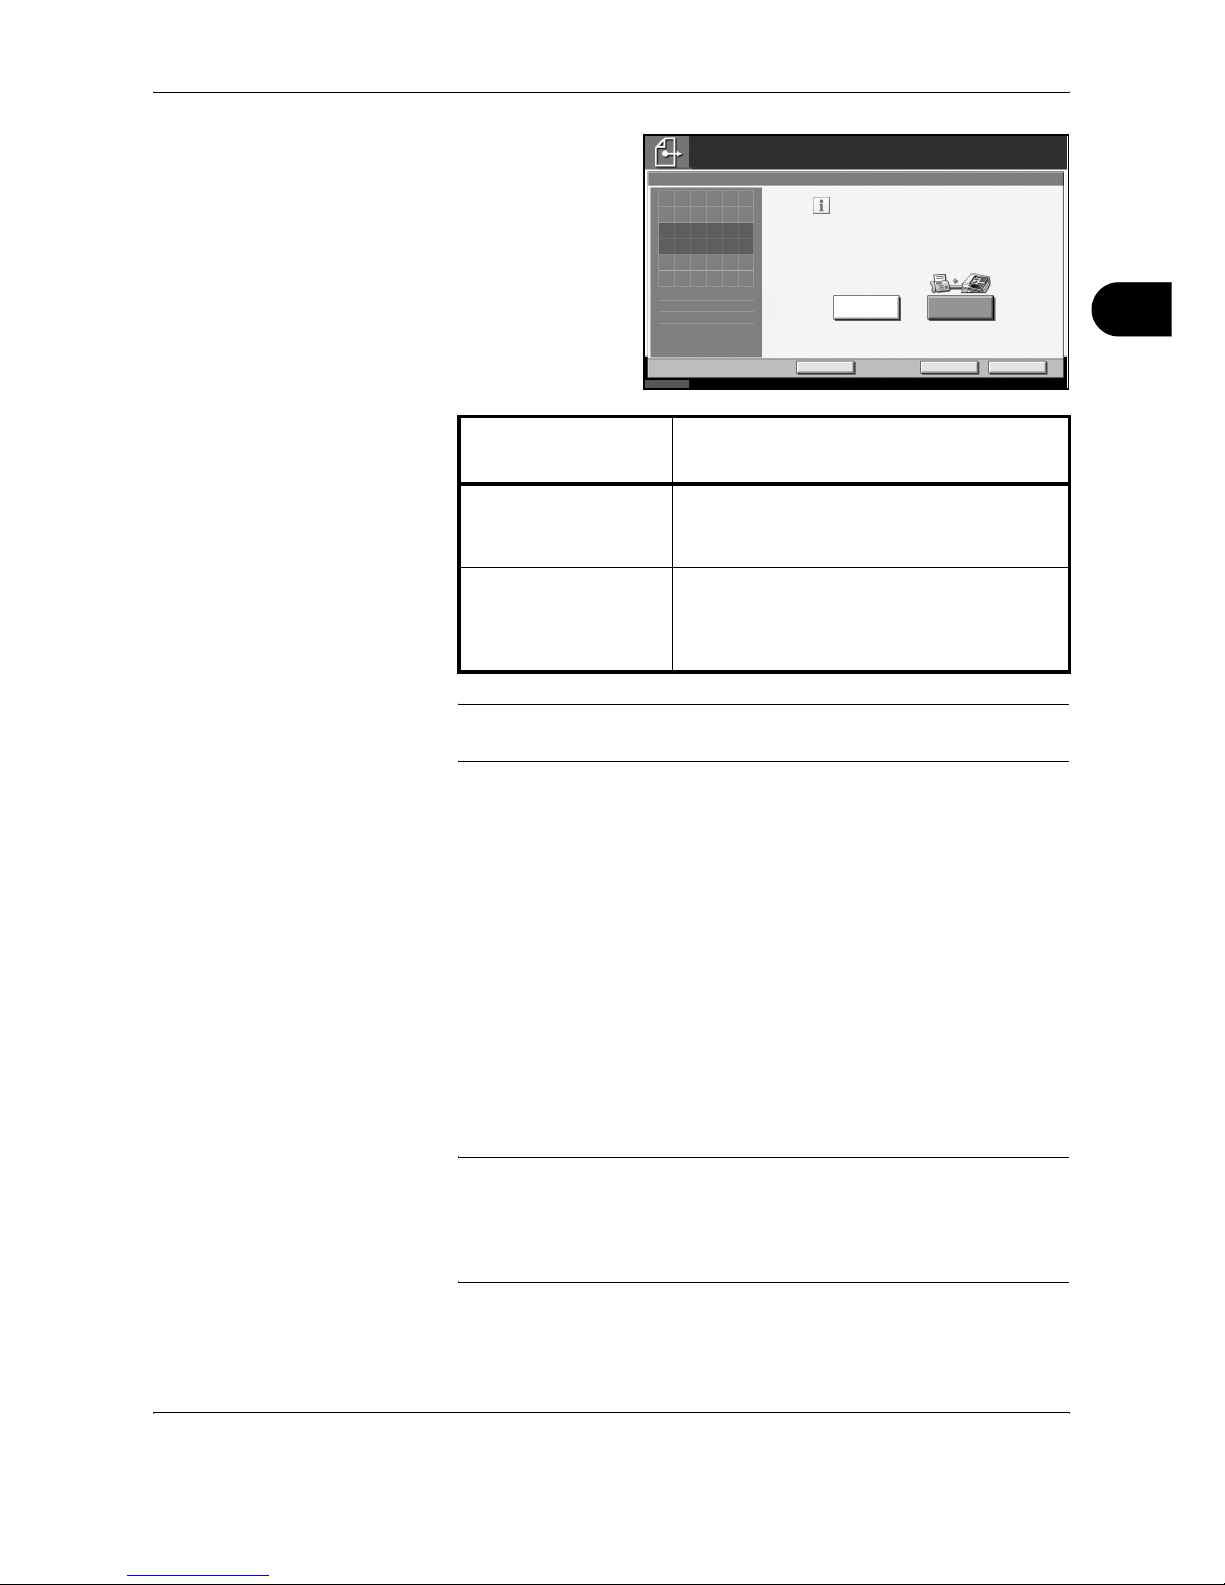
2 Press [On.]
3 Press [OK].
NOTE: In direct transmission, you can designate only one destination for
one transmission.
Memory Transmission (When originals are placed in the document
processor)
After originals placed in the document processor are scanned and stored
in the memory, the receiving system is dialed. This method is very
convenient because you can have originals returned to you without waiting
for sending of the originals to be completed. It is suitable for sending
multiple-page sheet originals.
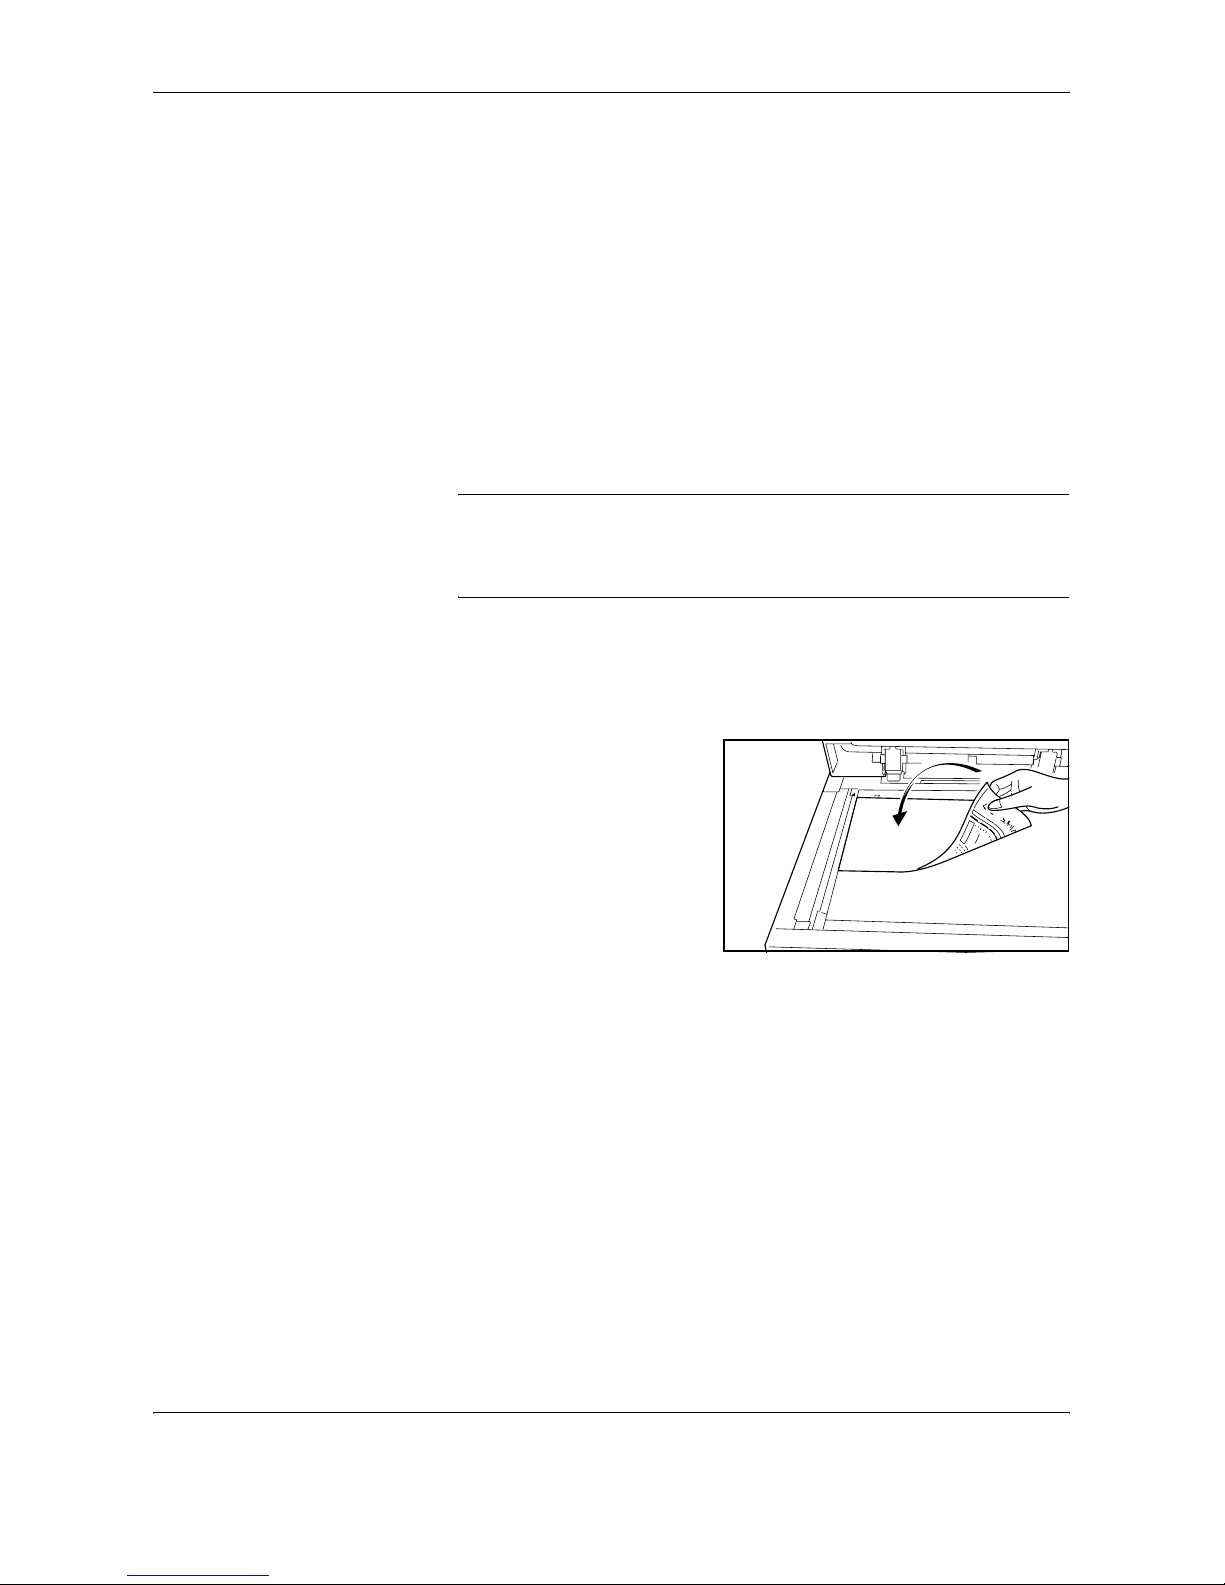
Memory Transmission (When originals are placed on the glass
surface)
This method is suitable for sending book originals that cannot be placed in
the document processor. After originals placed on the glass surface are
scanned and stored in the memory, the receiving system is dialed.
NOTE: When continuous scan is set, you can continue with scanning of
a next original after an original on the glass surface has been stored in
memory. Every time one page is scanned, you perform an operation to
allow continued scanning, and after all the originals have been stored in
memory, the receiving system is dialed.
Setting for Direct
transmission
Description
Off Starts memory transmission.
After originals are scanned into memory, the
communication starts.
On Starts direct transmission.
Dials the receiving system, and after the
communication has started, originals are
scanned.
Status
10/10/2007 10:00
Enter Destination.
Cancel OK
Add Short cut
Ready to directly transmit FAX .
OnOff
FAX Direct Transmission
Destination
Send FAX directly, without reading original
into memory. FAX can also be sent
page by page , with c onfirm at ion
aft er each page.
0
Press [OK] to display
the image.
Page 36
FAX Operation (Basic)
3-4 OPERATION GUIDE
Direct Transmission (When originals are placed in the document
processor)
After the telephone line has connected with the receiving system, scanning
of the originals placed in the document processor starts. When multiplepage originals are placed, each page is scanned after the previous one is
sent.
Direct Transmission (When originals are placed on the glass
surface)
This method is suitable for sending book originals that cannot be placed in
the document processor. After the telephone line has connected with the
receiving system, the originals placed on the glass surface are scanned
and sent.
NOTE: When continuous scan is set, you can continue with scanning of
a next original after an original on the glass surface has been sent. Every
time one page is scanned, you perform an operation to allow continued
scanning.
Placing Originals
3
Place the originals on the glass surface or in the optional document
processor. Refer to the machine’s Operation Guide for placing originals.
Page 37
FAX Operation (Basic)
OPERATION GUIDE 3-5
3
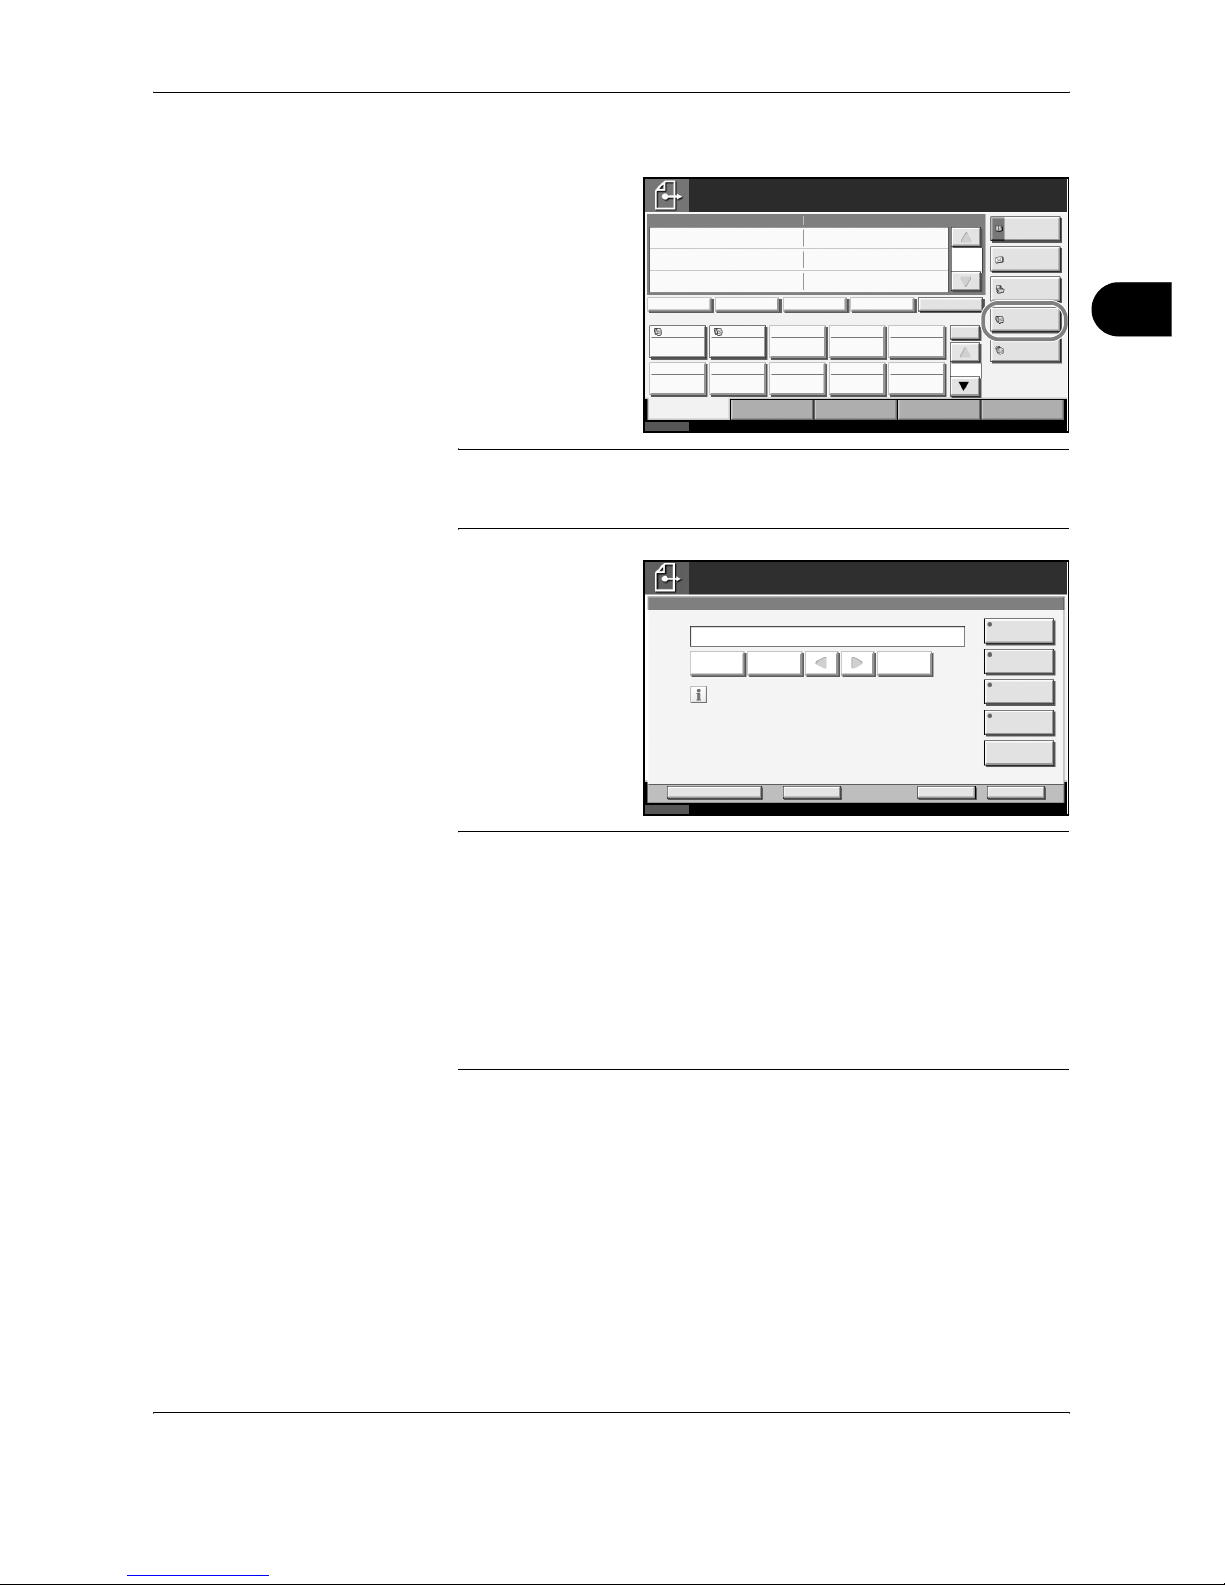
Dial the Receiving System
4
1 Press [FAX No.
Entry].
NOTE: When you press the numeric keys to enter numbers, the screen
changes to the entry screen for the fax number (the screen shown in the
next step).
2 Enter the fax
number of the
receiving
system using
the numeric
keys.
NOTE: Up to 64 digits can be entered as the fax number of the receiving
system.
Press [Space] to enter a space.
Use [W] or [X] to move the cursor.
To correct the fax number, press [Back Space] on the touch panel, and
delete the digits one by one before reentering the fax number. To delete
the number entirely, press the Clear key on the operation panel.
When [Add to Addr Book] is displayed, you can register entered contents
to the Address Book.
[Pause]
Pressing this key adds about three seconds of waiting time during dialing.
For example, when dialing the receiving system on an external line, you
can use this method to insert a pause before resuming dialing after you dial
a specific number.
Status
10/10/2007 10:00
Enter Destination.
Ready to send.
Destination
Destination
Detai l
Addres s B ook
FAX No.
Entr y
Folder Path
Entr y
E-mail
Addr Entry
Chain Det ail/Edit Delete Recall
Destination Quick Setup
Type of Original/
Transmission
Color/Im age A dvanced
Setup
No.
0
1/1
1/10
001 002 003 004 005
006 007 008 009 010
Free
A OFFIC E i-FAX
Addr Entry
On Hook
Status
10/10/2007 10:00
Enter Destination.
Cancel OKNext Des t.
Ready to send.
Pause
FAX No. Entry
Destination
Sub Addre ss
Transmission
Start Speed
ECM
Encr ypted
Transmission
On Hook
Back SpaceSpace
Add a new FAX destina ti on.
Enter the FAX number with the numeric keys.
Add t o Addr B ook
0
Page 38
FAX Operation (Basic)
3-6 OPERATION GUIDE
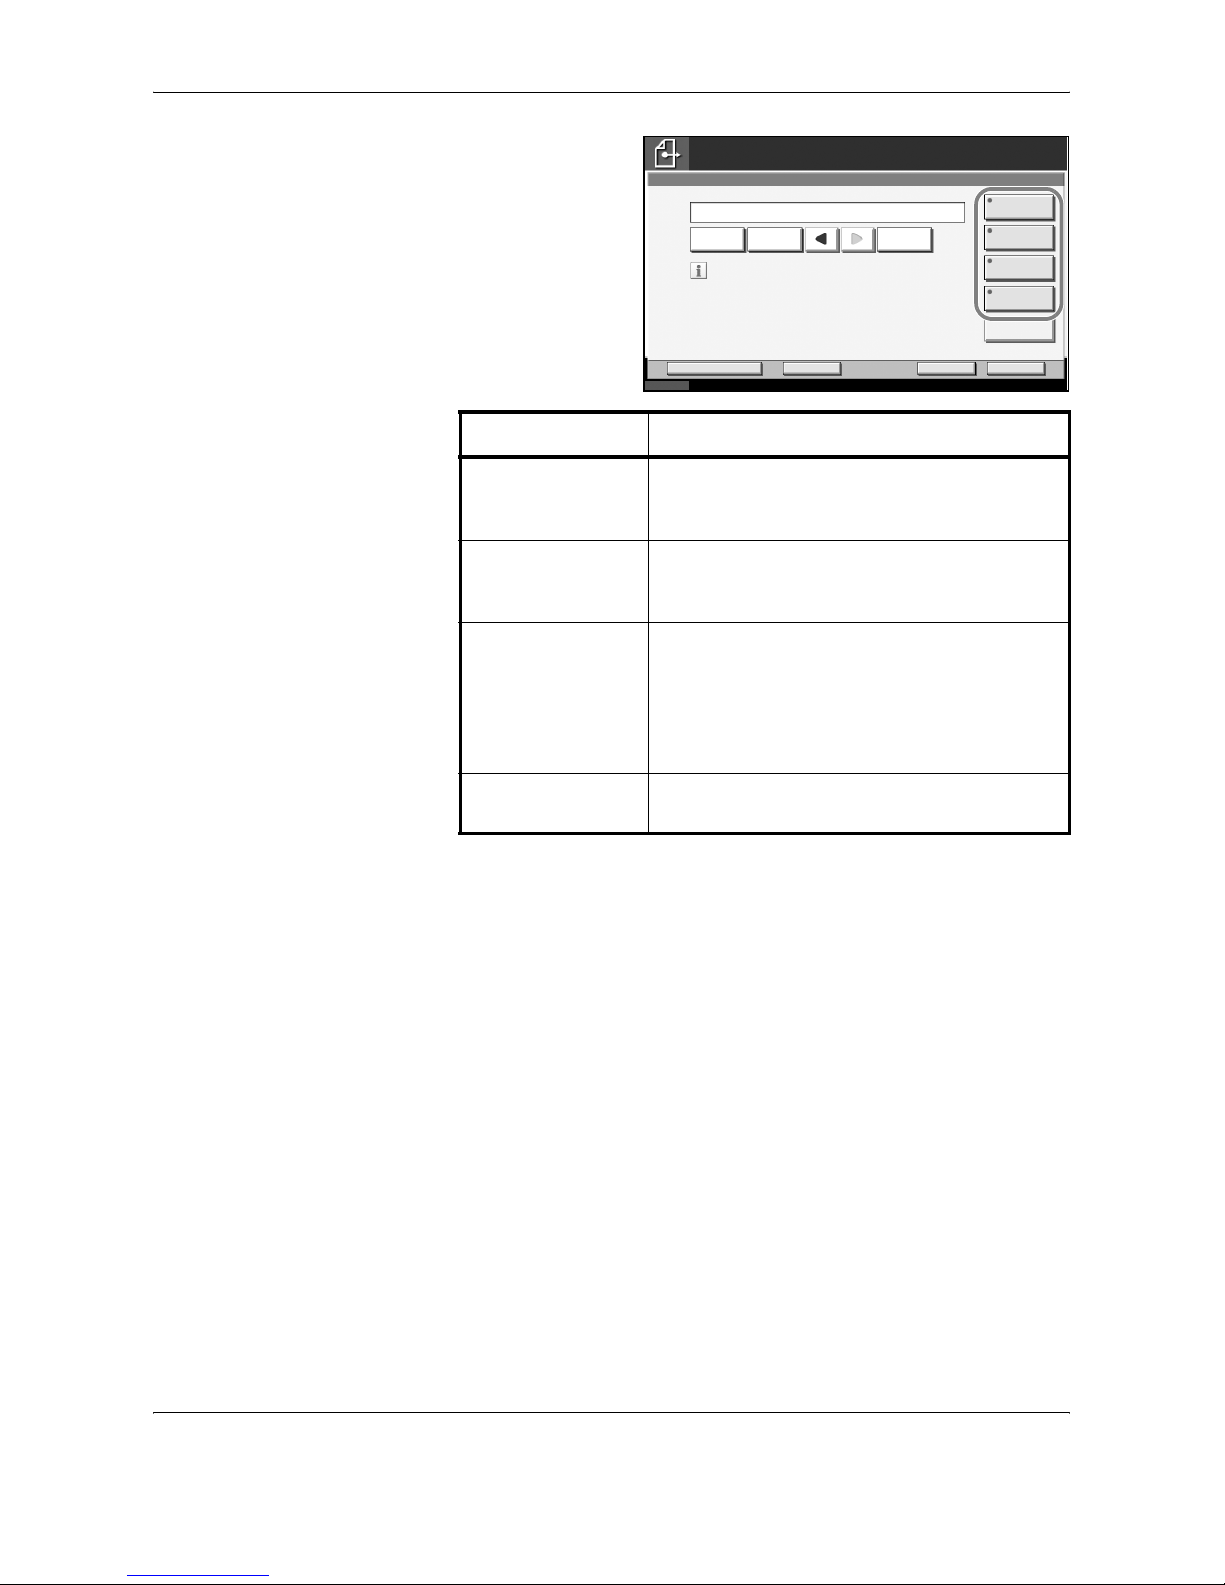
3 If necessary,
make any
detailed
settings. Press
each key to
change the
setting, and
press [OK].
[On Hook]
Press this key to connect to the telephone line.
When the FAX number has been entered, the machine starts dialing to the
receiving system.
After pressing this key, you can dial the number of the receiving system
using the numeric keys. For details, refer to Manual Send on page 4-11.
Dialing methods without using the numeric keys
• Using the Address Book (Refer to page 3-16.)
• Using One-touch keys (Refer to page 3-28.)
• Using the Speed Dial key (Refer to page 3-31.)
• Manual redial (recall) (Refer to page 3-32.)
Key Description
Sub Address To communicate using the sub address, press
this key. For details, refer to Sub Address
Communication on page 4-50.
Transmission Start
Speed
To change the transmission start speed, press
this key. Select the speed from 33,600 bps,
14,400 bps, and 9,600 bps.
ECM ECM (error correction mode) is a function to
automatically resend an image that has not
been correctly sent or received due to the
effects of noise on the telephone line during
transmission. To change the ECM
communication setting, press this key.
Encrypted
Transmission
To send faxes using encryption, press this key.
For details, refer to Encryption on page 6-26.
Status
10/10/2007 10:00
Enter Destination.
Cancel OK
Next Des t.
Ready to send.
Pause
FAX No. Entry
Destination
Sub Addre ss
Transmission
Start Speed
ECM
Encr ypted
Transmission
On Hook
Back SpaceSpace
Add a new FAX destina ti on.
Enter the FAX number with the numeric keys.
Add t o Addr B ook
0
01234567
Page 39

FAX Operation (Basic)
OPERATION GUIDE 3-7
3
NOTE: In addition to a fax, you can include e-mail transmission and
folder (SMB/FTP) transmission to send as one job. For details, refer to the
machine’s Operation Guide.
When the destination includes fax, the color mode becomes completely
monochrome.
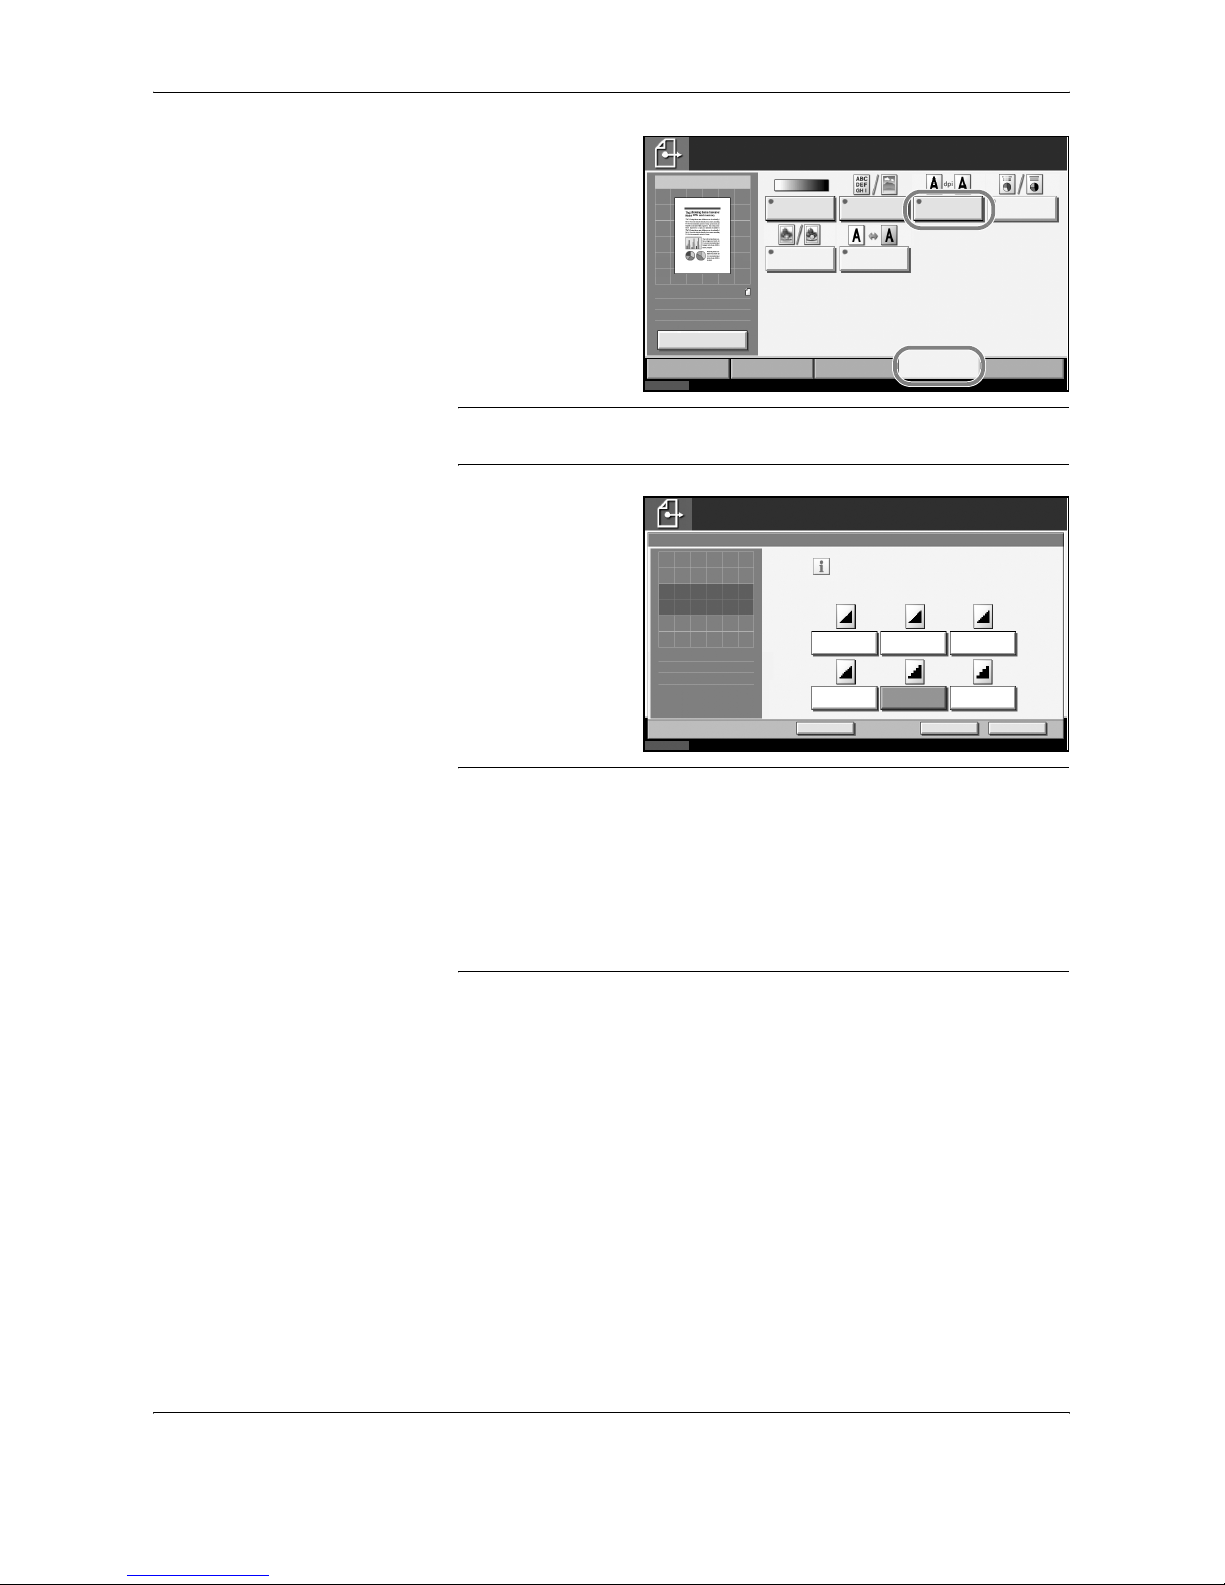
Selecting the Resolution
5
Select the resolution suitable for sending originals.
• 200 × 100 dpi (Normal): when sending originals with standard size
characters
• 200 × 200 dpi (Fine): when sending originals with relatively small
characters and thin lines
• 200 × 400 dpi (Super Fine): when sending originals with minute
characters and lines
• 400 × 400 dpi (Ultra Fine): when sending originals with minute
characters and lines more finely
• 600 × 600 dpi (600dpi): when sending originals with minute characters
and lines as finely as possible
NOTE: The default setting is 200 × 200 dpi (Fine).
The higher the resolution, the clearer the image. However, higher
resolution also means longer send times. Normally, up to 400 × 400 dpi
(Ultra Fine) is recommended.
The FAX transmission and transmission resolution are the same settings.
The machine does not support resolution of 300 × 300 dpi when sending
faxes. If you have selected 300 × 300 dpi, the machine sends faxes after
lowering the resolution to 200 × 200 dpi (Fine).
Using the program function, you can register the FAX transmission and
transmission resolution separately.
Typical character size: 10.5 point (example:
Resolution Resolution)
Typical character size: 8 point (example:
Resolution Resolution)
Typical character size: 6 point (example:
Resolution Resolution)
Typical character size: 6 point (example:
Resolution Resolution)
Typical character size: 6 point (example:
Resolution Resolution)
Page 40
FAX Operation (Basic)
3-8 OPERATION GUIDE
1 To change the
resolution,
press [Color/
Image], and
then [Scan
Resolution].
NOTE: You can see a preview of the image to be sent by pressing
[Preview]. For details, refer to Previewing Images on page 3-33.
2 Select the
resolution.
3 Press [OK].
IMPORTANT:
• If you select a high resolution, the image becomes clearer. However,
the higher the resolution is, the longer the send time is.
• When you send originals at a resolution of 200 × 400 dpi (Super Fine)
or higher, the fax machine on the receiving system needs to be
capable of receiving the originals at such image quality. When the
receiving system does not have such capability, originals are sent at
an image quality of 200 × 200 dpi (Fine).
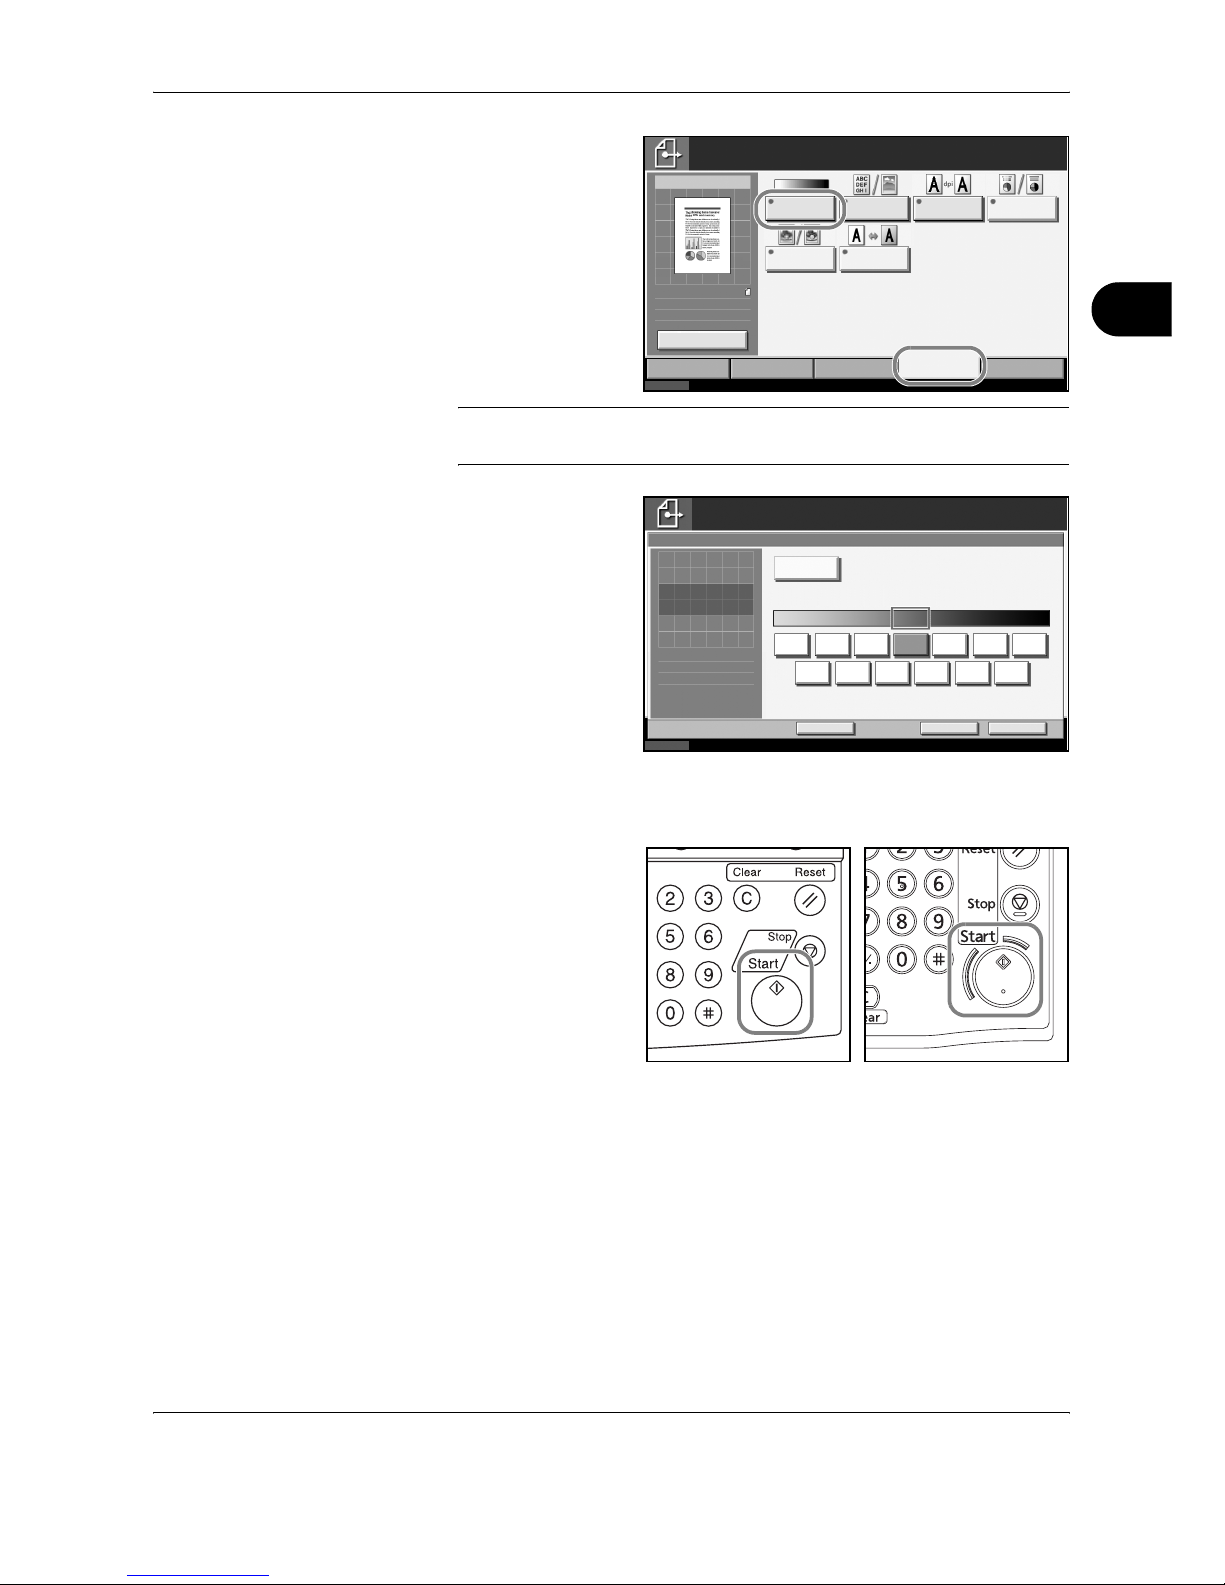
Selecting the Density
6
Adjusting the density when scanning originals
• Manual (-3 to +3): You can adjust the density using seven levels or 13
levels.
• Auto: The optimal density is chosen according to the density of the
originals.
Status 10/10/2007 10:00
Color/Im age Advanced
Setup
Type of Original/
Transmission
Ready to send.
Original
Zoom
Send
Sending Im age
Destination
Densi ty
Quick SetupDestination
Original
Image
Scan
Resolution
Color
Selection
Sharpness Background
Densi ty Adj.
100%
Letter
:
:
:
Letter
1
Change Setting
Status
10/10/2007 10:00
Cancel OK
Add Short cut
Ready to send.
Destination
Selec t fine ness of sc anning res olut ion.
The larger the number, the better the
image resolution.
600x 600dpi 400 x400dpi
Ultr a Fine
300x 300dpi
200x 400dpi
Super Fi ne
200x 100dpi
Normal
200x 200dpi
Fine
Scan R es olut ion
1
Press [OK] to display
the image.
Page 41
FAX Operation (Basic)
OPERATION GUIDE 3-9
3
1 To change the
original density,
press [Color/
Image], and
then [Density].
NOTE: You can see a preview of the image to be sent by pressing
[Preview]. For details, refer to Previewing Images on page 3-33.
2 Select the
density.
3 Press [OK].
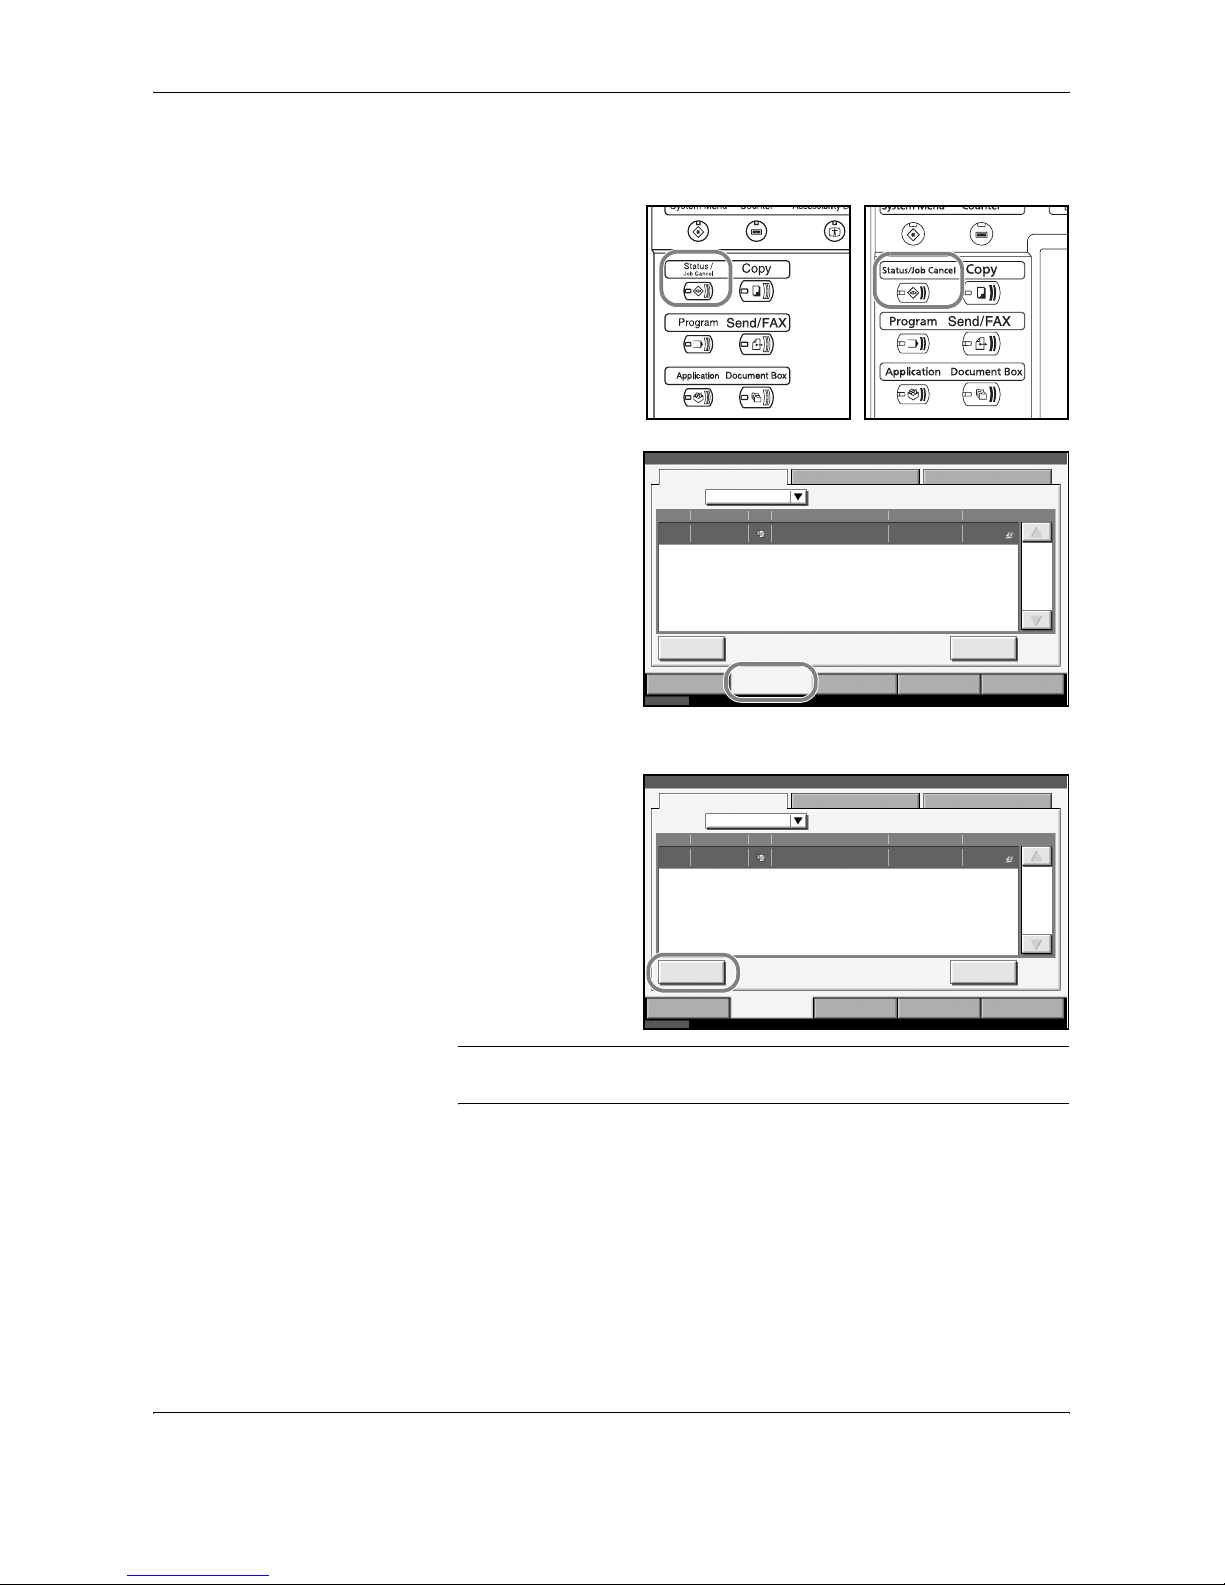
Send Start
7
Press the Start key.
Transmission
begins.
Status 10/10/2007 10:00
Color/Im age Advanced
Setup
Type of Original/
Transmission
Ready to send.
Original
Zoom
Send
Sending Im age
Destination
Densi ty
Quick SetupDestination
Original
Image
Scan
Resolution
Color
Selection
Sharpness Background
Densi ty Adj.
100%
Letter
:
:
:
Letter
1
Change Setting
Status
10/10/2007 10:00
Cancel OKAdd Short cut
Ready to send.
Destination
Auto
-3 -2 -1 0
Densi ty
+1 +2 +3
-2. 5 -1 .5 -0 .5 + 0.5 + 1.5 +2.5
Lighter Normal
Darke r
1
Press [OK] to display
the image.
30/40/50 ppm model 25 ppm model
Page 42
FAX Operation (Basic)
3-10 OPERATION GUIDE
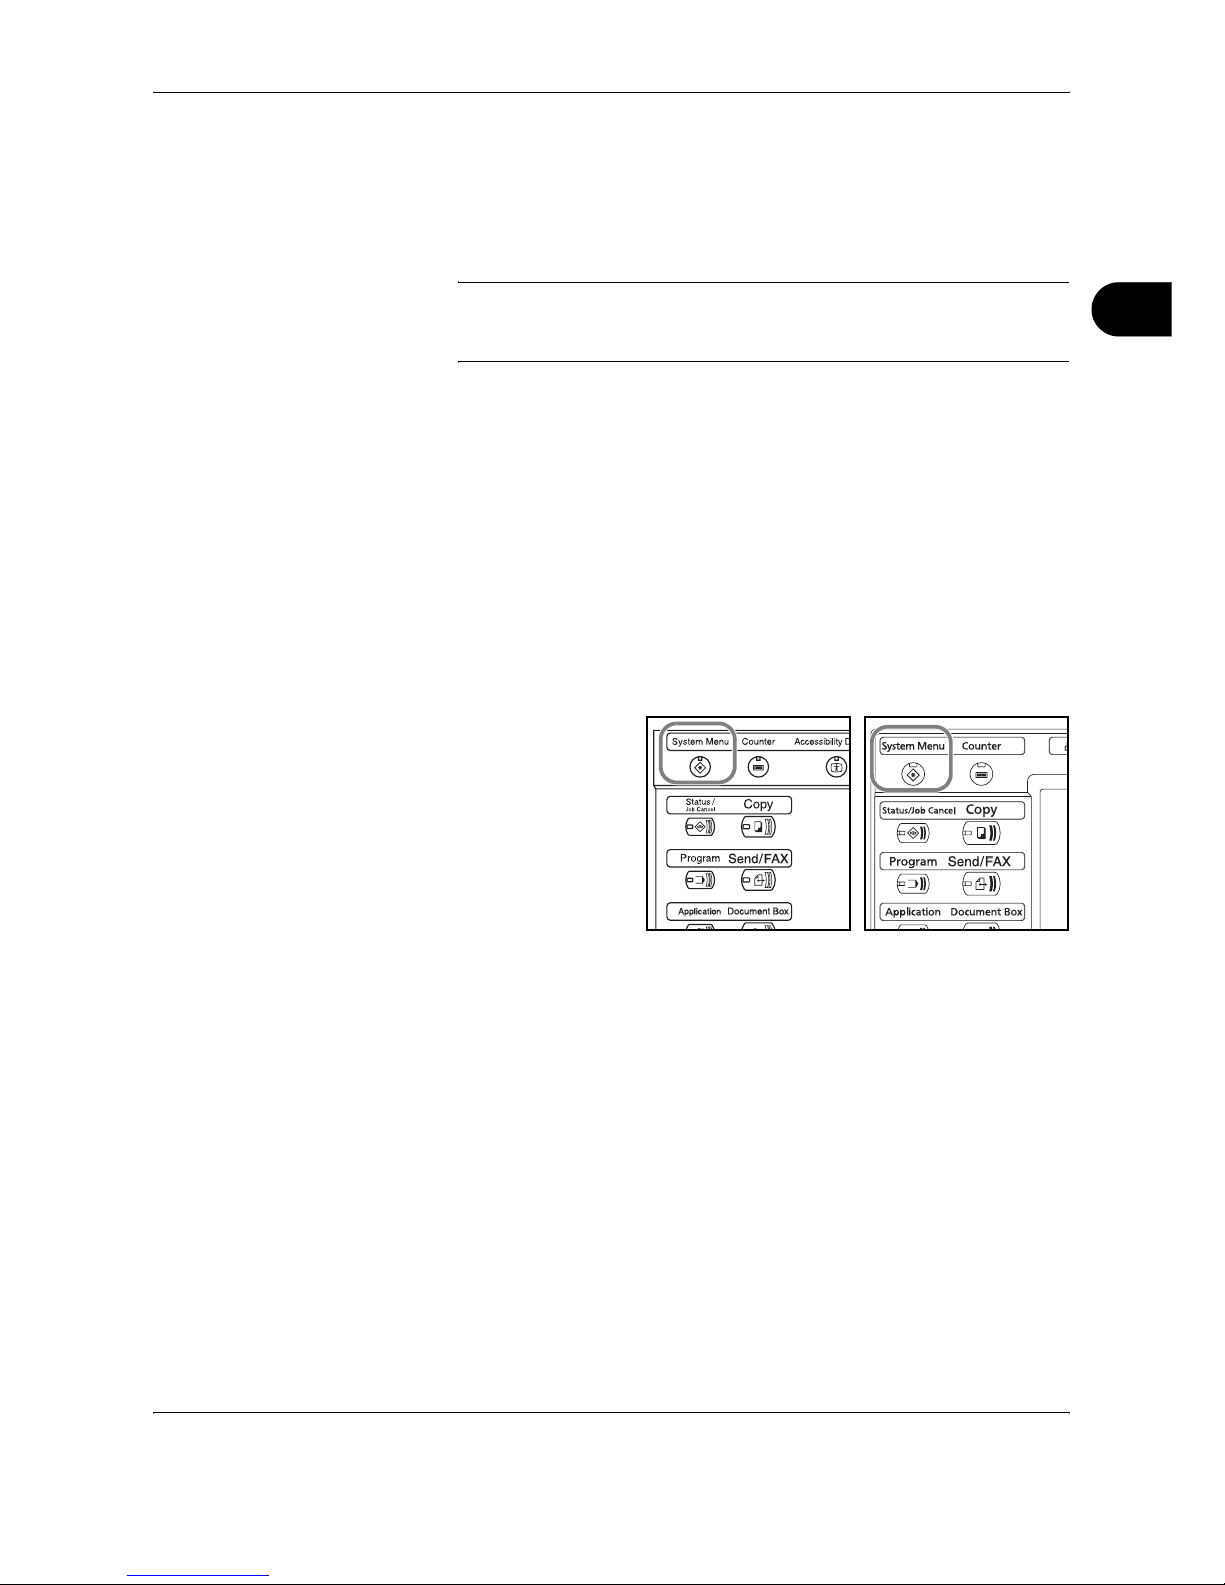
Checking the Send Status
1 Press the
Status/Job
Cancel key.
2 Press [Sending
Jobs].
The list of accepted
time, destination,
and status are
displayed for each
job.
Cancelling the Transmission
On the Sending Jobs
screen above, select
the job, and press
[Cancel].
When the cancel
confirmation screen
appears, press
[Yes].
NOTE: Pressing the Stop key on the operation panel while originals are
being scanned cancels the transmission.
30/40/50 ppm model 25 ppm model
Status
10/10/2007 10:00
Print ing Jobs Sendi ng Jobs St ori ng Jobs
Devic e/
Com munic atio n
Paper /Suppli es
Stat us Sche duled Job Log
All
Job No . Ac cepted T im e Type Des tinat ion Us er Nam e Stat us
Cancel Detai l
1/1
Stat us
Sending
Executing TX job 1.
000001 10: 00 1111
Job Ty pe
Status
10/10/2007 10:00
Print ing Jobs Sendi ng Jobs St ori ng Jobs
Devic e/
Com munic atio n
Paper /Suppli es
Stat us Sche duled Job Log
All
Job No . Ac cepted T im e Type Des tinat ion Us er Nam e Stat us
Cancel Detai l
1/1
Stat us
Sending
Executing TX job 1.
000001 10: 00 1111
Job Ty pe
Page 43
FAX Operation (Basic)
OPERATION GUIDE 3-11
3
FAX Automatic Reception
When using this machine as a FAX-dedicated machine that does not
receive telephone calls, set the machine to FAX-dedicated reception. No
special operation is required when receiving faxes.
NOTE: When you are receiving DRD service from a telephone company,
change the reception method to [Auto (DRD)]. For details, refer to DRD
Reception (Available for inch versions only) on page 6-14.
Reception Method
This machine allows the following five reception methods.
• Auto (Normal)
• Auto (FAX/TEL) (Refer to page 6-2.)
• Auto (TAD) (Refer to page 6-4.)
• Auto (DRD) (Refer to page 6-14.)
• Manual (Refer to page 4-12.)
Checking and Changing the Reception Method
1
Press the System
Menu key.
2
Press [FAX/i-FAX], [Next] of Reception, [Next] of FAX, and then [Change]
of RX Setting.
3
Select [Auto (Normal)].
4
Press [OK].
5
To exit from this setup, press [Close] several times until the System Menu
default screen is displayed.
Reception Starts
1
When a fax has been sent to you, the machine rings the registered number
of times, and then starts receiving the fax.
After reception has started, the Receive indicator blinks.
30/40/50 ppm model 2
5 ppm model
Page 44
FAX Operation (Basic)
3-12 OPERATION GUIDE
NOTE: You can change the number of times the ringing tone rings.
(Refer to Rings on page 6-7.)
To cancel the reception, refer to Cancelling Transmission (Disconnection
of Communication) on page 3-15.
Memory Reception
When the machine cannot print a fax due to paper running out or a paper
jams, it temporarily stores originals that have been sent in the image
memory. When the machine returns to the printable state, printing starts.
During memory reception, FAX Reception Printing Jobs are displayed on
Printing Jobs of the Status screen. To print the received originals, supply
paper or remove jammed paper.
NOTE: For the Status screen, refer to the machine’s Advanced Operation
Guide.
Reception Print
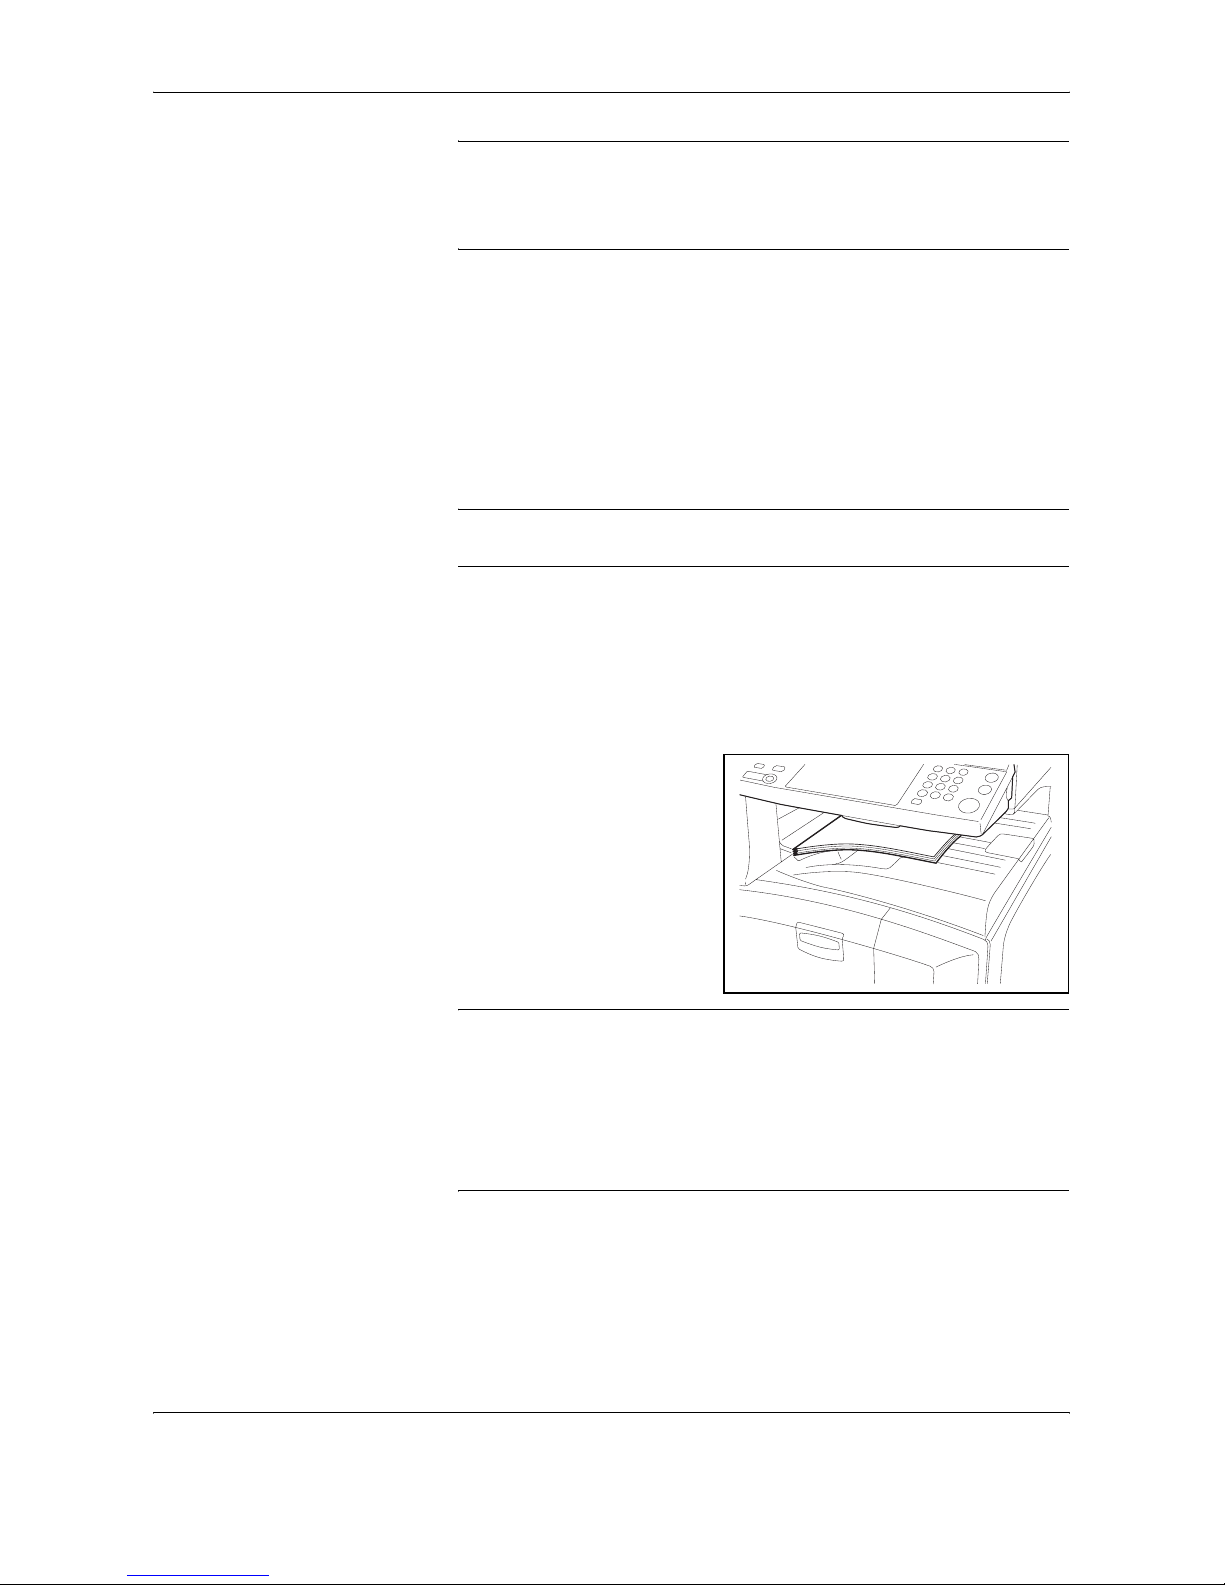
2
Received originals are output on the top tray with the print side facing
downward. Up to 250 sheets of plain paper (80 g/m²) can be held on the
top tray. However, the number of sheets varies with the condition of the
paper to be used.
IMPORTANT:
• The number of sheets that can be held varies with the output tray.
Refer to the machine’s Operation Guide. When the number of sheets
to be printed exceeds the number of sheets that can be held, remove
all the paper on the top tray.
• Even if the machine is not capable of printing due to paper running out
or a paper jam, it can still receive faxes (memory reception).
Page 45
FAX Operation (Basic)
OPERATION GUIDE 3-13
3
Cancelling Communication
The method for cancelling communication with this machine differs
depending on the transmission method (memory transmission or direct
transmission) and communication form. Methods of cancelling in various
cases are explained here.
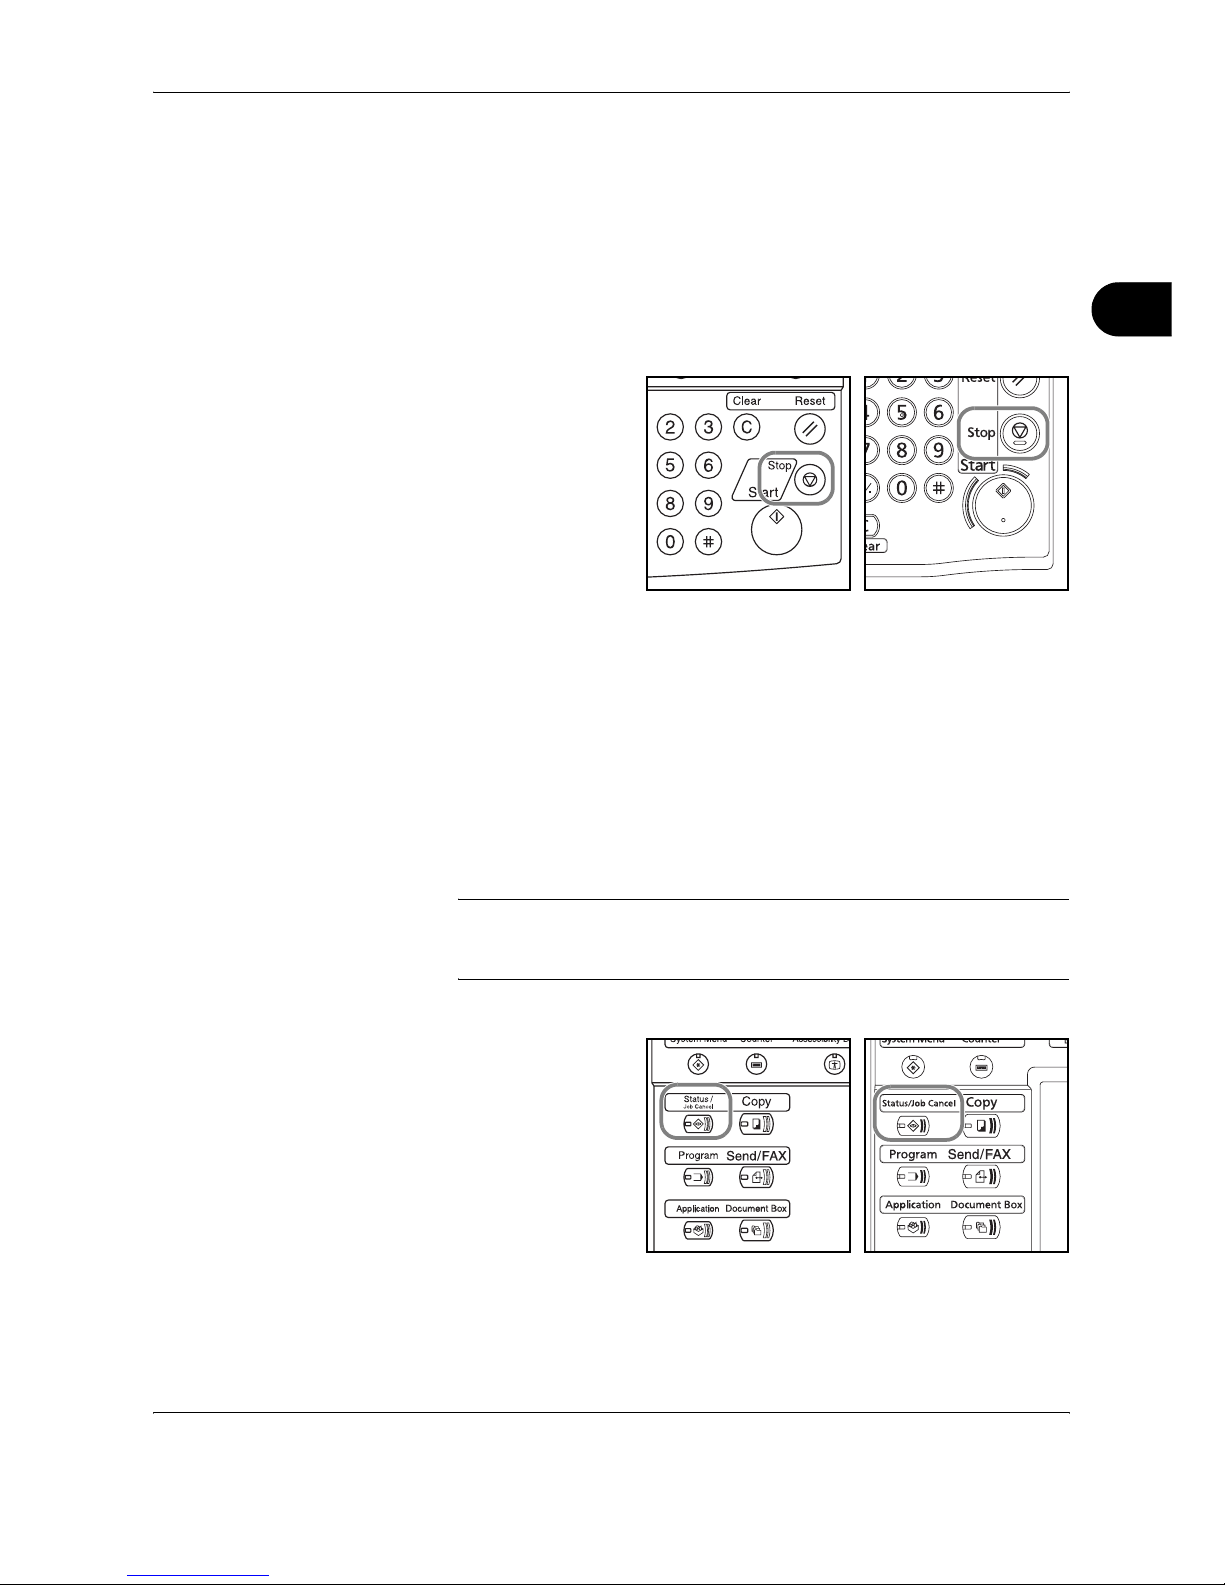
Cancelling Memory Transmission (while originals are being scanned)
During memory
transmission, to
cancel scanning
while originals are
being scanned,
press the Stop key
on the operation
panel, or press
[Cancel] on the touch
panel. Scanning of
originals is canceled,
and the originals are
ejected. When
originals remain in
the document
processor, take them
out from the original
output table.
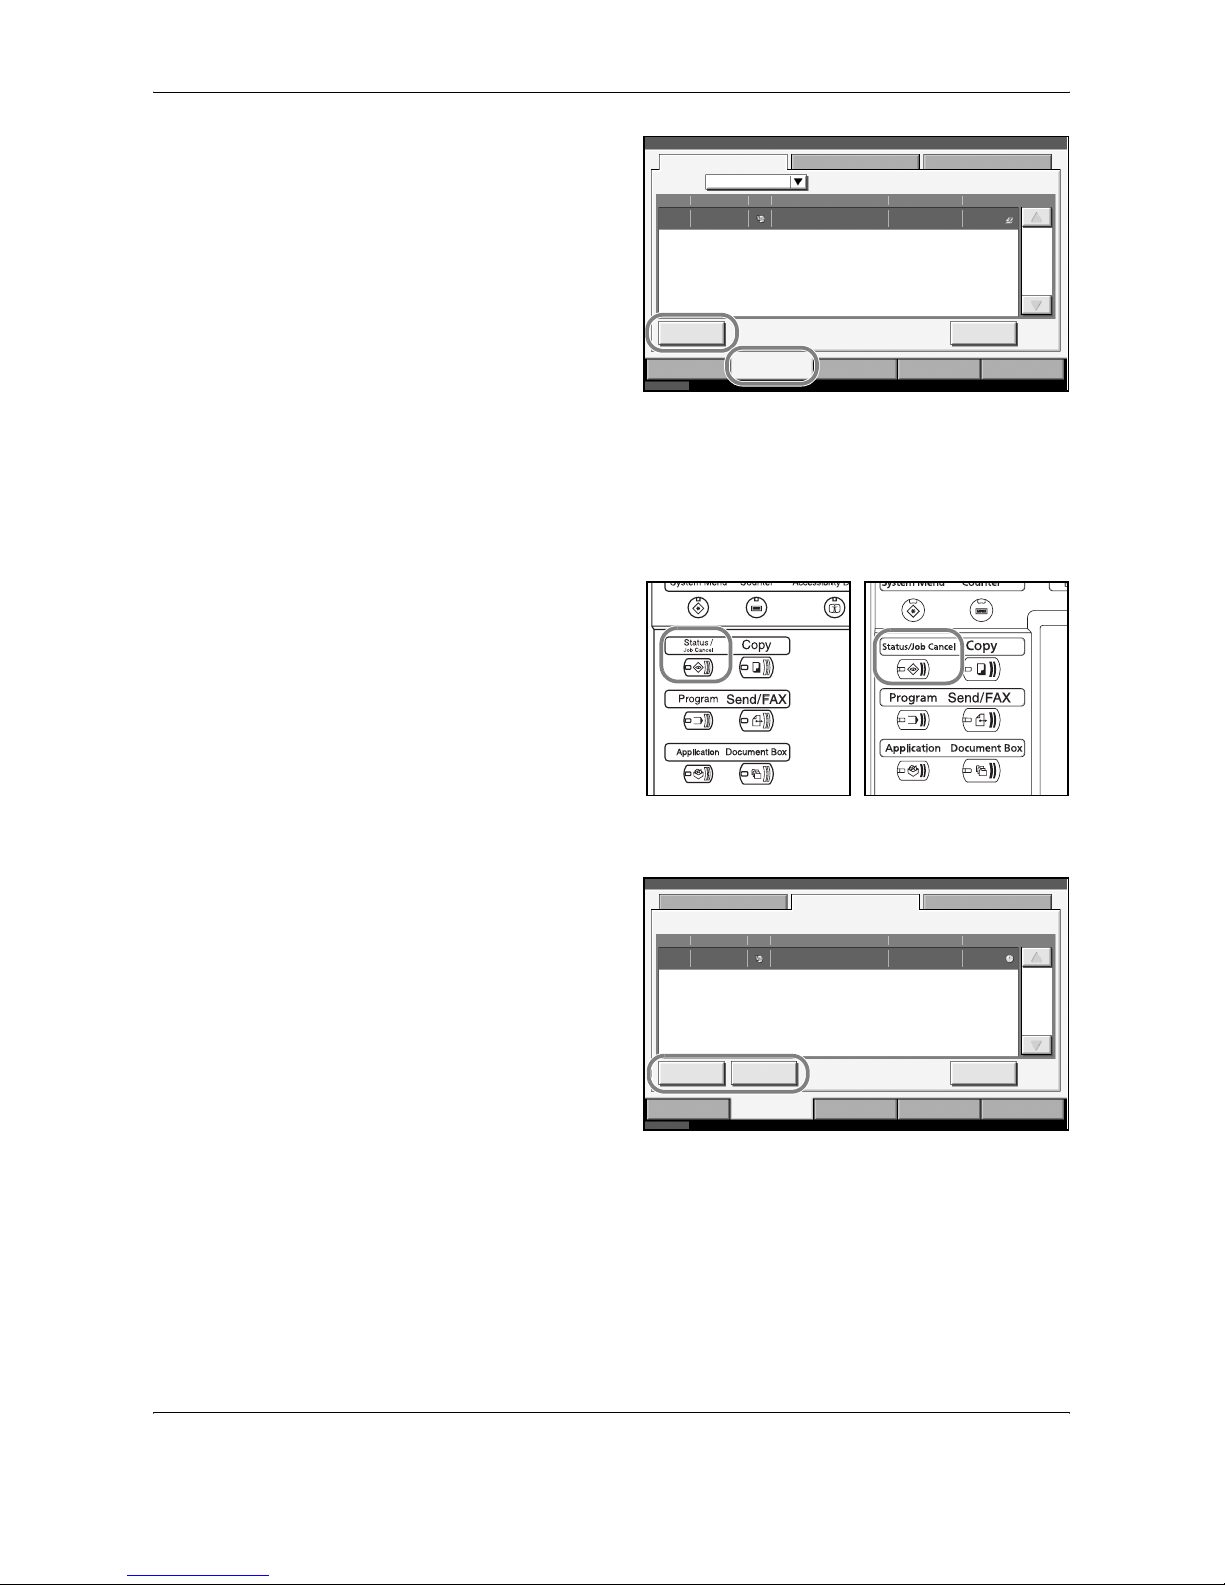
Cancelling Memory Transmission (during communication)
During memory transmission, to cancel communication after it has started
following the completed scanning of originals, use the following procedure.
NOTE: You can cancel transmission by disconnecting the telephone line.
For details, refer to Cancelling Transmission (Disconnection of
Communication) on page 3-15.
1
Press the Status/
Job Cancel key.
2
Press [Sending Jobs].
30/40/50 ppm model 25 ppm model
30/40/50 ppm model 25 ppm model
Page 46
FAX Operation (Basic)
3-14 OPERATION GUIDE
3
Select the job you
want to cancel, and
press [Cancel].
When the cancel
confirmation screen
appears, press
[Yes].
Communication is
canceled.
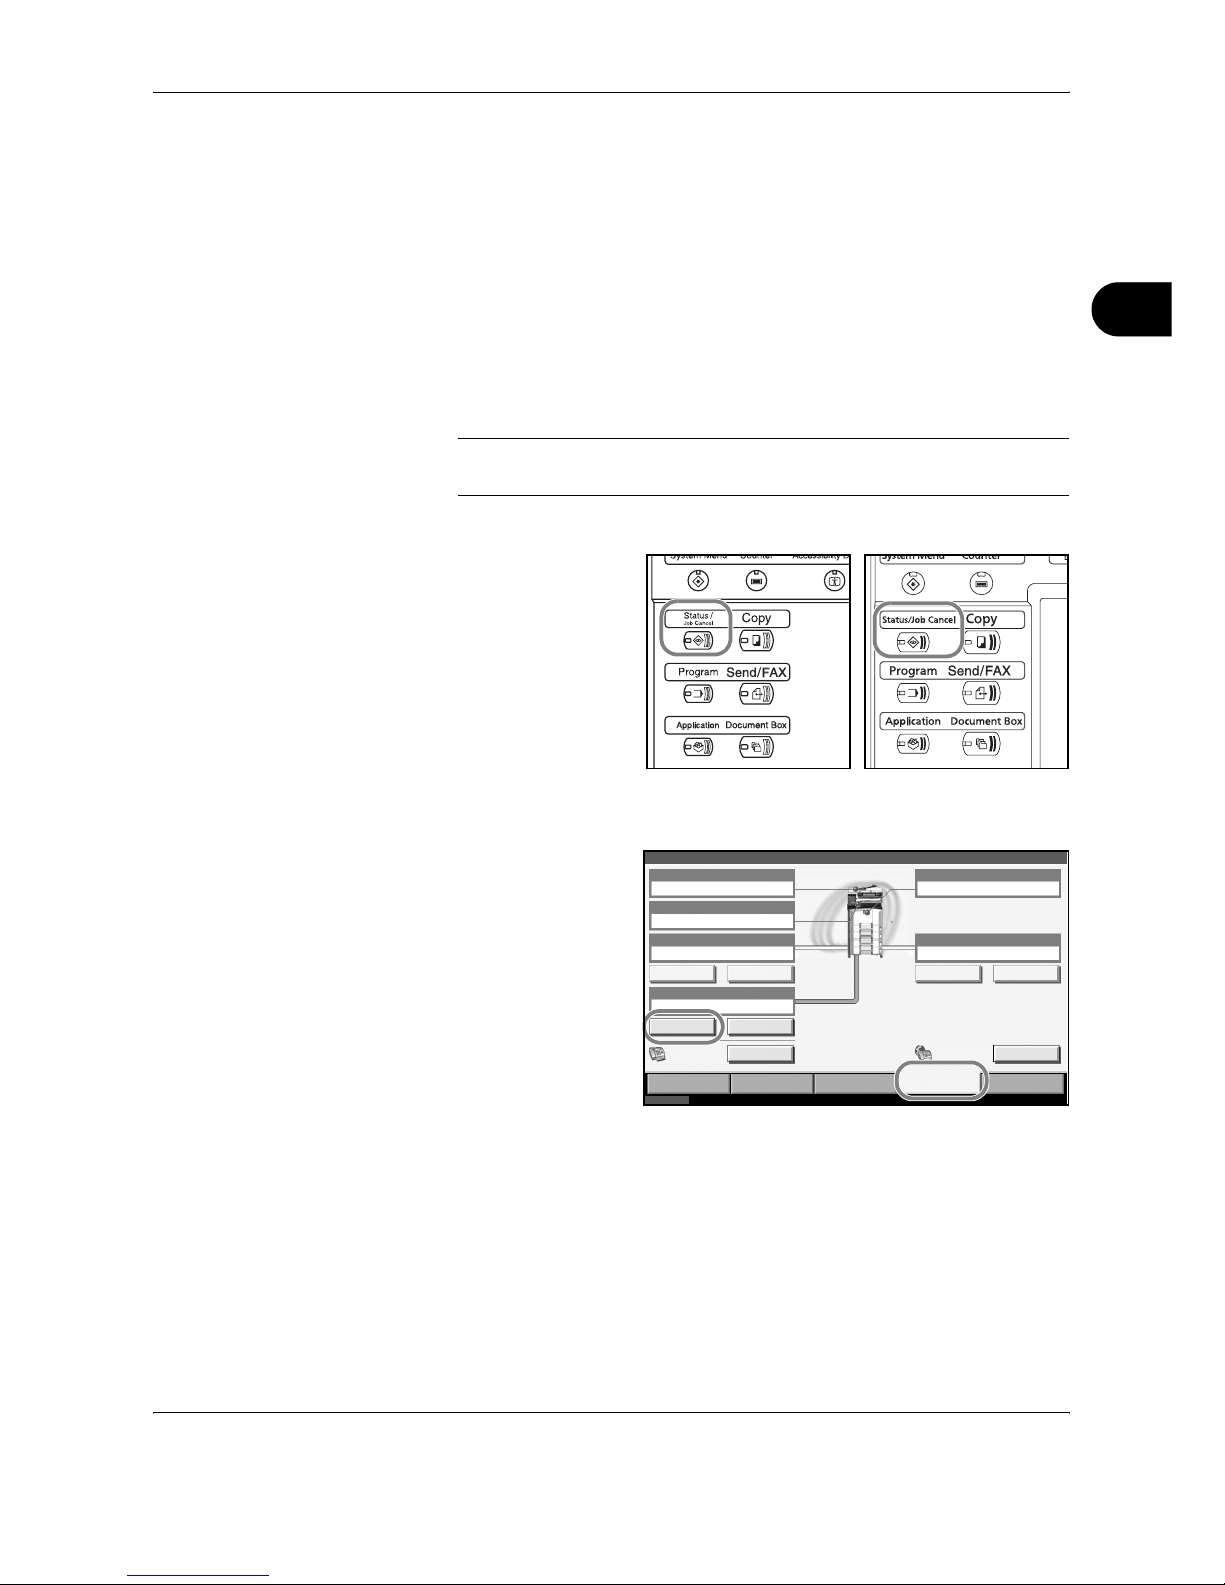
Cancelling and Sending Delayed Transmissions (Queued)
To cancel delayed transmissions that are queued, or to send delayed
transmissions immediately rather than waiting for the specified time, use
the procedure below.
1
Press the Status/
Job Cancel key.
2
Press [Sending Jobs], and then [Scheduled Job].
3
To cancel a delayed
transmission, select
the job to be
cancelled and press
[Cancel].
When the cancel
confirmation screen
appears, press
[Yes].
Transmission is
canceled.
To send delayed transmission immediately, select the job to be sent and
press [Start Now].
When the send confirmation screen appears, press [Yes].
Transmission begins.
Status
10/10/2007 10:00
Print ing Jobs Sendi ng Jobs St ori ng Jobs
Devic e/
Com munic atio n
Paper /Suppli es
Stat us Sche duled Job Log
All
Job No . Ac cepted T im e Type Des tinat ion Us er Nam e Stat us
Cancel Detai l
1/1
Stat us
Sending
Executing TX job 1.
000001 10: 00 1111
Job Ty pe
30/40/50 ppm model 25 ppm model
Status
10/10/2007 10:00
Print ing Jobs Sendi ng Jobs St oring Jobs Dev ic e /
Com munic atio n
Paper /Suppli es
Stat us Sche duled Job Log
Job No . Acce pted T ime Type Des ti nati on User Name
Star t T ime
Cancel Detai l
1/1
Stat us
12: 00
000007 9:30 A O FFICE
Star t Now
Executing TX job 7.
Page 47
FAX Operation (Basic)
OPERATION GUIDE 3-15
3
Cancelling Direct Transmission
During direct transmission, to cancel communication during transmission,
press the Stop key on the operation panel or [Cancel] on the touch panel.
The originals that have been scanned are ejected, and the screen returns
to the send default screen. When originals remain in the document
processor, take them out.
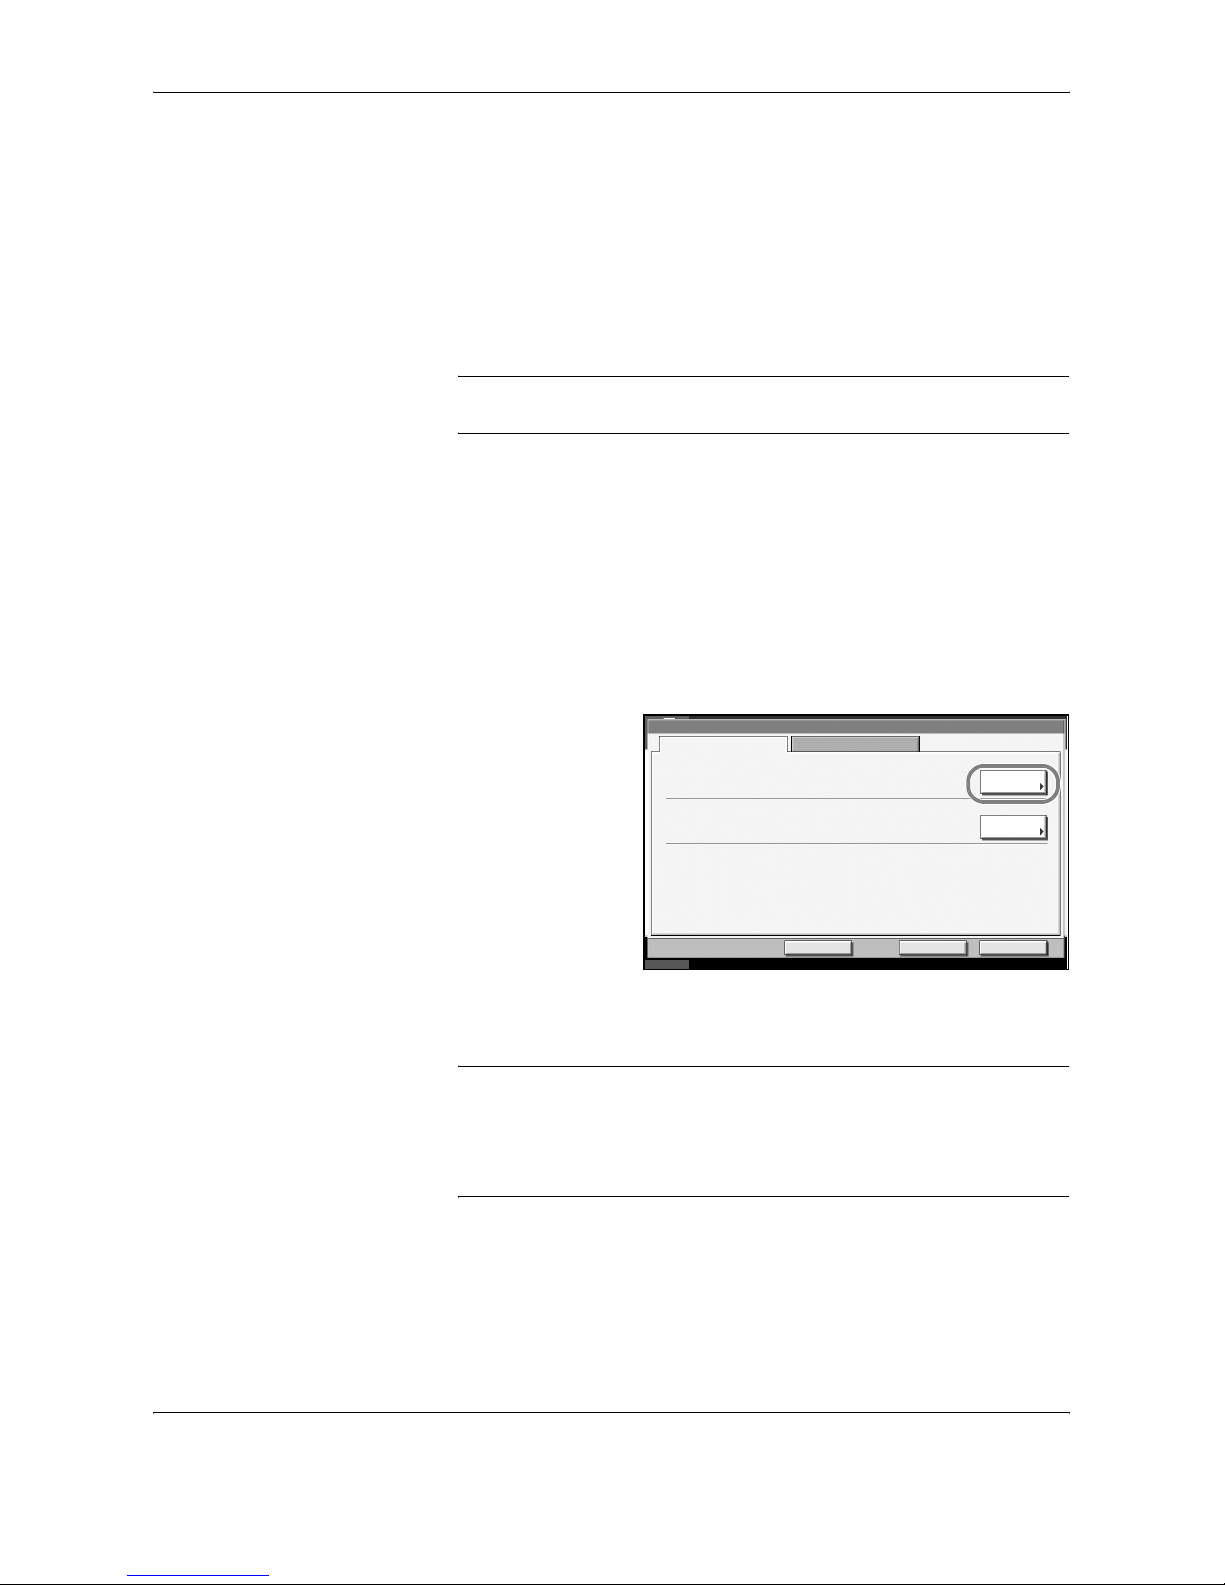
Cancelling Transmission (Disconnection of Communication)
When you cancel sending or receiving by disconnecting the telephone line
during communication, use the following procedure.
NOTE: If the Dual FAX option is installed, disconnect the line currently
being used for communication.
1
Press the Status/
Job Cancel key.
2
Press [Device/Communication].
3
Press [Line Off] of
FAX Port 1 or FAX
Port 2 (option).
When the cancel
confirmation screen
appears, press
[Yes].
The line in
transmission is
disconnected.
Cancelling Polling or Sub Address Bulletin Board Transmissions
To cancel a polling or sub address bulletin board transmission, delete the
polling transmission original saved in the polling box. For information on
how to delete the saved original, refer to Deleting Originals in a Polling Box
on page 4-61.
30/40/50 ppm model 25 ppm model
Status
Stat us
Ready.
Devic e/
Com munic atio n
Paper /Suppli es
10/10/2007 10:00
Scanner
Ready.
Print er
Not connected.
Removable Memory
Hard Di sk
Not connected.
Memory Card
Stor ing JobsSending JobsPrint ing Jobs
Format Remove
Line Of f M anual R X
Receiving...
FAX Li ne 1
Log
Format Printing list
FAX
Check New FAXFAX/i-FAX
Page 48
FAX Operation (Basic)
3-16 OPERATION GUIDE
Using the Address Book
You can select the destination for a fax or i-FAX from the Address Book.
Registering a New Destination
You can register new destinations to the Address Book. There are two
registration methods - contact registration; and, group registration for
registering several contact registrations as a unit.
NOTE: To register an i-FAX address as a contact, refer to Contact
Registration (i-FAX) on page 3-19.
Contact Registration (fax)
Up to 2,000 destinations can be registered. Destination name, fax number,
sub address communication, encryption, transmission start speed, and
ECM communication can be registered for each destination.
1
Press the System Menu key.
2
Press [Edit Destination], [Register/Edit] of Address Book, [Add], [Contact],
and then [Next].
3
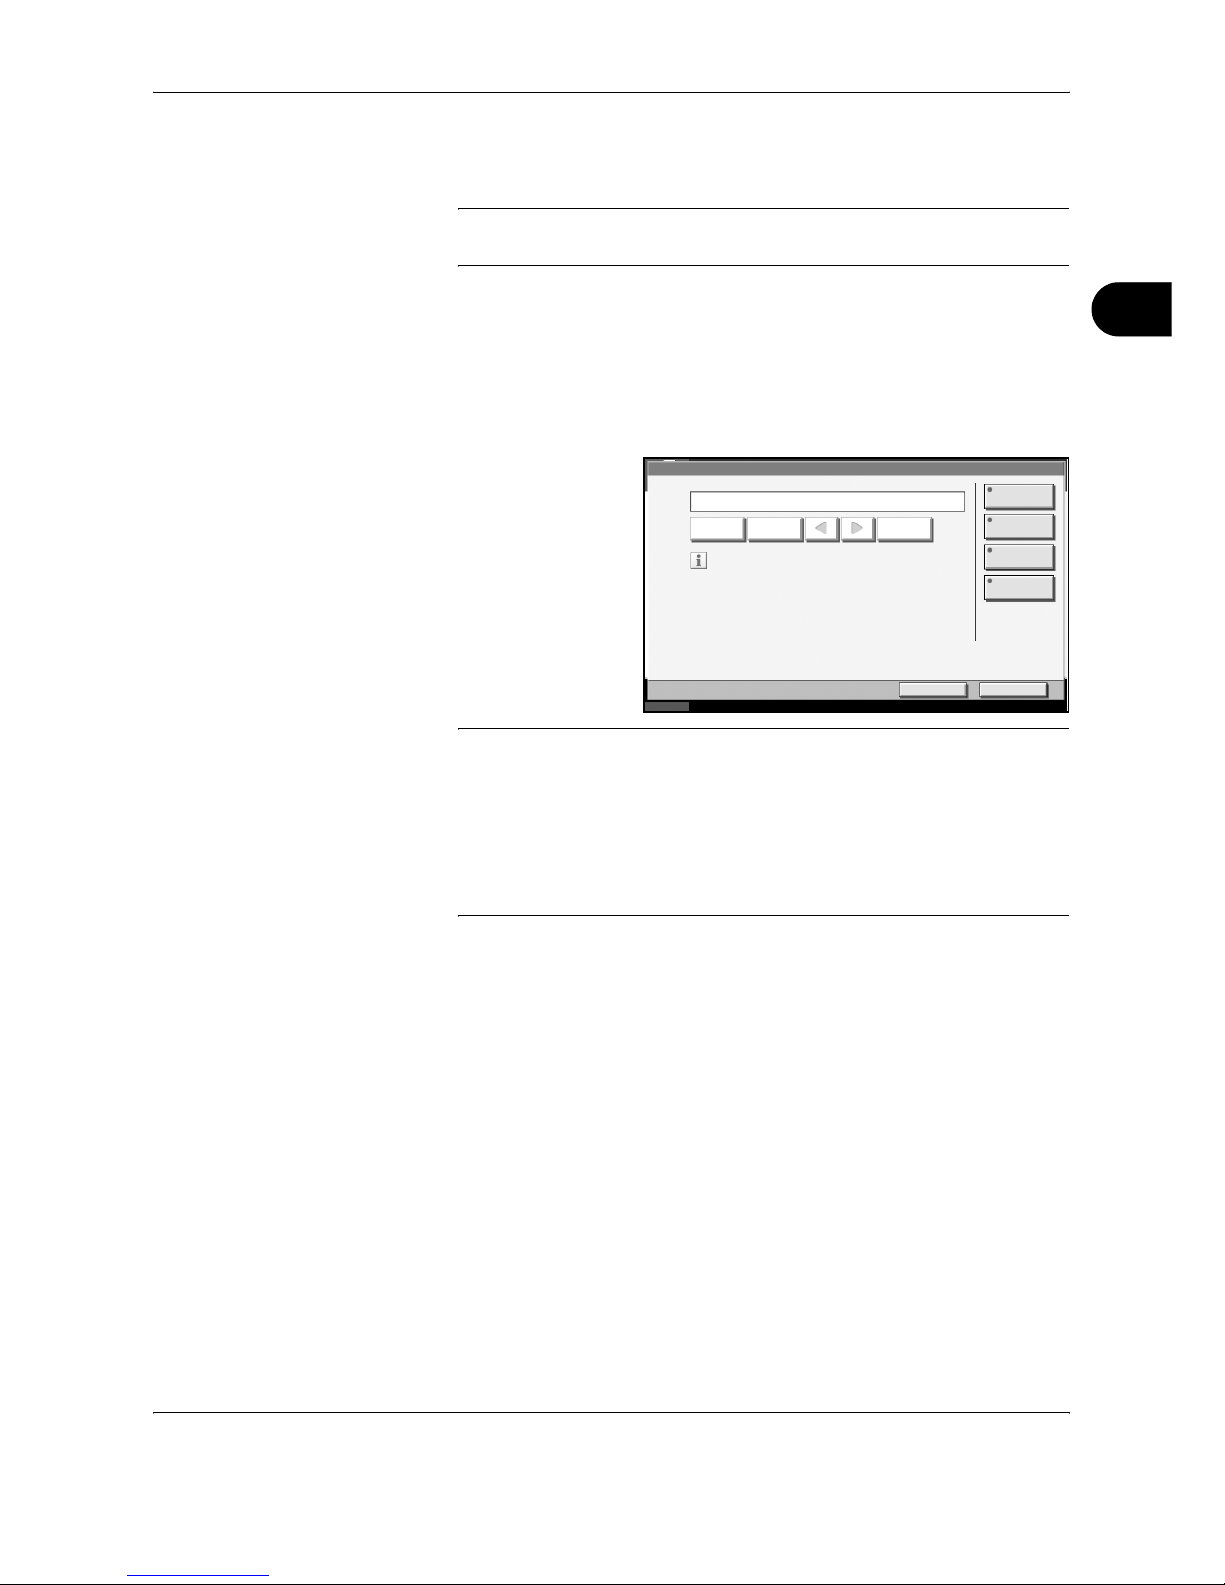
Press [Change] of
Address Number.
4
Using [+]/[-] or the numeric keys, enter the custom address number (0001
to 2,500).
NOTE: The address number is the identification number for each
destination. You can select a number available from a total of 2,500
numbers for registration - 2,000 numbers for contact registration and 500
numbers for group registration.
When ‘0000’ is displayed, an available number is automatically assigned.
5
Press [OK].
6
Press [Change] of Name.
Status
Contact Name
Back Register
Address Number:
10/10/2007 10:00
Addre ss
Name:
Change
Change
Cancel
Auto
Addre ss:
Page 49
FAX Operation (Basic)
OPERATION GUIDE 3-17
3
7
Enter the destination name to be displayed on the Address Book, and
press [OK]. Up to 32 characters can be entered.
NOTE: For details on character entry, refer to Character Entry Method on
page 2 of the Appendix.
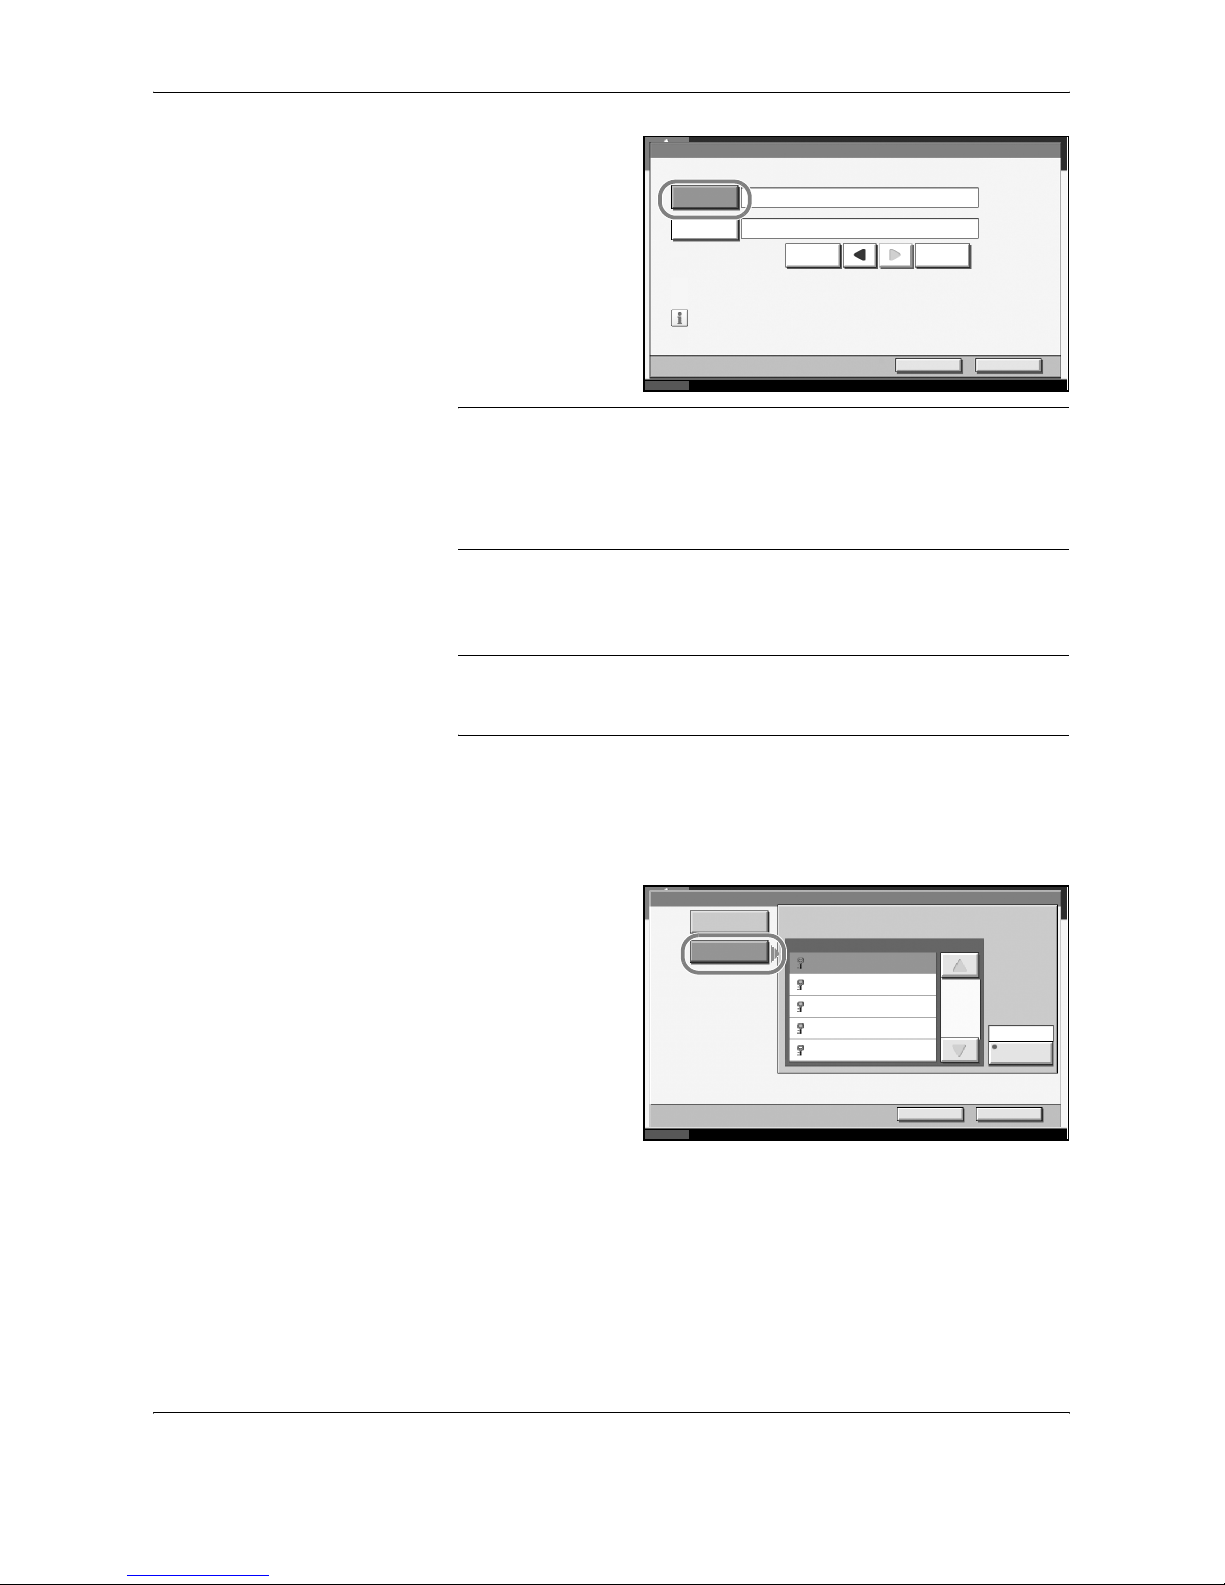
8
Press [Address].
9
Use [S]/[T] to select FAX.
10
Press [Change Dest.].
11
Use the numeric
keys to enter the
number of the
receiving system.
NOTE: Up to 32 digits can be entered as the number of the receiving
system.
Press [Space] to enter a space.
Use [W] or [X] to move the cursor.
To correct the fax number, press [Back Space] on the touch panel, and
delete the digits one by one before reentering the fax number. To delete
the number entirely, press the Clear key on the operation panel.
[Pause]
Pressing this key adds about three seconds of waiting time during dialing.
For example, when dialing the receiving system on an external line, you
can use this method to insert a pause before resuming dialing after you dial
a specific number.
12
Press [Sub Address]. When you do not use sub address communication,
go to step 16.
Status 10/10/2007 10:00
Cancel OK
Pause
Addre ss - FA X No. Ent ry
Sub Addre ss
Transmission
Start Speed
ECM
Encr ypted
Transmission
Back SpaceSpace
Add a new FAX destina ti on.
Enter FAX number wi th num eric k eys.
Page 50
FAX Operation (Basic)
3-18 OPERATION GUIDE
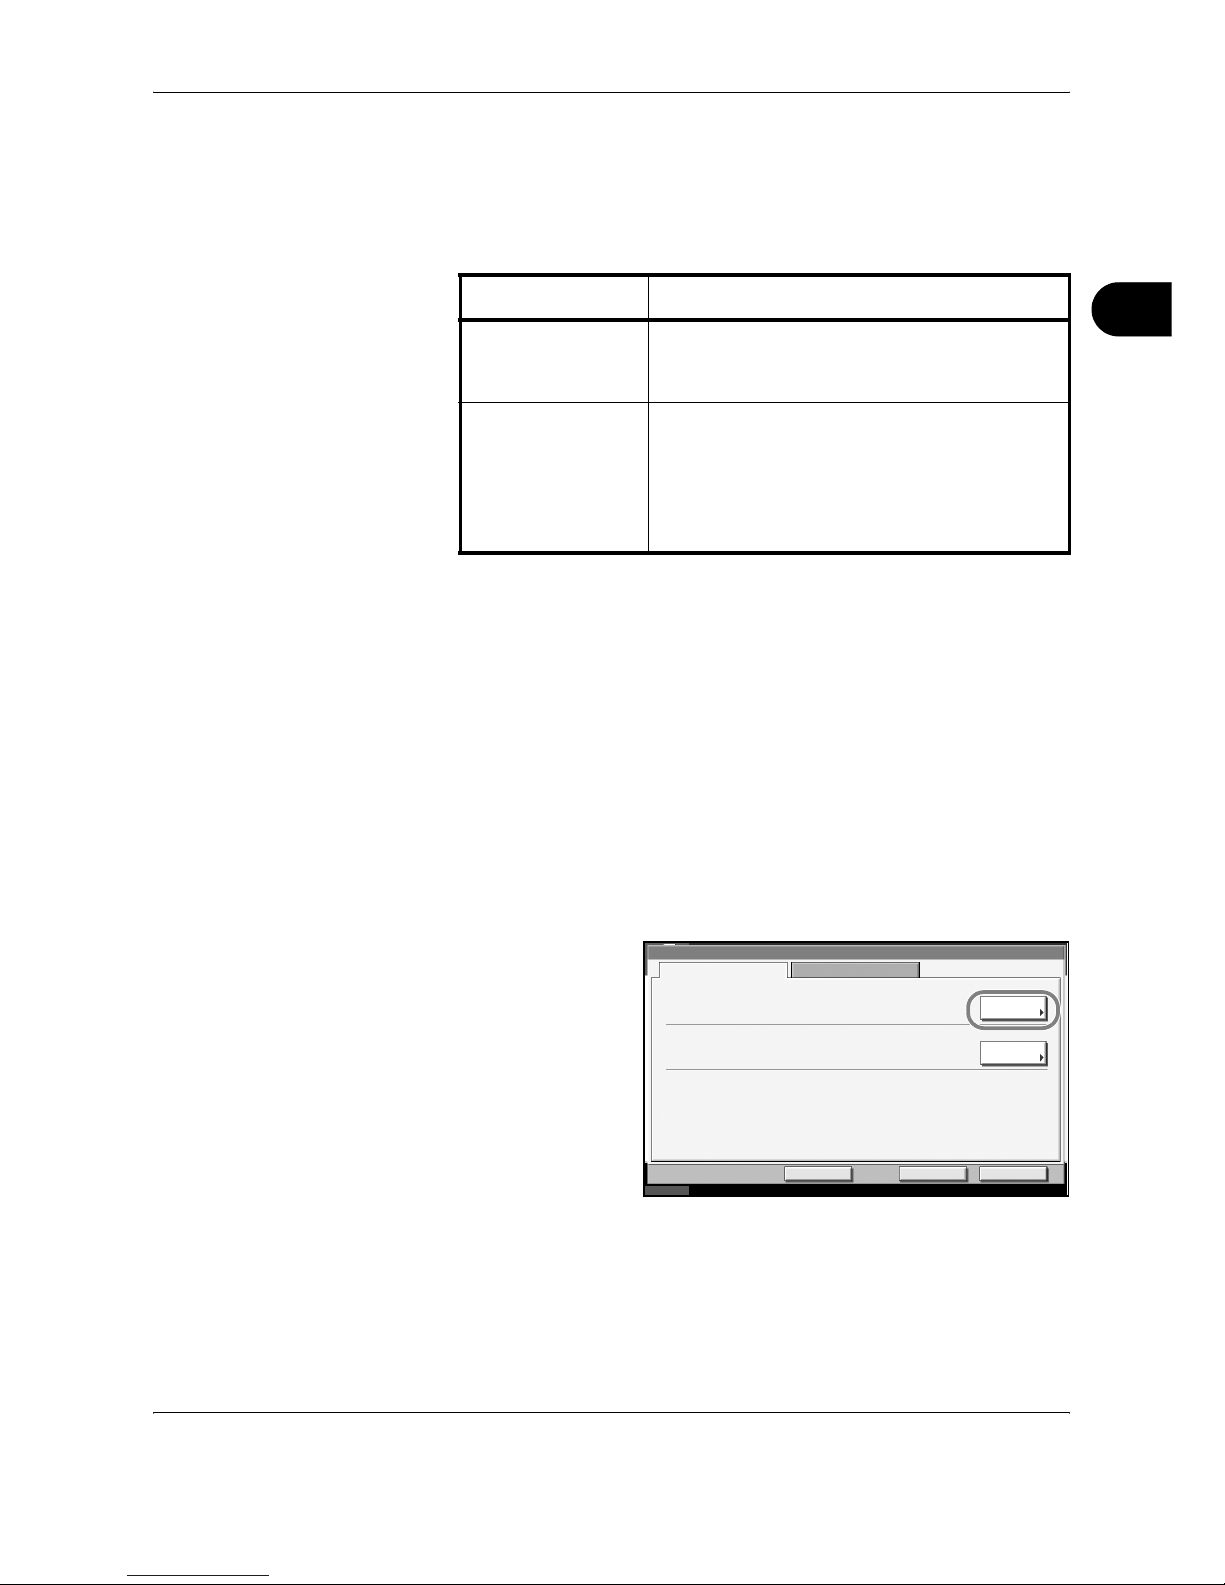
13
Press [Sub Address
Max 20 digits] and
enter the sub
address using the
numeric keys.
NOTE: You can use up to 20 digits including the numbers from 0 to 9,
‘ (space)’, ‘#’ and ‘*’ characters to enter a sub address.
Press [Space] to enter a space.
Use [W] or [X] to move the cursor.
Pressing [Back Space] deletes the character to the left of the cursor.
14
Press [Password] and enter the sub address password using the numeric
keys.
NOTE: You can use up to 20 digits including the numbers from 0 to 9,
‘ (space)’, ‘#’ and ‘*’ characters to enter a sub address password. When
the machine receives originals, a sub address password is not used.
15
Press [OK].
16
Press [Encrypted Transmission]. If you are not using encryption, go to step
21.
17
Press [On], and
select Encryption
Key No.
18
To specify the FAX Box of the receiving system, press [Encryption Box],
and go to the next step.
To print originals in the receiving system, select [Not Use], press [OK], and
go to Step 21.
19
Press [Use], and enter the encryption FAX Box number (four digits) with
the numeric keys, and press [OK].
Status
FAX No. Entr y - Sub Addr ess
Cancel OK
Sub Addre ss
Max . 20 digits
10/10/2007 10:00
Password
Set s ub address .
Enter sub addr es s and pas sword
usi ng numer ic key s. ( Up to 20 di gits.)
1234567890
Back SpaceSpac e
Status
Cancel OK
10/10/2007 10:00
FAX No. Entry - Encrypted Transmission
Off
On
Not Us e
01
02
03
04
05
001/001
Encr ypti on
Box
Page 51
FAX Operation (Basic)
OPERATION GUIDE 3-19
3
20
Press [OK].
21
If necessary, change the settings for transmission start speed and ECM
communication. Change the settings after pressing each key, and press
[OK].
22
Check if each item has been entered correctly, and press [OK].
23
Check if the destination has been set correctly, and press [Register]. The
destination is added to the Address Book.
Contact Registration (i-FAX)
Up to 2,000 contacts can be registered. Contact name, i-FAX address,
transmission mode and the conditions for the destination machine can be
registered for each contact.
1
Press the System Menu key.
2
Press [Edit Destination], [Register/Edit] of Address Book, [Add], [Contact],
and then [Next].
3
Press [Change] of
Address Number.
4
Using [+]/[-] or the numeric keys, enter the custom address number (0001
to 2,500).
Key Description
Transmission Start
Speed
To change the transmission start speed, press
this key. Select the speed from 33,600 bps,
14,400 bps, and 9,600 bps.
ECM ECM (error correction mode) is a function to
automatically resend an image that has not
been correctly sent or received due to the
effects of noise on the telephone line during
transmission. To change the ECM
communication setting, press this key.
Status
Contact Name
Back Register
Address Number:
10/10/2007 10:00
Addre ss
Name:
Change
Change
Cancel
Auto
Addre ss:
Page 52
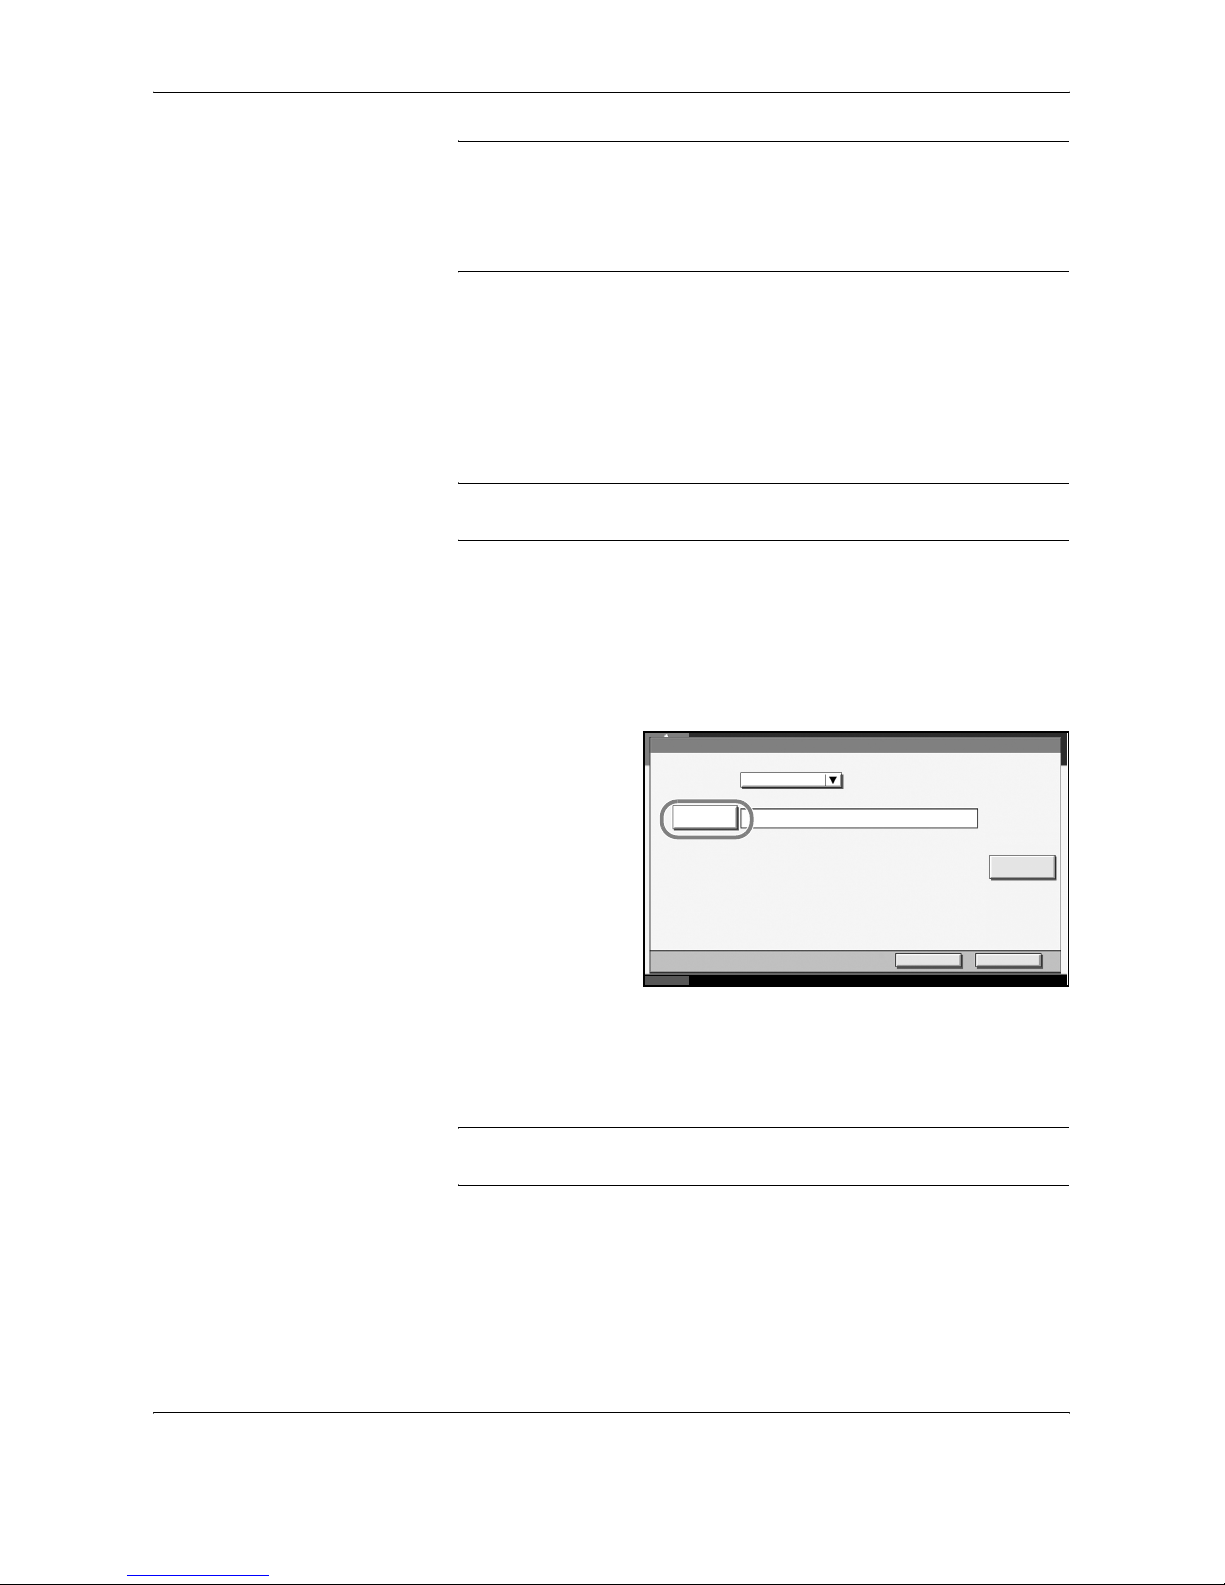
FAX Operation (Basic)
3-20 OPERATION GUIDE
NOTE: The address number is the identification number for each
destination. You can select numbers available from a total of 2,500
numbers for registration - 2,000 numbers for contact registration and 500
numbers for group registration.
When ‘0000’ is displayed, the number available is automatically assigned.
5
Press [OK].
6
Press [Change] of Name.
7
Enter the destination name to be displayed on the Address Book, and
press [OK]. Up to 32 characters can be entered.
NOTE: For details on character entry, refer to Character Entry Method on
page 2 of the Appendix.
8
Press [Address].
9
Use [S]/[T] to select i-FAX.
10
Press [Change Dest.].
11
Press [i-FAX
Address].
12
Enter the destination address and press [OK]. Up to 126 characters can be
entered.
NOTE: For details on character entry, refer to Character Entry Method on
page 2 of the Appendix.
Status
10/10/2007 10:00
Cancel OK
i-F AX
Addre ss
Destination
Condition
Sim ple
Mode
i-F AX Addre ss Entry
Page 53
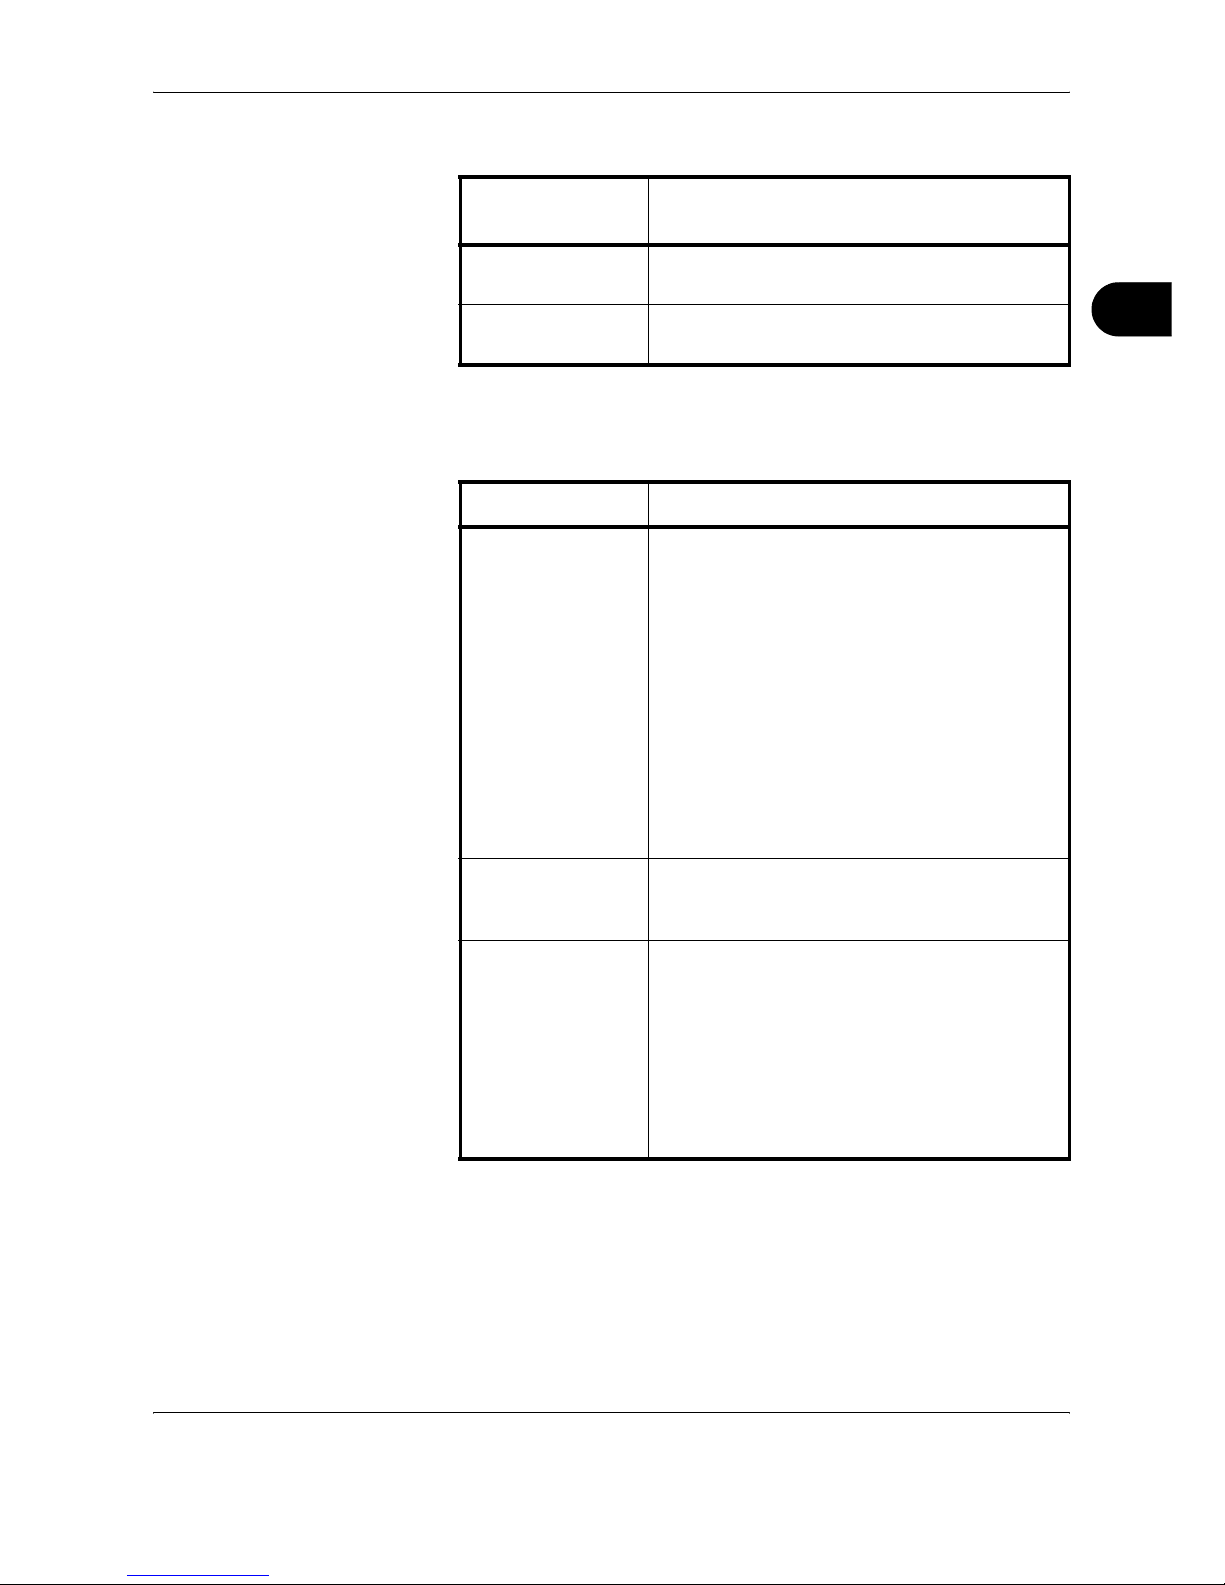
FAX Operation (Basic)
OPERATION GUIDE 3-21
3
13
Press [T] of Mode and select Simple or Full.
14
Press [Destination Condition].
15
Specify the destination conditions and press [OK].
16
Press [OK].
17
Press [OK].
18
Check if the destination has been set correctly, and press [Register].The
destination is added to the Address Book.
Transmission
mode
Description
Simple mode Transmission confirmation is not sent to the
destination machine.
Full mode Transmission confirmation is sent to the
destination machine.
Item Description
Resolution Specify the resolutions that can be received by
the destination fax machine.
If you try to send an i-FAX using a prohibited
resolution, it is automatically changed to a
permitted resolution and then sent.
• 200 × 100 dpi: Permitted (fixed)
• 200 × 200 dpi: Permitted (fixed)
• 200 × 400 dpi: Permitted or prohibited
• 400 × 400 dpi: Permitted or prohibited
• 600 × 600 dpi: Permitted or prohibited
To permit a resolution setting, press the key for
that resolution so that it is highlighted.
To prohibit a resolution, press the key again so
that it is no longer highlighted.
Compression Select a suitable file format for the destination
fax machine.
MH, MR, MMR or JBIG
Paper Size Specify the suitable document size options for
the destination fax machine.
• A4/Letter: Permitted (fixed)
• B4: Permitted or prohibited
• A3/Ledger: Permitted or prohibited
To permit a document size setting, press the key
for that size so that it is highlighted.
To prohibit a setting, press the key again so that
it is no longer highlighted.
Page 54
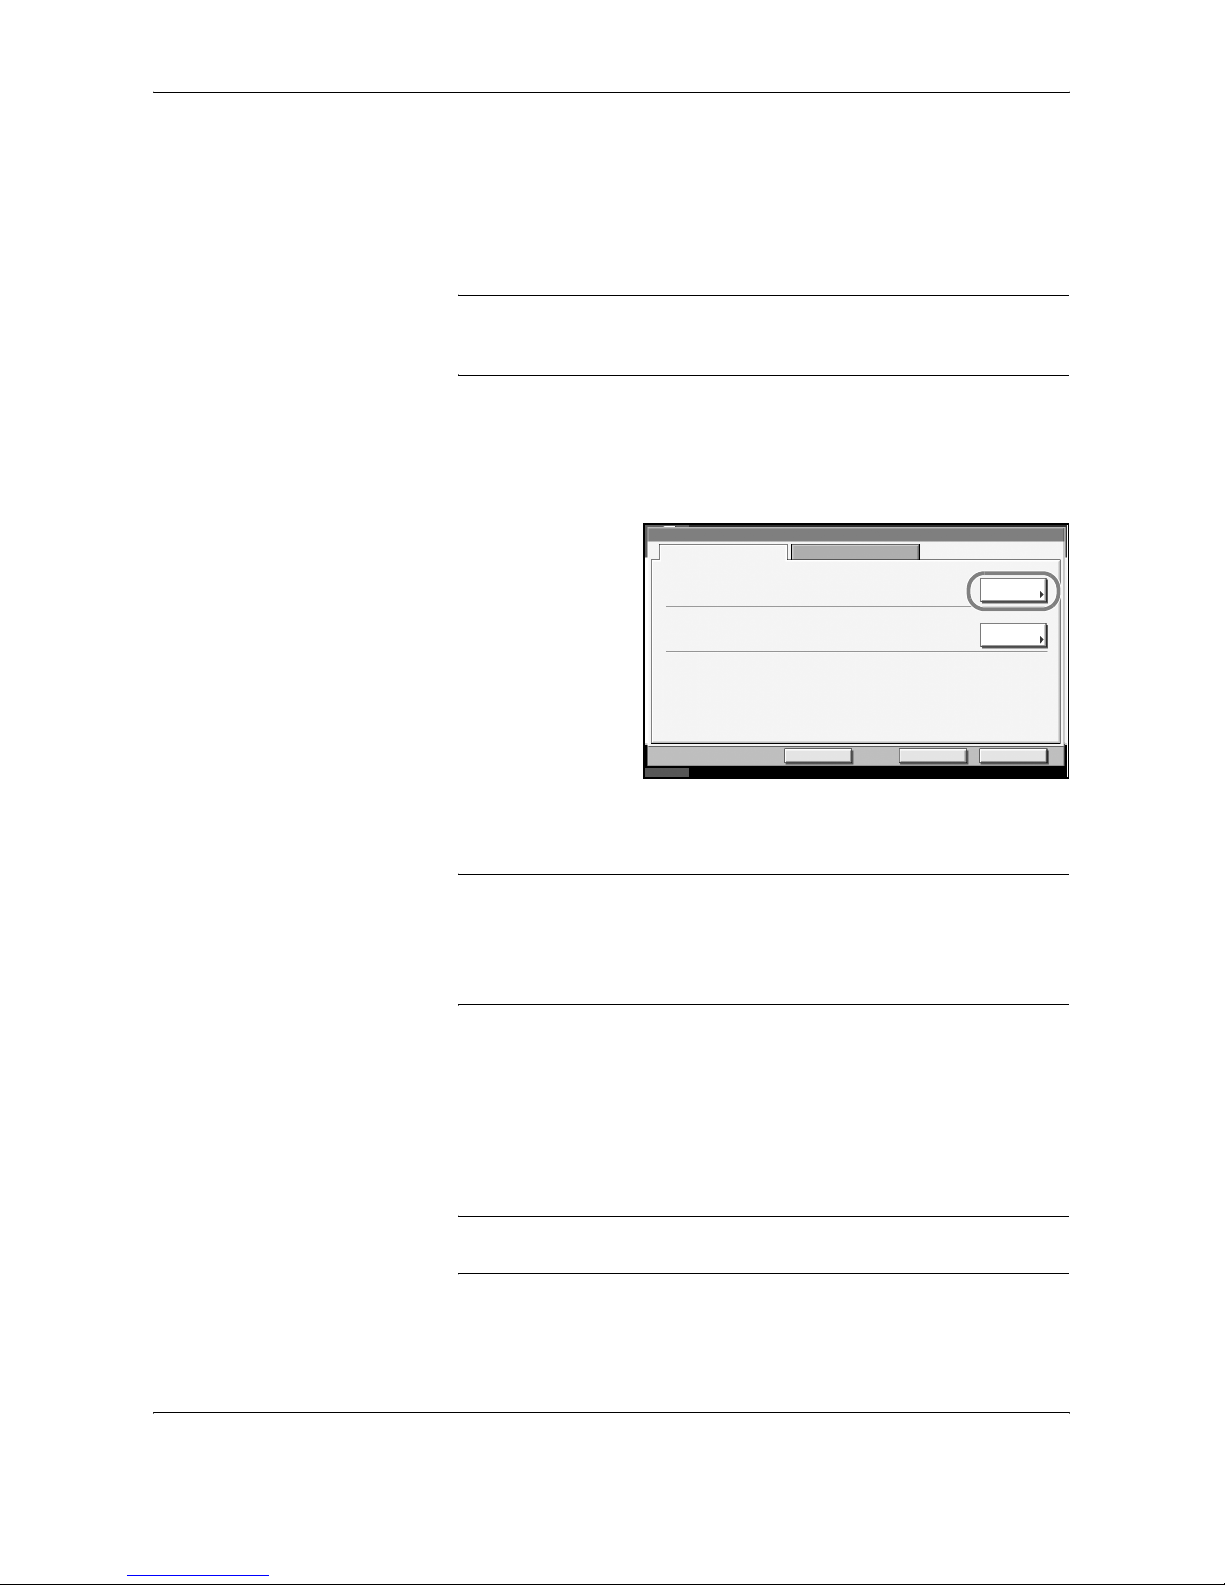
FAX Operation (Basic)
3-22 OPERATION GUIDE
Group Registration
You can register several destinations that have been registered to be
contacted as a unit. This method is convenient because several
destinations can be designated at one time. Up to 500 groups can be
registered.
NOTE: Group registration requires destinations that have been
registered as contact registration. Perform the necessary contact
registration in advance.
1
Press the System Menu key.
2
Press [Edit Destination], [Register/Edit] of Address Book, [Add], [Group],
and then [Next].
3
Press [Change] of
Address Number.
4
Use the numeric keys or [+]/[-] to enter the address number (0001 to
2,500).
NOTE: The address a number is the identification number for each
group. You can select a number available from a total of 2,500 numbers
for registration - 2,000 numbers for contact registration and 500 numbers
for group registration.
When ‘0000’ is displayed, an available number is automatically assigned.
5
Press [OK].
6
Press [Change] of Name.
7
Enter the group name to be displayed on the Address Book, and press
[OK]. Up to 32 characters can be entered.
NOTE: For details on character entry, refer to Character Entry Method on
page 2 of the Appendix.
8
Press [Group Member].
Status
Group Name
Back Register
Address Number:
10/10/2007 10:00
Group Member
Name:
Change
Change
Cancel
Auto
Addre ss:
Page 55
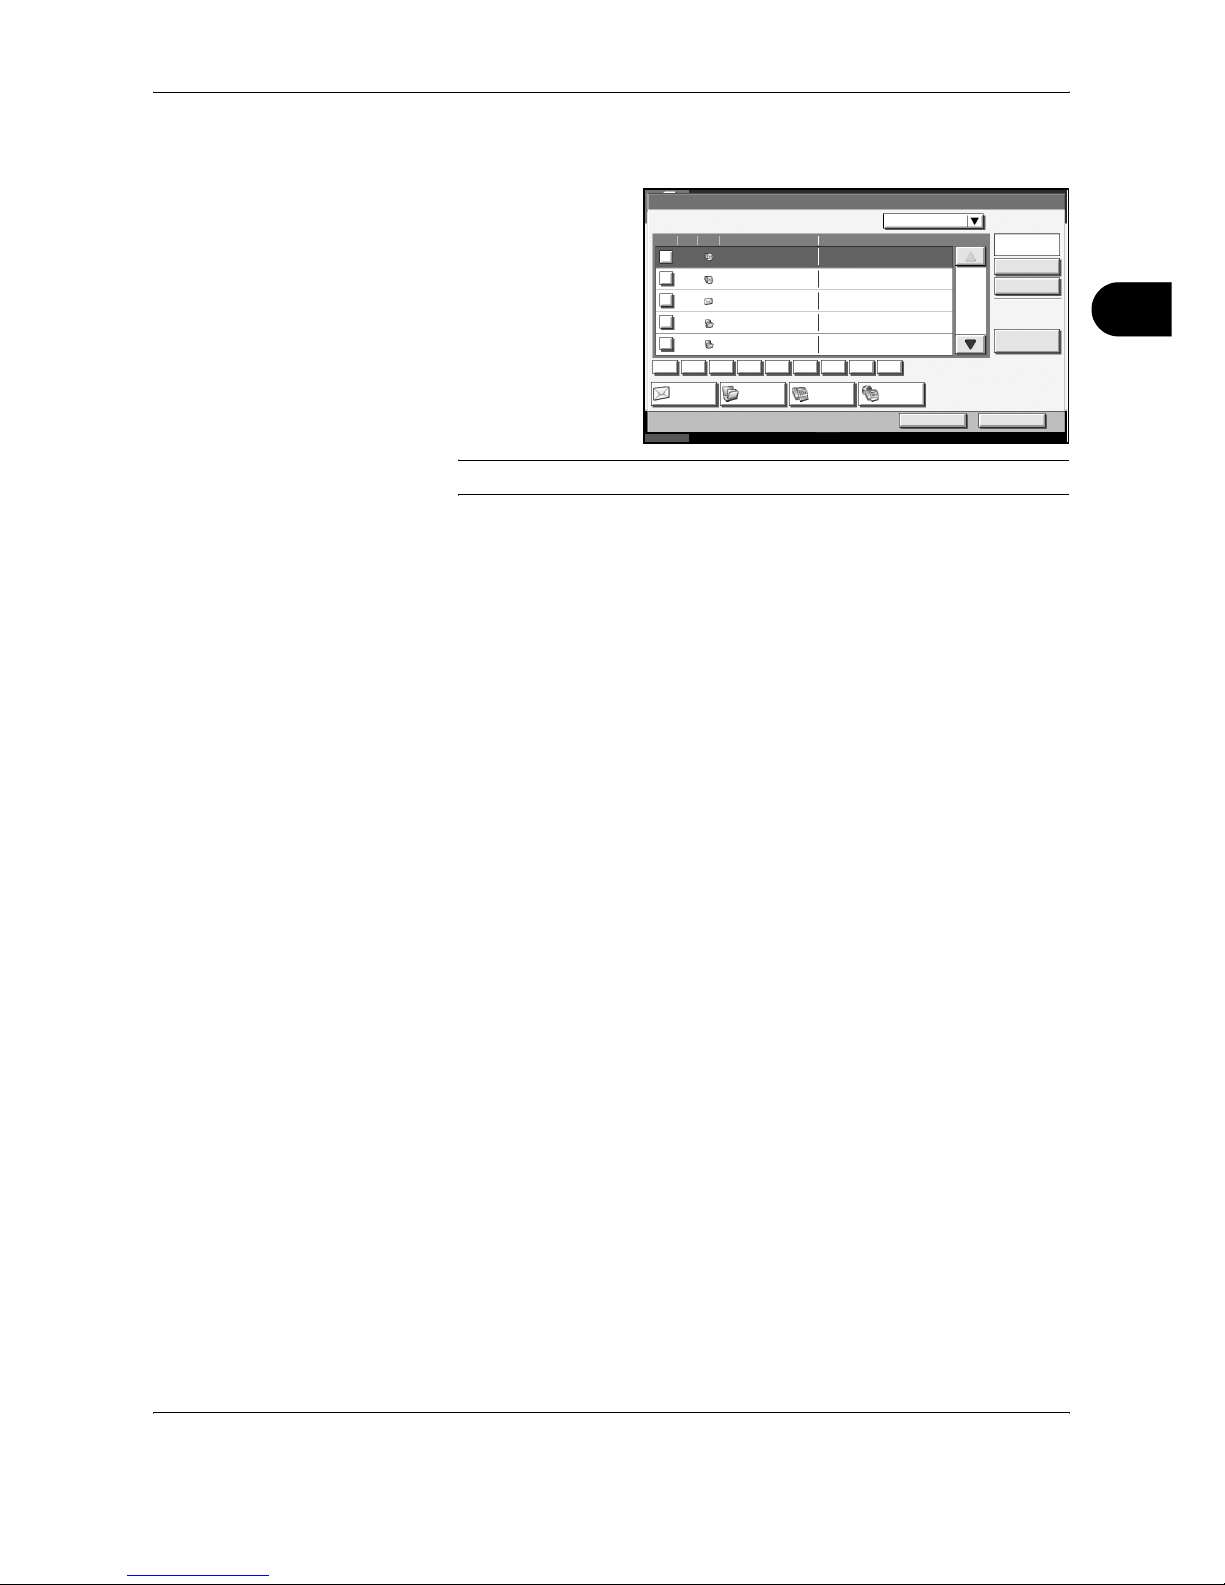
FAX Operation (Basic)
OPERATION GUIDE 3-23
3
9
Press [Add].
10
Select the
destination (contact)
to be registered to
the group.
NOTE: You can search for destinations by name or address number.
11
Press [OK].
12
To add a destination, repeat steps 8 to 11.
Check that the destination you selected has been added to the group and
press [Register]. The group is added to the Address Book.
Status
10/10/2007 10:00
Edit Destination - Add
Search(Nam e)
Searc h(No .)
Detai l
E-mail Folder FAX
Cancel OK
No.
Dest N o. Type Nam e Detai l
ABC
Sort
DEF GHI JKL MNO PQR S T UV WX YZ 0- 9
1/2
0001
0002
0003
0004
0005
A OFFIC E
B OFFIC E
C OFFICE
D OFFICE
E OFFICE
1234567890
0123456789
10.176 .1.54
10.172 .1.76
i-FAX
Page 56
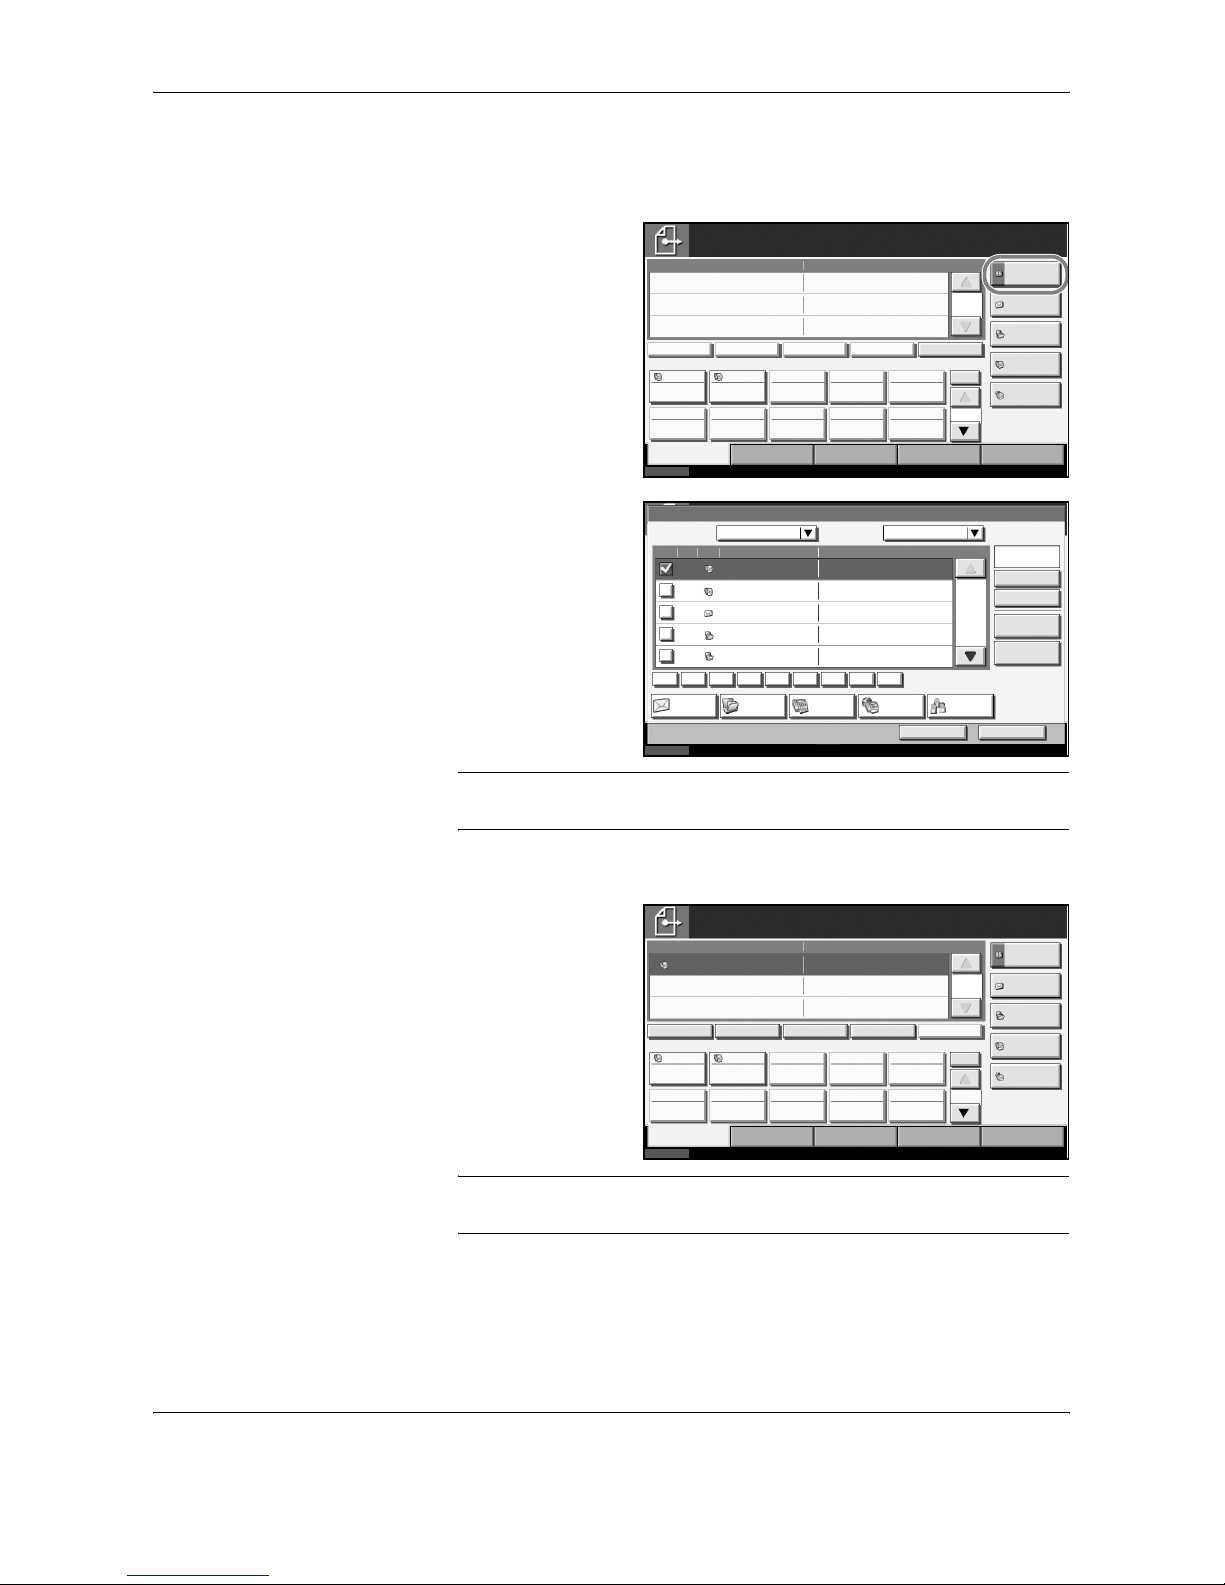
FAX Operation (Basic)
3-24 OPERATION GUIDE
Selecting a Destination from the Address Book
Select a destination registered in the Address Book.
1
Press [Address
Book] on the basic
send screen.
2
Select the
destination from the
list. You can select
several destinations.
The checkbox of the
destination selected
is checked.
NOTE: To cancel the selection, press the checkbox to erase the
checkmark.
3
Press [OK].
The destination you
have selected is
registered in the
destination list.
NOTE: To delete the destination that has been registered, select the
destination, and press [Delete].
Status
10/10/2007 10:00
Enter Destination.
Ready to send.
Destination
Destination
Detai l
Addres s B ook
FAX No.
Entr y
Folder Path
Entr y
E-mail
Addr Entry
Chain Det ail/Edit Delete Recall
Destination Quick Setup
Type of Original/
Transmission
Color/Im age A dvanced
Setup
No.
0
1/1
1/10
001 002 003 004 005
006 007 008 009 010
Free
A OFFIC E i-FAX
Addr Entry
On Hook
Status
10/10/2007 10:00
Addre ss Book
Search(Nam e)
Searc h(No .)
Detai l
E-mail Folder
Cancel OK
No.
Dest . No. Ty pe Nam e Detail
ABC
Sort
DEF GHI J KL MNO PQ RS T UV WX YZ 0- 9
Edit
Address Book
Addre ss BookA ddr Book
FAX Group
0001
/
0002
0002
0003
0004
0005
B OFFIC E
C OFFICE
D OFFICE
E OFFICE
0123456789
10.176 .1.54
10.172 .1.76
0001 A O FFICE 1234567890
i-FAX
Status
10/10/2007 10:00
Ready to send.
Destination
Destination
Detai l
Addres s B ook
FAX No.
Entr y
Folder Path
Entr y
E-mail
Addr Entry
Chain Det ail/Edit Delete Recall
Destination Quick Setup
Type of Original/
Transmission
Color/Im age Advanced
Setup
1
1/1
1/10
001 002 003 004 005
006 007 008 009 010
Free
A OFFIC E
A OFFIC E
No.
1234567890
i-FAX
Addr Entry
On Hook
Page 57
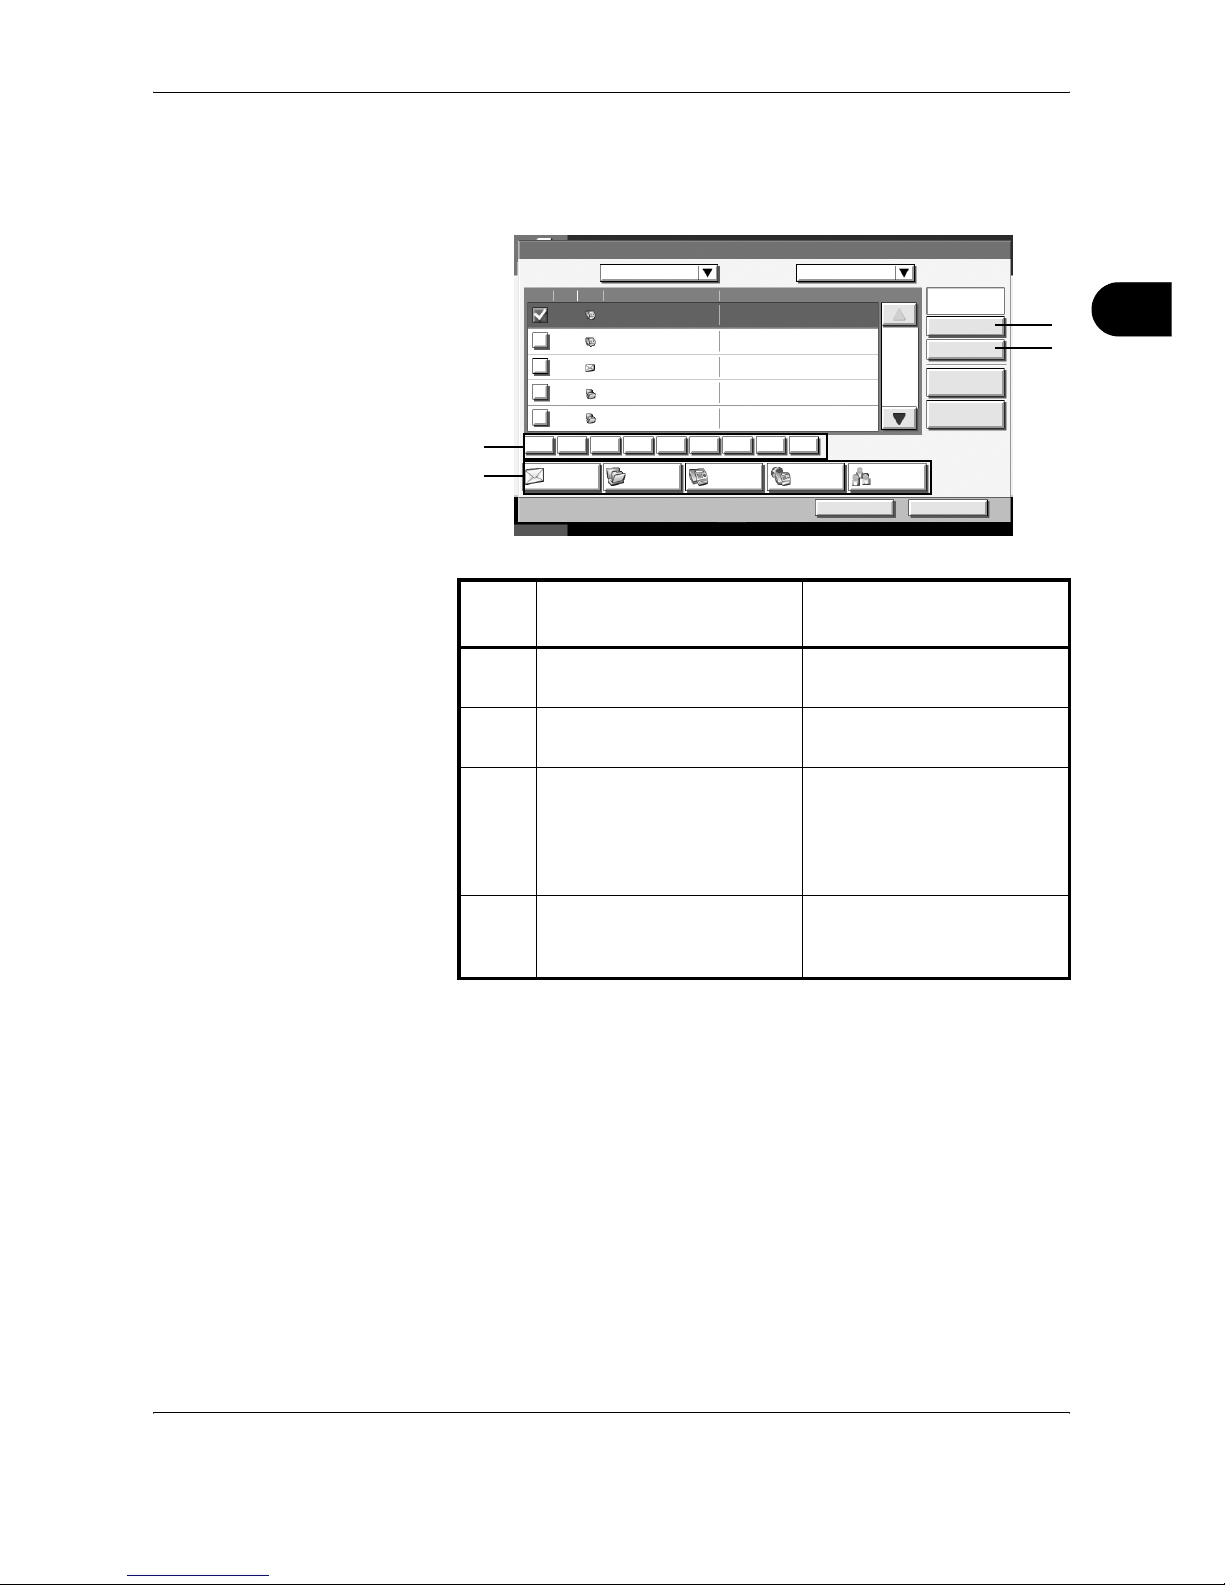
FAX Operation (Basic)
OPERATION GUIDE 3-25
3
Searching for a Destination
You can search for a destination registered in the Address Book, and
further refine your search if necessary.
Search (Name)
Press [Search (Name)] and enter the name you want to search.
Search (No.)
Press [Search (No.)] and enter the address number you want to search.
Destination type search refinement
Press [E-mail], [Folder], [FAX], [i-FAX] or [Group]. The destination by the
destination type is displayed.
Capital letter search refinement
Press the key of the capital letter you want to search.
Keys
used
Search method Search words, etc.
1 Search (Name) Search by the registered
name.
2 Search (No.) Search by the address
number.
3 Destination type search
refinement
Refine your search by using
the type of destination
registered (e-mail, folder
(SMB/FTP), FAX, Internet
FAX, and group)
4 Capital letter search
refinement
Refine your search by the
capital letters of the
registered name.
Status
10/10/2007 10:00
Address Book
Search(Nam e)
Searc h(No .)
Deta il
E-m ail Fol der
Cancel OK
No.
Dest . No. Type Nam e Deta il
ABC
Sort
DEF GHI JKL MNO PQRS TUV WX YZ 0-9
Edit
Address Book
Address BookAddr Book
FAX Group
0001
/
0002
0002
0003
0004
0005
B OFFICE
C OFFICE
D OFF IC E
E OF FIC E
0123456789
10.1 76 .1.5 4
10.1 72 .1.7 6
0001 A O FFI CE 12 34567890
i-FAX
2
1
4
3
Page 58
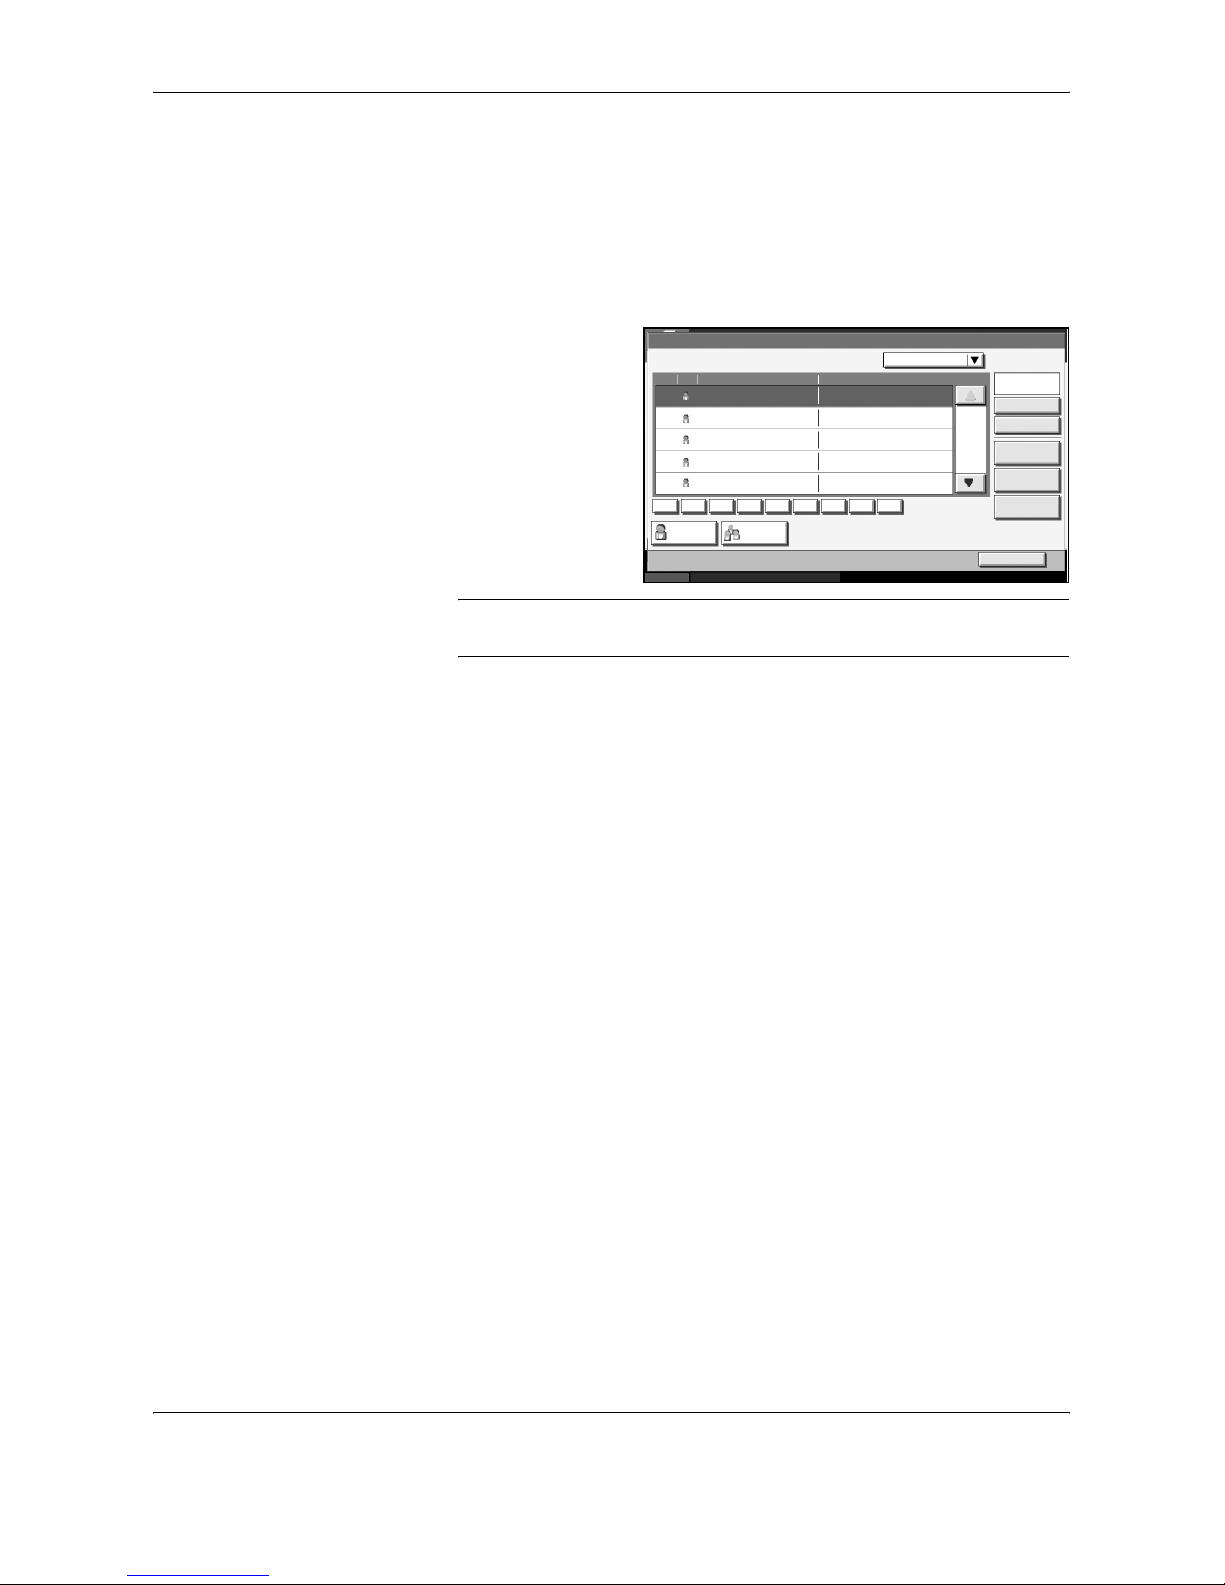
FAX Operation (Basic)
3-26 OPERATION GUIDE
Changing/Deleting Registration Contents
You can change or delete the contents of destinations (contact) or groups.
1
Press the System Menu key.
2
Press [Edit Destination] and then [Register/Edit] of Address Book.
3
Select the
destination or group
to edit.
NOTE: The destinations and groups can be rearranged and searched by
destination name, group name, and address number.
4
Press [Detail].
5
When editing the destination of a contact registration
Change Address Number, Name, the fax number of the destination, and
the send details setting. For details, refer to steps 3 to 23 in Contact
Registration (fax) or steps 3 to 17 in Contact Registration (i-FAX).
When editing a group
1 Change Address Number and Name. For details, refer to Group
Registration steps 3 to 7.
2 Press [Group Member].
3 To add a contact to a group, press [Add]. Refer to steps 10 and 11 in
Group Registration for information how to add contacts.
To remove a contact from a group, select the contact to be removed
and press [Delete]. Press [Yes] in the confirmation screen to remove
the contact.
You can view detailed information on the selected contact by
pressing [Detail].
When deleting the destination of a contact registration or group
Press [Delete]. Press [Yes] in the confirmation screen to delete the
destination or group.
6
Press [Register]. When the change confirmation screen appears, press
[Yes]. Changes or deletions made to the registered details are applied in
the Address Book.
Status
10/10/2007 10:00
Edit Destination - Address Book
Search( Name)
Searc h(No .)
Detai l
Cont act Gr oup
No.
No. Type Name Detail
ABC DEF GHI JKL MNO PQRS TUV WXYZ 0-9
Add
Sort
Delet e
1/2
0002
0003
0004
0005
B OFFIC E
C OFFICE
D OFFICE
E OFFICE
0001 A O FFICE
Close
Page 59
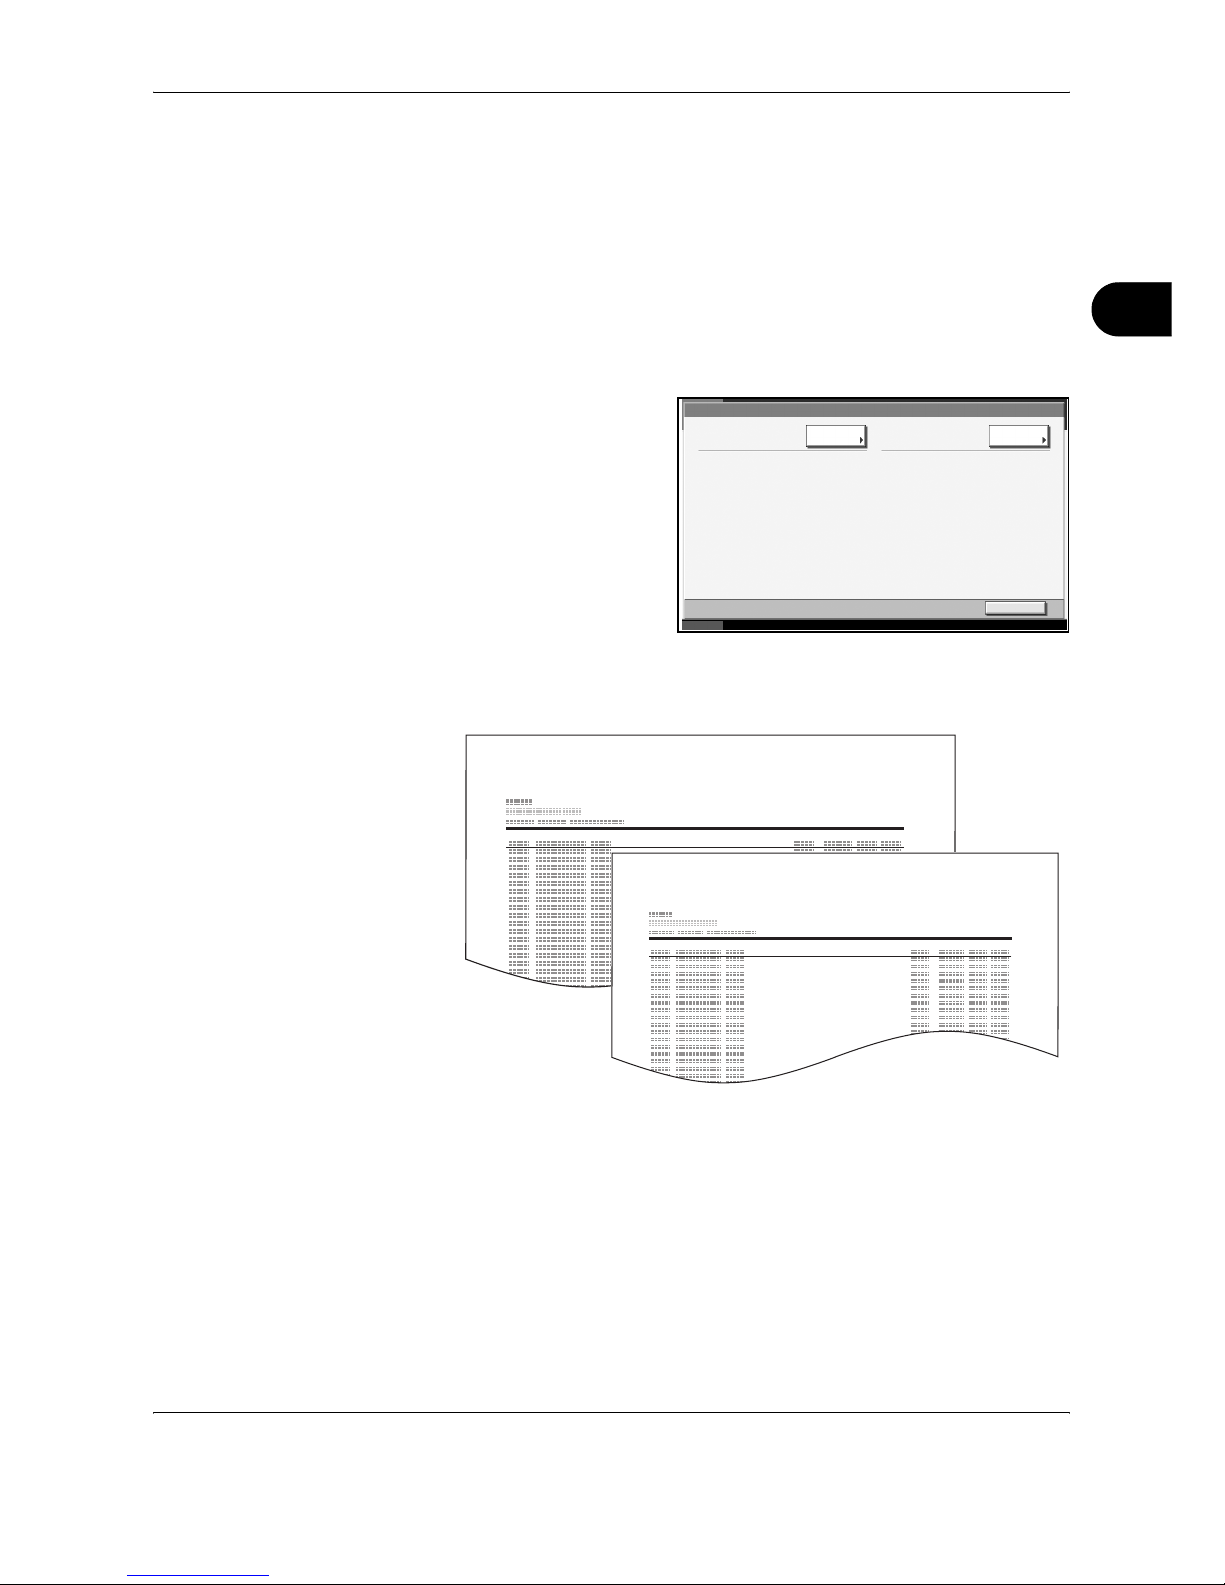
FAX Operation (Basic)
OPERATION GUIDE 3-27
3
Printing Address List
You can print the list of destinations registered in the Address Book.
You can sort the list in the order of names or address numbers of the
destinations.
1
Press the System Menu key.
2
Press [Edit Destination], and then [Next] of List Print.
3
Press [Print] of Address
List (Name) or Address
List (No.).
4
When the printing confirmation screen appears, press [Yes]. The machine
prints a list.
Edit Destination - List Print
Print
Address Li st (Name.):
Print
Close
10/10/2007 10:10
Address List (No.):
Status
Address List (Name)
Address List (No.)
Page 60
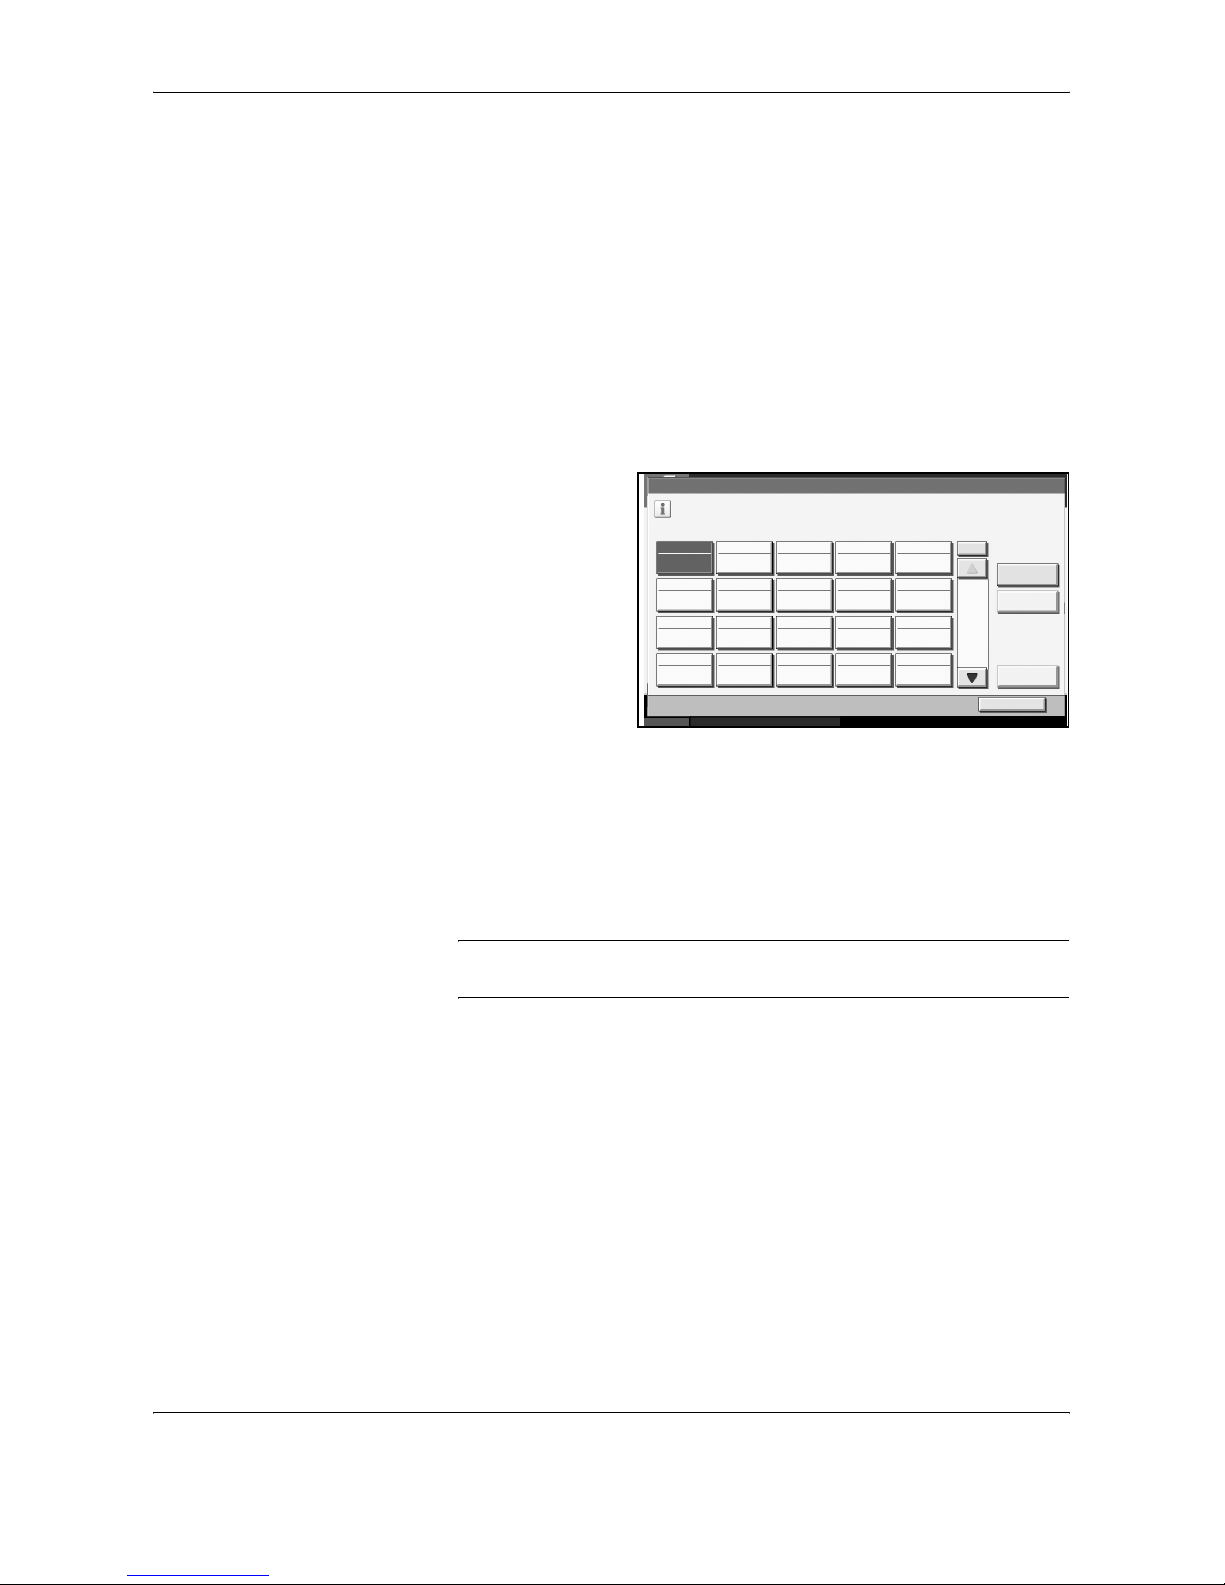
FAX Operation (Basic)
3-28 OPERATION GUIDE
Using One-touch Keys
With One-touch keys on the [Destination] screen, you can access
destinations in the Address Book.
Registering a New One-touch Key
You can register the destination (contact or group) in the Address Book to
a One-touch key. Up to 100 destinations can be registered.
1
Press the System Menu key.
2
Press [Edit Destination] and then [Change] of One-touch Key.
3
Select the Onetouch key number to
which to register the
destination (001 to
100). Pressing [No.]
directly selects the
One-touch key
number.
4
Press [Register/Edit].
5
Select the destination (contact or group) to register to the One-touch key
from the Address Book.
Pressing [Detail] shows the detailed information of the destination you
have selected.
NOTE: You can rearrange or search for the destination by destination
name, group name, or address number.
6
Press [OK]. The destination is registered to the One-touch key.
7
To exit from this setup, press [Close] several times until the System Menu
default screen is displayed.
Status
10/10/2007 10:00
Edit Destination - One-touch Key
Close
Regist er a one-touch key.
Register
/Edit
No.
Delet e
Detai l
1/5
001 002 003 004 005
006 007 008 009 010
011 012 013 014 015
016 017 018 019 020
Page 61
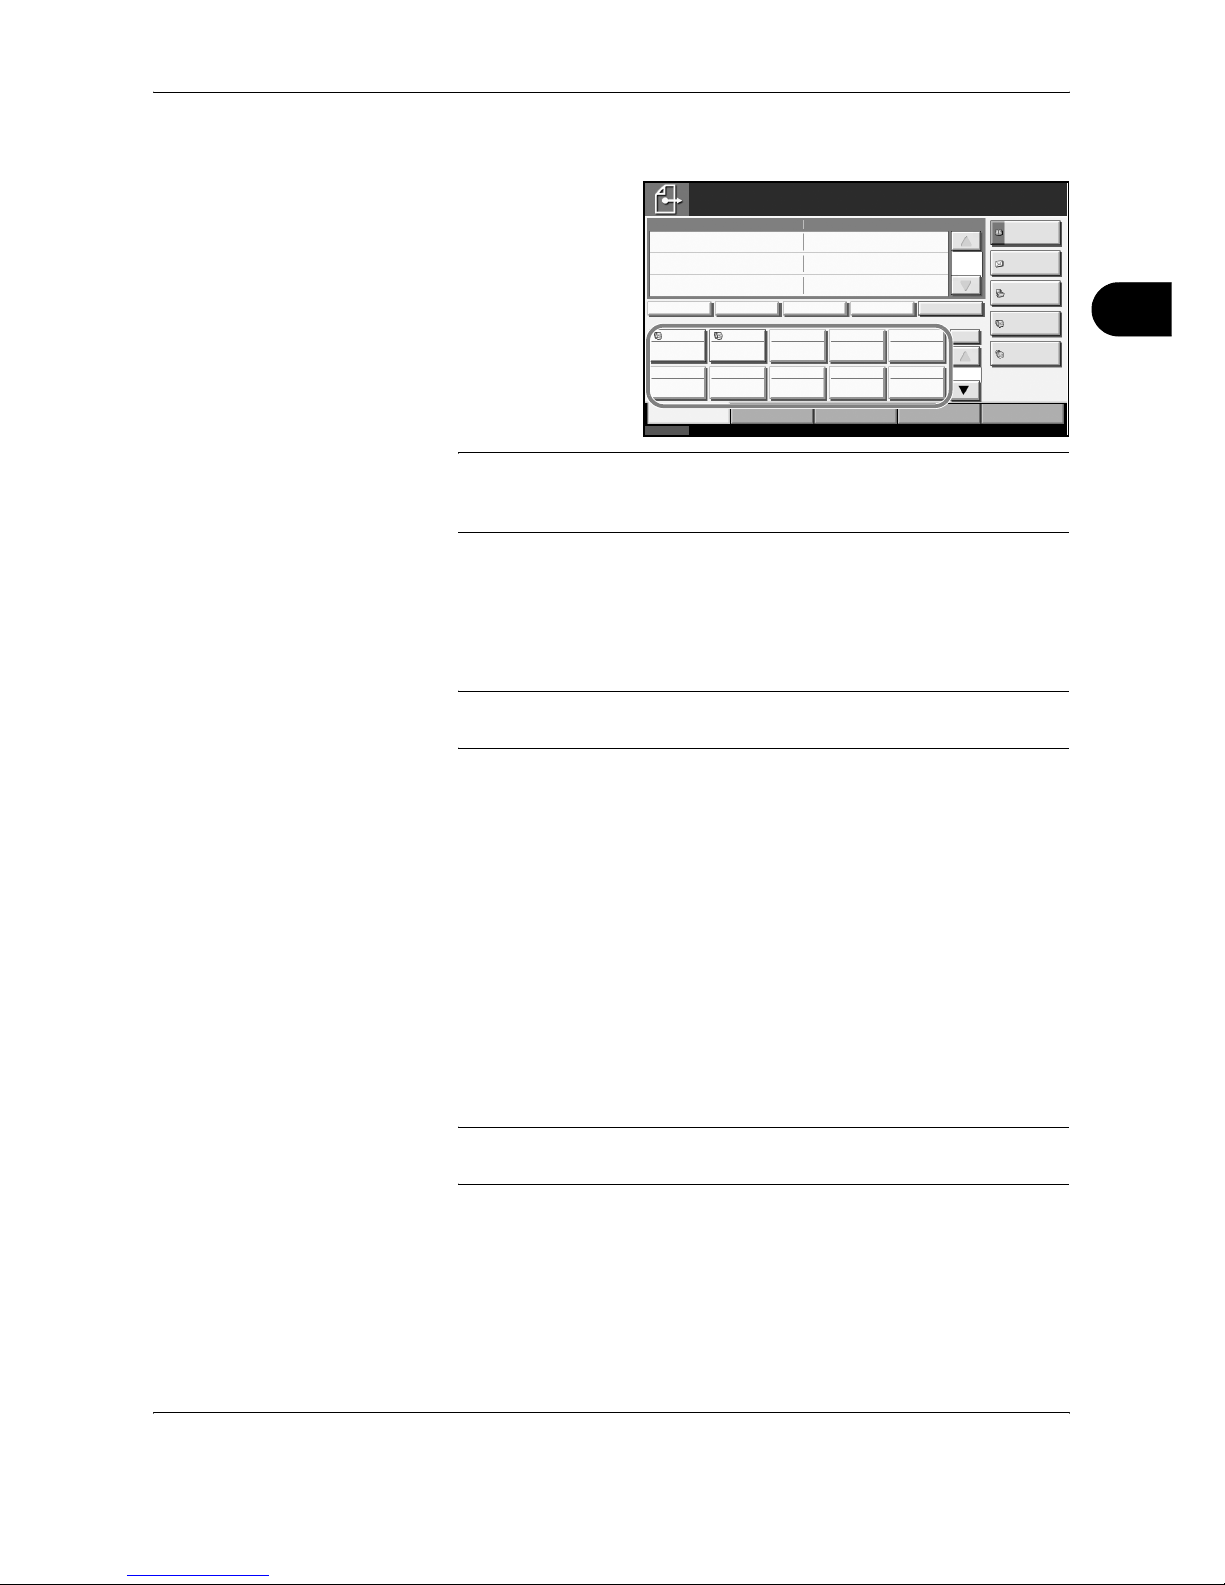
FAX Operation (Basic)
OPERATION GUIDE 3-29
3
Selecting a Destination by One-touch Key
Select a destination
by a One-touch key.
On the [Destination]
screen, press the
One-touch key to
which the destination
is registered.
NOTE: When the One-touch key for the destination is not displayed on
the touch panel, press [S]/[T] on the right side. The next/previous Onetouch keys are displayed.
Changing/Deleting Registration Contents
You can change the destination registered to a One-touch key to another
destination, or delete the registration contents of the One-touch key.
NOTE: When changing the destination information in the Address Book,
the information registered to the One-touch key is updated.
1
Press the System Menu key.
2
Press [Edit Destination] and then [Change] of One-touch Key.
3
Select the One-touch key number to edit (001 to 100). Pressing [No.]
selects the One-touch key number by direct input.
4
When changing the destination to another destination
1 Press [Register/Edit].
2 Select the new destination (contact or group).
Pressing [Detail] shows the detailed information of the destination
you have selected.
NOTE: You can rearrange or search for the destinations by destination
name, group name, or address number.
3 Press [OK].
4 Pressing [Yes] on the change confirmation screen registers the
destination to the One-touch key.
Status
10/10/2007 10:00
Enter Destination.
Ready to send.
Destination
Destination
Detai l
Addres s B ook
FAX No.
Entr y
Folder Path
Entr y
E-mail
Addr Entry
Chain Det ail/Edit Delete Rec all
Destination Quick Setup
Type of Original/
Transmission
Color/Im age A dvanced
Setup
No.
0
1/1
1/10
001 002 003 004 005
006 007 008 009 010
Free
A OFFIC E i-FAX
Addr Entry
On Hook
Page 62

FAX Operation (Basic)
3-30 OPERATION GUIDE
When deleting registration contents
1 Press [Delete].
2 Pressing [Yes] on the deletion confirmation screen deletes the
registration contents of the One-touch key.
5
To exit from this setup, press [Close] several times until the System Menu
default screen is displayed.
Page 63
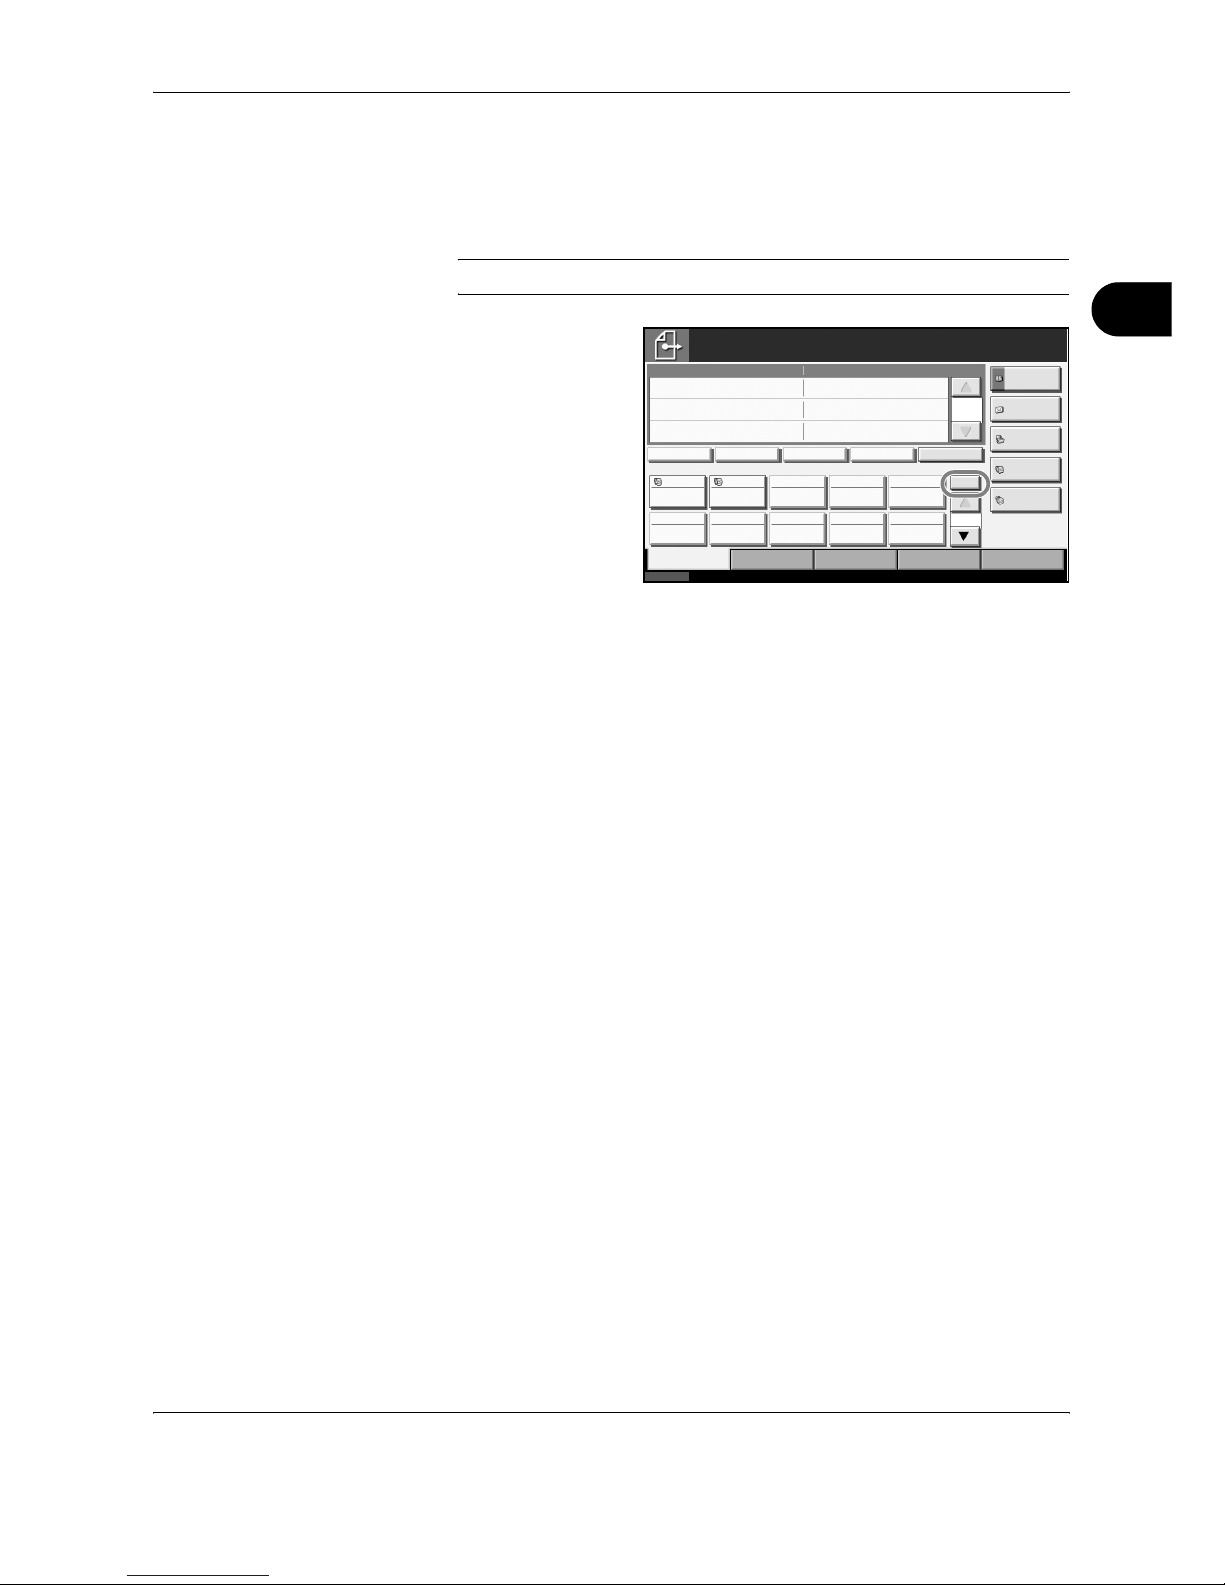
FAX Operation (Basic)
OPERATION GUIDE 3-31
3
Using the Speed Dial key
You can designate a three-digit One-touch key number (speed dial) to
select the destination.
NOTE: For details, refer to Using One-touch Keys on page 3-28.
Press [No.] on the
[Destination] screen,
and enter three-digit
one-touch key
number to the
number entry
screen.
Status
10/10/2007 10:00
Enter Destination.
Ready to send.
Destination
Destination
Detai l
Addres s B ook
FAX No.
Entr y
Folder Path
Entr y
E-mail
Addr Entry
Chain Det ail/Edit Delete Rec all
Destination Quick Setup
Type of Original/
Transmission
Color/Im age A dvanced
Setup
No.
0
1/1
1/10
001 002 003 004 005
006 007 008 009 010
Free
A OFFIC E i-FAX
Addr Entry
On Hook
Page 64
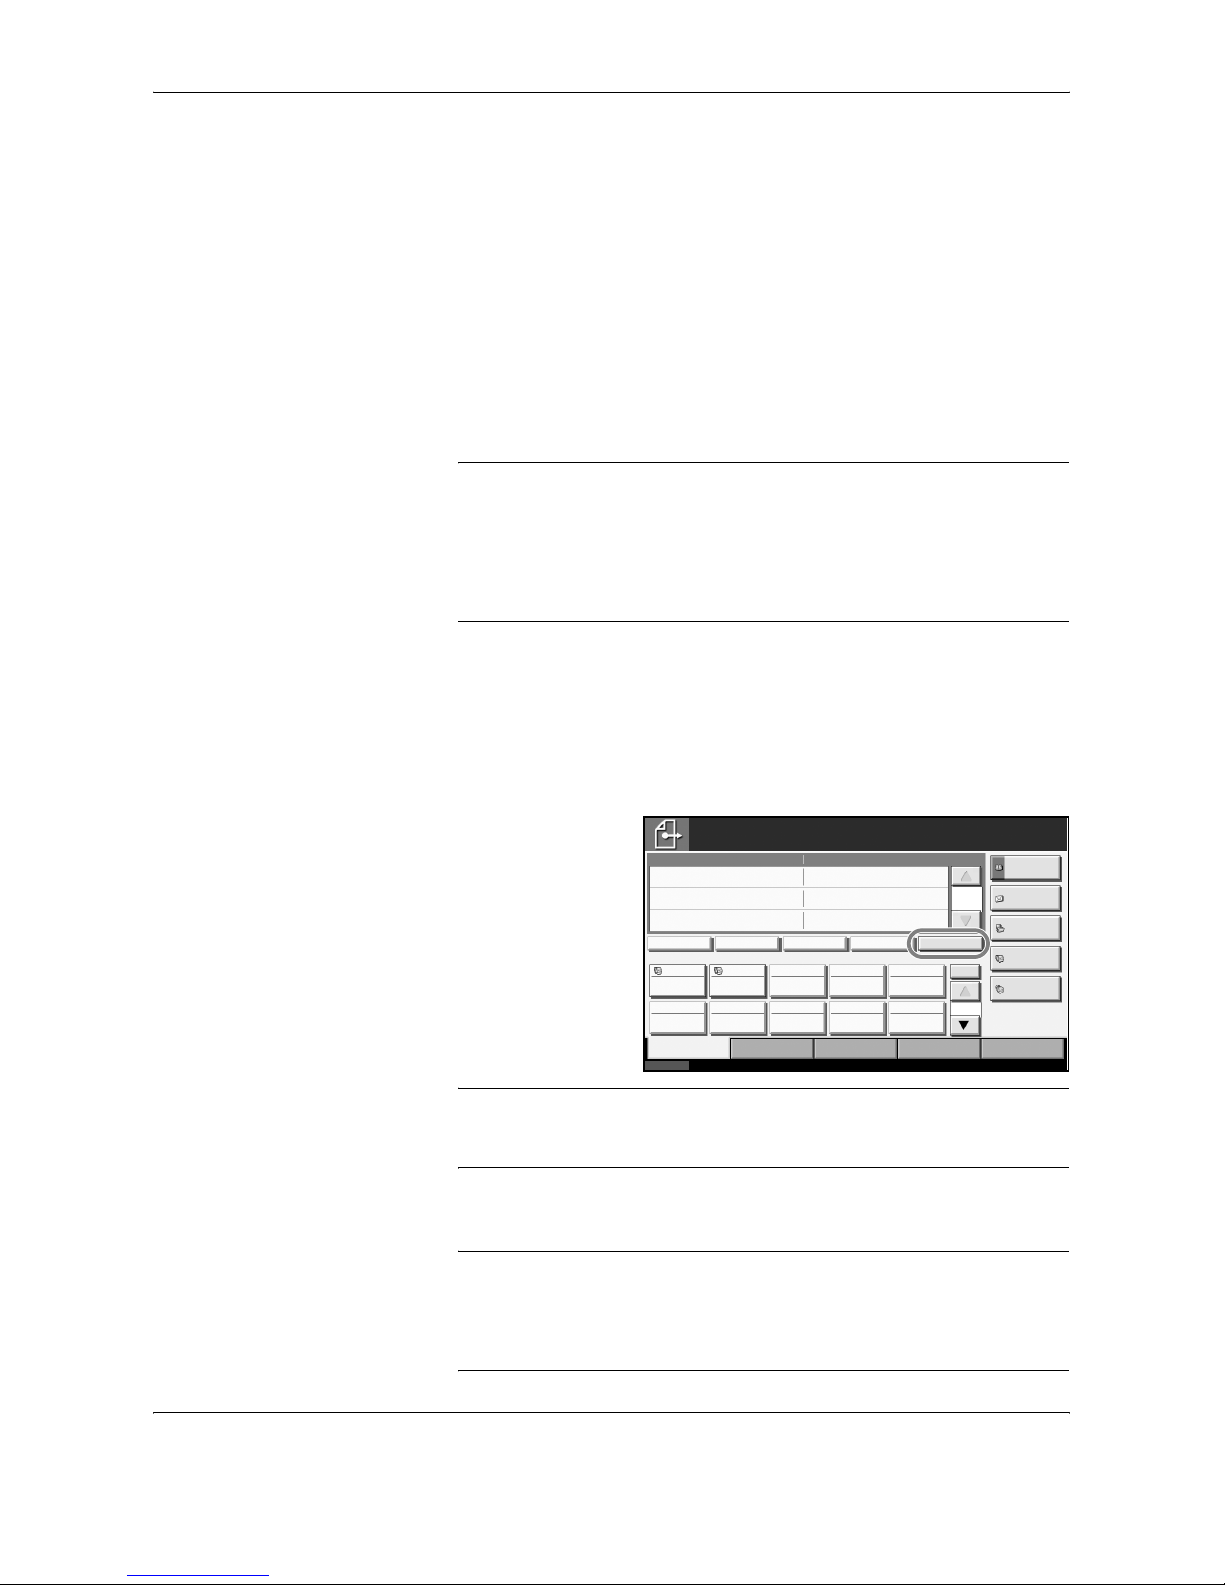
FAX Operation (Basic)
3-32 OPERATION GUIDE
Dialing the Same Receiving System (Redial)
Redial is a function allowing you to dial the last entered number once
again.
Automatic Redial
This function automatically redials a receiving system that does not
respond when you try to send fax.
No particular setting is required for automatic redial. Because the machine
redials repeatedly at a regular interval, you do not need to worry even
when the communication by the receiving system is prolonged.
NOTE: When using direct transmission, the machine does not
automatically redial.
You can change the number of automatic redials from between 0 and 14.
For details, refer to Retry Times on page 6-9.
You cannot send delayed transmission immediately while the machine is
waiting for redial.
Manual Redial (Recall)
Use this when the receiving system does not respond when you have tried
to send a fax. When you want to send the fax to the same receiving system,
press [Recall], and you can call the receiving system you dialed on the
destination list.
1
Press [Recall]. The
receiving system you
dialed is displayed
on the destination
list.
NOTE: When the last transmission included multi-address transmissions
and computers and e-mail destinations, they are also displayed. If
necessary, add or delete the receiving system.
2
Press the Start key. The transmission will start.
NOTE: Recall information is canceled in the following conditions.
• When you turn the power off
• When you send a next fax (new recall information is registered)
• When you log out
Status
10/10/2007 10:00
Enter Destination.
Ready to send.
Destination
Destination
Detai l
Addres s B ook
FAX No.
Entr y
Folder Path
Entr y
E-mail
Addr Entry
Chain Det ail/Edit Delete Rec all
Destination Quick Setup
Type of Original/
Transmission
Color/Im age A dvanced
Setup
No.
0
1/1
1/10
001 002 003 004 005
006 007 008 009 010
Free
A OFFIC E i-FAX
Addr Entry
On Hook
Page 65
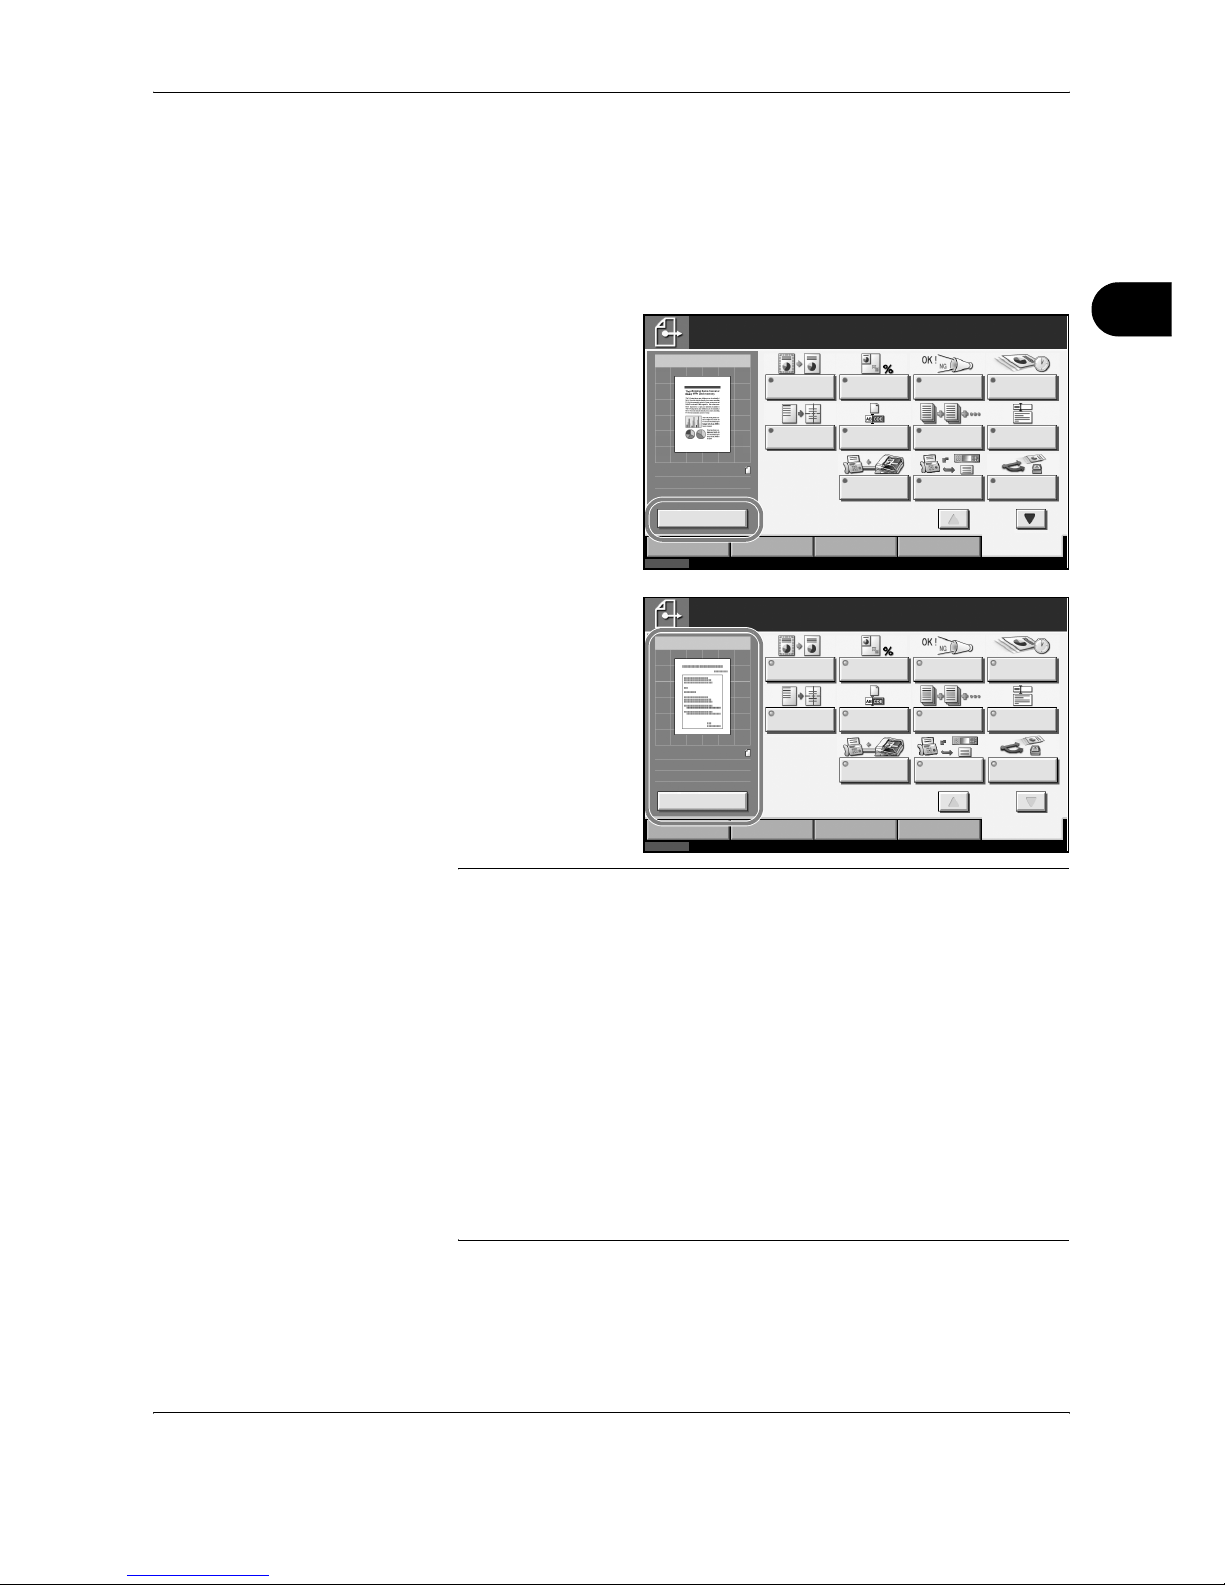
FAX Operation (Basic)
OPERATION GUIDE 3-33
3
Previewing Images
You can display a preview image of a scanned original on the panel to
check the image to be sent.
1
Prepare to send the image as described in steps 1 to 6 in Automatic Send
on page 3-2.
2
Press [Preview] on
the left side of the
[Quick Setup], [Type
of Original/
Transmission],
[Color/Image] or
[Advanced Setup]
screen.
The machine scans
the original and
displays a preview
image.
NOTE: If the transmission functions below are modified, the results are
applied in the preview image. For more information on the transmission
functions, refer to Automatic Send on page 3-2 or FAX Operation
(Advanced) on page 4-1.
If you have placed a multiple-page original in the optional document
processor, the machine scans all the originals but only the first page is
previewed.
You cannot change the transmission functions while the preview image is
displayed.
3
Press the Start key to send the fax. Transmission begins.
Status
10/10/2007 10:00
Enter Destination.
Color/Im age Advanced
Setup
Type ofOriginal/
Transmission
Ready to send.
Original
Zoom
Send
Sending Ima ge
Destination
Quick SetupDestination
Border Erase Zoom JobFinish
Notic e
FAX Delayed
Transmission
Centering File Name
Entr y
Cont inuous
Scan
E-m ail
Subject /B ody
FAX Direc t
Transmission
0
100%
Letter
:
:
:
Letter
Previ ew
FAX
Polling RX
Send and
Print
1/2
Status
10/10/2007 10:00
Color/Im age Advanced
Setup
Type of Original/
Transmission
Original
Zoom
Send
Sending Im age
Destination
Quick SetupDestination
Border Eras e Zoom Job Finis h
Notic e
FAX Delayed
Transmission
Centering File Name
Entr y
Cont inuous
Scan
E-mail
Subject /B ody
FAX Direc t
Transmission
1
:
::100%
Letter
Letter
FAX
Polling RX
Send and
Print
Press Start key to start sending.
Press [Change Setting] to change settings.
Change Setting
Executing TX job . 18
1/2
• Scan Resolution
• Scan Density
• Original Size Selection
• Sending Size Selection
•Zoom
• Original Orientation
• Selection of Image Quality
• Border Erase
Page 66

FAX Operation (Basic)
3-34 OPERATION GUIDE
To change any of the transmission functions, press the Stop key or press
[Change Setting]. The preview image disappears and the destination is
cancelled. To see the preview again, make the transmission function
changes and select the destination.
NOTE: To see a preview image when you are using the optional
document processor, place the originals in the document processor again.
You can also see a preview image in the same way with polling
transmissions. When you press the Start key for a polling transmission, the
machine scans the originals and saves the images in the polling box. For
more information on polling transmissions, refer to Using Polling
Transmission on page 4-56.
You cannot preview images in the following situations:
• When the original is a non-standard document size
• When you are using Mixed Sized Originals mode
Page 67

OPERATION GUIDE 4-1
4 FAX Operation
(Advanced)
This chapter explains the method to effectively use FAX.
• Long Originals .............................................................. 4-2
• Delayed Transmission.................................................. 4-3
• Broadcast Transmission............................................... 4-5
• Standby Transmission .................................................. 4-7
• Interrupt Send............................................................... 4-8
• Chain Dial..................................................................... 4-9
• Manual Send ...............................................................4-11
• Manual Reception ...................................................... 4-12
• Remote Switch Function ............................................ 4-14
• Memory Forwarding ................................................... 4-16
• FAX Box Function....................................................... 4-43
• Sub Address Communication..................................... 4-50
• Program Dial .............................................................. 4-53
• Polling Communication............................................... 4-55
• Account Management ................................................ 4-64
• Other Convenient Functions....................................... 4-68
Page 68
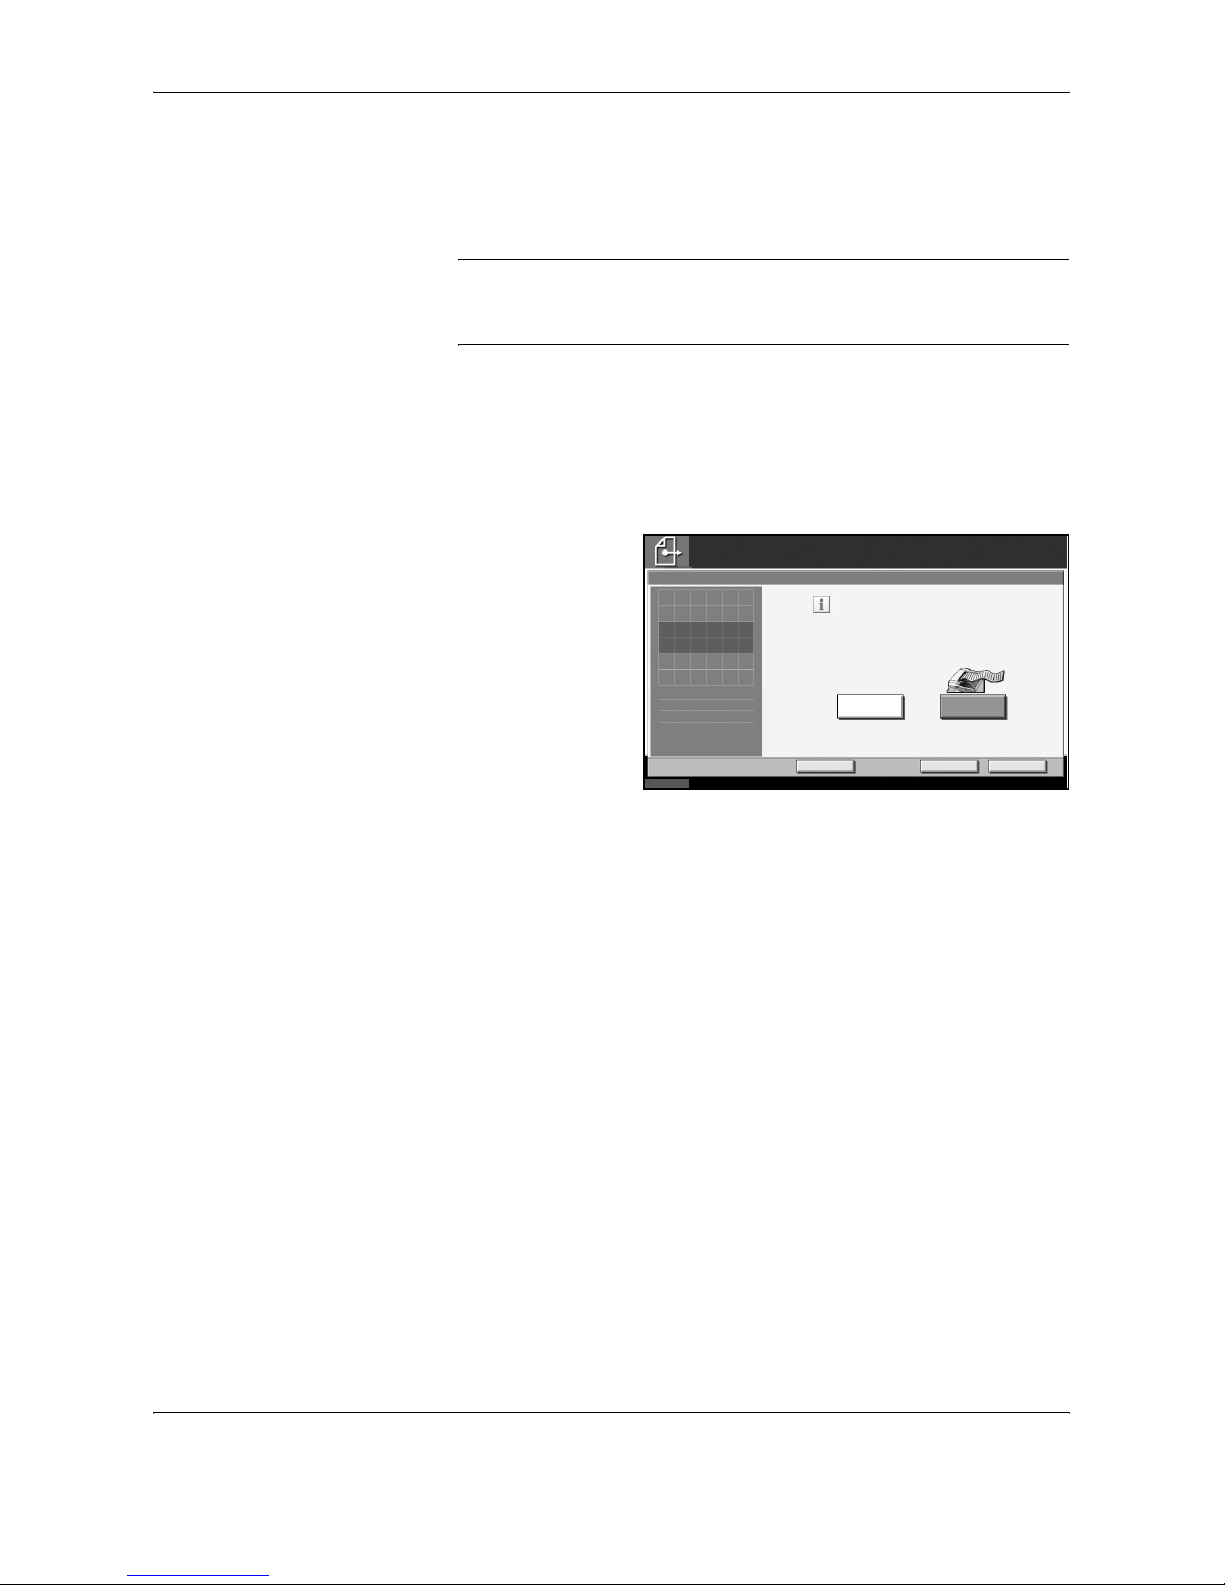
FAX Operation (Advanced)
4-2 OPERATION GUIDE
Long Originals
Use the optional document processor to scan long originals (originals that
are longer in the paper feeding direction).
NOTE: To send 2-sided originals, select [Off] (scan as standard size).
(Refer to 1-sided / 2-sided Selection on page 4-68.)
Originals of up to 1,600 mm/63" long can be scanned.
1
Press the Send/FAX key.
2
Place the originals in the optional document processor.
3
Press [Type of Original/Transmission], and then [Long Original].
4
To scan standard
size originals, press
[Off], and to scan
long originals, press
[On].
5
Press [OK].
6
Set the destination, and press the Start key. Transmission begins.
Status
Enter Destination.
Cancel OKA dd Short cut
Ready to send.
OnOf f
Long Original
Destination
Read long-sized original documents
usi ng a docum ent proce ss or.
0
10/10/2007 10:00
Press [OK] to display
the image.
Page 69

FAX Operation (Advanced)
OPERATION GUIDE 4-3
4
Delayed Transmission
When you have set a transmission start time, this function automatically
sends originals at the preset time. You can use delayed transmission
together with the broadcast transmission function, etc.
The method for sending originals to one destination after setting the start
time is explained here.
IMPORTANT: If the current time displayed on the touch panel is not
correct, you cannot send originals correctly at the preset time. In this case,
adjust the time. For details, refer to Date and Time Entry on page 2-6.
NOTE: You cannot select direct transmission.
Set the time from between 00:00 and 23:59 in one-minute increments.
Together with standby transmission and interrupt send, you can set up to
200 destinations for delayed transmission.
When two or more delayed transmissions are set for the same time, the
communication will start in the order that the delayed transmissions have
been set. When delayed transmissions have been set in reverse order,
however, sending of originals to be sent to the same destination is
prioritized over the ones to be sent to different destinations.
You can cancel a delayed transmission any time before the specified
transmission time. You can also send a delayed transmission before the
specified time. (Refer to Cancelling and Sending Delayed Transmissions
(Queued) on page 3-14.)
If you use delayed transmission when sending documents stored in the
Custom Box by fax, you cannot move documents until sending is finished.
For details on using Custom Boxes, refer to the machine’s Operation
Guide.
Batch Transmission Function
When fax originals to be sent to the same destination are set to the same
transmission start time with delayed transmission, you can send up to 10
groups of originals using batch transmission. This function prevents
repeated communication to the same destination and reduces the
communication cost.
Page 70
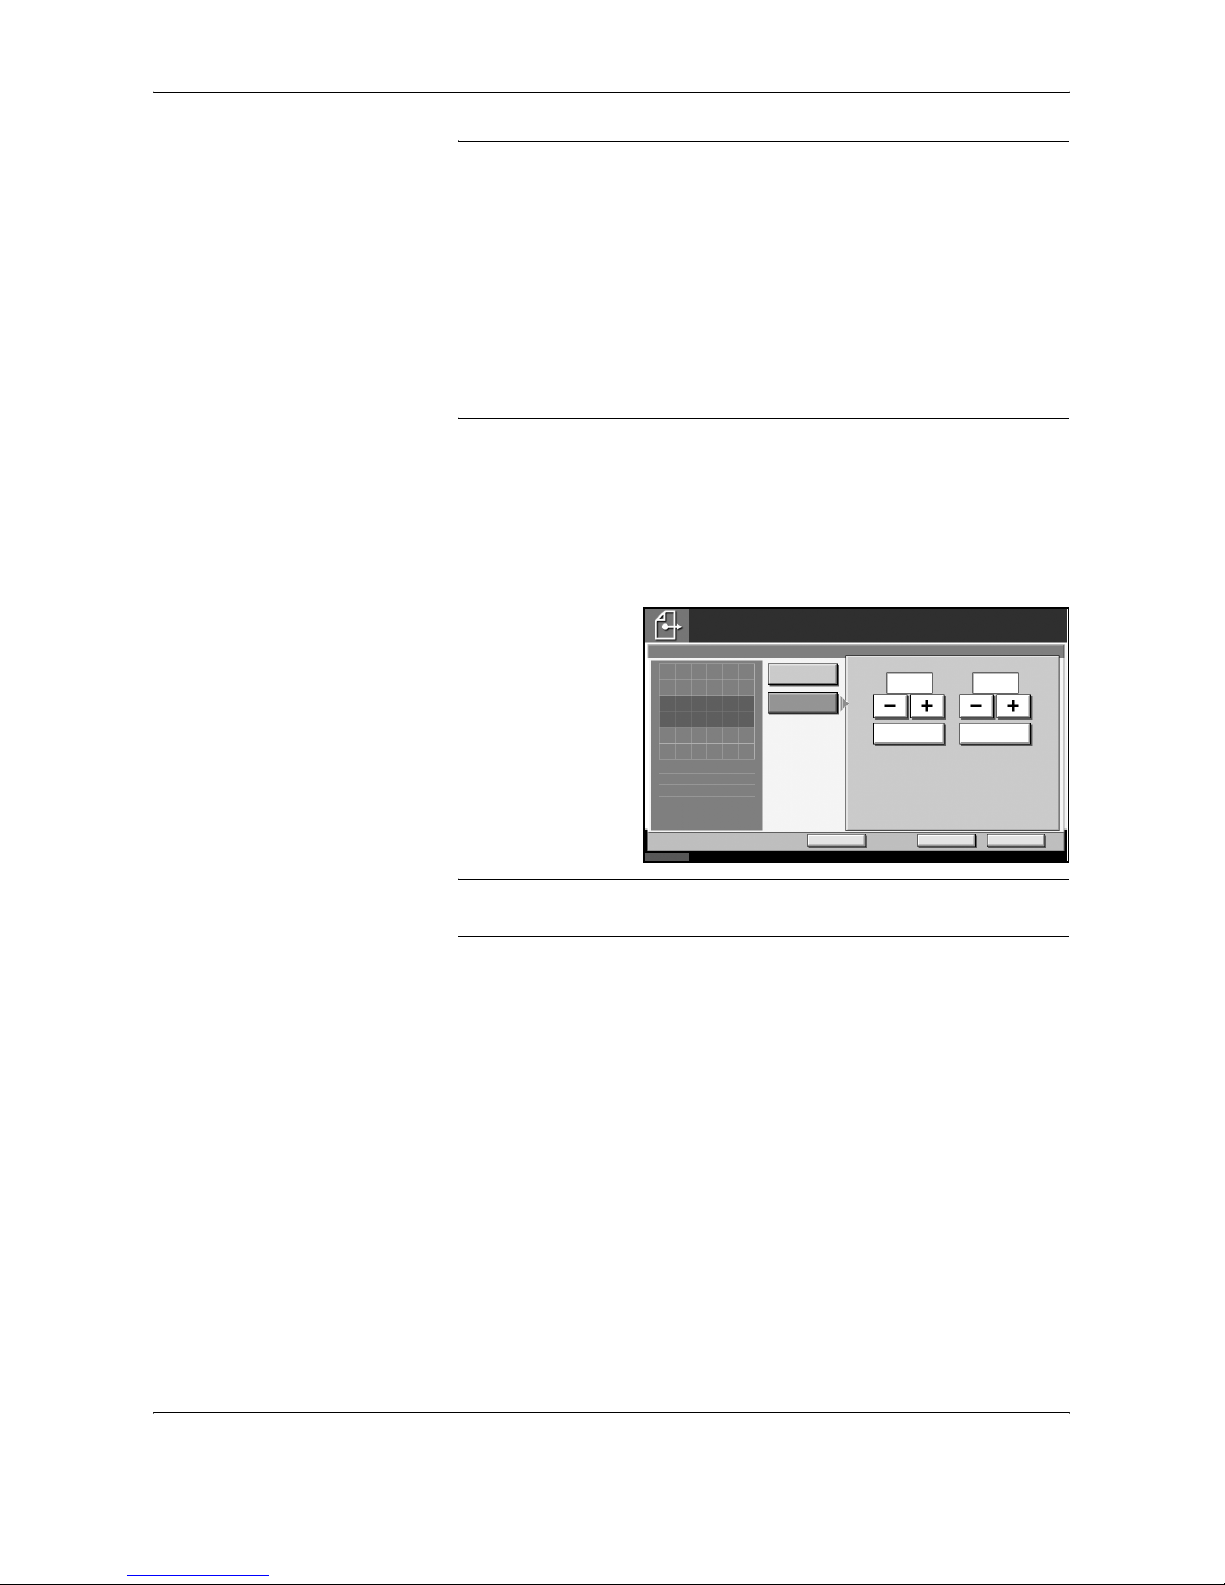
FAX Operation (Advanced)
4-4 OPERATION GUIDE
NOTE: You cannot send originals as a batch transmission in the case of
direct transmission.
In the case of broadcast transmission, when you have set two or more
groups of originals to the same transmission start time, and each group
includes the same receiving system fax number, you cannot send the
originals as a batch transmission.
When the transmission start time has come, and there are fax originals
waiting for redial to the same receiving system, the waiting originals are
also sent together as a batch transmission.
When job accounting is ON, only the originals with the same account ID set
using delayed transmission are sent as a batch transmission.
1
Press the Send/FAX key.
2
Place the originals.
3
Press [Advanced Setup], and then [FAX Delayed Transmission].
4
Press [On] and use
[+]/[-] to enter the
transmission start
time.
NOTE: You can also press [# Keys] and use the numeric keys to enter
the transmission start time.
5
Press [OK].
6
Set the destination, and press the Start key.
Originals are scanned, and transmission begins at the preset time.
Status
10/10/2007 10:00
Enter Destination.
Cancel OK
Add Short cut
Ready to send.
On
FAX Delayed Transmission
Destination
Off
Star t T ime
# Keys
0
10
Press [OK] to display
the image.
# Keys
0 :
Page 71

FAX Operation (Advanced)
OPERATION GUIDE 4-5
4
Broadcast Transmission
This function allows you to send the same originals to several destinations
in one operation. The machine stores (memorizes) originals to send in
memory temporarily, and automatically repeats dialing and transmission to
the set destination afterwards.
NOTE: When using a group for the destination, you can send originals to
up to 500 destinations in one operation.
You can use this function together with sub address communication and
delayed transmission.
When direct transmission has been selected, it changes to memory
transmission at the time of transmission.
1
Press the Send/FAX key.
2
Place the originals.
3
Select the destination.
Enter the fax number
1 Press [FAX No. Entry], and use the numeric keys to enter the fax
number. Press [Next Dest.] to enter the next fax number.
2 After entering all the destinations, press [OK].
Enter the i-FAX address
1 Press [i-FAX Addr Entry].
2 Press [i-FAX Address], enter the i-FAX address and then press [OK].
Press [Next Dest.] to enter the next i-FAX address.
3 After entering all the destinations, press [OK].
Select the destination from the Address Book
1 Press [Address Book].
2 Select the check boxes beside the destinations to select from the list.
3 Press [OK].
Select the destination from the One-touch keys
Press all the One-touch keys to which necessary destinations are
registered.
Page 72

FAX Operation (Advanced)
4-6 OPERATION GUIDE
NOTE: For more information on sending an Internet fax (i-FAX), refer to i-
FAX Transmission on page 8-10. For details of the Address Book, refer to
Using the Address Book on page 3-16. For details of One-touch keys,
refer to Using One-touch Keys on page 3-28.
You can select destinations using a combination of direct entry, the
Address Book and One-touch keys.
4
After selecting all the destinations, press the Start key. Transmission
begins.
NOTE: In addition to a fax, you can include e-mail transmission and
folder (SMB/FTP) transmission to send as one job. For details, refer to the
machine’s Operation Guide.
Page 73

FAX Operation (Advanced)
OPERATION GUIDE 4-7
4
Standby Transmission
During a communication, you can scan originals and schedule a next
transmission. When the first communication is completed, the machine
automatically starts the scheduled next transmission. When using standby
transmission, you do not need to wait when a communication has
prolonged due to broadcast transmission.
NOTE: Together with delayed transmission and interrupt send, up to 200
transmissions can be scheduled.
You can use other functions such as broadcast transmission.
1
Press the Send/FAX key.
2
Place the originals.
3
Select the destination, and set transmitting functions if you want to use
any.
4
Press the Start key. Scanning of the originals starts, and the next
transmission is scheduled.
5
When the communication is completed, the scheduled transmission will
begin.
Page 74
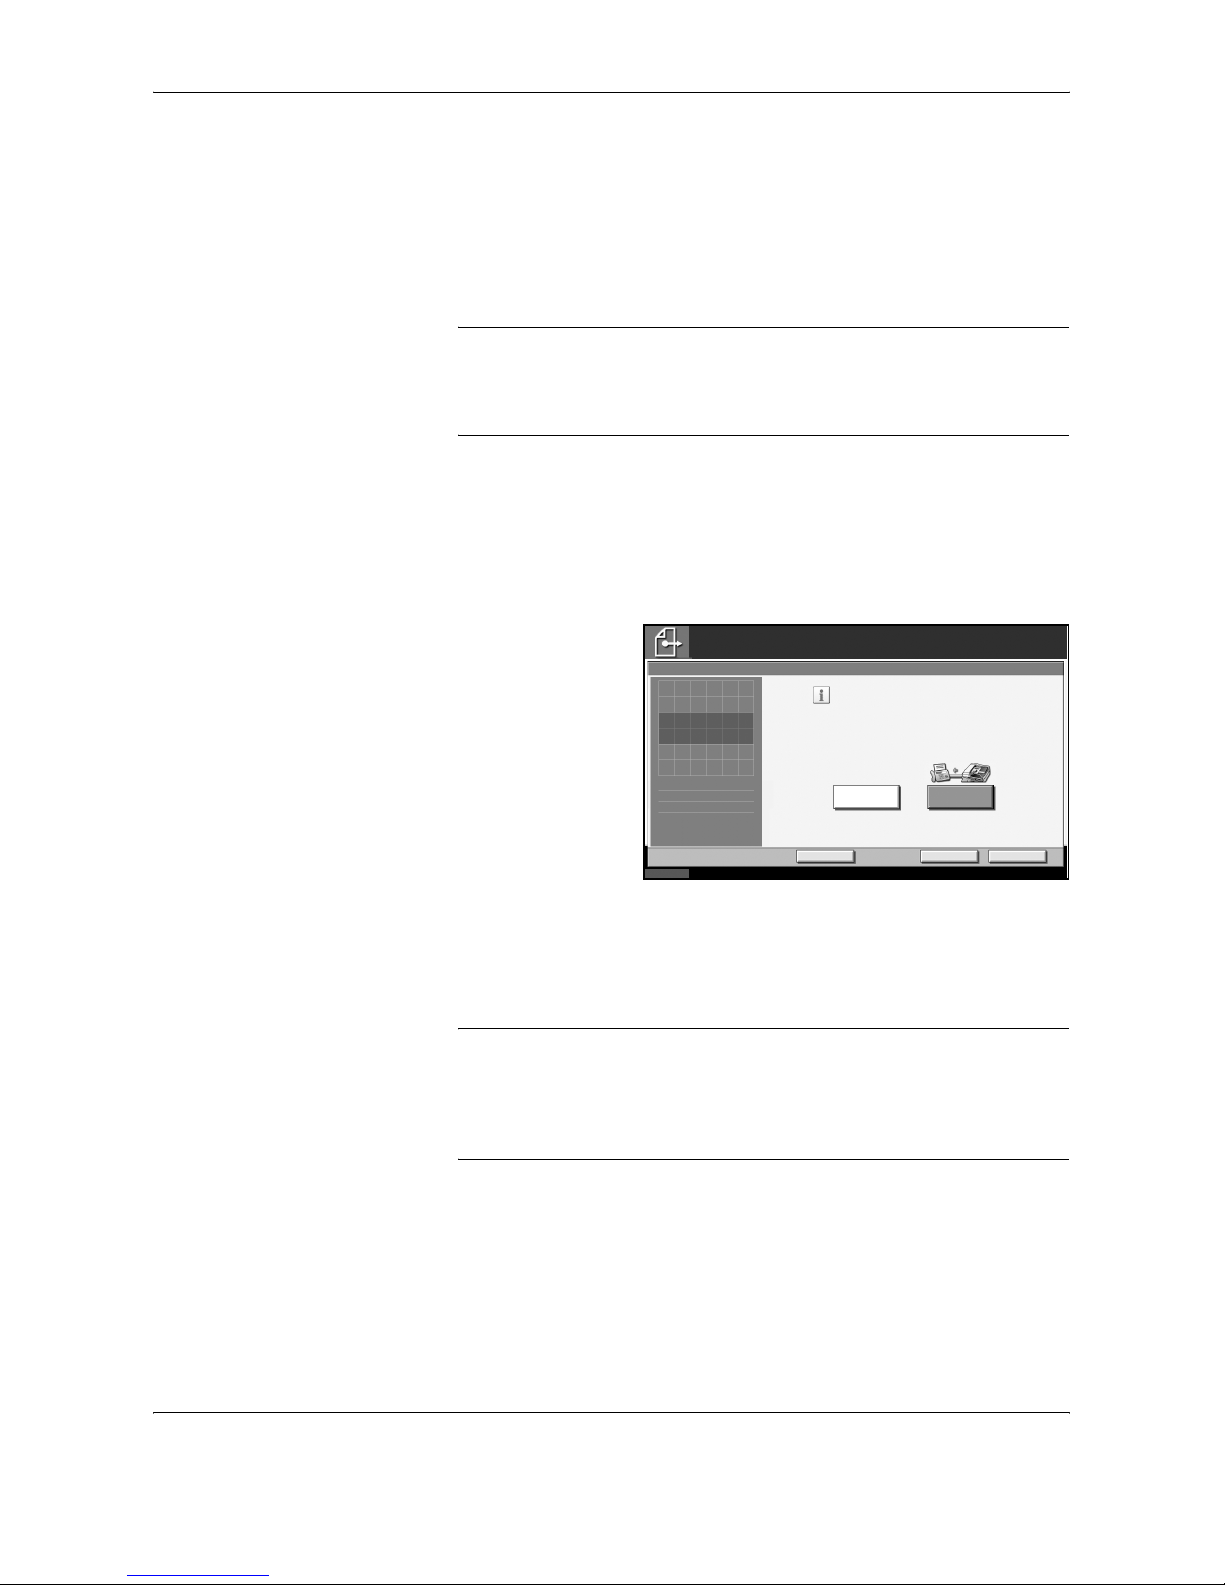
FAX Operation (Advanced)
4-8 OPERATION GUIDE
Interrupt Send
During communication, when you scan originals by selecting direct
transmission, you can use interrupt send. Even when the communication
is prolonged due to broadcast transmission or a next transmission being
scheduled, the machine will first send originals for which interrupt send has
been set.
NOTE: When the number of standby transmissions and delayed
transmissions has already reached 200, you cannot use interrupt send.
Depending on the timing of the interruption, you may not be able to
interrupt transmission immediately.
1
Press the Send/FAX key.
2
Load the originals to be sent using Interrupt Send.
3
Press [Advanced Setup], and then [FAX Direct Transmission].
4
Press [On].
5
Press [OK].
6
Set the destination, and press the Start key. The originals are left in queue,
and the transmission will start when transmission becomes possible.
NOTE: For operation of direct transmission, refer to Selection of
Transmission Method on page 3-2.
To cancel transmission while waiting for interrupt send, press the Stop key
on the operation panel or [Cancel] on the touch panel. For details, refer to
Cancelling Communication on page 3-13.
7
When the interrupt send is completed, the canceled communication and
standby transmission will automatically resume.
Status
10/10/2007 10:00
Enter Destination.
Cancel OK
Add Short cut
Ready to directly transmit FAX .
OnOff
FAX Direct Transmission
Destination
Send FAX directly, without reading original
into memory. FAX can also be sent
page by page , with c onfirm at ion
aft er each page.
0
Press [OK] to display
the image.
Page 75
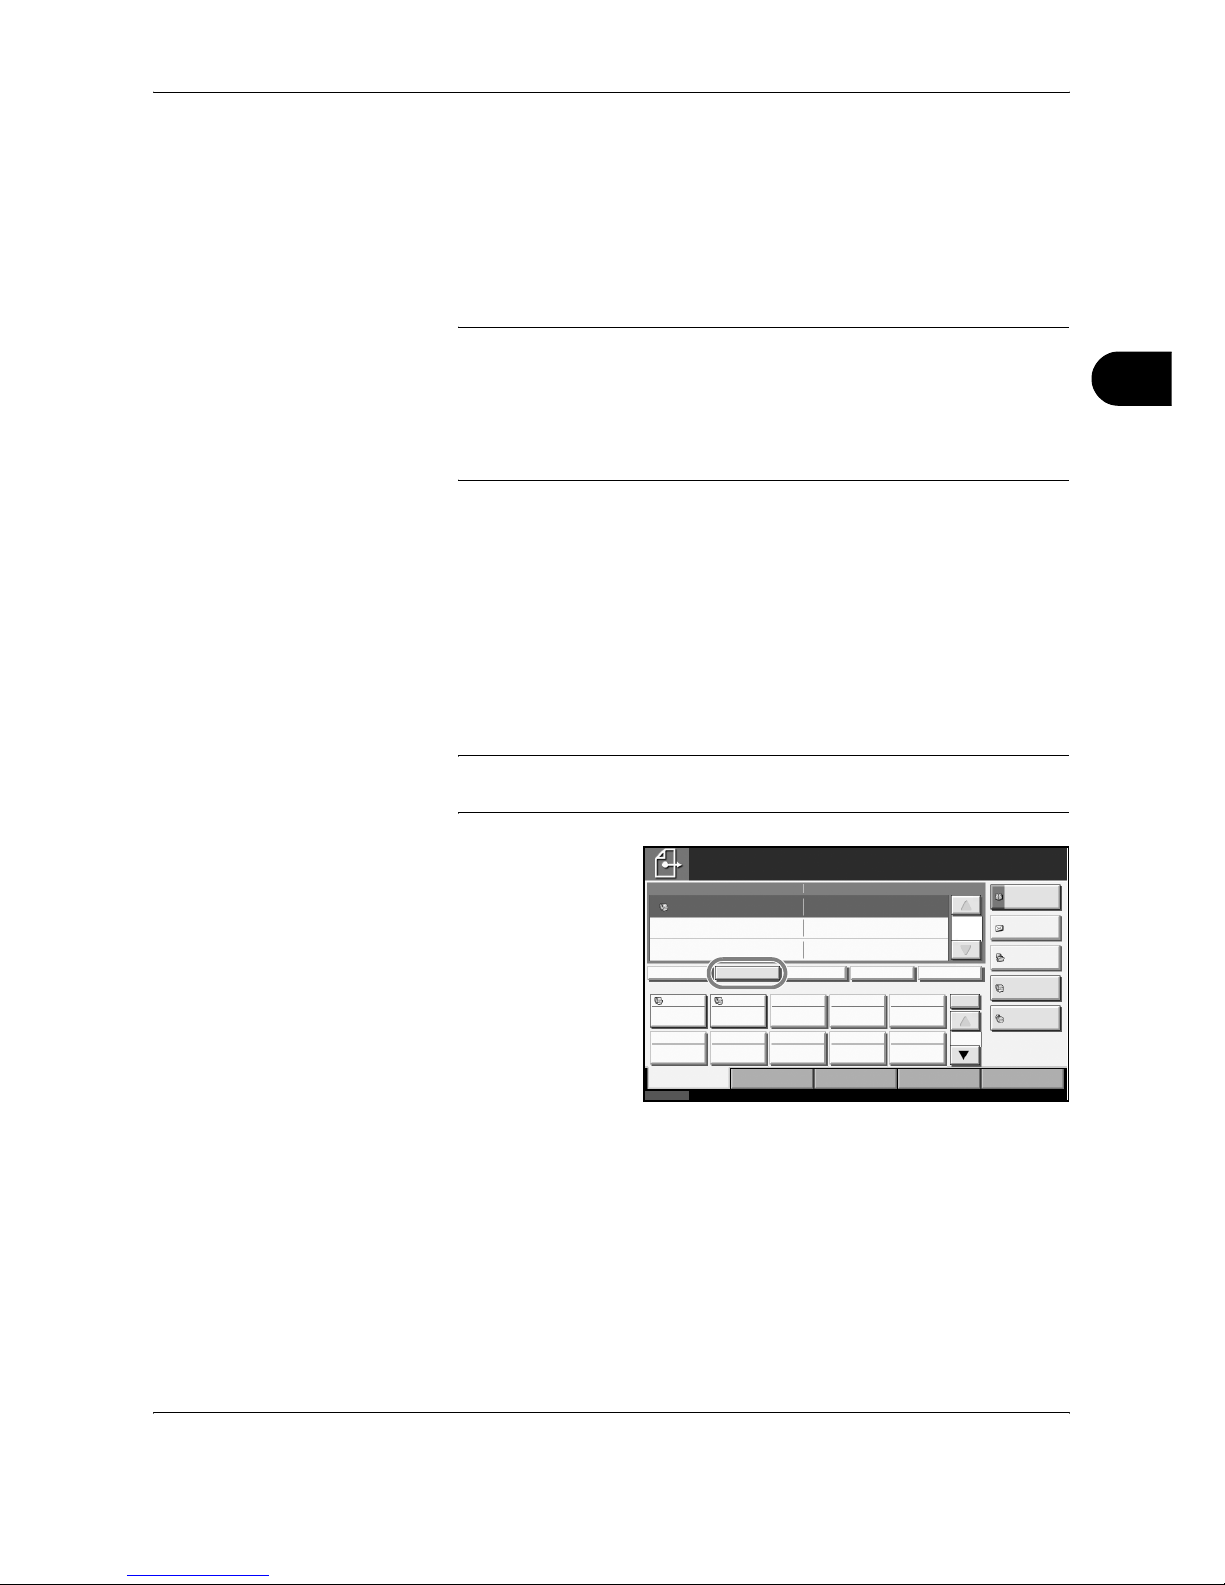
FAX Operation (Advanced)
OPERATION GUIDE 4-9
4
Chain Dial
Chain dial is a function that allows you to dial by linking fax numbers of the
receiving systems with a chain number created with a number common to
several destinations. By setting a toll free number and an area code to a
chain number, you do not need to enter such numbers for each
transmission.
NOTE: You can use the chain number at the head of the fax number of
the receiving system.
It is convenient to register chain numbers that are used frequently to the
Address Book or One-touch keys. For registration to the Address Book,
refer to Registering a New Destination on page 3-16. For registration to
One-touch keys, refer to Registering a New One-touch Key on page 3-28.
As an example, when using ‘212’ as the chain number
1
Press the Send/FAX key.
2
Place the originals.
3
Press [FAX No. Entry], and enter ‘212’ using the numeric keys, and press
[OK]. To use the Address Book or One-touch keys, select the destinations
to which ‘212’ has been registered.
NOTE: For the Address Book and One-touch keys, refer to Using the
Address Book on page 3-16 and Using One-touch Keys on page 3-28.
4
From the destination
display, select the
destination to which
‘212’ has been
registered, and
press [Chain].
5
Enter the fax number to connect to the chain number.
Use the numeric keys to enter a fax number
1 Press [FAX No. Entry]. ‘212’ is already entered, and then enter the
fax number. Press [Next Dest.] to enter the next fax number.
2 After entering all the destinations, press [OK].
Status
10/10/2007 10:00
Ready to send.
Destination
Destination
Detai l
Addres s B ook
FAX No.
Entr y
Folder Path
Entr y
E-mail
Addr Entry
Chain Detail/ Edit Delete Recall
Destination Quick Setup Type of Original/
Transmission
Color/Im age Advanced
Setup
1
1/1
1/10
001 002 003 004 005
006 007 008 009 010
Free
A OFFIC E
Free 212
No.
i-FAX
Addr Entry
On Hook
Page 76

FAX Operation (Advanced)
4-10 OPERATION GUIDE
Select fax number from the Address Book
1 Press [Address Book].
2 Select the destination from the list. You can select several
destinations.
3 Press [OK]. The chain number ‘212’ is automatically added to all the
destinations.
Select fax number from One-touch key
Select the destination from One-touch keys. You can select several
destinations. The chain number ‘212’ is automatically added to all the
destinations.
6
Press the Start key. Transmission begins.
Page 77

FAX Operation (Advanced)
OPERATION GUIDE 4-11
4
Manual Send
This method allows you to send originals by pressing the Start key after
confirming that the telephone line has connected to the receiving system.
Connecting a telephone set (commercially available product) to this
machine enables you to talk with the person at the receiving system before
sending originals.
Using after Confirming the Connection to the Receiving System
You can send originals after confirming that the telephone line has
connected to the receiving system.
1
Press the Send/FAX key.
2
Set the originals.
3
Press [On Hook].
4
Use the numeric keys to enter the number of the receiving system.
NOTE: To cancel the operation, press [Line Off].
5
When you hear the fax tone, the telephone line has connected to the
receiving system. Press the Start key. Transmission begins.
Using a Telephone to Send
When you want to talk to the person at the receiving system or the
receiving system needs to switch to fax, use this method to send originals.
1
Set the originals.
2
Lift the handset, and dial the number of the receiving system.
3
Check if the telephone line has connected to the fax of the receiving
system.
When you hear the fax tone
The receiving system is on fax.
1 Press the Send/FAX key.
2 Press [On Hook].
3 Press the Start key. Transmission begins.
When you hear a voice from the receiving system
The telephone line has connected to the telephone of the receiving system.
When the conversation is over, follow steps 1 to 3 above.
4
When sending starts (when the Send indicator on the operation panel
starts blinking), return the handset to its original position.
Page 78

FAX Operation (Advanced)
4-12 OPERATION GUIDE
Manual Reception
This method allows you to receive faxes by pressing [Manual RX] after
confirming that the telephone line has connected to the sending system.
Connecting a telephone set (commercially available product) to this
machine enables you to receive originals after talking to the person at the
sending system.
NOTE: FAX Automatic Reception has been preset for the receiving mode
of this machine. To use Manual Reception, you need to change the
receiving mode to Manual Reception. To change to manual mode, refer to
Receiving Mode on page 6-10.
When the Dual FAX option is installed, the only receiving mode available
on port 2 is FAX Automatic reception.
Receiving after Confirming Connection to the Sending System
You can receive originals after confirming by sound that the telephone line
has connected to the sending system.
1
When there is an incoming call, the machine makes a ringing tone.
2
Press the Send/FAX key.
3
Press [On Hook], and then [Manual RX].
4
After the sending side has started transmission, the machine starts
receiving the originals.
Using the Telephone to Receive
Use this method when you want to receive originals after talking to the
person at the sending system.
1
When there is an incoming call, the telephone connected to the machine
makes a ringing tone.
2
Lift the handset of the telephone.
3
Check if the telephone line has connected to the fax of the sending system.
When you hear the fax tone
The sending system is on fax.
Page 79
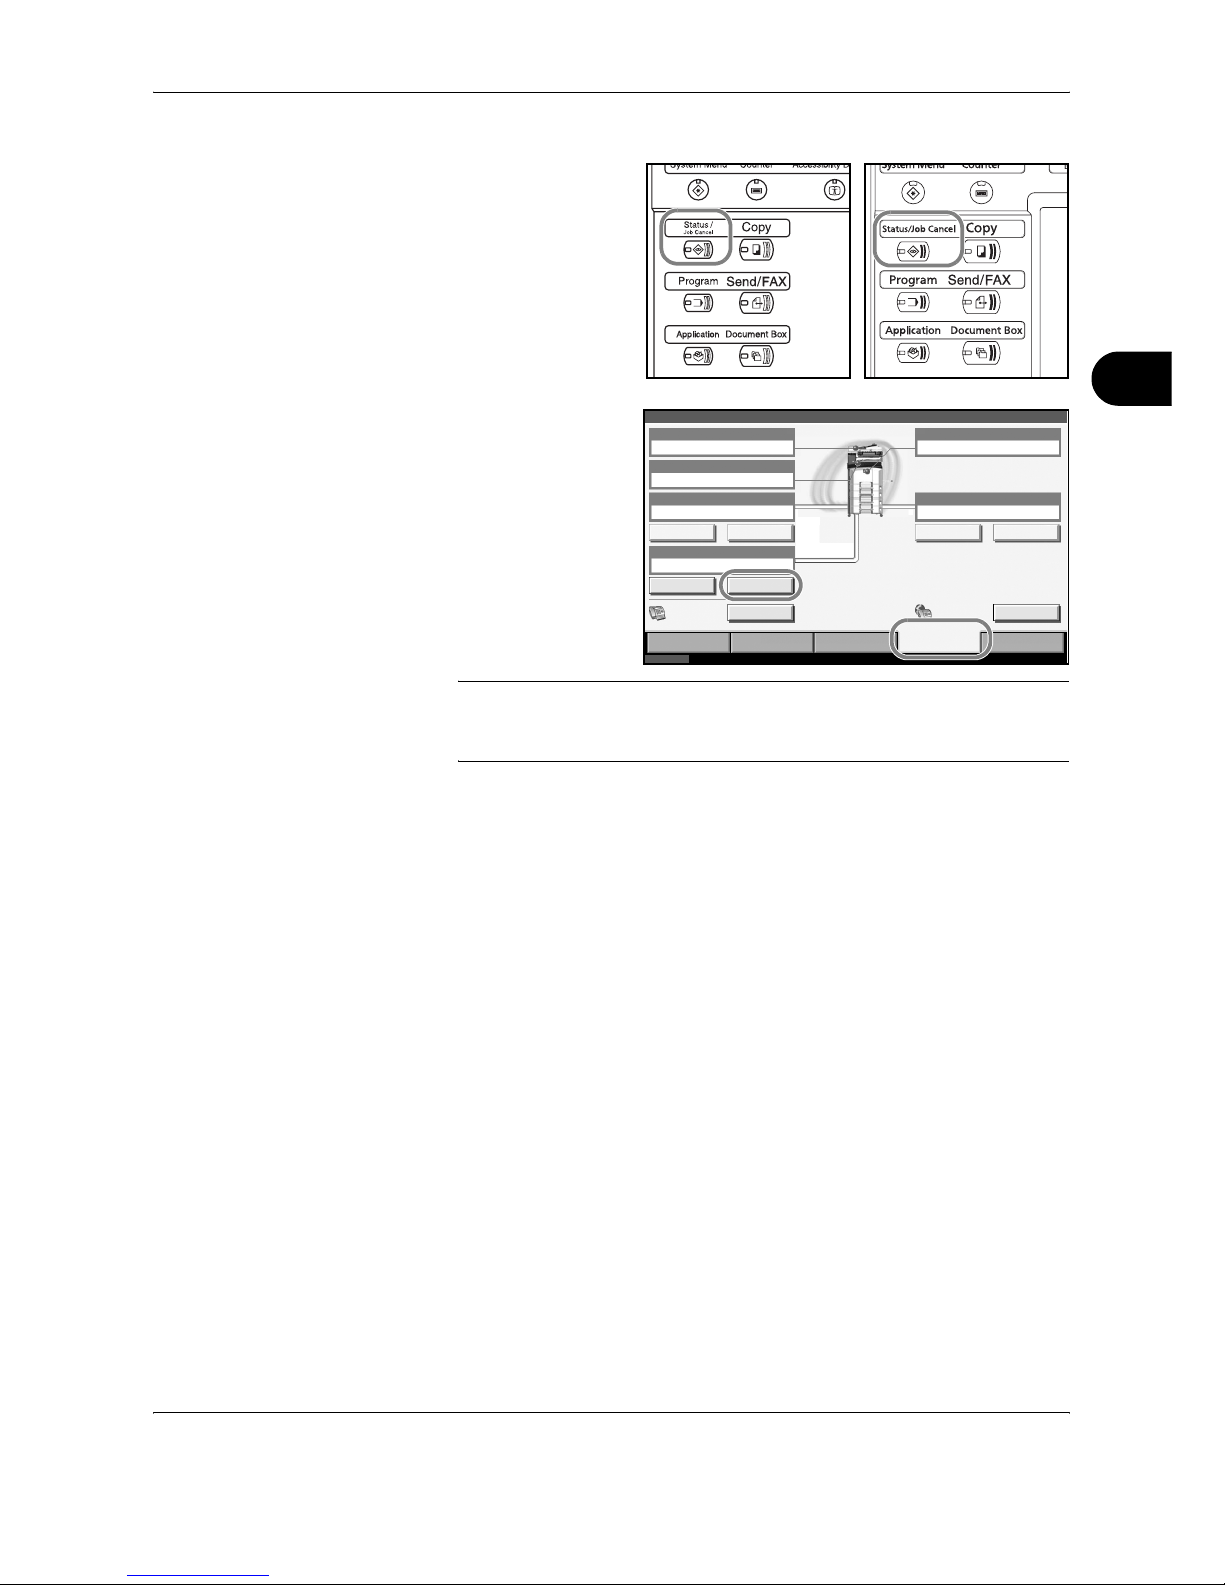
FAX Operation (Advanced)
OPERATION GUIDE 4-13
4
1 Press the
Status/Job
Cancel key.
2 Press [Device/
Communication
],
and then
[Manual RX].
Reception will
start.
NOTE: When using a telephone set that can send tone signals, use the
telephone to start the reception of originals with the remote switch
function. (Refer to Remote Switch Function on page 4-14.)
When you hear a voice from the receiving system
The telephone line has connected to the telephone of the sending system.
When the conversation is over, follow steps 1 to 2 above.
After the sending system has started transmission, the machine starts
receiving originals.
4
When reception starts (when the Receive indicator on the operation panel
starts blinking), return the handset to its original position.
30/40/50 ppm model 25 ppm model
Status
Stat us
Ready.
Devic e/
Com munic atio n
Paper /Suppli es
10/10/2007 10:00
Scanner
Ready.
Print er
Not connected.
Removable Memory
Hard Di sk
Not connected.
Memory Card
Stor ing JobsSe nding JobsPrint ing Jobs
Format Remove
Line Off Manual RX
FAX Li ne 1
Log
Format Printing list
FAX
Ready.
Check New FAXFAX/i-FAX
Page 80
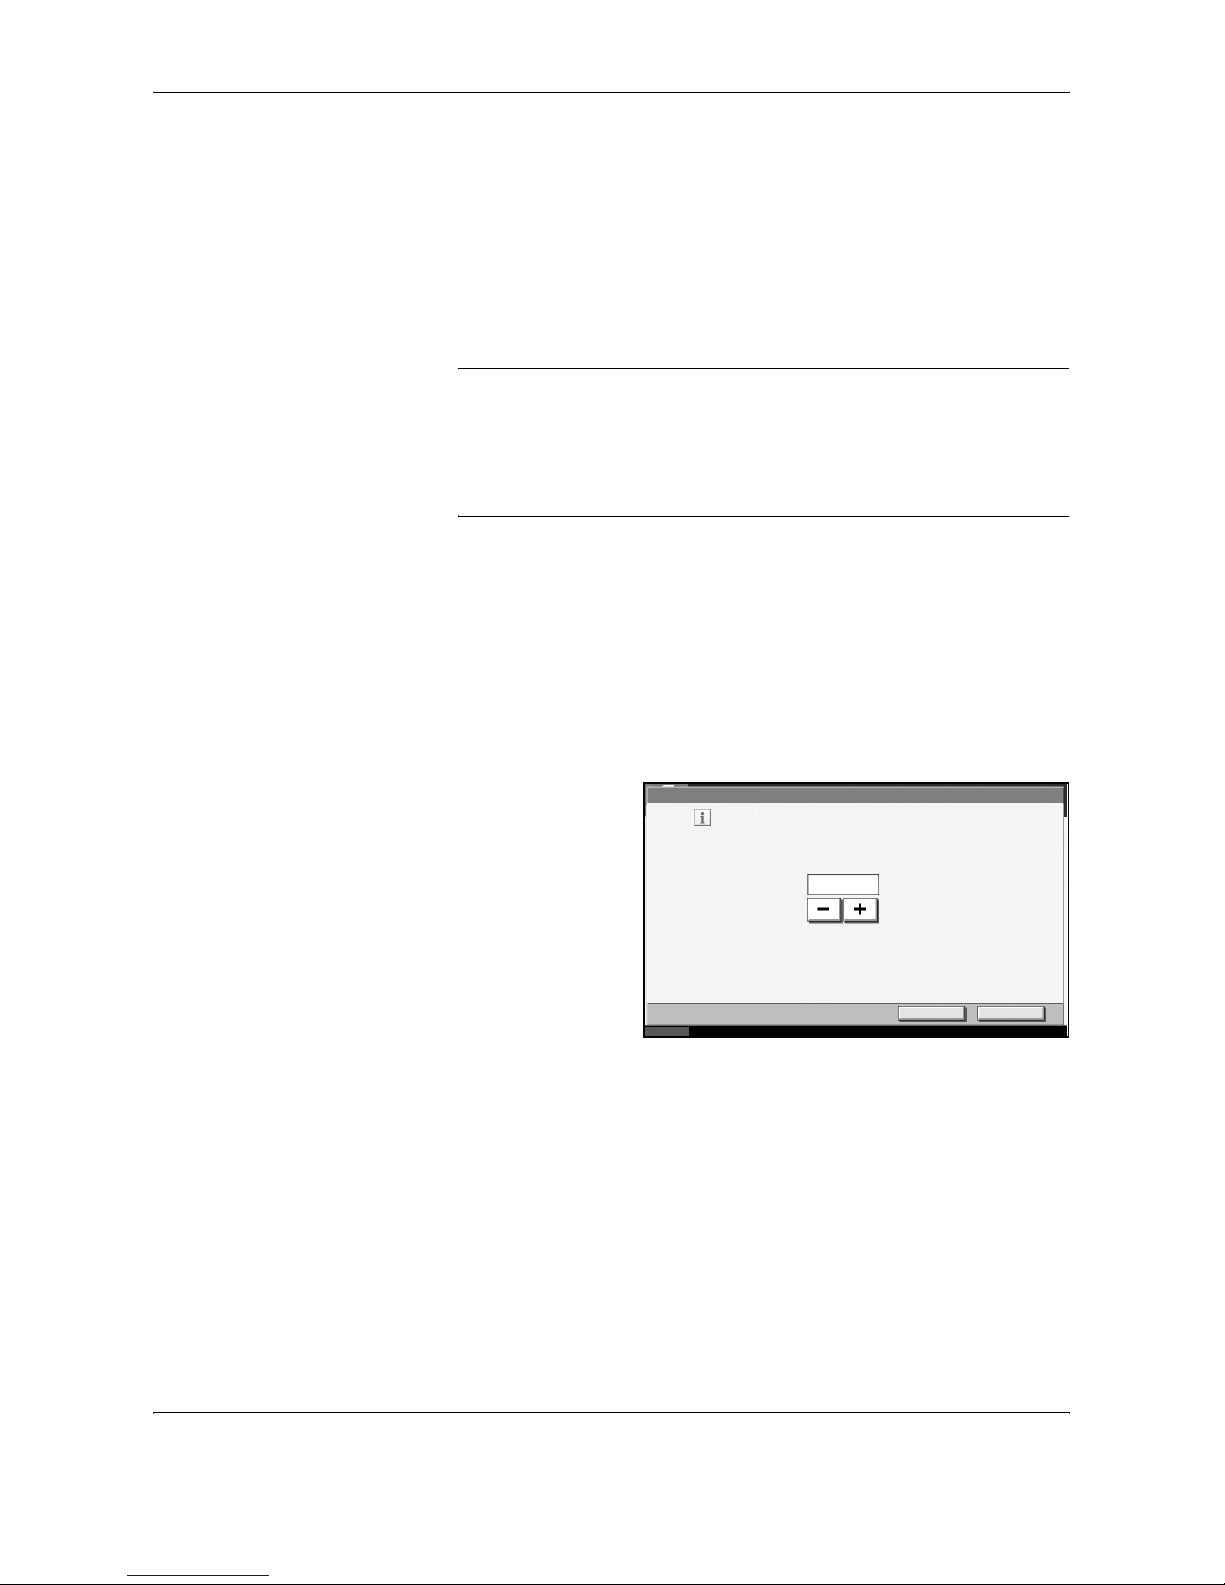
FAX Operation (Advanced)
4-14 OPERATION GUIDE
Remote Switch Function
You can start fax reception by operation from the connected telephone set.
This function is convenient for using this machine and a telephone set
(commercially available product) in combination installed at places distant
from each other.
To start fax reception by operation from the connected telephone set, use
the following operation.
NOTE: In order to use remote switch, it is necessary to connect the tone
signal-sending telephone set (commercially available product) to the
machine. However, even if it is a tone signal-sending telephone set, this
function may not be used satisfactorily depending on the type of
telephone set. For details, contact our agent or the store where you
purchased this machine.
How to Register Remote Switch Dial
Remote switch dial is set to 55 at the factory, but you can change the dial
number.
1
Press the System Menu key.
2
Press [FAX/i-FAX], [Next] of Reception, [Next] of FAX, and then [Change]
of Remote SW Dial.
3
Press [+]/[-] or the
numeric keys to
enter the number
you newly register.
(00 to 99)
4
Press [OK].
5
To exit from this setup, press [Close] several times until the System Menu
default screen is displayed.
Using the Remote Switch Dial
To start fax reception by operation from the connected telephone set, use
the following operation.
Status
FAX - Remot e SW Dial
Set a num ber whic h a co nnect ed telephone can us e
to remotely initiate a switch to FAX mode.
Use [-]/[+] or the numeric keys to enter a number.
Cancel OK
55
10/10/2007 10:00
(00- 99)
Page 81
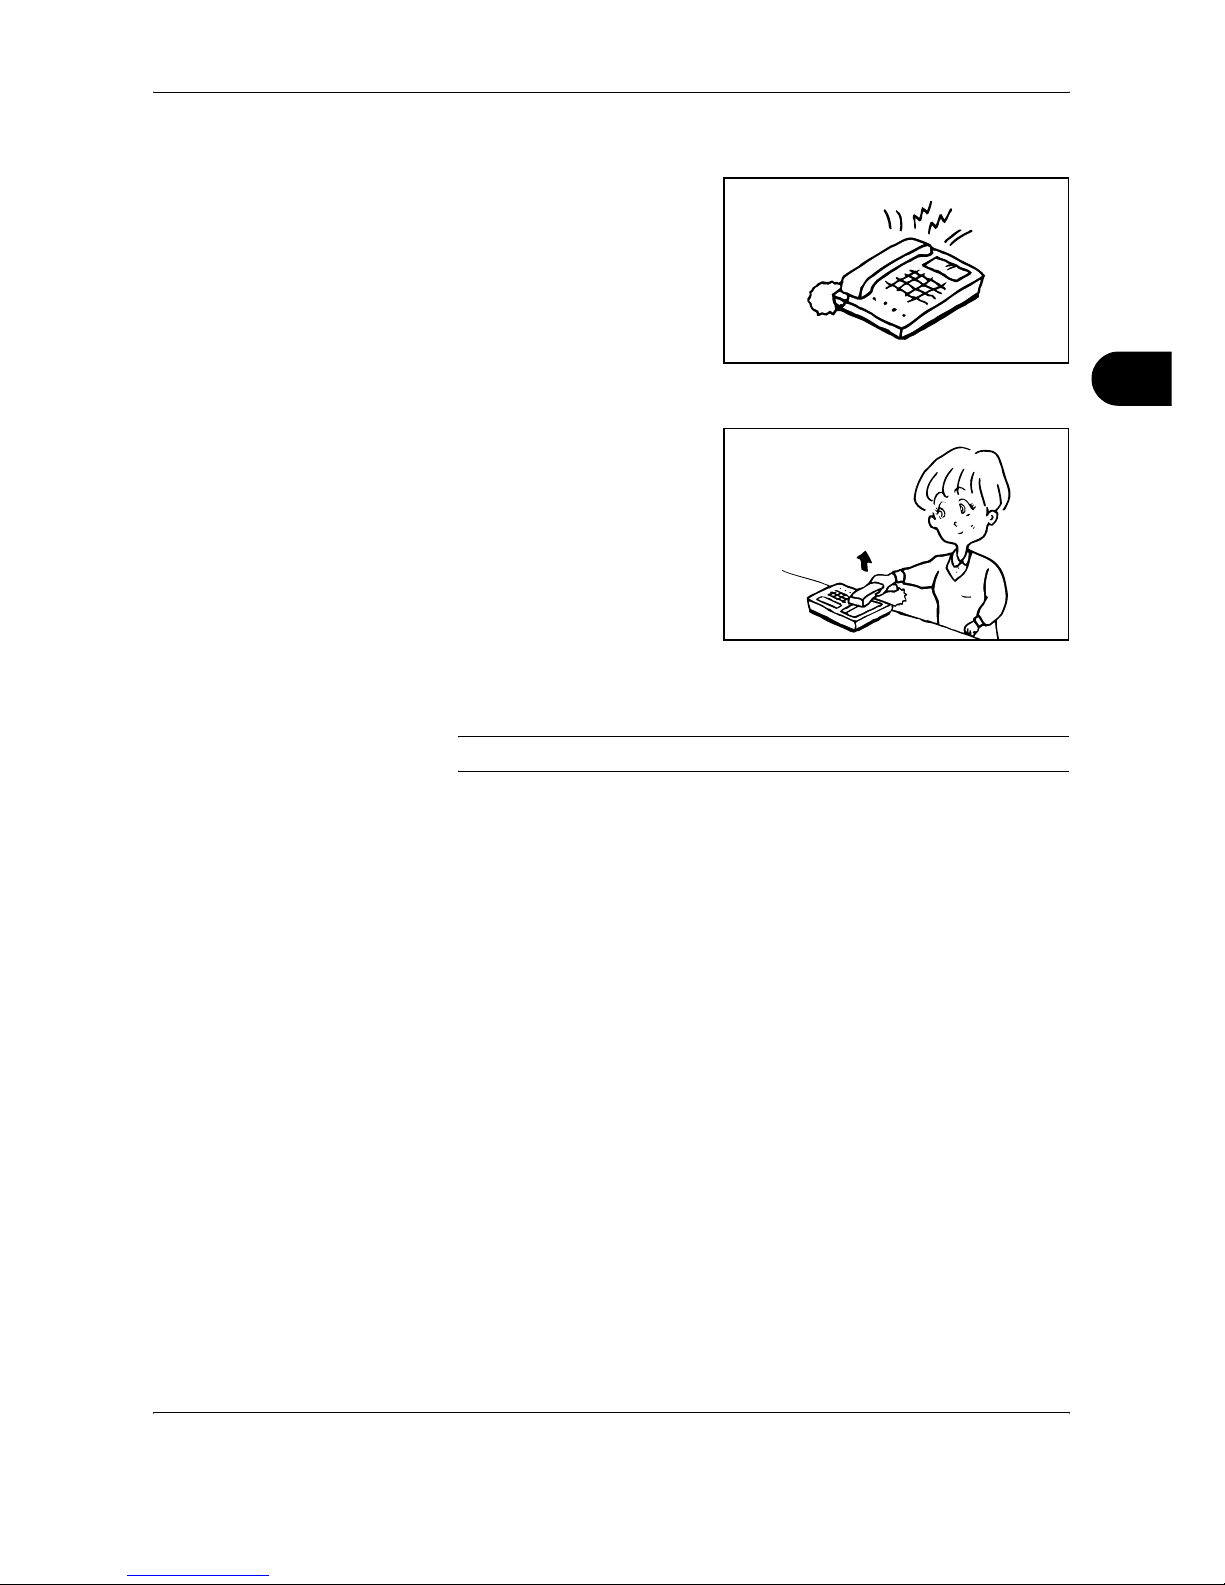
FAX Operation (Advanced)
OPERATION GUIDE 4-15
4
1
The connected telephone set makes a ringing tone.
2
Lift the handset of the telephone.
3
When you hear the fax tone from the handset, enter the two-digit remote
switch dial number using the dial button on the telephone set.
NOTE: The remote switch dial is set to 55 at the factory.
4
The telephone line switches to the machine, and reception starts.
Page 82
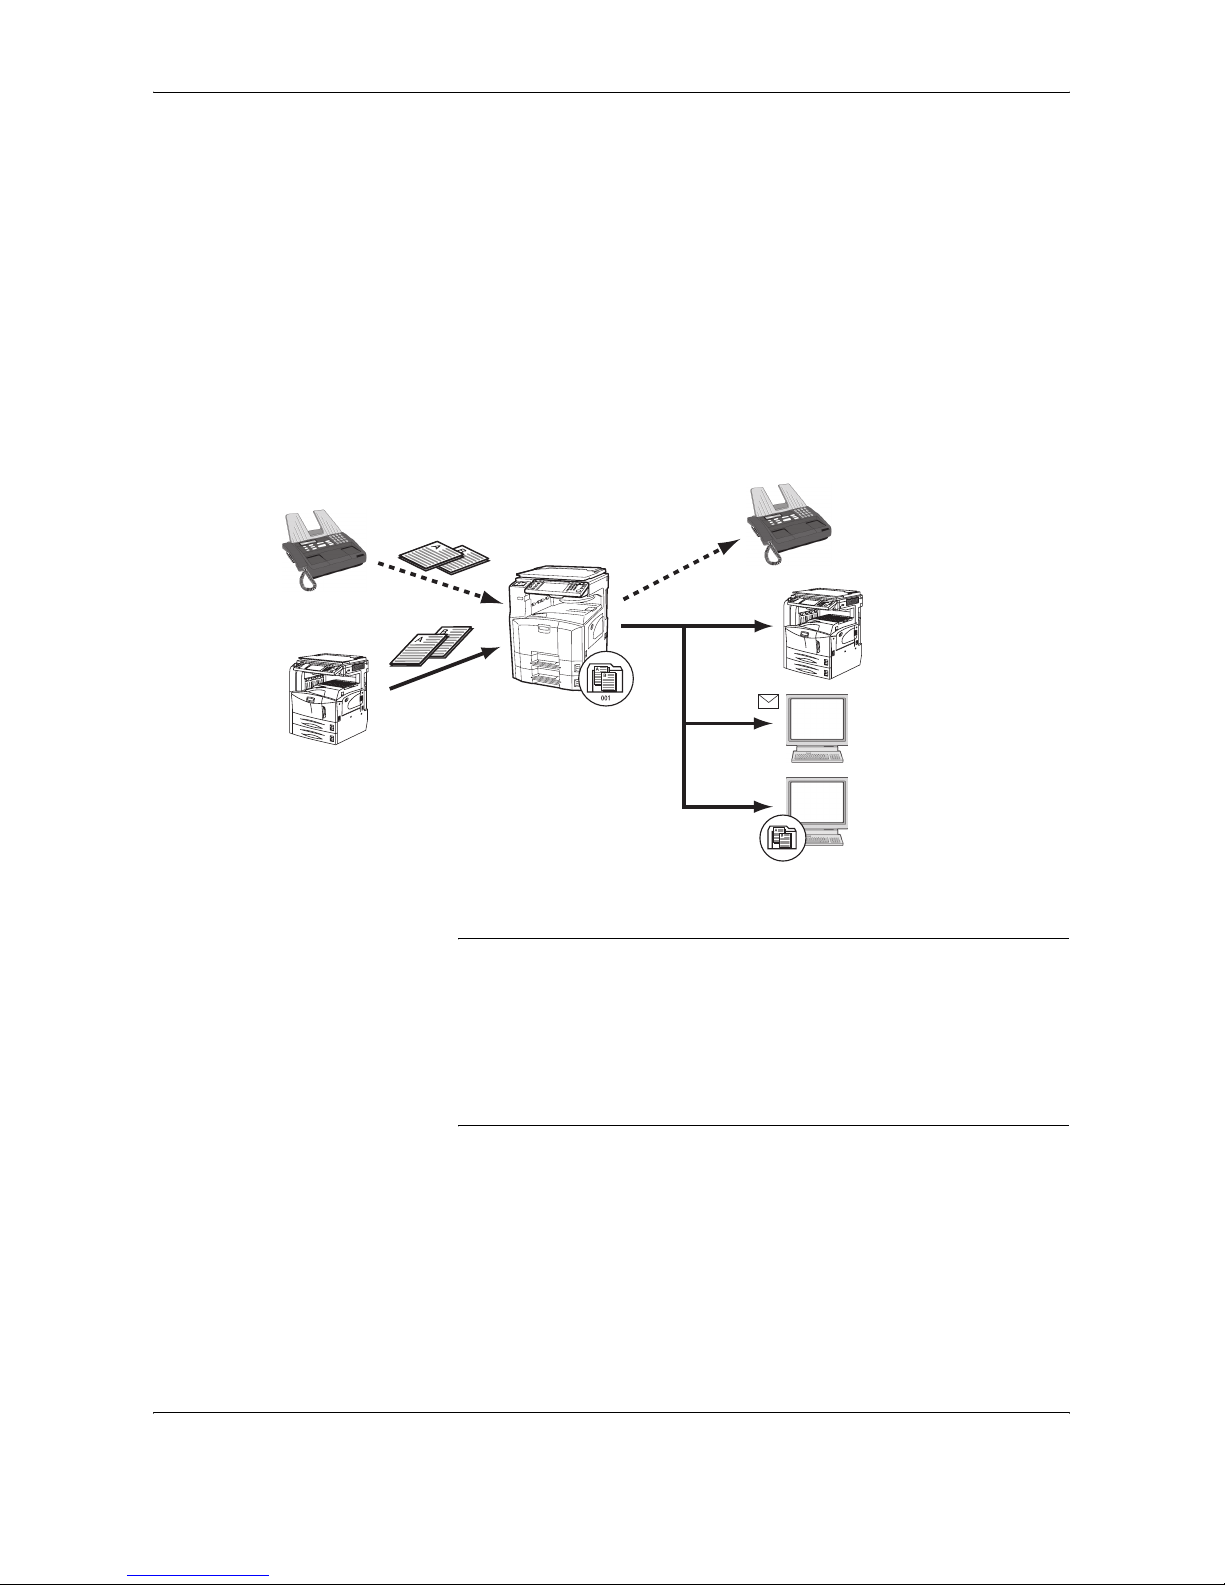
FAX Operation (Advanced)
4-16 OPERATION GUIDE
Memory Forwarding
When you have received a fax, you can forward the received image to
other faxes, computers, and FAX Boxes.
Type of Forwarding Destination and Requirements for Forwarding
You can set forwarding destinations and requirements for forwarding.
Type of Forwarding Destination
You can forward the received fax to other fax machines or FAX Boxes,
send it as an i-FAX or E-mail attachment or transfer it to a folder (SMB or
FTP).
Requirements for Forwarding
IMPORTANT:
• If the forwarding requirements are specified, only one destination
matching the requirements are printed from the registered
destinations.
• The forwarding requirements are searched for according to the
priorities 1 through 4 above.
• If multiple destinations match the requirements, the first one is printed.
The forwarding requirements are as follows:
1 Sub address
2 Sender fax number
3 Port (when the Dual FAX option is installed)
4 Recipient’s address (i-FAX)
External FAX
External FAX
External i-FAX
External i-FAX
E-mail transmission
Folder (SMB) transmission
Folder (FTP) transmission
Network
Network
FAX Box
Telephone
line
Telephone line
Page 83
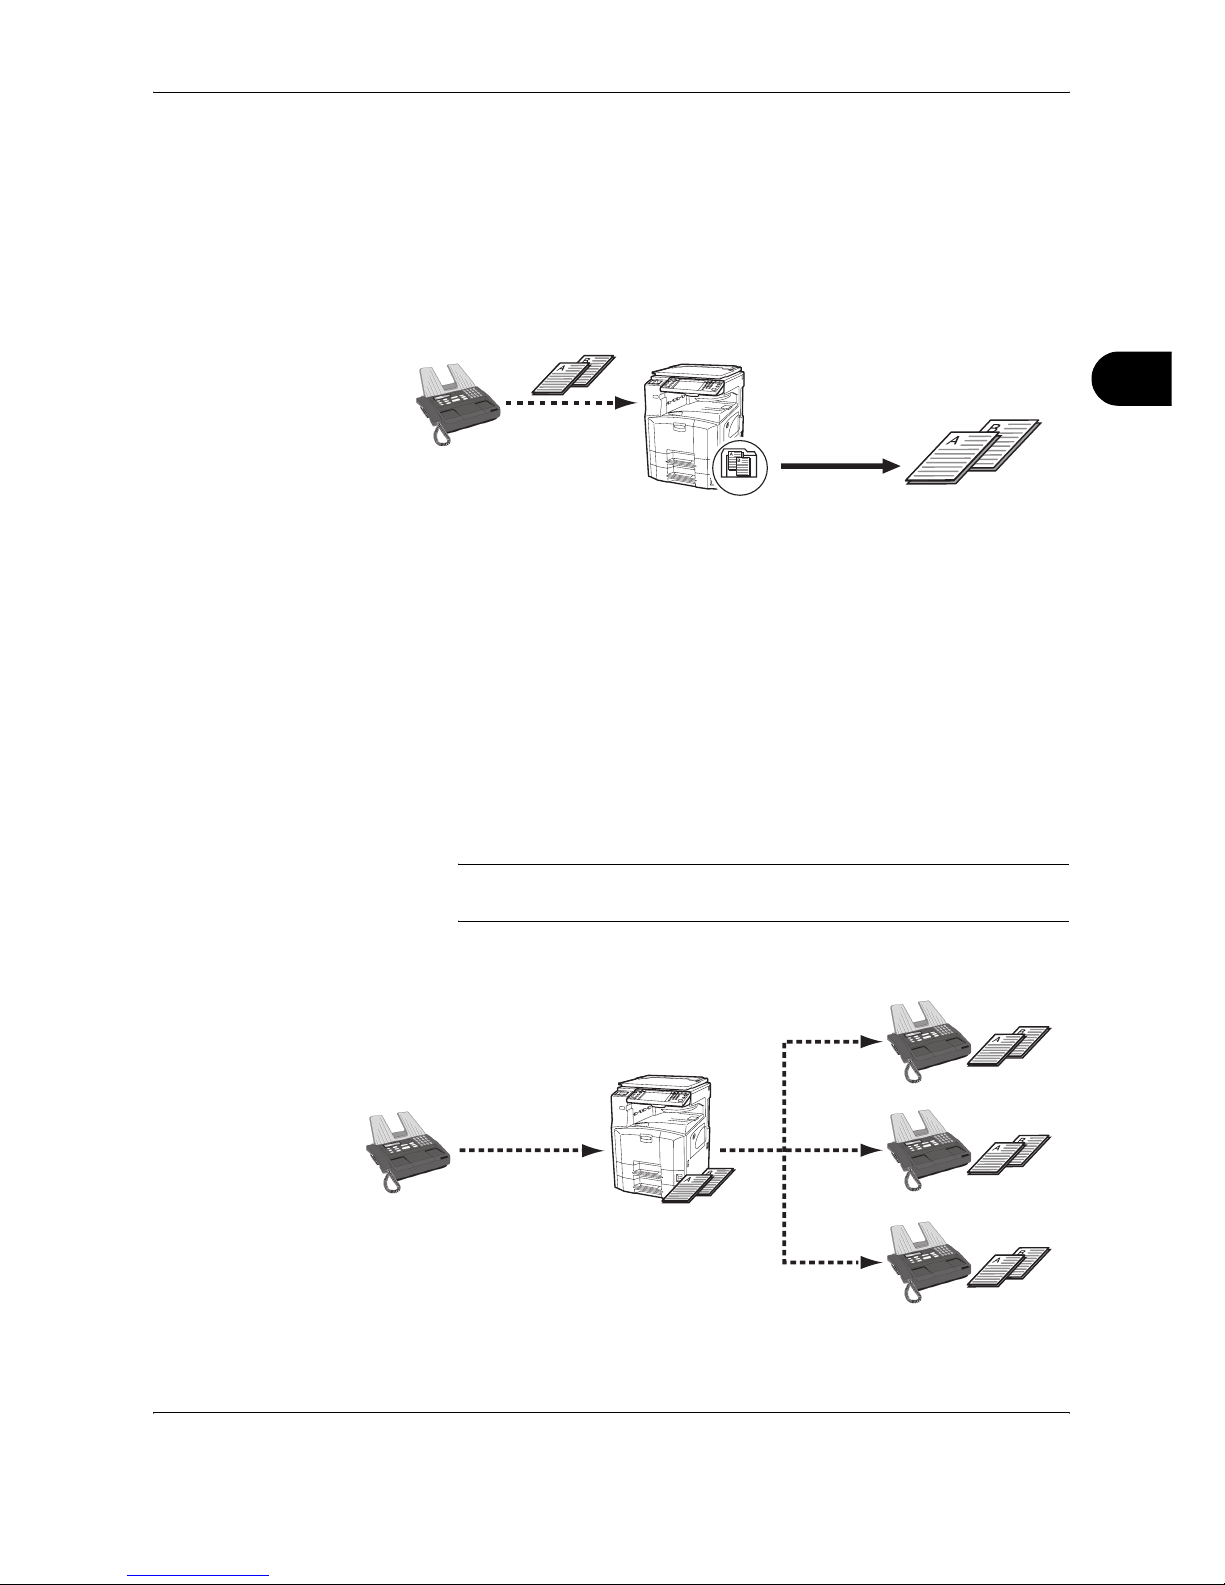
FAX Operation (Advanced)
OPERATION GUIDE 4-17
4
By using the memory forwarding function, you can perform the following
communication.
Sub address confidential delivery
You can store the received originals in the FAX Box registered in advance
without printing them, and output the originals without anyone seeing them.
Setting example
1 Register the FAX Box. (Refer to page 4-43.)
2 Perform sub address transmission. (Refer to page 4-50.)
3 Store originals in the FAX Box with memory forwarding.
4 Print originals from the FAX Box. (Refer to page 4-45.)
Sub address relay broadcast communication
Received originals are forwarded to multiple fax machines. By setting a
sub address as the forwarding requirement, you can restrict relay
broadcasting to a specific communication.
NOTE: When memory forwarding is used, the machine can output
received originals.
Setting example
1
FAX Box
registration
2
Sub Address transmission
Sub Address:1234
3
Memory forwarding
Sub Address:1234
4
Print
001
1
Sub Address
transmission
3
FAX reception
3
FAX reception
3
FAX reception
2
Memory forwarding
Sub Address: 3333
Sub Address:
3333
Page 84
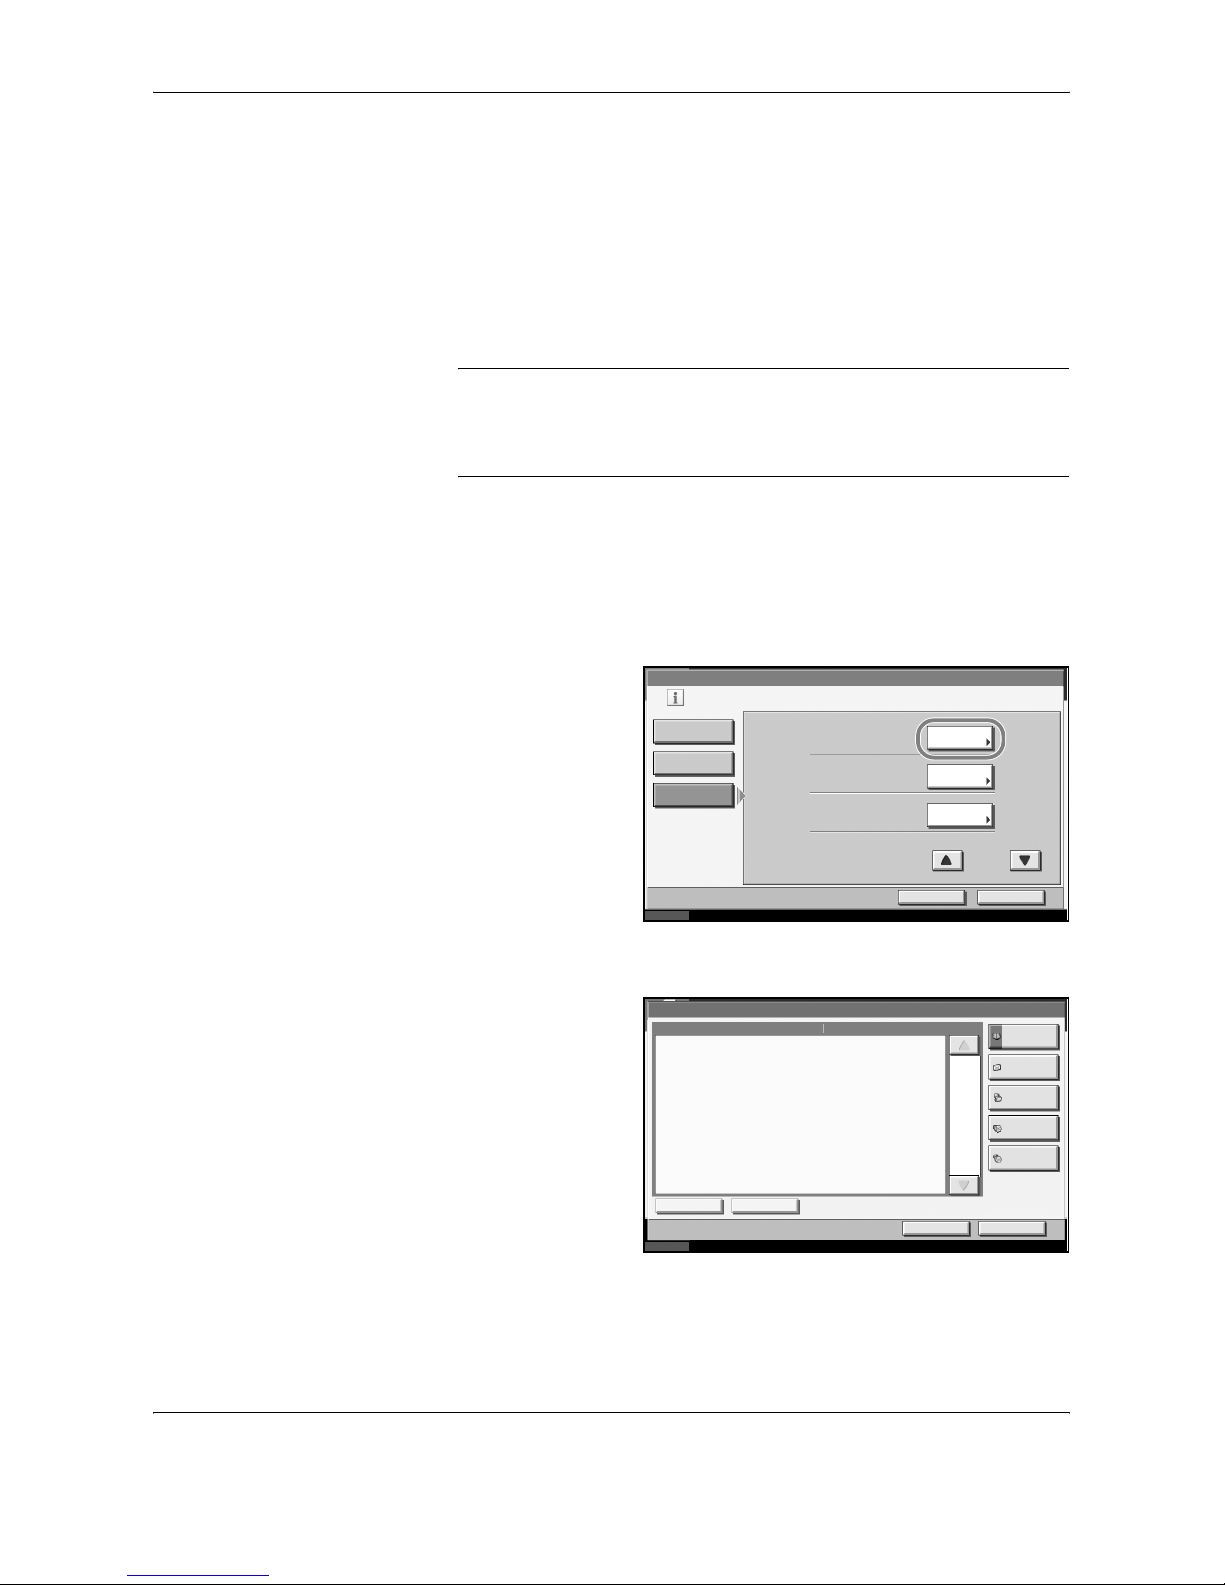
FAX Operation (Advanced)
4-18 OPERATION GUIDE
1 Perform sub address transmission. (Refer to page 4-50.)
2 Use memory forwarding to forward received originals to multiple fax
machines.
3 Each forwarding destination receives the fax.
Registration of Forwarding Settings (Forward All)
To set memory forwarding, use the following procedure.
NOTE: To perform forwarding settings for each reception requirement,
refer to Registration of Forwarding Settings (for Each Requirement) on
page 4-20.
To change the entry contents, follow the same operation.
1
Press the System Menu key.
2
Press [FAX/i-FAX], and then [Next] of Forward Setting.
3
Press [Use Requirements for All RX].
4
Press [Next] of
Forward Setting.
5
Press [Change] of Forward Destination.
6
Set the Forwarding
Destination. Select
the other party by
pressing one of the
following keys, and
press [OK] to add the
other party to the list.
Status
FAX/i-FAX - RX/Forward Requirements
Print or forward the received file according to
requirement s.
Cancel OK
10/10/2007 10:00
Off
Change Setting
by Requi rement
Use Requirem ents
for All RX
Forward Setting:
Print :
Off
Activating Time:
Next
Change
Change
1/2
All Day
Status
Requirement -Forwarding Destination
Cancel OK
10/10/2007 10:00
Addres s B ook
E-mail Addr
Entr y
Folder Path
Entr y
FAX No.
Entr y
Detail/Edit Delete
Dest Detail
i-F AX A ddr
Entr y
1/1
Page 85
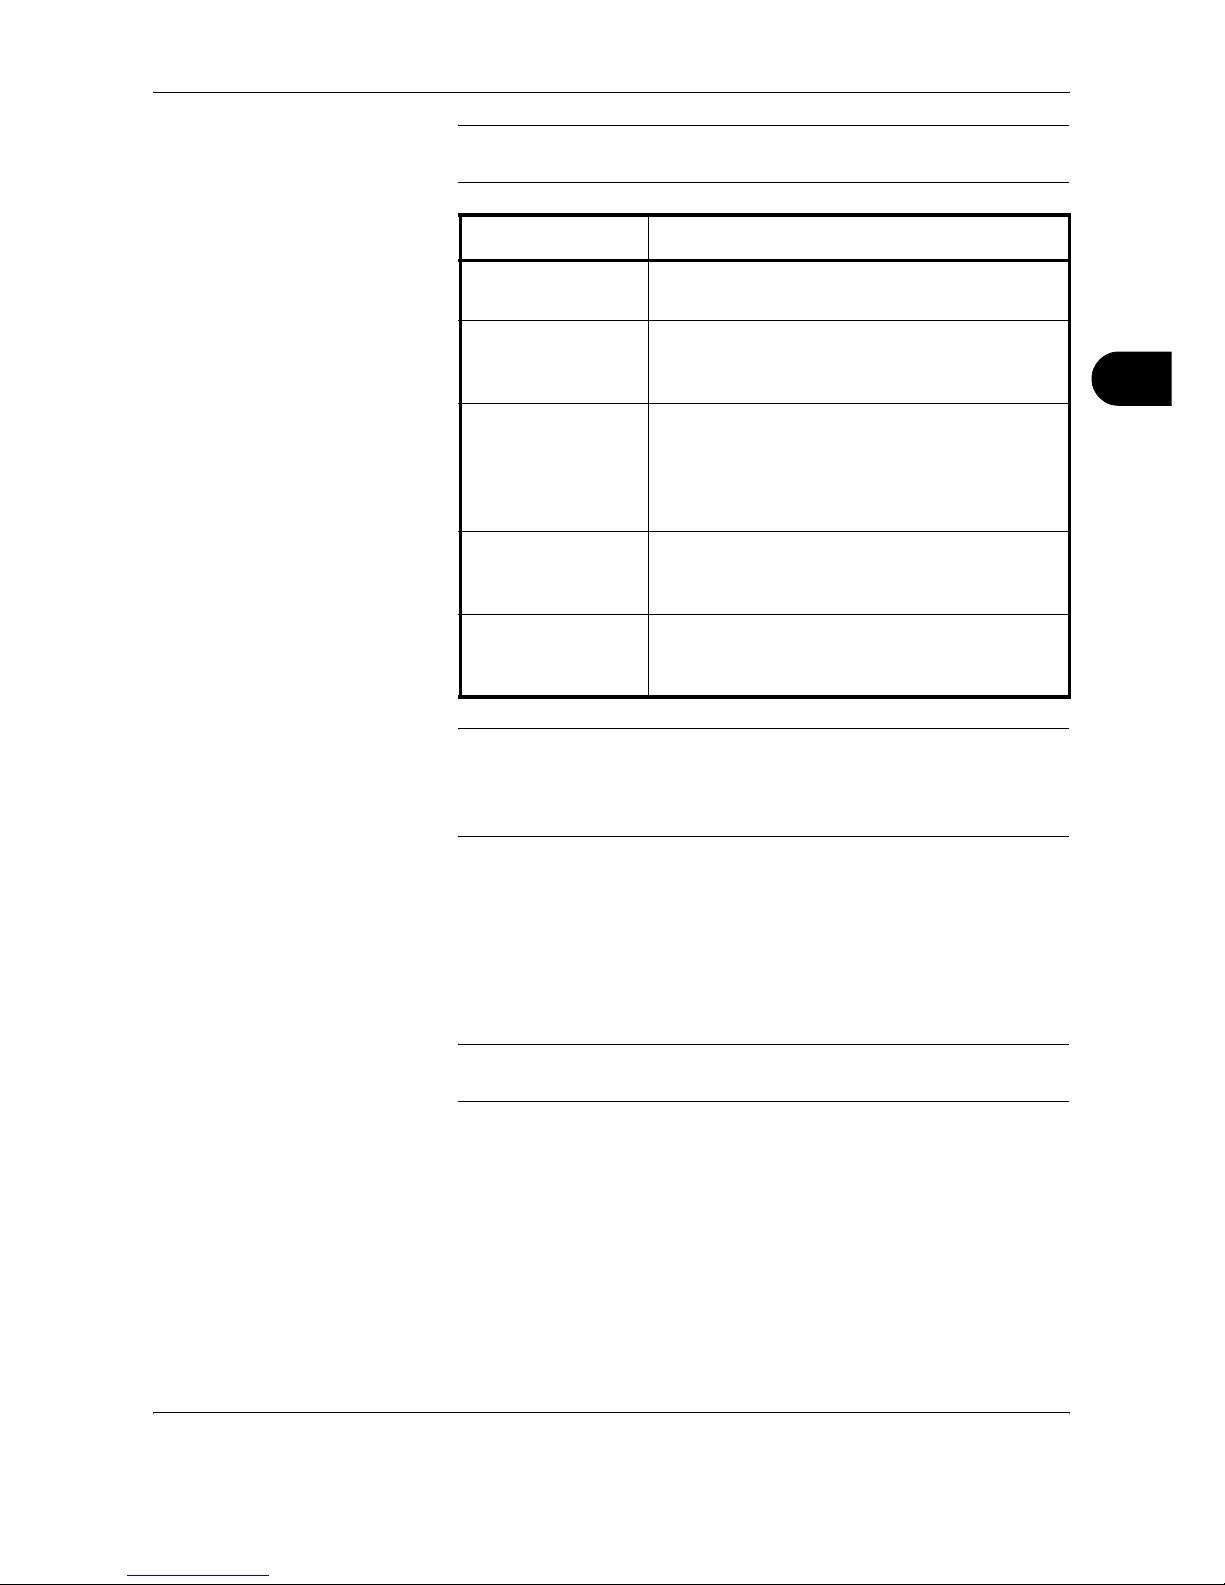
FAX Operation (Advanced)
OPERATION GUIDE 4-19
4
NOTE: You can register multiple destinations. By setting a group as the
destination, you can specify up to 500 recipients.
NOTE: To edit a registered destination, select the destination to be edited
from the list, press [Detail/Edit] and edit the information.
To remove a registered destination, select the destination to be removed
from the list and press [Delete].
7
Press [OK].
8
Perform forward detail setting. You can change the following settings.
• File format setting
• File separation setting
NOTE: For details on forwarding settings, refer to Forwarding Detail
Settings on page 4-25.
9
Press [OK].
10
Perform forward detail setting. You can change the following settings.
• Print setting
• Enable time setting
• File name registration
Key Description
Address Book Select the destination registered in the Address
Book
E-mail Addr Entry Forward originals in e-mail transmission. Enter
the e-mail address of the other party to which
you will forward the received originals.
Folder Path Entry Forward originals with folder (SMB)
transmission or folder (FTP) transmission. Enter
the Host Name, Path, Login User Name, and
Login Password of the other party to which you
will forward the received originals.
FAX No. Entry Forward originals to another fax. Enter the
recipient’s fax number using the numeric keys
and set the transmission details.
i-FAX Addr Entry Forward originals using i-FAX. Enter the Internet
fax address of the recipient and set the
conditions for the destination machine.
Page 86
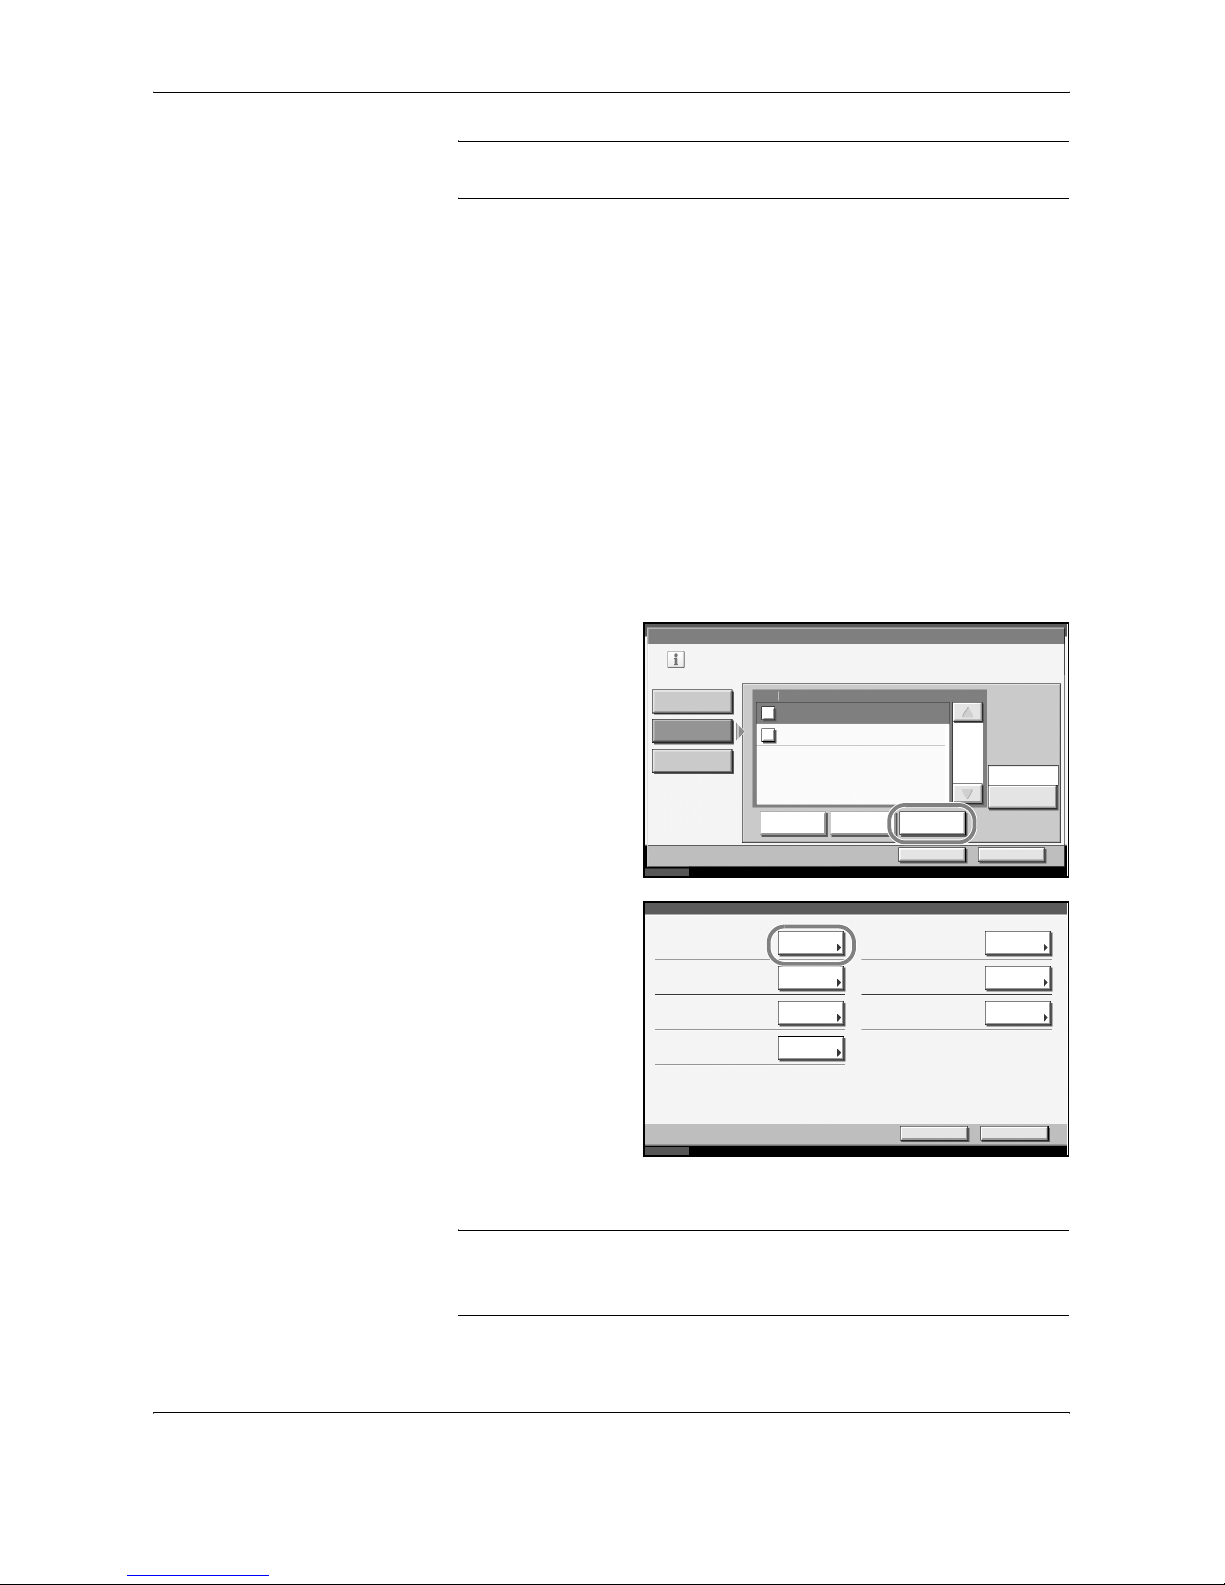
FAX Operation (Advanced)
4-20 OPERATION GUIDE
NOTE: For details on forwarding settings, refer to Forwarding Detail
Settings on page 4-25.
11
Press [OK]. Memory forwarding is set.
12
To exit from this setup, press [Close] several times until the System Menu
default screen is displayed.
Registration of Forwarding Settings (for Each Requirement)
To perform forwarding settings for each reception requirement, follow the
steps below. Up to 100 requirements for forwarding can be registered.
1
Press the System Menu key.
2
Press [FAX/i-FAX], and then [Next] of Forward Setting.
3
Press [Change Setting by Requirement].
4
Press [Add].
5
Press [Change] of
Requirement Name.
6
Enter the requirement name, and press [OK].
NOTE: For details on character entry, refer to Character Entry Method on
page 2 of the Appendix.
Up to 32 characters can be entered for the requirement name.
Status
FAX/i-FAX - RX/Forward Requirements
Cancel OK
10/10/2007 10:00
Print or forward the received file according to
requirement s.
Off
Others
Add
Change Setting
by Requi rement
Off
Use Requirem ents
for All RX
On Requirement Nam e
Delet eDetail/Edit
FAX A
FAX B
1/1
Status
Requirement :
Cancel Register
10/10/2007 10:00
Requirement Nam e :
Forward Setting:
Storing in FAX Box:
Off
File Name:
doc
Requirement :
Sub Addre ss
Print :
Off
Activating Time:
Change
Next
Change
Change
Change
Change
Change
All Day
Page 87
FAX Operation (Advanced)
OPERATION GUIDE 4-21
4
7
Press [Change] of Requirement.
8
To forward fax reception, select [FAX] and press [Next].
To forward i-FAX reception, select [i-FAX] and press [Next].
9
Register the forwarding requirements.
When FAX was selected in step 8.
When i-FAX was selected in step 8.
Forwarding
requirements
Registration method
Sub Address Press [Sub Address] and enter the sub address
using the numeric keys. You can use up to 20
digits including the numbers from 0 to 9,
‘ (space)’, ‘#’ and ‘*’ characters to enter a sub
address.
Sender FAX
Number
Press [Sender FAX Number] and enter the
sender’s fax number using the numeric keys.
You can enter up to 20 characters.
Port Press [Port] and select [Port 1] or [Port 2]. This
setting only appears when the Dual FAX option
is installed.
Forwarding
requirements
Registration method
E-mail Address Press [E-mail Address]. Enter the destination
Internet fax address and then press [OK]. You
can enter up to 126 characters.
Page 88
FAX Operation (Advanced)
4-22 OPERATION GUIDE
NOTE: When setting a forwarding condition by selecting a sender’s FAX
number (a local FAX information entry of the destination machine) but
leaving blank to the sender’s FAX number, you can forward a FAX that is
received from a sender whose number is not registered in the sender's
FAX number entries.
When you set the sender fax number or destination address as a
forwarding requirement, you can use an asterisk (*) as a wild-card
character. You can use this feature to specify a domain or to specify faxes
from a particular country or region, for example.
E.g.:
The wild-card character '*' can only be used at the beginning or end of a
character string. You cannot register a wild-card character ‘*’ by itself.
When registering a forwarding condition using the ‘*’ wild-card character,
up to 5 destinations can be registered.
10
Press [OK].
11
Press [Next] of Forward Setting.
12
Press [Change] of Forward Destination.
13
Set the Forward Destination. Select the other party by pressing one of the
following keys, and press [OK] to add the other party to the list.
• ‘44*’: Only fax numbers that start with ‘44’ are forwarded.
• ‘*@AAAA.com’ or ‘*@AAAA*’: Only Internet faxes received from
senders at the AAAA.com or AAAA domains are forwarded.
Key Description
Address Book Select the destination registered in the Address
Book.
E-mail Addr Entry Forward originals with e-mail transmission.
Enter the e-mail address of the other party to
which you forward the received originals.
Folder Path Entry Forward originals with folder (SMB)
transmission or folder (FTP) transmission. Enter
the Host Name, Path, Login User Name, and
Login Password of the other party to which you
will forward the received originals.
FAX No. Entry Forward originals to another fax. Enter the
recipient’s fax number using the numeric keys
and set the transmission details.
i-FAX Addr Entry Forward originals using i-FAX. Enter the Internet
fax address of the recipient and set the
conditions for the destination machine.
Page 89

FAX Operation (Advanced)
OPERATION GUIDE 4-23
4
NOTE: To edit a registered destination, select the destination to be edited
from the list, press [Detail/Edit] and edit the information.
To remove a registered destination, select the destination to be removed
from the list and press [Delete].
14
Press [OK].
15
Set details for forwarding settings. You can change the following settings.
• File format setting
• File separation setting
NOTE: For details on forwarding settings, refer to Forwarding Detail
Settings on page 4-25.
16
Press [OK].
17
Press [Change] of Storing in FAX Box.
18
Press [On] or [Off].
To store the originals in the FAX Box, press [On]. If you do not want to store
the originals in the FAX Box, select [Off], press [OK] and proceed to step
20.
NOTE: To set the FAX Box as the Forward Destination, register the FAX
Box in advance. For details, refer to FAX Box Function on page 4-43.
19
Select the FAX Box to be used to store the originals and press [OK].
20
Set details for forwarding settings. You can change the following settings.
• Print setting
• Enable time setting
• File name registration
NOTE: For details on forwarding settings, refer to Forwarding Detail
Settings on page 4-25.
21
Press [Register]. The forwarding settings is registered.
22
To register another forwarding settings, repeat steps 4 to 21.
23
Press [Others].
24
Press [Change] of Others.
Page 90

FAX Operation (Advanced)
4-24 OPERATION GUIDE
25
Select [On] or [Off], and press [OK].
To register a forwarding setting in the case that received originals have not
met reception requirements, select [On].
To perform normal reception print in the case that received originals have
not met reception requirements, press [Off], and go to step 27.
26
Perform forwarding settings, referring to steps 11 to 20.
NOTE: You can only store originals in the FAX Box when valid
requirements are set.
27
Press [Register]. The forwarding settings is registered.
28
Select the checkbox beside the forwarding settings to be enabled from the
list. The checkbox beside the forwarding setting to be enabled is checked.
NOTE: To disable the setting, press the checkbox to delete the
checkmark.
29
Press [OK]. Memory forwarding is set.
30
To exit from this setup, press [Close] several times until the System Menu
default screen is displayed.
Changing/Deleting a Forwarding Settings (for Each Requirement)
To change or delete a forwarding setting, follow the steps below.
1
Follow steps 1 to 3 of Registration of Forwarding Settings (for Each
Requirement) on page 4-20.
2
Select the requirement name to be deleted or changed.
To delete the requirement name, go to the next step. To change the
requirement name, go to step 4.
3
Press [Delete]. When the confirmation screen is displayed, press [Yes] and
go to step 6.
4
Press [Detail/Edit].
5
Change the forwarding settings referring to steps 5 to 21 of Registration of
Forwarding Settings (for Each Requirement) on page 4-20.
6
When the deletion or change is completed, press [OK].
7
To exit from this setup, press [Close] several times until the System Menu
default screen is displayed.
Page 91
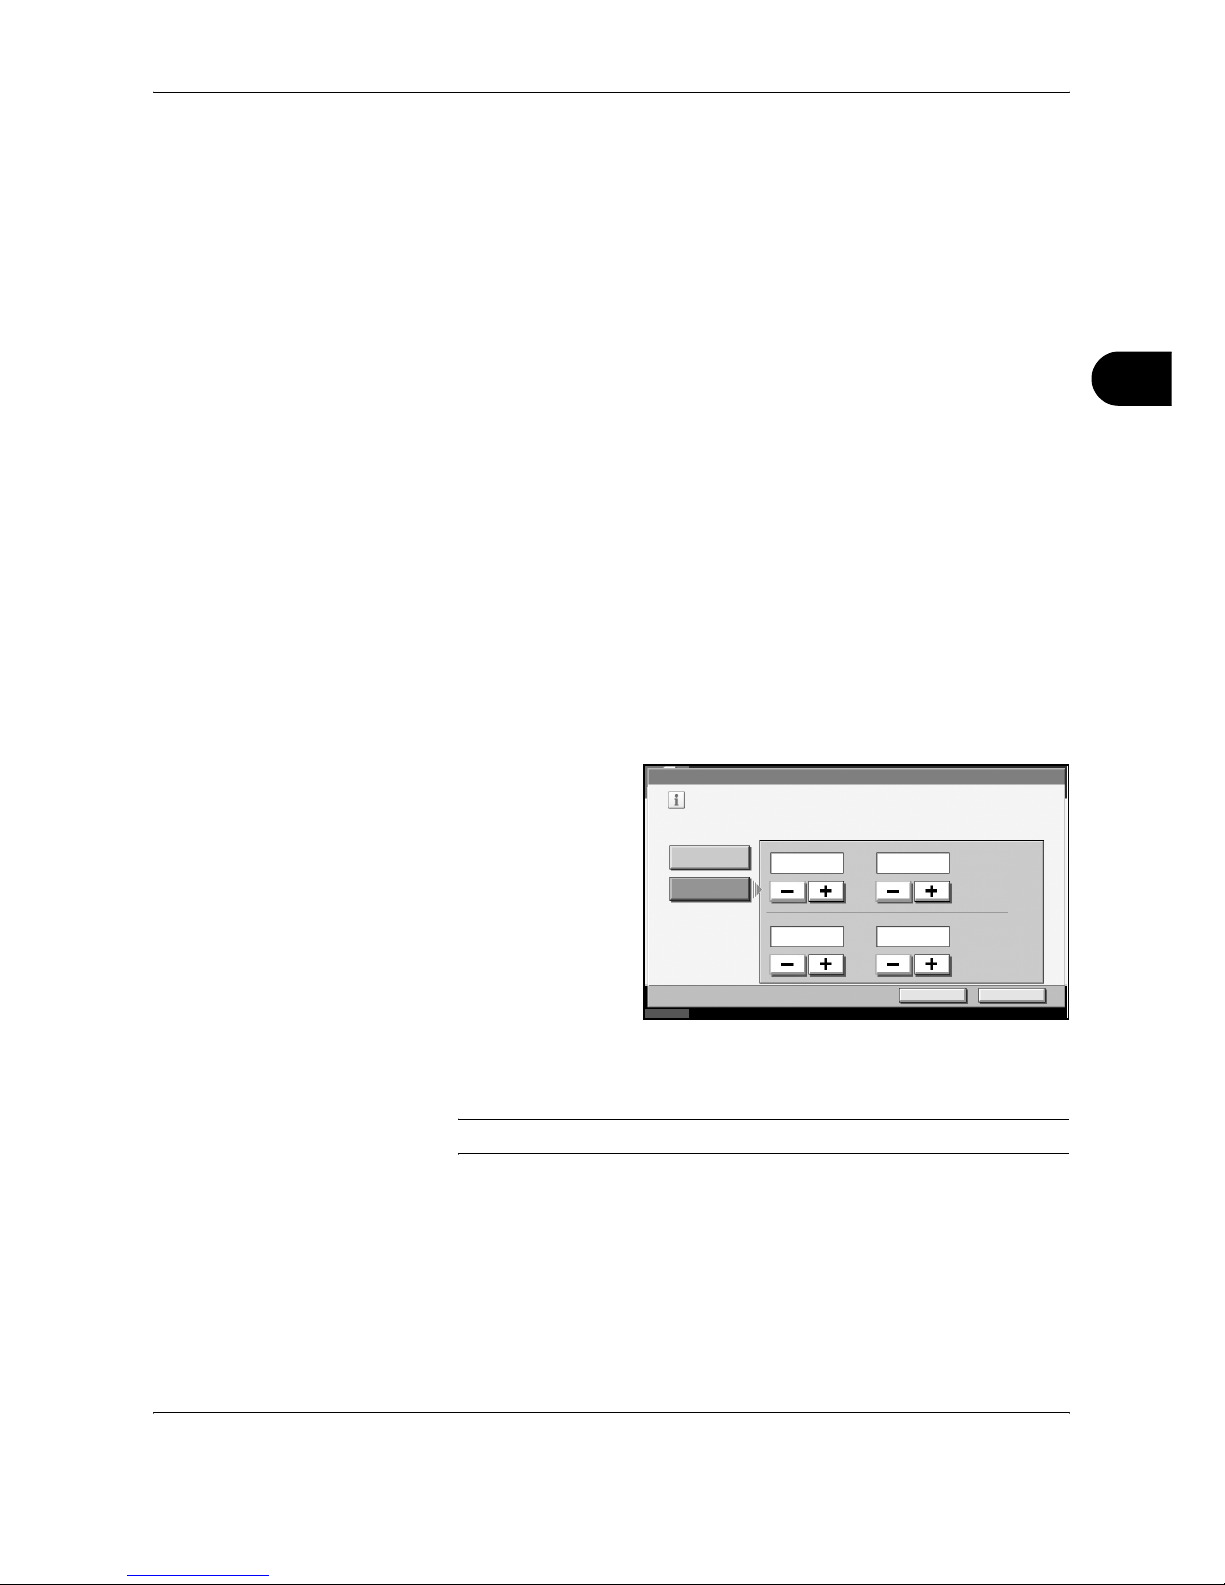
FAX Operation (Advanced)
OPERATION GUIDE 4-25
4
Cancelling the Forwarding Settings
To cancel the memory forwarding, follow the steps below.
1
Press the System Menu key.
2
Press [FAX] and then [Change] of Forward Setting.
3
Press [Off] and then [OK].
4
To exit from this setup, press [Close] several times until the System Menu
default screen is displayed.
Forwarding Detail Settings
With the forwarding settings, you can change the following detail settings.
Enable Time Setting
Register the times when the preset requirements become enabled and
disabled.
1
Follow steps 1 to 3 of Registration of Forwarding Settings (Forward All) on
page 4-18.
2
Press [Change] of Activating Time.
3
Select [All Day] or
[Preset Time].
To forward received
originals all day,
select [All Day],
press [OK] and then
go to step 5.
To set the forwarding
time, select [Preset
Time] and go to the
next step.
4
Press [+]/[-] to enter Start Time and End Time, and then press [OK].
NOTE: Enter the time on the 24 hours system.
5
Press [OK].
6
To exit from this setup, press [Close] several times until the System Menu
default screen is displayed.
Status
Requirement:FAX C - Activating Time
Specify the time for activating the requirements.
Print or f orward t he faxes r eceiv ed during the preset
time according to the requirements.
Cancel OK
10/10/2007 10:00
All Day
Preset T ime
Star t T ime
:
:
0 0
0 0
End Ti me
Page 92

FAX Operation (Advanced)
4-26 OPERATION GUIDE
File Format Setting
If you are sending the file as an E-mail attachment or transferring it to a
folder (SMB or FTP), select PDF or TIFF as the file format.
1
Follow steps 1 to 4 of Registration of Forwarding Settings (Forward All) on
page 4-18.
2
Press [Change] of File Format.
3
Press [PDF] or [TIFF], and then [OK].
4
Press [OK].
5
Press [OK].
6
To exit from this setup, press [Close] several times until the System Menu
default screen is displayed.
File Separation Setting
If you are sending the file as an E-mail attachment or transferring it to a
folder (SMB or FTP), you can choose whether the pages are separated.
1
Follow steps 1 to 4 of Registration of Forwarding Settings (Forward All) on
page 4-18.
2
Press [Change] of File Separation.
3
Press [Off] or [Each Page], and then [OK].
4
Press [OK].
5
Press [OK].
6
To exit from this setup, press [Close] several times until the System Menu
default screen is displayed.
Print Setting
You can set whether the machine should print received originals when
forwarding them. You can select either 1 or 2 as the number of copies.
1
Follow steps 1 to 3 of Registration of Forwarding Settings (Forward All) on
page 4-18.
2
Press [Change] of Print.
3
Press [On] or [Off].
If you selected [On], press [+] or [-] to set the number of copies.
Page 93

FAX Operation (Advanced)
OPERATION GUIDE 4-27
4
4
Press [OK].
5
Press [OK].
6
To exit from this setup, press [Close] several times until the System Menu
default screen is displayed.
File Name Registration
You can set the file name to be created when forwarding. You can append
information such as the date/time and the job number or fax number
(address for an i-FAX).
1
Follow steps 1 to 3 of Registration of Forwarding Settings (Forward All) on
page 4-18.
2
Press [T].
3
Press [Change] of File Name.
4
Press [File Name].
5
Enter the file name and press [OK].
6
To insert additional information into the file name, press [Job No.], [Date
and Time], [Add FAX No. to Front] or [Add FAX No. to Back].
NOTE: For details on character entry, refer to Character Entry Method on
page 2 of the Appendix.
Please note that when you have not add any additional information, file
names become the same, and, therefore, old files are overwritten when
received originals are forwarded with folder (SMB) transmission and folder
(FTP) transmission.
7
Press [OK].
8
Press [OK].
9
To exit from this setup, press [Close] several times until the System Menu
default screen is displayed.
Settings for Memory Forwarding from COMMAND CENTER (RX/Forward
Requirements Settings)
You can use COMMAND CENTER on a computer connected to the
network to specify the memory forwarding settings on this machine.
Refer to the machine’s Operation Guide for information on the network
settings.
Page 94
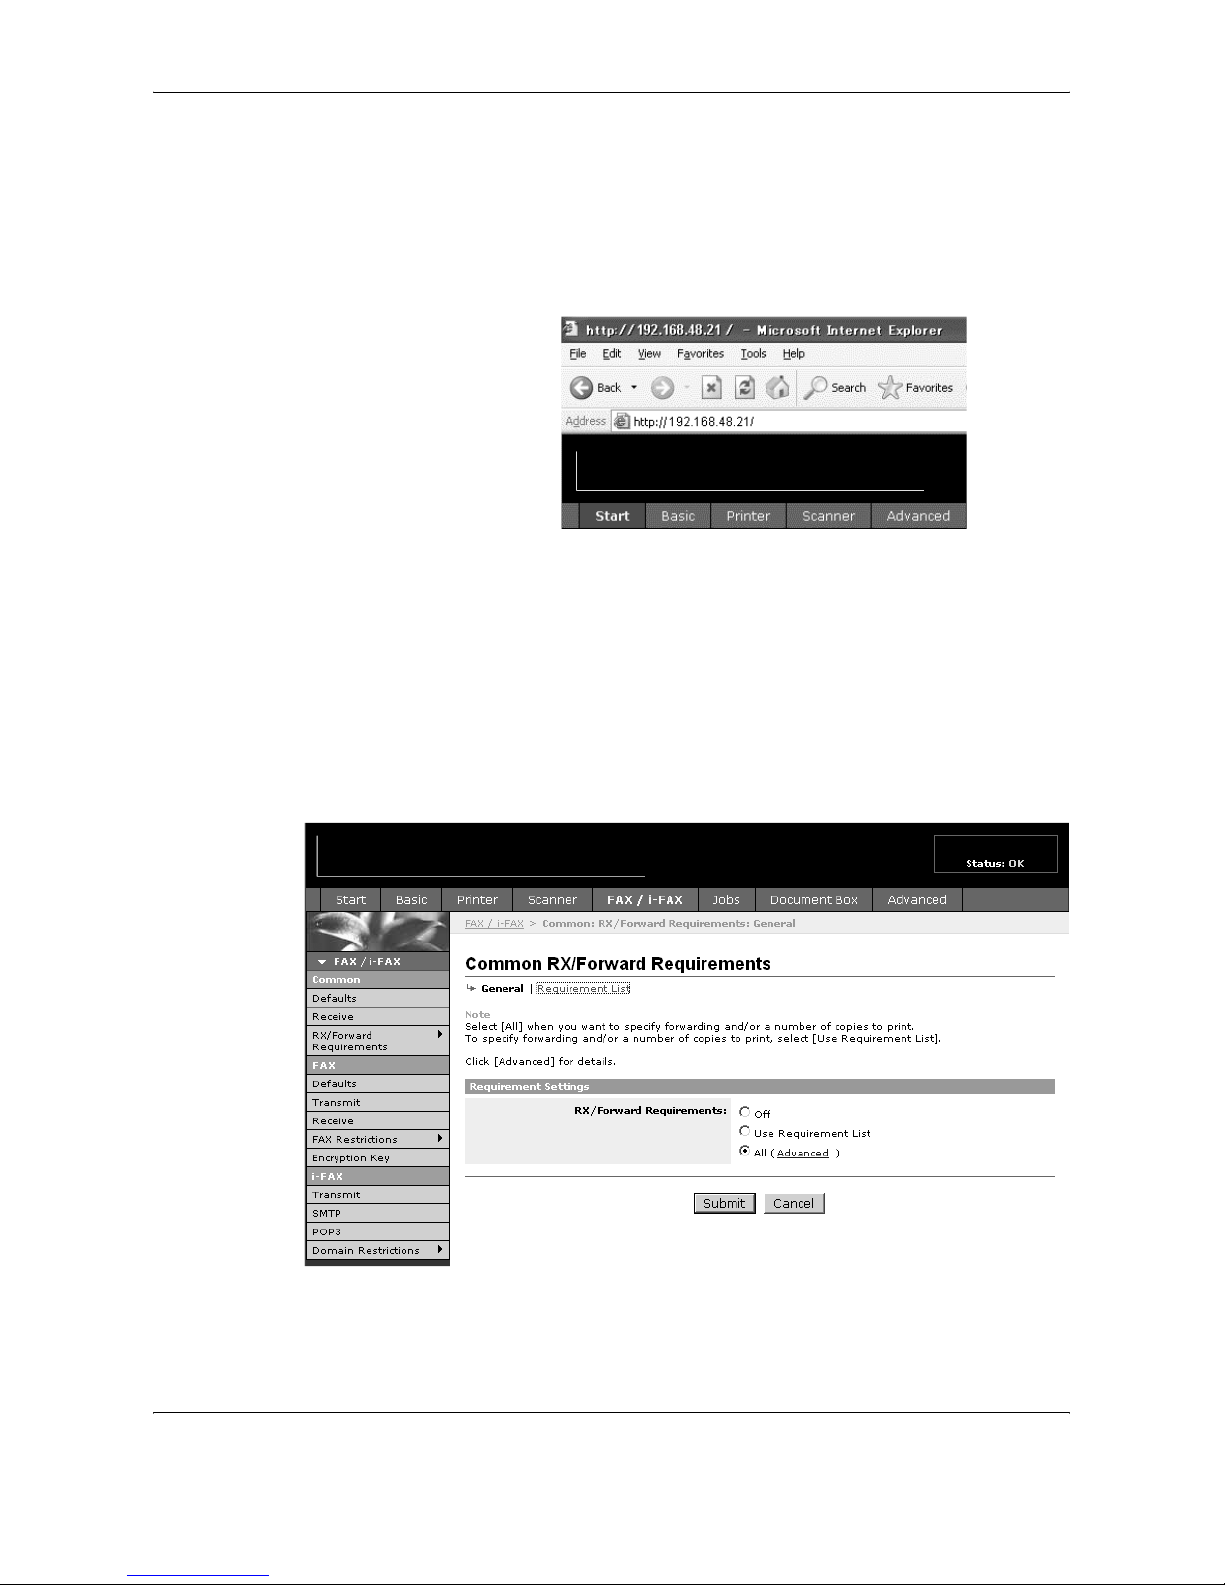
FAX Operation (Advanced)
4-28 OPERATION GUIDE
Accessing COMMAND CENTER
1
Open the web browser.
2
In the Address or Location bar, enter the machine’s IP address as the URL,
e.g. http://192.168.48.21/. The web page displays basic information about
the machine and COMMAND CENTER as well as the current status of the
machine.
3
Select a category from the navigation bar on the left to view and set values
for that particular category.
4
If administrator privileges have been enabled on COMMAND CENTER,
remember to enter the correct user name and password when trying to
access the relevant screens.
RX/Forward Requirements Settings
FAX/i-FAX > Common > RX/Forward Requirements > General
Specify the RX/forward requirements settings.
Page 95
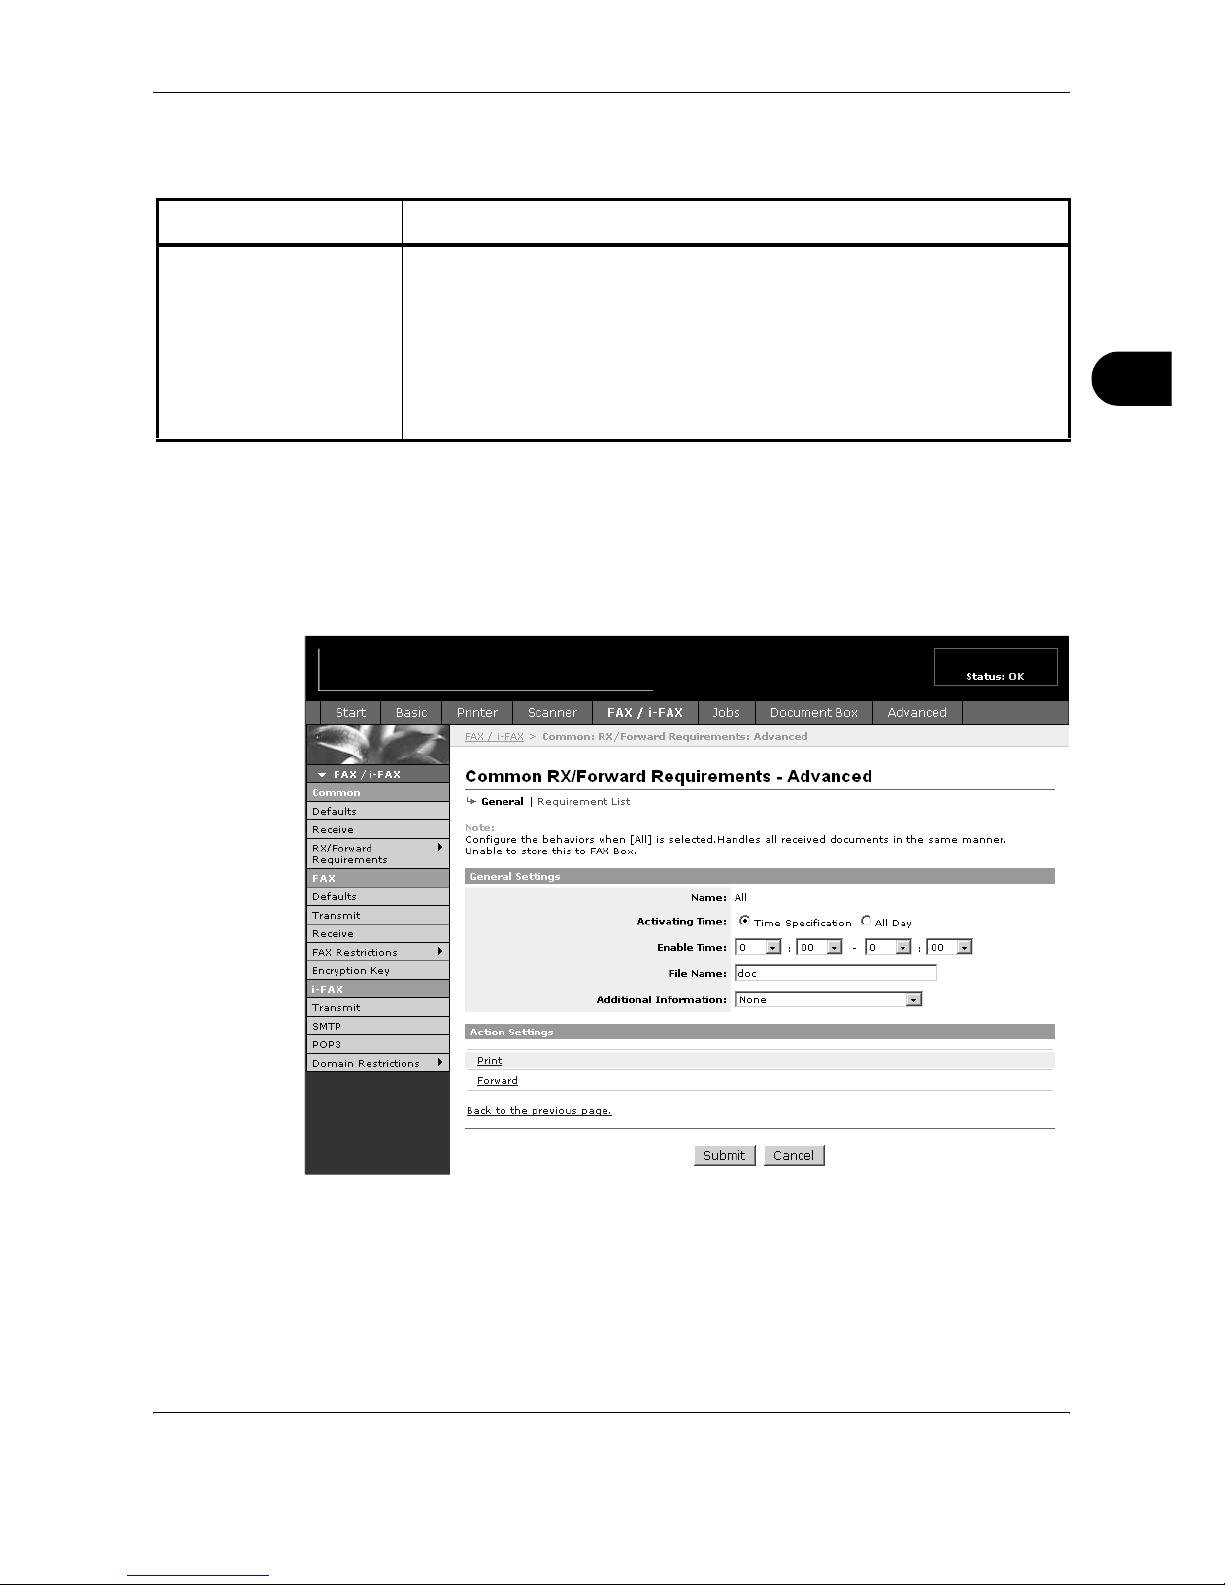
FAX Operation (Advanced)
OPERATION GUIDE 4-29
4
The settings available on the RX/Forward Requirements page are shown
below.
After completing the settings, click Submit to save the settings.
Advanced RX/Forward Requirements
FAX/i-FAX > Common > RX/Forward Requirements > Advanced
Specify the advanced RX/forward requirements settings.
Item Description
RX/Forward
Requirements
Select All, Use Requirement List or Off.
All: All received faxes are forwarded. Clicking Advanced displays the
Advanced settings page for RX/forward requirements. (Refer to Advanced
RX/Forward Requirements on page 4-29.)
Use Requirement List: Forwards faxes as per the reception requirements.
Click Requirement List to register reception requirements. (Refer to
Requirement List Settings on page 4-31.)
Off: Faxes are not forwarded.
Page 96
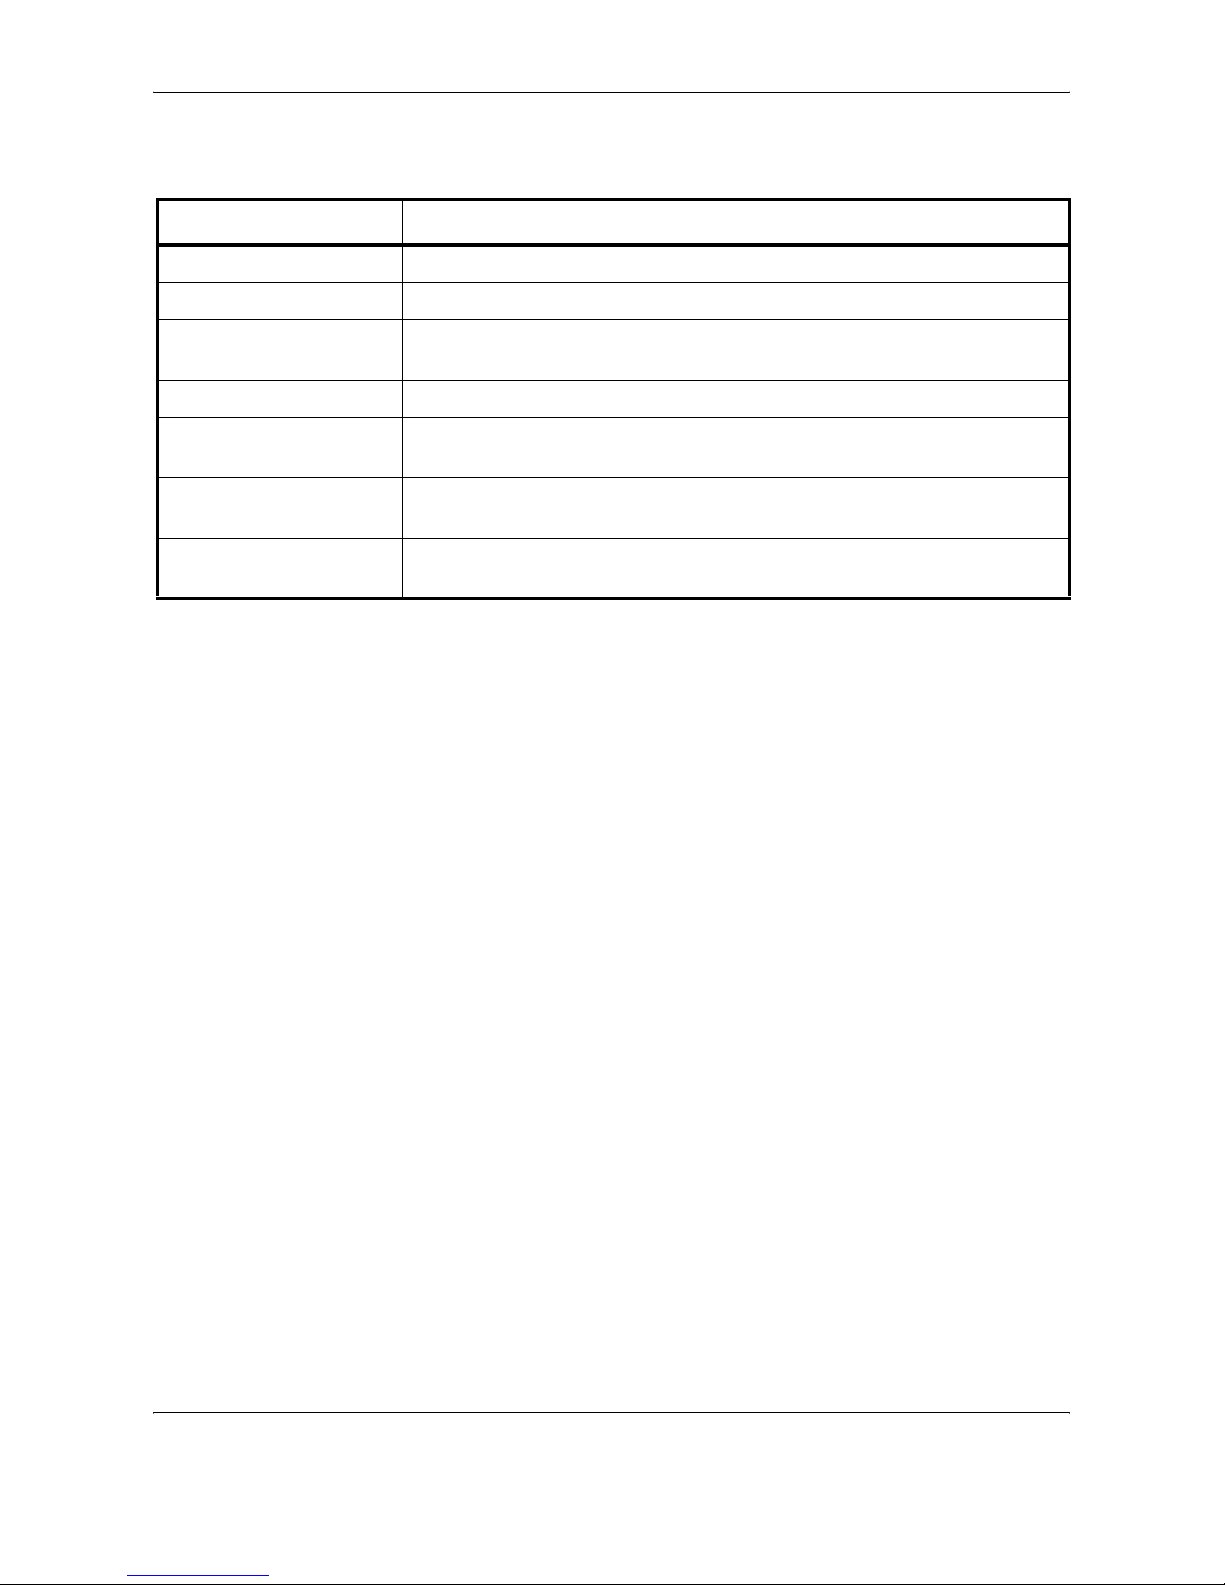
FAX Operation (Advanced)
4-30 OPERATION GUIDE
The settings available on the Advanced RX/Forward Requirements page
are shown below.
After completing the settings, click Submit to save the settings.
Item Description
Name Displays All.
Activating Time Specifies whether a time is specified.
Enable Time Registers times when the specified requirements are enabled or disabled. You
can register any time between 00:00 and 23:59.
File Name Sets the name of the file created when a fax is forwarded.
Additional Information Appends information such as the date/time, job number and destination
address to the file name.
Print To print the fax, click Print. The Print page is displayed. (Refer to Print
Settings on page 4-37.)
Forward To select the forwarding destination, click Forward. The Forwarding page is
displayed. (Refer to Forwarding Settings on page 4-38.)
Page 97
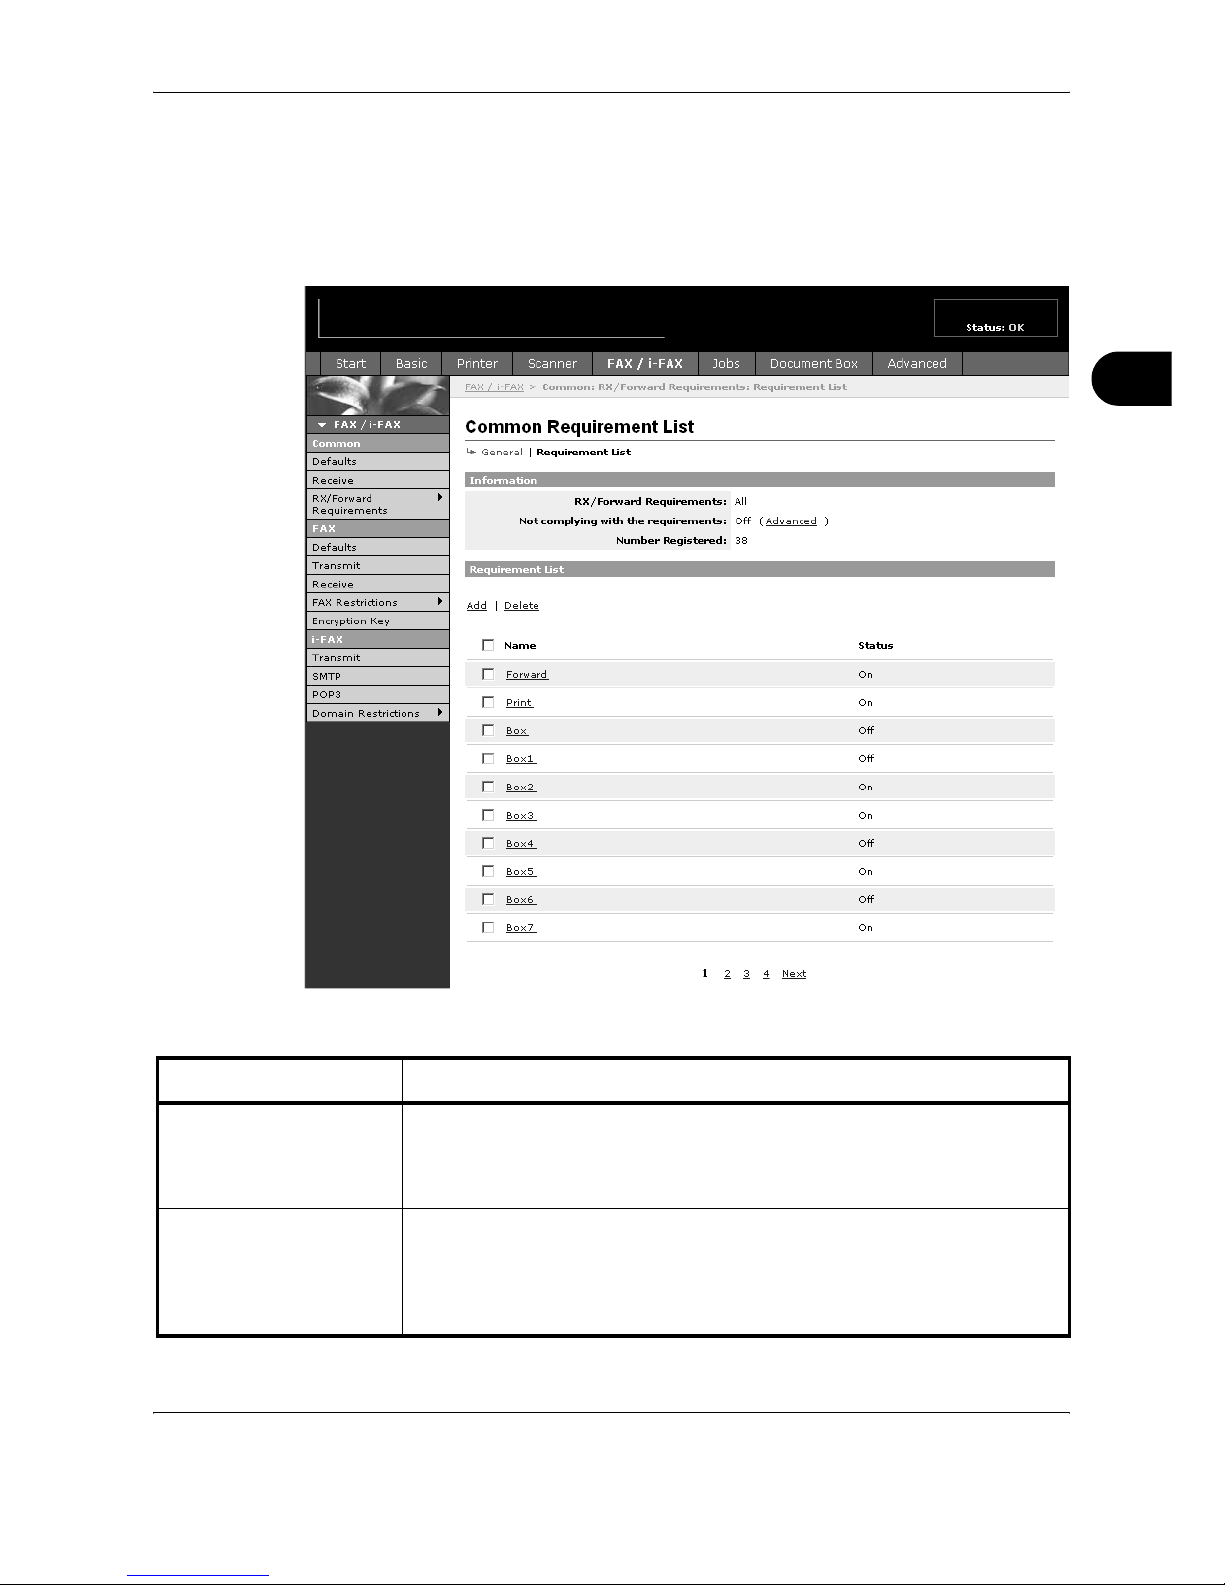
FAX Operation (Advanced)
OPERATION GUIDE 4-31
4
Requirement List Settings
FAX/i-FAX > Common > RX/Forward Requirements > Requirement
List
Specify the requirement list settings.
The settings available on the Requirement List page are shown below.
Item Description
Not complying with the
requirements
On is displayed when forwarding settings not conforming to the requirements
list are enabled and Off when disabled. To specify forwarding settings not
conforming to the requirements list, click Advanced. (Refer to Advanced Non-
Conformity with Requirements List on page 4-36.)
Requirement List Displays the registered forwarding settings. Click the checkboxes for the
forwarding setting to be enabled so that they are ticked. To change a
forwarding setting, click the name of the setting to be changed. The
Requirement List - Detail/Edit page appears. (Refer to Requirement List -
Detail/Edit on page 4-34.)
Page 98
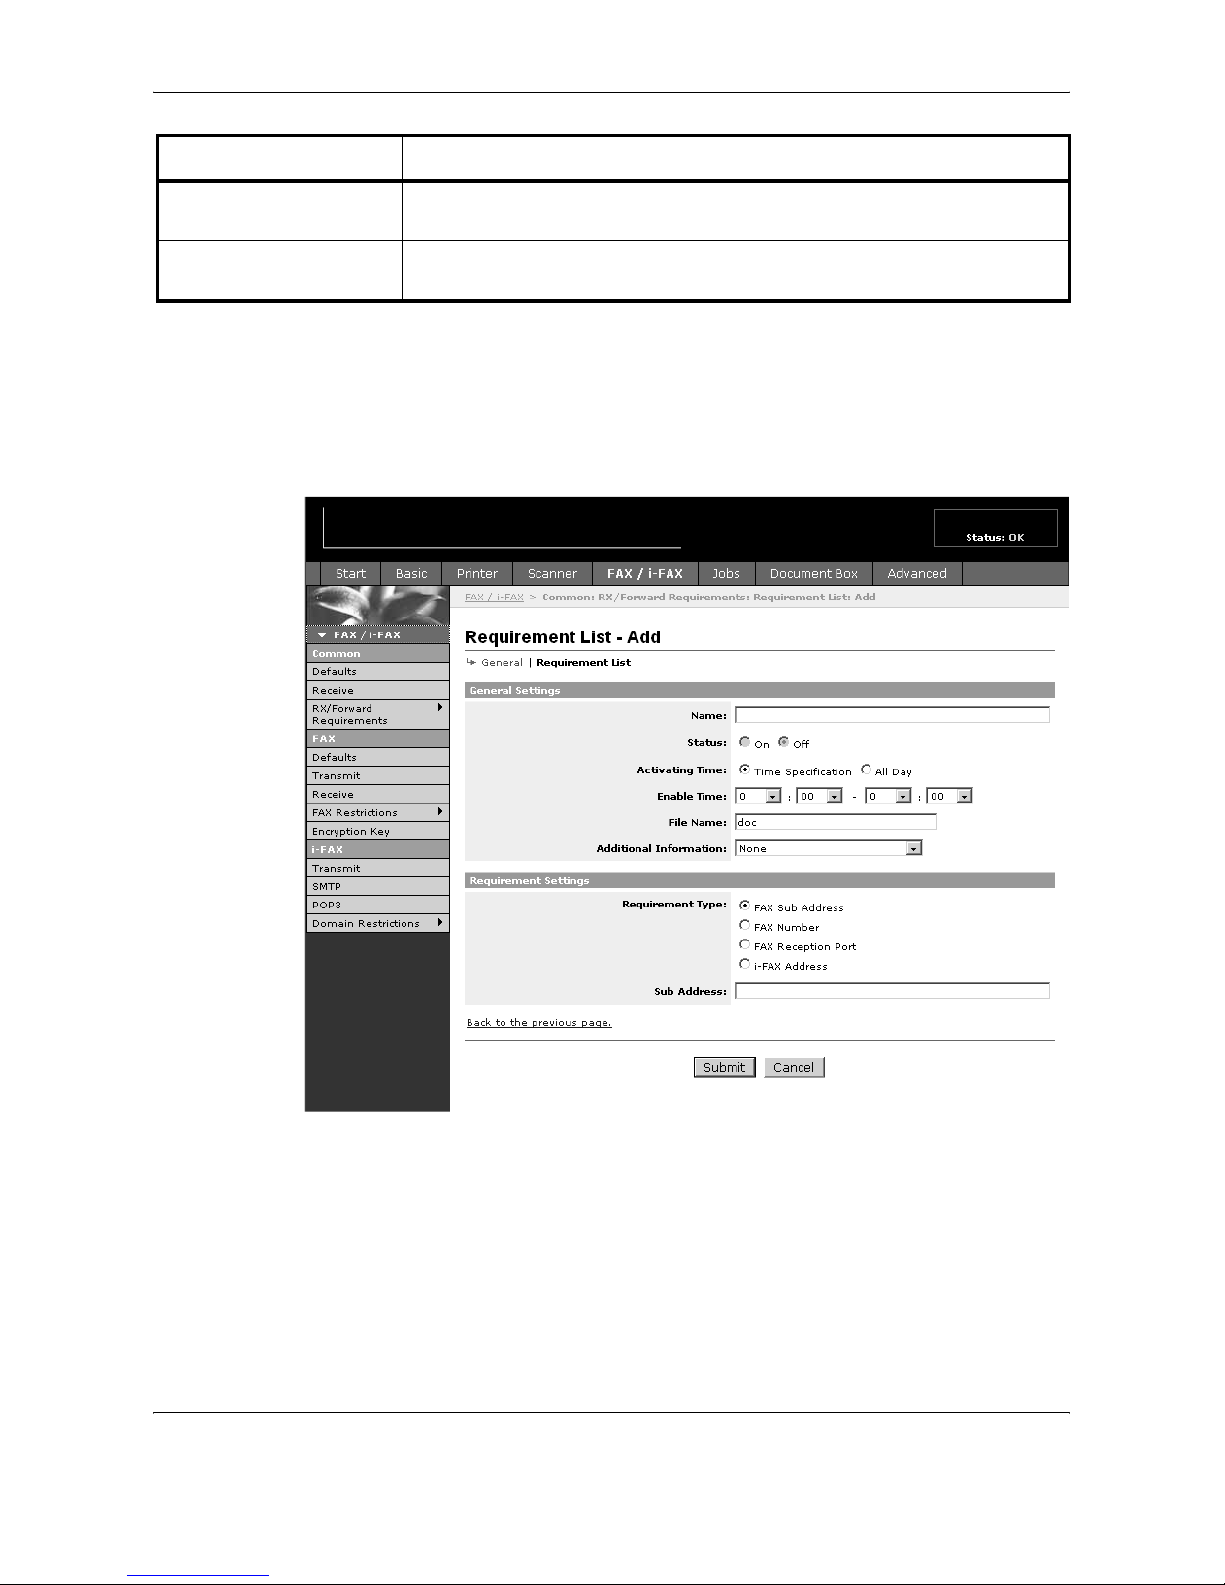
FAX Operation (Advanced)
4-32 OPERATION GUIDE
Adding Requirement List Settings
FAX/i-FAX > Common > RX/Forward Requirements > Requirement
List - Add
Use this page to add to the requirement list.
Add Click Add to add a new forwarding setting. The Requirement List - Add page
appears. (Refer to Adding Requirement List Settings on page 4-32.)
Delete To delete a forwarding setting, click the checkbox for the setting to be deleted
so that it is ticked and then click Delete.
Item Description
Page 99
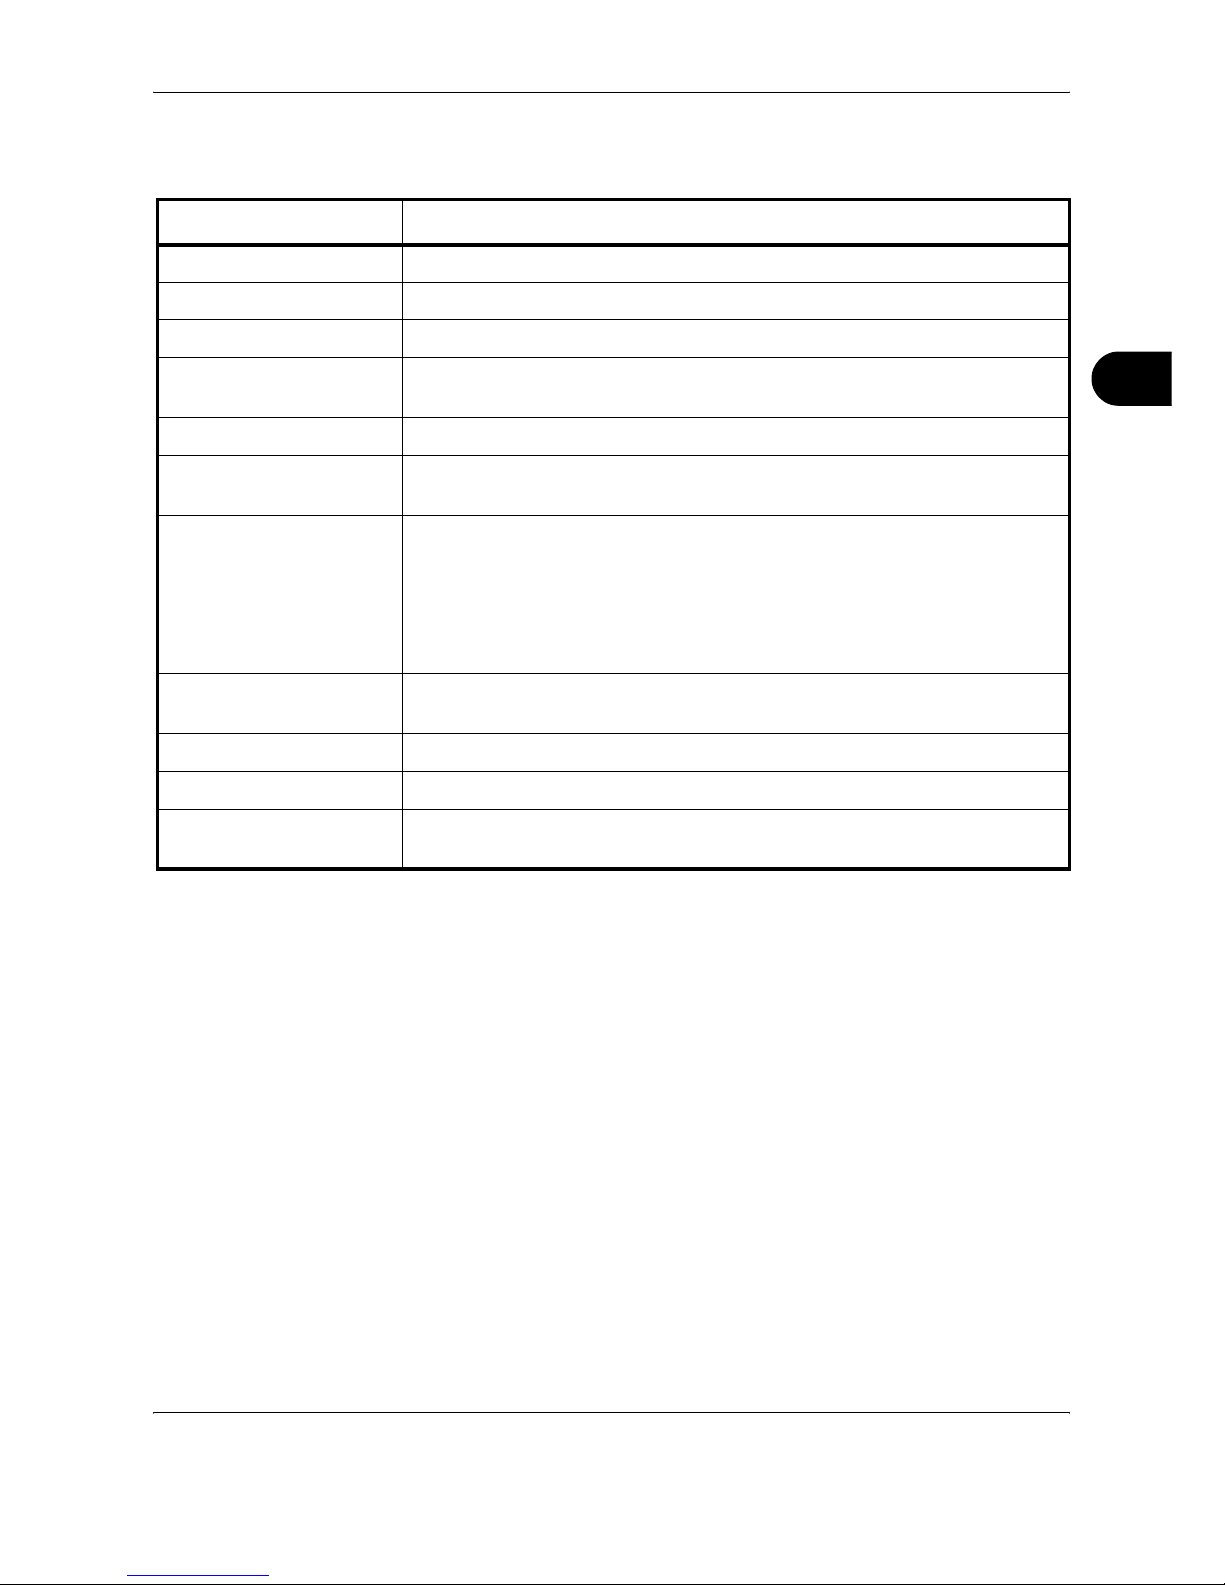
FAX Operation (Advanced)
OPERATION GUIDE 4-33
4
The settings available on the Requirement List - Add page are shown
below.
After completing the settings, click Submit to save the settings.
Item Description
Name Enter the forwarding requirement name.
Status Off is selected.
Activating Time Specifies whether a time is specified.
Enable Time Registers times when the specified requirements are enabled or disabled. You
can register any time between 00:00 and 23:59.
File Name Sets the name of the file created when a fax is forwarded.
Additional Information Appends information such as the date/time, job number and destination
address to the file name.
Requirement Type Choose from the following requirements:
• FAX Sub Address
• FAX Number
• FAX Reception Port
• i-FAX Address
Sub Address If FAX Sub Address was selected in the requirement type, enter the sub
address.
FAX Number If FAX N umber was selected in the requirement type, enter the fax number.
Reception Port If FAX Reception Port was selected in the requirement type, select the port.
i-FAX Address If i-FAX Address was selected in the requirement type, enter the Internet fax
address.
Page 100
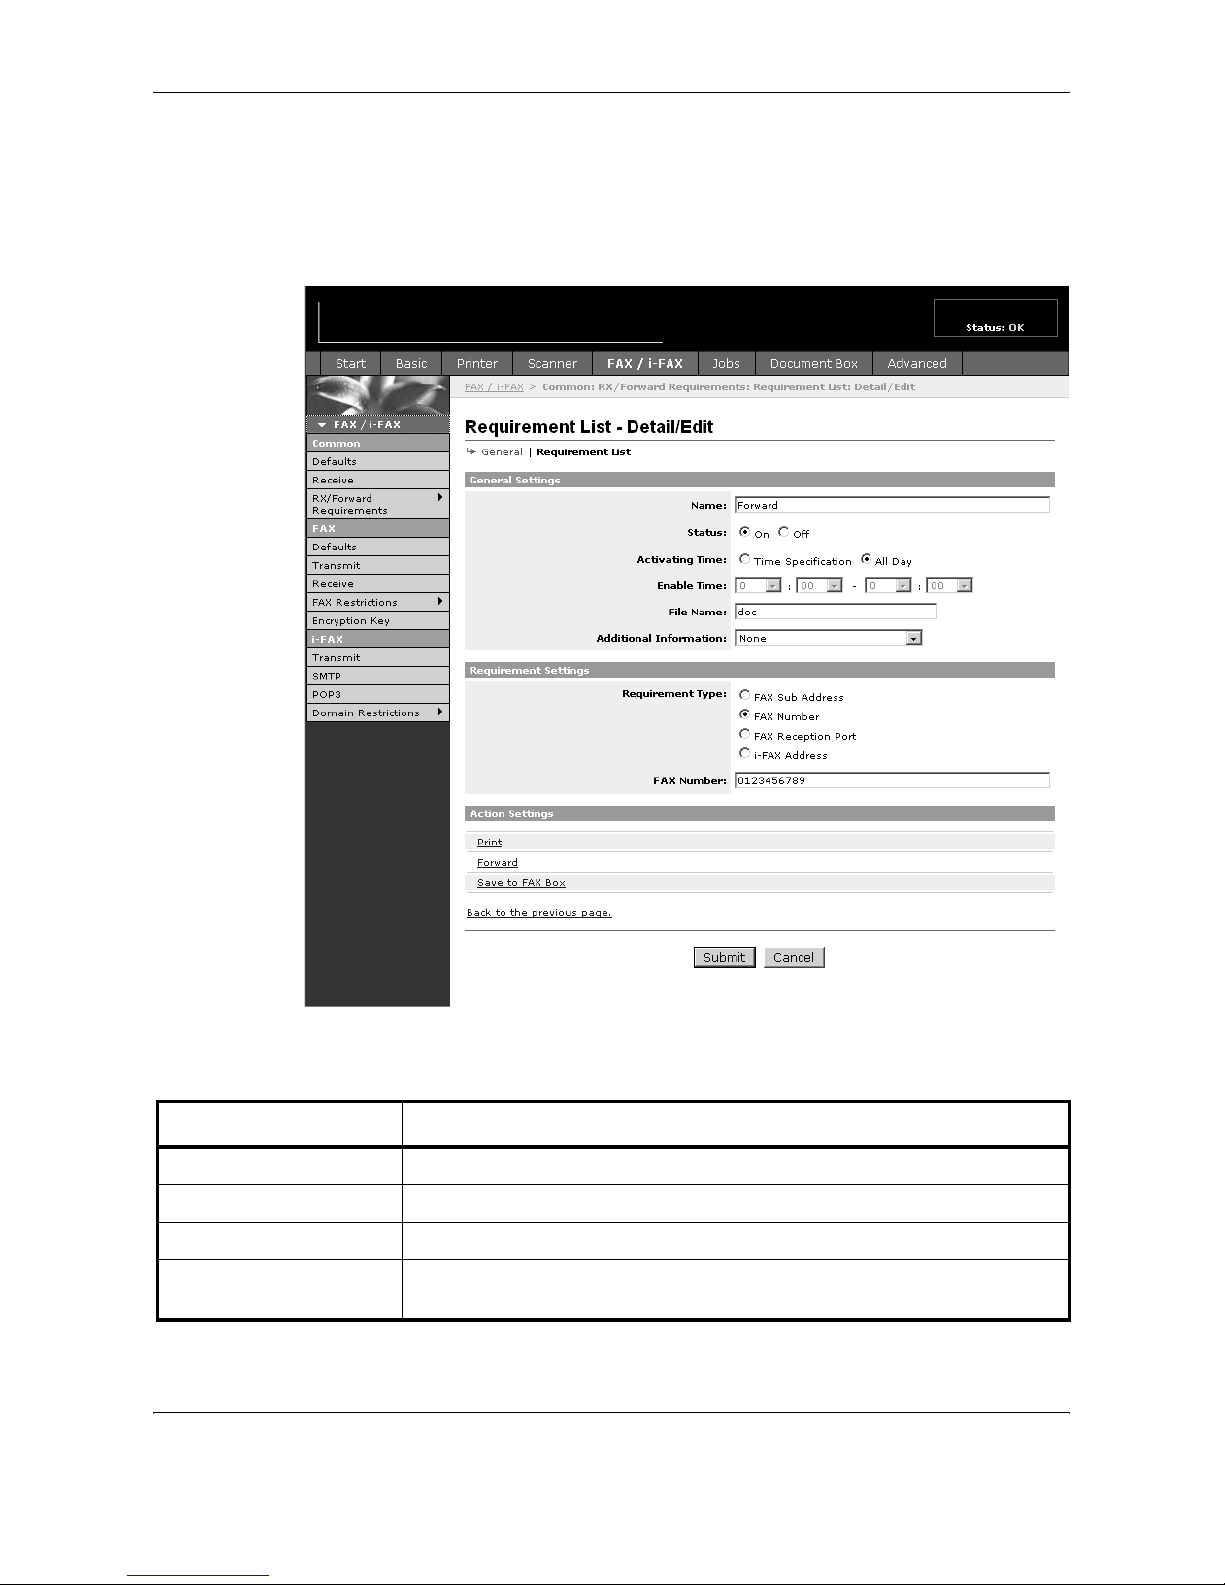
FAX Operation (Advanced)
4-34 OPERATION GUIDE
Requirement List - Detail/Edit
FAX/i-FAX > Common > RX/Forward Requirements > Requirement
List - Detail/Edit
Use this page to view and edit the requirement list details.
The settings available on the Requirement List - Detail/Edit page are
shown below.
Item Description
Name Enter the forwarding requirement name.
Status Specifies whether the forwarding settings are enabled.
Activating Time Specifies whether a time is specified.
Enable Time Registers times when the specified requirements are enabled or disabled. You
can register any time between 00:00 and 23:59.
 Loading...