

Page 1

Wireless
Gateway
N
dx ADSL2+
Quick Installation Guide
Guide d'installation rapide
Installationsanleitung
Guida per l'installazione rapida
Guía breve de instalación
Beknopte installatiegids
Hõ zlõ Kurulum Kõ lavuzu
Οδηγός γρήγορης εγκατάστασης
R24.0691.00
rev 2.1 3/07
Page 2

Page 3

Contents
English . . . . . . . . . . . . . . . . . . . . . . . . . . . . . . . . . . . . . . 1
Installation ............................................................................1
Additional Configuration ......................................................... 7
Troubleshooting.................................................................... 11
Additional Information ...........................................................14
Français . . . . . . . . . . . . . . . . . . . . . . . . . . . . . . . . . . . . 15
Installation ..........................................................................15
Configuration supplémentaire .................................................21
Dépannage .......................................................................... 26
Informations complémentaires ............................................... 28
Deutsch . . . . . . . . . . . . . . . . . . . . . . . . . . . . . . . . . . . . 29
Installation ......................................................................... 29
Weitere Konfiguration ........................................................... 35
Fehlerbehebung ................................................................... 40
Weitere Informationen .......................................................... 43
Italiano . . . . . . . . . . . . . . . . . . . . . . . . . . . . . . . . . . . . 45
Installazione ....................................................................... 45
Configurazione aggiuntiva ......................................................51
Risoluzione di problemi ........................................................ 56
Informazioni aggiuntive ........................................................ 58
Español . . . . . . . . . . . . . . . . . . . . . . . . . . . . . . . . . . . . 59
Instalación .......................................................................... 59
Configuración adicional ........................................................ 65
Solución de problemas.......................................................... 70
Información adicional ........................................................... 72
Nederlands . . . . . . . . . . . . . . . . . . . . . . . . . . . . . . . . . . 73
Installatie ........................................................................... 73
Aanvullende configuratiegegevens ......................................... 79
Problemen oplossen ............................................................. 84
Aanvullende informatie ......................................................... 86
Türkçe . . . . . . . . . . . . . . . . . . . . . . . . . . . . . . . . . . . . . 87
Kurulum .............................................................................. 87
Ek Konfigürasyon ................................................................. 93
Sorun Giderme ..................................................................... 97
Ek Bilgiler .......................................................................... 100
Ελληνικά . . . . . . . . . . . . . . . . . . . . . . . . . . . . . . .101
Εγκατάσταση .................................................................. 101
Πρόσθετη διαμόρφωση ..................................................... 107
Αντιμετώπιση προβλημάτων ............................................. 111
Πρόσθετες πληροφορί ες ................................................... 114
Support / Assistance / Servizio assistenza / Asistencia téc-
nica / Ondersteuning / Destek / Υποστήριξη . . . . . . . . 117
Page 4

Page 5

English
Installation
Package Contents
English
! USRobotics Wireless
N
dx ADSL2+ Gateway
! 15V DC Power supply ! Detachable Antennas
! Ethernet cable ! Installation CD-ROM
! Telephone cable ! Quick Installation Guide
Physical Features
Front
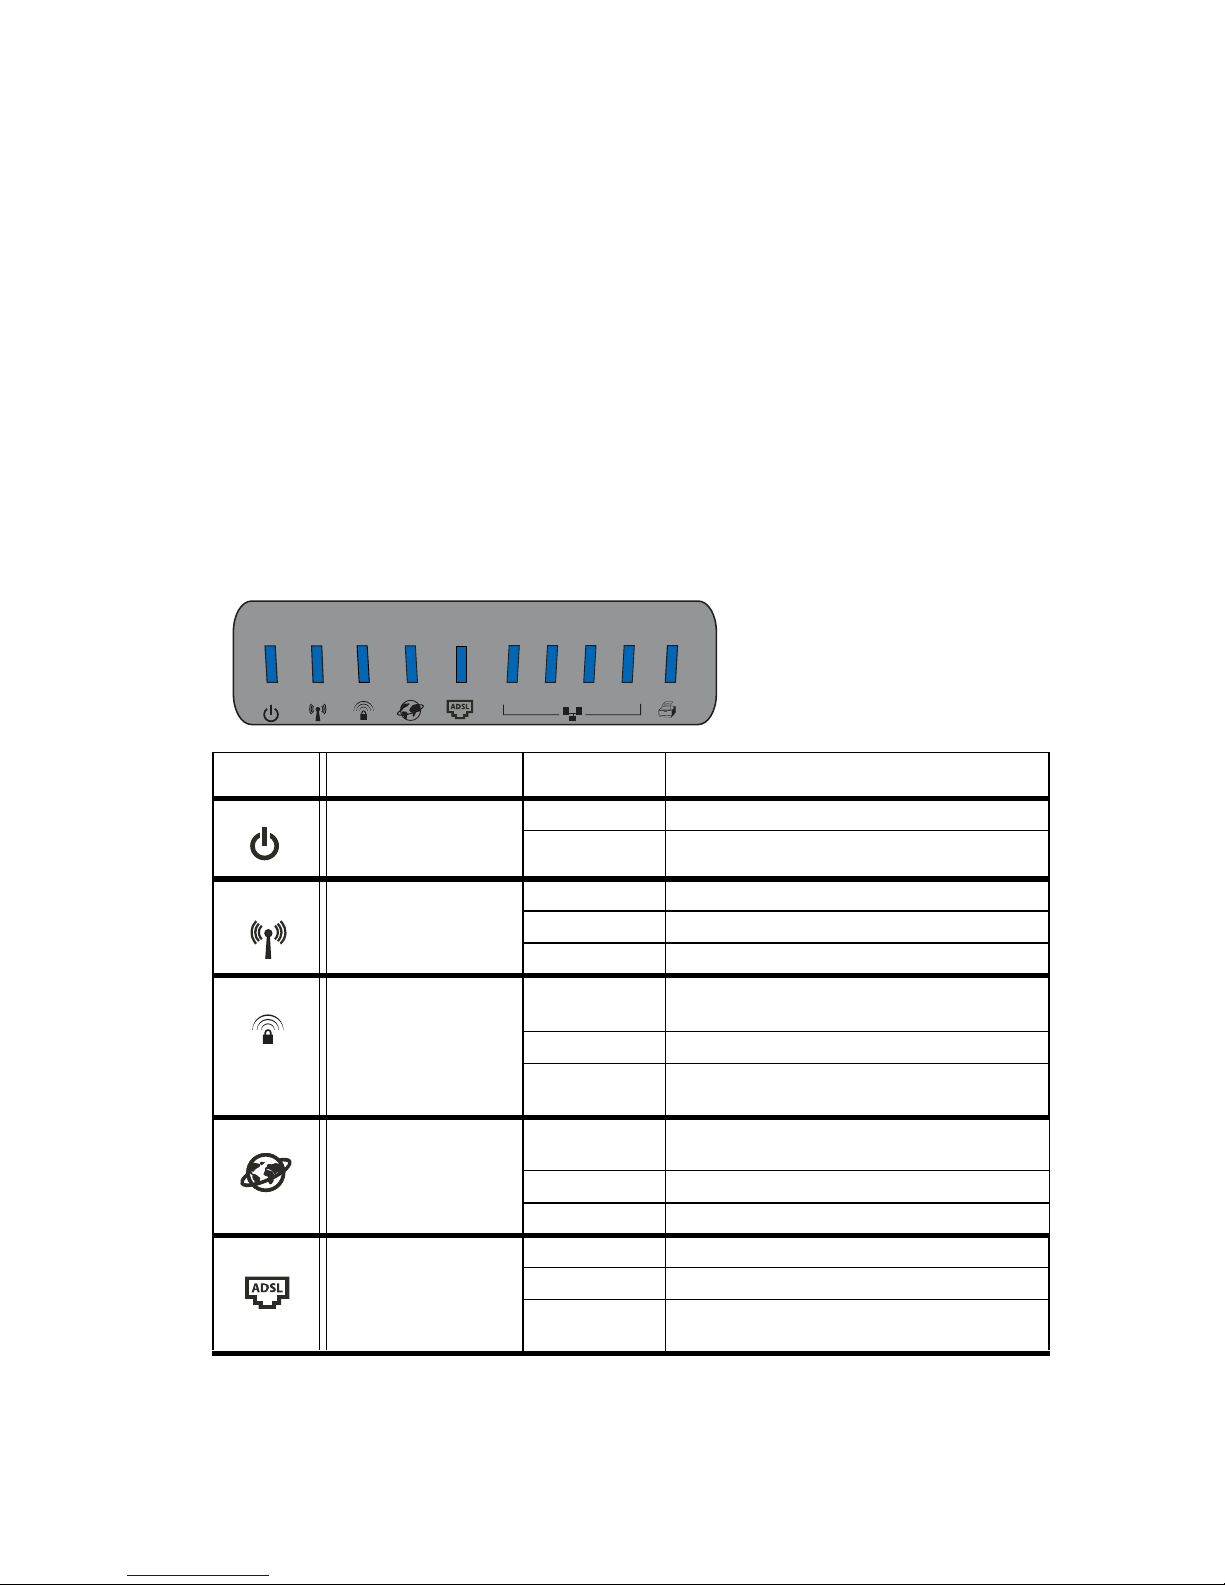
The gateway has the following status LEDs:
23
1
Symbol Name State Condition
Power
Off Not receiving power.
Solid Receiving power.
4
WLAN
(Wireless Network)
SecureEasySetup Off SecureEasySetup mode is not ready
WAN
(Internet)
ADSL Off No ADSL connection.
Off Wireless connection is disabled.
Solid Wireless connection is enabled.
Flashing Sending and receiving data.
on the gateway.
Solid SecureEasySetup mode is ready.
Blinking Communicating with
SecureEasySetup devices.
Off No Internet connection established
or the gateway is in bridge mode.
Flashing Sending and receiving data.
Solid Internet connection is established.
Solid ADSL link is achieved.
Flashing ADSL link is being established.
1
Page 6

English
Symbol Name State Condition
LAN
(1 to 4)
Off No LAN connection.
Solid LAN link is achieved.
Flashing Sending and receiving data.
Printer
Off No printer connection is detected.
Solid Printer connection is detected.
Flashing Sending data to printer.
Back
ADSL 1234
Item Function
ADSL
LAN 1 to 4
USB
Connects your gateway to your ADSL line.
Connects additional devices to your gateway.
Connects your gateway to a USB printer.
USB
Reset
15VDC
Secure
Easy
Setup
Reset
15VDC
SecureEasySetup
Reboots your gateway or restores your gateway to the
factory default settings.
• To reboot your gateway without changing your current settings, press and hold the
Reset
button for 1 full
second.
• To restore your access point to the factory defaultsettings, press and hold the
Reset
button for at least 7
seconds.
Connects the power adapter to your gateway.
Enables SecureEasySetup on your gateway.
• To enable SecureEasySetup on your gateway, press
and hold the
SecureEasySetup
button for 1 full second.
• To reset your wireless security settings to the factory default (no security enabled), press and hold the
SecureEasySetup
button for 7 seconds.
Connects an antenna to the gateway.
2
Page 7

Default Values
The Wireless Ndx ADSL2+ Gateway has the following default values:
English
! IP Address:
192.168.1.1
System Requirements
! ADSL line installed by your Internet Service Provider
! A computer with an Ethernet adapter installed
! An HTML 4.01-compliant Web browser with JavaScript enabled
Installation Instructions
Step One: Connect Microfilter(s) (if included or required by your ISP)
A microfilter removes interference between voice and ADSL signals. If a microfilter was not included with the gateway, ask your ISP if microfilters are necessary
for your telephony devices.
1. Plug each telephony device cable (telephone, fax machine, etc.) into a microfilter.
2. Connect the microfilter into the telephone wall jack.
Note:Do not install a microfilter on the cable that will connect your gateway
to the telephone jack unless you have a dual connection microfilter
with a connection for both the gateway and the telephone.
3
Page 8

English
Step Two: Connect Your Gateway
1. Connect your gateway to your ADSL line:
A. Connect the provided antennas to the back of the gateway.
B. Connect one end of the included phone cable to the
ADSL port on the
gateway.
C. Connect the other end of the phone cable to your wall telephone jack.
W
A
N
1
2
U
3
S
B
4
1
5
V
D
C
S
e
c
u
r
e
R
e
s
e
t
E
a
s
y
S
e
t
u
p
Note:The USB port on the gateway is for connecting a USB printer
only. For instructions on connecting a USB printer to your
gateway, see “Install a USB Printer” on page 8.
2. Connect the gateway to your computer:
A. Power off your computer.
B. Connect one end of the supplied Ethernet cable to your computer’s
Ethernet adapter.
C. Connect the other end to one of the gateway’s
W
A
N
1
2
US
3
B
4
1
5V
DC
S
e
c
u
re
Re
s
et
E
a
s
y
S
e
t
u
p
LAN ports.
3. Power up the network:
A. Connect the supplied power adapter to the
15VDC port on the gateway.
Note:UK Users: With the power adapter unplugged, connect the
appropriate power plug for your country on to the power adapter.
Apply enough pressure to cause a click and firmly seat the plug
before connecting the power adapter to your gateway.
4
Page 9

English
B. Plug the power adapter into a standard power outlet.
W
A
N
1
2
U
3
S
B
4
15
V
D
C
S
e
c
u
r
e
Re
se
t
E
a
s
y
S
e
t
u
p
C. Turn on your computer.
Step Three: Configure Your Gateway Using EasyConfigruator
You will need active ADSL and Internet service from your local telephone company or Internet Service Provider (ISP) before you try to go on the Internet. You
may need some of the following information from your ISP:
" VPI/VCI values
" ADSL standard (modulation)
" Encapsulation mode
" Protocol type
" Authentication (PAP or CHAP) for PPP connections
" IP address, user name and password (if they were assigned by your ISP)
" Subnet mask, gateway, and DNS server information
1. Insert the USRobotics Installation CD-ROM into your computer’s CD or
DVD ROM drive and do one of the following:
" Windows:
A. If the CD doesn’t start automatically, start it manually as follows:
i) Windows Vista: Click Windows
Windows XP: Click Windows
Windows 2000: On the desktop, double-click
Start > Computer.
Start > My Computer.
My Computer.
ii) Double-click the CD drive.
B. Select your preferred language, then read the license agreement and
click
OK.
C. Click
Setup. It can take up to one minute for EasyConfigurator to
start.
" Macintosh OS X: Open the CD-ROM and double-click
Configurator
. It can take up to one minute for EasyConfigurator to start.
" Linux: Open the CD-ROM and double-click
It can take up to one minute for EasyConfigurator to start.
USRobotics Easy-
EasyConfigurator linux-script.
5
Page 10

English
4. Select your country and your Internet Service Provider (ISP) from the dropdown lists on the
list, select
Other for the country and manually enter the settings provided by
Internet page. If your country or ISP does not appear in the
your ISP.
You may need to enter the user name and password for your ADSL connec-
tion after making your selections.
5. Click
6. You will be directed to the
Save.
Status tab. There will be a message at the top of
the page that indicates if your ADSL connection has been established. If the
message indicates that there is no ADSL connection, see “Troubleshooting”
on page 11 of this guide.
7. Click the
Note:The user name
Login tab, enter a password for the admin account and click Save.
admin and the password you enter will be used in
the future when you log in to the gateway.
8. Close EasyConfigurator.
For expanded EasyConfigurator details, see the User Guide on the USRobotics
Installation CD-ROM.
Step Four: Configure Your Wirless Security Settings
1. To configure your wireless security settings, press the
SecureEasySetup
button on the back of the gateway for one full second. This will set WPA2
and WPA (PSK) wireless security and configure a pass phrase/network key
for your wireless network.
Caution: If you have do not enable a wireless security method on the
gateway, your wireless network will be insecure. Unauthorised wireless devices may be able to connect to your network, use your Internet connection, and access computers on
the network.
2. If you will be connecting this computer to your network via a wireless connection, you can unplug the Ethernet cable from the gateway and your computer, install your wireless adapter, then connect your computer to your
gateway using a wireless connection. For instructions on installing your wireless adapter, see your wireless adapter’s documentation.
6
Page 11
English
Back Up Your Configuration Settings
Having a backup reduces the effort required to reapply your configuration settings should you ever restore your gateway to its factory default settings. USRobotics recommends that you back up your settings now.
1. On your computer, start a Web browser.
2. In the location or address line type
192.168.1.1 and press ENTER to
access the gateway configuration pages. When prompted, enter the user name
and password for the gateway.
3. Select
4. Click
5. Your system will prompt you to save or open the file. Select
Back Up Settings from the Device menu.
Back Up.
Save.
Congratulations. You have successfully completed the installation procedure. You can verify your Internet connection by registering your Wireless
ADSL2+ Gateway at
www.usr.com/productreg/
.
N
dx
Additional Configuration
Connect Installed Wireless Clients
You can use the SecureEasySetup™ button to connect Wireless Ndx and other
1
certified SecureEasySetup wireless devices to your gateway.
install any wireless adapters, refer to the wireless device’s documentation for
installation instructions.
If you still need to
If your wireless client has SecureEasySetup, you should see one of the following
logos on the device or within the client utility:
If your wireless device does not support SecureEasySetup, you can still manually
enter the wireless security settings.
1 BROADCOM, SecureEasySetup, and the SecureEasySetup logo are trademarks or registered
trademarks of Broadcom Corporation in the United States and/or other countries.
7
Page 12

English
Connect a SecureEasySetup Device to Your Wireless Gateway
2
1. Press the SecureEasySetup button on the back of your gateway for 1 second.
The SecureEasySetup LED on the front of your gateway will start blinking.
2. Initiate SecureEasySetup in the client utility for your wireless adapter.
3. The gateway and the wireless adapter will synchronise wireless security settings, and the device will be securely connected to the gateway.
Manually Connect a Device to Your Wireless Gateway
For instruction in changing your adapter’s mode or wireless security settings, see
your wireless adapter’s documentation.
1. Ensure that the wireless adapter in the device is set to infrastructure mode.
2. Set the Network name or SSID in the wireless adapter’s settings to the
work name
that is used in the gateway.
Net-
3. If you set wireless security on the gateway, ensure that the wireless security
settings for the wireless adapter match those that you set on the gateway.
To view the wireless security settings of your gateway:
1. Start a Web browser on your computer, and in the location or address
line type
192.168.1.1 and press ENTER.
2. Enter the user name and the password for your gateway and click
3. On the gateway configuration pages, go to the
Wireless to view your wireless security settings.
Security menu and select
OK.
Install a USB Printer
A USB printer can be connected to the Wireless Ndx ADSL2+ Gateway and
used as a network printer if both your operating system and your printer support
the Internet Printing Protocol (IPP). Windows Server
Vista, XP, and 2000 have built-in support for this function. Contact your printer
manufacturer to determine whether your printer supports IPP.
Note:When used with multi-function printers that scan and copy, the
Wireless
N
dx ADSL2+ Gateway only supports printing. For bi-directional communication features such as scanning, connect the multifunction printer directly to the computer. Notifications, such as low
ink or add paper, will not be transmitted from the Wireless
ADSL2+ Gateway to your computer.
®
2003, and Windows®
N
dx
2 For SecureEasySetup to be ready on your gateway, it must be set with WPA2 and WPA (PSK)
wireless security with TKIP and AES encryption, and a WPA pre-shared key (which is also commonly called a Network key, WPA key, or pass phrase). You can configure the settings manually, or
press the SecureEasySetup button to configure your wireless settings.
8
Page 13

English
For instructions on printer installation for Windows Me and 98SE, Mac, and
Linux, see the User Guide on the USRobotics Installation CD-ROM.
Step One: Local Printer Installation
Note:If the printer has already been installed on every computer that will use
it on the network, skip to “Step Two: Get Your Print Server Information” .
You need to install the drivers provided by the printer manufacturer on each
computer that will use the printer before connecting your printer to the Wireless
N
dx ADSL2+ Gateway.
1. Plug your USB printer into one of the USB ports on the computer.
2. Install the printer by following the installation instructions included with your
printer.
3. Print a test page to ensure that the printer is working properly.
4. Power off the printer.
Step Two: Get Your Print Server Information
1. Disconnect the printer from your computer and plug the thin rectangular end
of the USB cable into the
ADSL 1234
USB port on the Wireless
USB
Secure
Easy
15VDC
Setup
Reset
N
dx ADSL2+ Gateway.
2. Turn your printer on.
3. On your computer, start a Web browser.
4. In the location or address line type
192.168.1.1 and press ENTER to
access the gateway configuration pages.
5. Enter the user name and the password for your gateway and click
6. From the
Device menu, select Printer Server.
OK.
7. Enter the Printer name and a Comment for the printer.
8. Write down the printer location address (example:
ers/My_Printer
). You need the address to set up the printer on computers that
http://192.168.1.1:1631/print-
you want to have access to the printer.
9
Page 14

English
Step Three: Connect Computers to the Wireless USB Print Server
Note:You must perform this procedure on each computer on your network
N
to allow printing using the print server on the Wireless
dx ADSL2+
Gateway.
Windows Vista:
1. Click Windows Start > Control Panel > Hardware and Sound > Printers.
2. Click
3. Choose the radio button labeled
Add a Printer. The Add Printer Wizard will start.
Add a network, wireless or Bluetooth printer.
Click
Next
4. Click The Printer That I Want Isn’t Listed.
5. Choose
location address recorded during Step Two. Click
Select a shared printer by name, and in the URL field, enter the printer
Next.
Note:The URL information is case-sensitive and must be entered exactly as
it is listed on the
Printer location section on the gateway's Status page.
6. If prompted, select the manufacturer and model of your printer and follow
the on-screen instructions.
7. Enter a name for the printer and click
Next. You can choose to print a test
page to verify the printer's connectivity.
8. Click
Windows XP and 2000:
Finish to complete the setup process.
1. Do one of the following:
" Windows XP: Click Windows
" Windows 2000: Click Windows
2. Click
3. Click
Add a Printer. The Add Printer Wizard will start.
Next.
4. Select the radio button labeled
computer
5. Select
field, enter the
tion pages. Click
. Click Next.
Connect to a printer on the Internet or on a home or office network. In the URL
Printer location address you copied from the gateway configura-
Next.
Start > Printers and Faxes.
Start > Settings > Printers.
A network printer, or a printer attached to another
Note:The URL information is case-sensitive and must be entered exactly as
it is listed on the
10
Printer location section on the gateway's Status page.
Page 15

6. Select the manufacturer and model of your printer. Click OK.
Note:If your printer is not in the list, your printer drivers were not installed
correctly. Repeat “Step One: Local Printer Installation” on page 9.
English
7. When prompted, select
8. Click
Finish.
Yes to set this printer as your default printer.
Step Four: Verify the Printer's Connectivity
1. Do one of the following:
" Windows Vista: Click Windows
Sound
> Printers.
" Windows XP: Click Windows
" Windows 2000: Click Windows
2. Right-click on your printer and select
3. Click
Print Test Page. The test page should print successfully.
Start > Control Panel > Hardware and
Start > Printers and Faxes.
Start > Settings > Printers.
Properties.
Note:If the test page fails to print, see “Troubleshooting” in the User Guide
on the USRobotics Installation CD-ROM for additional information.
Troubleshooting
This basic procedure addresses a number of symptoms that you might experience with your gateway:
1. Verify the power cord and all the Ethernet cables are connected correctly.
This includes the cables connecting the gateway and all the computers in the
network. See the Installation illustrations on page 4.
2. Ensure that the power outlet to which the gateway is connected is a live out-
let.
3. Refer to the LED descriptions in this guide and then check the LEDs on the
gateway to make sure you are receiving power and all ports are functioning.
See the LED descriptions on page 1.
4. For wireless connections only
: Low link quality or range can be caused by
environmental interference, such as lead-based paint and concrete walls, or
some electronic items, such as 2.4GHz phones. Try to move the antenna of
the gateway or reposition the wireless clients to improve the link quality.
5. For wireless connections only:
Verify that each device connecting to the gateway is set to Infrastructure mode. Set the Network name or SSID in the wireless adapter’s settings to the
Network name that is used in the gateway, and
verify that you are using the same wireless security type. Refer to your wireless adapter’s documentation to determine how to change these settings.
11
Page 16

English
If you still have trouble using the gateway, see the “Troubleshooting” section of
the User Guide on the USRobotics Installation CD-ROM.
EasyConfigurator was unable to detect my Internet connection.
Solution:
1. Go the the Internet page in EasyConfigurator.
Select your country and service provider. If your service provider is not
listed, select
information. You may need some of the following information from your
ISP:
" VPI/VCI values
" ADSL standard (modulation)
" Encapsulation mode
" Protocol type
" Authentication (PAP or CHAP) for PPP connections
" IP address, your user name and password (if assigned by your ISP)
Other for your country and manually enter your connection
" Subnet mask, gateway, and DNS server information
2. If you are unsure about any required connection information, contact your
ISP.
3. Click
Save.
I am no longer able to access the Internet.
Solution:
1. Press the
your gateway. Wait for the gateway to completely reboot.
Note:Pressing and holding the
2. Reboot your computer. Wait for the computer to completely reboot and try
to access the Internet.
3. If you still cannot access the Internet, see the “Troubleshooting” section of
the User Guide on the USRobotics Installation CD-ROM for extended troubleshooting on this issue.
Reset button on the back of your gateway for 1 second to reboot
Reset button for 7 seconds will restore your
gateway to the factory default settings.
SecureEasySetup could not configure my wireless client.
Solution:
Press the SecureEasySetup button on the back of the gateway for one full second, then verify that the SecureEasySetup LED on the front of the gateway
starts blinking before initiating SecureEasySetup in the client utility for your
wireless adapter.
12
Page 17

English
My gateway’s configuration pages are not responding, but I can
still access the Internet.
Solution:
Press the Reset button on the gateway for 1 second to reboot the gateway. If you
are still unable to communicate with the gateway configuration pages, press in
and hold the
Reset button for 7 seconds. This will reset the gateway to the factory
default settings. If you made any personal configuration settings, you will need to
make the changes again or restore your settings if you created a backup file.
How do I configure my gateway if I am connecting a gaming
console or VoIP device?
Solution:
If you want to connect a device to your gateway such as a gaming console or
VoIP device, you will have to open up access to specific ports so the devices can
communicate with the Internet. This is done from the
way configuration pages, using
Port Triggering. For detailed information on Port
Triggering, see the “Configuration” and “Tutorials” sections of the User Guide on
the USRobotics Installation CD-ROM.
Security menu on the gate-
How do I configure the firewall on my gateway?
Solution:
You can access the gateway’s firewall settings from the
way configuration pages, using
WAN Setup. For detailed information on firewall
settings, see the “Configuration” and “Tutorials” sections of the User Guide on
the USRobotics Installation CD-ROM.
Internet menu on the gate-
13
Page 18

English
Additional Information
For regulatory and warranty information, see the User Guide on the
USRobotics Installation CD-ROM.
For operation and configuration information, see the User Guide on the
USRobotics Installation CD-ROM. The User Guide contains detailed information on the use and configuration of your Wireless
For expanded troubleshooting and additional information:
1. See the User Guide on the USRobotics Installation CD-ROM.
2. Go to the Support section of the USRobotics Web site at
www.usr.com/support/
Many of the most common difficulties that customers experience have been
addressed in the FAQ and Troubleshooting Web pages for your Wireless
N
dx ADSL2+ Gateway. The Support pages also contain information on the
latest firmware and may contain documentation updates.
3. Submit your technical support question using an online form, or contact
USRobotics customer support.
.
N
dx ADSL2+ Gateway.
4. See the Support contact information on the last page of this guide.
14
Page 19
Français
Installation
Contenu de la boîte
Français
! USRobotics Wireless
N
dx ADSL2+ Gateway
! Alimentation 15 VCC ! Antennes amovibles
! Câble Ethernet ! CD-ROM d'installation
! Un câble téléphonique ! Guide d'installation rapide
Caractéristiques matérielles
Face avant
La passerelle comporte les voyants de statut suivants :
23
1
Symbole Nom Etat Condition
Alimentation
Eteint Hors tension.
Continu Sous tension.
4
WLAN
(réseau sans fil)
SecureEasySetup Eteint Le mode SecureEasySetup n'est pas
WAN
(Internet)
ADSL Eteint Pas de connexion ADSL.
Eteint La connexion sans fil est désactivée.
Continu La connexion sans fil est activée.
Clignotant Envoi ou réception de données.
activé sur la passerelle.
Continu Le mode SecureEasySetup est activé.
Clignotant Communication en cours avec des
périphériques SecureEasySetup.
Eteint Aucune connexion Internet établie,
ou la passerelle est en mode pont.
Clignotant Envoi ou réception de données.
Continu Connexion Internet établie.
Continu La connexion ADSL a été établie.
Clignotant L'établissement de la connexion
ADSL est en cours.
15
Page 20

Français
Symbole Nom Etat Condition
LAN
(1 à 4)
Eteint Pas de connexion LAN.
Continu Connexion LAN établie.
Clignotant Envoi ou réception de données.
Imprimante
Eteint Pas de connexion imprimante
Continu Connexion imprimante détectée.
Clignotant Envoi de données à l'imprimante.
Face arrière
ADSL 1234
Elément Fonction
ADSL
LAN 1 à 4
Connecte votre passerelle à votre ligne ADSL.
Connecte des périphériques supplémentaires à votre
passerelle.
USB
détectée.
15VDC
Reset
Secure
Easy
Setup
USB
Reset (Réinitialiser)
15VDC (15 VCC)
SecureEasySetup
Connecte votre passerelle à une imprimante USB.
Redémarre votre passerelle ou rétablit les réglages
d'usine par défaut de votre passerelle.
• Pour redémarrer votre passerelle sans modifier
vos paramètres actuels, appuyez sur le bouton
Reset
(Réinitialiser) et maintenez-le enfoncé pendant
1seconde.
• Pour rétablir les réglages d’usine par défaut
de votre passerelle, appuyez sur le bouton de
Reset
(Réinitialiser) pendant au moins 7 secondes.
Connecte l'adaptateur secteur à votre passerelle.
Active SecureEasySetup sur votre passerelle.
• Pour activer SecureEasySetup sur votre passerelle,
maintenez le bouton
SecureEasySetup
enfoncé pendant
1 seconde.
• Pour rétablir la valeur par défaut de vos paramètres
de sécurité sans fil (aucune sécurité activée),
maintenez le bouton
SecureEasySetup
enfoncé pendant
7 secondes.
Connecte une antenne à la passerelle.
16
Page 21

Français
Valeurs par défaut
La passerelle Wireless Ndx ADSL2+ Gateway présente les valeurs par défaut
suivantes :
! Adresse IP :
192.168.1.1
Configuration minimale requise
! Une ligne ADSL installée par votre fournisseur d'accès Internet
! Un ordinateur équipé d'un adaptateur Ethernet
! Un navigateur Web conforme HTML 4.01 avec activation Javascript
Instructions d'installation
Etape 1 : connexion du ou des microfiltres
(si votre FAI l'exige ou s'il est fourni)
Un microfiltre empêche les interférences entre le téléphone et les signaux ADSL.
Lorsque votre passerelle ne comporte pas de microfiltre, renseignez-vous auprès
de votre FAI afin de savoir si vos appareils téléphoniques nécessitent de tels filtres.
1. Branchez le câble de vos appareils téléphoniques (téléphone, fax, etc.) dans
un microfiltre.
2. Connectez le microfiltre à la prise téléphonique murale.
Remarque : N'installez pas de microfiltre sur le câble qui reliera votre
passerelle à la prise téléphonique sauf si vous disposez d'un
microfiltre à double connexion, c'est-à-dire d'une microfiltre
doté d'une connexion pour la passerelle et d'un autre pour
le téléphone.
17
Page 22

Français
Etape 2 : connexion de votre passerelle
1. Connectez votre passerelle à votre ligne ADSL :
A. Connectez les antennes fournies à l'arrière de la passerelle.
B. Branchez une extrémité du câble téléphonique fourni dans le port
la passerelle.
C. Branchez l'autre extrémité à votre prise téléphonique murale.
W
A
N
1
2
U
3
S
B
4
1
5
V
D
C
S
e
c
u
r
e
R
e
s
e
t
E
a
s
y
S
e
t
u
p
Remarque : Le port USB de la passerelle ne permet de raccorder
qu'une imprimante USB. Pour lire des instructions
sur la façon de connecter une imprimante USB à votre
passerelle, consultez la section « Installer une imprimante
USB », page 22.
ADSL de
2. Connectez la passerelle à votre ordinateur :
A. Mettez l'ordinateur hors tension.
B. Connectez une extrémité du câble Ethernet fourni à l'adaptateur Ethernet
du PC.
C. Connectez l'autre extrémité du câble à l'un des ports
W
A
N
1
2
USB
3
4
15VDC
S
e
c
u
re
Reset
E
a
s
y
S
e
t
u
p
LAN de la passerelle.
3. Mise sous tension du réseau :
A. Branchez l'adaptateur secteur fourni sur le port
15 VCC de la passerelle.
Remarque : Utilisateurs du R-U : avec l'adaptateur secteur
débranché, branchez la prise d'alimentation
correspondant à votre pays sur l'adaptateur secteur.
Appliquez une pression suffisante pour enclencher et
fixer solidement la fiche avant de raccorder l'adaptateur
secteur à votre passerelle.
18
Page 23

Français
B. Branchez l'autre extrémité dans une prise murale d'alimentation standard.
W
A
N
1
2
U
3
S
B
4
15
V
D
C
S
e
c
u
r
e
Re
se
t
E
a
s
y
S
e
t
u
p
C. Allumez votre ordinateur.
Etape 3 : configuration de votre passerelle avec EasyConfigurator
Avant d'essayer de vous connecter à Internet, vous aurez besoin des services
ADSL et Internet actifs proposés par votre opérateur téléphonique local ou
votre fournisseur d'accès Internet (FAI). Vous devrez peut-être vous procurer
une partie des informations suivantes auprès de votre FAI :
" Valeurs VPI/VCI
" Norme ADSL (modulation)
" Mode d'encapsulage
" Type de protocole
" Authentification (PAP ou CHAP) pour connexions PPP
" Adresse IP, nom d'utilisateur et mot de passe (si attribués par votre FAI).
" Masque de sous-réseau, passerelle et serveur DNS
1. Insérez le CD-ROM d’installation d’USRobotics dans le lecteur CD-ROM ou
DVD-ROM de votre ordinateur, et procédez de l'une des manières suivantes :
" Windows :
A. Si le CD ne se lance pas automatiquement, démarrez-le manuellement
comme suit :
i) Windows Vista : cliquez sur
Windows XP : cliquez sur
Démarrer > Ordinateur.
Démarrer > Poste de travail.
Windows 2000, Me et 98SE : sur le bureau, double-cliquez sur
Poste de travail.
ii) Puis double-cliquez sur l'icône de votre lecteur CD.
B. Sélectionnez votre langue, lisez l'accord de licence, puis cliquez sur OK.
C. Cliquez sur
prendre jusqu'à 1 minute.
" Macintosh OS X : ouvrez le CD-ROM et double-cliquez sur USRobotics
EasyConfigurator
1minute.
" Linux : ouvrez le CD-ROM et double-cliquez sur
. Le démarrage d'EasyConfigurator peut prendre jusqu'à 1 minute.
script
Setup
(Installation). Le démarrage d'EasyConfigurator peut
. Le démarrage d'EasyConfigurator peut prendre jusqu'à
EasyConfigurator linux-
19
Page 24

Français
3. Sélectionnez votre pays et votre fournisseur d'accès Internet (FAI) dans
les listes déroulantes de la page
pas dans la liste, sélectionnez
Internet. Si votre pays ou votre FAI n'apparaît
Other (Autre) et saisissez les paramètres fournis
par votre FAI.
Vous devrez peut-être saisir le nom d'utilisateur et le mot de passe de votre
connexion ADSL après avoir effectué vos sélections.
4. Cliquez sur
Save (Enregistrer).
5. Vous êtes alors dirigé vers l'onglet
Status (Statut). Un message affiché
en haut de la page indique si votre connexion ADSL a été établie. Si le message indique qu'il n'y a pas de connexion ADSL, consultez la section
« Dépannage », page 26 de ce guide.
6. Cliquez sur l'onglet
admin et cliquez sur Save (Enregistrer).
Remarque : Le nom d'utilisateur
Login (Connexion), saisissez le mot de passe du compte
admin et le mot de passe que
vous saisirez seront utilisés par la suite lorsque vous
vous connecterez à la passerelle.
7. Fermez EasyConfigurator.
Pour obtenir plus d'informations sur EasyConfigurator, consultez le Guide de
l'utilisateur proposé sur le CD-ROM d'installation d'USRobotics.
Etape 4 : configuration de vos paramètres de sécurité sans fil
1. Pour configurer vos paramètres de sécurité sans fil, appuyez sur le bouton
SecureEasySetup situé à l'arrière de la passerelle pendant une seconde. Cela
permet d'activer la sécurité sans fil WPA2 et WPA (PSK) et de configurer une
phrase d'authentification / clé réseau pour votre réseau sans fil.
Attention : Si vous n'activez pas une méthode de sécurité sans fil
sur la passerelle, votre réseau sans fil ne sera pas sécurisé.
Des périphériques sans fil non autorisés pourront s'y
connecter, utiliser votre connexion Internet et accéder
aux ordinateurs du réseau.
2. Si vous devez connecter cet ordinateur à votre réseau via une connexion
sans fil, vous pouvez débrancher le câble Ethernet de la passerelle et de votre
ordinateur, installer votre adaptateur sans fil, puis connecter votre ordinateur
à votre passerelle à l'aide d'une connexion sans fil. Pour savoir comment
installer votre adaptateur sans fil, consultez la documentation qui l'accompagne.
20
Page 25
Français
Sauvegarde de vos paramètres de configuration
Au cas où vous devriez rétablir la configuration d'usine par défaut de votre
passerelle, les fichiers de sauvegarde vous simplifieront la tâche. USRobotics
vous recommande de sauvegarder vos paramètres maintenant.
1. Sur votre ordinateur, démarrez un navigateur Web.
2. Dans le champ d'adresse ou d'emplacement, saisissez 192.168.1.1 et appuyez
sur Entrée pour accéder aux pages de configuration de la passerelle.
A l'invite, saisissez le nom d'utilisateur et le mot de passe de la passerelle.
3. Sélectionnez
Device (Périphérique).
4. Cliquez sur
5. Vous serez invité à enregistrer ou à ouvrir le fichier. Sélectionnez
Back Up Settings (Sauvegarde des paramètres) dans le menu
Back Up (Sauvegarder).
Save
(Enregistrer).
Félicitations ! La procédure d'installation est terminée. Vous pouvez vérifier
votre connexion Internet en enregistrant votre Wireless
à l'adresse
www.usr.com/productreg/
.
N
dx ADSL2+ Gateway
Configuration supplémentaire
Connecter des clients sans fil installés
Le bouton SecureEasySetup™ vous permet de connecter des périphériques
Wireless
passerelle.
à la documentation qui les accompagne pour y trouver des instructions d'installation.
N
dx ou d’autres périphériques sans fil certifiés SecureEasySetup à votre
1
Si vous devez toujours installer des adaptateurs sans fil, reportez-vous
Si votre client sans fil a SecureEasySetup, vous devez voir l'un des logos suivants
sur le périphérique ou au sein de l'utilitaire client :
Si votre périphérique sans fil ne prend pas en charge SecureEasySetup, vous
pouvez tout de même saisir les paramètres de sécurité sans fil manuellement.
1 BROADCOM, SecureEasySetup et le logo SecureEasySetup sont des marques, déposées ou non,
de Broadcom Corporation aux Etats-Unis et/ou dans d'autres pays.
21
Page 26

Français
Connecter un périphérique SecureEasySetup à votre passerelle sans fil
2
1. Appuyez pendant 1 seconde sur le bouton SecureEasySetup situé à l'arrière
de votre passerelle. Le voyant SecureEasySetup situé à l'avant de votre
passerelle commence à clignoter.
2. Lancez SecureEasySetup dans l'utilitaire client de votre adaptateur sans fil.
3. La passerelle et l'adaptateur sans fil synchronisent alors les paramètres
de sécurité sans fil, et le périphérique sera connecté de manière sécurisée
àlapasserelle.
Connecter manuellement un périphérique à votre passerelle sans fil
Pour savoir comment modifier le mode ou les paramètres de sécurité sans
fil de votre adaptateur, reportez-vous à la documentation de ce dernier.
1. Assurez-vous que l'adaptateur sans fil inséré dans le périphérique est
configuré sur le mode infrastructure.
2. Configurez le nom du réseau ou SSID dans les paramètres de l'adaptateur
sans fil en fonction du
nom du réseau qui est utilisé dans la passerelle.
3. Si vous avez configuré la sécurité sans fil sur la passerelle, veillez à appliquer
les mêmes paramètres de sécurité à l'adaptateur sans fil qu'à la passerelle.
Pour voir les paramètres de sécurité de votre passerelle :
1. Lancez un navigateur Web sur votre ordinateur, puis dans le champ
d'adresse saisissez
192.168.1.1 et appuyez sur Entrée.
2. Saisissez le nom d'utilisateur et le mot de passe utilisés pour votre
passerelle et cliquez sur
3. Sur les pages de configuration de la passerelle, accédez au menu
OK.
Security
(Sécurité) et sélectionnez Wireless (Sans fil) pour voir vos paramètres de
sécurité sans fil.
Installer une imprimante USB
Vous pouvez connecter une imprimante USB à la passerelle Wireless Ndx
ADSL2+ Gateway et l'utiliser comme imprimante réseau si votre système
d'exploitation et votre imprimante prennent tous les deux en charge le protocole
IPP (Internet Printing Protocol). Windows Server
2 Pour que SecureEasySetup soit prêt sur votre passerelle, il doit être configuré avec la sécurité sans fil
WPA2 and WPA (PSK)
communément
manuellement, ou appuyer sur le bouton SecureEasySetup pour configurer vos paramètres sans fil.
clé réseau, clé WPA
et le cryptage
ou
TKIP and AES
phrase d'authentification
, et une clé pré-partagée WPA (également appelée
®
2003, Windows® Vista, XP,
). Vous pouvez configurer les paramètres
22
Page 27

Français
et 2000 prennent automatiquement en charge cette fonction. Contactez le
fabricant de votre imprimante pour déterminer si celle-ci prend en charge IPP.
Remarque : Lorsqu'elle est utilisée avec des imprimantes multifonctions
capables de numériser et de copier, la passerelle Wireless
N
dx
ADSL2+ Gateway prend uniquement en charge la fonction
d'impression. Pour activer les fonctions de communication
bidirectionnelles, notamment la numérisation, connectez
directement l'imprimante multifonction à l'ordinateur.
Les notifications concernant le niveau d'encre ou l'ajout
de papier ne sont pas transmises de la passerelle Wireless
N
dx
ADSL2+ Gateway à votre ordinateur.
Pour obtenir des instructions sur l'installation de l'imprimante sous Windows Me et
98SE, Mac et Linux, consultez le
Guide de l’utilisateur
sur le CD-ROM d’installation
d’USRobotics.
Etape 1 : installation de l'imprimante locale
Remarque : Si l'imprimante a déjà été installée sur chaque ordinateur
qui l'utilisera sur le réseau, passez à l'« Etape 2 : informations
relatives à votre serveur d'impression ».
Vous devez installer les pilotes fournis par le fabricant de l'imprimante sur
chaque ordinateur qui utilisera l'imprimante avant de connecter celle-ci à la
passerelle Wireless
N
dx ADSL2+ Gateway.
1. Branchez votre imprimante USB sur l'un des ports USB de l'ordinateur.
2. Installez l'imprimante en suivant les instructions d'installation fournies
avec votre imprimante.
3. Imprimez une page de test pour vous assurer que l'imprimante fonctionne
correctement.
4. Mettez l'imprimante hors tension.
Etape 2 : informations relatives à votre serveur d'impression
1. Débranchez l'imprimante de l'ordinateur et branchez l'extrémité
rectangulaire fine du câble USB dans le port
N
dx ADSL2+ Gateway.
ADSL 1234
USB
Secure
Easy
15VDC
Setup
Reset
USB de la passerelle Wireless
2. Allumez votre imprimante.
3. Sur votre ordinateur, démarrez un navigateur Web.
23
Page 28

Français
4. Dans le champ d'adresse, saisissez 192.168.1.1 et appuyez sur
Entrée pour accéder aux pages de configuration de la passerelle.
5. Saisissez le nom d'utilisateur et le mot de passe utilisés pour votre
passerelle et cliquez sur
OK.
6. Dans le menu
Device (Périphérique), sélectionnez Printer Server
(Serveur d'imprimante).
7. Entrez le
Printer name (Nom de l'imprimante) et un Comment
(Commentaire) pour l'imprimante.
8. Notez l'adresse de l'emplacement de l'imprimante (exemple :
http://192.168.1.1:1631/printers/My_Printer). Vous avez besoin
de l'adresse pour configurer l'imprimante sur des ordinateurs
qui doivent avoir accès à l'imprimante.
Etape 3 : connexion des ordinateurs au Wireless USB Print Server
Remarque :
Vous devez effectuer cette procédure sur chaque ordinateur
de votre réseau pour permettre une impression via le serveur
d'impression sur la passerelle Wireless
Windows Vista:
N
dx ADSL2+ Gateway.
1. Cliquez sur Démarrer > Panneau de configuration > Matériel et audio >
Imprimantes.
2. Cliquez sur
3. Appuyez sur le bouton radio intitulé
Ajouter une imprimante.
Add a network, wireless or Bluetooth printer
(Ajouter une imprimante en réseau, sans fil ou Bluetooth). Cliquez sur Suiv-
.
ant
4. Cliquez sur
The Printer That I Want Isn’t Listed (L'imprimante que je désire uti-
liser n'est pas indiquée dans la liste).
5. Choisissez
Select a shared printer by name (Sélectionner une imprimante par-
tagée par son nom) et saisissez dans le champ URL l'emplacement de l'imprimante que vous avez noté à l'étape 2. Cliquez sur
Suivant..
Remarque : L'URL est sensible à la casse et doit être saisie telle qu'elle
est indiquée dans la section
Printer location de la page Status
(Statut) de la passerelle.
6. Sélectionnez le fabricant et le modèle de votre imprimante. Cliquez sur
OK.
7. Notez un nom pour l'imprimeur et cliquez sur Suivant. Si le système vous y
invite, vous pouvez imprimer une page de test.
8. Pour terminer le processus de configuration, cliquez sur
Windows XP ou 2000:
Te rm i ne r.
1. Effectuez ensuite l'une des opérations suivantes :
" Windows XP : cliquez sur
" Windows 2000 : cliquez sur
Démarrer > Imprimantes et télécopieurs.
Démarrer > Paramètres > Imprimantes.
24
Page 29

2. Cliquez sur Ajouter une imprimante.
Français
3. L'assistant Add Printer Wizard (Ajout d'imprimante) se lance. Cliquez sur
vant
.
4. Sélectionnez le bouton radio
à un autre ordinateur
. Cliquez sur Suivant.
5. Cliquez sur le bouton radio
or office network
(Se connecter à une imprimante sur Internet ou au
Une imprimante réseau ou une imprimante connectée
Connect to a printer on the Internet or on a home
réseau de votre domicile ou de votre entreprise). Dans le champ URL, saisissez l'adresse indiquée dans la section
Printer location (Emplacement
de l'imprimante) que vous avez copiée à partir des pages de configuration
de la passerelle. Cliquez sur
Suivant.
Remarque : L'URL est sensible à la casse et doit être saisie telle qu'elle
est indiquée dans la section
Printer location de la page Status
(Statut) de la passerelle.
6. Sélectionnez le fabricant et le modèle de votre imprimante. Cliquez sur
OK.
Remarque : Si votre imprimante ne figure pas dans la liste, cela signifie
que ses pilotes n'ont pas été installés correctement. Répétez
l'« Etape 1 : installation de l'imprimante locale », page 23.
Sui-
7. Lorsque vous y êtes invité, définissez cette imprimante comme imprimante
par défaut en sélectionnant
8. Cliquez sur
Finish (Terminer).
Yes (Oui).
Etape 4 : vérification de la connexion de l'imprimante
1. Effectuez ensuite l'une des opérations suivantes :
" Windows Vista : cliquez sur
Matériel et audio > Imprimantes.
" Windows XP : cliquez sur
" Windows 2000 : cliquez sur
Démarrer > Panneau de configuration >
Démarrer > Imprimantes et télécopieurs.
Démarrer > Paramètres > Imprimantes.
2. Cliquez avec le bouton droit de la souris sur votre imprimante et cliquez sur
Propriétés.
3. Cliquez sur
Imprimer une page de test. La page de test doit s'imprimer correcte-
ment.
Remarque : Si elle ne s'imprime pas, reportez-vous à la section
« Dépannage » du Guide de l’utilisateursur le CD-ROM
d’installation d’USRobotics pour plus de détails.
25
Page 30

Français
Dépannage
Cette procédure de base permet de résoudre certains problèmes que vous
pourriez rencontrer avec votre passerelle :
1. Assurez-vous que le cordon d'alimentation et les câbles Ethernet sont
bien connectés. Il s'agit notamment des câbles connectant la passerelle
et tous les ordinateurs présents sur le réseau. Consultez les illustrations
de l'installation à la page 18.
2. Vérifiez que la prise de courant à laquelle la passerelle est branchée est active.
3. Reportez-vous aux descriptions des voyants DEL proposées dans ce guide,
puis observez les voyants DEL de la passerelle pour vous assurer que l'appareil est sous tension et que tous les ports fonctionnent. Consultez la description des voyants DEL à la page 15.
4. Pour les connexions sans fil uniquement :
des interférences avec l'environnement, liées notamment aux peintures à base de plomb et aux murs en béton,
ou à certains dispositifs électroniques tels que les téléphones 2,4 Ghz , peuvent réduire la portée et la qualité de la connexion sans fil. Essayez de bouger
l'antenne de la passerelle ou de repositionner les clients sans fil pour améliorer la qualité de la connexion.
5. Pour les connexions sans fil uniquement :
assurez-vous que chaque
périphérique qui se connecte à la passerelle est configuré sur le mode infrastructure. Configurez le nom du réseau ou SSID dans les paramètres
de l'adaptateur sans fil en fonction du
Network Name (nom du réseau) qui est
utilisé dans la passerelle, et assurez-vous que vous utilisez le même type de
sécurité sans fil. Pour déterminer comment modifier ces paramètres,
reportez-vous à la documentation de votre adaptateur sans fil.
Si vos problèmes d'utilisation de la passerelle persistent, consultez la section
«Dépannage» du
Guide de l’utilisateur
sur le CD-ROM d’installation d’USRobotics.
EasyConfigurator n'a pas pu détecter ma connexion Internet.
Solution :
1. Accédez à la page Internet indiquée dans EasyConfigurator.
Sélectionnez votre pays et votre fournisseur d'accès. Si votre fournisseur
d'accès n'est pas répertorié, sélectionnez
saisissez manuellement vos informations de connexion. Vous devrez peutêtre vous procurer une partie des informations suivantes auprès de votre
FAI :
" Valeurs VPI/VCI
Other (Autre) pour votre pays et
" Norme ADSL (modulation)
" Mode d'encapsulage
" Type de protocole
" Authentification (PAP ou CHAP) pour connexions PPP
" Adresse IP, votre nom d'utilisateur et votre mot de passe
(si attribués par votre FAI).
26
Page 31

Français
" Masque de sous-réseau, passerelle et serveur DNS
2. Si vous ne savez pas exactement quelles informations de connexion sont req-
uises, contactez votre FAI.
3. Cliquez sur
Save (Enregistrer).
Je n'arrive plus à me connecter à Internet.
Solution :
1. Appuyez sur le bouton
Reset (Réinitialiser) situé à l'arrière de votre
passerelle pendant 1 seconde pour redémarrer votre passerelle. Attendez
que la passerelle ait entièrement redémarré.
Remarque :
Si vous maintenez le bouton
Reset
enfoncé pendant 7 secondes,
les paramètres par défaut de votre passerelle sont rétablis.
2. Redémarrez votre ordinateur. Attendez que l'ordinateur ait entièrement redé-
marré et tentez d'accéder à Internet.
3. Si vous ne pouvez toujours pas accéder à Internet, reportez-vous
àlasection«Dépannage » du Guide de l’utilisateursur le CD-ROM d’installation d’USRobotics pour plus de détails.
SecureEasySetup n'a pas pu configurer mon client sans fil.
Solution :
Appuyez sur le bouton SecureEasySetup situé à l'arrière de la passerelle pendant
une seconde, puis assurez-vous que le voyant SecureEasySetup situé à l'avant de
la passerelle commence à clignoter avant de lancer SecureEasySetup dans
l'utilitaire client de votre adaptateur sans fil.
Les pages de configuration de ma passerelle ne répondent pas,
mais je peux tout de même accéder à Internet.
Solution :
Appuyez sur le bouton
Reset
(Réinitialiser) de la passerelle pendant 1 seconde
pour redémarrer la passerelle. Si vous ne parvenez toujours pas à accéder aux
pages de configuration de la passerelle, maintenez le bouton
Reset
enfoncé
pendant 7 secondes. Les paramètres par défaut de la passerelle seront réinitialisés.
Vos paramètres personnalisés ne seront pas conservés. Vous devrez donc les
effectuer à nouveau ou les restaurer si vous avez créé un fichier de sauvegarde.
Comment configurer ma passerelle si je connecte une
console de jeu ou un appareil VoIP ?
Solution :
Pour connecter un périphérique tel qu'une console de jeu ou un appareil
VoIP à votre passerelle, vous devrez ouvrir l'accès à des ports spécifiques
27
Page 32

Français
de manière à permettre aux périphériques de communiquer avec Internet.
Cette opération s'effectue à partir du menu
Security (Sécurité), via Port Triggering
(Déclenchement des ports). Pour plus de détails sur Port Triggering,
consultez les sections « Configuration » et « Didacticiels » du Guide de
l’utilisateursur le CD-ROM d’installation d’USRobotics.
Comment configurer le pare-feu de ma passerelle ?
Solution :
Vous pouvez accéder aux paramètres de pare-feu de la passerelle à partir
du menu
utilisant
Internet proposé sur les pages de configuration de la passerelle, en
WAN Setup (Configuration WAN). Pour plus de détails sur les paramètres
de pare-feu, consultez les sections « Configuration » et « Didacticiels » du Guide
de l’utilisateursur le CD-ROM d’installation d’USRobotics.
Informations complémentaires
Pour obtenir plus d'informations sur les mentions légales et la garantie,
reportez-vous au Guide de l’utilisateursur le CD-ROM d’installation d’USRobotics.
Pour obtenir plus d'informations sur le fonctionnement et la configuration,
reportez-vous au
Guide de l’utilisateur
sur le CD-ROM d’installation d’USRobotics.
Le Guide de l'utilisateur contient des informations détaillées sur l'utilisation et la
configuration de votre Wireless
N
dx ADSL2+ Gateway.
Pour obtenir des informations complètes sur le dépannage et des
précisions supplémentaires :
1. Reportez-vous au Guide de l’utilisateursur le CD-ROM d’installation
d’USRobotics.
2. Accédez à la section Support du site Web d'USRobotics à l'adresse :
www.usr.com/support/
.
Vous trouverez des réponses à la plupart des problèmes rencontrés par
les clients dans les pages Web FAQ et Dépannage consacrées à votre Wireless
N
dx ADSL2+ Gateway. Les pages d'assistance contiennent également des
informations sur les microcodes les plus récents et les mises à jour de
documentation.
3. Posez votre question à l'assistance technique à l'aide du formulaire en ligne
ou contactez l'Assistance clientèle d'USRobotics.
4. Consultez les coordonnées de l'assistance technique, indiquées en dernière
page de ce guide.
28
Page 33

Deutsch
Installation
Packungsinhalt
Deutsch
! USRobotics Wireless
N
dx ADSL2+ Gateway
! Netzteil, 15 V Gleichspannung ! Abnehmbare Antennen
! Ethernet-Kabel ! Installations-CD-ROM
! Telefonkabel ! Installationsanleitung
Funktionen
Vorderseite
Am Gateway befinden sich die folgenden Status-LEDs:
23
1
Symbol Name Zustand Funktion
Stromversorgung
Aus Keine Stromzufuhr.
An Stromzufuhr aktiv.
4
WLAN
(WirelessNetzwerk)
SecureEasySetup Aus SecureEasySetup-Modus am
WAN
(Internet)
ADSL Aus Keine ADSL-Verbindung.
Aus Die WLAN-Verbindung ist deaktiviert.
An Die WLAN-Verbindung ist aktiviert.
Blinkt Daten werden gesendet oder
empfangen.
Gateway nicht bereit.
An Der Modus SecureEasySetup ist
bereit.
Blinkt Kommunikation mit
SecureEasySetup-Geräten.
Aus Keine Internetverbindung oder
Gateway befindet sich im BridgeModus.
Blinkt Daten werden gesendet oder
empfangen.
An Internetverbindung aufgebaut.
An ADSL-Verbindung hergestellt
Blinkt ADSL-Verbindung wird aufgebaut.
29
Page 34

Deutsch
Symbol Name Zustand Funktion
LAN
(1 bis 4)
Aus Keine LAN-Verbindung.
An LAN-Verbindung hergestellt.
Blinkt Daten werden gesendet oder
Drucker
Aus Keine Verbindung zum Drucker
An Verbindung zum Drucker erkannt.
Blinkt Daten werden zum Drucker
Rückseite
ADSL 1234
Element Funktion
ADSL
LAN 1 bis 4
Anschluss des Gateways an die ADSL-Leitung.
Anschluss zusätzlicher Geräte an das Gateway.
empfangen.
erkannt.
gesendet.
USB
Reset
15VDC
Secure
Easy
Setup
USB
Reset
15VDC
SecureEasySetup
Anschluss des Gateways an einen USB-Drucker.
Startet das Gateway neu oder setzt das Gateway auf
die Werkseinstellungen zurück.
• Zum Neustarten des Gateways ohne Verlust der
aktuellen Einstellungen halten Sie die
Reset
-Taste
1 Sekunde lang gedrückt.
• Zum Zurücksetzen des Gateways auf die
Werkseinstellungen halten Sie die
Reset
-Taste 7
Sekunden lang gedrückt.
Anschluss des Netzteils an das Gateway.
Startet SecureEasySetup auf dem Gateway.
• Zum Starten von SecureEasySetup auf dem Gateway
halten Sie die
SecureEasySetup
-Taste 1 Sekunde lang
gedrückt.
• Um die Wireless-Sicherheitseinstellungen auf
Werkseinstellungen (keine Sicherheitsfunktion
aktiviert) zurückzusetzen, halten Sie die
SecureEasySetup
-Taste 7 Sekunden lang gedrückt.
Anschluss einer Antenne an das Gateway.
30
Page 35

Standardwerte
Auf dem Wireless Ndx ADSL2+ Gateway sind folgende Standardwerte
eingestellt:
Deutsch
! IP-Adresse:
192.168.1.1
Systemanforderungen
! ADSL-Verbindung eines entsprechenden Internet Service Providers (ISP)
! Computer mit installiertem Ethernet-Adapter
! Ein HTML 4.01-kompatibler Webbrowser mit aktiviertem JavaScript
Installationsanleitung
1. Schritt: Anschließen des/der Mikrofilter(s) (falls vorhanden oder falls
vom ISP vorgeschrieben)
Ein Mikrofilter beseitigt Interferenzen zwischen dem Sprach- und dem ADSLSignal. Falls Ihrem Gateway kein Mikrofilter beigelegt war, fragen Sie bei Ihrem
ISP nach, ob dieser für Ihre Telefongeräte erforderlich ist.
1. Schließen Sie jedes Telefongerät (Telefon, Fax usw.) an einen Mikrofilter an.
2. Stecken Sie den Mikrofilter in die Telefonsteckdose.
Hinweis:Installieren Sie keinen Mikrofilter an dem Kabel, das Ihr Gateway
mit der Telefonbuchse verbindet, sofern der Filter nicht mit einer
entsprechenden Buchse für das Gateway und das Telefon ausgestattet ist.
31
Page 36

Deutsch
2. Schritt: Anschließen des Gateways
1. Schließen Sie das Gateway an die ADSL-Leitung an:
A. Bringen Sie die mitgelieferten Antennen an der Rückseite des
Gateways an.
B. Stecken Sie ein Ende des beigefügten Telefonkabels in den
ADSL-
Anschluss des Gateways.
C. Stecken Sie das andere Ende des Telefonkabels in eine Telefonsteckdose.
W
A
N
1
2
U
3
S
B
4
1
5
V
D
C
S
e
c
u
re
R
e
s
e
t
E
a
s
y
S
e
t
u
p
Hinweis:Der USB-Anschluss am Gateway dient nur zum Anschluss
eines USB-Druckers. Anweisungen zum Anschließen eines
USB-Druckers an das Gateway finden Sie unter "Installieren
eines USB-Druckers" auf Seite 36.
2. Schließen Sie das Gateway an den Computer an:
A. Schalten Sie zunächst den Computer aus.
B. Stecken Sie das eine Ende des im Lieferumfang enthaltenen
Ethernet-Kabels in den Ethernet-Adapter Ihres Computers.
C. Verbinden Sie das andere Kabelende mit einem der
Gateways.
W
A
N
1
2
USB
3
4
15
VDC
S
e
c
u
re
Reset
E
a
s
y
S
e
t
u
p
3. Nehmen Sie das Netzwerk in Betrieb:
A. Schließen Sie das mitgelieferte Netzteil an den
15VDC-Anschluss des
Gateways an.
Hinweis:Anwender in Großbritannien: Bevor Sie das Netzteil
anschließen, setzen Sie den für Ihr Land geeigneten Stecker
auf das Netzteil. Drücken Sie den Stecker fest an, bis er
hörbar einrastet. Nun können Sie das Netzteil an das
Gateway anschließen.
LAN-Anschlüsse des
32
Page 37

Deutsch
B. Stecken Sie das Netzteil in eine Steckdose.
W
AN
1
2
U
3
S
B
4
1
5
V
D
C
S
e
c
u
re
R
e
s
e
t
E
a
s
y
S
e
t
u
p
C. Schalten Sie den Computer ein.
3. Schritt: Konfigurieren des Gateways mit EasyConfigurator
Sie benötigen einen aktiven ADSL- und Internetdienst Ihrer Telefongesellschaft
oder Ihres Internet Service Providers (ISP), bevor Sie eine Verbindung zum
Internet herstellen können. Dazu sind evtl. die folgenden Informationen von
Ihrem ISP erforderlich:
" Werte für VPI/VCI
" ADSL-Standard (Modulation)
" Kapselungsmodus
" Protokolltyp
" Authentifizierung (PAP oder CHAP) für PPP-Verbindungen
"
IP-Adresse, Benutzername und Passwort (falls von Ihrem ISP zugewiesen)
" Subnetzmaske und Angaben zu Gateway und DNS-Server
1. Legen Sie die USRobotics Installations-CD-ROM in das CD-ROM- oder
DVD-Laufwerk Ihres Computers und führen Sie einen der folgenden
Schritte durch:
" Windows:
A. Wenn die CD nicht automatisch gestartet wird, können Sie sie man-
uell starten:
i) Windows Vista: Klicken Sie auf
Start > Computer.
Windows XP: Klicken Sie auf
Windows 2000, Me und 98SE: Doppelklicken Sie auf dem Desk-
top auf
ii) Doppelklicken Sie dann auf das Symbol des CD-ROM-Laufwerks.
B. Wählen Sie die gewünschte Sprache, lesen Sie den Lizenzvertrag und
klicken Sie auf
C. Klicken Sie auf
EasyConfigurator kann bis zu einer Minute dauern.
" Macintosh OS X: Starten Sie die CD-ROM und doppelklicken Sie auf
USRobotics EasyConfigurator. Das Starten von EasyConfigurator kann bis
zu einer Minute dauern.
" Linux: Starten Sie die CD-ROM und doppelklicken Sie auf
EasyConfigurator linux-script. Das Starten von EasyConfigurator kann bis
zu einer Minute dauern.
Start > Arbeitsplatz.
Arbeitsplatz.
OK.
Setup (Konfiguration). Das Starten von
33
Page 38

Deutsch
3. Wählen Sie auf der Seite Internet Ihr Land und Ihren Internet Service
Provider (ISP) aus den Dropdown-Listen aus. Wenn Ihr Land oder ISP in
der Liste nicht angezeigt wird, wählen Sie als Land
Other (Sonstige) aus und
geben Sie die von Ihrem ISP angegebenen Einstellungen manuell ein.
Danach müssen Sie sich für Ihre ADSL-Verbindung ggf. mit Benutzername
und Passwort anmelden.
4. Klicken Sie auf
5. Die Registerkarte
Save (Speichern).
Status
wird angezeigt. Eine Meldung im oberen
Bildschirmbereich gibt bekannt, ob die ADSL-Verbindung hergestellt werden
konnte. Wenn laut Meldung keine ADSL-Verbindung zustande gekommen ist,
lesen Sie den Abschnitt "Fehlerbehebung" auf Seite 40 in dieser Anleitung.
6. Klicken Sie auf die Registerkarte Login (Anmelden), geben Sie ein Passwort
für das
admin-Konto ein und klicken Sie auf Save (Speichern).
Hinweis:Der Benutzername
admin und das Passwort werden bei
zukünftigen Anmeldungen am Gateway benötigt.
7. Schließen Sie EasyConfigurator.
Eine genaue Beschreibung von EasyConfigurator finden Sie in der
Bedienungsanleitung auf der USRobotics Installations-CD-ROM.
4. Schritt: Konfigurieren der WLAN-Sicherheitseinstellungen
1. Zum Konfigurieren der WLAN-Sicherheitseinstellungen halten Sie die
SecureEasySetup-Taste an der Rückseite des Gateways eine Sekunde
gedrückt. Dadurch werden die WLAN-Sicherheitsstandards WPA2 und WPA
(PSK) in Kraft gesetzt und ein Kennwort/Netzwerkschlüssel für das WLAN
konfiguriert.
Vorsicht: Falls Sie keine WLAN-Sicherheitsmethode für das Gateway
einstellen, ist Ihr WLAN nicht sicher bzw. nicht geschützt.
Unbefugte WLAN-Geräte können eine Verbindung zu Ihrem
Netzwerk herstellen, Ihre Internetverbindung nutzen und auf
Computer im Netzwerk zugreifen.
2. Wenn Sie diesen Computer drahtlos in Ihr Netzwerk integrieren möchten,
trennen Sie das Ethernet-Kabel vom Gateway und vom Computer.
Installieren Sie nun den Wireless-Adapter und stellen Sie anschließend eine
WLAN-Verbindung zwischen dem Computer und dem Gateway her.
Anweisungen zur Installation des Wireless-Adapters finden Sie in der
Dokumentation, die zusammen mit dem Adapter geliefert wird.
34
Page 39

Deutsch
Sichern der Konfigurationseinstellungen
Eine Sicherheitskopie der Einstellungen ist nützlich, falls das Gateway auf die
werkseitigen Voreinstellungen zurückgesetzt werden muss. USRobotics
empfiehlt daher, die Einstellungen zu sichern.
1. Öffnen Sie auf Ihrem Computer einen Webbrowser.
2. Geben Sie zum Öffnen der Gateway-Konfigurationsseiten in der Adresszeile
ein und drücken Sie die Eingabetaste.
192.168.1.1 Geben Sie bei
Aufforderung Ihren Benutzernamen und Ihr Passwort für das Gateway ein.
3. Wählen Sie im Menü
Device (Gerät) die Option Back Up Settings
(Sicherungseinstellungen).
4. Klicken Sie auf
Back Up (Sichern).
5. Sie werden aufgefordert, die Datei entweder zu speichern oder zu öffnen.
Klicken Sie auf
Save (Speichern).
Herzlichen Glückwunsch! Sie haben die Installation abgeschlossen. Sie
können Ihre Internetverbindung prüfen, indem Sie Ihren Wireless
ADSL2+ Gateway unter
www.usr.com/productreg/
registrieren.
N
dx
Weitere Konfiguration
Verbinden installierter Wireless-Clients
Mit der SecureEasySetup™-Taste können Sie Wireless Ndx - und andere
1
SecureEasySetup-zertifizierte Wireless-Geräte an Ihr Gateway anschließen.
Falls Sie dennoch Wireless-Adapter installieren müssen, lesen Sie bitte die
Installationsanweisungen in der entsprechenden Dokumentation.
Wenn Ihr Wireless-Client mit SecureEasySetup ausgestattet ist, sollten Sie eines
der folgenden Logos auf dem Gerät oder im Dienstprogramm des Clients sehen:
Wenn Ihr Wireless-Gerät SecureEasySetup nicht unterstützt, können Sie die
WLAN-Sicherheitseinstellungen immer noch manuell eingeben.
1 BROADCOM, SecureEasySetup und das SecureEasySetup-Logo sind Marken oder eingetragene
Marken der Broadcom Corporation in den Vereinigten Staaten und/oder anderen Ländern.
35
Page 40

Deutsch
Anschließen eines SecureEasySetup-Geräts an das Wireless Gateway
2
1. Halten Sie die SecureEasySetup-Taste an der Rückseite des Gateways
1 Sekunde lang gedrückt. Die SecureEasySetup-LED an der Vorderseite des
Gateways beginnt zu blinken.
2. Aktivieren Sie SecureEasySetup im Client-Dienstprogramm Ihres WirelessAdapters.
3. Das Gateway und der Wireless-Adapter synchronisieren die WLAN-Sicherheitseinstellungen, sodass das Gerät sicher mit dem Gateway verbunden ist.
Manuelles Anschließen eines Geräts an das Wireless Gateway
Anweisungen zur Änderung des Adapter-Modus oder der Sicherheitseinstellungen finden Sie in der Dokumentation Ihres Wireless-Adapters.
1. Der Wireless-Adapter im Gerät muss sich im Infrastrukturmodus befinden.
2. Stellen Sie den Netzwerknamen oder die SSID des Wireless-Adapters auf den
Netzwerknamen des Gateways ein.
3. Wenn Sie Wireless-Sicherheitseinstellungen am Gateway vorgenommen
haben, müssen die Sicherheitseinstellungen des Wireless-Adapters den
Einstellungen am Gateway entsprechen.
So zeigen Sie die für Ihr Gateway geltenden WLANSicherheitseinstellungen an:
1. Starten Sie auf Ihrem Computer einen Webbrowser, geben Sie in der
Adressleiste
192.168.1.1 ein und drücken Sie die Eingabetaste.
2. Geben Sie den Benutzernamen und das Passwort für das Gateway ein
und klicken Sie auf
3. Öffnen Sie auf den Gateway-Konfigurationsseiten das Menü
(Sicherheit) und wählen Sie
OK.
Security
Wireless (WLAN). Nun werden Ihre WLAN-
Sicherheitseinstellungen angezeigt.
Installieren eines USB-Druckers
Ein USB-Drucker kann an das Wireless Ndx ADSL2+ Gateway angeschlossen
und als Netzwerkdrucker eingesetzt werden, wenn sowohl Ihr Betriebssystem als
auch Ihr Drucker das Internet Printing Protocol (IPP) unterstützen. Diese
Funktion wird von Windows Server
®
2003, Windows®Vista, XP, und 2000
2 Damit SecureEasySetup auf Ihrem Gateway funktioniert, muss es mit den WLAN-
Sicherheitsstandards WPA2 and WPA (PSK), der Verschlüsselungsmethode TKIP and AES und
einem gemeinsamen Schlüssel (häufig auch Netzwerkschlüssel, WPA-Schlüssel oder Kennwort genannt)
eingestellt sein. Sie können die Einstellungen manuell konfigurieren oder dies durch Drücken der
SecureEasySetup-Taste automatisch durchführen lassen.
36
Page 41

standardmäßig unterstützt. Wenn Sie nicht wissen, ob Ihr Drucker IPP
unterstützt, wenden Sie sich bitte an den Druckerhersteller.
Deutsch
Hinweis:
Beim Einsatz mit Multifunktionsgeräten, die sowohl drucken als
auch scannen und kopieren können, unterstützt das Wireless
N
dx
ADSL2+ Gateway nur die Druckfunktion. Zur Bereitstellung
bidirektionaler Kommunikationsfunktionen (z. B. Scannen) muss
das Multifunktionsgerät direkt an den Computer angeschlossen
werden. Es werden keine Tinten- oder Papierstandmeldungen über
das Wireless
N
dx ADSL2+ Gateway an den Computer
übertragen.
Anweisungen für die Druckerinstallation unter Windows Me und 98SE, Mac
sowie Linux finden Sie im Bedienungsanleitung auf der USRobotics InstallationsCD-ROM.
1. Schritt: Installieren eines lokalen Druckers
Hinweis:Wenn der Drucker bereits auf jedem Computer installiert wurde,
der ihn im Netzwerk nutzen wird, fahren Sie fort mit "2. Schritt:
Einholen von Informationen vom Druckserver".
Bevor Sie den Drucker an das Wireless
N
dx ADSL2+ Gateway anschließen,
müssen auf jedem Computer die entsprechenden Druckertreiber installiert sein.
1. Schließen Sie den USB-Drucker an einen USB-Anschluss am Computer an.
2. Befolgen Sie zum Installieren des Druckers die zugehörige
Installationsanleitung.
3. Drucken Sie zur Überprüfung der ordnungsgemäßen Druckfunktion eine
Testseite aus.
4. Schalten Sie den Drucker aus.
2. Schritt: Einholen von Informationen vom Druckserver
1. Trennen Sie den Drucker von Ihrem Computer und stecken Sie das dünne,
rechteckige Ende des USB-Kabels in den
USB-Anschluss des Wireless
N
dx
ADSL2+ Gateways.
ADSL 1234
USB
Secure
Easy
15VDC
Setup
Reset
2. Schalten Sie den Drucker ein.
3. Öffnen Sie auf Ihrem Computer einen Webbrowser.
4. Geben Sie zum Öffnen der Gateway-Konfigurationsseiten in der Adresszeile
192.168.1.1 ein und drücken Sie die Eingabetaste.
37
Page 42

Deutsch
5. Geben Sie den Benutzernamen und das Passwort für das Gateway ein und
klicken Sie auf
OK.
6. Wählen Sie aus dem Menü
Device (Gerät) die Option Printer Server
(Druckserver).
7. Geben Sie im Feld
Printer name den Druckernamen ein und im Feld Comment
einen Kommentar für den Drucker.
8. Schreiben Sie sich die Druckerstandortadresse (z. B.
printers/My_Printer
) auf. Sie benötigen die Adresse, um den Drucker auf
http://192.168.1.1:1631/
Computern einzurichten, die Zugriff auf den Drucker haben sollen.
38
Page 43

Deutsch
3. Schritt: Verbinden des Computers mit dem Wireless USB Print Server
Hinweis:Sie müssen diesen Vorgang auf jedem Computer in Ihrem
Netzwerk durchführen, damit das Drucken über den Druckserver
des Wireless
Windows Vista
N
dx ADSL2+ Gateways möglich ist.
1. Klicken Sie auf Start > Systemsteuerung > Hardware und Sound > Drucker.
2. Klicken Sie auf
3. Aktivieren Sie das Optionsfeld
hinzufügen
. Klicken Sie auf Weiter.
4. Klicken Sie auf
5. Wählen Sie
Drucker hinzufügen.
Einen Netzwerk-, Drahtlos- oder Bluetoothdrucker
Der gesuchte Drucker ist nicht aufgeführt.
Einen freigegebenen Drucker über den Namen auswählen und geben Sie
im URL-Feld die Adresse des Druckerstandorts ein, die Sie sich in Schritt 2
notiert haben. Klicken Sie auf
Weiter.
Hinweis:Bei der Eingabe der URL ist Groß-/Kleinschreibung zu
berücksichtigen. Die Schreibweise muss mit der im Abschnitt
Printer location (Druckerstandort) auf der Status-Seite des
Gateways übereinstimmen.
6. Wählen Sie Hersteller und Modell des Druckers aus.
7. Notieren Sie einen Namen fur des Druckers auf Klicken sie auf
Weiter. Sie
können bei Aufforderung eine Testseite drucken.
8. Klicken Sie auf
Windows XP oder 2000
Fertig stellen, um die Installation abzuschließen.
1. Führen Sie einen der folgenden Schritte durch:
" Unter Windows XP: Klicken Sie auf
" Unter Windows 2000: Klicken Sie auf
2. Klicken Sie auf
Drucker hinzufügen.
Start > Drucker und Faxgeräte.
Start > Einstellungen > Drucker.
3. Der Druckerinstallations-Assistent wird gestartet. Klicken Sie auf
4. Wählen die Option
angeschlossen ist
5. Wählen Sie die Option
Firmennetzwerk herstellen
location
(Druckerstandort) ein, die Sie den Gateway-Konfigurationsseiten
entnommen haben. Klicken Sie auf
Netzwerkdrucker oder Drucker, der an einen anderen Computer
. Klicken Sie auf Weiter.
Verbindung mit einem Drucker im Internet oder Heim-/
. Im Feld URL geben Sie die Adresse aus Printer
Weiter.
Hinweis:Bei der Eingabe der URL ist Groß-/Kleinschreibung zu
berücksichtigen. Die Schreibweise muss mit der im Abschnitt
Printer location (Druckerstandort) auf der Status-Seite des
Gateways übereinstimmen.
Weiter.
39
Page 44

Deutsch
6. Wählen Sie Hersteller und Modell des Druckers aus. Klicken Sie auf OK.
Hinweis:Wenn Ihr Drucker nicht in der Liste steht, wurden die
Druckertreiber nicht korrekt installiert. Wiederholen Sie
"1. Schritt: Installieren eines lokalen Druckers" auf Seite 37.
7. Wählen Sie bei Aufforderung
Ja, um diesen Drucker als Standarddrucker
festzulegen.
8. Klicken Sie auf
Fertig stellen.
4. Schritt: Überprüfen der Druckerverbindung
1. Führen Sie einen der folgenden Schritte durch:
" Unter Windows Vista: Klicken Sie auf
ware und Sound
> Drucker.
" Unter Windows XP: Klicken Sie auf
" Unter Windows 2000: Klicken Sie auf
Start > Systemsteuerung > Hard-
Start > Drucker und Faxgeräte.
Start > Einstellungen > Drucker.
2. Klicken Sie mit der rechten Maustaste auf Ihren Drucker und wählen Sie
Eigenschaften.
3. Klicken Sie auf
Testseite drucken. Die Testseite sollte gedruckt werden können.
Hinweis:Wenn die Testseite nicht gedruckt wird, finden in der
Bedienungsanleitung auf der USRobotics Installations-CD-ROM
unter "Fehlerbehebung" weitere Informationen.
Fehlerbehebung
Wenn es zu Komplikationen mit dem Gateway kommt, sollten Sie die folgenden
Punkte zuerst überprüfen:
1. Sind das Netzkabel und alle Ethernet-Kabel korrekt eingesteckt? Überprüfen
Sie auch die Kabel, die das Gateway und die Computer im Netzwerk
miteinander verbinden. Siehe Installationsillustrationen auf Seite 32.
2. Ist das Gateway an eine stromführende Steckdose angeschlossen?
3. Überprüfen Sie die LED-Anzeigen am Gateway anhand der Beschreibung in
dieser Anleitung daraufhin, ob die Stromzufuhr aktiv ist und alle Anschlüsse
funktionieren. Siehe LED-Beschreibungen auf Seite 29.
4. Wireless-Verbindungen: Eine schlechte Verbindungsqualität oder eine geringe
Reichweite kann durch Störungsquellen in der Umgebung verursacht werden,
z. B. bleihaltige Farbe, Betonwände oder gewisse elektronische Geräte, wie
2,4-GHz-Telefone. Versuchen Sie Folgendes, um die Verbindungsqualität zu
verbessern: Platzieren Sie die Antenne des Gateways an einer anderen Stelle
oder wählen Sie einen anderen Standort für den Wireless-Client.
5. Wireless-Verbindungen: Vergewissern Sie sich, dass jedes mit dem Gateway
verbundene Gerät auf Infrastruktur-Modus eingestellt ist. Stellen Sie den
Netzwerknamen oder die SSID des Wireless-Adapters auf den
Netzwerknamen
40
Page 45

Deutsch
des Gateways ein und überprüfen Sie, ob Sie die gleichen WirelessSicherheitseinstellungen festgelegt haben. Hinweise zum Ändern dieser
Einstellungen finden Sie in der Dokumentation für Ihren Wireless-Adapter.
Wenn Sie weiterhin Probleme mit dem Gateway haben, lesen Sie in der
Bedienungsanleitung auf der USRobotics Installations-CD-ROM den Abschnitt
"Fehlerbehebung".
EasyConfigurator hat meine Internetverbindung nicht erkannt.
Lösungsvorschlag:
1. Öffnen Sie in EasyConfigurator die Seite Internet.
Wählen Sie Ihr Land und Ihren Internet Service Provider. Sollte Ihr ISP hier
nicht aufgeführt sein, wählen Sie als Land
Verbindungsdaten manuell ein. Dazu sind evtl. die folgenden Informationen
von Ihrem ISP erforderlich:
" Werte für VPI/VCI
" ADSL-Standard (Modulation)
" Kapselungsmodus
" Protokolltyp
Other (Sonstige) und geben Sie die
" Authentifizierung (PAP oder CHAP) für PPP-Verbindungen
" IP-Adresse, Benutzername und Passwort (falls von Ihrem ISP
zugewiesen)
" Subnetzmaske und Angaben zu Gateway und DNS-Server
2. Falls Sie die erforderlichen Verbindungsdaten nicht mit Sicherheit wissen,
wenden Sie sich an Ihren Internet Service Provider (ISP).
3. Klicken Sie auf
Save (Speichern).
Ich kann nicht mehr auf das Internet zugreifen.
Lösungsvorschlag:
1. Halten Sie die
gedrückt, um das Gateway neuzustarten. Warten Sie den Neustart des
Gateways ab.
Hinweis:Wenn Sie die
2. Starten Sie den Computer neu. Warten Sie, bis der Computer den Neustart
beendet hat, und versuchen Sie, auf das Internet zuzugreifen.
Reset-Taste an der Rückseite des Gateways 1 Sekunde lang
Reset-Taste 7 Sekunden lang gedrückt halten, wird
das Gateway auf die Werkseinstellungen zurückgesetzt.
3. Wenn Sie weiterhin nicht auf das Internet zugreifen können, lesen Sie den
Abschnitt "Fehlerbehebung" in der Bedienungsanleitung auf der USRobotics
Installations-CD-ROM, wo Sie eine ausführlichere Anleitung zur Fehlersuche
finden.
41
Page 46

Deutsch
SecureEasySetup konnte meinen Wireless-Client nicht konfigurieren.
Lösungsvorschlag:
Halten Sie die SecureEasySetup-Taste an der Rückseite des Gateways eine
Sekunde lang gedrückt. Vergewissern Sie sich anschließend, dass die
SecureEasySetup-LED an der Vorderseite des Gateways zu blinken beginnt,
bevor Sie SecureEasySetup im Client-Dienstprogramm Ihres Wireless-Adapters
aktivieren.
Die Konfigurationsseiten meines Gateways reagieren nicht,
aber ich kann trotzdem noch auf das Internet zugreifen.
Lösungsvorschlag:
Halten Sie die Reset-Taste an der Rückseite des Gateways eine Sekunde lang
gedrückt, um das Gateway neuzustarten. Sollte auch danach keine
Kommunikation mit den Gateway-Konfigurationsseiten möglich sein, halten Sie
die
Reset-Taste 7 Sekunden lang gedrückt. Damit stellen Sie auf dem Gateway die
werkseitigen Voreinstellungen für die Konfiguration wieder her. Falls Sie
benutzerdefinierte Einstellungen vorgenommen haben, müssen Sie die
Änderungen entweder erneut eingeben oder anhand einer Sicherungsdatei
(falls vorhanden) wiederherstellen.
Wie sieht die Konfiguration des Gateways für eine
Spielkonsole oder ein VoIP-Gerät aus?
Lösungsvorschlag:
Wenn Sie eine Spielkonsole oder ein VoIP-Gerät an das Gateway anschließen
möchten, müssen Sie den Zugriff auf bestimmte Anschlüsse freigeben, damit die
Geräte mit dem Internet kommunizieren können. Dies können Sie auf den
Gateway-Konfigurationsseiten im Menü
Security (Sicherheit) über Port Triggering
(Anschlussweiterleitung) erzielen. Näheres zur Anschlussweiterleitung finden Sie
in der Bedienungsanleitung auf der USRobotics Installations-CD-ROM unter den
Abschnitten "Konfiguration" und "Lernprogramme".
Wie konfiguriere ich auf dem Gateway eine Firewall?
Lösungsvorschlag:
Die Firewall-Einstellungen können Sie auf den Gateway-Konfigurationsseiten
über das Menü
aufrufen. Näheres zu den Firewall-Einstellungen finden Sie in der
Bedienungsanleitung auf der USRobotics Installations-CD-ROM unter den
Abschnitten "Konfiguration" und "Lernprogramme".
Internet und den Menüpunkt WAN Setup (WAN-Einrichtung)
42
Page 47

Deutsch
Weitere Informationen
Hinweise zu Vorschriften und Garantie finden Sie in der Bedienungsanleitung
auf der USRobotics Installations-CD-ROM.
Informationen zum Betrieb und zur Konfiguration finden Sie in der
Bedienungsanleitung auf der USRobotics Installations-CD-ROM. Die
Bedienungsanleitung enthält ausführliche Informationen über die Verwendung
und Konfiguration Ihres Wireless
Ausführlichere Informationen zur Fehlerbehebung und zu weiteren
Themen finden Sie in folgenden Quellen:
1. Siehe Bedienungsanleitung auf der USRobotics Installations-CD-ROM.
2. Rufen Sie den Support-Bereich auf der Website von USRobotics
unterUSRobotics www.usr.com/support/
Viele der häufigsten Probleme, denen Kunden begegnen können, werden
in den FAQ (Häufig gestellte Fragen) und auf den Webseiten zur
Fehlerbehebung für Ihren Wireless
Auf diesen Seiten finden Sie außerdem Informationen zur neuesten
Firmware und evtl. Updates zu Dokumentationen.
N
dx ADSL2+ Gateways.
auf.
N
dx ADSL2+ Gateway angesprochen.
3. Senden Sie Ihre technischen Fragen über das entsprechende Online-
Formular ein oder wenden Sie sich persönlich an den Kundendienst von
USRobotics.
4. Die Adresse für den Technischen Support finden Sie auf der letzten Seite
dieser Anleitung.
43
Page 48

Deutsch
44
Page 49

Italiano
Installazione
Contenuto della confezione
Italiano
! USRobotics Wireless
N
dx ADSL2+ Gateway
! Alimentatore 15 V CC ! Antenne rimovibili
! Cavo Ethernet ! CD-ROM di installazione
! Cavo telefonico ! Guida all'installazione rapida
Caratteristiche del prodotto
Visuale anteriore
Il gateway presenta i seguenti LED di stato:
23
1
Simbolo Nome Stato Condizione
Accensione
Spento Non alimentato
Acceso Alimentato
4
WLAN
(rete wireless)
SecureEasySetup Spento La modalità SecureEasySetup non è
WAN
(Internet)
ADSL Spento Nessuna connessione ADSL
Spento Connessione wireless disattivata
Acceso Connessione wireless attivata
Lampeggiante Invio o ricezione di dati
pronta
Acceso La modalità SecureEasySetup è
pronta
Lampeggiante Comunicazione con dispositivi
SecureEasySetup in corso
Spento La connessione a Internet non è
stabilita oppure il gateway è in
modalità Bridge
Lampeggiante Invio o ricezione di dati
Acceso Connessione a Internet stabilita
Acceso Collegamento ADSL stabilito
Lampeggiante Si sta stabilendo una connessione
ADSL
45
Page 50

Italiano
Simbolo Nome Stato Condizione
LAN
(da 1 a 4)
Spento Nessuna connessione LAN
Acceso Collegamento LAN attivo
Lampeggiante Invio o ricezione di dati
Stampante
Spento Nessuna connessione a stampante
Acceso Connessione a stampante rilevata
Lampeggiante Invio dati a stampante in corso
Visuale posteriore
ADSL 1234
Elemento Funzione
ADSL
LAN da 1 a 4
USB
Connette il gateway alla linea ADSL
Consente di collegare dispositivi aggiuntivi al gateway
Consente di collegare il gateway alla stampante USB
rilevata
USB
Reset
15VDC
Secure
Easy
Setup
Reset (Ripristino)
15VDC
SecureEasySetup
Consente di riavviare il gateway o ne ripristina le
impostazioni predefinite
• Per riavviare il gateway senza modificare le
impostazioni attuali, tenere premuto il tasto
Reset
per
1 secondo
• Per ripristinare le impostazioni predefinite di
sicurezza wireless del gateway, tenere premuto il tasto
Reset
per almeno 7 secondi.
Consente di collegare l'adattatore di alimentazione al
gateway
Attiva SecureEasySetup sul gateway
• Per attivare la funzione SecureEasySetup sul
gateway, tenere premuto il tasto
SecureEasySetup
per 1
secondo
• Per ripristinare le impostazioni di sicurezza wireless
predefinite (protezione disattivata), tenere premuto il
tasto
SecureEasySetup
per 7 secondi
Consente di collegare un'antenna al gateway
46
Page 51

Valori predefiniti
Wireless Ndx ADSL2+ Gateway presenta i seguenti valori predefiniti:
Italiano
! Indirizzo IP:
192.168.1.1
Requisiti del sistema
! Linea ADSL installata dal provider di servizi Internet
! Un computer con scheda Ethernet installata
! Browser Web compatibile con la versione HTML 4.01 con Javascript attivato
Istruzioni per l'installazione
Fase uno: collegamento dei microfiltri (se inclusi o richiesti dal
proprio ISP)
Il microfiltro consente di rimuovere le interferenze tra segnali vocali e segnali
ADSL. Se un microfiltro non è fornito con il gateway, richiedere al proprio ISP
se i dispositivi telefonici in uso ne richiedono l'utilizzo.
1. Collegare a un microfiltro il cavo di ciascun dispositivo telefonico in uso (telefono, fax, ecc.).
2. Collegare il microfiltro alla presa telefonica a muro.
Nota:non installare microfiltri sul cavo che collega il gateway alla presa
del telefono, a meno che non si utilizzi un microfiltro a doppia
connessione, sia per il telefono sia per il gateway.
47
Page 52

Italiano
Fase due: collegamento del gateway
1. Collegamento del gateway alla linea ADSL:
A. Collegare le antenne fornite in dotazione alla parte posteriore del gateway.
B. Collegare un'estremità del cavo telefonico in dotazione alla porta
gateway.
C. Collegare l'altra estremità alla presa a muro del telefono.
W
A
N
1
2
U
3
S
B
4
1
5
V
D
C
S
e
c
u
r
e
R
e
s
e
t
E
a
s
y
S
e
t
u
p
Nota:la porta USB del gateway consente di collegare unicamente la
stampante USB. Per istruzioni su come collegare la stampante
USB al gateway, vedere la sezione "Installazione della stampante
USB" a pagina 52.
ADSL del
2. Collegamento del gateway al computer:
A. Spegnere il computer.
B. Collegare un'estremità del cavo Ethernet in dotazione alla scheda
Ethernet del computer.
C. Collegare l'altra estremità a una delle porte
W
A
N
1
2
USB
3
4
15V
DC
S
e
c
u
re
Re
set
E
a
s
y
S
e
t
u
p
LAN del gateway.
3. Alimentazione della rete:
A. Collegare il cavo di alimentazione fornito in dotazione alla porta
gateway.
Nota:utenti nel Regno Unito: con l'alimentatore scollegato, collegare
la spina di alimentazione appropriata per il Paese. Prima di
collegare l'adattatore di alimentazione al gateway, premere fino a
che non si avverte uno scatto e la spina non è alloggiata in modo
stabile.
15VDC del
48
Page 53

Italiano
B. Inserire la spina dell'adattatore di alimentazione in una presa di corrente
standard.
W
A
N
1
2
US
3
B
4
1
5
VD
C
S
e
c
u
r
e
R
es
et
E
a
s
y
S
e
t
u
p
C. Accendere il computer.
Fase tre: configurazione del gateway con EasyConfigurator
Prima di accedere a Internet è necessario disporre di un servizio ADSL
e Internet attivo, fornito dalla società di servizi telefonici o da un ISP (fornitore
di Internet) locale. Potrebbe essere necessario richiedere alcune delle seguenti
informazioni al proprio ISP.
" Valori VPI/VCI
" Standard ADSL (modulazione)
" Modalità di incapsulamento
" Tipo di protocollo
" Autenticazione (PAP o CHAP) per connessioni PPP
" Indirizzo IP, nome utente e password, nel caso siano stati assegnati
dall'ISP
" Subnet mask, gateway e dati relativi al server DNS
1. Inserire il CD-ROM di installazione USRobotics nell'unità CD o DVD ROM
del computer ed eseguire una delle seguenti opzioni:
" Windows:
A. Se l'installazione non si avvia automaticamente, eseguire la procedura
manualmente, come indicata di seguito:
i) Windows Vista: fare clic su
Windows XP: fare clic su
Start, quindi su Computer.
Start, selezionare Risorse del computer.
Windows 2000, Me e 98SE: sul desktop, fare doppio clic su
Risorse del computer.
ii) Fare doppio clic sull'icona del CD-ROM.
B. Selezionare la lingua desiderata, quindi leggere il contratto di licenza e
fare clic su
C. Fare clic su
potrebbe richiedere fino a un minuto.
" Macintosh OS X: accedere al CD-ROM e fare doppio clic su
EasyConfigurator
un minuto.
OK.
Setup (Configurazione). L'avvio di EasyConfigurator
USRobotics
. L'avvio di EasyConfigurator potrebbe richiedere fino a
49
Page 54

Italiano
" Linux: accedere al CD-ROM e fare doppio clic su EasyConfigurator linux-
script
. L'avvio di EasyConfigurator potrebbe richiedere fino a un minuto.
3. Selezionare il proprio Paese e il provider di servizi Internet (ISP) dagli elenchi
a discesa presenti nella pagina Internet. Se il proprio Paese o ISP non compare
nell'elenco, selezionare
Other (Altro) e immettere manualmente le
impostazioni fornite dal proprio ISP.
Una volta effettuate le selezioni, potrebbe essere necessario inserire il nome
utente e la password per la connessione ADSL.
4. Fare clic su
5. Viene visualizzata la scheda
Save (Salva).
Status (Stato). Un messaggio nella parte superiore
della pagina indica se la connessione ADSL è stata stabilita. Se il messaggio
indica che la connessione ADSL non è stata stabilita, consultare la sezione
"Risoluzione di problemi" a pagina 56 di questa guida.
6. Fare clic sulla scheda
admin e fare clic su Save.
Nota:il nome utente
Login (Accesso), immettere una password per l'account
admin e la password inseriti verranno utilizzati per
le future connessioni al gateway.
7. Chiudere EasyConfigurator.
Per ulteriori informazioni su EasyConfigurator, consultare la Guida utente sul CDROM di installazione USRobotics.
Fase quattro: configurazione delle impostazioni di sicurezza wireless
1. Per configurare le impostazioni di sicurezza wireless, tenere premuto il tasto
SecureEasySetup sul retro del gateway per 1 secondo. In questo modo, la
sicurezza wireless verrà impostata su WPA2 and WPA (PSK) (WPA2 e
WPA - PSK) e vengono configurati un nome di rete e una password per la
rete wireless.
Avvertenza: se non si attiva un metodo di sicurezza wireless sul
gateway, la rete wireless non è protetta e dispositivi
wireless non autorizzati potrebbero collegarsi alla rete,
servirsi della connessione a Internet e accedere ai
computer in rete.
2. Se la connessione alla rete avviene in modalità wireless, è possibile scollegare
il cavo Ethernet dal gateway e dal computer, installare l'adattatore wireless
ed eseguire la connessione al gateway mediante connessione wireless.
Per istruzioni sull'installazione dell'adattatore wireless, consultare la
documentazione dello stesso.
50
Page 55

Italiano
Backup delle impostazioni di configurazione
Disponendo di un backup, in caso di ripristino delle impostazioni predefinite del
gateway, non sarà necessario modificare di nuovo le impostazioni di
configurazione per personalizzarle. USRobotics consiglia di eseguire subito il
backup delle impostazioni.
1. Dal computer, avviare un browser Web.
2. Nella barra degli indirizzi, digitare
192.168.1.1 e premere Invio per
accedere alle pagine di configurazione del gateway. Quando richiesto, digitare
nome utente e password del gateway.
3. Selezionare
Device (Dispositivo).
4. Fare clic su
5. Il sistema richiede di salvare o aprire il file. Selezionare
Back Up Settings (Esegui backup delle impostazioni) dal menu
Back Up.
Save (Salva).
Congratulazioni. La procedura di installazione è completa. Per controllare
la connessione a Internet, eseguire la registrazione di Wireless
Gateway all'indirizzo
www.usr.com/productreg/
.
N
dx ADSL2+
Configurazione aggiuntiva
Collegamento di client wireless installati
Utilizzando il tasto SecureEasySetup™ è possibile connettere Wireless Ndx e
altri dispositivi wireless certificati SecureEasySetup al gateway.
stato installato alcun adattatore wireless, consultare la relativa documentazione
per informazioni sull'installazione.
1
Se ancora non è
Se il client wireless è compatibile con SecureEasySetup, uno dei logo riportati di
seguito viene visualizzato sul dispositivo o nell'utilità client:
Se il dispositivo wireless non supporta SecureEasySetup, è tuttavia possibile
immettere manualmente le impostazioni di sicurezza wireless.
1 BROADCOM, SecureEasySetup e il logo SecureEasySetup sono marchi di fabbrica o marchi di
fabbrica registrati di Broadcom Corporation negli Stati Uniti e/o in altri Paesi.
51
Page 56

Italiano
Connessione tra un dispositivo SecureEasySetup e il gateway wireless
2
1. Premere il tasto SecureEasySetup sul retro del gateway per 1 secondo. Il LED
SecureEasySetup sulla parte anteriore del gateway inizia a lampeggiare.
2. Avviare SecureEasySetup nell'utilità client per l'adattatore wireless.
3. Il gateway e il dispositivo wireless sincronizzano le impostazioni di sicurezza
wireless e il dispositivo risulta in questo modo connesso al gateway in modo
sicuro.
Connessione manuale tra un dispositivo e il gateway wireless
Per ulteriori informazioni sulla modifica di modalità dell'adattatore o delle
impostazioni di sicurezza wireless, consultare la relativa documentazione.
1. Assicurarsi che l'adattatore wireless del dispositivo sia impostato sulla modalità Infrastructure (Infrastruttura).
2. Impostare il nome della rete, o SSID, tra le impostazioni dell'adattatore
wireless sul
Network name (Nome di rete) utilizzato dal gateway.
3. Se nel gateway si configurano impostazioni di sicurezza wireless, assicurarsi
che coincidano con le impostazioni di sicurezza dell'adattatore wireless.
Per visualizzare le impostazioni di sicurezza wireless del gateway:
1. Dal computer, avviare un browser Web, nella barra degli indirizzi digitare
192.168.1.1 e premere Invio.
2. Inserire il nome utente e la password del gateway, quindi fare clic su
3. Nelle pagine di configurazione del gateway, accedere al menu
Security
OK.
(Sicurezza) e selezionare Wireless per visualizzare le impostazioni di
sicurezza wireless.
Installazione della stampante USB
È possibile collegare una stampante USB a Wireless Ndx ADSL2+ Gateway e
usarla come stampante di rete se il sistema operativo e la stampante supportano
Internet Printing Protocol (IPP). Windows Server
e 2000 dispongono del supporto integrato per questa funzione. Rivolgersi al
®
2003, Windows® Vista, XP,
2 Per attivare SecureEasySetup sul gateway, è necessario attivare l'impostazione di protezione
wireless WPA2 and WPA (PSK) (WPA e WPA - PSK), la crittografia TKIP and AES (TKIP
e AES) e una chiave precondivisa WPA, solitamente chiamata Network key (Chiave di rete) WPA
key (Chiave WPA) o Pass phrase (Password). È possibile configurare le impostazioni manualmente
o premere il tasto SecureEasySetup per configurare le impostazioni wireless.
52
Page 57

Italiano
produttore della stampante per determinare se quest'ultima supporta il protocollo IPP.
Nota:quando viene usato con stampanti multifunzionali in grado di eseguire
scansioni e copie, Wireless
N
dx ADSL2+ Gateway supporta solo la
funzione di stampa. Per le funzioni di comunicazione bidirezionali,
come la scansione, collegare la stampante multifunzionale direttamente
al computer. I messaggi di avviso che richiedono di sostituire
l'inchiostro o aggiungere la carta non sono trasmessi da Wireless
N
dx
ADSL2+ Gateway al computer.
Per istruzioni sull'installazione della stampante per Windows Me e 98SE, Mac,
e per Linux, vedere la guida utente sul CD-ROM di installazione USRobotics.
Fase uno: installazione di una stampante locale
Nota:se la stampante è già stata installata su tutti i computer che la
utilizzeranno in rete, passare alla sezione “Fase due: recupero delle
informazioni sul server di stampa”.
Prima di collegare la stampante a Wireless
N
dx ADSL2+ Gateway, è importante
installare i driver forniti dal produttore della stampante su tutti i computer che la
useranno.
1. Collegare la stampante USB a una delle porte USB del computer.
2. Installare la stampante seguendo le istruzioni fornite con la stessa.
3. Stampare una pagina di prova per verificare il corretto funzionamento della
stampante.
4. Spegnere la stampante.
Fase due: recupero delle informazioni sul server di stampa
1. Scollegare la stampante dal computer e collegare l'estremità di forma rettan-
golare del cavo USB alla porta
ADSL 1234
USB
15VDC
Reset
USB di Wireless
Secure
Easy
Setup
N
dx ADSL2+ Gateway.
2. Accendere la stampante.
3. Dal computer, avviare un browser Web.
4. Nella barra degli indirizzi, digitare
accedere alle pagine di configurazione del gateway.
5. Inserire il nome utente e la password del gateway, quindi fare clic su
6. Dal menu
Device (Dispositivo), selezionare Printer Server (Server di stampa).
192.168.1.1 e premere Invio per
OK.
53
Page 58

Italiano
7. Compilare i campi Printer name (Nome stampante) e Comment (Commenti).
8. Annotare l'indirizzo indicato nel campo Printer Location (esempio:
http://192.168.1.1:1631/printers/My_Printer). Questo indirizzo è necessario per
configurare la stampante su tutti i computer che vi avranno accesso.
Fase tre: connessione dei computer al server di stampa USB wireless
Nota:questa operazione dovrà essere eseguita su tutti i computer in rete a cui
si desidera consentire l'accesso al server di stampa su Wireless
N
dx
ADSL2+ Gateway.
Windows Vista
1. Fare clic su Start > Pannello di controllo > Hardware e suoni > Stampanti.
2. Fare clic su
3. Selezionare il pulsante
stampante di rete, wireless o Bluetooth). Fare clic su
4. Fare clic su
Aggiungi stampante.
Add a network, wireless or Bluetooth printer (Aggiungi una
Next (Avanti).
The Printer That I Want Isn’t Listed (La stampante desiderata non è
presente nell'elenco).
5. Scegliere
Select a shared printer by name (Seleziona il nome di una stampante
condivisa) e, nel campo URL, inserire la posizione della stampante, registrata
durante la Fase due. Fare clic su
Next.
Nota:il campo URL rileva la distinzione tra maiuscole e minuscole.
Le informazioni devono pertanto essere inserite esattamente come
mostrato nella sezione
Printer location (Posizione stampante) della
pagina Status (Stato) del gateway.
6. Selezionare il produttore e il modello della stampante.
7. Inserire il nome della stampante che si desidera installare. Stampare una
pagina di prova, se necessario.
8. Fare clic su
Fine per completare la procedura di configurazione.
Windows XP e 2000
1. Eseguire una delle seguenti operazioni:
" Windows XP: fare clic su
" Windows 2000: fare clic su
2. Fare clic su
Aggiungi stampante.
3. Viene avviata la procedura guidata di installazione della stampante. Fare clic
su
Avanti.
4. Selezionare il pulsante di opzione
altro computer.
54
Fare clic su Avanti.
Start > Stampanti e fax.
Start > Impostazioni > Stampanti.
Stampante di rete o stampante collegata a un
Page 59

Italiano
5. Selezionare Connetti ad una stampante in Internet o della rete domestica o aziendale.
Nel campo URL, digitare la
configurazione del gateway. Fare clic su
posizione stampante copiata dalle pagine di
Avanti.
Nota:il campo URL rileva la distinzione tra maiuscole e minuscole.
Le informazioni devono pertanto essere inserite esattamente come
mostrato nella sezione
Printer location (Posizione stampante) della
pagina Status (Stato) del gateway.
6. Selezionare il produttore e il modello della stampante. Fare clic su
OK.
Nota:se la stampante non appare nell'elenco, significa che i driver non sono
stati installati correttamente. Ripetere la sezione "Fase uno:
installazione di una stampante locale" a pagina 53.
7. Quando viene richiesto, selezionare
Sì per configurare la stampante come
predefinita.
8. Fare clic su
Fine.
Fase quattro: verifica della connessione della stampante
1. Eseguire una delle seguenti operazioni:
" Windows Vista: Fare clic su
Stampanti.
>
" Windows XP: fare clic su
" Windows 2000: fare clic su
2. Fare clic con il pulsante destro del mouse sulla stampante e scegliere
3. Fare clic su
Stampa pagina di prova. La pagina di prova viene stampata.
Start > Pannello di controllo > Hardware e suoni
Start > Stampanti e fax.
Start > Impostazioni > Stampanti.
Proprietà.
Nota:se la pagina di prova non viene stampata, consultare la sezione
“Risoluzione di problemi” nella guida utente sul CD-ROM di
installazione USRobotics per informazioni aggiuntive.
55
Page 60

Italiano
Risoluzione di problemi
Questa procedura di base può risolvere alcuni problemi che potrebbero
verificarsi con il gateway:
1. Verificare che tutti i cavi Ethernet e il cavo di alimentazione siano collegati
correttamente, inclusi i cavi che collegano il gateway e tutti i computer della
rete. Vedere le illustrazioni della procedura di installazione a pagina 48.
2. Assicurarsi che la presa di corrente a cui è collegato il gateway sia
funzionante.
3. Fare riferimento alle descrizioni dei LED della presente guida, quindi
controllare i LED del gateway per verificare l'alimentazione e il
funzionamento delle porte. Vedere la descrizione dei LED a pagina 45.
4. Solo per la connessione wireless: la scarsa qualità o copertura di connessione
può dipendere da interferenze dovute a fattori ambientali, come vernici
contenenti piombo e pareti di cemento o ad alcune apparecchiature
elettroniche, come telefoni a 2,4 Ghz. Provare a spostare l'antenna del gateway
o a riposizionare i client wireless per migliorare la qualità della connessione.
5. Solo per la connessione wireless:
verificare che i dispositivi connessi al
gateway siano impostati sulla modalità Infrastructure (Infrastruttura).
Impostare il nome della rete, o SSID, tra le impostazioni dell'adattatore
wireless sul
Network name
(Nome di rete) utilizzato dal gateway e verificare
l'uso dello stesso tipo di protezione wireless. Consultare la documentazione
dell'adattatore wireless per determinare come modificare queste impostazioni.
Se si continuano a riscontrare problemi con il gateway, fare riferimento alla
sezione “Risoluzione di problemi” della guida utente sul CD-ROM di installazione
USRobotics.
EasyConfigurator non ha rilevato alcuna connessione a Internet.
Soluzione possibile
1. Accedere alla pagina Internet in EasyConfigurator.
Selezionare il Paese e l'ISP. Se il proprio provider di servizi non figura
nell'elenco, selezionare
informazioni di connessione. Potrebbe essere necessario richiedere alcune
delle seguenti informazioni al proprio ISP.
" Valori VPI/VCI
" Standard ADSL (modulazione)
" Modalità di incapsulamento
Other (Altri) per il Paese e immettere manualmente le
" Tipo di protocollo
" Autenticazione (PAP o CHAP) per connessioni PPP
" Indirizzo IP, nome utente e password, nel caso siano stati assegnati
dall'ISP
" Subnet mask, gateway e dati relativi al server DNS
2. In caso di dubbi sulle informazioni di connessione richieste, rivolgersi al
proprio ISP.
3. Fare clic su
56
Save (Salva).
Page 61

Impossibile accedere nuovamente a Internet.
Soluzione possibile:
Italiano
1. per riavviare il gateway, premere il tasto
Reset (Ripristino) sul retro dello
stesso per 1 secondo. Attendere che il gateway abbia completato il riavvio.
Nota:per ripristinare le impostazioni predefinite del gateway, tenere premuto
il tasto
Reset per 7 secondi.
2. Riavviare il computer. Attendere che il computer abbia completato il riavvio
e accedere a Internet.
3. Se non è ancora possibile accedere a Internet, fare riferimento alla sezione
Risoluzione di problemi della guida utente sul CD-ROM di installazione
USRobotics per istruzioni dettagliate.
SecureEasySetup non è in grado di configurare il client wireless.
Soluzione possibile:
Premere il tasto SecureEasySetup sul retro del gateway per 1 secondo; verificare
che il LED SecureEasySetup nella parte anteriore del gateway lampeggi prima di
avviare SecureEasySetup nell'utilità client dell'adattatore wireless.
Le pagine di configurazione del gateway non funzionano, ma è
comunque possibile accedere a Internet.
Soluzione possibile:
Per riavviare il gateway, premere il tasto Reset sul retro dello stesso per 1 secondo.
Se il problema persiste, tenere premuto il tasto
Reset per 7 secondi. In questo
modo verranno ripristinate le impostazioni predefinite del gateway. Se si
utilizzano impostazioni di configurazione personalizzate, sarà necessario definirle
nuovamente o ripristinarle (se è stato creato un file di backup).
Come si configura il gateway se ci si connette con una
console di gioco o con un dispositivo VoIP?
Soluzione possibile:
Se si desidera connettere una console di gioco o un dispositivo VoIP al gateway,
è necessario consentire l'accesso a porte specifiche per permettere ai dispositivi
di comunicare con Internet. Per eseguire questa operazione, accedere alla funzione
Port Triggering (Attivazione delle porte) dal menu Security (Sicurezza) delle
pagine di configurazione del gateway. Per informazioni dettagliate sull'attivazione
delle porte, consultare le sezioni “Configurazione” e “Procedure guidate” della
guida utente sul CD-ROM di installazione USRobotics.
57
Page 62

Italiano
Come si effettua la configurazione del firewall sul gateway?
Soluzione possibile:
Per modificare le impostazioni del firewall del gateway, accedere alle pagine di
configurazione del gateway e selezionare
menu
consultare le sezioni “Configurazione” e “Procedure guidate” della guida utente sul
CD-ROM di installazione USRobotics.
Internet. Per informazioni dettagliate sulle impostazioni del firewall,
WAN Setup (Impostazione WAN) dal
Informazioni aggiuntive
Per informazioni su conformità e garanzia, consultare la guida utente sul CD-
ROM di installazione USRobotics.
Per informazioni su funzionamento e configurazione, consultare la guida
utente sul CD-ROM di installazione USRobotics. La Guida utente contiene
informazioni dettagliate sull'uso e la configurazione di Wireless
Gateway.
N
dx ADSL2+
Per ulteriori informazioni sulla risoluzione dei problemi:
1. Consultare la guida utente sul CD-ROM di installazione USRobotics.
2. Visitare la sezione relativa al supporto tecnico del sito Web di USRobotics
all'indirizzo www.usr.com/support/
La maggior parte dei problemi riscontrati dai clienti è trattata nelle pagine
del sito Web che riportano le domande frequenti (FAQ) e la risoluzione
di problemi per Wireless
tecnico contengono informazioni sul firmware più recente ed eventuali
aggiornamenti della documentazione.
3. Inviare domande di carattere tecnico utilizzando il modulo online o
contattare direttamente l'assistenza clienti USRobotics.
4. Consultare l'ultima pagina di questa guida contenente le informazioni sul
servizio di assistenza.
N
dx ADSL2+ Gateway. Le pagine del supporto
.
58
Page 63

Español
Instalación
Contenido de la caja
Español
! USRobotics Wireless
N
dx ADSL2+ Gateway
! Fuente de alimentación de 15 V de CC ! Antenas extraíbles
! Cable Ethernet ! CD de instalación
! Cable de teléfono ! Guía breve de instalación
Características físicas
Parte frontal
La puerta de enlace cuenta con los siguientes LED de estado:
23
1
Símbolo Nombre Estado Condición
Alimentación
Apagado Sin recepción de corriente
Luz fija Recepción de corriente
4
WLAN
(red inalámbrica)
SecureEasySetup Apagado El modo SecureEasySetup no está
WAN
(Internet)
ADSL Apagado Sin conexión ADSL
Apagado La conexión inalámbrica está
desactivada
Luz fija La conexión inalámbrica está activada
Intermitente Enviando y recibiendo datos
preparado en la puerta de enlace
Luz fija El modo SecureEasySetup está
preparado
Intermitente Se ha establecido la comunicación
con dispositivos SecureEasySetup
Apagado No se ha establecido la conexión a
Internet o la puerta de enlace está en
modo de puente
Intermitente Enviando y recibiendo datos
Luz fija Conexión a Internet establecida
Luz fija Conexión ADSL establecida
Intermitente Se está estableciendo la conexión
ADSL
59
Page 64

Español
Símbolo Nombre Estado Condición
LAN
(de 1 a 4)
Apagado Sin conexión LAN
Luz fija Conexión LAN establecida
Intermitente Enviando y recibiendo datos
Impresora
Apagado No se ha detectado ninguna conexión
Luz fija Se ha detectado una conexión
Intermitente Envío de datos a la impresora
Parte trasera
ADSL 1234
Elemento Función
ADSL
LAN (de 1 a 4)
Conecta la puerta de enlace a la línea ADSL.
Conecta dispositivos adicionales a la puerta de enlace.
para la impresora
para la impresora
USB
Reset
15VDC
Secure
Easy
Setup
USB
Reset (Reinicio)
15VDC
SecureEasySetup
Conecta la puerta de enlace a una impresora USB.
Reinicia la puerta de enlace o restablece su configuración
original.
• Para reiniciar la puerta de enlace sin cambiar la
configuración actual, mantenga pulsado el botón
Reset
(Reinicio) durante un segundo.
• Para restablecer la configuración de fábrica de la
puerta de enlace, mantenga pulsado el botón
Reset
(Reinicio) durante al menos 7 segundos.
Conecta la fuente de alimentación a la puerta de enlace.
Activa SecureEasySetup en la puerta de enlace.
• Para activar SecureEasySetup en la puerta de enlace,
mantenga pulsado el botón
SecureEasySetup
durante un
segundo.
• Para restablecer la configuración de seguridad
inalámbrica original (funciones de seguridad
desactivadas), mantenga pulsado el botón
SecureEasySetup
durante 7 segundos.
Conecta una antena a la puerta de enlace.
60
Page 65

Valores predeterminados
Wireless Ndx ADSL2+ Gateway cuenta con los siguientes valores
predeterminados:
Español
! IP address (Dirección IP):
192.168.1.1
Requisitos del sistema
! Línea ADSL instalada por su proveedor de acceso a Internet
! Ordenador con un adaptador Ethernet instalado
! Navegador de Internet compatible con HTML 4.01 y JavaScript
Instrucciones de instalación
Paso 1: Conexión de los microfiltros (si están incluidos o si lo exige su
proveedor de acceso a Internet)
Los microfiltros eliminan las interferencias producidas entre las señales ADSL y
las de voz. Si la puerta de enlace no incluye uno, pregunte a su proveedor si
sus dispositivos telefónicos necesitan microfiltros.
1. Conecte el cable de cada dispositivo telefónico (teléfono, fax, etc.) a un
microfiltro.
2. Enchufe el microfiltro al cajetín de la línea telefónica.
Nota:No instale ningún microfiltro en el cable de conexión de la puerta de
enlace con el cajetín de la línea telefónica, salvo si el microfiltro se
conecta tanto con la puerta de enlace como con el teléfono.
61
Page 66

Español
Paso 2: Conexión de la puerta de enlace
1. Conecte la puerta de enlace a la línea ADSL:
A. Conecte las antenas suministradas en la parte trasera de la puerta de
enlace.
B. Conecte un extremo del cable telefónico al puerto
ADSL de la puerta de
enlace.
C. Conecte el otro extremo al cajetín de la red telefónica.
W
A
N
1
2
U
3
S
B
4
1
5
V
D
C
S
e
c
u
re
R
e
s
e
t
E
a
s
y
S
e
t
u
p
Nota:El puerto USB de la puerta de enlace solo se puede utilizar para
impresoras USB. Para obtener instrucciones sobre cómo conectar
una impresora USB a la puerta de enlace, consulte “Instalación de
una impresora USB” en la página 66.
2. Conecte la puerta de enlace al ordenador:
A. Apague el ordenador.
B. Conecte un extremo del cable Ethernet suministrado al adaptador
Ethernet del equipo.
C. Conecte el otro extremo a uno de los puertos
W
A
N
1
2
USB
3
4
15V
DC
S
e
c
u
re
Reset
E
a
s
y
S
e
t
u
p
LAN de la puerta de enlace.
3. Establezca la conexión de la red:
A. Conecte la fuente de alimentación suministrada al puerto
15VDC de la
puerta de enlace.
Nota:Usuarios residentes en el Reino Unido: Con la fuente de
alimentación desconectada, acople el enchufe adecuado al
adaptador de corriente. Antes de conectar la fuente de
alimentación a la puerta de enlace, presione con fuerza hasta que
oiga un clic y el enchufe quede firmemente ajustado.
62
Page 67

Español
B. Enchufe el adaptador a una toma de corriente estándar.
W
A
N
1
2
USB
3
4
15VDC
S
e
c
u
re
Reset
E
a
s
y
S
e
t
u
p
C. Encienda el ordenador.
Paso 3: Configuración de la puerta de enlace mediante EasyConfigurator
Debe contar con conexión a Internet y ADSL de su compañía telefónica o de su
proveedor de acceso a Internet (ISP) antes de conectarse a Internet. Es posible
que tenga que solicitarle a su proveedor de acceso a Internet (ISP) la siguiente
información:
" Valores VPI/VCI
" Estándar ADSL (modulación)
" Modo de encapsulado
" Tipo de protocolo
" Autenticación (PAP o CHAP) para conexiones PPP
" Dirección IP, nombre de usuario y contraseña en caso de que su
proveedor de acceso a Internet (ISP) se los haya proporcionado
" Información sobre el servidor DNS, la máscara de subred y la puerta de
enlace
1. Introduzca el CD de instalación de USRobotics en la unidad de CD-ROM o
de DVD del equipo y realice una de las siguientes acciones:
" Si es usuario de Windows:
A. Si la instalación no comienza automáticamente, puede iniciarla de
forma manual:
i) Si es usuario de Windows Vista : Haga clic en
Inicio > Equipo.
Si es usuario de Windows XP: Haga clic en
Si es usuario de Windows 2000, Me o 98SE: Haga doble clic en
el icono
ii) Haga doble clic en el icono de la unidad de CD-ROM.
B. Seleccione el idioma que prefiera. A continuación, lea el acuerdo de
licencia y haga clic en
C. Haga clic en
hasta un minuto en iniciarse.
" Si es usuario de Macintosh OS X: Abra el CD-ROM y haga doble clic en
USRobotics EasyConfigurator
en iniciarse.
" Si es usuario de Linux: Abra el CD-ROM y haga doble clic en
EasyConfigurator linux-script. Este programa puede tardar hasta un minuto
en iniciarse.
Inicio > Mi PC.
Mi PC que aparece en el escritorio.
OK (Aceptar).
Setup (Configuración). EasyConfigurator puede tardar
. Este programa puede tardar hasta un minuto
63
Page 68

Español
3. Seleccione su país y su proveedor de acceso a Internet (ISP) en las listas
desplegables de la página
elija
Other (Otro) e introduzca manualmente la configuración que le propor-
Internet. Si su país o su ISP no figuran en la lista,
cionó su ISP.
Es posible que, una vez realizada la selección, tenga que escribir el nombre de
usuario y la contraseña para su conexión ADSL.
4. Haga clic en
Save (Guardar).
5. A continuación, accederá a la ficha
Status (Estado). En la parte superior de la
página aparecerá un mensaje que indicará si se ha establecido la conexión
ADSL. Si el mensaje indica que no se existe ninguna conexión ADSL, consulte la sección “Solución de problemas” en la página 70 de esta guía.
6. Haga clic en la ficha
cuenta
admin y pulse Save (Guardar).
Nota:Necesitará el nombre de usuario
Login (Inicio de sesión), escriba una contraseña para la
admin y la contraseña cada vez
que vaya a conectarse a la puerta de enlace.
7. Cierre EasyConfigurator.
Si desea obtener instrucciones más detalladas sobre EasyConfigurator, consulte
la guía del usuario del CD de instalación de USRobotics.
Paso 4: Configuración de los parámetros de seguridad inalámbrica
1. Para configurar los parámetros de seguridad inalámbrica, mantenga pulsado
el botón de SecureEasySetup, situado en la parte trasera de la puerta de
enlace, durante un segundo. De esta manera se configurará el sistema de
seguridad inalámbrica WPA2 o WPA (PSK) y se establecerá una clave de red
o contraseña para su red inalámbrica.
Precaución:Deberá activar un método de seguridad inalámbrica en la
puerta de enlace para proteger su red inalámbrica. De lo
contrario, permitiría a dispositivos inalámbricos no
autorizados conectarse a su red, utilizar su conexión a
Internet y acceder a todos los ordenadores de la red.
2. Si tiene intención de establecer una conexión inalámbrica, puede desconectar
el cable Ethernet de la puerta de enlace y del ordenador, instalar un adaptador
inalámbrico y conectar el ordenador a su puerta de enlace mediante conexión
inalámbrica. Para obtener más información sobre la instalación del adaptador
inalámbrico, consulte las instrucciones del mismo.
64
Page 69

Español
Realización de copias de seguridad de los parámetros de configuración
Disponer de una copia de seguridad le facilitará la tarea de volver a aplicar los
parámetros de la puerta de enlace en el caso de que tenga que restablecer la
configuración original de la misma. USRobotics le recomienda que realice una
copia de seguridad de su configuración.
1. Abra el navegador de Internet.
2. En la barra de direcciones, escriba
192.168.1.1 y pulse Intro para acceder
a las páginas de configuración de la puerta de enlace. Cuando se indique,
introduzca el nombre de usuario y la contraseña de la puerta de enlace.
3. En el menú
Device (Dispositivo), seleccione Back Up Settings (Copia de seguri-
dad de la configuración).
4. Haga clic en
5. El sistema le indicará que debe abrir o guardar el archivo. Seleccione
Back Up (Copia de seguridad).
Save
(Guardar).
¡Enhorabuena! El proceso de instalación ha finalizado. Si registra Wireless
N
dx ADSL2+ Gateway en
www.usr.com/productreg/
, podrá comprobar el
funcionamiento de su conexión a Internet.
Configuración adicional
Conexión de clientes inalámbricos ya instalados
Podrá utilizar el botón SecureEasySetup™ para conectar a su puerta de enlace
Wireless
SecureEasySetup.
obtener más información sobre las instrucciones de instalación de otros
adaptadores inalámbricos.
N
dx y otros dispositivos inalámbricos homologados por
1
Consulte la documentación de su dispositivo inalámbrico para
Si el cliente inalámbrico dispone de SecureEasySetup, aparecerá uno de los
siguientes logotipos en el dispositivo o en el programa del cliente:
Si el dispositivo inalámbrico no dispone de SecureEasySetup, podrá acceder a la
configuración de seguridad inalámbrica de forma manual.
1 BROADCOM, SecureEasySetup y el logotipo de SecureEasySetup son marcas comerciales o mar-
cas comerciales registradas de Broadcom Corporation en Estados Unidos y otros países.
65
Page 70

Español
Conexión de un dispositivo SecureEasySetup a la Wireless Gateway
2
1. Mantenga pulsado el botón SecureEasySetup , situado en la parte trasera de la
puerta de enlace, durante un segundo. El LED de SecureEasySetup, situado
en la parte frontal de la puerta de enlace, comenzará a parpadear.
2. Inicie SecureEasySetup en el programa del cliente que utilizará para el adaptador inalámbrico.
3. Se sincronizará la configuración de seguridad inalámbrica de la puerta de
enlace y del adaptador inalámbrico, que deberá estar conectado correctamente a la puerta de enlace.
Conexión de un dispositivo a la Wireless Gateway
Si desea obtener más información sobre cómo cambiar el modo de
funcionamiento de su adaptador inalámbrico o la configuración de seguridad
inalámbrica, consulte la documentación del adaptador inalámbrico.
1. Asegúrese de que el adaptador inalámbrico del dispositivo está en el modo
Infrastructure (Infraestructura).
2. El nombre de red o SSID (
Network name) que aparece en la configuración del
adaptador inalámbrico debe coincidir con el de la puerta de enlace.
3. Si opta por dotar de seguridad inalámbrica a la puerta de enlace, asegúrese de
que los parámetros de seguridad del adaptador inalámbrico coinciden con los
que figuran en la puerta de enlace.
Para visualizar los parámetros de seguridad inalámbrica de la puerta de
enlace, siga los pasos siguientes:
1. Abra el navegador de Internet, escriba
192.168.1.1 en la barra de
direcciones y, a continuación, pulse Intro.
2. Introduzca el nombre de usuario, la contraseña de la puerta de enlace y
haga clic en
OK (Aceptar).
3. En las páginas de configuración de la puerta de enlace, acceda al menú
Security (Seguridad) y seleccione Wireless (Configuración inalámbrica) para
visualizar los parámetros de seguridad inalámbrica.
Instalación de una impresora USB
Si el sistema operativo y la impresora son compatibles con el protocolo de impresión
por Internet (IPP), podrá conectar una impresora USB a la Wireless
Gateway y utilizarla como impresora de red. Windows Server
®
N
dx ADSL2+
2003, Windows®
2 Para que la función SecureEasySetup de la puerta de enlace, esté activada, debe seleccionar
WPA2 and WPA (PSK) (WPA2 y WPA, PSK) con cifrado TKIP and AES (TKIP y AES) como
método de seguridad inalámbrica, y una clave WPA compartida previamente (que suele recibir el
nombre de clave de red, clave WPA o contraseña). Podrá establecer los parámetros de forma manual o
mediante el botón SecureEasySetup para realizar la configuración inalámbrica.
66
Page 71

Español
Vista, XP, y Windows 2000 incorporan esta función. Para saber si su impresora es
compatible con el protocolo IPP, póngase en contacto con el fabricante.
Nota:Si se utiliza con impresoras multifunción que pueden escanear y copiar,
N
la Wireless
dx ADSL2+ Gateway solo es compatible con la función
de impresión. Para funciones de comunicación bidireccional, como el
escaneado, conecte la impresora multifunción directamente al
ordenador. La Wireless
N
dx ADSL2+ Gateway no enviará avisos
(poca tinta, falta papel, etc.) al ordenador.
Si desea obtener instrucciones sobre la instalación de impresoras para Windows
Me y 98SE, Mac y Linux, consulte la Guía del usuario del CD de instalación de
USRobotics.
Paso 1: Instalación de una impresora local
Nota:Si la impresora ya está instalada en todos los ordenadores que la
utilizarán en la red, pase directamente al “Paso 2: Datos del servidor de
impresión”.
Antes de conectar la impresora a la Wireless
N
dx ADSL2+ Gateway deberá
instalar los controladores suministrados por el fabricante en todos los
ordenadores desde los que desee imprimir.
1. Conecte la impresora USB a uno de los puertos USB del ordenador.
2. Instale la impresora siguiendo las instrucciones de instalación suministradas
con la misma.
3. Imprima una página de prueba para comprobar que la impresora funciona
correctamente.
4. Apague la impresora.
Paso 2: Datos del servidor de impresión
1. Desconecte la impresora del ordenador y conecte el extremo rectangular
estrecho del cable USB en el puerto
USB de la Wireless
N
dx ADSL2+
Gateway.
ADSL 1234
USB
Secure
Easy
15VDC
Setup
Reset
2. Encienda la impresora.
3. Abra el navegador de Internet.
4. En la barra de direcciones, escriba
a las páginas de configuración de la puerta de enlace.
5. Introduzca el nombre de usuario y la contraseña de la puerta de enlace y haga
clic en
OK (Aceptar).
192.168.1.1 y pulse Intro para acceder
67
Page 72

Español
6. En el menú Device (Dispositivo), seleccione Printer Server (Servidor de
impresión).
7. Rellene los campos
Printer name (Nombre de impresora) y Comment (Comen-
tario).
8. Anote la dirección de la ubicación de la impresora (por ejemplo:
http://192.168.1.1:1631/printers/My_Printer). Necesitará esta dirección para con-
figurar la impresora en los ordenadores de la red que desea que tengan acceso
a la misma.
Paso 3: Conexión de ordenadores al Wireless USB Print Server
Nota:Deberá seguir este procedimiento con todos los ordenadores de la red,
para que estos puedan imprimir mediante el servidor de impresión de
la Wireless
Windows Vista
N
dx ADSL2+ Gateway.
1. Haga clic en el botón de Windows Inicio > Panel de control > Hardware y sonido
>
Impresoras.
2. Haga clic en
3. Active la opción
inalámbrica o Bluetooth). Haga clic en
4. Haga clic en
Agregar impresora.
Add a network, wireless or Bluetooth printer (Impresora de red,
Siguiente.
The Printer That I Want Isn’t Listed (La impresora que deseo conec-
tar no está incluida en la lista).
5. Elija
Select a shared printer by name (Seleccionar una impresora compartida por
nombre) y, en el campo URL, escriba la ubicación de la impresora introducida en el paso 2. Haga clic en
Next (Siguiente).
Nota:La información del URL distingue entre mayúsculas y minúsculas, por
lo que debe introducirse exactamente de la misma manera en que se
muestra en la sección
Printer location (Ubicación de la impresora) de la
página Status (Estado) de la puerta de enlace.
6. Seleccione la marca y el modelo de la impresora.
7. Introduzca el nombre, la localización y la descripción de la impresora que
está instalando y haga clic en
Siguiente. Cuando se le pregunte, podrá optar
por imprimir una página de prueba.
8. Haga clic en
Windows XP o 2000
Finalizar para completar la configuración.
1. Siga uno de los dos pasos siguientes:
" Si es usuario de Windows XP: Haga clic en
" Si es usuario de Windows 2000: Haga clic en
Impresoras.
2. Haga clic en
Agregar impresora.
Inicio > Impresoras y faxes.
Inicio > Configuración >
3. Se iniciará el asistente para agregar impresora. Haga clic en
68
Siguiente.
Page 73

Español
4. Active la opción Una impresora de red o una impresora conectada a otro equipo.
Haga clic en
Siguiente.
5. Seleccione
En el campo URL, especifique en la sección
Conectar a una impresora en Internet o en su red doméstica u organización.
Printer location la ubicación de la
impresora que copió al consultar las páginas de configuración de la puerta de
enlace. Haga clic en
Siguiente.
Nota:La información del URL distingue entre mayúsculas y minúsculas, por
lo que debe introducirse exactamente de la misma manera en que se
muestra en la sección
Printer location (Ubicación de la impresora) de la
página Status (Estado) de la puerta de enlace.
6. Seleccione la marca y el modelo de la impresora y haga clic en
OK (Aceptar).
Nota:Si su impresora no figura en esta lista, los controladores de la
impresora no se habrán instalado correctamente. Repita el “Paso 1:
Instalación de una impresora local” en la página 67.
7. Cuando se le pida, seleccione
Sí para indicar que esta será la impresora por
defecto.
8. Haga clic en
Finalizar.
Paso 4: Comprobación de la conexión de la impresora
1. Siga uno de los dos pasos siguientes:
" Si es usuario de Windows Vista:Haga clic en el botón de Windows
Inicio > Panel de control > Hardware y sonido > Impresoras.
" Si es usuario de Windows XP: Haga clic en
" Si es usuario de Windows 2000: Haga clic en
Impresoras.
Inicio > Impresoras y faxes.
Inicio > Configuración >
2. Haga clic con el botón derecho del ratón en el icono de la impresora y selec-
cione
3. Haga clic en
Propiedades.
Imprimir página de prueba. La página de prueba debería imprimirse
correctamente.
Nota:En caso contrario, consulte la sección “Solución de problemas” de la
Guía del usuario del CD de instalación de USRobotics para obtener más
información.
69
Page 74

Español
Solución de problemas
Este procedimiento básico puede aplicarse para solucionar algunos de los
problemas que pueden surgir al utilizar la puerta de enlace:
1. Asegúrese de que todos los cables Ethernet y el cable de alimentación están
bien conectados, así como los cables a la puerta de enlace y a todos los
ordenadores de la red. Consulte las ilustraciones de la instalación de la
página 62.
2. Asegúrese de que la toma a la que está conectada la puerta de enlace recibe
corriente.
3. Consulte las descripciones de los LED incluidas en esta guía y compruebe el
estado de los indicadores LED de la puerta de enlace para asegurarse de que
recibe corriente de la toma y que todos los puertos funcionan correctamente.
Consulte las descripciones de los LED en la página 59.
4. Información exclusiva para conexiones inalámbricas
: La mala calidad de la
conexión o del alcance se puede deber a interferencias del entorno, como las
producidas por la pintura metalizada, las paredes de hormigón o algunos dispositivos electrónicos (como los teléfonos de 2,4 GHz). Para mejorar la calidad de la conexión, pruebe a mover la antena de la puerta de enlace o a
cambiar los clientes inalámbricos de sitio.
5. Información exclusiva para conexiones inalámbricas:
Compruebe que todos
los dispositivos conectados a la puerta de enlace están configurados en modo
Infrastructure (Infraestructura). El nombre de red o SSID (
Network name) que
aparece en la configuración del adaptador inalámbrico debe coincidir con el
de la puerta de enlace. Compruebe, además, que el tipo de seguridad inalámbrica es el mismo en ambos casos. Consulte el manual del adaptador inalámbrico para averiguar cómo se cambian estos parámetros.
Si sigue sin poder utilizar la puerta de enlace, consulte la sección “Solución de
problemas”de la Guía del usuario del CD de instalación de USRobotics.
EasyConfigurator no detectó mi conexión a Internet.
Solución:
1. Acceda a la página Internet de EasyConfigurator.
Seleccione el país y el proveedor de acceso. Si su proveedor no aparece en la lista,
seleccione
Es posible que tenga que solicitarle a su proveedor de acceso a Internet (ISP) la
siguiente información:
" Valores VPI/VCI
" Estándar ADSL (modulación)
" Modo de encapsulado
" Tipo de protocolo
" Autenticación (PAP o CHAP) para conexiones PPP
" Dirección IP, nombre de usuario y contraseña en caso de que su
" Información sobre el servidor DNS, la máscara de subred y la puerta de
Other (Otro) e introduzca, de forma manual, los datos de la conexión.
proveedor de acceso a Internet (ISP) se los haya proporcionado
enlace
70
Page 75

Español
2. Si no está seguro acerca de los datos de la conexión que solicita el asistente,
póngase en contacto con su proveedor de acceso a Internet.
3. Haga clic en
Save (Guardar).
No puedo acceder a Internet.
Solución:
1. Para reiniciar la puerta de enlace mantenga pulsado el botón
Reset (Reinicio),
situado en la parte trasera de la puerta de enlace, durante un segundo. Espere
hasta que la puerta de enlace se haya reiniciado completamente.
Nota:Si mantiene pulsado el botón
Reset (Reinicio) durante 7 segundos, la
puerta de enlace recuperará la configuración original.
2. Reinicie el ordenador. Espere hasta que se haya reiniciado completamente e
intente acceder a Internet.
3. Si el problema persiste, consulte la sección Solución de problemas de la Guía del
usuario del CD de instalación de USRobotics para obtener más información
sobre las posibles formas de resolver este problema.
SecureEasySetup no ha podido efectuar la configuración de mi
cliente inalámbrico.
Solución:
Mantenga pulsado el botón SecureEasySetup situado en la parte trasera de la
puerta de enlace durante un segundo. A continuación, antes de iniciar
SecureEasySetup en el programa del cliente que utilizará para el adaptador
inalámbrico, compruebe que el LED de SecureEasySetup situado en la parte
frontal de la puerta de enlace parpadea.
Las páginas de configuración de la puerta de enlace no funcionan
correctamente, pero aún puedo acceder a Internet.
Solución:
Mantenga pulsado el botón Reset (Reinicio) de la puerta de enlace durante un
segundo para reiniciarla. Si aún no puede acceder a las páginas de configuración
de la puerta de enlace, mantenga pulsado el botón
Reset (Reinicio) durante 7
segundos. De esta manera, se restablecerán los valores originales de la puerta de
enlace. Si cambió algún ajuste, deberá modificarlo de nuevo o restablecer los
valores mediante la copia de seguridad de la configuración.
¿Cómo configuro la puerta de enlace si voy a conectar una
videoconsola o un dispositivo VoIP?
Solución:
Para conectar un dispositivo VoIP o una videoconsola a la puerta de enlace,
deberá habilitar el acceso a puertos concretos. De este modo, los dispositivos
podrán acceder a Internet. Para ello, acceda al menú
Security (Seguridad) de las
71
Page 76

Español
páginas de configuración de la puerta de enlace y elija la opción Port Triggering
(Activación de puertos). Consulte los apartados Configuración y Guías de la Guía
del usuario del CD de instalación de USRobotics para obtener más información
sobre esta función.
¿Cómo puedo configurar el cortafuegos en la puerta de
enlace?
Solución:
En las páginas de configuración de la puerta de enlace, vaya al menú
elija la opción
configuración del cortafuegos de la puerta de enlace. Consulte los apartados
Configuración y Guías de la Guía del usuario del CD de instalación de USRobotics
para obtener más información sobre esta función.
WAN Setup (Configuración WAN) para acceder a los parámetros de
Internet y
Información adicional
Consulte la Guía del usuario del CD de instalación de USRobotics para obtener
información sobre las condiciones de la garantía o la adecuación a las
normas del sector.
Consulte la Guía del usuario del CD de instalación de USRobotics para obtener
información sobre el funcionamiento y la configuración. En la guía del
usuario encontrará información pormenorizada sobre el uso y la configuración
de la Wireless
Si desea obtener más información sobre el dispositivo y la solución de
problemas, consulte:
1. La Guía del usuario del CD de instalación de USRobotics.
2. La sección de asistencia técnica del sitio Web de USRobotics:
www.usr.com/support/
N
dx ADSL2+ Gateway.
Las páginas de preguntas más frecuentes y solución de problemas de la
Wireless
problemas que experimentan los usuarios. Asimismo, el sitio Web de
asistencia técnica contiene información sobre el firmware más reciente y las
actualizaciones de la documentación.
3. Si tiene dudas sobre cuestiones técnicas, envíe sus preguntas por medio de un
formulario en línea o póngase en contacto con el equipo de asistencia técnica
de USRobotics.
4. La información de contacto de los servicios de asistencia que aparecen en la
última página de esta guía.
72
N
dx ADSL2+ Gateway, en las que se incluyen la mayoría de los
Page 77

Nederlands
Installatie
Inhoud verpakking
Nederlands
! USRobotics Wireless
N
dx ADSL2+ Gateway
! 15 VDC stroomtoevoer ! Afneembare antennes
! Ethernet-kabel ! Installatie-cd
! Telefoonkabel ! Beknopte installatiegids
Producteigenschappen
Voorzijde
De gateway heeft de volgende statuslampjes:
23
1
Symbool Naam Status Situatie
Voeding
Uit Ontvangt geen stroom.
Aan Ontvangt stroom.
4
WLAN
(draadloos
netwerk)
SecureEasySetup Uit SecureEasySetup is niet gereed op de
WAN (Wide Area
Network)
(internet)
ADSL Uit Geen ADSL-verbinding.
Uit Draadloze verbinding is uitgeschakeld.
Aan Draadloze verbinding is ingeschakeld.
Knippert Er worden gegevens verzonden of
ontvangen.
gateway.
Aan SecureEasySetup is gereed.
Knippert Er wordt met de SecureEasySetup-
apparaten gecommuniceerd.
Uit Er is geen internetverbinding tot stand
gebracht of de gateway staat in de
Bridge mode (Modus Bridge).
Knippert Er worden gegevens verzonden of
ontvangen.
Aan Internetverbinding wordt tot stand
gebracht.
Aan ADSL-verbinding tot stand gebracht.
Knippert Er wordt een ADSL-verbinding tot stand
gebracht.
73
Page 78

Nederlands
Symbool Naam Status Situatie
LAN
(1 t/m 4)
Uit Geen LAN-verbinding.
Aan LAN-verbinding wordt tot stand
Knippert Er worden gegevens verzonden of
Printer
Uit Er is geen verbinding met de printer
Aan Er is een verbinding met de printer
Knippert Er worden gegevens naar de printer
Achterzijde
ADSL 1234
Item Functie
ADSL
Voor aansluiting van de gateway op de ADSL-lijn.
gebracht
ontvangen.
gedetecteerd.
gedetecteerd.
verzonden.
USB
Reset
15VDC
Secure
Easy
Setup
LAN 1 t/m 4
USB
Reset
15 VDC
SecureEasySetup
Voor de aansluiting van extra apparaten op de
gateway.
Voor de aansluiting van de gateway op een USBprinter.
Hiermee kunt u de gateway opnieuw opstarten of de
fabrieksinstellingen van de gateway herstellen.
• Houd de
Reset
-knop 1 seconde ingedrukt om de
gateway opnieuw op te starten zonder de huidige
instellingen te wijzigen.
• Houd de
Reset
-knop minimaal 7 seconden ingedrukt
om de fabrieksinstellingen van de gateway te
herstellen.
Voor aansluiting van de netvoedingsadapter op de
gateway.
Hiermee wordt SecureEasySetup op de gateway
ingeschakeld.
• Houd als u SecureEasySetup op de gateway wilt
inschakelen de
SecureEasySetup
-knop 1 seconde
ingedrukt.
• Houd de
SecureEasySetup
-knop 7 seconden
ingedrukt als u de fabrieksinstellingen voor de
draadloze beveiligingsinstellingen wilt herstellen
(geen beveiliging ingeschakeld).
Voor de aansluiting van een antenne op de gateway.
74
Page 79

Standaardinstellingen
Hieronder staan de standaardinstellingen van de Wireless Ndx ADSL2+
Gateway:
Nederlands
! IP-adres:
192.168.1.1
Systeemvereisten
! Een door een Internet Service Provider geïnstalleerde ADSL-lijn
! Een computer met een geïnstalleerde Ethernet-adapter
! Een met HTML 4.01 compatibele webbrowser waarop JavaScript is
ingeschakeld
Aanwijzingen voor installatie
Stap één: microfilter(s) aansluiten (indien meegeleverd of vereist door
uw ISP)
Een microfilter verwijdert de storing tussen spraak- en ADSL-signalen. Als er
geen microfilter met de gateway is meegeleverd, dient u uw ISP te vragen of er
microfilters nodig zijn voor uw telefonie-apparatuur.
1. Sluit de kabel van elk telefonie-apparaat (telefoon, fax, etc.) aan op een
microfilter.
2. Sluit het microfilter aan op de telefoonaansluiting in de muur.
Opmerking:sluit alleen een microfilter aan op de kabel waarmee de
gateway op de telefoonaansluiting wordt aangesloten als u een
microfilter met twee aansluitingen hebt, een voor de gateway
en een voor de telefoon.
75
Page 80

Nederlands
Stap twee: de gateway aansluiten
1. Sluit de gateway op de ADSL-lijn aan:
A. Sluit de meegeleverde antennes aan op de achterzijde van de gateway.
B. Sluit een uiteinde van de meegeleverde telefoonkabel aan op de
poort van de gateway.
C. Sluit het andere uiteinde van de telefoonkabel aan op de
telefoonaansluiting in de muur.
W
A
N
1
2
U
3
S
B
4
1
5
V
D
C
S
e
c
u
re
R
e
s
e
t
E
a
s
y
S
e
t
u
p
Opmerking:de USB-poort van de gateway is alleen bedoeld voor de
aansluiting van een USB-printer. Raadpleeg “Een USBprinter installeren” op pagina 80 voor instructies over de
aansluiting van een USB-printer op de gateway.
ADSL-
2. Sluit de gateway aan op uw computer:
A. Schakel de computer uit.
B. Sluit één uiteinde van de meegeleverde Ethernet-kabel aan op de
Ethernet-adapter van uw computer.
C. Sluit het andere uiteinde aan op een van de
W
A
N
1
2
USB
3
4
15
VDC
S
e
c
u
re
Reset
E
a
s
y
S
e
t
u
p
LAN-poorten van de gateway.
3. Schakel het netwerk in:
A. Sluit de meegeleverde netvoedingsadapter aan op de
15 VDC-poort van de
gateway.
Opmerking:gebruikers in Groot-Brittannië: sluit als de
netvoedingsadapter niet in het stopcontact steekt de juiste
stekker voor uw land op de netvoedingsadapter aan.
Oefen voldoende druk uit totdat u een klik hoort en zorg
ervoor dat de stekker stevig vastzit voordat u de
netvoedingsadapter op de gateway aansluit.
76
Page 81

Nederlands
B. Sluit de netvoedingsadapter aan op een gewoon stopcontact.
W
A
N
1
2
U
3
S
B
4
15
V
D
C
S
e
c
u
r
e
Re
se
t
E
a
s
y
S
e
t
u
p
C. Schakel uw computer in.
Stap drie: de gateway met de EasyConfigurator configureren
Voordat u het internet op gaat, dient de ADSL- en internetservice van uw lokale
telefoniebedrijf of Internet Service Provider (ISP) actief te zijn. Vraag uw ISP om
de volgende informatie:
" VPI/VCI-waarden
" ADSL-norm (modulatie)
" Isolatiemodus
" Protocoltype
" Verificatie (PAP of CHAP) voor PPP-verbindingen
" IP-adres, gebruikersnaam en wachtwoord (als uw ISP deze aan u heeft
toegewezen)
" Informatie over het subnetmasker, de gateway en de DNS-server
1. Plaats de installatie-cd van USRobotics in het cd- of dvd-station van de
computer en voer een van de onderstaande procedures uit:
" Windows:
A. Indien de cd niet automatisch begint, kunt u deze als volgt handmatig
starten:
i) Windows Vista: klik op
Windows XP: klik in Windows op
Windows 2000, Me en 98SE: dubbelklik op
Start. Klik vervolgens op Computer.
Start > Deze computer.
Deze computer.
ii) En dubbelklik vervolgens op uw cd-station.
B. Selecteer de door u gewenste taal, lees de licentieovereenkomst en klik
vervolgens op
OK.
C. Klik op
Setup (Instellen). Het kan ongeveer een minuut duren voordat
de EasyConfigurator is opgestart.
" Macintosh OS X: open de cd en dubbelklik op
EasyConfigurator
EasyConfigurator is opgestart.
" Linux: open de cd en dubbelklik op
ongeveer een minuut duren voordat de EasyConfigurator is opgestart.
USRobotics
. Het kan ongeveer een minuut duren voordat de
EasyConfigurator linux-script. Het kan
77
Page 82

Nederlands
3. Selecteer uw land en uw Internet Service Provider (ISP) in de
vervolgkeuzelijsten op de pagina
niet in de lijst voorkomt, kunt u
Internet (Internet). Indien uw land of ISP
Other (Anders) selecteren voor het land en de
instellingen van uw ISP handmatig invoeren.
Mogelijk dient u nadat u uw keuzes hebt gemaakt de gebruikersnaam en het
wachtwoord voor de ADSL-verbinding in te voeren.
4. Klik op
5. Het tabblad
Save (Opslaan).
Status (Status) wordt weergegeven. In een bericht bovenaan de
pagina wordt aangegeven of de ADSL-verbinding tot stand is gebracht. Als
het bericht aangeeft dat de ADSL-verbinding niet tot stand is gebracht, dient
u het gedeelte “Problemen oplossen” op pagina 84 van deze handleiding te
raadplegen.
6. Klik op het tabblad
admin-account in en klik op Save (Opslaan).
Opmerking:voortaan dient u de gebruikersnaam
Login (Aanmelden), voer het wachtwoord voor de
admin en het door u
ingevoerde wachtwoord te gebruiken als u zich bij de
gateway aanmeldt.
7. Sluit de EasyConfigurator.
Raadpleeg voor meer informatie over de EasyConfigurator de gebruikershandleiding
op de installatie-cd van USRobotics.
Stap vier: de draadloze beveiligingsinstellingen configureren
1. Druk om de draadloze beveiligingsinstellingen te configureren de
SecureEasySetup-knop aan de achterzijde van de gateway 1 seconde in. Op
deze manier wordt de draadloze beveiligingsmethode WPA2 en WPA (PSK)
ingesteld. Ook wordt er een coderingstekenreeks/netwerksleutel voor uw
draadloze netwerk geconfigureerd.
Waarschuwing:
2. Als u deze computer via een draadloze verbinding op uw netwerk wilt
aansluiten, kunt u nu de Ethernet-kabel van de gateway en de computer
loskoppelen. Installeer vervolgens een draadloze adapter en sluit de computer
via een draadloze verbinding op de gateway aan. Raadpleeg voor instructies
bij de installatie van de draadloze adapter de documentatie van de draadloze
adapter.
78
als u geen draadloze beveiligingsmethode op de
gateway instelt, is uw draadloze netwerk niet
beveiligd. Dit betekent dat onbevoegde draadloze
apparaten verbinding met uw netwerk kunnen maken,
uw internetverbinding kunnen gebruiken en toegang
tot computers op het netwerk kunnen krijgen.
Page 83

Nederlands
Een back-up van de configuratie-instellingen maken
Een back-up maakt het gemakkelijker om uw configuratie-instellingen opnieuw
toe te passen nadat u om welke reden dan ook de fabrieksinstellingen van de
gateway hebt hersteld. USRobotics beveelt u aan nu een back-up van de
instellingen te maken.
1. Start op de computer een webbrowser.
2. Voer
192.168.1.1 op de locatie- of adresregel in en druk op ENTER om
naar de configuratiepagina's van de gateway te gaan. Voer als daar om wordt
gevraagd de gebruikersnaam en het wachtwoord van de gateway in.
3. Selecteer
Device (Apparaat).
4. Klik op
5. Het systeem vraagt u of u het bestand wilt opslaan of openen. Selecteer
Back Up Settings (Back-up van instellingen maken) in het menu
Back Up (Back-up).
Save
(Opslaan).
Gefeliciteerd. U hebt de installatieprocedure met succes voltooid. U kunt
uw internetverbinding verifiëren door uw Wireless
registreren op
www.usr.com/productreg/
.
N
dx ADSL2+ Gateway te
Aanvullende
configuratiegegevens
Verbinding maken met geïnstalleerde draadloze clients
Met de SecureEasySetup™-knop kunt u een verbinding tot stand brengen tussen
de gateway en geïnstalleerde Wireless
gecertificeerde draadloze apparaten.
adapters wilt installeren de documentatie bij het draadloze apparaat voor
installatie-instructies.
Als uw draadloze client over SecureEasySetup beschikt, dient een van de
volgende logo's op het apparaat of in het hulpprogramma van de client te staan:
Als uw draadloze apparaat SecureEasySetup niet ondersteunt, kunt u de
beveiligingsinstellingen voor uw draadloze netwerk handmatig invoeren.
1 BROADCOM, SecureEasySetup en het SecureEasySetup-logo zijn handelsmerken of gede-
poneerde handelsmerken van Broadcom Corporation in de Verenigde Staten en/of andere landen.
N
dx of andere door SecureEasySetup
1
Raadpleeg als u nog meer draadloze
79
Page 84

Nederlands
Een verbinding tot stand brengen tussen een SecureEasySetup-apparaat
en de draadloze gateway:
2
1. Houd de SecureEasySetup-knop op de achterzijde van de gateway 1 seconde
ingedrukt. Het SecureEasySetup-lampje op de voorzijde van de gateway
begint te knipperen.
2. Start SecureEasySetup in het hulpprogramma van de client voor uw
draadloze adapter.
3.
De
gateway
en de draadloze adapter synchroniseren de draadloze beveiligings-
instellingen. Het apparaat heeft nu een veilige verbinding met de gateway.
Handmatig een verbinding tussen een apparaat en de draadloze gateway
tot stand brengen:
Raadpleeg de documentatie bij de draadloze adapter voor meer informatie over
het wijzigen van de beveiligingsinstellingen of de bedrijfsmodus van de adapter.
1. Zorg ervoor dat de draadloze adapter in het apparaat op de modus
Infrastructure (Infrastructuur) is ingesteld.
2. Voer bij de instellingen van de draadloze adapter als netwerknaam of SSID de
Network name (Netwerknaam) in die door de gateway wordt gebruikt.
3. Als u op de gateway draadloze beveiliging hebt ingesteld, dient u ervoor te
zorgen dat de beveiligingsinstellingen van de draadloze adapter
overeenkomen met die van de gateway.
De draadloze beveiligingsinstellingen van de gateway bekijken:
1. Start een webbrowser op de computer en voer
192.168.1.1 op de
locatie- of adresregel in. Druk vervolgens op ENTER.
2. Voer de gebruikersnaam en het wachtwoord van de gateway in en klik op OK.
3. Ga in de configuratiepagina's van de gateway naar het menu Security
(Beveiliging) en selecteer
Wireless (Draadloos) om uw draadloze
beveiligingsinstellingen te bekijken.
Een USB-printer installeren
Er kan een USB-printer op de Wireless Ndx ADSL2+ Gateway worden
aangesloten en deze kan als netwerkprinter worden gebruikt, als zowel uw
besturingssysteem als uw printer het Internet Printing Protocol (IPP)
ondersteunen. In Windows Server
2000 is ondersteuning voor deze functie ingebouwd. Neem contact op met de
fabrikant van uw printer als u wilt weten of uw printer IPP ondersteunt.
®
2003, Windows® Vista, XP en Windows
2 Om SecureEasySetup op de gateway te kunnen gebruiken, dient deze te worden ingesteld op de
draadloze beveiligingsmethode WPA2 and WPA (PSK) (WPA2 en WPA (PSK)) met de codering
TKIP and AES (TKIP en AES) en een vooraf gedeelde WPA-sleutel (ook vaak een netwerksleutel,
WPA-sleutel of coderingstekenreeks genoemd). U kunt de instellingen handmatig configureren of op de
knop SecureEasySetup drukken om de instellingen van uw draadloze netwerk te configureren.
80
Page 85

Nederlands
Opmerking:
als de Wireless Ndx ADSL2+ Gateway met multifunctionele
printers wordt gebruikt die ook kunnen scannen en kopiëren,
ondersteunt deze gateway alleen afdrukken. Sluit de multifunctionele printer voor bidirectionele communicatiefuncties, zoals
scannen, rechtstreeks op de computer aan. Berichten over het
bijvullen van inkt of papier worden niet van de Wireless
N
dx
ADSL2+ Gateway naar de computer verzonden.
Raadpleeg voor instructies over de installatie van een printer voor Windows Me en
98SE, Mac en Linux de
Gebruikershandleiding
op de installatie-cd van USRobotics.
Stap 1: een lokale printer installeren
Opmerking:
ga als de printer reeds op alle computers is geïnstalleerd die er
gebruik van maken wanneer deze met het netwerk is verbonden
naar “Stap één: gegevens van de printserver ophalen”.
Voordat u de printer op de Wireless
N
dx ADSL2+ Gateway aansluit, dient u de
door de fabrikant van de printer verstrekte stuurprogramma's te installeren op
alle computers die de printer moeten gebruiken.
1. Sluit uw USB-printer aan op een van de USB-poorten van uw computer.
2. Installeer de printer door de installatie-instructies die met de printer zijn
meegeleverd op te volgen.
3. Druk een testpagina af om te controleren of de printer juist functioneert.
4. Schakel de printer uit.
Stap één: gegevens van de printserver ophalen
1. Koppel de printer van de computer los en sluit het platte, rechthoekige
uiteinde van de USB-kabel aan op de
USB-poort van de Wireless
N
dx
ADSL2+ Gateway.
ADSL 1234
USB
Secure
Easy
15VDC
Setup
Reset
2. Schakel de printer in.
3. Start op de computer een webbrowser.
4. Voer
192.168.1.1 op de locatie- of adresregel in en druk op ENTER om
naar de configuratiepagina's van de gateway te gaan.
5. Voer de gebruikersnaam en het wachtwoord van de gateway in en klik op
6. Selecteer
7. Voer bij
Printer Server (Printserver) in het menu Device (Apparaat).
Printer name (Printernaam) de naam van de printer en bij Comment
(Opmerking) informatie over de printer in.
OK.
81
Page 86

Nederlands
8. Noteer het adres van de printerlocatie (bijvoorbeeld http://192.168.1.1:1631/
printers/My_Printer
). U hebt dit adres nodig om de printer in te stellen op alle
computers die u toegang tot de printer wilt geven.
Stap drie: computers op de Wireless USB Print Server aansluiten
Opmerking:u dient deze procedure op elke computer op uw netwerk uit te
N
voeren om afdrukken via de printserver op de Wireless
dx
ADSL2+ Gateway mogelijk te maken.
Windows Vista
1. Klik in Windows op Start > Configuratiescherm > Hardware en geluiden > Print-
ers
.
2. Klik op
3. Selecteer het keuzerondje
toevoegen
4. Klik op
5.
Kies Een gedeelde printer op naam selecteren en voer in het URL-veld het adres
Printer toevoegen.
Netwerkprinter, draadloze printer of Bluetooth-printer
. Klik op Volgende.
De printer die ik wil gebruiken, staat niet in de lijst.
van de printerlocatie in dat u tijdens stap twee hebt genoteerd. Klik op
Volgende.
Opmerking:
6. Selecteer de fabrikant en het model van uw printer. Klik op
7. Klik op
de URL-informatie is hoofdlettergevoelig en dient precies zo te
worden ingevoerd als weergegeven in het gedeelte
tion
(Printerlocatie) op de pagina Status (Status) van de gateway.
Ja als u wordt gevraagd of u de printer wilt instellen als standaard
Printer loca-
OK.
printer.
8. Klik op
Windows XP en 2000
Voltooien om de installatieprocedure af te sluiten.
1. Voer een van de volgende stappen uit:
" Windows Vista: Klik in Windows op
Hardware en geluiden
" Windows XP: klik in Windows op
" Windows 2000: klik in Windows op
2. Klik op
Printer toevoegen.
3. De wizard Printer toevoegen begint. Klik op Volgende.
4. Selecteer het keuzerondje
andere computer
82
. Klik op Volgende.
Start > Configuratiescherm >
> Printers.
Start > Printers en faxapparaten.
Start > Instellingen > Printers.
Een netwerkprinter of een printer aangesloten op een
Page 87

Nederlands
5. Selecteer
netwerk
dat u op de configuratiepagina's van de gateway hebt verkregen. Klik op
Opmerking:
Verbinding maken met een printer op het internet of op een thuis- of kantoor-
. Voer in het veld URL het adres in van de
Printer location
(Printerlocatie)
Volgende
de URL-informatie is hoofdlettergevoelig en dient precies zo te
worden ingevoerd als weergegeven in het gedeelte
tion
(Printerlocatie) op de pagina Status (Status) van de gateway.
Printer loca-
6. Selecteer de fabrikant en het model van uw printer. Klik op OK.
Opmerking:als uw printer niet in de lijst voorkomt, zijn uw printerstuur-
programma's niet goed geïnstalleerd. Herhaal “Stap 1: een
lokale printer installeren” op pagina 81.
7. Klik op Ja als u wordt gevraagd of u de printer als standaardprinter wilt instellen.
8. Klik op Voltooien.
Stap vier: de aansluiting van de printer controleren
1. Voer een van de volgende stappen uit:
" Windows XP: klik in Windows op
" Windows 2000: klik in Windows op
2. Klik met de rechtermuisknop op uw printer en selecteer
3. Klik op
Test pag in a af dr ukk en . De printer dient met succes een testpagina af te
Start > Printers en faxapparaten.
Start > Instellingen > Printers.
Eigenschappen.
drukken.
.
Opmerking:ga als de testpagina niet wordt afgedrukt naar “Problemen
oplossen” in de Gebruikershandleiding op de installatie-cd van
USRobotics voor meer informatie.
83
Page 88

Nederlands
Problemen oplossen
In deze basisprocedure komen een aantal problemen met de gateway aan bod:
1. Controleer of het netsnoer en alle Ethernet-kabels goed zijn aangesloten.
Hiermee bedoelen we ook de kabels die de gateway en alle computers in het
netwerk met elkaar verbinden. Bekijk de installatie-afbeeldingen op pagina 76.
2. Controleer het stopcontact waarop de gateway is aangesloten.
3. Raadpleeg de beschrijvingen van de lampjes in deze handleiding en
controleer vervolgens de lampjes op de gateway om zeker te weten dat de
apparaten stroom ontvangen en dat alle poorten functioneren. Raadpleeg de
beschrijvingen van de lampjes op pagina 73.
4. Alleen voor draadloze verbindingen
beperkt bereik kunnen worden veroorzaakt door interferentie uit de
omgeving, zoals verf op loodbasis en betonnen muren, of door sommige
elektronica, zoals 2,4 GHz-telefoons. Verplaats de antenne van de gateway of
de draadloze clients om de kwaliteit van de verbinding te verbeteren.
5. Alleen voor draadloze verbindingen:
gateway zijn aangesloten op de modus Infrastructure (Infrastructuur) zijn
ingesteld. Stel de netwerknaam of SSID in de instellingen van de draadloze
adapter in op de
Network name (Netwerknaam) die door de gateway wordt
gebruikt. Controleer of u hetzelfde type draadloze beveiliging gebruikt.
Raadpleeg de documentatie bij uw draadloze adapter om na te gaan hoe u
deze instellingen kunt wijzigen.
: een slechte verbindingskwaliteit of een
controleer of alle apparaten die op de
Raadpleeg als u nog steeds problemen met de gateway hebt het gedeelte
“Problemen oplossen” in de Gebruikershandleiding op de installatie-cd van
USRobotics.
De EasyConfigurator detecteert mijn internetverbinding niet.
Oplossing:
1. Ga naar de pagina Internet (Internet) in de EasyConfigurator.
Selecteer uw land en uw internetprovider. Als uw internetprovider niet wordt
vermeld, dient u
uw ISP handmatig in te voeren. Vraag uw ISP om de volgende informatie:
" VPI/VCI-waarden
" ADSL-norm (modulatie)
" Isolatiemodus
" Protocoltype
" Verificatie (PAP of CHAP) voor PPP-verbindingen
" IP-adres, gebruikersnaam en wachtwoord (als uw ISP deze aan u heeft
toegewezen)
" Informatie over het subnetmasker, de gateway en de DNS-server
Other (Anders) te selecteren voor het land en de instellingen van
2. Als u niet zeker bent van bepaalde verbindingsgegevens, dient u contact met
uw ISP op te nemen.
3. Klik op
84
Save (Opslaan).
Page 89

Ik kan geen verbinding meer met het internet maken.
Oplossing:
Nederlands
1. Houd de
Reset-knop op de achterzijde van de gateway 1 seconde ingedrukt
om de gateway opnieuw op te starten. Wacht tot de gateway volledig is
opgestart.
Opmerking:als u de
Reset-knop 7 seconden ingedrukt houdt, worden de
fabrieksinstellingen van de gateway hersteld.
2. Start uw computer opnieuw op. Wacht tot uw computer volledig is opgestart
en probeer vervolgens verbinding met internet te maken.
3. Raadpleeg als u nog steeds geen toegang tot het internet hebt het gedeelte
Problemen oplossen in de Gebruikershandleiding op de installatie-cd van
USRobotics voor uitgebreide informatie over de oplossing van dit probleem.
SecureEasySetup kan de draadloze client niet configureren.
Oplossing:
Houd de SecureEasySetup-knop op de achterzijde van de gateway 1 seconde
ingedrukt en controleer vervolgens of het SecureEasySetup-lampje aan de
voorzijde van de gateway knippert voordat u SecureEasySetup in het
hulpprogramma van de client voor uw draadloze adapter inschakelt.
De configuratiepagina's van de gateway reageren niet, maar ik
heb wel verbinding met het internet.
Oplossing:
Houd de Reset-knop op de gateway 1 seconde ingedrukt om de gateway opnieuw
op te starten. Houd als u nog steeds niet met de configuratiepagina's van de
gateway kunt communiceren de
Reset-knop 7 seconden ingedrukt. Op deze
manier worden de fabrieksinstellingen van de gateway hersteld. Als u
persoonlijke configuratie-instellingen gebruikt, dient u de wijzigingen opnieuw in
te voeren. Als u over een back-upbestand beschikt, kunt u de instellingen ook
hiermee herstellen.
Hoe configureer ik de gateway als ik een gameconsole of
VoIP-apparaat wil aansluiten?
Oplossing:
Als u een gameconsole of een VoIP-apparaat op de gateway wilt aansluiten, dient
u bepaalde poorten te openen zodat het betreffende apparaat met het internet
kan communiceren. Dit kunt u doen via
menu
Security (Beveiliging) in de configuratiepagina's van de gateway. Raadpleeg
de hoofdstukken Configuratie en Tutorials in de Gebruikershandleiding op de
installatie-cd van USRobotics voor meer informatie over poort-triggering.
Port Triggering (Poort-triggering) in het
85
Page 90

Nederlands
Hoe configureer ik de firewall in de gateway?
Oplossing:
U kunt toegang tot de firewall-instellingen van de gateway krijgen via
(WAN-setup) in het menu
gateway. Raadpleeg de hoofdstukken Configuratie en Tutorials in de
Gebruikershandleiding op de installatie-cd van USRobotics voor meer informatie
over de firewall-instellingen.
Internet (Internet) van de configuratiepagina's van de
WAN Setup
Aanvullende informatie
Raadpleeg voor informatie over reglementen en garantie de
Gebruikershandleiding op de installatie-cd van USRobotics.
Raadpleeg voor informatie over de werking en de configuratie de
Gebruikershandleiding op de installatie-cd van USRobotics. In de
gebruikershandleiding vindt u meer informatie over het gebruik en de
configuratie van uw Wireless
Meer informatie over het oplossen van problemen en overige informatie:
1. Raadpleeg de Gebruikershandleiding op de installatie-cd van USRobotics.
2. Ga naar het gedeelte Support (Ondersteuning) op de website van
USRobotics op www.usr.com/support/
N
dx ADSL2+ Gateway.
.
De meest voorkomende problemen waar gebruikers mee te maken krijgen,
worden besproken in de gedeelten FAQ (Veelgestelde vragen) en
Troubleshooting (Problemen oplossen) voor de Wireless
Gateway. Op de ondersteuningswebsite vindt u ook informatie over de
nieuwste firmware- en documentatie-updates.
3. Gebruik een online formulier om ons uw technische vraag toe te sturen of
neem contact op met de klantenservice van USRobotics.
4. Raadpleeg de contactgegevens voor ondersteuning op de laatste pagina van
deze handleiding.
N
dx ADSL2+
86
Page 91

Türkçe
Kurulum
Ambalaj İçeriği
Türkçe
! USRobotics Wireless
N
dx ADSL2+ Gateway
! 15V DC Güç kaynağõ ! Sökülebilir Antenler
! Ethernet kablosu ! Kurulum CD-ROM'u
! Telefon kablosu ! Hõzlõ Kurulum Kõlavuzu
Fiziksel Özellikler
Ön
Ağ geçidi aşağõdaki durum LED'lerine sahiptir:
23
1
Sembol Adõ Durum Koşul
Güç
Kapalõ Güç alõnmõyor.
Yanõyor Güç alõnõyor.
4
WLAN
(Kablosuz Ağ)
SecureEasySetup Kapalõ
WAN
(Internet)
ADSL Kapalõ ADSL bağlantõsõ yok.
Kapalõ Kablosuz bağlantõ devre dõşõdõr.
Yanõyor Kablosuz bağlantõ etkindir.
Yanõp
sönüyor
Yanõyor SecureEasySetup modu hazõr.
Yanõp
sönüyor
Kapalõ Internet bağlantõsõ sağlanamadõ ya
Yanõp
sönüyor
Yanõyor Internet bağlantõsõ kuruldu.
Yanõyor ADSL bağlantõsõ kuruldu.
Yanõp
sönüyor
Veri gönderiyor ve alõyor.
SecureEasySetup modu ağ geçidi
cihazõnda hazõr değil.
SecureEasySetup cihazlarõyla
iletişim kuruyor.
da ağ geçidi köprü modunda.
Veri gönderiyor ve alõyor.
ADSL bağlantõsõ kuruluyor.
87
Page 92

Türkçe
Sembol Adõ Durum Koşul
LAN
(1 - 4)
Yazõcõ
Geri
ADSL 1234
Item (Çeşitli Bilgiler) İşlev
ADSL
LAN 1 - 4
Ağ geçidi cihazõnõzõ ADSL hattõna bağlar.
Ek cihazlarõ ağ geçidi cihazõnõza bağlar.
Kapalõ LAN bağlantõsõ yok.
Yanõyor LAN bağlantõsõ kuruldu.
Yanõp
Veri gönderiyor ve alõyor.
sönüyor
Kapalõ Yaz õcõ bağlantõsõ algõlanmadõ.
Yanõyor Yazõcõ bağlantõsõ algõlandõ.
Yanõp
Yazõcõya veri gönderiliyor.
sönüyor
USB
Reset
15VDC
Secure
Easy
Setup
USB
Reset (Resetle)
15VDC
SecureEasySetup
Ağ geçidi cihazõnõzõ USB yazõcõya bağlar.
Ağ geçidi cihazõnõ yeniden başlatõr veya ağ geçidi
cihazõnõn varsayõlan fabrika ayarlarõnõ geri yükler.
•Ağ geçidi cihazõnõzõ mevcut ayarlarõnõzõ
değiştirmeden yeniden başlatmak için
Reset
düğmesini 1 saniye basõlõ tutun.
•Ağ geçidi cihazõnõ varsayõlan fabrika ayarlarõna
geri döndürmek için,
Reset
düğmesini en az 7
saniye basõlõ tutun.
Güç adaptörünü ağ geçidi cihazõna bağlar.
Ağ geçidi cihazõnda SecureEasySetup programõnõ
etkinleştirir.
•Ağ geçidi cihazõnda SecureEasySetup
programõnõ etkinleştirmek için
SecureEasySetup
düğmesini 1 saniye basõlõ tutun.
• Kablosuz güvenlik ayarlarõnõzõ varsayõlan fabrika
ayarlarõna (güvenlik özelliği olmadan) resetlemek
için,
SecureEasySetup
düğmesini 7 saniye basõlõ
tutun.
Ağ geçidi cihazõna bir anten bağlar.
88
Page 93

Varsayõlan Değerler
Wireless Ndx ADSL2+ Gateway aşağõdaki varsayõlan değerlere sahiptir:
Türkçe
! IP Adresi:
192.168.1.1
Sistem Gereksinimleri
! ADSL hattõ Internet Servis Sağlayõcõnõz tarafõndan kurulur
! Ethernet adaptörü kurulu bir bilgisayar
! Etkin JavaScript desteği bulunan HTML 4.01 uyumlu bir Internet tarayõcõ
Kurulum Talimatlarõ
Adõm Bir: Mikrofiltreleri bağlayõn (verilmişse veya İSS'niz
gerektiriyorsa)
Bir mikrofiltre, ses ve ADSL sinyalleri arasõndaki parazitleri ortadan kaldõrõr.
Eğer ağ geçidi ile birlikte bir mikrofiltre verilmemişse, telefon cihazlarõnõz
için mikrofiltre gerekip gerekmediğini ISS'nizden öğrenebilirsiniz.
1. Her tip telefon cihazõnõn kablosunu (telefon, faks makinesi vs.)
mikrofiltreye takõn.
2. Mikrofiltreyi duvardaki telefon soketine bağlayõn.
Not: Hem ağ geçidi hem de telefonunuz için bir ikili bağlantõ
mikrofiltreniz yoksa, ağ geçidi cihazõnõzõ telefon soketine bağlayan
kablo üzerine mikrofiltre kurmayõn.
89
Page 94

Türkçe
İkinci Adõm: Ağ Geçidini Bağlayõn
1. Ağ geçidi cihazõnõzõ ADSL hattõna bağlayõn:
A. Verilen antenleri ağ geçidi cihazõnõn arkasõna bağlayõn.
B. Verilen telefon kablosunun bir ucunu að geçidi üzerindeki
portuna bağlayõn.
C. Telefon kablosunun diğer ucunu duvardaki telefon girişine takõn.
W
AN
1
2
U
3
S
B
4
1
5
V
D
C
S
e
c
u
re
R
e
s
e
t
E
a
s
y
S
e
t
u
p
Not: Ağ geçidi üzerindeki USB portu, yalnõzca USB yazõcõ
bağlamak içindir. Ağ geçidi USB yazõcõ bağlamakla ilgili
talimatlar için bkz. “Bir USB Yazõcõsõ Kurun”, sayfa 94.
ADSL
2. Ağ geçidi cihazõnõ bilgisayarõnõza bağlayõn:
A. Bilgisayarõnõzõ kapatõn.
B. Dahili Ethernet kablosunun bir ucunu bilgisayarõnõzõn Ethernet
adaptörüne bağlayõn.
C. Diğer ucu að geçidi cihazõ
W
A
N
1
2
LAN portlarõndan birine bağlayõn.
US
3
B
4
15
VD
C
S
e
c
u
re
Re
se
t
E
a
s
y
S
e
t
u
p
3. Ağõn başlatõlmasõ:
A. Cihazla birlikte verilen güç adaptörünü að geçidi cihazõnõn
portuna bağlayõn.
Not: İngiltere'deki Kullanõcõlar: Güç adaptörü prize takõlõ
değilken, güç adaptörüne ülkeniz için uygun olan elektrik fişini
bağlayõn. Güç adaptörünü ağ geçidine bağlamadan önce, fişi
klik sesi duyuluncaya kadar bastõrõn ve sõkõca yerine oturtun.
15VDC
90
Page 95

Türkçe
B. Güç adaptörünü standart bir elektrik fişine takõn.
W
A
N
1
2
U
3
S
B
4
15
V
D
C
S
e
c
u
r
e
Re
se
t
E
a
s
y
S
e
t
u
p
C. Bilgisayarõnõzõ açõn.
Üçüncü Adõm: Ağ Geçidini EasyConfigruator Programõnõ
Kullanarak Konfigüre Edin
Internete girebilmek için yerel telefon şirketi veya Internet Servis
Sağlayõcõdan (ISS) ADSL ve Internet servisini aktif hale getirmeniz gerekir.
ISS'nizden alabileceğiniz aşağõdaki bilgilerden bazõlarõna ihtiyaç
duyabilirsiniz:
" VPI/VCI değerleri
" ADSL standardõ (modülasyon)
" Kapatma Modu
" Protokol türü
" PPP bağlantõlar için kimlik doğrulama (PAP veya CHAP)
" IP adresi, kullanõcõ adõ ve şifre (ISS'niz tarafõndan verilmişse).
" Alt ağ maskesi, ağ geçidi ve DNS sunucusu bilgileri
1. USRobotics Kurulum CD-ROM'u'unu bilgisayarõnõzõn CD veya DVD
ROM sürücüsüne takõn ve aşa
ğõdaki işlemlerden birini gerçekleştirin:
" Windows:
A. CD otomatik olarak başlatõlmazsa aşağõdaki gibi manuel olarak
başlatõn:
i) Windows Vista: Windows
Windows XP: Windows
Windows 2000, Me ve 98SE: Masa üzerinde
Başlat > Bilgisayar.
Başlat > Bilgisayarõm.
Bilgisayarõm.
ii) Simgesini tõklatõn ve CD sürücüsünü çift tõklatõn.
B. Tercih ettiğiniz dili seçin, lisans Anlaşmasõnõ inceleyin ve
OK
(Tamam) tuşunu tõklatõn.
C.
Setup (Kur) üzerine tõklatõn. EasyConfigurator programõnõn
başlamasõ bir dakika kadar zaman alabilir.
" Macintosh OS X: CD-ROM'u açõn ve
simgesini çift tõklatõn. EasyConfigurator programõnõn başlamasõ bir
dakika kadar zaman alabilir.
USRobotics EasyConfigurator
91
Page 96

Türkçe
"
Linux
: CD-ROM'u açõn ve
EasyConfigurator linux-script
.
EasyConfigurator programõnõn başlamasõ bir dakika kadar zaman alabilir.
3. Internet sayfasõndaki aşağõya açõlõr listelerden ülkenizi ve Internet Servis
Sağlayõcõnõzõ (ISS) seçin. Ülkeniz ya da İSS'niz listede yoksa,
Other
(Diğer) seçeneğini seçin ve İSS'niz tarafõndan sağlanan ayarlarõ kendiniz
girin.
Seçimleri yaptõktan sonra ADSL bağlantõnõz için kullanõcõ adõ ve şifreyi
girmeniz gerekebilir.
4.
Save (Kaydet) üzerine tõklayõn.
5.
Status (Durum) sekmesine yönlendirileceksiniz. Eğer ADSL bağlantõnõz
kurulmuş ise sayfanõn üst kõsmõnda bu durumu gösteren bir mesaj
olacaktõr. Eğer mesaj görüntüleniyor ancak ADSL bağlantõsõ
bulunmuyorsa bu kõlavuzun “Sorun Giderme”, sayfa 97 bölümüne bakõn.
6.
Login (Oturum Açma) sekmesini tõklatõn, admin hesabõ için şifre girin ve
Save (Kaydet) tuşunu tõklatõn.
Not:
admin kullanõcõ adõ ve gireceğiniz şifre, gelecekte de ağ
geçidine oturum açtõğõnõzda kullanõlacaktõr.
7. EasyConfigurator programõnõ kapatõn.
EasyConfigurator ile ilgili daha geniş ayrõntõ için, USRobotics Kurulum
CD-ROM'undaki Kullanõm Kõlavuzuna bakõn.
Dördüncü Adõm: Kablosuz Güvenlik Ayarlarõnõ Konfigüre Edin
1. Kablosuz güvenlik ayarlarõnõ konfigüre etmek için, ağ geçidi cihazõnõn
arkasõndaki SecureEasySetup düğmesine bir saniye basõn. Bu WPA2
ve WPA (PSK) kablosuz güvenliğini ayarlayacak ve kablosuz ağ için
parola tümce/ağ anahtarõ konfigüre edecektir.
Dikkat: Eğer ağ geçidi cihazõnda herhangi bir kablosuz güvenlik
yöntemini etkinleştirmezseniz, kablosuz ağõnõz güvensiz
olacaktõr. Yetkisiz kablosuz cihazlar ağõnõza bağlanabilir,
Internet bağlantõnõzõ kullanabilir ve ağõnõzdaki bilgisayarlara erişebilir.
2. Eğer bu bilgisayarõ ağa kablosuz bir bağlantõ üzerinden bağlayacaksanõz,
Ethernet kablosunu ağ geçidi cihazõndan ve bilgisayardan çõkarabilir,
kablosuz adaptörünüzü kurduktan sonra bilgisayarõ kablosuz bağlantõ
kullanarak ağ geçidi cihazõna bağlayabilirsiniz. Kablosuz adaptörünüzün
kurulumuyla ilgili talimatlar için kablosuz adaptörünüzün belgelerine
bakõn.
92
Page 97

Türkçe
Konfigürasyon Ayarlarõnõzõ Yedekleyin
Yedekleme yapmak, ağ geçidi cihazõnõzõn varsayõlan fabrika ayarlarõnõ geri
yüklemeniz halinde konfigürasyon ayarlarõnõn tekrar yapõlmasõnõ kolaylaştõrõr.
USRobotics ayarlarõnõzõ şimdi yedeklemenizi önerir.
1. Bilgisayarõnõzdan Internet tarayõcõsõnõ açõn.
2. Yer veya adres satõrõna
192.168.1.1 yazõn ve ağ geçidi konfigürasyonu
sayfalarõna erişmek için ENTER tuşuna basõn. Ekranda istendiğinde ağ
geçidi cihazõ kullanõcõ adõ ve parolasõnõ girin.
3.
Device (Cihaz) menüsünden Back Up Settings (Ayarlarõ Yedekle)
seçeneğini seçin.
4.
Back Up (Yedekle) seçeneğini tõklatõn.
5. Sisteminiz, dosyayõ kaydetmenizi veya açmanõzõ isteyecektir.
Save
(Kaydet) düğmesini tõklatõn.
Tebrikler. Kurulum prosedürünü tamamladõnõz. Internet bağlantõnõzõ
Wireless
N
dx ADSL2+ Gateway cihazõnõzõ
www.usr.com/productreg/
adresinde kaydettirerek kontrol edebilirsiniz.
Ek Konfigürasyon
Kurulmuş Kablosuz İstemciler Bağlayõn
Wireless Ndx ya da diğer onaylõ ağ geçidi kablosuz cihazlarõnõ
SecureEasySetup cihazõna bağlamak için SecureEasySetup™ düğmesini
kullanabilirsiniz.
talimatlarõ için kablosuz cihazõn belgelerine bakõn.
1
Hala kurmanõz gereken bir kablosuz adaptör varsa, kurulum
Kablosuz istemcinizde SecureEasySetup özelliği varsa, aşağõdaki logolardan
birini cihazõn üzerinde veya istemci yardõmcõ programõnda görmeniz
gereklidir:
Kablosuz cihazõnõz SecureEasySetup özelliğini desteklemiyorsa dahi,
kablosuz güvenlik ayarlarõnõ manuel olarak da girebilirsiniz.
1 BROADCOM, SecureEasySetup ve SecureEasySetup logosu, Amerika Birleşik Devletleri'nde
ve/veya diğer ülkelerde, Broadcom Corporation'õn ticari markalarõ veya tescilli ticari
markalarõdõr.
93
Page 98

Türkçe
Kablosuz Yönelticinize SecureEasySetup Cihazõ Bağlayõn:
2
1. Ağ geçidi cihazõnõn arkasõndaki SecureEasySetup düğmesini 1 saniye
basõlõ tutun. Ağ geçidi cihazõnõn ön kõsmõndaki SecureEasySetup LED'i
yanõp sönmeye başlayacaktõr.
2. Kablosuz adaptörünüz için istemci yardõmcõ programõnda
SecureEasySetup özelliğini başlatõn.
3. Ağ geçidi ve kablosuz adaptör, kablosuz güvenlik ayarlarõnõ senkronize
edecektir ve cihaz güvenli bir şekilde ağ geçidi cihazõna bağlanacaktõr.
Kablosuz Ağ Geçidine Manuel Olarak Cihaz Bağ layõ n:
Adaptörünüzün modunu ya da kablosuz güvenlik ayarlarõnõ değiştirmek
hakkõndaki talimatlar için kablosuz adaptörünüzün belgelerine bakõn.
1. Cihazdaki kablosuz adaptörün altyapõ moduna ayarlanmõş olduğundan
emin olun.
2. Kablosuz adaptör ayarlarõndaki Ağ adõ
cihazõnda kullanõlan Network Name
nõ veya SSID'yi, ağ geçidi
(Ağ adõ) bölümüne göre ayarlayõn.
3. Ağ geçidi için kablosuz güvenlik ayarõ yapõldõysa, kablosuz adaptörün
kablosuz güvenlik ayarlarõnõn ağ geçidi cihazõnda yaptõğõnõz ayarlarla aynõ
olduğundan emin olun.
Ağ geçidinin kablosuz güvenlik ayarlarõnõ görüntülemek için:
1. Bilgisayarõnõzda bir Internet tarayõcõ başlatõn, konum ya da adres
satõrõna
2. Ağ geçidi için kullanõcõ adõnõ ve şifreyi girin ve
192.168.1.1 yazõn ve ENTER tuşuna basõn.
OK (Tamam)
düğmesini tõklatõn.
3. Ağ geçidi konfigürasyon sayfalarõnda,
gidin ve
Wireless (Kablosuz) seçeneğini seçerek kablosuz güvenlik
Security (Güvenlik) menüsüne
ayarlarõnõ görüntüleyin.
Bir USB Yazõcõsõ Kurun
Bir USB yazõcõsõ Wireless Ndx ADSL2+ Gateway cihazõna bağlanabilir ve
işletim sisteminizle yazõcõnõz Internet Baskõ Protokolünü (IPP) destekliyorsa,
ağ yazõcõsõ olarak kullanõlabilir. Windows Server
®
2003, Windows® Vista,
2 SecureEasySetup programõnõn ağ geçidi cihazõnda hazõr olmasõ için, WPA2 ve WPA (PSK)
kablosuz güvenlik, TKIP ve AES şifreleme ve bir WPA ön paylaşõmlõ anahtar (genellikle Ağ
anahtarõ, WPA anahtarõ, veya parola tümce olarak adlandõrõlõr) ayarlanmalõdõr. Ayarlarõ man-
uel olarak yapõlandõrabilirsiniz ya da kablosuz ayarlarõnõzõ yapõlandõrmak için SecureEasySetup
butonuna basabilirsiniz.
94
Page 99

Türkçe
XP, ve 2000, bu fonksiyon için dahili desteğe sahiptir. Yazõcõnõzõn IPP
destekli olup olmadõğõnõ öğrenmek için yazõcõnõzõn üreticisiyle iletişim kurun.
Not: Tarama ve kopyalama yapan çok fonksiyonlu yazõcõlarla
kullanõldõğõnda, Wireless
N
dx ADSL2+ Gateway yalnõzca yazdõrma
işlemini destekler. Tarama gibi iki yönlü iletişim özellikleri için, çok
fonksiyonlu yazõcõyõ doğrudan bilgisayara bağlayõn. Kartuşun
azalmasõ ya da kağõt bitmesi gibi uyarõlar, Wireless
N
dx ADSL2+
Gateway tarafõndan bilgisayara iletilmez.
Windows Me, 98SE, Mac ve Linux için yazõcõ kurma talimatlarõ için bkz.
Kullanõm Kõlavuzu USRobotics Kurulum CD-ROM'unda.
1. Adõm: Yerel Yazõcõ Kurulumu
Not: Eğer yazõcõ kendisini kullanacak olan her bilgisayarda kurulu ise
“Adõm İki: Yazdõrma Sunucunuzun Bilgilerini Alõn” adõmõna geçin.
Ya zõcõnõzõ Wireless
N
dx ADSL2+ Gateway cihazõna bağlamadan önce,
yazõcõnõn üreticisi tarafõndan sağlanan sürücüleri yazõcõyõ kullanacak olan tüm
bilgisayarlara kurmanõz gerekmektedir.
1. USB yazõcõnõzõ, bilgisayardaki USB portlarõndan birine takõn.
2. Yazõcõyõ, birlikte verilen kurulum talimatlarõna göre kurun.
3. Yazõcõnõn düzgün bir biçimde çalõşõp çalõşmadõğõnõ kontrol etmek için bir
test sayfasõ yazdõrõn.
4. Yazõcõyõ kapatõn.
Adõm İki: Yazdõrma Sunucunuzun Bilgilerini Alõn
1. Yazõcõnõn bilgisayarõn
dikdörtgen ucunu Wireless
õzla olan bağlantõsõnõ kesin ve USB kablosunun ince,
N
dx ADSL2+ Gateway üzerindeki USB
portuna takõn.
ADSL 1234
USB
Secure
Easy
15VDC
Setup
Reset
2. Yazõcõnõzõ açõn.
3. Bilgisayarõnõzdan Internet tarayõcõsõnõ açõn.
4. Yer veya adres satõrõna
sayfalarõna erişmek için ENTER tuşuna basõn.
5. ağ geçidi için kullanõcõ adõnõ ve şifreyi girin ve
tõklatõn.
6.
Device (Cihaz) menüsünden Printer Server (Yazõcõ Sunucusu) seçeneğini
seçin.
7. Yazõcõ için bir
Yazõcõ adõ ve bir Yorum girin.
192.168.1.1 yazõn ve ağ geçidi konfigürasyon
OK (Tamam) düğmesini
95
Page 100

Türkçe
8. Yazõcõ konumunun adresini yazõn (örnek: http://192.168.1.1:1631/printers/
My_Printer
). Yazõcõya erişmesini istediğiniz bilgisayarlarda yazõcõyõ
kurmak için bu adrese ihtiyacõnõz olacaktõr.
Adõm Üç: Bilgisayarlarõ Kablosuz USB Yazdõrma Sunucusuna
Bağlayõn
Not: Bu prosedürü, Wireless
N
dx ADSL2+ Gateway üzerindeki
yazdõrma sunucusunu kullanmalarõnõ sağlamak için ağõnõzdaki
bütün bilgisayarlarda uygulamalõsõnõz.
Windows Vista
1. Windows Start (Başlat) > Control Panel (Denetim Masasõ) > Hardware and
Sound
2.
Yazõcõ Ekle seçeneğini tõklatõn.
3.
Add a network, wireless or Bluetooth printer (Bir ağ ekle, kablosuz veya
Bluetooth yazõcõsõ) yazõlõ seçenek düğmesini seçin.
(Donanõm ve Ses) > Printers (Yazõcõlar) seçeneklerini tõklatõn.
Next (İleri) düğmesini
tõklatõn.
4.
The Printer That I Want Isn’t Listed (İstediğim Yazõcõ Listede Yok)
seçeneğini seçin.
5.
Select a shared printer by name (Paylaşõlan bir yazõcõyõ adõna göre seç)
seçeneğini seçin ve URL alanõna Adõm İki'de kaydedilen yazõcõ konumu
adresini girin.
Next (İleri) düğmesini tõklatõn.
Not: URL bilgileri büyük-küçük harf duyarlõdõr ve aynen að geçidi
cihazõnõn Durum sayfasõndaki
Printer location (Yazõcõ konumu)
bölümünde listelendiği gibi girilmelidir..
6. Yazõcõnõzõn markasõnõ ve modelini seçin.
7. Kurmakta olduğunuz yazõcõnõn ismini girin ve
Next'e (İleri) tõklayõn.
İstendiğinde, bir deneme sayfasõ basõp basmayacağõnõzõ seçebilirsiniz.
8. Kurulumu tamamlamak için
Windows XP ve 2000
Finish'i (Son) tõklatõn.
1. Aşağõdaki işlemlerden birini gerçekleştirin:
" Windows XP için: Windows
Başlat > Yazõcõlar ve Fakslar seçeneğini
tõklatõn.
" Windows 2000 için:
2.
Yazõcõ Ekle seçeneğini tõklatõn.
3. Yazõcõ Ekleme Sihirbazõ çalõşacaktõr.
4.
A network printer, or a printer attached to another computer (Ağ yazõcõsõ ya
da bir başka bilgisayara eklenmiş yazõcõ) yazõlõ butonu seçin.
Başlat > Ayarlar > Yazõcõlar seçeneklerini tõklatõn.
Next'e (İleri) tõklayõn.
Next'e (İleri)
tõklayõn.
5.
Internet üzerindeki bilgisayara ya da ev veya ofis bilgisayarõna bağlan
seçeneğini seçin. URL alanõna, ağ geçidi konfigürasyonu sayfalarõndan
96
 Loading...