

Page 1

USR7500 USB Print Server
Installation Guide
Guide d'installation
Installationsanleitung
Guida all'installazione rapida
Guía breve de instalación
Beknopte installatiegids
R24.0503.00
Page 2

Page 3

Quick Installation Guide ...................................................... 1
Guide d'installation ............................................................. 7
Installationsanleitung.......................................................... 13
Guida all'installazione rapida .............................................. 19
Guía breve de instalación .................................................... 25
Beknopte installatiegids...................................................... 31
Page 4

Page 5

USR7500 USB Print Server
Quick Installation Guide
Package Contents:
• USR7500 USB Print Server
• Installation Guide (this guide)
• 9VDC/12VDC Power supply
• Installation CD-ROM
Product Details
Status LED:If this LED is lighted green, the USB Print Server is idle. If this LED is blinking green,
information is being transmitted and received. If this LED is lighted green and the
Error LED is lighted, there is a hardware error. If this LED is blinking green and the
Error LED is flashing, there is a firmware upgrade in progress.
Error LED: If this LED is lighted red and the Status LED is lighted, there is a hardware error. If this
LED is blinking red and the Status LED is blinking, there is a firmware upgrade in
progress. If this LED is blinking red and the Status LED is lighted, there is not a printer
connected to the USB port.
USB Port: Use this port to connect a USB printer to the USB Print Server.
ENET Port: Use this port to connect the USB Print Server to a router, switch, or other Ethernet
network device.
9VDC/12VDC:Use this port to connect the power supply to the USB Print Server.
Diagnostic:Press and hold this button for two (2) seconds to print out a diagnostic page contain-
ing the USB Print Server settings. To restore the factory default settings and print out
a diagnostic page containing the default setting information, unplug the power supply of the USB Print Server, press and hold in the diagnostic button, and plug the
power supply back in. Continue to hold in the Diagnostic button for 10 seconds to
restore the factory default settings.
Connecting the USR7500 USB Print Server
Note: For the most updated information, visit: http://www.usr.com/support
You can also refer to the User Guide on the U.S. Robotics Installation CD-ROM for more
detailed information.
Prepare for installation
Note: Your model number is 7500. You can find your serial number on the bottom label of
the USR7500 USB Print Server and on the side of the package. Write your serial number
down. If you ever need to call our Technical Support department, you will need this number
to receive assistance.
1
Page 6

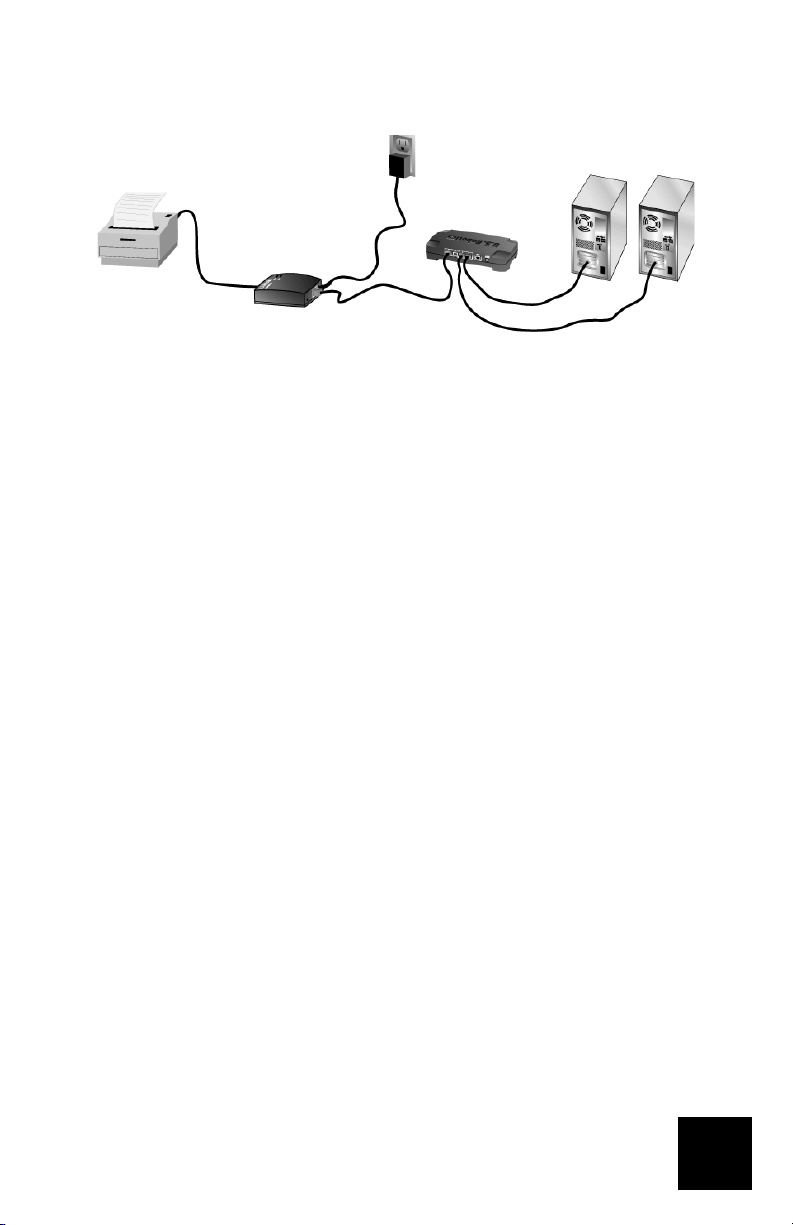
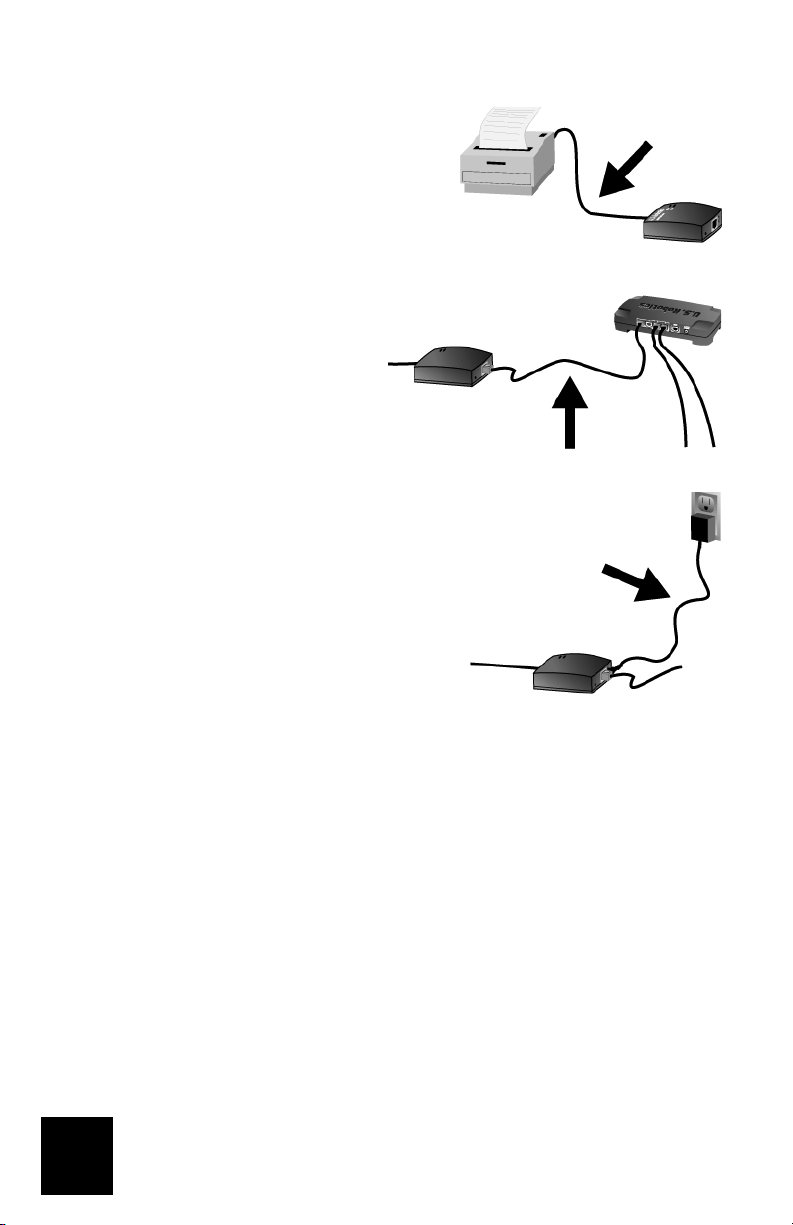
Step One: Connect the square end of a USB cable to
the USB port on your printer. Connect the thin rectangular end of the USB cable to the USB port on the Print
Server. Make sure your printer power cable is plugged in
and the printer is turned on.
Connect one end of an Ethernet cable to your
router or switch and the other end to the
Ethernet port on the Print Server.
Connect the included power adapter to the power socket
on the USB Print Server. Plug the power adapter into a
standard power outlet.
Step Two: Make sure your computer is turned on. Insert the Installation CD-ROM into your CD-
ROM drive. Click Setup Wizard and follow the on-screen instructions to configure the settings of
the Print Server, to install the USB Print Server driver, and to set up the printer.
You will then need to install the software on any machine that will be using the printer over the
network. Insert the Installation CD-ROM into your CD-ROM drive. Click Additional Computers and
then click Next. Select User and then follow the on-screen instructions. For more detailed information, refer to the User Guide on the Installation CD-ROM.
When you have completed the setup for the main computer and any client computers, you will be
able to use your USB printer over your network.
2
Page 7
Congratulations! The installation procedure is now complete.
Launch a Web browser and register your product at www.usr.com/productreg
We are constantly striving to provide users with the most helpful information. For the most
updated configuration and troubleshooting information, visit the U.S. Robotics Web site at
http://www.usr.com/support
3
Page 8

Troubleshooting
For Macintosh and Linux assistance, refer to the Troubleshooting section in the User Guide on the
Installation CD-ROM.
The USB Print Server is not appearing in my network.
Possible Solution:
Make sure the USB Print Server is plugged in and receiving power.
Possible Solution:
Make sure the USB Print Server is securely connected to the router, switch, or Ethernet network
device on your network. A loose connection could keep you from being able to access the USB
Print Server. Make sure your router, switch, or Ethernet network device is receiving power and
turned on. Try repeating the installation steps.
Possible Solution:
Make sure that your computer has the TCP/IP network protocol installed. If you do not have the
TCP/IP network protocol installed, refer to the documentation for your operating system.
Possible Solution:
The USB Print Server might not be receiving an IP address or there might be an IP address conflict
with another device on the network. Unplug and then plug back in the power supply for the USB
Print Server. This will release the IP address and then allow the USB Print Server to receive a new
IP address from the DHCP server of your network.
Possible Solution:
If you are using an Ethernet crossover cable, the USB Print Server may not appear in your network. Make sure that you are using a standard Ethernet cable and not an Ethernet crossover
cable. If you are not sure if your Ethernet cable is a standard one or a crossover cable, try connecting the USB Print Server to your network device using a different Ethernet cable.
Possible Solution:
If the USB Print Server still does not appear in your network, repeat the Installation procedure.
The printer does not appear after connecting it to the USB Print Server.
Possible Solution:
Make sure the printer is securely connected to the USB Print Server. A loose connection could
keep you from being able to access the printer. Try repeating the installation steps.
The Status LED of the USB Print Server continuously stays lighted.
Possible Solution:
Reset the USB Print Server by unplugging the power supply and plugging it back in. If this doesn’t
reset the USB Print Server, restore the factory default settings. Unplug the power supply of the
USB Print Server, press and hold in the diagnostic button, and plug the power supply back in.
Continue to hold in the Diagnostic button for 10 seconds .
4
Page 9

I have installed my multi-function printer, but my fax and scanner capabilities do not work.
Possible Solution:
If you have a multi-function printer (printer/fax/scanner) connected to the USB Print Server, only
the printer functionality will work. If you want to use the other features of your multi-function
printer, it must be connected directly to a computer.
I tried to install the software for Peer-to-Peer printing, but received an error
message and the installation was aborted.
Possible Solution:
If you have previously installed the USB Print Server software, you will need to uninstall it before
you can install the Peer-to-Peer software. Click Windows Start, Programs, and then U.S. Robotics
Print Server. Select Uninstall USB Print Server Driver and then follow the on-screen instructions.
When the uninstallation is complete, you will need to reboot your computer. You will then be able
to install the Peer-to-Peer software.
Some printing jobs do not print correctly.
Possible Solution:
Make sure you have the correct driver for your printer installed on each computer on your network. Refer to the documentation for your printer to verify this information.
Possible Solution:
If you are using an older, low speed printer, you may need to change the Handshake Signal configuration setting. Click Windows Start, Programs, and then U.S. Robotics Print Server. Select Bi-
Admin Mangement Utility. Click the Configuration icon and then click the Port tab. Change the
Handshake Signal to Busy & Ack and then click OK.
Possible Solution:
Your printer may be configured to start printing after the first page is spooled, which can cause
printing problems in certain applications. You will need to change this setting.
Windows 98, NT, and Me users: Click Windows Start, Control Panel, and then Printers. Select
your printer and then click File, Properties, and then Details. Click the Spool Settings button,
select Start printing after last page is spooled, and then click OK.
Windows 2000 users: Click Windows Start, Settings, and then Printers. Right-click your printer,
click Properties, and then click the Advanced tab. Select Start printing after last page is spooled
and then click OK.
Windows XP users: Click Windows Start and then Printers and Faxes. Right-click your printer,
click Properties, and then click the Advanced tab. Select Start printing after last page is spooled
and then click OK.
5
Page 10

Are You Still Having Problems?
1. Go to the User Guide on the Installation CD-ROM.
More configuration and troubleshooting information is available in the User Guide on the Installation
CD-ROM.
2. Go to the Support section of the U.S Robotics Web site at www.usr.com.
Many of the most common difficulties users experience have been addressed in the FAQ and Troubleshooting Web pages for your specific product. Your product number is USR7500. You may need to know this to
obtain information on the U.S. Robotics Web site.
3. Call the U.S. Robotics Technical Support department.
Technical questions about U.S. Robotics products can also be answered by technical support specialists.
Country Voice Online Support Hours
United States (888) 216-2850 http://www.usr.com/emailsupport 9:00 A.M. - 5:00 P.M., M-F CST
Canada (888) 216-2850 http://www.usr.com/emailsupport 9:00 A.M. - 5:00 P.M., M-F CST
Austria 07 110 900 116 http://www.usr.com/emailsupport/de 9:00A.M.–17:00P.M.,M-F
Belgium (Flemish) +32 (0)70 233 545 http://www.usr.com/emailsupport/ea 9:00A.M.–17:00P.M.,M-F
Belgium (French) +32 (0)70 233 546 http://www.usr.com/emailsupport/ea 9:00A.M.–17:00P.M.,M-F
Denmark +45 7010 4030 http://www.usr.com/emailsupport/uk 9:00A.M.–17:00P.M.,M-F
Finland +358 98 171 0015 http://www.usr.com/emailsupport/ea 10:00A.M.–18:00P.M.,M-F
France 082 507 0693 http://www.usr.com/emailsupport/fr 9:00A.M.–17:00P.M.,M-F
Germany 01805671548 http://www.usr.com/emailsupport/de 9:00A.M.–17:00P.M.,M-F
Hungary 01805671548 http://www.usr.com/emailsupport/hu 9:00A.M.–17:00P.M.,M-F
Ireland +44 870 844 4546 http://www.usr.com/emailsupport/uk 9:00A.M.–18:00P.M.,M-F
Italy 848 80 9903 http://www.usr.com/emailsupport/it 9:00A.M.–17:00P.M.,M-F
Luxembourg +352 342 080 8318 http://www.usr.com/emailsupport/bn 9:00A.M.–17:00P.M.,M-F
Middle East/Africa +44 870 844 4546 http://www.usr.com/emailsupport/me 9:00A.M.–17:00P.M.,M-F
Netherlands 0900 20 25 857 http://www.usr.com/emailsupport/ea 9:00A.M.–17:00P.M.,M-F
Norway +47 23 50 0097 http://www.usr.com/emailsupport/ea 9:00A.M.–17:00P.M.,M-F
Poland http://www.usr.com/emailsupport/pl 8:00A.M.–18:00P.M.,M-F
Portugal +351 (0)21 415 4034 http://www.usr.com/emailsupport/pt 9:00A.M.–17:00P.M.,M-F
Spain 902 117 964 http://www.usr.com/emailsupport/es 9:00A.M.–17:00P.M.,M-F
Sweden +46 (0) 77 128 1020 http://www.usr.com/emailsupport/ea 9:00A.M.–17:00P.M.,M-F
Switzerland +0848 840 200 http://www.usr.com/emailsupport/de 9:00A.M.–17:00P.M.,M-F
UK 0870 844 4546 http://www.usr.com/emailsupport/uk 9:00A.M.–17:00P.M.,M-F
For current support contact information, go to the following web site: http://www.usr.com
6
Page 11

USR7500 USB Print Server
Guide d'installation
Package Contents:
• USR7500 USB Print Server
• Guide d'installation (le présent guide)
• Adaptateur secteur 9VDC/12VDC
• CD-ROM d'installation
Détails de Produit
Voyant DEL de statut (Status) :Ce voyant s'allume en vert lorsque l'USB Print Server est inactif.
S'il clignote en vert, des informations sont en cours de transmission et de réception.
Si ce voyant s'allume en vert et que le voyant DEL d'erreur (Error) est allumé, cela signifie qu'une erreur matérielle est survenue. Si ce voyant clignote en vert et que le
voyant d'erreur clignote également, cela signifie qu'une mise à jour du microcode est
en cours.
Voyant DEL d'erreur (Error) : Si ce voyant s'allume en rouge et que le voyant DEL de statut (Sta-
tus) est allumé, cela signifie qu'une erreur matérielle est survenue. S'il clignote en
rouge et que le voyant de statut clignote également, cela signifie qu'une mise à jour
du microcode est en cours.
Port USB : Utilisez ce port pour connecter une imprimante USB à l'USB Print Server
Port ENET : Utilisez ce port pour connecter l'USB Print Server à un routeur, un commutateur ou
un autre équipement réseau Ethernet.
9VDC/12VDC:Utilisez ce port pour connecter l'adaptateur secteur à l'USB Print Server.
Diagnostic :Maintenez ce bouton enfoncé pendant deux (2) secondes pour imprimer une page de
diagnostic indiquant les paramètres de l'USB Print Server. Pour rétablir les
paramètres par défaut et imprimer une page de diagnostic contenant des informations sur ces paramètres, débranchez l'adaptateur secteur de l'USB Print Server,
maintenez le bouton diagnostic enfoncé, puis rebranchez l'adaptateur secteur. Maintenez le bouton Diagnostic enfoncé pendant dix secondes pour rétablir les
paramètres par défaut.
Branchement de l'USR7500 USB Print Server
Remarque : pour obtenir les informations les plus récentes, rendez-vous sur le site
http://www.usr.com/support Pour obtenir des informations plus détaillées, vous pouvez
également consulter le guide de l'utilisateur sur le CD-ROM d'installation U.S. Robotics.
Préparation à l'installation
Remarque : votre numéro de modèle est le 7500. Vous trouverez le numéro de série sur
l'étiquette située sous l'USB Print Server et sur le côté de la boîte. Vous en aurez besoin si
vous devez appeler notre service d'assistance technique. assistance.
7
Page 12
Etape 1: Branchez l'extrémité carrée d'un câble USB
au port USB de votre imprimante. Insérez l'extrémité
rectangulaire du câble USB dans le port USB du serveur
d'impression. Assurez-vous que le cordon d'alimentation de l'imprimante est branché et que l'imprimante est
allumée.
Connectez l'une des extrémités d'un câble
Ethernet à votre routeur ou commutateur, et
l'autre extrémité au port Ethernet du serveur
d'impression.
Branchez l'une des extrémités de l'adaptateur secteur
fourni dans la prise d'alimentation de l'USB Print Server
et l'autre extrémité dans une prise murale d'alimentation
standard.
Etape 2: Assurez-vous que votre ordinateur est allumé. Insérez le CD-ROM d'installation dans
votre lecteur CD-ROM. Cliquez sur Setup Wizard (Assistant d'installation) et suivez les instructions à l'écran pour configurer les paramètres du serveur d'impression, pour installer le pilote de
l'USB Print Server et pour paramétrer l'imprimante.
Vous devrez ensuite installer le logiciel sur tous les ordinateurs qui utiliseront l'imprimante par le
biais du réseau. Insérez le CD-ROM d'installation dans votre lecteur CD-ROM. Cliquez sur Addi-
tional Computers (Ordinateurs supplémentaires) puis sur Next (Suivant). Sélectionnez User (Util-
isateur) puis suivez les instructions à l'écran. Pour plus de renseignements, reportez-vous au
guide de l'utilisateur sur le CD-ROM d'installation.
Une fois que vous aurez terminé la configuration de l'ordinateur principal et des ordinateurs clients, vous pourrez utiliser votre imprimante USB en réseau.
8
Page 13

Félicitations ! La procédure d'installation est terminée.
Lancez un navigateur Web et enregistrez votre produit à l'adresse www.usr.com/productreg
Nous nous efforçons constamment de fournir aux utilisateurs les renseignements les plus utiles.
Pour obtenir les informations les plus récentes sur la configuration et le dépannage, visitez le site
Web d'U.S. Robotics à l'adresse http://www.usr.com/support
9
Page 14

Dépannage
Pour obtenir de l'assistance sur Macintosh et sur Linux, reportez-vous à la section Dépannage du
guide d'utilisation sur le CD-ROM d'installation.
L'USB Print Server n'apparaît pas dans mon réseau.
Solution possible :
Assurez-vous que l'USB Print Server est branché et sous tension.
Solution possible :
Vérifiez que l'USB Print Server est connecté solidement au routeur, commutateur ou autre
équipement réseau Ethernet de votre réseau. Il est possible que vous ne puissiez pas accéder à
l'USB Print Server s'il est mal branché. Assurez-vous que votre routeur, commutateur ou autre
périphérique réseau Ethernet est allumé et sous tension. Essayez de recommencer la procédure
d'installation.
Solution possible :
Assurez-vous que le protocole réseau TCP/IP est installé sur votre ordinateur. Si ce n'est pas le
cas, reportez-vous à la documentation de votre système d'exploitation.
Solution possible :
Il est possible que l'USB Print Server ne reçoive pas une adresse IP ou il peut y avoir un conflit
d'adresses IP avec un autre équipement du réseau. Débranchez puis rebranchez l'adaptateur
secteur de l'USB Print Server. Ainsi, l'adresse IP sera libérée et l'USB Print Server pourra recevoir
une nouvelle adresse IP du serveur DHCP de votre réseau.
Solution possible :
Si vous utilisez un câble croisé Ethernet, il est possible que l'USB Print Server n'apparaisse pas
dans votre réseau. Vérifiez que vous utilisez un câble Ethernet standard et non un câble croisé
Ethernet. En cas de doute, essayez de connecter l'USB Print Server à votre équipement réseau à
l'aide d'un autre câble Ethernet.
Solution possible :
Si l'USB Print Server n'apparaît toujours pas dans votre réseau, recommencez la procédure
d'installation.
L'imprimante n'apparaît pas après l'avoir connectée à l'USB Print Server.
Solution possible :
Assurez-vous que l'imprimante est branchée solidement à l'USB Print Server. Il est possible que
vous ne puissiez pas accéder à l'imprimante si elle est mal branchée. Essayez de recommencer la
procédure d'installation.
Le voyant DEL de statut de l'USB Print Server reste constamment allumé.
Solution possible :
Réinitialisez l'USB Print Server en débranchant puis en rebranchant l'adaptateur secteur. Si l'USB
10
Page 15

Print Server n'est pas réinitialisé, rétablissez les paramètres par défaut. Débranchez l'adaptateur
secteur de l'USB Print Server, maintenez le bouton Diagnostic enfoncé, puis rebranchez
l'adaptateur secteur. Maintenez le bouton Diagnostic enfoncé pendant dix secondes.
J'ai installé mon imprimante multifonctions, mais les fonctionnalités fax et
scanner ne sont pas disponibles.
Solution possible :
Si vous connectez une imprimante multifonctions (imprimante/fax/scanner) à l'USB Print Server,
seule la fonctionnalité d'impression sera disponible. Pour utiliser les autres fonctionnalités de
votre imprimante multifonctions, vous devez la connecter directement à votre ordinateur.
J'ai essayé d'installer le logiciel pour l'impression Client à Client, mais un
message d'erreur s'est affiché et l'installation a échoué.
Solution possible :
Si vous avez précédemment installé le logiciel de l'USB Print Server, vous devrez le désinstaller
avant de pouvoir installer le logiciel Client à Client. Cliquez sur Démarrer, Programmes, puis U.S.
Robotics Print Server. Sélectionnez Uninstall USB Print Server Driver (Désinstaller le pilote de
l'USB Print Server) puis suivez les instructions à l'écran. Lorsque la désinstallation est terminée,
vous devez redémarrer votre ordinateur. Vous pourrez alors installer le logiciel Client à Client.
Certains travaux d'impression ne s'impriment pas correctement.
Solution possible :
Vérifiez que le pilote requis pour votre imprimante est installé sur chacun des ordinateurs de
votre réseau. Pour savoir de quel pilote vous avez besoin, consultez la documentation de votre
imprimante.
Solution possible :
Si vous utilisez une imprimante ancienne et lente, vous devrez peut-être modifier la configuration
du signal d'établissement de liaison. Cliquez sur Démarrer, Programmes, puis U.S. Robotics
Print Server. Sélectionnez Bi-Admin Management Utility (Utilitaire d'administration Bi-Admin).
Cliquez sur l'icône Configuration puis sur l'onglet Port. Pour le signal d'établissement de liaison
(Handshake Signal), spécifiez Busy & Ack (Occupé et accusé de réception), puis cliquez sur OK.
Solution possible :
Votre imprimante est peut-être configurée pour commencer à imprimer après la mise en attente
de la première page, ce qui peut provoquer des problèmes d'impression dans certaines applications. Vous devez modifier ce paramètre. Utilisateurs de Windows 98, NT, et Me : cliquez sur
Démarrer, Paramètres, Panneau de configuration puis sur Imprimantes. Sélectionnez votre
imprimante puis cliquez sur Fichier, Propriétés, puis Détails. Cliquez sur le bouton Paramètres du
spouleur, sélectionnez Commencer l'impression une fois la dernière page spoulée, puis cliquez
sur OK.
Utilisateurs de Windows 2000 : cliquez sur Démarrer, Paramètres, puis sur Imprimantes. Cliquez
avec le bouton droit de la souris sur votre imprimante, cliquez sur Propriétés, puis sur l'onglet
11
Page 16

Avancé. Sélectionnez Commencer l'impression une fois la dernière page spoulée puis cliquez
sur OK.
Utilisateurs de Windows XP : cliquez sur Démarrer, puis sur Imprimantes et télécopieurs.
Cliquez avec le bouton droit de la souris sur votre imprimante, cliquez sur Propriétés, and puis
sur l'onglet Avancé. Sélectionnez Commencer l'impression une fois la dernière page spoulée
puis cliquez sur OK.
Are You Still Having Problems?
1. Allez à la section Support du site Web d'U.S. Robotics à l'adresse www.usr.com.
Vous trouverez la réponse à la plupart des problèmes rencontrés par les utilisateurs dans les
pages Web FAQ et Dépannage consacrées à votre produit. Votre numéro de produit est USR7500.
Vous en aurez besoin pour obtenir des informations sur le site Web d'U.S. Robotics.
2. Contactez le service d'assistance technique d'U.S. Robotics. Nos spécialistes peuvent aussi
répondre aux questions techniques concernant les produits U.S. Robotics.
Pays Téléphone En ligne Horaires d'ouverture
Etats-Unis (888) 216-2850 http://www.usr.com/emailsupport 9h à 17h CST, du L au V
Canada (888) 216-2850 http://www.usr.com/emailsupport 9h à 17h CST, du L au V
Allemagne 0180 567 1548 http://www.usr.com/emailsupport/de 9h - 17h du L au V
Autriche 07110 900116 http://www.usr.com/emailsupport/de 9h - 17h du L au V
Belgique
(Flamand) +32 (0) 7 023 3545 (Flamand) http://www.usr.com/emailsupport/ea 9h - 17h du L au V
(Français) +32 (0) 7 023 3546 (Français) http://www.usr.com/emailsupport/ea 9h - 17h du L au V
Danemark +45 70 10 4030 http://www.usr.com/emailsupport/uk 9h - 17h du L au V
Espagne 902 11 7964 http ://www.usr.com/emailsupport/es 9h - 17h du L au V
Finlande +358 981710015 http://www.usr.com/emailsupport/ea 9h - 17h du L au V
France +33 082 507 0693 http://www.usr.com/emailsupport/fr 9h - 17h du L au V
Hongrie 0180 567 1548 http://www.usr.com/emailsupport/hu 9h - 17h du L au V
Irlande +44 870 844 4546 http://www.usr.com/emailsupport/uk 9h - 17h du L au V
Italie +848 80 9903 http://www.usr.com/emailsupport/it 9h - 17h du L au V
Luxembourg +352 342 080 8318 http://www.usr.com/emailsupport/bn 9h - 17h du L au V
Moyen-Orient/ Afrique +44 870 844 4546 http://www.usr.com/emailsupport/me 9h - 17h du L au V
Norvège +47 23 50 0097 http://www.usr.com/emailsupport/ea 9h - 17h du L au V
Pays-Bas 0900 202 5857 http://www.usr.com/emailsupport/ea 9h - 17h du L au V
Pologne --- http://www.usr.com/emailsupport/pl 8h - 18h du L au V
Portugal +351 (0) 21 415 4034 http://www.usr.com/emailsupport/pt 9h - 17h du L au V
Royaume-Uni 0870 844 4546 http://www.usr.com/emailsupport/uk 9h - 17h du L au V
Russie 8-800-200-200-1 http://www.usr.com/emailsupport/ru 10h - 18h du L au V
Suède +46 (0) 77 128 1020 http://www.usr.com/emailsupport/ea 9h - 17h du L au V
Suisse 0848 840 200 http://www.usr.com/emailsupport/de 9h - 17h du L au V
Pour obtenir les coordonnées les plus récentes de l'assistance technique, visitez le site Web suivant: http://www.usr.com/support
12
Page 17

USR7500 USB Print Server
Installationsanleitung
Packungsinhalt:
• USR7500 USB Print Server
• Installationsanleitung (dieses Dokument)
• Netzteil, 9 V/12V Gleichspannung
• Installations-CD-ROM
Produktangaben
Status LED (Statusanzeige):Wenn diese Anzeige grün leuchtet, befindet sich der USB Print
Server im Leerlauf. Blinkt diese Anzeige grün, werden Informationen
übertragen und empfangen. Leuchtet diese Anzeige grün und die
Error LED (Fehleranzeige) leuchtet gleichzeitig, liegt ein
Hardwarefehler vor. Blinkt diese Anzeige grün und die Fehleranzeige
Error LED (Fehleranzeige): Wenn diese Anzeige rot leuchtet und die Statusanzeige ebenfalls
USB Port (USB-Anschluss): Über diesen Anschluss verbinden Sie einen USB-Drucker mit dem
ENET Port (ENET-Anschluss): Über diesen Anschluss verbinden Sie den USB Print Server mit
9VDC/12VDC: Der Anschluss für das Netzkabel.
Diagnostic (Diagnose): Drücken und halten Sie diese Taste zwei (2) Sekunden lang, um eine
ebenfalls, wird gerade ein Firmware-Upgrade durchgeführt.
leuchtet, liegt ein Hardwarefehler vor. Blinkt diese Anzeige rot und
die Statusanzeige blinkt ebenfalls, wird gerade ein FirmwareUpgrade durchgeführt. Wenn diese Anzeige rot blinkt und die
Statusanzeige leuchtet, ist kein Drucker an den USB-Anschluss
angeschlossen.
USB Print Server.
einem Router, Switch oder einem anderen Ethernet-Netzwerkgerät.
Diagnoseseite mit den USB Print Server-Einstellungen
auszudrucken. Wenn Sie die werkseitigen Voreinstellungen
wiederherstellen und eine Diagnoseseite mit den
Standardeinstellungen ausdrucken möchten, ziehen Sie zuerst das
Netzteil des USB Print Servers. Drücken und halten Sie dann die
Diagnosetaste, während Sie das Netzteil wieder einstecken. Halten
Sie die Diagnosetaste zehn Sekunden lang gedrückt, um die
werkseitigen Voreinstellungen wiederherzustellen.
Anschließen des USR7500 USB Print Servers
Hinweis: Die aktuellsten Informationen finden Sie auf unserer Website unter:
http://www.usr.com/support Sie können sie auch in der Bedienungsanleitung auf der
Installations-CD-ROM nachlesen.
Vorbereiten der Installation
Hinweis: Ihre Modellnummer lautet 7500. Sie finden die Seriennummer auf dem Etikett an
der Unterseite des USR7500 USB Print Servers und auf der Packungsseite. Notieren Sie
sich die Seriennummer. Sie benötigen sie, wenn Sie sich an unseren Technischen Support
wenden.
13
Page 18

1. Schritt: Stecken Sie das quadratische Ende des
USB-Kabels in den USB-Anschluss des Druckers.
Stecken Sie das dünne rechteckige Ende des
USB-Kabels in den USB-Anschluss des USB Print
Servers. Vergewissern Sie sich, dass das Netzkabel Ihres
Druckers angeschlossen und der Drucker eingeschaltet
ist.
Verbinden Sie das eine Ende eines EthernetKabels mit Ihrem Router oder Switch und das
andere Ende mit dem Ethernet-Anschluss des
USB Print Server.
Stecken Sie das im Lieferumfang enthaltene Netzkabel in
den Netzanschluss des USB Print Servers. Stecken Sie
das Netzteil in eine Steckdose.
2. Schritt: Achten Sie darauf, dass Ihr Computer eingeschaltet ist. Legen Sie die
Installations-CD-ROM in das CD-ROM-Laufwerk ein. Klicken Sie auf
(Setup-Assistent) und folgen Sie den Anweisungen auf dem Bildschirm, um die Einstellungen für
den USB Print Servers zu konfigurieren, den Treiber des USB Print Servers zu installieren und den
Drucker einzurichten.
Anschließend müssen Sie die Software auf allen Computern installieren, die den Drucker über
das Netzwerk verwenden. Legen Sie die Installations-CD-ROM in das CD-ROM-Laufwerk ein.
Klicken Sie auf Additional Computers (Weitere Computer) und dann auf Next (Weiter). Klicken Sie
auf User (Benutzer) und folgen Sie den Anweisungen auf dem Bildschirm. Weitere Informationen
finden Sie in der Bedienungsanleitung auf der Installations-CD-ROM.
Wenn das Setup des Hauptcomputers und evtl. der Client-Computer abgeschlossen ist, können
Sie den USB-Drucker über Ihr Netzwerk verwenden.
14
Setup Wizard
Page 19

Herzlichen Glückwunsch! Der Installationsvorgang ist jetzt abgeschlossen.
Starten Sie Ihren Web-Browser und registrieren Sie Ihr Produkt unter www.usr.com/productreg
Wir bemühen uns, Benutzern stets nützliche Informationen zu liefern. Die aktuellsten
Konfigurations- und Fehlerbehebungsinformationen finden Sie auf der U.S. Robotics-Website
unter: http://www.usr.com/support
15
Page 20

Fehlerbehebung
Hilfe für Macintosh und Linux finden Sie im Abschnitt "Fehlerbehebung" in der
Bedienungsanleitung auf der Installations-CD-ROM.
Der USB Print Server ist in meinem Netzwerk nicht sichtbar.
Lösungsvorschlag:
Stellen Sie sicher, dass der USB Print Server an die Stromversorgung angeschlossen ist und auch
mit Strom versorgt wird.
Lösungsvorschlag:
Stellen Sie sicher, dass der USB Print Server fest mit dem Router, Switch oder einem anderen
Ethernet-Netzwerkgerät im Netzwerk verbunden ist. Möglicherweise können Sie wegen einer
losen Verbindung nicht auf den USB Print Server zugreifen. Stellen Sie sicher, dass Router,
Switch oder ein anderes Ethernet-Netzwerkgeräte mit Strom versorgt wird und eingeschaltet ist.
Wiederholen Sie evtl. die Installationsschritte.
Lösungsvorschlag:
Vergewissern Sie sich, dass das TCP/IP-Netzwerkprotokoll auf Ihrem Computer installiert ist.
Lesen Sie in der Betriebssystem-Dokumentation nach, wenn kein TCP/IP-Netzwerkprotokoll
installiert ist.
Lösungsvorschlag:
Der USB Print Server erhält möglicherweise keine IP-Adresse oder es besteht ein
IP-Adressenkonflikt mit einem anderen Gerät im Netzwerk. Ziehen Sie das Netzteil des USB Print
Servers aus der Steckdose und stecken Sie es anschließend wieder ein. Auf diese Weise wird die
IP-Adresse freigegeben und der USB Print Server kann vom DHCP-Server in Ihrem Netzwerk eine
neue IP-Adresse erhalten.
Lösungsvorschlag:
Wenn Sie ein Ethernet-Crossover-Kabel verwenden, wird der USB Print Server möglicherweise
nicht in Ihrem Netzwerk angezeigt. Stellen Sie sicher, dass Sie ein Standard-Ethernet-Kabel und
kein Crossover-Kabel verwenden. Wenn Sie nicht sicher sind, ob Ihr Kabel ein Standard- oder
Crossover-Kabel ist, verbinden Sie den USB Print Server versuchsweise über ein anderes Kabel
mit dem Netzwerk.
Lösungsvorschlag:
Wird der USB Print Server weiterhin nicht im Netzwerk angezeigt, wiederholen
Sie den Installationsvorgang.
Der Drucker erscheint nicht, nachdem er mit dem USB Print Server
verbunden wurde.
Lösungsvorschlag:
Stellen Sie sicher, dass der Drucker fest mit dem USB Print Server verbunden ist. Eine lose
Verbindung kann den Zugriff auf den Drucker verhindern. Wiederholen Sie evtl. die
Installationsschritte.
Die Statusanzeige des USB Print Servers leuchtet ständig.
Lösungsvorschlag:
Setzen Sie den USB Print Server zurück, indem Sie das Netzteil aus der Steckdose ziehen und
16
Page 21

anschließend erneut einstecken. Wird der USB Print Server auf diese Weise nicht zurückgesetzt,
stellen Sie die werkseitigen Voreinstellungen wieder her. Ziehen Sie das Netzteil des USB Print
Servers, drücken und halten Sie die Diagnosetaste und stecken Sie das Netzteil wieder ein.
Halten Sie die Diagnosetaste weitere zehn Sekunden lang gedrückt.
Ich habe mein Multifunktionsgerät installiert, Fax und Scanner
funktionieren jedoch nicht.
Lösungsvorschlag:
Wenn Sie ein Multifunktionsgerät (Drucker/Fax/Scanner) mit dem USB Print Server verbinden,
funktioniert nur der Drucker. Möchten Sie auch die anderen Funktionen Ihres
Multifunktionsgeräts nutzen, muss es direkt an einen Computer angeschlossen werden.
Bei dem Versuch, die Software für Peer-to-Peer-Druck zu installieren,
erscheint eine Fehlermeldung und die Installation wird abgebrochen.
Lösungsvorschlag:
Wenn Sie vorher bereits die USB Print Server-Software installiert haben, müssen Sie diese erst
deinstallieren, bevor Sie die Peer-to-Peer-Software installieren können. Klicken Sie auf Windows
Start, Programme und dann U.S. Robotics Print Server (U.S. Robotics Druckserver). Klicken Sie
auf Uninstall USB Print Server Driver (USB Print Server-Treiber deinstallieren) und folgen Sie
den Anweisungen auf dem Bildschirm. Nach der Deinstallierung müssen Sie den Computer neu
starten. Anschließend können Sie die Peer-to-Peer-Software installieren.
Einige Druckaufträge werden nicht korrekt ausgedruckt.
Lösungsvorschlag:
Stellen Sie sicher, dass Sie auf jedem Computer im Netzwerk den richtigen Druckertreiber
installiert haben. Überprüfen Sie die Angaben in der Dokumentation Ihres Druckers.
Lösungsvorschlag:
Wenn Sie mit einem älteren, langsamen Drucker arbeiten, müssen Sie möglicherweise die
Konfigurationseinstellung für das Handshake-Signal ändern. Klicken Sie auf Windows Start,
Programme und dann U.S. Robotics Print Server (U.S. Robotics Druckserver). Wählen Sie
Bi-Admin Mangement Utility (Verwaltungsprogramm Bi-Admin). Klicken Sie auf das Symbol
"Konfiguration" und dann auf die Registerkarte "Port" (Anschluss). Ändern Sie das
Handshake-Signal auf Busy & Ack (Auslastung und Anerkennung) und klicken Sie dann auf OK.
Lösungsvorschlag:
Ihr Drucker ist möglicherweise so konfiguriert, dass er erst mit dem Drucken beginnt, nachdem
die erste Seite gespoolt ist. Dies kann bei bestimmten Anwendungen zu Druckfehlern führen.
Ändern Sie diese Einstellung wie folgt:
Unter Windows 9x, NT und Me: Klicken Sie unter Windows auf Start, Einstellungen,
Systemsteuerung und dann Drucker. Wählen Sie Ihren Drucker und klicken Sie dann auf Datei,
Eigenschaften, Details. Klicken Sie auf die Schaltfläche Spool-Einstellungen, wählen Sie
Drucken nach Eintreffen der letzen Seite in der Warteschlange beginnen und klicken Sie dann
auf OK.
Benutzer von Windows 2000: Klicken Sie auf Start, Einstellungen, Systemsteuerung und dann
auf Drucker. Klicken Sie mit der rechten Maustaste auf Ihren Drucker, wählen Sie Eigenschaften
17
Page 22

und klicken Sie dann auf die Registerkarte "Erweitert". Wählen Sie Drucken nach Eintreffen der
letzen Seite in der Warteschlange beginnen und klicken Sie dann auf OK.
Benutzer von Windows XP: Klicken Sie auf Start und dann auf Drucker und Faxgeräte. Klicken
Sie mit der rechten Maustaste auf Ihren Drucker, wählen Sie Eigenschaften und klicken Sie dann
auf die Registerkarte "Erweitert". Wählen Sie Drucken nach Eintreffen der letzten Seite in der
Warteschlange beginnen und klicken Sie dann auf OK.
Haben Sie Ihr Problem immer noch nicht gelöst?
1. Lesen Sie in der Bedienungsanleitung auf der Installations-CD-ROM nach.
Genauere Informationen zur Konfiguration und Fehlerbehebung finden Sie in der Bedienungsanleitung auf
der Installations-CD-ROM.
2. Gehen Sie unter www.usr.com zum Support-Bereich der U.S. Robotics-Website.
Viele der am häufigsten auftretenden Schwierigkeiten, die Benutzer erleben, werden in den FAQ (Häufig
gestellte Fragen) und den Webseiten zur Fehlerbehebung für Ihr Produkt angesprochen. Ihre
Produktnummer lautet USR7500. Sie müssen sie kennen, um Informationen von der U.S. Robotics-Website
zu erhalten.
3. Wenden Sie sich an den Technischen Support von U.S. Robotics.
Technische Fragen zu U.S. Robotics-Produkten werden dort von Experten beantwortet.
Land Telefon Online Öffnungszeiten
USA (888) 216-2850 http://www.usr.com/emailsupport 9:00 - 17:00 Uhr Ortszeit, Mo - Fr
Kanada (888) 216-2850 http://www.usr.com/emailsupport 9:00 - 17:00 Uhr Ortszeit, Mo - Fr
Österreich 07 110 900 116 http://www.usr.com/emailsupport/de 9:00 – 17:00 Uhr, Mo – Fr
Belgien (Niederländisch) +32 (0)70 233 545 http://www.usr.com/emailsupport/ea 9:00 – 17:00 Uhr, Mo – Fr
Belgien (Französisch) +32 (0)70 233 546 http://www.usr.com/emailsupport/ea 9:00 – 17:00 Uhr, Mo – Fr
Dänemark +45 7010 4030 http://www.usr.com/emailsupport/uk 9:00 – 17:00 Uhr, Mo – Fr
Finnland +358 98 171 0015 http://www.usr.com/emailsupport/ea 10:00 - 18:00 Uhr Ortszeit, Mo - Fr
Frankreich 082 507 0693 http://www.usr.com/emailsupport/fr 9:00 – 17:00 Uhr, Mo – Fr
Deutschland 01805671548 http://www.usr.com/emailsupport/de 9:00 – 17:00 Uhr, Mo – Fr
Ungarn 01805671548 http://www.usr.com/emailsupport/hu 9:00 - 17:00 Uhr, Mo - Fr
Irland +44 870 844 4546 http://www.usr.com/emailsupport/uk 9:00 - 18:00 Uhr Ortszeit, Mo - Fr
Italien 848 80 9903 http://www.usr.com/emailsupport/it 9:00 – 17:00 Uhr, Mo – Fr
Luxemburg +352 342 080 8318 http://www.usr.com/emailsupport/bn 9:00 - 17:00 Uhr, Mo - Fr
Nahost/Afrika +44 870 844 4546 http://www.usr.com/emailsupport/me 9:00 - 17:00 Uhr Ortszeit, Mo - Fr
Niederlande 0900 20 25 857 http://www.usr.com/emailsupport/ea 9:00 - 17:00 Uhr, Mo - Fr
Norwegen +47 23 50 0097 http://www.usr.com/emailsupport/ea 9:00 - 17:00 Uhr, Mo - Fr
Polen http://www.usr.com/emailsupport/pl 8:00 - 18:00 Uhr, Mo - Fr
Portugal +351 (0)21 415 4034 http://www.usr.com/emailsupport/pt 9:00 – 17:00 Uhr, Mo – Fr
Spanien 902 117 964 http://www.usr.com/emailsupport/es 9:00 – 17:00 Uhr, Mo – Fr
Schweden +46 (0)77 128 1020 http://www.usr.com/emailsupport/ea 9:00 – 17:00 Uhr, Mo – Fr
Schweiz +0848 840 200 http://www.usr.com/emailsupport/de 9:00 – 17:00 Uhr, Mo – Fr
Großbritannien 0870 844 4546 http://www.usr.com/emailsupport/uk 9:00 - 17:00 Uhr Ortszeit, Mo - Fr
Aktuelle Support-Adressen finden Sie stets auf der folgenden Website: http://www.usr.com
18
Page 23

USR7500 USB Print Server
Guida all'installazione rapida
Contenuto della confezione:
• USR7500 USB Print Server
• Guida all'installazione (questa guida)
• Alimentatore 9VDC/12VDC
• CD-ROM di installazione
Dettagli sul prodotto
LED Status (Stato): se questo LED si illumina di verde, USB Print Server è inattivo. Se
LED Error (Errore): se questo LED si illumina di rosso e il LED Status è acceso, si è
Porta USB: questa porta consente di collegare una stampante USB a USB Print
Porta ENET: questa porta consente di collegare USB Print Server a un router, a uno
9VDC/12VDC: questa porta consente di collegare l'alimentatore a USB Print Server.
Diagnostic (Diagnostica):tenere premuto il pulsante per due (2) secondi per stampare una
questo LED è verde lampeggiante, è in corso la trasmissione e la
ricezione delle informazioni. Se questo LED si illumina di verde e il LED
Error (Errore) è illuminato, si è verificato un errore relativo
all'hardware. Se questo LED è verde lampeggiante e il LED Error
lampeggia, è in corso l'aggiornamento del firmware.
verificato un errore hardware. Se questo LED lampeggia in rosso e il
LED Status lampeggia, è in corso l'aggiornamento del firmware. Se
questo LED lampeggia in rosso e il LED Status è acceso, alla porta USB
non è collegata alcuna stampante.
Server.
switch o a un altro dispositivo di rete Ethernet.
pagina di diagnostica contenente le impostazioni di USB Print Server.
Per ripristinare le impostazioni predefinite e stampare una pagina di
diagnostica contenente le informazioni sulle impostazioni predefinite,
scollegare l'alimentatore di USB Print Server, tenere premuto il
pulsante di diagnostica e ricollegare l'alimentatore del dispositivo.
Ripristinare le impostazioni predefinite tenendo premuto il tasto
Diagnostic per 10 secondi.
Connessione di USR7500 USB Print Server
Nota: per ottenere le informazioni più aggiornate, visitare l'indirizzo
http://www.usr.com/support In alternativa, consultare la guida utente sul CD-ROM di
installazione U.S. Robotics per istruzioni più dettagliate.
Prima dell'installazione
Nota: il numero di modello è 7500. Il numero di serie è indicato sull'etichetta inferiore di
USR7500 USB Print Server e sul lato della sua confezione. Annotare il numero di serie nello
spazio sottostante. Il numero di serie è necessario per ottenere l'assistenza del supporto
tecnico.
19
Page 24

Fase uno - Collegare l'estremità quadrata di un cavo
USB alla relativa porta sulla stampante. Collegare
l'estremità rettangolare sottile del cavo USB a una porta
USB disponibile sul server di stampa. Accertarsi che il
cavo di alimentazione della stampante sia inserito e la
stampante sia accesa.
Collegare un'estremità del cavo Ethernet al
router o allo switch e l'altra estremità alla
porta Ethernet sul server di stampa.
Collegare l'adattatore di alimentazione in dotazione alla
presa di USB Print Server. Inserire la spina dell'adattatore
di alimentazione in una presa di corrente standard.
Fase due - Accertarsi che il computer sia acceso. Inserire il CD-ROM di installazione nell'unità
CD-ROM. Fare clic sull'installazione guidata e seguire le istruzioni visualizzate per configurare le
impostazioni del server di stampa, installare il driver di USB Print Server e impostare la
stampante.
Successivamente, installare il software sui computer che utilizzano la stampante in rete. Inserire
il CD-ROM di installazione nell'unità CD-ROM. Fare clic su Additional Computers (Computer
aggiuntivi), quindi fare clic su Next (Avanti). Selezionare User (Utente) e seguire le istruzioni
visualizzate. Per ulteriori informazioni, consultare la guida utente sul CD-ROM di installazione.
Dopo aver terminato la configurazione del computer principale e dei computer client, sarà
possibile utilizzare la stampante USB sulla rete.
20
Page 25

Congratulazioni! La procedura di installazione è completa.
Avviare un browser Web e registrare il prodotto all'indirizzo www.usr.com/productreg
Ci preoccupiamo di fornire agli utenti le informazioni più utili. Per ottenere informazioni sulla
configurazione più aggiornate e la risoluzione dei problemi, visitare il sito Web di U.S.Robotics
all'indirizzo http://www.usr.com/support
21
Page 26

Risoluzione di problemi
Per l'assistenza Macintosh e Linux, fare riferimento alla sezione Risoluzione di problemi della
guida utente nel CD-ROM di installazione.
USB Print Server non viene visualizzato in rete.
Soluzione possibile
Accertarsi che USB Print Server riceva alimentazione.
Soluzione possibile
Accertarsi che USB Print Server sia collegato in modo corretto al router, allo switch o a un
dispositivo di rete Ethernet sulla rete. Una connessione allentata potrebbe impedire l'accesso
a USB Print Server. Accertarsi che il router, lo switch o il dispositivo di rete Ethernet riceva
alimentazione e sia acceso. Provare a ripetere la procedura di installazione.
Soluzione possibile
Accertarsi che il computer disponga di un protocollo di rete TCP/IP installato. Se non si dispone
del protocollo di rete TCP/IP, consultare la documentazione relativa al sistema operativo in uso.
Soluzione possibile
USB Print Server potrebbe non ricevere un indirizzo IP o potrebbe esistere un conflitto tra
l'indirizzo IP e un altro dispositivo di rete. Scollegare e ricollegare l'alimentazione di USB Print
Server. In questo modo, viene rilasciato l'indirizzo IP e si consente a USB Print Server di ricevere
un nuovo indirizzo IP dal server DHCP della rete.
Soluzione possibile
Se si utilizza un cavo crossover Ethernet, USB Print Server potrebbe non essere visualizzato in
rete. Accertarsi di utilizzare un cavo Ethernet standard e non un cavo crossover Ethernet. Se non
si è certi se il cavo Ethernet in uso è standard o crossover, provare a collegare USB Print Server al
dispositivo di rete utilizzando un cavo Ethernet differente.
Soluzione possibile
Se USB Print Server continua a non essere visualizzato in rete, ripetere la procedura di
installazione.
La stampante non viene visualizzata dopo averla collegata a USB Print
Server.
Soluzione possibile
Accertarsi che la stampante sia ben collegata a USB Print Server. Una connessione allentata
potrebbe impedire l'accesso alla stampante. Provare a ripetere la procedura di installazione.
Il LED Status (Stato) di USB Print Server rimane acceso.
Soluzione possibile
Reimpostare USB Print Server scollegando e ricollegando l'alimentatore. Se USB Print Server
non viene reimpostato, sarà necessario ripristinare le impostazioni predefinite. Scollegare
22
Page 27

l'alimentatore di USB Print Server, tenere premuto il pulsante Diagnostic (Diagnostica)
e ricollegare l'alimentatore. Tenere premuto il pulsante Diagnostic per altri 10 secondi.
La stampante multifunzione è stata installata ma le funzionalità fax e
scanner non sono disponibili.
Soluzione possibile
Se una stampante multifunzione (stampante/fax/scanner) è collegata a USB Print Server,
è disponibile solo la funzionalità della stampante. Se si desidera utilizzare le altre funzioni della
stampante multifunzione, è necessario collegarla direttamente a un computer.
Durante l'installazione del software per la stampa Peer-to-Peer è stato
visualizzato un messaggio di errore e l'installazione è stata interrotta.
Soluzione possibile
Se il software di USB Print Server è già stato installato in precedenza, è necessario disinstallarlo
prima di poter installare il software Peer-to-Peer. Fare clic su Start, Programmi, quindi su U.S.
Robotics Print Server. Selezionare Uninstall USB Print Server Driver (Disinstalla driver di USB
Print Server) e seguire le istruzioni visualizzate. Al termine della procedura di disinstallazione, è
necessario riavviare il computer. Successivamente, sarà possibile installare il software Peer-toPeer.
Alcuni lavori di stampa non vengono stampati correttamente.
Soluzione possibile
Accertarsi che ogni computer sulla rete disponga del driver corretto per la stampante di rete.
Consultare la documentazione per la stampante per verificare questa informazione.
Soluzione possibile
Se si utilizza una stampante meno recente e a bassa velocità, potrebbe essere necessario
modificare l'impostazione di configurazione del segnale di handshake. Fare clic su Start,
Programmi, quindi su U.S. Robotics Print Server. Selezionare l'utilità di gestione Bi-Admin.
Fare clic sull'icona di configurazione, quindi sulla scheda Port (Porta). Modificare il segnale di
handshake in Busy & Ack (Occupato e libero), quindi fare clic su OK.
Soluzione possibile
La stampante potrebbe essere configurata per avviare la stampa dopo lo spooling della prima
pagina, con conseguenti problemi di stampa in alcune applicazioni. È necessario modificare
questa impostazione.
Utenti Windows 98, NT e Me - Fare clic su Start, Pannello di controllo, quindi su Stampanti.
Selezionare la stampante in uso, quindi fare clic su File, Proprietà, Dettagli. Fare clic sul pulsante
Imposta spooler, selezionare Inizia stampa al termine dello spooling dell'ultima pagina, quindi
fare clic su OK.
Utenti Windows 2000 - Fare clic su Start, Impostazioni, quindi su Stampanti. Fare clic con il
pulsante destro del mouse sulla stampante, selezionare Proprietà, quindi la scheda Avanzate.
Selezionare Inizia stampa al termine dello spooling dell'ultima pagina, quindi fare clic su OK.
23
Page 28

Per utenti Windows XP - Fare clic su Start, quindi su Stampanti e fax. Fare clic con il pulsante
destro del mouse sulla stampante, fare clic su Proprietà, quindi sulla scheda Avanzate.
Selezionare Inizia stampa al termine dello spooling dell'ultima pagina, quindi fare clic su OK.
Si continuano a riscontrare problemi di funzionamento?
1. Consultare la guida utente nel CD-ROM di installazione.
Per ulteriori informazioni sulla risoluzione di problemi e sulla configurazione, consultare la guida utente nel
CD-ROM di installazione.
2. Consultare la sezione Assistenza del sito Web di U.S. Robotics all'indirizzo www.usr.com.
La maggior parte dei problemi riscontrati dagli utenti sono trattati nelle pagine del sito Web che riportano le
domande frequenti (FAQ) e la risoluzione dei problemi per un dato prodotto. Il numero di questo prodotto è
USR7500. Per ricevere informazioni sul sito Web di U.S. Robotics, potrebbe essere necessario conoscere il
numero di modello.
3. Rivolgersi al reparto di assistenza tecnica U.S. Robotics.
Il personale addetto all'assistenza è in grado di rispondere a quesiti di natura tecnica circa i prodotti
U.S. Robotics.
Paese Telefono Online Orario
Stati Uniti (888) 216-2850 http://www.usr.com/emailsupport 9:00 - 17:00, lun-ven
Canada (888) 216-2850 http://www.usr.com/emailsupport 9:00 - 17:00, lun-ven
Austria 07 110 900 116 http://www.usr.com/emailsupport/de 9:00 - 17:00, lun-ven
Belgio (area fiamminga) +32 (0)70 233 545 http://www.usr.com/emailsupport/ea 9:00 - 17:00, lun-ven
Belgio (Francia) +32 (0)70 233 546 http://www.usr.com/emailsupport/ea 9:00 - 17:00, lun-ven
Danimarca +45 7010 4030 http://www.usr.com/emailsupport/uk 9:00 - 17:00, lun-ven
Finlandia +358 98 171 0015 http://www.usr.com/emailsupport/ea 10:00 - 18:00, lun-ven
Francia 082 507 0693 http://www.usr.com/emailsupport/fr 9:00 - 17:00, lun-ven
Germania 01805671548 http://www.usr.com/emailsupport/de 9:00 - 17:00, lun-ven
Ungheria 01805671548 http://www.usr.com/emailsupport/hu 9:00 - 17:00, lun-ven
Irlanda +44 870 844 4546 http://www.usr.com/emailsupport/uk 9:00 - 18:00, lun-ven
Italia 848 80 9903 http://www.usr.com/emailsupport/it 9:00 - 17:00, lun-ven
Lussemburgo +352 342 080 8318 http://www.usr.com/emailsupport/bn 9:00 -17:00, lun-ven
Medio Oriente e Africa +44 870 844 4546 http://www.usr.com/emailsupport/me 9:00 - 17:00, lun-ven
Paesi Bassi 0900 20 25 857 http://www.usr.com/emailsupport/ea 9:00 - 17:00, lun-ven
Norvegia +47 23 50 0097 http://www.usr.com/emailsupport/ea 9:00 - 17:00, lun-ven
Polonia http://www.usr.com/emailsupport/pl 8:00 - 18:00, lun-ven
Portogallo +351 (0)21 415 4034 http://www.usr.com/emailsupport/pt 9:00 - 17:00, lun-ven
Spagna 902 117 964 http://www.usr.com/emailsupport/es 9:00 - 17:00, lun-ven
Svezia +46 (0) 77 128 1020 http://www.usr.com/emailsupport/ea 9:00 - 17:00, lun-ven
Svizzera +0848 840 200 http://www.usr.com/emailsupport/de 9:00 -17:00, lun-ven
Regno Unito 0870 844 4546 http://www.usr.com/emailsupport/uk 9:00 - 17:00, lun-ven
Per informazioni aggiornate su come contattare l'assistenza tecnica, visitare il sito Web all'indirizzo http://www.usr.com
24
Page 29

Servidor de impresión USB USR7500
Guía breve de instalación
Contenido de la caja:
• Servidor de impresión USB USR7500
• Guía de instalación (esta guía)
• Fuente de alimentación de 9 V CC/12 V CC
• CD de instalación
Detalles del producto
LED de estado:Si este indicador está de color verde, el servidor de impresión USB está inactivo.
LED de error: Si este indicador está rojo y el indicador LED de estado está encendido, se ha
Puerto USB: Use este puerto para conectar una impresora USB al servidor de impresión USB.
Puerto ENET: Use este puerto para conectar el servidor de impresión USB a un router, un
9 V CC/12 V CC:Use este puerto para conectar la fuente de alimentación al servidor de impresión
Diagnóstico: Mantenga pulsado el botón de diagnóstico durante dos (2) segundos para
Si está verde pero parpadea, se está transmitiendo y recibiendo información. Si
está verde y el indicador LED de error está encendido, se ha producido un error de
hardware. Si parpadea en verde y el indicador LED de error también se enciende y
se apaga, se está realizando una actualización de firmware.
producido un error de hardware. Si parpadea en rojo y el indicador LED de estado
también se enciende y se apaga, se está realizando una actualización de
firmware. Si parpadea en rojo y el indicador LED de estado está encendido, no hay
ninguna impresora conectada al puerto USB.
conmutador u otro dispositivo de red Ethernet.
USB.
imprimir una página de diagnóstico que incluye la configuración del servidor de
impresión USB. Para restaurar los valores configurados de fábrica e imprimir una
página de diagnóstico con la información acerca de la configuración por defecto,
desenchufe la fuente de alimentación del servidor de impresión USB y mantenga
pulsado el botón de diagnóstico mientras vuelve a enchufar la fuente de
alimentación. Siga pulsando el botón de diagnóstico durante 10 segundos más
para restaurar los valores configurados de fábrica.
Conexión del servidor de impresión USB USR7500
Nota: Encontrará la información más reciente en http://www.usr.com/support.
En la guía del usuario que encontrará en el CD de instalación de U.S. Robotics obtendrá
información más detallada.
Preparativos para la instalación
Nota: El número de su modelo es 7500. Encontrará el número de serie en la etiqueta de la
parte posterior del USR7500 USB Print Server y en el lateral de la caja. Anótelo. Si alguna
vez tiene que llamar a nuestro servicio de asistencia técnica, necesitará este número para
que le atiendan.
25
Page 30

Paso 1: Conecte el extremo cuadrado de un cable USB al
puerto USB de la impresora. Conecte el extremo
rectangular fino del cable USB al puerto USB del
servidor de impresión. Asegúrese de que el cable
de alimentación de la impresora está enchufado y de
que la impresora está encendida.
Conecte uno de los extremos de un cable
Ethernet al router o conmutador y el otro
extremo al puerto Ethernet del servidor de
impresión.
Conecte el adaptador de corriente incluido al conector de
alimentación del servidor de impresión USB. Enchufe el
adaptador a una toma de corriente estándar.
Paso 2: Asegúrese de que el ordenador está encendido. Introduzca el CD de instalación
en la unidad de CD-ROM. Haga clic en Setup Wizard (Asistente de configuración) y siga las
instrucciones que aparecerán en la pantalla para configurar los parámetros del servidor de
impresión, instalar el controlador del servidor de impresión USB y configurar la impresora.
A continuación, deberá instalar el software en todos los equipos que vayan a utilizar la impresora
a través de la red. Introduzca el CD de instalación en la unidad de CD-ROM. Haga clic en
Additional Computers (Ordenadores adicionales) y, a continuación, en Next (Siguiente).
Seleccione User (Usuario) y siga las instrucciones que aparecerán en la pantalla. Si desea
obtener información más detallada, consulte la guía del usuario que encontrará en el CD-ROM
de instalación.
Cuando haya finalizado la configuración del ordenador principal y los ordenadores cliente, podrá
usar la impresora USB a través de la red.
26
Page 31

¡Enhorabuena! La instalación ya ha terminado.
Abra el navegador de Internet y registre su producto en www.usr.com/productreg.
En U.S. Robotics, realizamos un esfuerzo constante con el fin de proporcionar a los usuarios
información de utilidad. Para obtener la información de configuración y resolución de problemas
más reciente, visite el sitio Web de U.S. Robotics en la dirección http://www.usr.com/support
27
Page 32

Solución de problemas
Si desea obtener asistencia para Macintosh y Linux, consulte la sección Solución de problemas
de la Guía del usuario del CD-ROM de instalación.
El servidor de impresión USB no aparece en la red.
Solución posible:
Asegúrese de que el servidor de impresión USB está enchufado y de que recibe corriente.
Solución posible:
Asegúrese de que el servidor de impresión USB está bien conectado al router, al conmutador
o al dispositivo de red Ethernet de la red. Una mala conexión podría impedirle acceder al servidor
de impresión USB. Asegúrese de que el router, conmutador o dispositivo de red Ethernet recibe
corriente y está encendido. Intente volver a llevar a cabo los pasos de instalación.
Solución posible:
Asegúrese de que el ordenador tiene el protocolo de red TCP/IP instalado. Si no dispone
del protocolo de red TCP/IP instalado, consulte la documentación del sistema operativo.
Solución posible:
Es posible que el servidor de impresión USB no reciba una dirección IP o puede que exista un
conflicto de direcciones IP con otro dispositivo de la red. Desenchufe y vuelva a enchufar la
fuente de alimentación del servidor de impresión USB. De esta forma se liberará la dirección IP, lo
que permitirá al servidor de impresión USB recibir otra dirección IP mediante el servidor DHCP de
la red.
Solución posible:
Si utiliza un cable cruzado Ethernet, puede que el servidor de impresión USB no aparezca en la
red. Asegúrese de utilizar un cable Ethernet estándar en lugar de un cable cruzado Ethernet. Si no
está seguro de si el cable Ethernet es estándar o cruzado, intente conectar el servidor de
impresión USB al dispositivo de red a través de otro cable Ethernet distinto.
Solución posible:
Si el servidor de impresión USB sigue sin aparecer en la red, repita el procedimiento
de instalación.
La impresora no aparece tras conectarla al servidor de impresión USB.
Solución posible:
Asegúrese de que la impresora está bien conectada al servidor de impresión USB. Una
mala conexión podría impedirle acceder a la impresora. Intente volver a llevar a cabo los
pasos de instalación.
El indicador LED de estado correspondiente al servidor de impresión USB
permanece encendido ininterrumpidamente.
Solución posible:
Reinicie el servidor de impresión USB; para ello, desenchufe la fuente de alimentación y
enchúfela de nuevo. Si el servidor de impresión USB no se reinicia, restablezca los valores
configurados de fábrica. Desenchufe la fuente de alimentación del servidor de impresión USB,
mantenga pulsado el botón de diagnóstico y vuelva a enchufar la fuente de alimentación. Siga
28
Page 33

pulsando el botón de diagnóstico durante 10 segundos.
He instalado mi impresora multifunción pero las funciones de fax y escáner
no funcionan.
Solución posible:
Si dispone de una impresora multifunción (impresora, fax y escáner) conectada al servidor de
impresión USB, sólo funcionarán correctamente las funciones de impresión. Si desea utilizar el
resto de las funciones de la impresora multifunción, deberá conectarla directamente a un
ordenador.
He intentado instalar el software para la impresión entre entidades pares
pero recibo un mensaje de error y la instalación se cancela.
Solución posible:
Si ha instalado el software correspondiente al servidor de impresión USB con anterioridad,
deberá desinstalarlo con el fin de instalar el software para la impresión entre entidades pares.
Haga clic en Inicio, Programas y, a continuación, en U.S. Robotics Print Server (Servidor de
impresión U.S. Robotics). Seleccione Uninstall USB Print Server Driver (Desinstalar controlador
del servidor de impresión USB) y, a continuación, siga las instrucciones que aparecerán en la
pantalla. Cuando haya finalizado la desinstalación, deberá reiniciar el ordenador. Tras hacerlo,
podrá instalar el software para la impresión entre entidades pares.
Algunos trabajos no se imprimen correctamente.
Solución posible:
Asegúrese de disponer del controlador correspondiente a la impresora instalado en todos
los ordenadores de la red. Consulte la documentación de la impresora para verificar esta
información.
Solución posible:
Si utiliza una impresora antigua de velocidad baja, puede que necesite cambiar el parámetro
de configuración relativo a la señal de la secuencia de entrada en contacto. Haga clic en Inicio,
Programas y, a continuación, en U.S. Robotics Print Server (Servidor de impresión
U.S. Robotics). Seleccione Bi-Admin Management Utility (Programa de gestión Bi-Admin). Haga
clic en el icono Configuration (Configuración) y, a continuación, en la ficha Port (Puerto). Cambie
la señal de la secuencia de entrada en contacto a Busy & Ack (Ocupado y acuse de recibo) y,
después, haga clic en OK (Aceptar).
Solución posible:
Cabe la posibilidad de que la impresora esté configurada para empezar a imprimir después de
que la primera página haya entrado en la cola de impresión, lo que puede provocar problemas de
impresión en ciertas aplicaciones. Será necesario cambiar este parámetro.
Usuarios de Windows 98, NT y Me: Haga clic en Inicio, Panel de control y, por último, en
Impresoras. Seleccione su impresora y haga clic en Archivo, Propiedades, Detalles. Haga clic en
el botón Config. de la cola de impresión, seleccione Iniciar la impresión cuando la última página
haya entrado en la cola y, a continuación, haga clic en Aceptar.
Usuarios de Windows 2000: Haga clic en Inicio, Configuración, Impresoras. Haga clic con el
botón derecho del ratón en su impresora, haga clic en Propiedades y, después, en la ficha
29
Page 34

Avanzadas. Seleccione Iniciar la impresión cuando la última página haya entrado en la cola y
haga clic en Aceptar.
Usuarios de Windows XP: Haga clic en Inicio y, después en Impresoras y faxes. Haga clic con el
botón derecho del ratón en su impresora, haga clic en Propiedades y, después, en la ficha
Opciones avanzadas. Seleccione Iniciar la impresión cuando la última página haya entrado en
la cola y haga clic en Aceptar.
Si sigue teniendo problemas:
1. Consulte la guía del usuario del CD de instalación.
Encontrará más información sobre solución de problemas y configuración en la guía del usuario del CD
de instalación.
2. Consulte la sección de Soporte del sitio Web de U.S Robotics www.usr.com.
La mayoría de los problemas que experimentan los usuarios aparecen en las páginas de preguntas más
habituales y resolución de problemas del producto correspondiente. El número de su producto es USR7500.
Si alguna vez necesita obtener información del sitio Web de U.S. Robotics, se le pedirá este número.
3. Llame al servicio de asistencia técnica de U.S. Robotics.
Los informáticos de nuestro servicio podrán atender las consultas técnicas sobre los productos de
U.S. Robotics.
País Teléfono Internet Horario de asistencia
Estados Unidos (888) 216-2850 http://www.usr.com/emailsupport 9:00 - 17:00, Lun. - Vier.
Canadá (888) 216-2850 http://www.usr.com/emailsupport 9:00 - 17:00, Lun. - Vier.
Austria 07 110 900 116 http://www.usr.com/emailsupport/de 9:00 - 17:00, Lun. - Vier.
Bélgica (flamenco) +32 (0)70 233 545 http://www.usr.com/emailsupport/ea 9:00 - 17:00, Lun. - Vier.
Bélgica (francés) +32 (0)70 233 546 http://www.usr.com/emailsupport/ea 9:00 - 17:00, Lun. - Vier.
Dinamarca +45 7010 4030 http://www.usr.com/emailsupport/uk 9:00 - 17:00, Lun - Vier.
Finlandia +358 98 171 0015 http://www.usr.com/emailsupport/ea 10:00 - 18:00, Lun. - Vier.
Francia 082 507 0693 http://www.usr.com/emailsupport/fr 9:00 - 17:00, Lun. - Vier.
Alemania 01805671548 http://www.usr.com/emailsupport/de 9:00 - 17:00, Lun. - Vier.
Hungría 01805671548 http://www.usr.com/emailsupport/hu 9:00 - 17:00, Lun. - Vier.
Irlanda +44 870 844 4546 http://www.usr.com/emailsupport/uk 9:00 - 18:00, Lun. - Vier.
Italia 848 80 9903 http://www.usr.com/emailsupport/it 9:00 - 17:00, Lun. - Vier.
Luxemburgo +352 342 080 8318 http://www.usr.com/emailsupport/bn 9:00 - 17:00, Lun. - Vier.
Oriente Medio/África +44 870 844 4546 http://www.usr.com/emailsupport/me 9:00 - 17:00, Lun. - Vier.
Países Bajos 0900 20 25 857 http://www.usr.com/emailsupport/ea 9:00 - 17:00, Lun. - Vier.
Noruega +47 23 50 0097 http://www.usr.com/emailsupport/ea 9:00 - 17:00, Lun. - Vier.
Polonia http://www.usr.com/emailsupport/pl 8:00 - 18:00, Lun. - Vier.
Portugal +351 (0)21 415 4034 http://www.usr.com/emailsupport/pt 9:00 - 17:00, Lun. - Vier.
España 902 117 964 http://www.usr.com/emailsupport/es 9:00 - 17:00, Lun - Vier.
Suecia +46 (0) 77 128 1020 http://www.usr.com/emailsupport/ea 9:00 - 17:00, Lun. - Vier.
Suiza +0848 840 200 http://www.usr.com/emailsupport/de 9:00 - 17:00, Lun. - Vier.
Reino Unido 0870 844 4546 http://www.usr.com/emailsupport/uk 9:00 - 17:00, Lun. - Vier.
Si desea recibir información actualizada sobre los servicios de asistencia, visite el sitio Web:
http://www.usr.com.
30
Page 35

USR7500 USB Print Server
Beknopte installatiegids
Inhoud verpakking:
• USR7500 USB Print Server
• Installatiegids (deze gids)
• Voeding: 9VDC/12VDC
• Installatie-cd-rom
Productgegevens
Statuslampje: als dit lampje groen brandt, is de USB Print Server inactief. Wanneer dit lampje
groen knippert, worden er gegevens verzonden en ontvangen. Als dit lampje
groen is en het foutlampje brandt, dan is er sprake van een hardwarefout. Als dit
lampje groen knippert en het foutlampje knippert, wordt de firmware bijgewerkt.
Foutlampje: als dit lampje rood brandt en het statuslampje brandt, is er sprake van een hard-
warefout. Wanneer dit lampje rood knippert en het statuslampje knippert, wordt
de firmware bijgewerkt. Als dit lampje rood knippert en het statuslampje brandt,
dan is er geen printer op de USB-poort aangesloten.
USB-poort: gebruik deze poort om een USB-printer op de USB Print Server aan te sluiten.
ENET-poort: gebruik deze poort om de USB Print Server op een router, switch of ander
Ethernet-netwerkapparaat aan te sluiten.
9VDC/12VDC: gebruik deze poort om de voeding op de USB Print Server aan te sluiten.
Diagnostic: houd dit knopje twee seconden ingedrukt met een paperclip om een diagnosepag-
ina met de instellingen van de USB Print Server af te drukken. Om de fabrieksinstellingen te herstellen en een diagnosepagina met de standaardinstellingen af te
drukken, koppelt u de voeding van de USB Print Server los waarna u de voeding
weer aansluit en daarbij de diagnoseknop ingedrukt houdt. Houd de diagnoseknop nog tien seconden ingedrukt om de fabrieksinstellingen te herstellen.
De USR7500 USB Print Server aansluiten
Opmerking: de meest recente informatie vindt u op http://www.usr.com/support
De gebruikershandleiding op de U.S. Robotics installatie-cd bevat ook gedetailleerde informatie.
De installatie voorbereiden
Opmerking: uw modelnummer is 7500. U vindt uw serienummer aan de onderzijde van de
USR7500 USB Print Server en op de zijkant van de verpakking. Noteer uw serienummer. U
hebt dit nummer nodig wanneer u contact opneemt met onze technische ondersteuning.
31
Page 36

Stap één: sluit het vierkante uiteinde van de
USB-kabel aan op de USB-poort op de printer. Sluit het
dunne rechthoekige gedeelte van de USB-kabel aan op
de USB-poort op de USB Print Server. Controleer of de
elektriciteitskabel van de printer is aangesloten op een
stopcontact en dat de printer is ingeschakeld.
Sluit één uiteinde van een Ethernet-kabel aan
op uw router of switch en het andere uiteinde
op de Ethernet-poort op de USB Print Server.
Sluit de meegeleverde elektriciteitsadapter aan op de
stroomaansluiting van de USB Print Server. Sluit de
elektriciteitsadapter aan op een gewoon stopcontact.
Stap twee: zorg ervoor dat uw computer ingeschakeld is. Plaats de installatie-cd in het cd-rom-
station. Klik op de Setup Wizard en volg de aanwijzingen op het scherm om de Print Server te
configureren, het USB Print Server-stuurprogramma te installeren en om de printer in te stellen.
Vervolgens dient u de sofware op alle computers te installeren die de printer via het netwerk
zullen gebruiken. Plaats de installatie-cd in het cd-rom-station. Klik op Additional Computers
(Andere computers) en klik vervolgens op Next (Volgende). Selecteer User (Gebruiker) en volg de
aanwijzingen op het scherm. Raadpleeg de gebruikershandleiding op de installatie-cd voor meer
informatie over configureren.
Wanneer u de installatie voor de hoofdcomputer en clientcomputers hebt voltooid, kunt u de
USB-printer gebruiken via het netwerk.
32
Page 37

Gefeliciteerd! De installatieprocedure is nu voltooid.
Start een webbrowser en ga naar www.usr.com/productreg om uw product te registreren.
We streven er altijd naar om gebruikers de best mogelijke informatie te geven. De meest recente
informatie over configuratie en problemen oplossen, vindt u op de website van U.S. Robotics Web
op
http://www.usr.com/support
33
Page 38

Problemen oplossen
Voor hulp met Macintosh of Linux, dient u het gedeelte Problemen oplossen in de
gebruikershandleiding op de installatie-cd-rom te raadplegen.
De USB Print Server is niet beschikbaar op mijn netwerk.
Mogelijke oplossing:
Controleer of het netsnoer van de USB Print Server is aangesloten en stroom ontvangt.
Mogelijke oplossing:
De USB Print Server moet goed zijn aangesloten op de router, switch of het Ethernet-netwerkapparaat op het netwerk. Als er een kabel loszit, hebt u geen verbinding met de USB Print Server.
Controleer of de router, switch of het Ethernet-netwerkapparaat stroom ontvangt en of het
apparaat is ingeschakeld. Probeer de installatiestappen opnieuw uit te voeren.
Mogelijke oplossing:
Het TCP/IP-netwerkprotocol moet op uw computer zijn geïnstalleerd. Raadpleeg de documentatie
van het besturingssysteem als dit niet het geval is.
Mogelijke oplossing:
De USB Print Server ontvangt geen IP-adres of het IP-adres geeft een conflict met een ander
apparaat in het netwerk. Koppel de USB Print Server los van de stroomtoevoer en sluit de
printserver daar vervolgens weer op aan. Hiermee wordt het IP-adres vrijgegeven en kan de USB
Print Server een nieuw IP-adres van de DHCP-server in het netwerk ontvangen.
Mogelijke oplossing:
Als u een Ethernet-crossover-kabel gebruikt, is de USB Print Server waarschijnlijk niet
beschikbaar in het netwerk. Gebruik een standaard Ethernet-kabel en geen Ethernet-crossoverkabel. Als u niet weet of de kabel een standaardkabel of een crossover-kabel is, moet u de USB
Print Server met een andere Ethernet-kabel op het netwerk aansluiten.
Mogelijke oplossing:
Als de USB Print Server nog steeds niet in het netwerk beschikbaar is, dient u deze opnieuw te
installeren.
De printer verschijnt niet nadat deze op de USB Print Server is aangesloten.
Mogelijke oplossing:
Controleer of de printer goed is aangesloten op de USB Print Server. Als de kabel loszit, kunt u
niet afdrukken met de printer. Probeer de installatiestappen opnieuw uit te voeren.
Het statuslampje van de USB Print Server blijft branden.
Mogelijke oplossing:
Reset de USB Print Server door de printserver los te koppelen van en weer aan te sluiten op
de stroomtoevoer. Als de USB Print Server hiermee niet opnieuw wordt ingesteld, moet u de
standaard fabrieksinstellingen herstellen. Koppel de USB Print Server los van de stroomtoevoer,
druk de diagnoseknop in en houd deze ingedrukt en sluit de printserver weer op de
stroomtoevoer aan. Houd de diagnoseknop tien seconden ingedrukt.
34
Page 39

Ik heb mijn multifunctionele printer geïnstalleerd, maar de fax en scanner
werken niet.
Mogelijke oplossing:
Indien u een multifunctionele printer (printer/fax/scanner) hebt aangesloten op de USB Print
Server, dan zal alleen de printer werken. Als u de andere functies van uw multifunctionele printer
wilt gebruiken, dient u de printer direct op een computer aan te sluiten.
Ik heb geprobeerd de software voor het Peer-to-Peer afdrukken te
installeren, maar er verscheen een foutbericht met de mededeling
dat de installatie is afgebroken.
Mogelijke oplossing:
Als u de software voor de USB Print Server al eerder had geïnstalleerd, dient u deze software
eerst te verwijderen voordat u de Peer-to-Peer software kunt installeren. Klik in Windows op
Start, Programma's en vervolgens op U.S. Robotics Print Server. Selecteer Uninstall USB Print
Server Driver (Stuurprogramma USB Print Server verwijderen) en volg de aanwijzingen op
het scherm. Nadat de installatie ongedaan is gemaakt, moet de computer opnieuw worden
opgestart. Vervolgens kunt u de Peer-to-Peer software installeren.
Niet alle afdruktaken worden goed afgedrukt.
Mogelijke oplossing:
Controleer of op elke computer op het netwerk het juiste printerstuurprogramma is geïnstalleerd.
Raadpleeg hiervoor de documentatie van de printer.
Mogelijke oplossing:
Als u een oudere, langzame printer gebruikt, dan kan het zijn dat u de instelling Handshake
Signal in de configuratie moet wijzigen. Klik in Windows op Start, Programma's en vervolgens op
U.S. Robotics Print Server. Selecteer de Bi-Admin Management Utility. Klik op het pictogram
Configuration (Configuratie) en vervolgens op het tabblad Port (Poort). Wijzig het Handshakesignaal in Busy & Ack (Bezet en bevestigen) en klik op OK.
Mogelijke oplossing:
Uw printer kan zo zijn ingesteld, dat deze pas begint af te drukken nadat de eerste pagina in
de wachtrij is geplaatst, wat bij bepaalde toepassingen voor problemen bij het afdrukken kan
zorgen. U dient deze instelling te wijzigen.
Gebruikers van Windows 98, NT en ME: klik in Windows op Start, Configuratiescherm en
vervolgens op Printers. Selecteer uw printer en klik op Bestand, Eigenschappen en Details. Klik
op de knop Wachtrij-instellingen, selecteer Afdrukken zodra de laatste pagina in de wachtrij is
geplaatst en klik op OK.
Gebruikers van Windows 2000: klik in Windows op Start, Instellingen en vervolgens op
Configuratiescherm. Klik met de rechtermuisknop op uw printer, klik op Eigenschappen en klik
op het tabblad Geavanceerd. Selecteer Afdrukken zodra de laatste pagina in de wachtrij is
geplaatst en klik op OK.
Gebruikers van Windows XP: klik in Windows op Start en vervolgens op Printers en faxen.
Klik met de rechtermuisknop op uw printer, klik op Eigenschappen en klik op het tabblad
35
Page 40

Geavanceerd. Selecteer Afdrukken zodra de laatste pagina in de wachtrij is geplaatst en
klik op OK.
Hebt u nog steeds problemen?
1. Ga naar de gebruikershandleiding op de installatie-cd.
In de gebruikershandleiding op de installatie-cd vindt u meer informatie over technische ondersteuning
en problemen oplossen.
2. Ga naar het gedeelte Support van de website van U.S Robotics op www.usr.com.
De meest voorkomende problemen waar gebruikers mee te maken krijgen, worden besproken in de
gedeelten Veelgestelde vragen en Problemen oplossen voor uw product. Uw productnummer is USR7500.
Dit nummer kan van toepassing zijn als u naar informatie zoekt op de website van U.S. Robotics.
3. Neem contact op met de afdeling technische ondersteuning van U.S. Robotics.
Technische vragen over producten van U.S. Robotics kunnen tevens worden beantwoord door de
specialisten van de afdeling technische ondersteuning.
Land Telefoonnummer On line Openingstijden
Verenigde Staten (888) 216-2850 http://www.usr.com/emailsupport 9.00 - 17.00 uur, maandag tot vrijdag CST
Canada (888) 216-2850 http://www.usr.com/emailsupport 9.00 - 17.00 uur, maandag tot vrijdag CST
Oostenrijk 07 110 900 116 http://www.usr.com/emailsupport/de 9.00 - 17.00 uur, maandag tot vrijdag
België (Vlaams) +32 (0)70 233 545 http://www.usr.com/emailsupport/ea 9.00 -17.00 uur, maandag tot vrijdag
België (Frans) +32 (0)70 233 546 http://www.usr.com/emailsupport/ea 9.00 -17.00 uur, maandag tot vrijdag
Denemarken +45 7010 4030 http://www.usr.com/emailsupport/uk 9.00 -17.00 uur, maandag tot vrijdag
Finland +358 98 171 0015 http://www.usr.com/emailsupport/ea 10.00 - 18.00 uur, maandag tot vrijdag
Frankrijk 082 507 0693 http://www.usr.com/emailsupport/fr 9.00 - 17.00 uur, maandag tot vrijdag
Duitsland 01805671548 http://www.usr.com/emailsupport/de 9.00 - 17.00 uur, maandag tot vrijdag
Hongarije 01805671548 http://www.usr.com/emailsupport/hu 9.00 - 17.00 uur, maandag tot vrijdag
Ierland +44 870 844 4546 http://www.usr.com/emailsupport/uk 9.00 - 18.00 uur, maandag tot vrijdag
Italië 848 80 9903 http://www.usr.com/emailsupport/it 9.00 - 17.00 uur, maandag tot vrijdag
Luxemburg +352 342 080 8318 http://www.usr.com/emailsupport/bn 9.00 - 17.00 uur, maandag tot vrijdag
Midden-Oosten/Afrika +44 870 844 4546 http://www.usr.com/emailsupport/uk 9.00 - 17.00 uur, maandag tot vrijdag
Nederland 0900 20 25 857 http://www.usr.com/emailsupport/ea 9.00 - 17.00 uur, maandag tot vrijdag
Noorwegen +47 23 50 0097 http://www.usr.com/emailsupport/ea 9.00 - 17.00 uur, maandag tot vrijdag
Polen http://www.usr.com/emailsupport/pl 8.00 - 18.00 uur, maandag tot vrijdag
Portugal +351 (0)21 415 4034 http://www.usr.com/emailsupport/pt 9.00 - 17.00 uur, maandag tot vrijdag
Spanje 902 117 964 http://www.usr.com/emailsupport/es 9.00 - 17.00 uur, maandag tot vrijdag
Zweden +46 (0) 77 128 1020 http://www.usr.com/emailsupport/ea 9.00 -17.00 uur, maandag tot vrijdag
Zwitserland +0848 840 200 http://www.usr.com/emailsupport/de 9.00 - 17.00 uur, maandag tot vrijdag
Groot-Brittannië 0870 844 4546 http://www.usr.com/emailsupport/uk 9.00 - 17.00 uur, maandag tot vrijdag
Informatie over actuele contactgegevens vindt u op de website: http://www.usr.com
36
Page 41

Page 42

Printed in Taiwan.
 Loading...