

Page 1

56K* Performance Pro Modem
Installation Guide
Windows XP, 2000, NT, Me, 98, 95, and Linux
Operating Systems
part number R24.0208.00
Page 2
Before You Begin
Before you begin, we recommend you uninstall any
other modems you have in your system and unplug
all telephone lines connected to these modems.
Refer to your old modem’s documentation for
instructions. If you have an older U.S. Robotics
modem, see the “Uninstalling a U.S. Robotics
Modem” chapter in the manual that came with your
older modem.
Write the new U.S. Robotics modem’s serial number
in the box below. The serial number is located on the
white bar code sticker on the modem and on the
modem’s box.
NOTE: It is very important that you have your serial
number written down for future reference. If you
ever need to call our Technical Support department,
you will need this number to receive assistance.
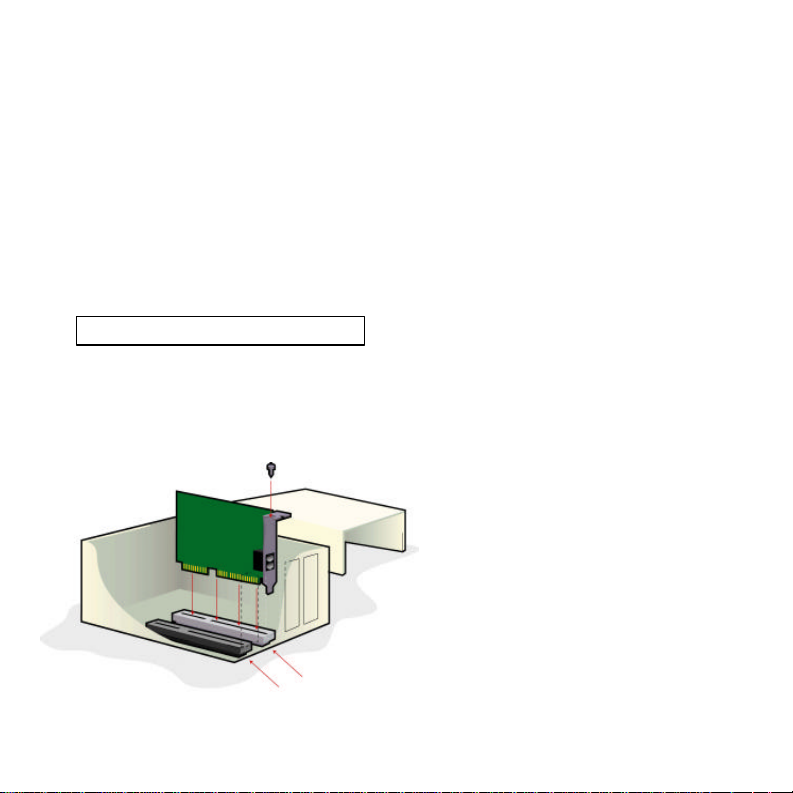
Step 1
Insert the modem into the
empty PCI expansion slot.
Turn off and unplug your computer and all
peripherals. Remove the computer’s cover. (If you do
not know how to do this, refer to your
computer’s documentation.)
CAUTION: To avoid risk of electrical shock, make sure
your computer and all peripheral devices are turned
off and unplugged from electrical outlets and that
any telephone cables have been removed from
existing modems and their wall jacks.
Remove the expansion slot cover at the back of an
empty PCI expansion slot. PCI slots are 3.5 inches
long and are usually white plastic lined with metal.
The slot cover is on the back of the computer and
covers an opening on the computer’s case. Most slot
covers are held in place with a screw. Insert the
modem, gold edge first, into the slot. You will need to
press the modem in firmly so that it is seated
properly in its slot. When the modem is installed
correctly, you will no longer see any part of the gold
edge. The modem’s metal bracket will cover the
opening on the back of the computer. Secure the
modem with the screw you removed. Replace the
computer’s cover. Reconnect and turn on
all peripherals.
PCI expansion slot
ISA expansion slot
2.
Page 3

Step 2
Install the modem drivers.
NOTE: If at any time during the installation you are
prompted to select the location of your installation
drivers, the following are the correct locations on the
Installation CD (assuming D: is your CD-ROM drive).
Windows XP/2000/Me/98/95 drivers: D:\Drivers
Windows NT4 drivers: D:\Drivers\WinNT4
NOTE: Windows XP/2000/NT/Me users must be
logged in using an account with administrative
privileges before attempting to install the modem
drivers. Windows XP home users have administrative
privileges by default.
Windows XP Users: Control Panel: Category View
Turn on your computer. Insert your Installation CD
into your CD-ROM drive before you log in or Windows
opens. Click Windows Start, Control Panel, Network
and Internet Connections. Click Phone and Modem
Options. Select the Modems tab. Click Properties.
Select Driver tab. Click Update Driver. Select Install
from a list or specific location (Advanced) and click
Next. Select Don’t search. I will choose the driver to
install and click Next. Select Have Disk. Click Browse
and select your CD drive. Double-click Drivers and
select the driver most appropriate to your modem.
Click Next. Click Finish to complete the installation.
Control Panel: Classic View
Turn on your computer. Insert your Installation CD
into your CD-ROM drive before you log in. Click
Windows Start, Control Panel. Double-click Phone
and Modem Options. Select Modems tab. Click
Properties. Select Driver tab. Click Update Driver.
Windows 2000 Users
Turn on your computer. Insert your Installation CD
into your CD-ROM drive before you log in. When the
Found New Hardware screen appears, click Next.
Select Search for a suitable driver for my device
(recommended). Click Next. Select CD-ROM drives .
Click Next. A Digital Signature Not Found message
may appear.* Click Yes. Click Finish to complete
the installation.
driver available.
Windows NT Users
Turn on your computer. Insert your Installation CD into
your CD-ROM drive before you log in. Double-click the
My Computer icon. Right-click on the icon for your CDROM drive and select Explore. Double-click the
Drivers\WinNT4 folder. Double-click Setup. This will
start the Modem Setup Wizard. When the Modem
Setup screen appears, click Install. When the
installation is complete, you will be asked if you want
to restart your computer. Click Yes.
Windows Me Users
Turn on your computer. Insert your Installation CD into
your CD-ROM drive before Windows opens. When the
Add New Hardware Wizard appears, select Automatic
search for a better driver
(Recommended), and click Next. Click Finish to
complete the installation.
Windows 98 Users
Turn on your computer. Insert your Installation CD into
your CD-ROM drive before Windows opens. When the
Add New Hardware Wizard appears, click Next. Select
Search for the best driver for your device
(Recommended), and click Next. Select Specify a
3.
Page 4

location and click Browse. Double-click your CD-ROM
drive and select Drivers. Click OK. Click Next. When
the driver is found, click Next. Click Finish to complete
the installation.
Windows 95 Users
Turn on your computer. Insert your Installation CD into
your CD-ROM drive before Windows opens. When the
Add New Hardware Wizard appears, click Next. If the
Wizard is unable to locate the driver, click Other
Locations. Click Browse and select your CD drive.
Select Drivers and click OK. Click OK on the Select
Other Location window. Click Finish. At this point you
may get an Insert Disk notice. Click OK. The Copying
Files screen will open. Click Browse and select your
CD-ROM drive. Double-click Drivers. Click OK. The
Copying Files screen will appear again. Click OK to
complete the installation.
Linux 2.3 and Higher Users
NOTE: All 2.3 and higher Linux kernels contain the
U.S. Robotics Linux modem drivers. Installation of the
modem under this kernel is fully automatic provided
your kernel has the Plug and Play module
enabled (default).
Step 3
Connect the modem to an
analog phone line.
Plug one end of the phone cord into the jack on
the modem labeled and plug the other end
into an analog phone wall jack.
When you are not using the modem, you can use a
telephone by plugging the telephone’s cord into
the modem’s jack.
Step 4
Verify that the modem is
properly installed.
If you have Windows XP
Category View: Click Windows Start, and click Control
Panel. Click Network and Internet Connections, Phone
and Modem Options, and then click the Modems tab.
You should see a description of your modem and a
COM port setting. Click Modem, highlight the
description of your new modem, and click Properties .
Click the Diagnostics tab. Click the Query Modem
button. You should see a series of commands and
responses from the modem. This means that the
installation was a success. If your modem is not listed
and/or you do not see a series of commands and
responses, make sure that your internal modem is
physically installed correctly in your computer. With
power off, press the modem in firmly so that it is
seated properly in its slot. When the modem is
installed correctly, you will no longer see any part of
the gold edge. If your modem still does not work, you
may need to remove it and reinstall it in another
available PCI slot. Shut down and restart your PC.
Check your modem again using Control Panel as
described previously.
4.
Page 5

Classic View: Click Windows Start, and click Control
Panel. Click Network and Internet Connections, Phone
and Modem Options, and then click the Modems tab.
You should see a description of your modem and a
COM port setting. Click Modem, highlight the
description of your new modem, and click Properties .
Click the Diagnostics tab. Click the Query Modem
button. You should see a series of commands and
responses from the modem. This means that the
installation was a success. If your modem is not listed
and/or you do not see a series of commands and
responses, make sure that your internal modem is
physically installed correctly in your computer. With
power off, press the modem in firmly so that it is
seated properly in its slot. When the modem is
installed correctly, you will no longer see any part of
the gold edge. If your modem still does not work, you
may need to remove it and reinstall it in another
available PCI slot. Shut down and restart your PC.
Check your modem again using Control Panel as
described previously.
If you have Windows 2000
Click Windows Start, Settings, and then Control Panel .
Double-click the Phone and Modem Options icon. Click
the Modems tab. Make sure that the correct modem is
highlighted. Click the Properties button. Click the
Diagnostics tab. Click the Query Modem button. You
should see a series of commands and responses from
the modem. This means that the installation was a
success. If your modem is not listed and/or you do not
see a series of commands and responses, make sure
that your internal modem is physically installed
correctly in your computer. With power off, press the
modem in firmly so that it is seated properly in its slot.
When the modem is installed correctly, you will no
longer see any part of the gold edge. If your modem
still does not work, you may need to remove it and
reinstall it in another available PCI slot. Shut down and
restart your PC. Check your modem again using Control
Panel as described previously.
5.
If you have Windows NT
Click Windows Start, Settings, and then Control Panel .
Double-click the Modems icon. In the Modems
Properties screen, you should see a description for
your modem. If your modem is not listed, make sure
that your internal modem is physically installed
correctly in your computer. With power off, press the
modem in firmly so that it is seated properly in its slot.
When the modem is installed correctly, you will no
longer see any part of the gold edge. If your modem
still does not work, you may need to remove it and
reinstall it in another available PCI slot. Shut down
and restart your PC. Check your modem again using
Control Panel as described previously. Check for
hardware conflicts by clicking Windows Start,
Programs, Administrative Tools (Common), Windows
NT Diagnostics. Select the Resources tab.
If you have Windows Me/98/95
Click Windows Start, Settings, and then Control Panel .
Double-click the Modems icon. In the Modems
Properties screen, you should see a description for
your modem. Click the Diagnostics tab. Make sure
that the correct COM Port (modem) is highlighted.
Click the More Info button. You should see a series of
commands and responses from the modem. This
means that the installation was a success. If your
modem is not listed and/or you do not see a series of
commands and responses, make sure that your
internal modem is physically installed correctly in your
computer. With power off, press the modem in firmly
so that it is seated properly in its slot. When the
modem is installed correctly, you will no longer see
any part of the gold edge. If your modem still does
not work, you may need to remove it and reinstall it in
another available slot. Shut down and restart your PC.
Check your modem again using the Control Panel as
described previously.
Page 6

If you have Linux
Reboot the PC and note that another serial port is
listed along with the device name (/dev/ttyX),
indicating the modem is present. Log in to the
system. Check that the modem is communicating
properly. If working in a shell environment, start a
Minicom terminal session from the terminal prompt. If
using X Windows, use Minicom through a shell
window or use the dial-up program (Kppp or
equivalent). Make sure that your internal modem is
physically installed correctly in your computer. With
power off, press the modem in firmly so that it is
seated properly in its slot. When the modem is
installed correctly, you will no longer see any part of
the gold edge. If your modem still does not work, you
may need to remove it and reinstall it in another
available PCI slot. Shut down and restart your PC.
Using Kppp in X Windows:
1) Execute the Kppp program (or other dial-up
program) from the Internet submenu.
2) Within the Kppp program, click the Setup button,
then the Device tab, and then select the device
name of the modem from the pull-down menu.
3) Click the Modem tab, then click the Query Modem
button. About 15 seconds later a window should
appear with I-screen information from the modem,
indicating a successful installation.
Using Minicom:
1) Launch a terminal (shell) session.
2) Create a symbolic link for the modem using the
following commands:
3) Type Minicom < enter> to start Minicom.
4) If the modem initializes under Minicom, type “AT”
<enter>. If you receive “OK,” your modem has
installed successfully.
cd/dev<enter>
rm modem <enter>
ln -s ttySX <enter>
6.
Step 5
Install software and register
your modem.
Re-insert the Installation CD. The CD’s installation
utility should start automatically. The Setup Wizard
on the CD guides you through installing the program
group (including Internet Call Notification,
ControlCenter, and optional faxmodem software) and
registering your modem.
NOTE: If the Installation CD interface does not run
automatically, click Windows Start and then click Run.
In the “Run” dialog box, type D:\setup.exe. If your
CD-ROM drive uses a different letter, type that letter
in place of “D.”
Page 7

OPTIONAL: Enabling the
Gaming Mode Feature
Your modem includes the Gaming Mode feature for
enhanced online gaming performance. Turn on for
faster response times in online games; turn off for
Web browsing, e-mail, and downloading files.
Go to the D:\Drivers\Gaming directory on the
Installation CD and double-click the gmtray.exe file.
(If your CD-ROM drive uses a different letter, go to
that letter in place of “D.”) This will automatically
install the Gaming Mode feature to your system.
Using the Gaming Mode
Feature
1) Once you have enabled the Gaming Mode feature,
you will see a modem icon on the toolbar of
your Windows desktop. This icon is used to enable the
Gaming Mode feature on your modem.
2) To enable the Gaming Mode feature, simply rightclick the icon when you are NOT online and
select Gaming Mode Enabled.
3) In order to disable Gaming Mode for normal Web
browsing, right-click the icon when you are NOT
online and select Gaming Mode Disabled.
NOTE TO LINUX USERS: This systray icon was not
designed for use with Linux. You will have to issue AT
commands to the modem to control Gaming Mode.
• To enable Gaming Mode: AT&FG
• To disable Gaming Mode: AT&F1
Troubleshooting
Having problems with your
modem? Try these basic
troubleshooting steps first.
1) Is your phone cord properly connected? The phone
cord should be plugged into the jack on the modem and into
the wall phone jack. Use the phone cord included in your
modem’s box if possible.
2) Is your modem properly installed in your
computer?
Possible solution: Refer to the “Verify that the modem is
properly installed” section of this Installation Guide for
possible solutions based on your particular
operating system.
7.
Page 8

Problems
My software isn’t recognizing my modem.
Possible solution: Your communications software may not
function properly if you have more than one version of the
software installed, you are using an older version, or you have
more than one communications software package installed on
your system. We highly recommend using the
communications software provided with your modem on the
Installation CD.
Possible solution: Your software’s COM port settings may be
incorrect or may not have the correct modem type selected.
Windows 98/95: Some older software programs require you
to select a COM port manually. This software may not
recognize COM 5, which is the only COM port that this modem
can be installed on. To reconcile this discrepancy, DOS Box
Support must also be installed. Right-click the My Computer
icon and then click Open. Double-click your CD-ROM drive and
then double-click the Drivers folder. Right-click the
dosbox.inf file and then left-click Install. This will
automatically install DOS Box functionality on your system.
Restart your computer to enable DOS Box functionality. As
long as the software is configured to COM 4, DOS Box Support
will automatically enable the software to find the modem
on COM 5.
Possible solution: If you are using software that uses a
Windows modem description and you had a previous modem
installed, you may need to update your software’s setting to
reflect the use of the U.S. Robotics 56K Performance
Pro Modem.
Windows Me/98/95: The U.S. Robotics 56K Performance Pro
Modem will install on COM 5 only in Windows Me, 98, and 95
and cannot be moved to another COM port. To confirm that the
modem installed on COM 5, click Windows Start, Settings,
and Control Panel. Double-click Modems, select your
modem, and select Properties. Check your communication
software’s documentation for instructions on adjusting the
port settings in your software.
Windows XP/2000/NT: Check your communication software’s
documentation for instructions on adjusting the port settings
in your software and use the next available port.
8.
Possible solution: You may not have the correct modem type
selected in your software or in Windows. Click Windows
Start, Settings, and Control Panel. When Control Panel
opens, click Modems. You will see a list of installed modems.
My computer isn’t recognizing my modem.
Windows XP/2000/Me/98/95: If Plug and Play fails to find the
modem as new hardware, you need to check the following:
• Confirm that the modem is firmly seated in the PCI slot.
The modem should sit evenly in the slot with no part of
the gold edge showing.
• Try installing the modem in another PCI slot.
• Check your computer manual to make sure that the PCI
slot is configured properly.
Windows NT 4.0: You will need to run a setup program for
Windows NT 4.0. This program is located on your Installation
CD at D:\Drivers\WinNT4.
My modem appeared to install correctly but seems
to be performing erratically.
Possible solution: Although PCI devices can share IRQs, there
are devices on the market that do not share IRQs properly. If
the modem has been assigned to an IRQ with one of these
devices, the modem may perform erratically.
Windows Me/98/95: Right-click the My Computer icon on
your desktop. Click Properties, and then the Device Manager
tab. Double-click the Computer icon at the top of the device
list. You will see a listing of your system’s IRQs and the
devices to which they are assigned. Locate your modem and
the IRQ which it is assigned. If this IRQ is being used by any
other devices, it may be causing the modem to work
improperly. Either your modem or the device which shares an
IRQ with your modem will have to be reassigned to another
IRQ in order to resolve your conflict. You may want to try
installing the modem in another PCI slot, or refer to the
sharing device’s documentation for more information about
removing, disabling, or relocating it.
Page 9

Windows XP/2000/NT 4.0: This issue should not apply to
Windows XP, Windows 2000, or Windows NT 4.0.
My modem won’t dial out or doesn’t answer
incoming calls.
FOR BOTH DIALING AND ANSWERING PROBLEMS:
Possible solution: You may have a bad phone cord connection
to your modem, or your phone cord may be plugged into the
wrong jack. The phone cord should be plugged into the
jack on the modem and into the wall phone jack. Use the
phone cord included in your modem’s box if possible.
Possible solution: You may have devices between the modem
and the phone jack. There should be no line splitters, fax
machines, or other devices between the modem and the
wall jack.
OFFICE USERS:
Possible solution: You may have plugged your modem’s phone
cord into a digital line. This can damage your modem. Contact
the department responsible for your phone system if you are
unsure whether or not your phone line is digital.
Possible solution: If your phone system requires dialing “9” to
access an outside line, be sure to add “9” before the number
you are dialing.
VOICE MAIL USERS:
Possible solution: If you have voice mail provided by your
local phone company, your dial tone may be altered when
messages are waiting. Retrieve your voice mail to restore
your normal dial tone.
My modem sounds like it’s trying to connect to
another modem but fails.
Possible solution: You may have a poor connection. All calls
are routed differently, so try placing the call again.
My modem isn’t achieving a 56K Internet connection.
The V.92 and V.90 protocols allow for download speeds of up
to 56K and the V.92 protocol adds upload speeds of up to 48K,
but line conditions may affect the actual speeds during a
given connection. Due to unusual telephone line
configurations, some users will not be able to take full
advantage of V.92 or V.90 technology at this time. In order to
achieve a V.92 or V.90 connection:
• The server you’re dialling in to must support and provide
a digital V.92, V.90, or 56K signal. Your ISP can provide
you with a list of dial-up connections and information on
what those connections currently support.
• The telephone line between your ISP and your modem
must be capable of supporting a 56K connection and
contain only one analog-to-digital conversion. The 56K
signal from your ISP begins as a digital signal.
Somewhere between the ISP and your modem, there will
be a digital-to-analog signal conversion so that your
modem can receive the data. There must be no more
than one analog-to-digital signal conversion in the path
from your ISP to your modem. If more than one analog-todigital conversion occurs, your connect speeds will
default to V.34 (33.6 Kbps). There may also be
impairments on the local lines between your ISP and
your modem. These impairments can prevent or limit
V.92 connection speeds. All telephone calls are routed
differently, so you should try making your 56K connection
several times. One way to test this is to dial into a long
distance location. Long distance lines are often much
clearer than local lines. It is important to note that
telephone companies are constantly upgrading their
systems. Lines that do not support 56K today may
support 56K in the near future.
• Your modem must be connecting to a V.92, V.90, or 56K
server. A pair of 33.6K modems will not connect to each
other at 56K speeds.
9.
Page 10

Uninstalling Your Modem
Uninstalling the
modem drivers.
NOTE: Read through this section in its entirety
before attempting to uninstall the modem drivers as
portions of this procedure apply only to specific
versions of Windows operating systems.
Click Windows Start, Settings, Control Panel. Doubleclick Modems (or Phone and Modem for Windows
2000 and Windows XP). Select the Modems tab
(applicable to Windows XP only). Select the modem
you want to uninstall and click Remove. Click Yes and
OK or Close, depending on your operating system.
NOTE: Windows 98/95 require the removal of the
U.S. Robotics 56K Fax PCI DOS Box Support file. To
remove this file, click Windows Start, Settings, Control
Panel. Double-click Add/Remove Programs. Select
the Install/Uninstall tab (applicable to Windows 95
only). Select U.S. Robotics 56K Fax PCI DOS Box
Support file. Click Add/Remove. Click Yes to reboot
your computer.
Physically disconnect the
modem from the computer.
Turn off and unplug your computer and
all peripherals.
CAUTION: To avoid risk of electrical shock, make sure
your computer and all peripheral devices are turned
off and unplugged from electrical outlets and that
any telephone cables have been removed from the
modem and from the wall jack.
Remove the computer’s cover. (If you do not know
how to do this, refer to your computer’s documentation.) Locate the modem inside the computer and
remove the screw that attaches the modem’s metal
bracket to the computer. Remove the modem from
its slot. Replace the computer’s cover.
10.
Page 11

Support Resources
If you have not fixed your problem after trying the
suggestions in the “Troubleshooting” section, you can
receive additional help via one of these
convenient resources:
World Wide Web
Contains useful product information, documents, and
manuals. Log on to: http://www.usr.com/support
Internet FTP
ftp://ftp.usr.com
Are you still having problems?
1) Call the dealer who sold you the modem
The dealer may be able to troubleshoot the problem over the
phone or may request that you bring the modem back to the
store for service.
2) Call the U.S. Robotics Technical Support
Department
Technical questions about U.S. Robotics modems can also be
answered by technical support specialists.
In the United States and Canada
(801) 401-1141
9:00 A.M. - 5:00 P.M. CST Monday - Friday
Automated service is available 24 hours a day, 7 days a
week. Be sure to have your serial number and your model
number readily available. Your model number is 5610.
U.S. Robotics also staffs its own fee-based 900 number for
immediate assistance. These lines are staffed from:
9:00 A.M. - 5:00 P.M. CST Monday - Friday
No-Hold line: (900) 555-USR1
For a no-hold call, a $2.50 per minute (price subject to change
without notice) will appear on your local phone bill. You must
be 18 or older or have parental permission. (Service available
in the U.S. only)
Manufacturer’s Declaration of Conformity
for any person to use a computer or other electronic device,
11.
Page 12

Equivalence Number is located on the bottom of the modem.
12.
U.S. Robotics Corporation
Limited Warranty
HARDWARE: U.S. Robotics warrants to the
end user (“Customer”) that this hardware
product will be free from defects in
workmanship and materials, under normal
use and service, for the following length of
time from the date of purchase from
U.S. Robotics or its authorized reseller:
Two (2) years
U.S. Robotics’ sole obligation under this
express warranty shall be, at U.S. Robotics’
option and expense, to repair the defective
product or part, deliver to Customer an
equivalent product or part to replace the
defective item, or if neither of the two
foregoing options is reasonably available,
U.S. Robotics may, in its sole discretion,
refund to Customer the purchase price paid
for the defective product. All products that
Page 13

are replaced will become the property of
U.S. Robotics. Replacement products may
be new or reconditioned. U.S. Robotics
warrants any replaced or repaired product
or part for ninety (90) days from shipment,
or the remainder of the initial warranty
period, whichever is longer.
SOFTWARE: U.S. Robotics warrants to
Customer that each software program
licensed from it will perform in substantial
conformance to its program specifications,
for a period of ninety (90) days from the
date of purchase from U.S. Robotics or its
authorized reseller. U.S. Robotics
warrants the media containing software
against failure during the warranty period.
No updates are provided. U.S. Robotics’
sole obligation under this express
warranty shall be, at U.S. Robotics’ option
and expense, to refund the purchase price
paid by Customer for any defective
software product, or to replace any
defective media with software which
substantially conforms to applicable U.S.
Robotics published specifications.
Customer assumes responsibility for the
selection of the appropriate applications
program and associated reference
materials. U.S. Robotics makes no
warranty or representation that its
software products will meet Customer’s
requirements or work in combination with
any hardware or applications software
products provided by third parties, that
the operation of the software products will
13.
be uninterrupted or error free, or that all
defects in the software products will be
corrected. For any third-party products
listed in the U.S. Robotics software product
documentation or specifications as being
compatible, U.S. Robotics will make
reasonable efforts to provide compatibility,
except where the noncompatibility is
caused by a “bug” or defect in the third
party’s product or from use of the software
product not in accordance with U.S.
Robotics’ published specifications or
User Guide.
THIS U.S. ROBOTICS PRODUCT MAY INCLUDE
OR BE BUNDLED WITH THIRD-PARTY
SOFTWARE, THE USE OF WHICH IS GOVERNED
BY A SEPARATE END-USER LICENSE AGREEMENT. THIS U.S. ROBOTICS WARRANTY DOES
NOT APPLY TO SUCH THIRD-PARTY SOFTWARE.
FOR THE APPLICABLE WARRANTY, PLEASE
REFER TO THE END-USER LICENSE AGREEMENT GOVERNING THE USE OF
SUCH SOFTWARE.
OBTAINING WARRANTY SERVICE: Customer
must contact a U.S. Robotics Corporate
Service Center or an Authorized U.S.
Robotics Service Center within the
applicable warranty period to obtain
warranty service authorization. Dated proof
of purchase from U.S. Robotics or its
authorized reseller may be required.
Page 14

Products returned to U.S. Robotics’
Corporate Service Center must be
pre-authorized by U.S. Robotics with a
Service Repair Order (SRO) number marked
on the outside of the package, and sent
prepaid and packaged appropriately for
safe shipment, and it is recommended that
they be insured or sent by a method that
provides for tracking of the package. The
repaired or replaced item will be shipped to
Customer, at U.S. Robotics’ expense, not
later than thirty (30) days after U.S.
Robotics receives the defective product.
Return the product to:
In The United States:
USR-Walnut
528 Spanish Lane
Walnut, CA 91789
In Canada:
U.S. Robotics
Unit-100, 13751 Mayfield Pl.
Richmond, B.C. Canada V6V 2G9
U.S. Robotics shall not be responsible for
any software, firmware, information, or
memory data of Customer contained in,
stored on, or integrated with any products
returned to U.S. Robotics for repair, whether
under warranty or not.
WARRANTIES EXCLUSIVE: IF A U.S. ROBOTICS
PRODUCT DOES NOT OPERATE AS
WARRANTED ABOVE, CUSTOMER’S SOLE
REMEDY FOR BREACH OF THAT WARRANTY
14.
SHALL BE REPAIR, REPLACEMENT, OR REFUND
OF THE PURCHASE PRICE PAID, AT
U.S. ROBOTICS’ OPTION. TO THE FULL EXTENT
ALLOWED BY LAW, THE FOREGOING
WARRANTIES AND REMEDIES ARE EXCLUSIVE
AND ARE IN LIEU OF ALL OTHER WARRANTIES,
TERMS, OR CONDITIONS, EXPRESS OR
IMPLIED, EITHER IN FACT OR BY OPERATION
OF LAW, STATUTORY OR OTHERWISE,
INCLUDING WARRANTIES, TERMS, OR
CONDITIONS OF MERCHANTABILITY, FITNESS
FOR A PARTICULAR PURPOSE, SATISFACTORY
QUALITY, CORRESPONDENCE WITH
DESCRIPTION, AND NON-INFRINGEMENT, ALL
OF WHICH ARE EXPRESSLY DISCLAIMED.
U.S. ROBOTICS NEITHER ASSUMES NOR
AUTHORIZES ANY OTHER PERSON TO ASSUME
FOR IT ANY OTHER LIABILITY IN CONNECTION
WITH THE SALE, INSTALLATION,
MAINTENANCE OR USE OF ITS PRODUCTS.
U.S. ROBOTICS SHALL NOT BE LIABLE UNDER
THIS WARRANTY IF ITS TESTING AND
EXAMINATION DISCLOSE THAT THE ALLEGED
DEFECT OR MALFUNCTION IN THE PRODUCT
DOES NOT EXIST OR WAS CAUSED BY
CUSTOMER’S OR ANY THIRD PERSON’S
MISUSE, NEGLECT, IMPROPER INSTALLATION
OR TESTING, UNAUTHORIZED ATTEMPTS TO
OPEN, REPAIR OR MODIFY THE PRODUCT, OR
ANY OTHER CAUSE BEYOND THE RANGE OF
THE INTENDED USE, OR BY ACCIDENT, FIRE,
LIGHTNING, OTHER HAZARDS, OR ACTS
OF GOD.
Page 15

LIMITATION OF LIABILITY: TO THE FULL EXTENT
ALLOWED BY LAW, U.S. ROBOTICS ALSO
EXCLUDES FOR ITSELF AND ITS SUPPLIERS
ANY LIABILITY, WHETHER BASED IN
CONTRACT OR TORT (INCLUDING
NEGLIGENCE), FOR INCIDENTAL,
CONSEQUENTIAL, INDIRECT, SPECIAL, OR
PUNITIVE DAMAGES OF ANY KIND, OR FOR
LOSS OF REVENUE OR PROFITS, LOSS OF
BUSINESS, LOSS OF INFORMATION OR DATA,
OR OTHER FINANCIAL LOSS ARISING OUT OF
OR IN CONNECTION WITH THE SALE,
INSTALLATION, MAINTENANCE, USE,
PERFORMANCE, OR INTERRUPTION OF ITS
PRODUCTS, EVEN IF U.S. ROBOTICS OR ITS
AUTHORIZED RESELLER HAS BEEN ADVISED
OF THE POSSIBILITY OF SUCH DAMAGES, AND
LIMITS ITS LIABILITY TO REPAIR,
REPLACEMENT, OR REFUND OF THE
PURCHASE PRICE PAID, AT U.S. ROBOTICS’
OPTION. THIS DISCLAIMER OF LIABILITY FOR
DAMAGES WILL NOT BE AFFECTED IF ANY
REMEDY PROVIDED HEREIN SHALL FAIL OF
ITS ESSENTIAL PURPOSE.
DISCLAIMER: Some countries, states, or
provinces do not allow the exclusion or
limitation of implied warranties or the
limitation of incidental or consequential
damages for certain products supplied to
consumers, or the limitation of liability for
personal injury, so the above limitations
and exclusions may be limited in their
application to you. When the implied
warranties are not allowed to be excluded
in their entirety, they will be limited to the
duration of the applicable written warranty.
This warranty gives you specific legal rights
which may vary depending on local law.
GOVERNING LAW: This Limited Warranty
shall be governed by the laws of the State of
Illinois, U.S.A. excluding its conflicts of laws
principles and excluding the United Nations
Convention on Contracts for the
International Sale of Goods.
15.
Page 16

 Loading...