

Page 1

This manual covers installation and operating instructions for the following U.S. Robotics modems:
• • Sportster Voice 56K ∗∗ internal and external modems
U.S. Robotics, the USRobotics logo, and Sportster are registered trademarks and Connections,
Total Control, Courier, RapidComm, x2, and the x2 logo are trademarks of U.S. Robotics. Windows
is a registered trademark of Microsoft Corp. CompuServe is a registered trademark of CompuServe
Inc. America Online is a registered trademark of America Online Inc. Any other trademarks, trade
names, service marks, or service names owned or registered by any other company and used in this
manual are the property of their respective companies.
© 1997 U.S. Robotics
7770 North Frontage Road
Skokie, IL 60077-2690
All Rights Reserved
∗∗ IMPORTANT! This modem is 56Kbps capable. However, current FCC rules limit download
speeds to 53Kbps. See page 3 for details.
Page 2

TABLE OF CONTENTS
U.S. Robotics: The Intelligent Choice in Information Access 1
Welcome to x2 Information Access 2
Product Features 4
Read This First! 6
Part I - Internal Modem Installation 6
Section A: Internal Modem Installation with Windows 3.x 7
A Word about COM Ports and IRQs 8
How to Use ComTest to Determine Your Modem’s Settings 9
What to Do with ComTest’s Recommendation 13
How to Change the Factory Settings 16
How to Insert the Modem 17
Installing RapidComm Voice with the Setup Wizard 24
Sending Your First Fax 37
Section B: Internal Modem Installation with Windows 95 40
Plug and Play Installation 40
How to Prepare for Plug and Play Installation 41
How to Insert the Modem 42
How to Move Through the “New Hardware Found” Screens 46
Installing RapidComm Voice with the Setup Wizard 49
ii
Page 3

TABLE OF CONTENTS
Sending Your First Fax 63
Part II - External Modem Installation 66
Section A: External Modem Installation with Windows 3.x 67
How to Determine Which Serial Cable to Buy 67
How to Hook Up the Modem 69
Installing RapidComm Voice with the Setup Wizard 70
Sending Your First Fax 83
Section B: External Modem Installation with Windows 95 86
How to Determine Which Serial Cable to Buy 86
How to Hook Up the Modem 88
How to Move Through the “New Hardware Found” Screens 89
Installing RapidComm Voice with the Setup Wizard 92
Sending Your First Fax 106
Part III - Beyond Setup 109
Section A: Installing Other Fax/Data/Voice Software 110
Type of Modem 110
Initialization String 110
Flow Control 111
UART (External Modems Only) 111
Section B: Troubleshooting and Online Help Resources 112
iii
Page 4

TABLE OF CONTENTS
Internal Modem Users Only 118
If You Are Running DOS 6.0 or Higher 118
Online Help Resources 119
Are You Still Having Problems? 123
If You Must Return the Modem to Us 123
RapidComm Voice Troubleshooting Tips 124
A Note to Users with Older Versions of RapidComm on Their Systems 125
Section C: Glossary 126
Section D: Technical Quick Reference 139
Front Panel Lights 140
Command Summary 141
DIP Switches (Modems with DIP Switches Only) 156
S-Registers 158
The Serial Interface 169
Section E: Regulatory Information 171
Manufacturer’s Declaration of Conformity 171
Caution to the User 172
IC (Canada) 172
UL Listing/CUL Listing 173
Connecting to the Telephone Company 173
iv
Page 5

TABLE OF CONTENTS
Fax Branding 173
Radio and Television Interference 174
For Canadian Modem Users 175
Limited Warranty 179
Index 181
v
Page 6

U.S. ROBOTICS: THE INTELLIGENT CHOICE IN
INFORMATION ACCESS
ongratulations! You have just purchased the
C
Sportster® Voice 56K faxmodem. Since
1976, U.S. Robotics has grown to become a key
manufacturer and developer of information access
technology. U.S. Robotics’ advanced technology
allows you to use your faxmodem to open up a
new world of information access. And now you
can take advantage of the highest transfer rates
available today with our new x2™ technology!
As an innovator in the data communications field,
U.S. Robotics has a history of bringing the latest
technology to market at an affordable price.
U.S. Robotics owns the core technology, known
as the data pump, that works in its access
products. This allows U.S. Robotics to bring new
technologies and features to market faster and at
a lower cost while passing the savings on to you.
Be sure to read the following section to learn
more about the latest U.S. Robotics
breakthrough, x2 technology. Your new Sportster
takes advantage of this technology to make
connecting over analog lines faster than ever
before.
For more information on U.S. Robotics, visit the
U.S. Robotics World Wide Web Home Page at:
http://www.usr.com.
1
Page 7

WELCOME TO X2 INFORMATION ACCESS
However, due to FCC rules which restrict
power output of your service provider’s
modems, current download speeds are limited
to 53Kbps. This modem is easily upgradable
to new features and enhancements as they
become available.
An integrated end-to-end
solution from the leader
The latest breakthrough in
online communications
Until now, 33.6 Kbps was thought to be the
practical limit for speed over standard phone
lines. Now, x2 shatters that barrier, to bring
you download speeds of up to 56 Kbps.
2
U.S. Robotics is well positioned to bring you
x2 technology. Our Sportster modems are the
world's number one seller, and our Total
ControlTM and CourierTM product lines are
favored by many Internet service providers.
This widespread acceptance allows U.S.
Robotics to offer x2 technology to virtually
anyone.
Page 8

WELCOME TO X2 INFORMATION ACCESS
Taking advantage of the
modern telephone network
x2 technology uses the increasingly digital
telephone network to bring you faster
downloads, by eliminating the analog-to-digital
conversion in the downstream path.
The result is a completely new kind of
transmission technique. Based on “encoding”
rather than “modulation,” it can give you
download speeds that you never thought
possible. What’s more, with standard V.42 bis
compression, x2 can download at speeds up
to a blistering 115.2 Kbps.
x2 takes advantage of the typical network
configuration found when an analog subscriber
connects to a digitally connected server.
Because it bypasses the analog-to-digital
conversion in the downstream path, x2 can use
nearly all of the available 64K network
bandwidth. (Upstream data, typically less
speed sensitive, travels at the standard V.34
rate.)
The new standard for online
speed
U.S. Robotics has already submitted x2 to the
ITU-T standards committee for acceptance as
the next online standard.
For more information on U.S. Robotics’ x2
technology, see our World Wide Web page at
http://x2.usr.com.
3
Page 9

PRODUCT FEATURES
Your new x2 modem
provides many advanced
features. Here are just a
few:
Modulation Schemes
x2 technology
ITU-T V.34+
ITU-T V.34
ITU-T V.32bis
ITU-T V.32
ITU-T V.22bis
ITU-T V.22
ITU-T V.23
Bell 212A
ITU-T V.21
Bell 103
Error Control and Data
Compression Schemes
ITU-T V.42
ITU-T V.42bis
MNP 2-5
Fax Modulation Schemes
ITU-T V.17
ITU-T V.29
ITU-T V.27ter
ITU-T V.21
Fax Standards
EIA 578 Class 1 FAX
EIA 592 Class 2.0 FAX
Front Channel Link Rates
33333, 37333, 41333, 42666,
44000, 45333, 46666, 48000,
49333, 50666, 52000, 53333,
54666, 56000, 57333
Back Channel Link Rates
14400, 16800, 19200, 21600,
24000, 26400, 28800, 31200
V.34+ Link Rates
4800, 7200, 9600, 12000, 14400,
16800, 19200, 21600, 24000,
26400, 28800, 31200, 33600
V.32bis Link Rates
4800, 7200, 9600, 12000, 14400
Additional Link Rates
300, 1200/75 (V.23), 1200, 2400
Fax Link Rates
2400, 4800, 7200, 9600, 12000,
14400
4
Page 10

PRODUCT FEATURES
Speakerphone
With the addition of an inexpensive set of
externally powered speakers, your new
Sportster Voice modem provides all the
convenience of a full-duplex speakerphone.
Unlike many half-duplex speakerphones, your
Sportster allows you to converse normally
without annoying echoes and distortion. Simply
plug the speakers into the SPEAKER jack on
the modem and you’re ready to go.
Personal Voice Mail
Personal Voice Mail turns your modem into a
full-featured messaging system. Enjoy the
convenience of professional voice mail in your
home or office for a fraction of the cost.
If you have an internal modem and are using
the Windows 3.x operating system, start at
With Personal Voice Mail, you can record
custom greetings, receive messages, and set up
multiple voice “mailboxes”. You can even
access your voice messages remotely.
Your modem will automatically detect
incoming fax/voice/data calls and route them
appropriately. The included fax-on-demand
feature allows callers to select information from
a list and have it automatically faxed to them.
5
Page 11

PART I - INTERNAL MODEM INSTALLATION
READ THIS FIRST!
Part I, Section A: Internal Modem
Installation with Windows 3.x (page 7).
If you have an internal modem and are using
the Windows 95 operating system, start at
Part I, Section B: Internal Modem
Installation with Windows 95 (page 40).
This part of the manual covers the installation
of your internal Sportster and the
accompanying fax/data/voice software. The
instructions are provided for both Windows
3.1/ 3.11 (hereafter jointly referred to as
Windows 3.x) and Windows 95 users. Please
refer to the section dealing with the operating
system you use. The two sections are:
6
If you have an external modem and are using
the Windows 3.x operating system, start at
Part II, Section A: External Modem
Installation with Windows 3.x (page 69).
If you have an external modem and are using
the Windows 95 operating system, start at
Part II, Section B: External Modem
Installation with Windows 95 (page 89).
Section A: Internal Modem Installation
with Windows 3.x (page 7)
Section B: Internal Modem Installation
with Windows 95 (page 40)
Page 12
SECTION A: INTERNAL MODEM INSTALLATION
WITH WINDOWS 3.X
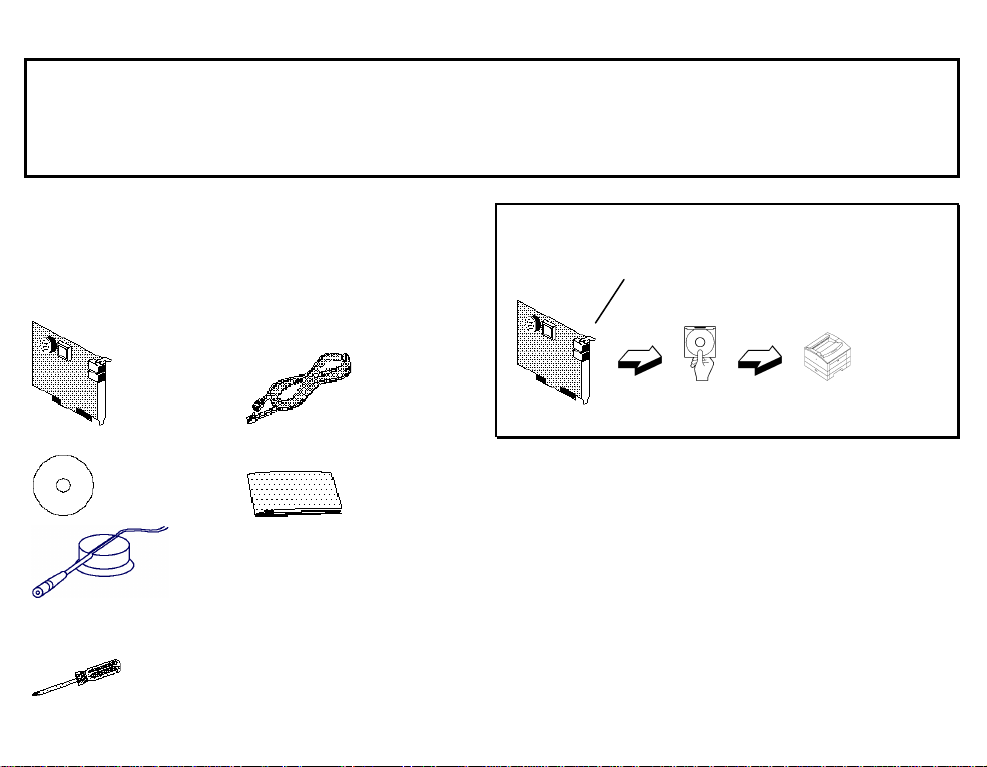
You’ll need these items from your
Sportster box:
modem phone cord
Connections CD manual
microphone
Plus:
a screwdriver (not included)
THIS FIRST SECTION WILL WALK YOU THROUGH THE
STEPS INVOLVED IN CONNECTING YOUR SPORTSTER TO
YOUR COMPUTER.
HARDWARE SOFTWARE TESTING
7
Page 13

PART I: SECTION A: INTERNAL MODEM INSTALLATION WITH WINDOWS 3.X
A Word about COM Ports and
IRQs
Most computer accessories — a mouse,
sound card, enhanced graphics card, scanner,
etc. — require a special connection through
which they can communicate with the
computer. For an internal modem, it’scalled a
communications (COM) port. Most computers
have 1 or 2 COM ports but can have up to 4.
On an internal modem, the COM port is
represented by the modem itself.
Each COM port uses an IRQ (interrupt
request). An accessory uses an IRQ to get the
attention of your computer’s CPU (central
processing unit) so that the accessory can
perform a task. The computer stops what it’s
doing, depending on the priority of the request,
to help the accessory perform its task. When
two accessories share an IRQ, it’s like two
people asking different questions in unison to a
third person. Just as the person being asked the
two questions cannot understand either request,
a computer can lock up or otherwise fail to
communicate properly with your modem when
there is an IRQ conflict.
8
Page 14
PART I: SECTION A: INTERNAL MODEM INSTALLATION WITH WINDOWS 3.X
D KEY POINT: Accessories cannot share
COM ports and should not share IRQs.
When accessories try to share settings,
they will either not work properly or not
work at all. This section of the manual will
help you understand the COM/IRQ
settings on your new Sportster.
U.S. Robotics has set your Sportster to use
COM 2 and IRQ 3. This is the industry
standard for modem settings. In most cases,
these settings will work. In some instances,
however, these settings are already being used
by another accessory, such as a sound card or
another COM port. We recommend that you
run the ComTest program (on the
Connections CD) to determine what settings
your modem should use.
NOTE: Some communications
software programs require a particular
setting for your modem. (RapidComm
Voice, which shipped with your modem,
does not.) If you wish to use a program
other than RapidComm Voice, now is a
good time to read that software’s manual
to determine what setting is required.
How to Use ComTest to
Determine Your Modem’s
Settings
1. Insert your Connections CD into your CD-
ROM drive.
2. In the Windows Program Manager, select
Run from the File menu. Enter the file name
as d:\comtest.exe. This starts ComTest,
9
Page 15
PART I: SECTION A: INTERNAL MODEM INSTALLATION WITH WINDOWS 3.X
the program that determines which COM
ports and IRQs are available for use by
your modem.
3. The screen at the top of the next page
appears when ComTest starts.
• If there is a modem in your computer
which you are replacing with your new
Sportster, you need to go to “Testing an
Installed Modem” on page 13 to
determine which options to select so that
ComTest can detect what the older
modem’s COM and IRQ settings are.
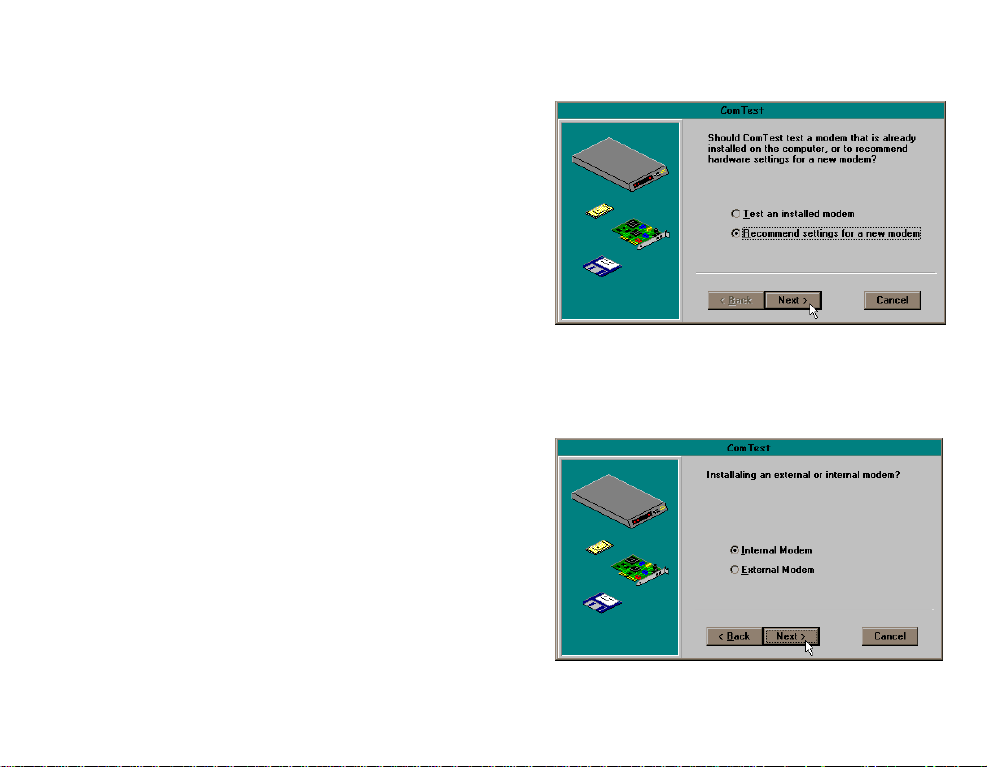
• If a modem is not currently installed in
your computer, choose the Recommend
settings for a new modem option.
Then click on the Next button.
4. If it’s not already selected, choose the
Internal Modem option.
10
Then click on the Next button.
Page 16
PART I: SECTION A: INTERNAL MODEM INSTALLATION WITH WINDOWS 3.X
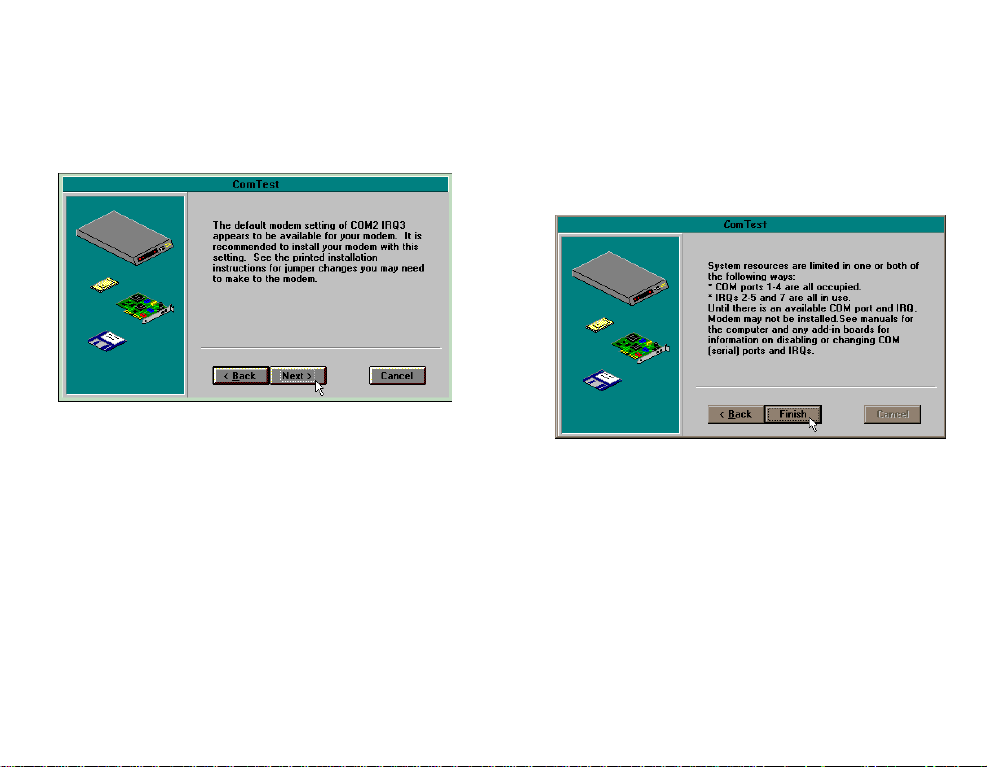
5. If you have a free setting, you will see a
screen like this.
COM2/IRQ3 is free in this example.
ComTest might instead recommend
COM1/IRQ4, COM3/IRQ4, or
COM4/IRQ3 for your modem.
Write down the settings you’re given in the
spaces provided on the first page of this
manual. You’ll need to know the settings
later.
Click on the Next button.
If you DO NOT have a free setting, you will
see a screen like this.
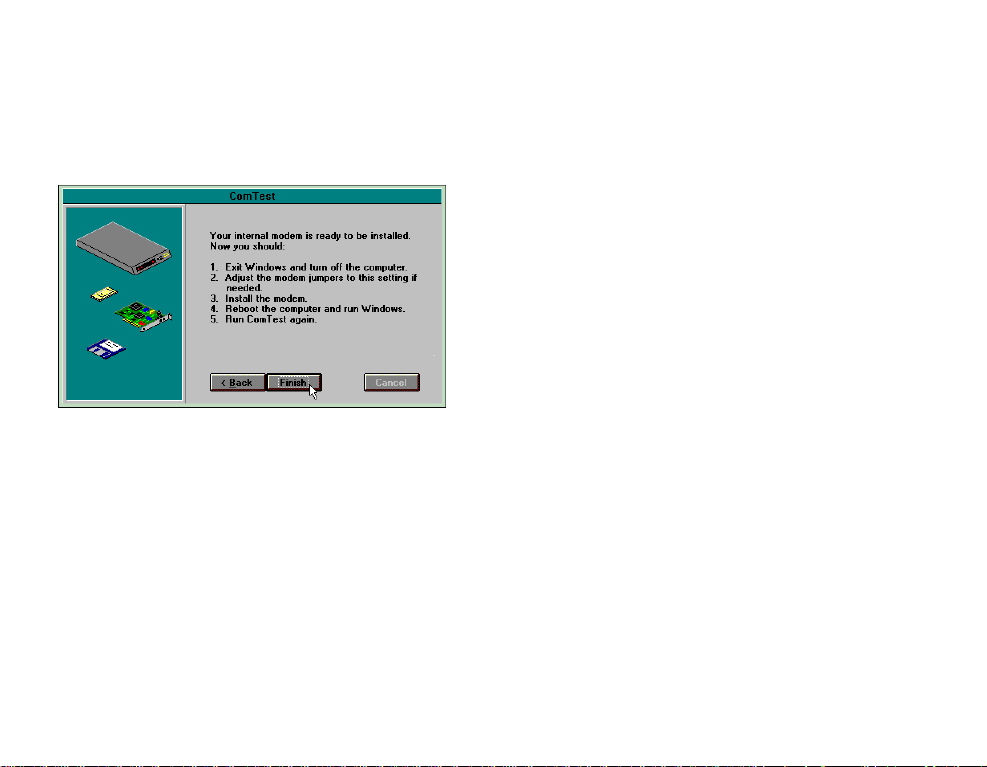
Click on the Finish button to exit ComTest.
Go to “What to Do with ComTest’s
Recommendation” on page 14.
11
Page 17
PART I: SECTION A: INTERNAL MODEM INSTALLATION WITH WINDOWS 3.X
6. When you see this screen, click on the
Finish button to exit ComTest.
Go to “What to Do with ComTest’s
Recommendation” on page 14.
Testing an Installed Modem
If there is a modem already installed in your
computer, you can determine its COM and
IRQ settings by selecting the Test an installed
modem option. Follow the instructions on
screen until you see the screen that tells you
“Testing is complete.” This screen will also tell
you which COM and IRQ settings your
present modem is using. These are the settings
you want to use for your new Sportster. Write
the settings down in the spaces provided on
the first page of this manual.
Turn off your computer and remove your
present modem.
• If your present modem is using
COM2/IRQ3, go to “How to Insert the
Modem” on page 19.
• If your present modem uses settings other
than COM2/IRQ3, go to “How to Change
the Factory Settings” on page 17.
12
Page 18

PART I: SECTION A: INTERNAL MODEM INSTALLATION WITH WINDOWS 3.X
What to Do with ComTest’s
Recommendation
If ComTest recommended COM1/IRQ4
You will have to change the factory settings on
your modem.
NOTE: If your communications
software requires a setting for your
modem that ComTest does not
recommend, there is a good chance
that the setting is being used by
another device in your system. To find
out how to free that setting in your
system, consult your computer
manufacturer’s manual. If the
communications software requires
COM2/IRQ3, go to “How to Insert the
Modem” on page 19. If the
communications software requires
different settings, go to “How to
Change the Factory Settings” on page
17.
Write “COM1” and “IRQ4” in the spaces
provided on the first page of this manual. Go to
“How to Change the Factory Settings” on
page 17.
If ComTest recommended COM2/IRQ3
You can insert the modem, as is, into your
computer.
Write “COM2” and “IRQ3” in the spaces
provided on the first page of this manual. Go to
“How to Insert the Modem” on page 19.
13
Page 19

PART I: SECTION A: INTERNAL MODEM INSTALLATION WITH WINDOWS 3.X
If ComTest recommended COM3/IRQ4 or
COM4/IRQ3
Do not use either of these settings.
While the COM port part of the setting is
acceptable (ComTest only recommends
COM ports that are not being used), the
IRQ part of the setting is not acceptable.
When ComTest recommends either
COM3/IRQ4 or COM4/IRQ3, the IRQ in
the setting is being used by another
accessory. You could use the suggested
IRQ for the modem, but you run the risk that
the modem and/or the other accessory
sharing the IRQ might not work properly.
If you do not have a sound card, use
COM3/IRQ5. Write “COM3” and “IRQ5”
in the spaces provided on the first page of
this manual. You will have to change the
factory settings on your modem. Go to
“How to Change the Factory Settings” on
page 17.
If you do have a sound card, use
COM2/IRQ3. To use this setting, you have to
first disable your computer’s second serial port
(COM2). This is a pronged socket on the
back of your computer.
Go to your computer manufacturer’s manual.
• Find out which of the sockets on the back
of your computer is the second serial port.
• If you have something plugged into that
port, find out if you can plug it in
somewhere else. Any accessory plugged
into that port after the port has been
disabled will not work.
• Find out how to disable the COM port.
14
Page 20

PART I: SECTION A: INTERNAL MODEM INSTALLATION WITH WINDOWS 3.X
• Then return to this point in this manual to
continue.
After disabling COM2, you can use the
COM2/IRQ3 setting.
Write “COM2” and “IRQ3” on the first page
of this manual and go to “How to Insert the
Modem” on page 19.
If ComTest tells you that You do not have
any available COM ports and/or IRQs
We recommend you disable COM1 or
COM2. When you disable one of these COM
ports, you can use it and its default IRQ for
your modem. Go to your computer
manufacturer’s manual.
• Find out which socket is COM1 and which
is COM2.
• If nothing is plugged into either port, you
can disable either of the ports. Your
computer manufacturer’s manual will tell
you how to disable the COM port.
• If one of the ports is being used by an
accessory, choose the unused port. Note if
the port is COM1 or COM2. This is the
port you should disable for your modem.
• If both ports are being used, you may be
able to attach one of the accessories
elsewhere so that you can disable that
COM port for use by your modem. The
accessory will not work once its port is
disabled.
If you’ve disabled COM1, you can now use
the COM1/IRQ4 setting. Write this setting
down on the first page of this manual. Go to
“How to Change the Factory Settings”.
If you’ve disabled COM2, you can now use
the COM2/IRQ3 setting. Write this setting
15
Page 21
PART I: SECTION A: INTERNAL MODEM INSTALLATION WITH WINDOWS 3.X
down on the first page of this manual. Go to
“How to Insert the Modem” on page 19.
How to Change the Factory
Settings
(NOTE: If ComTest recommended
COM2/IRQ3 for your modem, you can
skip this section.)
1. Always touch an unpainted metal part of
your computer (the back is usually
unpainted) to discharge static electricity
before handling the modem. Static can
damage your modem.
2. Take the modem out of its plastic bag.
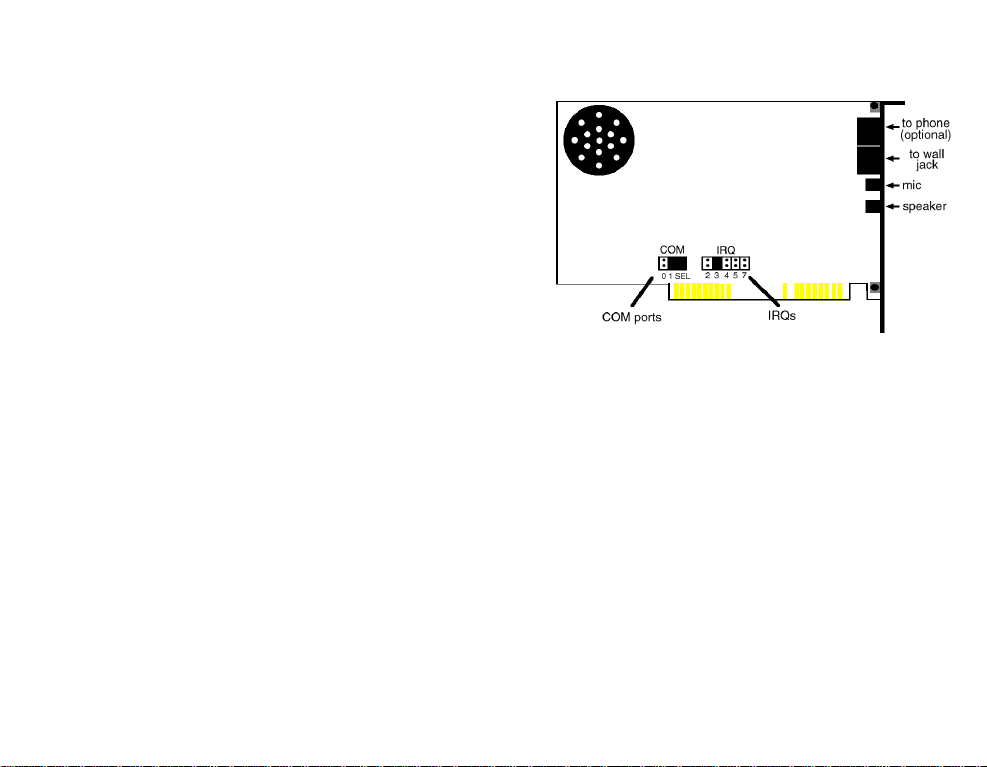
3. Find the COM port and IRQ shunts (small
black plastic pieces) on your modem. They
should be in roughly the area indicated in
the following illustration.
4. To change the COM port and IRQ settings,
you must move the shunts on the COM
port and IRQ pins. To do this, lift the shunts
off the pins.
16
Page 22
PART I: SECTION A: INTERNAL MODEM INSTALLATION WITH WINDOWS 3.X
0 1 SEL
0 1 SEL
0 1 SEL
0 1 SEL
TIP: Grasp the shunts with a tweezers
or needle-nosed pliers. DO NOT grasp
too firmly, as you may crush the shunts. If
a shunt seems stuck, gently rock it back
and forth as you lift. Do not touch any
other part of the modem or your
computer with the tweezers/pliers.
5. Move the shunt to the new setting.
• The COM port setting can involve one
to three shunts. The four possible COM
port settings are as follows:
COM 1
COM 3
COM 2
COM 4
• Unlike most COM port settings, the
IRQ setting involves only one shunt.
Simply move the shunt to the pin labeled
with the IRQ you want.
How to Insert the Modem
NOTE: Before installing your
modem, write its serial number in the
space provided on the first page of this
manual. (You’ll find the serial number
underneath the bar code on the white
sticker on the modem and on the box
the modem came in.) If you place a call
to our technical support department, the
technical support representative will ask
you for the serial number. This will help
him or her identify the type of modem
you have.
17
Page 23
PART I: SECTION A: INTERNAL MODEM INSTALLATION WITH WINDOWS 3.X
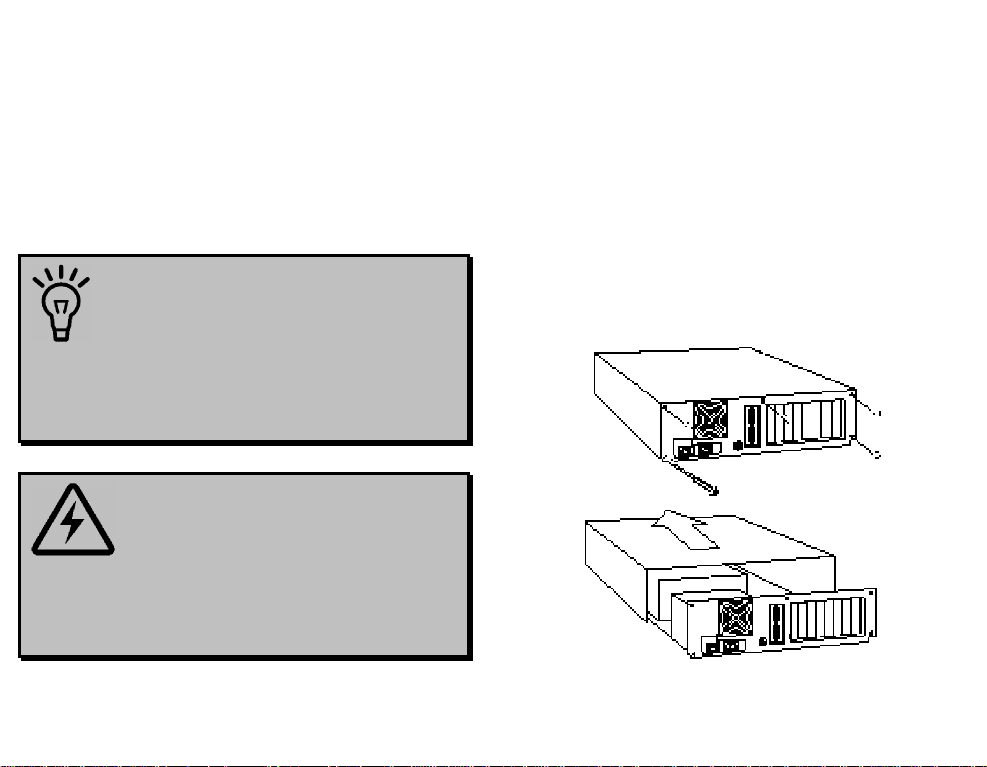
1. Turn off your computer and unplug it from
the electrical outlet.
2. Unplug any peripheral devices (printer,
monitor, keyboard, mouse, etc.) from the
computer.
TIP: Before you unplug anything,
label the cords or make a sketch of how
things are connected. This can be helpful
when you plug things back in later.
CAUTION: To avoid risk of
electric shock, make sure your computer
and all peripheral devices are turned off
and unplugged.
3. Remove the screws from your computer’s
cover and then remove the cover, as shown
in the following diagrams. Your computer
may differ in appearance from these
diagrams, but the basic principle for
removing the cover should be the same.
Refer to your computer manufacturer’s
manual if you need further instructions.
18
Page 24
PART I: SECTION A: INTERNAL MODEM INSTALLATION WITH WINDOWS 3.X
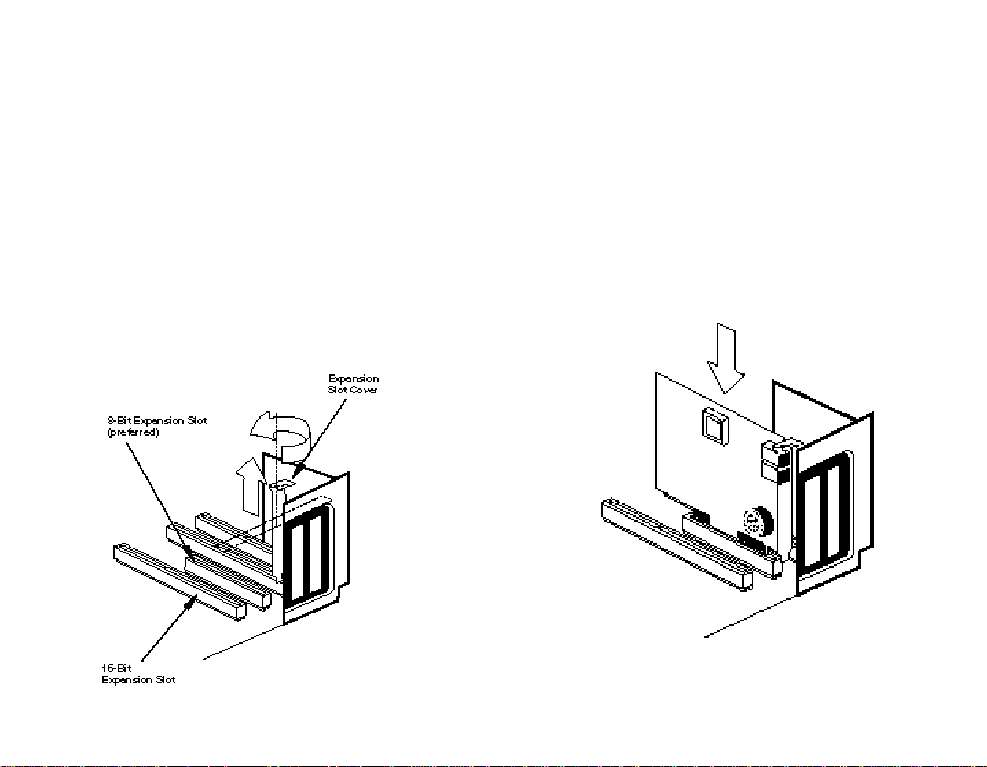
4. Find an empty ISA expansion slot that’s at
least as long as the gold edge of your
modem. ISA slots are black plastic grooves
lined with silver. Unscrew and remove the
expansion slot cover (the long narrow piece
of metal that keeps dust from entering
through the opening perpendicular to the
slot). Be careful not to drop the screw into
the computer.
5. Holding the modem at each corner, with the
gold edge facing the slot, push the modem
down as gently as possible until it snaps into
the expansion slot. (NOTE: The drawings
show horizontally aligned expansion slots.
Some computers have vertically aligned
slots. The instructions apply to both styles.)
19
Page 25
PART I: SECTION A: INTERNAL MODEM INSTALLATION WITH WINDOWS 3.X
You will need to apply a little pressure to
seat the modem properly. Sometimes a
gentle back-and-forth motion helps to fit the
modem all the way into the slot. If you feel
resistance, the modem may not be properly
lined up with the slot. Do not force it into
the slot. Remove the modem and try again.
6. Once the modem is in place, fasten it firmly
into place using the screw that you removed
in step 4.
7. Put the computer’s cover back on and
fasten it with the screws you removed in
step 3.
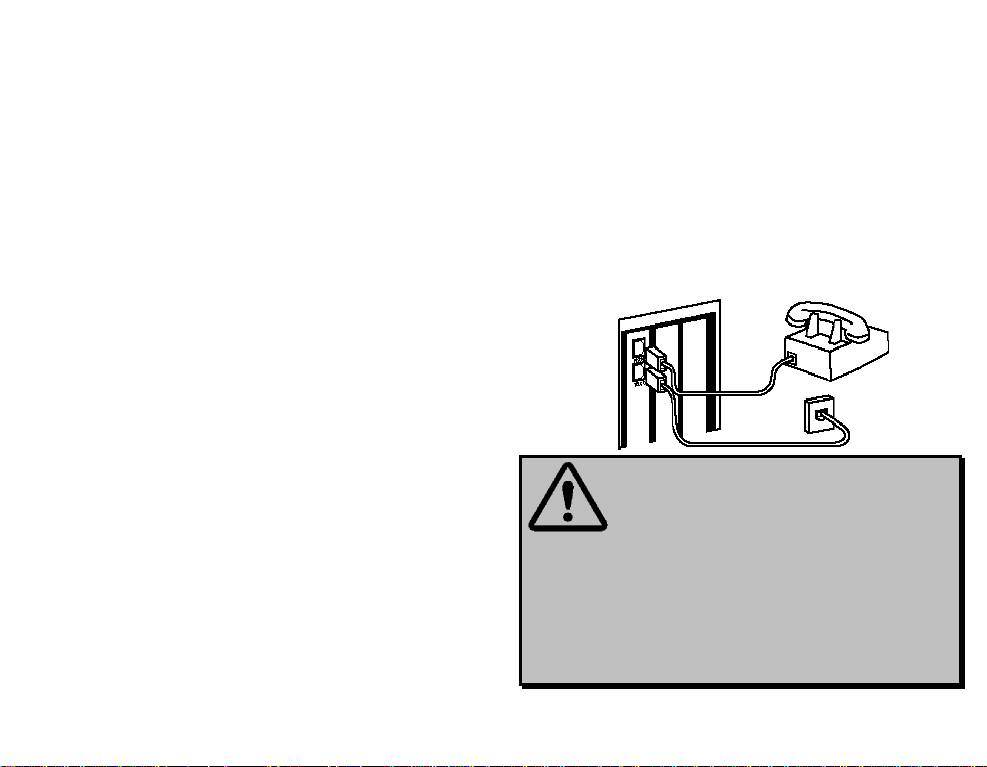
8. If you currently have a phone plugged into
the wall jack you intend to use for the
modem, disconnect the phone from the
jack.
9. Plug one end of the phone cord that came
with the modem into the TELCO jack on
the modem. Plug the other end of the cord
into the wall jack.
(If you want to use a telephone on the same
line when you’re not using the modem, plug the
telephone’s cord into the modem’s PHONE
jack.)
WARNING: The phone jack you
use must be for an ANALOG phone line.
Most offices use digital lines. Be sure you
know what type of line you have. The
modem will be damaged if you use a
digital phone line.
20
Page 26
PART I: SECTION A: INTERNAL MODEM INSTALLATION WITH WINDOWS 3.X
10. Plug the microphone into the MIC jack on
the modem. Place the microphone where it
will pick up your voice.
11. Plug the power cords, cables, and
peripherals back into the computer and turn
the computer on.
12. Start Windows.
13. If you have your modem set to one of these
settings.
• COM1/IRQ4
• COM2/IRQ3
• COM3/IRQ4
• COM4/IRQ3
Go to “Installing RapidComm Voice with
the Setup Wizard” on page 25.
14. If you have your modem set to a setting that
is not in the preceding list, enter your
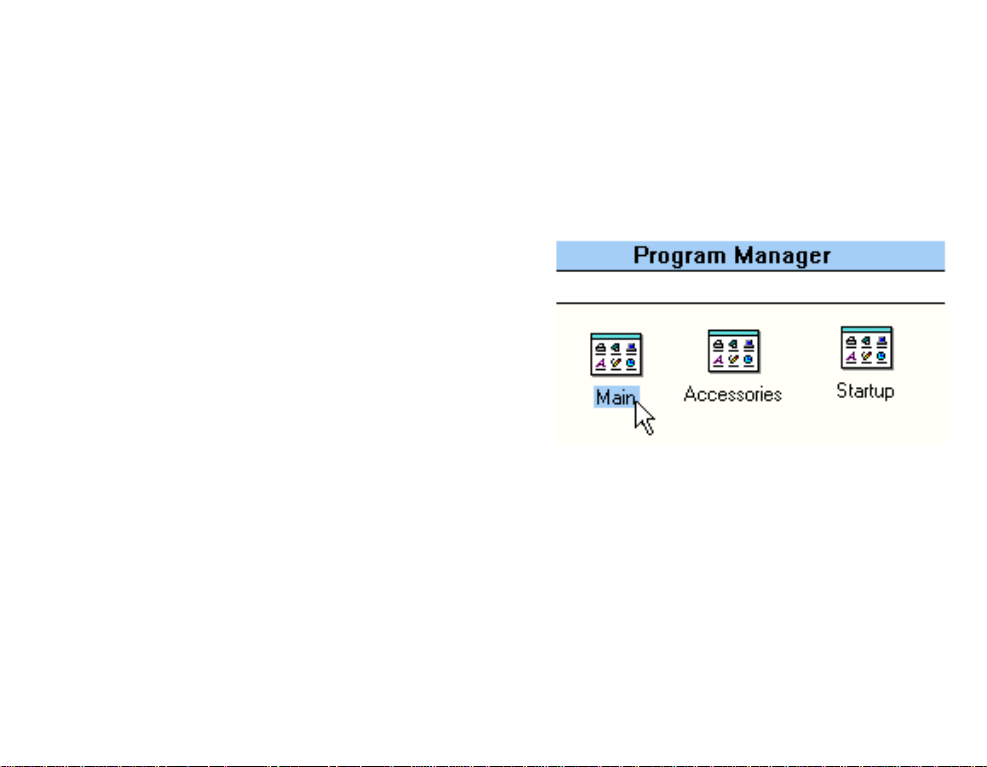
Program Manager and double-click on
the Main icon.
21
Page 27
PART I: SECTION A: INTERNAL MODEM INSTALLATION WITH WINDOWS 3.X
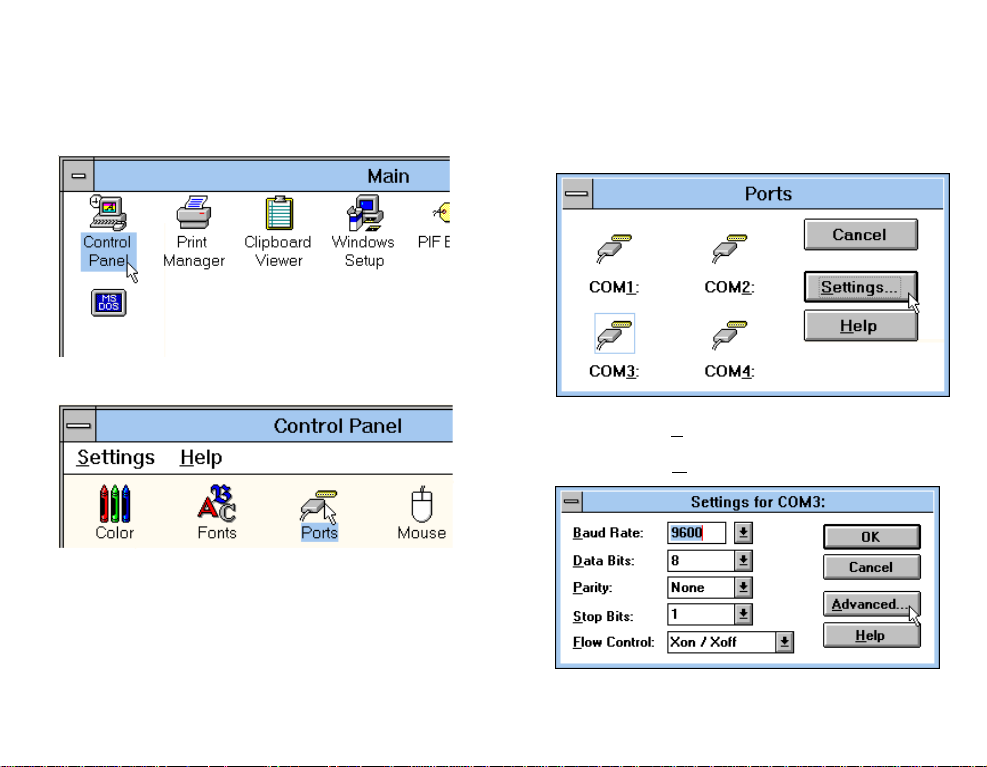
15. Double-click on the Control Panel icon.
16. Double-click on the Ports icon.
17. If it’s not already selected, select the COM
port for your modem.
Click on the Settings button.
18. Click on the Advanced button.
22
Page 28
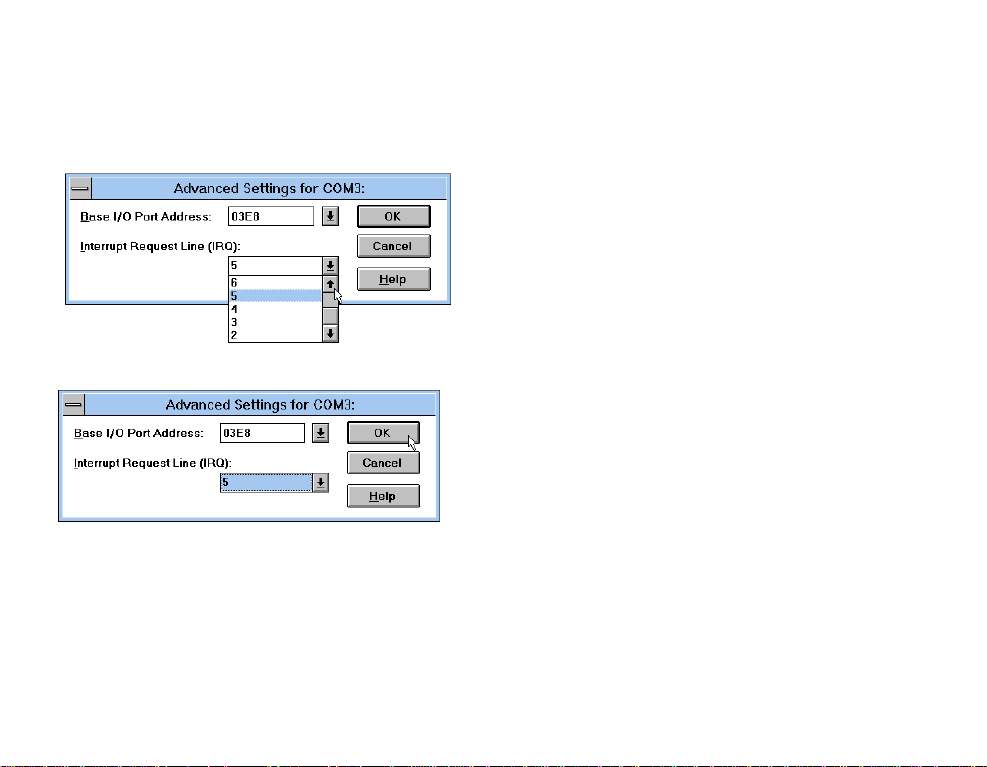
PART I: SECTION A: INTERNAL MODEM INSTALLATION WITH WINDOWS 3.X
19. Scroll to select the IRQ you set your
modem for.
20. Click the OK button.
You will see a brief series of screens after the
preceding screen. Click on each screen’s OK
button until you see a screen with a Close
button. Click on the Close button to exit
Program Manager.
23
Page 29
PART I: SECTION A: INTERNAL MODEM INSTALLATION WITH WINDOWS 3.X
THIS NEXT SECTION WALKS YOU THROUGH THE
STEPS INVOLVED IN INSTALLING THE
FAX/DATA/VOICE SOFTWARE FROM THE
CONNECTIONS CD ONTO YOUR COMPUTER.
HARDWARE SOFTWARE TESTING
Installing RapidComm Voice
with the Setup Wizard
RapidComm Voice simplifies sending and
receiving faxes directly from your computer
desktop. You can send faxes to specified
groups of numbers after building your own fax
directory, specify individual cover pages when
necessary, and send individual faxes without
exiting your word processing program.
Additionally, RapidComm Voice works to turn
your desktop into a powerful voice message
center with multiple mailboxes.
This section will walk you through the basics of
running the U.S. Robotics Setup Wizard,
which installs RapidComm Voice
(fax/data/voice software) and other useful
software programs. It also helps you register
your new Sportster modem.
24
NOTE: If you have an older version
of RapidComm or RapidComm Voice
installed on your system, uninstall it
before continuing.
Page 30
PART I: SECTION A: INTERNAL MODEM INSTALLATION WITH WINDOWS 3.X
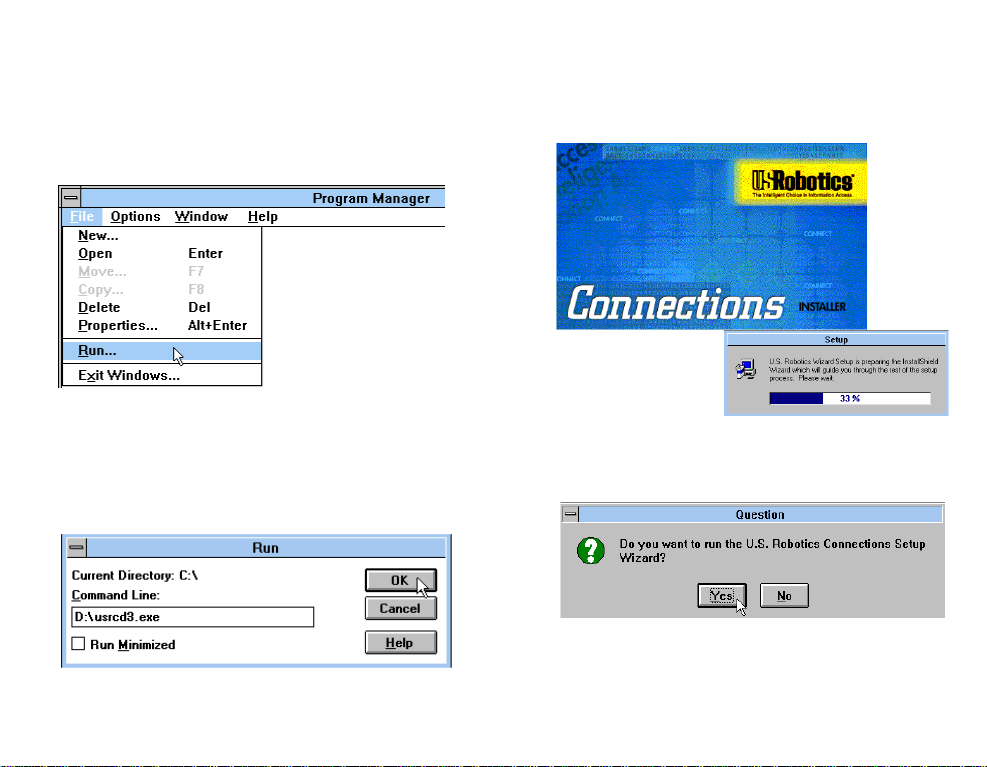
1. In Program Manager, click on the File
menu and select Run.
2. In the text box, type D:\usrcd3.exe (If
your CD-ROM drive has a letter name
other than D, type that letter in place of D.)
Then click the OK button.
3. You will see a screen that looks like this.
4. After you read this screen, click on the Yes
button.
25
Page 31

PART I: SECTION A: INTERNAL MODEM INSTALLATION WITH WINDOWS 3.X
5. After reading the following screen, click on
the Next button.
6. You will see this screen for a moment.
7. When you see this screen, select the correct
modem, verify that the port setting is
correct, and then click on the Next button.
26
Page 32

PART I: SECTION A: INTERNAL MODEM INSTALLATION WITH WINDOWS 3.X
8. When you see the following two screens, fill
in the blank boxes with the appropriate
information, using the Tab key to move
between fields. Click on each screen’s
Next button when you have filled in all of
the necessary information.
27
Page 33

PART I: SECTION A: INTERNAL MODEM INSTALLATION WITH WINDOWS 3.X
9. In the following screen, un-check any
software you do not want by clicking on the
name of the software. An “x” in the box to
the left of each application indicates that
software will be installed. We recommend
that you install all of the software listed.
(NOTE: Make sure you select the correct
translation of RapidComm Voice.) Then
click on the Next button.
10. As the CD installs the software on your
system, you will see a series of screens that
guide you through the installation. Please
follow the on-screen directions.
11. This is the first screen of the RapidComm
Voice Setup program. The RapidComm
Voice files will be saved to the location
listed in the dialog box. If you wish to save
the files to another location, enter the path
in place of the path listed in the dialog box.
Then click on Install.
28
Page 34

PART I: SECTION A: INTERNAL MODEM INSTALLATION WITH WINDOWS 3.X
12. You will see this screen for a moment as the
Setup Wizard installs the RapidComm
Voice files.
13. After you read this screen, click on either
the Yes or No button.
• If you click on the Yes button, every
document you print will be treated as a
fax unless you change the printer
selection in the program from which
you're trying to print.
• If you click on the No button,
RapidComm Voice will not be chosen as
the default printer. When you want to
send a fax, you will have to select
RapidComm Voice as the printer in the
program from which you're trying to
print.
14. You will see this screen for a moment.
15. After you read this screen, click on the OK
button.
29
Page 35

PART I: SECTION A: INTERNAL MODEM INSTALLATION WITH WINDOWS 3.X
16. After you read this screen, click on the OK
button.
17. When you see this screen, we recommend
you click on the Yes button.
NOTE: If you click on “No,” the
registration screens will appear upon your
next restart.
18. After you read the following three screens
and verify that the information you typed
earlier is correct, click on each screen’s
Next button.
30
Page 36

PART I: SECTION A: INTERNAL MODEM INSTALLATION WITH WINDOWS 3.X
19. When you see this screen, By Modem will
already be selected. We recommend you
choose the By Modem option because it's a
great way to try out your Sportster. Choose
By Modem by clicking on the OK button.
31
Page 37

PART I: SECTION A: INTERNAL MODEM INSTALLATION WITH WINDOWS 3.X
20. After you read this screen, we recommend
you click on the Yes button.
21. When you see this screen
• If you have to dial a prefix (such as 9) to
make a call outside your building, type
the prefix before the 1 in the Prefix box
and then click on the Dial button.
• If you do NOT have to dial a prefix,
simply click on the Dial button.
22. Finally, you will see a screen indicating that
the registration information has been sent
(see circled text in the screen below).
23. Restart Windows.
32
Page 38

PART I: SECTION A: INTERNAL MODEM INSTALLATION WITH WINDOWS 3.X
24. When your desktop appears, double-click
on the RapidComm Voice icon.
25. The following screen is the first in the
RapidComm Voice Setup Wizard. After
you read this screen, click on the Next
button.
When you see this screen, you should only
have to verify that the information shown is
correct and then fill in the Data box (if you
have a third phone number for your
modem) and the Local Area Code box.
Then click on the Next button.
33
Page 39

PART I: SECTION A: INTERNAL MODEM INSTALLATION WITH WINDOWS 3.X
27. After you verify the information on this
screen, click on the Next button.
28. When you see this screen…
Check the COM port your modem is
connected to.
• If you know your modem is on COM 2
(which is selected by default), click on
the Next button. Then go to step 29.
• If you know your modem is connected
to another COM port, select that port
34
Page 40

PART I: SECTION A: INTERNAL MODEM INSTALLATION WITH WINDOWS 3.X
on screen and then click on the Next
button. Then go to step 29.
• If you're not sure which port your
modem is on, click on the Auto Detect
button. The Auto Detect program will
search your system to see which COM
port your modem is attached to. You'll
see a screen like this.
Click on the Next button. Then go to
step 29.
• If you get this screen instead
Go to the "Troubleshooting and Online Help
Resources" section.
29. When you see the following screen, select
single or multiple mailboxes for your
personal voice mail system. Then click on
Next.
35
Page 41

PART I: SECTION A: INTERNAL MODEM INSTALLATION WITH WINDOWS 3.X
30. When you see this screen
• If you want RapidComm Voice to start
up every time you start Windows, select
the box to the left of Run RapidComm
Voice at Windows startup. Then click
on the Finish button.
• If you do not want RapidComm Voice
to start up every time you start
Windows, simply click on the Finish
button.
31. After a moment, you will see this screen.
This is the main RapidComm Voice screen.
For sending your first fax, keep this screen
open. (After this initial run, RapidComm
Voice will not need to be running in order to
send a fax.)
36
Page 42

PART I: SECTION A: INTERNAL MODEM INSTALLATION WITH WINDOWS 3.X
THIS SECTION WALKS YOU THROUGH TESTING THE
MODEM AND THE FAX/DATA/VOICE SOFTWARE
WHILE SENDING YOUR FIRST FAX WITH YOUR NEW
SPORTSTER.
HARDWARE SOFTWARE TESTING
Sending Your First Fax
Using RapidComm Voice, you can send and
receive faxes directly from your computer and
eliminate the need for an expensive fax
machine. Once you learn the basics of sending
faxes, you can learn more involved fax
functions (such as sending documents to
groups of numbers at assigned times) and how
to transfer data files. (These more advanced
functions are explained in the electronic
RapidComm Voice manual on your
Connections CD.) This chapter will walk you
through sending your first fax.
1. Open an application in which you can
create documents that you might want to
fax (e.g. a word processing application).
Create a document containing only a
sentence or two. Name the document
"tester". Keep the document open.
37
Page 43

PART I: SECTION A: INTERNAL MODEM INSTALLATION WITH WINDOWS 3.X
2. From the File menu, select Print.
3. If it's not already selected as the printer
driver, select RapidComm Voice as the
printer. This can be changed in the Control
Panel or in the print dialog box of most
Windows applications.
4. Click on the OK button or the Print button
(the button you click in that application to
indicate you're ready to print) in the Print
dialog box.
5. When you see this screen, fill in the
information shown in the text boxes in the
following screen. The U.S. Robotics fax
number is 847-676-3559. This will send
your "tester" document to a U.S. Robotics
fax machine.
38
Page 44

PART I: SECTION A: INTERNAL MODEM INSTALLATION WITH WINDOWS 3.X
NOTE: If you have to dial a special prefix
(such as 9) to connect to a telephone
number outside of your building, make sure
you type that prefix in before the telephone
number.
When you've finished, click on the Send
Fax button.
6. You will see a series of screens as the fax is
being transmitted. When the fax has been
successfully transmitted, you will see a
screen that looks like this.
C
Congratulations —you are ready
to start using your Sportster!
You can now go to the “Troubleshooting and Online
Help Resources” section of this guide for
information on how to contact U.S. Robotics using
your Sportster.
You can also go to the electronic RapidComm Voice
manual on your Connections CD for more detailed
instructions on sending faxes and other things you
can do with your Sportster and RapidComm Voice.
39
Page 45

SECTION B: INTERNAL MODEM INSTALLATION
WITH WINDOWS 95
You’ll need these items from your
Sportster box:
THIS FIRST SECTION WILL WALK YOU THROUGH
THE STEPS INVOLVED IN CONNECTING YOUR
SPORTSTER TO YOUR COMPUTER.
modem phone cord
Connections CD manual
microphone
Plus:
a screwdriver (not included)
40
HARDWARE SOFTWARE TESTING
Plug and Play Installation
With Windows 95, you should be able to
simply plug your new modem into your
computer, power up, and be ready to work.
The operating system does all the work of
recognizing the modem for you. This section
will walk you through this “Plug and Play”
installation.
Page 46

PART I: SECTION B: INTERNAL MODEM INSTALLATION WITH WINDOWS 95
How to Prepare for Plug and
Play Installation
1. Touch an unpainted metal part of your
computer (the back is usually unpainted) to
discharge static electricity. Static can
damage your modem.
2. Take the modem out of its plastic bag.
3. Find the COM port and IRQ shunts (small
black plastic pieces) on your modem. They
should be in roughly the area indicated in
the illustration at the right.
4. When doing a “Plug and Play” installation,
you need to take all the shunts off of the
COM and IRQ jumpers. Remove them,
and then replace them so each is sitting on
one jumper pin as shown in the illustration
on the next page.
41
Page 47

PART I: SECTION B: INTERNAL MODEM INSTALLATION WITH WINDOWS 95
TIP: Grasp the shunts with a tweezers
or a needle-nosed pliers. DO NOT grasp
too firmly, as you may crush the shunts. If
a shunt seems stuck, try gently rocking it
back and forth as you lift. Do not touch
any other part of your computer with the
tweezers/pliers.
4. Once you have placed all the shunts on
single jumper pins, you should be ready to
insert the modem into your computer.
How to Insert the Modem
NOTE: Before installing your
modem, write its serial number in the
spaces provided on the first page of this
manual. (You’ll find the serial number
underneath the bar code on the white
sticker on the modem and on the
outside of the box the modem came in.)
If you ever need to call our technical
support department, the technical
support representative will ask you for
the serial number. This will help him or
her identify the type of modem you
have.
42
Page 48

PART I: SECTION B: INTERNAL MODEM INSTALLATION WITH WINDOWS 95
1. Turn off your computer and unplug it from
the electrical outlet.
2. Unplug any peripheral devices (printer,
monitor, keyboard, mouse, etc.) from the
computer.
TIP: Before you unplug anything,
label the cords or make a sketch of how
things are connected. This can be helpful
when you plug things back in later.
CAUTION: To avoid risk of
electric shock, make sure your computer
and all peripheral devices are turned off
and unplugged.
3. Remove the screws from your computer’s
cover and then remove the cover, as shown
in the following diagrams. Your computer
may differ in appearance from these
diagrams, but the basic principle for
removing the cover should be the same.
Refer to your computer manufacturer’s
manual if you need further instructions.
43
Page 49

PART I: SECTION B: INTERNAL MODEM INSTALLATION WITH WINDOWS 95
4. Find an empty ISA expansion slot that’s at
least as long as the gold edge of your
modem. (ISA slots are black plastic
grooves lined with silver.) Unscrew and
remove the expansion slot cover (the long
narrow piece of metal that keeps dust from
entering through the opening perpendicular
to the slot). Be careful not to drop the
screw into the computer.
5. Holding the modem at each corner, with the
gold edge facing the slot, push the modem
down as gently as possible until it snaps into
an expansion slot. (Note: The drawing
shows horizontally aligned expansion slots.
Some computers have vertically aligned
slots. The instructions apply to both styles.)
44
Page 50

PART I: SECTION B: INTERNAL MODEM INSTALLATION WITH WINDOWS 95
You’ll have to apply a little pressure to seat
the modem properly. Sometimes a gentle
back-and-forth motion helps fit the modem
all the way into the slot. If you feel
resistance, the modem may not be properly
lined up with the slot. Do not force it into
the slot. Remove the modem and try again.
6. Once the modem is in place, screw the
modem firmly into place using the screw
that you removed in step 4.
7. Put the computer’s cover back on and
fasten it with the screws.
8. If you currently have a phone plugged into
the wall jack you’re going to use for the
modem, disconnect the phone’s cable from
the jack.
9. Plug one end of the phone cable that came
with the modem into the TELCO jack at
the rear of the modem. Plug the other end
of the cable into the wall jack. (If you want
to use a telephone on the same line as the
modem, plug the telephone’s cable into the
modem’s PHONE jack.)
45
Page 51

PART I: SECTION B: INTERNAL MODEM INSTALLATION WITH WINDOWS 95
How to Move Through the
WARNING: The phone jack you
use must be for an ANALOG phone line.
Most office phones are wired through
digital lines. Be sure you know what type
of line you have. The modem will be
damaged if you use a digital phone line.
10. Plug the microphone into the MIC jack on
the modem. Place the microphone where it
will pick up your voice.
11. Plug the power cords, cables, and
peripherals back into the computer and turn
the computer on.
46
“New Hardware Found ”
Screens
1. When Windows restarts, after about a
minute you will see this screen pop up
automatically.
If the Driver from disk... option is not
already selected, select it.
Click on the OK button.
Page 52

PART I: SECTION B: INTERNAL MODEM INSTALLATION WITH WINDOWS 95
2. Insert the Connections CD into your CD-
ROM drive.
3. When you see this screen, type in D:\ to
replace the A:\. (Note: If your CD-ROM
drive has a different letter name, type that
letter instead of D.)
Click on the OK button. Windows will
install the drivers for your new modem.
4. Now you can verify that the install was a
success. When your desktop returns, click
on the Start button and scroll up to
Settings.
47
Page 53

PART I: SECTION B: INTERNAL MODEM INSTALLATION WITH WINDOWS 95
5. Scroll over to select Control Panel. 6. Double-click on the Modems icon.
48
Page 54

PART I: SECTION B: INTERNAL MODEM INSTALLATION WITH WINDOWS 95
7. In the Modems Properties screen, you
should see Sportster Voice 56000 Fax
Internal listed. This indicates that your new
Sportster is installed correctly.
Click on the OK button.
Now you are ready to install the software for
your modem.
THIS NEXT SECTION WALKS YOU THROUGH THE
STEPS INVOLVED IN INSTALLING THE
FAX/DATA/VOICE SOFTWARE FROM THE
CONNECTIONS CD ONTO YOUR COMPUTER.
HARDWARE SOFTWARE TESTING
Installing RapidComm Voice
with the Setup Wizard
This section will walk you through the basics of
running the U.S. Robotics Setup Wizard,
which installs RapidComm Voice
(fax/data/voice software) and other useful
software programs. It also helps you register
your new Sportster modem.
49
Page 55

PART I: SECTION B: INTERNAL MODEM INSTALLATION WITH WINDOWS 95
RapidComm Voice simplifies sending and
receiving faxes directly from your computer
desktop. You can send faxes to specified
groups of numbers after building your own fax
directory, specify individual cover pages when
necessary, and send individual faxes without
exiting your word processing program.
Additionally, RapidComm Voice works to turn
your desktop into a powerful voice message
center with multiple mailboxes.
NOTE: If you have an older version
of RapidComm or RapidComm Voice
installed on your system, uninstall it
before continuing.
1. From the Windows 95 desktop, click on
the Start button and then Run.
50
Page 56

PART I: SECTION B: INTERNAL MODEM INSTALLATION WITH WINDOWS 95
2. In the box, type D:\usrcd3.exe
(If your CD-ROM drive has a letter name
other than D, type that letter in place of D.)
3. You will see a screen that looks like this.
4. After you read this screen, click on the Yes
button.
51
Page 57

PART I: SECTION B: INTERNAL MODEM INSTALLATION WITH WINDOWS 95
5. After you read this screen, click on the
Next button.
6. You will see this screen for a moment.
7. When you see this screen, select the correct
modem, verify that the port setting is
correct, and then click on the Next button.
52
Page 58

PART I: SECTION B: INTERNAL MODEM INSTALLATION WITH WINDOWS 95
8. When you see the next two screens, fill in
the blank boxes with the appropriate
information, using the Tab key to move
between fields. Click on each screen’s
Next button when you have filled in all of
the necessary information.
53
Page 59

PART I: SECTION B: INTERNAL MODEM INSTALLATION WITH WINDOWS 95
9. In the following screen, un-check any
software you do not want by clicking on the
name of the software. An “x” in the box to
the left of each application indicates that the
software will be installed. We recommend
that you install all of the software listed.
(NOTE: Make sure you select the correct
translation of RapidComm Voice.) Then
click on the Next button.
10. As the CD installs the software on your
system, you will see a series of screens
guiding you through the installation. Please
follow the on-screen directions.
11. This is the first screen of the RapidComm
Voice Setup program. The RapidComm
Voice files will be saved to the location
listed in the dialog box. If you wish to save
the files to another location, enter the path
in place of the path listed in the dialog box.
Then click on Install.
54
Page 60

PART I: SECTION B: INTERNAL MODEM INSTALLATION WITH WINDOWS 95
12. You will see this screen for a moment as the
Setup Wizard installs the RapidComm
Voice files.
13. When you see this screen, click on either
the Yes or No button.
• If you click on the Yes button, every
document you print will be treated as a
fax unless you change the printer
selection in the program from which you
are printing.
• If you click on the No button,
RapidComm Voice will not be selected
as the default printer. When you want to
send a fax, you must select RapidComm
Voice as the printer in the program from
which you are printing.
14. You will see this screen for a moment.
15. After you read this screen, click on the OK
button.
55
Page 61

PART I: SECTION B: INTERNAL MODEM INSTALLATION WITH WINDOWS 95
16. After you read this screen, click on the OK
button.
17. After you read this screen, we recommend
you click on the Yes button.
NOTE: If you click on “No,” the
registration screens will appear upon your
next restart.
18. After you read the following three screens
and verify that the information you typed
earlier is correct, click on each screen’s
Next button.
56
Page 62

PART I: SECTION B: INTERNAL MODEM INSTALLATION WITH WINDOWS 95
19. When you see this screen, you are ready to
register your new Sportster. By Modem will
already be selected. We recommend you
choose the By Modem option because it’s
a great way to try out your Sportster.
Choose By Modem by clicking on the OK
button.
57
Page 63

PART I: SECTION B: INTERNAL MODEM INSTALLATION WITH WINDOWS 95
20. After you read this screen, we recommend
you click on the Yes button.
21. When you see this screen…
• If you have to dial a prefix (such as 9) to
make a call outside your building, type
the prefix before the 1 in the Prefix box
and then click on the Dial button.
• If you do NOT have to dial a prefix,
simply click on the Dial button.
22. Finally, you will see a screen indicating that
the registration information has been sent
(see circled text in the screen below).
23. Restart Windows.
58
Page 64

PART I: SECTION B: INTERNAL MODEM INSTALLATION WITH WINDOWS 95
24. When you desktop appears, double-click
on the RapidComm Voice icon.
25. The following screen is the first screen of
the RapidComm Voice Setup Wizard.
After you read the screen, click on the
Next button.
59
Page 65

PART I: SECTION B: INTERNAL MODEM INSTALLATION WITH WINDOWS 95
26. When you see this screen, you should only
have to verify the information shown, and
then fill in the Data box (if you have a third
phone number just for your modem) and
the Local Area Code box. Then click on
the Next button.
27. After you verify the information on this
screen, click on the Next button.
60
Page 66

PART I: SECTION B: INTERNAL MODEM INSTALLATION WITH WINDOWS 95
28. When you see the following screen, make
sure the correct modem is selected. Then
click on the Next button.
29. When you see the following screen, select
single or multiple mailboxes for your
personal voice mail system.
61
Page 67

PART I: SECTION B: INTERNAL MODEM INSTALLATION WITH WINDOWS 95
30. When you see this screen…
• If you want RapidComm Voice to
launch with every Windows startup,
click on the box to the left of Run
RapidComm Voice at Windows
startup. A check will appear in the box.
Then click on the Finish button.
• If you do not want RapidComm Voice
to start every time you start Windows,
simply click on the Finish button.
31. You will see this screen.
This is the main RapidComm Voice screen.
To send your first fax, keep this screen
open. (After this initial run, RapidComm
Voice will not need to be running in order to
send a fax.)
62
Page 68

PART I: SECTION B: INTERNAL MODEM INSTALLATION WITH WINDOWS 95
THIS SECTION WALKS YOU THROUGH TESTING THE
MODEM AND THE FAX/DATA/VOICE SOFTWARE
WHILE SENDING YOUR FIRST FAX WITH YOUR NEW
SPORTSTER.
HARDWARE SOFTWARE TESTING
Sending Your First Fax
Using RapidComm Voice, you can send and
receive faxes directly from your computer and
eliminate the need for an expensive fax
machine. Once you learn the basics of sending
faxes, you can learn more involved fax
functions (such as sending documents to
groups of numbers at assigned times) and how
to transfer data files. (These more advanced
functions are explained in the electronic
RapidComm Voice manual that’s on your
Connections CD.) This chapter will walk you
through sending your first fax.
1. Open an application in which you can
create documents that you might want to
fax (e.g. a word processing application).
Create a document containing only a
sentence or two. Name the document
“tester”. Keep the document open.
63
Page 69

PART I: SECTION B: INTERNAL MODEM INSTALLATION WITH WINDOWS 95
2. From the File menu, select Print.
3. If it’s not already selected as the printer,
select RapidComm Voice. This can be
changed in most Windows applications in
the print dialog box.
4. Click the OK button or the Print button
(whichever button you click in that
application to indicate you’re ready to print)
in the print dialog box.
5. When you see this screen, fill in the
information shown in below in the white
boxes. For testing purposes, send your
“tester” document to the U.S. Robotics fax
number, 847-676-3559.
NOTE: If you have to dial a special prefix
(such as 9) to connect to a telephone
number outside of your building, make sure
64
Page 70

PART I: SECTION B: INTERNAL MODEM INSTALLATION WITH WINDOWS 95
you type that prefix in before the telephone
number.
When you’ve finished, click on the Send
Fax button.
6. You will see a series of screens as the fax is
being transmitted. When the fax has been
successfully transmitted, you will see a
screen that looks like this.
Congratulations —you are now
ready to start using your
Sportster!
You can now go to the “Troubleshooting and
Online Help Resources” section in this guide
for information on how to contact U.S.
Robotics using your Sportster.
Go to electronic RapidComm Voice manual on
your Connections CD for more detailed
instructions on sending faxes and other things
you can do with your Sportster and
RapidComm Voice.
65
Page 71

PART II - EXTERNAL MODEM
INSTALLATION
This part of the manual covers the installation
of your external Sportster and the
accompanying fax/data/voice software. The
instructions are provided for both Windows
3.1/ 3.11 (hereafter jointly referred to as
Windows 3.x) and Windows 95 users. Please
refer to the section dealing with the operating
system you use. The two sections are:
Section A: External Installation with
Windows 3.x (page 69)
Section B: External Installation with
Windows 95 (page 89)
66
Page 72

SECTION A: EXTERNAL MODEM INSTALLATION
WITH WINDOWS 3.X
You’ll need these items from your
Sportster box:
modem phone
cord
Connections CD manual
power adapter
Plus:
A serial cable. (This must be purchased separately. See
column to the right.)
THIS FIRST SECTION WILL WALK YOU THROUGH
THE STEPS INVOLVED IN CONNECTING YOUR
SPORTSTER TO YOUR COMPUTER.
HARDWARE SOFTWARE TESTING
How to Determine Which
Serial Cable to Buy
Before you can begin installation, you need to
purchase an RS-232 serial cable. The
following section will help you to determine
which serial cable to purchase.
67
Page 73

PART II: SECTION A: EXTERNAL MODEM INSTALLATION WITH WINDOWS 3.X
If your PC's serial connector looks like this
you need a shielded serial cable with a
25-pin female to 25-pin male connector.
If your PC's serial connector looks like this
you need a shielded serial cable with a
9-pin female to 25-pin male connector.
NOTE: Your computer’s rear panel
may not be identical to the diagrams
above. However, you should look for
connectors that match the enlarged
portions of the diagrams. If you cannot
locate the proper connector, refer to your
computer’s manual.
68
Page 74

PART II: SECTION A: EXTERNAL MODEM INSTALLATION WITH WINDOWS 3.X
How to Hook Up the Modem
1. Turn off your computer and any attached
devices, such as a printer.
2. Connect the serial cable to the modem and
to the computer. When looking for the
serial port label on the back of your
computer, look for ports labeled COM,
MODEM, RS-232, or SERIAL. DO
NOT select AUX, GAME, LPT, or
PARALLEL.
NOTE: Remember which serial port
you selected. This information will be
necessary when installing your
communications software.
3. Plug the power adapter into the power jack
on the modem and into a standard wall
outlet.
4. Plug one end of the phone cord into the
telephone jack (labeled with a wall plug
icon on the bottom of the case) and the
other end into a phone wall jack.
WARNING: The phone jack you
use must be for an ANALOG phone line.
Most office phones are wired through
digital lines. Be sure you know what type
of line you have. The modem will be
damaged if you use a digital phone line.
69
Page 75

PART II: SECTION A: EXTERNAL MODEM INSTALLATION WITH WINDOWS 3.X
5. If you wish to use your modem and phone
through the same phone wall jack, plug
your phone's cord into the modem's phone
jack (labeled with a phone icon on the
bottom of the case). Use an adapter cable
if necessary. (NOTE: You cannot use the
modem and phone at the same time if they
are sharing a line.)
6. Turn your modem on.
7. Turn your computer on.
8. Start Windows.
THIS NEXT SECTION WALKS YOU THROUGH THE
STEPS INVOLVED IN INSTALLING THE
FAX/DATA/VOICE SOFTWARE FROM THE
CONNECTIONS CD ONTO YOUR COMPUTER.
HARDWARE SOFTWARE TESTING
Installing RapidComm Voice
with the Setup Wizard
This section will walk you through the basics of
running the U.S. Robotics Setup Wizard,
which installs RapidComm Voice
(fax/data/voice software) and other useful
software programs. It also helps you register
your new Sportster modem.
70
Page 76

PART II: SECTION A: EXTERNAL MODEM INSTALLATION WITH WINDOWS 3.X
RapidComm Voice simplifies sending and
receiving faxes directly from your computer
desktop. You can send faxes to specified
groups of numbers after building your own fax
directory, specify individual cover pages when
necessary, and send individual faxes without
exiting your word processing program.
1. In Program Manager, click on the File
menu and select Run.
Additionally, RapidComm Voice works to turn
your desktop into a powerful voice message
center with multiple mailboxes.
NOTE: If you have an older version
of RapidComm or RapidComm Voice
installed on your system, uninstall it
before continuing.
2. In the text box, type D:\usrcd3.exe (If
your CD-ROM drive has a letter name
other than D, type that letter in place of D.)
Then click the OK button.
71
Page 77

PART II: SECTION A: EXTERNAL MODEM INSTALLATION WITH WINDOWS 3.X
3. You will see a screen that looks like this.
4. After you read this screen, click on the Yes
button.
5. After reading the following screen, click on
the Next button.
6. You will see this screen for a moment.
72
Page 78

PART II: SECTION A: EXTERNAL MODEM INSTALLATION WITH WINDOWS 3.X
7. When you see this screen, select the correct
modem, verify that the port setting is
correct, and then click on the Next button.
8. When you see the following two screens, fill
in the blank boxes with the appropriate
information, using the Tab key to move
between fields. Click on each screen’s
Next button when you have filled in all of
the necessary information.
73
Page 79

PART II: SECTION A: EXTERNAL MODEM INSTALLATION WITH WINDOWS 3.X
9. In the following screen, un-check any
software you do not want by clicking on the
name of the software. An “x” in the box to
the left of each application indicates that the
software will be installed. We recommend
that you install all of the software listed.
(NOTE: Make sure you select the correct
translation of RapidComm Voice.) Then
click on the Next button.
10. As the CD installs the software on your
system, you will see a series of screens that
guide you through the installation. Please
follow the on-screen directions.
11. This is the first screen of the RapidComm
Voice Setup program. The RapidComm
Voice files will be saved to the location
listed in the dialog box. If you wish to save
the files to another location, enter the path
in place of the path listed in the dialog box.
Then click on Install.
74
Page 80

PART II: SECTION A: EXTERNAL MODEM INSTALLATION WITH WINDOWS 3.X
12. You will see this screen for a moment as the
Setup Wizard installs the RapidComm
Voice files.
13. After you read this screen, click on either
the Yes or No button.
• If you click on the Yes button, every
document you print will be treated as a
fax unless you change the printer
selection in the program from which
you're trying to print.
• If you click on the No button,
RapidComm Voice will not be chosen as
the default printer. When you want to
send a fax, you will have to select
RapidComm Voice as the printer in the
program from which you're trying to
print.
14. You will see this screen for a moment.
15. After you read this screen, click on the OK
button.
75
Page 81

PART II: SECTION A: EXTERNAL MODEM INSTALLATION WITH WINDOWS 3.X
16. After you read this screen, click on the OK
button.
17. When you see this screen, we recommend
you click on the Yes button.
NOTE: If you click on “No,” the
registration screens will appear upon your
next restart.
18. After you read the following three screens
and verify that the information you typed
earlier is correct, click on each screen’s
Next button.
76
Page 82

PART II: SECTION A: EXTERNAL MODEM INSTALLATION WITH WINDOWS 3.X
19. When you see this screen, By Modem will
already be selected. We recommend you
choose the By Modem option because it's a
great way to try out your Sportster. Choose
By Modem by clicking on the OK button.
77
Page 83

PART II: SECTION A: EXTERNAL MODEM INSTALLATION WITH WINDOWS 3.X
20. After you read this screen, we recommend
you click on the Yes button.
21. When you see this screen
• If you have to dial a prefix (such as 9) to
make a call outside your building, type
the prefix before the 1 in the Prefix box
and then click on the Dial button.
• If you do NOT have to dial a prefix,
simply click on the Dial button.
22. Finally, you will see a screen indicating that
the registration information has been sent
(see circled text in the screen below).
23. Restart Windows.
78
Page 84

PART II: SECTION A: EXTERNAL MODEM INSTALLATION WITH WINDOWS 3.X
24. When you desktop appears, double-click
on the RapidComm Voice icon.
25. The following screen is the first in the
RapidComm Voice Setup Wizard. After
you read this screen, click on the Next
button.
When you see this screen, you should only
have to verify that the information shown is
correct and then fill in the Data box (if you
have a third phone number for your
modem) and the Local Area Code box.
Then click on the Next button.
79
Page 85

PART II: SECTION A: EXTERNAL MODEM INSTALLATION WITH WINDOWS 3.X
27. After you verify the information on this
screen, click on the Next button.
28. When you see this screen…
Check the COM port your modem is
connected to.
• If you know your modem is on COM 2
(which is selected by default), click on
the Next button. Then go to step 29.
• If you know your modem is connected
to another COM port, select that port
80
Page 86

PART II: SECTION A: EXTERNAL MODEM INSTALLATION WITH WINDOWS 3.X
on screen and then click on the Next
button. Then go to step 29.
• If you're not sure which port your
modem is on, click on the Auto Detect
button. The Auto Detect program will
search your system to see which COM
port your modem is attached to. You'll
see a screen like this.
Click on the Next button. Then go to
step 29.
• If you get this screen instead
Go to the "Troubleshooting and Online Help
Resources" section.
29. When you see the following screen, select
single or multiple mailboxes for your
personal voice mail system. Then click on
Next.
81
Page 87

PART II: SECTION A: EXTERNAL MODEM INSTALLATION WITH WINDOWS 3.X
30. When you see this screen
• If you want RapidComm Voice to start
up every time you start Windows, select
the box to the left of Run RapidComm
Voice at Windows startup. Then click
on the Finish button.
• If you do not want RapidComm Voice
to start up every time you start
Windows, simply click on the Finish
button.
31. After a moment, you will see this screen.
This is the main RapidComm Voice screen.
For sending your first fax, keep this screen
open. (After this initial run, RapidComm
Voice will not need to be running in order to
send a fax.)
82
Page 88

PART II: SECTION A: EXTERNAL MODEM INSTALLATION WITH WINDOWS 3.X
THIS SECTION WALKS YOU THROUGH TESTING THE
MODEM AND THE FAX/DATA/VOICE SOFTWARE
WHILE SENDING YOUR FIRST FAX WITH YOUR NEW
SPORTSTER.
HARDWARE SOFTWARE TESTING
Sending Your First Fax
Using RapidComm Voice, you can send and
receive faxes directly from your computer and
eliminate the need for an expensive fax
machine. Once you learn the basics of sending
faxes, you can learn more involved fax
functions (such as sending documents to
groups of numbers at assigned times) and how
to transfer data files. (These more advanced
functions are explained in the electronic
RapidComm Voice manual on your
Connections CD.) This chapter will walk you
through sending your first fax.
1. Open an application in which you can
create documents that you might want to
fax (e.g. a word processing application).
Create a document containing only a
sentence or two. Name the document
"tester". Keep the document open.
83
Page 89

PART II: SECTION A: EXTERNAL MODEM INSTALLATION WITH WINDOWS 3.X
2. From the File menu, select Print.
3. If it's not already selected as the printer
driver, select RapidComm Voice as the
printer. This can be changed in the Control
Panel or in the print dialog box of most
Windows applications.
4. Click on the OK button or the Print button
(whichever button you click in that
application to indicate you're ready to print)
in the print dialog box.
5. When you see this screen, fill in the
information shown below in the white
boxes. The U.S. Robotics fax number is
847-676-3559. This will send your "tester"
document to a U.S. Robotics fax machine.
NOTE: If you have to dial a special prefix
(such as 9) to connect to a telephone
number outside of your building, make sure
you type that prefix in before the telephone
number.
When you've finished, click on the Send
Fax button.
6. You will see a series of screens as the fax is
being transmitted. When the fax has been
84
Page 90

PART II: SECTION A: EXTERNAL MODEM INSTALLATION WITH WINDOWS 3.X
successfully transmitted, you will see a
screen that looks like this.
Congratulations —you are
ready to start using your
Sportster!
You can now go to the “Troubleshooting and
Online Help Resources” section of this guide
for information on how to contact U.S.
Robotics using your Sportster.
You can also go to the electronic RapidComm
Voice manual on your Connections CD for
more detailed instructions on sending faxes and
other things you can do with your Sportster
and RapidComm Voice.
85
Page 91

SECTION B: EXTERNAL MODEM INSTALLATION
WITH WINDOWS 95
You’ll need these items from your
Sportster box:
modem phone cord
Connections CD manual
power adapter
Plus:
A serial cable. (This must be purchased. See column to the
right.)
86
THIS FIRST SECTION WILL WALK YOU THROUGH
THE STEPS INVOLVED IN CONNECTING YOUR
SPORTSTER TO YOUR COMPUTER.
HARDWARE SOFTWARE TESTING
How to Determine Which
Serial Cable to Buy
Before you can begin installation, you need to
purchase an RS-232 serial cable. The
following section will help you to determine
which serial cable to purchase.
Page 92

PART II: SECTION B: EXTERNAL MODEM INSTALLATION WITH WINDOWS 95
If your PC's serial connector looks like this
you need a shielded serial cable with a
25-pin female to 25-pin male connector.
If your PC's serial connector looks like this
you need a shielded serial cable with a
9-pin female to 25-pin male connector.
NOTE: Your computer’s rear panel
may not be identical to the diagrams
above. However, you should look for
connectors that match the exploded
portions of the diagrams. If you cannot
locate the proper connector, refer to your
computer’s manual.
87
Page 93

PART II: SECTION B: EXTERNAL MODEM INSTALLATION WITH WINDOWS 95
How to Hook Up the Modem
1. Turn off your computer and any attached
devices, such as a printer.
2. Connect the serial cable to the modem and
to the computer. When looking for your
serial port label on the back of your
computer, select COM, MODEM, RS232, or SERIAL. DO NOT select AUX,
GAME, LPT, or PARALLEL.
Note: Remember which serial port
you selected. This information will be
necessary when installing your
communications software.
3. Plug the power adapter into the power jack
and into a standard wall outlet.
4. Plug one end of the phone cord into the
telephone jack (labeled with a wall plug
icon on the bottom of the case) and the
other end into a phone wall jack.
WARNING: The phone jack
you’re going to use must be for an
ANALOG phone line. Most office phones
are wired through digital lines. Be sure
you know what type of line you have. The
modem will be damaged if you use a
digital phone line.
5. If you wish to use your modem and phone
through the same phone wall jack, plug
your phone's cord into the modem's phone
jack (labeled with a phone icon on the
bottom of the case). Use an adapter cable
88
Page 94

PART II: SECTION B: EXTERNAL MODEM INSTALLATION WITH WINDOWS 95
if necessary. (NOTE: You can not use the
modem and phone at the same time if they
share the same line.)
6. Turn your modem on.
7. Turn your computer on.
8. Start Windows.
How to Move Through the
“New Hardware Found ”
Screens
1. When Windows restarts, after about a
minute you will see this screen pop up
automatically.
If the Driver from disk... option is not
already selected, select it.
Click on the OK button.
89
Page 95

PART II: SECTION B: EXTERNAL MODEM INSTALLATION WITH WINDOWS 95
2. Insert the Connections CD into your CD-
ROM drive.
3. When you see this screen, type in D:\ to
replace the A:\. (If your CD-ROM drive
has a different letter name, type that letter
instead of D.)
Click on the OK button. Windows will
install the drivers for your new modem.
4. Now you can verify that the install was a
success. When your desktop returns, click
on the Start button and scroll up to
Settings.
90
Page 96

PART II: SECTION B: EXTERNAL MODEM INSTALLATION WITH WINDOWS 95
5. Scroll over to select Control Panel. 6. Double-click on the Modems icon.
91
Page 97

PART II: SECTION B: EXTERNAL MODEM INSTALLATION WITH WINDOWS 95
7. In the Modems Properties screen, you
should see Sportster Voice 56000 Fax
External listed. This indicates that your
new Sportster is installed correctly.
Click on the OK button.
92
Now you are ready to install the software for
your modem.
THIS NEXT SECTION WALKS YOU THROUGH THE
STEPS INVOLVED IN INSTALLING THE FAX/DATA
SOFTWARE FROM THE CONNECTIONS CD ONTO YOUR
COMPUTER.
HARDWARE SOFTWARE TESTING
Installing RapidComm Voice
with the Setup Wizard
This section will walk you through the basics of
running the U.S. Robotics Setup Wizard,
which installs RapidComm Voice
(fax/data/voice software) and other useful
Page 98

PART II: SECTION B: EXTERNAL MODEM INSTALLATION WITH WINDOWS 95
software programs. It also helps you register
your new Sportster modem.
RapidComm Voice simplifies sending and
receiving faxes directly from your computer
desktop. You can send faxes to specified
groups of numbers after building your own fax
directory, specify individual cover pages when
necessary, and send individual faxes without
exiting your word processing program.
Additionally, RapidComm Voice works to turn
your desktop into a powerful voice message
center with multiple mailboxes.
NOTE: If you have an older version
of RapidComm or RapidComm Voice
installed on your system, uninstall it
before continuing.
1. From the Windows 95 desktop, click on
the Start button and then Run.
93
Page 99

PART II: SECTION B: EXTERNAL MODEM INSTALLATION WITH WINDOWS 95
2. In the box, type D:\usrcd3.exe
(If your CD-ROM drive has a letter name
other than D, type that letter in place of D.)
3. You will see a screen that looks like this.
4. After you read this screen, click on the Yes
button.
94
Page 100

PART II: SECTION B: EXTERNAL MODEM INSTALLATION WITH WINDOWS 95
5. After you read this screen, click on the
Next button.
6. You will see this screen for a moment.
7. When you see this screen, select the correct
modem, verify that the port setting is
correct, and then click on the Next button.
95
 Loading...