

Page 1

Cold Press Juicer | CPJ 362F
Instruction Manual
Cold Press Juicer 1
Page 2
CONGRATULATIONS!
For joining the next revolution in juicing
- cold press technology for natural
juicing. We welcome you to Usha family
as a proud owner of Usha Nutripress
cold press juicer.
Usha Nutripress brings to you the
revolutionary cold press technology
with low temperature juicing and
silent operation to extract more juice,
more nutrition and more taste from
vegetables & fruits.
Understanding your nutritional
requirements towards leading an active
lifestyle, Usha Nutripress can eortlessly
& eciently extract juices from hard
vegetables, green leafy vegetables,
fruits, nuts & grains and frozen desserts.
In order to seamlessly operate your
machine and get best results every
time, we urge you to read this manual
carefully and familiarize yourself with
your Usha Nutripress.
We look forward to continued
association with you. Should you have
any further queries, you can visit our
website –
www.ushacpj.com
2 Cold Press Juicer
Usha Nutripress -
Get more juice out of life
Page 3

CONTENTS
KNOW YOUR JUICER
Unpacking your NUTRIPRESS
Cold Press Juicer box ............................... 4
Parts Description ....................................... 5
Exploded view of Parts ............................ 6
OPERATE USHA NUTRIPRESS
How to operate ........................................ 15
Using your USHA NUTRIPRESS to
make dierent types of juices .............18
DISASSEMBLING
Step by Step process
to disassemble ........................................ 22
SAFETY INSTRUCTIONS
Save These Instruction ............................. 7
Important Safeguards ............................. 7
Safety Warning .......................................... 9
Before rst usage ....................................10
ASSEMBLE USHA NUTRIPRESS
Step by step process to assemble ..... 11
Choosing the right location .................11
Assembly of Main Unit and Parts .......11
CLEANING AFTER DISASSEMBLING
Individual cleaning of each part ........ 24
How to Clean Silicone Parts ................. 26
MISCELLANEOUS
Troubleshooting guide ......................... 28
Service just a call or click away............ 30
Product Specications
& Technical details .................................. 30
Warranty Card .......................................... 31
Cold Press Juicer 3
Page 4
SECTION 1
KNOW YOUR USHA NUTRIPRESS
COLD PRESS JUICER :
1a. UNPACKING YOUR
NUTRIPRESS COLD PRESS JUICER
1. Open the cardboard box and remove
the top thermocole packing.
2. Lift the main unit from the base packing.
3. Remove the juice/pulp container and
hopper from the base packing.
Main unit
Juicing bowl
Hopper/ Feeding
Tube
Spinning Brush
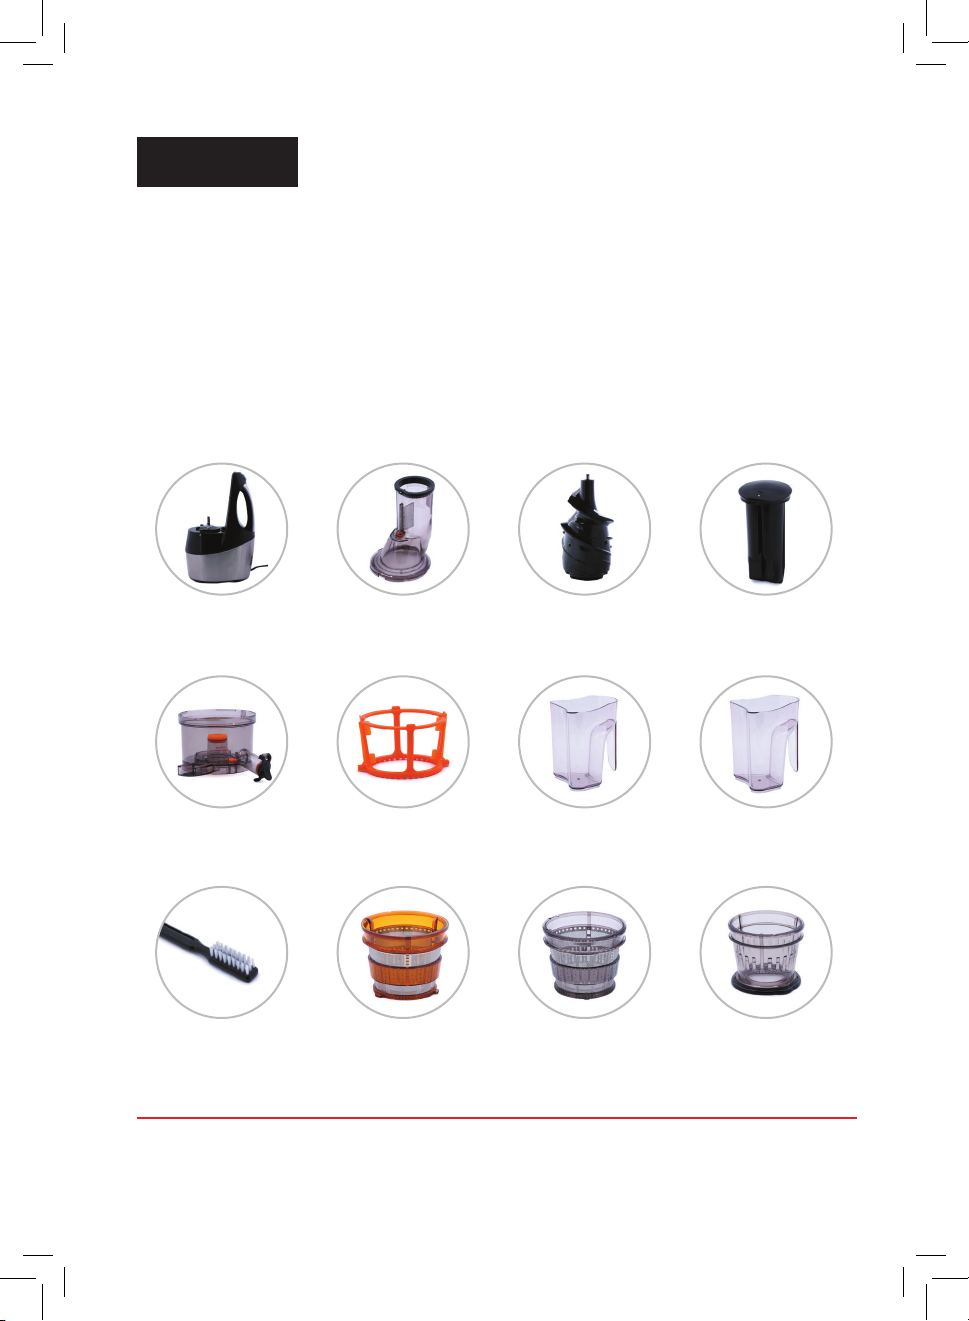
Your USHA Nutripress CPJ 362F is delivered
with the following components: Main unit,
Hopper/ Feeding Tube, Auger, Pusher,
Juicing bowl, Spinning Brush, Pulp
Container, Juice Container, Cleaning Brush,
Fine filter, Coarse filter, Frozen dessert filter
Auger
Pulp Container
Pusher
Juice Container
Cleaning Brush
Warning : Packaging material (e.g. Films, Thermocole) can be dangerous for children.
There is a risk of suffocation! Keep all packaging well away from children.
4 Cold Press Juicer
Fine filter
Coarse filter
Frozen dessert filter
Page 5
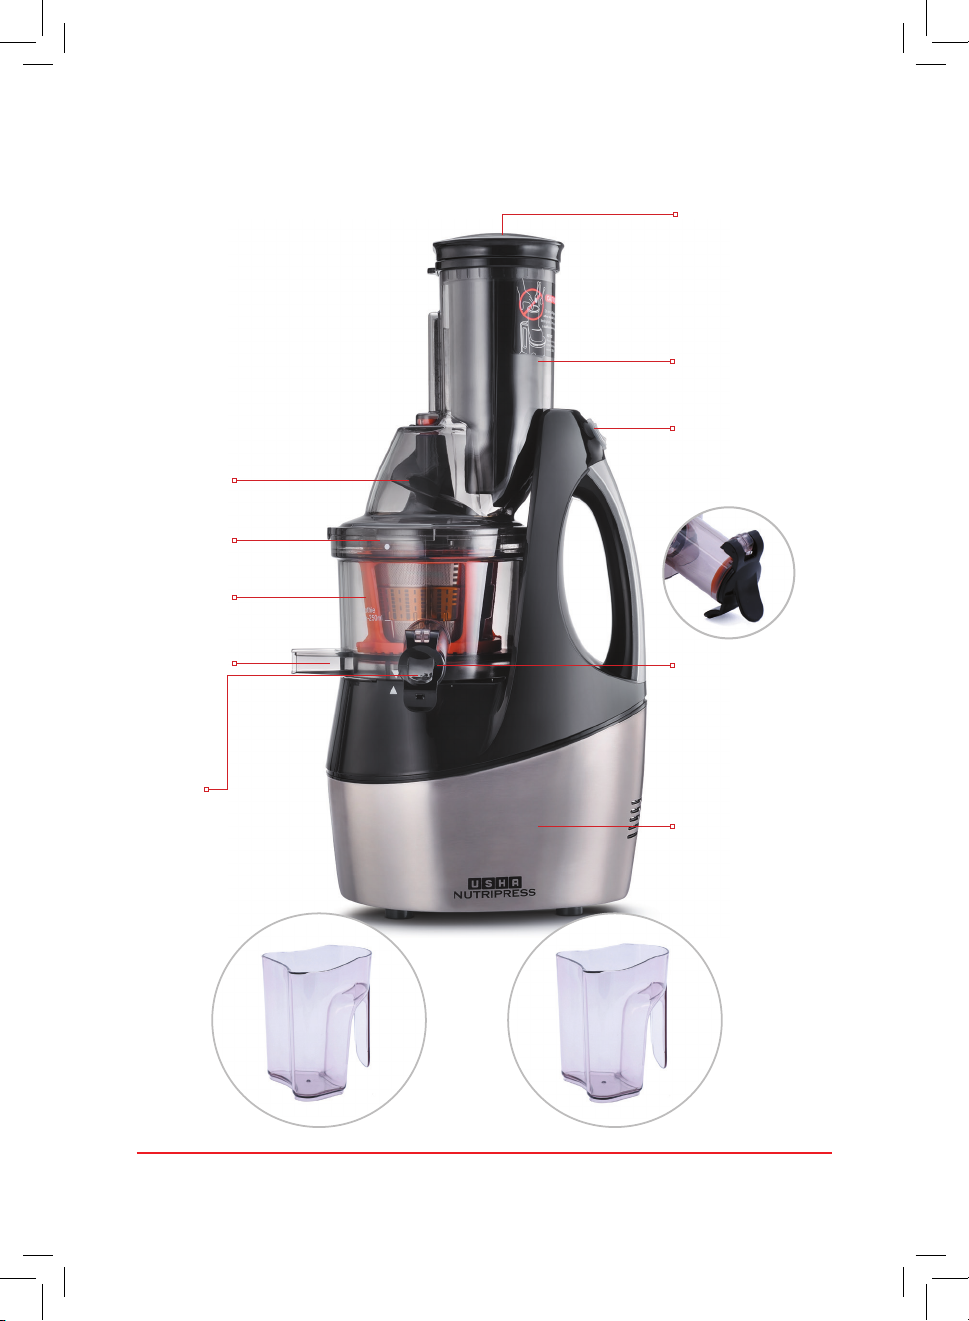
1b. PARTS DESCRIPTION
Auger
Juicing
Chamber
Spinning
Brush
Pusher
Hopper/ Feeding
Tube
Control Switch
Pulp
Outlet
Juice
Outlet
Pulp
Container
Note : The product illustrated/ photographed in this manual may vary from the actual product
Smart Cap
Main Unit
Juice
Container
Cold Press Juicer 5
Page 6

1c. EXPLODED VIEW OF PARTS
TOPSET ASSEMBLY
• Align the white dots on each part and assemble in the order shown.
• Once assembled, turn the hopper clockwise to close.
6 Cold Press Juicer
Page 7

SECTION 2
SAFETY INSTRUCTIONS
SAVE THESE INSTRUCTIONS
THIS APPLIANCE IS FOR HOUSEHOLD
USE ONLY.
(The appliance cannot be covered under
warranty if the product is used in a way
not intended by the manufacturer or is
used commercially.)
All details with regard to the installation,
operation and care are compiled to the
best of our knowledge.
No claims can be derived from the
information provided, the illustrations or
descriptions in this manual.
IMPORTANT SAFEGUARDS
BEFORE USING YOUR NUTRIPRESS
JUICER, PLEASE READ THE BASIC SAFETY
PRECAUTIONS LISTED BELOW:
1. Read all instructions before using your
cold press juicer.
2. To protect against risk of electrical shock
do not put the main unit, cord or plug in
water or other liquids and do not wash the
unit in the dishwasher.
3. Children should not be allowed to use this
product. Keep the product and its cord out
of reach of children.
4. Do not leave the juicer unsupervised while
it is operating.
Save the instruction manual
for future reference.
If the appliance is given as a
gift, please include the manual
with the product.
The safety instructions mentioned below
will tell you how to use your cold press
juicer without harming yourself and
damaging your juicer.
5. Unplug the power cord from outlet when
- not in use, before putting on or taking o
parts and before cleaning.
6. Avoid contact with moving parts.
7. Do not operate the juicer if the power cord
is damaged or if the appliance
malfunctions or damaged in any manner.
Please contact the customer care
executive for examination and/or repair.
8. The use of attachments not recommended
or sold by the manufacturer may cause
re, electric shock or injury.
9. Do not use the product outdoors.
10. Do not let the power cord hang over
edge of table or counter.
Cold Press Juicer 7
Page 8

11. Always make sure that the hopper is
closed securely before switching on the
juicer. Do not open the hopper while the
juicer is in operation.
12. Be sure to switch OFF the appliance after
each use. Make sure the motor stops
completely before disassembling.
13. Do not put ngers or other objects inside
the feeding tube during operation.
If food parts get lodged, use pusher or
another piece of fruit or vegetable to
push it down. When this method does
not work, switch o the juicer and
disassemble the hopper to remove the
remaining food.
14. Do not use the appliance if the spinning
brush is damaged.
15. Do not alter or modify the appliance in
anyway.
16. Do not open the housing on the product
under any circumstances. There is a
danger of an electrical shock. In addition,
it may cause the juicer to malfunction.
under warranty. The User bears the
sole risk.
18. Do not extract juice from any extremely
hard food (e.g. nuts), ber-rich food (e.g.
sugarcane) or food with very little juice.
17. Do not use the appliance for anything
other than its intended purpose as
described in the manual .This product is
only intended for normal domestic use.
Uses for a dierent purpose or for a
purpose which exceeds this description
are considered incompatible with the
intended or designated use. Claims of
all kinds due to damages resulting from
unintended uses will not be covered
8 Cold Press Juicer
Page 9

SAFETY WARNING:
1. Unplug the power cord when not in use.
2. Do not put fingers or other objects in to
the feeding tube while it is in operation;
*It may cause injury.
3. Do not keep or operate the appliance
near infants or toddler.
* It may injure them
4. Do not put the juicer parts in the
dishwasher or extremely hot water;
*The parts may wear faster
5. Do not use the appliance on an uneven
surface; *It may cause a malfunction if
the appliance tips over.
6. Do not use any hazardous chemicals to
clean the appliance; *It may change the
color of the appliance or result in a fire.
7. Do not repair, disassemble the base, or
customize the appliance; *The
appliance may not operate properly and
may cause fire, electric shock, or injury.
8. Do not spray water or flammable sprays
near the appliance; *It may cause fire or
electrical shock
Cold Press Juicer 9
Page 10
BEFORE USING THE JUICER FOR THE FIRST TIME:
1. Please clean all components thoroughly
prior to juicing.
2. Examine the product for any visible
external damages prior to using it. Never
put a damaged product into operation.
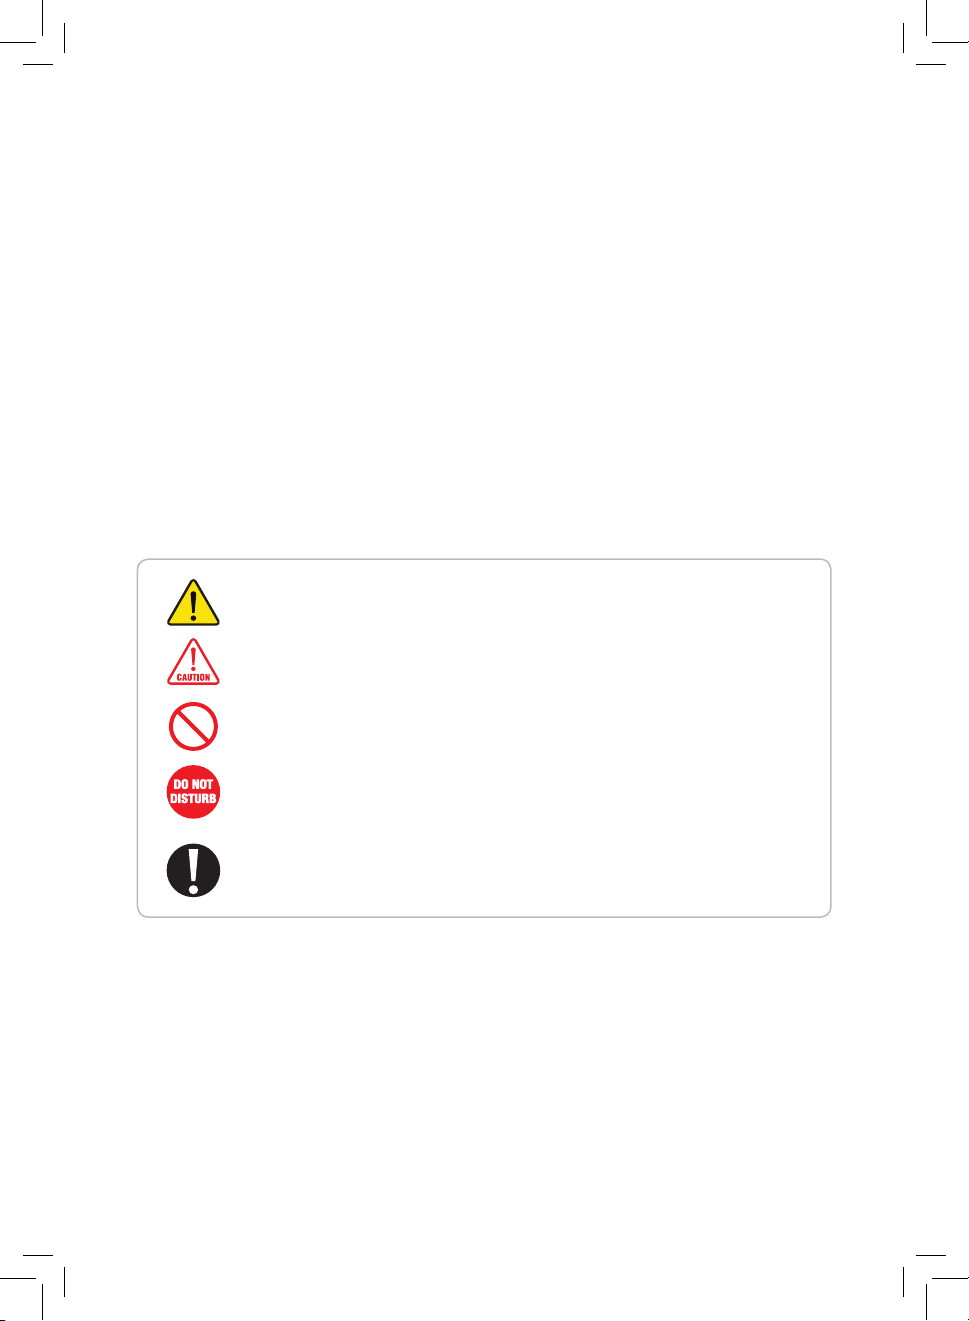
WARNING NOTICES:
The following precautions are provided to
ensure the safety of the user.
Please carefully read through the
precautions and exercise care when using
the appliance.
Warning: This label warns of the risk of death or severe injuries.
Caution: This label warns of the risk of injuries or appliance damage.
Prohibited
Do not disassemble
Must take action
10 Cold Press Juicer
Page 11

SECTION 3
3a. STEP BY STEP PROCESS TO ASSEMBLE YOUR
NUTRIPRESS JUICER
STEP 1: CHOOSING THE RIGHT LOCATION:
In order to ensure the safe and trouble-free operation of the product, the setup location
must full the following prerequisites:
• Place the unit on a at stable surface.
An unstable location may:
• May create noise as your machine may vibrate.
• May be dangerous since vibration may cause the machine to move.
• Do not use the product outdoors.
• Do not operate the product near hot gas or hot stove.
• Choose the setup location in such a way that children cannot reach the product.
• The product is not intended to be installed in a wall or a built-in cupboard.
• Do not set up the product in a hot, wet or extremely damp environment or near
ammable material.
STEP 2: MAIN UNIT AND JUICING BOWL ASSEMBLY:
a. Before starting the assembly, please check if the Silicone plug provided below the pulp
spout is rmly inserted. Note: The Juicer may leak if not assembled properly. While juicing,
prevent excess pulp build-up inside the pulp spout as it may dislodge the silicone plug.
• The main unit and the juicing bowl have white arrows to indicate the correct
position for tment.
• Place the juicing bowl on the main unit so that the white
arrow on the bowl is directly placed over the white arrow
on the main unit.
Cold Press Juicer 11
Page 12

FILTER ASSEMBLY:
FILTER ASSEMBLY FOR JUICE AND SMOOTHIE :
Note: The ne lter is recommended for
juicing and the coarse lter is
recommended for making smoothies.
• Assemble the ne/coarse lter into the
orange colored spinning brush.
• Then place this assembly in to the juicing
bowl ensuring that the white dot on the
lter is aligned with the white dot on the
juicing bowl.
• Ensure that the lter assembly doesn’t
move or wobble after tting it inside the
juicing bowl.
1 2 3 4 5
FILTER FOR FROZEN DESSERT:
FILTER ASSEMBLY FOR JUICE AND SMOOTHIE :
For making frozen dessert place the frozen
dessert lter in the juicing bowl, so that the
Ensure that the lter doesn’t move or
wobble after tting it inside the juicing bowl.
white points are placed directly above each
other.
Note: Spinning brush not required for
making frozen dessert.
1 2 3 4
12 Cold Press Juicer
Page 13

STEP 3: AUGER ASSEMBLY:
• Place the auger inside the assembly as
shown below.
1 2 3
Note: The auger needs to be locked in place in order to close the lid.
STEP 4: HOPPER ASSEMBLY:
• Place the hopper / feeding tube over the
juicing bowl, ensuring that the white dots
are placed directly above each other.
• Ensure that the hopper is positioned
directly above the auger. Turn the hopper
to the left in the direction of the arrow
(clockwise) until it is locked in place.
• Turn the auger clockwise while pressing
down so that it is locked in place.
You will hear a click once the hopper is
locked in place.
• Place the pusher into the feeding tube.
1 2 3 4
Cold Press Juicer 13
Page 14

STEP 5: JUICE AND PULP COLLECTOR PLACEMENT:
Place the pulp container under the pulp spout and the juice container under the juice spout
as shown in the illustration:
Note: Please note:
The juicer may leak if not
assembled properly.
Juicer will not operate if parts
are not assembled properly.
The auger must be locked, in
order to close the feeding tube
with the bowl.
14 Cold Press Juicer
Page 15

SECTION 4
OPERATE USHA NUTRIPRESS
4a. HOW TO OPERATE YOUR USHA NUTRIPRESS
BASIC STEPS COMMON TO ALL KINDS OF RECIPES
BEFORE OPERATING:
Wash all the parts before using the juicer for the rst time.
Make sure that the silicone plug is assembled properly.
STEP 1: AFTER PREPARING THE INGREDIENTS, PLUG IN
THE POWER CORD INTO A WALL OUTLET.
Note: Do not touch the power cord with wet hands.
The juicer may leak if not assembled properly. It may cause electrical shock, shortcircuit, or re.
• Check the safety of the wall outlet.
STEP 2: PRESS THE ON BUTTON TO OPERATE ONLY AFTER INSERTING FEW
INGREDIENTS INTO THE FEEDING TUBE.:
SWITCH POSITIONS:
• ON: Pulls down and slowly masticates
the ingredients.
• OFF: For switching o
• REV: Reverse button pushes the
ingredients back up to dislodge them.
Note: The REV(reverse) button only works
while holding down the switch.
OFF OFFReverse Forward
IF THE JUICER STOPS DURING OPERATION:
If the ingredients get jammed inside the
juicer and the hopper does not open or the
juicer stops during operation:
• Switch OFF ensuring that the juicer comes
to a complete stop.
• Then press and hold the REVERSE button
for 2~5 seconds until the ingredients get
dislodged.
• Let the juicer stop completely before using
the REVERSE button again to prevent
malfunction.
• Repeat REVERSE - OFF - ON as often as
needed to achieve the desired result.
• If the juicer does not work after these steps,
disassemble and clean the parts before
operating the juicer again.
Cold Press Juicer 15
Page 16

STEP 3: INSERT THE PREPARED
INGREDIENTS ONE PIECE AT A TIME.
Note: If large quantities of
ingredients are put into the feeding
tube, it can cause the juicer to stop.
STEP 4: USE THE SMART CAP TO MAKE
MIXED JUICES, SMOOTHIES AND TO
STOP JUICE FROM DRIPPING, OR FOR
A QUICK RINSE BETWEEN DIFFERENT
JUICES.
TIP:
• You can create mixed juices by keeping the
smart cap closed during juicing.
• Quickly rinse away any leftover avours by
running a glass of water in the juicer with
the smart cap closed.
• After juicing, close the smart cap to stop
the juice from dripping, especially when
disassembling the juicing bowl o the base.
STEP 5: AFTER JUICE AND PULP ARE
COMPLETELY EXTRACTED, SWITCH
THE UNIT OFF.
Note: Please note:
• If the remaining ingredients in
the juicing bowl have not been extracted
completely, the hopper may not open
easily.
• After each extraction, run the juicer for
an additional 30 seconds to let the juicer
extract the remaining pulp.
• When the hopper is stuck, press the
REVERSE - OFF -ON button in this
order; switching back and forth 2 or 3
times to dislodge the ingredients. Then
place hands on top of the hopper and
rmly press down while simultaneously
turning the hopper counter clockwise to
open.
Depending on the ingredients, pour
water down the feeding tube to rinse out
the interior of the juicing bowl and then
attempt to remove the hopper.
Note: Please note:
• Leave the smart cap open when juicing
ingredients that create excessive foam
during extraction, (e.g. apples, celery).
• Pay close attention when operating with
the smart cap closed. Juice may overow
if the juice collected in the bowl exceeds
the maximum capacity.
16 Cold Press Juicer
Page 17

DON’TS WHILE JUICING & OPERATIONAL WARNING:
1. Operating the juicer without ingredients
can damage the juicer.
2. Do not continuously operate the
juicer for more than 30 minutes. This
can damage the motor from overheating.
After continuous use, let the juicer
rest for 30 minutes to cool down before
starting another session.
3. Do not put fingers or other objects into
the feeding tube. Always use the pusher
when needed.
If any other object is inserted into the
feeding tube during operation, such
materials can get stuck and damage the
juicer parts and/or cause injury.
4. Do not put dried or hard ingredients like
whole grains, fruits with hard seeds or
ice into the juicer.
These may damage the juicer parts (e.g.
juicing bowl, auger, and lter).
• Fruits with pits and hard seeds (e.g.
peaches, mangoes and cherries) must be
pitted before juicing.
Do not use the juicer to extract vegetable
oil from ingredients.
If vegetable/animal oil gets on the auger,
it may reduce performance and even
damage the part.
6. Do not reinsert the extracted pulp into
the juicer. This can cause the juicer to
stop or can jam the hopper.
7. After juicing ingredients with seeds like
grapes, thoroughly clean all the crevices
on the bottom of the auger.
• When using frozen fruits with small seeds
and high liquid content such as grapes,
thaw them before inserting into the juicer.
5. Do not use ingredients containing
excessive amounts of vegetable oil or
animal fat.
Cold Press Juicer 17
Page 18

USING YOUR USHA NUTRIPRESS TO
MAKE DIFFERENT TYPES OF JUICES:
Experience the best quality juice by
understanding each ingredient’s
characteristics and knowing the optimal
way of handling the ingredients.
HARD VEGETABLES LIKE
CARROT, BEETROOT ETC:
PREPARATION TIPS:
Hard vegetables may put excess strain onto
the motor and cause
it to stall.
• Soak in cold water prior to juicing
• Slice the ingredients 1 inch thick or cut
1 inch wide and 2-6 inches long.
JUICING TIPS:
1. Slowly insert the ingredients one at a time.
2. Pace the juicing speed ensuring each
ingredient is thoroughly extracted.
3. We recommend using the ne lter for
optimal juice extraction.
GREEN LEAFY VEGETABLES
WITH HIGH FIBRES: E.G.
CELERY, KALE, SPINACH:
PREPARATION TIPS:
• Fibrous ingredients like spinach, celery
and kale should be cut into small lengths
before juicing.
• Cut the stems into 2 inch pieces and
bundle up the leafy part as you insert them
into the juicer.
• While juicing leafy ingredients make
batches of 500 g per session.
• For best result, disassemble and wash the
juicing bowl before juicing again.
• If leafy ingredients wrap around the auger,
open the lid and remove the bres before
continuing.
JUICING TIPS:
• Slowly insert the ingredients one at a time.
• Pace the juicing speed ensuring each
ingredient is thoroughly extracted.
• To maximize the juice yield, It is best to
juice brous ingredients with ingredients
having higher water content, like carrots,
apples : (9:1 recommended ratio)
• We recommend using the ne lter for
optimal juice extraction.
18 Cold Press Juicer
Page 19

FRUITS:
PREPARATION TIPS:
In case of fruits with pits and seeds like
peaches, mangoes, cherries etc.
1. Please remove the pits and seeds from
the fruits before juicing.
2. Cut 8-12 wedges then slowly insert the
ingredients down the feeding tube.
In case of fruits having inedible skin like
Pineapple, melon, mango, orange, etc.
Peel the skins from the ingredients
before juicing.
JUICING TIPS:
• Insert the ingredients slowly to minimize
the amount of leftover seeds in the filter
and to prevent the seeds from clogging
the filter.
• Depending on the size of the fruit, insert
3 to 5 pieces at a time while monitoring
the extraction result.
• We recommend using the fine filter for
juicing fruits
FOR MAKING FROZEN
DESSERT:
PREPARATION TIPS:
• Use frozen fruit.
• Thaw them 5 to 20 minutes depending
on the amount and type of ingredient
before feeding into the juicer.
• Slowly process a smaller amount per
batch.
JUICING TIPS:
• Use the Frozen dessert filter instead of
juicing filter and spinning brush
• Do not fill ice into the juicer.
• Frozen ingredients usually lose significant
amount of fluid from thawing.
Note: Damage to the juicer due to owner
negligence or from not following
the instructions in the owner’s
manual will void the warranty
service.
Note: The coarse filter is recommended for
making smoothies.
Cold Press Juicer 19
Page 20

DO’S AND DON’TS
DO NOT PUT THE FOLLOWING INGREDIENTS INTO YOUR JUICER:
• Do not extract ingredients containing
vegetable or animal oil like Sesame seed,
butter, margarine, etc. This can reduce
performance and even damage the juicer.
FEW NOTES:
• Before Operating: If the juicer is jammed or if
the hopper does not open, press the REVERSE
button and hold until it becomes dislodged.
Repeat REV-OFF-ON as needed.
• Continue operating the juicer until all the
ingredients in the juicing bowl are
extracted. The hopper may not open
easily if there is a lot of pulp remaining in
the juicer.
• Juice Yield: The juice yield may vary
depending on the juicing speed as
dierent ingredient yields dierent
amounts of juice.
Tip:
It is recommended that the extracted juice be
consumed immediately after extracting.
Depending on the density of the ingredients
• Do not insert ingredients like Coconut,
sugarcane, whole grains, etc. with no
water content into the juicer.
the extracted juice can gradually show layers
over time.
EXTRACTION TIP:
• Slowly insert the ingredients one piece at a
time.
• Use the pusher to push the ingredients
down the feeding tube. (The pusher also
helps prevent juice from spraying out of the
feeding tube when extracting ingredients
with high water content)
• Leave the smart cap open when juicing
ingredients that create excessive foam
during extraction. Foam can accumulate if
operated with the smart cap closed.
If there is an excessive amount of foam, use a
mesh lter to separate it from the juice.
20 Cold Press Juicer
Page 21

TIPS ON USING THE SMART CAP
HOW TO USE
THE SMART CAP:
• Juicing with the smart cap closed allows
mixed juice creations with dierent fruits,
vegetables and liquids.
• After juicing, close the smart cap to block
excess juice from dripping, especially when
disassembling the juicing bowl o the base.
• When making dierent juices quickly rinse
away any leftover avours by running a
glass of water in the juicer with the smart
cap closed.
• Leave the smart cap open when juicing
ingredients that create excessive foam
during extraction (e.g. apples, celery).
• Pay close attention when operating the
juicer with the smart cap closed. Juice may
overow if the juice collected in the juicing
bowl exceeds its capacity marked on the
juicing bowl.
• Depending on the ingredient, you may get
extra pulp in the juice when juicing
continuously.
• To reduce the amount of pulp, disassemble
the top-set and wash frequently.
ADJUSTING THE AMOUNT
OF PULP IN THE JUICE
• Depending on the ingredient, you may get
extra pulp in the juice when juicing
continuously.
• To reduce the amount of pulp, disassemble
the top-set and wash frequently.
Cold Press Juicer 21
Page 22

SECTION 5 DISASSEMBLING AFTER USAGE:
STEP 1: SWITCHING OFF AND REMOVAL
OF POWER CORD
• Switch OFF and unplug the power cord
from the wall outlet.
Note: For easier clean up, operate the juicer
for an additional 30 seconds after the juice is
extracted.
STEP 2: REMOVING THE HOPPER /
FEEDING TUBE:
• Hold the hopper from the top and turn it
counter clockwise to open.
STEP 3: REMOVING THE JUICING
BOWL:
• Hold the juicing bowl with both hands
and lift it off the main unit.
Note: Ensure that the smart cap is closed to
prevent spillage of residual juice.
1 2 3
1 2
Note: If the hopper is stuck, press
the REV – OFF – FORWARD button in this
order, switch back and forth 2 to 3 times
to dislodge. Then place your hands on
top of the hopper and rmly press down
simultaneously turning the hopper counter
clockwise to open.
22 Cold Press Juicer
Page 23

STEP 4:
• Remove the auger, from the juicing bowl.
• Next remove the filter assembly from the
juicing bowl.
• Separate the filter and the spinning brush
as shown below.
1 2
3
Note: Immediately clean the juicer after
each use. If remaining residue in the juicer
dries up, it can make disassembling and
clean-up difficult. The excess build up may
cause poor performance in future uses.
• For easier disassembly, place the top-set
in the sink and run water through from
the top of the top-set.
• After cleaning ,thoroughly dry the
bottom of the auger where it connects
to the metal cylinder shaft on the base
• Clean the components with water using
the cleaning brush provided with the
juicer
Cold Press Juicer 23
Page 24

SECTION 6 CLEANING AFTER DISASSEMBLING:
REMOVAL OF SILICON PLUG FOR
CLEANING
• Pull out the silicone plug and clean the
juicing bowl under running water.
• Use the tip of the cleaning brush to pull out
any residue stuck inside the pulp spout.
• Clean the juicing bowl, the juice and the
pulp outlet thoroughly using water.
INDIVIDUAL CLEANING
OF EACH PART:
CLEANING THE AUGER:
• Clean the auger under running water.
• Use the tip of the cleaning brush to push
out any residue in the crevices on the
bottom of the auger
TIPS:
• Ensure that no pulp remains in the auger.
• Use a soft dry cloth for wiping o any
residual water from the auger.
24 Cold Press Juicer
Page 25

CLEANING THE FILTER
• Clean the lters thoroughly using the
cleaning brush to remove any residue
stuck in the mesh.
Note: Please ensure that the filters are
thoroughly cleaned and don’t have any
pulp or food particle residue. The residue
may spoil the filter and also cause growth
of fungus, molds.
QUICK RINSE GUIDE:
With the smart cap closed, ll the Juicing
bowl half way with water and turn on the
juicer.
Similarly, clean the frozen dessert filter
under water and wipe it dry.
CLEANING THE MAIN UNIT
• Clean the base with a soft damp towel
and wipe it dry.
• If the towel is dripping wet, make sure to
squeeze out the excess liquid before using
it on the juicer.
Note: Immediately clean the juicer after
each use. Do not let remaining residue in
the juicer to dry up, the build-up might
lead to malfunction.
Let it run for a moment. Open the smart cap
and let the water run out of the juicing bowl.
TIPS:
• It is not necessary to completely clean the
juicer in between making multiple juices
during a single juicing session.
• It is recommended to disassemble and
clean the top assembly thoroughly after
the juicing sessions to prevent residue
build up.
Cold Press Juicer 25
Page 26

HOW TO CLEAN SILICON PARTS:
CLEANING THE SILICONE BRUSH:
The steps shown below will help you remove
the Silicone brush from the spinning brush:
1. Hold the spinning brush from the top side
as shown in the image. Pull out the ear
of the silicone brush from the Spinning
Brush.
2. Hold the edge of the Silicone brush and
slide it down, till it is completely out from
one side.
3. Similarly, hold the edge of the Silicone
brush and slide it down from the other
side. The Silicone brush will be detached
from the spinning brush.
The below instructions will show you how to
reassemble the Silicone brush after cleaning:
1. Hold the spinning brush as shown in the
picture. Now hold the bottom edge of
the Silicone brush and slide it up, till it
completely slides in and locks within
the slot.
2. Similarly, hold the edge of the Silicone
brush on the top side and slide it up till it
locks in completely.
3. Now hold the spinning brush from the
bottom as shown in the image and
reinsert the ear of the silicone brush into
the slot.
1 2 1 2
3 4
26 Cold Press Juicer
3 4
Clean the Silicone brush using water.
Page 27

CLEANING THE COMPRESSION
SILICONE RING:
TO REMOVE THE COMPRESSION RING:
1. Squeeze the ring from the top side and
push it down the juice chamber
2. Pull out the Compress silicon from the
bottom side of the juicing chamber.
ASSEMBLING THE COMPRESSION RING
ON TO THE JUICING BOWL:
1. After Cleaning the compression ring, hold
the ring on the top side, squeeze it and
insert into the center opening of the
juicing chamber from the top side.
1
2
3 3
Clean the compression ring using water.
1
2
Wipe away any residual water from
components after cleaning.
Before assembling the juicing bowl, ensure
that the compression silicone and silicone
ring are rmly inserted.
Note: If the compression silicone
and silicone ring are not firmly
inserted, juice may leak from the
bottom of the juicing bowl.
Cold Press Juicer 27
Page 28

SECTION 7 MISCELLANEOUS
TROUBLESHOOTING GUIDE
PROBLEM
THE PRODUCT DOES
NOT START.
THE AMOUNT OF JUICE
IS VERY LITTLE AND
RESIDUES ARE STILL
D AM P.
SHUTDOWN DURING
USAGE.
THE PRODUCT MAKES
LOUD/STRANGE NOISE
DURING USE.
DURING OPERATION, THE
JUICING BOWL SHAKES.
THERE IS TOO MUCH
PULP IN THE JUICE.
SOLUTION
Please check if the power plug is properly inserted into the main
power supply.
• Please check whether the assembly is done according to the
guidelines.
• Fruits or vegetables that were stored in the refrigerator for a long
time must be soaked in clear water for at least 10 minutes before
using them.
• Dierent ingredients hold dierent amounts of uid that will yield
dierent amounts of juice.
• Check if all parts are assembled correctly.
• While juicing ingredients with small seeds, after a few servings, it
may reduce the juice yield. For best result, disassemble and wash
the top- set (without main unit) in between juicing.
• If there is seed residue on the bottom of the lter, this can aect
juicer performance and theoverall juice yield.
Check whether too much food is inserted into the juicer.
• Check whether the food contains hard cores.
• When the juicer stops because there are too many ingredients
inserted in it, press the REV(II)-O-ON(I) button in this order, switching
back and forth 2 to 3 times.
• If the juicer stops due to the overload protection, let the juicer cool
for 30 minutes to 2 hours before juicing again.
This is normal. This happens while juicing hard ingredients.
• Check if the parts are assembled correctly. Try reassembling the
parts and listen for the odd noise.
• Do not start the juicer unless there are ingredients and/ or liquid
in it.
• If the juicer is operated without ingredients or liquid, the noise level
can increase and also can lead to damage.
• The friction noise from the pressure auger and the lter will
disappear when ingredients are inserted into the juicer.
The auger and the lter are set up to crush and squeeze the
ingredients. It is normal for the auger and the lter to vibrate.
• If the ingredient contains strong bre, the vibration from the top set may be stronger.
Depending on the ingredient, the juice may contain a lot of
ne pulp.
• To reduce the ne pulp, clean the top-set (without main unit)
frequently and extract the pulp.
28 Cold Press Juicer
Page 29

PROBLEM
SOLUTION
• Use a mesh lter and put the juice through it to collect the
unwanted pulp.
• The lifetime of each part may vary depending on length and
method of use and ingredients extracted.
• If too many ingredients are inserted at the same time, it may
cause the juicer to stop frequently.
This can lead to pulpy juice. Insert the ingredients slowly and few
pieces at a time.
THE HOPPER DOES
NOT CLOSE.
LAYERS OF SEPARATION
IN THE JUICE.
THE HOPPER IS STUCK.
DISCOLORATION OF
THE PLASTIC PARTS.
Make sure the pressure auger is pushed all the way into the
lter in order for the hopper to close properly.
• If the pressure auger is not inserted properly, the hopper may
not close.
Depending on the consistency of the ingredients, the extracted juice
may show layers of dierent juices. It is dierent from separation due
to oxidation caused by juicing with a high-speed juicer.
After juicing, let the juicer operate for another 30 seconds to
extract the remaining pulp. If there is too much pulp lid may
not open. In this situation, press the REV(II)-ON(I) button in
this order, switching back and forth 2 to 3 times.
• Pour water down the feeding tube to rinse out the insides and
then try opening the hopper.
After juicing, if the juicer is not cleaned right away, the
remaining pulp inside the top-set can dry up which can make
disassembling and cleaning hard. This can also aect the
juicer’s performance and color.
• Ingredients that are rich in carotenoids such as carrots and
spinach may dye the plastic parts. When the parts are dyed with
carotenoids, rub vegetable oil into the dyed areas and use mild
detergent to clean.
• Vegetable oil should only be used during clean-up for parts that
are discoloured. Do not use vegetable oil on the pressure auger
or the lter. If vegetable oil or oil from animal fat gets on the
pressure auger or the lter, this can aect the juicer’s performance
and may result in damaged parts.
• The silicone pieces on the top-set can be detached to be
thoroughly cleaned.
JUICE DRIPPING DOWN
THE BODY OF THE BASE.
If the compression silicone on the bottom of the juicing bowl is not
plugged in correctly, the juice may seep out on to the juicer base.
Before assembling the parts, check and make sure the compression
silicone is plugged in correctly.
Cold Press Juicer 29
Page 30

PRODUCT SPECIFICATIONS & TECHNICAL DETAILS
Model CPJ 362F Rated Voltage 230V
Rated Frequency 50 Hz Power Consumption 240 W
Speed 65 rpm Motor AC Induction Motor
Maximum use < 30 mins Power Cord 3 pin
Product Weight 7 .17 kg
Note: In view of Usha policy of continual development, specifications may change
without notice.
SERVICE JUST A CALL OR CLICK AWAY:
Should you need any assistance, please get
in touch with our nearest service provider
and he will send a dependable service
technician to resolve your issue.
Your feedback, suggestions, ideas about
the cold press juicer will help us serve you
better.
You may reach us at our toll free number
1800-1033-111.
Always quote the following when
you require assistance of Usha service
representative:
• Model Number, Date of purchase, Machine
Sr. No, Bill No, Purchased from.
WHAT IS NOT COVERED:
The manufacturer does not assume any
liability for damages arising as a result of the
following:
• Non-observance of the manual.
• If the fault is caused by factors other than
normal domestic use or use not in
accordance with the owner’s manual.
• If this product is used for commercial
purpose, (Example : Public places such as
lodging house, training centre, dormitory)
• Use of unauthorized spare parts and
unauthorized repairs
• Modications of the product are not
recommended and are not covered by the
warranty.
• Service trips to your home to teach you
how to use the product.
• If the product is connected to any voltage
other than the rated specication.
• If the fault is caused by accident, neglect,
misuse or Act of God.
• If the fault is caused by pests for example,
rats or cockroaches, etc.
• Noise or vibration that is considered
normal, for example spin sound, or
warning beeps.
• Removal of foreign objects / substances
from the machine: example, grit, molds,
food particles etc.
30 Cold Press Juicer
Page 31

WARRANTY CARD
This appliance is warranted for 2 years on product and 5 years on motor against all manufacturing
defects from the date of sale.
In the event of any complaint, please contact at Usha Care Toll Free No. 1800 1033 111.
THE WARRANTY IS VALID ONLY WHEN:
1. The appliance has been installed, used and maintained in accordance with the instruction
manual.
2. The warranty card and cash memo duly signed by the authorized dealer are presented with the
complaint.
3. The appliance has not been opened or tampered with, by any unauthorized person.
THIS WARRANTY DOES NOT APPLY FOR:
1. Damages due to chipping, peeling, plating and denting.
2. Breakage or damage to components made out of Bakelite, Urea, ABS, SAN and such plastic
materials, rubber parts and cord.
3. Normal wear and tear of parts.
4. Damage resulting from accidents, mishandling or negligence on part of the customer.
Liability for consequential loss or damage is neither accepted nor implied.
S.NO:
CASH MEMO: DATE:
DEALER’S NAME AND ADDRESS:
OWNER’S NAME & ADDRESS:
Cold Press Juicer 31
Page 32

Cold Press Juicer | CPJ 362F
COOK
To explore our range of
products and recipes log
on to www.usha.com
32 Cold Press Juicer
 Loading...