

Page 1
GH-625XT
User Manual
Version 3.0
Page 2

GH-625XT
Table of Content
1. INTRODUCTION AND FEATURES................................................................................ 4
1.1 INTRODUCTION...............................................................................................................4
1.2 FEATURES .......................................................................................................................4
2. SPECIFICATION ............................................................................................................5
3. HARDWARE OVERVIEW .............................................................................................. 6
3.1 PACKAGE CONTENTS ....................................................................................................6
3.2 BUTTON INTRODUCTION...............................................................................................7
3.3 ANTENNA INTRODUCTION.............................................................................................8
3.4 BATTERY CHARGER DESCRIPTION .............................................................................8
3.5 HOW TO USE HEART RATE MONITOR..........................................................................9
3.6 MOUNT THE BIKE HOLDER..........................................................................................10
3.7 TIME OF DATE MODE SETTING................................................................................... 11
3.8 SYMBOL EXPLANATION ...............................................................................................12
4. GETTING START......................................................................................................... 13
4.1 STARTING UP YOUR GH-625XT...................................................................................13
4.2 CHANGE THE PAGE......................................................................................................13
4.3 GETTING START A TRAINING AND SAVING................................................................14
5. Menu Structure - Main Menu...................................................................................... 19
6. Activity......................................................................................................................... 20
6.1 ACTIVITY INFO...............................................................................................................20
6.1.1 TRAINING INFO......................................................................................20
6.1.2 MULTISPORT..........................................................................................21
6.2 SETTING.........................................................................................................................22
6.2.1 AUTO HOLD ........................................................................................... 22
6.2.2 ALERTS .................................................................................................22
6.2.3 CALORIES.............................................................................................. 23
6.2.4 LAP SETTING.......................................................................................... 24
6.2.5 Data Recording....................................................................................... 24
6.3 DELETE ALL...................................................................................................................25
6.4 MEMORY STATUS .........................................................................................................25
7. GYM..............................................................................................................................26
7.1 TRAINER ........................................................................................................................26
7.1.1 DIST / TIME...........................................................................................26
7.1.2 DIST / SPEED......................................................................................... 27
Page 2
Page 3

GH-625XT
7.1.3 SPEED / TIME.........................................................................................27
7.1.4 PACE / DIST........................................................................................... 29
7.1.5 YOURSELF..............................................................................................29
7.2 MULTISPORT .................................................................................................................30
7.3 INTERVAL TRAIN ...........................................................................................................32
7.3.1 CREATE WORKOUT.................................................................................. 32
7.3.2 LIST ALL................................................................................................ 32
7.3.3 DELTE ALL ............................................................................................. 33
8. NAVIGATION ................................................................................................................ 33
8.1 ADD MAP MODE / REMOVE MAP MODE.....................................................................33
8.2 ROUTES.........................................................................................................................34
8.2.1 LIST ALL................................................................................................ 34
8.2.2 DELETE ALL............................................................................................35
8.2.3 ROUTES SETTING ................................................................................... 35
8.3 SAVE WAYPOINT...........................................................................................................35
8.4 FIND WAYPOINT............................................................................................................36
8.4.1 LIST ALL................................................................................................ 36
8.4.2 DELETE ALL............................................................................................37
8.5 RETURN TO START /STOP GOTO................................................................................37
9 CONNECT TO PC.........................................................................................................37
10 CONFIGURATION....................................................................................................... 38
10.1 USER PROFILE............................................................................................................38
10.2 SET CUSTOM PAGE....................................................................................................38
10.3 SET SYSTEM ...............................................................................................................39
10.4 UNITS ...........................................................................................................................40
10.5 CARDIO SET................................................................................................................40
10.5 GPS SETTINGS............................................................................................................41
10.6 MAP MODE SET...........................................................................................................42
10.7 FACTORY RESET ........................................................................................................42
10.8 SYSTEM UPGRADE.....................................................................................................42
10.9 ABOUT PRODUCT .......................................................................................................42
11.Glossary...................................................................................................................... 43
12. T roubleshooting & FAQ ............................................................................................ 44
Page 3
Page 4

GH-625XT
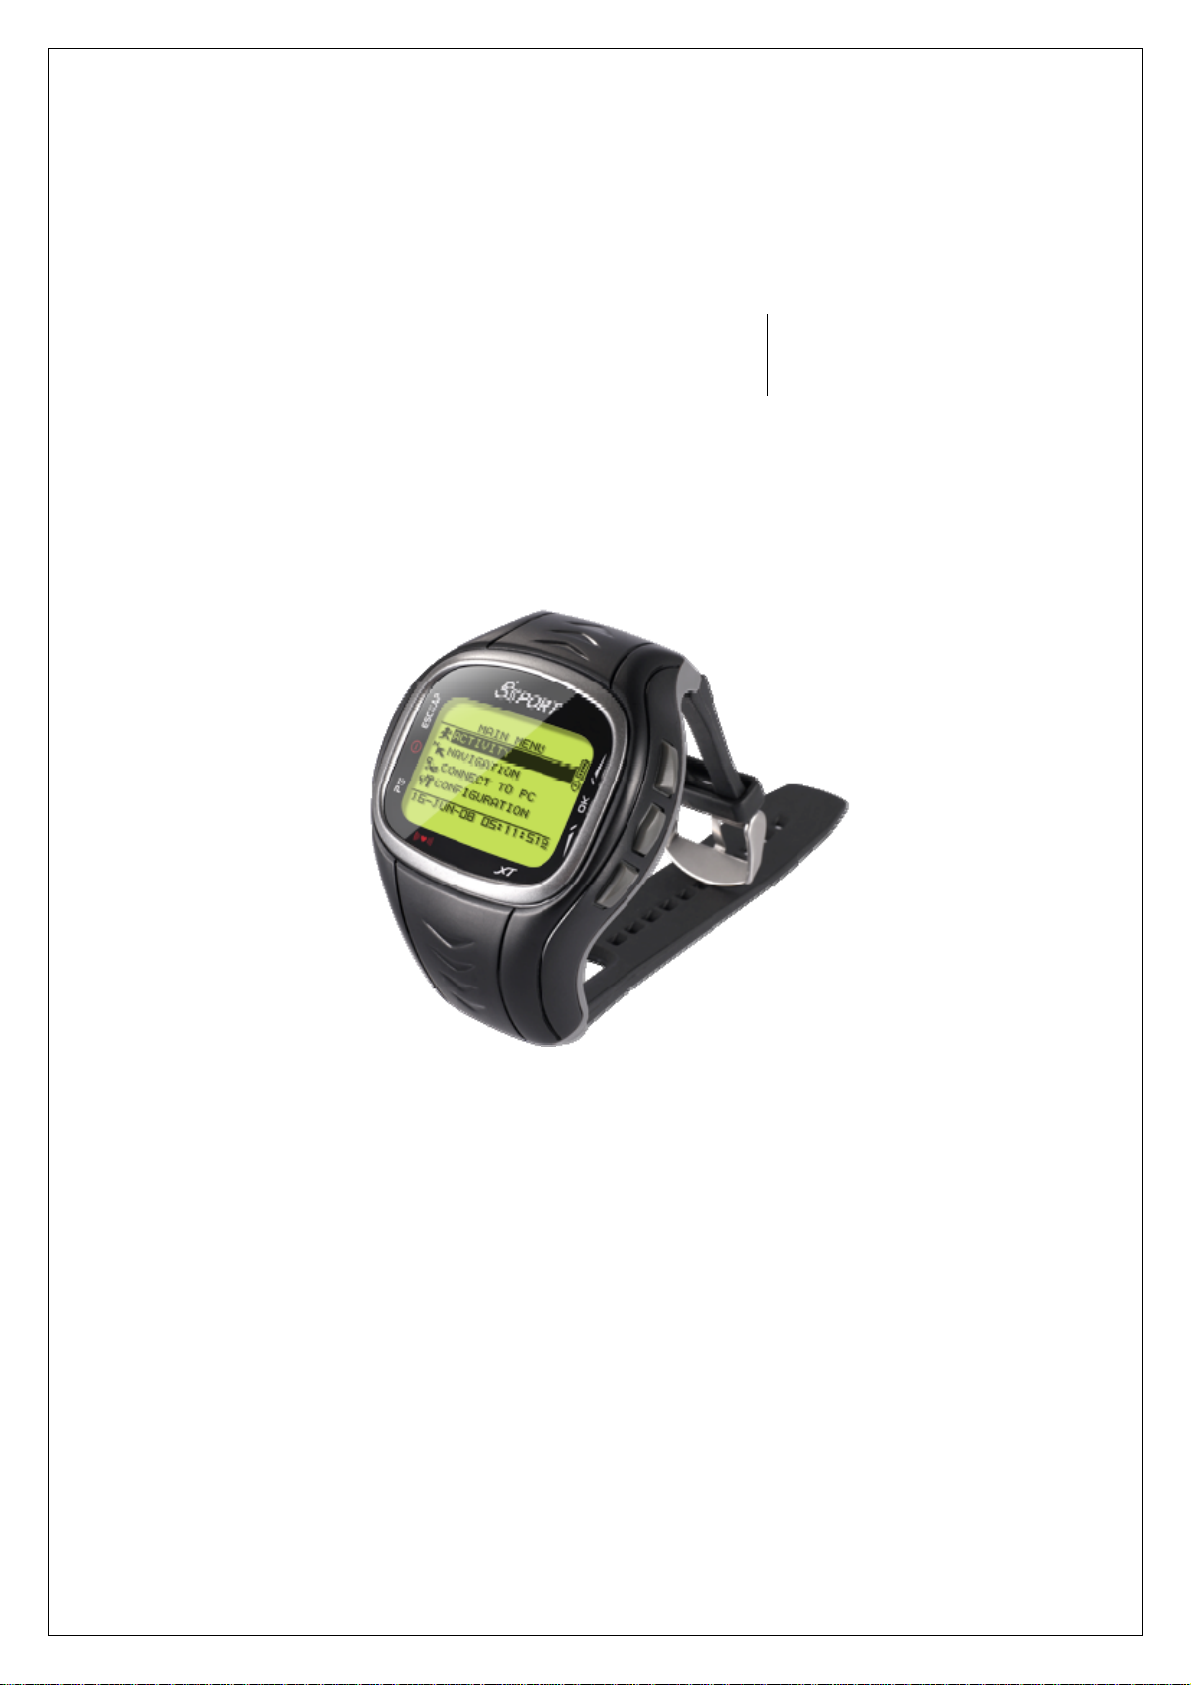
Thank you for purchasing GS-Spo rt GH-625XT. We sincerely hope you to enjoy using this high technology
GPS device. For fully understand the functions and features of GH-625XT, please read the user manual
before you get started.
1. INTRODUCTION AND FEATURES
1.1 INTRODUCTION
GS-Sport GH-625XT is a stylish, fully-sealed, wrist type GPS device. GH-625XT is a multi-use GPS sports
training watch that can be used in most any outdoor application likes running, swimming, triathlon …, to
monitor, track and analy ze your exercise and training routines or simply to log traveled routes, information is
displayed using the included Training Gym program, or exported into popular formats such as GPX, CVS,
TXT or KML for use with other po pular web-sites, and sof tware. Training tools such as alarms for distance, lap
times, speed, heart rate, calorie burn calculations, heart rate monitor and bread crumb trails for easy
back-track to origin points, makes the GH-625XT a must have.
1.2 FEATURES
z The main features of GH-625XT
z Slim type compact and watch design
z Built-in SiRF Star IV high performance GPS chipset and support emperies prediction to make always
stay hot start situation.
z Embedded high resolution display for easy read under sunlight.
z Trainer mode : Assistant trainers to improve performance
z Interval Training: To enhance personal condition to accustom specify activities like soccer or h ockey.
z Smart Track Back: To guide point by point to make you never get lost.
z Mutisport: Allow you to set different sport into one program for training.
z Support both TOD mode and clock alarm function an d can be used as real watch over 5 days.
z Built in rechargeable Li-ion poly battery
z Over 18 hours in operation mode.
z Support virtual trainer, multiple sports and interval training.
z Support 5KHz Heart Rate Monitor .
Page 4
Page 5
GH-625XT
2. SPECIFICATION
Electrical and Mechanical Parameters General
Item GH-625XT
Number of T r ackpoints 120,000
LAP 6,000
Number of Waypoints 100
Display Size 24.9 x 39.88 (H x W in mm.)
Display type 4 gray color LCD
Pixels (H x W) 128x96
Unit Weight 83 g
Water resistance Standard IPX7
Unit Size
Backlight Display Single level
Operating temperature
Humidity 5% to 95% Non-condensing
Voltage 3.7V for a rechargeable battery, 5V for charging input;
Charging connector DC 5V
Battery Rechargeable Li-Polymer
GPS on (3D fixed); Backlight off
Battery life
Connect to PC Interface USB to DIN4 cable
Charger 2.5 hours completed charging
GPS Chipse SiRF Star IV
Frequency L1, 1575.42 MHz
C/A code 1.023 MHz chip rate
GPS on (3D fixed); Backlight on
GPS Parameters General
76.5 x 61.5 x 17.5 (L x D (Φ)x H in mm.)
-10℃ – 60 ℃
TOD Mode Over 5 days
≧
18 hours
≧
15 hours
Channels 48 track verification channels
Antenna Type Built-in Patch antenna
Position
5 meters, 2D RMS, WAAS enabled
Velocity 0.1 m/s
Time 1 us synchronized to GPS time
Default datum WGS-84
Reacquisition 0.1 sec., average
Page 5
10 meters, 2D RMS
Page 6
GH-625XT
Hot start 1 sec., average
Warm start 38 sec., average
Cold start 42 sec., average
Altitude 18,000 meters (60,000 feet) max.
Velocity 515 meters/ second (1000 knots) max.
Acceleration Less than 4g
Jerk 20 m/sec3
3. HARDWARE OVERVIEW
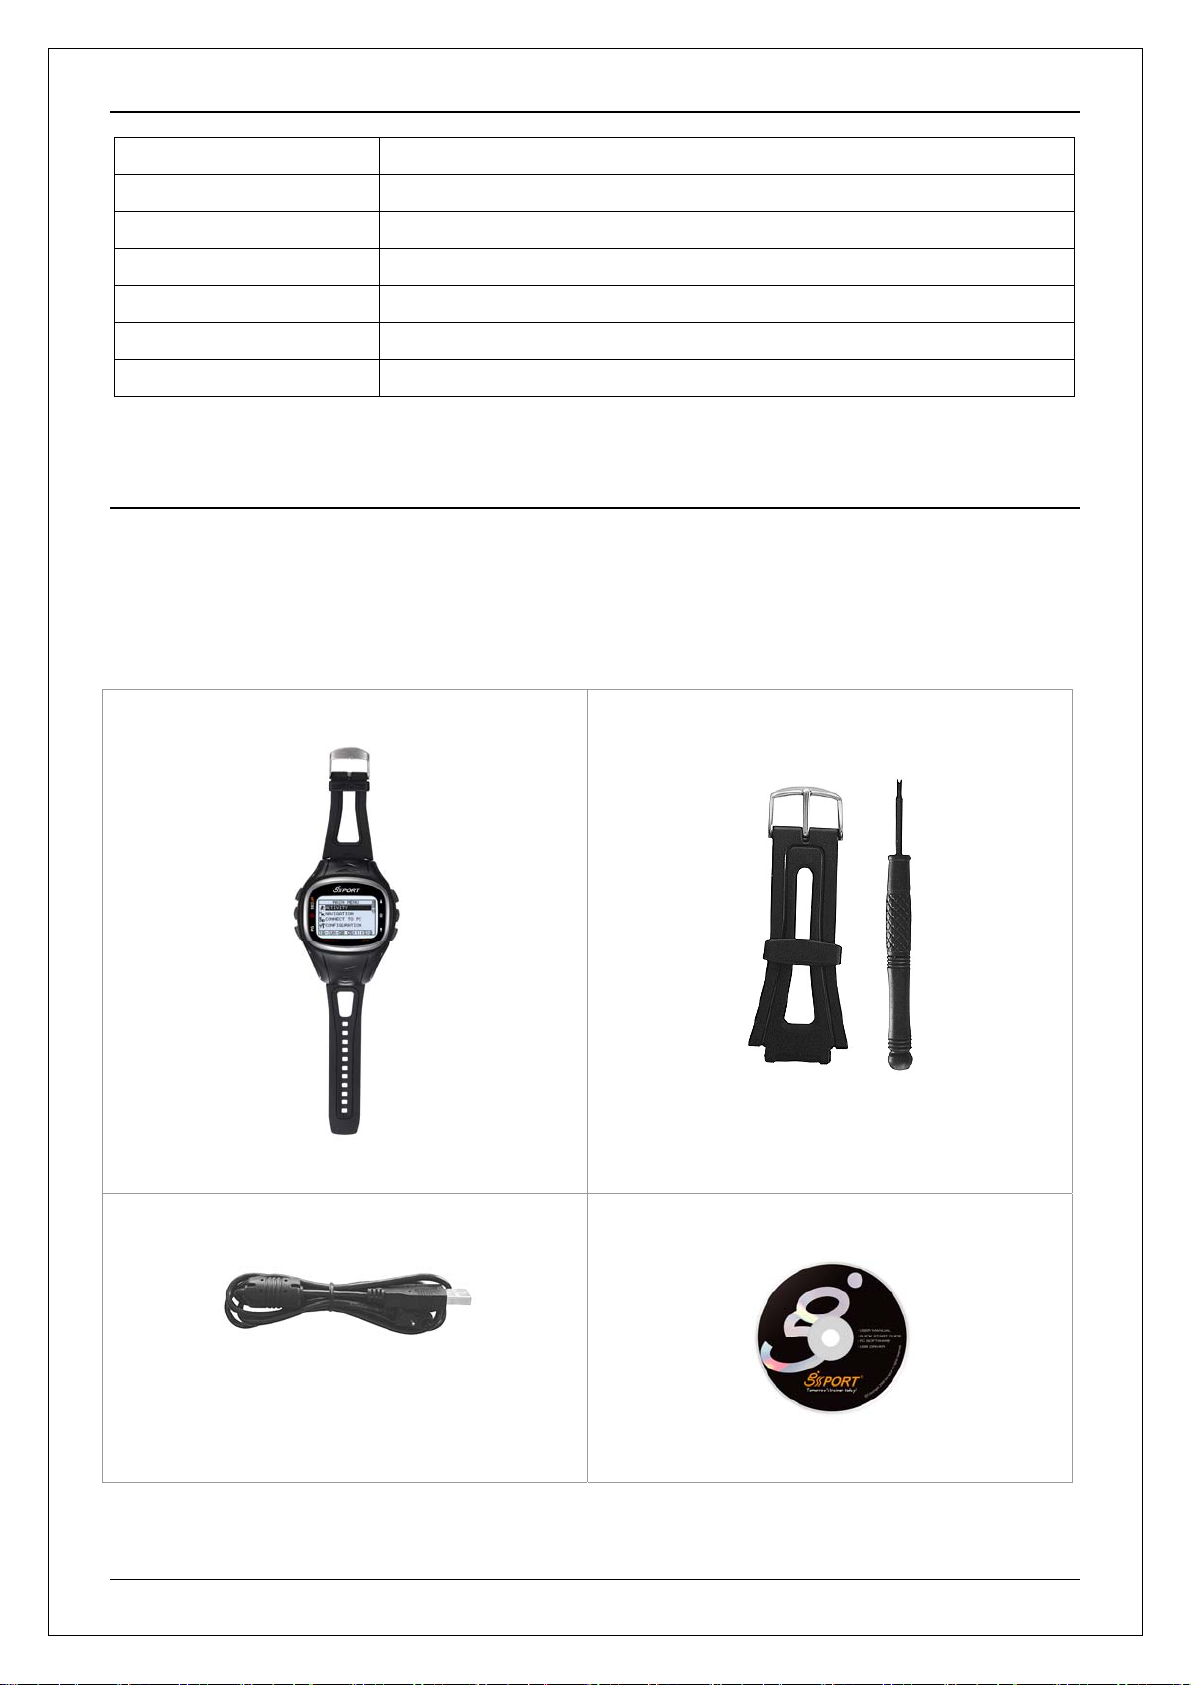
3.1 PACKAGE CONTENTS
Check the contents of your GH-625XT package. If you find any accessories are missing or appear damaged,
please contact your dealer immediately.
GH-5625XT
Extended watchband & Screwdriver
USB Clip
Page 6
CD-ROM
Page 7
GH-625XT
Quick Guide
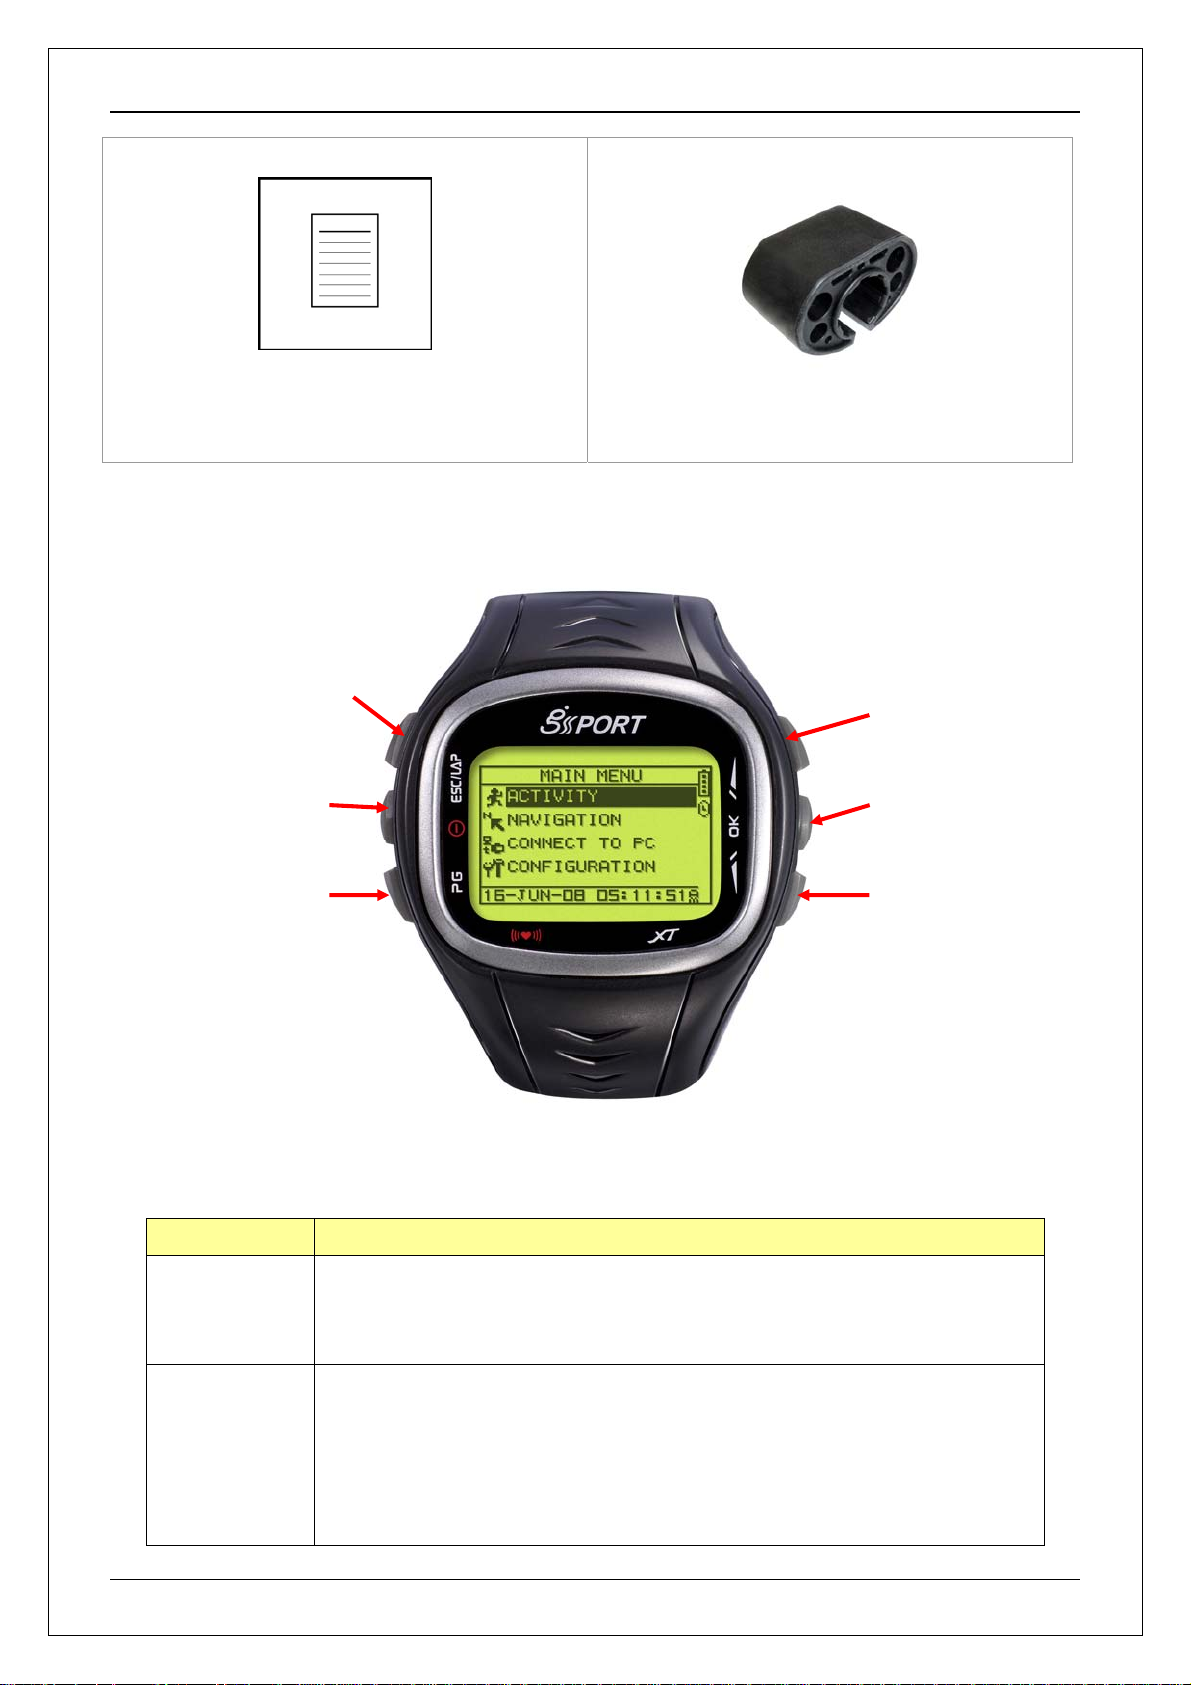
3.2 BUTTON INTRODUCTION
ESC/LAP
Power / Backlight
Page
Bike Holder (optional)
Up
Enter
Down
Button Description
ESC/LAP
Power/Backlight
In Menu mode, press ESC button to escape from the current page and go back
to the previous page.
Press ESC button to split a lap when timer is running.
Press 2 seconds to turn on/off GH-625XT.
When GH-625XT is turn on, quickly press this button will turn on/off the
backlight.
Press and hold this button for 14 seconds to do hardware reset if the system is
halted.
Page 7
Page 8
GH-625XT
PG (Page)
Switch between the screens of “Menu mode”, “Location mode”, “Speedometer
mode” and “Map mode”.
Up / Down
OK / Enter
To move upward/downward for highlighting an item.
In Speedometer mode, press to switch between two views.
In Map mode, press to zoom in or zoom out.
Press to enter the highlighted item.
Press to confirm data entry or feature selection in Menu mode.
In Speedometer mode, press to start/stop the timer.
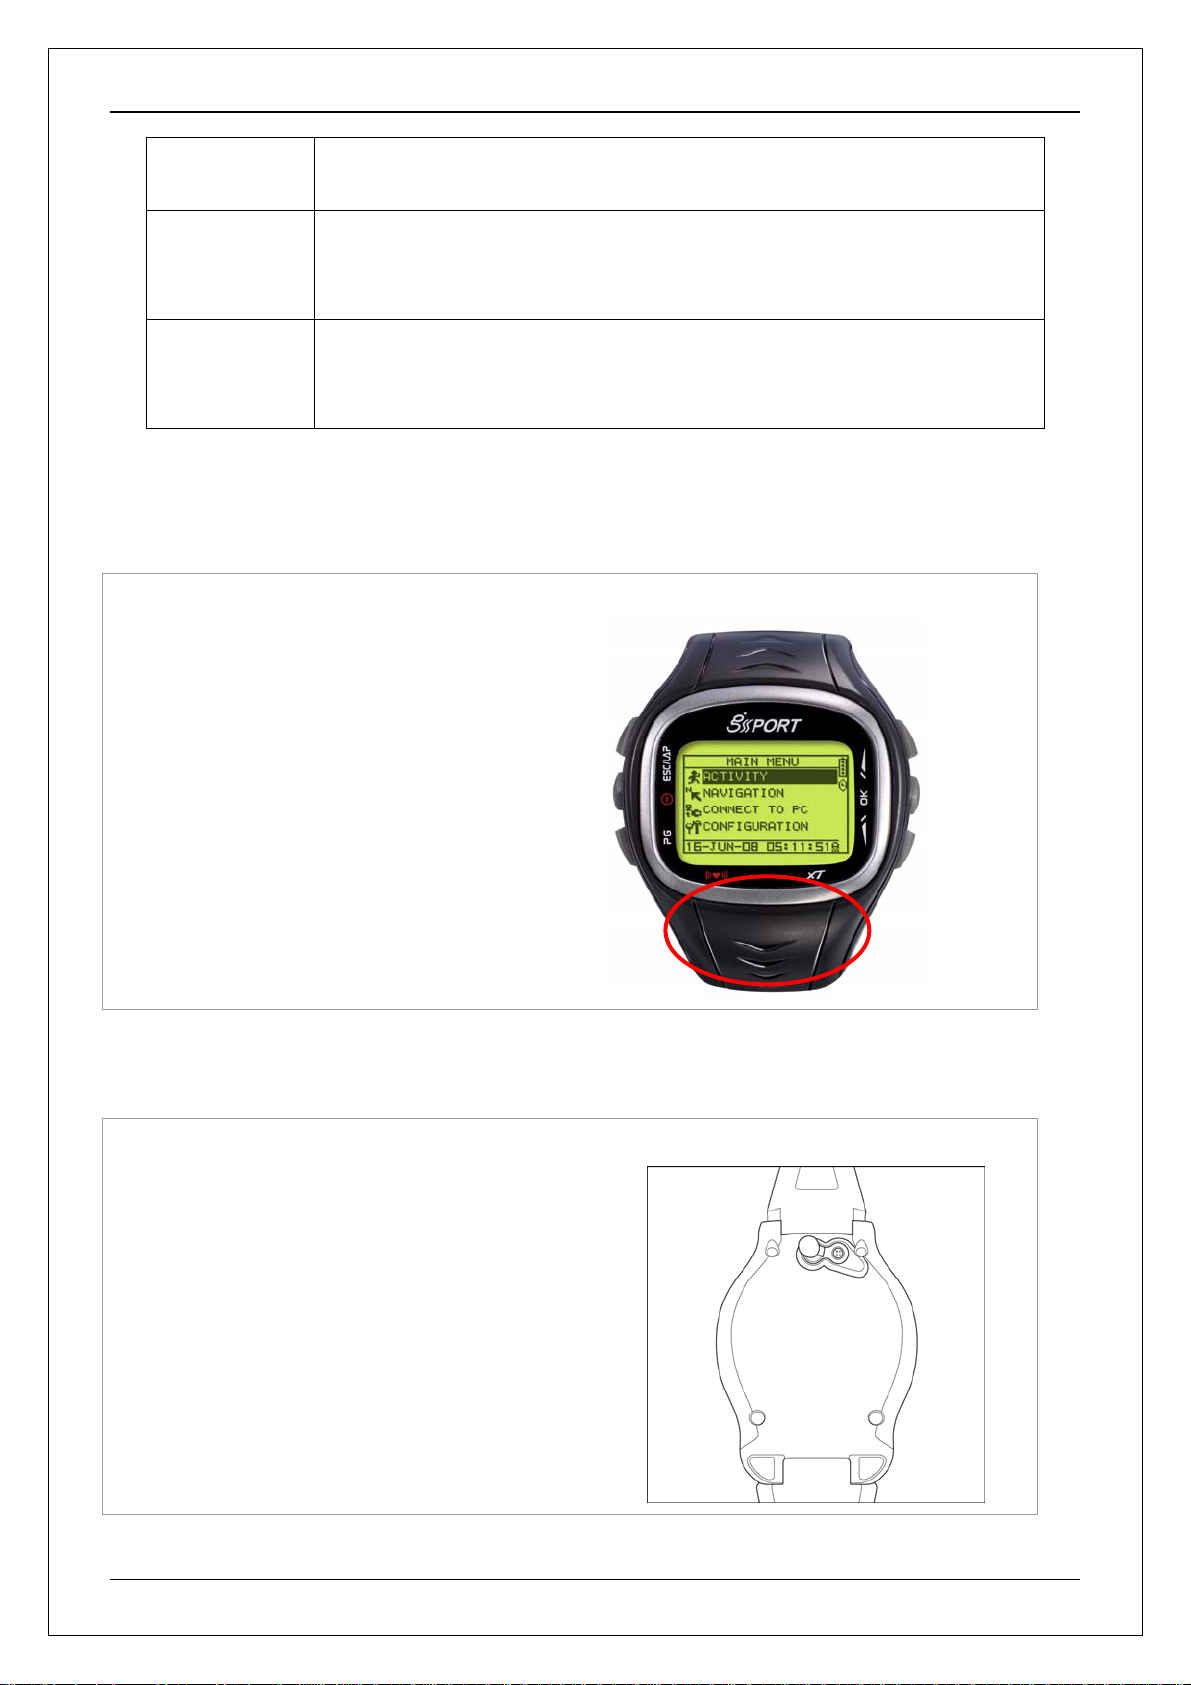
3.3 ANTENNA INTRODUCTION
The GPS antenna is located in the lower part of the
device. Let it face to the sky for a better reception.
3.4 BATTERY CHARGER DESCRIPTION
GH-625XT operates by a built-in Li-ion rechargeable
battery. A battery icon shown on the left bottom
corner of screen indicates the remaining battery
power.
Inside the USB socket, there is a small "bar" on the
right side.
Page 8
Page 9
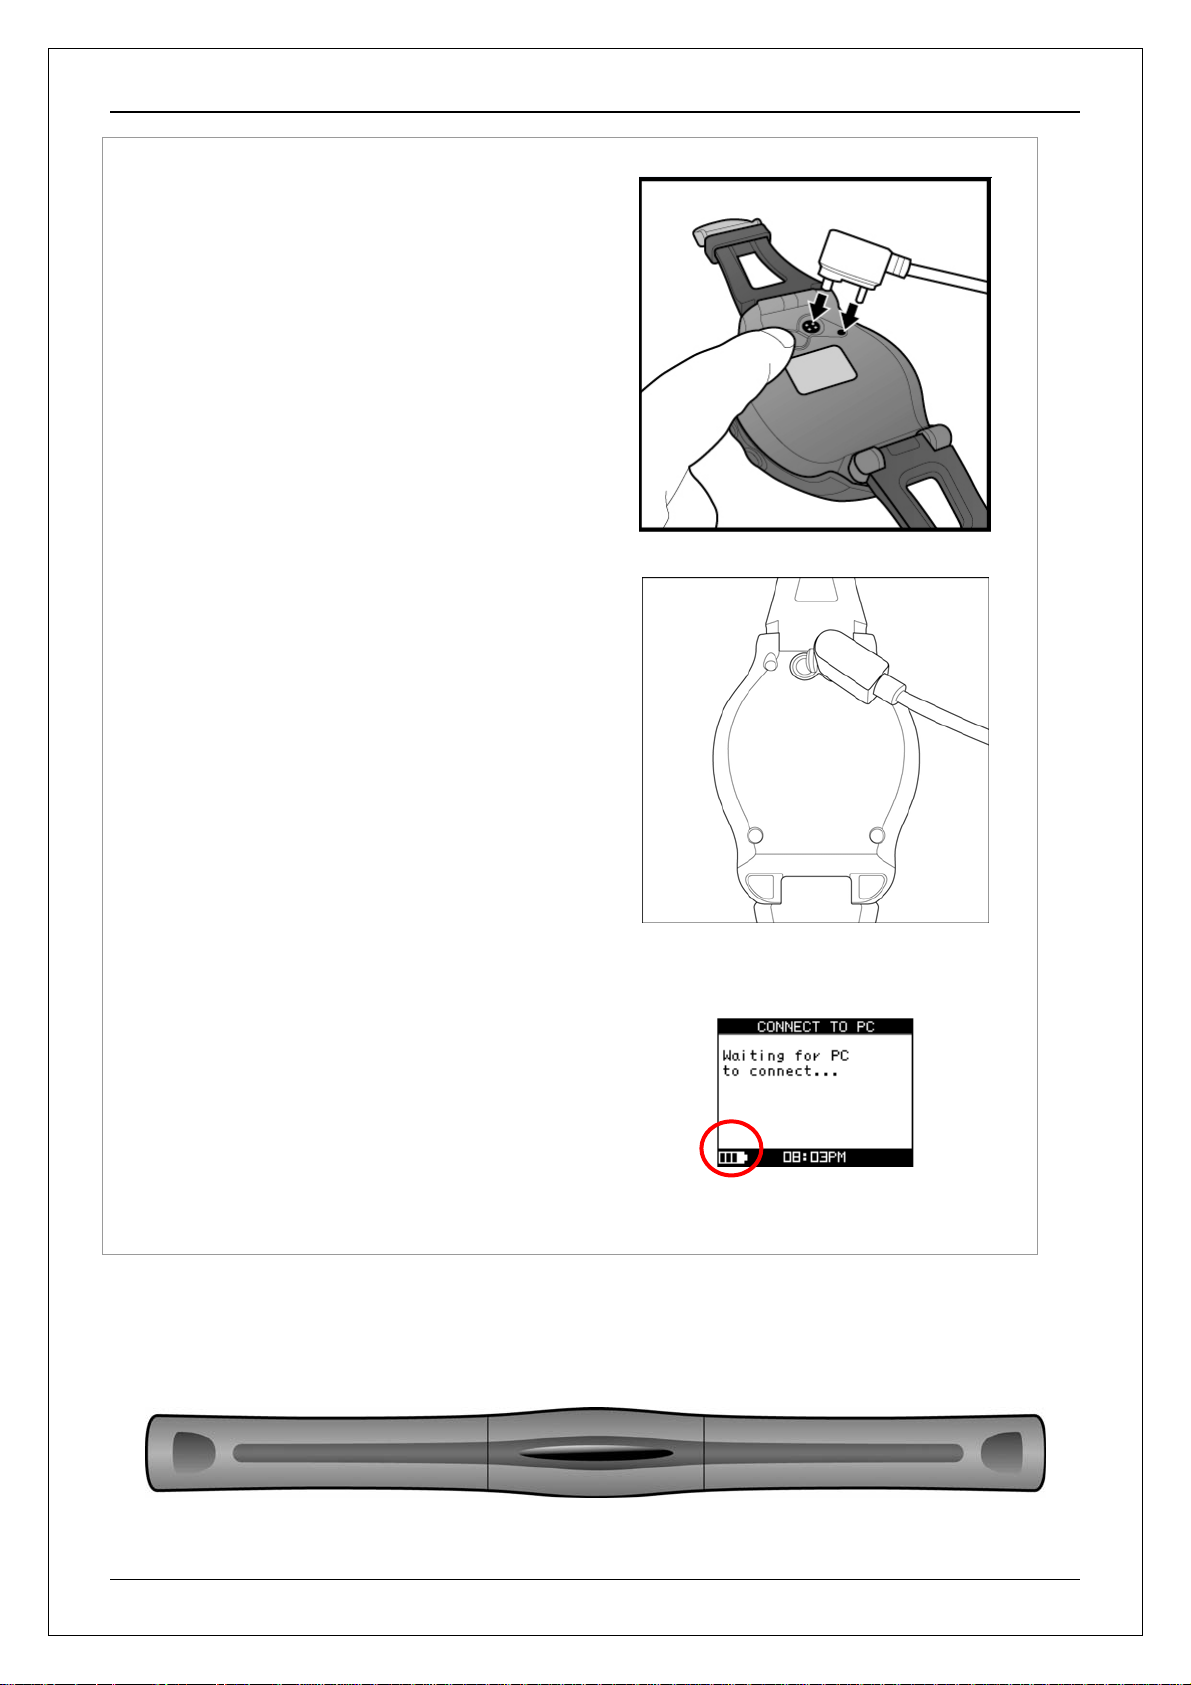
GH-625XT
There is a "groove" on the side of the column of USB
connector.
Aim the "groove" at the "bar" for plugging in the USB
connector.
To charge the battery:
1. Connect one end of USB clip with your
GH-625XT and the other end with the AC adapter or
USB port on PC.
2. It may need about 2.5 hours to fully charge the
battery.
3.5 HOW TO USE HEART RATE MONITOR
Wear the Heart Rate Monitor (only for GH-625XT)
Outer side
Page 9
Page 10
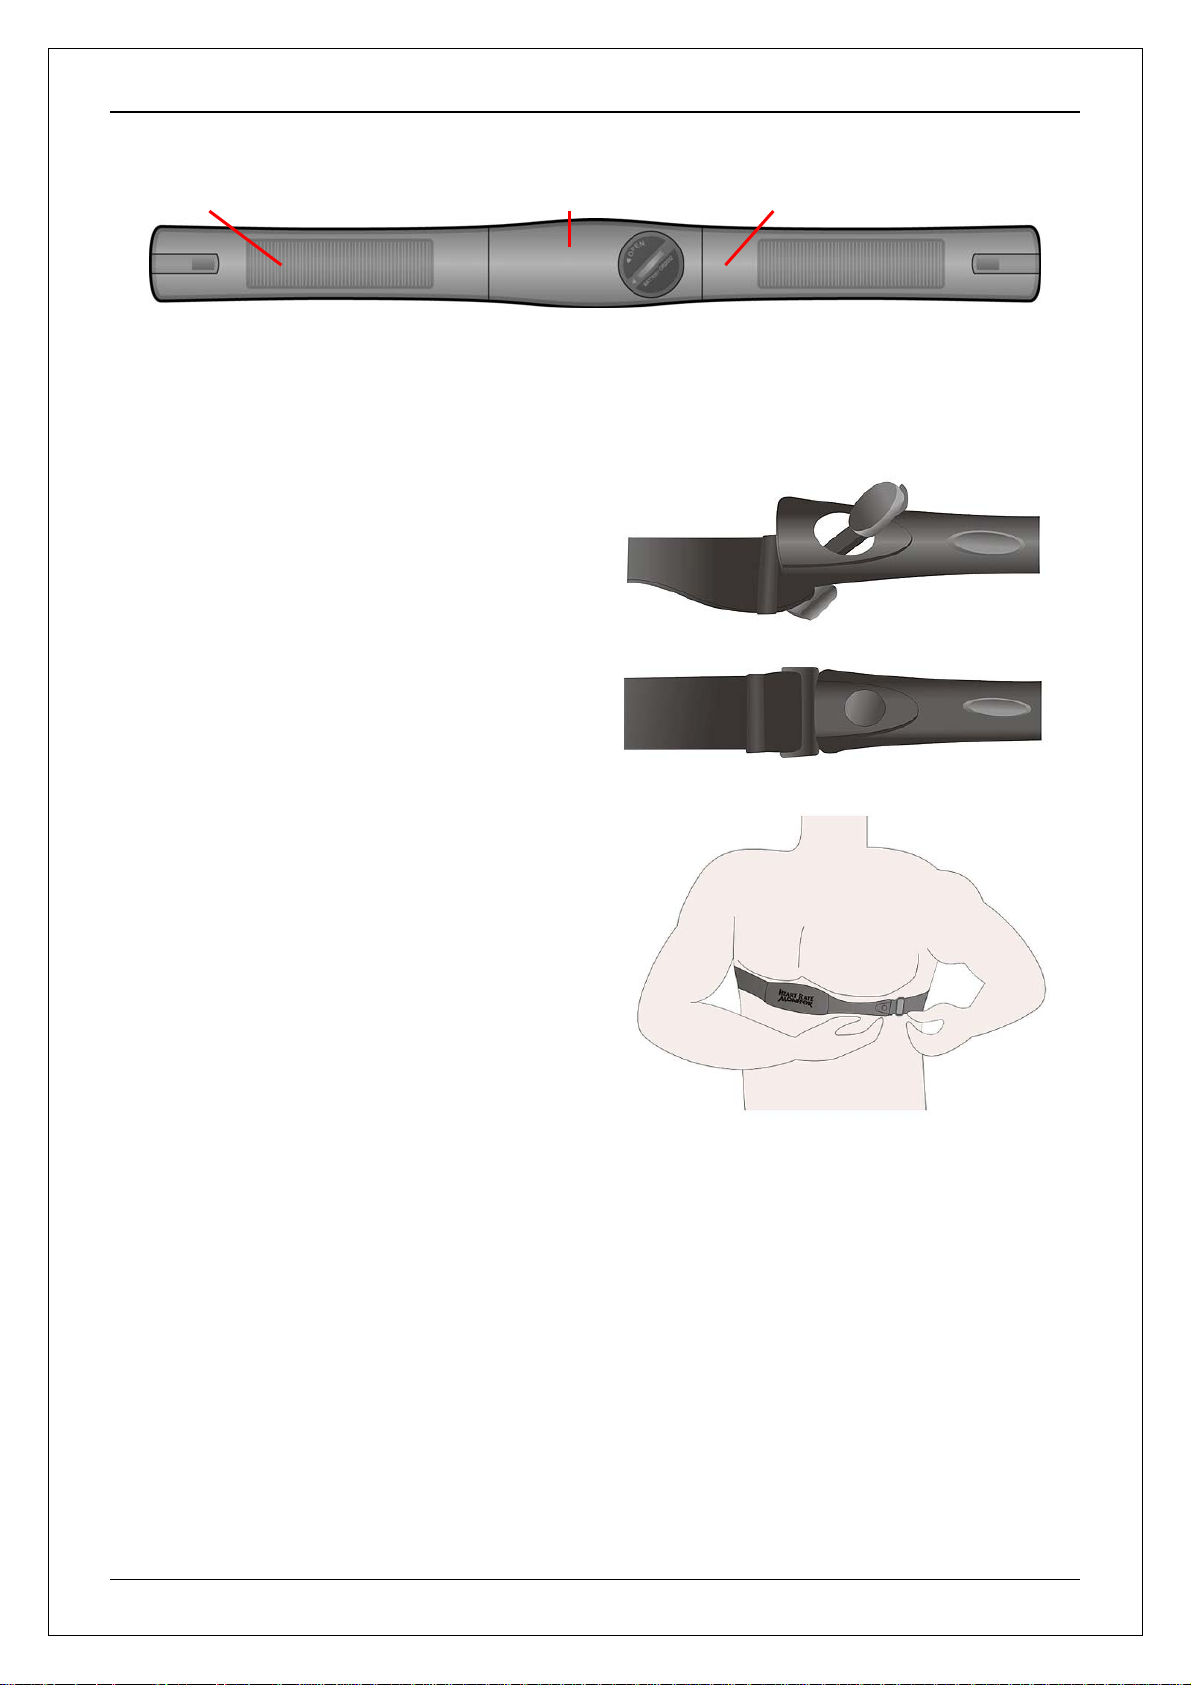
GH-625XT
Heart rate sensor Transmitter Heart rate sensor
Inner side.
Cling this side to your skin. You can wet the sensor to obt ain a better reception of your pulse.
1. Put one end of the strap through the slot of the
heart rate monitor first.
2. Wrap the heart rate monitor and strap around
your chest. A djust the he art rate monitor to be at the
center of your chest.
3. Adjust the strap to fit your chest and make it tight
enough to prevent dropping while you are jogging.
4. Put another end of the strap through the slot of
the heart rate monitor to finish the wearing.
3.6 MOUNT THE BIKE HOLDER
Page 10
Page 11
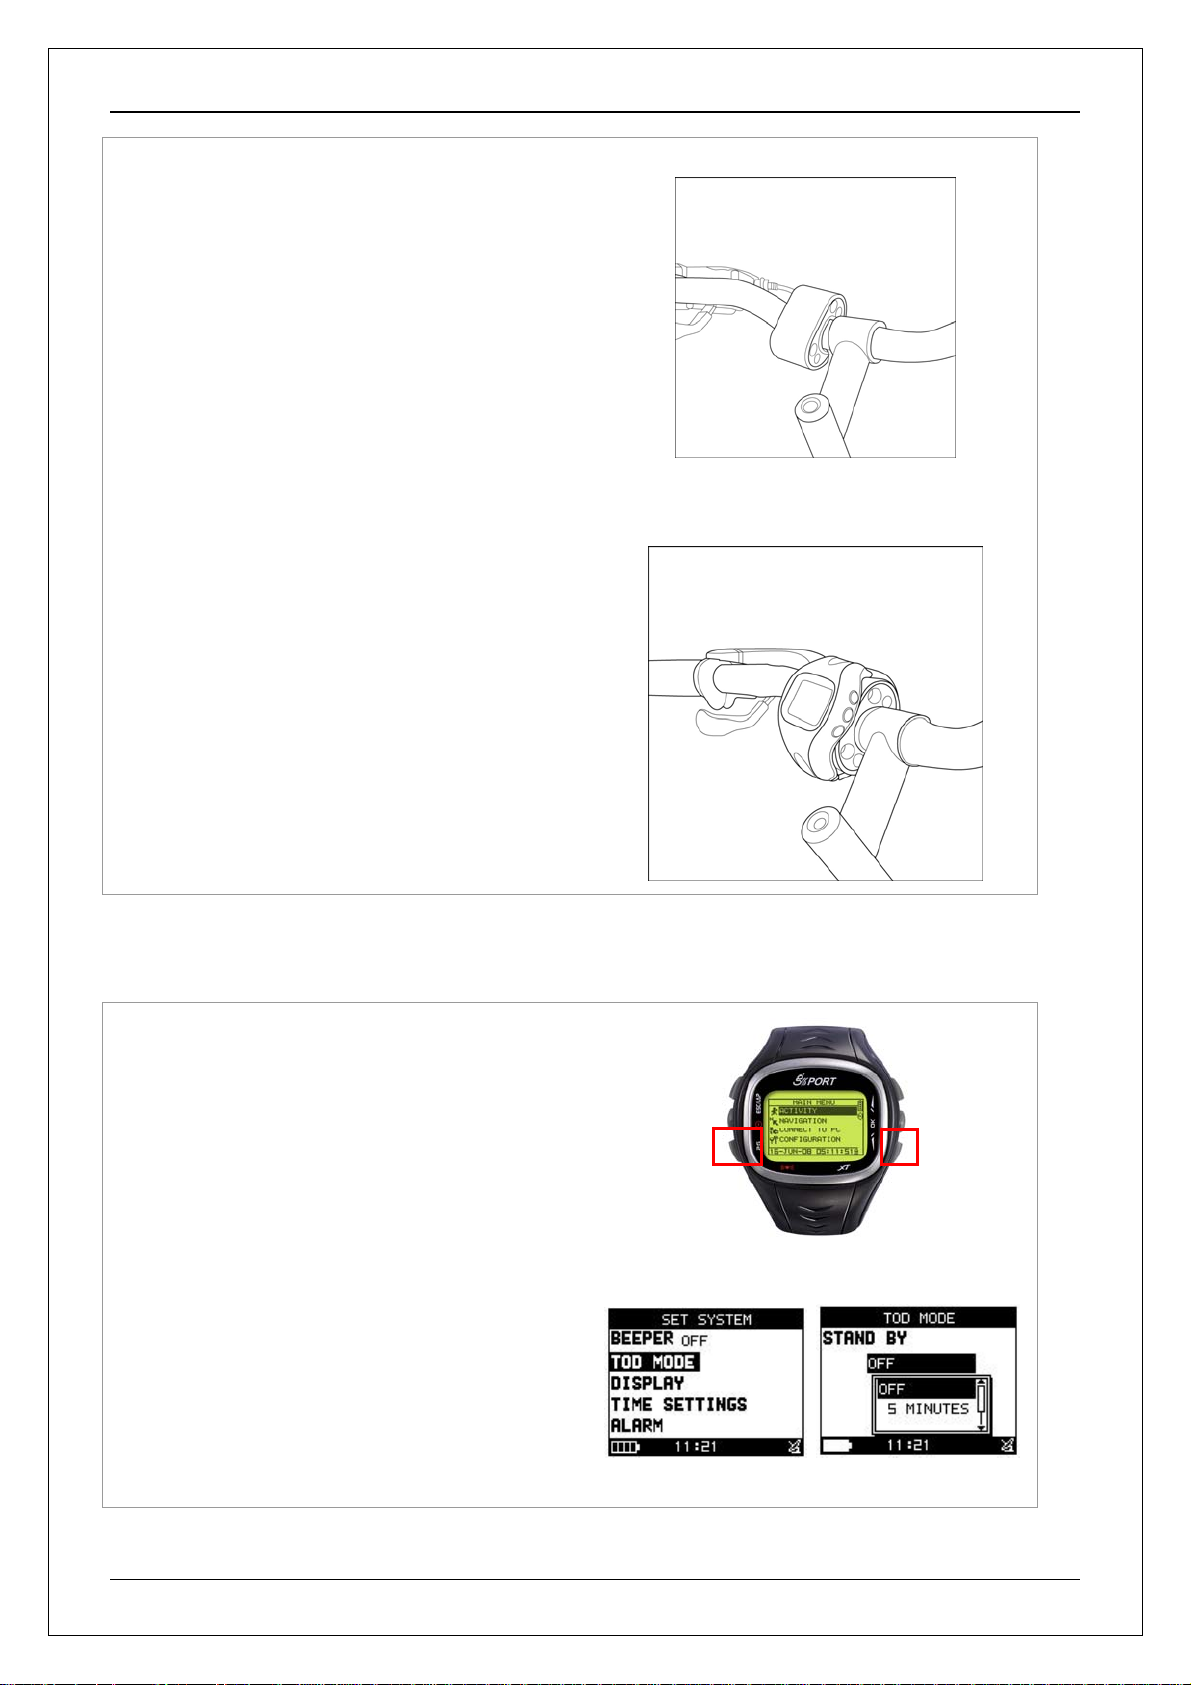
1. Buckle up the bike holder on the bike.
GH-625XT
2. Bind up the GH-625XT strap.
Test the stability by twisting the watch set.
3.7 TIME OF DATE MODE SETTING
1. GH-625XT supports TOD mode after a while for
non usage in order to save more power.
2. You may go to CONFIGURATION>SET
SYSTEM>TOD MODE to enable this function.
3. System will upon the TIME for non usage to enter
the TOD MODE.
4. You may press PG button and Down button at
the same time for 2 seconds to escape the T OD
MODE.
.
Page 11
OR
Page 12
GH-625XT
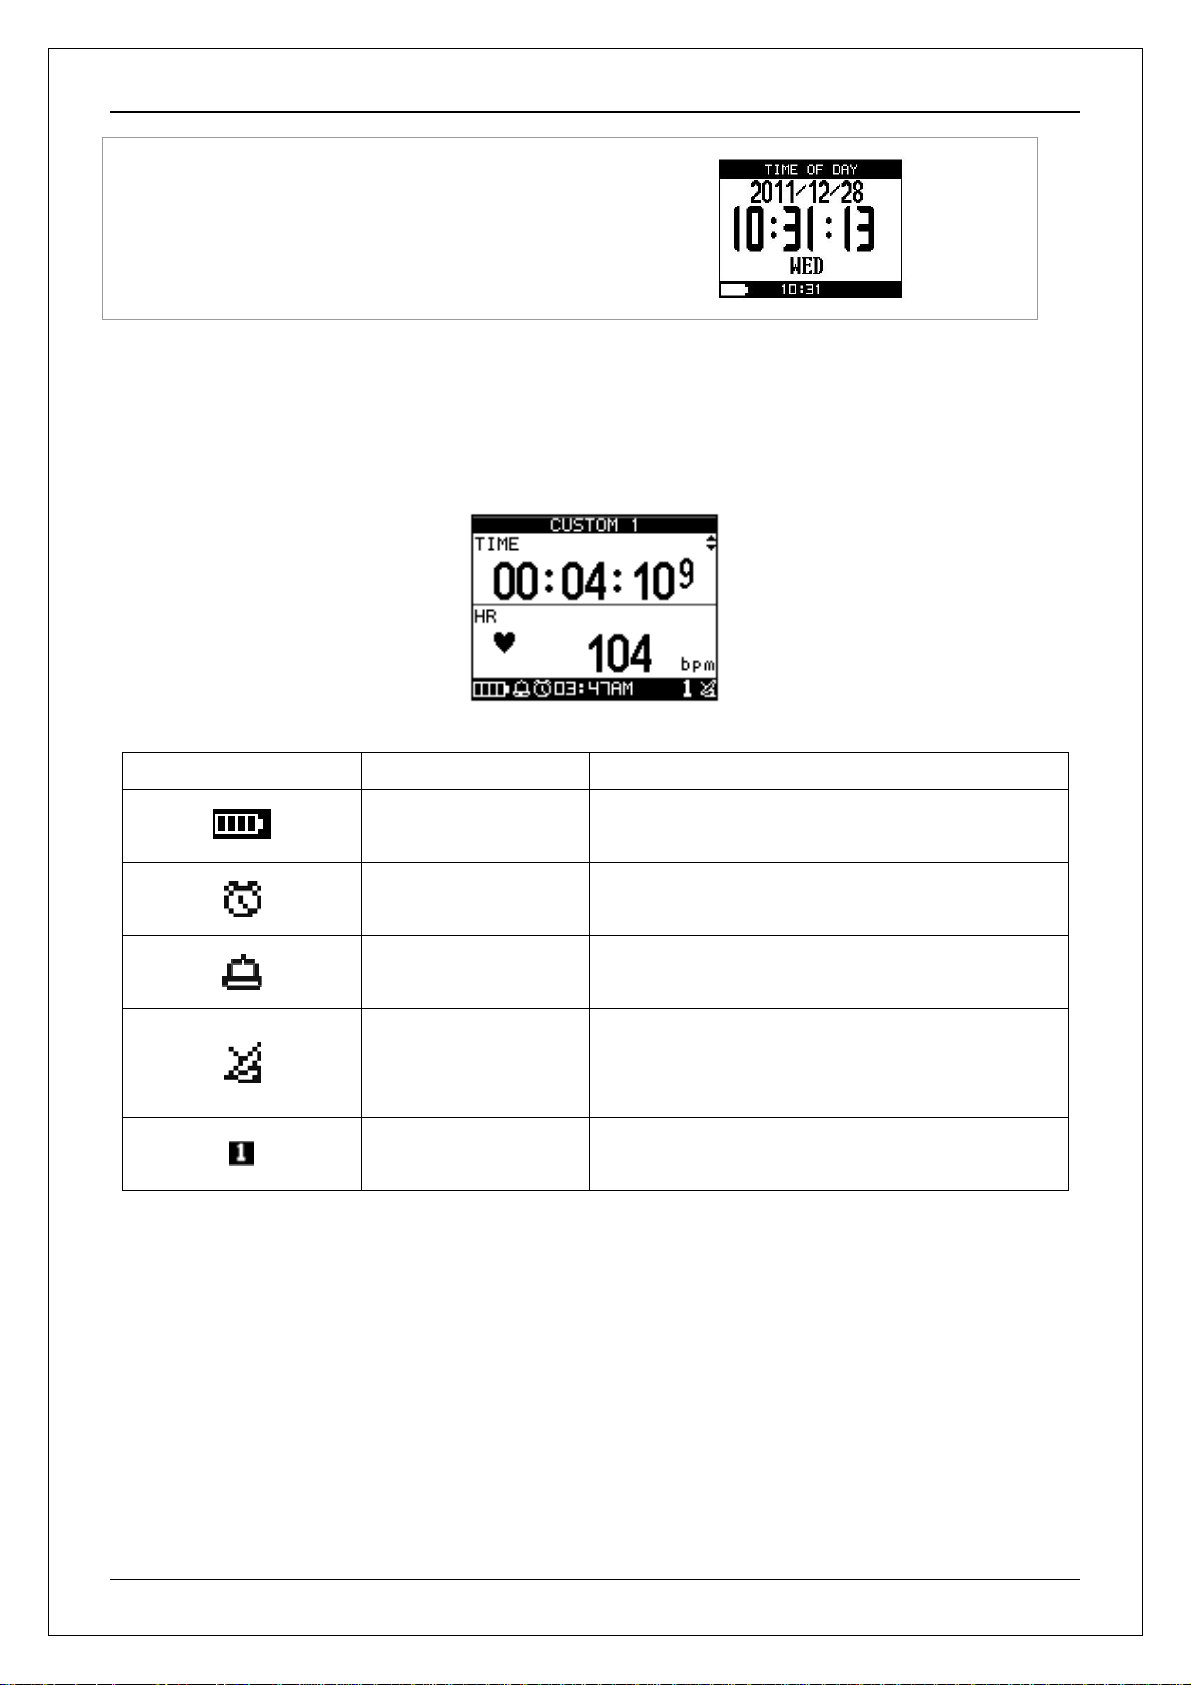
3.8 SYMBOL EXPLANATION
Icon picture Description Indication
Battery capacity
Heart Rate Alarm Zone
indication
timer icon
Clock alert
satellite icon
indicator
The remaining battery power
When you stop the timer, the icon will be flashing. If
it is auto paused, you will see the icon flashing
This icon will show up when you set the alarm clock
for WEEKEND, WEEKDAY, DAILY…or OFF
GPS status indicator
z Flash: No signal
z Solid: 3D fix
There are three numbers to indicate Heart Rate
Alarm Zone, press PG for 5 sec to switch.
Page 12
Page 13
GH-625XT
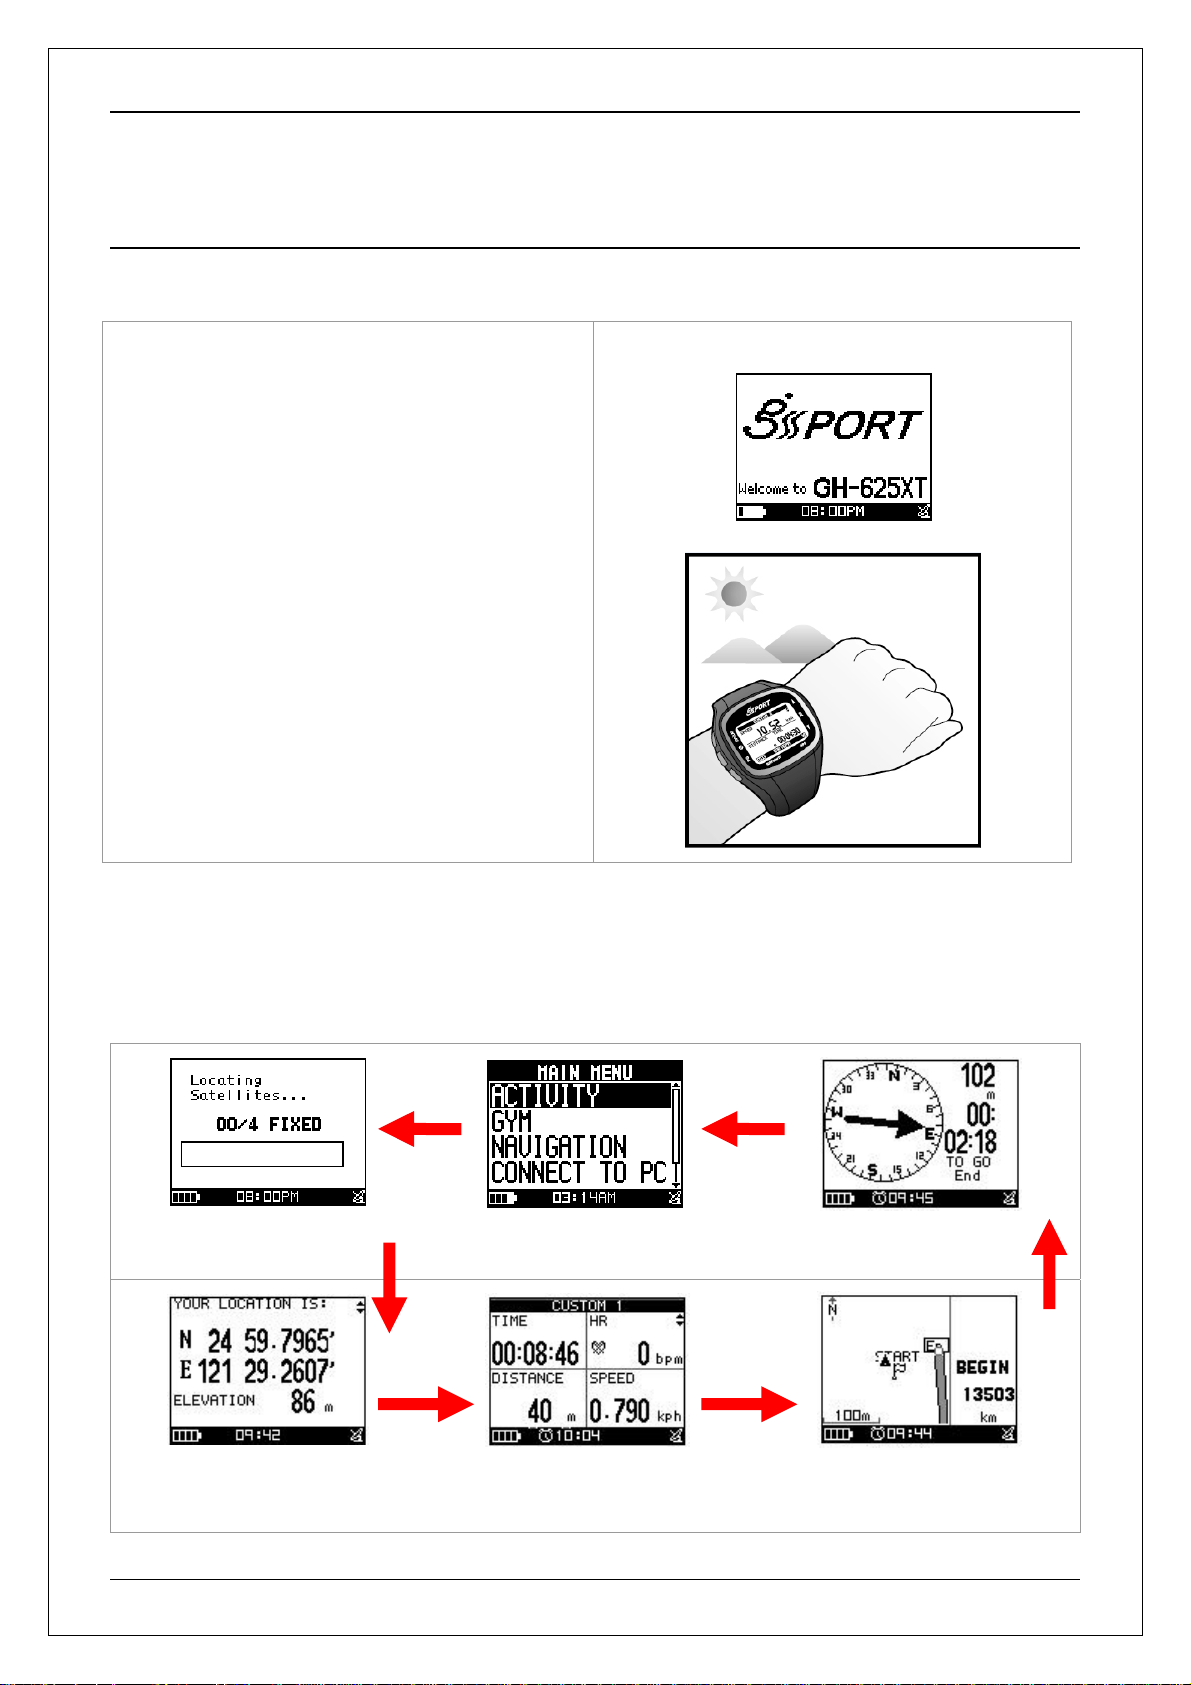
4. GETTING START
4.1 STARTING UP YOUR GH-625XT
Press the Power button for 2 seconds to turn on the
device. You will see the welcome screen displayed.
Allow the GH-625XT a short time to track satellites
for the first time you use it. Take your GH-625XT to
the outdoor open space with a clear view to the sky
and it will be easy to acquire satellite signal with a
few seconds. If the device can't get 3D fixed, you can
still press PG button to exit the Locating screen.
To turn off your GH-625XT, press the Power button
for 2 seconds.
If the system frozen, press power button over 10
seconds to do hardware reset.
4.2 CHANGE THE PAGE
Press PG button to switch between different modes
Locating satellites
Location mode
Menu Mode
Speedometer mode
Map Mode
Map mode (If enable)
Page 13
Page 14
GH-625XT
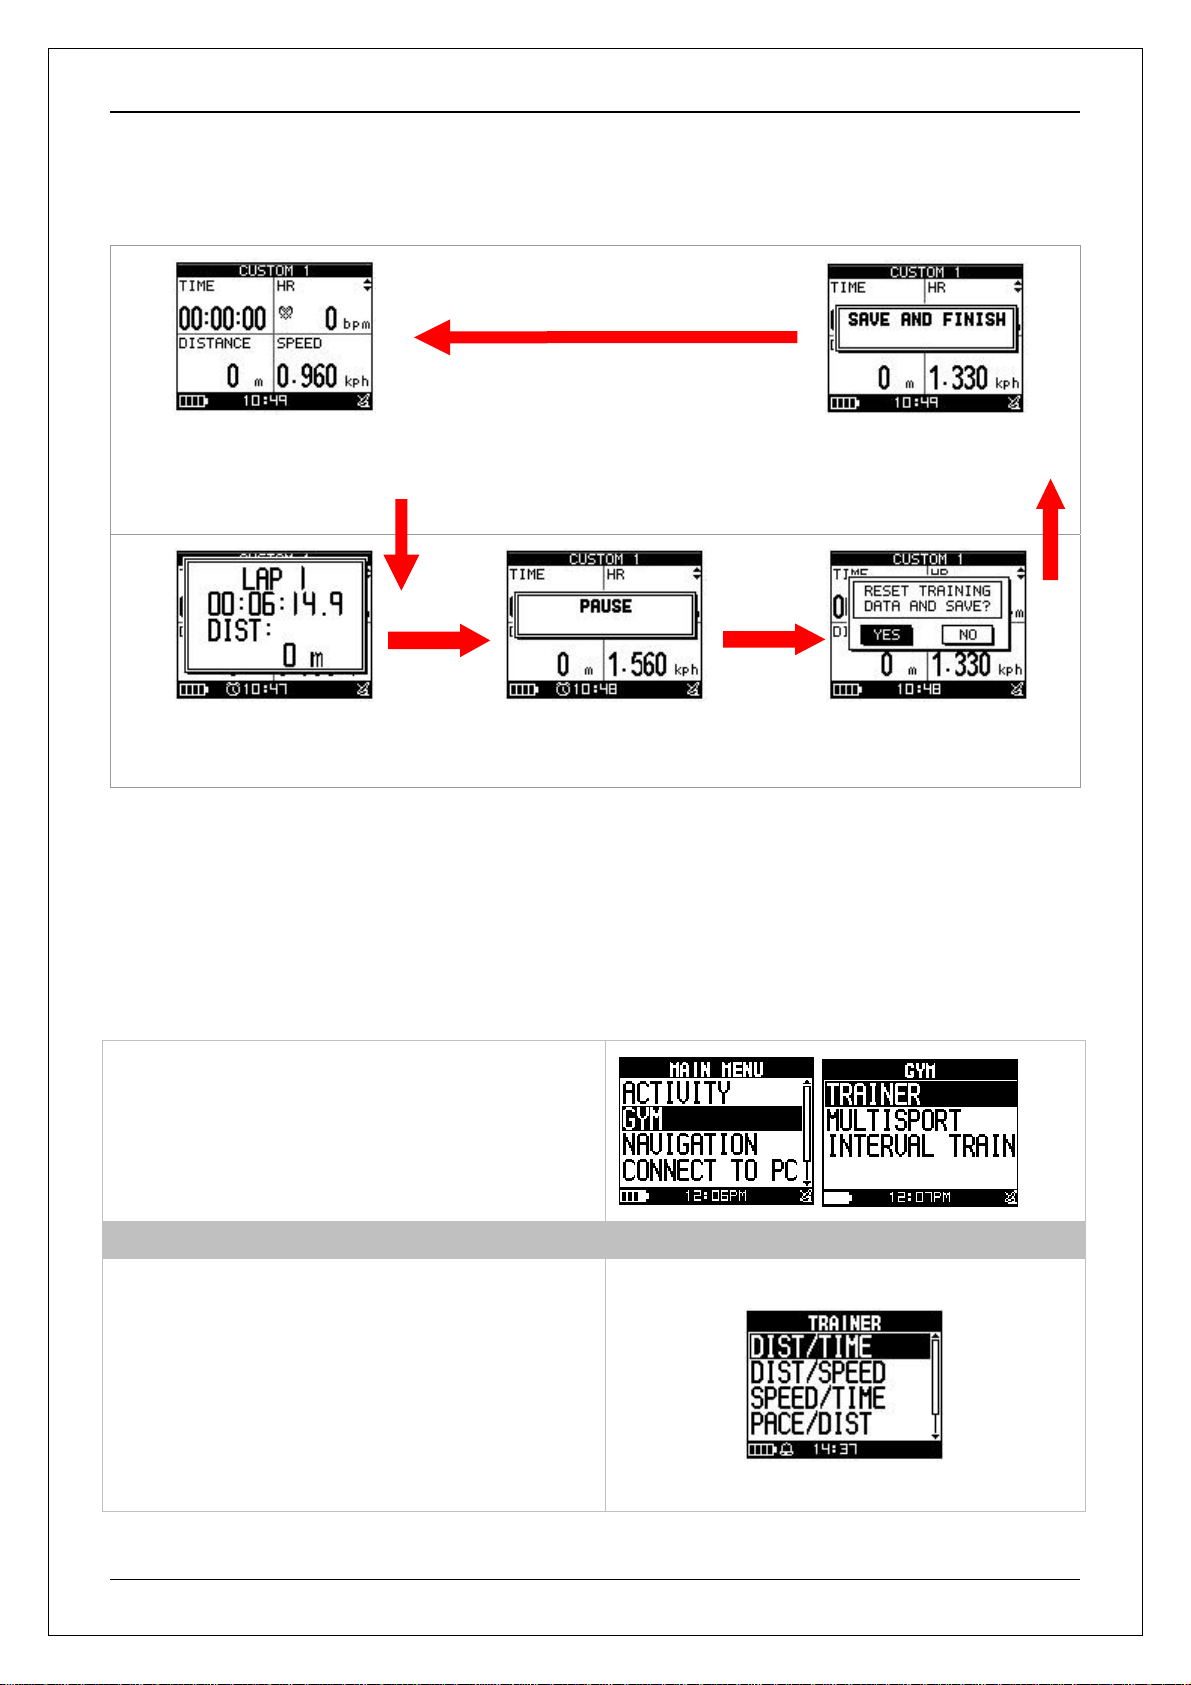
4.3 GETTING START A TRAINING AND SAVING
To start training by “OK” key and you also can split laps by press “LAP” key while in training
In speedometer page or custom
pages, pressing “ENTER” to start
timer
Pressing “LAP” button to
split a Lap.
Pressing “ENTER” to pause
your training
Select YES and pressing
“ENTER”
To save data
Pressing “ESC” to save data
when in PAUSE
4.4 Your personal coach:GYM
In order to improve your training performance, GH-625XT provides GYM to pretend your coach to improve
your performance through mutual training and reaction.
[MAIN MENU] > [GYM]
There are three major subjects for personal training
Trainer
Mutisport
Interval Training
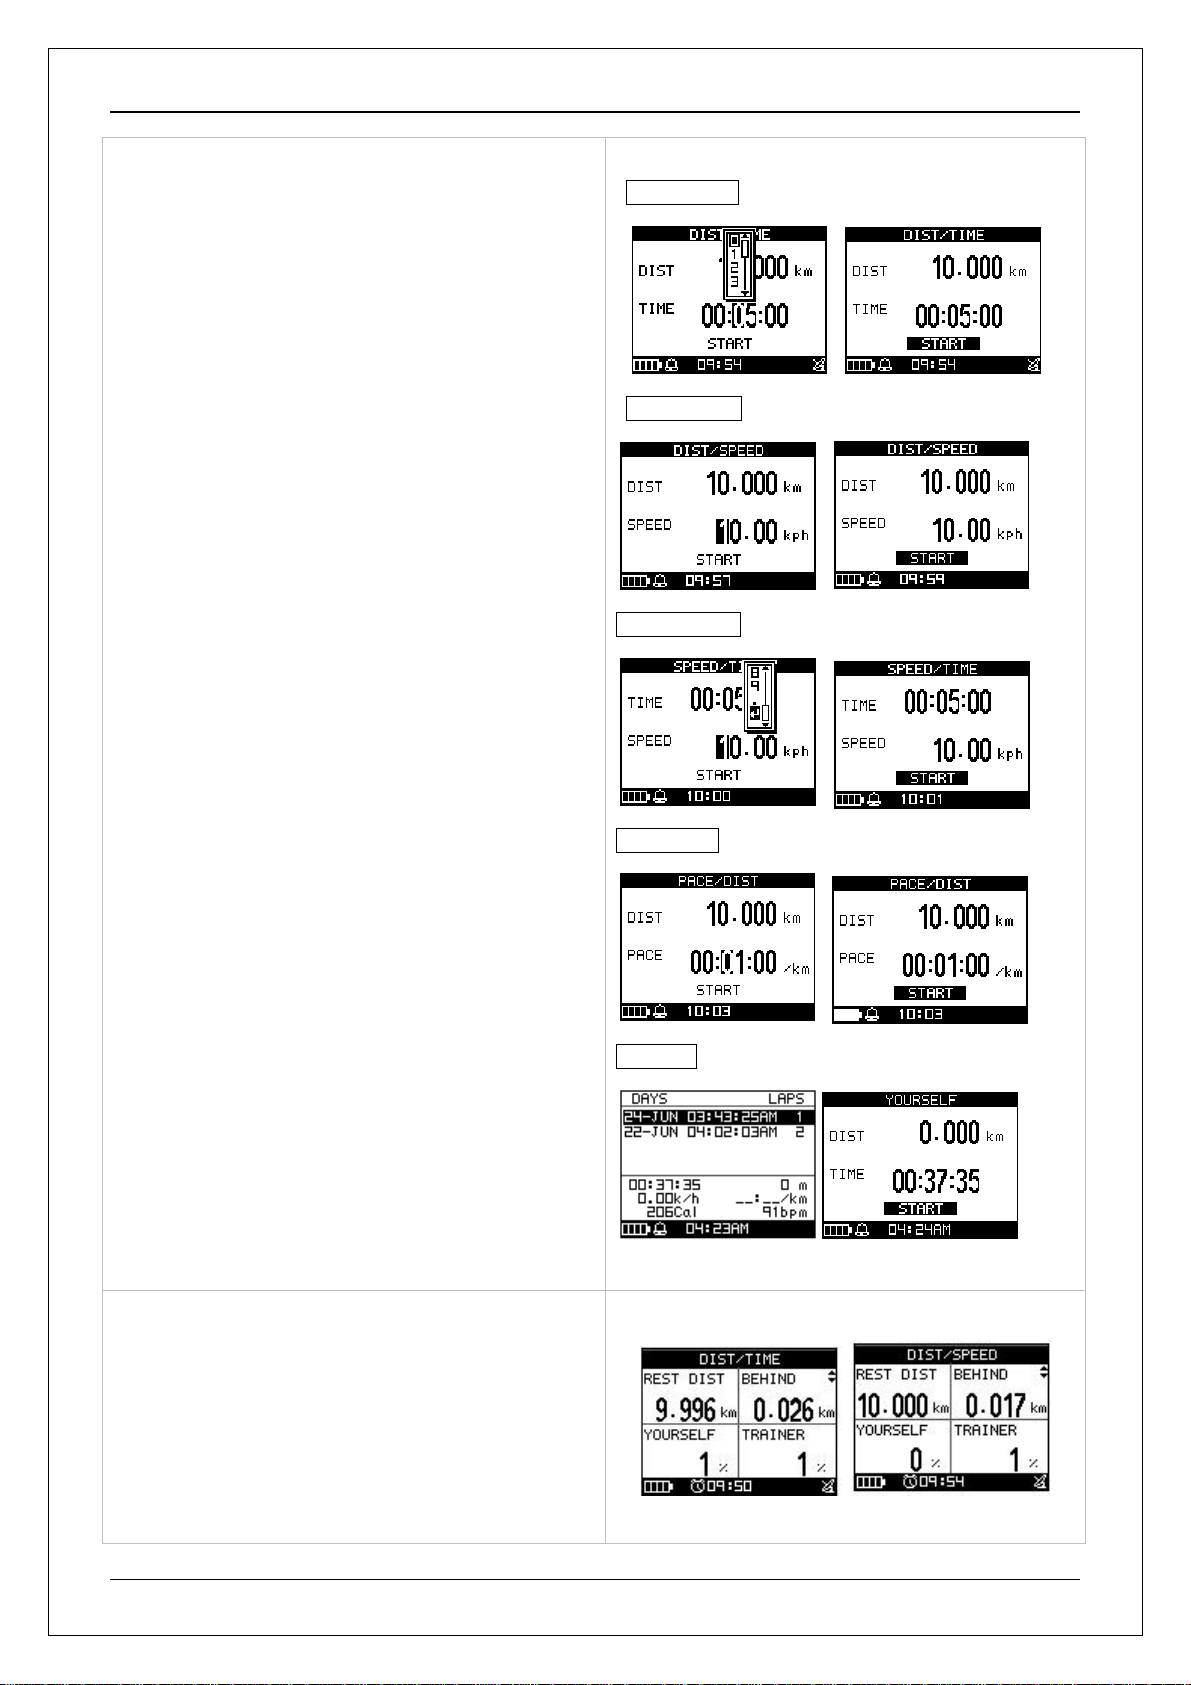
TRAINER
There are five types to set your training partner.
Dist / Time
Dist / Speed
Speed / Time
Pace / Dist
Yourself
Page 14
Page 15
GH-625XT
1. To set up your target trainer parameters through
setting for distance, time, speed, pace or
specified training file accordingly. The trainer will
according to the setting to race with you.
2. Finished setting, press ‘’Up or Down button’’ to
select ‘’Start’’ and then press ‘’Enter button’’ to
start.
Dist / Time
Dist / Speed
Speed / Time
3. When you decided to START the race, the
competition window will pop up. System will ask
Pace / Dist
Yourself
you the whether to record this race and give an
alarm during race.
Page 15
Page 16

[REST DIST] The rest of distance
[BEHINE /AHEAD] The status of competition
GH-625XT
[YOURSELF] The finished percentage of yourself
[TRAINER] The finished percentage of trainer
MUTISPORT
Mutisport could be used on composite activities
competition; you could set running, biking, or others
for your personal training.
Trainer can make a Transition or switch to next sport
by pressing “UP” key 3 seconds.
INTERVAL TRAINING
Several activities likes hockey or soccer need this kind
particular training.
Trainer can create a new workout and then insert
interested session into the program.
Trainer may select the interest workout to go for
training. System will according to setting to run the
program as well as LAP is functional.
Page 16
Page 17

GH-625XT
4.6 How to Use Smart Track Back
To use track can guide you go back along your training record and make you never get lost.
[MAIN MENU] > [ACTIVITY] > [ACTIVITY INFO]
1. You will see all data you saved, press ‘’ Enter
button’’ to enter.
2. Click ‘’ TRACK BACK?’’ and then press ‘’Enter
button’’.
3. Chose ‘’ Backward’’ or ‘’ Forward’’ to start your
track back. It will take some times to compress
the record in order to optimize the memory
usage.
4. The screen will show map. Sometimes you may
press OK or ESC button to skip or back the
waypoints if you locate the intercross section
You may also go to MENU mode to
NAVIGATION>ROUTES> ROUTES SETTING to
enable AUTO JUMP, if you would like to have
system to recognize the closest point to switch
then.
5. Press ‘’Page button’’ display the distance and
time for you to reach destination on the right part
of screen. The direction of destination waypoint
is shown by the arrow sign of the compass.
Page 17
Page 18

GH-625XT
4.7 Bibliography
Item Description
ALTIUDE Current altitude
ALTI MAX The highest altitude
ALTI MIN The lowest altitude
CALORIES shows how many calories you have burned
CAL RATE Burn calories per hour
HR Instant heart rate information
HR AVG Average heart rate information
HR INZN Heart rate zone
HR MAX The max hear rate information
LAPS Lap counts
LAP DIST Lap distance
LAP PACE The average pace for the last lap
LAP SPEED The average speed for the last lap
LAP TIME The time spent for the last lap
PACE the time needed for one mile or one km
P ACE A VG Average pace
PACE BEST The fastest pace
PACE INZN Pace zone
SPEED Instant speed
SPEED A VG The average speed.
SPEED MAX Max speed
SPEED INZN Speed zone
TIME Time
DISTANCE shows how far you have trained
Asc SPEED Ascending speed
CUMULATE + Raise accumulative altitude
CUMULATE - Falling accumulative altitude
REST DIST The rest of distance to go
REST TIME The rest of time to go
PACER Evaluated time between trainer to virtual trainer
PACER E Evaluated rest distance to destination
PACER T Evaluate rest time to destination
SLOPE The tilt percentage from vertical to horizontal
Page 18
Page 19

GH-625XT
5. Menu Structure - Main Menu
This diagram presents all the available menu options for your quick look up.
ACTIVITY
ACTIVITY INFO
TRAINING INFO
MULTISPORT
AUTO HOLD
TIME/DIST ALERT
SPEED/P ACE ALERT
ALERTS
HEART RATE ALER T
SETTING
SETTING
CALORIES
LAP SETTING
DATA RECORD
DELETE ALL
MEMORY STATUS
DIST / TIME
DIST / SPEED
TRAINER
SPEED / TIME
PACE / DIST
GYM
NA VIGATION
CONNECT TO PC
CONFIGURATION
MULTISPORT
INTERVAL TRAIN
ADD MAP MODE / REMOVE MAP MODE
ROUTES
SAVE WAYPOINT
FIND WAYPOINT
RETURN TO START / STOP GOTO
USER PROFILE
PAGE SETTING
YOURSELF
CREATE WORKOUT
LIST ALL
DELETE ALL
LIST ALL
DELETE ALL
ROUTES SETTING
LIST ALL
DELETE ALL
SET PAGE 1
SET PAGE 2
SET PAGE 3
Page 19
Page 20

GH-625XT
SET PAGE 4
SET LAP PAGE
BEPPER
TPD MODE
6. Activity
SET SYSTEM
UNITS UNIT
COORDINATION
CARDIO SET
GPS SETTINGS
MAP MODE SET
FACTORY RESET
SYSTEM UPGRADE
ABOUT PRODUCT
DISPLAY
TIME SETTINGS
ALARM
WAAS / EGNOS
GPS
GPS INFO
6.1 ACTIVITY INFO
6.1.1 TRAINING INFO
Personal training records will be located into this session.
[MAIN MENU] > [ACTIVITY] > [ACTIVITY INFO] > [TRAINING INFO]
1. Use Up and Down button to scroll to the item
you wish to display and press ‘’Enter button’’ .
The all training data information will display:
2. Use Up and Down to select the file you wish to
check and press ‘’Enter button, the training
data information is shown on the screen.
Page 20
Page 21

Information items are displayed:
z Date and Time.
z Total distance of this training.
z Total calories you have burned.
GH-625XT
z Total time of this training.
z Average speed of this training.
z Fastest speed of this training.
z VIEW?
screen.
z TRACK BACK?
BEGIN point or END point of this training
route. When the Track Back is active, you may
press OK or ESC to go to next or previous
waypoint.
z LAPS?
z DELETE?
Display this training data on the
You can track back to the
View the LAP details on map mode.
You can delete this training data.
6.1.2 MULTISPORT
Muti-sport training records will be located into this session.
[MAIN MENU] > [ACTIVITY] > [ACTIVITY INFO] > [MULTISPORT]
1. Use Up and Down button to scroll to the item
you wish to display and press ‘’Enter button’’.
The all training data information will display:
2. Use Up and Down to select the file you wish to
check and press ‘’Enter button, the training
data information is shown on the screen.
z TRACK BACK? You can track back to the
BEGIN point or END point of this training
route.
z DELETE? You can delete this training data.
Page 21
Page 22

GH-625XT
6.2 SETTING
6.2.1 AUTO HOLD
[MAIN MENU] > [ACTIVITY]> [SETTING] > [AUTO HOLD]
1. The Auto Hold function allows you to pause
the timer automatically when you stop moving
or your speed falls below a certain value.
2. When the timer is paused, the data is not
recorded. Thus the average speed and
calories calculation could be more accurate.
6.2.2 ALERTS
¾ 6.2.2-1 TIME / DIST ALERT
[MAIN MENU] > [ACTIVITY] > [SETTING] > [ALERTS] > [TIME/DIST ALERT]
1. Use Up and Down button to select the item
and press OK to modify it.
2. You can set the alarm to sound once when the
specified time is reached, or repeat to sound
on every specified time, or turn it off.
3. You can set the alarm to sound once when
you reached the specified distance, or repeat
to sound on every specified distance, or turn it
off.
¾ 6.2.2-2 SPEED / PACE ALERT
[MAIN MENU] > [ACTIVITY]> [SETTING] > [ALERTS] > [TIME/DIST ALERT]
1. Use Up and Down button to select the item and
press OK to modify it.
2. You can set the alarm to sound when your
speed or pace is above or below a specified
value.
¾ 6.2.2-3 HEART RATE ALERT
[MAIN MENU] > [ACTIVITY]> [SETTING] > [ALERTS] > [HEART RATE ALERT]
Page 22
Page 23

GH-625XT
1. Use Up and Down button to select the item and
press OK to modify it.
2. You can set the alarm to sound when your HR
ZONE / CUSTOM setting is above or below a
specified value or OFF alarm.
3. Heart Rate Alert supports 3 regions setting,
when training is start, the Heart Rate Alarm
region indicator will appear in Speedometer
page.
4. Trainer may press “UP” 3 key seconds to
switch Heart Rate Alarm region.
¾ 6.2.2-4 SETTING
[MAIN MENU] > [ACTIVITY]> [SETTING] > [ALERTS] > [SETTING]
To select the alerts sign wit h message /beeper or
symbol/beeper.
6.2.3 CALORIES
[MAIN MENU] > [ACTIVITY]> [SETTING] > [CALORIES]
SPORT TYPE
Select sport type from "Walking", "Hiking",
"Running", "Biking" or "By Time" by press UP and
Down button.
Page 23
Page 24

GH-625XT
TRAINING LEVEL
Select training level depend on your sport type, the
default setting is Middle.
EXTRA WEIGHT
1. Confirm the extra weight you carry and then
input to EXTRA WEIGHT item.
2. System will calculate the calories consumption
depending on the specified sport type.
6.2.4 LAP SETTING
[MAIN MENU] > [ACTIVITY]> [SETTING] > [LAP SETTING]
There are five selections for setting.
OFF
Disable LAP function.
DISTANCE
LAP trigger by specify distance.
BY TIME
LAP trigger by specify time.
BY POINT
LAP trigger by specify location where you start
training.
GPS OFF LAP
To save more power and use the watch as a normal
training watch with LAP function. When LAP key was
active, system will account into an additional lap and
distance will be taken into training according to
setting. GPS will be disable in this period.
6.2.5 Data Recording
[MAIN MENU] > [ACTIVITY]> [SETTING] > [DATA RECORDING ]
1. System is default to record one point for every
second. This will create the most accurate
record for your training activity. However, you
can set a different interval to record the points.
Page 24
Page 25

GH-625XT
2. Set the longer interval means less data in a fixed
period of time. But you can use the device for a
longer time.
3. Indoor Training means to record training data
with Heart Rate without GPS fix.
6.3 DELETE ALL
[MAIN MENU] > [ACTIVITY]> [DELETE ALL]
You can delete all the training data stored in the
device.
6.4 MEMORY STATUS
[MAIN MENU] > [ACTIVITY]> [MEMORY STATUS]
You will see how many points left and the remaining
time you can use. The remaining time depends on
the period of your record setting.
Page 25
Page 26

GH-625XT
7. GYM
In order to improve and enhance your raining performance. GH-625XT provide s GYM to pretend your coach
to improve your performance through mutual training and reaction.
7.1 TRAINER
7.1.1 DIST / TIME
[MAIN MENU] > [GYM] > [TRAINER]>[DIST / TIME]
The distance for 10 km and time for 5 minutes which means the virtual trainer will finish 3km within 15 minutes
to compete with you.
1. You could change DIST / TIME to set up your
goal.
2. Finished setting, press ‘’Up or Down button’’ to
select ‘’Start’’ and then press ‘’Enter button’’ to
start.
3. Your training performance will shown on the
device including REST DISTANCE, CURRENT
PROGRESS(BEHINE OR AHEAD),
YOURSELF PERFORMANCE AND TRAINER
PERFORMANCE.
4. Press ESC button for recording your lap info.
5. Press Enter button for 2seconds will exit this
training . REALLY WANT TO STOP ?.
Page 26
Page 27

GH-625XT
7.1.2 DIST / SPEED
[MAIN MENU] > [GYM] >[TRAINER]>[DIST / SPEED]
Set distance for 10 km and speed for 10km/hr which means you have to keep your speed over 10km/hr.
1. You could change DIST / SPEED to set up your
goal.
2. Finished setting, press ‘’Up or Down button’’ to
select ‘’Start’’ and then press ‘’Enter button’’ to
start.
3. Your training performance will shown on the
device including REST DISTANCE, CURRENT
PROGRESS(BEHINE OR AHEAD),
YOURSELF PERFORMANCE AND TRAINER
PERFORMANCE.
4. Press Enter button for 2seconds will exit this
training . REALLY WANT TO STOP ?.
7.1.3 SPEED / TIME
[MAIN MENU] > [GYM] >[TRAINER]>[SPEED / TIME]
Set speed 10km/hr and time 00:05:00 means you have to keep 10km/hr to training till 1 hour.
1. You could change SPEED / TIME to set up your
goal.
Page 27
Page 28

GH-625XT
2. Finished setting, press ‘’Up or Down button’’ to
select ‘’Start’’ and then press ‘’Enter button’’ to
start.
3. Your training performance will shown on the
device including REST DISTANCE, CURRENT
PROGRESS(BEHINE OR AHEAD),
YOURSELF PERFORMANCE AND TRAINER
PERFORMANCE.
4. Press Enter button for 2seconds will exit this
training . REALLY WANT TO STOP ?.
Page 28
Page 29

GH-625XT
7.1.4 PACE / DIST
[MAIN MENU] > [GYM] > [TRAINER]>[PACE/DIST]
Set speed 10km/hr and time 01:00:00 means you have to keep 10km/hr to training till 1 hour.
1. You could change SPEED / TIME to set up your
goal.
2. Finished setting, press ‘’Up or Down button’’ to
select ‘’Start’’ and then press ‘’Enter button’’ to
start.
3. Your training performance will shown on the
device including REST DISTANCE, CURRENT
PROGRESS(BEHINE OR AHEAD),
YOURSELF PERFORMANCE AND TRAINER
PERFORMANCE.
4. Press Enter button for 2seconds will exit this
training . REALLY WANT TO STOP ?.
7.1.5 YOURSELF
[MAIN MENU] >[GYM]>[TRAINER]>[YOURSELF]
1. Trainer can select the pervious records as your
competition partner during the race.
Page 29
Page 30

GH-625XT
2. The setting is according to the specified record.
3. Your training performance will shown on the
device including REST DISTANCE, CURRENT
PROGRESS(BEHINE OR AHEAD),
YOURSELF PERFORMANCE AND TRAINER
PERFORMANCE.
4. Press Enter button for 2seconds will exit this
training . REALLY WANT TO STOP ?.
7.2 MULTISPORT
[MAIN MENU] > [GYM] > [TRAINER] >[MULTISPORT]
you could set running, biking, swimming training time/ speed on GH-625XT to train yourself.
Multi-Sport provides you professional training such
as triathlon to string a whole record
1. Set up the training sequence and custom
page individually.
Page 30
Page 31

2. Press ‘’start multisport’’
GH-625XT
3. When you press ‘’UP’’ button for 3 seconds,
the training item will transit to next item and
keep record your training data.
4. The message will show on display and let you
know the next item is going to keep recording.
5. Till you going to stop training, press ‘’ OK’’
button and display shows ‘’ PAUSE’’
6. Rest training data and save ? Press ‘’YES’’
7. All training data back to zero for going next
new training data.
.
Page 31
Page 32

7.3 INTERVAL TRAIN
7.3.1 CREATE WORKOUT
GH-625XT
1. Several activities likes hockey or soccer need
this kind particular training. To select CREATE
WORKOUT to create a new workout.
2. To insert interested session into the program.
3. The training program will be built up with the
sequent training sessions.
4. Once finished, select CONFIRM to save and
start training.
5. The training program will be listed in LIST ALL
for the further training.
7.3.2 LIST ALL
1. The list of workout data you have created
Page 32
Page 33

GH-625XT
2. Press ‘’START’’ to start the training
3. You may press ‘’LAP’’ button to switch to next
training item directly.
4. When the all sessions finished, system will pop
message to ask to save training data.
7.3.3 DELTE ALL
You can delete all the training data stored in the
device.
8. NAVIGATION
8.1 ADD MAP MODE / REMOVE MAP MODE
[MAIN MENU] > [NAVIGATION] > [ADD/REMOVE MAP MODE]
You can use this feature to display or not display the
map mode. However, whil e the Map Mode is off, and
you execute "Return to start" or "GOTO" a waypoint,
the Map Mode will be turn on again.
If Map mode was enable, Map information will
appear.
Page 33
Page 34

GH-625XT
8.2 ROUTES
8.2.1 LIST ALL
[MAIN MENU] > [NAVIGATION] > [ROUTES] > [LIST ALL]]
1. Get routes data from software ‘’ Training Gym Pro
2. The map information of routes will show on the
display for your guiding. Select ‘’FOLLOW’’ to get
training. It will guide you automatically. You may
press ’’ENTER’’ or ‘’ESC’’ to go next or last
waypoint
3. Chose ‘’ Backward’’ or ‘’ Forward’’ to start your
route.
4. DO YOU RECORD RUNNING DATA ? Press
YES
5. The screen will show map. Press ‘’Page button’’
display the distance and time for you to reach
destination on the right part of screen. The
direction of destination waypoint is shown by the
arrow sign of the compass.
NOTE: Please use Training Gym Pro Ver 1.6.7 or
above to transfer ROUTE to device.
Page 34
Page 35

GH-625XT
8.2.2 DELETE ALL
[MAIN MENU] > [NAVIGATION] > [ROUTES] > [DELETE ALL]
1. A confirmation dialog box will appear.
2. Use Up and Down button to highlight "YES" and
press OK.
3. All routes data in memory will be deleted.
8.2.3 ROUTES SETTING
[MAIN MENU] > [NAVIGATION] > [ROUTES] > [ROUTE SETTING]
1. SWITCH DISTANCE: The R radius of coverage
setting, if the coverage is cover specified point,
system will automatically guide the next point.
2. AUTO JUMP: If trainer offset the way to point B,
system will upon the distance to point B to
R
B C
re-direct to point C.
NOTE: AUTO JUMP configuration also will affect
TRACK BACK application.
8.3 SAVE WAYPOINT
[MAIN MENU] > [NAVIGATION] > [SAVE WAYPOINT]
1. You can save the current position. If the GPS
position is fixed, it shows the longitude, latitude
and elevation on the screen.
2. Use Up and Down button to scroll to the item you
A
wish to modify and then use the ‘’Enter button’’ to
select and confirm.
Page 35
Page 36

GH-625XT
3. When you finish the modification, input a “enter
sign” character or press the ‘’Esc /Lap button’’ to
exit.
4. Move highlight to "CONFIRM?" and press ‘’Enter
button’’ . The location data will be stored in the
memory
8.4 FIND WAYPOINT
8.4.1 LIST ALL
[MAIN MENU] > [NAVIGATION] > [FIND WAYPOINT] > [LIST ALL]
1. Use Up and Down button to scroll to the
Waypoint you wish to go to and press ‘’Enter
button’’.
2. Highlight "GOTO?" item and press ‘’Enter
button’’.
3. You will see your current position and
destination point on the screen, and those
nearby waypoints are also displayed.
4. Press ‘’Page button’’ display the distance and
time for you to reach destination on the right
part of screen. The direction of destination
waypoint is shown by the arrow sign of the
compass.
Page 36
Page 37

GH-625XT
8.4.2 DELETE ALL
[MAIN MENU] > [NAVIGATION] > [FIND WAYPOINT] > [DELETE ALL]
1. A confirmation dialog box will appear.
2. Use Up and Down button to highlight "YES" and
press OK.
3. All waypoints in memory will be deleted.
8.5 RETURN TO START /STOP GOTO
[MAIN MENU] > [NAVIGATION] > [RETURN TO START / STOP GOTO]
1. You can use this feature to navigate you back to
the start point of the latest saved training data.
2. The navigation screen is shown and you can
follow the direction of arrow to go back to the
start point.
3. If you want to stop the navigation, press [MAIN
MENU] > [NAVIGATION] > [STOP GOTO].
9 CONNECT TO PC
[MAIN MENU] > [CONNECT TO PC]
The Exercise Studio allows you to setup the pause, alarm and sport type for GH-625.
You can transfer the training data from GH-625XT your
PC.
Page 37
Page 38

GH-625XT
10 CONFIGURATION
10.1 USER PROFILE
[MAIN MENU] > [CONFIGURATION] > [USER PROFILE]
1. You can input your personal information in the
user profile.
2. The data fields include "username", "gender",
"birth date", "weight" and "height".
3. The system will do the calories calculation base
on the information you provide. Please input the
correct value.
10.2 SET CUSTOM PAGE
[MAIN MENU] > [CONFIGURATION] > [SET CUSTOM PAGE]
1. Modify the screen field number.
2. There have five types of screen field could be
choose for every page.
3. Select the function coefficient you want then
press ’Enter button’’ to save setting.
Page 38
Page 39

GH-625XT
10.3 SET SYSTEM
[MAIN MENU] > [CONFIGURATION] > [SET SYSTEM]
BEEPER
You can set beeper on or off
TOD MODE
There are two selections could be enter to watch
mode by 5. It means watch mode will be entered
after 5minutes when system is stand by. OFF means
always in operation mode.
DISPLAY
z Backlight
Set the backlight to stay on or automatically turn off
after a period of time once you press Power button to
activate the backlight.
z Language
There are 5 different languages of User Interface,
including "English", "Sp ani sh", "It alian",’’ French’’ and
"Germany".
z Contrast
The display brightness can be adjusted by this way.
TIME SETTINGS
z Time Format
1. Use Up and Down button to scroll to the
item and press OK to modify it.
2. You can set the time to display in the 12
Hour or 24 hour format.
Page 39
Page 40

z Time Zone
1. Use Up and Down button to scroll to the
item and press OK to modify it.
2. You can select your local time zone.
GH-625XT
z Daylight Saving
1. Use Up and Down button to scroll to the
item and press OK to modify it.
2. You can select the daylight saving if
necessary, and then system will display
the correct time for you.
ALARM
You can set the alarm clock for WEEKEND,
WEEKDAY, DAILY…or OFF. And then set up the
time you want clock to ring you.
10.4 UNITS
[MAIN MENU] > [CONFIGURATION] > [UNITS]
1. The measurement unit can be set as "statute"
or "metric".
2. The speed unit can be set as Pace (min/m,
min/K) or Speed (mph, kph).
10.5 CARDIO SET
[MAIN MENU] > [CONFIGURATION] > [CARDIO SETTING]
1. You can select USE MAX or CUSTOM to set up
your heart rate zone or guiding Max heart is
calculated by 220-age.
Page 40
Page 41

GH-625XT
2. CUSTOM means you can set your own heart rate
zone by yourself. You can select any percent age
or bmp for viewing.
3. CUSTOM means you can set your own heart rate
zone by yourself.
10.5 GPS SETTINGS
[MAIN MENU] > [CONFIGURATION] > [GPS SETTINGS]
WAAS/EGNOS
You can turn on/off the "W AAS/EGNOS" feature.
GPS
The GPS function can be turned off for saving battery
power. If the battery power is pretty low, the system
will also ask you if you want to turn off the GPS
function.
GPS INFO
Here you can see the positioning status of how many
satellite signals are obtained and the signal strength.
Page 41
Page 42

10.6 MAP MODE SET
GH-625XT
DIRECTH TO NORTH: In Map Mode, system always
orients to North on twelve o’clock direction.
BIRD EYE VIEW: System always changes its
orientation upon practical direction.
10.7 FACTORY RESET
[MAIN MENU] > [CONFIGURATION] > [FACTORY RESET]
This feature allows you to restore the GH-625XT
back to factory default status. In another words, the
training data, waypoint, and user profile will be
erased.
10.8 SYSTEM UPGRADE
[MAIN MENU] > [CONFIGURATION] > [SYSTEM UPGRADE]
1. Allow you to upgrade the firmware of
GH-625XT.
2. If you want to cancel the upgrade process,
press Power + ESC button at the same time.
10.9 ABOUT PRODUCT
[MAIN MENU] > [CONFIGURATION] > [ABOUT PRODUCT]
Display the firmware version information.
Page 42
Page 43

11.Glossary
Relates to data being transmitted from GH-625. Activity is a history or log
GH-625XT
Activity
Waypoint
Trackpoint
Navigation
2D Operating
Mode
3D Operating
Mode
Weak Signal
of events. Activity data includes time or distance updates.
Waypoints a re sets of coordinates that identify a point in physical space. For
the purposes of terrestrial navigation, these coordinates usually include
longitude and latitude, and sometimes altitude (particularly for air
navigation).
The current moving trace.
The act of determining the course or heading of movement.
A “two-dimensional GPS position fix” includes only horizontal coordinates.
It requires a minimum of three visible satellites.
A “three-dimensional GPS position fix” includes horizontal coordinates, pl us
elevation. It requires a minimum of four visible satellites.
GPS signal is weak (GPS is fixing).
Receiving
WAAS/EGNOS
IPX7
GMT
Can’t find GPS (GPS turned off or broken down).
Wide Area Augmentation System / European Geostationary Navigation
Overlay Service. These are two satellite-based systems that can be used to
increase the accuracy of GPS position fixes.
An IPX7 designation means the GPS case can withstand accidental
immersion in one meter of water for up to 30 minutes.
Greenwich Mean Time (GMT) is a term originally referring to mean solar
time at the Royal Observatory, Greenwich in England. It is now often used
to refer to Coordinated Universal Time (UTC) when this is viewed as a time
zone, although strictly UTC is an atomic time scale which only approximates
GMT in the old sense. It is also used to refer to Universal Time (UT), which
is the astronomical concept that directly replaced the original GM T.
Page 43
Page 44

GH-625XT
12. T roubleshooting & FAQ
1.) Q: What should I do if the watch would not power on?
A: Press the OK + Down and P ower buttons at the same time. You will be abl e to turn it
on in the firmware upgrade mode. Please follow the regular firmware update procedure.
2.) Q: What should I do if the firmware upgrade fails?
Note: Do not power down your GH-625XT
A: (1) Please go over the process again.
(2) Choose the proper firmware file.
3.) Q: After installing the software and opening it, a pop-up window shows up stating "The service
is not ready." What should I do to resolve that?
A: Please close the program. Open it back again. The database will reset automatically.
4.) Q: How can I uninstall the GS-Sport Training Gym Pro software?
A: (1) Utilize the uninstall function from the Windows Menu:
Start > Programs > Globalsat GS-Sport Training Gym Pro > Uninstall
(2) Use Add or Remove Programs from Windows Control Panel:
Go to Start > Control Panel > Add or Remove Programs. Search for GS-Sport Training
Gym Pro, click on it to highlight, and press the Change/Remove button.
5.) Q: Where can I download the files if I lost the CD-ROM?
A: Please go to this
website:http://www.gssport.com/pro_dl.php?en_product_id=1&en_product_cnt_id=32
6.) Q: How do I keep my current training records before upgrading the software version?
A: (1) Backup the database from this location: C:\Program Files\GlobalSat
Technology\GS-Sport Training Gym Pro\Data\User. You can go ahead and uninstall the so ftwar e.
(2) Copy and overwrite the database back to the corresponding folder.
7.) Q: Why am I unable to upgrade the watch with the new firmware?
A: (1) Please check if the firmware file is correct.
(2) Verify it the watch is set to System Upgrade mode.
8.) Q: Why does it show "PC COM POR T Error" when I tried to download the data from the w atch?
A: (1) Please check if the USB driver is installed or not.
Page 44
Page 45

GH-625XT
(2) Connect the watch to your PC with the USB cable.
(3) Double click the GS-Sport Training GYM Pro' icon from the Desktop to start the
application.
(4) In the Menu Bar, go to Settings > Configuration. Click the can COM Port" button.
The COM Port would be automatically scanned.
9.) Q: Why is the watch unable to receive a heart rate signal?
A: (1) Check if you are properly wearing the heart rate monitor . Also, spr ay some water on it
before use.
(2) Turn on the Heart Rate Alert function.
(3) If it is still not working, check the battery of the Heart Rate Monitor.
10.) Q: How to edit and upload waypoints through the software?
A: To Edit Waypoints, see steps below:
(1) From Track Records, select the training file that you want to browse.
(2) Click Waypoints in the function bar and you will see all t he waypoints. Right-click on
one of the waypoints to edit its contents.
(3) Press the Save button when you're done.
To Upload Waypoints, refer to the procedures below:
(1) Select the waypoints that you want to transfer to the device.
(2) To upload, you can do this by going to Data Transmission > Way Points > Upload to
Device.
(3) In the watch, please enter CONFIGURATION > CONNECT TO PC.
(4) Afterwards, it should show that you successfully uploaded the waypoint into the
device.
11.) Q: What formats of the training file do the software supports?
A: It can save or open a training record as or from the following formats: .kml, .nmea, .gpx,
csv, and .txt.
To open a file, go to File > Open. Choose a certain file you want to open.
To save a file, select one training file you want to save. Go to File > Save. Choose a certain
file type you want to save it as.
12.) Q: How to import or export the training records from or to an activity file?
A: To import the training records from a specific file (.ACT):
Go to Main > Import Activity. Choose the file you want to import.
To export the training records to a specific file (.ACT):
Choose one training file you wa nt to export. Go to Mai n > Export Ac tivity > Activity Details.
Input additional note. Click OK.
Page 45
Page 46

GH-625XT
13.) Q: Why does it always show "Application database not ready" whenever I execute the
software?
A: Please try the following:
(1) Navigate to the Services Setting by going to START > Control Panel > System &
Maintenance > Administrative Tools > Services.
(2) Find out service name MySQL1.
(3) Select MySQL1 and click Start to connect it.
(4) Please try to open up the program again.
14.) Q: How do I check the firmware version of my watch?
A: You can do this by going to Main Menu > Configuration > About Product. The last line
should indicate the firmware version of your watch, in this format: F-XXX-XX-XXXXXXX.
15.) Q: What languages are currently supported by my watch?
A: The languages currently supported by the watch are as follows: English, Spanish, Italian,
France, German, and Chinese.
FCC Notices
This device complies with part 15 of the FCC rules. Operation is subject to the following two
conditions:
(1) This device may not cause harmful interference, and
(2) This device must accept any interference received, including interference that may cause
undesired operation.
FCC RF Exposure requirements:
This device and its antenna(s) must not be co-located or oper ation in conjunction with any other
antenna or transmitter.
NOTE: THE MANUFACTURER IS NOT RESPONSIBLE FOR ANY RADIO OR TV INTERFERENCE
CAUSED BY UNAUTHORIZED MODIFICATIONS TO THIS EQUIPMENT. SUCH MODIFICATIONS
COULD VOID THE USER’S AUTHORITY TO OPERATE THE EQUIPMENT.
CAUTION
RISK OF EXPLOSION IF BATTERY IS REPLACED BY AN INCORRECT TYPE.
DISPOSE OF USED BATTERIES ACCORDING TO THE INSTRUCTIONS
Page 46
Page 47

GH-625XT
Page 47
 Loading...