

Page 1
© US Blaster Europe BV
1
PROFESSIONAL CD PLAYER WITH ANTI ANTI-SHOCK MEMORY
USER MANUAL
USB 7319
IMPORTANT
Use of controls or adjustments or performance of procedures other than those specified herein may
result in hazardous radiation exposure.
Page 2

© US Blaster Europe BV
2
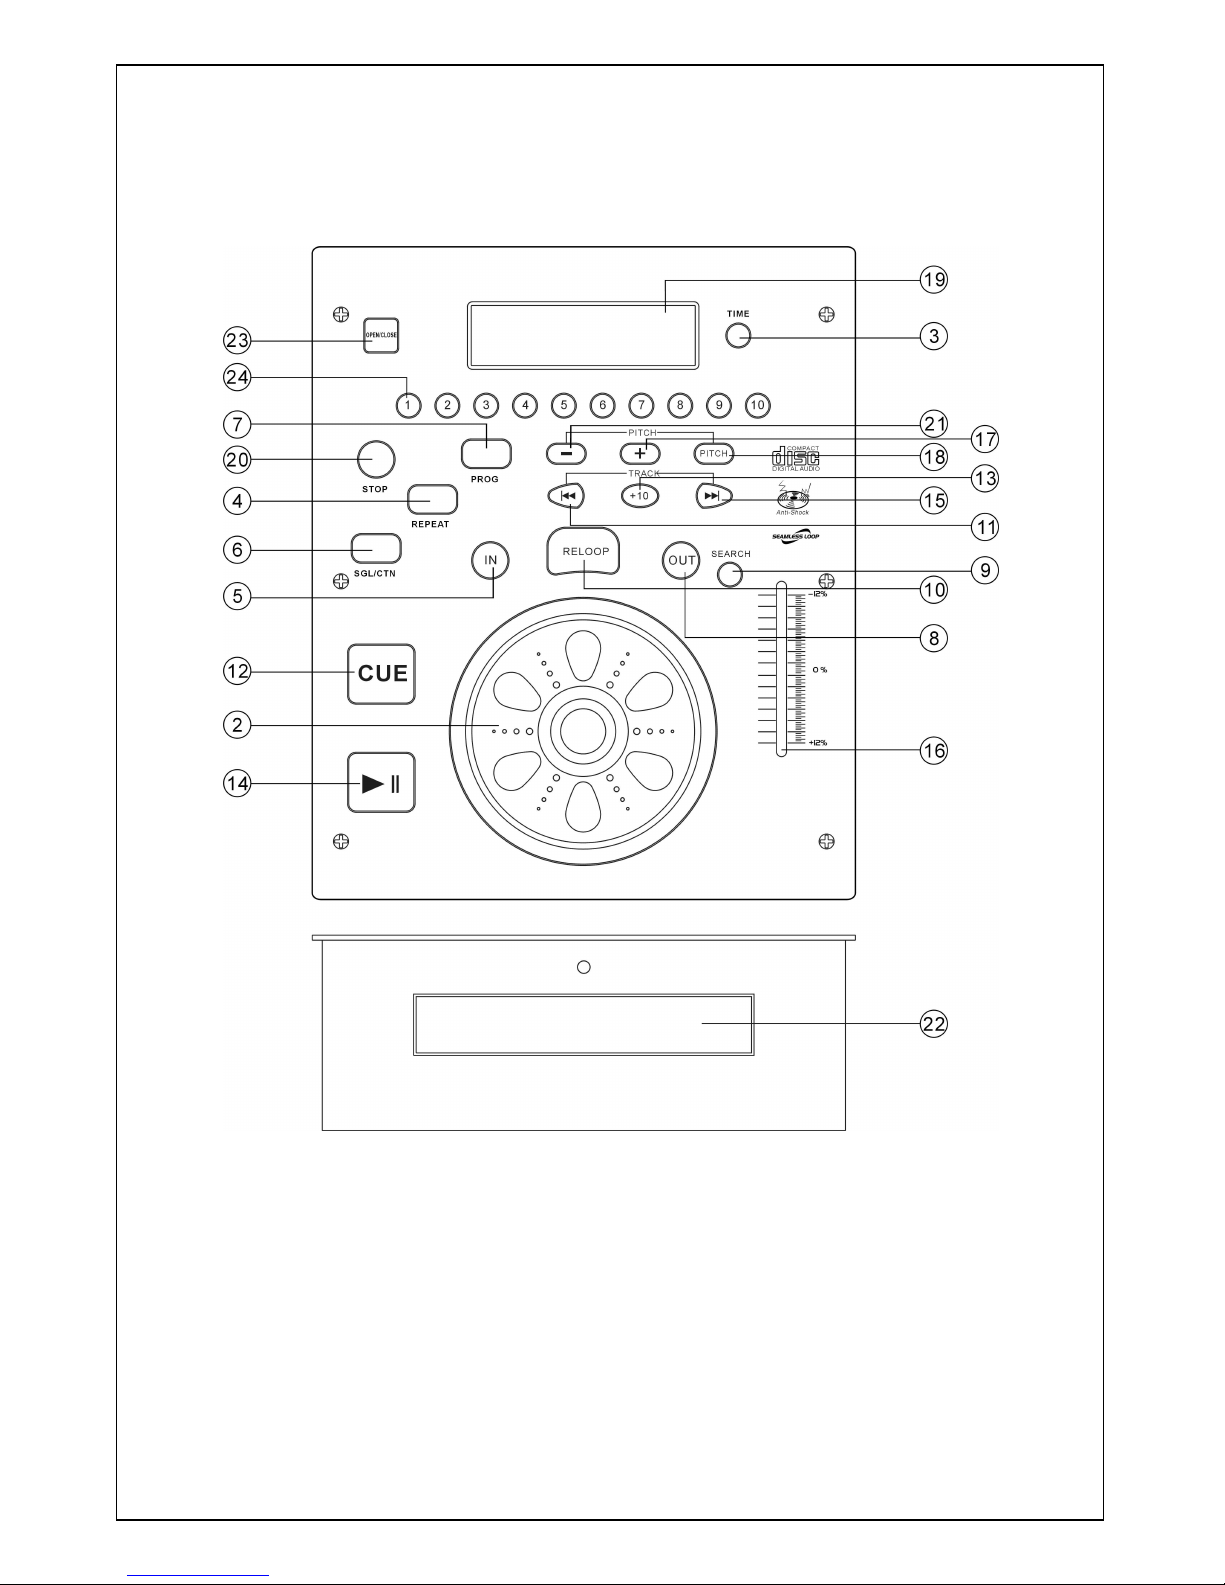
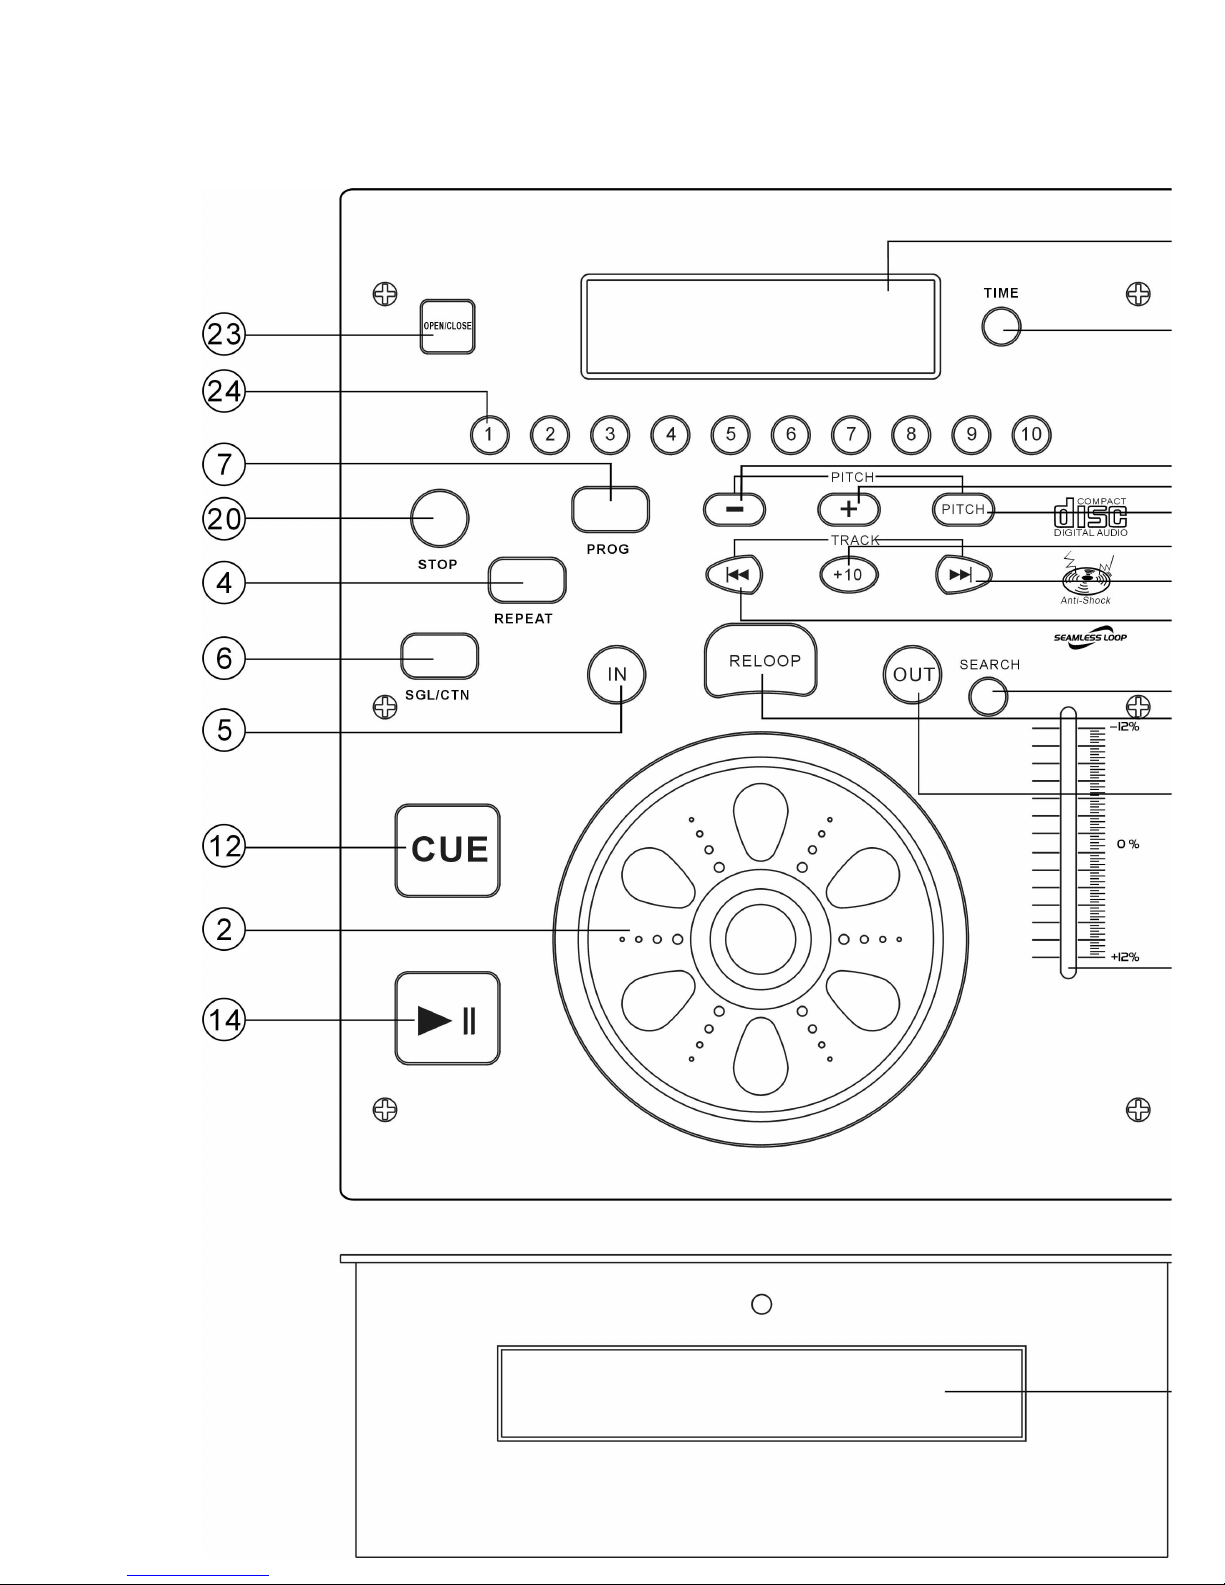
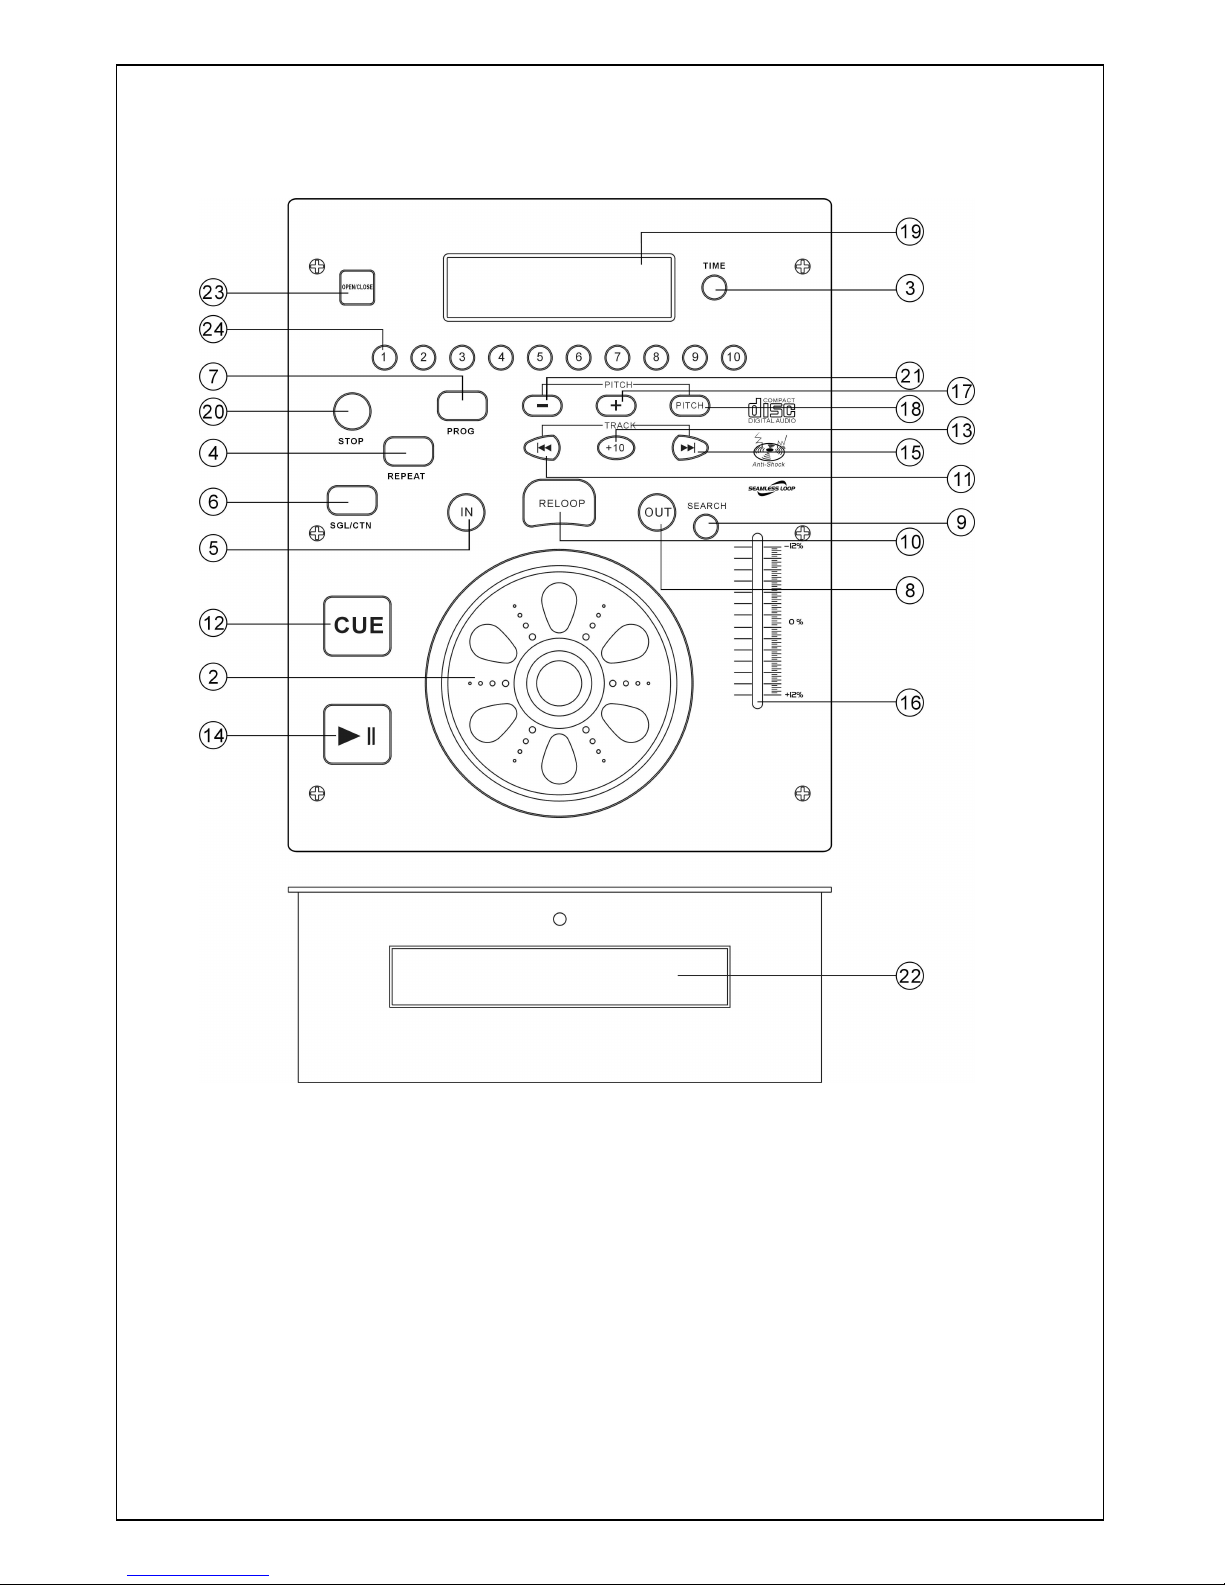
CD Player function :
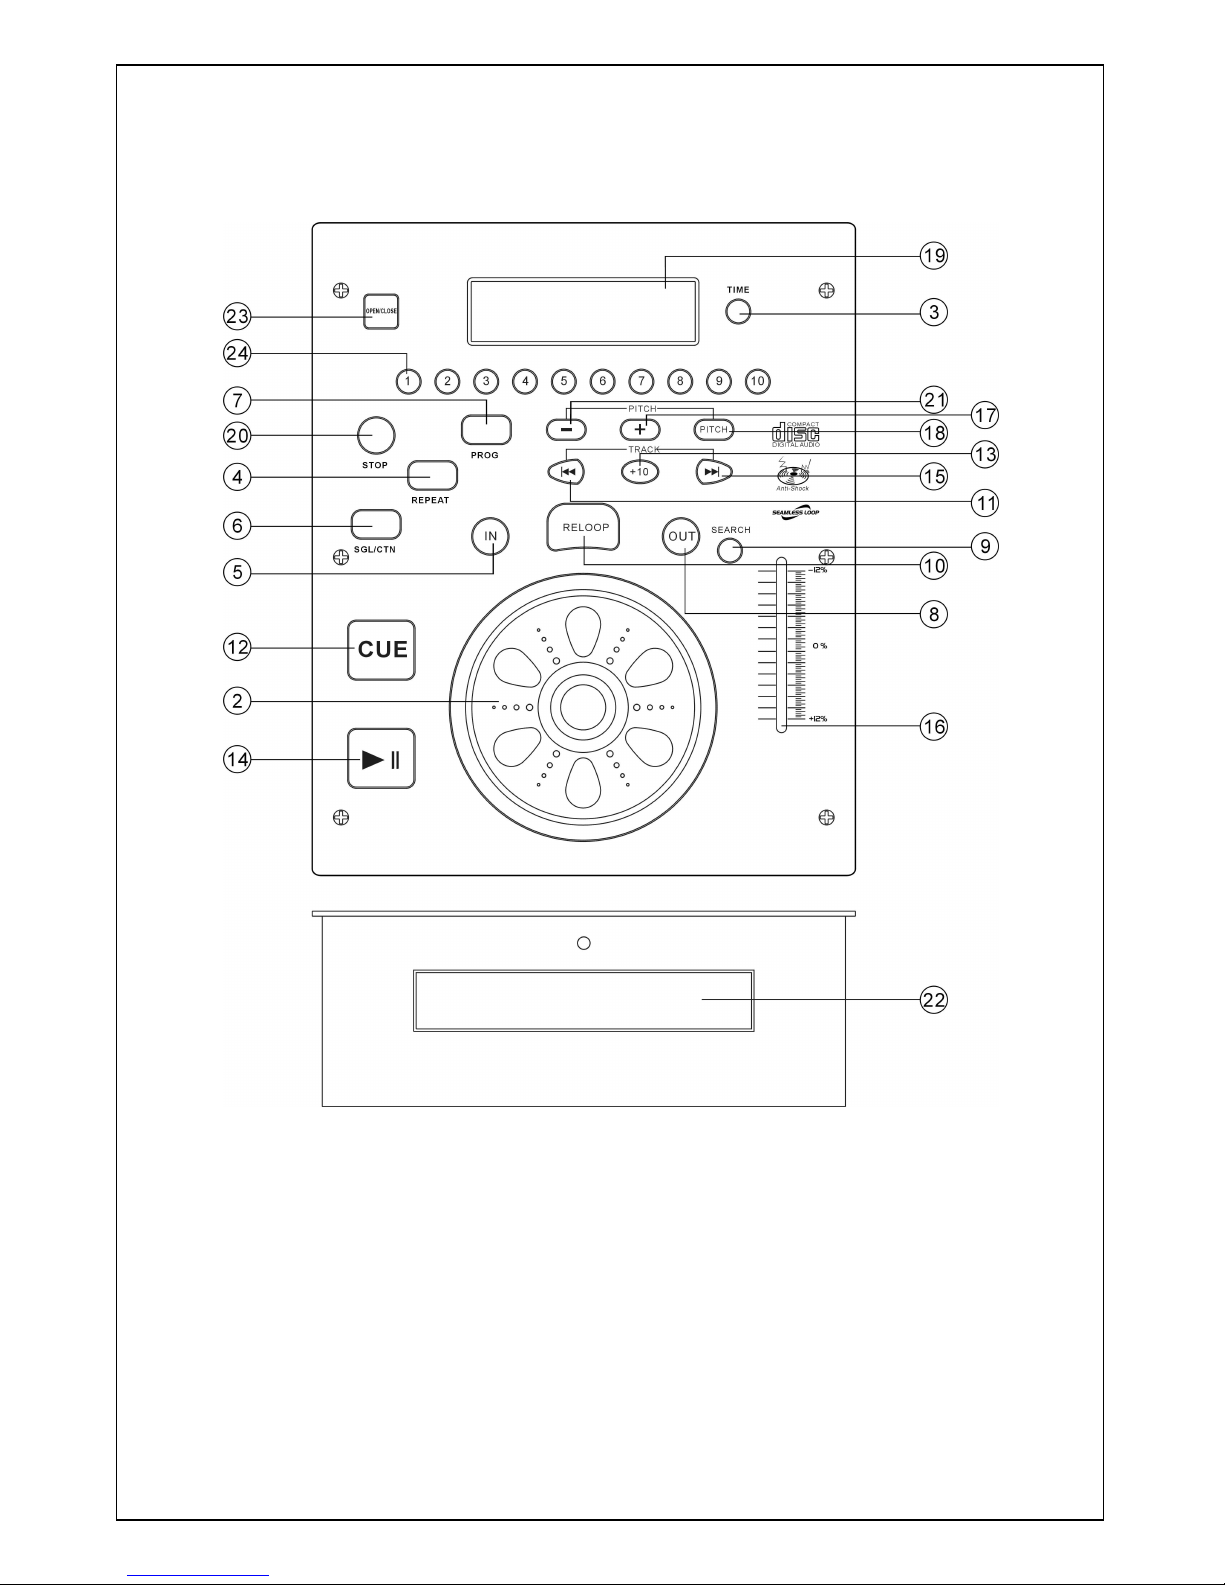
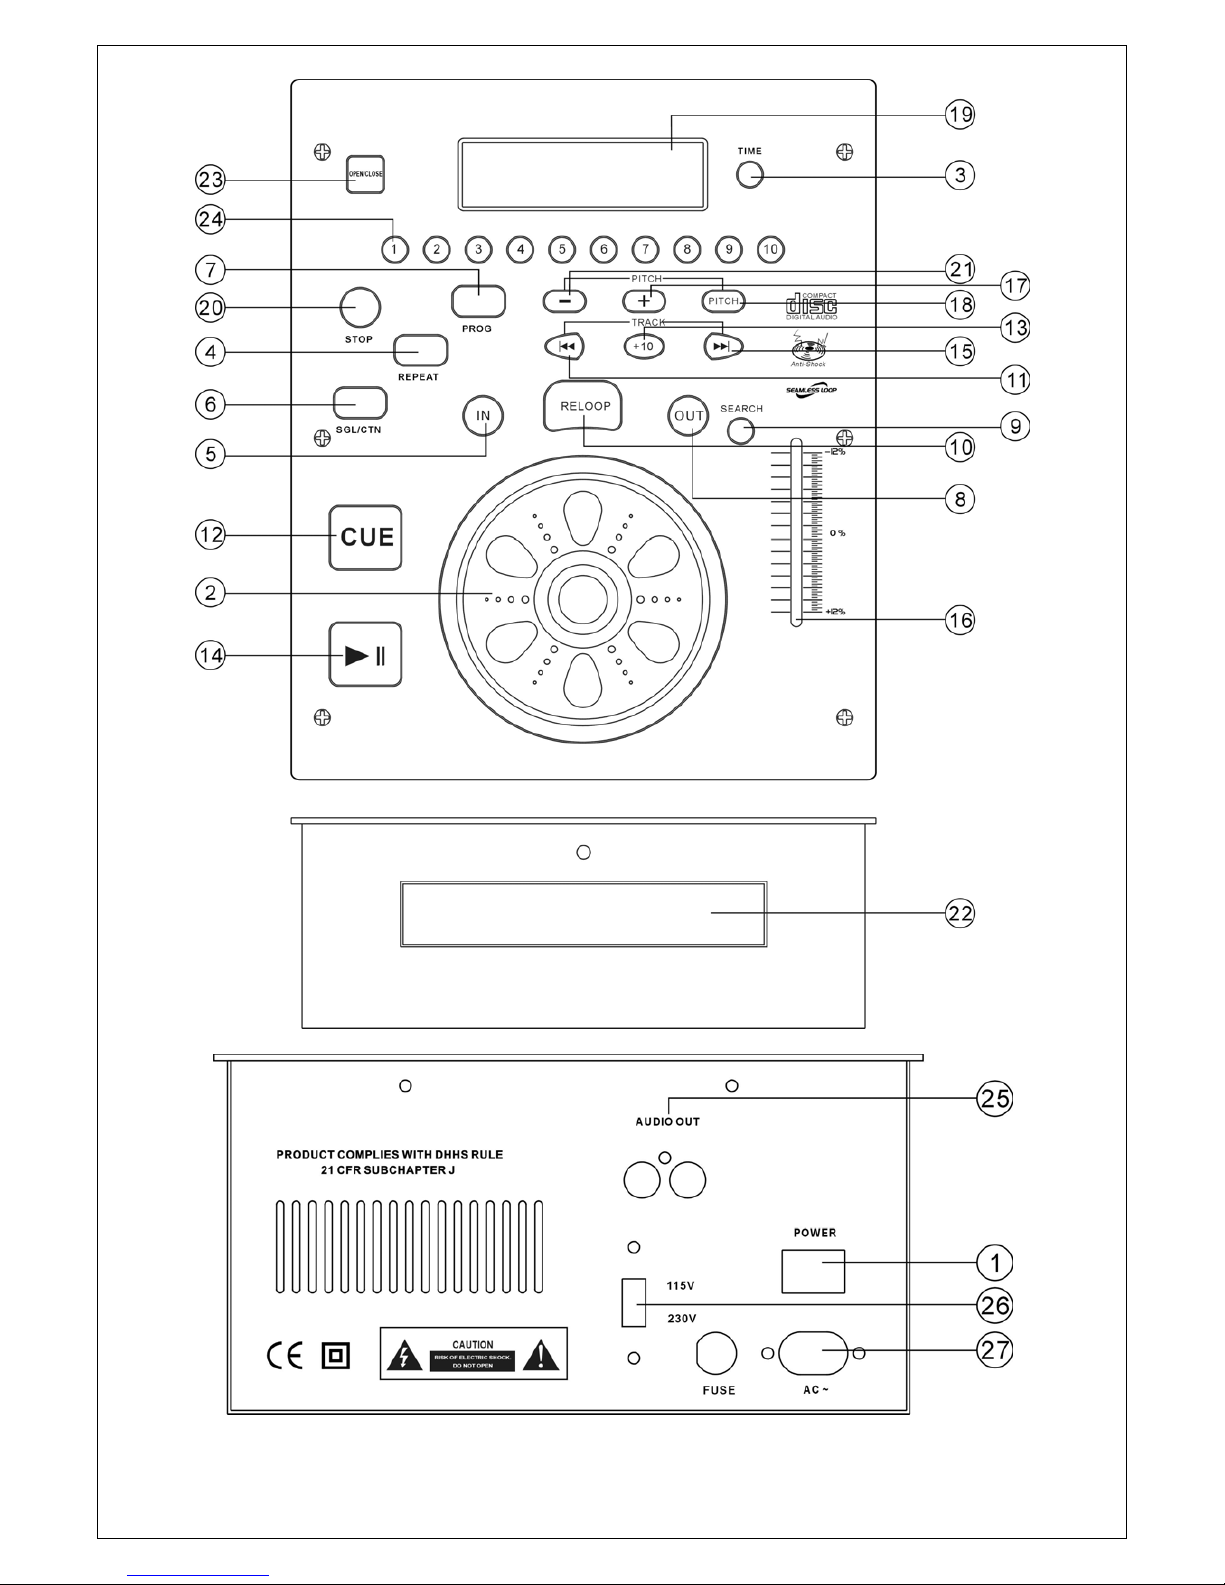
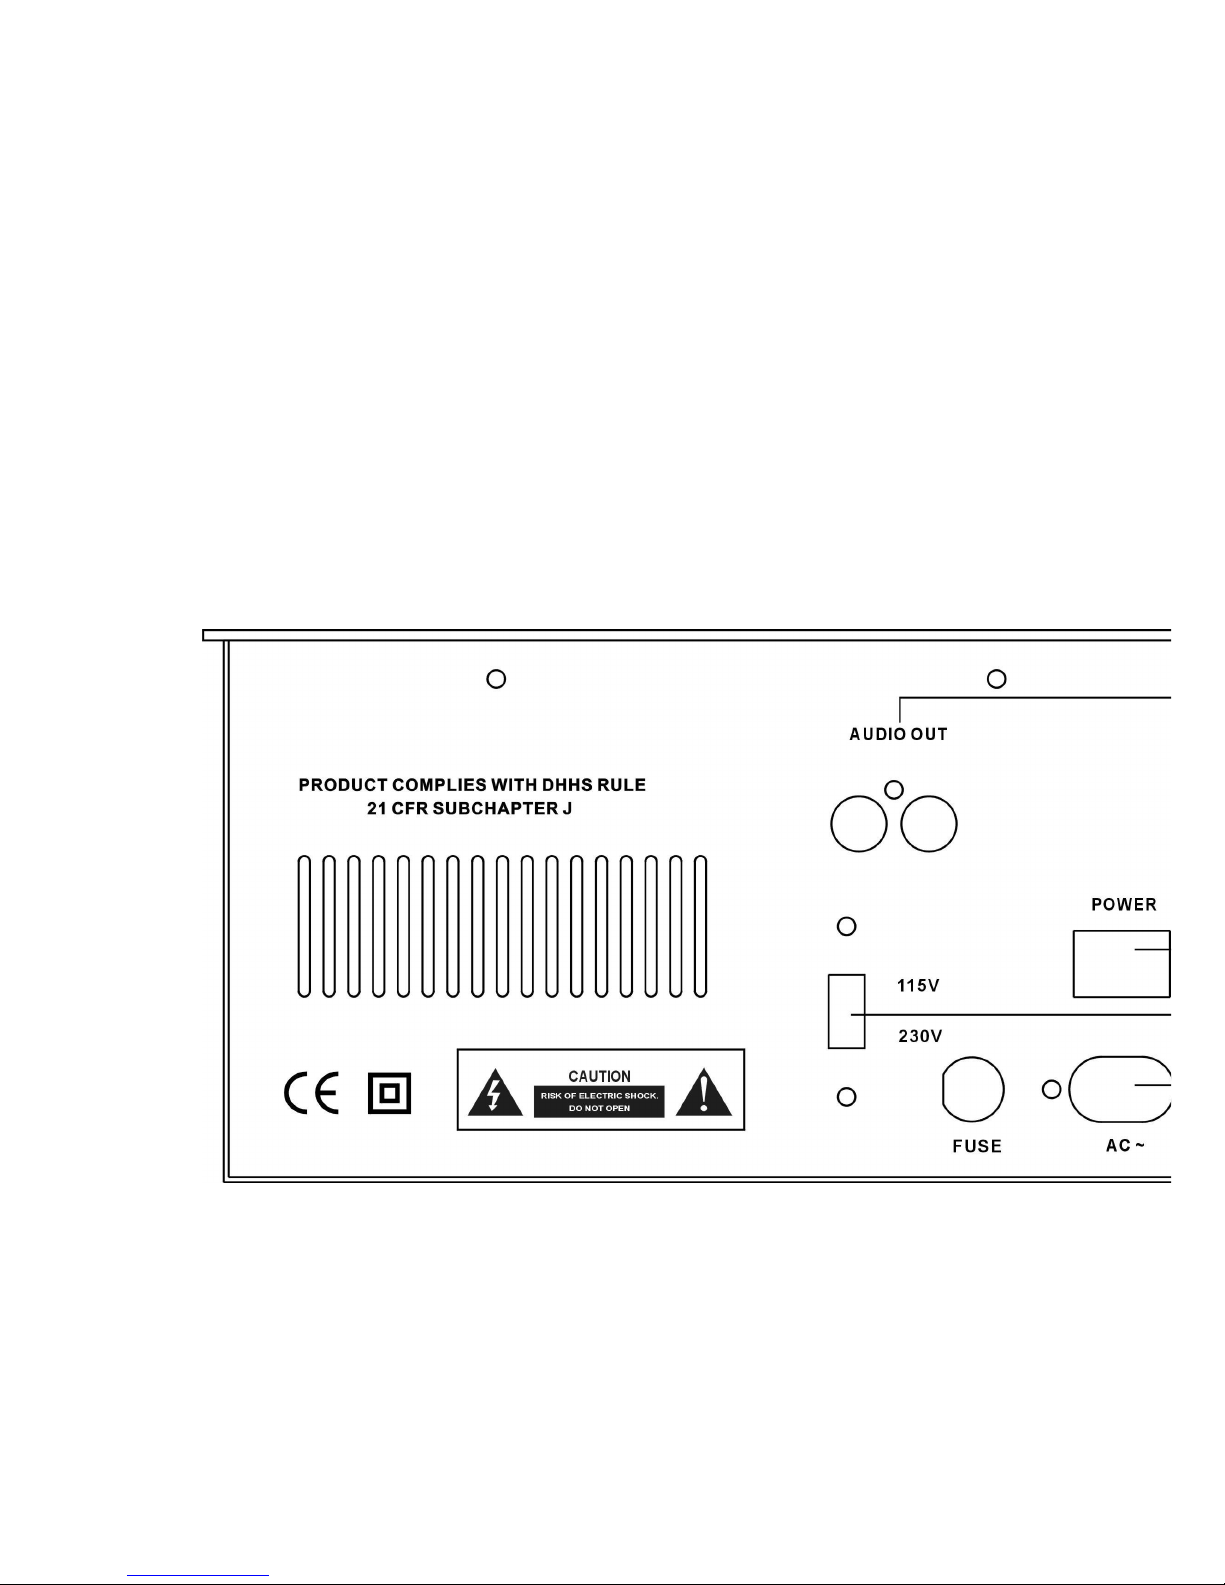
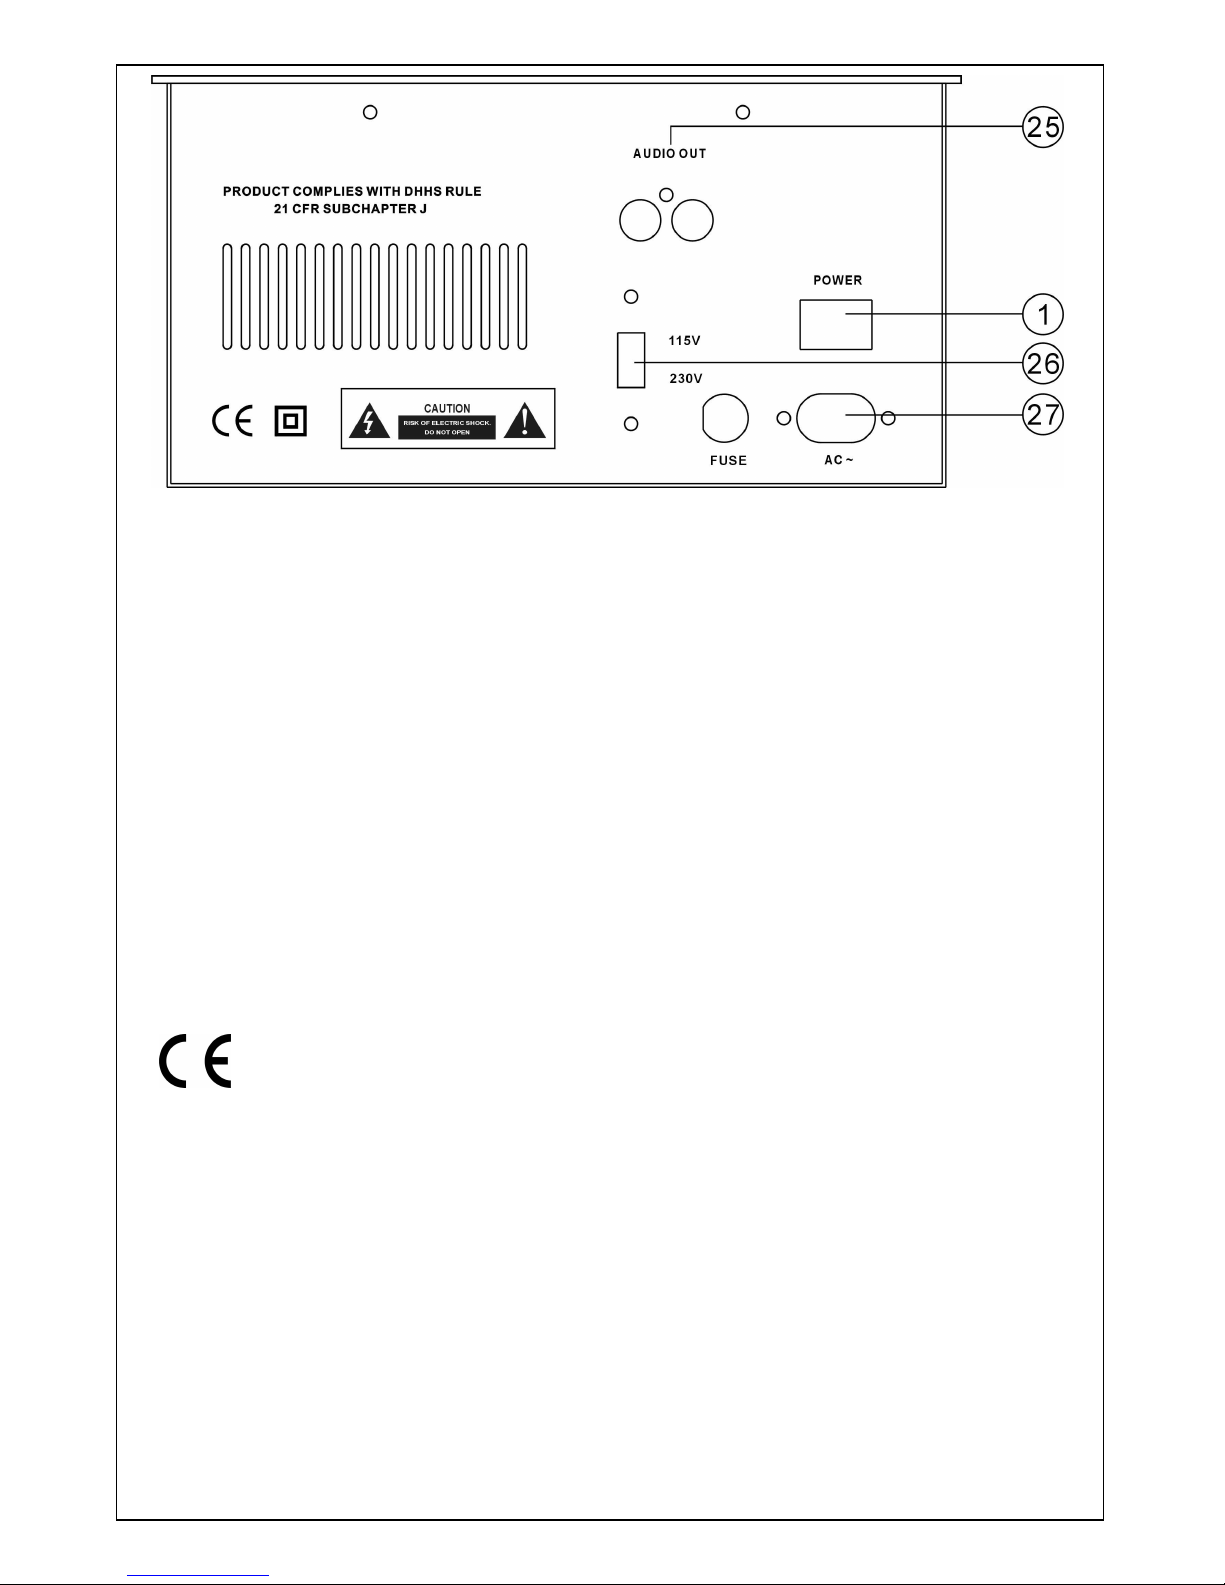
1. POWER BUTTON
Press the power switch to turn the unit on. To switch the POWER off press the POWER switch
again.
2. JOG & SHUTTLE WHEELS
Shuttle : Use the dial to select the scanning direction and speed. The disc is scanned in the
forward direction when the shuttle dial is turned clockwise from the neutral position, in the reverse
direction when the shuttle dial is turned counterclockwise. The scanning speeds up when the
shuttle dial is turned faster.
Jog : In pause mode, if you turn the jog, the point at which the sound is being produced moves by
a number of frames corresponding to the number of clicks. Clockwise moves the point forward,
counterclockwise moves the point backward.In play mode, the jog increases or decreases the
speed of the song. ( clockwise : increase , counterclockwise : decrease ).
3. TIME BUTTON
Used this knob to choose the time mode : Elapsed time, remaining time or total remaining time.
4. REPEAT BUTTON
Use this button to repeat one track or all the track of the CD
5. IN BUTTON ( LOOP SYSTEM )
This button sets the beginning of the loop. The Loop indicator on the display flashes
6. CONTINU / SINGLE BUTTON
Press these to switch between the SINGLE and CONTINUOUS play mode. The selected mode is
indicated on the LCD. In SINGLE mode, after each track, the unit stop the reading. In continu
mode, the unit read all track and stops.
7. PROG BUTTON
In STOP mode, you can program several tracks ( 20 tracks max. ) :
- Press the STOP button to enter in the stop mode
- Press the PROG button to enter in the program mode
- Use the skip track buttons to choose the track you want to listen then press the prog button to
enter you choise.
- Use one more time the skip track buttons to choose the track you want to listen then press the
prog button to enter you choise.
- Repeat the operation to select all the track you want to listen
- Press the play / pause button to start the playback
8. OUT BUTTON ( LOOP BUTTON )
When you press this button, you set the end point of the seamless loop and you start the loop. To
finish the loop, press again this button.
9. SEARCH BUTTON
When you push this button, you enable change the “Jog” and “search” function.
10. RELOOP BUTTON ( LOOP SYSTEM )
This button is used to start the last saved loop. To finish the loop, press the reloop button.
11. SKIP I<< BUTTON
use this switch to re-strart the track or to select the last track.
12. CUE BUTTON
Pressing the CUE button during play provides a return to the position at which play was started
Page 3

© US Blaster Europe BV
3
13. +10 BUTTON
Use this button to jump of 10 tracks in one press.
14. PLAY / PAUSE BUTTON
Each time you press the PLAY/PAUSE button, the operation changes from play to pause or from
pause to play.
15. SKIP >>I BUTTON
Used this knob to select the next track.
16. PITCH CONTROL
use this fader to increase or decrease the speed of the track.
17. PITCH BEND + BUTTON
The pitch will automatically rise when the + button is pressed and return to the original pitch when
it is released.
18. PITCH BUTTON
If you push this button, the adjustement of the pitch potentiometer is available.
19. DISPLAY
20. STOP BUTTON
Press this button to stop the playback.
21. PITCH BEND - BUTTON
The pitch will drop while the - button is pressed and return to the original pitch when it is released.
22. REMOTE SENSOR
This sensor receive the information of the remote control.Don’t plance any object or sticker in front
of the senso
23. EJECT BUTTON
Press to load or eject disk. Each press will open or close the disk tray.
NOTE: disc holder will not open unless stop or pause button has been pushed fir
24. TRACK SELECT BUTTONS
Pressing 0-9 buttons,allow you to select tracks from the CD
Page 4
© US Blaster Europe BV
4
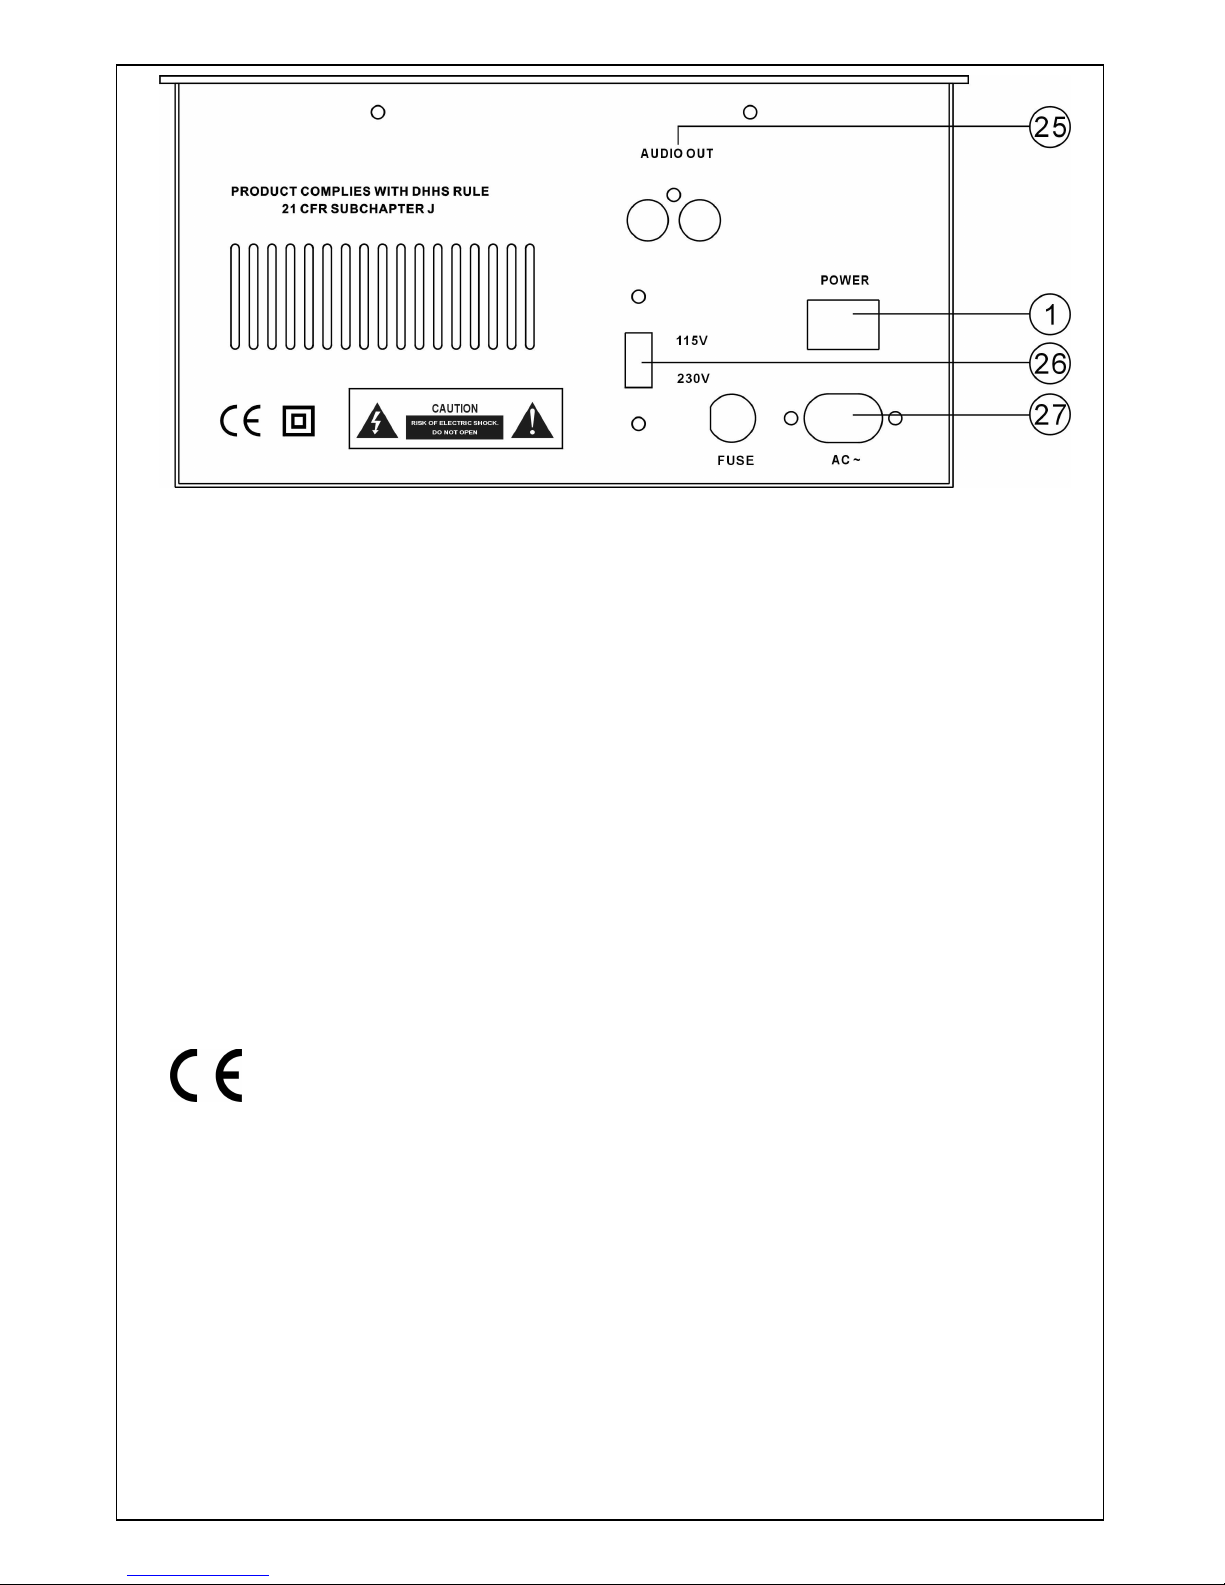
Connection :.
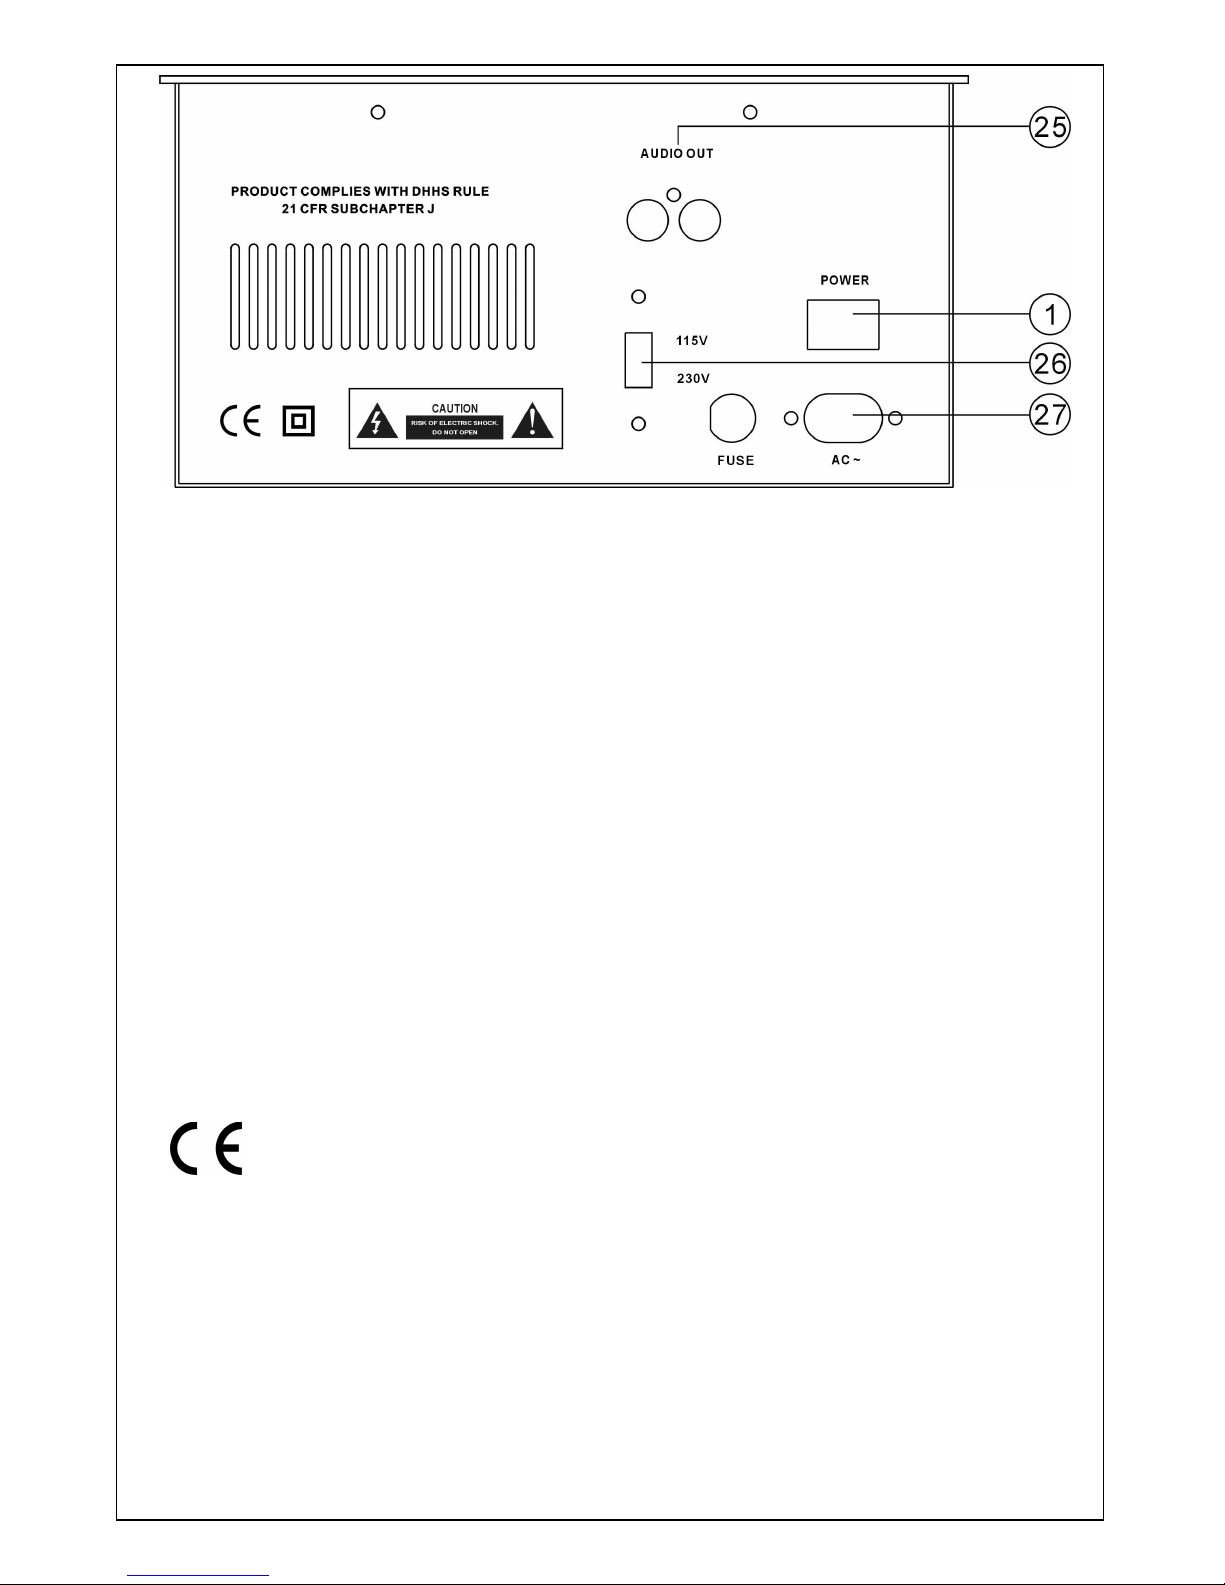
25. LINE OUT
The audio for each CD player is an output for these jacks. Connect to the line input of the mixer.
26. POWER SUPPLY SWITCH
Used this selector to choose the good Power supply. ( several countries have another power
supply
27. AC CORD
Used this cable to connect the AC mains power to the unit
SPECIFICATIONS :
Anti-Shock Buffer Memory : 40 seconds
Range of adjustments : +/- 12%
Power supply : 115 / 230V 50/60Hz,
Dimensions : Player : 217x260x112mm
Page 5
© US Blaster Europe BV
1
PROFESSIONELE CD SPELER MET SCHOKBESTENDIG GEHEUGEN
HANDLEIDING
USB 7319
BELANGRIJK
Het onjuist gebruik van de bedieningsknoppen of instellingen, of het gebruik van andere methodes
dan hierin gespecificeerd zijn, kan een schadelijke straling tot gevolg hebben.
Page 6

© US Blaster Europe BV
2
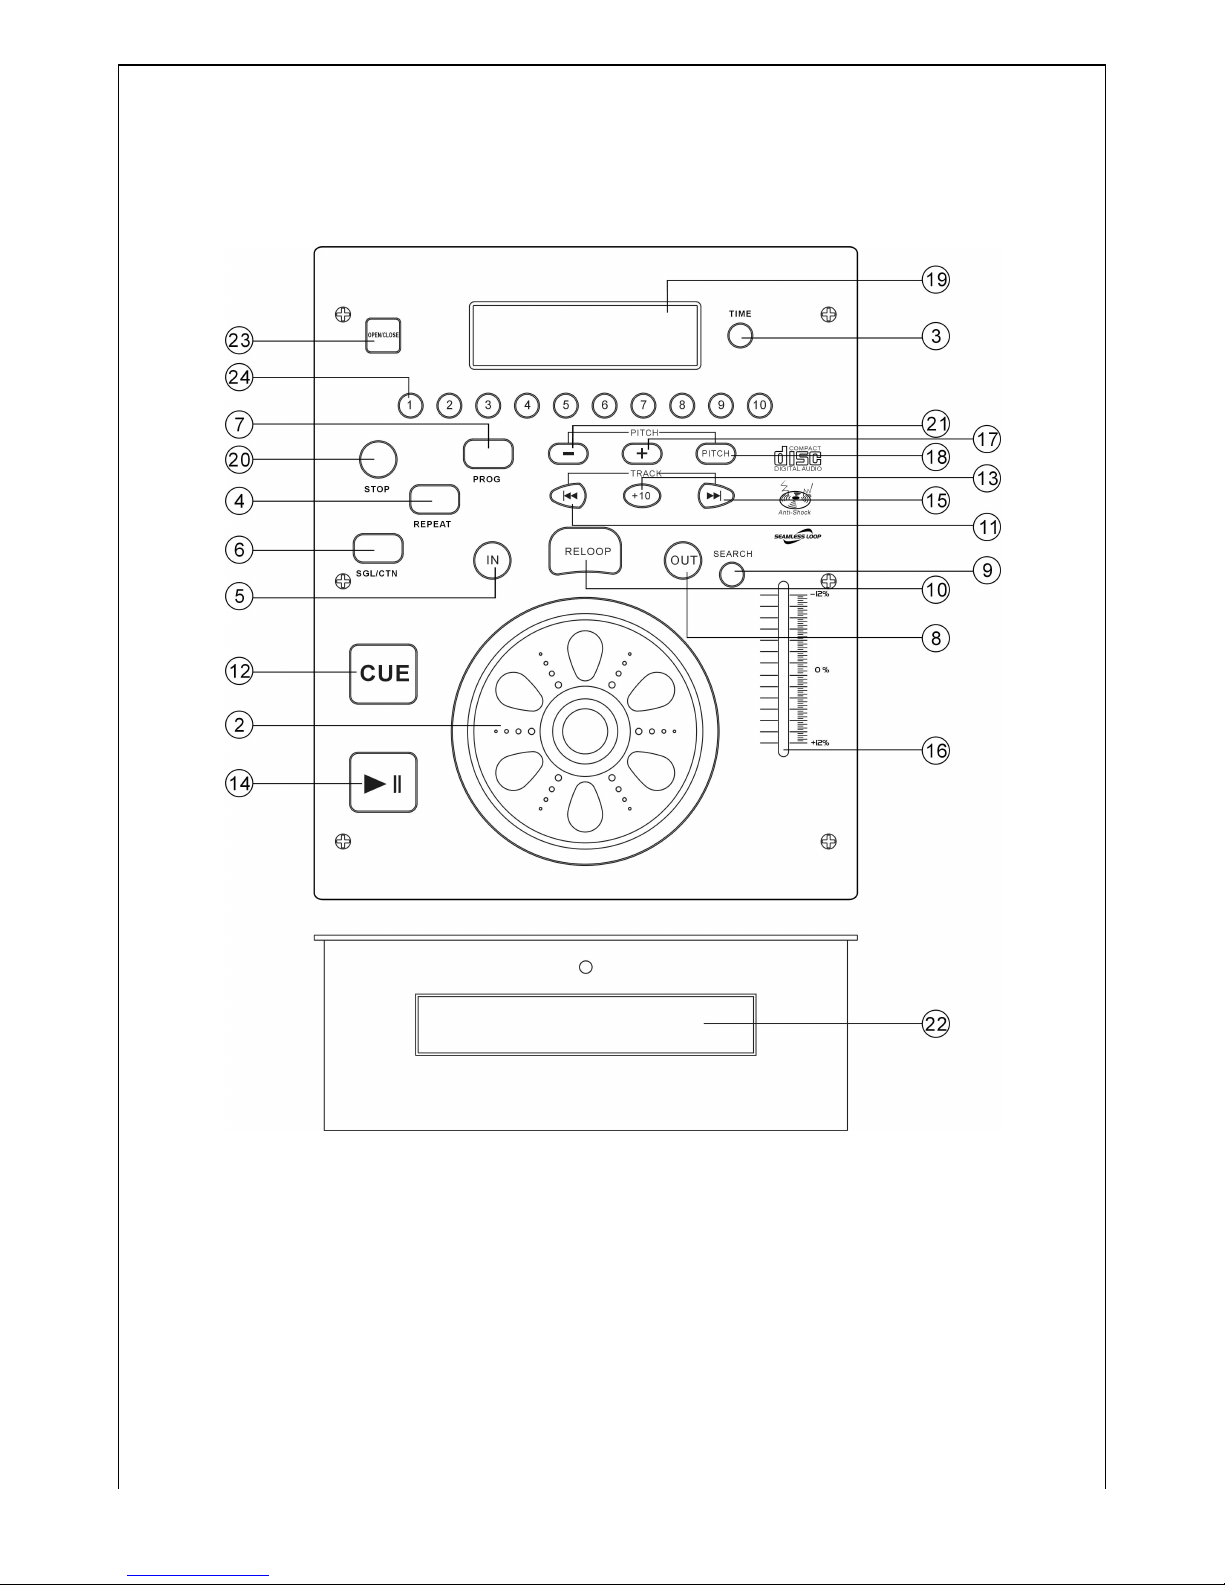
Bediening van de CD speler:
1. STROOMSCHAKELAAR
Druk de knop van de schakelaar in om het apparaat aan te zetten. Zet het apparaat uit door de
knop van de schakelaar opnieuw in te drukken.
2. JOG & SHUTTLE WHEELS
Shuttle: Gebruik de schijf om scanrichting en snelheid te kiezen. De disk wordt in voorwaartse
richting gescand als het shuttle wheel, vanuit zijn neutrale positie, in de richting van de wijzers
mee wordt gedraaid. De richting terug wordt gekozen door het shuttle wheel tegen de richting
van de wijzers van de klok in te draaien.
De scansnelheid gaat omhoog, wanneer het shuttle wheel sneller wordt verdraaid.
Jog: In de mode “pause”, indien de jog wheel wordt gedraaid, wordt de plaats waar het geluid
wordt geproduceerd, telkens een paar stappen verschoven in overeenstemming met het aantal
klikken. In de richting van de klokwijzers mee wordt de plaats naar voren verschoven, in de
richting tegen de klokwijzers in wordt de plaats terug verschoven. In de mode “play”, verhoogt of
verlaagt de jog de reprosnelheid (in de richting van de klokwijzers: versnelling; tegen de richting
van de klokwijzers in: vertraging).
3. TIME BUTTON
Gebruik deze toets voor de keuze van de mode “time”: doorlooptijd, resterende tijd of totale
resterende tijd.
4. REPEAT BUTTON
Gebruik deze drukknop voor het herhalen van één spoor of alle sporen van de CD.
5. IN BUTTON (LOOP SYSTEM)
Deze drukknop stelt het beginpunt van de loop in. De loop indicator op de display flikkert.
6. CONTINU / SINGLE BUTTON
Door indrukken van deze toets kan tussen de play mode SINGLE en CONTINUOUS geschakeld
worden. De gekozen mode wordt op de display weergegeven. In de SINGLE mode zal de speler
na iedere loop stoppen met spelen. In de CONTINUE mode zal de speler alle nummers afspelen
en dan stoppen.
7. PROG BUTTON
In de STOP mode kunt u een paar nummers programmeren (maximaal 20 nummers):
- Druk de STOP knop in om in de stop mode te komen.
- Druk de PROG knop in om in de program mode te komen.
- Gebruik de skip track knoppen om het nummer te kiezen dat u wenst te horen; druk vervolgens de
prog knop in om uw keuze in te voeren.
- Gebruik opnieuw de skip track knoppen om het nummer te kiezen dat u wenst te horen; druk
vervolgens de prog knop in om uw keuze in te voeren.
- Door herhaling van deze stappen kiest u alle nummers die u wenst te horen.
- Druk de play / pause knop voor het starten van afspelen.
8. OUT BUTTON (LOOP BUTTON)
Indien deze knop wordt ingedrukt, wordt het eindpunt van de naadloze loop ingesteld en de loop
wordt gestart. Druk deze knop weer in om de loop te stoppen. (Loop is een willekeurig stuk muziek
van een CD dat u selecteert om naadloos te herhalen).
Page 7

© US Blaster Europe BV
3
9. SEARCH BUTTON
Indien deze knop wordt ingedrukt, kunnen de “Jog” and “Search” functies afgewisseld worden.
10. RELOOP BUTTON (LOOP SYSTEM)
Deze knop wordt gebruikt om de laatst opgeslagen loop te starten. Druk de reloop knop in om de
loop te beëindigen.
11. SKIP I<< BUTTON
Door gebruik van deze knop wordt het nummer opnieuw gestart of het laatste nummer gekozen.
12. CUE BUTTON
Door drukken op de CUE knop tijdens afspelen kunt u terug naar de positie waar het afspelen is
begonnen.
13. +10 BUTTON
Gebruik deze drukknop om met één druk hierop 10 nummers verder te springen.
14. PLAY / PAUSE BUTTON
Iedere keer, als de PLAY / PAUSE knop wordt ingedrukt, wordt de operatie van afspelen naar
pauze en van pauze naar loop gewijzigd.
15. SKIP >>I BUTTON
Gebruik deze druknop om het volgende nummer te selecteren.
16. PITCH CONTROL
Gebruik deze fader voor het verhogen of verlagen van de snelheid van de weergave van de
muziek.
17. PITCH BEND + BUTTON
De pitch zal automatisch verhogen, indien de (+) knop wordt ingedrukt en zal naar de originele
pitch terugkeren, als de knop wordt losgelaten.
18. PITCH BUTTON
Indien op deze knop wordt gedrukt, is het instellen van de pitch van de potentiometer beschikbaar.
19. DISPLAY
20. STOP BUTTON
Druk op deze knop om het afspelen te stoppen.
21. PITCH BEND - BUTTON
De pitch zal dalen, indien de (-) knop wordt ingedrukt en zal, naar de originele pitch terugkeren,
als de knop wordt losgelaten.
22. REMOTE SENSOR
Deze sensor ontvangt de informatie van de afstandsbediening. Plaats vóór deze sensor geen
voorwerpen of stikkers.
23. EJECT BUTTON
Druk deze knop in om een disk in te laden of uit te werpen. Door ieder indrukken van deze knop
zal de diskhouder open gaan of sluiten.
OPMERKING: de diskhouder zal niet open gaan, indien de speler niet in stop of pauze mode
staat.
24. TRACK SELECT BUTTONS
Door indrukken van de knoppen 0-9 kunnen nummers van de CD geselecteerd worden.
Page 8
© US Blaster Europe BV
4
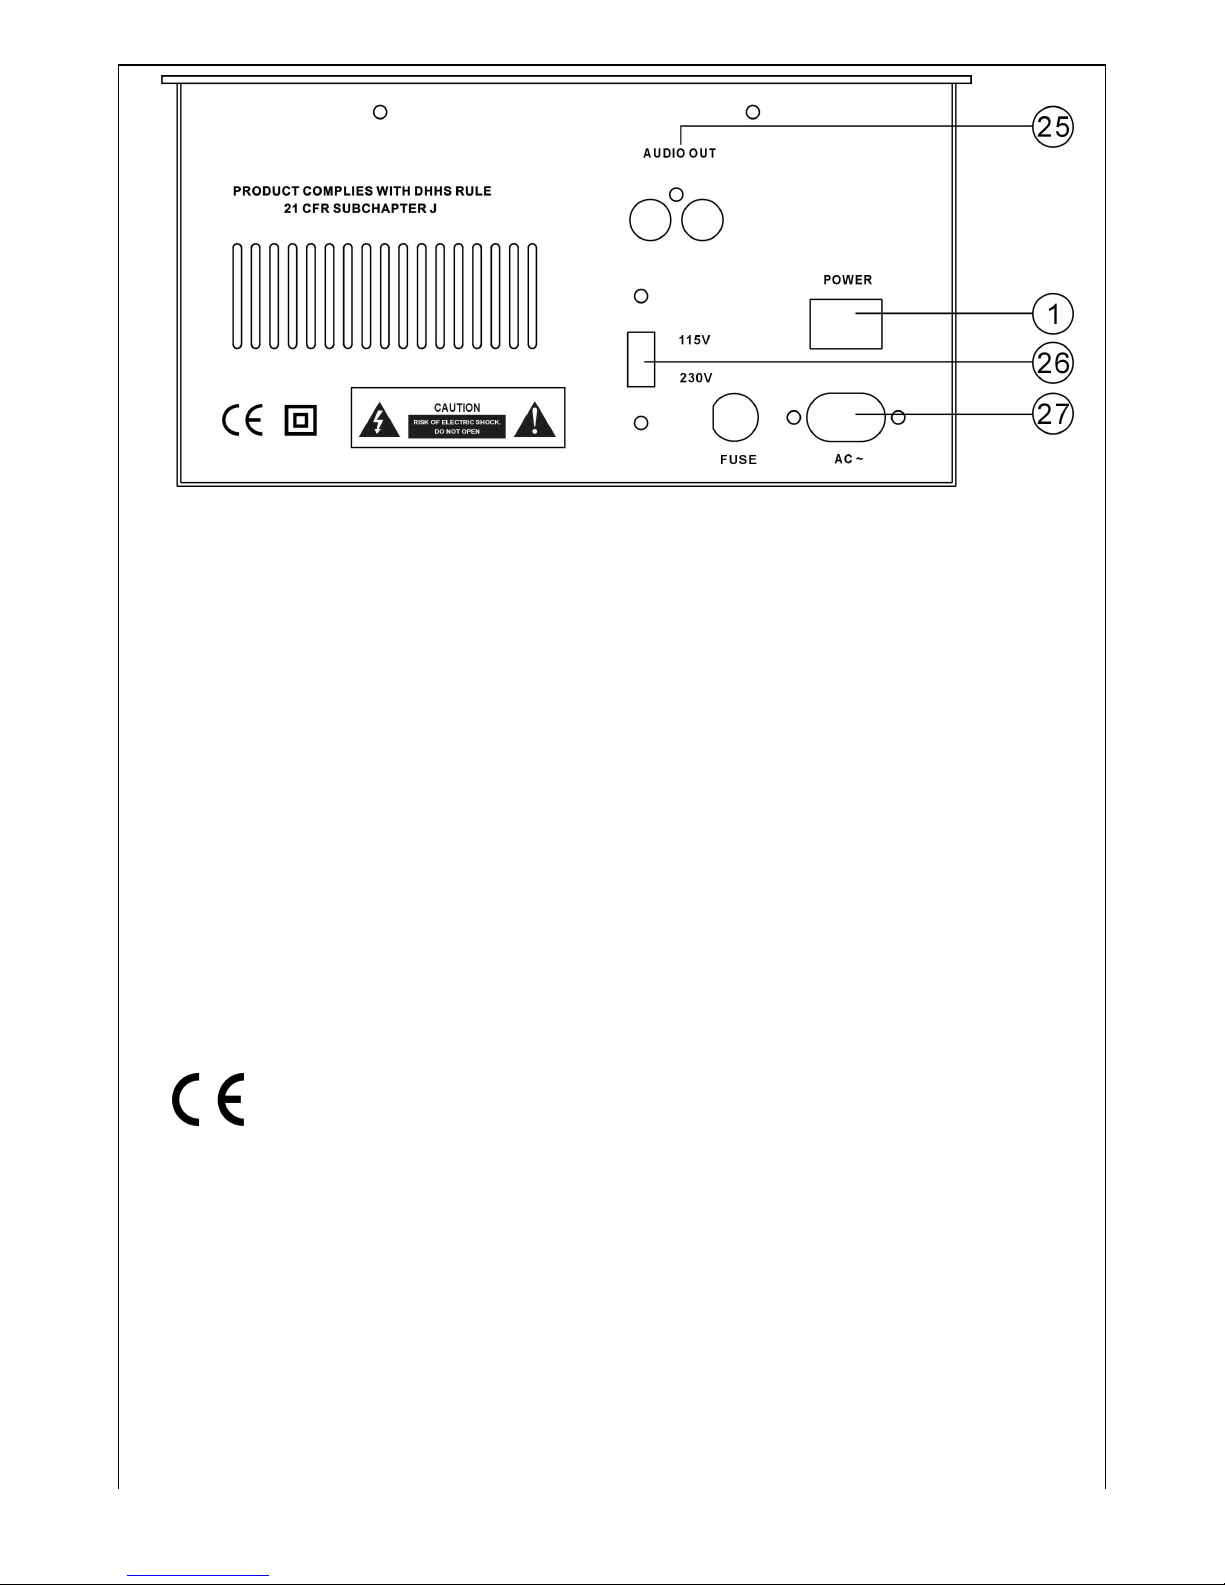
Verbindingen:
25. LINE OUT
De audio voor iedere CD speler is een uitgang voor deze jacks. Sluit aan de lijningang van de
mixer aan.
26. POWER SUPPLY SWITCH
Gebruik deze keuzeschakelaar om het juiste voltage te kiezen (sommige landen hebben andere
voltages).
27. AC CORD
Gebruik deze kabel voor de verbinding van de AC hoofdvoeding met de speler.
SPECIFICATIES:
Schokbestendig buffergeheugen: 40 seconden
Omvang van instellingen: +/- 12%
Voeding: 115 / 230 V 50/60 Hz
Afmetingen: Speler: 217x260x112 mm
Page 9
© US Blaster Europe BV
1
PROFESSIONELLER CD-PLAYER MIT EINEM ANTI-SHOCK-SPEICHER
BENUTZERHANDBUCH
USB 7319
WICHTIG
Die Benützung von Befehlsschaltern, ggf. Anpassungen, bzw. anderen Vorgängen, als hier
beschrieben sind, kann die Aussetzung gefährlicher Strahlung zur Folge haben.
Page 10

© US Blaster Europe BV
2
Funktionen des CD-Players:
1. EIN- UND AUSSCHALTTASTE
Durch die Betätigung diese Taste schalten Sie das Gerät ein, durch wiederholte Betätigung aus.
2. RÄDCHEN JOG & SHUTTLE
Shuttle (Schnellvorschub): Benützen Sie zur Wahl der Scann-Geschwindigkeit und -Richtung.
Die CD wird in der Vorwärtsrichtung gescannt im Falle, dass Shuttle im Uhrzeigersinn aus der
neutralen Position eingestellt ist und in der Rückwärtsrichtung im Falle der Shuttle-Einstellung
entgegen dem Uhrzeigersinn. Die Scann-Geschwindigkeit erhöht sich, falls Shuttle schneller
gedreht wird.
Jog (Rückführen): Im Pause-Modus, Falls Sie „Jog“ zu einem Ort verschieben/drehen, in dem
der Ton produziert, erfolgt eine Verschiebung um einige Schritte, die der Klick-Anzahl
entsprechen. Im Uhrzeigersinn wird der Punkt nach vorn versetzt, entgegen dem Uhrzeigersinn
wird der Punkt zurück versetzt. Im Play-Modus erhöht, ggf. reduziert Jog die Geschwindigkeit des
Lieds. (im Uhrzeigersinn: Erhöhung, entgegen dem Uhrzeigersinn: Reduzierung).
3. TASTE TIME
Benützen Sie diese Taste zur Wahl des Zeit-Modus: Abgelaufene Zeit, Restzeit, ggf.
Gesamtrestzeit.
4. TASTE REPEAT
Diese Taste dient zur Wiederholung einer Spur, ggf. aller Spuren der CD.
5. TASTE IN ( LOOP SYSTEM )
Diese Taste stellt den Anfang der Schleifen ein. Die Schleifen-LED auf dem Display blinkt.
6. TASTE CONTINUE / SINGLE
Durch die Betätigung schalten Sie zwischen dem Wiedergabemodus SINGLE und CONTINUOUS
um. Der gewählte Modus erscheint auf dem Display. Im SINGLE-Modus unterbricht der Player
nach jeder Spur das Einlesen. Im CONTINUOUS-Modus liest die Einheit alle Spuren ein und
stoppt.
7. TASTE PROG
Sie können im STOP-Modus mehrere Spuren programmieren (Max 20 Spuren):
- Durch die Betätigung der STOP-Taste im „Stop-Modus“
- Durch die Betätigung der PROG-Taste im „Prog-Modus“
- Zur Wahl der Spur, die Sie anhören möchten, betätigen Sie die Taste „Skip Track“, nachfolgend
betätigen Sie die „Prog-Taste“ zur Eingabe Ihrer Wahl.
- Zur Wahl der Spur, die Sie anhören möchten, betätigen Sie nochmals die Tasten „Skip Track“,
nachfolgend betätigen Sie die „Prog-Taste“ zur Eingabe Ihrer Wahl.
- Durch die Wiederholung dieses Vorgangs wählen Sie alle Spuren, die Sie anhören möchten
- Um die Wiedergabe zu starten, betätigen Sie die Taste Play / Pause
8. TASTE OUT (TASTE LOOP )
Durch die Betätigung dieser Taste stellen Sie den Endpunkt der endlosen Schleife "seamless
loop" ein und starten die Schleife. Zur Beendung der Schleife betätigen Sie diese Taste erneut.
9. TASTE SEARCH (SUCHEN)
Bestätigen Sie diese Taste, ermöglichen Sie die Änderung der Funktionen “Jog” und “Search”.
10. TASTE RELOOP ( LOOP SYSTEM )
Diese Taste wird zum Starten der letzten gespeicherten Schleife benützt. Zur Beendung dieser
Schleife betätigen Sie die Taste "reloop".
11. TASTE SKIP I<<
Durch die Betätigung dieser Taste wird erneut die Spur gestartet, bzw. die letzte Spur gewählt.
Page 11

© US Blaster Europe BV
3
12. TASTE CUE
Bei der Betätigung der Taste CUE während der Wiedergabe erfolgt eine Rücksetzung zur Stelle,
an der die Wiedergabe angefangen hat.
13. TASTE +10
Durch einmalige Betätigung dieser Taste überspringen Sie 10 Spuren.
14. TASTE PLAY / PAUSE
Jedes mal, wenn Sie die Taste PLAY/PAUSE betätigen, ändert sich der Vorgang vom Modus
„Play“ zum Modus „Pause“ und umgekehrt.
15. TASTE SKIP >>I (ÜBERSPRINGEN)
Betätigen Sie diese Taste zur Wahl der nächsten Spur.
16. PITCH CONTROL
Benützen Sie diesen Fader zur Erhöhung, bzw. Reduzierung der Spurgeschwindigkeit.
17. TASTE PITCH BEND (TONBIEGUNG) (+)
Die Tonhöhe erhöht sich bei Betätigung der Taste (+) automatisch und wird auf den Ausgangswert
zurückgesetzt, nachdem Sie die Taste loslassen.
18. TASTE PITCH
Bei der Betätigung der Taste ist der Potentiometer-Pitch zur Verfügung.
19. DISPLAY
20. TASTE STOP
Beim Betätigen der STOP-TASTE unterbrechen Sie die Wiedergabe.
21. TASTE PITCH BEND (-)
Die Tonhöhe sinkt bei Betätigung der Taste (-) und wird auf den Ausgangswert zurückgesetzt,
nachdem Sie die Taste loslassen
22. SENSOR DER FERNBEDIENUNG
Dieser Sensor empfängt Informationen von der Fernbedienung. Platzieren Sie vor diesen Sensor
keine Gegenstände, bzw. Aufkleber.
23. TASTE EJECT
Bei Betätigung der Taste wird die CD hineingezogen, ggf. herausgeschoben. Bei jeder Betätigung
öffnet/schließt sich die CD-Mechanik.
BEMERKUNG: Die CD-Mechanik öffnet sich nicht, falls Sie die Tasten „Stop“, bzw. „Pause“ nicht
betätigt haben.
24. SPURENWAHLTASTEN
Durch Betätigung der Tasten 0-9 wählen Sir Spuren Ihrer CD
Page 12
© US Blaster Europe BV
4
Verbindung :
25. LINE OUT
Audio ist für jeden CD-Player ein Ausgang für diese Stecker (Jacks). Verbindung zu dem
Linieneingang des Mixpults
26. WAHL DER SPEISUNG
Benützen Sie diesen Wahlschalter zur Wahl der richtigen Speisung (verschiedene Länder haben
verschiedene Speisung)
27. AC-KABEL
Schließen Sie mit diesem Kabel den AC-Hauptanschluss (Wechselstrom) an die Einheit an.
SPEZIFIKATION :
Speicherpuffer Anti-Shock: 40 Sekunden
Anpassungsbereich: +/- 12 %
Speisung : 115 / 230V 50/60 Hz,
Maße : Player: 217x260x112 mm
Page 13
Page 14
FRANÇAIS
ATTENTION
Afin de prévenir tous risques de choc électrique vous ne devez pas enlever le capot.
Aucune pièce utile à l’utilisateur à l’intérieur.
Confier la réparation à un personnel qualifié.
IMPORTANT
L'emploi de contrôles ou ajustements ou utilisations autres que celles indiquées peuvent provoquer une exposition aux radiations.
bien lire le mode d’emploi avant toute utilisation
Description :
1. BOUTON POWER
Lorsque vous appuyez sur ce bouton, vous mettez en marche l’appareil.
2. MOLETTE
Si la fonction search est activée, la molette va servir une recherche très rapide soit en pause , soit en lecture.
Si la fonction search est désactivée :
- En pause, ce jog vous permet d’effectuer une recherche trame à trame ( en avant ou en arrière ). Pendant cette recherche, vous entendez les
sons correspondants aux trames.
-
En lecture, le jog vous permet d’accélérer ou diminuer la vitesse de la chanson (Sens horaire : augmentation , Sens anti-horaire : diminution).
3. BOUTON TIME
Appuyez sur ce bouton pour choisir l’affichage du temps. Soit le temps écoulé, soit le temps restant ou soit le temps restant total. Les indicateurs
ELAPSED, REMAIN et TOTAL REMAIN vous indiquent le mode TIME
4. BOUTON REPEAT
La touche repeat sert à faire se répéter une plage, le disque entier ou toutes les pistes programmées (en fonction du nombre de pressions,
l’afficheur indique la sélection).
5. BOUTON IN ( SYSTEME BOUCLE )
Ce bouton va vous permettre de fixer le point de départ de la boucle. Lorsque le point de départ de la boucle est fixé, l’indicateur LOOP ( sur
l’afficheur ) clignote
6. BOUTON CONTINU / SINGLE
Appuyez sur ce bouton pour choisir le mode de lecture : Soit Single ( Le lecteur lit une piste puis se met en pause ), soit Continu ( le lecteur lit
l’intégralité des pistes sans se mettre en pause ). Les indicateurs SINGLE et CONTINU vous indiquent le mode de lecture.
7. BOUTON PROG
En mode STOP, vous pouvez programmer la lecture de certaines plages ( 20 plages au maximum ). Pour cela, suivez les instructions suivantes :
-
Appuyez sur le bouton STOP pour passer en mode stop
- Appuyez sur le bouton PROG pour commencer la programmation
- Appuyez sur les touches SKIP I<< ou >>I pour choisir la plage que vous voulez écouter en premier puis appuyez sur la touche PROG pour
valider votre choix
- Utiliser à nouveau les touches SKIP pour choisir la deuxième plage puis validez en utilisant la touche PROG.
- Reproduisez l’opération jusqu’à ce que toutes les pistes que vous voulez écouter soient programmées ( 20 plages max. )
- Appuyez sur la touche play / pause pour lancer la lecture
8. BOUTON OUT ( SYSTEME BOUCLE )
En appuyant sur ce bouton, vous fixez le point de fin de la boucle parfaite et vous lancez la boucle. Pour sortir de la boucle, appuyez une nouvelle
fois sur ce bouton. Lorsque vous êtes en mode boucle, l’indicateur LOOP sur l’afficheur reste allumé.
9. BOUTON SEARCH
Quand vous appuyez sur ce bouton, la molette va vous servir à faire une recherche très rapide sur la piste ( ou le disque ).
10. BOUTON RELOOP ( SYSTEME BOUCLE )
Ce bouton vous permet de relancer la dernière boucle mémorisé. Appuyez sur le bouton B (8 ) pour sortir de la boucle.
11. BOUTON SKIP I<<
Utilisez ce bouton pour retourner au début de la piste ou pour passer à la piste précédente.
12. BOUTON CUE
Appuyez sur ce bouton durant la lecture pour retourner au point de départ de la lecture .
13. BOUTON +10
Utilisez ce bouton pour passer dix pistes d’un coup. ( ex : vous pouvez passer de la piste 1 à la piste 11 ).
14. BOUTON PLAY / PAUSE
Utilisez cette touche pour passer en mode lecture. Durant la lecture, appuyez sur cette touche pour passer en mode pause.
15. BOUTON SKIP >>I
Utilisez cette touche pour passer à la piste suivante.
16. POTENTIOMETRE PITCH
Ce potentiomètre est utilisé pour augmenter ou diminuer la vitesse de la chanson
17. PITCH BEND +
Si vous appuyez sur la touche +, la vitesse de la chanson augmentera. Si vous relâchez cette touche la vitesse reviendra à son tempo original.
18. BOUTON PITCH
A l’aide de ce bouton, vous pouvez valider le fonctionnement du potentiomètre pitch.
19. AFFICHEUR
20. BOUTON STOP
Cette touche arrête la lecture du CD et le lecteur passe en mode STOP.
Page 15

21. PITCH BEND -
Si vous appuyez sur la touche -, la vitesse de la chanson diminuera. Si vous relâchez cette touche la vitesse reviendra à son tempo original.
22. TIROIR CD
Placez le disque sur le tiroir.
23. BOUTON OPEN / CLOSE
Appuyez sur la touche OPEN / CLOSE pour ouvrir et fermer le tiroir. Le tiroir ne peut pas être ouvert pendant le lecture du disque
24. TOUCHE D’ACCES DIRECT AUX PLAGES
Ces dix touches ( 0,1,2,3,4,5,6,7,8,9 ) vont vous permettre de choisir exactement la piste que vous voulez écouter .
25. SORTIE LINE OUT
Ces connecteurs sont les sorties gauche et droite. Reliez ces connecteurs RCA à votre table de mixage.
26. SELECTEUR TENSION
Positionnez correctement ce sélecteur sur la tension correspondant à votre pays ( Ex : France = 220V )
27. CORDON SECTEUR + SUPPORT FUSIBLE
Branchez votre câble secteur sur cette prise
Le fusible va protéger le lecteur CD contre un problème électrique. Si le lecteur CD ne s’allume pas, il faut vérifier le compartiment à fusibles. Si le
fusible est cassé, il faut le remplacer par un nouveau de même taille et de même valeur.
CARACTERISTIQUES TECHNIQUES :
Mémoire anti-choc : 40s
Gamme d’ajustement : +/-12%
Alimentation : 115 / 230V 50/60Hz,
Dimensions : 217x260x112mm
Page 16

© US Blaster Europe BV
1
LETTORE CD PROFESSIONALE CON MEMORIA
ANTI-SHOCK
LIBRETTO D´ ISTRUZIONI
USB 7319
Page 17
© US Blaster Europe BV
2
Page 18

© US Blaster Europe BV
3
AVVERTENZA
L´ uso dei comandi, modifiche o altri processi diversi da quelli
sottoindicati, puó comportare il pericolo di radiazione.
Funzioni del lettore CD
1. TASTO ACCENSIONE E SPEGNIMENTO
Premendo tale tasto si accende l´unitá. Premendo
ripetutamente il tasto si spegne l´unitá.
2. VOLANTINO DI COMANDO A MANO JOG &
SHUTTLE
Shuttle (andatura veloce). Si utilizza per selezionare la
direzione della scalanata e velocitá. Il disco è scanalato in
avanti nel caso, in cui lo shuttle sia impostato nel senso
orario da posizione neutra, e verso indietro nel caso, in cui
lo shuttle sia impostato nel senso antiorario. La velocitá
della scalanata aumenta, qualora lo shuttle sia girato
piu´velocemente.
Jog ( a grado a grado): Attraverso il regime pause,
qualora il „jog“ sia avanzato, il punto in cui si produce il
suono, avanza di alcuni passi corrispondenti a numero dei
clic. Nel senso orario il punto avanza in avanti, nel senso
antiorario si sposta indietro. Attraverso il regime di lettura,
il jog aumenta o diminuisce la velocitá della canzone. (nel
senso orario: aumenta la velocitá, nel senso antiorario:
diminuisce la velocitá).
Page 19

© US Blaster Europe BV
4
3. TASTO TIME
Usare tale tasto per selezionare il regime di tempo „ time
mode“. Tempo trascorso, tempo rimanente o tempo
rimanente totale.
4. TASTO REPEAT
Tale tasto serve per ripetere una pista o tutte le piste del
CD.
5. TASTO IN (LOOP SYSTEM)
Tale tasto imposta l´inizio del circuito . L´indicatore di
circuito lampeggia sul display.
6. TASTO CONTINUE/SINGLE
Premendo tale tasto si commuta il regime tra SINGLE e
CONTINUOUS. Il regime selezionato viene visualizzato
sul display. Attraverso il regime SINGLE l´unitá dopo ogni
pista interrompe
la lettura. Attraverso il regime continue l´unitá legge tutte
le piste e si ferma.
7. TASTO PROG
Attraverso il regime STOP possiamo programmare alcune
piste. (al massimo 20 piste):
- Premendo il tasto STOP si entra nel regime „stop“.
- Premendo il tasto STOP si entra nel regime
„programma“.
- Per selezionare la pista, che desideriamo ascoltare, è
necessario premere il tasto „skip track“/passaggio pista,
e successivamente premere il tasto „prog“ per impostare
la vostra selezione.
- Per selezionare la pista, che desideriamo, è necessario
premere il tasto „skip track/passaggio pista“, e
Page 20

© US Blaster Europe BV
5
successivamente premere „prog“ per impostare la vostra
selezione.
- ripetendo tale operazione vengono selezionate tutte le
piste, che desiderate ascoltare.
- Per iniziare la lettura è necessario premere il tasto
play/pause.
8. TASTO OUT (TASTO LOOP)
Premendo il tasto si imposta il punto terminale del
circuito perpetuo e lo stesso si avvia. Dopo il termine del
circuito è necessario premere nuovamente tale tasto.
9. TASTO SEARCH ( RICERCA)
Premendo tale tasto si puo´ cambiare la funzione „ jog“
e „search“.
10. TASTO RELOOP (LOOP SYSTEM)
Tale tasto viene utilizzato per avviare l´ultimo circuito
salvato. Dopo il suo termine è necessario premere il tasto
„reloop“.
11. TASTO SKIP TRACK
Premendo tale tasto si avvia nuovamente la pista o viene
selezionata quell´ultima.
12. TASTO CUE
Premendo il tasto CUE durante il regime di lettura si rientra
in posizione, in cui è iniziata la lettura.
13. Tasto + 10
Premendo solo una volta il tasto si sorpassano 10 piste.
Page 21

© US Blaster Europe BV
6
14. TASTO PLAY/PAUSE
Ogni volta premendo il tasto PLAY/PAUSE l´operazione si
trasforma dal regime di lettura al
regime „pause“ e dal regime „pause“ al regime „play“.
15. TASTO SKIP
Tale tasto si utilizza per selezionare un´altra pista.
16. PITCH CONTROL
Tale tasto si usa per aumentare o diminuire la velocitá
della pista.
17. TASTO PITCH BEND (+)
L´acutezza del tono aumenta automaticamente,
premendo il tasto (+) e torna al valore precedente, allentando
lo stesso tasto.
18. TASTO PITCH
Premendo il tasto è disponibile la registrazione del potenziometro
del tono.
19. DISPLAY
20. TASTO STOP
Premendo il tasto si interrompe la lettura.
21. TASTO PITCH BEND (-)
L´acutezza del tono scende premendo il tasto (-) e torna
al valore precedente, allentando lo stesso tasto.
22. SENSORE TELECOMANDO
Tale sensore riceve le informazioni del telecomando. Di
fronte a tale sensore non posizionare alcun oggetto o adesivo.
Page 22
© US Blaster Europe BV
7
23. TASTO EJECT
Tale tasto fa introdurre o uscire il disco. Premendo il
tasto ogni volta, la meccanica allungabile del CD si apre o
chiude.
Annotazione: Non premendo il tasto „ stop“ o „pause“, la
meccanica del disco non si apre.
24. TASTO SELEZIONE DELLA PISTA
Premendo i tasti 0-9 selezionate le piste del vostro CD.
Collegamento:
25. LINE OUT
Page 23

© US Blaster Europe BV
8
Audio per ogni CD lettore è l´uscita per questi
connettori. Il collegamento d´entrata del pannello di comando
mixer.
26. SELEZIONE ALIMENTAZIONE
Tale selettore si usa per selezionare una corrispondente
tensione corretta. (ogni paese con diversi tipi di alimentazione).
27. CAVO AC
Tale cavo si utilizza per il collegamento della
distribuzione principale AC (corrente alternata) con l´unitá.
SPECIFICAZIONE:
Anti –Shock Buffer memoria : 40 secondi
Portata adattamento: +/-12%
Alimentazione: 115/230V 50/60Hz
Dimensioni: Lettore:
217x260x112mm
Page 24
© US Blaster Europe BV
1
Lector profesional de CD con sistema antishock
INSTRUCCIONES PARA EL USO
USB 7319
IMPORTANTE
Usando y operando controles de otra manera de que la mencionada más adelante puede resultar en
riesgo de accidente por radiación peligrosa.
Page 25

© US Blaster Europe BV
2
Funciones de lector de CD:
1. INTERRUPTOR POWER
Presionando este botón encenderá la unidad. Presionandolo otra vez apagará la unidad.
2. RUEDAS JOG & SHUTTLE
Shuttle (movimiento rápido) : Usen esta función para seleccionar la dirección del "scanning" del
disco y su velocidad. El disco es leído hacia en adelante caso de el Shuttle está orientado en
sentido de las agujas del reloj de la posición neutral o hacia atrás si el Shuttle está orientado en
contra de las agujas del reloj. La velocidad sube en caso el Shuttle está girado con más
velocidad.
Jog (progresión) : Girando el "JOG" en el modo de pausa el puesto donde el sonido está
producido es avanzado por unos pasos que corresponden al número de los clics. En dirección de
las agujas del reloj el punto se mueve hacia adelante en contra al revés. En el modo de
reproducción el jog aumenta o baja la velocidad de la canción (en dirección de las agujas del reloj
la velocidad sube y al revés baja).
3. TECLA TIME
Usen esta tecla para la opción del modo de tiempo : el tiempo transcurrido., el tiempo restante o
el tiempo restante total que queda.
4. TECLA REPEAT
Esta tecla sirve para repetición de una pista o de todas la pistas de CD.
5. TECLA IN ( LOOP SYSTEM )
Esta tecla usen para activar la reproducción con bucle. El indicador del bucle está parpadeando .
6. TECLA CONTINUE / SINGLE
Al presionar esta tecla cambian los modos (SINGLE o CONTINUOUS) de reproducción. El modo
elegido está iluminado en el visualizador. En el modo SINGLE la unidad terminará la lectura
después de cada pista. En el modo CONTINUOUS la unidad dará lectura a todas las pistas y se
parará.
7. TECLA PROG
En el modo de STOP pueden programar algunas pistas ( 20 pistas al máximo ) :
- presione la tecla STOP para entrar en el modo de "stop"
- presione la tecla PROG para entrar en el modo de "programa"
- para elegir la pista que quiere escuchar presione teclas "skip track! (saltar pista) y después la
tecla "PROG" para confirmar su selección.
- para selección de la pista que quiere escuchar repite los pasos mencionados arriba (presionar
skiptrack y prog).
- todas las pistas que quieren eschuchar programará por repetición de operaciones precedentes
- Para empezar la reproducción presione la tecla PLAY/PAUSE.
8. TECLA OUT (TECLA LOOP )
Al presionar esta tecla pondrá el punto final de bucle infinito. Para terminar el bucle presione esta
tecla una vez más.
9. TECLA SEARCH (BÚSQUEDA)
Presinando esta tecla cambiará funciones "JOG" o "SEARCH".
10. TECLA RELOOP ( LOOP SYSTEM )
Esta tecla se usa para activación de bucle últimamente archivado. Para terminación de bucle,
presione tecla "reloop".
11. TECLA SKIP I<< (SALTAR)
Usando esta tecla elegirá la última pista o se reproducirá la pista de nuevo.
Page 26

© US Blaster Europe BV
3
12. TECLA CUE
Al presionar esta tecla (CUE) en el modo de reproducción (PLAY) la unidad se volverá al punto
inicial en el qual la reproducción ha empezado.
13. TECLA +10
Presionando esta tecla una vez, saltarán diez pistas.
14. TECLA PLAY / PAUSE
Cambia el modo de reproducción (PLAY) y el modo de pausa (PAUSE) y al revés cada vez
cuando la presionen.
15. TECLA SKIP >>I (SALTAR )
Esta tecla se usa para saltar la pista.
16. PITCH CONTROL
Esta tecla se usa para aumento o reducción de velocidad de pista.
17. TECLA PITCH BEND (INFLEXIÓN TONAL) (+)
La altura del tono subirá automáticamente al presionar tecla (+) al deapretarlo se volverá al
valor original.
18. TECLA PITCH
Esta tecla sirve para poder ajustar el potenciómetro de pitch.
19. PANTALLA - VISUALIZADOR
20. TECLA STOP
Al presionar esta tecla cortarán la reproducción.
21. TECLA PITCH BEND (-)
La altura del tono bajará automáticamente al presionar tecla (-) al deapretarlo se volverá al valor
original.
22. SENSOR DEL CONTROL REMOTO
Este sensor acepta información del control remoto por eso no coloquen nada en frente de ese
sensor.
23. TECLA EJECT
Al presionar esta tecla abrirán o cerrarán la bandeja de discos. Note: La bandeja de discos no se
abrirá hasta que las teclas "STOP" o "PAUSE" no estén presionadas.
24. TECLAS PARA SELECCIÓN DE PISTAS
Al presionar teclas 0 -9 seleccionará pistas de su CD.
Page 27
© US Blaster Europe BV
4
Conexiones :
25. LINE OUT
Audio se_al de salida para cada lector de CD por estos conectores . Interconexión para entrada
de línea de mixer.
26. SELECTOR DE ALIMENTACIÓN
Este selector usen para selectar la alimentación correspondiente (depende del país) .
27. CABLE C.A.
Este cable usen para conexión de la unidad al corriente (corrinte alternativa).
ESPECIFICACIONES :
Sistema de memoria de Anti-Shock : 40 segundos
Rango de ajustamiento: +/- 12%
Alimentación : 115 / 230V 50/60Hz,
Dimensiones : lector : 217x260x112mm
 Loading...