


CAR Amplifier P.M.P.O 800 Watt
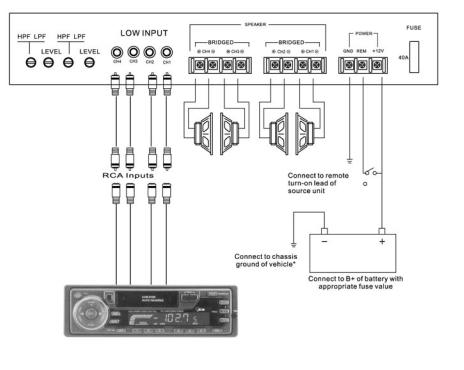
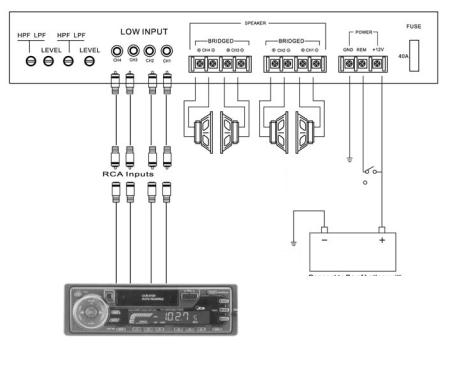
• RCA Inputs are connected to both left and right channels
• Gain for left and right Channels operate independtly
• Impedance for each channel should be 4 Ohm minimum
• Crossover can be set for High-Pass(LP) low-Pass(LP) or FulI Range(FULL)
• Keep ground as short as possible
GB
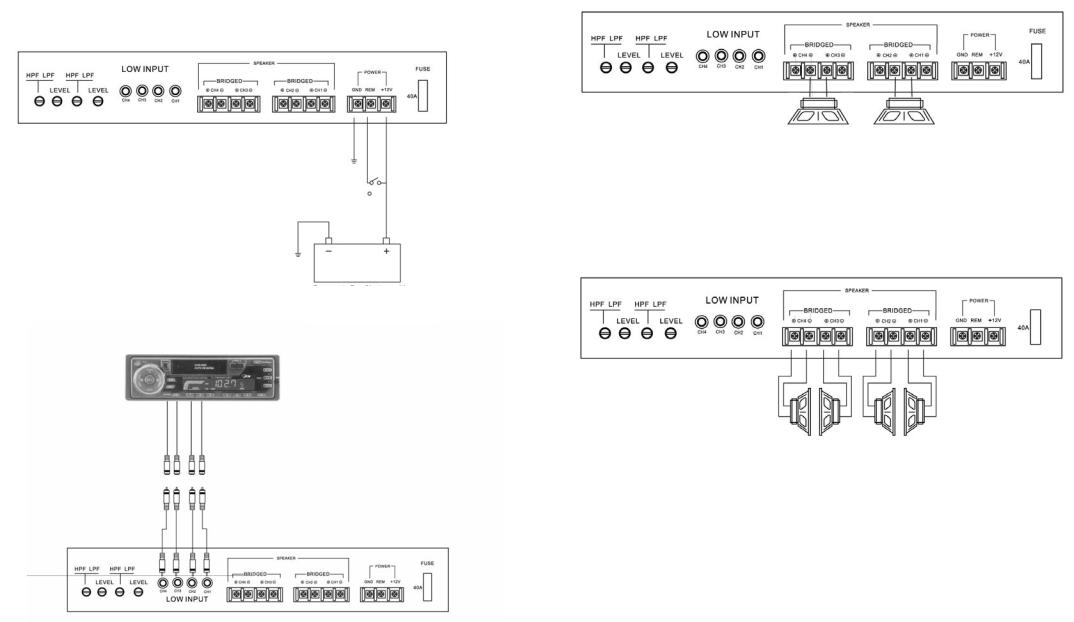
• RCA Inputs are connected to both left and right channels
• Gain for left and right Channels operate independtly
• Impedance for each channel should be 2 Ohm minimum
• Crossover can be set for High-Pass(LP) low-Pass(LP) or FulI Range(FULL)
•High level Inputs connect directly to radio's speaker outputs
•RCA Inputs connect to radio's RCA preamp outputs
CAUTlON: Use only one Input configuration. Using both the High Level Inputs & RCA Inputs may cause undesirable operation.
2 |
3 |
FEATURES:
•power on led indicator
•low impedance input
•input level control
•hl-pass switch
•auto power on/off by remote (+12v)
•car audio amplifier
•this package contains one piece
SPECIFICATIONS:
•MAX. OUTPUT POWER 200W X 4 = 800W @ 4 Ohm
•CONTINUOUS MAXIMUM OUTPUT POWER
•80W x 4 (4 OHM); 100Wx4(2 OHM) 160Wx 2 (4 OHM)
All measurements done at: 14,4v dc. l khz input signal frequency response 10hz-50khz
•power supply: 10.8v-15v(dc only)
due to variables in power rating, margin of error 5% is allowed
•when vehicles engine is not running, voltage drops normally lowering the power ratings indicated on the box
•we follow a policy of continuous advancement in development this reason, all specifications are
subject to change without prior notlce
CONGRATULATIONS
Congratulations on your purchase of US BLASTER series car audio amplifier. Amplifiers for car audio system are designed, engineered and manufactured in the highest level of quality, and will afford you years of listening enjoyment.
Thank you for making US BLASTER series car audio amplifier your choice for car audio equipment!
INTRODUCTION
Your new high performance automotive power amplifier incorporates the latest technology including a highly efficient switching mode power converter mono channels of high fidelity power amplification and a small rugged chassis to be space efficient.
This manual provides sufficient information on the connection and use of your power amplifier.
All connections to this power amplifier are easy and secure with Well-designed high current screw-ter- minals and RCA type input connectors.
PREPARATIONS
Before you install the amplifier, read all instructions carefully. If you are unsure about any part of the installation process, we recommend that you have a professional amplifier
•Be sure your vehicle has a 12-volt DC, negative-ground electrical system.
•Before you mount the amplifier, temporarily connect the amplifier and test to be sure it works. Do not permanently mount the amplifier until you are sure the connections are correct.
INSTALLATION AND WIRING |
|
The quality of installation will affect the system’s performance and Reliability. When you consider the |
|
complexity of installation you may well decide to seek professional services. The dealer should provide |
GB |
such services or will be able to recommend a professional installer. |
LOCATION
•You may mount the unit in any convenient location such as under the seat, in the trunk or the cargo space.
•Try to keep the power supply and speaker wires as short as possible as to minimize power loss and provide higher audio output from the system.
•Be sure that the cooling sides of the system are in free air and not against the other panel an instrument surface.
Warning: Do not touch the amplifier or place flammable objects near it when operating. The amplifier gets very hot while in use.
4 |
5 |
POWER AND SPEAKER OUTPUT TERMINALS
1.Power Terminal (B+) 12V. Power wires must be installed so that the wire connected to the +12V terminal of the system is also connected to the positive "+’’ terminal of the battery of the vehicle.
Ground Terminal (-)
The wire connected to the ground terminal of the system would be connected to the automobile chassis or the negative,"-" terminal of the battery of the vehicle
TROUBLE SHOOTING
PROBLEM |
Amplifier does not operate when vehicle and radio are on |
|
CAUSE |
No power to the REM or B+ terminal |
|
CORRECTION |
1. |
Check connections with a test light or meter 2. Replace fuse. |
PROBLEM |
Sound from only One Speaker |
|
CAUSE |
1. |
Defective speaker 2. Poor wire Connectors |
CORRECTION |
1. |
Adjust to the center. 2. Replace speaker. 3. Check all speaker wires. |
MAINTENANANCE
The following suggestions will help you care for your amplifier to you can enjoy it for years.
•Keep the amplifier dry. If it gets wet, wipe it dry immediately Liquids can contain minerals that corrode electronic circuits.
•Use and store the amplifier only in normal temperature environments.
Temperature extremes can shorten the life of electronic devices and distort or melt plastic parts.
•Handle the amplifier gently and carefully, dropping it can damage circuit boards and cases and can cause
the amplifier to work improperly.
•Keep the amplifier away from dust and dirt, which can cause premature wear parts.
•Wipe the amplifier with a damp cloth occasionally to keep it looking new. Do not use harsh chemicals, cleaning solvents,
or strong detergents to clean your amplifier.
Modifying or tampering with the product’s internal components can cause a malfunction and invalidate your product’s warranty.
PROBLEM |
Sound distorted. |
|
CAUSE |
1. |
Bad or grounded Speaker wire Connections 2. Both high and low Level inputs are |
Connected. |
|
|
CORRECTION |
1. |
Check all speaker wires. 2. Use only one input. |
PROBLEM |
Amplifier Heats up and turns off |
|
CAUSE |
1. |
Bad or grounded speaker wire connections. 2.poor ventilation. |
CORRECTION |
1. |
Check all speaker wires. 2. Bad speaker. 3. Move amplifier to an open area with |
|
better ventilation. |
|
PROBLEM |
Engine or Alternator Noise |
|
CAUSE |
Improper ground. |
|
CORRECTION |
Check ground connector to stereo and amplifier. |
|
PROBLEM |
Low sound or no sound from output |
|
CAUSE |
1. |
The input is low 2. Volume control or long-distance volume control is wrong |
GB
LISTENING SAFELY
To protect your hearing, follow these guidelines:
•Do not listen at extremely high volume levels. Extended, high-volume listening can lead to permanent hearing loss.
•Always start by setting the volume to the lowest level possible before you begin listening then gradually increase the volume as necessary.
•Once you set the volume, do not increase it. Over a period of time, your ears adapt to the volume level, so a volume level that does not cause discomfort might still damage your hearing.
6 |
7 |
KFZ-Verstärker P.M.P.O 800 Watt
An die RemoteAnschlussleitung des Ursprungsgeräts anschließen.
An die RemoteAnschlussleitung des Ursprungsgeräts
anschließen. An den B+-Pol der Batterie mit geeigneter Sicherung anschließen.
Erdungen so kurz wie möglich halten.
RCA-Eingänge
•High-Level-Eingänge werden direkt an die Ausgänge der Radiolautsprecher angeschlossen.
•RCA-Eingänge können an RCA-Vorverstärkerausgänge angeschlossen werden.
Achtung: Nur eine Eingangskonfiguration verwenden. Verwendung sowohl der High-Level-Eingänge als auch der RCA-Eingänge kann zu Betriebsstörungen führen.
•RCA-Eingänge werden sowohl an die linken als auch die rechten Kanäle angeschlossen.
•Verstärkungsregler für die linken und rechten Kanäle arbeiten unabhängig.
•Impedanz für jeden Kanal sollte mindestens 4 Ohm betragen.
•Crossover kann für High-Pass (LP), Low-Pass (LP) oder Full-Range (FULL) eingestellt werden.
D
•RCA-Eingänge werden sowohl an die linken als auch die rechten Kanäle angeschlossen.
•Verstärkungsregler für die linken und rechten Kanäle arbeiten unabhängig.
•Impedanz für jeden Kanal sollte mindestens 2 Ohm betragen.
•Crossover kann für High-Pass (LP), Low-Pass (LP) oder Full-Range (FULL) eingestellt werden.
8 |
9 |
An die RemoteAnschlussleitung des Ursprungsgeräts anschließen.
An die Chassiserdung des Fahrzeugs anschließen.
An den B+-Pol der Batterie mit geeigneter Sicherung anschließen.
FUNKTIONEN:
•led-anzeigen netz ein
•eingang mit niedriger impedanz
•eingangslautstärkeregler
•hi-pass-schalter
•netz ein/aus über fernbedienung (+12 v)
•kfz-audioverstärker
•dieses paket enthält ein stück
TECHNISCHE DATEN:
•Maximale ausgangsleistung 200 w x 4 = 800 w bei 4 ohm
•ständige maximale ausgangsleistung
•80 w x 4 (4 ohm); 100 w x 4 (2 ohm) 160 w x 2 (4 ohm)
alle messungen durchgeführt bei: 14,4 v gleichstrom. 1 khz eingangssignal frequenzgang 10 hz - 50 khz
•stromversorgung: 10,8 v - 15 v (nur gleichstrom)
aufgrund von unterschieden bei der nennleistung ist eine fehlermarge von 5% erlaubt.
•wenn der fahrzeugmotor nicht läuft, fällt die spannung normalerweise und die auf dem gerät angegebene
•nennleistung ist verringert. wir befolgen eine politik der ständigen weiterentwicklung, deshalb können alle technischen daten ohne vorankündigung geändert werden.
kfz-verstärker p.m.p.o 800 watt
GHERZLICHEN GLÜCKWUNSCH
Wir gratulieren Ihnen zum Kauf eines Autoboosters der Marke US BLASTER. Booster werden nach dem höchsten Qualitätsstandard entworfen und hergestellt und werden Ihnen viele Jahre problemfreies Hörvergnügen bereiten.Wir danken Ihnen, dass Sie einen US BLASTER Autobooster für Ihre Audioanlage gewählt haben !
EINLEITUNG
Ihr neuer Car Audio Power Booster in modernster Technologie enthält ein leistungsstarkes Schaltnetzteil und Hi-Fi Monokanäle in einem kompakten, robusten Gehäuse. Diese Anleitung gibt Ihnen alle notwendigen Informationen, um Ihren Booster richtig anzuschließen und zu bedienen. Alle Anschlüsse an diesen Power Booster erfolgen einfach und sicher über Hochstromschraubanschlüsse und Cinch Eingangsverbinder.
VORBEREITUNG
Vor Einbau des Boosters erst alle Anweisungen genau durchlesen. Wenn Sie sich über einen Teil des Einbaus im unklaren sind, empfehlen wir Ihnen, einen Spezialisten zu Rate zu ziehen.
•Vergewissern Sie sich, dass Ihr Fahrzeug eine 12V DC Anlage mit negativer Masse besitzt.
•Bevor Sie den Verstärker definitiv einbauen, schließen Sie ihn provisorisch an und testen Sie ihn, um sicher zu sein, dass alle Anschlüsse korrekt sind.
EINBAUORT |
|
• Das Gerät kann an einem geeigneten Platz unter dem Sitz, im Kofferraum oder auf der Ladefläche |
|
eingebaut werden. |
|
• Die elektrischen Leitungen und Lautsprecherkabel sollten so kurz wie möglich gehalten werden, um |
D |
Leistungsverluste zu verringern |
|
und höhere Audioleistung zu erzielen. |
|
• Die Kühlrippen des Geräts dürfen nicht von Platten oder anderen Flächen behindert werden. |
|
Warnung: Während des Betriebs niemals den Verstärker berühren oder brennbare Gegenstände in der |
|
Nähe lassen. |
|
10 |
11 |
 Loading...