

Page 1

USB 7131
Portable handy audio system
Many thanks for purchasing this US Blaster product.
Always read the safety instructions below before letting a professional install this equipment.
MAGNETIC FIELD
CAUTION! Do not locate sensitive highgain equipment such as preamplifiers or tape decks directly
above or below the unit. Because this amplifier has a high power,it has a strong magnetic field
which can induce hum into unshielded devices that are located nearby. The field is strongest
just above and below the unit.Locate the amplifier(s) in the bottom of the rack and the preamplifier
or other sensitive equipment at the top.
CAUTION!
Risk of electric shock. Do not open.
To prevent electric shock do not remove top or bottom covers.No user serviceable parts inside.
Refer servicing to qualified servicing personnel.Disconnect power cord before removing back panel
cover to access gain switch.
WARNING
To reduce the risk of electric shock,do not expose this equipment to rain or moisture!
WATCH FOR THESE SYMBOLS
© US Blaster Europe BV
The exclamation point triangle is used to alert the user
to important operating or
maintenance instructions.
The lighting bolt triangle is
used to alert the user to
the risk of electric shock.
Page 2

Features
Amplifier:
• Superior audio performance with low noise and powerful, full-spectrum transparent audio and
natural sounding selectable echo effects
• 4 mono balanced XLR mic and balanced 1/" line inputs, trim controls and 3-band EQ's Effects
and PAN controls
• Stereo power amplifier delivers 100W/side @ 4 ohms. Fan cooled, bipolar amplifier design for
longest life and maximum reliability.
• Effect send and return for you to output of the remote effect device to be connected to the
mixer.
• Tape In and Record Out RCA jacks with tape level control
• Effect with delay time, echo depth and level controls
• Internal AC supply with 115/230V select switch
• The cabinet with internal stand hole
Speaker:
• 2-way configuration with passive filter
• Frequency response: 80Hz - 20KHz
• Rated power: 60W
• Nominal Impedance: 8 ohms
• Each speaker with 1 speakon and 2 1/4"jacks connectors
• Cabinet with handle and 2 wheels
• Each cabinet with internal stand hole
© US Blaster Europe BV
Page 3
© US Blaster Europe BV
Page 4

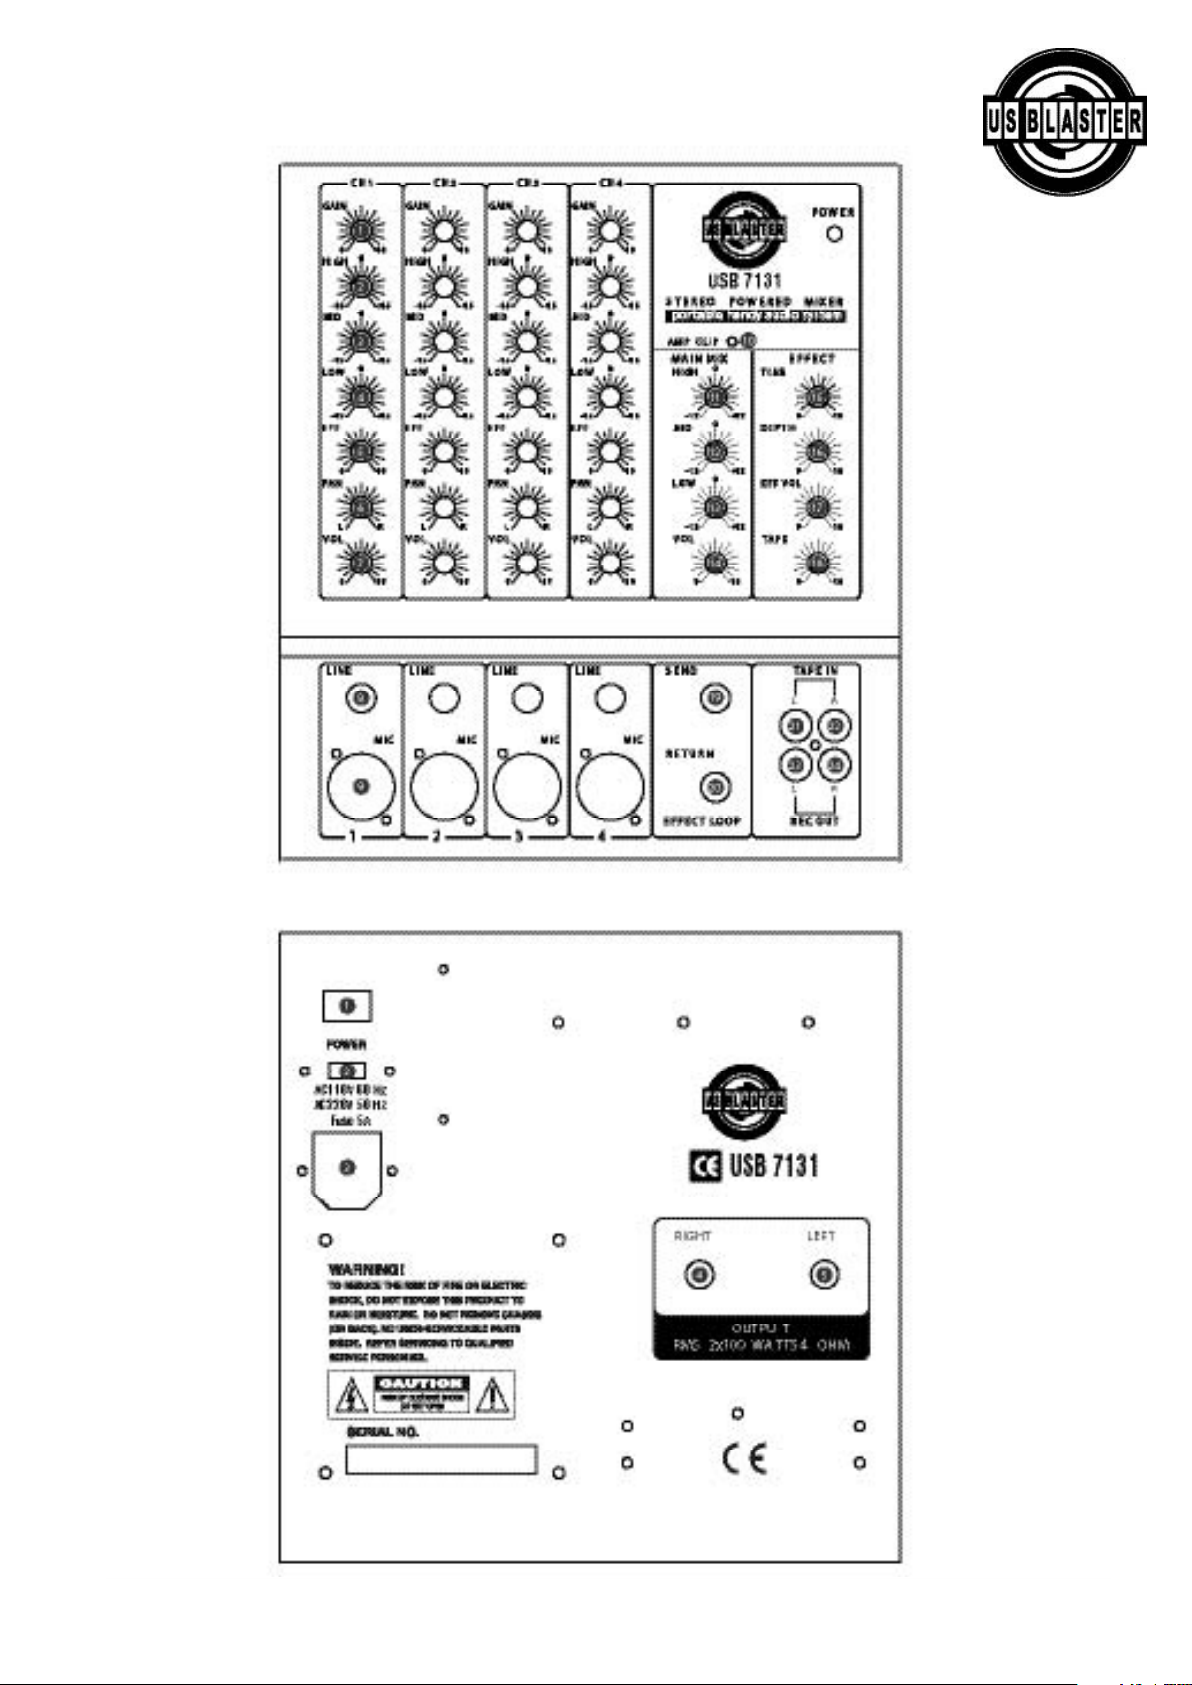
Front panel
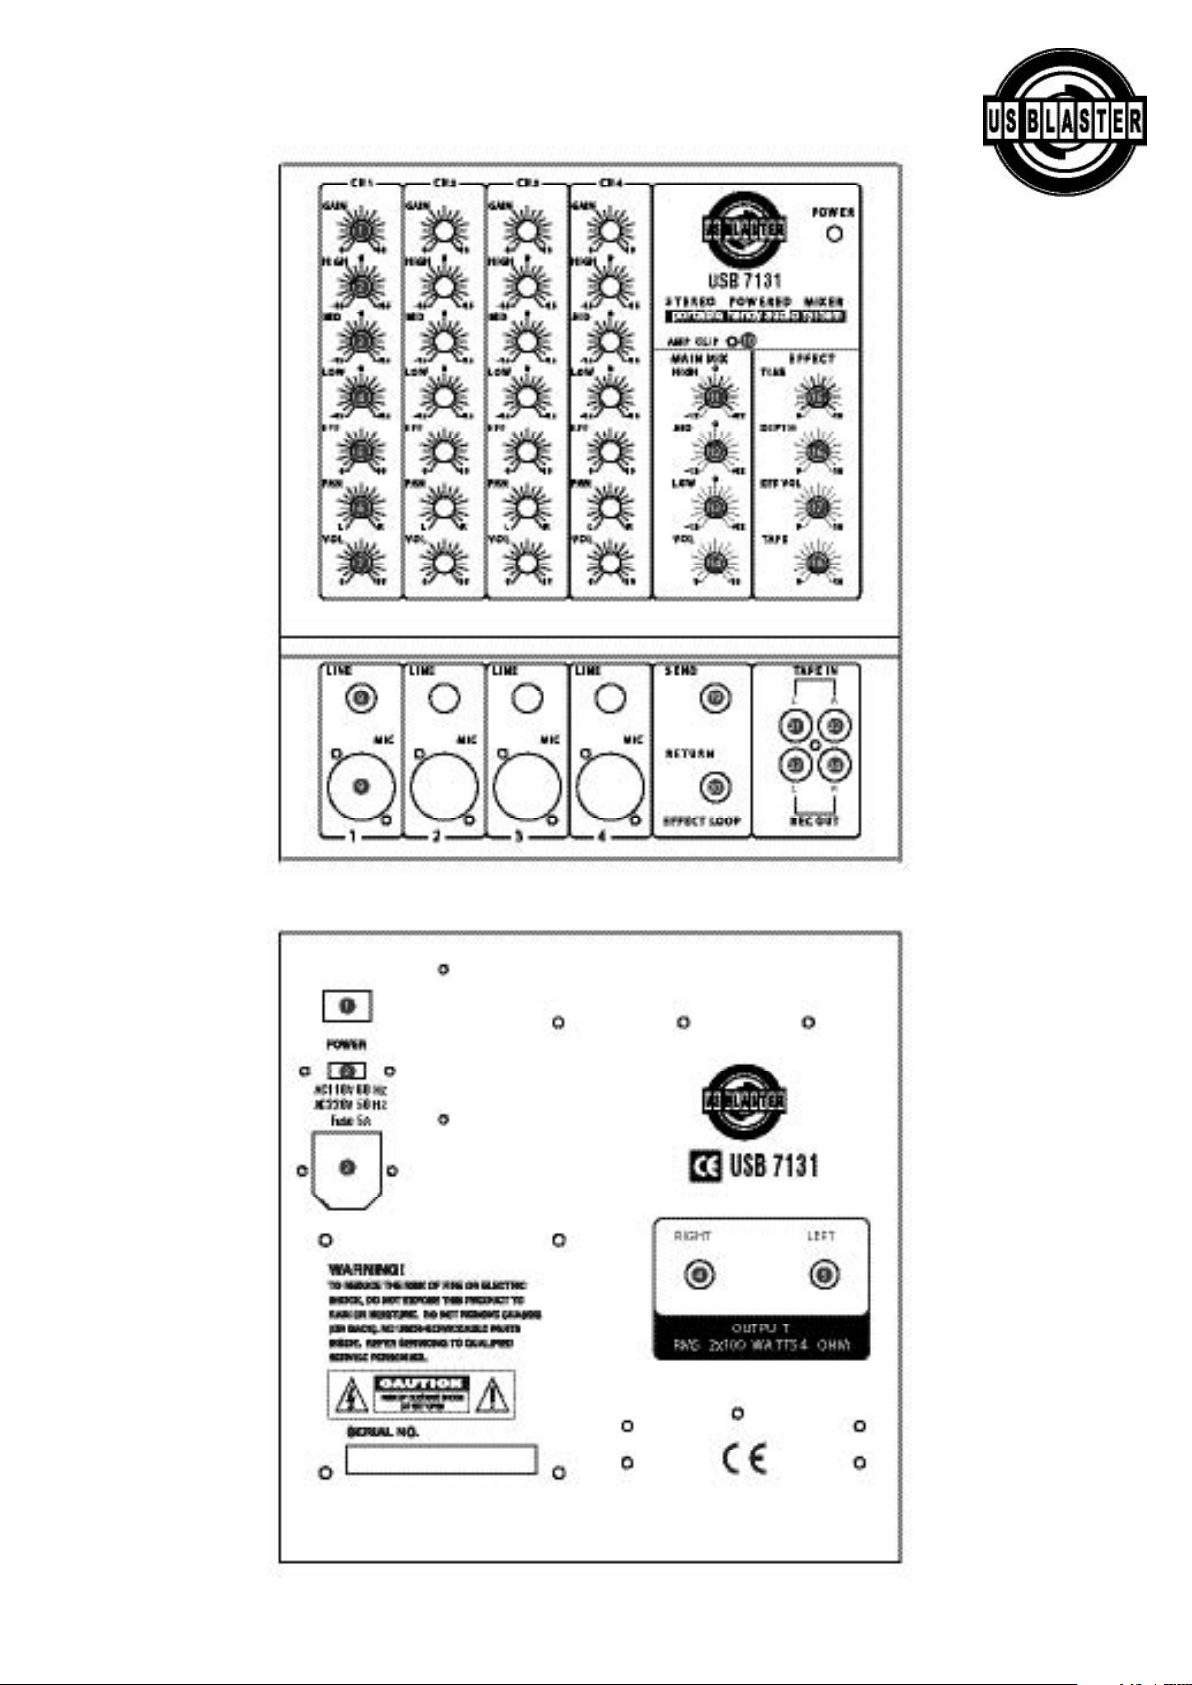
1 .Gain The gain control adjusts the input sensitivity of the Mic and line inputs on the
input channels.
2 .High allow you to controls the Hi-range of signals 10KHz 12dB
3 .Mid allow you to controls the Mid-range of signals 2.5KHz ( 12dB)
4 .Low allow you to controls the Bass-range of signals 100Hz ( 12d B)
5 .EFF use this controls when you want to get effect sound by adjustment of input signal
6 .Pan The Channel Pan positions the output of the channel in the stereo field of the main
mix. It's constant-power design ensures there are no level discrepancies whether a signal
is hard-panned, center-stage, or somewhere in between.
7 .Level allow you to adjusts channel signal level to be sent to the master
8 .Line balanced and unbalanced 1/4 (6.35mm).diameter stereo jack input socket for
connection of high level sound sources.
9 .Mic neutrik electronically balanced XLR connector input socket. For connecting low level
signal sources. Such as microphones or other low impedance devices.
10.MP peak LED The peak LED illuminates when a amplifier output signal is going into
overload. It detects the peak level on the AMP output and will light at approximately 1dB
before clipping to warn that the signal is approaching overload. You do not want the peak
LED to light expect very intermittently during a take or a mix. If it does light persistently,
reduce input gain to protect your speakers.
11.High allow you to controls the Hi-range of the master output signals 10KHz 12dB
12.Mid allow you to controls the Mid-range of the master output signals 2.5KHz ( 12dB)
13.Low allow you to controls the Bass-range of the master output signals 100Hz ( 12d B)
14.Volume It allow you to adjust the master output level.
15.Time It allow you to adjust the delay time of the effect.
16.Depth This pose allow you to control the echo repeat depth of the effect.
17.EEF Volume this pose allow you to control the effect level to the master output.
18.Tape this pose allow you to adjust the level of the tape input to master bus.
19.Send 1/4 jack connector, output level control by EFF(5)
20.Rerturn 1/4 jack connector, allowing the output of the remote effect device to be connected to
the mixer.
21/22.Tape in RCA connector, allow you to input high level signal such as TAPE, CD.
23/24.REC output RCA connector can be used to connect the mixer to the record input of your
recorder enabling you to record your mix.
REAR PANEL:
1. Power switch please make sure that all the volume pose set on the mix position when you
want to turn on this unit, the power LED will be light when you turn on the power switch
2. Voltage selector before plugging in the power cord, make sure that the voltage selector
Switch is set to the connect voltage
3. Power connector with fuse molder
This standard IEC power cord receptacle is used to connect the AC power to your unit
4. Right speaker output
One 1/4 (6.35mm) jacks for you to connecting a speaker cabinet, the min impedance is 4 ohms.
5.Left speaker output
One 1/4 (6.35mm) jacks for you to connecting a speaker cabinet, the min impedance is 4 ohms.
© US Blaster Europe BV
Page 5
SPECIFICATIONS
1. POWER OUTPUTS(R.M.S)
100 Watts + 100 Watts @ 4 per side
0.1% (T.H.D) @ 1KHz
2. TOTAL HARMONIC DISTORTION
Main Amp<0.05% @ 1KHz
Mic Ch ~ Main Amp<0.01% @ 1KHz
3. FREQUENCY RESPONSE
3dB, 20Hz ~ 20KHz @ 1W/8 Ohm (Speaker output)
4. INPUT LEVEL SENSITIVITY
MIC CH ........................................................................................................-60dBv
LINE CH ......................................................................................................-30 dBv
TAPE IN ......................................................................................................-10 dBv
EFF SEND......................................................................................................+4dBv
EFF RETURN ....................................................................................................0dBv
5. NOISE
S/N ...............................................................................................................86 dB
6. CHANNEL AND MASTER EQUALISATION
HIGH (Shelving) ...................................................................................10KHz/ 12dB
MID (Bell)..............................................................................................1KHz/ 12dB
LOW (Shelving).....................................................................................100Hz/ 12dB
7. WEIGHT ......................................................................................................27 Kgs
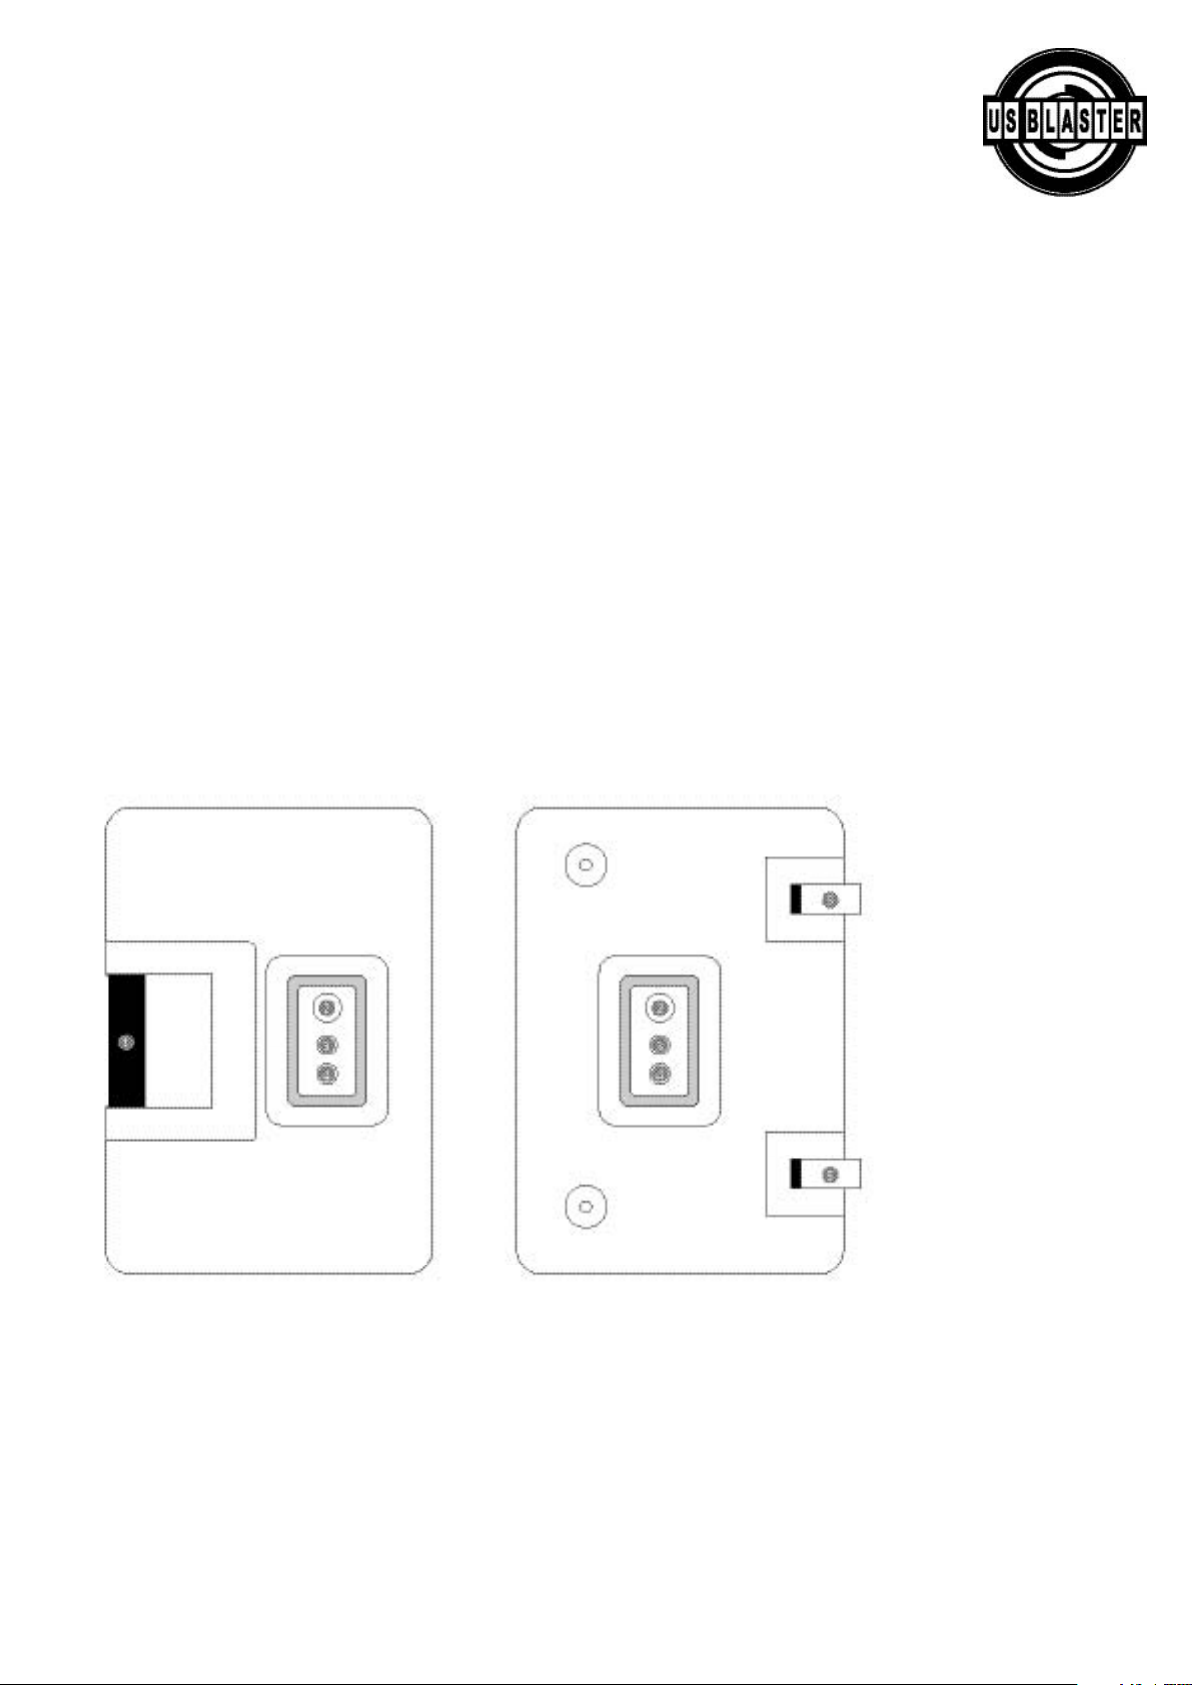
Speaker
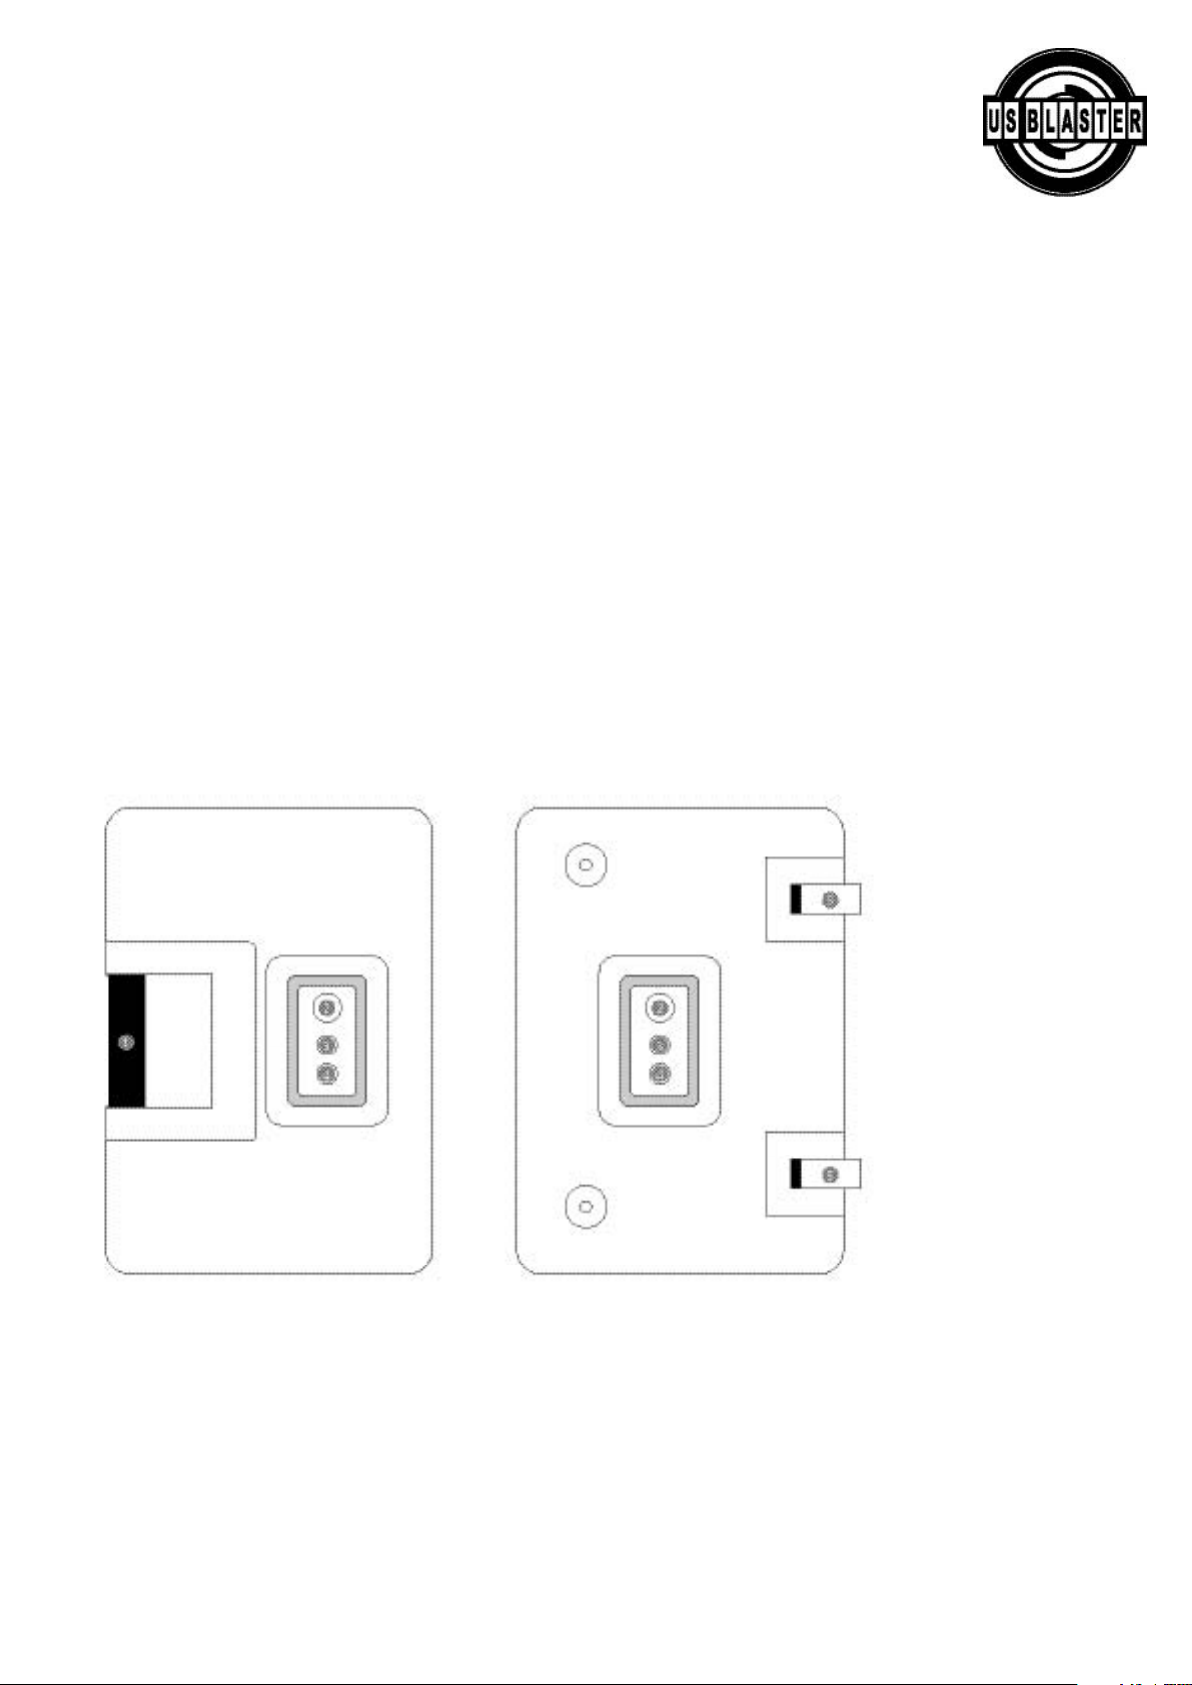
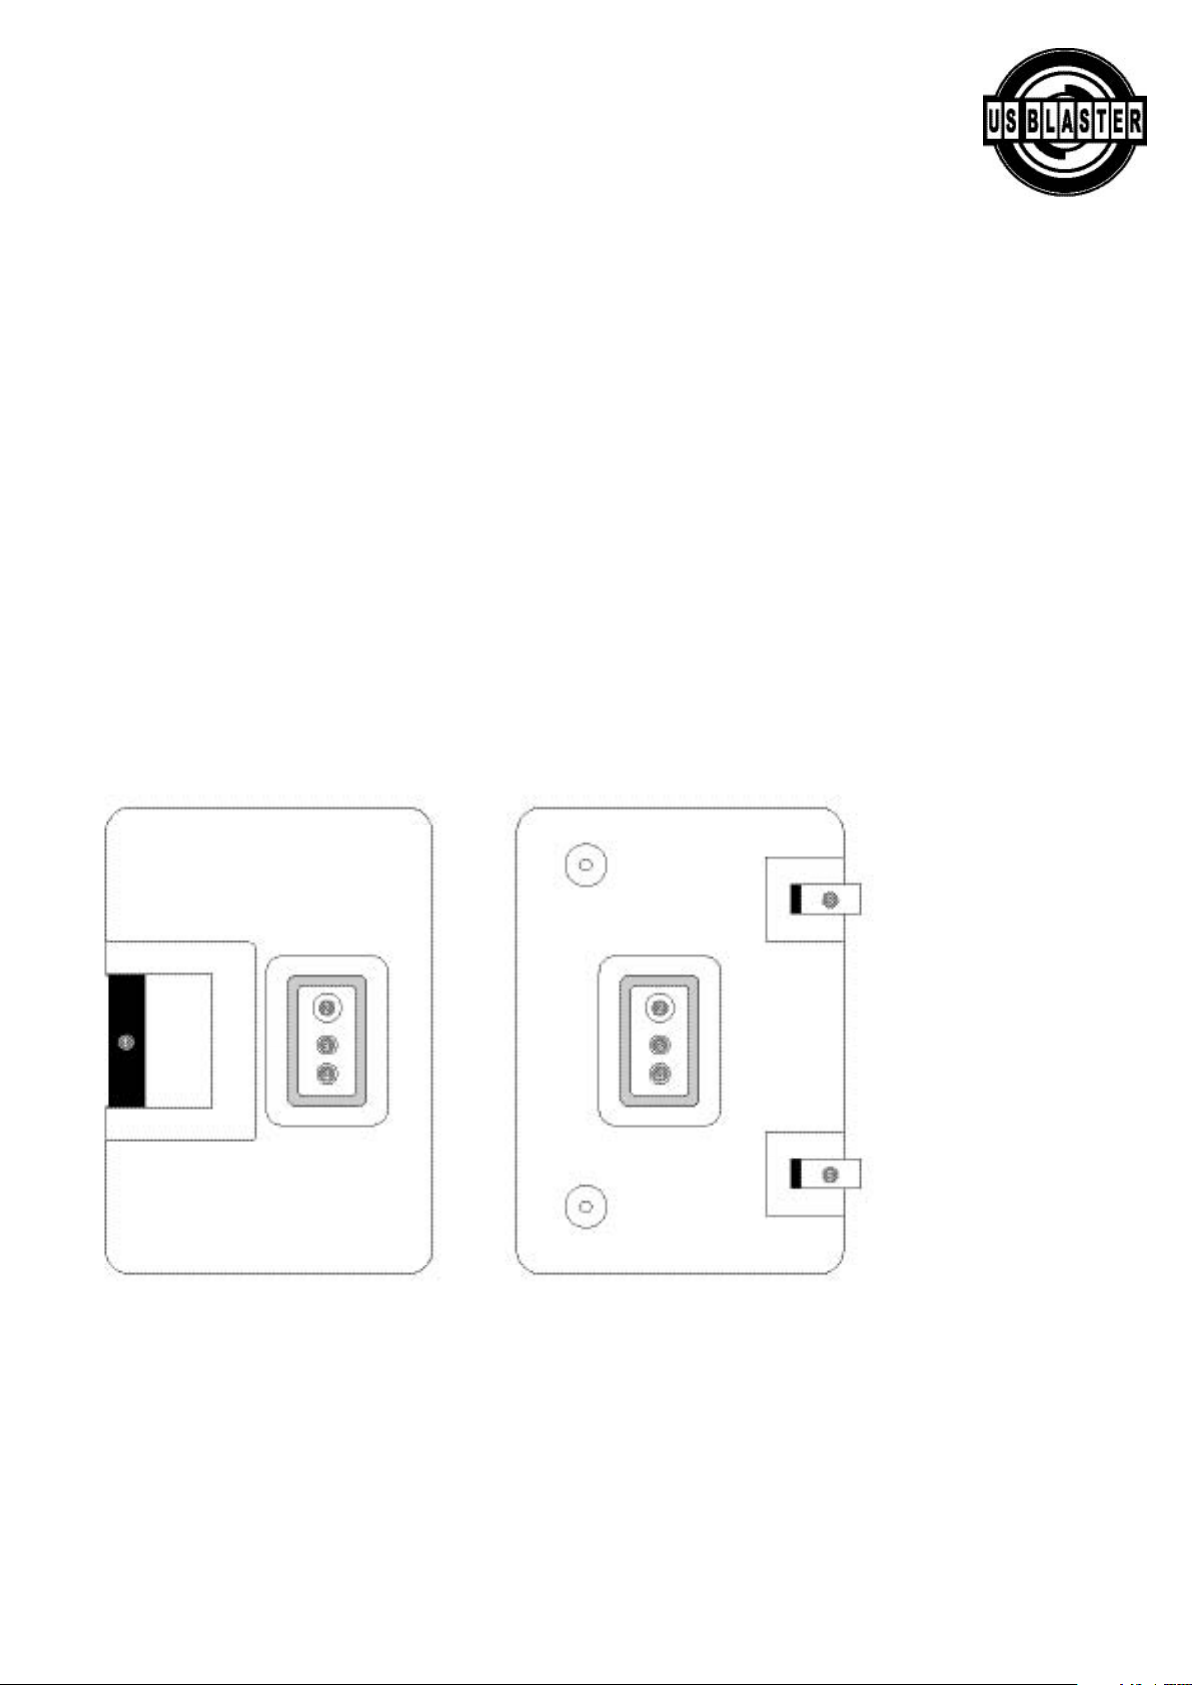
1 Handle: It allow you to easy take away.
2 Speakon: allow you to input amplifier signal
3/4 jack connectors: allow you to input amplifier signal
5 Wheel: It allow you to easy take away.
Supplied
1 Power supply cord
2 Operating instructions
© US Blaster Europe BV
Page 6

Page 7
USB 7131
Tragbare handliche Audio-Anlage
Vielen Dank, dass Sie dieses Produkt von US Blaster gekauft haben. Lesen Sie stets die folgenden Sicherheitshinweise durch, bevor Sie einen Fachmann dieses Gerät einbauen lassen.
MAGNETFELD
VORSICHT! Stellen Sie keine empfindlichen High-Gain-Geräte wie Vorverstärker oder
Kassettendecks direkt auf oder unter das Gerät. Da dieser Verstärker eine hohe Leistung hat, verfügt er über ein starkes Magnetfeld, das bei nicht abgeschirmten Geräten, die sich in der Nähe
befinden, zu Brummen führen kann. Das Feld ist direkt über und unter dem Gerät am stärksten.
Stellen Sie den/die Verstärker unten in das Rack und den Vorverstärker oder andere empfindliche
Geräte darüber.
VORSICHT!
Um Stromschläge zu vermeiden, sollten Sie nicht versuchen, die oberen oder unteren Abdeckungen
zu entfernen. Es gibt keine vom Benutzer wartbaren Teile im Inneren. Überlassen Sie
Wartungsarbeiten qualifizierten Fachleuten. Ziehen Sie das Netzkabel heraus, bevor Sie die hintere
Abdeckung entfernen, um zum Gain-Schalter zu gelangen.
WARNUNG
Um das Risiko eines Stromschlags zu vermeiden, sollten Sie das Gerät nie Regen oder Feuchtigkeit
aussetzen.
ACHTUNG
© US Blaster Europe BV
Das Dreieck mit dem
Ausrufezeichen wird verwendet, um Benutzer über
wichtige Bedienungs- oder
Wartungsanweisungen zu
informieren
Das Dreieck mit dem Blitz
wird verwendet, um
Benutzer vor der Gefahr von
Stromschlägen zu warnen
Page 8

Merkmale
Verstärker
• Hervorragender Klang mit geringem Rauschen und leistungsstarken, auf voller Bandbreite trans
parenten und natürlich klingenden, wählbaren Echo-Effekten
• 4 symmetrische Mono-XLR-Mikrofoneingänge und symmetrische _"-Line-Eingänge, TrimBedienelemente und 3-Band-EQ-Effekte und PAN-Bedienelemente
• Stereo-Verstärker liefert 100 W/Seite bei 4 Ohm. Lüftergekühlt, zweipolige
Verstärkerkonstruktion für lange Lebensdauer und maximale Betriebssicherheit
• ”Effect Send” und “Effect Return” zum Ausgang des Remote-Effektgeräts, das Sie an das
Mischpult anschließen
• Tape-In- und Record-Out-RCA-Buchsen mit Bandpegelsteuerung
• Effekt mit Verzögerungszeit, Echotiefe und Pegelsteuerung
• Interne Stromversorgung mit 115/230-V-Wahlschalter
• Das Gehäuse hat eine Halterungsbohrung
Lautsprecher:
• 2-Wege-Konfiguration mit passivem Filter
• Frequenzgang: 80 Hz – 20 kHz
• Nennleistung: 60 W
• Nominale Impedanz: 8 Ohm
• Jeder Lautsprecher hat 1 Speakon- und 2 1/4"-Anschlussbuchsen
• Das Gehäuse hat einen Griff und 2 Räder
• Das Gehäuse hat eine Halterungsbohrung
© US Blaster Europe BV
Page 9
© US Blaster Europe BV
Page 10

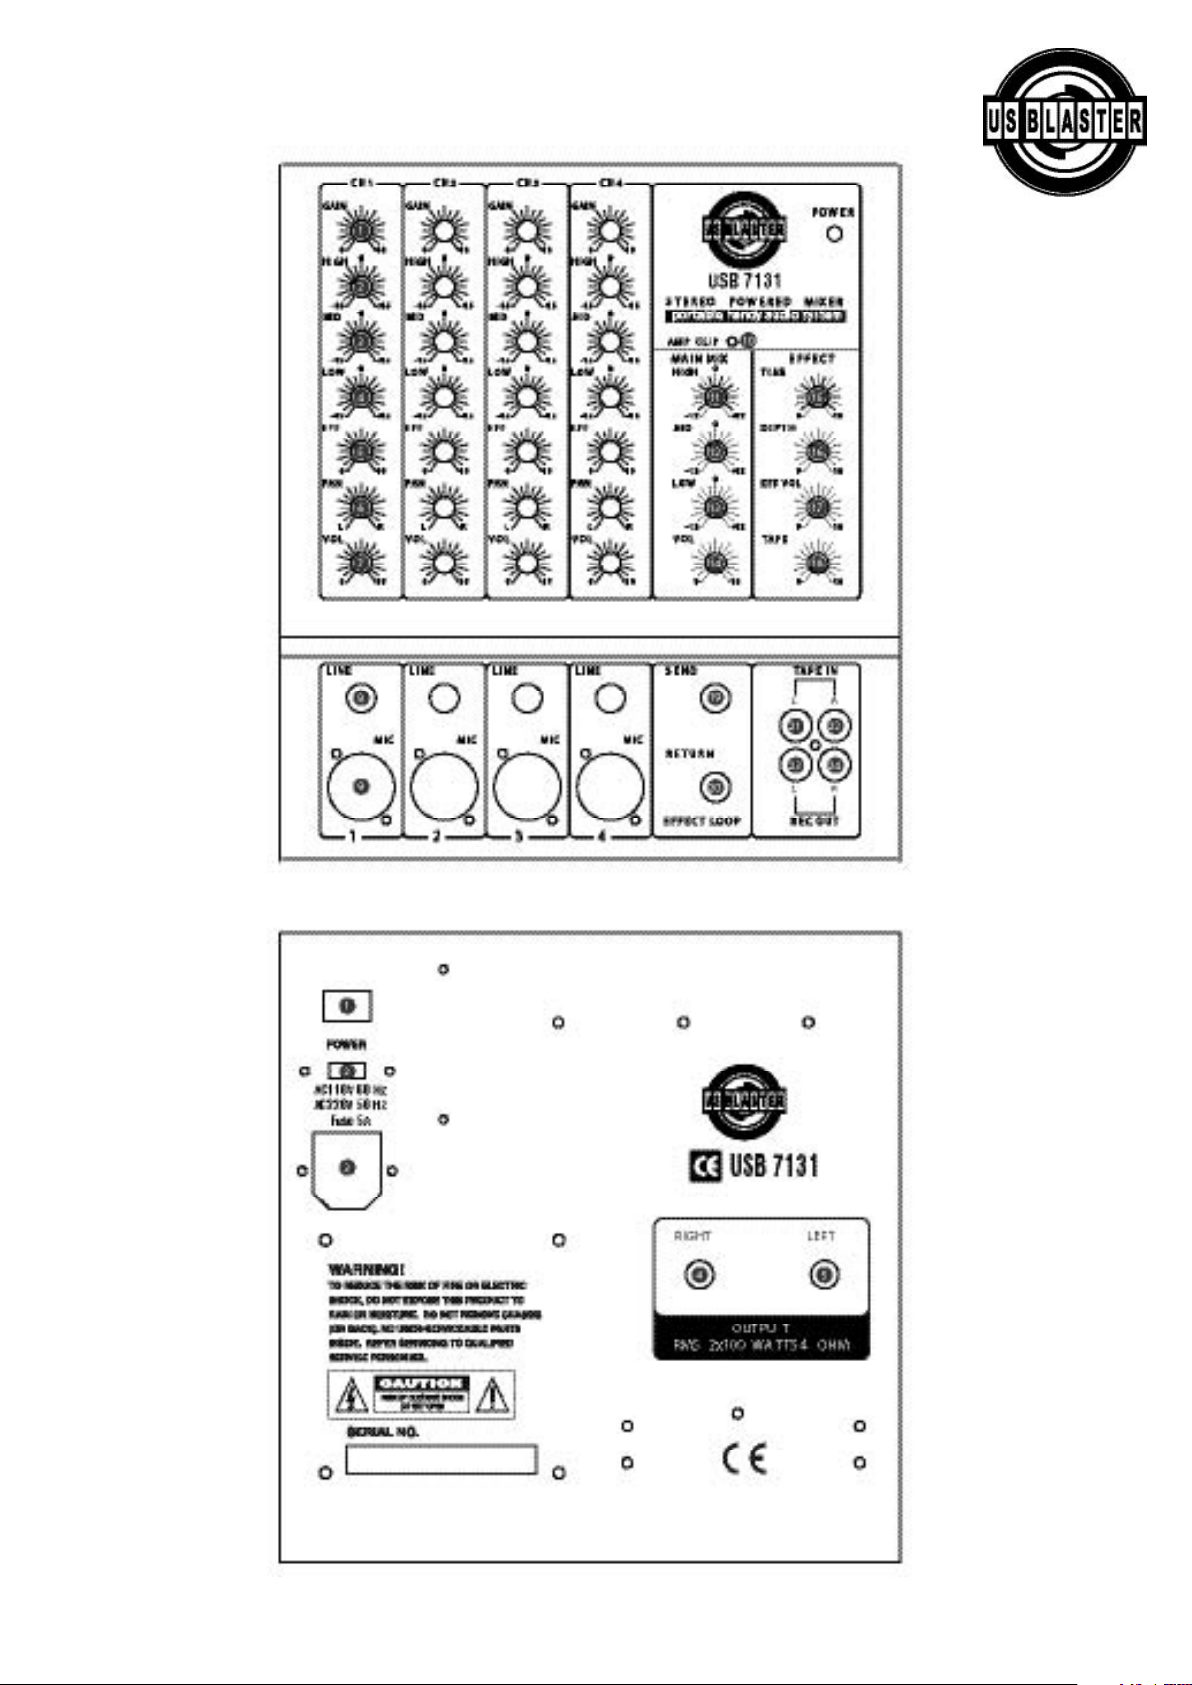
Vorderseite
1. Gain: Der Gain-Regler stellt die Eingangsempfindlichkeit des Mikrofons und der Line-
Eingänge an den Eingangskanälen ein.
2. High: Ermöglicht Ihnen die Steuerung des hohen Signalbereichs 10 kHz ( ± 12 dB).
3. Mid: Ermöglicht Ihnen die Steuerung des mittleren Signalbereichs 2,5 kHz ( ± 12 dB).
4. Low: Ermöglicht Ihnen die Steuerung des Bass-Signalbereichs 100 Hz ( ± 12 dB).
5. EFF: Verwenden Sie dieses Bedienelement, wenn Sie Effektton durch Einstellung des
Eingangssignals erhalten möchten.
6 . Pan: Das Kanal-Pan stellt den Kanalausgang im Stereofeld des Hauptmischgeräts ein. Sein kon
stantes Leistungsdesign stellt sicher, dass es keine Pegeldiskrepanzen gibt, egal ob ein Signal
hard-panned, center-stage oder irgendwo dazwischen liegt.
7 . Pegel: Ermöglicht Ihnen die Einstellung des Kanalsignalpegels, der an den Master gesendet
wird.
8 . Line: Symmetrische und unsymmetrische Stereoeingangsbuchse mit einem Durchmesser von
1/4" (6,35 mm) für den Anschluss von High-Level-Tonquellen.
9 . Mic: Elektronische symmetrische XLR-Neutrik-Anschlusseingangsbuchse. Für das Anschließen
von Low-Level-Signalquellen, wie zum Beispiel Mikrofonen und anderen Geräten mit niedriger
Impedanz.
10 . AMP-Peak-LED: Die Peak-LED leuchtet, wenn ein Ausgangssignal des Verstärkers in die Nähe
der Übersteuerung kommt. Sie erkennt den Spitzenpegel am Verstärkerausgang und leuchtet
automatisch 1 dB vor dem Clipping, um zu warnen, dass sich das Signal der Übersteuerung
nähert. Die Peak-LED sollte nicht leuchten, außer mit großen Unterbrechungen während des
Aufnehmens oder Mischens. Wenn sie ständig leuchtet, verringern Sie den Eingangs-Gain, um
die Lautsprecher zu schützen.
11 . High: Ermöglicht Ihnen die Steuerung des hohen Master-Ausgangsignalbereichs 10 kHz ( ± 12 dB).
12 . Mid Ermöglicht Ihnen die Steuerung des mittleren Master-Ausgangsignalbereichs 2,5 kHz
( ± 12 dB).
13 . Low: Ermöglicht Ihnen die Steuerung des Bass-Master-Ausgangsignalbereichs 100 Hz ( ± 12 dB).
14. Volume: Ermöglicht Ihnen, die Master-Ausgangslautstärke einzustellen.
15. Time: Ermöglicht Ihnen, die Verzögerungszeit des Effekts einzustellen.
16. Depth: Ermöglicht Ihnen, die Echowiederholungstiefe des Effekts zu steuern.
17. EEF Volume: Ermöglicht Ihnen, den Effektpegel für den Master-Ausgang zu steuern.
18. Tape: Ermöglicht Ihnen, den Pegel des Bandeingangs für den Masterbus einzustellen.
19. Send: 1/4"-Anschlussbuchse, Ausgangspegelsteuerung durch EFF (5).
20. Return: 1/4"-Anschlussbuchse, ermöglicht den Anschluss des Remote-Effektgeräteausgangs
an das Mischpult.
21/22. Tape in: RCA-Anschluss, ermöglicht Ihnen einen High-Level-Eingang wie zum Beispiel TAPE
(Band) oder CD.
23/24. REC output: RCA-Anschluss, kann für den Anschluss des Mischpults an den
Aufzeichnungseingang Ihres Recorders verwendet werden. Sie können damit Ihren Mix
aufzeichnen.
RÜCKSEITE:
1. Ein/Aus-Taste: Bitte achten Sie darauf, dass alle Lautstärkeeinstellungen für das Mischen richtig sind,
bevor Sie das Gerät einschalten. Die Netz-LED leuchtet, wenn Sie das Gerät einschalten.
2. Spannungswahlschalter: Achten Sie vor dem Anschließen des Netzkabels darauf, dass der
Spannungswahlschalter auf die richtige Spannung eingestellt ist.
3. Netzanschluss mit Sicherung
Die übliche IEC-Netzanschlusssteckdose wird verwendet, um einen Netzanschluss des Geräts herzustellen.
4. Ausgang des rechten Lautsprechers
Eine 1/4"-Buchse (6,35 mm) zum Anschluss eines Lautsprechers mit mindestens 4 Ohm Impedanz.
5. Ausgang des linken Lautsprechers
Eine 1/4"-Buchse (6,35 mm) zum Anschluss eines Lautsprechers mit mindestens 4 Ohm Impedanz.
© US Blaster Europe BV
Page 11
TECHNISCHE DATEN
1. NETZAUSGÄNGE (R.M.S)
100 Watt + 100 Watt bei 4 _ pro Seite
0,1% (T.H.D) bei 1 kHz
2. GESAMTKLIRRFAKTOR
Hauptverstärker ≤ 0,05% bei 1 kHz
Mikrofonkanal ~ Hauptverstärker ≤ 0,01% bei 1 kHz
3. FREQUENZGANG
±3 dB, 20 Hz ~ 20 kHz bei 1 W / 8 _ (Lautsprecherausgang)
4. EMPFINDLICHKEIT DES EINGANGSPEGELS
MIC CH.......................................................................................................–60 dBv
LINE CH .....................................................................................................–30 dBv
TAPE IN......................................................................................................–10 DBv
EFF SEND ....................................................................................................+4 dBv
EFF RETURN ...................................................................................................0 dBv
5. RAUSCHEN
Rauschabstand 86 dB
6. Kanal- und Master-EQUALIZATION
HIGH (Shelving) ...............................................................................10 kHz/ ±12 dB
MID (Bell)..........................................................................................1 kHz/ ±12 dB
LOW (Shelving) ................................................................................100 Hz/ ±12 dB
7. GEWICHT..................................................................................................... 27 kg
Lautsprecher:
1 Griff: Er erlaubt einen einfachen Transport.
2 Speakon: Ermöglicht den Eingang des Verstärkersignals.
3/4 Anschlussbuchsen: Ermöglicht den Eingang des Verstärkersignals.
5 Rad: Es erlaubt einen einfachen Transport.
Im Lieferumfang enthalten
1. NETZKABEL
2. BEDIENUNGSANLEITUNG
© US Blaster Europe BV
Page 12

Page 13
USB 7131
Système audio portable pratique
Nous vous remercions d’avoir choisi US Blaster. Lisez toujours les consignes de sécurité cidessous avant de faire installer cet équipement par un professionnel.
CHAMP MAGNETIQUE
DANGER! Ne placez pas d’équipements à gain élevé sensibles tels que des pré-amplificateurs ou
des platines de défilement directement au dessus ou en dessous de l’appareil. Comme cet amplificateur développe une grande puissance, il possède un champ magnétique important qui peut induire des ronflements dans les appareils non blindés situés à proximité. Le champ est le plus fort juste
au-dessus et juste en dessous de l’appareil. Placez l’amplificateur au bas du meuble et le
pré-amplificateur ou les autres équipements sensibles en haut.
DANGER
Pour éviter tout risque d’électrocution, n’enlevez pas les couvercles supérieur et inférieur. Aucune
pièce devant faire l’objet d’un entretien par l’utilisateur ne se trouve a l’intérieur.
Pour toute réparation, adressez-vous exclusivement à un technicien qualifié. Enlevez la fiche de la
prise murale avant d’enlever le panneau arrière pour accéder au commutateur de gain.
Attention
Pour diminuer le risque d'électrocution, n'exposez pas cet appareil à la pluie ou à l'humidité.
Attention aux symboles suivants
© US Blaster Europe BV
Le triangle avec un point
d’exclamation est utilisé
pour souligner des instructions de maintenance ou
d’utilisation importantes.
Le triangle avec le symbole
de l’éclair est utilisé pour
avertir l’utilisateur du risque
d’électrocution.
Page 14

Caractéristiques
Amplificateur :
• Performances audio supérieures avec peu de bruit, spectre complet et puissant, effets d’écho
sélectionnables naturels
• 4 entrées de ligne mono équilibrées mic XLR et équilibrées _", commandes de compensation et
effets égalisateurs 3 bandes et commandes PAN
• Amplificateur de puissance stéréo 100W / côtés @ 4 ohms. Refroidi par ventilateur, design
amplificateur bipolaire pour une longue durée de vie et une fiabilité maximale.
• Effet envoi et retour pour sortir de l’appareil effet distant à connecter au mixer.
• Prises RCA entrée cassette et sortie enregistrement avec commande du niveau de cassette
• Effet avec délai d’attente, profondeur d’écho et commandes de niveau
• Alimentation CA interne avec commutateur sélection 115/230V
• Boîtier avec trou pour socle interne
Haut-parleur :
• 2 voies avec filtre passif
• Réponse de fréquence : 80Hz -20KHz
• Puissance nominale : 60W
• Impédance nominale : 8 ohms
• Chaque haut-parleur avec 1 speakon et 2 connecteurs prises 1/4"
• Boîtier avec poignée et 2 roues
• Chaque boîtier avec trou pour socle interne
© US Blaster Europe BV
Page 15
© US Blaster Europe BV
Page 16

Panneau avant
1. Gain La commande du gain règle la sensitivité d’entrée des entrées Mic et ligne sur
les canaux d’entrée.
2. High vous permet de commander la gamme élevée des signaux 10KHz 12dB
3. Mid vous permet de commander la gamme moyenne des signaux 2,5KHz 12dB
4. Low vous permet de commander la gamme basse des signaux 100Hz 12dB
5. EFF utilisez cette commande lorsque vous souhaitez obtenir un effet sonore en réglant le signal
d’entrée
6 . Pan: Channel Pan positionne la sortie du canal dans le champ stéréo du mix principal. Son
design à alimentation permanente garantit toute absence de divergences qu’un signal soit hardpanned, center-stage ou entre les deux.
7 . Level: vous permet de régler le niveau de signal du canal à envoyer au ‘master’
8 . Line douille d’entrée prise stéréo diamètre 1/4 (6,35 mm) équilibré et non équilibré pour con
nexion de sources sonores de haut niveau.
9 . Mic douille entrée connecteur XLR équilibré électroniquement . Pour connecter les sources de
signal de faible niveau. Telles que des micros ou d’autres appareils de faible impédance.
10 . MP peak LED: La DEL de point s’allume lorsque le signal de sortie d’un amplificateur passe en
surcharge. Il détecte le niveau de pointe sur la sortie AMP et s’allume à environ 1 dB avant
d’être coupé pour avertir que le signal approche la surcharge. Vous ne souhaitez pas que la DEL
de pointe s’allume de manière intermittente pendant une prise ou un mixage. Si elle s’allume en
permanence, réduisez le gain d’entrée pour protéger vos haut-parleurs.
11 . High vous permet de commander la gamme élevée des signaux de sortie principaux 10KHz-12dB
12 . Mid vous permet de commander la gamme moyenne des signaux de sortie principaux 2,5KHz-12dB
13 . Low vous permet de commander la gamme basse des signaux de sortie principaux 100Hz 12dB
14. Volume: vous permet d’adapter le niveau de sortie principal.
15. Time: vous permet d’adapter le délai d’attente de l’effet.
16. Depth: cette pose vous permet de commander la profondeur de l’effet de répétition de l’écho.
17. EEF Volume: cette pose vous permet de commande le niveau d’effet vers la sortie principale.
18. Tape: cette pose vous permet d’adapter le niveau de l’entrée par bande vers le bus maître.
19. Send: connecteur prise 1/4, commande du niveau de sortie par EFF(5)
20. Rerturn: connecteur prise 1/4, permet de connecter au mixer la sortie de l’appareil d’effet
distant.
21/22. Tape in: connecteur RCA, vous permet d’entrée un signal de niveau élevé tel que CASSETTE, CD.
23/24. REC output: connecteur RCA peut être utilisé pour connecter le mixer à l’entrée
d’enregistrement de votre enregistreur pour vous permettre d’enregistrer votre mixage.
PANNEAU ARRIERE :
1. Commutateur d’alimentation. Veillez à ce que la pose volume se trouve en position mix lorsque vous
souhaitez allumer cet appareil, la DEL d’alimentation s’allume lorsque vous activez le commutateur
d’alimentation.
2. Sélecteur de tension. Avant de brancher le cordon d’alimentation, veillez à ce que le commutateur de
sélection de tension soit réglé sur la tension de connexion.
3. Connecteur d’alimentation avec mouleur de fusible. Ce réceptacle de cordon d’alimentation IEC stan
dard est utilisé pour connecter l’alimentation CA à votre unité.
4. Sortie haut-parleur droit. une prise 1/4 (6.35mm) pour la connexion au boîtier des haut-parleurs, l’im
pédance minimale est de 4 ohms.
5. Sortie haut-parleur gauche. une prise 1/4 (6.35mm) pour la connexion au boîtier des haut-parleurs,
l’impédance minimale est de 4 ohms.
© US Blaster Europe BV
Page 17
CARACTERISTIQUES
1. SORTIES ALIMENTATION (R.M.S)
100 Watts + 100 Watts @ 4 par côté
0.1% (T.H.D) @ 1KHz
2. DISTORSION HARMONIQUE TOTALE
Amp. Principal <0.05% @ 1KHz
Mic Ch ~ Amp. Princ.<0.01% @ 1KHz
3. REPONSE EN FREQUENCE
3dB, 20Hz ~ 20KHz @ 1W/8 Ohms (Speaker output)
4. INPUT LEVEL SENSITIVITY
MIC CH ........................................................................................................-60dBv
LINE CH ......................................................................................................-30 dBv
TAPE IN ......................................................................................................-10 dBv
EFF SEND......................................................................................................+4dBv
EFF RETURN ....................................................................................................0dBv
5. NOISE
S/N ...............................................................................................................86 dB
6. CHANNEL AND MASTER EQUALISATION
HIGH (Shelving) ...................................................................................10KHz/ 12dB
MID (Bell)..............................................................................................1KHz/ 12dB
LOW (Shelving).....................................................................................100Hz/ 12dB
7. POIDS ........................................................................................................27 Kgs
Haut-parleur :
1 Poignée : vous permet de l’emporter facilement.
2 Speakon: vous permet d’entrer le signal de l’amplificateur
3/4 connecteurs prise : vous permet d’entrer le signal de l’amplificateur
5 Roulette : vous permet de l’emporter facilement.
Fourni
1 CORDON D’ALIMENTATION
2 MODE D’EMPLOI
© US Blaster Europe BV
 Loading...