

Page 1
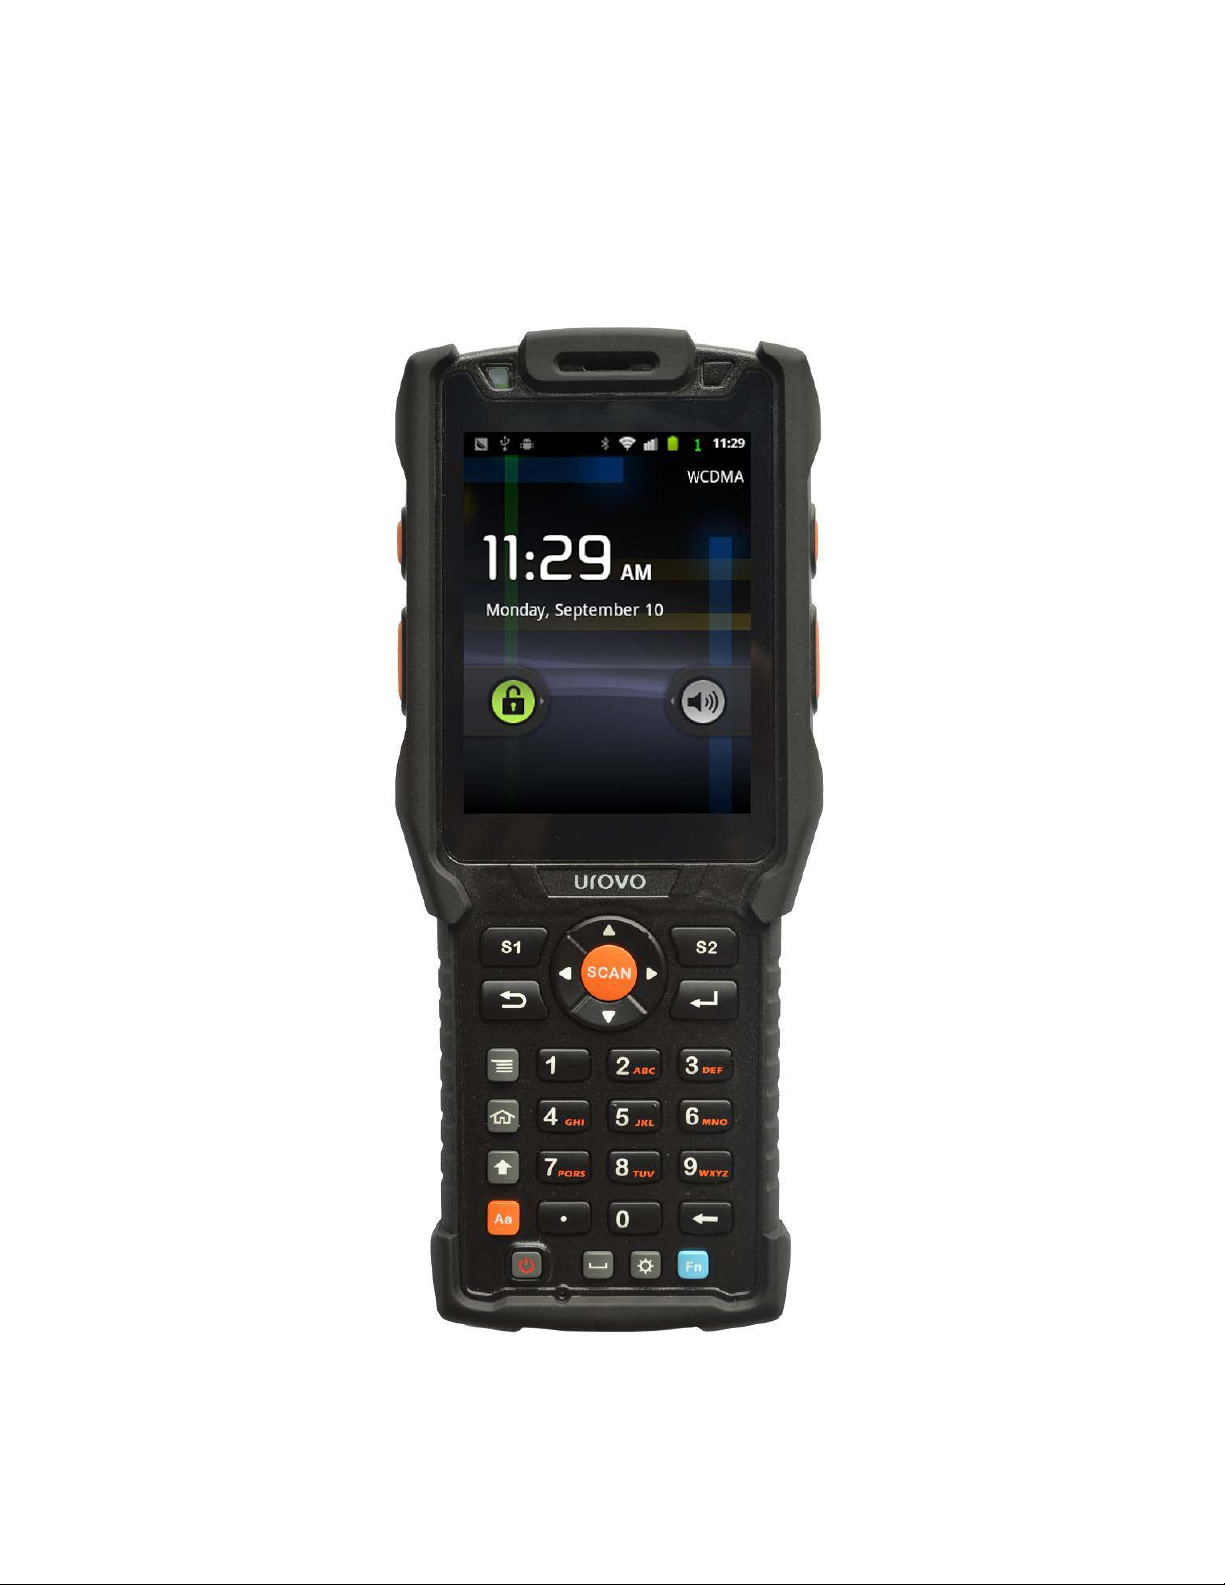
V5000 Series User Manual (Android)
Page 2

1
Copyright notice
This article contains information to indicate the current status of the
product at the time of publication; we reserve the right to make updates on
product features, specifications, warranty information and the contents of
this article, without having to give prior notice.
This article contains exclusive information patented and protected by
copyright law, all rights reserved. Except as allowed under current
copyright law, no part of this document may be photocopied, reproduced,
modified or translated without the written consent of Urovo Technology
Corporation Limited.
The software programs used to operate this product are also
protected by copyright law, all rights reserved. Microsoft, Windows,
Windows 2000, Windows XP, and Windows 2003, Windows Vista, and
Windows 2008, Windows 7, ActiveSync, Windows Mobile Device Center
and Internet Explorer are the property of Microsoft Corporation.
All other brand names, trademarks and service marks mentioned in
this document are the property of their respective rights holders.
Please read this manual carefully before using this product.
Page 3

2
Table of contents
Copyright notice .............................................................................................................................. 1
Table of contents
Chapter 1: Product Package
Chapter 2: Product Description
About This Product
Main characteristics
Applications
Specifications
Functions
I. Front of the Unit
II. Side of the unit
III. Keypad
IV. Back of the unit
Chapter 3: Usage Instructions
Chapter 4: Advanced Settings
Chapter 5: Basic Functions
............................................................................................................................ 2
........................................................................................................... 3
...................................................................................................... 4
..................................................................................................................... 4
.................................................................................................................... 5
................................................................................................................................ 6
.............................................................................................................................. 7
....................................................................................................................................... 12
.................................................................................................................... 12
...................................................................................................................... 13
................................................................................................................................. 15
................................................................................................................... 17
...................................................................................................... 20
...................................................................................................... 23
........................................................................................................... 30
Chapter 6: After-Sales Service
...................................................................................................... 37
Page 4
3
Chapter 1: Product Package
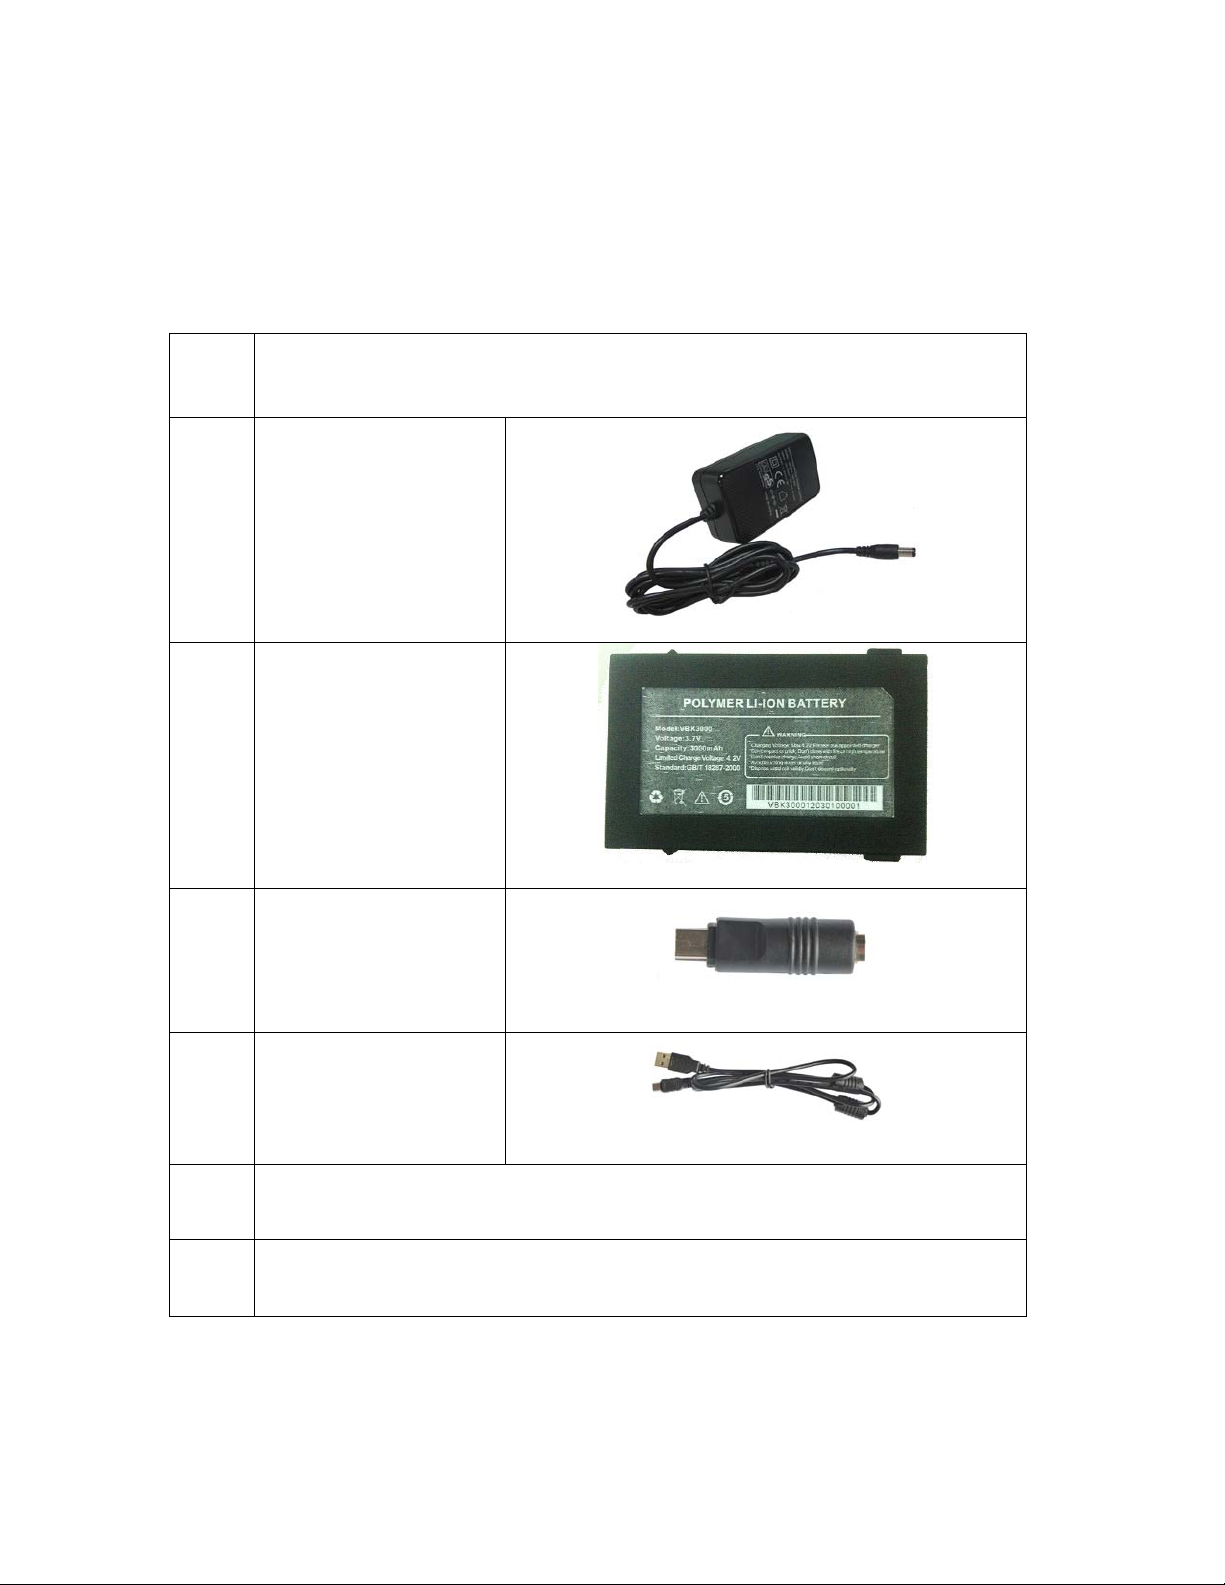
Packing List
Please check to confirm that the package contains the following items:
Item
1
2
3
Power adapter x 1
Lithium battery x 1
Adapter head x 1
Name of part
4
Data cable x 1
5
V5000 series manual x 1
6
Product warranty card x 1
Page 5

4
Chapter 2: Product Description
About This Product
The V5000 series serves as the foundation of our independent
research and development, design, and production of industrial handheld
terminals for various industries. The form factor features a flexible,
ergonomic design that is lightweight and impact-resistant, with dual-power
mode, long standby time, and supports voice call functionality.
1. Integrated portable industrial design
The V5000 industrial terminals are designed to be waterproof,
dustproof, and resistant to impact drops, corrosion, static and
temperature extremes.
The V5000 series complies with IP65 requirements, have passed
impact testing from a height of 1.5 meters onto concrete floors, and
are not affected by dust or splashes of water. The V5000 uses a highcapacity battery that guarantees long working hours throughout the
day, and the terminal utilizes a dual-power mode to prevent loss of
data. It is ergonomic to minimize user fatigue, weighs only 350 grams,
and comes in a compact size of 190 (l) x 75 (w) x 30 (h) mm.
2. High-speed, large-capacity data processing
The V5000 series of industrial terminals uses Samsung’s Cortex-A8
1GHz processor + 512MB RAM and matching 512MB built-in Flash
memory. This enables it to quickly and accurately run high-speed
programs with complex processing. Its memory capacity can be
expanded up to 32GB with the use of microSD/TF cards, meeting a
number of business data storage needs.
3. Powerful and flexible data communication
The V5000 series supports WCDMA HSDPA standard voice, SMS and
data traffic, supports 802.11b/g Wi-Fi wireless LAN communication,
Page 6

5
RS232 serial communications and Bluetooth. Meets Cisco CCX2/3
security standards, fully supports Cisco AP and safety specifications,
meaning you can run remote data updates.
4. Human-computer interaction capabilities
The V5000 series of products uses the Android operating system. This
platform is a truly open and completely comprehensive mobile
software platform, supported by a wealth of software resources for
users to choose from, giving the user a wide breadth of
customization options.
Main characteristics
1. A compact, lightweight, durable structure
2. Long working hours: the main battery when fully charged can last for
more than eight hours
3. Charging convenience: the V5000 uses a USB port for charging, making it
convenient to be recharged just about anywhere
4. Dual power sources: if the main battery is used up, the terminal will use
its backup battery. A fully charged backup battery can maintain standby
time of 6 hours, preventing accidental power failure and data loss
5. Hardware modules can be updated:
1) 3.0MP camera
2) GPS positioning
6. Built-in scanning module
7. Communication modes: Wi-Fi ,Bluetooth and GPRS/3G
8. Open design: the software interface allows development of third-party
applications
Page 7

6
9. Industrial grade equipment, waterproof, dustproof, resistant to drop
impact, high / low temperature under normal working conditions
10. High-speed, high-capacity data processing capabilities, with its Samsung
1GHz processor, 512MB of RAM and 512MB built-in Flash memory. Flash
memory can be expanded up to 32GB with the use of microSD / TF cards
11. 3.5 inch color resistive touch screen
12. Supports Chinese handwriting input
Applications
1. Apparel industry
2. Distribution, retail, and supply chain management
3. Logistics, including warehousing, courier services, LTL transport, and
more
4. Hospitals, government offices, mobile/remote offices, and asset
inventory
Page 8

7
Specifications
Model
V 5000
Weight
350g (with battery)
keyboard
touch screen
speed
times/second
Readabl
Code 39; Codabar; Code 128;
Overall maximum size:
Physical
specification
s
Product
performance
Overall dimensions
Keypad
Input method
Operating system
CPU
Display
190mm*75mm*30mm
Product handle:
90mm*50mm*20mm
Alphanumeric keys, navigation
keys, scan button, side buttons
English, Chinese pinyin,
handwritten input, supports soft
Either Windows CE 6.0 R3 or
Android 2.3 operating system,
multi-language support
Samsung Cortex-A8 1GHz
processor
3.5 inches TFT-LCD QVGA (240 x
320) or VGA (480 × 640) color
Scanning
parameters
Memory
1-
Dimensiona
l laser
ROM 256 / 512MB Nand Flash
RAM 256 / 512MB Mobile DDR
Scan
e bar
codes
100 times/second +/- 20
Discrete 2 of 5; IATA 2 of 5;
Interleaved 2 of 5; Code 93; UPC
Page 9

8
A; UPC E0; EAN 8; EAN 13; MSI;
EAN 128; UPC E1; Trioptic Code
39; Bookland EAN; Coupon Code;
2-
Dimensiona
l CMOS
sensor
Readabl
e bar
codes
RSS-Limited; RSS-14; RSSExpanded
1D Symbologies:UPC/EAN,
Bookland EAN, UCC Coupon Code,
ESSN EAN, CODE 39, CODE 128,
GS1-128, ISBT 128, Trioptic Code
39, CODABAR, MSI, Interleaved
2/5, Discrete 2/5, Chinese2/5 ,
Korean3/5, Matrix 2/5, CODE
32,CODE 93, CODE 11, Inverse 1D,
GS1 DataBar, Composite Codes
2D Symbologies:PDF417、
MicroPDF417、Data Matrix, Data
Matrix Inverse, MaxiCode, QR
Code, Aztec, Aztec Inverse Postal
Codes:U.S. Postnet, U.S. Planet,
U.K. Postal, Japan Postal,
Australian Postal, Netherlands KIX
Code, USPS 4CB/One
Code/Intelligent Mail, UPU FICS
Postal
Page 10
9
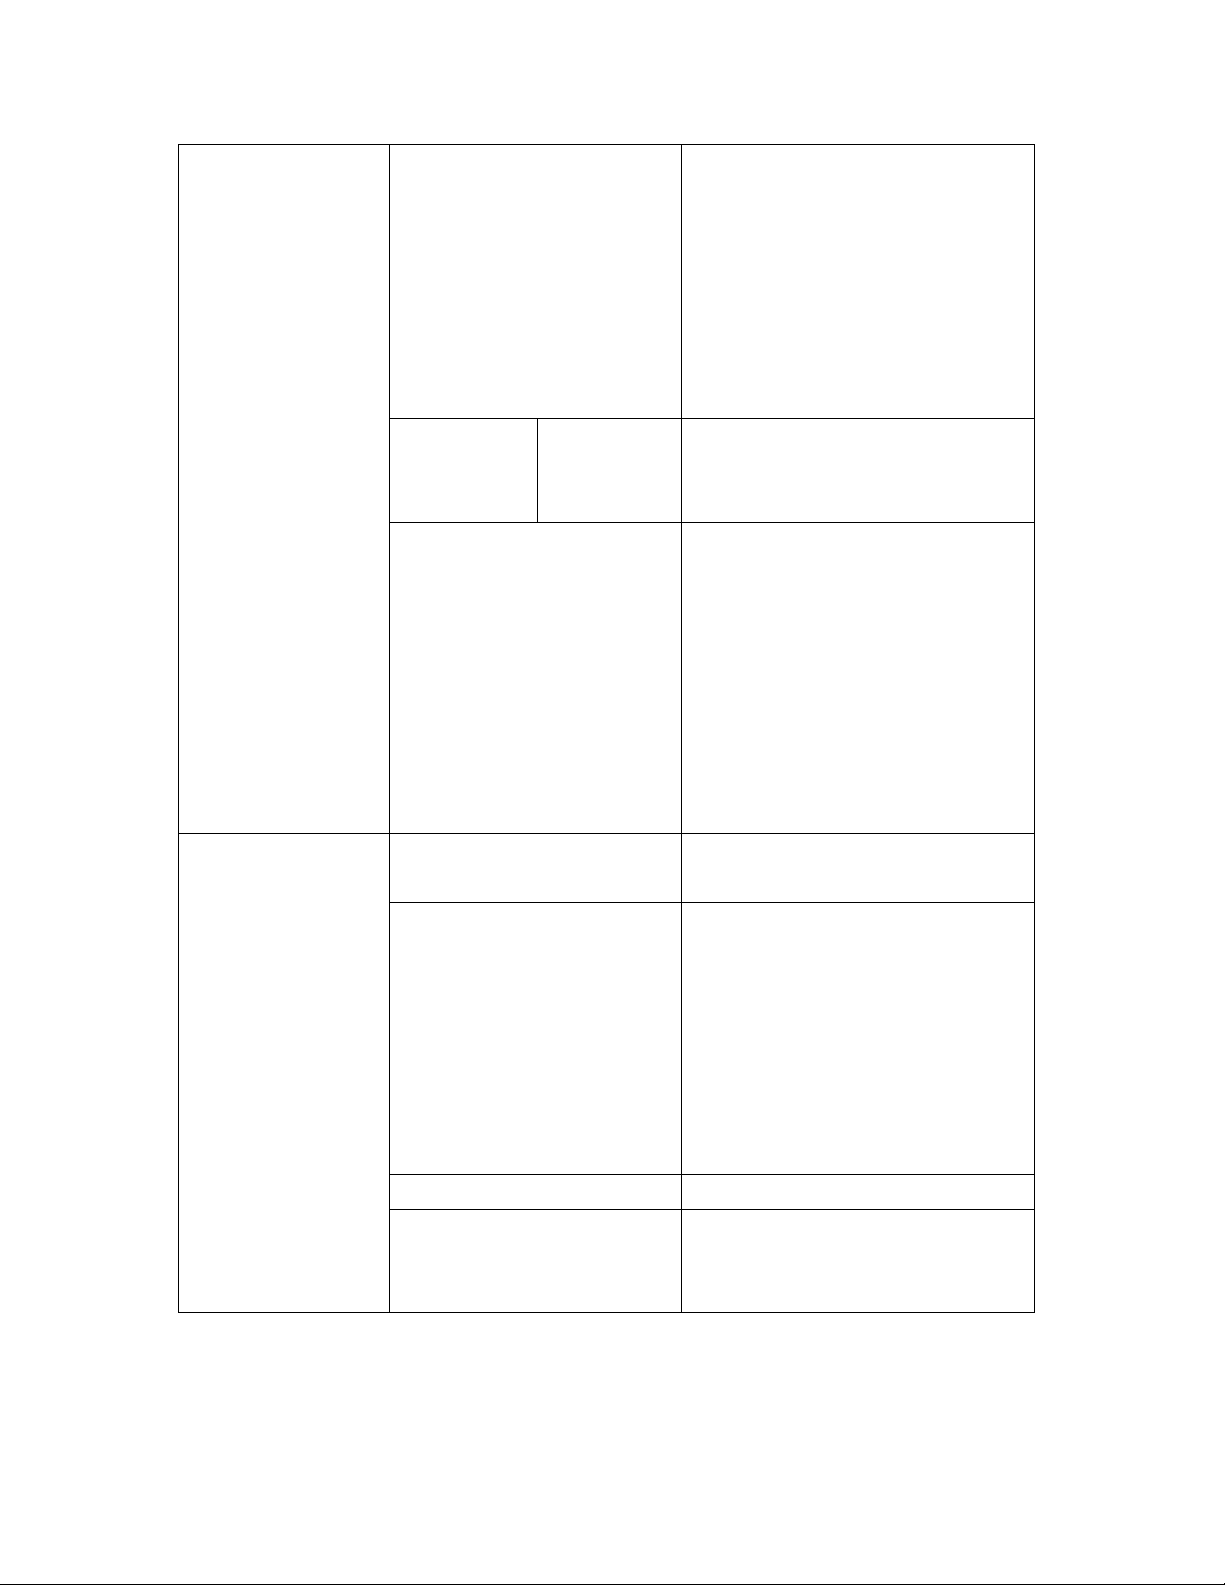
Standard, built-in 802.11b /
MHz
g wireless communication
module, the communication
Data
communications
Wi-Fi / Wireless LAN
Working
WCDMA
frequency
Data services
speed of up to 54MB /s to
meet the safety standards of
CISCO CCX2 / 3, and fully
supports the the CISCO AP
and safety regulations
UMTS1900/850 MHz
GSM850/900/1800/1900
GSM CS: UL 9.6kbps/DL
9.6kbps
GPRS/EDGE: Multi-slot Class
12, Class B
WCDMA CS: UL 64kbps/DL
64kbps
WCDMA PS: UL 384kbps/DL
384kbps
HSDPA:DL 3.6Mbps
Extended
functionality
Camera
3 million/5 million HD pixels,
has flash and autofocus
Supports A-GPS, 48
channels, positioning
GPS
accuracy of less than 1m, the
initial positioning time is less
than 38 seconds
Bluetooth Bluetooth Class 2.1+EDR
Speaker (mono) x 1
Audio frequency
Microphone x 1
Earpiece x 1
Page 11
10
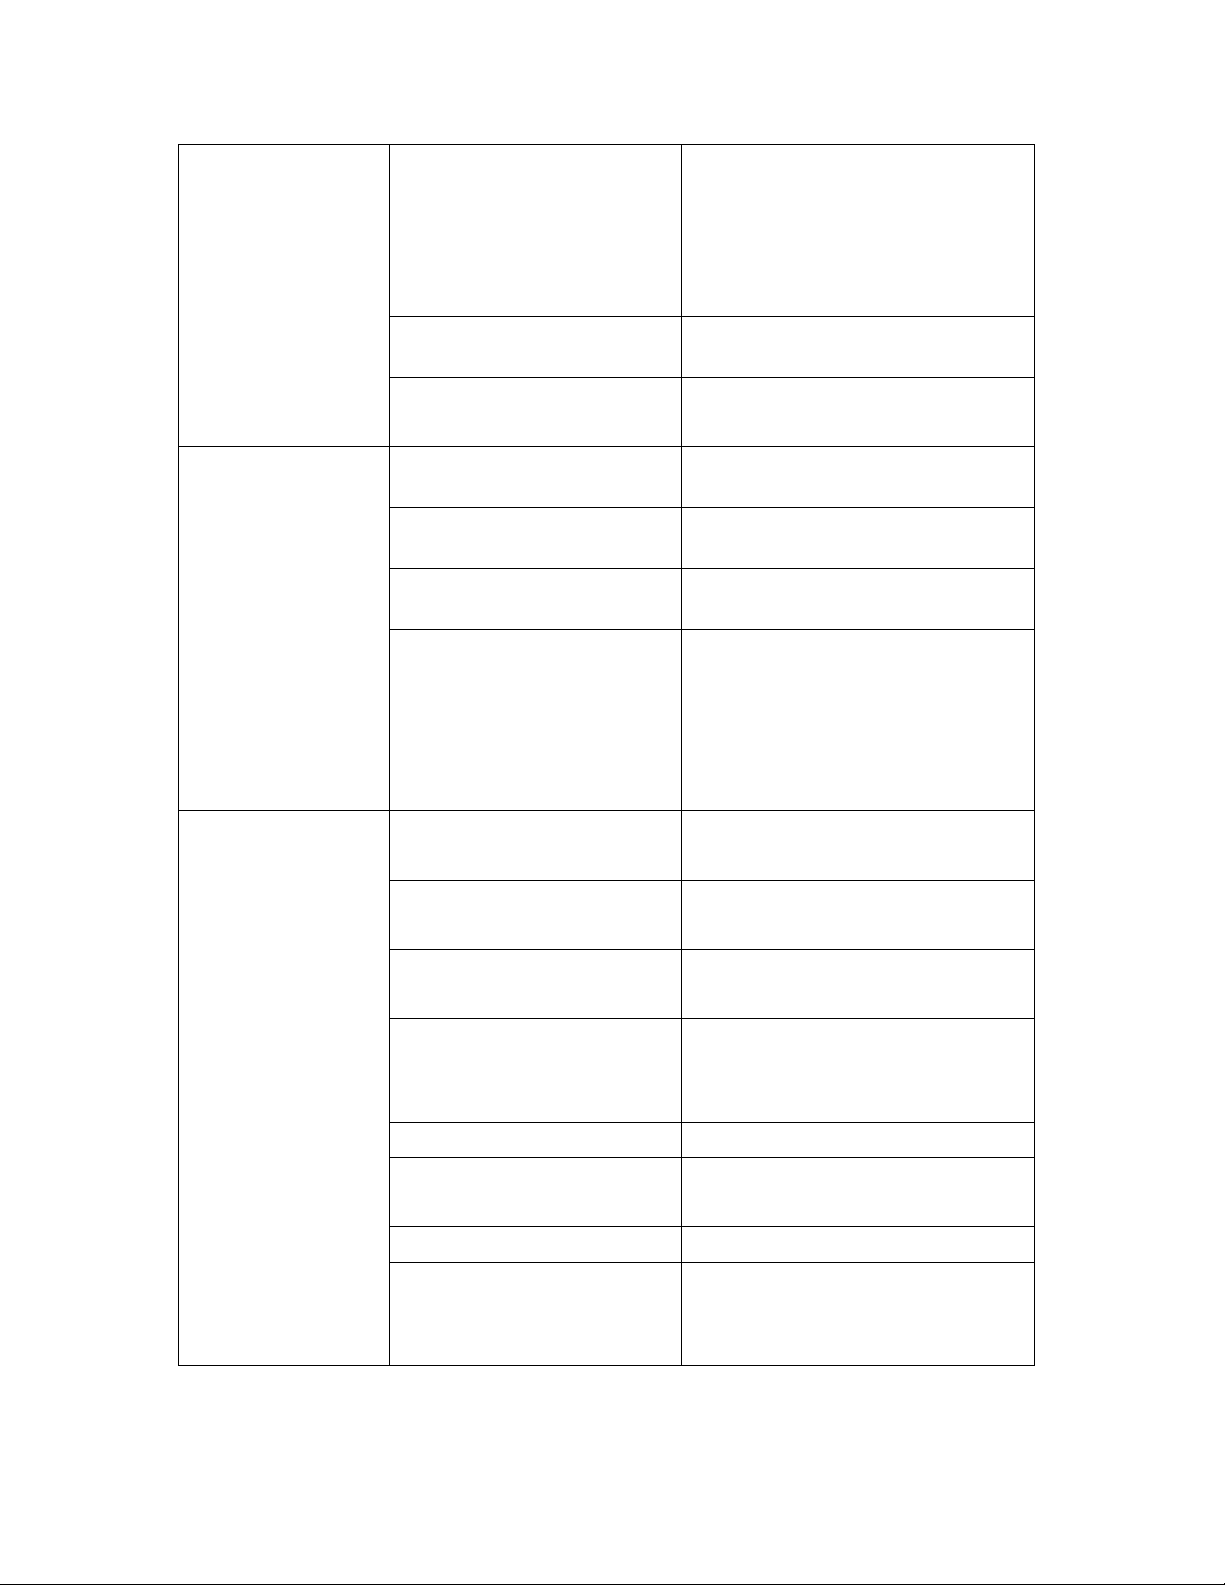
3.7V 3000mAh rechargeable
environment)
support 32G) x 1, SIM x 1
Bluetooth serial protocol
Product approvals
CCC, CE, FCC
EN60950/IEC950
lithium battery, standby
Power supply
Environmental
interaction
Main power supply
time of 8 hours or more
(depending on the
Backup power supply 150mAh backup battery
Used to keep the internal
RTC power supply
clock running
Operating temperature
Storage temperature
-10 to +50 ℃
-20 to +60 ℃
Humidity 5 to 95% (non-condensing)
The unit can survive a drop
of 1.5m onto solid concrete
Impact endurance
surfaces, provided it is
working within the operating
temperature range
External
interfaces and
accessories
product
specifications
Expansion cord slots
Micro SD / TF (maximum
Mini USB x 1, 3.5 mm audio
Physical interface
interface x 1
Can charge two batteries at
Charging stand
the same time
Can be connected to all
Printer
printers that support
Other accessories Power adapter, data cable
Industrial protection
IP65
rating
Complies with UL60950, CSA
Electrical safety
C22.2 No.6050,
Page 12
11
Laser safety
standard
accessories)
specifications
IEC2/FDA II level, in line with
the IEC60825-/EN60825-1
Meets the provisions of the
Ministry of Information
Network access license
Industry Standards License
of telecommunication
equipment
12 months (excluding
Warranty period
Page 13
12
Functions
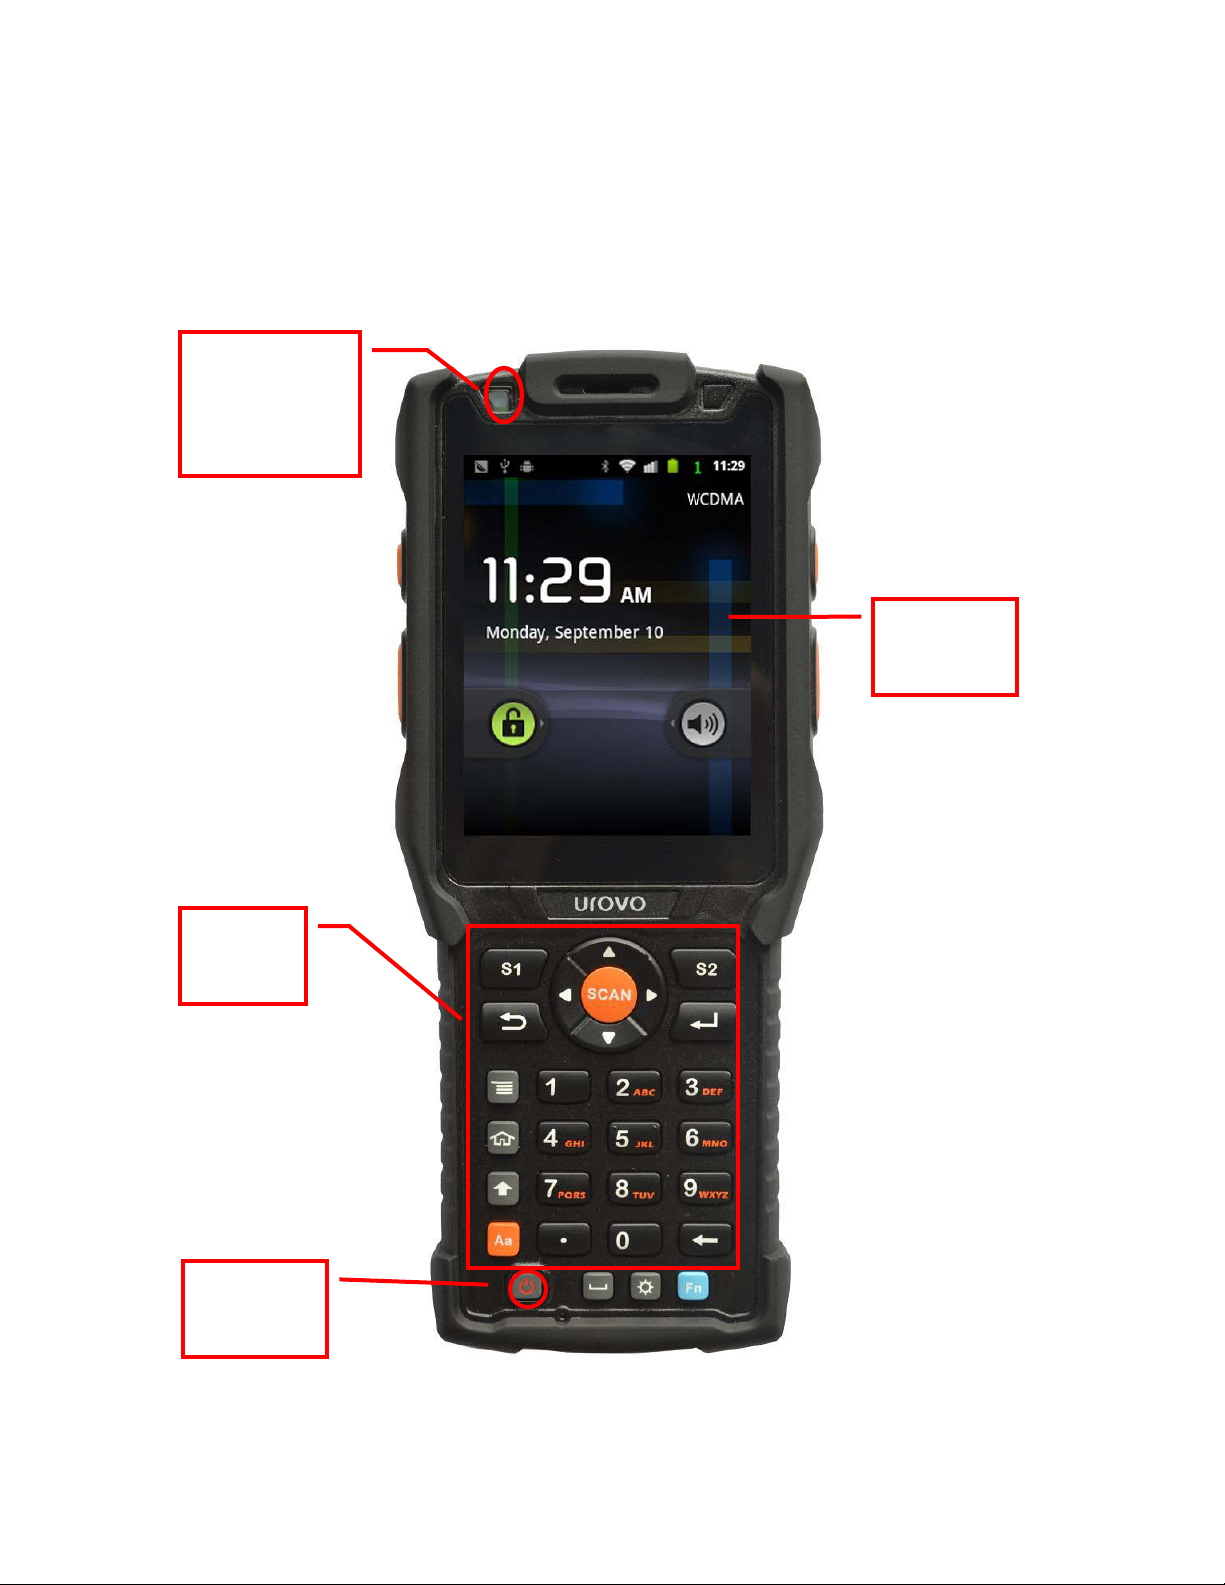
I. Front of the Unit
1 . Scan
light/chargin
g system
4 . Touch
screen
2 . Main
keypad
3 . Power
button
Page 14
13
keys
1) Scanning LED, charging and instructions
① Barcode scanning light is red for successful scan
② Charging display is red while recharging, and green when charging is
complete and during normal use
2) Main keypad
Go to next page
3) Power key
Turn the device on/off, or turn the LCD backlight on/off, or to wake the
device from sleep mode
4) Touch screen
Use the stylus to operate the machine
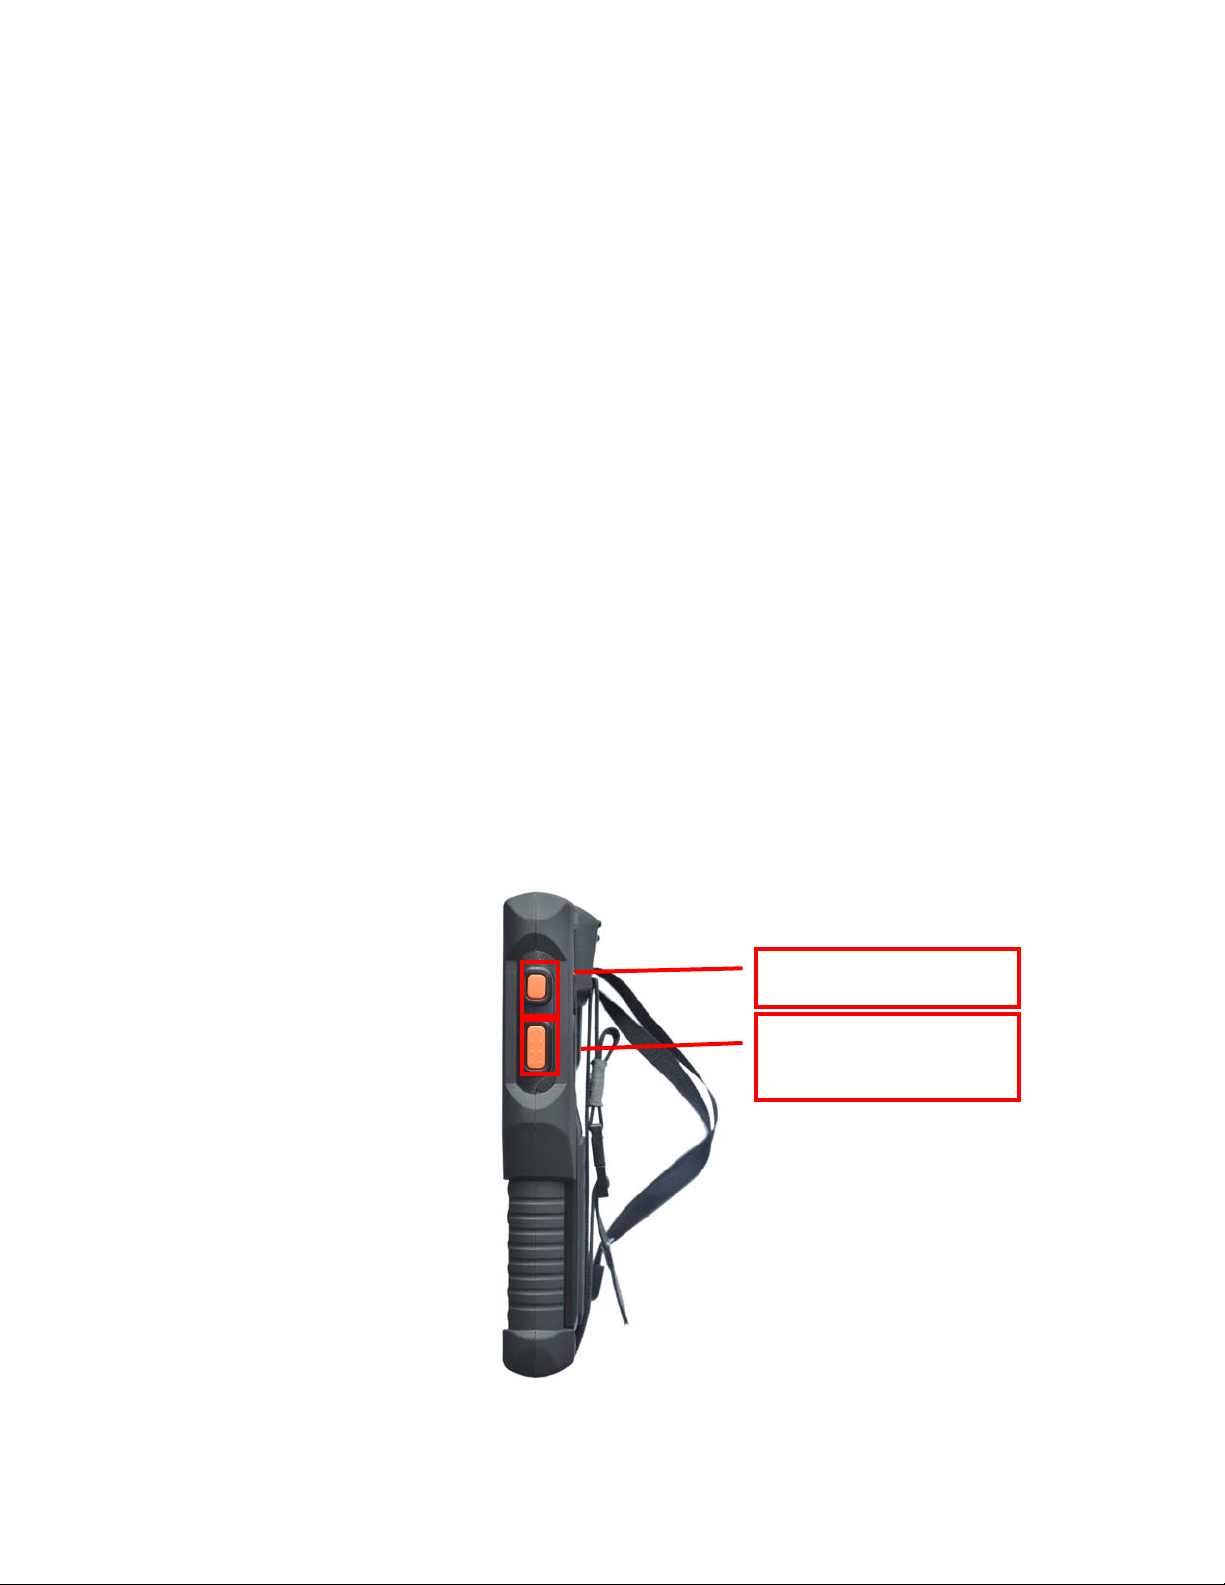
II. Side of the unit
1. Custom buttons
2. Bar code scan
Page 15
14
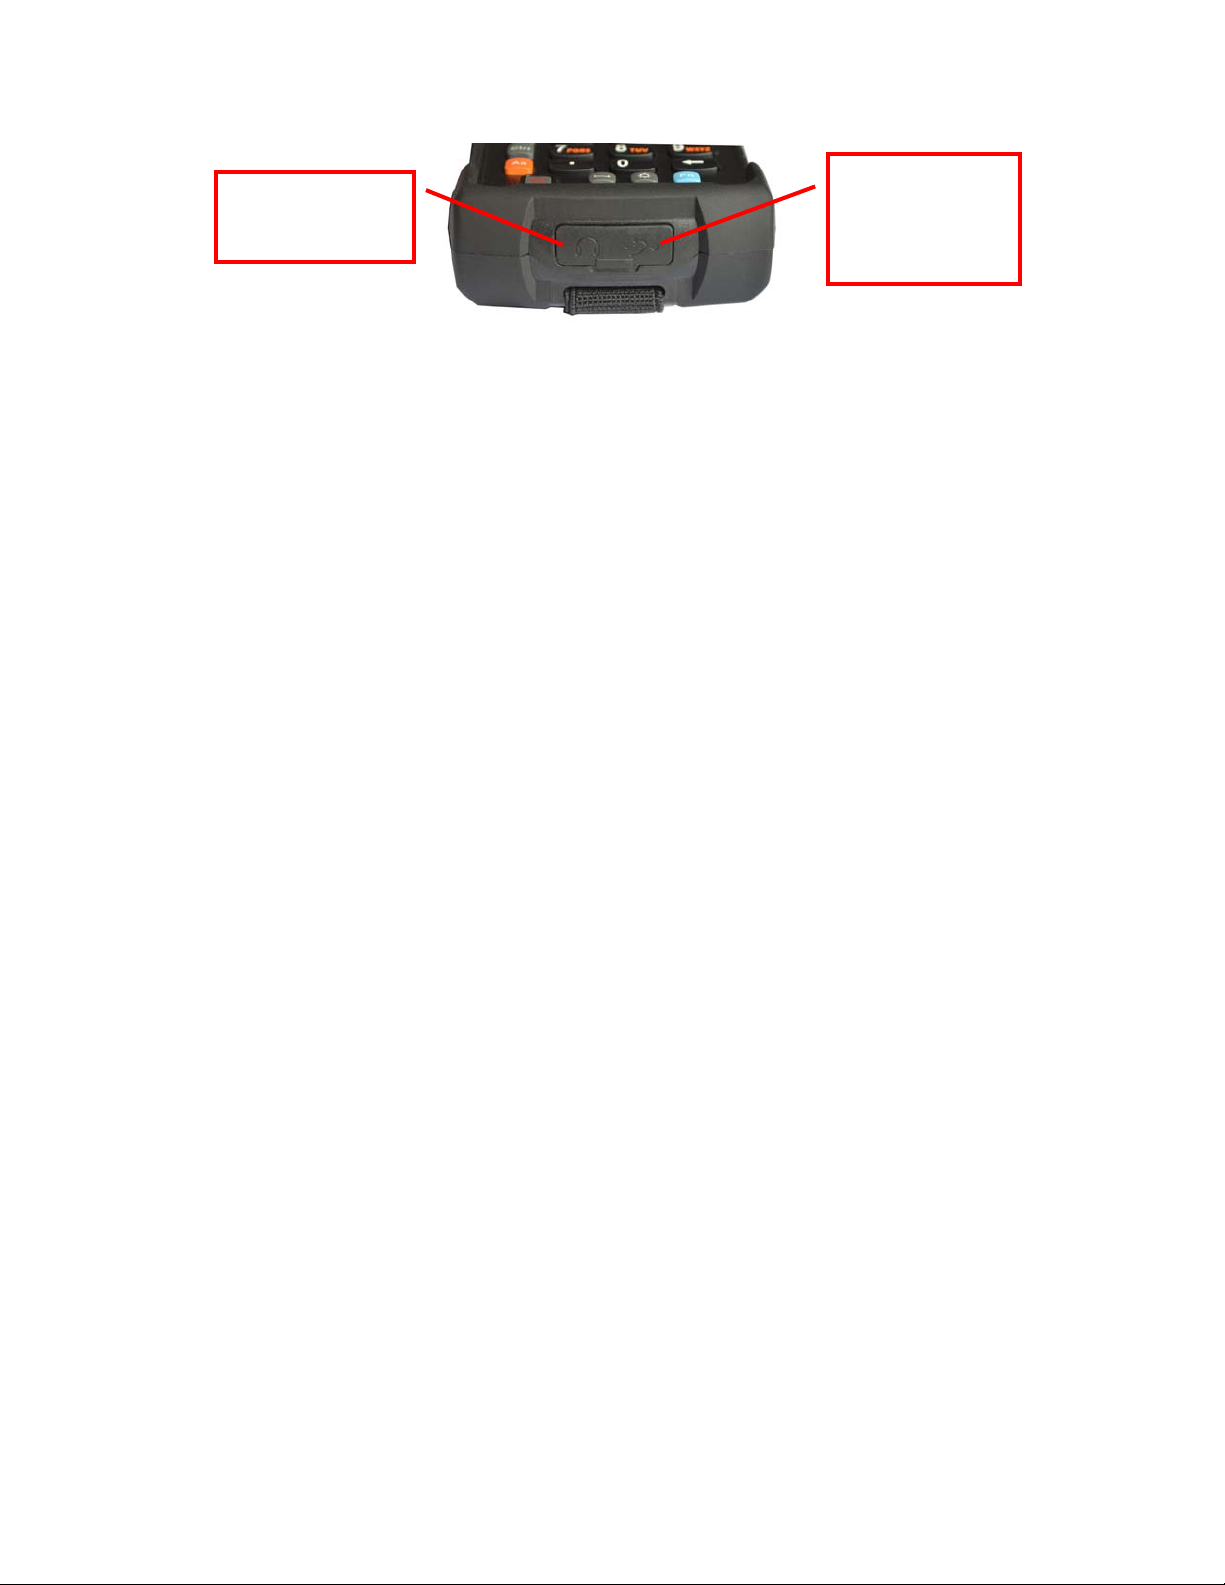
interface
3. Headphone
jack
4. Charging
and USB
1. Custom buttons: user-defined key in the secondary development
2. Bar code scan keys: Press this key to scan the bar code
3. Headphone jack: Can insert 3.5 mm headphones
4. Charging and USB interface: Sending and receiving data by USB data line
or charging by Power adapter
Page 16
15
III. Keypad
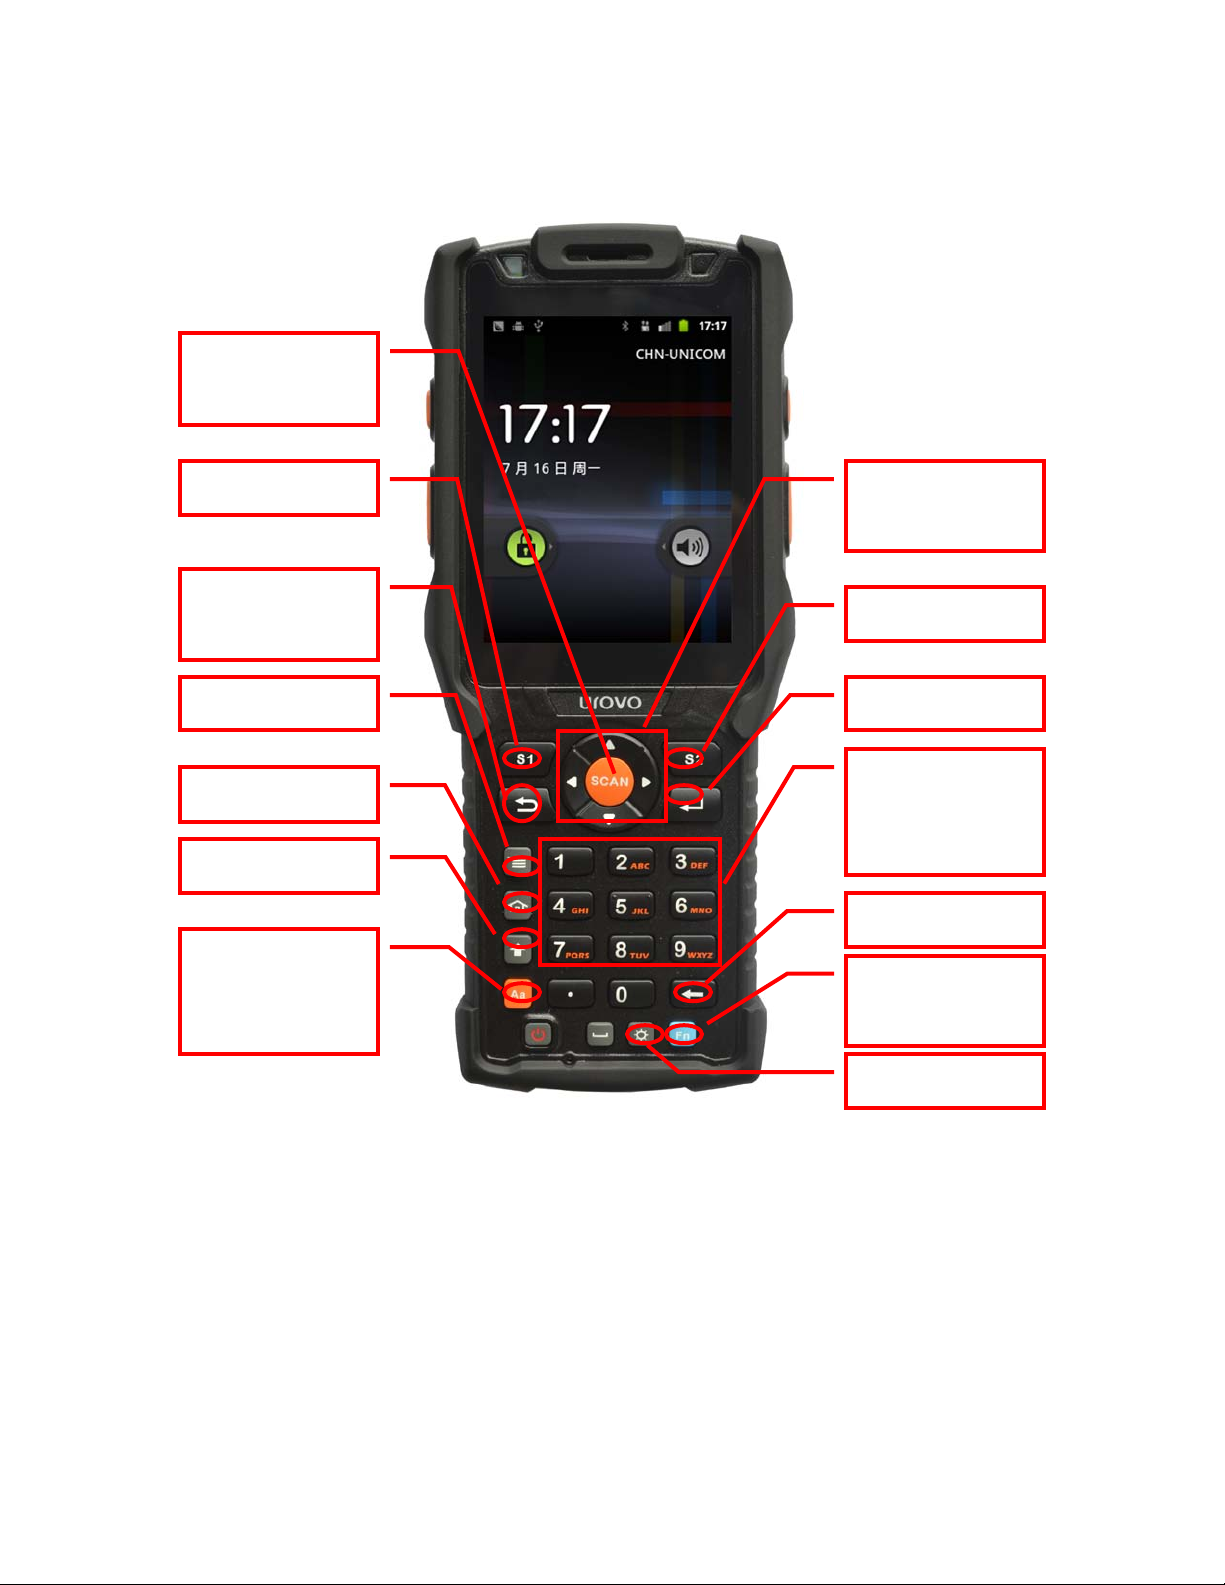
2. S1 key
3. Return/ESC
key
4. Menu key
5. Home key
6. Shift key
7.
r shift keys
9. S2 key
10. Enter key
11.
r keys
12. Backspace
8. Direction
key
keys
1. Barcode
scanning
Number/lette
1) Barcode scanning key: Press this key to scan the bar code
2) S1 key: left softkey
3) Return/ESC key: return to previous menu/cancel actions
4) Menu key: access menu options for current application
Number/lette
13. Function
14. Backlight
Page 17

16
5) Home key: return to the desktop interface
Fn + 0
F10
Fn + 5
F5
6) Shift key: for switching between letters or symbols
7) Number/letter key: press to switch the keypad’s current input mode
8) Arrow keys: in four directions – up, down, left and right
9) S2: right softkey
10) Enter key: used to approve an action
11) Number / letter keys: input the appropriate numbers or letters
12) Backspace: delete one number/letter character
13) Function key: press this key and one of the number/letter keys to
activate a system key combination
14) Backlight key: press to turn backlight on/off
List of key combination:
Fn + 1 F1 Fn + 6 F6
Fn + 2 F2 Fn + 7 F7
Fn + 3 F3 Fn + 8 F8
Fn + 4 F4 Fn + 9 F9
Page 18
17
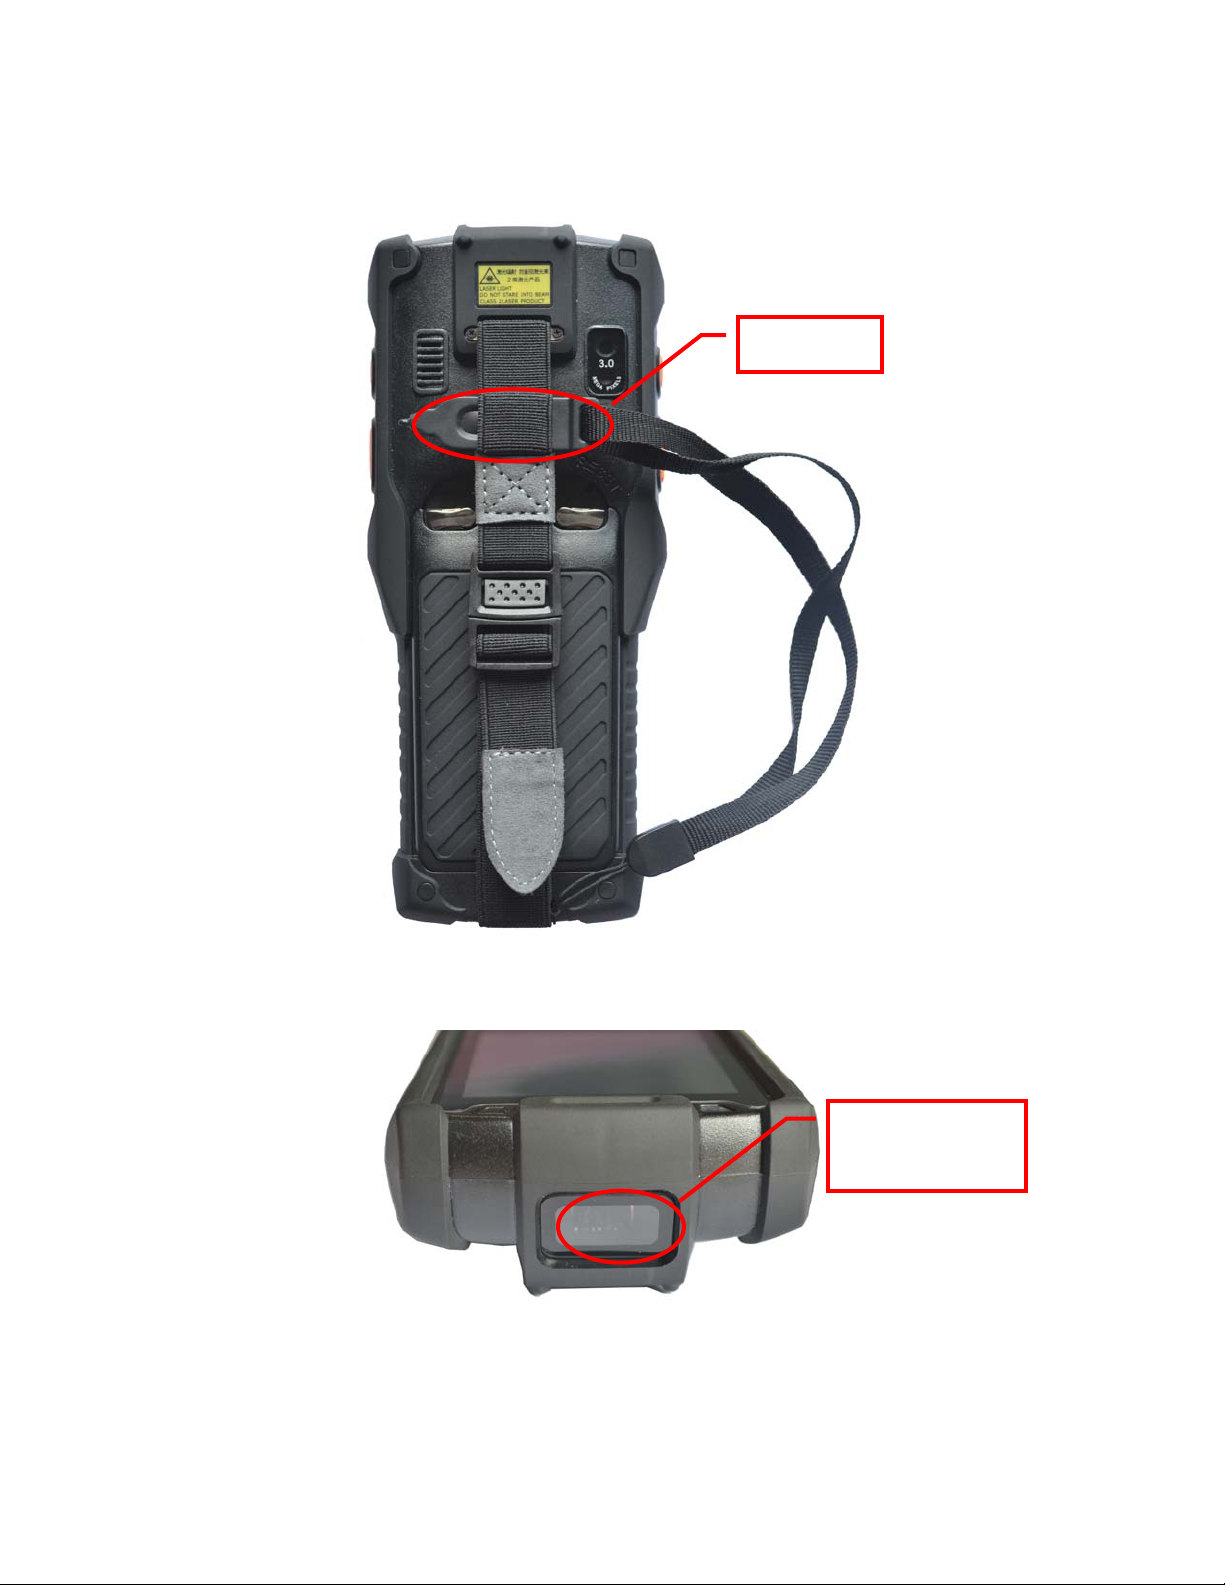
IV. Back of the unit
1. Stylus
window
2. Barcode
Page 19
18
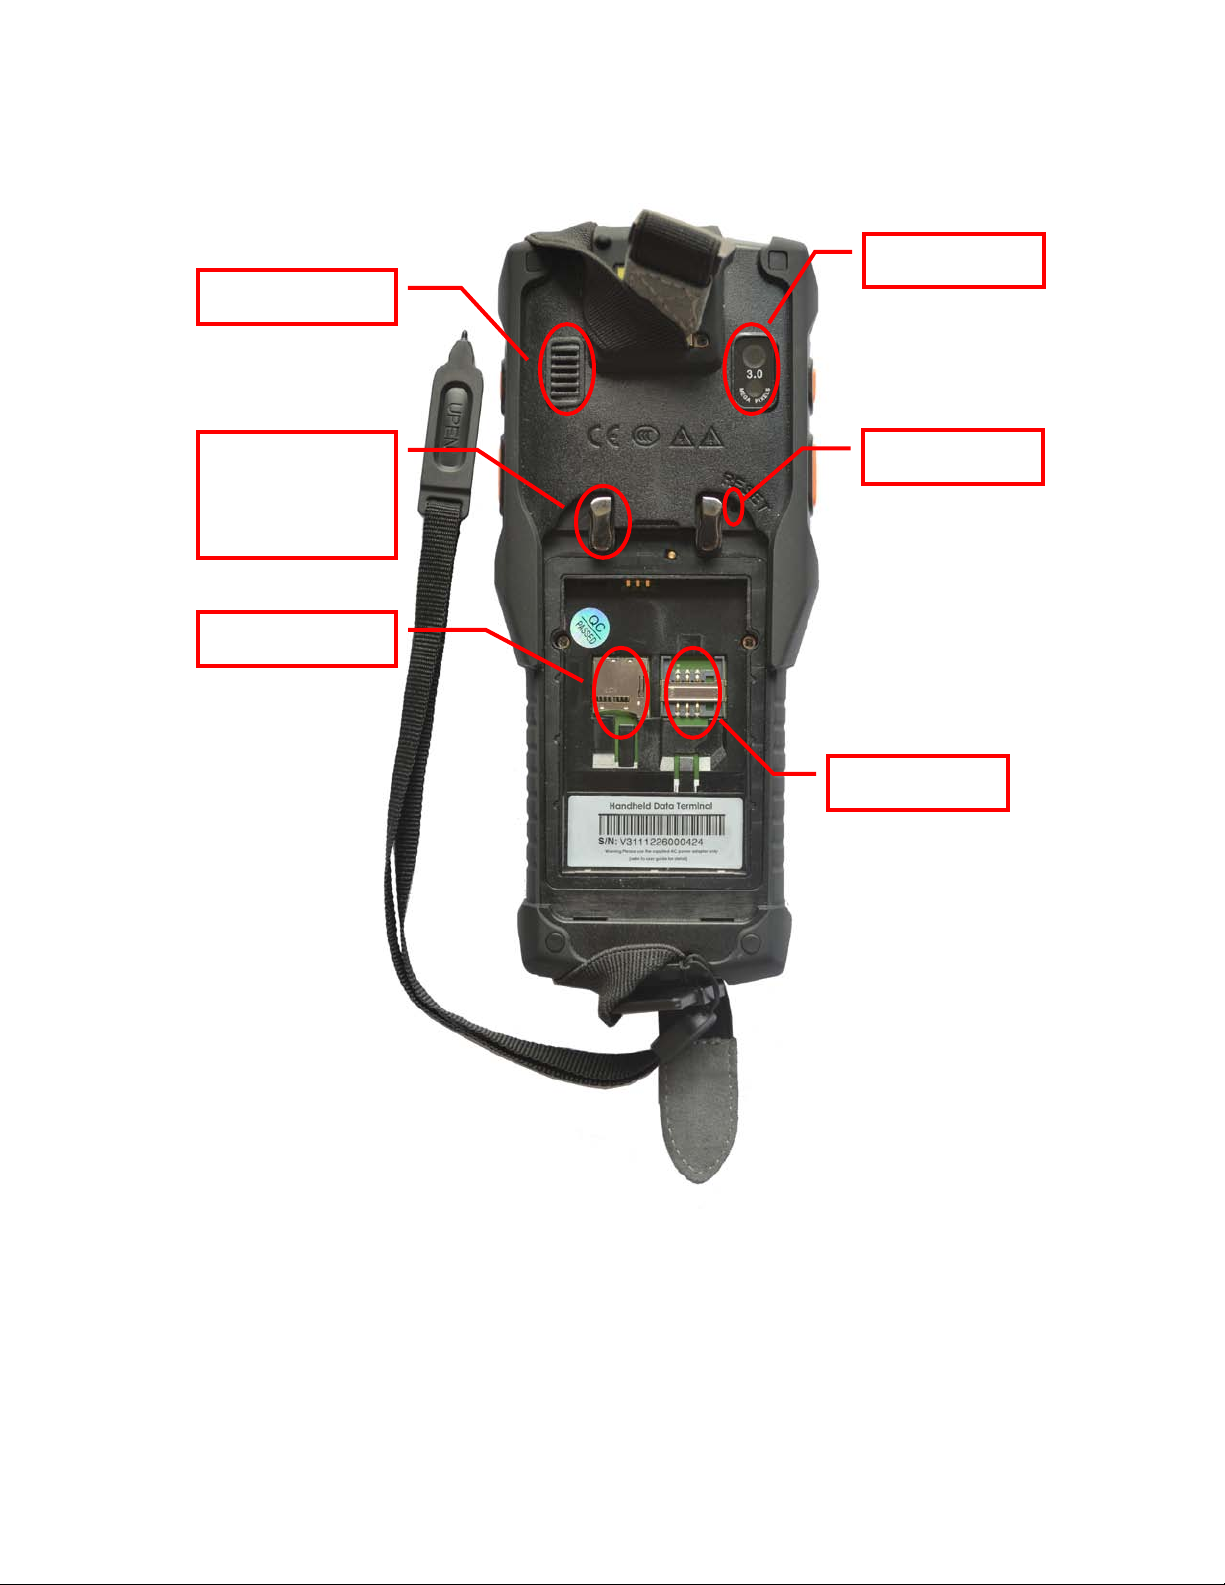
6. Camera
snap-on cover
3. Speaker
4. Main
battery’s
5. TF card slot
7. Reset hole
8. SIM card
1) Stylus: for interface operation
2) Barcode scanning window: shoots a laser from this window, so do not
look directly into it
Page 20

19
3) Speaker: source of sound output, such as for the music player and
warning tones
4) Main battery snap-on cover: secures the battery cover onto the terminal
5) TF card slot: user can insert microSD / TF memory card
6) Camera: used to take pictures
7) Reset hole: click the reset hole with the stylus to reset the device
8) SIM card slot: You can insert a SIM card provided by your carrier
Page 21

20
Chapter 3: Usage Instructions
Installing the SIM card, memory card and battery
1. Swing open the main battery cover clip by 90 degrees, you can then
remove the battery cover
2. Insert the SIM card or microSD/TF card into their corresponding slots in
the battery compartment
3. Insert the battery, then cover it with the battery cover clip
Note: when you first use the battery, the battery will only be around 50%
charged
You can recharge through the power supply that comes with your adapter
or charger (sold separately) for charging. Charging for the first time should
take more than 12 hours.
Turning on/turning off and locking the screen
· Turning it on
Press and hold the power key until the device begins vibrating. Release the
power key when the system LED is lit, indicating the device is turned on.
· Turning it off
The user can turn the device off to save battery power when it is not in use.
Press and hold the power button for 3 seconds or more. A prompt box will
pop up on the screen. Select "shut down", and the device is turned off.
When the device is turned off, data in the system cache that has not been
saved will be lost.
· Lock/unlock screen
Page 22
21
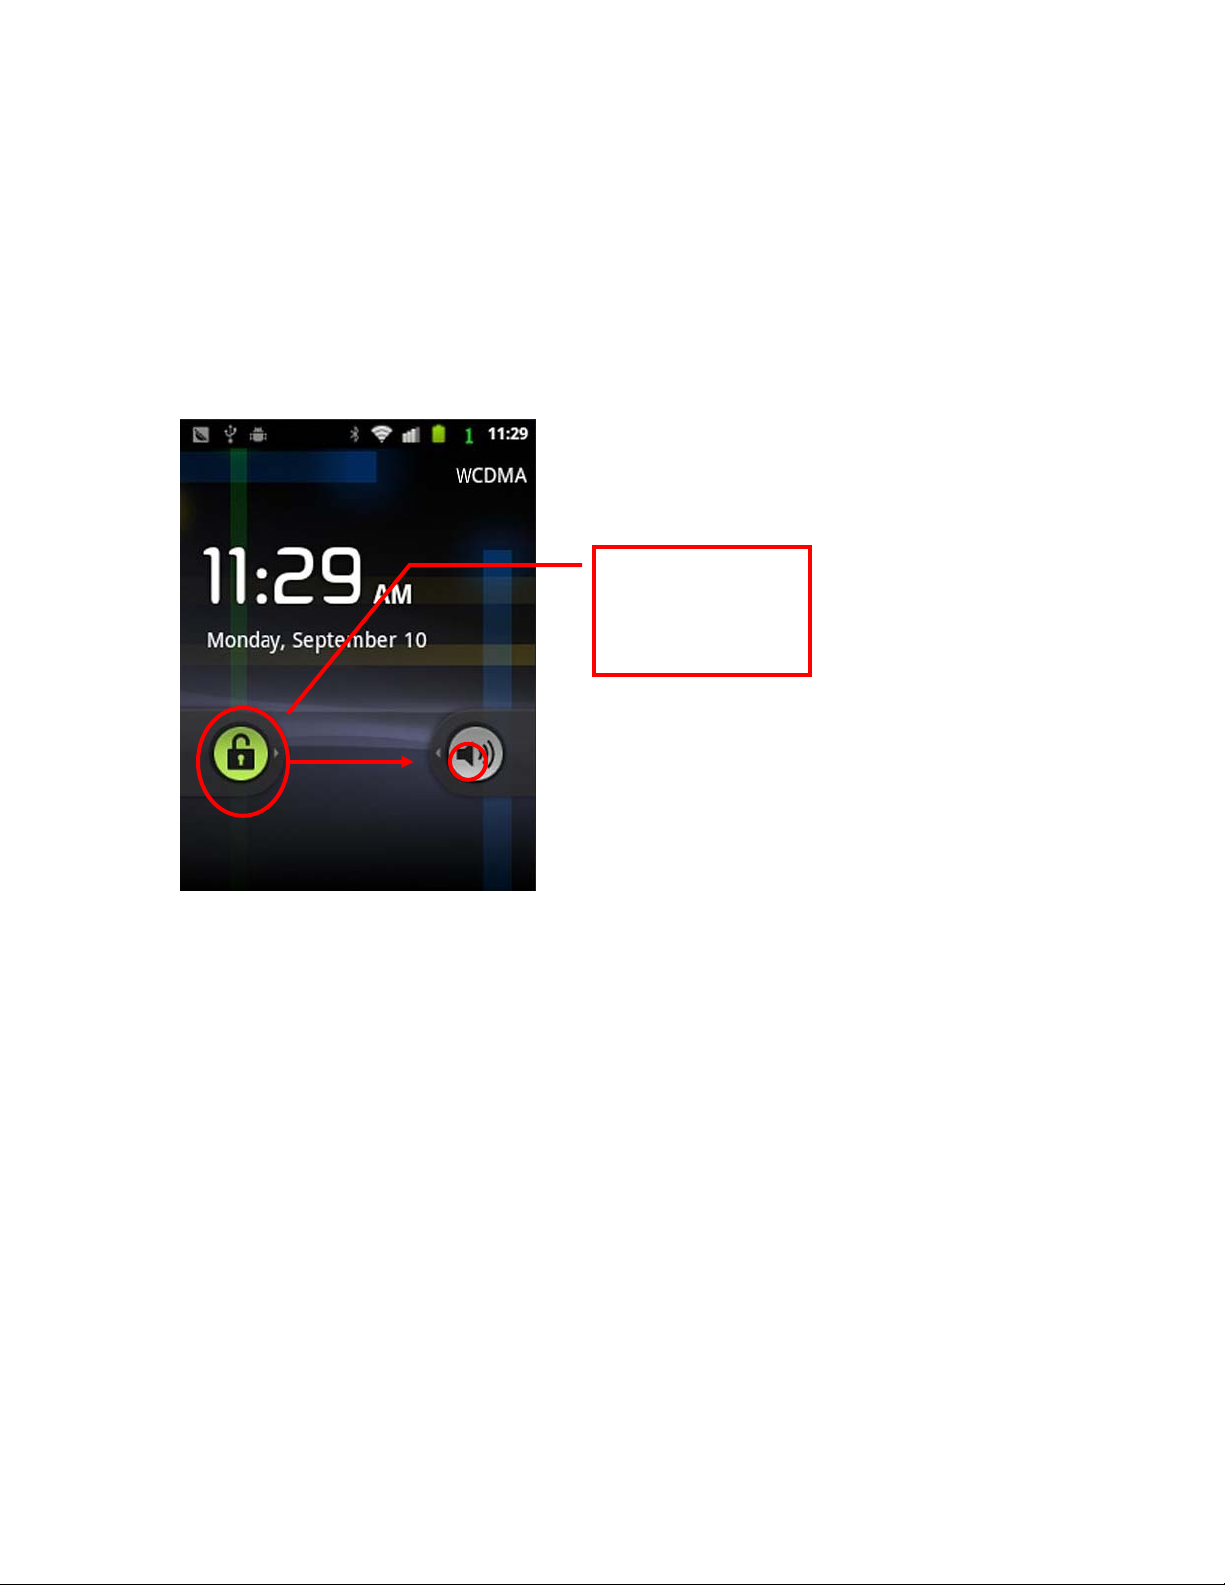
The device by default function will turn off and lock the touch screen if it
Drag the lock to
to unlock
has not received any action after one minute. This is done to conserve
battery power. This can also be done by manually pressing the power lock
screen key.
Briefly press the phone power button to activate the screen, then follow
the operation shown in the image:
the green dot
The main screen
The main screen displays the application icon, the various controls, folder
options, etc. You can also customize the wallpaper for the main screen.
Main screen icons
· View
Click any icon on the main screen to open the application.
The icon list can be switched to either the left or right side of the main
screen.
· To add
Page 23

22
Press the main screen until the device vibrates, allowing you to add icons to
the main screen’s pop-up. You can add shortcuts, folders, and so on, or
replace the wallpaper and theme.
"Add" is among the menu options.
· To move and delete
Press and hold the selected icon on the main screen. This highlights the
icon by enlarging it. You can drag the icon to any available space on the
screen. At the same time, the trash can icon appears at the bottom of the
screen. You can delete the icon by dragging it to the trash can; when the
icon turns red, release your hold on the icon, and it will be deleted.
· Using the stylus
Use the stylus to click on the screen for a variety of commands: open
applications, choose menu commands, select options in the dialog box, and
so on. Use the stylus to double click on a selected application’s icon. You
can drag the stylus to highlight text, or click and drag scrollbars along the
sliding bar. Press the stylus anywhere on the screen for about 2 seconds to
pop up an action menu.
Note: Please use the stylus that came packaged with your device. To
prevent damaging the screen, do not use an ordinary pen, pencil or other
sharp objects.
Page 24
23
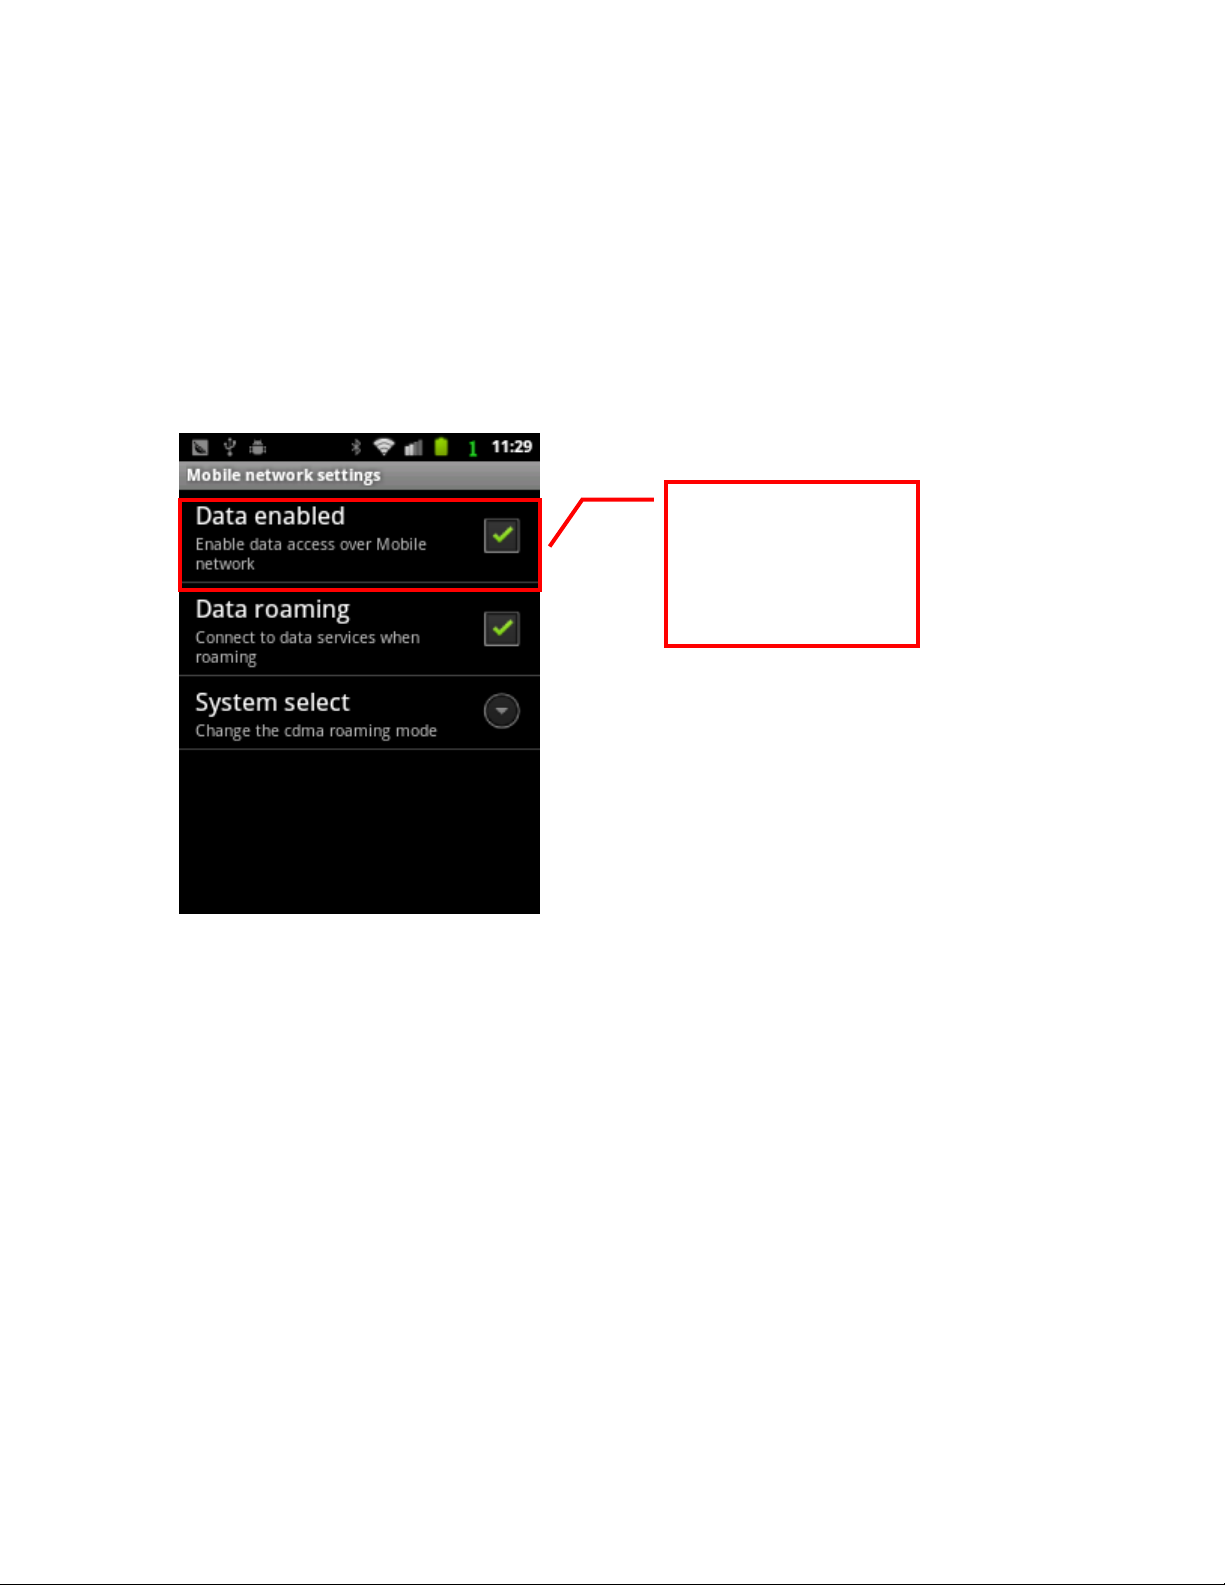
network
Chapter 4: Advanced Settings
Network settings
From the main screen click on wireless and menu → settings → network →
mobile network
Check "enable
data" in order to
connect to the
Setting up Wi-Fi network
You can ask your network administrator for your wireless network
information, including SSID, encryption type, authentication mode, key, and
so on.
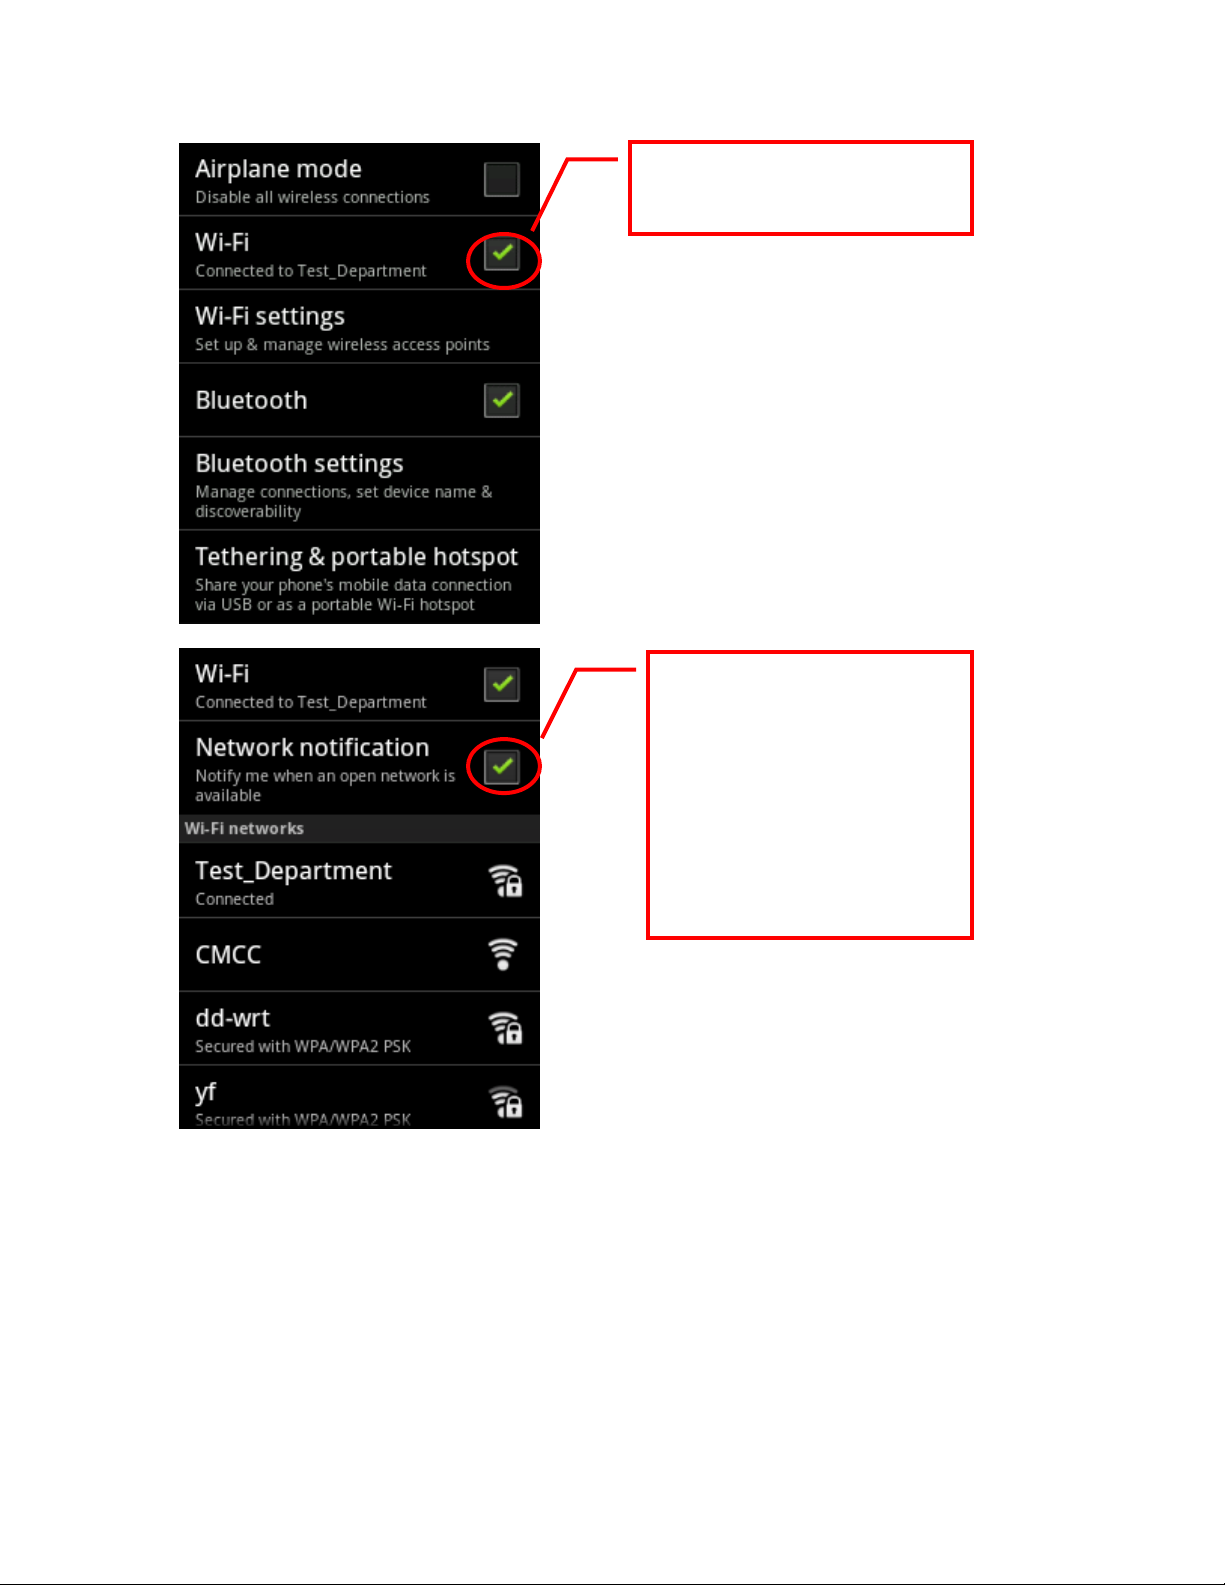
From the main screen click menu → settings → wireless and network
Page 25
24
First check the open Wi-Fi,
local area networks.
then click Wi-Fi settings
Check network
notification of entering
Wi-Fi settings interface,
the system automatically
searches for and displays
the available wireless
When the connection is visible to a network, click the network name, enter
the password → connection
Page 26
25
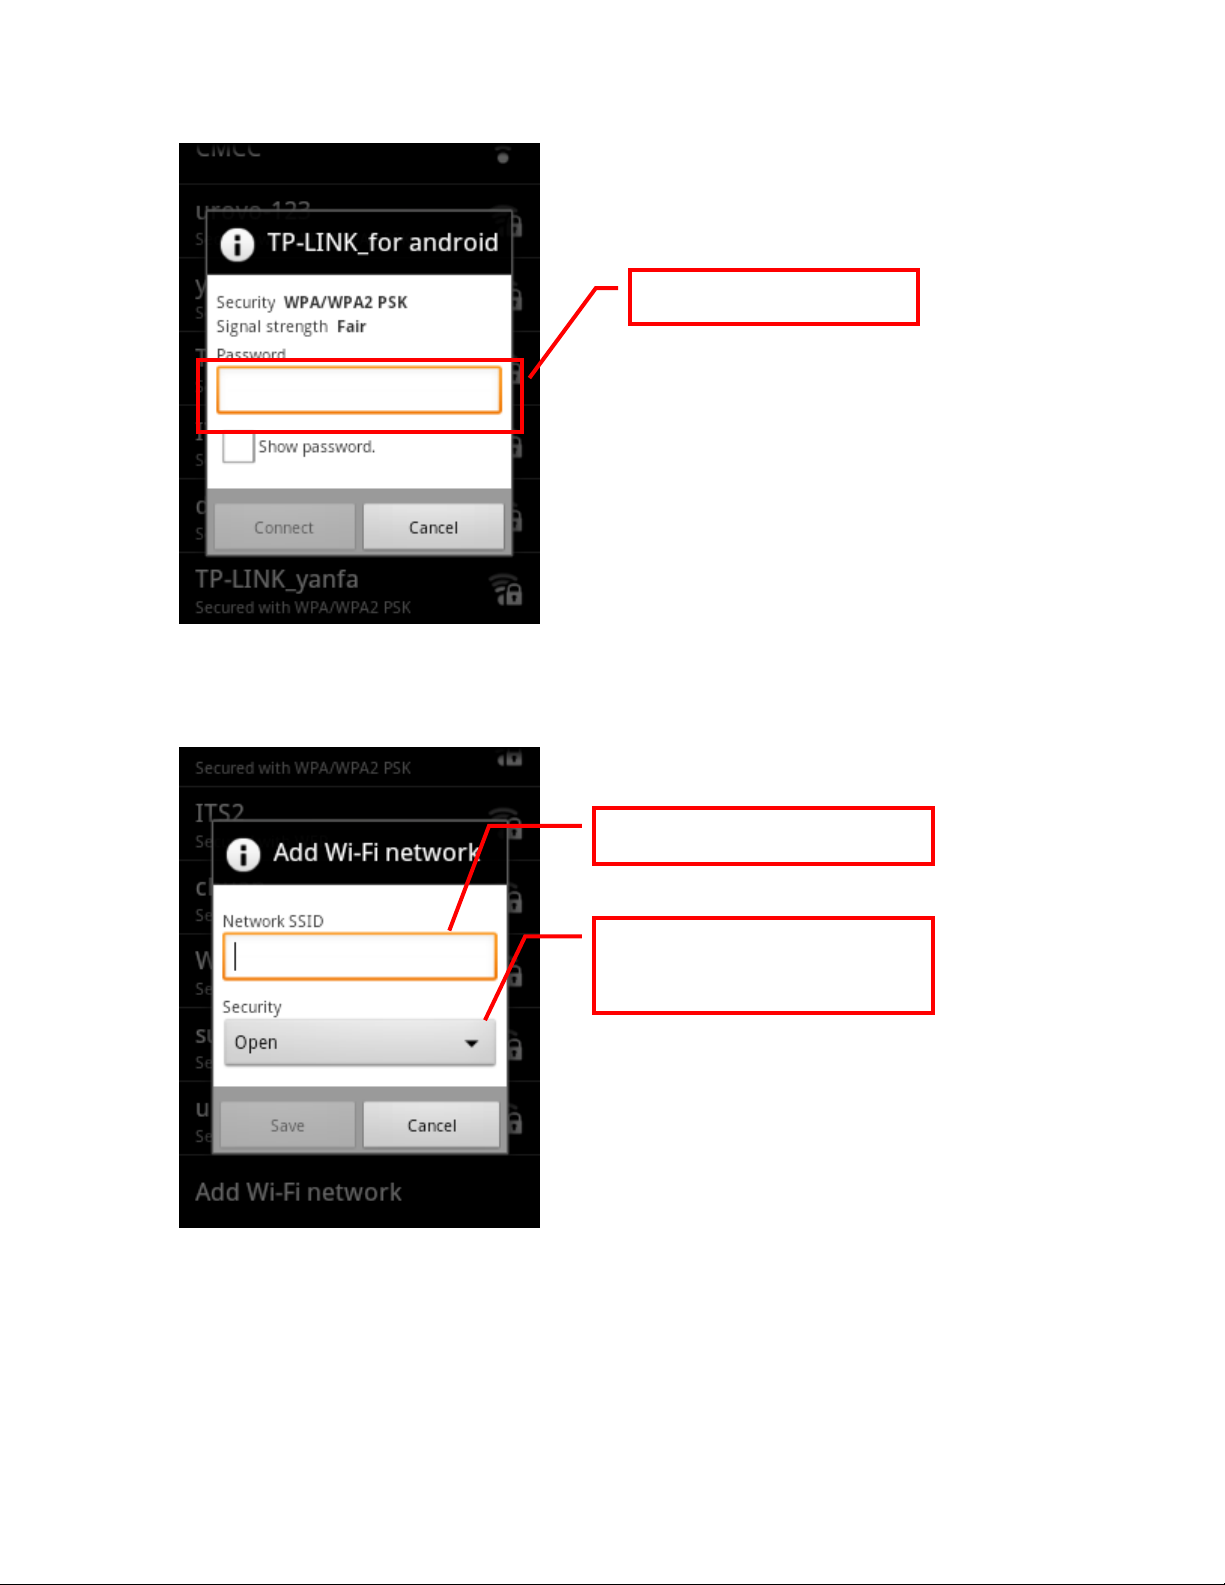
Password input
When you choose to add a Wi-Fi network, you need to fill in all of the
network information.
Enter a network name
Choose the correct
authentication mode
Barcode scanning
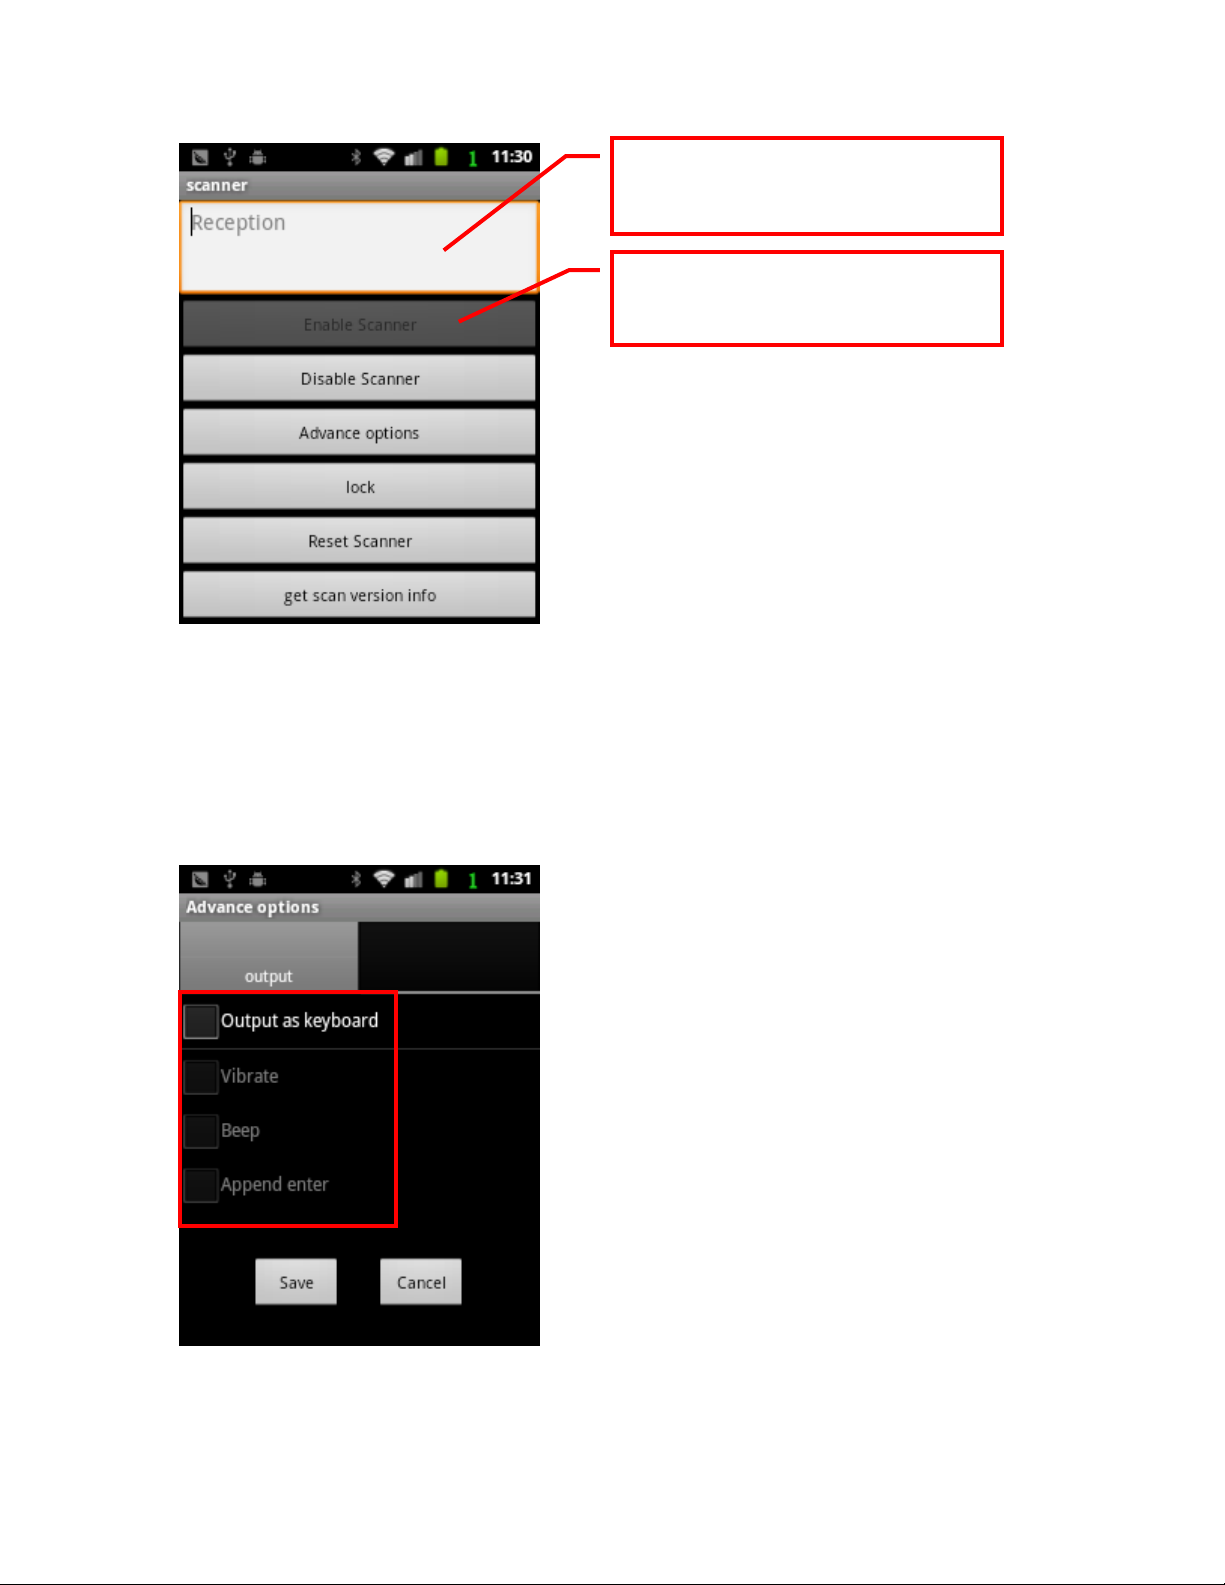
From the main screen click the menu button → scan header, and then on
the main keyboard press the orange "bar code scanning keys".
Page 27
26
A successful scan code will
display the barcode contents
To start scanning, tap to open
the scan head
Select the advanced settings option, to set a standard input device scan
head. At this point, the barcode will be scanned and converted into a
keyboard message, which allows other programs that do not support
barcode scanning (such as Wordpad, remote desktop, and so on) to use the
scanned information
Page 28
27
Click on the "reset default parameter" to restore all parameters of the scan
the next option
header to their factory settings.
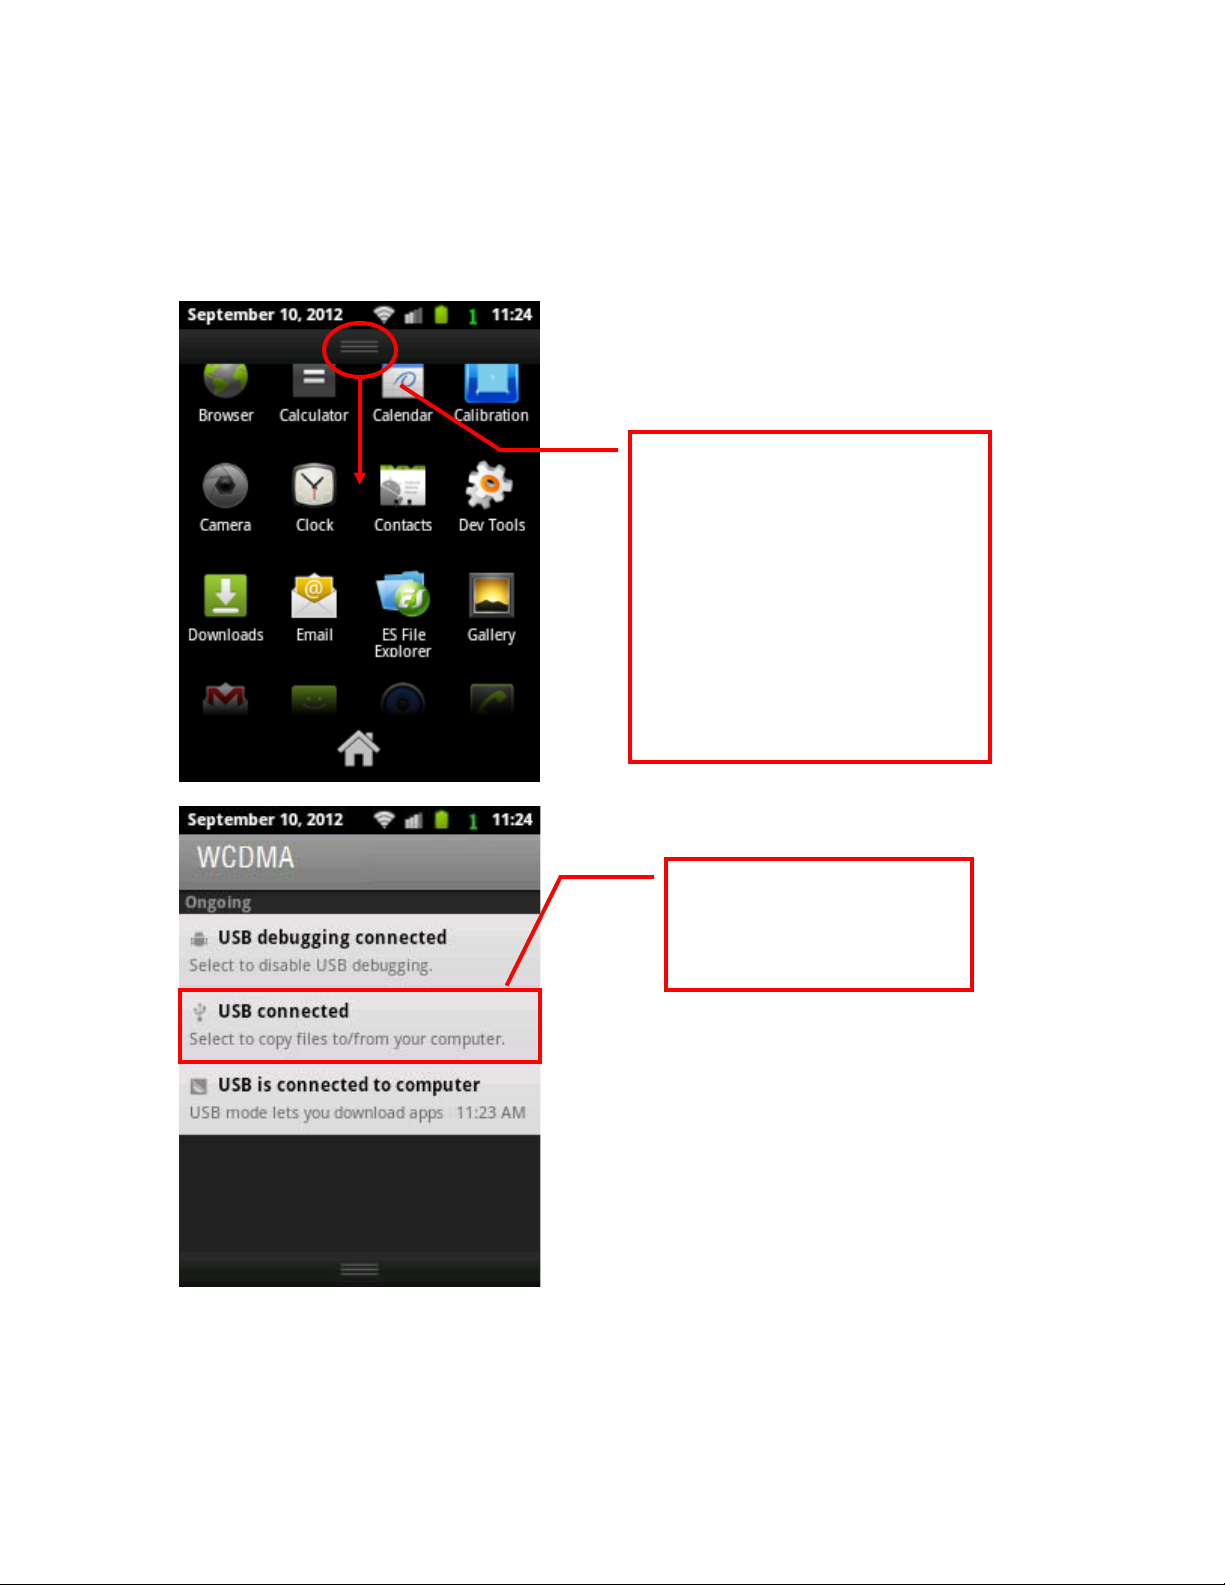
Online with a personal computer
When linked to a personal
computer, you can press
and hold the top of the
screen to enable the USB
settings interface to appear,
which helps with tasks that
require linking to an
external computer.
Select USB connected
items, then move to
Page 29
28
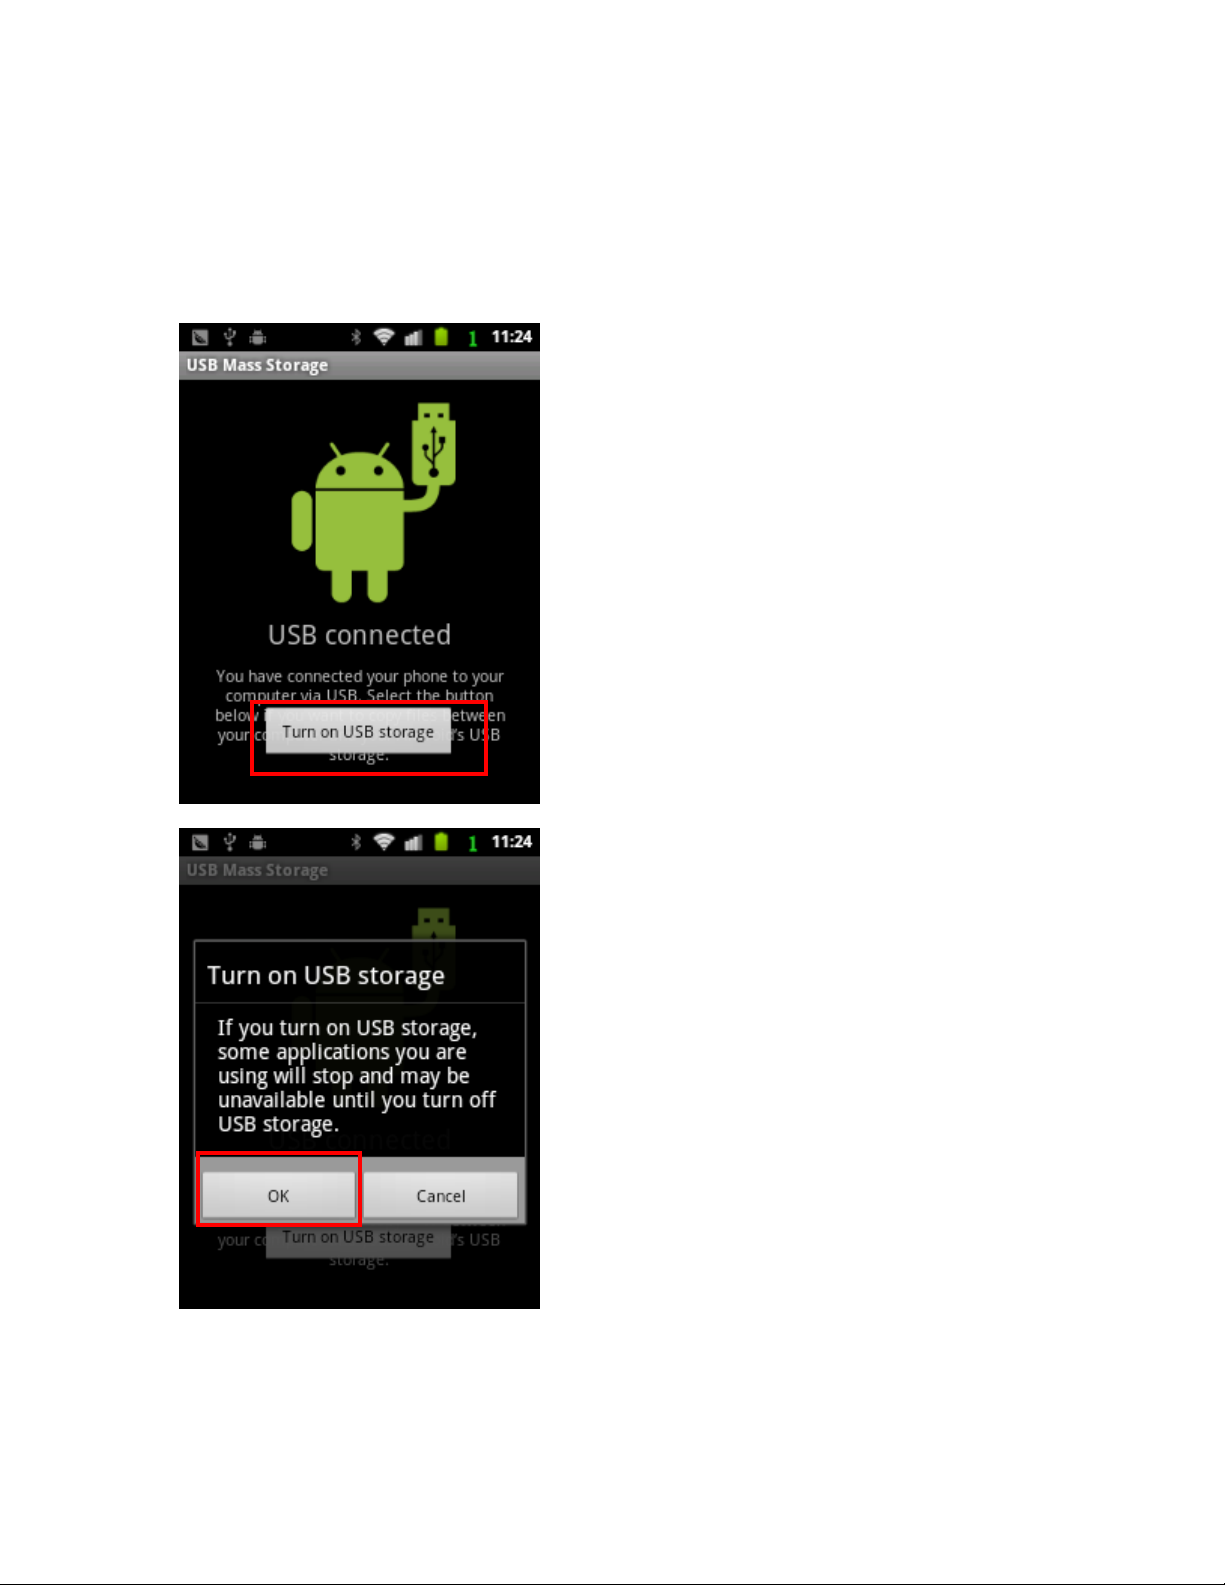
Tap to open → identify USB storage devices, this will map the device's
storage card as a removable disk on your computer, enabling data access.
Click to turn off the USB storage device, allowing it to be disconnected
safely.
Bluetooth settings
Page 30

29
From the main screen click menu → settings → wireless and network, to
access operations such as Bluetooth, and identifying the Bluetooth device
name.
Page 31

30
Chapter 5: Basic Functions
Dial-up
When you call make sure that the connection to the network is secure.
Touch the "dial-up" icon on the main screen, or go to the main menu and
search the "dialing" application icon.
· A direct dial
Enter a number, click the dial button. If this phone number can be
recognized by the phone book, the name is displayed in the demand-dial
interface.
· Through contacts
Click on phone address book
→ contacts → call
After entering the address book, press the Menu key to access the shortcut
menu that appears at the bottom of the screen. You can create new
contacts, search, display options, and so on.
· Dial from phone records
Directly in the call history click on the right side of the phone dial-up icon,
began dialing; click on the number, enter the call history details, you can
choose to replay, send text messages, and add contact operation.
E-mail
This system includes a standard e-mail application to read or send e-mail. A
default e-mail service setup wizard is included for easy configuration.
Click on “e-mail” to enter the mail function.
The first time you open the e-mail, the installation wizard will appear to
help you set up your e-mail account, installed by default into the Inbox.
Calculator
Page 32

31
You can use this to run basic calculating operations, by clicking on the main
menu "calculator" icon.
Drag the screen to the left to open the Advanced screen.
Touch and hold the calculator display area to open a menu for you to copy
the contents of the input and access other tools.
Touch Clear to delete the last number you entered or operator. Touch and
hold Clear to delete all the content in the display area.
Browser
Click the "browser" icon in the main menu, or enter the URL in the quick
search input box to access the Internet.
Click the Internet icon, and the browser will open to the default home page.
Web pages are displayed as full screens.
· Open a Web page
Go to the URL input box by clicking on the top of the screen, then enter the
URL; click on the on-screen keyboard "go to" or simply click on the "→".
When you open the browser, it will show you on the most recently viewed
pages. If you recently did not use the browser, it will open the home page
you have set up.
· Web operation
Clicking on the device’s menu key accesses the shortcut menu at the
bottom of the screen. Through this you can refresh the Web page, stop
loading the current page, open a new window, view bookmarks, or close
the current Web page.
· Set home page
The home page is shown every time you open a new browser window.
Page 33

32
Click the Menu button → More → Settings → Set Home → enter the URL,
click OK.
To copy the URL on the long URL input box in the pop-up menu, select
"Copy URL as home page”.
· Website
1) Scroll: slide your finger across the screen
2) To zoom in or out: double-click your fingers on the touch screen to zoom
in on Web pages, double-click again to zoom out.
3) Copy the contents of Web pages: you can copy large sections of text on
Web pages, by sliding the cursor over the requested information. This will
highlight the text → Click Copy, and the content is copied to the clipboard.
Alarm Clock
Click → Add alarm clock → alarm icon
Use the Settings to enable the alarm clock, time, repeat, ringtones,
vibration and label options.
Address Book
"Address Book" icon, touch the main screen or launcher to display all your
contacts alphabetically in a scrolling list, each contact will include the
relevant contact details. If you are using a new mobile phone, and have not
yet added any contacts, the Contacts menu displays a message to prompt
you to add contacts.
1) Open the "Contacts”
2) Click on Menu, select "New Contact"
3) Enter the contact name
Page 34
33
4) Select the contact information categories of information (such as phone
Cancel the check icon
number and e-mail address), and then enter the contact information of the
corresponding category (scroll the page to view all categories)
6) Click on the class plus button to add multiple entries in the category. For
example: add unit phone number and residential telephone numbers. Click
the button to the left of the contact information for items, the menu
contains the preset label (such as mobile phones and unit phone number).
You can also click on the custom menu to create your own labels.
7) Click the Contacts icon to set the requested Contact emoticons. The
photos can be displayed next to the contact name in the contact list or
other applications.
8) After completing the settings, click Finish.
Setting Up
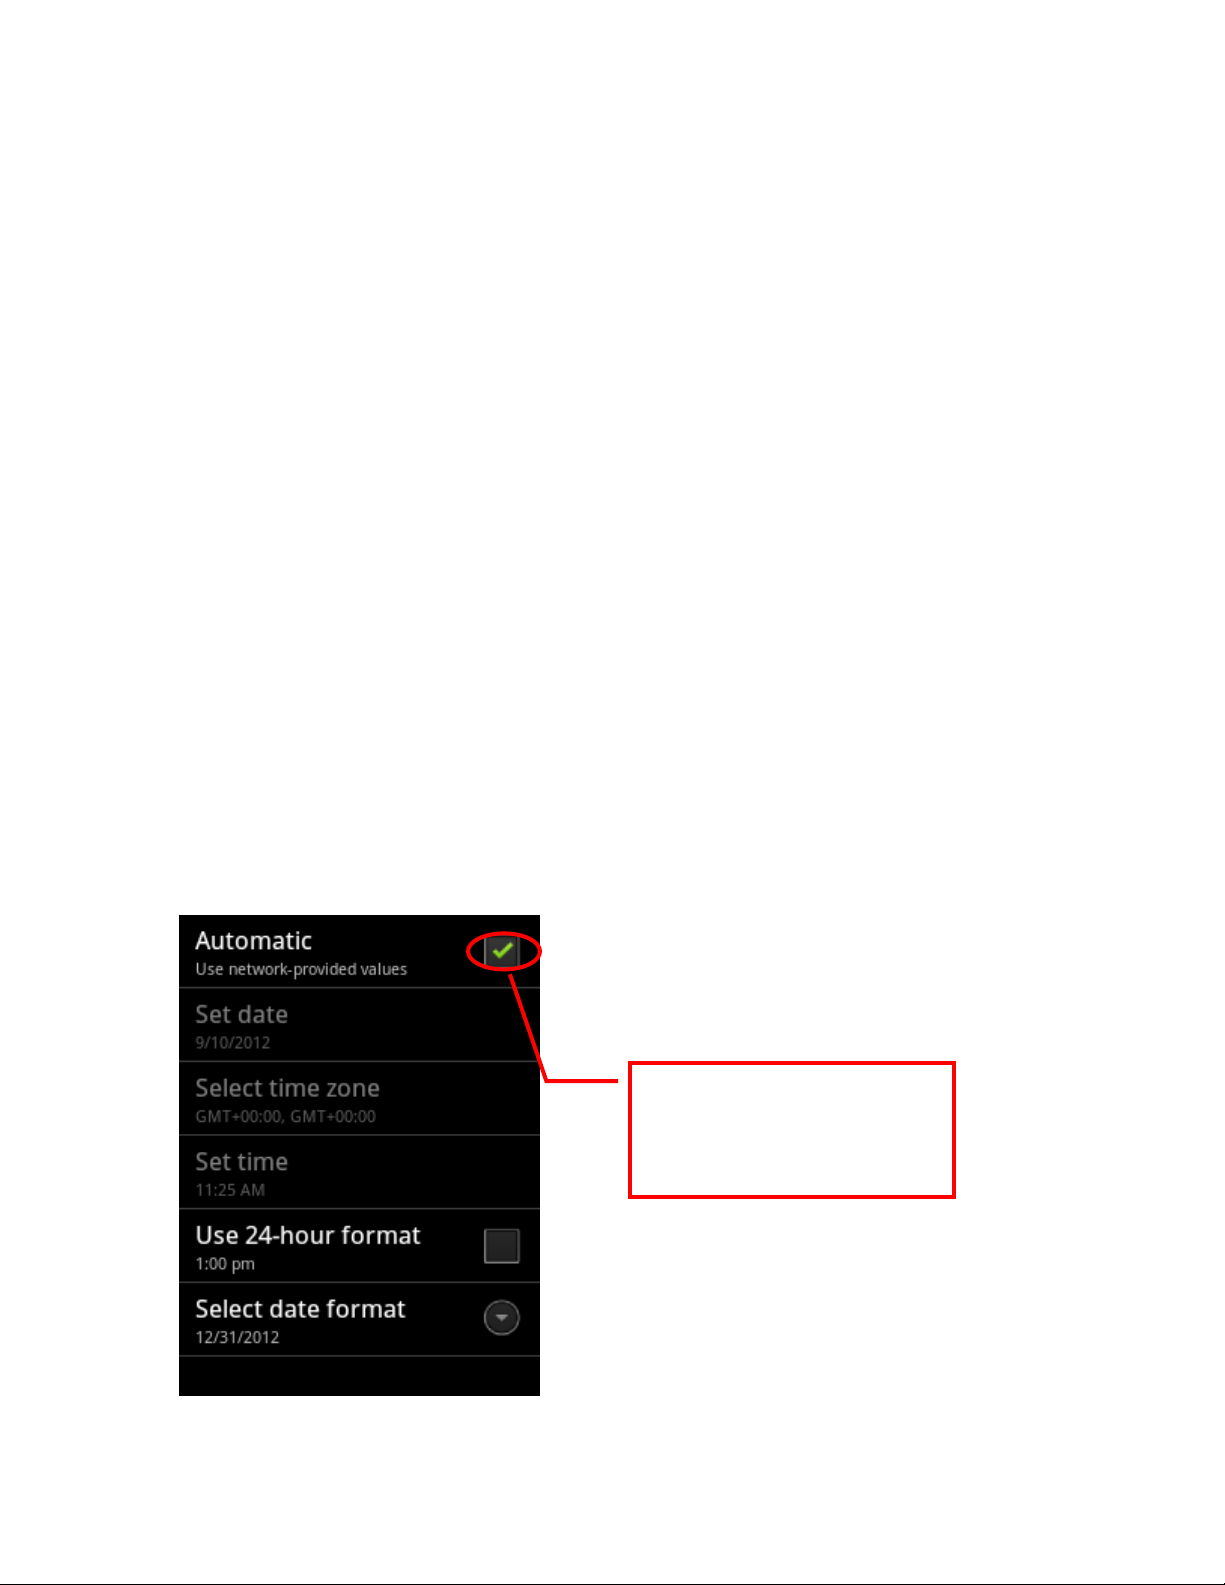
1. Time setting
Click on the menu button from the main screen → Settings → Date and
Time
allows you to manually
set the date and time.
Page 35

34
2. Other settings
Sound settings, language settings, call settings, display settings, and so on
can be updated under the "Settings" menu.
Restart device
You may need to restart the device if it is running slower than usual or the
software encounters an operation issue.
A restart would mean unsaved work is lost as the device is rebooted.
Restarting options:
1. Warm reboot
A warm reboot stops the device’s current operations, and powers the
system back on. All settings and data will be saved. To do a warm reboot:
insert the stylus into the Reset hole in the back of the device.
2. Cold reboot
A cold reboot turns off the power; all data that is not saved or just stored in
the cache will be lost. To do a cold reboot: press and hold the Fn key while
inserting the stylus into the Reset hole in the back of the device.
Immediately release both the Fn and Reset simultaneously.
Restore factory settings
In some cases, you may need to clear your own settings. This can be done
via "restore factory settings". All stored device and function settings are
erased.
To return to the factory settings, from the main screen click the menu
button → privacy → settings → restore factory settings.
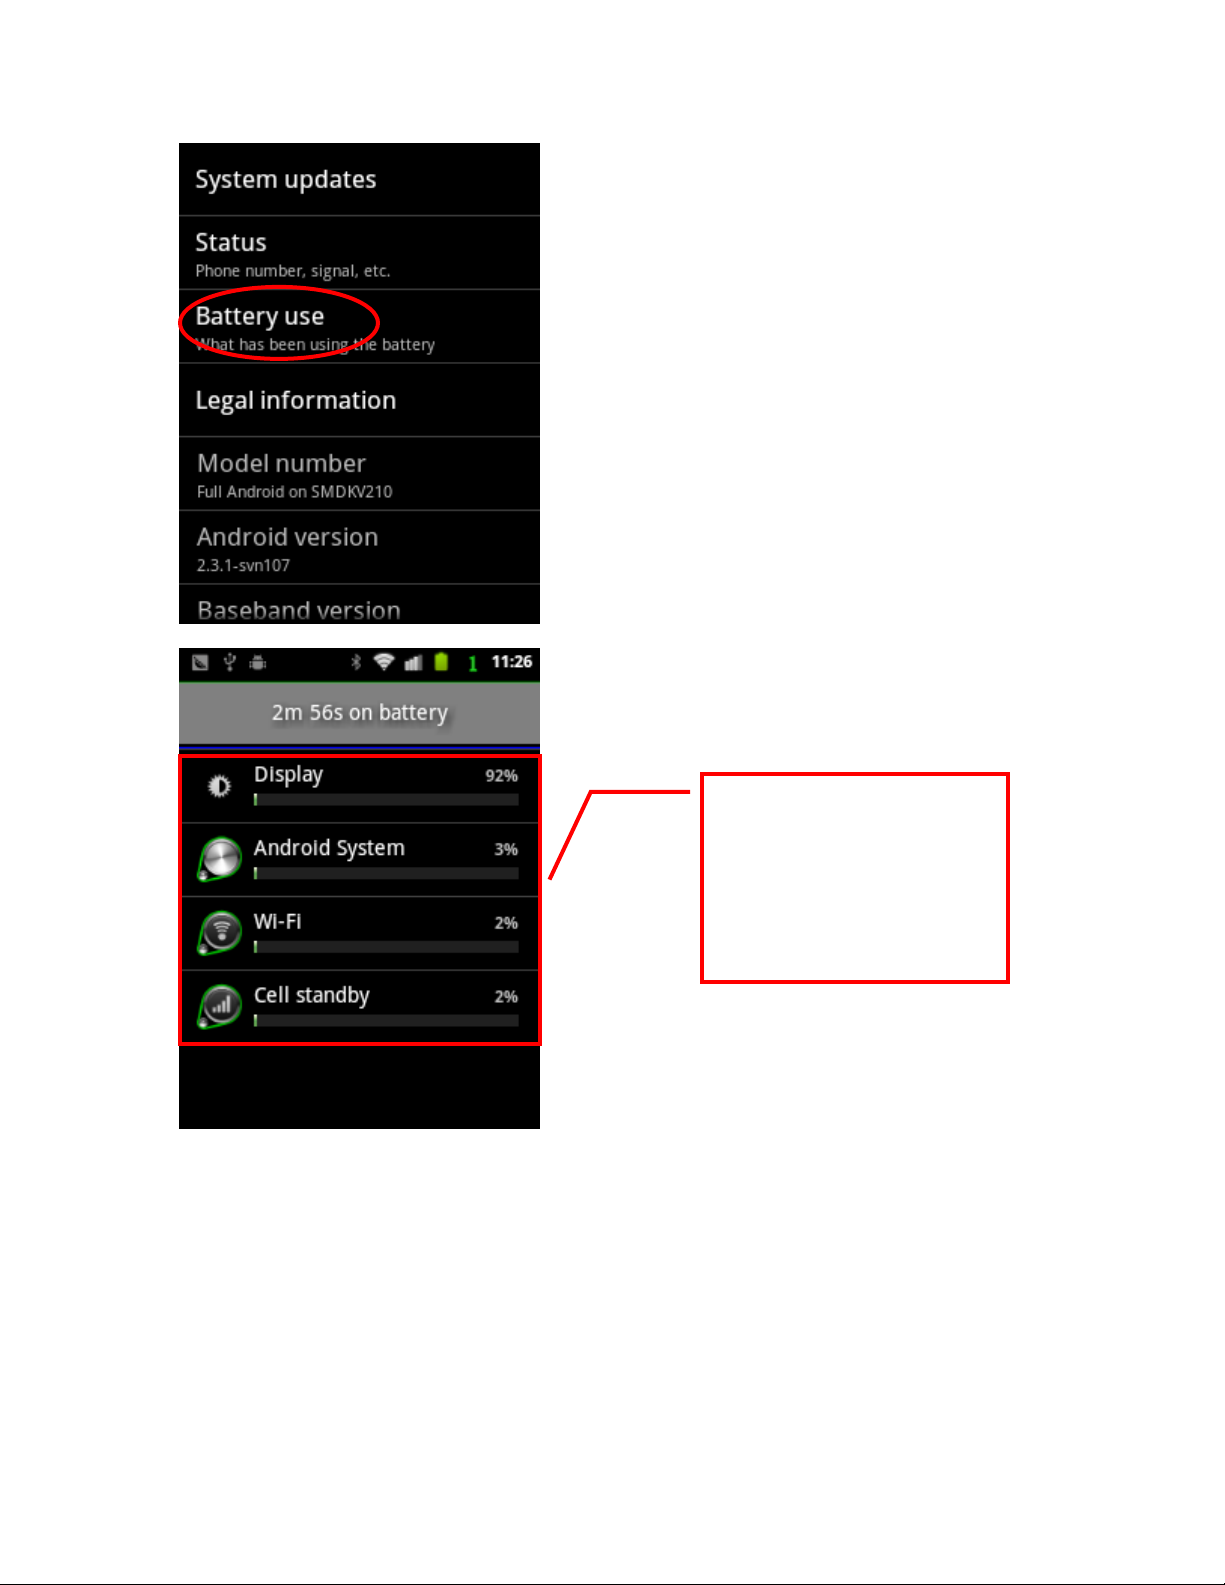
View battery
From the main screen, click menu → settings → device → power usage.
Page 36
35
Battery use considerations
settings.
Click here to view the
detailed power
consumption, and
make the appropriate
When the device’s battery runs out, some files and information stored in
the memory will disappear. So either maintain steady power supply, or save
your documents regularly.
Under normal situations, the primary battery can be used for more than 8
hours when fully charged. The device gives low power alerts when the
Page 37

36
power supply approaches low levels. Continued use without recharging will
eventually lead the device to shut down.
Please do the following to extend battery life:
1. Reduce the number of times charging and discharging the battery.
Recharge only when the system prompts it.
2. Avoid excessive discharge, such as on a daily basis. Excessive discharge
will seriously harm the battery’s lifespan.
3. Avoid overcharging, as it can harm the battery’s lifespan. Charging
usually stops when a battery is more than 95% full; the charger included in
the package will calculate this.
4. Do a full charge and discharge of the battery once you use it for the first
time. Do this once every 3 months.
5. If the battery will not used for a long period of time, it can be removed
from the terminal and stored separately. This enables it to conserve power
longer than if it was left in the device, retaining about 50% of the original
battery power.
Page 38

37
Chapter 6: After-Sales Service
Support and services
Website
Go to
www.urovo.com to find out more about our products, accessories
and other support information.
Customer Support
If you have questions about this manual or our website content cannot
answer your questions, you may contact our customer service staff. If your
machine is in need of repair, please contact the company to obtain service
information, shipping instructions and warranty coverage. If your device’s
problem meets the conditions of the warranty period, please ready your
proof of purchase and the warranty card. Further instructions will be sent,
depending on the specifics of the problem.
Before you contact the company, please be sure to:
1. Read this manual
2. Have the following information ready
˙ Model
˙ Serial number
˙ Purchase certificate
˙ Warranty card
3. Have your device on hand, service personnel may request that you
operate the machine.
4. Prepare the questions you want to ask, providing a detailed description
of the problem can help customer service staff to quickly resolve your issue.
 Loading...