

UROVO TECHNOLOGY U2 Users manual
1
Important notice on lithium ion battery
2
Appearance and Buttons
2
3
U2 Rugged
Wearable User Guide
1)Charge the battery only with original Unitech power adaptor
supplied in the box
2)Do not store the device with battery installed for long period of time
3)If long period storage is required, remove battery from device.
4) During long storage period, maintenance work is required at every
3 months period. During maintenance, discharge the battery
completely, and then charge to 60% - 70% (or 3.8V - 3.9V).
5) Store battery in dry, cool environment. Temperature should be 20 to 40 degree Celsius and relative humidity should be 45% to 85%
6) Charge battery at 5 to 45 degree Celsius
7) Do not operate the device outside the recommended temperature,
which is from --10°-50°.
8) Do not install a third party battery into Urovo device
Safety precaution
1)Do not transport the battery at temperature higher than 65 degree
Celsius
2)Do not expose battery to fire or heat source
3)Do not forcefully install the battery in opposite direction into the
device
4)Avoid impact and high vibration force on the battery
5)Keep battery dry at all time
6)Do not use battery that is damaged or appear to have been
modified
7)Do not use unauthorized power adaptor to charge the battery
8)Do not discharge the battery beyond the specification of the
battery
9)Do not place battery into microwave oven or pressured container
10)Do not damage battery with sharp objects
11)Do not operate in environment with extreme electrostatic fields
or magnetic fields.
12)If leakage found in battery, avoid contact with body parts.
Should leakage be in contact with body parts, flush with water and
immediately seek medical attention
13)If battery exhibits unusual behavior like color change,
temperature became hot, shape is swollen, remove battery from
device and stop using that battery
14)If the contact point on the battery is dirty, clean with a dry cloth
15)Dispose the battery according local regulation. Recycle if
possible.
16)Improper usage or storage may cause battery performance to
drop, leak, damage, or even escalate to personal safety issue.
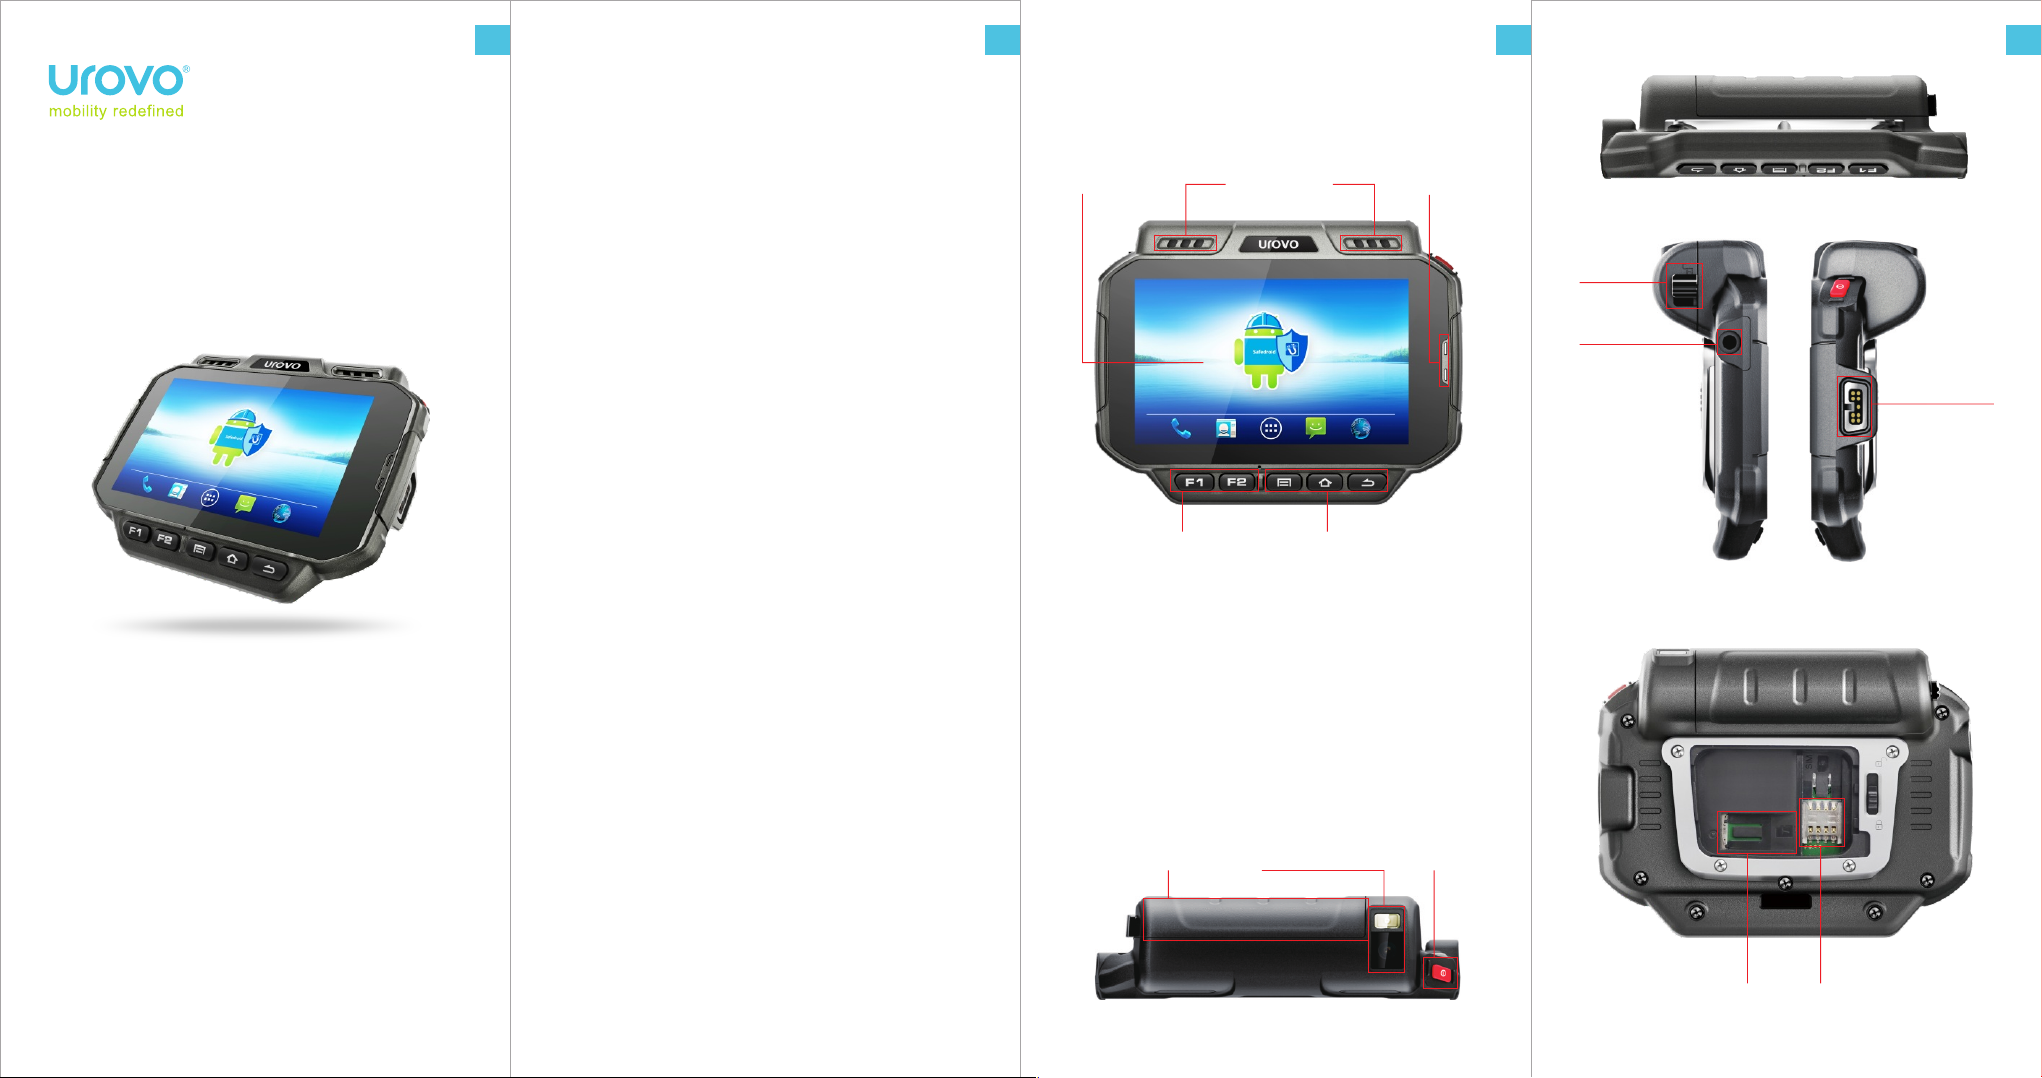
Front view
Touch Screen
F1/F2 Button Menu Button HOME Button Back Button
To turn on device:Hold power button until the device switches on.
To turn off device:Hold power button during operation until the device
shows a menu,select “Power off”
To turn off display:Press the power button.device also turn off the
display automatically if left idle for some time.That amount of time can
be configure at “Setting→Display→Sleep”
To turn on the display:Press the power button lightly.
Loud Speaker
System LED
Side view
Battery
Camera and Flash
Power Button
Battery
buckle
Earphone Port
Pogo Pin
Magnetic
interface
Rear view
Micro SD/TF Slot Micro SIM Slot
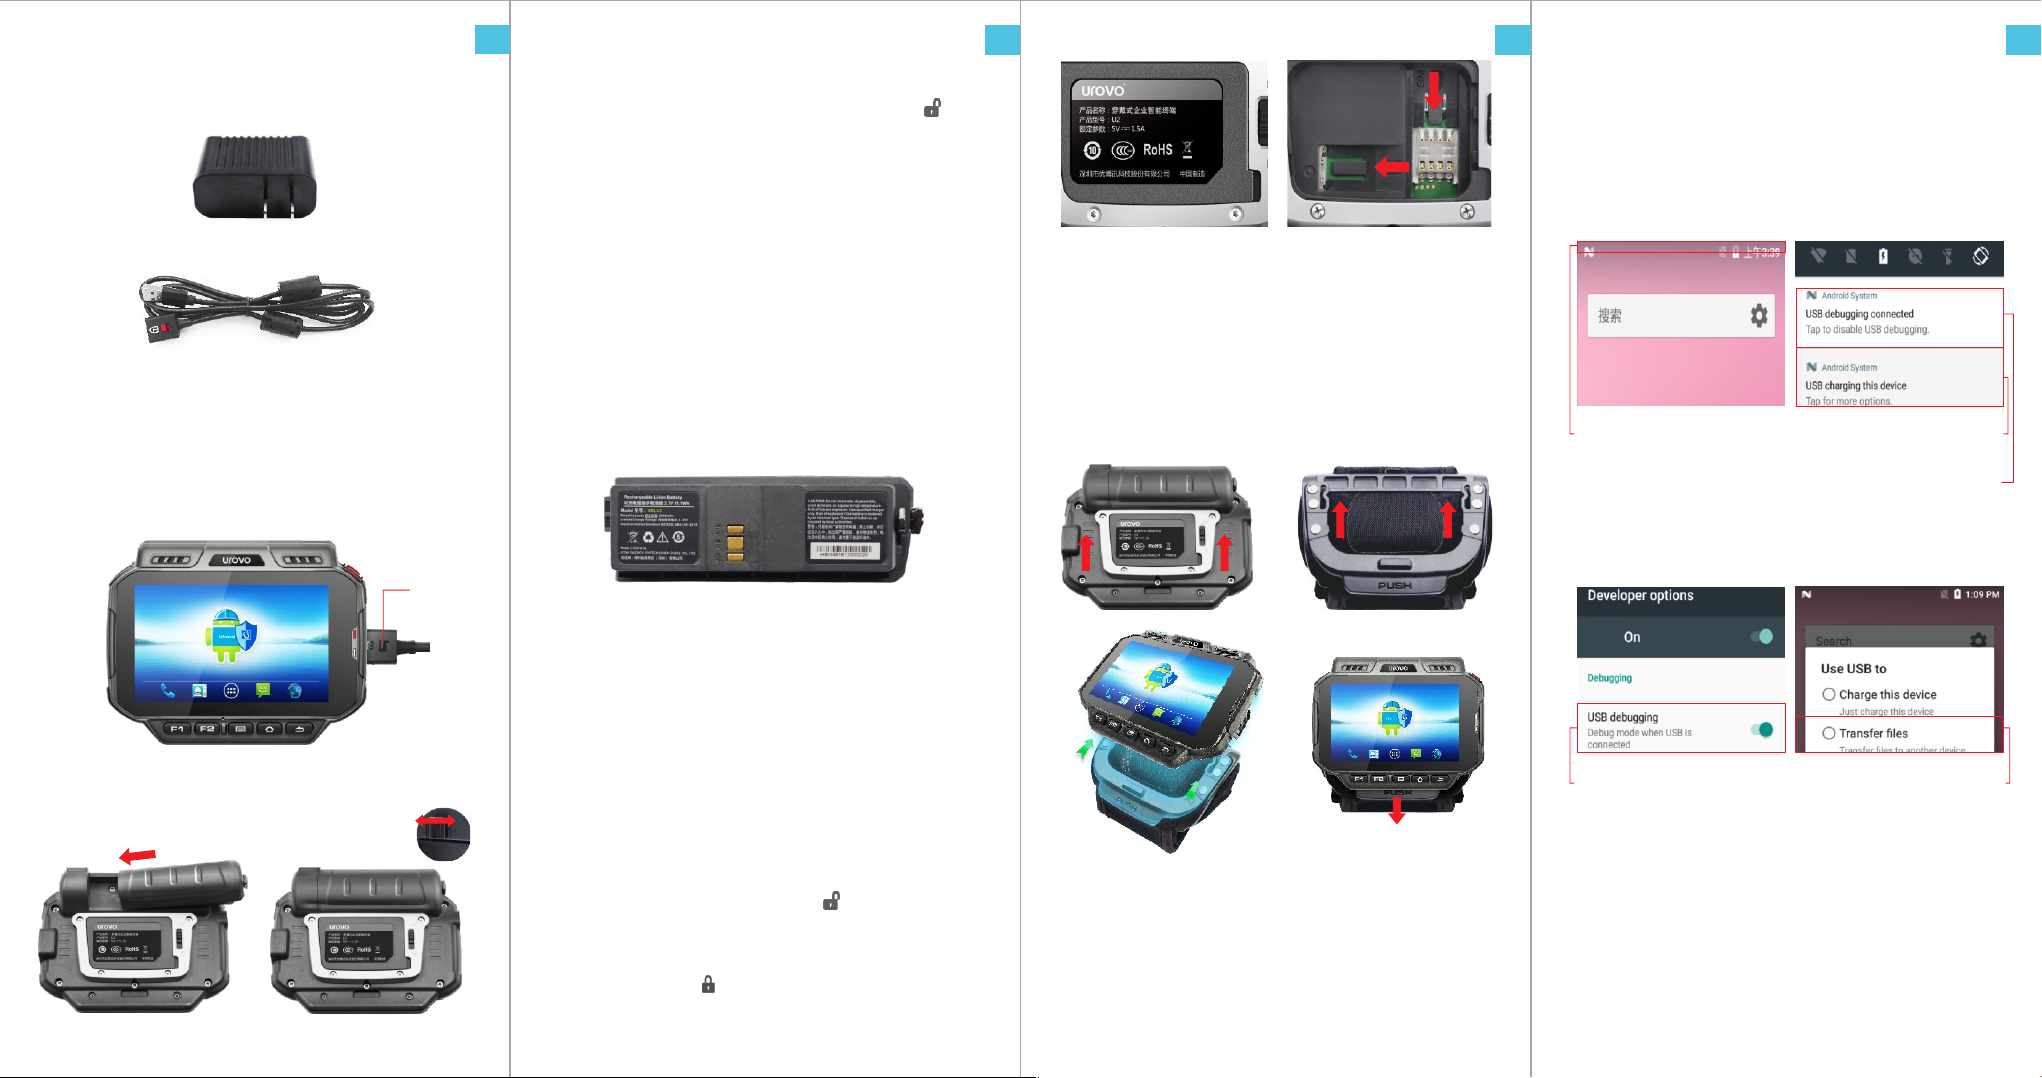
Battery Installation
Charging by Direct-Charge
5
Insert battery in the direction as shown in the picture on the right.Sit
the battery tightly in the corresponding position.
When disassembling, first press the button to the unlocked " " icon
position, and then pull out the battery.
6
Battery instructions
7
8
Connecting to PC
After you install the Android driver or an Android smart phone
assistant, you can connect the devices to your PC with USB cable
provided. (You can download the software mentioned above from
www.urovo.com/en. After device connected to your PC, the screen
would display like this:
Power adapt
USB-Pogo Pin Data Communication Cable
Power adapt
When device is charged using DCpower adapter,the power indication
LED is red,when fully charged,the LED will turn green
USB-Pogo Pin Data Communication Cable
Connect the device and computer by USB-Pogo Pin data
communication cable.
Buckle
Battery Installation
The device battery for the polymer battery, can only use the original
designated charger, must not be free to change the cradle or
adapter.
Do not use metal contact or artificial short-circuit electrode, can not
be placed in the overheating, tide or corrosion of the environment,
not squeeze or collision.
The battery in the absence of electricity after the timely charge, not in
the empty or full capacity of the case of long-term storage,
preferably about 50% of the electricity storage; if long-term use of
equipment, please remove the battery from the device to save.
Note: If the battery appears to pop up or leak, please replace the
battery.
Note: When you first get the battery, the battery remaining capacity
may be only about 50%, you can use the included power adapter or
cradle (need to buy separately) to charge, the first charge
recommended in 8 hours or more.
SIM card / TF card
Installation Instructions
The back cover of the buckle to the unlock " " icon position to
open the back cover, the SIM card in the right direction to the SIM
card into the corresponding card slot (as shown), TF card installed
and SIM card similar The The card is fitted with a rear cover and then
the button is set to the " " position.
Note:
1, SIM card for the standard SIM card.
2, SIM card slot and TF card can be inserted into the position, not brute
force to push. 3, TF card inserted card slot, remove the hand inward click
on the TF card exposed in the card slot outside the part, hear a slight
noise, TF card can pop up, do not pull out the TF card with brute force.
Wrist strap Installation Instructions
Guide direction
Wrist strap installation: as shown in the direction of the wrist strap
guide rail into the rear cover of the guide rail groove, and then forced
the wristband along the direction of the guide to the bottom.
Wrist strap disassembly: forced in accordance with the "PUSH"
direction down, and then the wristband along the direction of the
guide pulled out.
Tap the top of the screen, drag
downwards and the USB setting
interface will appear.
Check the USB debug if you intend
to develop software and step
through your code with the device.
Note: When you enable device as USB Storage to PC, the flash
memory of the device are map as a PC drive. At this point of time,
you cannot install APK to the device.
To install APK to the device, it should not be in USB Storage mode.
Click on this to go the next
left interface
Click on this to go the next
left interface
Check the SD Card option if you
intend to transfer files between
your PC and the device.
 Loading...