

Page 1
micro cd system
with MP3
Merrimack, New Hampshire 03054
Customer Service 800-846-3000
www.brookstone.com
512574
Page 2
512574 Micro System w/MP3 Doc. Size:5"W x 4.75"H
Output at 100% Prints 1/0 Black
352
512574_INS_MicroSysw/MP3 PG 9/13/05 2:43 PM Page 3
Page 3

34 3
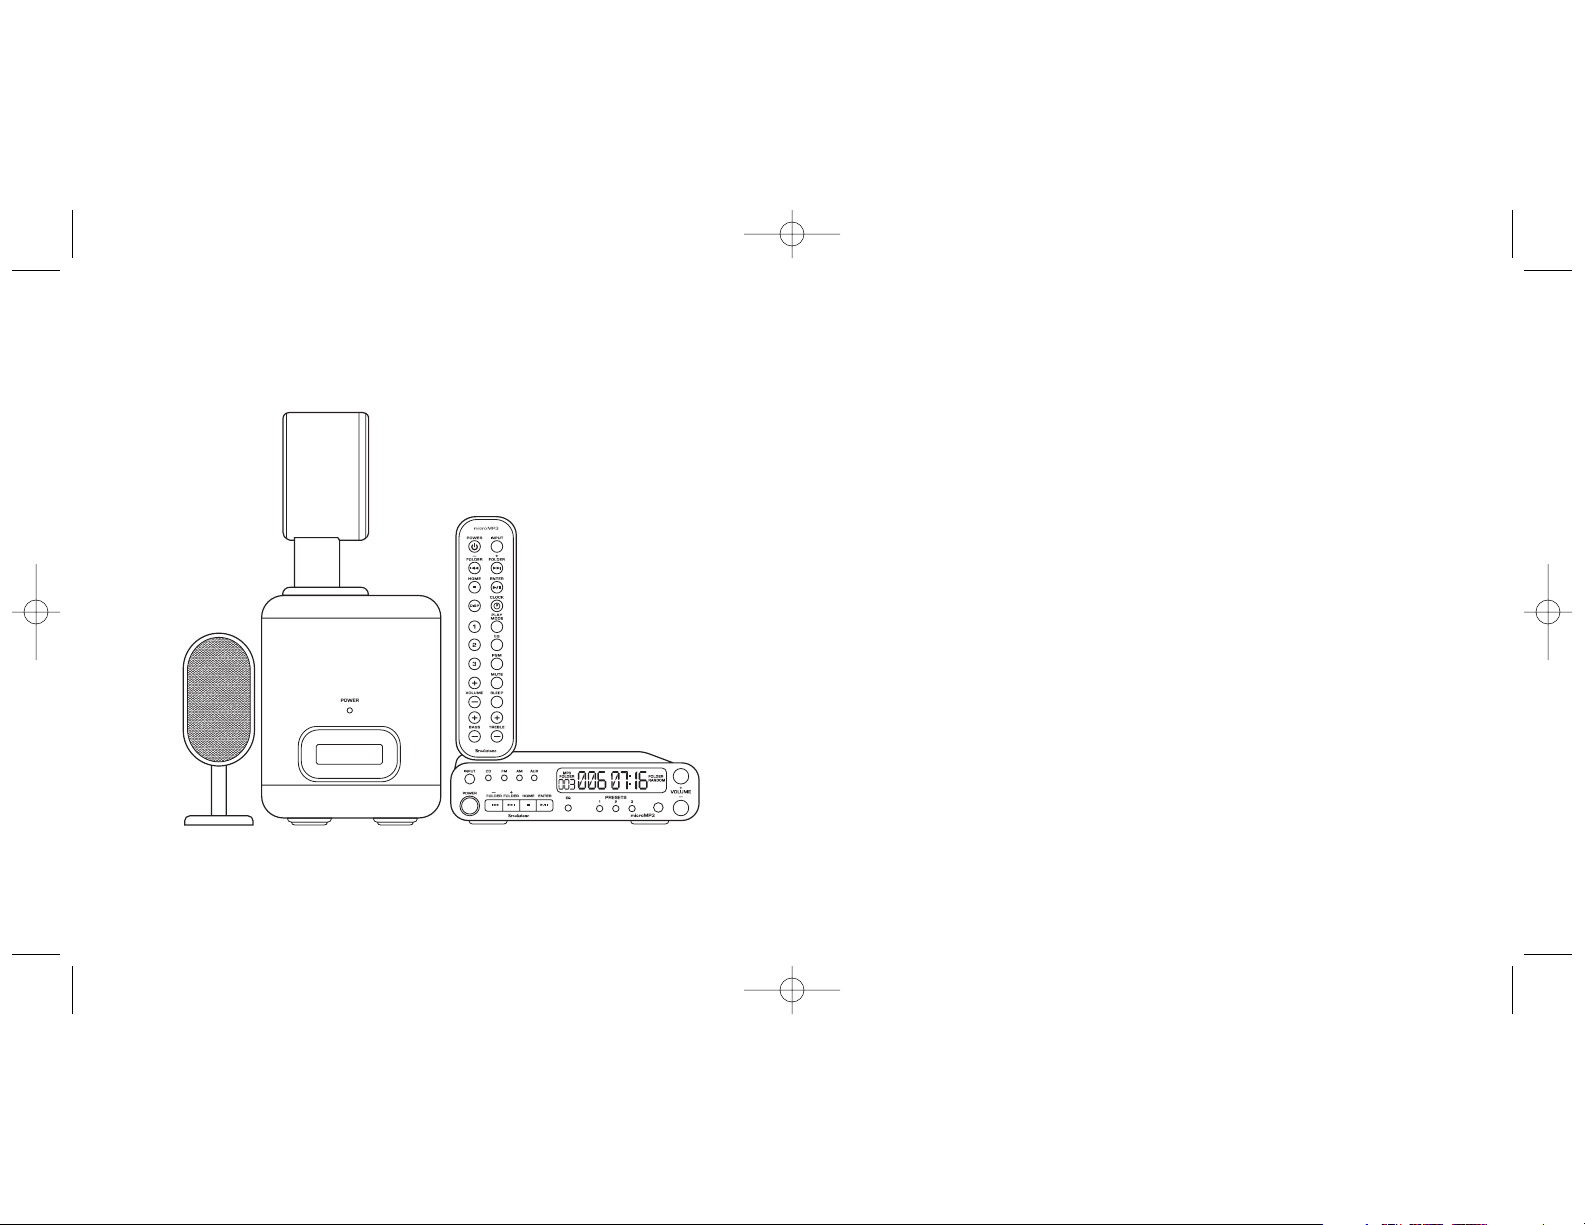
MICRO CD SYSTEM WITH MP3
Brookstone makes life better.
Our Micro CD System with MP3 delivers amazing acoustical range—
and fits just about anywhere. Twin, full-range speakers and a
powerful, 33-watt subwoofer produce rich, clear, room-filling sound,
taking your music into another dimension.
The Micro CD System with MP3 has been thoroughly tested to be
certain it meets our own exacting quality control standards. Please
take a few moments to review the following important information
before using it.
The mini system with full-size sound!
512574 Micro System w/MP3 Doc. Size: 5"W x 4.75"H
Output at 100% Prints 1/0 Black
512574_INS_MicroSysw/MP3 PG 9/13/05 2:43 PM Page 5
Page 4

SPECIFICATIONS
Remote control uses one CR2025 button cell battery (included).
33
512574 Micro System w/MP3 Doc. Size: 5"W x 4.75"H
Output at 100% Prints 1/0 Black
CAUTION
•TO REDUCE THE RISK OF ELECTRIC SHOCK, DO NOT REMOVE
COVER OR BACK.THERE ARE NO USER-SERVICEABLE PARTS
INSIDE. REFER SERVICING TO QUALIFIED SERVICE PERSONNEL.
•TO REDUCE THE RISK OF FIRE OR ELECTRIC SHOCK, DO NOT
EXPOSE THIS UNIT TO RAIN OR MOISTURE.
The lightning flash with arrow-head symbol within an
equilateral triangle is intended to alert the user to the
presence of uninsulated "dangerous voltage" within the
unit’s enclosure that may be of sufficient magnitude to
constitute a risk of electric shock.
The exclamation point within an equilateral triangle is
intended to alert the user to the presence of important
operating and maintenance (servicing) instructions in the
literature accompanying the unit.
4
512574_INS_MicroSysw/MP3 PG 9/13/05 2:43 PM Page 7
Page 5

CARE AND MAINTENANCE
System
Wipe the housing gently with a soft, dry cloth. If the unit is heavily
stained or soiled, wipe with a moistened cloth. To avoid damage, do
not use any cleaning agents or abrasive cleaners.
Speakers
Wipe the speakers gently with a clean, damp cloth.To avoid damage,
do not use any cleaning agents or abrasive cleaners.
CD Lens
When the lens gets dirty, malfunctions may occur.The lens should be
cleaned using a commercially available camera lens cleaner.
CD Compartment
•Do not put anything except a compact disc into compartment.
Other objects can damage the mechanism.
•Do not force the compartment open.
•Keep the compartment closed when not in use to prevent dirt and
dust from settling inside.
•Never place multiple discs into the compartment at the same time.
32
IMPORTANT SAFETY INSTRUCTIONS
1. READ INSTRUCTIONS
All the safety and operating instructions should be read before the
unit is operated.
2. RETAIN INSTRUCTIONS
The safety and operating instructions should be retained for
future reference.
3. HEED WARNINGS
All warnings on the unit and in the operating instructions should
be adhered to.
4. FOLLOW INSTRUCTIONS
All operating and use instructions should be followed.
5. WATER AND MOISTURE
The unit should not be used near water—for example, near a
bathtub, washbowl, kitchen sink, laundry tub, in a wet basement,
or near a swimming pool.
6. CARTS AND STANDS
The unit should be used only with a cart or stand that is
recommended by the manufacturer.
7. A UNIT AND CART COMBINATION SHOULD BE MOVED WITH CARE
Quick stops, excessive force, and uneven surface may cause the
unit and cart combination to overturn.
5
512574 Micro System w/MP3 Doc. Size: 5"W x 4.75"H
Output at 100% Prints 1/0 Black
512574_INS_MicroSysw/MP3 PG 9/13/05 2:43 PM Page 9
Page 6

Improving FM Reception
Fully unwind the FM WIRE ANTENNA located on the back of the
system and position it for best sound.
Replacing the Remote Control Battery
1. Slide the BATTERY COMPARTMENT open.
2. Remove the old battery and insert a new CR2025 battery into the
battery compartment, ensuring the positive (+) side faces up.
3. Close the BATTERY COMPARTMENT.
Note: When the remote control is not going to be used for more than
30 days, remove the battery to prevent it from leaking. If it leaks, wipe
away the liquid inside the BATTERY COMPARTMENT and replace with a
new battery.
31
512574 Micro System w/MP3 Doc. Size: 5"W x 4.75"H
Output at 100% Prints 1/0 Black
8. WALL OR CEILING MOUNTING
The unit should be mounted to a wall or ceiling only as
recommended by the manufacturer.
9. VENTILATION
The unit should be situated so that its location or position does
not interfere with its proper ventilation. For example, the unit
should not be situated on a bed, sofa, rug or similar surface that
may block the ventilation openings or placed in a built-in
installation, such as a bookcase or cabinet that may impede the
flow of air through the ventilation openings.
10. HEAT
The unit should be situated away from heat sources such as
radiators, heat registers, stoves, or other units (including
amplifiers) that produce heat.
11. POWER SOURCE
The unit should be connected to a power supply only of the type
described in the operating instructions or as marked on the unit.
12. GROUNDING OR POLARIZATION
Precautions should be taken so that the grounding or polarization
means of a unit is not defeated.
13. POWER CORD PROTECTION
Power-supply cord should be routed so that it is not likely to be
walked on or pinched by items placed upon or against it, paying
particular attention to cord at outlets, convenience receptacles,
and the point where it exits the unit.
6
512574_INS_MicroSysw/MP3 PG 9/13/05 2:43 PM Page 11
Page 7

Setting Radio Stations into Memory
You m ay store up to three FM stations and three AM stations in
channel memory.
1. Press INPUT on the unit or remote to select FM or AM mode.
The AM INDICATOR or FM INDICATOR illuminates on the unit.
2. Press - FOLDER/ or + FOLDER/ to select the
desired station.
3. Press and hold PRESET 1, PRESET 2 or PRESET 3 on the unit or 1,2, or 3
on the remote for three seconds.The unit beeps and the desired
preset number appears on the unit’s display. The station is now saved.
Note: If it has been previously set, the former station is replaced.
4. Repeat Steps 2 and 3 to store additional stations.
Playing Preset Stations
1. Press INPUT on the unit or remote to select FM or AM mode.
2. Press PRESET 1, PRESET 2 or PRESET 3 on the unit or 1, 2, or 3 on
the remote to hear your desired station.
Improving AM Reception
Reposition the unit to get better AM reception.
30
14. PROTECTIVE ATTACHMENT PLUG
The unit is equipped with an attachment plug having overload
protection. This is a safety feature. See Instruction Manual for
replacement or resetting of protective device. If replacement of
the plug is required, be sure the service technician has used a
replacement plug specified by the manufacturer that has the same
overload protection as the original plug.
15. CLEANING
The unit should be cleaned only as recommended by
the manufacturer.
16. POWER LINES
An outdoor antenna should be located away from power lines.
17. OUTDOOR ANTENNA GROUNDING
If an outside antenna is connected to the receiver, be sure the
antenna system is grounded so as to provide some protection
against voltage surges and built-up static charges. Article 810 of
the National Electrical Code, ANSI/NFPA 70, provides information
with regard to proper grounding of the mast and supporting
structure, grounding of the lead-in wire to an antenna-discharge
unit, size of grounding conductors, location of antenna discharge
unit, connection to grounding electrodes, and requirements for
the grounding electrode. See Figure 1.
7
512574 Micro System w/MP3 Doc. Size: 5"W x 4.75"H
Output at 100% Prints 1/0 Black
512574_INS_MicroSysw/MP3 PG 9/13/05 2:43 PM Page 13
Page 8

Playing the Radio
1. Press INPUT on the unit or remote to select FM or AM mode.
The AM INDICATOR or FM INDICATOR illuminates on the unit.
2. Press - FOLDER/ or + FOLDER/ to select a radio station.
•If you press - FOLDER/ or + FOLDER/ for less than
three seconds each time, the receiving frequency moves up or
down incrementally.
•If you press and hold - FOLDER/ or + FOLDER/ for
more than three seconds, the frequency continues to increase
automatically until a radio station is received.
Note: The last tuned station is retained and recalled when you turn
the system on. The tuned station is stored into memory, even if power
is disconnected or cut due to temporary power failure.
29
512574 Micro System w/MP3 Doc. Size: 5"W x 4.75"H
Output at 100% Prints 1/0 Black
18. NON-USE PERIODS
The power cord of the unit should be unplugged from the outlet
when left unused for a long period of time.
19. OBJECT AND LIQUID ENTRY
Care should be taken so that objects do not fall and liquids are not
spilled into the unit through openings.
8
ANTENNA
LEAD IN WIRE
ANTENNA DISCHARGE UNIT
(NEC SECTION 810-20)
GROUNDING CONDUCTORS
(NEC SECTION 810-21)
GROUND CLAMPS
ELECTRIC C
SERVICE EQUIPMENT
NEC - NATIONAL ELECTRICAL CODE
FIGURE 1
EXAMPLE OF ANTENNA GROUNDING PER THE NATIONAL ELECTRICAL CODE
POWER SERVICE GROUNDING
ELECTRODE SYSTEM
(NEC ART 250, PART H)
GROUND CLAMPS
512574_INS_MicroSysw/MP3 PG 9/13/05 2:43 PM Page 15
Page 9

28
Muting Sound
1. Press MUTE on the remote control to silence audio output. MUTE
appears on the display.
2. Press MUTE again to cancel this function and regain sound.
Using Sleep Feature
This feature shuts off the system and goes into Standby mode when
the selected sleep time has passed.
Sleep time can be set from 10-90 minutes.
Press SLEEP on the remote control to select the desired sleeping time.
Your selection will appear on the display.
To c ancel the sleep feature, press SLEEP until there is no sleep time on
the display.
20. DAMAGE REQUIRING SERVICE
The unit should be serviced by qualified service
personnel when:
a) The power-supply cord or the plug has been damaged; or
b) Objects have fallen, or liquid has been spilled into the unit; or
c) The unit has been exposed to rain; or
d) The unit does not appear to operate normally or exhibits a
marked change in performance; or
e) The unit has been dropped, or the enclosure damaged.
21. SERVICING
The user should not attempt to service the unit beyond that
described in the operating instructions. All other servicing should
be referred to qualified service personnel.
LASER SAFETY
Laser CD players use invisible laser light and are equipped with safety
switches to avoid exposure when the door is open and safety
interlocks are defeated. It is dangerous to defeat or bypass safety
switches. Avoid direct exposure to laser beam.
Note: Do not look directly into the laser. It may cause damage to eyes.
WARNING
Hazardous laser radiation is present when the unit is open and
interlocks are defeated.
9
512574 Micro System w/MP3 Doc. Size: 5"W x 4.75"H
Output at 100% Prints 1/0 Black
512574_INS_MicroSysw/MP3 PG 9/13/05 2:43 PM Page 17
Page 10

27
Adjusting Volume
Press VOLUME +/- on the remote control or main unit until the
desired volume is reached.
Adjusting Bass
Press BASS +/- on the remote control until the desired bass sound
is reached.
Adjusting Treble
Press TREBLE +/- on the remote control until the desired bass sound
is reached.
Changing Sound Quality with EQ
During play,press EQ repeatedly to select the preferred equalizer mode.
FLAT ROCK POP JAZZ
512574 Micro System w/MP3 Doc. Size: 5"W x 4.75"H
Output at 100% Prints 1/0 Black
IMPORTANT
This unit may be sensitive to high levels of static electricity. If the unit
powers off or the display becomes irregular, reset by unplugging the
power cord for a minimum of 15 seconds.
BATTERY PRECAUTIONS
•Dispose of the old battery properly. Do not dispose of the old
battery in a fire.
•Do not leave the battery where a child or pet could play with or
swallow it. If the battery is swallowed, contact a
physician immediately.
•The battery may explode if mistreated. Do not attempt to recharge
or disassemble the battery.
FCC COMPLIANCE INFORMATION
This equipment has been tested and found to comply with the limits
for a Class B digital device, pursuant to Part 15 of the FCC Rules.
These limits are designed to provide reasonable protections against
harmful interference in a residential installation. This equipment
generates, uses and can radiate radio frequency energy and, if not
installed and used in accordance with these instructions, may cause
harmful interference to radio communications. However, there is no
guarantee that interference will not occur in a particular installation.
10
512574_INS_MicroSysw/MP3 PG 9/13/05 2:43 PM Page 19
Page 11

Editing Programmed Memory
1. With the CD or MP3 in Stop mode, press PGM on the remote
control repeatedly until you reach the track or folder you want
to replace.
2. For CDs, press - FOLDER/ or + FOLDER/ to select the
track you want to replace.
For MP3s, press - FOLDER/ or + FOLDER/
to select the
folder you want to replace. Press PGM to confirm your selection.
Press - FOLDER/ or + FOLDER/
again to select the track
you want to replace.
3. Press PGM again to confirm your selection.
4. Repeat Steps 2 and 3 to edit other programmed memory.
26
If harmful interference to radio or television reception should occur,
determined by turning the equipment off and on, the user is
encouraged to correct interference by trying one or more of the
following measures:
•Relocate the receiving antenna.
•Increase the separation between equipment and receiver.
•Connect equipment to an outlet on a circuit different from receiver.
•Consult an experienced radio/TV technician for help.
SAVE THESE INSTRUCTIONS
11
512574 Micro System w/MP3 Doc. Size: 5"W x 4.75"H
Output at 100% Prints 1/0 Black
512574_INS_MicroSysw/MP3 PG 9/13/05 2:43 PM Page 21
Page 12

Programming CD and MP3 Play
This feature programs the order in which tracks are played. You may
program up to 64 CD tracks and 64 MP3 tracks.
1. With the CD or MP3 in Stop mode, press PGM on the remote
control. For CDs, 00 P--01 PRGM appears on the display.
For MP3s, 000 flashes on the display, and P--01 PRGM appears.
2. Press - FOLDER/ or + FOLDER/ to locate the desired CD
track or MP3 folder.
3. Press PGM to confirm your selection. For CDs, 00 P--002 PRGM
appears on the display.
For MP3s, 000 flashes on the display and P--01 PRGM appears.
4. For MP3s, press - FOLDER/ or + FOLDER/ again to locate
the desired MP3 track. Press PGM to confirm your selection.
5. Repeat Steps 2-4 to program other tracks or folders for your
desired sequence.
6. Press ENTER to play your programmed sequence.
Note:
•After the last programmed track or folder is played, the CD or MP3
stops playing automatically. To replay the programmed sequence,
press PGM, then ENTER .
•To cancel programmed play, you can open the CD COMPARTMENT
DOOR or press HOME two times when you are in CD or
MP3 mode.
25
512574 Micro System w/MP3 Doc. Size: 5"W x 4.75"H
Output at 100% Prints 1/0 Black
LOCAT
Page 13

Repeating the Disc
Press PLAY MODE on the remote control until RPT ALL appears on
the display.
Note: To exit this function, press PLAY MODE until RPT ALL disappears
from the display.
Repeating the MP3 Folder
Press PLAY MODE on the remote control until RPT FOLDER appears on
the display.
Note: To exit this function, press PLAY MODE until RPT FOLDER
disappears from the display.
Displaying MP3 ID3 Information
During MP3 playback, press DISP on the remote control. The
information about the current track displays as follows:
File (file name) > Title (track title) > Artist (artist name) > Album
(album name).
Note:
•To exit this function, press DISP.
•The ID3 information enters the display from right to left.
24 13
14. VOLUME +/- - Adjusts the sound level.
15. CD COMPARTMENT DOOR
16. DIMMER LOW/HIGH - Adjusts brightness of the display.
17. AUX IN - Jack that connect to an external auxiliary sound source
(TV, VCR,DVD Player, cassette deck, mini disc player, etc.).
1
2
3
4
5
6
7
8
9 10
11
12
13
14
15
512574 Micro System w/MP3 Doc. Size: 5"W x 4.75"H
Output at 100% Prints 1/0 Black
512574_INS_MicroSysw/MP3 PG 9/13/05 2:43 PM Page 25
Page 14

•To temporarily stop CD or MP3 play, press ENTER
.
The playing time flashes on the display. Press ENTER again
to resume play.
•Play stops automatically after all tracks have been played.
The display shows the total number of tracks and folders and the
total playing time.
Playing Tracks in Random Order
1. Repeatedly press PLAY MODE on the remote control until RANDOM
appears on the display.The unit then plays all songs on the disc in
random order.
2. To exit this function, press PLAY MODE until RANDOM disappears
from the display.The disc continues playing to the end, but in the
correct order.
Repeating One Track
1. With the CD or MP3 in Stop mode, press - FOLDER/ or
+ FOLDER/ to select a desired track.
2. Press PLAY MODE on the remote control until RPT 1 appears on the
display.The selected track plays repeatedly.
Note: To cance l this function, press PLAY MODE until RPT 1 disappears
from the display.
23
512574 Micro System w/MP3 Doc. Size: 5"W x 4.75"H
Output at 100% Prints 1/0 Black
18. TO SUBWOOFER - Jack that connects to the subwoofer.
19. ( ) - Jack that connects to headphones.
20. FM ANTENNA
21. LINE OUT (R, L) - Jacks that connect to external channel speakers.
14
16
17
18
21
19
20
512574_INS_MicroSysw/MP3 PG 9/13/05 2:43 PM Page 27
to
dimmer aux in lr
low high
subwoofer
line out
ant
Page 15

Playing CDs and MP3s
1. With the unit on, press INPUT on the unit or remote control
incrementally until the CD INDICATOR illuminates on the unit.
2. Press the CD COMPARTMENT DOOR and it lifts open.
3. Place your desired CD or MP3 into the tray with the label facing up.
4. Close the CD COMPARTMENT DOOR.
5. Press - FOLDER/ or + FOLDER/ on either the main unit
or remote control to locate your desired CD or MP3 track.
Note:
•If your MP3s are in folders, press HOME to enter the MP3 folder
directory, then press - FOLDER/ or + FOLDER/
to locate
your desired MP3 folder. After locating your desired MP3 folder,
press
HOME
to enter the folder, then press
- FOLDER/ or +
FOLDER/
to locate your desired track.
•If you do not select a track or MP3 folder, the unit will play the disc
from the beginning.
6. Press ENTER on either the main unit or remote control to
begin play.The display shows the track number and playing time.
For MP3s, the display also shows the folder.
7. To stop CD or MP3 play at any time, press HOME .
Note:
•Press and hold - FOLDER/ or + FOLDER/ to search any
desired point within a track or MP3 folder.
22 15
Remote Control
22. POWER - Switches the power on and off.
23. - FOLDER/
-
Skips backwards through a disc or track in CD
mode; skips backwards through radio stations in Tuner mode; skips
backwards through folders in MP3 mode; or skips backwards through
time in Clock mode. Press and hold for faster reverse.
24. HOME
- Stops CD or programmed play or enters the MP3
folder directory.
25.
DISP - Displays ID3 Information.
26. (1,2,3) - Three preset buttons for desired FM or AM stations.
27. VOLUME +/- - Adjusts the sound level.
28. BASS +/- - Adjusts bass sound.
29. INPUT - Toggles between CD, FM, AM and AUX modes.
30. + FOLDER/
-
Skips forward through a disc or track in CD mode;
skips forward through radio stations in Tuner mode; skips forward
through folders in MP3 mode; or skips forwards through time in Clock
mode. Press and hold for faster advance.
31. ENTER
- Plays and pauses CD play and MP3s.
32. CLOCK - Sets the time.
33. PLAY MODE - Toggles between random CD play, repeating one
track on a CD or repeating all tracks on a CD.
34. EQ - Selects equalizer mode (Flat, Rock, Pop and Jazz).
512574 Micro System w/MP3 Doc. Size: 5"W x 4.75"H
Output at 100% Prints 1/0 Black
512574_INS_MicroSysw/MP3 PG 9/13/05 2:43 PM Page 29
Page 16

Setting the Clock
1. Press and hold CLOCK on the remote control until the minutes
begin flashing on the display.
2. Press - FOLDER/
or
+ FOLDER/ on the main unit or
remote control until the correct time displays.
3. Press CLOCK to confirm your selection.
Note: The clock only displays in 12-hour mode. PM appears on the
display for afternoon/evening hours. AM does not appear for
morning hours.
Turning the System On/Off
To t urn the system on, press POWER on the main unit or remote
control. Press POWER again to turn the unit off.
21
512574 Micro System w/MP3 Doc. Size: 5"W x 4.75"H
Output at 100% Prints 1/0 Black
35. PGM - Programs CD or MP3 tracks into memory.
36. MUTE - Silences audio output.
37. SLEEP - Selects the sleeping time option in Sleep mode.
38. TREBLE +/- - Adjusts treble sound.
39. BATTERY COMPARTMENT
16
22
23
24
25
27
28
26
29
30
31
32
33
34
35
36
37
38
39
512574_INS_MicroSysw/MP3 PG 9/13/05 2:43 PM Page 31
Page 17

SYSTEM OPERATION
Using the Remote Control
The remote control is required to set the clock and many
other functions on the main unit.
To u se the remote control, point it at the REMOTE SENSOR
on the main unit for control from your listening position.
Note:
•Even if the remote control is within effective range, operation may
be compromised by obstacles between the remote control and the
main unit.
•If the remote control is operated near other units which generate
infrared rays, or if other remote control devices using infrared rays
are used near the unit, the remote control may operate incorrectly.
Conversely, this remote control may make other units
operate incorrectly.
20 17
Subwoofer
40. POWER INDICATOR - Indicates power is on.
41. DC IN - Jack that connects DC power cord to an
electrical outlet.
42. TO CD DECK - Jack that connects the CD player to the subwoofer.
43. SPEAKER (4OHM) R L - Jacks that connect the right and left
speakers to the subwoofer.
Page 18

SYSTEM SETUP
Connecting the Unit
1. Connect one end of the SUBWOOFER CABLE into TO SUBWOOFER
on the back of the unit, and the other end into TO CD DECK on the
back of the subwoofer.
2. Insert the LEFT SPEAKER CABLE and RIGHT SPEAKER CABLE into L
and R on the back of the subwoofer.
3. Insert one end of the DC POWER CORD into DC IN on
the back of the subwoofer, and the other end into an
electrical outlet.
Connecting the Unit to Another Audio Source
1. Insert one end of the MP3 CABLE into your audio source’s headphone
jack and the other end into AUX IN on the back of the unit.
2. With the unit On, press INPUT incrementally until the AUX
INDICATOR illuminates on the unit.
19
512574 Micro System w/MP3 Doc. Size: 5"W x 4.75"H
Output at 100% Prints 1/0 Black
Accessories
44. DC POWER CORD
45. MP3 CABLE
46. SUBWOOFER CABLE
47. LEFT SPEAKER CABLE
48. RIGHT SPEAKER CABLE
18
 Loading...