


OPERATING INSTRUCTIONS
AM/FM SYNTHESIZER
TUNER
DT-920
Please follow the instructions in this manual to obtain the optimum results from this unit.
We also recommend that you keep this manual handy for future reference.
TOA Corporation
CONTENTS
TO USE YOUR UNIT PROPERLY AND SAFELY
ACCESSORIES
CONNECTIONS
CONTROLS
LISTENING TO THE RADIO
FREQUENCY UP/DOWN TUNING
DIRECT TUNING
AUTOMATIC OR MANUAL PRESET TUNING
LISTENING TO PRESET STATIONS
MAINTENANCE
TROUBLESHOOTING GUIDE
SPECIFICATIONS
TO USE YOUR UNIT PROPERLY AND SAFELY
- Do not damage the power cord.
- When not in use, disconnect the power cord from the
outlet. Grasp the plug, not the cord, when disconnecting
th e unit.
- If water should enter the unit, electrical shock or a
malfunction may result. Use in an area where there is
low humidity and little dust.
- Do not disassemble or alter the unit in any way.
1
1
2
3
3
3
4
4
5
6
6
6
CAUTION
THIS UNIT SHOULD NOT BE ADJUSTED OR REPAIRED
BY ANYONE EXCEPT PROPERLY QUALIFIED SERVICE
PERSONNEL.
WARNING!
TO AVOID THE HAZARDS OF FIRE OR ELECTRICAL
SHOCK, DO NOT EXPOSE THIS APPLIANCE TO RAIN
OR OTHER MOISTURE.
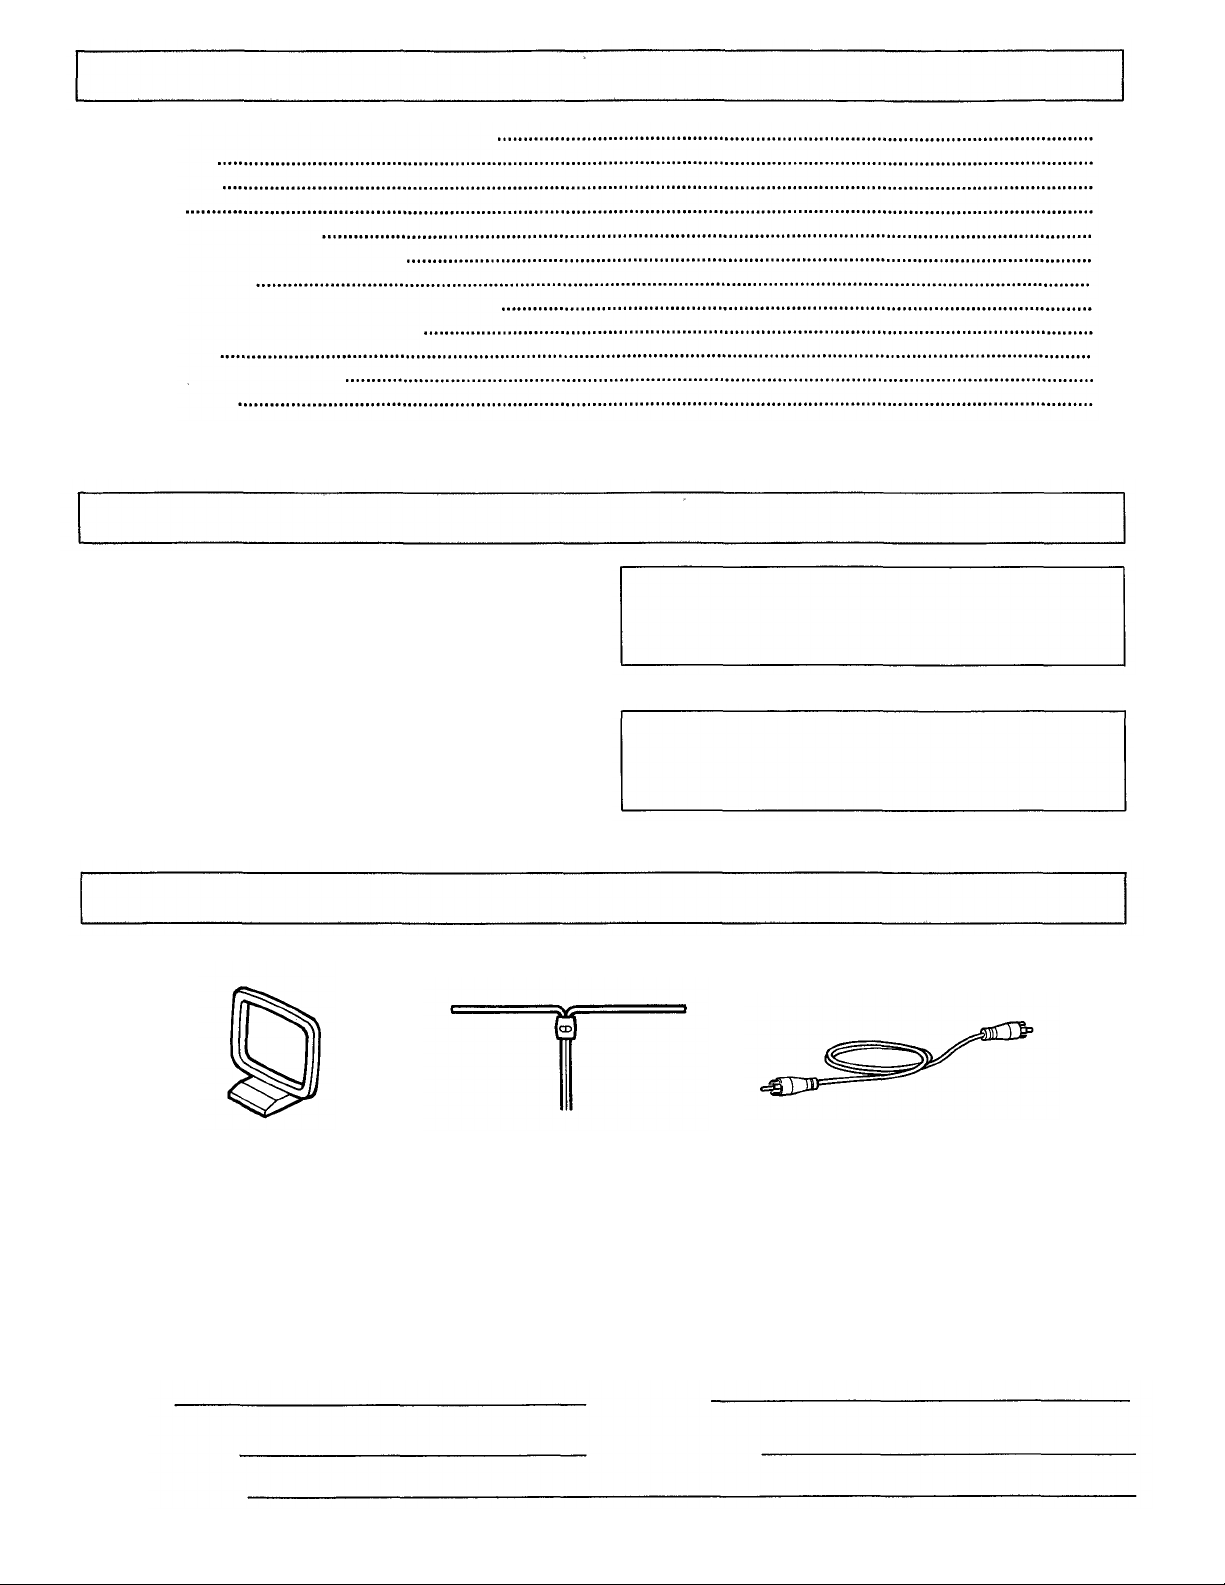
ACCESSORIES
AM loop antenna
Part No. 614 240 0845
FM indoor antenna
Part No. 614 023 7481
ATTENTION
For your protection in the event of theft or loss of this product, please fill in the information below for your own personal
records.
Model No.
DT-920
Serial No.
(Located on the back of the unit)
Date of Purchase
Purchase Price
RCA plug audio cable
Part No. 645 005 0534
Where Purchased
-1-
WARNING: TO PREVENT FIRE OR SHOCK HAZARD, DO NOT EXPOSE
THIS APPLIANCE TO RAIN OR MOISTURE.
RISK OF ELECTRIC SHOCK
DO NOT OPEN
These markings are located on the bottom, side or back of the unit.
CAUTION: TO PREVENT THE RISK OF ELECTRIC SHOCK, DO NOT REMOVE COVER (OR BACK). NO USER-
SERVICEABLE PARTS INSIDE. REFER SERVICING TO QUALIFIED SERVICE PERSONNEL.
This symbol indicates that dangerous
voltage constituting a risk of electric shock
is present within this unit.
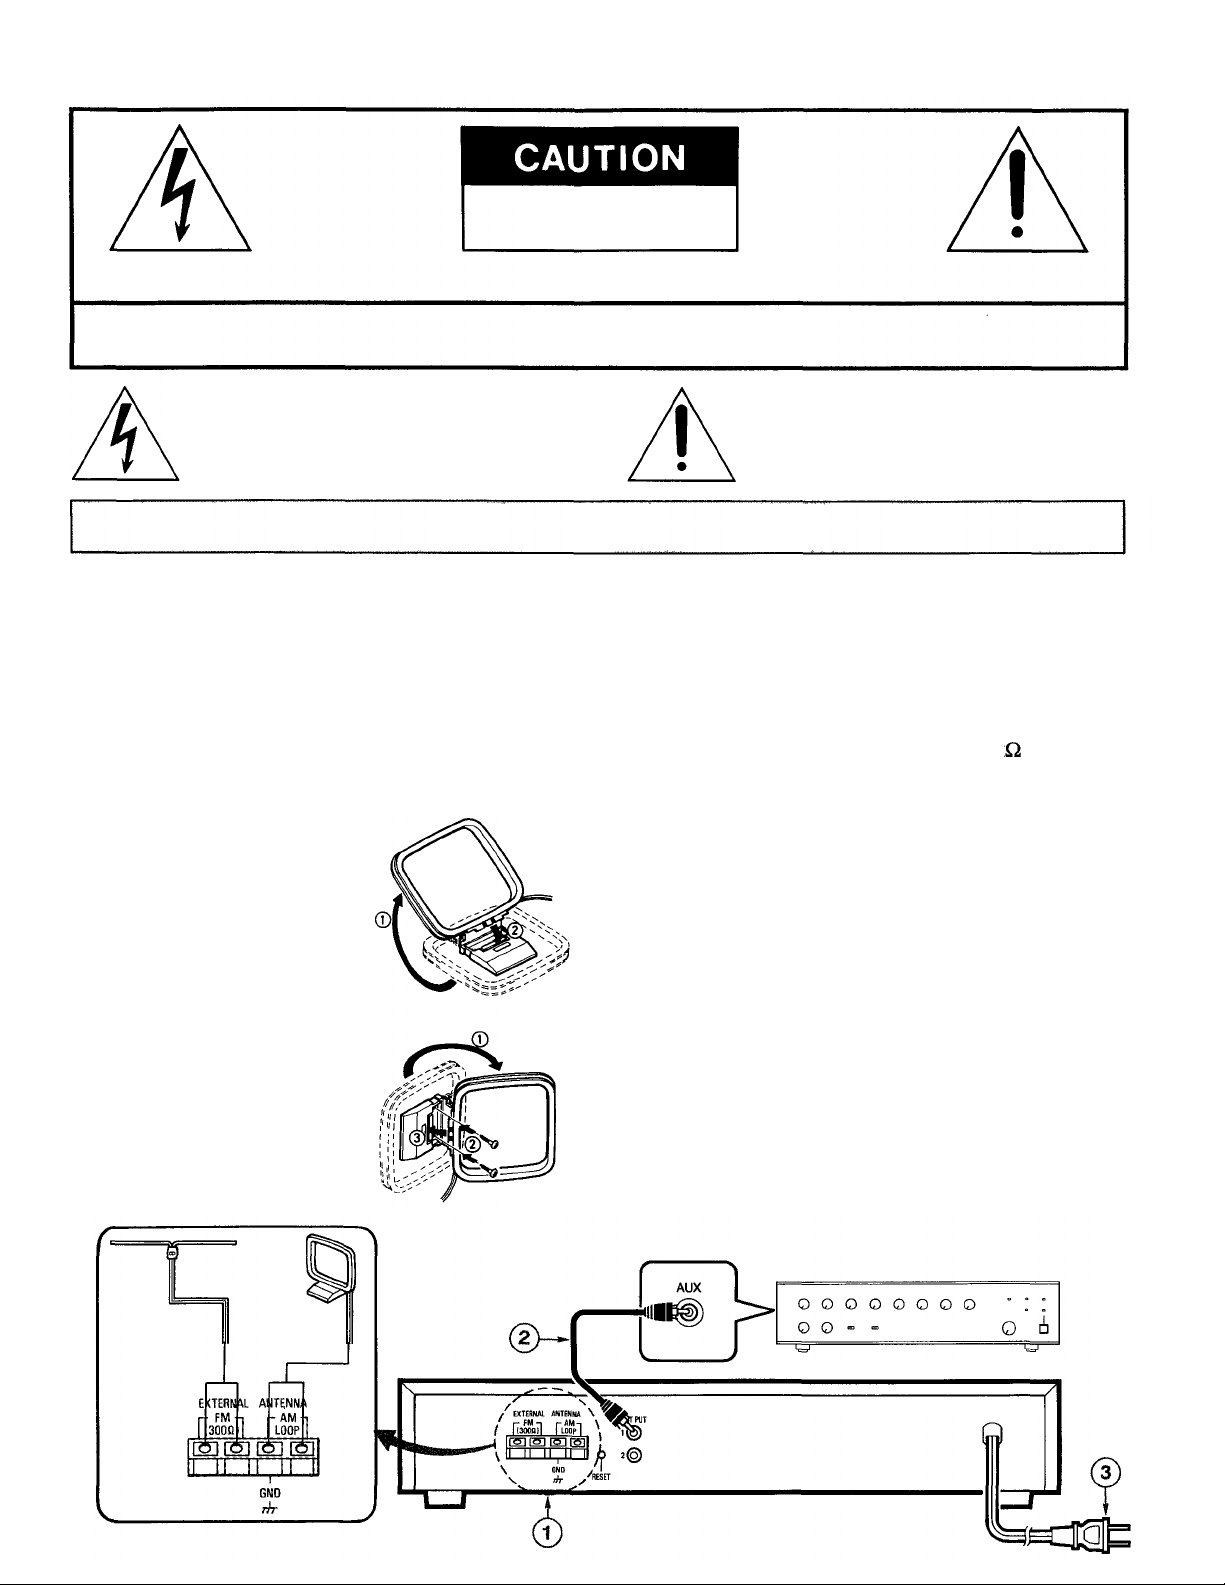
CONNECTIONS
1. Connect the FM and AM antennas as shown below.
FM antenna
The T-shaped indoor FM antenna (300-ohm) is sufficient
to receive most local FM broadcasts and should be
connected to the rear FM terminals on the DT-920.
Infringe areas, or where reception is distorted or noisy,
an FM outdoor antenna (not supplied) should be
connected instead o f the indoor antenna. The terminals
will accept 300-ohm twin lead cable.
AM antenna
The AM loop antenna is
sufficient to receive most
local AM broadcasts.
Assemble the loop antenna
This symbol indicates that there are
important operating and maintenance
instructions in the literature accompany-
ing this unit.
NOTE:
To minimize noise...
- Keep the speaker wires, power c ord and all other cables away from
the antennas.
- Do not place the antenna close to a TV or speaker.
2. Connect one end of a supplied audio cable to the
OUTPUT (1 or 2) jack on the TUNER and the other end
to the AUX input jack (-20 to 0dBV, 10k ) of the 900
series II amplifier.
3. After making all the connections, connect the AC power
cord to 120V AC 60Hz outlet.
This unit is equipped with a polarized plug. If you have
difficulty inserting the plug, turn it over and reinsert it. If
the unit will not be used for a long time, disconnect the
AC plug from the AC outlet.
Unwind the antenna wires
(about 3 turns), then
connect them to the AM
LOOP terminals. Place the
loop antenna in a position
which yields the best AM
reception, or attach it to a
wall or other surface as
shown.
CAUTION: TO PREVENT ELECTRIC SHOCK, MATCH
WIDE BLADE OF PLUG TO WIDE SLOT, FULLY INSERT.
ATTENTION:
POUR ÉVITER LES CHOCS ÉLECTRIQUES, INTRODUIRE
LA LAME LA PLUS LARGE DE LA FICHE DANS LA BORNE
CORRESPONDANTE DE LA PRISE ET POUSSER JUSQU'
AU FOND.
CAUTION:
Loose or incorrect connections will result in poor sound or
improper operation.
900 SERIES II AMPLIFIER
DT-920
-2-

CONTROLS
1. Power button (POWER)
2. Channel/Frequency select button (CH/FREQ)
3. Display (MULTI-FUNCTION DISPLAY)
4. Band select button (BAND)
5. Tuning button (DOWN TUNING UP)
6. Preset tuning buttons (PRESET)
7. Direct-in button (DIRECT IN)
8. Memory button (MEMORY)
LISTENING TO THE RADIO
Preparation
1. Press the POWER button on the tuner.
FREQUENCY UP/DOWN TUNING
Automatic tuning
9. Scan level button (SCAN LEVEL)
10. Automatic/Manual tuning select button
(AUTO/MANUAL)
Manual tuning
1. Press the BAND button to select AM or FM.
2. Press the CH/FREQ button to select the frequency
mode. "FREQ" appears.
3. Press the AUTO/MANUAL button to select the automatic
tuning mode. "AUTO" appears.
4. Press the SCAN LEVEL button to select the desired
scanning level, "SCAN 1" or "SCAN 2."
SCAN 1: To receive stations with weak signals
SCAN 2: To receive stations with strong signals
5. Press the TUNING "UP" or "DOWN" button.
The unit will scan up or down the band and receive the
next station with a signal that is at least as strong as the
scanning level selected in step 4.
6. Adjust for the desired sound quality with the appropriate
controls of the connected amplifier.
1. Press the BAND button to select AM or FM.
2. Press the CH/FREQ button to select the frequency
mode. "FREQ" appears.
3. Press the AUTO/MANUAL button to select the manual
tuning mode. ("AUTO" disappears and "MONO" appears
when FM band is selected.)
4. Press and hold the TUNING "UP" or "DOWN" button
until the desired station frequency appears on the
display.
- Press and release the TUNING "UP" or "DOWN"
repeatedly change the selected frequency one step
at a time.
-3-

DIRECT TUNING
1. Press the BAND button to select AM or FM.
2. Press the DIRECT IN button.
"FM ---. -- MHz" or "AM - - - - kHz" appears and blinks.
3. Press the PRESET buttons (1 - 0) to enter the frequency
of a broadcast station.
Example:
FM 98.1 MHz... Press 9, 8 and 1.
FM 103.5 MHz... Press 1, 0, 3 and 5.
AM 560 kHz... Press 5 and 6.
AM 1680 kHz... Press 1, 6 and 8.
AUTOMATIC OR MANUAL PRESET TUNING
NOTE:
If you try to enter an incorrect station frequency (86.0MHz
or 500kHz, for example), the display will continue to blink
until the correct number is entered.
Automatic preset tuning (APT)
1. Press the BAND button to select AM or FM.
2. Press the SCAN LEVEL button to select the desired
scan level, "SCAN 1" or "SCAN 2."
3. Press and hold down the MEMORY button for at least 3
seconds, until "APT" and "CH" blink, then release the
button.
The unit will start at the low end of the selected band and
scan upward (higher frequency numbers). Up to 20
stations will be memorized automatically.
After the last station is programmed, the lowest preset
station number will be selected. "APT" disappears.
4. To automatically preset stations on the other band,
press the BAND button, then follow steps 1 - 3 above.
Manual preset tuning
1. Press the BAND button to select AM or FM.
2. Tune in a station as described in "FREQUENCY UP/
DOWN TUNING" or "DIRECT TUNING."
3. Press the MEMORY button. "MEMO" appears and
"CH - -" blinks.
4. Press two PRESET buttons (1 - 0) while "CH - -" is
blinking.
When presetting stations, t wo buttons must be pressed
(except when presetting CH40).
Example:
CH01 ....... Press "0" and "1".
CH05 ....... Press "0" and "5".
CH12 ....... Press "1" and "2".
CH39 ....... Press "3" and "9".
CH40 ....... Press "4" only.
IMPORTANT NOTE
- If APT is activated, all previously programmed stations
will be cleared and new stations will be programmed.
- FM stations will be automatically programmed into CH01
- CH20.
AM stations will be automatically programmed into
CH21 - CH40.
The selected station is now programmed. The preset
channel number and the frequency of the programmed
station appear on the display.
NOTES:
- You cannot enter preset numbers above CH40.
- If a new station is programmed into a band and
preset number already containing a programmed
station, the previously programmed station will be
cleared.
5. To manually preset stations on the other band, press
the BAND button, then follow steps 1 - 4 above.
-4-

LISTENING TO PRESET STATIONS
Program stations as described in "AUTOMATIC OR MANUAL TUNING."
Using the TUNING "UP" or "DOWN" button
1. Press the CH/FREQ button to select the channel mode.
("FREQ" disappears.)
2. Press the TUNING "UP" or "DOWN" button until the
desired channel number appears on the display.
- The preset station for the selected channel number
can be heard.
Using the PRESET button
1. Press two PRESET buttons (1 - 0) to select the desired
channel number.
Example:
CH01 ... Press "0" and "1".
CH05 ... Press "0" and "5".
CH12 ... Press "1" and "2".
CH39 ... Press "3" and "9".
CH40 ... Press "4" only.
You cannot enter preset numbers above CH40.
- The preset station for the selected channel number can
be heard.
- If a channel number which has not been preset is
entered,"----" appears f or 2 seconds and the previous
station is selected.
WHAT TO DO IF ...
If the operation of the unit or display is not normal, or you
wish to clear the contents of the memory, disconnect the
power cord from the AC outlet, then press the RESET
button (rear of the unit) for at least 20 seconds.
Changing the reception frequencies
It is not necessary to perform this procedure in U.S.A and CANADA.
1. Select the band to be changed.
2. Turn the power off.
3. While pressing the BAND button, press the POWER button.
AM: 520 - 1710 kHz (10 kHz steps)
FM: 87.9 - 107.9 MHz (200 kHz steps)
522 - 1710 kHz (9 kHz steps)
87.5-108.0 MHz (50 kHz steps)
- The preset stations will be retained in the memory even
if th e unit is turned off.
If the memory contents are lost due to a power failure or
other condition, preset the stations again.
-5-

MAINTENANCE
Cleaning the cabinet
Use a clean soft cloth moistened with plain lukewarm
water and wrung dry. Never use benzol, benzene or other
strong chemical cleaners since these could damage the
WARNING:
FOR YOUR PERSONAL SAFETY, BE SURE TO
DISCONNECT THE AC POWER CORD BEFORE
PROCEEDING WITH ANY MAINTENANCE OR CLEANING.
finish of your unit. It is important that no liquid reaches the
inside of the unit.
TROUBLESHOOTING GUIDE
If you have followed the instruction and are having difficulty operating the unit, locate the SYMPTOM in the left column
below. Check the corresponding POSSIBLE CAUSE and CORRECTIVE ACTION columns to locate and remedy the
problem.
SYMPTOM
No power when the POWER button is set to
ON.
Poor FM reception.
No power plug connection at the AC outlet.
No antenna is connected.
Shorted or faulty connection(s) between the
FM antenna and the tuner.
The antenna is not positioned for the best
reception.
POSSIBLE CAUSE
CORRECTIVE ACTION
Insert power plug into the AC outlet
Connect the supplied FM antenna to the FM
antenna terminals on the rear panel of the unit.
Refer to the "CONNECTIONS" section.
Check the connections to the FM antenna
terminals on the rear panel of the unit.
Change the position of the antenna. Refer to the
"CONNECTIONS" section.
Continuous or intermittent hissing noise
during AM reception, especially at night.
A humming noise can be heard during AM
broadcast reception.
The tuner operation or display is not normal.
Noise caused by motors, fluorescent lamps,
lightning, television. etc.
The power cord may be too close to the AM
loop antenna or the antenna wire.
The memory must be reset.
Keep the unit away from noise sources.
Install an outdoor AM antenna (Noise may be
reduced, but not completely eliminated.)
Position the power cord away from the antenna
line and the AM loop antenna.
Adjust the position of the AM loop antenna.
Disconnect the power cord, then press the
RESET button (rear of the tuner) at least 20
seconds. See page 5.
Servicing:
Should this product require service, refer to the TOA Electronics, Inc., TOA Canada Corporation warranty.
SPECIFICATIONS DT-920
Tuning range AM:
FM:
87.9MHz - 107.9MHz (200kHz steps)/87.5MHz - 108.0MHz (50kHz steps)
FM usable sensitivity
AM usable sensitivity
Power requirements
Power consumption
Dimensions (W x H x D)
Weight
520kHz - 1710kHz (10kHz steps)/522kHz - 1710kHz (9kHz steps)
14.7dBf
700µV/m
120V AC ±10%, 60Hz
6 Watts
Approx. 420 x 82 x 270 mm
Approx. 2.8 kg
IMPORTANT INFORMATION
All specifications are subject to change without notice.
-6-

FCC INFORMATION
This device complies with Part 15 of the FCC Rules.
Operation is subject to the condition that this device does not
cause harmful interference.
CAUTION:
Changes or modifications not expressly approved by TOA may
void the user's authority to operate this equipment.
TOA Corporation
Printed in Hong Kong
1AD6P1P0022--A
 Loading...