

Unox LineMiss XF138, LineMiss XF110, LineMiss XF180, LineMiss XF188, LineMiss XF135 Instruction Manual And Technical Datas
...Page 1
INSTRUCTION MANUAL AND
TECHNICAL DATAS
MANUEL DES INSTRUCTIONS
ET DES DONNÉES TECHNIQUES
BEDIENUNGSANWEISUNG
MANUALE DI ISTRUZIONI
E DATI TECNICI
MANUAL ISTRUCIONES Y
DATOS TECNOCOS
UNO
R
LineMiss
LineMiss
TM
Page 2

UNO
R
UNO
R
CERTIFICATION
INSTALLATION
Installation
INSTRUCTION FOR THE OPERATOR
NOTES FOR THE USE
CONTROL PANEL
USE OF “CLASSIC”
CONTROL PANEL
3.2 - DESCRIPTION AND USE
OF “DYNAMIC” CONTROL PANEL
VARIOUS FUNCTIONS
CLEANING OF THE OVEN
TURNING OFF IN CASE
OF BREAKDOWN
COOKING TYPOLOGIES
COOKING VARIABLES
USE OF PANS - GRIDS
ORDINARY MAINTENANCE
SPECIAL MAINTENANCE
MORE FREQUENT BREAKDOWNS
APPENDIX - CONTROL PANELS
Page 3
UNO
R
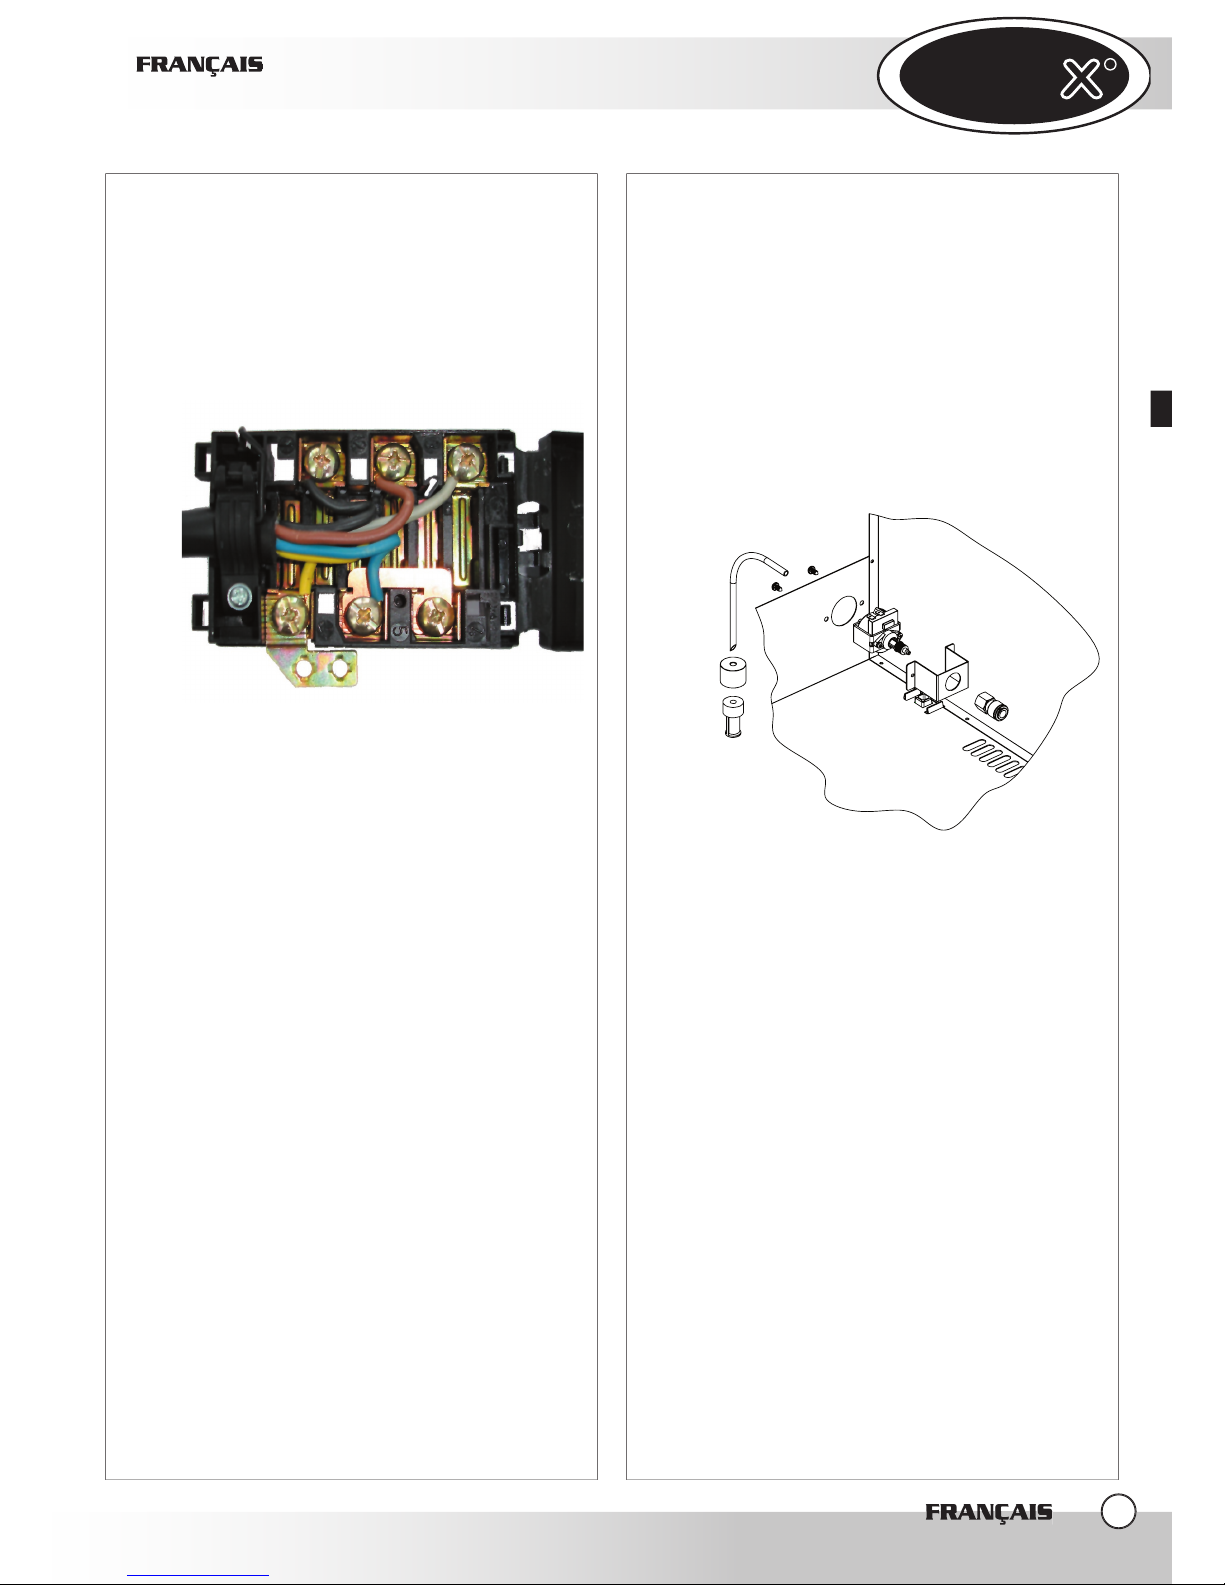
follow concern the phases of a proper installation,
All the electrical connections and installation
the electrical and water connections looking at the
You find the feet inside the appliance. The feet must
Do not ever use the appliance without its feet.
Assemble the feet as showed in picture
N°.
With particular reference to the ovens, all models
that this be of non combustible material.
thermal insulating material and you must be very
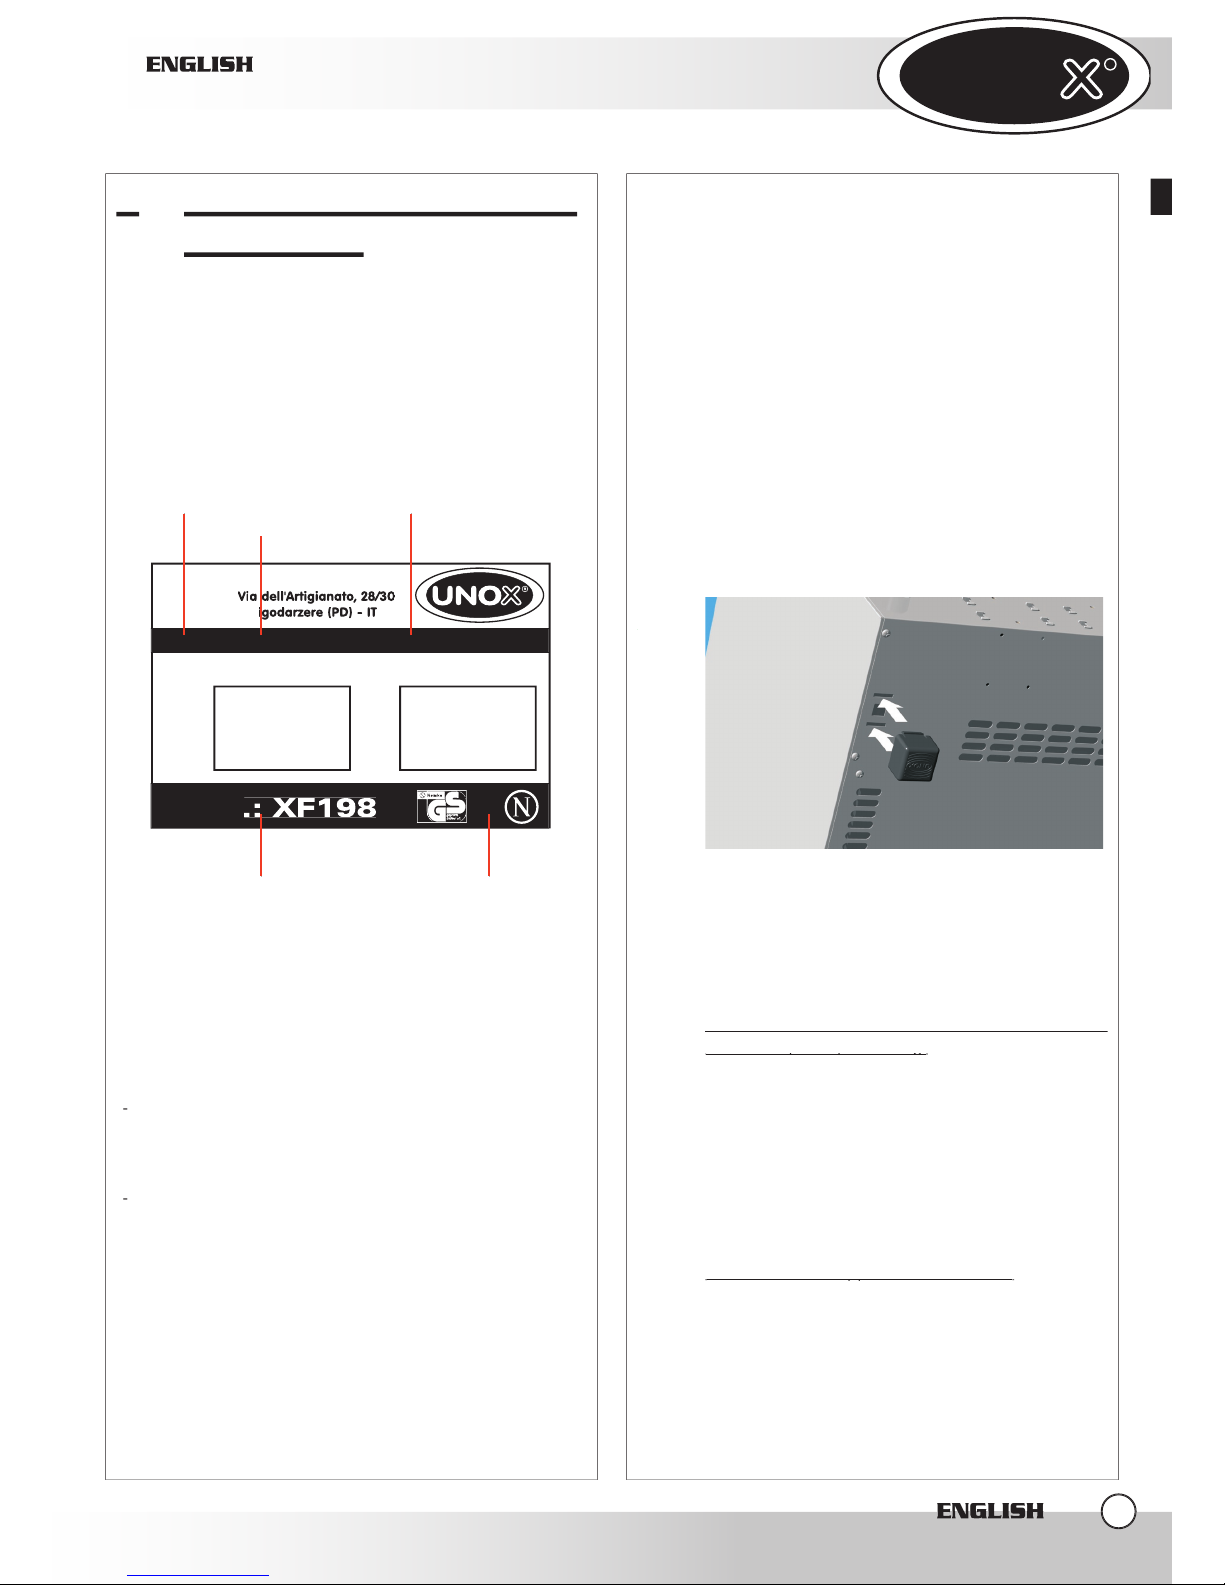
UNOX S.p.A.
Vi
35010 - V
ALY
MOD
DATE
TYPE: kW: POWER: FREQUENCY:
MOD: S/N
SERIE
TENSION D'ALIMENTACION
Page 4
UNO
R
UNO
R
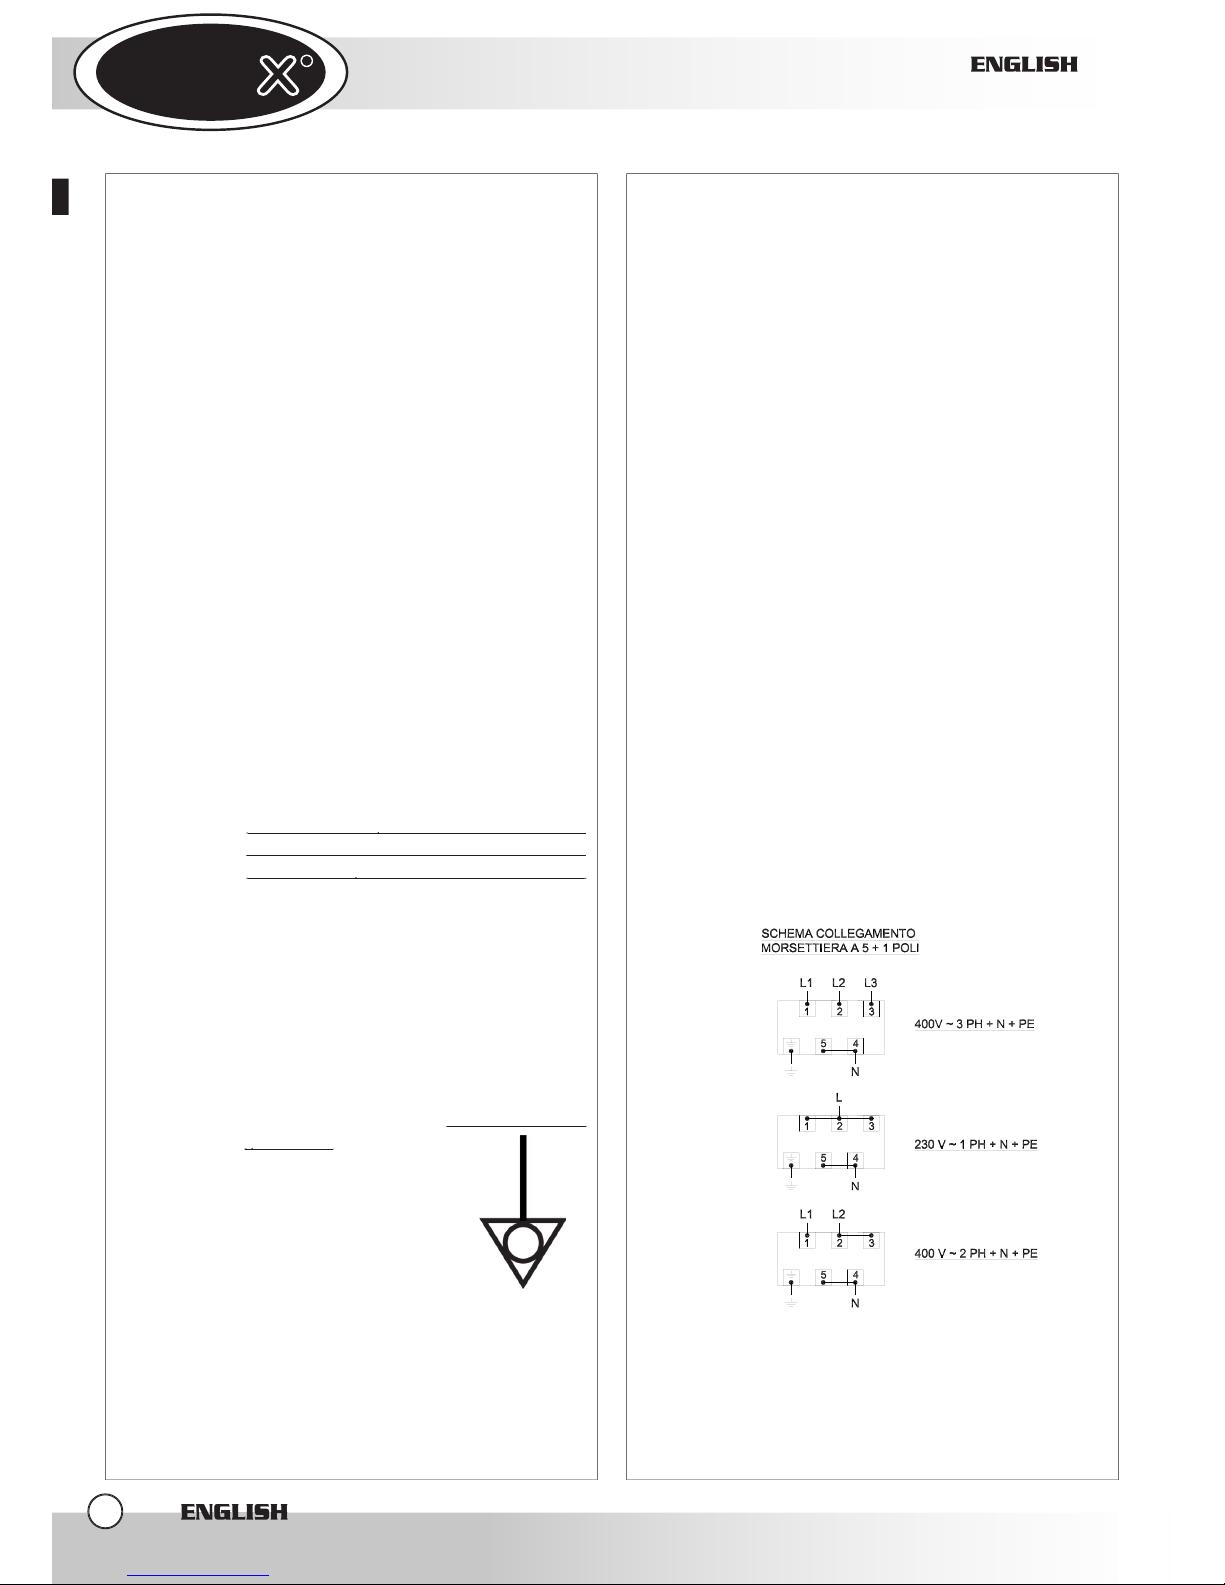
4.1 – ELECTRICAL CONNECTION
4.2 – WATER CONNECTION
by qualified
personnel
according to the standard in
force.
The installer is responsable for a
correct electrical connection and for security
rules observance.
frequency correspond to those stated on the
to the network can be easily reached.
the switch must have an appropriate input.
thermal switch.
When the appliance is working, the power
technical data plate, by more than ± 10%.
of the network.
to insert the plug in the proper socket
with electrical cord with 5 conductors: it
to use according to the chosen connection
the clamps.
WARNING:
4
Page 5
UNO
R
that the cable and the copper bridge are well fixed
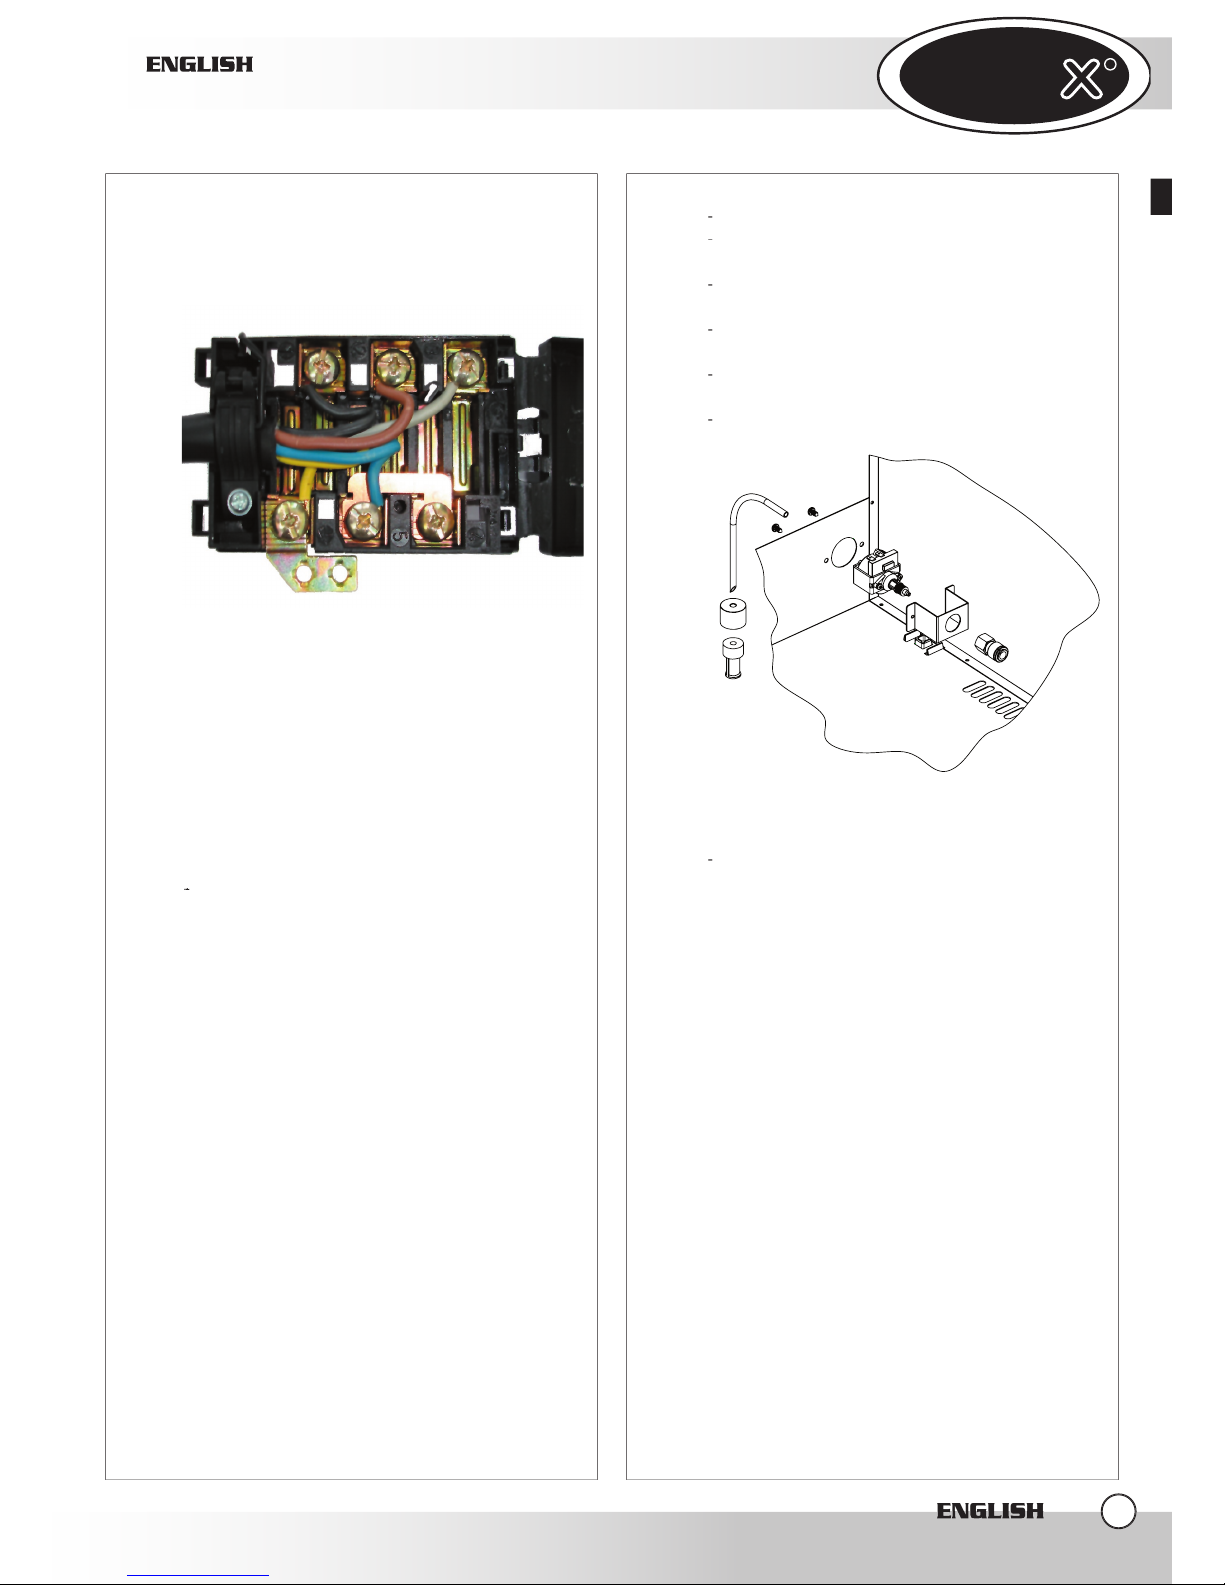
WATER CONNECTION
the water system and the water connection of the
the duct from any eventual remainder.
We suggest you to us a
appliance
water pump)
to suck water into the oven you must operate as
follows:
fix the water pump (4) to the oven using the
the drawing, insert the sinker (2) and fix it to
the water filter.
WARNING:
tank, the pump itself can burn. If the pump utters
water in the tank.
from which the fumes that come from the cavity are
the cooking parameters set on the oven and on the
type and quantity of food put inside the oven).
Page 6
UNO
R
UNO
R
water.
WARNING
find and read it.
to cook food as here below described. Every other
fresh and frozen;
frozen;
When placing the food in the cooking chamber,
When placing the food in the cooking chamber,
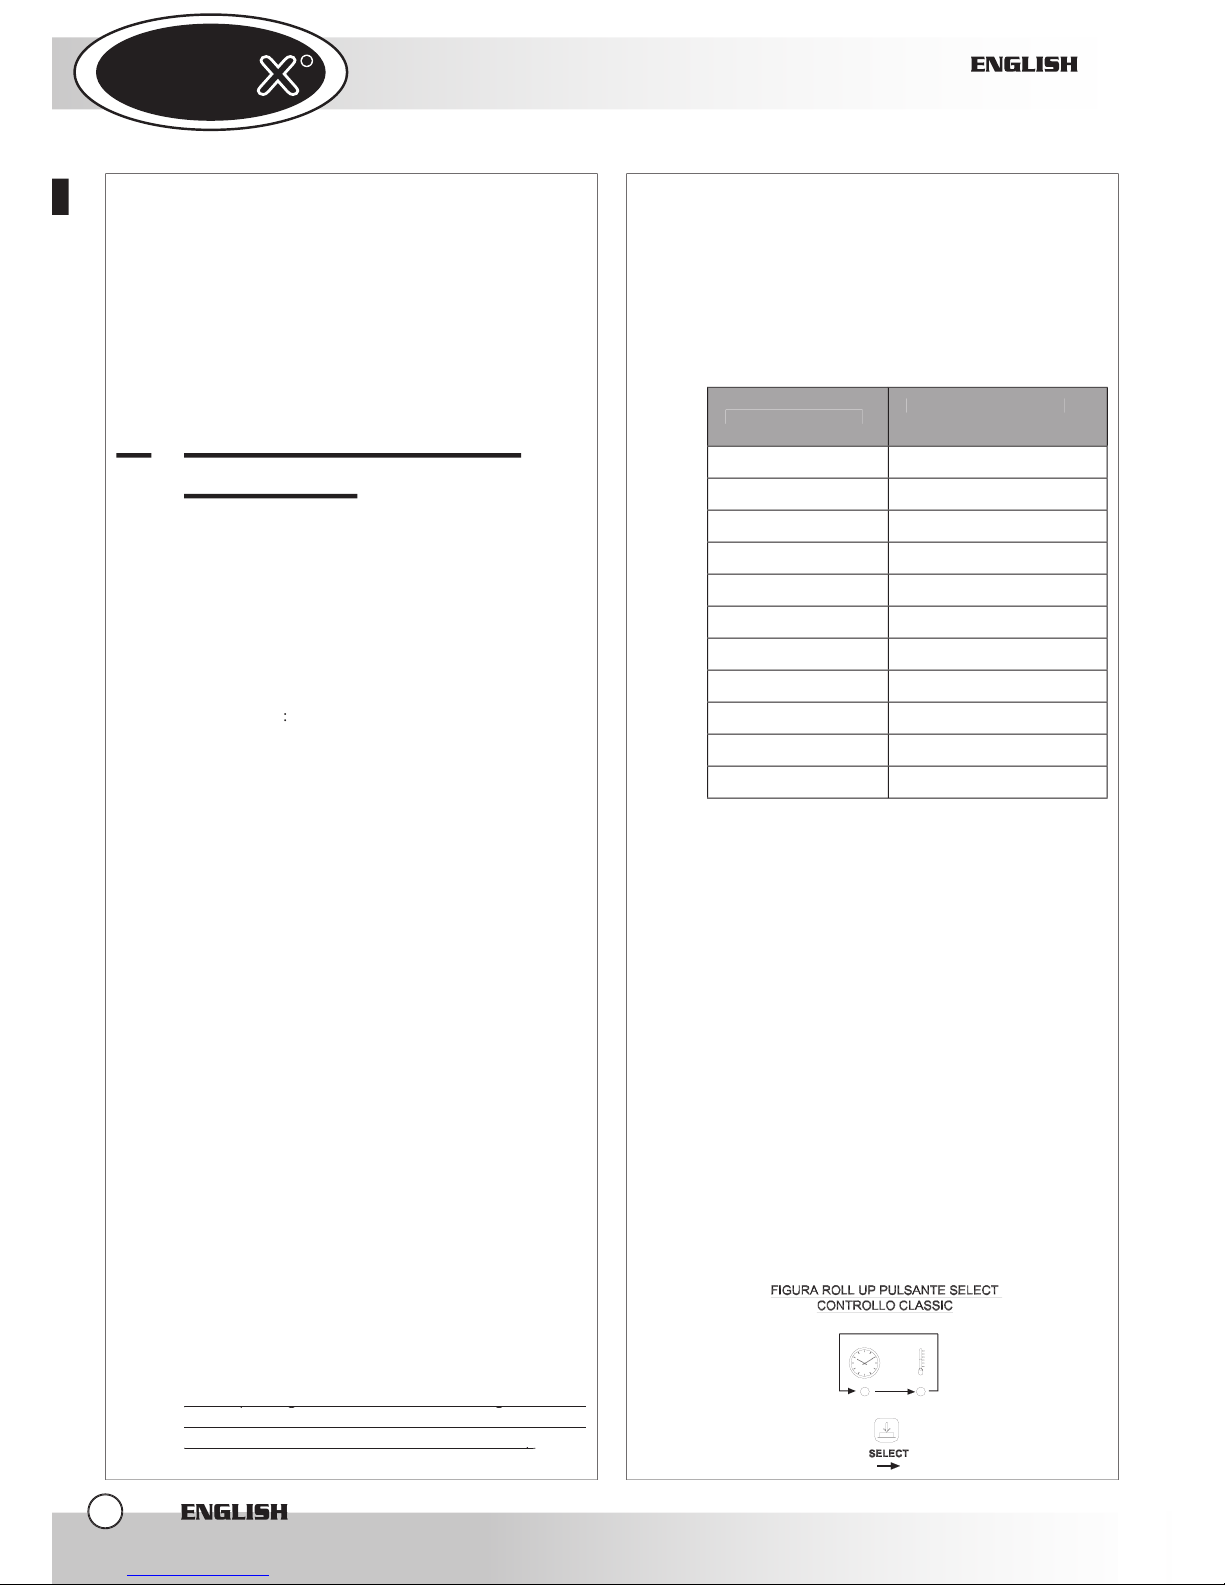
TYPE
As soon as current reaches the appliance, the
the time in hours.minutes), the LED of the “TIME”
Page 7
UNO
R
the control panel switches automatically off. The
When you read INF on the TIME display, the oven
will work continuously until you stop it pressing the
temperature 30°C)
At the end of a cooking cycle the heating elements
for 15 seconds, the digits 0.00 will flash for 45
the one entered at the beginning of the cooking
At the end of the 45 seconds or if the cooking cycle
the oven has just been turned on) and the START/
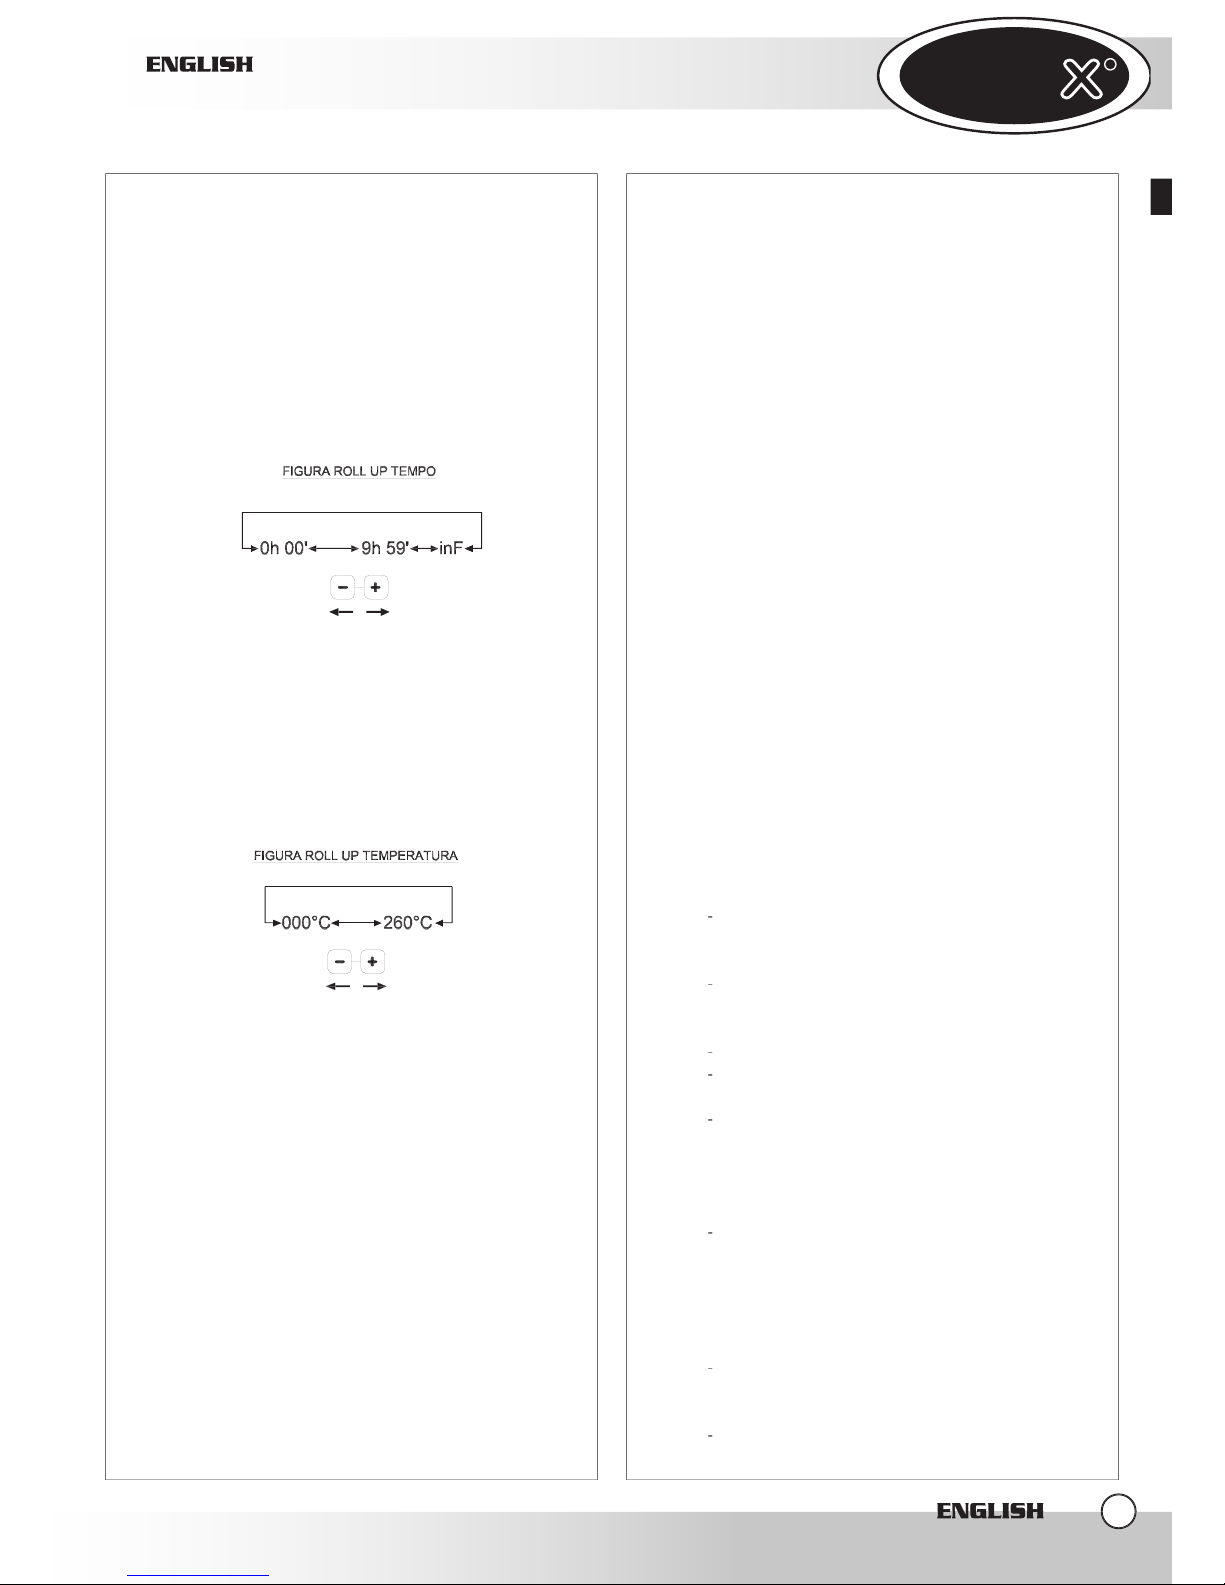
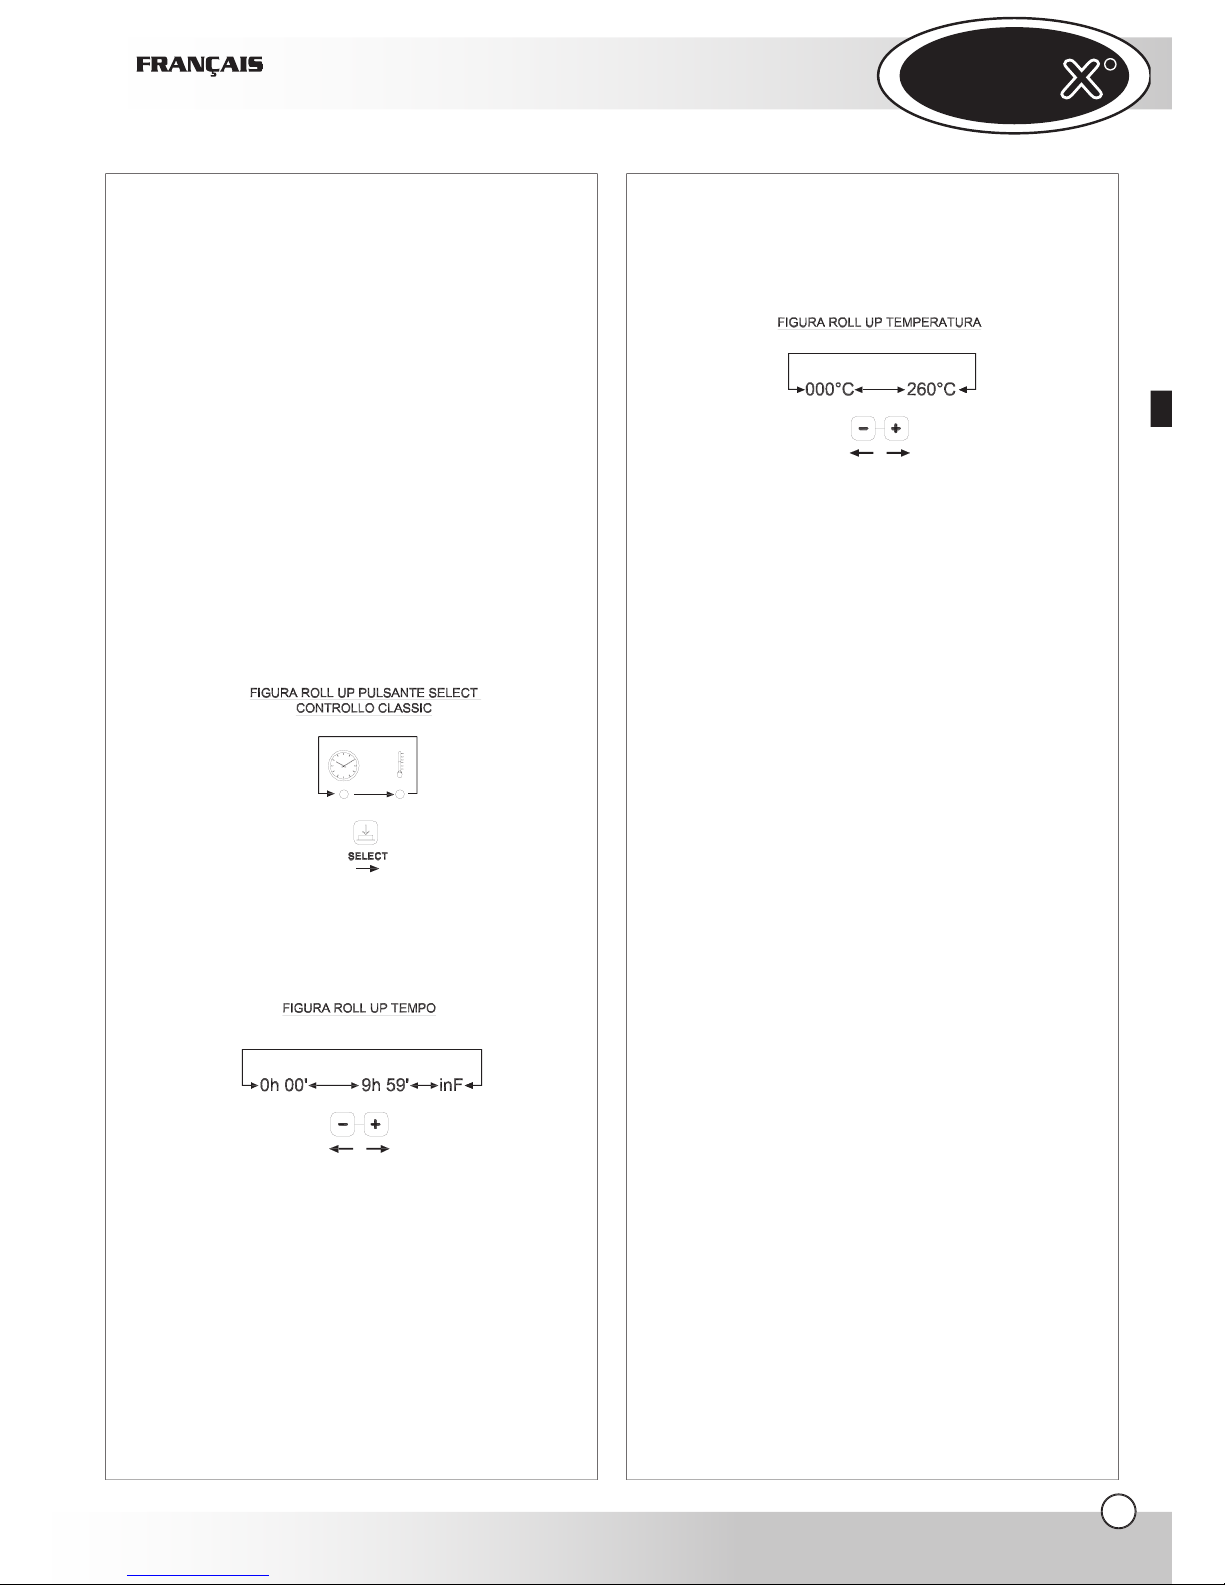
Visualization and modification of the
While the oven is working, it is possibile to visualize
the parameters and modify them if the oven is
working in the manual mode; to scroll the different
the SELECT key.
time (COUNTDOWN related to the selected step).
visualizes for 4 seconds the set tempeture (fixed LED
– it is possibile to modify the temperature using +
will show on the display)
the manual mode
for 5 seconds; the storage of the program
will be confirmed by the sound of the buzzer
Page 8
UNO
R
UNO
R
will show on the display)
While the oven works with a program the
visualization of the cooking parameters is like the
While the oven works with a program IT IS NOT
At the end of a cooking cycle the heating elements
for 15 seconds, the digits 0.00 will flash for 45
the one entered at the beginning of the cooking
At the end of the 45 seconds or if the cooking cycle
the oven has just been turned on) and the START/
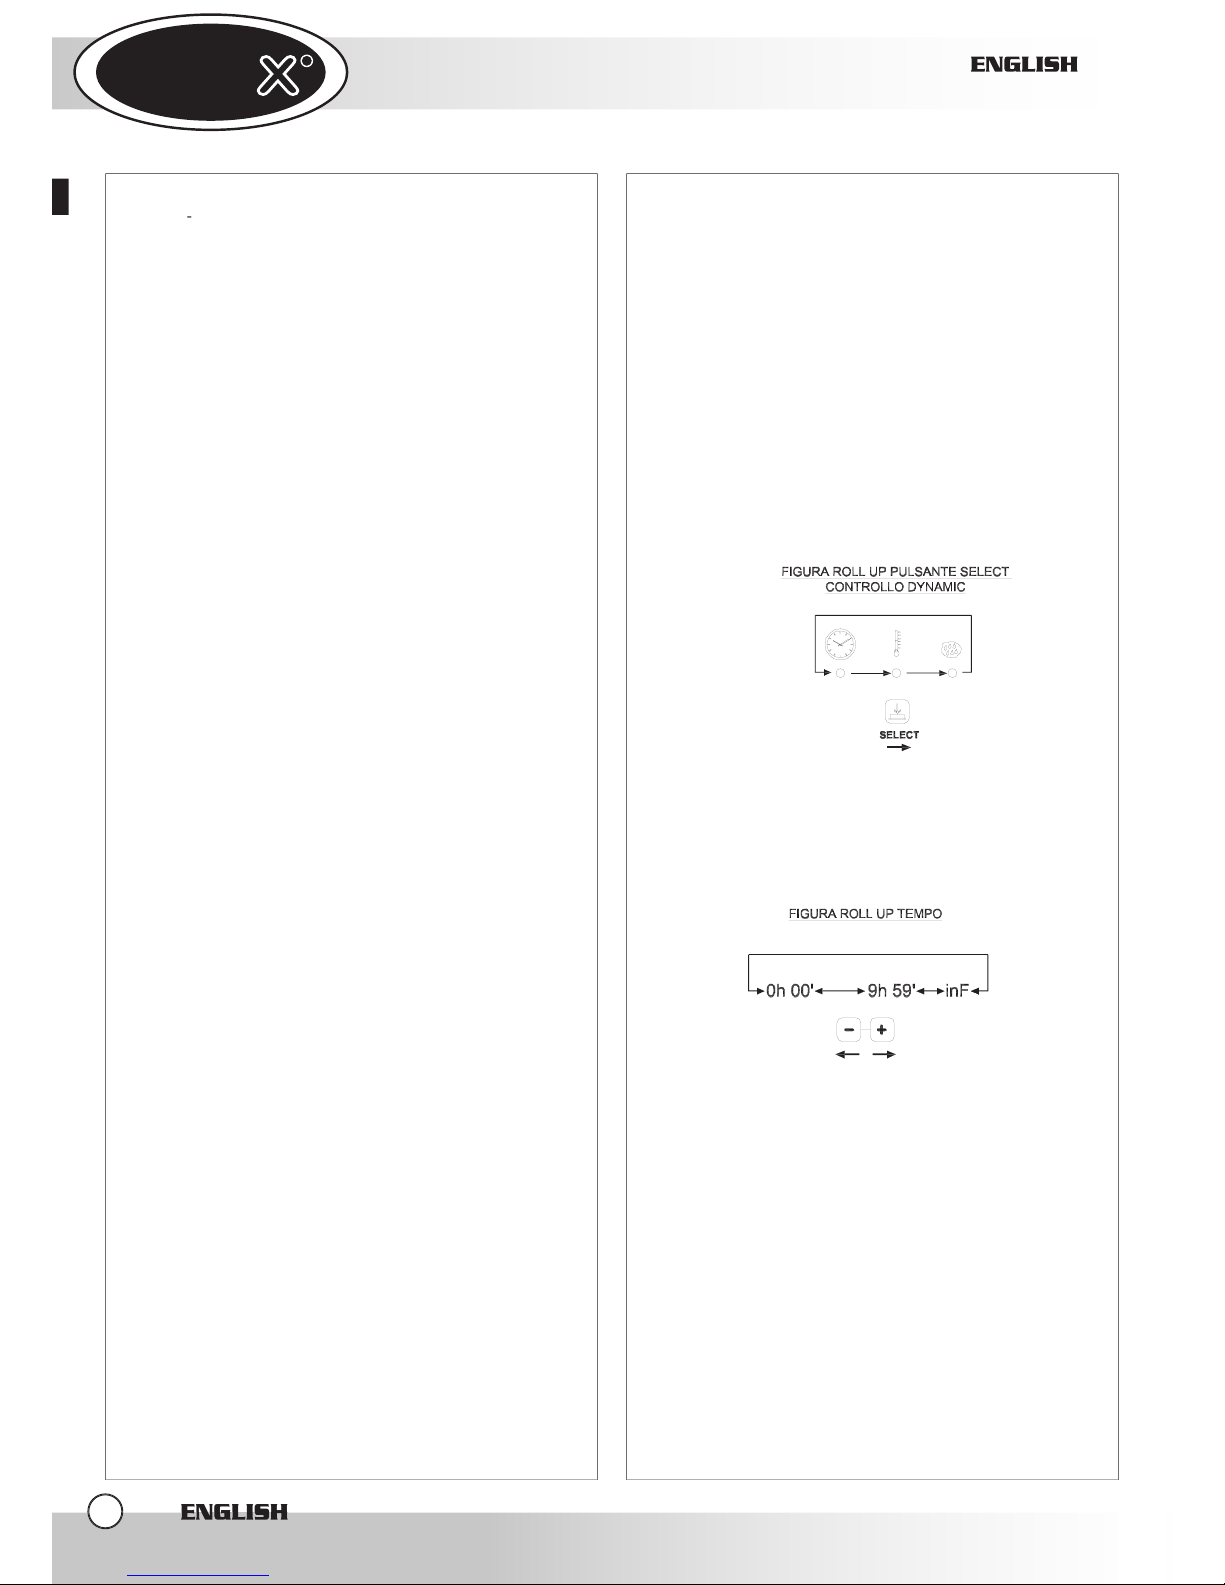
Automatic pre-heating
An automatic pre-heating phase is run only when
When you start the program with the START / STOP
temperature plus 30°C.
As soon as current reaches the appliance, the
the time in hours.minutes), the LED of the “TIME”
the control panel switches automatically off. The
When you read INF on the TIME display, the oven
will work continuously until you stop it pressing the
temperature 30°C)
Page 9

UNO
R
At the end of a cooking cycle the heating elements
for 15 seconds, the digits 0.00 will flash for 45
the one entered at the beginning of the cooking
At the end of the 45 seconds or if the cooking cycle
the oven has just been turned on) and the START/
Visualization and modification of the
While the oven is working, it is possibile to visualize
the parameters and modify them if the oven is
working in the manual mode; to scroll the different
to push the SELECT key. To scroll the the different
time (COUNTDOWN related to the selected step).
visualizes for 4 seconds the set tempeture (fixed LED
– it is possibile to modify the temperature using +
will show on the display)
the manual mode
for 5 seconds; the storage of the program
will be confirmed by the sound of the buzzer
will show on the display)
While the oven works with a program the
visualization of the cooking parameters is like the
While the oven works with a program IT IS NOT
At the end of a cooking cycle the heating elements
for 15 seconds, the digits 0.00 will flash for 45
the one entered at the beginning of the cooking
Page 10
UNO
R
UNO
R
At the end of the 45 seconds or if the cooking cycle
the oven has just been turned on) and the START/
Automatic pre-heating
An automatic pre-heating phase is run only when
When you start the program with the START / STOP
temperature plus 30°C.
While the oven is working (both in the manual and
water inside the cavity by pressing the “MANUAL
WATER” key. The electric water valve works only for
the time the key is pressed.
VARIOUS FUNCTIONS
functioning of the oven when you open the door.
When you open the door, the cooking cycle (both
the door, the cooking cycle starts again from where
WARNING
With the empty cavity, heat the oven up for about 30
thermic insulation smell.
At the end of each cooking cycle, clean the cavity
though they are diluted.
though they are diluted.
from the appliance.
trained personnel.
the baking is realized through hot air.
the baking is realized through hot air with
the addition of humidity.
Warning:
Page 11
UNO
R
with a height of more than 20 mm and
with a height of more than 20 mm and
touch.
that circulates round and round inside the cooking
An even baking is guaranteed also when the oven
the surface , with a golden crust, and in the internal
type of food that has to be cooked.
A lower temperature than the proper one
A higher temperature than the proper one
food remains uncooked (sometimes this is
A shorter cooking time than that required by the
food does not allow to have completely cooked
food.
A longer cooking time than that required by the
food causes the burning of the food surface.
the kind of food that needs to be cooked, without
An overload of the oven can give, as a result, an
Aluminium trays: Pastry, non-frozen bread
Wire grids: meat to be finished such as
frozen pizza
All maintenance operations must be done only by
the complete machine
All maintenance operations must be done only by
Page 12

UNO
R
UNO
R
follows:
with one with the same characteristics.
the power supply reaches the appliance, the main
with manual recovery. This safety thermostat is
Page 13

UNO
R
BREAKDOWN CAUSE SOLUTION
The tension of the electrical
system is missing
Restore the tension
Safety thermostat intervention Refit the safety thermostat
Intervention of one of the fuse
of the power board
Replacement of the fuse
The oven is completely turned
off
The connection to the electrical
system not made in the correct
way
Control the connection of the
appliance to the electrical
system
The water inlet is closed Open the water inlet
The connection to the water
system or to the external tank
not made in the proper way
Control the connection to the
water system or to the external
tank
No water in the external tank
(in case the oven is connected
to an external tank)
Pour water into the tank
The inflow of humidity in the
cavity is on, but the water does
not come out of the pipes
The filter on the water
connection is closed by dirt
Clean the filter
The door is open or it is not
properly closed
Close the door in the correct
way
The oven does not start even
though you set the time and
pressed the START/STOP key
Damaged door micro switch Contact a specialized
technician for reparation
The wires that connect the
avity probe are not connected
o the power board
c
t
Control the connections
On the temperature display
you can read EE1
Damaged cavità probe Contact a specialized
technician for reparation
Damaged door basket Contact a specialized
technician for reparation
There is water coming out of
the cavity from the door
basket, even though the door
is closed
Loosened door mechanism Contact a specialized
technician for reparation
Burnt lamp Sostituire la lampadina
The oven light does not turn on
Loosened lamp Inserire in maniera corretta la
lampadina nel portalampade
The fans do not reverse the
rotating direction
Contact a specialized
technician for reparation
One of the fans do not work (in
case that you have an oven
with more than one motor)
Contact a specialized
technician for reparation
The cooking results are even
One of the heating element is
broken
Contact a specialized
technician for reparation
Page 14
UNO
R
UNO
R
Page 15

UNO
R
______________________________________________________________________
________________________________________________________________________
________________________________________________________________________
___________________________________________________________________________________
___________________________________________________________________________________
___________________________________________________________________________________
___________________________________________________________________________________
___________________________________________________________________________________
___________________________________________________________________________________
___________________________________________________________________________________
___________________________________________________________________________________
___________________________________________________________________________________
___________________________________________________________________________________
___________________________________________________________________________________
___________________________________________________________________________________
___________________________________________________________________________________
___________________________________________________________________________________
___________________________________________________________________________________
___________________________________________________________________________________
___________________________________________________________________________________
___________________________________________________________________________________
___________________________________________________________________________________
___________________________________________________________________________________
___________________________________________________________________________________
___________________________________________________________________________________
___________________________________________________________________________________
___________________________________________________________________________________
___________________________________________________________________________________
___________________________________________________________________________________
___________________________________________________________________________________
___________________________________________________________________________________
___________________________________________________________________________________
___________________________________________________________________________________
___________________________________________________________________________________
___________________________________________________________________________________
Page 16
UNO
R
UNO
R
3.1
3.2
APÉNDICE - PANEL DE MANDO
Page 17

UNO
R
DBT 73/23/CEE et 93/68/CEE,
selon la norme EN60335-2-42+A1 et
selon la norme EN60335-2-46+A1
selon les normes EN60555-3, EN55014 et EN55104.
Avant de positionner l’appareil vérifiez les
UNOX S.p.A.
Vi
35010 - V
ALY
MOD
DATE
TYPE: kW: POWER: FREQUENCY:
MOD: S/N
SERIE
TENSION D'ALIMENTACION
Page 18
UNO
R
UNO
R
des personnes qualifiées
. Le
technicien est responsable du branchement
électrique correcte et de l’observation des
normatives de sûreté
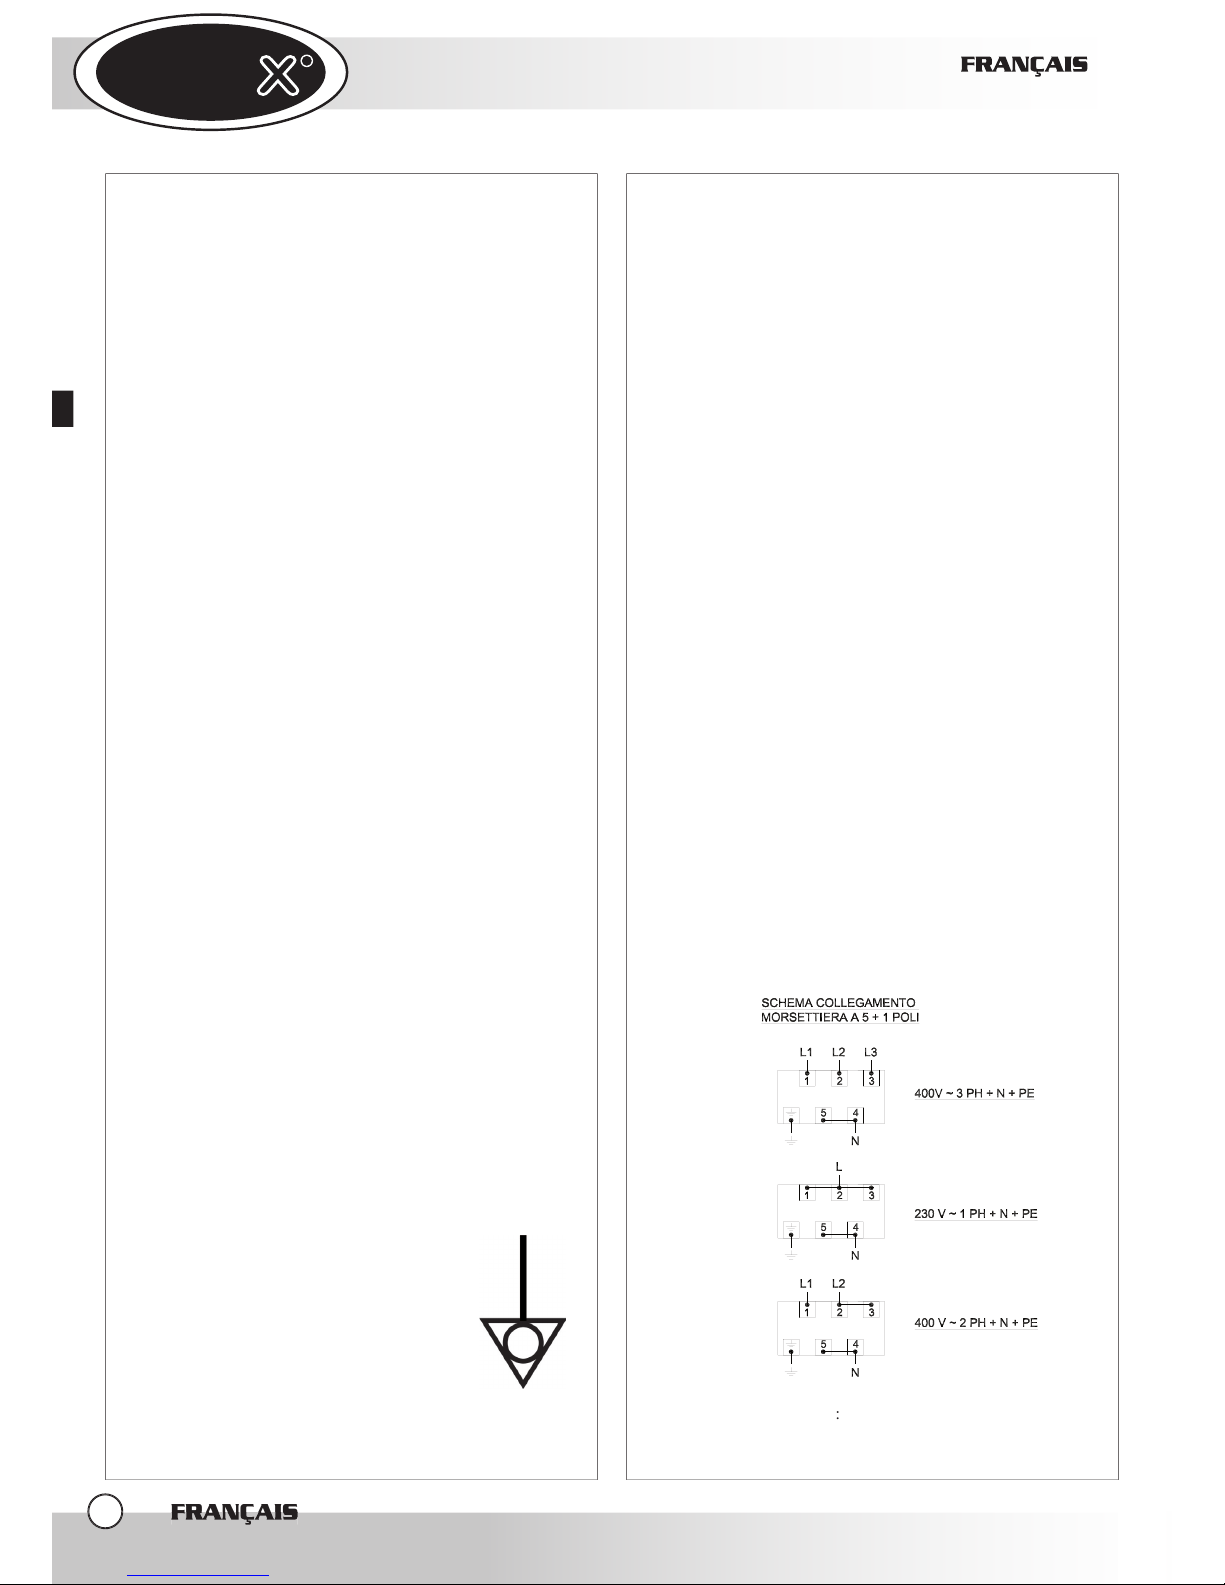
Avant d’effectuer le branchement, contrôlez
tri phase aux 5 pôles de portée appropriée
faisant levier, avec un tournevis adapté, sur
Page 19
UNO
R
fondre.
filtre mécanique.
Avant de relier le tube d’eau au four faire s’écouler
pour éviter la déséquilibre
facultative de la pompe pour l’approvisionnement
fixez la pompe (4) au four au moyen du
fumi caldi e umidi (temperatura e umidità dei fumi
forno e dal tipo e dalla quantità di prodotto inserito
tramite l’apposita cappa condensante disponibile
vapeurs chaudes et humides sortent à travers cette
Page 20
UNO
R
UNO
R
four et du type et de la quantité de produit inséré à
ATTENTION!
ATTENTION!
fournit des importantes indications en ce qui
four » des aliments comme rapporté ci-dessous.
tableau des commandes
TYPE DU TABLEAU
FRANÇAIS
Page 21
UNO
R
Allumage et extinction À peine la tension est
fournie, le contrôle s’allume automatiquement :
Après 15 minutes de la fin du cycle de cuisson (soit
temps possible 0 heures et 01 minutes – 9 heures
température de départ 30°C)
A la fin du cycle de cuisson les résistances les
A la fin des 45 secondes ou bien si la cuisson vient
zéro (on se trouve dans la même situation qu’on
Visualisation et modification des
visualiser les paramètres et les modifier si le four
fonctionne en modalité manuelle ; pour parcourir
temps restant (relatif au step sélectionné) (COUNT
FRANÇAIS
Page 22

UNO
R
UNO
R
fonctionnement manuel.
A la fin du cycle de cuisson les résistances et les
valeur de température reste établie et le led START/
À la fin des 45 secondes ou bien si la cuisson est
température établie majorée de 30 °C.
Allumage et extinction
À peine la tension est fournie, le contrôle s’allume
Après 15 minutes de la fin du cycle de cuisson (soit
FRANÇAIS
Page 23

UNO
R
FRANÇAIS
temps possible 0 heures et 01 minutes – 9 heures
température de départ 30°C)
– (range d’humidité possible 0 – 100 % - 5 niveaux
A la fin du cycle de cuisson les résistances les
A la fin des 45 secondes ou bien si la cuisson vient
zéro (on se trouve dans la même situation qu’on
Visualisation et modification des
visualiser les paramètres et les modifier si le four
fonctionne en modalité manuelle ; pour parcourir
temps restant (relatif au step sélectionné) (COUNT
Page 24

UNO
R
UNO
R
fonctionnement manuel.
A la fin du cycle de cuisson les résistances, les
À la fin des 45 secondes ou bien si la cuisson est
température établie majorée de 30 °C.
fonctionnement du four lorsqu’on ouvre la porte
Page 25

UNO
R
Avant d’effectuer n’importe quelle intervention
Avant d’utiliser l’équipement pour la première fois
technique ayant un personnel qualifié.
Page 26

UNO
R
UNO
R
tend à brûler la partie extérieure et à laisser
Avant d’effectuer n’importe quel type d’entretien il
tableau des commandes frontal et le dos du
four.
Avant d’effectuer n’importe quel type d’entretien il
tableau des commandes frontal et le dos du
four.
Au cas où le tableau des commandes est
tableau des fusibles et faites une rotation
Page 27

UNO
R
DÉGÂT
CAUSE SOLUTION
Manque de tension du
réseau électrique
Rétablir la tension
d’alimentation
Intervention du dispositif
thermique de sécurité
Rétablir le dispositif
thermique de sécurité
Intervention d’un des
fusibles présents sur la
fiche de puissance
Remplacement du
fusible
Le four est
complètement éteint
Branchement au réseau
électrique fait
incorrectement
Vérifier le branchement
au réseau électrique
Entrée de l’eau fermée Ouvrez l’entrée de l’eau
La connexion au réseau
hydrique ou au réservoir
faite incorrectement
Vérifiez la connexion au
réseau hydrique ou au
réservoir
Absence d'eau dans le
réservoir (dans le cas où
l'eau est chargée du
réservoir )
Mettez de l’eau dans le
réservoir
L’émission d’humidité
dans la chambre de
cuisson est activée mais
l’eau ne sort pas à
travers les tubes en
acier
Le Filtre d’entrée de
l’eau est bouché par des
impuretés
Nettoyez le filtre
Porte ouverte ou bien
mal fermée
Fermez correctement la
porte
Le four ne part pas
même si le temps a été
établi et le bouton
START / STOP a été
pressé
Interrupteur de la porte
endommagé
Il faut s’adresser à un
technicien spécialisé
pour la réparation
Fils de liaison de la
sonde de température
de la chambre détachés
de la fiche de puissance
Vérifiez la branchement
Sur le display de la
température apparaît
constamment l’écriture
EE1
Sonde de la chambre
endommagée
Il faut s’adresser à un
technicien spécialisé
pour la réparation
Joint endommagé Il faut s’adresser à un
technicien spécialisé
pour la réparation
Avec la porte ferme,
l’eau sort à travers le
joint
Système de fermeture
magnétique endommagé
Il faut s’adresser à un
technicien spécialisé
pour la réparation
Lumière du four éteinte Lampe brûlée Remplacez la lampe
Page 28

UNO
R
UNO
R
LineMiss™
Page 29

UNO
R
______________________________________________________________________
________________________________________________________________________
________________________________________________________________________
___________________________________________________________________________________
___________________________________________________________________________________
___________________________________________________________________________________
___________________________________________________________________________________
___________________________________________________________________________________
___________________________________________________________________________________
___________________________________________________________________________________
___________________________________________________________________________________
___________________________________________________________________________________
___________________________________________________________________________________
___________________________________________________________________________________
___________________________________________________________________________________
___________________________________________________________________________________
___________________________________________________________________________________
___________________________________________________________________________________
___________________________________________________________________________________
___________________________________________________________________________________
___________________________________________________________________________________
___________________________________________________________________________________
___________________________________________________________________________________
___________________________________________________________________________________
___________________________________________________________________________________
___________________________________________________________________________________
___________________________________________________________________________________
___________________________________________________________________________________
___________________________________________________________________________________
___________________________________________________________________________________
___________________________________________________________________________________
___________________________________________________________________________________
___________________________________________________________________________________
___________________________________________________________________________________
___________________________________________________________________________________
Page 30

UNO
R
UNO
R
DER „CLASSIC“ BEDIENUNG
DER „DYNAMIC“ BEDIENUNG
VERSCHIEDENE FUNKTIONEN
WARTUNG / REINIGUNG
ANWEISUNGEN BEI STÖRUNGEN
VERÄNDERLICHE PARAMETER
AUSSERGEWOHNLICHE WARTUNG
ANHANG - BEDIENPANEL
Page 31

UNO
R
ANWEISUNGEN
Alle Elektrischen Anschlüsse und Installationsarbeiten
Vor der Aufstellung des Gerätes überprüfen Sie bitte
Anschlusses etc. unter Berücksichtigung der
AUFSTELLUNG
Ablaufkamin des Gerätes und der nächsten Möbel
Alle Geräte müssen auf einem Unterbau oder
werden.
werden muss, ist es wichtig das diese Teile aus
UNOX S.p.A.
Vi
35010 - V
igodarzere (PD) - ITALY
MOD
DATE
TYPE: kW: POWER: FREQUENCY:
MOD: S/N
Page 32

UNO
R
UNO
R
ABZIEHEN DES SCHUTZFILMS
Ziehen Sie unbedingt den weißen Schutzfilm von
wichtig um ein verbrennen des Schutzfilms während
Alle Installations- und Wartungsarbeiten dürfen
werden.
INSTALLATION
werden und sie muss nach den Vorschriften
Anschluss des Ofens und der Beachtung
Vor dem Anschluss stellen Sie bitte sicher
Wenn das Gerät arbeitet darf die
Zusätzlich muss das Gerät
Ausgleich.
Äquipotential Ausgleich
ANSCHLUSS DER ZULEITUNG
folgt:
weg (1).
Verbinden Sie die Leiter wie auf dem
Page 33

UNO
R
Ausführen Sie die Verbindung der Klemmleiste wie
WASSER- UND ABWASSERINSTALLATION
WASSER ANSCHLUß
Wasseranschluss an, das Wasser soll gefiltert und
Vor dem Anschluss des Filters lassen Sie eine gewisse
zu befreien.
Wasserführenden Teilen und in der Backkammer
verursacht werden, sind von der Gewährleistung
ANSCHLUSS AN EINEN EXTERNEN
WASSERTANK
Wasserpumpe)
ACHTUNG:
Page 34

UNO
R
UNO
R
Alle Öfen sind mit winddichtem Kamin für das
ACHTUNG:
ACHTUNG
Werk autorisierten Kundendienst an und Verwenden
All diese Hinweise gewährleisten den sicheren
ANWEISUNGEN FÜR DEN BETRIEB
Vorwort:
frisch oder gefroren
Wenn Sie die Lebensmittel in die Backkammer
Auf Grund vom Model des Ofens, haben wir 2
verschiedene Kontroll- Panelle: CLASSIC Kontroll-
Page 35

UNO
R
Als 15 Minuten vom Kochenzyklus Ende vergangen
zwei Kochparameters zu wählen: ZEIT und
Zeit Ansatz
Als auf dem Display zeigt sich das Schrift INF,
funktioniert der Ofen immer bis wann blockieren Sie
Widerstände und Motoren auf, der Buzzer klingt 15
Wenn während diese 45 Sekunden wird ein Zeit
während des Ofenbetriebs
Während des Ofenbetrieb, wenn das Ofenbetrieb
Wenn Sie die Zeit auswählen, wird das Display
Wenn Sie die Temperatur auswählen, wird das
Page 36

UNO
R
UNO
R
AUTOMATISCHE STEUERUNG
verfahren Sie wie folgt:
Wählen Sie das Programmplatz mit den
Wählen Sie das gewünschte
Zu einem schon gespeicherte Programm
wiederkehren
Wenn Sie zu einem schon gespeicherte Programm
wiederkehren möchten, verfahren Sie wie folgt:
Wählen Sie das Programmplatz mit den
Wählen Sie das gewünschte
Während des Programmbetriebs ist die Anzeige
Während eines Programmbetriebs
Wiederstände und Motoren auf, der Buzzer klingt 15
Wenn während diese 45 Sekunden wird ein Zeit
Automatische Vorheizfunktion
Verwendung von gespeicherten Programmen 1 - 70
zur Verfügung.
Wenn Sie das Gerät mit „START PROG“ starten, wird
wird dies durch ein Tonsignal gemeldet. Dann
Als 15 Minuten vom Kochenzyklus Ende vergangen
Page 37

UNO
R
zwei Kochparameters zu wählen: ZEIT und
Zeit Ansatz
Als auf dem Display zeigt sich das Schrift INF,
funktioniert der Ofen immer bis wann blockieren Sie
Wiederstände und Motoren auf, der Buzzer klingt 15
Wenn während diese 45 Sekunden wird ein Zeit
Page 38

UNO
R
UNO
R
während des Ofenbetriebs
Während des Ofenbetrieb, wenn das Ofenbetrieb
Wenn Sie die Zeit auswählen, wird das Display
Wenn Sie die Temperatur auswählen, wird das
AUTOMATISCHE STEUERUNG
verfahren Sie wie folgt:
Wählen Sie das Programmplatz mit den
Wählen Sie das gewünschte
Zu einem schon gespeicherte Programm
wiederkehren
Wenn Sie zu einem schon gespeicherte Programm
wiederkehren möchten, verfahren Sie wie folgt:
Wählen Sie das Programmplatz mit den
Wählen Sie das gewünschte
Während des Programmbetriebs ist die Anzeige
Während eines Programmbetriebs
Wiederstände und Motoren auf, der Buzzer klingt 15
Wenn während diese 45 Sekunden wird ein Zeit
Automatische Vorheizfunktion
Verwendung von gespeicherten Programmen 1 - 70
zur Verfügung.
Wenn Sie das Gerät mit „START PROG“ starten, wird
Zeit ist auf dem Bedienfeld keine Anzeige sichtbar.
wird automatisch starten.
Während der Arbeitsweise des Ofens (je manuelle
Page 39

UNO
R
wird, startet der Gangvorgang wieder.
Zyklisch machen die Flügelräder einer Wendung: sie
drehen sich nach eine Richtung für 2 Minuten, dann
halten sie, endlich fangen sie in entgegengesetzter
Richtung wieder
zu drehen an, für 2 Minuten.
WARTUNG-REINIGUNG
Wartungs- oder Reinigungsarbeiten die Stromzufuhr
zum Gerät und warten Sie ab bis das Gerät
Vor der ersten Benutzung des Gerätes: Reinigen Sie
verwenden.
Verwenden Sie zur Reinigung des Stahls keine
ÄUSSERE REINIGUNG DES OFENS
AUSSERBETRIEB NAHME IM STÖRFALL
Wenden Sie sich an einen technischen, vom
Warnung :
Page 40

UNO
R
UNO
R
HEIßLUFT MIT FEUCHTIGKEIT:
Zuführung von variabler Feuchtigkeit durchgeführt.
VARIABLE KOCHMÖGLICHKEITEN
wählen.
verschiedene Koch Möglichkeiten, entsprechend
Je mehr Lebensmittel je länger die Koch- Garzeit.
Aluminium Bleche: Backwaren, Brot.
Vorspeisen, Kartoffeln.
WARTUNG
Jede Wartung muss von einem qualifizierten
zugänglich.
Jede Wartung muss von einem qualifizierten
Vor dem Beginn einer Wartung muss das Gerät vom
AUSTAUSCH DER LAMPE ZUR
technischen Eigenschaften verfügt.
Zur Montage die eben erwähnten
Arbeitsschritte in umgekehrter Reihenfolge
vornehmen.
AUSWECHSELN DER FEINSICHERUNG
Wenn die Bedienpanel keine Funktion zeigt, aber
Zum Wechseln der Feinsicherung gehen Sie wie
folgt vor:
Trennen Sie das Gerät vom Netz;
Page 41

UNO
R
abgeschaltet.
Sicherheitsthermostat hat
ausgelöst.
Reaktivieren Sie das
Sicherheitsthermostat.
Die Feinsicherung ist defekt. Erneuern Sie die Feinsicherung
Das Gerät ist nicht richtig
angeschlossen.
Kontrollieren Sieden korrekten
Anschluss
Die Dampfzuführung ist aktiviert,
es ist kein Wasser an den
Ausläufen sichtbar
Die Wasserzuführung ist
geschlossen.
Öffnen Sie den Wasserzulauf.
Die Verbindung zur
Wasserzuführung oder zum Tank
ist unterbrochen.
Kontrollieren Sie alle Leitungen.
Falls das Gerät an einem Tank
betrieben wird ist der Tank leer.
Füllen Sie Wasser in den Tank.
Ein Wasserfilter ist verschmutzt. Kontrollieren und säubern Sie alle
Filter.
Das Gerät startet nicht nachdem
eine Zeit eingestellt und der
START/STOP Knopf gedrückt
wurde.
Die Garraumtür ist offen oder nicht
richtig verschlossen
Schließen Sie die Garraumtür.
Defekter Türkontakt.
Kontaktieren Sie einen
autorisierten Fachmann
Auf der Temperatuanzeige
leuchtet ständig EE1
Die Verbindung vom
Garraumtemperaturfühler ist
unterbrochen
Kontrollieren Sieden korrekten
Anschluss
Defekter
Garraumtemperaturfühler
Kontaktieren Sie einen
autorisierten Fachmann
Wasser tritt trotz
geschlossener Tür aus dem
Garraum aus
Defekte Türdichtung Kontaktieren Sie einen
autorisierten Fachmann
Defekter Magnetsverschluss Kontaktieren Sie einen
autorisierten Fachmann
Die Garraumbeleuchtung lässt sich
nicht einschalten.
Defektes Leuchtmittel. Wechseln Sie das Leuchtmittel.
Lockeres Leuchtmittel. Überprüfen Sie den richtigen Sitz
des Leuchtmittels.
Das Koch-/ Backergebnis ist
ungleichmäßig.
Die Motoren führen keinen
Drehrichtungswechsel durch.
Kontaktieren Sie einen
autorisierten Fachmann.
Ein Lüfterrad dreht sich nicht ( bei
Mehrmotorigen Geräten).
Kontaktieren Sie einen
autorisierten Fachmann.
Ein Heizelement ist defekt.
Kontaktieren Sie einen
autorisierten Fachmann.
Verschließen Sie den Sicherungshalter durch Drehung um 20° im Uhrzeigersinn.
Page 42

UNO
R
UNO
R
Page 43

UNO
R
______________________________________________________________________
________________________________________________________________________
________________________________________________________________________
___________________________________________________________________________________
___________________________________________________________________________________
___________________________________________________________________________________
___________________________________________________________________________________
___________________________________________________________________________________
___________________________________________________________________________________
___________________________________________________________________________________
___________________________________________________________________________________
___________________________________________________________________________________
___________________________________________________________________________________
___________________________________________________________________________________
___________________________________________________________________________________
___________________________________________________________________________________
___________________________________________________________________________________
___________________________________________________________________________________
___________________________________________________________________________________
___________________________________________________________________________________
___________________________________________________________________________________
___________________________________________________________________________________
___________________________________________________________________________________
___________________________________________________________________________________
___________________________________________________________________________________
___________________________________________________________________________________
___________________________________________________________________________________
___________________________________________________________________________________
___________________________________________________________________________________
___________________________________________________________________________________
___________________________________________________________________________________
___________________________________________________________________________________
___________________________________________________________________________________
___________________________________________________________________________________
___________________________________________________________________________________
Page 44

UNO
R
UNO
R
TARGHETTA DATI
CERTIFICAZIONE
Installazione
- OPERAZIONI PRELIMINARI
Installazione
4.1- COLLEGAMENTO ELETTRICO
4.2- COLLEGAMENTO IDRICO
ISTRUZIONI PER L’UTENTE
NOTE PER L’USO
PANNELLO COMANDI
ELETTRONICO
3.1
3.2 DESCRIZIONE E USO DEL PANNELLO
COMANDI DYNAMIC
FUNZIONI VARIE
PULIZIA FORNO
SPEGNIMENTO IN CASO DI
GUASTO
TIPOLOGIE DI COTTURA
VARIABILI DI COTTURA
USO DI TEGLIE - GRIGLIE
APPPENDICE - PANNELLI COMANDI
Page 45

UNO
R
DBT 73/23/CEE e 93/68/CEE,
secondo la norma EN60335-2-42+A1 e
secondo la norma EN60335-2-46+A1
secondo le norme EN60555-3, EN55014 e EN55104.
Non utilizzare l’attrezzatura senza piedini.
Non utilizzare l’attrezzatura senza piedini.
figura
UNOX S.p.A.
Vi
35010 - V
ALY
MOD
DATE
TYPE: kW: POWER: FREQUENCY:
MOD: S/N
TENSIONE DI ALIMENTAZIONE
Page 46

UNO
R
UNO
R
da personale
qualificato
secondo le normative vigenti.
L’installatore è responsabile del corretto
collegamento elettrico e dell’osservanza
delle norme di sicurezza
targhetta apposta sull’apparecchio.
forno, di ± 10%.
la cui efficacia
ALLACCIAMENTO ALIMENTAZIONE
oppure collegare il
cavo direttamente ad un quadro elettrico.
forno alla tipologia di fornitura di corrente elettrica
Aprire il coperchio della morsettiera
facendo leva, con un cacciavite adeguato,
Page 47

UNO
R
fermacavo
AVVERTENZA:
fondere.
forno un rubinetto di intercettazione e un filtro
onde evitare la squilibratura delle
ventole, la rottura delle resistenze e fenomeni di
togliere la schiena del forno
fissare la pompa (4) al forno mediante il
tagliare l’estremità del tubetto acqua come da
filtro (1) acqua
ATTENZIONE:
fumi caldi e umidi (temperatura e umidità dei fumi
forno e dal tipo e dalla quantità di prodotto inserito
Page 48

UNO
R
UNO
R
tramite l’apposita cappa condensante disponibile
ATTENZIONE:
ATTENZIONE:
fornisce importanti indicazioni riguardanti la
tra i valori di 0 - 260° C.
TIPO PANNELLO
temperatura di cottura.
Accensione spegnimento
Appena viene fornita tensione il controllo si accende
Page 49

UNO
R
tasto, il controllo si spegne automaticamente. Si
tempo impostabile 0 ore e 01 minuti – 9 ore e 59
viene fermato manualmente mediante la pressione
temperatura partenza 30°C)
Avvio / interruzione cottura
Al termine del ciclo di cottura si spengono resistenze
tempo pari a 45 secondi sul display lampeggia la
tempo (mediante i pulsanti + e -) il forno riparte
Al termine dei 45 secondi oppure se la cottura viene
/ STOP tutti i parametri precedentemente impostati
Visualizzazione e modifica parametri durante il
funzionamento del forno
visualizzare i parametri e modificarli se il forno
visualizza alternativamente per 4 secondi la
temperatura impostata (led temperatura fisso
Page 50

UNO
R
UNO
R
visualizzazione dei parametri di cottura avviene
Al termine del ciclo di cottura si spengono resistenze
tempo pari a 45 secondi sul display lampeggia la
tempo (mediante i pulsanti + e -) il forno riparte
Al termine dei 45 secondi oppure se la cottura viene
/ STOP tutti i parametri precedentemente impostati
temperatura impostata maggiorata di 30 °C.
tempo, temperatura all’interno della camera di
Accensione spegnimento
Appena viene fornita tensione il controllo si accende
tasto, il controllo si spegne automaticamente. Si
tempo impostabile 0 ore e 01 minuti – 9 ore e 59
Page 51

UNO
R
viene fermato manualmente mediante la pressione
temperatura partenza 30°C)
temperatura impostabile 0 – 100 %).
Avvio / interruzione cottura
Al termine del ciclo di cottura si spengono resistenze,
tempo (mediante i pulsanti + e -) il forno riparte
Al termine dei 45 secondi oppure se la cottura viene
/ STOP tutti i parametri precedentemente impostati
Visualizzazione e modifica parametri
visualizzare i parametri e modificarli se il forno sta
funzionando in modalità manuale); per scorrere
temperatura fisso) (è possibile modificare il valore
temperatura lampeggiante).
Page 52

UNO
R
UNO
R
visualizzazione dei parametri di cottura avviene
Al termine del ciclo di cottura si spengono resistenze,
tempo (mediante i pulsanti + e -) il forno riparte
Al termine dei 45” o se interrompo la cottura
tutti i parametri precedentemente impostati si
temperatura impostata maggiorata di 30 °C
ACQUA MANUALE
funzionamento del forno quando si apre la porta:
viene messo in pausa (non viene perso alcun dato);
AVVERTENZA:
temperatura di 200°C per eliminare eventuali odori
Page 53

UNO
R
Avvertenza :
temperatura 30 °C superiore alla temperatura
temperatura 30 °C superiore alla temperatura
teglie con un altezza superiore ai 20 mm
tocchino.
Viene utilizzata aria calda come mezzo di cottura
VARIABILI DI COTTURA
tende più ad essiccare che a cuocere il cibo.
Page 54

UNO
R
UNO
R
wurstel, salsicce, pane surgelato, pizza
frontale e la schiena del forno.
fusibili posto sulla scheda di potenza (posizionata
fusibile
fusibile stesso
Page 55

UNO
R
GUASTO CAUSA RIMEDIO
Mancanza della tensione di rete Ripristinare la tensione di
alimentazione
Intervento del dispositivo termico di
sicurezza
Ripristino del dispositivo termico di
sicurezza
Intervento di uno dei fusibili presenti
sulla scheda di potenza
Sostituzione del fusibile
Il forno è completamente spento
Collegamento alla rete elettrica
eseguito in maniera non corretta
Verificare il collegamento alla rete
elettrica
Ingresso acqua chiuso Aprire ingresso acqua
Collegamento alla rete idrica o al
serbatoio eseguito in maniera non
corretta
Verificare il collegamento alla rete
idrica o al serbatoio
Assenza di acqua nel serbatoio (nel
caso di carico acqua dal serbatoio)
Immettere acqua nel serbatoio
Limmissione di umidità nella
camera di cottura è attivata ma non
esce acqua dai tubi in acciaio
Filtro entrata acqua ostruito impurità Pulire il filtro
Porta aperta o chiusa in maniera
errata
Chiudere correttamente la porta
Il forno non parte sebbene sia stato
impostato il tempo e il pulsante
START / STOP sia stato premuto
Interruttore porta danneggiato Rivolgersi ad un tecnico specializzato
per la riparazione
Fili di collegamento della sonda
camera staccati dalla scheda di
potenza
Verificare i collegamenti
Sul display della temperatura appare
costantemente la scritta EE1
Sonda camera danneggiata Rivolgersi ad un tecnico specializzato
per la riparazione
Guarnizione danneggiata Rivolgersi ad un tecnico specializzato
per la riparazione
Con la porta chiusa fuoriesce acqua
dalla guarnizione
Meccanismo della maniglia allentato Rivolgersi ad un tecnico specializzato
per la riparazione
Lampadina bruciata Sostituire la lampadina
Luce forno spenta
Lampadina allentata Inserire in maniera corretta la
lampadina nel portalampade
Le ventole non effettuano più
linversione di marcia
Rivolgersi ad un tecnico specializzato
per la riparazione
Una delle ventole è ferme (nel caso
di forni che dispongono di più
motori)
Rivolgersi ad un tecnico specializzato
per la riparazione
Il forno non cucina in maniera
uniforme
Una delle resistenze è rotta Rivolgersi ad un tecnico specializzato
per la riparazione
Page 56

UNO
R
UNO
R
Page 57

UNO
R
______________________________________________________________________
________________________________________________________________________
________________________________________________________________________
___________________________________________________________________________________
___________________________________________________________________________________
___________________________________________________________________________________
___________________________________________________________________________________
___________________________________________________________________________________
___________________________________________________________________________________
___________________________________________________________________________________
___________________________________________________________________________________
___________________________________________________________________________________
___________________________________________________________________________________
___________________________________________________________________________________
___________________________________________________________________________________
___________________________________________________________________________________
___________________________________________________________________________________
___________________________________________________________________________________
___________________________________________________________________________________
___________________________________________________________________________________
___________________________________________________________________________________
___________________________________________________________________________________
___________________________________________________________________________________
___________________________________________________________________________________
___________________________________________________________________________________
___________________________________________________________________________________
___________________________________________________________________________________
___________________________________________________________________________________
___________________________________________________________________________________
___________________________________________________________________________________
___________________________________________________________________________________
___________________________________________________________________________________
___________________________________________________________________________________
___________________________________________________________________________________
___________________________________________________________________________________
Page 58

UNO
R
UNO
R
VARIABLES DE LA COCCION
AVERIAS MAS FRECUENTES
Page 59

UNO
R
Antes de posicionar el aparato, comprobar las
UNOX S.p.A.
Vi
35010 - V
ALY
MOD
DATE
TYPE
W:
POWER: FREQUENCY:
MOD: S/N
TENSION DE ALIMENTACION
Page 60

UNO
R
UNO
R
La conexión a la red de alimentación
eléctrica debe ser realizada
por
personal cali cado según las normativas
vigentes. El instalador es responsable
de la correcta conexión eléctrica y del
acatamiento de las normas de seguridad
Antes de efectuar la conexión cerciorarse
tengan una distancia mínima de apertura de
A su vez el aparato debe estar incorporado
trifásico a 5 polos de capacidad apropiada
Abrir la tapa de la terminal eléctrica ,
fijador de cables
4
Page 61

UNO
R
ADVERTENCIA:
(para
Antes de conectar el tubo de agua al horno, hacer
fluir el agua para eliminar eventuales residuos.
para evitar el desequilibrio de los
ventiladores, la rotura de las resistencias y
fenómenos de corrosión.
fijar la bomba (4) al horno mediante el
ATENCION:
temperatura y la humedad de los humos dependen
Page 62

UNO
R
UNO
R
ATENCION:
ATENCION:
verduras.
Al colocar los alimentos en la cámara de cocción,
Al colocar los alimentos en la cámara de cocción,
temperatura de cocción.
Apenas se suministra la tensión, el panel se
Page 63

UNO
R
– (rango tiempo programable 0 horas y 01 minutos
– 9 horas y 59 minutos)
Al finalizar el ciclo de cocción dejan de funcionar las
tiempo (mediante los pulsadores + y -) el horno
Al finalizar los 45 segundos o en el caso que la
Visualización y modificación de los parámetros
visualizar los parámetros y modificarlos si el horno
Page 64

UNO
R
UNO
R
visualización de los parámetros de cocción se
funcionamiento manual.
Al finalizar el ciclo de cocción dejan de funcionar
temperatura y encendido el led START/STOP.
tiempo (mediante los pulsadores + y -) el horno
Al finalizar los 45 segundos o en el caso que la
temperatura programada aumentada en 30 °.
tiempo, temperatura en el interior de la cámara de
Apenas se suministra la tensión, el panel se
Page 65

UNO
R
– (rango tiempo programable 0 horas y 01 minutos
– 9 horas y 59 minutos)
– 100 % 5 niveles de humedad).
Al finalizar el ciclo de cocción dejan de funcionar
tiempo de 45 segundos sobre la pantalla parpadea
tiempo (mediante los pulsadores + y -) el horno
valores de temperatura y humedad relativos al
Al finalizar los 45 segundos o en el caso que la
Visualización y modificación de los
visualizar los parámetros y modificarlos si el horno
temperatura fijo –es posible modificar el valor de la
temperatura programada mediante los pulsadores
Page 66

UNO
R
UNO
R
visualización de los parámetros de cocción se
funcionamiento manual.
Al finalizar el ciclo de cocción dejan de funcionar
tiempo (mediante los pulsadores + y -) el horno
valores de temperatura y humedad relativos al
Al finalizar los 45 segundos o en el caso que la
temperatura programada aumentada en 30 °.
AGUA MANUAL
VENTILADORES
ADVERTENCIA
Antes de efectuar cualquier intervención de
temperatura aproximada de 200°C para eliminar
Al final de cada ciclo de cocción limpiar el interior
Page 67

UNO
R
ADVERTENCIA:
temperatura de 30°C superior a la
temperatura de 30°C superior a la
temperatura de cocción antes de cualquier
temperatura de cocción antes de cualquier
temperatura.
VARIABLES DE COCCION
tiende a quemar la parte externa quedando
viceversa.
Page 68

UNO
R
UNO
R
wurstel, salsichas, pan congelado, pizza
tapa trasera del horno.
vez al año) a un control total con la mediación de
Antes de efectuar cualquier tipo de manutención es
tapa trasera del horno.
fusible, efectuando una rotación de 20° en
fusible;
Page 69

UNO
R
AVERIA CAUSA REMEDIO
F
a
l
t
a
d
e
t
e
n
s
i
ó
n
e
n
l
a
r
e
d
.
R
e
e
s
t
a
b
l
e
c
e
r
l
a
t
e
n
s
i
ó
n
d
e
a
l
i
m
e
n
t
a
c
i
ó
n
I
n
t
e
r
v
e
n
c
i
ó
n
d
e
l
a
p
a
r
a
t
o
t
é
r
m
i
c
o
d
e
s
e
g
u
r
i
d
a
d
.
R
e
e
s
t
a
b
l
e
c
i
m
i
e
n
t
o
d
e
l
d
i
s
p
o
s
i
t
i
v
o
t
é
r
m
i
c
o
d
e
s
e
g
u
r
i
d
a
d
I
n
t
e
r
v
e
n
c
i
ó
n
d
e
u
n
o
d
e
l
o
s
f
u
s
i
b
l
e
s
p
r
e
s
e
n
t
e
s
e
n
l
a
t
a
r
j
e
t
a
d
e
p
o
t
e
n
c
i
a
.
S
u
s
t
i
t
u
c
i
ó
n
d
e
l
f
u
s
i
b
l
e
E
l
h
o
r
n
o
e
s
t
á
c
o
m
p
l
e
t
a
m
e
n
t
e
a
p
a
g
a
d
o
C
o
n
e
x
i
ó
n
a
l
a
r
e
d
e
l
é
c
t
r
i
c
a
r
e
a
l
i
z
a
d
a
e
n
m
a
n
e
r
a
e
r
r
a
d
a
.
V
e
r
i
f
i
c
a
r
l
a
c
o
n
e
x
i
ó
n
a
l
a
r
e
d
e
l
é
c
t
r
i
c
a
I
n
g
r
e
s
o
d
e
l
a
g
u
a
c
e
r
r
a
d
o
A
b
r
i
r
e
l
i
n
g
r
e
s
o
d
e
l
a
g
u
a
C
o
n
e
x
i
ó
n
a
l
a
r
e
d
h
í
d
r
i
c
a
o
a
l
d
e
p
ó
s
i
t
o
e
n
m
a
n
e
r
a
e
r
r
a
d
a
.
V
e
r
i
f
i
c
a
r
l
a
c
o
n
e
x
i
ó
n
a
l
a
r
e
d
h
í
d
r
i
c
a
o
a
l
d
e
p
ó
s
i
t
o
A
u
s
e
n
c
i
a
d
e
a
g
u
a
e
n
e
l
d
e
p
ó
s
i
t
o
(
e
n
e
l
c
a
s
o
d
e
c
a
r
g
a
d
e
l
a
g
u
a
d
e
s
d
e
e
l
d
e
p
ó
s
i
t
o
)
I
n
t
r
o
d
u
c
c
i
ó
n
d
e
a
g
u
a
e
n
e
l
d
e
p
ó
s
i
t
o
L
a
i
n
t
r
o
d
u
c
c
i
ó
n
d
e
h
u
m
e
d
a
d
e
n
l
a
c
á
m
a
r
a
d
e
c
o
c
c
i
ó
n
e
s
a
c
t
i
v
a
d
a
p
e
r
o
e
l
a
g
u
a
n
o
s
a
l
e
d
e
l
o
s
t
u
b
o
s
F
i
l
t
r
o
d
e
e
n
t
r
a
d
a
d
e
l
a
g
u
a
o
b
s
t
r
u
í
d
o
d
e
i
m
p
u
r
e
z
a
s
.
P
u
l
i
r
e
l
f
i
l
t
r
o
P
u
e
r
t
a
a
b
i
e
r
t
a
o
c
e
r
r
a
d
a
e
n
m
a
n
e
r
a
e
r
r
a
d
a
C
e
r
r
a
r
c
o
r
r
e
c
t
a
m
e
4
n
t
e
l
a
p
u
e
r
t
a
E
l
h
o
r
n
o
n
o
p
a
r
t
e
a
u
n
q
u
e
e
l
t
i
e
m
p
o
h
a
y
a
s
i
d
o
p
r
o
g
r
a
m
a
d
o
y
e
l
e
l
p
u
l
s
a
d
o
r
S
T
A
R
T
/
S
T
O
P
h
a
y
a
s
i
d
o
a
p
r
e
t
a
d
o
.
I
n
t
e
r
r
u
p
t
o
r
d
e
l
a
p
u
e
r
t
a
d
a
ñ
a
d
o
D
i
r
i
g
i
r
s
e
a
u
n
t
é
c
n
i
c
o
e
s
p
e
c
i
a
l
i
z
a
d
o
p
a
r
a
l
a
r
e
p
a
r
a
c
i
ó
n
C
a
b
l
e
s
d
e
c
o
n
e
x
i
ó
n
d
e
l
a
s
o
n
d
a
c
á
m
a
r
a
d
e
s
c
o
l
g
a
d
o
s
d
e
l
a
t
a
r
j
e
t
a
d
e
p
o
t
e
n
c
i
a
V
e
r
i
f
i
c
a
r
l
a
s
c
o
n
e
x
i
o
n
e
s
E
n
l
a
p
a
n
t
a
l
l
a
d
e
l
a
t
e
m
p
e
r
a
t
u
r
a
a
p
a
r
e
c
e
s
i
e
m
p
r
e
l
a
e
s
c
r
i
t
u
r
a
E
E
1
S
o
n
d
a
c
á
m
a
r
a
d
a
ñ
a
d
a
D
i
r
i
g
i
r
s
e
a
u
n
t
é
c
n
i
c
o
e
s
p
e
c
i
a
l
i
z
a
d
o
p
a
r
a
l
a
r
e
p
a
r
a
c
i
ó
n
G
u
a
r
n
i
c
i
ó
n
d
a
ñ
a
d
a
D
i
r
i
g
i
r
s
e
a
u
n
t
é
c
n
i
c
o
e
s
p
e
c
i
a
l
i
z
a
d
o
p
a
r
a
l
a
r
e
p
a
r
a
c
i
ó
n
C
o
n
l
a
p
u
e
r
t
a
c
e
r
r
a
d
a
s
a
l
e
a
g
u
a
d
e
l
a
g
u
a
r
n
i
c
i
ó
n
M
e
c
a
n
i
s
m
o
d
e
l
a
m
a
n
i
l
l
a
r
e
l
a
j
a
d
a
D
i
r
i
g
i
r
s
e
a
u
n
t
é
c
n
i
c
o
e
s
p
e
c
i
a
l
i
z
a
d
o
p
a
r
a
l
a
r
e
p
a
r
a
c
i
ó
n
L
a
m
p
a
d
i
n
a
q
u
e
m
a
d
a
S
u
s
t
i
t
u
c
i
ó
n
l
a
m
p
a
d
i
n
a
L
u
z
d
e
l
h
o
r
n
o
a
p
a
g
a
d
a
L
a
m
p
a
d
i
n
a
r
e
l
a
j
a
d
a
I
n
s
e
r
i
r
e
n
m
a
n
e
r
a
c
o
r
r
e
c
t
a
l
a
l
a
m
p
a
d
i
n
a
e
n
e
l
p
o
r
t
a
l
á
m
p
a
r
a
L
o
s
v
e
n
t
i
l
a
d
o
r
e
s
n
o
r
e
a
l
i
z
a
n
l
a
i
n
v
e
r
s
i
ó
n
d
e
m
a
r
c
h
a
D
i
r
i
g
i
r
s
e
a
u
n
t
é
c
n
i
c
o
e
s
p
e
c
i
a
l
i
z
a
d
o
p
a
r
a
l
a
r
e
p
a
r
a
c
i
ó
n
U
n
o
d
e
l
o
s
v
e
n
t
i
l
a
d
o
r
e
s
n
o
f
u
n
c
i
o
n
a
(
e
n
e
l
c
a
s
o
d
e
l
o
s
h
o
r
n
o
s
q
u
e
d
i
s
p
o
n
e
n
d
e
m
á
s
m
o
t
o
r
e
s
)
D
i
r
i
g
i
r
s
e
a
u
n
t
é
c
n
i
c
o
e
s
p
e
c
i
a
l
i
z
a
d
o
p
a
r
a
l
a
r
e
p
a
r
a
c
i
ó
n
E
l
h
o
r
n
o
n
o
c
o
c
i
n
a
e
n
m
a
n
e
r
a
u
n
i
f
o
r
m
e
U
n
a
d
e
l
a
s
r
e
s
i
s
t
e
n
c
i
a
s
e
s
t
á
d
a
ñ
a
d
a
D
i
r
i
g
i
r
s
e
a
u
n
t
é
c
n
i
c
o
e
s
p
e
c
i
a
l
i
z
a
d
o
p
a
r
a
l
a
r
e
p
a
r
a
c
i
ó
n
AVERIAS MÁS FREQUENTES
Page 70

UNO
R
UNO
R
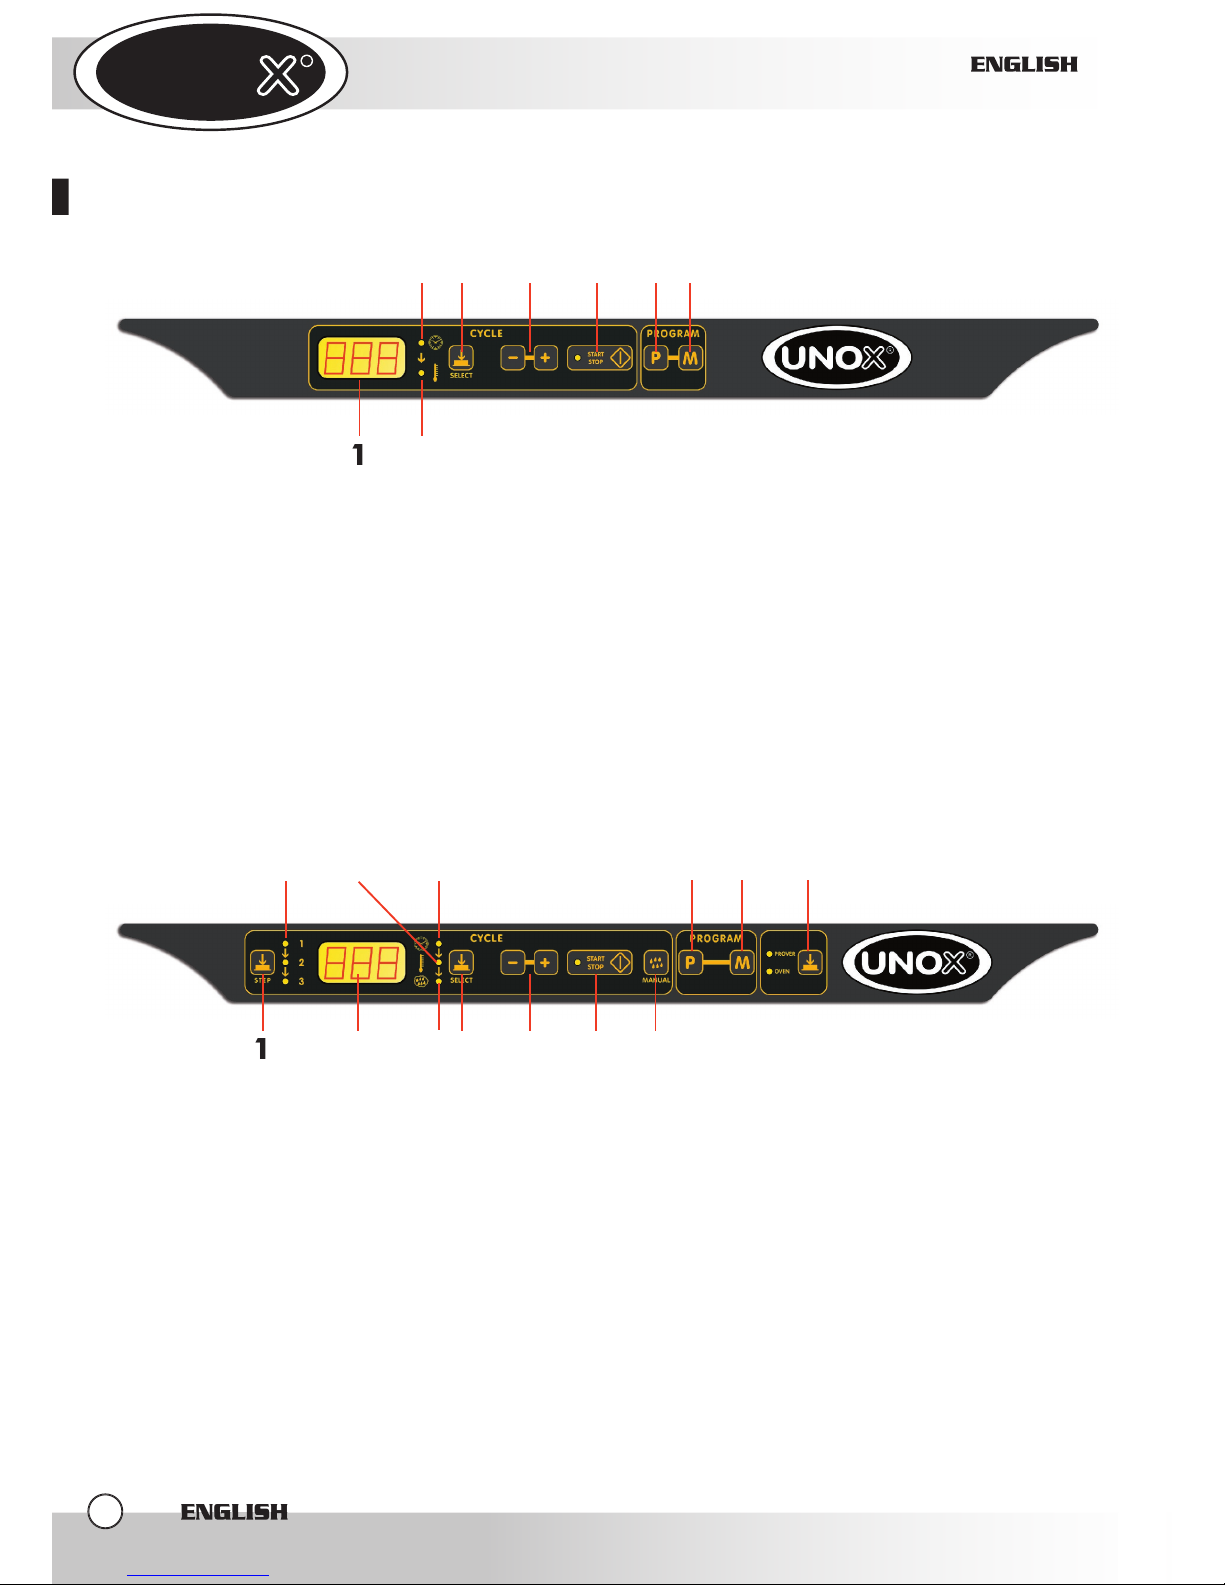
PANELES DE MANDO LineMiss™
Panel DYNAMIC
1-pulsador selección nivel cocción
2-led nivel de cocción
3-pantalla visualización parámetros cocción
4-led tiempo cocción
5-led temperatura cocción
6-led humedad
7-pulsador selección tiempo temperatura humedad
8- pulsadores incremento/decremento parámetros cocción
9-START/STOP ciclo cocción
10-pulsador introducción manual humedad
11-pulsador para llamar modalidad programa
12- pulsador memorización programas
13-selección horno/fermentador
Panel CLASSIC
1-pantalla visualización parámetros cocción
2-led tiempo cocción
3-led temperatura cocción
4-pulsador selección tiempo temperatura
5-pulsadores incremento/decremento parámetros cocción
6-START/STOP ciclo cocción
7-pulsador para llamar modalidad programa
8-pulsador memorización programas
Page 71
UNO
R
______________________________________________________________________
________________________________________________________________________
________________________________________________________________________
___________________________________________________________________________________
___________________________________________________________________________________
___________________________________________________________________________________
___________________________________________________________________________________
___________________________________________________________________________________
___________________________________________________________________________________
___________________________________________________________________________________
___________________________________________________________________________________
___________________________________________________________________________________
___________________________________________________________________________________
___________________________________________________________________________________
___________________________________________________________________________________
___________________________________________________________________________________
___________________________________________________________________________________
___________________________________________________________________________________
___________________________________________________________________________________
___________________________________________________________________________________
___________________________________________________________________________________
___________________________________________________________________________________
___________________________________________________________________________________
___________________________________________________________________________________
___________________________________________________________________________________
___________________________________________________________________________________
___________________________________________________________________________________
___________________________________________________________________________________
___________________________________________________________________________________
___________________________________________________________________________________
___________________________________________________________________________________
___________________________________________________________________________________
___________________________________________________________________________________
___________________________________________________________________________________
___________________________________________________________________________________
Page 72

UNO
R
UNOX S.p.A.
Via dell’Artigianato, 28/30 - 35010 – Vigodarzere (PD) - ITALY
Tel.: +39 049 86.57.511 - FAX: +39 049 86.57.555
www.unox.com
 Loading...