

Page 1
EISMASCHINE Gelato
Copyright UNOLD AG | www.unold.de
Bedienungsanleitung
Instructions for use | Notice d´utilisation
Gebruiksaanwijzing
Instrucciones de uso
Modell 48855
| Istruzioni per l’uso
| Instrukcja obsługi
Page 2

INHALTSVERZEICHNIS
Copyright UNOLD AG | www.unold.de
Bedienungsanleitung Modell 48855
Technische Daten ....................................6
Symbolerklärung ...................................... 6
Für Ihre Sicherheit ................................... 6
Bedienfeld .............................................. 10
Vor dem ersten Gebrauch..........................10
Vor der Eiszubereitung .............................11
Eis herstellen ..........................................12
Reinigen und Pflegen ............................... 15
Hinweise zu den Rezepten ........................ 16
Rezeptideen für Kinder und Erwachsene .... 16
Rezeptideen für Erwachsene ..................... 18
Garantiebestimmungen ............................20
Entsorgung / Umweltschutz ......................20
Service-Adressen .....................................21
Informationen für den Fachhandel ............. 21
Bestellformular ........................................ 105
Instructions for use Model 48855
Technical Specifications ........................... 22
Explanation of symbols ............................. 22
For your safety ......................................... 22
Control panel...........................................26
Before using the appliance for
the first time ........................................... 26
Before making ice cream .......................... 27
Making ice cream ....................................28
Cleaning and care .................................... 31
Instructions and tips for the
ice cream recipes ....................................32
Recipe ideas for children and grown-ups .... 32
Recipe ideas for grown-ups ....................... 34
Guarantee Conditions ............................... 35
Waste Disposal/Environmental Protection ...35
Service ...................................................21
Notice d´utilisation Modèle 48855
Spécification technique ........................... 36
Explication des symboles .......................... 36
Pour votre sécurité ................................... 36
Boutons de commande ............................. 40
Avant la première utilisation .....................40
Avant de préparer la glace ........................41
Fabriquer de la glace ...............................42
Nettoyage et entretien .............................. 45
Consignes importantes et conseils
pour les recettes ...................................... 45
Idées de recettes pour petits et grands .......46
Idées de recettes pour adultes ..................48
Conditions de Garantie ............................. 49
Traitement des déchets /
Protection de l’environnement ...................49
Service ...................................................21
Gebruiksaanwijzing Model 48855
Technische gegevens ............................... 50
Verklaring van de symbolen .......................50
Voor uw veiligheid ....................................50
Bedieningspaneel ....................................54
Vóór het eerste gebruik .............................54
Vóór de ijsbereiding .................................55
Ijs maken ................................................ 56
Reiniging en onderhoud ...........................59
Belangrijke aanwijzingen en
tips bij de ijsrecepten ..............................59
Receptideeën voor kinderen
en volwassenen .......................................60
Receptideeën voor volwassenen .................62
Garantievoorwaarden ................................ 63
Verwijderen van afval/Milieubescherming ...63
Service ...................................................21
Page 3

INHALTSVERZEICHNIS
Copyright UNOLD AG | www.unold.de
Istruzioni per l’uso Modello 48855
Dati tecnici ............................................ 64
Significato dei simboli .............................64
Per la vostra sicurezza .............................. 64
Pannello comandi .................................... 68
Prima del primo utilizzo ...........................68
Prima di preparare il gelato ....................... 69
Preparazione del gelato ............................70
Pulizia e cura .......................................... 73
Avvertenze importanti e consigli per
le ricette di gelati ....................................74
Spunti per ricette da bambini e da adulti ... 74
Spunti per ricette da adulti ....................... 76
Norme die garanzia .................................. 77
Smaltimento / Tutela dell’ambiente ...........77
Service ...................................................21
Manual de instrucciones Modelo 48855
Datos técnicos ........................................ 78
Explicación de símbolos ...........................78
Para su seguridad .................................... 78
Panel de mando ......................................82
Antes del primer uso ................................ 82
Antes de la preparación de helado ............. 83
Elaborar helado .......................................84
Limpieza y cuidado .................................. 87
Indicaciones y consejos importantes
para las recetas ......................................88
Ideas de recetas para niños y adultos .........88
Ideas de recetas para adultos .................... 90
Condiciones de Garantia ........................... 91
Disposición/Protección del
medio ambiente ......................................91
Service ...................................................21
Instrukcja obsługi Model 48855
Dane techniczne ...................................... 92
Objaśnienie symboli ................................. 92
Dla bezpieczeństwa użytkownika ...............92
Panel obsługowy ...................................... 96
Przed pierwszym użyciem .........................96
Przed przygotowaniem lodów .....................97
Produkcja lodów ......................................98
Czyszczenie i pielęgnacja .........................101
Ważne wskazówki i porady dotyczące
przepisów na lody ....................................101
Przepisy dla dzieci i dorosłych ...................102
Przepisy dla dorosłych .............................. 103
Warunki gwarancji....................................104
Utylizacja / ochrona środowiska ................. 104
Service ...................................................21
Page 4
DE
Copyright UNOLD AG | www.unold.de
EN
FR
NL
IT
ES
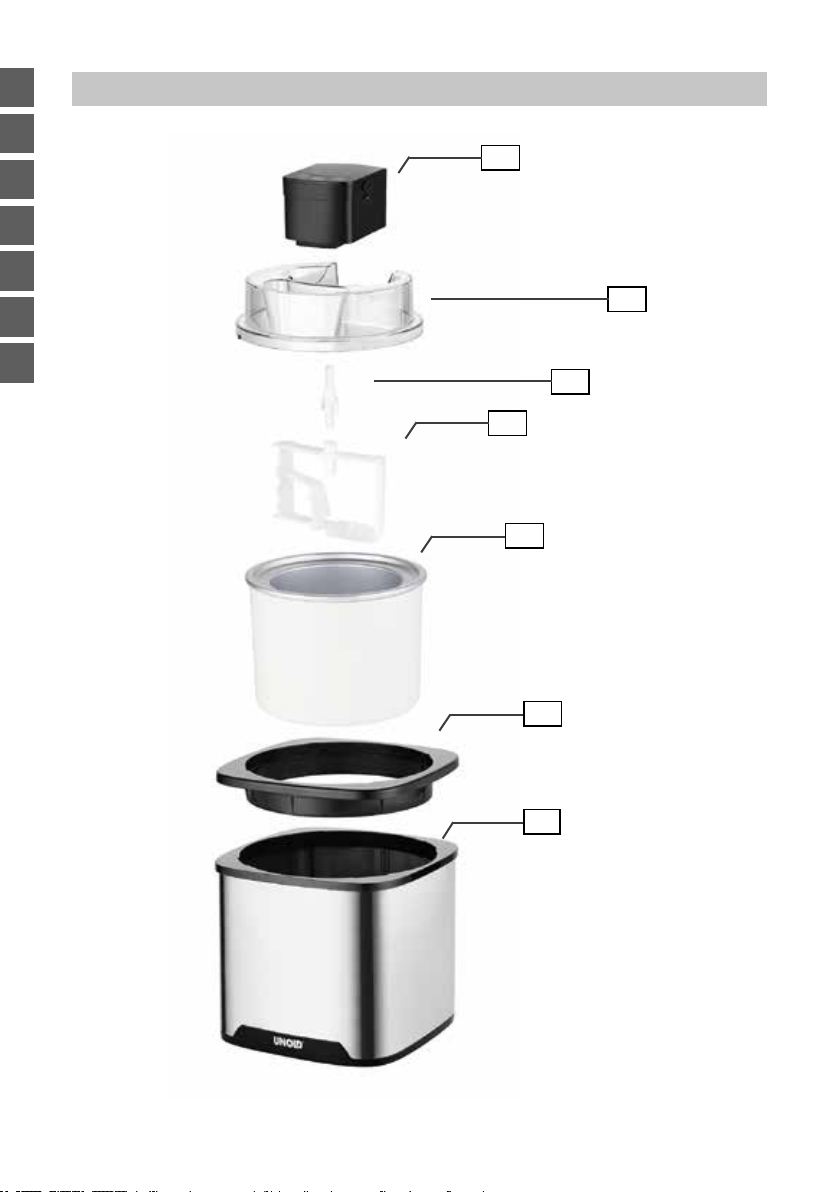
IHRE NEUE EISMASCHINE
1
2
PL
3
4
5
6
7
4 von 106
Stand 25.10.2024
Page 5

IHRE NEUE EISMASCHINE
Copyright UNOLD AG | www.unold.de
DE
DE Ab Seite 6
1 Motor
2 Deckel mit Einfüllöffnung
3 Antriebswelle/Achse
4 Mischer
5 Entnehmbarer Kühlbehälter
6 Kühlbehältereinsatz
7 Gehäuse
EN Page 22
1 Motor
2 Lid with fill opening
3 Drive shaft/axle
4 Mixer
5 Removable cooling container
6 Cooling container insert
7 Housing
FR Page 36
1 Moteur
Couvercle avec orifice de
2
remplissage
3 Arbre d'entraînement / axe
4 Mélangeur
5 Réservoir réfrigérant amovible
6 Support du réservoir réfrigérant
7 Boîtier
NL Pagina 50
1 Motor
2 Deksel met vulopening
3 Aandrijfas/as
4 Mixer
5 Uitneembare koelbak
6 Koelbakinzet
7 Behuizing
IT Pagina 64
1 Motore
Coperchio con apertura di
2
riempimento
3 Albero motore/asse
4 Mescolatore
5 Cestello refrigerante estraibile
6 Inserto cestello refrigerante
7 Scocca
ES Página 78
1 Motor
2 Tapa con boca de llenado
3 Eje de accionamiento/eje
4 Mezcladoras
5 Recipiente refrigerador extraíble
Soporte del recipiente
6
refrigerador
7 Carcasa
PL Strony 92
1 Silnik
Pokrywa z otworem do
2
napełniania
3 Wał napędowy / oś
4 Mieszadło
5 Wyjmowany pojemnik na lody
6 Panel obsługowy
7 Wkład pojemnika na lody
7 Obudowa
EN
FR
NL
IT
ES
PL
Stand 25.10.2024
5 von 106
Page 6
DE
Copyright UNOLD AG | www.unold.de
BEDIENUNGSANLEITUNG MODELL 48855
EN
FR
NL
IT
ES
PL
TECHNISCHE DATEN
Leistung: 12 W, 220–240 V~, 50 Hz
Fassungsvermögen: Ca. 1,5 Liter
Abmessungen: Ca. 21,9 x 21,9 x 25,5 cm (B/T/H)
Kühlbehälter ca. 19,1 x 19,1 x 14,5 cm (B/T/H)
Gewicht: Ca. 3,2 kg
Zuleitung: Ca. 120 cm
Kühlmittel Carboxymethylcellulose, Urea, Wasser
Ausstattung: Fassungsvermögen 1,5 Liter, entnehmbarer Kühlbehälter
Gehäuse aus hochwertigem Edelstahl und Kunststoff,
Deckel mit Einfüllöffnung, Display mit Timer und
Touch-Control-Bedienfeld, Motor mit Rechts-/Linkslauf,
Schutzklasse II
Zubehör: Bedienungsanleitung mit Rezepten
Änderungen und Irrtümer in Ausstattungsmerkmalen, Technik, Farben und Design
vorbehalten
SYMBOLERKLÄRUNG
Dieses Symbol kennzeichnet eventuelle Gefahren, die Verletzungen
nach sich ziehen können oder zu Schäden am Gerät führen.
FÜR IHRE SICHERHEIT
Bitte lesen Sie die folgenden Anweisungen und bewahren Sie diese auf.
Personen im Haushalt
1. Dieses Gerät kann von Kindern ab 8 Jahren sowie von Personen
mit reduzierten physischen, sensorischen oder mentalen
Fähigkeiten oder Mangel an Erfahrung und/oder Wissen benutzt
werden, wenn sie beaufsichtigt oder bezüglich des sicheren
Gebrauchs des Gerätes unterwiesen wurden und die daraus
resultierenden Gefahren verstanden haben.
2. Kinder dürfen nicht mit dem Gerät spielen.
3. Reinigung und Benutzer-Wartung dürfen nicht durch Kinder
durchgeführt werden, es sei denn, sie sind älter als 8 Jahre und
werden beaufsichtigt.
4. Bewahren Sie das Gerät und das Kabel außerhalb der Reichweite
von Kindern unter 8 Jahren auf.
6 von 106
Stand 25.10.2024
Page 7

Hinweise zur Gesundheit
Copyright UNOLD AG | www.unold.de
5. Aufgetautes oder angetautes Eis sofort verbrauchen und nicht
wieder einfrieren.
6. Verzehren Sie das Eis nur, solange es noch frisch ist. Eventuelle
Reste sofort einfrieren und innerhalb einer Woche verzehren.
7. Verwenden Sie nur frische Zutaten.
8. Achten Sie insbesondere bei der Verwendung von Eiern darauf,
dass diese möglichst frisch sind, um Keimbildung zu vermeiden.
Eisreste, die Ei enthalten, nicht wieder einfrieren.
9. Eiscreme, die aus rohem Ei oder nur teilweise erhitztem Ei
hergestellt wurde, sollte nicht von Kleinkindern, Schwangeren,
Senioren oder chronisch bzw. akut erkrankten Menschen verzehrt
werden.
10. Reinigen Sie das Gerät sofort, wenn Sie die Eiszubereitung
beendet haben. Andernfalls können sich Keime bilden.
11. Tritt Kühlflüssigkeit aus dem Kühlbehälter aus, muss der
Kühlbehälter ersetzt werden.
12. Die im Kühlbehälter enthaltene Kühlflüssigkeit ist nicht zum
Verzehr geeignet. Tritt Flüssigkeit aus dem Kühlbehälter aus,
verwenden Sie den Behälter nicht mehr. Bei versehentlichem
Kontakt folgende Maßnahmen ergreifen: Verunreinigte Kleidung
waschen, Haut sofort gründlich mit Wasser und Seife reinigen,
bei versehentlichem Schlucken den Mund ausspülen und kein
Erbrechen herbeiführen – holen Sie umgehend ärztlichen Rat
ein!
DE
EN
FR
NL
IT
ES
PL
Elektrische Sicherheit
13. Gerät nur an Wechselstrom gemäß Typenschild anschließen.
14. Dieses Gerät darf nicht mit einer externen Zeitschaltuhr oder
einem Fernbedienungssystem betrieben werden.
15. Nach Gebrauch, vor der Reinigung oder bei eventuellen Störungen
während des Betriebs bitte immer den Netzstecker ziehen.
16. Gerät nie in Wasser oder eine andere Flüssigkeit eintauchen, die
Zuleitung vor Feuchtigkeit schützen.
17. Die Zuleitung vor Gebrauch vollständig abwickeln.
Stand 25.10.2024
7 von 106
Page 8

DE
Copyright UNOLD AG | www.unold.de
EN
FR
NL
IT
ES
PL
18. Wickeln Sie die Zuleitung nicht um das Gerät und vermeiden
Sie Knicke in der Zuleitung, um Schäden an der Zuleitung zu
vermeiden.
19. Das Gerät nur in Innenräumen verwenden.
20. Ziehen Sie die Zuleitung nur am Netzstecker aus der Steckdose,
niemals an der Zuleitung ziehen.
21. Um Schäden an der Zuleitung zu vermeiden, das Gerät niemals
an der Zuleitung tragen oder an der Zuleitung ziehen.
22. Ziehen Sie den Stecker aus der Steckdose, bevor Sie das Gerät
zerlegen und reinigen, Einzelteile abnehmen oder anbringen
oder wenn das Gerät an eine andere Stelle gestellt werden soll.
23. Prüfen Sie regelmäßig Stecker und Zuleitung auf Verschleiß
oder Beschädigungen. Bei Beschädigung des Anschlusskabels
oder anderer Teile senden Sie das Gerät zur Überprüfung
und Reparatur an unseren Kundendienst. Unsachgemäße
Reparaturen können zu Gefahren für den Benutzer führen und
den Ausschluss der Garantie bewirken.
Hinweise zum Aufstellen und sicheren Gebrauch des Gerätes
24. Das Gerät sowie die Einsatzteile sind nicht spülmaschinenge
-
eignet.
25.
Stellen Sie das Gerät auf eine freie, ebene Fläche.
26. Das Gerät ist ausschließlich für den Haushaltsgebrauch oder
ähnliche Verwendungszwecke bestimmt, z. B.
Teeküchen in Geschäften, Büros oder sonstigen Arbeitsstätten,
landwirtschaftliche Betriebe,
zur Verwendung durch Gäste in Hotels, Motels oder sonstigen
Beherbergungsbetrieben,
in Privatpensionen oder Ferienhäusern.
27. Gerät und Zuleitung aus Sicherheitsgründen nie auf oder in der
Nähe von heißen Oberflächen abstellen oder betreiben.
28. Das Kabel darf nicht über die Kante der Arbeitsfläche
herunterhängen.
29. Berühren Sie die Innenseite des Kühlbehälters nicht mit bloßen
Händen oder anderen Körperteilen (insbesondere wenn diese
nass sind), um Verletzungen/Erfrierungen zu vermeiden.
8 von 106
Stand 25.10.2024
Page 9
30. Die maximale Füllmenge darf nicht überschritten werden. Der
Copyright UNOLD AG | www.unold.de
Kühlbehälter sollte bis maximal 5 cm unterhalb des oberen
Randes gefüllt sein, da sich das Eis durch den Gefriervorgang
ausdehnt.
31. Das Gerät muss vollständig zusammengebaut und eingeschaltet
sein, bevor Sie die gewünschten Zutaten einfüllen. Geben Sie
die erforderlichen Zutaten niemals vorher in den Kühlbehälter,
da die Zutaten am Behälterrand festfrieren können. Hierdurch
kann es zur Beeinträchtigung des gewünschten Ergebnisses
kommen.
32. Bewegen Sie das Gerät nicht, solange es in Betrieb ist.
33. Lassen Sie das Gerät nie unbeaufsichtigt, wenn es in Betrieb ist.
34. Verwenden Sie das Gerät nie ohne Kühlbehälter!
35. Während des Betriebs keine Gegenstände in das laufende
Gerät halten und nicht mit der Hand hineingreifen. Es besteht
Verletzungsgefahr!
36. Benutzen Sie das Gerät nur nach ordnungsgemäßem
Zusammenbau.
37. Betreiben Sie das Gerät nie mit Zubehör anderer Geräte.
38. Benutzen Sie keine spitzen oder scharfen Gegenstände im
Kühlbehälter, dieser könnte dadurch zerkratzt werden. Verwenden
Sie bei Bedarf Kunststoff- oder Holzschaber.
39. Schalten Sie das Gerät aus und ziehen Sie den Netzstecker,
wenn die Eiszubereitung beendet ist, wenn Sie das Gerät reinigen
wollen oder wenn Sie einen Fehler am Gerät beheben müssen.
40. ACHTUNG: Bitte nur Lebensmittel in den Behälter einfüllen.
DE
EN
FR
NL
IT
ES
PL
Nicht in das laufende Gerät greifen – es besteht
Verletzungsgefahr! Die Innenseite des Kühlbehälters nicht mit
bloßen Händen berühren!
Öffnen Sie auf keinen Fall den Motor des Gerätes. Es besteht
die Gefahr eines Stromschlages.
Achtung: Bitte berühren Sie den Kühlbehälter nie mit nassen
Körperteilen wie z. B. den Fingern, um Verletzungen/Erfrierungen
zu vermeiden.
Der Hersteller übernimmt keine Haftung bei fehlerhafter Montage, bei unsachgemäßer oder fehlerhafter
Verwendung oder nach Durchführung von Reparaturen durch nicht autorisierte Dritte.
Stand 25.10.2024
9 von 106
Page 10
DE
Copyright UNOLD AG | www.unold.de
EN
BEDIENFELD
FR
NL
IT
ES
PL
4
1
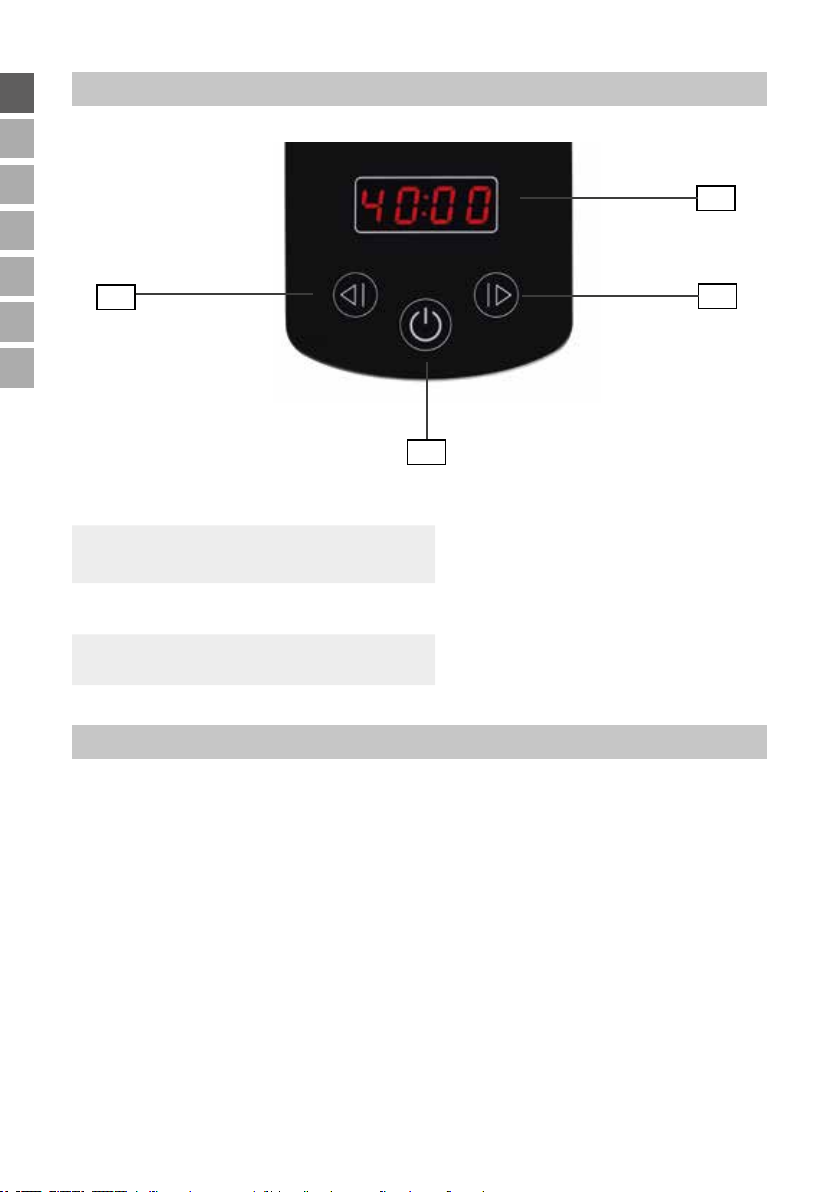
Display mit Laufzeitanzeige
EIN/AUS-Taste
2
Schaltet das Gerät ein oder aus
Taste +
3
Erhöhen der Laufzeit
Taste -
4
Verringern der Laufzeit
VOR DEM ERSTEN GEBRAUCH
1
3
2
1. Entfernen Sie alle Verpackungsmaterialien und ggf. Transportsicherungen
und Aufkleber (nicht das Typenschild oder die Seriennummer!). Halten Sie
Verpackungsmaterial von Kindern fern – Erstickungsgefahr! Entsorgen Sie
Verpackungsmaterial bei Bedarf gemäß den vor Ort geltenden Richtlinien.
Tipp: Bewahren Sie das Verpackungsmaterial auf, falls Sie das Gerät einmal
zur Reparatur einsenden möchten.
2. Prüfen Sie das Gerät auf Beschädigungen. Nehmen Sie das Gerät bei
sichtbaren Beschädigungen nicht in Betrieb, sondern wenden Sie sich an
unseren Kundenservice..
3. Reinigen Sie alle Teile mit einem feuchten Tuch, wie im Kapitel „Reinigen
und Pflegen“ beschrieben.
4. Stellen Sie das Gerät auf eine ebene und trockene Arbeitsfläche.
10 von 106
Stand 25.10.2024
Page 11
VOR DER EISZUBEREITUNG
Copyright UNOLD AG | www.unold.de
DE
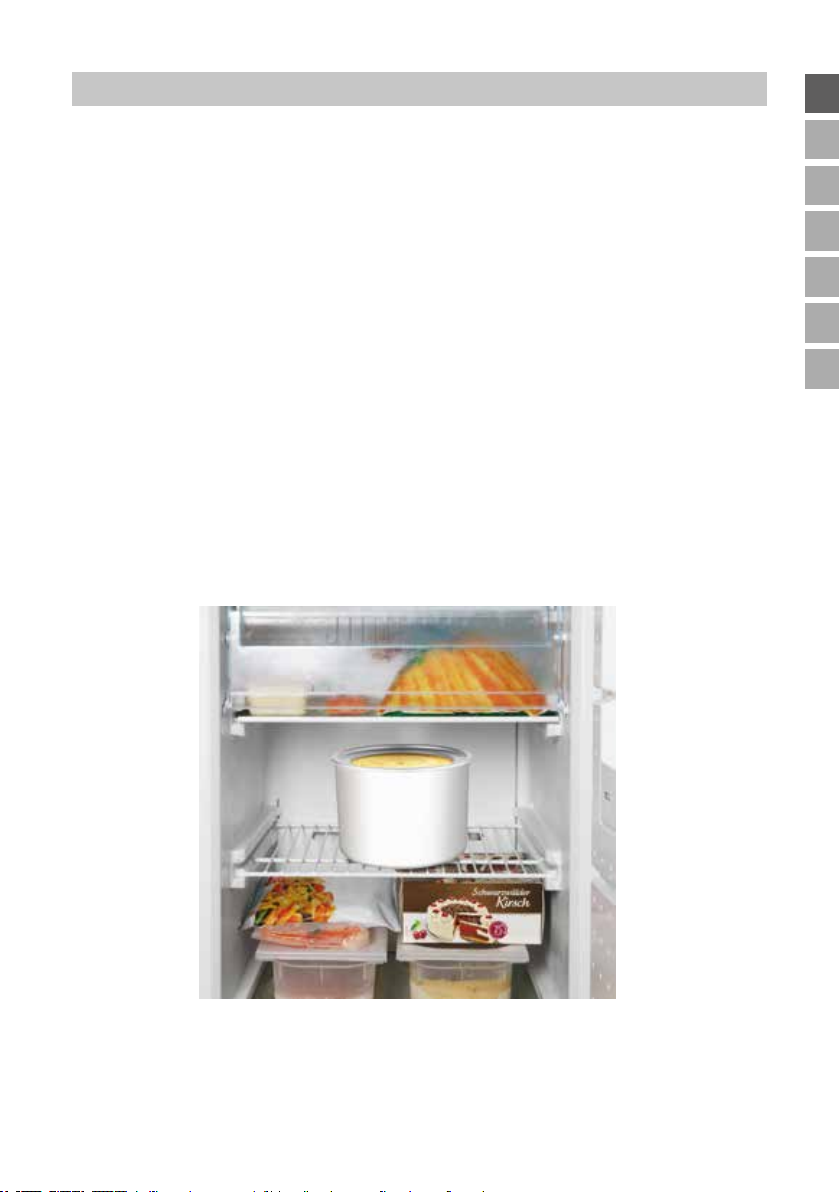
1. Bevor Sie Eis herstellen können, müssen Sie den mit einer Kühlflüssigkeit
gefüllten Kühlbehälter für mindestens 8 Stunden in das ***-Tiefkühlfach
bzw. die Gefriertruhe stellen. Die Temperatur muss mindestens −18 °C
betragen. Achten Sie bitte darauf, den Behälter vorher innen zu reinigen
und ihn anschließend vollständig zu trocknen.
2. Stellen Sie den Kühlbehälter aufrecht mit der Öffnung nach oben in das
Tiefkühlfach.
3. Je nach Temperatur des Gefriergerätes dauert der Gefriervorgang zwischen
8 und 22 Stunden. Durch Schütteln des Behälters können Sie feststellen,
ob die gesamte Kühlflüssigkeit gefroren ist.
4. Tipp: Wenn Sie die Eismaschine nicht verwenden, lagern Sie den
Kühlbehälter z. B. in einem Kunststoffbeutel im Gefriergerät. So ist der
Behälter immer einsatzbereit.
5. Wenn Sie mehrere Sorten Eis nacheinander herstellen möchten, empfehlen
wir die Anschaffung von weiteren Kühlbehältern. Diese können Sie direkt
bei uns beziehen, das Bestellformular finden Sie auf Seite 107.
EN
FR
NL
IT
ES
PL
Stand 25.10.2024
11 von 106
Page 12
DE
Copyright UNOLD AG | www.unold.de
EIS HERSTELLEN
EN
FR
NL
IT
ES
PL
Die gewünschten Zutaten sollten einige Stunden vor der Zubereitung bereits im
Kühlschrank vorgekühlt werden! Falls Sie Alkohol für das Rezept verwenden,
geben Sie diesen bitte erst zum Eis, wenn es bereits die gewünschte Konsistenz
hat. Die maximale Füllmenge für den Kühlbehälter beträgt 1.100 ml.
Tipp: Wenn Sie ein Rezept mit Alkohol verwenden, dosieren Sie den Alkohol
sparsam und geben Sie ihn erst zum Ende der Gefrierzeit zu, da Alkohol die
Gefrierzeit verlängert.
1. Bereiten Sie die Eismasse nach den Rezepten im Rezeptteil zu. Wenn es
sich um Eismassen handelt, die vorher gekocht werden müssen, machen
Sie dies am Vortag, damit die Masse gut abkühlen kann.
2. Wir empfehlen, die Eismasse vor der Verwendung grundsätzlich im
Kühlschrank zu kühlen.
3. Nehmen Sie den Kühlbehälter aus dem Gefrierfach.
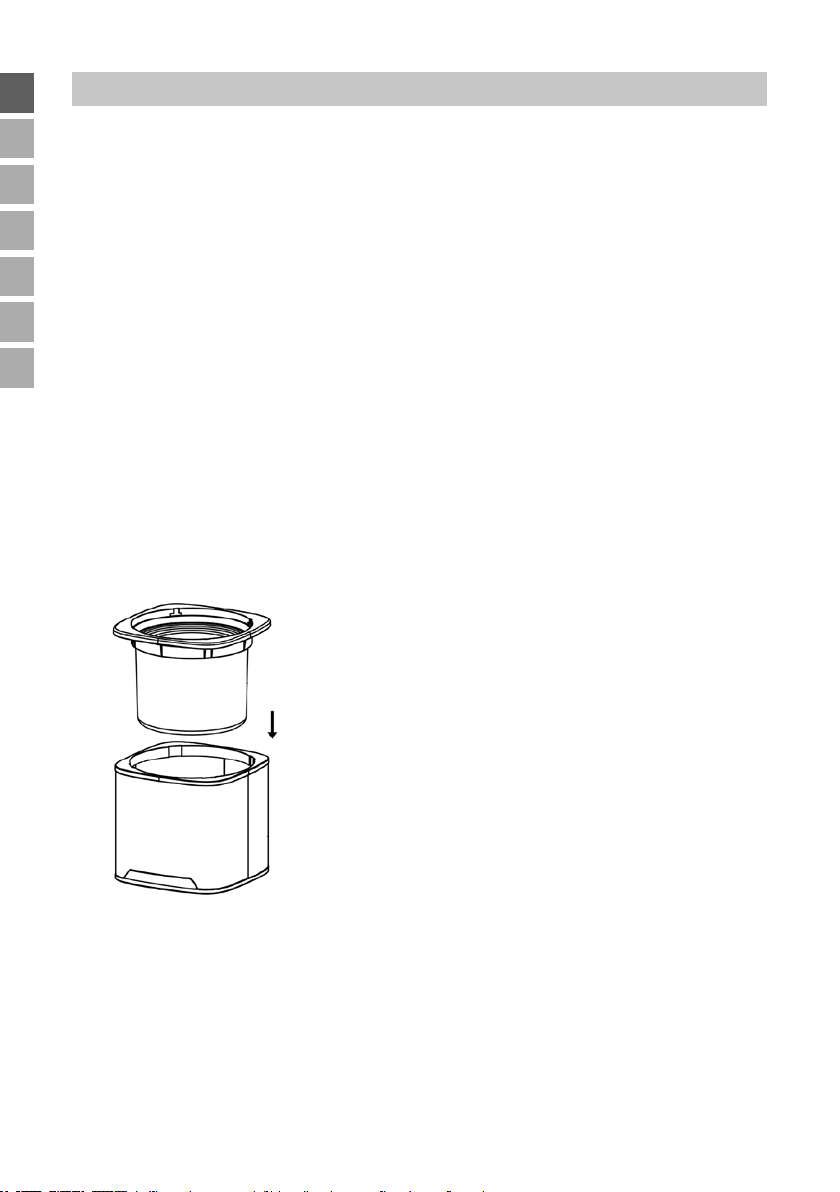
4. Setzen Sie den Kühlbehälter in den Kühlbehältereinsatz.
5. Platzieren Sie nun den Kühlbehältereinsatz mit Kühlbehälter im Gehäuse
des Gerätes.
6. Stecken Sie ggf. die Achse auf den Mischer. Achten Sie darauf, beide Teile
richtig zu verbinden – die Seite der Achse mit den beiden Ärmchen muss in
Richtung Mischer aufgesteckt werden.
12 von 106
Stand 25.10.2024
Page 13
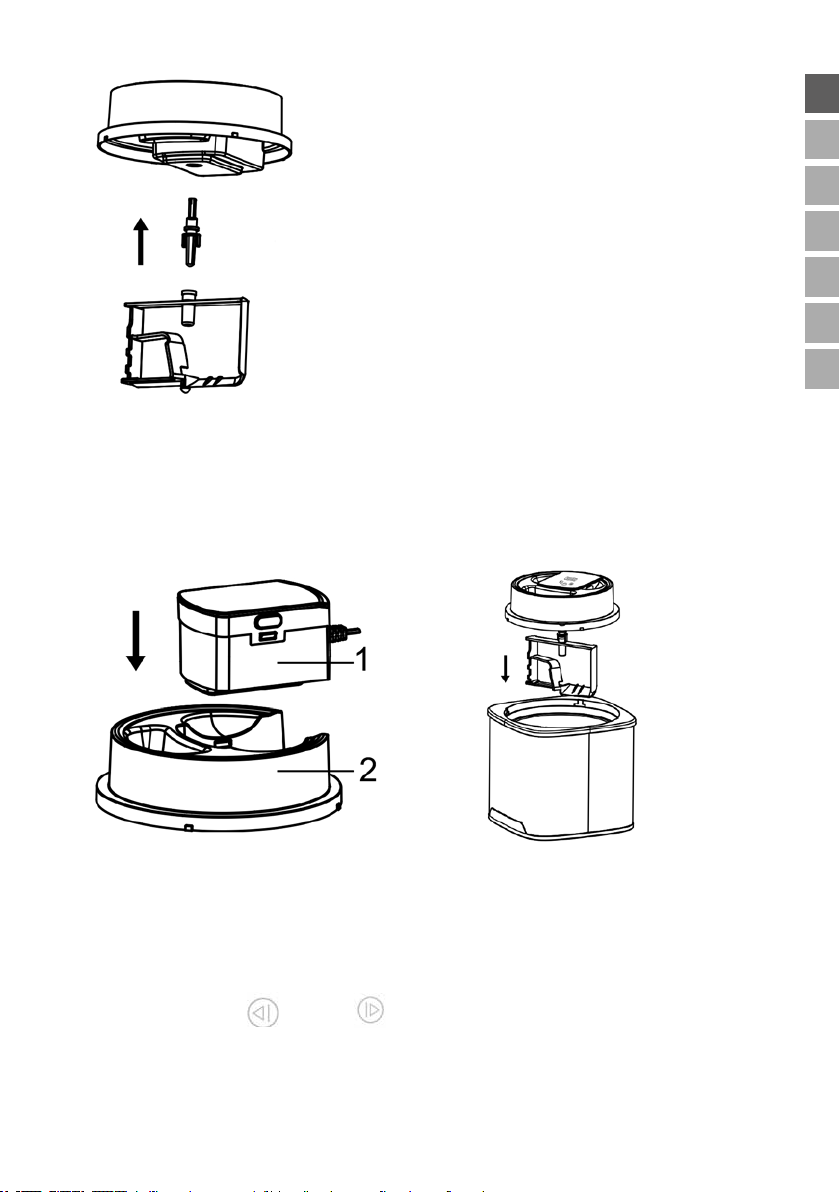
7. Befestigen Sie den Motor am Deckel und setzen Sie beides vorsichtig auf
Copyright UNOLD AG | www.unold.de
das Gerät.
8. Stecken Sie die Achse in die Öffnung an der Motorunterseite.
9. Der Motor kann nur in einer Richtung richtig am Deckel fixiert werden (siehe
Abb.).
DE
EN
FR
NL
IT
ES
PL
10. Drehen Sie den Deckel gegen den Uhrzeigersinn, bis dieser fest einrastet.
11. Stecken Sie den Netzstecker in eine Steckdose. Das Gerät befindet sich im
Stand-by-Modus.
12. Schalten Sie das Gerät an der EIN/AUS-Taste ein, im Display erscheint
40:00.
13. Mit den Tasten und können Sie nun die gewünschte Laufzeit
zwischen 5 und 45 Minuten in 5-Minuten-Schritten einstellen. Die gewählte
Zeit erscheint im Display und läuft rückwärts.
Stand 25.10.2024
13 von 106
Page 14

DE
Copyright UNOLD AG | www.unold.de
EN
FR
NL
IT
ES
PL
14. Hinweis: Wenn Sie nach 2 Sekunden keine Tasten-Eingabe vornehmen,
startet der Mischermotor.
15. Öffnen Sie dann die Öffnung am Einfüllschacht und füllen Sie Eismasse
durch den Schacht in das Gerät. Geben Sie die Eismasse keinesfalls in das
ausgeschaltete Gerät. Die Eismasse würde sofort am Rand des Kühlbehälters
festfrieren.
16. Weil sich während des Gefrierens das Volumen erhöht, füllen Sie bitte den
Behälter nicht bis zum Rand, sondern lassen Sie ca. 5 bis 7 cm Platz.
17. Lassen Sie die Eismaschine so lange laufen, bis das Eis die gewünschte
Konsistenz hat. Bei Bedarf können Sie die gewählte Laufzeit verringern oder
verlängern. Je nach Zutaten dauert dies 20 bis 40 Minuten. Prüfen Sie bitte
von Zeit zu Zeit den Gefriervorgang und schalten Sie das Gerät aus, wenn
der Mischer stillsteht.
18. Wenn die Eismasse zu fest wird, ändert sich ggf. die Drehrichtung des
Mischers, um Schäden am Motor zu vermeiden.
19. Achtung: Schalten Sie das Gerät während der Eiszubereitung nicht aus.
Dadurch würde die Eismasse am Kühlbehälterinnenrand festfrieren.
Sollte der Motor während der Zubereitung überhitzen, schaltet der Motor
automatisch ab. Ziehen Sie in diesem Fall den Netzstecker und lassen Sie
das Gerät abkühlen. Möchten Sie dann wieder Eis zubereiten, müssen Sie
ggf. neue Eiszutaten verwenden.
20. Wenn Sie ein Rezept mit Alkohol verwenden, dosieren Sie den Alkohol
sparsam und geben Sie Ihn erst zum Ende der Gefrierzeit zu, da Alkohol die
Gefrierzeit verlängert.
21. Schalten Sie das Gerät an der EIN/AUS-Taste aus.
22. Nehmen Sie den Deckel ab, indem Sie ihn nach oben vom Gerät drehen.
23. Entnehmen Sie den Kühlbehältereinsatz mit dem Kühlbehälter aus dem
Gerät.
24. Das Eis entnehmen Sie am besten mit einem Plastik- oder Holzspatel, um
den Behälter nicht zu zerkratzen.
25. Speiseeis sollte eine weiche Konsistenz haben. Wenn Sie jedoch härteres
Eis bevorzugen, stellen Sie den Behälter zusätzlich in das Gefrierfach/den
Gefrierschrank.
26. Bewahren Sie das Eis im Behälter jedoch nicht länger als 30 Minuten im
Gefrierfach auf. Wenn Sie das Eis nicht sofort essen möchten, füllen Sie es
bitte in eine geschlossene Gefrierdose um, die Sie dann in das Gefrierfach
stellen. Das Eis kann dabei durch das Zusammenziehen der Eiskristalle
14 von 106
Stand 25.10.2024
Page 15
Wasserschlieren bilden, da die optimale Eistemperatur bei ca. -10 °C liegt,
Copyright UNOLD AG | www.unold.de
die Temperatur in Gefriergeräten jedoch meistens niedriger ist.
Nicht in das laufende Gerät greifen – es besteht
Verletzungsgefahr! Die Innenseite des Kühlbehälters nicht
mit bloßen Händen berühren! Achtung: Bitte berühren Sie den
Kühlbehälter keinesfalls mit nassen Körperteilen, wie z. B.
den Fingern. Andernfalls besteht die Gefahr von Verletzungen/
Erfrierungen.
DE
EN
FR
NL
IT
ES
REINIGEN UND PFLEGEN
Ziehen Sie nach dem Gebrauch und vor dem Reinigen den Netzstecker des
Gerätes.
Berühren Sie den Kühlbehälter nicht mit bloßen Händen, wenn Sie diesen
aus dem Gerät heben. Andernfalls besteht die Gefahr von Verletzungen/Erfrierungen.
1. Lassen Sie den Kühlbehälter auf Raumtemperatur aufwärmen, bevor Sie
ihn reinigen. Andernfalls besteht die Gefahr von Verletzungen/Erfrierungen.
2. Wischen Sie die Innenseite des Kühlbehälters mit einem feuchten Tuch gut
aus und trocknen Sie ihn anschließend gut ab.
3. Spülen Sie den Mischer mit einem milden Spülmittel.
4. Wischen Sie Gehäuse und Deckel von innen und außen mit einem feuchten
Tuch mit etwas Spülmittel aus und mit einem feuchten Tuch mit klarem
Wasser nach. Verwenden Sie keine scharfen oder scheuernden Putzmittel.
5. Trocknen Sie das Gerät gründlich ab.
6. Tauchen Sie den Motor mit der Zuleitung keinesfalls in Flüssigkeiten ein.
7. Der Kühlbehälter muss vollständig trocken sein, bevor Sie ihn wieder in das
Gefrierfach stellen.
8. Eine regelmäßige Reinigung verlängert die Lebensdauer des Gerätes
erheblich.
9. Bewahren Sie das Gerät an einem trockenen und staubgeschützten Ort auf.
Tipp: Bewahren Sie die Verpackung des Gerätes auf und verstauen Sie die
Eismaschine bei Nichtgebrauch in diesem Karton.
PL
Stand 25.10.2024
15 von 106
Page 16

DE
Copyright UNOLD AG | www.unold.de
HINWEISE ZU DEN REZEPTEN
EN
FR
NL
IT
ES
PL
Verwenden Sie nur vollreife Früchte. Obststücke und/oder ganze Beeren erst zum
Schluss zufügen.
Wenn das Rezept die Zugabe von Eiern vorsieht, verwenden Sie nur ganz frische Eier.
Sie können Milch durch Sahne ersetzen oder die Sahne durch Milch ersetzen.
Je mehr Sahne Sie verwenden, desto cremiger wird das Eis.
Zucker können Sie durch Honig, Sirup oder Süßstoff ersetzen. Bei Softeis ist
dies jedoch nicht möglich.
Milch kann auch durch Sojadrink ersetzt werden.
Die Eiscreme schmeckt frisch zubereitet am besten. Möchten Sie die Eiscreme
jedoch länger aufbewahren, geben Sie der Eismasse 30 g Eisbasis hinzu.
Eisbasis verhindert, dass sich die Wasserkristalle bei der Lagerung wieder
zusammenziehen und das Eis splitterig wird. Sie erhalten Eisbasis bei
Hobbybäcker-Versand - Inge Pinzer
Am Mühlholz 6 – 89287 Bellenberg
Tel. 0 73 06/92 59 00 - Fax 0 73 06/92 59 05
Internet: www.hobbybaecker.de
Wenn Sie festeres Eis wünschen, stellen Sie die Eismasse für 15–30 Minuten
in das Gefrierfach, bevor Sie die Masse in die Eismaschine füllen. Gerade in der
heißen Jahreszeit sind die Temperaturen auch im Kühlschrank etwas höher, weil
z. B. die Kühlschranktür geöffnet wird und die Raumtemperatur höher ist.
Eis schmilzt nicht so schnell, wenn Sie der Eismasse vor dem Gefrieren ein
Päckchen Fix-Gelatine (kaltlösliche Gelatine) zufügen.
REZEPTIDEEN FÜR KINDER UND ERWACHSENE
Vanille-Eis
150 ml Milch, 150 g Sahne, 1/2 Vanilleschote, 1 Prise Salz, 1 Eigelb, 40 g
Zucker, 25 g Kondensmilch.
Die Milch und 50 g Sahne in einen Topf geben und erhitzen. Die Vanilleschote
längs aufschlitzen, das Mark mit einem Löffel herauskratzen und zusammen mit
der Schote und dem Salz zur Sahnemilch geben. Das Ganze unter Rühren einmal
aufkochen lassen, sofort von der Platte nehmen und die Schote herausnehmen.
Das Eigelb mit dem Zucker cremig schlagen, dann die heiße Sahnemilch unter
Rühren dazu laufen lassen. Die Flüssigkeit zurück in den Topf gießen und unter
16 von 106
Stand 25.10.2024
Page 17

Rühren erhitzen, bis die Masse leicht andickt. Die Kondensmilch einrühren, die
Copyright UNOLD AG | www.unold.de
Masse umfüllen und etwa eine halbe Stunde abkühlen lassen, dann für eine
Stunde in den Kühlschrank stellen. Die restliche Sahne steif schlagen und unter
die gekühlte Puddingmasse ziehen. Die Mischung in die laufende Eismaschine
geben und in 15 bis 30 Minuten gefrieren lassen.
Schokoladen-Eis
100 ml Milch, 1 Eigelb, 40 g Zucker, 1/2 P. Vanillinzucker, 50 g
Vollmilchschokolade, 100 g Sahne, 1 TL Kakao
Die Milch in einem Topf erhitzen und einmal aufwallen lassen. Inzwischen das
Eigelb mit dem Vanillinzucker zu einer festen Schaummasse schlagen. Dabei
den Zucker nach und nach einrieseln lassen. Die heiße Milch unter ständigem
Rühren mit dem Schneebesen langsam in die Eischaummasse gießen. Die
Eiermilch wieder in den Milchtopf füllen und nochmals unter Rühren erhitzen,
bis die Flüssigkeit leicht andickt. Das Ganze in eine Rührschüssel umfüllen und
etwa eine halbe Stunde abkühlen lassen.
In der Zwischenzeit die Schokolade mit drei Esslöffeln Sahne im Wasserbad
unter Rühren schmelzen und sofort mit einem gehäuften Teelöffel Kakao unter
die Eiermilch rühren, bis die Schokolade ganz aufgelöst ist. Die Mischung eine
halbe Stunde abkühlen lassen, dann nochmals für etwa eine Stunde in den
Kühlschrank stellen.
Die restliche Sahne leicht anschlagen und unter die Schokoladenmilch rühren.
Das Ganze in die laufende Eismaschine geben und in etwa 30 Minuten gefrieren
lassen.
DE
EN
FR
NL
IT
ES
PL
Joghurt-Eis
90 g Sahne, ca. 40 g Puderzucker, 175 g Joghurt in beliebiger Geschmacksrichtung
(z. B. Frucht- oder Nussjoghurt), 1 Ei
Die Sahne mit dem Puderzucker cremig schlagen. Den Joghurt mit dem Ei
verquirlen und die Sahne unterziehen. Die Masse in die laufende Eismaschine
geben und in etwa 25 Minuten gefrieren lassen.
Eis-Schokoküsse
4 Schokoküsse, 1-2 EL Puderzucker, 175 ml Milch
Die Schokoküsse vorsichtig zerlegen. Dazu die Waffeln und den Schokoladenguss
ablösen und beiseite stellen. Den Zuckerschaum in eine Schüssel geben. Den
Zucker und die Milch zum Zuckerschaum geben und alles zu einer homogenen
Stand 25.10.2024
17 von 106
Page 18

DE
Copyright UNOLD AG | www.unold.de
EN
FR
NL
IT
ES
PL
Creme verrühren. Diese in die Eismaschine füllen und in etwa 10 Minuten
gefrieren. Nun den Schokobruch zur Eismasse geben und das Ganze in weiteren
10 bis 15 Minuten gefrieren lassen. Inzwischen die Schokokuss-Waffeln auf
einer Platte auslegen. Nach Ablauf der Gefrierzeit einen großen Eisportionierer
(Größe 14) mit der Eismasse füllen und auf jede Waffel eine Kugel setzen. Die
Eis-Schokoküsse noch für einige Stunden im Gefriergerät nachgefrieren lassen.
Tipp: Sie können die Eis-Schokoküsse mit braunem oder weißem Schokoguss
überziehen und mit Schokoraspeln bestreuen.
REZEPTIDEEN FÜR ERWACHSENE
Ananas-Kokos-Shake
1 Dose Ananasscheiben (ca. 125 g Einwaage), 65 ml Kokosmilch, 2 Eiweiß, 25 g
Puderzucker, 1 EL weißer Rum, 1/2 Banane, 1/2 EL Zitronensaft, Belegkirschen,
Holzspießchen, 125 ml Ananas-Saft, weitere 60 ml Kokosmilch
3/4 der Ananasscheiben mit dem Ananassirup aus der Dose und der Kokosmilch
(62 ml) pürieren. Die übrigen Scheiben klein schneiden, dazugeben und alles für
eine halbe Stunde kühl stellen. Die Eiweiße mit dem Puderzucker schlagen und
unter das Fruchtpüree rühren. Das Ganze in der Eismaschine etwa 40 Minuten
gefrieren lassen. Nach 25 Minuten den Rum hinzufügen. Die Hälfte der Banane
in Scheiben schneiden und mit Zitronensaft beträufeln. Die Scheiben und die
Kirschen auf Holzspießchen stecken.
Vier große Kugeln Eis in eine Rührschüssel geben. Den Rest in der Gefriertruhe
aufbewahren. Den Ananassaft, die Kokosmilch und die restliche Banane zu den
Eiskugeln geben und alles pürieren. Das Mixgetränk auf Gläser verteilen und mit
den Spießchen dekorieren.
Campari-Orangen-Sorbet
35 ml Campari, 200 ml Orangensaft, 75 g Puderzucker, 1 Eiweiß
Den Campari mit 180 ml Orangensaft und 30 g Puderzucker in einen hohen
Rührbecher geben und so lange rühren, bis sich der Zucker aufgelöst hat. Das
Ganze für zwei Stunden in den Kühlschrank stellen.
Nach Ablauf der Kühlzeit das Eiweiß mit dem restlichen Puderzucker und dem
übrigen Orangensaft schaumig schlagen. Diese Eiweißmasse mit der OrangenCampari-Mischung verrühren. Die Eismischung in die laufende Eismaschine
geben und in 30 bis 40 Minuten gefrieren lassen.
18 von 106
Stand 25.10.2024
Page 19

Tipp: Das Campari-Orangen-Sorbet ist aufgrund seines Alkoholgehaltes recht
Copyright UNOLD AG | www.unold.de
weich, sodass Sie es direkt aus dem Gefriergerät portionieren können.
Sehr gut schmeckt dieses Sorbet, wenn Sie es mit einem Spritzbeutel in hohe
Gläser geben und mit frisch gepresstem Orangensaft auffüllen.
DE
EN
FR
NL
IT
ES
PL
Die Rezepte in dieser Bedienungsanleitung wurden von den Autoren und von der UNOLD AG
sorgfältig erwogen und geprüft, dennoch kann keine Garantie übernommen werden. Eine Haftung der
Autoren bzw. der UNOLD AG und ihrer Beauftragten für Personen-, Sach- und Vermögensschäden
ist ausgeschlossen.
Stand 25.10.2024
19 von 106
Page 20
DE
Copyright UNOLD AG | www.unold.de
GARANTIEBESTIMMUNGEN
EN
FR
NL
IT
ES
PL
Wir gewähren auf dieses Gerät der Marke UNOLD eine Garantie von 24 Monaten – bei gewerblichem
Gebrauch 12 Monate – ab dem Kaufdatum, für Schäden, die bei bestimmungsgemäßem
Gebrauch nachweislich auf Werksfehler zurückzuführen sind. Innerhalb der Garantiezeit beheben
wir Material- und Herstellungsfehler nach unserem Ermessen durch Reparatur oder Umtausch.
Unsere Garantieleistungen gelten ausschließlich für in Deutschland und Österreich verkaufte
Geräte. Bei anderen Ländern wenden Sie sich bitte an den zuständigen Importeur. Geräte, für
die eine Mängelbeseitigung beansprucht wird, senden Sie bitte zusammen mit einer Kopie des
maschinell erstellten Kaufbelegs, auf dem das Kaufdatum ersichtlich sein muss, sowie einer
Fehlerbeschreibung gut verpackt an unseren Kundendienst. Auf unserer Internetseite https://unold.
de/pages/rucksendungen können Sie sich einen Rücksendeschein ausdrucken (nur für Einsendungen
aus Deutschland und Österreich). Von der Garantie ausgeschlossen sind Schäden durch Verschleiß,
unsachgemäße Handhabung und Nichteinhaltung der Wartungs- und Pflegeanweisungen.
Der Garantieanspruch erlischt, wenn Reparaturen oder Eingriffe am Gerät von dritter Stelle
vorgenommen werden. Diese Herstellergarantie beschränkt weder Ihre gesetzlichen Rechte noch Ihre
Ansprüche gegenüber dem Verkäufer oder Händler aus dem Kaufvertrag gemäß den Bestimmungen
des Bürgerlichen Gesetzbuches (BGB). Ihre gesetzlichen Rechte als Verbraucher, insbesondere Ihre
Rechte auf Gewährleistung und die gesetzlichen Mängelansprüche gemäß §§ 437 ff. BGB, bleiben
unberührt.
UNOLD AG, Mannheimer Straße 4, D-68766 Hockenheim
ENTSORGUNG / UMWELTSCHUTZ
Unsere Geräte werden auf hohem Qualitätsniveau für eine lange Nutzungsdauer hergestellt.
Regelmäßige Wartung und fachgerechte Reparaturen durch unseren Kundendienst können die
Nutzungsdauer des Gerätes verlängern. Wenn ein Gerät defekt und nicht mehr zu reparieren ist,
beachten Sie bitte: Dieses Produkt darf nicht zusammen mit dem normalen Hausmüll entsorgt
werden. Es besteht eine gesetzliche Bestimmung, Elektro- und Elektronikaltgeräte (Altgeräte)
sowie Batterien und Akkumulatoren getrennt vom Hausmüll zu entsorgen. Sie erkennen diese
Altgeräte durch das nebenstehende Symbol der durchgestrichenen Mülltonne (WEEE-Symbol).
Sie müssen daher dieses Produkt an einer ausgewiesenen Sammelstelle zum Recycling von elektrischen oder
elektronischen Geräten abliefern. Durch das separate Sammeln und Recyceln von Abfallprodukten helfen
Sie mit, die natürlichen Ressourcen zu schonen und stellen sicher, dass das Produkt in gesundheits- und
umweltverträglicher Weise entsorgt wird. Jeder Verbraucher ist für das Löschen von personenbezogenen Daten
auf dem Elektro- bzw. Elektronikgerät selbst verantwortlich.
20 von 106
Stand 25.10.2024
Page 21
SERVICE-ADRESSEN
Copyright UNOLD AG | www.unold.de
DE
DEUTSCHLAND
Kundendienst
Telefon +49 (0) 62 05/94 18-27
Telefax +49 (0) 62 05/94 18-22
Mannheimer Straße 4
68766 Hockenheim
Sie möchten innerhalb der Garantiezeit ein Gerät zur Reparatur einsenden? Auf unserer Internetseite
www.unold.de/ruecksendung können Sie sich einen Rücksendeschein ausdrucken, um damit das
Paket kostenlos bei der Post abzugeben (nur für Einsendungen aus Deutschland und Österreich).
E-Mail [email protected]
Internet www.unold.de
SCHWEIZ POLEN
MENAGROS AG
Hauptstr. 23
CH 9517 Mettlen
Telefon +41 (0) 71 6346015
Quadra-Net
Dziadoszanska 10
61-248 Poznań
Internet www.quadra-net.pl
Telefax +41 (0) 71 6346011
E-Mail [email protected]
Internet www.bamix.ch
INFORMATIONEN FÜR DEN FACHHANDEL
EN
FR
NL
IT
ES
PL
Hiermit erklärt die UNOLD AG, dass sich die Eismaschine 48855 in Übereinstimmung mit den
grundlegenden Anforderungen der europäischen Richtlinie für elektromagnetische Verträglichkeit
(2014/30/EU) und der Niederspannungsrichtlinie (2014/35/EU) bendet.
Hiermit bestätigt die UNOLD AG, dass sowohl das Produkt als auch die eingesetzten Rohstoffe den
Vorschriften des LFBG 2005, § 30+31, der EC Direktive 1935/2004 und den Empfehlungen des
BfR in ihrer jeweils aktuellen Fassung entspricht. Die gesetzlichen Grenzwerte werden eingehalten.
Die Übereinstimmung mit den Regularien bezieht sich auf den Tag der Erstellung dieser Erklärung.
Hockenheim, 28.9.2016, UNOLD AG, Mannheimer Straße 4, 68766 Hockenheim
Diese Anleitung kann im Internet unter www.unold.de als pdf-Datei heruntergeladen werden.
Stand 25.10.2024
21 von 106
Page 22
DE
Copyright UNOLD AG | www.unold.de
INSTRUCTIONS FOR USE MODEL 48855
EN
FR
NL
IT
ES
PL
TECHNICAL SPECIFICATIONS
Power: 12 W, 220–240 V~, 50 Hz
Capacity: approx. 1500 ml
Dimensions: approx. 21.9 x 21.9 x 25.5 cm (W/D/H)
Cooling container approx. 19.1 x 19.1 x 14.5 cm
Weight approx. 3.2 kg
Power cord: approx. 120 cm
Refrigerant: Carboxymethylcellulose, urea, water
Features: Capacity 1.5 litres, removable cooling container, housing of
high-quality stainless steel and plastic, lid with fill opening,
display with timer and touch control panel, motor with clockwise
and anti-clockwise rotation, degree of protection II
Accessories: Operating instructions with recipes
Equipment features, technology, colours and design are subject to change without
notice.
EXPLANATION OF SYMBOLS
This symbol denotes a possible hazard which could cause injury or
damage to the appliance.
FOR YOUR SAFETY
Please read the following instructions and keep them on hand for later
reference.
Instructions for persons in the household
1. This appliance can be used by children 8 years and older, as
well as by persons with reduced physical, sensory or mental
abilities or with lack of experience and/or knowledge, if they are
supervised or if they have been instructed with regard to safe
use of the appliance and have understood the dangers that can
result from use of the appliance.
2. Children must not play with the appliance.
3. Children are not allowed to perform cleaning and user
maintenance, unless they are 8 years of age or older and are
supervised.
22 von 106
Stand 25.10.2024
Page 23

4. Keep the appliance and the power cord out of the reach of
Copyright UNOLD AG | www.unold.de
children under 8 years of age.
Instructions concerning health
5. Consume thawed ice cream immediately, do not refreeze it.
6. Only consume the ice cream as long as it is still fresh. Immediately
freeze any remaining ice cream and consume it within one week.
7. Use only fresh ingredients.
8. When using eggs, particularly ensure that they are as fresh as
possible to avoid the formation of germs. Do not re-freeze leftover ice cream that contains eggs.
9. Ice cream that has been produced with raw egg or partially heated
eggs should not be eaten by small children, pregnant women,
the elderly or by persons who are chronically ill or acutely ill.
10. Clean the appliance immediately, when you have finished
preparing the ice cream. If you do not germs can form.
11. If cooling fluid escapes from the cooling container, the cooling
container must be replaced.
12. The coolant contained in the cooling tank is not suitable for
consumption. If liquid escapes from the cooling container, do
not use the container any more. In case of accidental contact,
take the following measures: Wash contaminated clothing,
immediately clean skin thoroughly with soap and water, rinse
mouth if swallowed accidentally and do not induce vomiting –
seek medical advice immediately!
DE
EN
FR
NL
IT
ES
PL
Electrical safety
13. Connect the appliance only to an AC power supply with voltage
as specified on the rating plate.
14. This appliance must not be operated with an external timer or a
remote control system.
15. After use, before cleaning or if there are any faults during
operation, always unplug the power plug.
16. Never immerse the appliance in water or other liquids, protect
the power cord from moisture.
17. Completely unwind the power cord before use.
18. To prevent damage to the power cord do not wind the power cord
around the appliance, and do not kink the power cord.
Stand 25.10.2024
23 von 106
Page 24

DE
Copyright UNOLD AG | www.unold.de
EN
FR
NL
IT
ES
PL
19. Only use the appliance indoors.
20. Only unplug the appliance from the electrical outlet by pulling
on the power plug. Do not, under any circumstances, pull on the
power cable to unplug the appliance.
21. To prevent damage to the power cord never carry the appliance
via the power cord or pull on the power cord.
22. Unplug the appliance from the electrical outlet before you
disassemble and clean the appliance, remove or attach component
parts or if the appliance should be set up at a different location.
23. Check the power plug and the power cord regularly for wear or
damage. If the power cord or other parts are damaged, send the
appliance to our customer service department for inspection and
repair. Unauthorised repairs can result in serious risks for the
user and void the warranty.
Instructions for set-up and safe use of the appliance
24. The appliance and the insert components are not dishwasher
safe.
25. Place the appliance on a free, level surface.
26. The appliance is intended for household use only, or for similar
areas of use, such as,
kitchenettes in businesses, offices or other workplaces,
agricultural enterprises,
for use by guests in hotels, motels or other lodgings,
in private guest houses or holiday homes.
27. For safety reasons, never place or operate the appliance on or in
the vicinity of hot surfaces.
28. The power cord must not hang down over the edge of the work
surface.
29. To avoid injury/freezing, do not touch the inside of the cooling
container with bare hands or other body parts (particularly if
hands or other body parts are wet).
30. The maximum fill quantity should not be exceeded. The cooling
container should not be filled more than 5 cm under the upper
edge, since ice cream expands during the freezing process.
31. The appliance must be completely assembled and switched on
before you add the desired ingredients. Never put the required
24 von 106
Stand 25.10.2024
Page 25
ingredients into the cooling container beforehand, because the
Copyright UNOLD AG | www.unold.de
ingredients can firmly freeze onto the edge of the container. This
can prevent the desired result from being achieved.
32. Do not move the appliance when it is in operation.
33. Never leave the appliance unattended when it is in operation.
34. Never use the appliance without cooling containers!
35. Do not hold objects in the running appliance during operation,
and do not reach into the appliance with your hand. Danger of
injury!
36. Use the appliance only after it has been properly assembled.
37. Never operate the appliance with accessories of other appliances.
38. Do not use any pointed or sharp objects in the ice cream
container. Such objects can scratch the ice-cream container. If
necessary, use a plastic or wooden scraper.
39. Switch off the appliance and unplug the power plug, when you
have concluded preparing the ice cream, if you would like to
clean the appliance, of if you must rectify an appliance fault.
40. ATTENTION: Only fill container with food products.
Never reach into the appliance while it is in operation – danger
of injury! Do not touch the inside of the cooling container with
bare hands!
Do not open motor of the appliance under any circumstances.
There is danger of electric shock.
Attention: To avoid injury/freezing, never touch the cooling
container with wet fingers or hands.
DE
EN
FR
NL
IT
ES
PL
The manufacturer will not be liable in the event of incorrect assembly, improper or incorrect use or if
repairs are carried out by unauthorized third parties.
Stand 25.10.2024
25 von 106
Page 26
DE
Copyright UNOLD AG | www.unold.de
EN
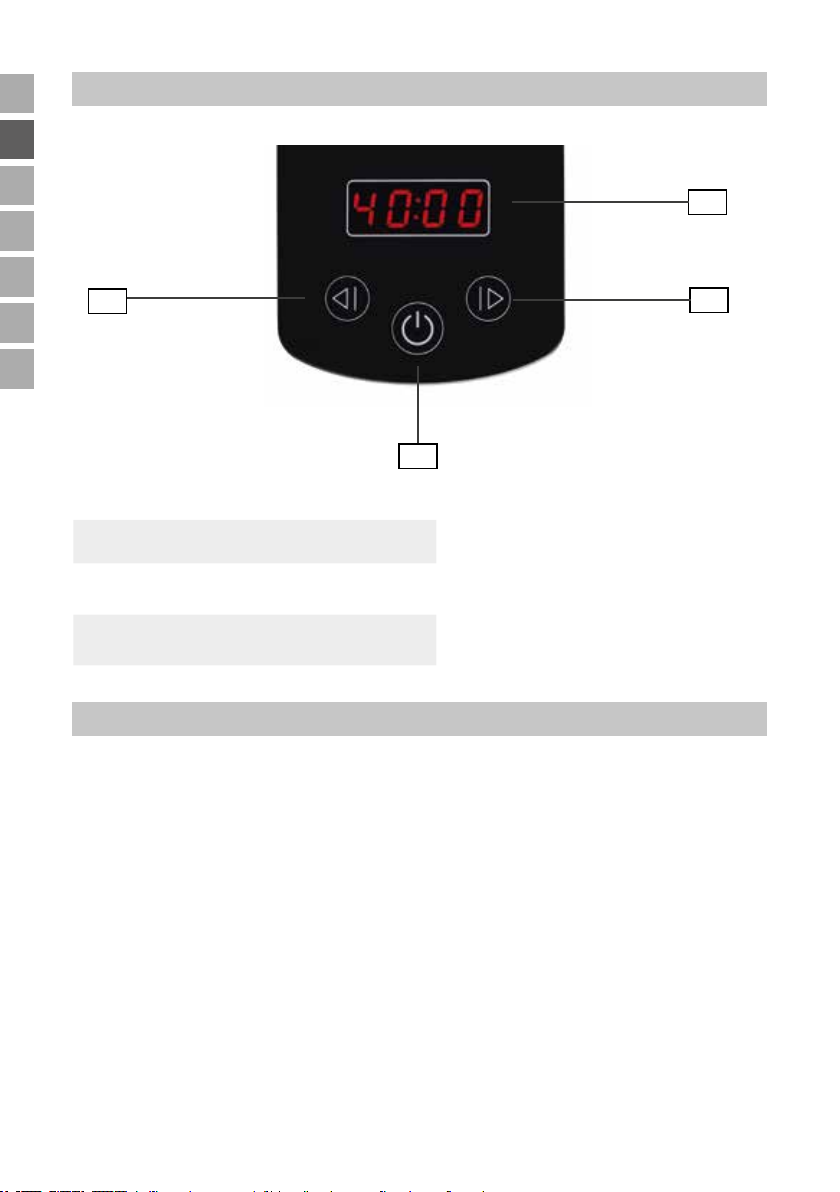
CONTROL PANEL
FR
NL
IT
ES
PL
4
2
1
Display with runtime indication
ON/OFF button
2
switches the appliance on or off.
Button +
3
increases runtime
Button -
4
decreases runtime
BEFORE USING THE APPLIANCE FOR THE FIRST TIME
1
3
1. Remove all packaging materials and any transport guards and stickers (not
the type plate or the serial number!). Keep the packaging material away
from children. Choke hazard! Dispose of the packaging material according
to the applicable statutory waste disposal regulations.
2. Inspect the appliance for damage. If there is visible damage, do not operate
the appliance; instead, contact our customer service department.
3. Clean all parts with a damp cloth, as described in the section „Cleaning and
care“.
4. Place the appliance on a solid, level and dry work surface.
26 von 106
Stand 25.10.2024
Page 27
BEFORE MAKING ICE CREAM
Copyright UNOLD AG | www.unold.de
DE
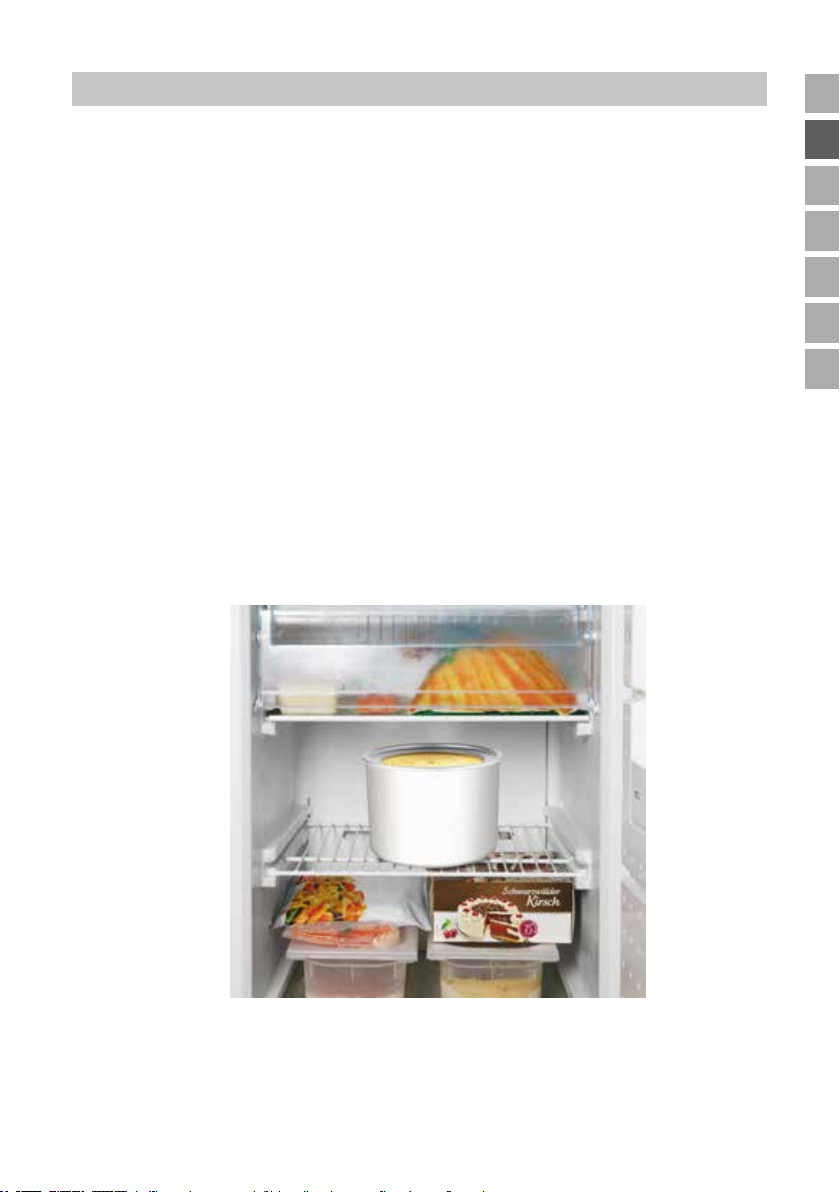
1. Before you can make ice cream, you must place the cooling container filled
with a cooling fluid in the *** freezer compartment or freezer for approx.
8 hours. The temperature must be at least -18°C. Beforehand, ensure that
you clean the inside of the container and then completely dry it.
2. Place the cooling container upright in the freezer compartment, with the
opening upwards.
3. The freezing process takes between 8 and 22 hours depending on the
temperature of the freezer. By shaking the container you can determine
whether all the coolant is frozen.
4. Tip: When you are not using the ice cream machine, store the cooling
container in a plastic bag, for example, in the freezer. Thus the container
will always be ready for use.
5. If you want to make several types of ice cream in succession, we recommend
the purchase of additional cooling containers. You can order additional
cooling containers directly from Unold; an order form is provided on page
107.
EN
FR
NL
IT
ES
PL
Stand 25.10.2024
27 von 106
Page 28
DE
Copyright UNOLD AG | www.unold.de
MAKING ICE CREAM
EN
FR
NL
IT
ES
PL
The desired ingredients should have already been pre-cooled for several hours
prior to preparation! If you are using alcohol for the recipe, please only add it to
the ice cream when the ice cream has the desired consistency. The maximum fill
quantity for the cooling container is 1,100 ml.
Tip: If you are using a recipe with alcohol, only use a little alcohol and only add
it at the end of the freezing time because the alcohol extends the freezing time.
1. Prepare the ice cream mixture as specified in the recipes in the recipe
section. If the ice cream mixture must be boiled, this should be done a day
in advance so that the mixture has time to cool thoroughly.
2. We recommend that you always thoroughly cool the ice cream mixture in the
refrigerator before use.
3. Take the cooling container out of the freezer compartment.
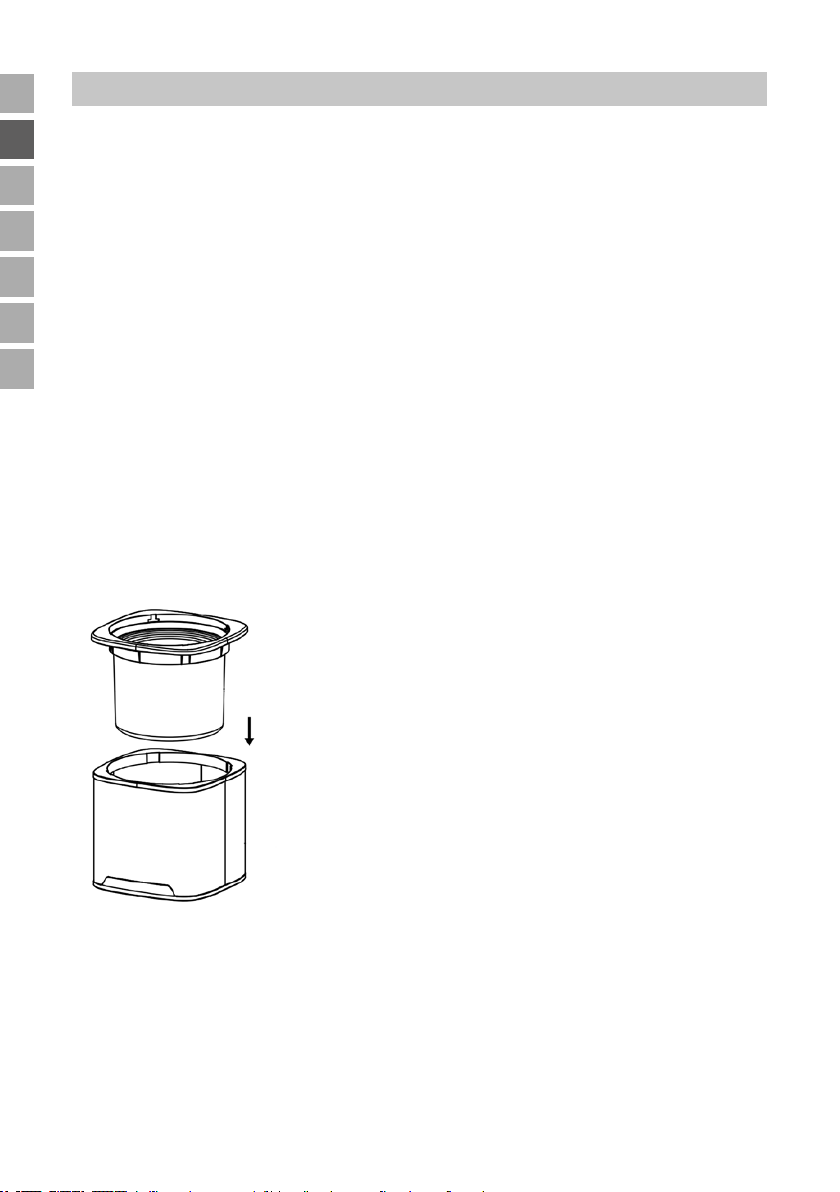
4. Place the cooling container in the cooling container insert.
5. Then place the cooling container insert with cooling container in the housing
of the appliance.
6. If necessary, fit the axle onto the mixer. Ensure that both parts are correctly
connected – the side of the axle with the two little arms must be attached
in the direction of the mixer.
7. Fasten the motor on the lid and carefully place both on the appliance.
8. Insert the axle in the opening on the underside of the motor.
9. The motor can only be correctly fixed in place on the lid in one direction
(see Fig.).
28 von 106
Stand 25.10.2024
Page 29
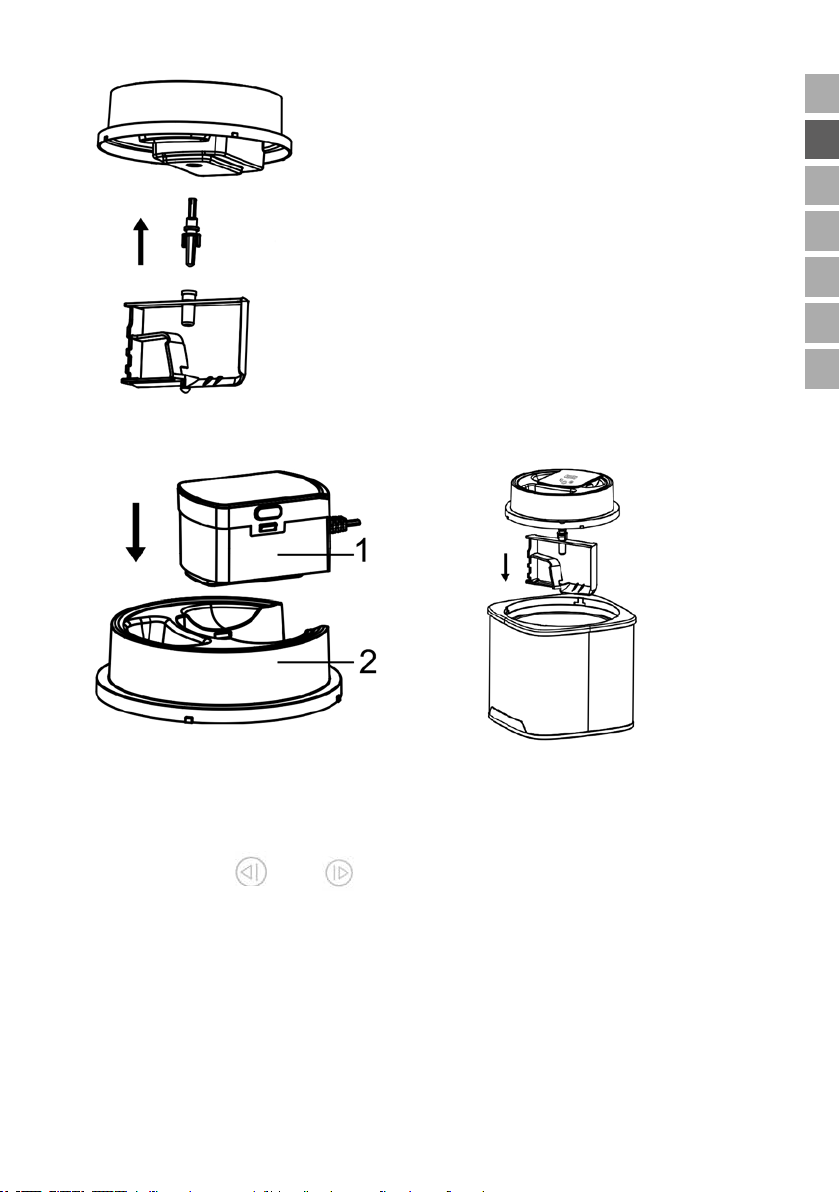
10. Turn the lid anti-clockwise until it firmly locks in place.
Copyright UNOLD AG | www.unold.de
DE
EN
FR
NL
IT
ES
PL
11. Plug the appliance into an electrical
outlet. The appliance is in standby mode.
12. Switch on the appliance via the ON/OFF button, 40:00 appears in the
display.
13. Now use the and buttons to select the desired runtime between
5 minutes and 45 minutes in 5-minute increments. The selected time
appears in the display and counts down.
14. Note: If you do not make any button entries, after 2 seconds the mixer motor
starts.
15. Then uncover the opening on the filling shaft and pour the ice cream mixture
into the appliance through the shaft. Do not, under any circumstances, pour
the ice cream mixture into the appliance when the appliance is switched off.
Stand 25.10.2024
29 von 106
Page 30

DE
Copyright UNOLD AG | www.unold.de
EN
FR
NL
IT
ES
PL
The ice-cream mixture would immediately freeze on the edge of the cooling
container.
16. Since the volume increases during the freezing process, do not fill the
container all the way up to the edge, but rather leave approximately 5 to
7 cm space.
17. Let the ice cream maker run until the ice cream has the desired consistency.
If necessary, you can reduce or extend the selected runtime. Depending on
the ingredients this takes 20 to 40 minutes. Check the freezing process
from time to time, and switch off the appliance when the mixer has come
to a standstill.
18. If the ice cream mixture becomes too solid, the mixer‘s direction of rotation
changes as needed to prevent motor damage.
19. Attention: Do not switch off the appliance while it is making ice cream. This
would freeze the ice cream mixture on the inner edge of the cooling container.
If the motor overheats during preparation, it switches off automatically. In
this case, unplug the mains plug and let the appliance cool. If you want to
prepare ice cream again, you may have to use new ice cream ingredients.
20. If you are using a recipe with alcohol, only use a little alcohol and only add
it at the end of the freezing time because the alcohol extends the freezing
time.
21. Switch off the appliance via the ON/OFF button.
22. Take the lid off of the appliance, by pulling it upward and off of the appliance.
23. Remove the cooling container insert together, with the cooling container,
from the appliance.
24. It is best to remove the ice cream with a plastic or wooden spatula, so as not
to scratch the container.
25. Ice cream should have a soft consistency. However, if you prefer harder ice
cream, then additionally place the container in the freezer compartment/
freezer.
26. However do not keep the ice cream in the container in the freezer
compartment for longer than 30 minutes. If you do not want to eat the ice
cream immediately, please pour it into a closed freezer container, which you
then place in the freezer compartment. In this regard, due to the contraction
of ice crystals the ice cream can form water streaks because the optimal ice
cream temperature is approx. -10°C, but the temperature in the freezing
appliances is usually lower.
30 von 106
Stand 25.10.2024
Page 31
Never reach into the appliance while it is in operation – danger
Copyright UNOLD AG | www.unold.de
of injury! Do not touch the inside of the cooling container with
bare hands! Attention: Do not, under any circumstances, touch
the cooling container with wet body parts, such as your fingers,
for example. Otherwise, there is danger of injury/freezing.
DE
EN
FR
NL
CLEANING AND CARE
Unplug the mains plug of the appliance after use and before cleaning.
Do not touch the coolant container with bare hands when lifting it out of the
appliance. Otherwise, there is danger of injury/freezing.
1. Allow the cooling container to warm to room temperature before cleaning it.
Otherwise, there is danger of injury/freezing.
2. Wipe off the inside of the cooling container thoroughly with a damp cloth
and then dry it well.
3. Rinse the mixer with a mild washing-up liquid.
4. Wipe off the inside and outside of the housing and lid with a damp cloth and
a little washing-up liquid, and with a cloth dampened with clean water. Do
not use sharp objects or abrasive cleaning agents.
5. Thoroughly dry the appliance.
6. Do not, under any circumstances, immerse the motor with the power cord,
in liquids.
7. The cooling container must be completely dry before it is put back in the
freezer compartment.
8. Regular cleaning significantly extends the service life of the appliance.
9. Store the appliance in a dry location, where it is protected against dust. Tip:
Keep the packaging of the appliance on hand and keep the ice cream maker
in this box when it is not in use.
IT
ES
PL
Stand 25.10.2024
31 von 106
Page 32

DE
Copyright UNOLD AG | www.unold.de
INSTRUCTIONS AND TIPS FOR THE ICE CREAM RECIPES
EN
FR
NL
IT
ES
PL
Use only fruit that is completely ripe.
Only add pieces of fruit and/or entire berries at the end.
If the recipe requires eggs, only use very fresh eggs.
You can replace milk with cream, or cream with milk.
The more cream you use the creamier the ice cream will be.
You can replace sugar with honey, syrup or sweetener. However this is not
possible for soft ice cream.
Milk can also be replaced with soy drink.
The ice cream tastes best right after it has been freshly prepared. However, if you
want to store ice cream longer add 30 grams stabiliser to the ice cream mixture.
The stabiliser prevents the ice crystals from contracting again in storage and it
prevents the ice cream from becoming grainy. You can get the stabiliser at
Hobbybäcker-Versand - Inge Pinzer
Am Mühlholz 6 – 89287 Bellenberg, Germany
Tel. +49 73 06/92 59 00 - Fax +49 73 06/92 59 05
Internet: www.hobbybaecker.de
If you want firmer ice cream, place the ice cream mixture in the freezer
compartment for 15–30 minutes, before pouring the mixture into the ice cream
maker. In the summer months, in particular, temperatures even in the refrigerator
can be slightly higher since, for example, the refrigerator door is opened and the
room temperature is higher.
Ice cream does not melt so quickly if you add a package of cold-soluble gelatine)
to the ice cream before freezing.
RECIPE IDEAS FOR CHILDREN AND GROWN-UPS
Vanilla ice cream
150 ml milk, 150 g cream, 1/2 vanilla pod, 1 pinch salt, 1 egg yolks, 40 g sugar,
25 g condensed milk.
Put the milk and 50 g cream in a pot and heat. Slit the vanilla pod open
lengthwise, scrape out the seeds with a spoon and together with the pod and
the salt, add to the cream/milk. Stirring constantly, bring the entire mixture to
a boil, remove immediately from the burner and take out the pod. Whip the egg
yolk together with the sugar until creamy, then under constant stirring, add the
hot cream/milk. Pour the liquid back into the pot and heat, stirring constantly,
32 von 106
Stand 25.10.2024
Page 33

until the ice cream mixture thickens slightly. Stir in the condensed milk, put
Copyright UNOLD AG | www.unold.de
the ice cream mixture in a different container and let it cool, then put it in the
refrigerator for one hour. Whip the whipping cream until stiff and fold it into the
cooled pudding mixture. Pour the mixture into the running ice cream maker and
let it freeze for 15 to 30 minutes.
Chocolate ice cream
100 ml milk, 1 egg yolk, 40 g sugar, 1/2 package vanilla sugar, 50 g milk
chocolate, 100 g cream, 1 Tsp. cocoa
Heat the milk in a pan and let it boil up once. In the meantime, beat the egg yolk
with the vanilla sugar into a foam mixture. In this process drizzle the sugar into
the mixture slowly. Stirring the hot milk constantly with the wire whisk, slowly
pour it into the ice cream foam mixture. Put the egg/milk mixture back into the
milk pan, and again heat it up under constant stirring until the liquid thickens
slightly. Pour the entire mixture into a mixing bowl and let it cool for half an hour.
In the meantime melt the chocolate with three tablespoons in the water bath
under constant stirring and stir it into the egg milk mixture with a heaping
teaspoon of cocoa until the chocolate is completely dissolved. Allow the mixture
to cool for half an hour, then again put it in the refrigerator for approx. one hour.
Whip the remaining whipping cream slightly and fold it into the chocolate/milk
mixture. Pour the entire mixture into the running ice cream machine and let it
freeze approx. 30 minutes.
DE
EN
FR
NL
IT
ES
PL
Frozen yogurt
90 g cream, approx. 40 g powdered sugar, 175 g yogurt, any flavour (e.g. fruit
yogurt or nut yogurt), 1 egg
Whip the cream and the powdered sugar until it is creamy. Drizzle the egg into
the yogurt and fold the cream into the yogurt. Pour the mixture into the running
ice cream maker and let it freeze for approx. 25 minutes.
Ice cream Schokoküsse (chocolate kisses – a German confection consisting of
marshmallow cream dipped in chocolate on a waffle)
4 chocolate kisses, 1-2 Tsp. powdered sugar, 175 ml milk
Carefully take the chocolate kisses apart. To do this detach the waffle bases and
the chocolate glaze, and set these items aside. Pour the sugar foam into a bowl.
Add the sugar and milk to the sugar foam and stir everything together into an
homogeneous cream. Pour this into the ice cream maker and freeze for approx.
10 minutes. Now add the chocolate fragments to the ice cream mixture and
Stand 25.10.2024
33 von 106
Page 34

DE
Copyright UNOLD AG | www.unold.de
EN
FR
NL
freeze everything for an additional 10 to 15 minutes. In the meantime place the
chocolate kiss waffles on a tray. After the freezing time elapses use a large ice
cream scoop (size 14) and place a large scoop of the ice cream mixture on each
waffle. Re-freeze the ice cream chocolate kisses for several hours in the freezer.
Tip: You can glaze the ice cream chocolate kisses with brown chocolate or white
chocolate and sprinkle with chocolate shavings.
IT
ES
PL
RECIPE IDEAS FOR GROWN-UPS
Pineapple-chocolate shake
1 can pineapple slices (approx. 125 g net weight), 65 ml coconut milk, 2 egg
whites, 25 g powdered sugar, 1 Tsp. white rum, 1/2 banana, 1/2 Tsp. lemon
juice, glacé cherries, wooden skewers, 125 ml pineapple juice, an additional
60 ml coconut milk.
Puree 3/4 of the pineapple slices with the pineapple syrup from the can and
the coconut milk (62 ml). Cut the remaining slices into small pieces, add to
the mixture, and let everything cool for one half hour. Beat the egg white and
powdered sugar and fold it into the fruit puree. In the ice cream machine let the
entire mixture freeze for approx. 40 minutes. After 25 minutes add the rum. Cut
half of the banana into slices and drizzle with lemon juice. Put the slices and
cherries on wooden skewers. Place four large scoops of ice cream in a mixing
bowl. Keep the rest in the freezer. Add the pineapple juice, the coconut milk,
and the rest of the banana to the scoops of ice cream and puree it all. Distribute
the mixed beverage in the four glasses and decorate with the skewers.
Campari-orange sorbet
35 ml Campari, 200 ml orange juice, 75 g powdered sugar, 1 egg white
Pour the Campari with 180 ml orange juice and 30 g powdered sugar into a high
mixing bowl and stir until the sugar is dissolved. Put the entire mixture in the
refrigerator for two hours.
After the cooling time has elapsed, beat the egg whites with the rest of the
powdered sugar and remaining orange juice until it is foamy. Stir the egg white
mixture together with the orange-Campari mixture. Pour the ice cream mixture
into the running ice cream machine and let it freeze for 30 to 40 minutes.
Tip: Due to its alcohol content, the Campari-orange sorbet is quite soft, so that
you can portion it directly from the freezing device.
This sorbet tastes very good when you put it into tall glasses with an icing bag,
and top it off with fresh squeezed orange juice.
34 von 106
Stand 25.10.2024
Page 35
GUARANTEE CONDITIONS
Copyright UNOLD AG | www.unold.de
DE
We grant a warranty of 24 months for this UNOLD brand appliance - 12 months for commercial use - from the
date of purchase, covering damage that is demonstrably due to factory defects when used as intended. Within
the warranty period, we will remedy material and manufacturing defects at our discretion by repair or exchange.
Our warranty services apply exclusively to appliances sold in Germany and Austria. For other countries, please
contact the responsible importer. Please send appliances for which you seek removal of defects, together with
a copy of the machine-generated proof of purchase that shows the date of purchase along with a description of
the fault, to our customer service department using suitable packaging. On our website https://unold.de/pages/
rucksendungen, you can print out a return slip (only for return shipments from Germany and Austria). All types of
damage attributable to wear and tear, improper handling and non-compliance with the maintenance and care
instructions are excluded from the warranty. The warranty claim is void if repairs or interventions on the appliance are carried out by a third party. This manufacturer’s warranty does not limit your statutory rights or your
claims against the seller or dealer under the purchase contract in accordance with the provisions of the German
Civil Code (BGB). Your statutory rights as a consumer, in particular your rights to warranty and the statutory
claims for defects in accordance with Sections 437 et seqq. BGB, remain unaffected.
UNOLD AG, Mannheimer Straße 4, D-68766 Hockenheim
WASTE DISPOSAL / ENVIRONMENTAL PROTECTION
Our appliances are produced on a highquality level for a long lifetime. Regular maintenance
and expert repairs by our after-sales service can extend the useful life of the appliance. If an
appliance is defective and repair is not possible, we ask you to follow the following instructions
for disposal. Do not dispose this appliance together with your standard household waste. There
is a legal requirement to dispose of waste electrical and electronic equipment (WEEE) as well
as batteries and accumulators separately from household waste. You can recognise this waste
equipment by the crossed-out wheeled bin symbol (WEEE symbol). Please bring this product to an approved
collection point for recycling of electric and electronic products. By separate collection and disposal of waste
products you help to protect natural resources and ensure, that the product is disposed in an adequate way to
protect health and environment.
EN
FR
NL
IT
ES
PL
The instruction booklet is also available for download: www.unold.de
The authors have thoroughly considered and tested the recipes included in these operating
instructions. Nevertheless, a guarantee cannot be accepted. The authors, respectively UNOLD AG
and their assignees shall not be liable for personal injuries, material damages and financial loss.
Stand 25.10.2024
35 von 106
Page 36
DE
Copyright UNOLD AG | www.unold.de
NOTICE D´UTILISATION MODÈLE 48855
EN
FR
NL
IT
ES
PL
SPÉCIFICATION TECHNIQUE
Puissance : 12 W, 220-240 V~, 50 Hz
Contenance : env. 1 500 ml
Dimensions : env. 21,9 x 21,9 x 25,5 cm (l/p/h)
réservoir réfrigérant env. 19,1 x 19,1 x 14,5 cm
Poids: env. 3,25 kg
Câble d’alimentation : env. 120 cm
Réfrigérant: Carboxyméthylcellulose, urée, eau
Équipement : Contenance 1,5 litre, réservoir réfrigérant amovible, coque en plastique et
acier inoxydable de haute qualité, couvercle avec orifice de remplissage,
écran avec minuterie et boutons de commande tactiles, moteur tournant
à droite ou à gauche, Indice de protection II
Accessoires: Notice d‘utilisation avec recettes
Modifications et erreurs des caractéristiques de l‘équipement, de la technique, des couleurs et du
design réservées.
EXPLICATION DES SYMBOLES
Ce symbole vous indique des risques possibles qui puissent entraîner des lésions ou des
endommagements de l’appareil.
POUR VOTRE SÉCURITÉ
Veuillez lire les indications suivantes et les conserver.
Personnes dans le foyer
1. Cet appareil peut être utilisé par des enfants de plus de 8 ans
et par des personnes dont les capacités physiques, sensorielles
ou intellectuelles sont limitées ou dont l‘expérience et/ou les
connaissances sont insuffisantes, si ceux-ci sont surveillés ou
s‘ils ont été formés à une utilisation sûre de l‘appareil et aux
dangers pouvant en résulter.
2. Les enfants ne doivent pas jouer avec l‘appareil.
3. Le nettoyage et la maintenance incombant à l‘utilisateur ne
doivent pas être effectués par des enfants, à moins qu‘ils soient
âgés de plus de 8 ans et qu‘ils soient surveillés.
4. Conserver l‘appareil ainsi que le câble hors de portée des enfants
de moins de 8 ans.
36 von 106
Stand 25.10.2024
Page 37

Remarques concernant la santé
Copyright UNOLD AG | www.unold.de
5. Consommer immédiatement la glace dégelée ou décongelée, et
ne pas la recongeler.
6. Ne consommer la glace que si elle est encore fraîche. Recongeler
immédiatement les restes éventuels et les consommer dans un
délai d‘une semaine.
7. Utiliser uniquement des ingrédients frais.
8. Lors de l‘utilisation d‘œufs notamment, veiller à ce qu‘ils soient
aussi frais que possibles afin d‘éviter la formation de germes.
Ne pas recongeler les restes de glace qui contiennent des œufs.
9. Les crèmes glacées élaborées à partir d‘œufs crus ou seulement
partiellement cuits ne doivent pas être consommées par des
enfants en bas âge, des femmes enceintes, des personnes âgées
ou des personnes atteintes d‘affections aigües ou chroniques.
10. Nettoyer l‘appareil immédiatement après avoir terminé la
préparation de la glace. Dans le cas contraire, des germes
peuvent se former.
11. Si du liquide frigorifique s‘écoule du réservoir réfrigérant, le
réservoir doit être remplacé.
12. Le liquide de refroidissement contenu dans le réservoir réfrigérant
n’est pas un produit consommable. Si un liquide sort du réservoir
réfrigérant, n’utilisez plus le réservoir. En cas de contact par
inadvertance, prendre les mesures suivantes : Laver les vêtement
souillés, laver immédiatement et minutieusement la peau avec
de l’eau et du savon, rincer la bouche en cas d’ingestion par
inadvertance et ne pas provoquer de vomissement - Consultez
immédiatement un médecin !
Sécurité électrique
13. Raccorder exclusivement l’appareil au courant alternatif
conformément à la plaque signalétique.
14. Cet appareil ne doit pas être utilisé avec un minuteur externe ou
un système de commande à distance.
15. Après utilisation, avant le nettoyage ou en cas d‘éventuels
dysfonctionnements durant le fonctionnement, veuillez toujours
débrancher la prise.
16. Ne jamais immerger l‘appareil dans l‘eau ou un autre fluide et
protéger le cordon d‘alimentation de l‘humidité.
Stand 25.10.2024
37 von 106
DE
EN
FR
NL
IT
ES
PL
Page 38

DE
Copyright UNOLD AG | www.unold.de
EN
FR
NL
IT
ES
PL
17. Dérouler intégralement le cordon avant utilisation.
18. Ne jamais enrouler le câble autour de l’appareil et éviter tout pli
du cordon afin de ne pas l’endommager.
19. Utiliser l‘appareil à l‘intérieur uniquement.
20. Débrancher l‘appareil en tirant sur la prise uniquement ; Ne tirer
en aucun cas sur le câble d‘alimentation.
21. Afin d‘éviter d‘endommager le cordon, ne jamais porter l‘appareil
par son câble d‘alimentation ou tirer sur le câble.
22. Débrancher la prise avant de démonter et de nettoyer l‘appareil,
de retirer ou de monter des pièces détachées, ou si l‘appareil
doit être installé à un autre endroit.
23. Vérifier régulièrement que la prise mâle et le cordon d‘alimentation
ne sont pas usés ni abîmés. Si le câble de raccordement ou
d’autres pièces sont abîmés, envoyer l’appareil pour contrôle
et réparation à notre service après-vente. Toute réparation
irrégulière peut provoquer des dangers pour l’utilisateur et
entraîner l’extinction de la garantie.
Remarques relatives à l‘installation et au fonctionnement sécurisé de
l‘appareil
24. L‘appareil, ainsi que les pièces détachées, ne sont pas lavables
en machine.
25. Poser l’appareil sur une surface plane et dégagée.
26. L‘appareil est exclusivement destiné à un usage ménager ou à
des fins similaires, par ex.
une kitchenette dans des boutiques, des bureaux ou d‘autres
lieux de travail,
des exploitations agricoles,
à l‘usage des clients dans des hôtels, motels ou autres lieux
d‘hébergement,
dans des pensions privées ou des résidences de vacances.
27. Pour des raisons de sécurité, ne jamais placer ou utiliser
l‘appareil et le cordon sur ou à proximité de surfaces chaudes.
28. Le câble ne doit jamais pendre par dessus le bord du plan de
travail.
29. Ne pas toucher la partie intérieure du réservoir réfrigérant à
mains nues ou avec d‘autres parties du corps (notamment si
celles-ci sont mouillées) afin d‘éviter des blessures / gelures.
38 von 106
Stand 25.10.2024
Page 39
30. La quantité de remplissage maximale ne doit pas être dépassée.
Copyright UNOLD AG | www.unold.de
Le réservoir réfrigérant doit être rempli jusqu‘à 5 cm maximum
sous le bord supérieur car la glace se dilate durant la congélation.
31. L’appareil doit être totalement assemblé et être allumé avant que
vous n‘y placiez les ingrédients souhaités. Ne jamais introduire
les ingrédients nécessaires à l‘avance dans le réservoir réfrigérant
car ils pourraient geler sur le bord du réservoir. Cela pourrait
altérer la qualité du résultat obtenu.
32. Ne déplacez pas l‘appareil lorsqu‘il est en fonctionnement.
33. Ne laissez jamais l‘appareil sans surveillance lorsqu‘il est en
fonctionnement.
34. N‘utilisez jamais l‘appareil sans réservoir réfrigérant !
35. Ne placez aucun objet dans l‘appareil et n‘intervenez pas avec
les mains lorsqu‘il est en fonctionnement. Risque de blessures !
36. Utiliser l‘appareil uniquement après un assemblage correct.
37. Ne jamais faire fonctionner l‘appareil avec les accessoires
d‘autres appareils.
38. Ne pas utiliser d‘objets pointus ou contondants dans le réservoir
réfrigérant. Cela pourrait le rayer. En cas de besoin, utiliser une
spatule en plastique ou en bois.
39. Éteindre l‘appareil et débrancher la prise lorsque la préparation
de la glace est terminée, si vous voulez nettoyer l‘appareil ou si
vous devez éliminer un dysfonctionnement sur l‘appareil.
40. ATTENTION : ne remplir le réservoir qu‘avec des aliments.
DE
EN
FR
NL
IT
ES
PL
Ne pas intervenir sur l’appareil en fonctionnement : risque
de blessures ! Ne pas toucher la face intérieure du réservoir
réfrigérant à mains nues !
N’ouvrir en aucun cas le moteur de l’appareil. Risque
d’électrocution.
Attention : ne jamais toucher le réservoir réfrigérant avec
des parties du corps humides, comme par ex. vos doigts, afin
d’éviter des blessures / gelures.
Le fabricant n’est nullement responsable en cas de montage non conforme, d‘utilisation irrégulière ou non
conforme ou suite à l’exécution de réparations par des tiers non autorisés.
Stand 25.10.2024
39 von 106
Page 40
DE
Copyright UNOLD AG | www.unold.de
EN
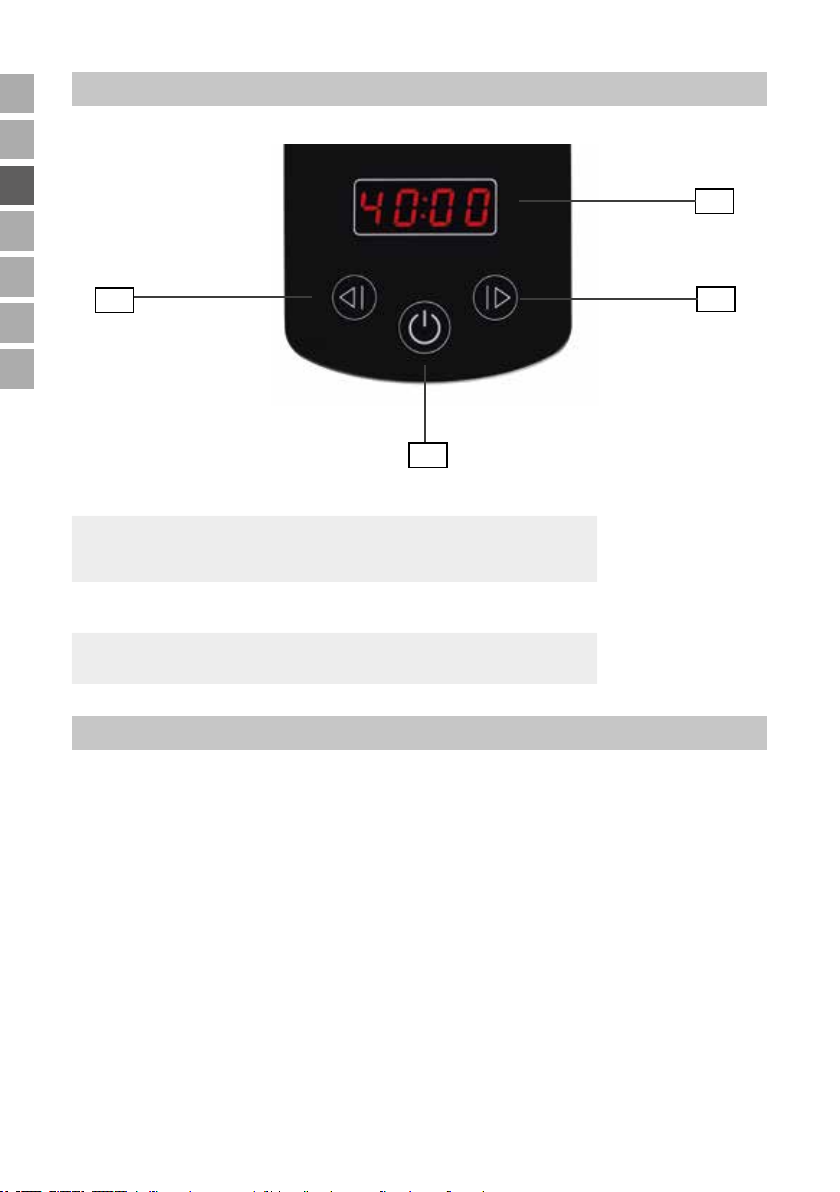
BOUTONS DE COMMANDE
FR
NL
IT
ES
PL
4
2
1
Écran d’affichage de la durée de fonctionnement
Touche MARCHE / ARRÊT
2
pour allumer ou éteindre l’appareil.
Touche +
3
pour augmenter la durée
Touche -
4
pour réduire la durée
AVANT LA PREMIÈRE UTILISATION
1
3
1. Retirez tous les matériaux d’emballage et les éventuelles protections de
transport et étiquettes (mais pas la plaque signalétique ou le numéro de
série !). Mettez les matériaux d’emballage hors de portée des enfants Risque d’étouffement ! Jetez le matériau d’emballage conformément aux
directives locales applicables.
2. Vérifiez que l’appareil n’est pas abîmé. Ne mettez pas l’appareil en service
s’il est visiblement abîmé et contactez notre service client.
3. Nettoyez toutes les pièces à l’aide d’un chiffon humide, conformément aux
indications du chapitre « Nettoyage et Entretien ».
4. Posez l‘appareil sur une surface de travail plane et sèche.
40 von 106
Stand 25.10.2024
Page 41
AVANT DE PRÉPARER LA GLACE
Copyright UNOLD AG | www.unold.de
DE
1. Avant de pouvoir faire de la glace, vous devez placer le réservoir réfrigérant
rempli de liquide réfrigérant pendant au moins 8 heures dans le compartiment
de congélation*** du réfrigérateur ou dans le congélateur. La température
doit être de -18 °C au minimum. Veillez à nettoyer au préalable l‘intérieur
du réservoir et à le sécher ensuite intégralement.
2. Mettez le réservoir réfrigérant droit avec l’ouverture vers le haut dans le
compartiment de congélation.
3. Selon la température du congélateur, l‘opération de congélation dure
entre 8 et 22 heures. En secouant le réservoir, vous pouvez déterminer si
l‘intégralité du fluide réfrigérant est congelé.
4. Astuce : Lorsque vous n‘utilisez pas la machine à glace, conservez le réservoir
réfrigérant, par exemple, dans un sac en plastique dans votre congélateur.
Ainsi, le réservoir est toujours prêt à l‘emploi.
5. Si vous souhaitez fabriquer plusieurs variétés de glaces les unes après les
autres, nous vous conseillons d’acheter d‘autres réservoirs réfrigérants. Vous
pouvez nous contacter directement pour les acheter à l’aide du formulaire
de commande page 107.
EN
FR
NL
IT
ES
PL
Stand 25.10.2024
41 von 106
Page 42
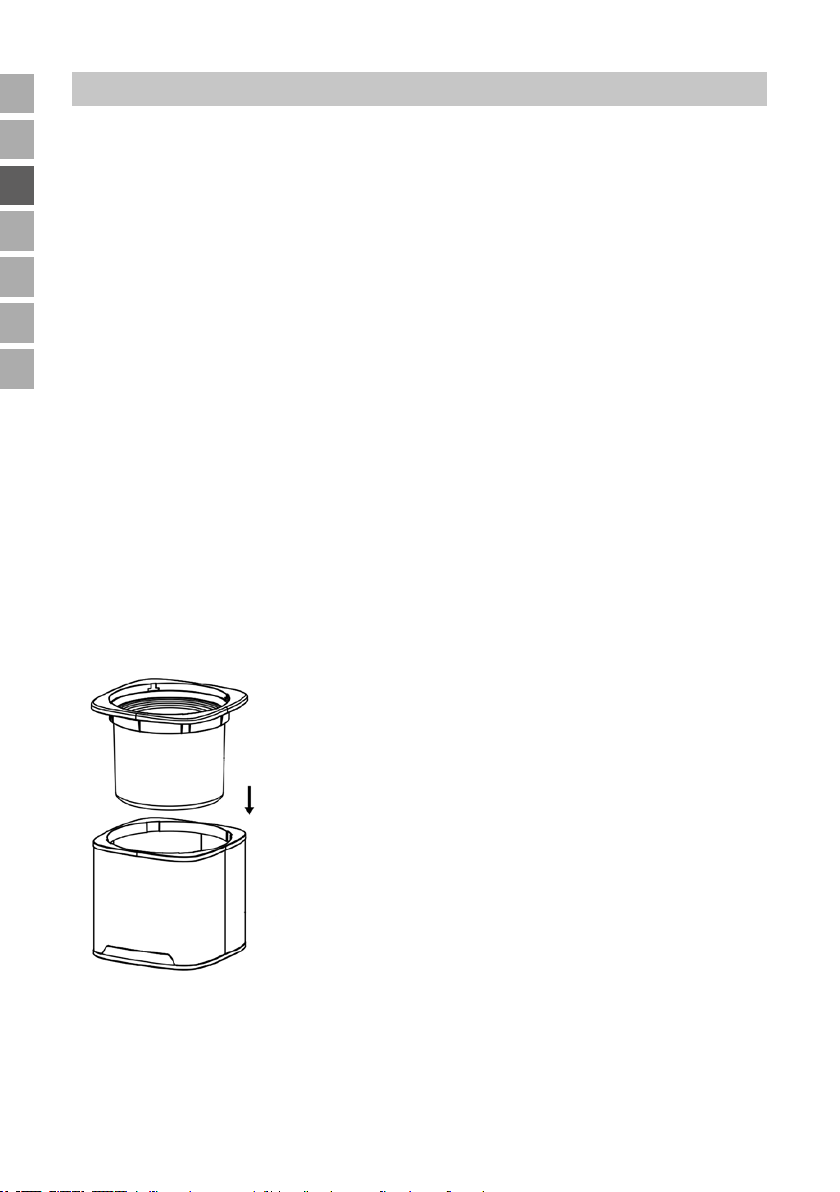
DE
Copyright UNOLD AG | www.unold.de
FABRIQUER DE LA GLACE
EN
FR
NL
IT
ES
PL
Il est préférable de pré-réfrigérer les ingrédients que vous souhaitez utiliser dans
le réfrigérateur pendant quelques heures avant la préparation ! Si votre recette
de glace contient de l‘alcool, ne l‘ajoutez à la glace que lorsque celle-ci a déjà
la consistance souhaitée. La contenance maximale du réservoir réfrigérant est
de 1 100 ml.
Astuce : Si votre recette de glace contient de l‘alcool, veuillez le doser avec
parcimonie et ne l‘ajoutez qu‘à l‘issue de la durée de congélation, car l‘alcool
freine la congélation.
1. Préparez la glace en suivant les recettes fournies dans la partie Recettes.
S‘il s‘agit de préparations de glaces qui doivent être cuites au préalable,
procédez à cette opération la veille afin que la préparation puisse refroidir
correctement.
2. D’une manière générale, nous vous conseillons de laisser refroidir la
préparation de glace dans le réfrigérateur avant de la mettre dans la machine
à glace.
3. Retirez le réservoir réfrigérant du compartiment de congélation.
4. Positionnez le réservoir réfrigérant dans son support.
5. Placez ensuite le support du réservoir réfrigérant avec le réservoir dans le
boîtier de l’appareil.
6. Branchez éventuellement l‘axe sur le mélangeur. Veillez à relier correctement
les deux éléments : le côté de l‘axe avec les deux petits bras doit être
enfoncé dans le sens du mélangeur.
7. Fixez le moteur au couvercle et replacez les deux éléments délicatement
sur l‘appareil.
42 von 106
Stand 25.10.2024
Page 43
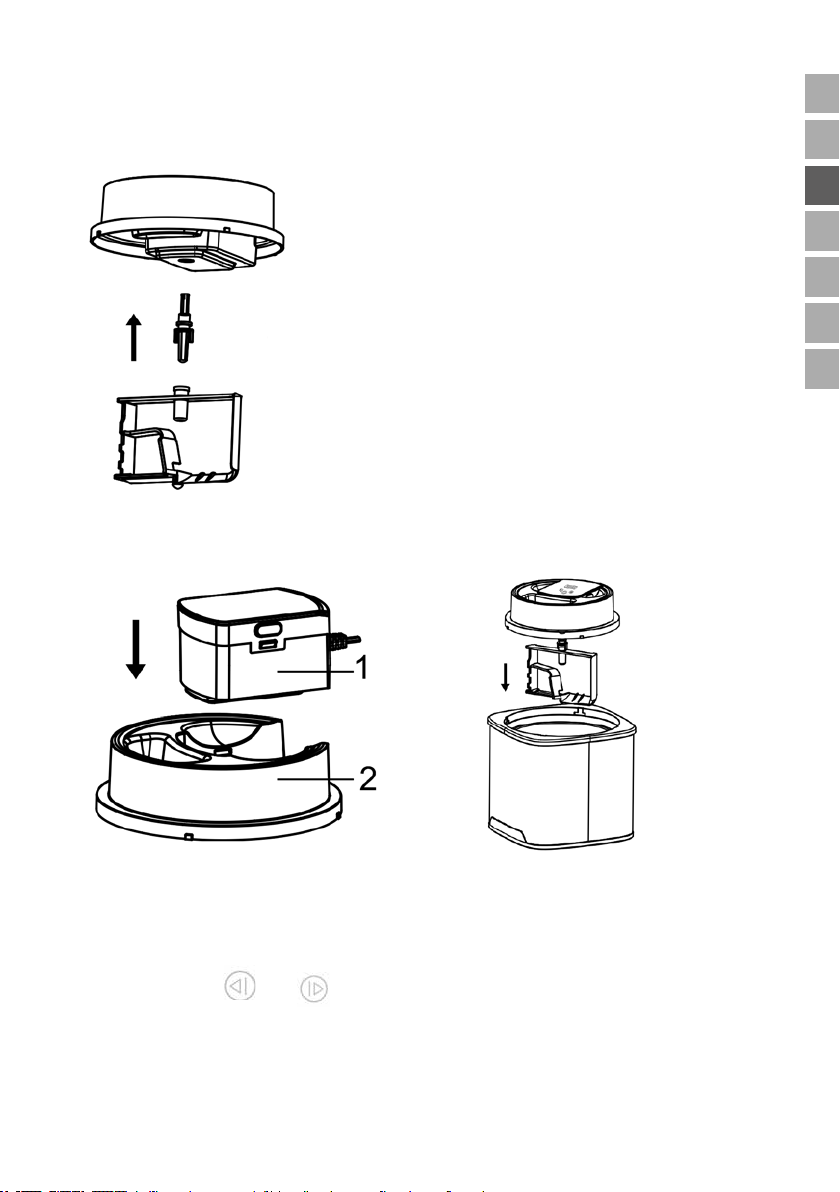
8. Insérez l‘axe dans l’ouverture sur la face inférieure du moteur.
Copyright UNOLD AG | www.unold.de
9. Le moteur ne peut être fixé correctement sur le couvercle que dans un seul
sens (voir fig.).
10. Tournez le couvercle dans le sens contraire des aiguilles d’une montre
jusqu‘à ce qu’il s’enclenche fermement.
DE
EN
FR
NL
IT
ES
PL
11. Branchez la prise mâle dans une prise de courant murale. L‘appareil est en
mode veille.
12. Allumez l‘appareil à l’aide de la touche MARCHE/ARRÊT. L’écran affiche
40:00.
13. Les touches et permettent de régler la durée de fonctionnement
souhaitée entre 5 et 45 minutes par étapes de 5 minutes. La durée choisie
s’affiche à l’écran. Le compte à rebours s’écoule.
14. Remarque : Si vous n’appuyez sur aucune touche pendant 2 secondes, le
moteur du mélangeur démarre.
Stand 25.10.2024
43 von 106
Page 44

DE
Copyright UNOLD AG | www.unold.de
EN
FR
NL
IT
ES
PL
15. Ensuite, ouvrez l‘orifice sur la cheminée de remplissage et remplissez
l‘appareil avec la préparation de glace par la cheminée. Ne mettez surtout
pas la préparation de glace dans l’appareil lorsqu’il est éteint. La préparation
de glace gèlerait aussitôt sur le bord du réservoir réfrigérant.
16. Étant donné que le volume augmente au cours de la congélation, veillez à ne
pas remplir le réservoir jusqu‘au bord et à conserver un espace de 5 à 7 cm.
17. Laissez la machine à glace tourner jusqu‘à ce que la glace ait la consistance
souhaitée. Si nécessaire, vous pouvez réduire ou augmenter la durée de
fonctionnement choisie. Selon les ingrédients, cette durée est de 20 à
40 minutes. Vérifier la prise de la glace de temps à autre et arrêtez l‘appareil
si le mélangeur est immobile.
18. Si la glace devient trop ferme, le sens de rotation du mélangeur peut
éventuellement changer pour que le moteur ne soit pas abîmé.
19. Attention : Ne pas éteindre l‘appareil pendant la préparation de glace. La
préparation de glace gèlerait sur le bord intérieur du réservoir réfrigérant.
Si le moteur surchauffe pendant la préparation, le moteur s‘arrête
automatiquement. Dans un tel cas, débranchez la prise de courant et laissez
l‘appareil refroidir. Si vous souhaitez continuer à préparer de la glace, vous
devrez peut-être utiliser de nouveaux ingrédients.
20. Si votre recette de glace contient de l‘alcool, veuillez le doser avec parcimonie
et ne l‘ajoutez qu‘à l‘issue de la durée de congélation, car l‘alcool freine la
congélation.
21. Éteignez l‘appareil avec la touche MARCHE/ARRÊT.
22. Retirez le couvercle en le tournant vers le haut.
23. Retirez de l‘appareil le support du réservoir réfrigérant avec le réservoir.
24. Idéalement, éliminez la glace avec une spatule en plastique ou en bois afin
de ne pas rayer le réservoir.
25. La glace alimentaire doit avoir une consistance molle. Cependant, si vous
préférez une glace plus dure, laissez le réservoir plus longtemps dans le
compartiment de congélation / le congélateur.
26. Mais vous ne devez pas laisser la glace dans le réservoir plus de 30 minutes
dans le compartiment de congélation. Si vous ne souhaitez pas manger
immédiatement la glace, transvasez-la dans une boîte de congélation
fermée que vous placez dans le congélateur. Il se peut alors que la glace
présente des stries en surface du fait de la formation de cristaux de glace.
La température optimale de la glace se situe autour de -10 °C, mais la
température des congélateurs est souvent plus basse.
44 von 106
Stand 25.10.2024
Page 45
Ne pas intervenir sur l‘appareil en fonctionnement : risque
Copyright UNOLD AG | www.unold.de
de blessures ! Ne pas toucher la paroi intérieure du réservoir
réfrigérant à mains nues ! Attention : Ne jamais toucher le
réservoir réfrigérant avec les doigts humides, ou tout autre
partie du corps humide, afin d‘éviter les blessures / gelures.
NETTOYAGE ET ENTRETIEN
Après utilisation et avant le nettoyage, débranchez l‘appareil du secteur.
Ne touchez pas le réservoir réfrigérant à mains nues lorsque vous le sortez
de l‘appareil afin d‘éviter les blessures / gelures.
1. Laissez le réservoir réfrigérant se réchauffer à température ambiante avant
de le nettoyer afin d‘éviter les blessures / gelures.
2. Essuyez soigneusement l‘intérieur du réservoir réfrigérant à l’aide d’un
chiffon humide et séchez-le ensuite correctement.
3. Lavez le mélangeur avec un produit à vaisselle doux.
4. Essuyez l‘intérieur et l‘extérieur du boîtier et du couvercle à l’aide d’un
chiffon humide et un peu de produit à vaisselle, puis à l’aide d’un chiffon
humidifié à l‘eau claire. N’utilisez pas de détergents abrasifs ou agressifs.
5. Séchez minutieusement l‘appareil.
6. Ne plongez jamais le moteur avec le cordon d‘alimentation dans des liquides.
7. Le réservoir réfrigérant doit être parfaitement sec avant d‘être replacé dans
le compartiment de congélation.
8. Un nettoyage régulier prolonge nettement la durée de vie de l‘appareil.
9. Conservez l‘appareil dans un endroit sec et à l‘abri de la poussière. Astuce :
Conservez l‘emballage de l‘appareil et rangez la machine à glace dans ce
carton si vous ne l‘utilisez pas.
DE
EN
FR
NL
IT
ES
PL
CONSIGNES IMPORTANTES ET CONSEILS POUR LES RECETTES
Utiliser uniquement des fruits parfaitement mûrs.
Ajouter des morceaux de fruits et/ou des baies entières à la fin uniquement.
Si la recette prévoit l‘utilisation d‘œufs, utiliser uniquement des œufs ultra-frais.
Vous pouvez remplacer le lait par de la crème ou la crème par du lait.
Plus vous utiliserez de crème, plus votre glace sera onctueuse.
Stand 25.10.2024
45 von 106
Page 46

DE
Copyright UNOLD AG | www.unold.de
EN
FR
NL
IT
ES
PL
Vous pouvez remplacer le sucre par du miel, du sirop ou de l‘édulcorant.
Cependant, cela n‘est pas possible dans le cas de glace italienne.
Le lait peut également être remplacé par du drink de soja.
La crème glacée est encore meilleure lorsqu‘elle est consommée fraîche.
Cependant, si vous souhaitez conserver la crème glacée plus longtemps, veuillez
ajouter 30 g de base glacée à la masse de glace. La base de glace empêche une
nouvelle concentration des cristaux d‘eau au moment du stockage et donc une
consistance friable de la glace. Vous pouvez obtenir de la base glacée auprès de
Hobbybäcker-Versand - Inge Pinzer
Am Mühlholz 6 – 89287 Bellenberg (Allemagne)
Tél. 0 73 06/92 59 00 - Fax 0 73 06/92 59 05
Site Internet : www.hobbybaecker.de
Si vous souhaitez obtenir une glace plus ferme, veuillez placer la masse de glace
pendant 15 à 30 minutes dans le compartiment de congélation avant de verser
la masse dans la machine à glace. Durant la saison chaude, les températures
sont également plus élevées dans un réfrigérateur car, par ex., la porte du
réfrigérateur est ouverte et que la température ambiante est plus élevée.
La glace fondra moins rapidement si vous ajoutez un paquet de gélatine à fixer
(gélatine soluble à froid) avant la congélation.
IDÉES DE RECETTES POUR PETITS ET GRANDS
Glace à la vanille
150 ml de lait, 150 g de crème, 1/2 gousse de vanille, 1 pincée de sel, 1 jaune
d‘œuf, 40 g de sucre, 25 g de lait concentré.
Verser le lait et 50 g de crème dans une casserole et faire chauffer. Fendre la
gousse de vanille dans la longueur, gratter la pulpe avec une cuillère et l‘intégrer
avec la gousse et le sel dans le lait additionné de crème. Porter le tout à ébullition
en mélangeant, retirer immédiatement de la plaque et enlever la gousse. Fouetter
le jaune d‘œuf avec le sucre pour obtenir une texture crémeuse, puis ajouter la
préparation chaude à base de crème tout en mélangeant. Verser à nouveau la
préparation liquide dans la casserole et faire chauffer tout en remuant jusqu‘à
ce que l‘appareil épaississe légèrement. Incorporer le lait concentré, transvaser
la préparation et laisser refroidir environ une demie heure, puis réserver au
réfrigérateur pendant une heure. Fouetter la crème restante et l‘incorporer à
l‘appareil à pudding refroidi. Verser le mélange dans la machine à glace en
fonctionnement et laisser geler pendant 15 à 30 minutes.
46 von 106
Stand 25.10.2024
Page 47

Glace au chocolat
Copyright UNOLD AG | www.unold.de
100 ml de lait, 1 jaune d‘œuf, 40 g de sucre, 1/2 pincée de sucre vanillé, 50 g
de chocolat au lait, 100 g de crème, 1 cc de cacao
Faire chauffer le lait dans une casserole et porter à ébullition. Entre-temps,
fouetter le jaune d‘œuf avec le sucre vanillé pour obtenir une masse mousseuse
et ferme. Ce faisant, verser progressivement le sucre en pluie. Verser lentement
le lait chaud dans la masse à base d‘œufs, tout en remuant en permanence
avec le fouet. Verser à nouveau le lait mélangé aux œufs dans la casserole et
faire chauffer une nouvelle fois la préparation en mélangeant, jusqu‘à ce qu‘elle
épaississe légèrement. Transvaser le tout dans un saladier et laisser refroidir
pendant une demie heure environ.
Pendant ce temps, faire fondre le chocolat au bain-marie avec trois cuillérées
à soupe de crème tout en mélangeant, et incorporer immédiatement une
cuillère à café bombée de cacao jusqu‘à ce que le chocolat soit intégralement
fondu. Laisser le mélange refroidir une demie heure, puis placer à nouveau au
réfrigérateur pendant environ une heure.
Fouetter légèrement la crème restante et l‘incorporer au lait chocolaté. Verser le
tout dans la machine à glace en fonctionnement et laisser geler pendant environ
30 minutes.
Glace au yaourt
90 g de crème, env. 40 g de sucre en poudre, 175 g de yaourt du goût de votre
choix (par ex. un yaourt aux fruits ou aux noix), 1 œuf
Fouetter la crème avec le sucre en poudre pour obtenir une texture crémeuse.
Battre le yaourt avec l‘œuf et incorporer la crème. Verser l‘appareil dans la
machine à glace en fonctionnement et laisser geler pendant environ 25 minutes.
DE
EN
FR
NL
IT
ES
PL
Glace aux têtes-de-nègres
4 têtes-de-nègres, 1 à 2 c. à soupe de sucre en poudre, 175 ml de lait
Scinder délicatement les têtes-de-nègres. Pour cela, séparer les gaufrettes du
glaçage au chocolat et mettre de côté. Mettre la guimauve dans un saladier.
Verser le sucre et le lait sur la guimauve et mélanger le tout pour obtenir une
crème homogène. Verser cette crème dans la machine à glace et laisser refroidir
env. 10 minutes. Maintenant, ajouter les morceaux de chocolat à la glace et
laisser le tout refroidir 10 à 15 minutes supplémentaires. Entretemps, poser les
gaufrettes des têtes-de-nègres sur une plaque. Une fois le temps de congélation
écoulé, remplir une grosse cuillère à glace (taille 14) de la masse de glace
Stand 25.10.2024
47 von 106
Page 48

DE
Copyright UNOLD AG | www.unold.de
EN
FR
et poser une boule sur chaque gaufrette. Congeler les têtes-de-nègres glacées
quelques heures supplémentaires au congélateur.
Conseil : vous pouvez recouvrir les têtes-de-nègres glacées d‘un nappage au
chocolat marron ou blanc et parsemer de copeaux de chocolat.
NL
IT
ES
PL
IDÉES DE RECETTES POUR ADULTES
Shake ananas-coco
1 boîte d‘ananas en rondelles (poids net env. 125 g ), 65 ml de lait de coco,
2 blancs d‘œuf, 25 g de sucre en poudre, 1 cs de rhum blanc, 1/2 banane, 1/2 cs
de jus de citron, cerises de décoration, pics en bois, 125 ml de jus d‘ananas,
60 ml de lait de coco supplémentaires
Écraser les 3/4 des rondelles d‘ananas en purée avec le sirop sortant de la boîte
avec le lait de coco (62 ml). Découper les rondelles restantes en petits morceaux,
les ajouter à la préparation et laisser refroidir pendant une demie heure. Fouetter
le blanc d‘œuf avec le sucre en poudre et incorporer à la purée de fruits. Laisser
le tout congeler dans la machine à glace pendant environ 40 minutes. Ajouter
le rhum au bout de 25 minutes. Découper la moitié de la banane en rondelles
et les arroser du jus de citron. Enfiler les rondelles de banane et les cerises sur
des pics en bois.
Placer quatre grosses boules de glace dans un saladier. Conserver le reste au
congélateur. Verser le jus d‘ananas, le lait de coco et le reste de la banane dans
le saladier contenant les boules de glace et écraser le tout en purée. Répartir la
boisson dans des verres et décorer avec les pics.
Sorbet Campari-orange
35 ml de Campari, 200 ml de jus d‘orange, 75 g de sucre en poudre, 1 blanc
d‘œuf
Verser le Campari avec 180 ml de jus d‘orange et 30 g de sucre en poudre dans
un bol haut et mélanger jusqu‘à dissolution complète du sucre. Placer le tout
pendant deux heures au réfrigérateur. Une fois le temps de réfrigération écoulé,
fouetter le blanc d‘œuf en mousse avec le reste de sucre en poudre et le jus
d‘orange restant. Incorporer cet appareil au mélange orange-Campari. Verser le
mélange à base d‘œufs dans la machine à glace en fonctionnement et laisser
geler pendant 30 à 40 minutes. Conseil : du fait de sa teneur en alcool, le sorbet
Campari-orange est assez mou, de telle sorte qu‘il peut être divisé en portions
dès sa sortie du congélateur. Ce sorbet est excellent versé dans des verres hauts
à l‘aide d‘une poche à douille et arrosé de jus d‘orange fraîchement pressé.
48 von 106
Stand 25.10.2024
Page 49
Les recettes figurant dans la présente notice ont été soigneusement étudiées et testées par leurs
Copyright UNOLD AG | www.unold.de
auteurs et par UNOLD AG, mais elles ne sont pas garanties. Toute responsabilité des auteurs ainsi
que d’UNOLD AG et ses représentants est exclue pour tous dommages corporels, matériels et
pécuniaires.
DE
EN
FR
CONDITIONS DE GARANTIE
Nous appliquons une garantie de 24 mois sur cet appareil de la marque UNOLD - 12 mois en cas d’usage professionnel
- à compter de la date d’achat pour les dommages dus à un défaut de fabrication, si la preuve en est apportée et si
l’appareil a été utilisé correctement. Pendant la période de garantie, nous apportons gratuitement une solution aux défauts de
matériaux et de fabrication par réparation ou remplacement. Notre garantie s’applique exclusivement aux appareils vendus
en Allemagne et en Autriche. Pour les autres pays, veuillez contacter l’importateur concerné. Vous devez envoyer à notre
service clients les appareils pour lesquels vous sollicitez une garantie pour défaut, après les avoir correctement emballés,
en joignant une copie du justificatif d’achat imprimé, qui doit indiquer lisiblement la date d’achat, ainsi qu’un descriptif
du ou des défauts. Vous pouvez imprimer un bon de retour sur notre site Internet https://unold.de/pages/ruckversanden
(uniquement pour les envois depuis l’Allemagne et l’Autriche). Sont exclus de la garantie les dommages causés par l’usure,
une mauvaise manipulation et le non-respect des instructions d’entretien et de maintenance. Le droit à la garantie s’annule
si des réparations ou des interventions sont effectuées sur l’appareil par un tiers. Cette garantie du fabricant ne limite pas
vos droits légaux ni vos droits vis-à-vis du vendeur ou du distributeur dans le cadre du contrat d’achat conformément aux
dispositions du Code civil allemand (BGB). Vos droits légaux en tant que consommateur restent inchangés, notamment vos
droits à la garantie légale de conformité et contre les vices cachés conformément aux articles 437 et suivants du Code de la
consommation allemand (BGB).
UNOLD AG, Mannheimer Straße 4, D-68766 Hockenheim
TRAITEMENT DES DÉCHETS / PROTECTION DE L’ENVIRONNEMENT
Nos appareils sont produits selon un standard élevé de qualité pour une longue durée d’utilisation. Un
entretien régulier et des réparations compétentes par notre service après-vente prolongent cette durée
d’utilisation. Si néanmoins l’appareil est endommagé et ne peut plus être réparé, veuillez suivre les
instructions suivantes. Ne jamais disposer ce produit avec les dégâts de ménage. Il existe une obligation
légale d’éliminer les déchets d’équipements électriques et électroniques (DEEE) ainsi que les piles et les
accumulateurs séparément des déchets ménagers. Vous reconnaissez ces appareils usagés grâce au
symbole de la poubelle barrée (symbole DEEE) ci-contre. Apportez ce produit à une station de collection pour
récupération de produits électriques et électroniques. Par la collection séparée vous aidez à protéger les
ressources naturelles et prenez soin, que le produit est démonté sans risque pour la santé et l’environnement.
NL
IT
ES
PL
Stand 25.10.2024
49 von 106
Page 50
DE
Copyright UNOLD AG | www.unold.de
GEBRUIKSAANWIJZING MODEL 48855
EN
FR
NL
IT
ES
PL
TECHNISCHE GEGEVENS
Vermogen: 12 W, 220–240 V~, 50 Hz
Capaciteit: ca. 1500 ml
Afmeting: ca. 21,9 x 21,9 x 25,5 cm (bxdxh)
koelbak ca. 19,1x 19,1 x 14,5 cm
Gewicht: ca. 3,2 kg
Voedingskabel: ca. 120 cm
Koelmiddel: Carboxymethylcellulose, ureum, water
Uitvoering: Inhoud 1,5 liter, uitneembare koelbak, behuizing van hoogwaardig rvs
en kunststof, deksel met vulopening, display met timer en touch control-
bedieningspaneel, motor met rechts-/linksloop, beschermklasse II
Toebehoren: Gebruiksaanwijzing met recepten
Wijzigingen en vergissingen in de uitrustingskenmerken, techniek, kleuren en design voorbehouden.
VERKLARING VAN DE SYMBOLEN
Dit symbool wijst op eventuele gevaren die letsel tot gevolg kunnen hebben of tot schade
aan het apparaat leiden.
VOOR UW VEILIGHEID
Lees de volgende aanwijzingen door en bewaar deze goed.
Personen in het huishouden
1. Dit apparaat kan door kinderen vanaf 8 jaar worden gebruikt
en door personen die over gebrekkige fysieke, sensorische of
geestelijke vaardigheden of gebrek aan ervaring en/of kennis
beschikken, mits zij onder toezicht staan of instructies hebben
gekregen aangaande het veilige gebruik van dit apparaat en de
hieruit resulterende gevaren begrepen hebben.
2. Kinderen mogen niet met het apparaat spelen.
3. Reiniging en onderhoud door de gebruiker mogen niet door
kinderen worden uitgevoerd, tenzij deze ouder dan 8 jaar zijn en
onder toezicht staan.
4. Berg het apparaat en de kabel op buiten bereik van kinderen
onder de 8 jaar.
50 von 106
Stand 25.10.2024
Page 51

Aanwijzingen m.b.t. de gezondheid
Copyright UNOLD AG | www.unold.de
5. Ontdooid of ontdooiend ijs onmiddellijk gebruiken en niet
opnieuw invriezen.
6. Eet het ijs uitsluitend, zolang het nog vers is. Vries eventuele
resten onmiddellijk in en consumeer deze binnen een week.
7. Gebruik uitsluitend verse ingrediënten.
8. Let er vooral bij het gebruik van eieren op dat deze zo vers
mogelijk zijn om kiemvorming te voorkomen. Vries ijsresten die
ei bevatten niet opnieuw in.
9. IJs dat gemaakt is van rauw ei of slechts deels verhit ei, dient
niet geconsumeerd te worden door kleine kinderen, zwangeren,
oudere mensen of chronisch c.q. acuut zieke mensen.
10. Reinig het apparaat onmiddellijk als u de ijsbereiding beëindigd
hebt. Anders kunnen kiemen worden gevormd.
11. Als koelvloeistof uit de koelbak komt, moet de koelbak vervangen
worden.
12. De in de koelbak aanwezige koelvloeistof is niet geschikt voor
consumptie. Als vloeistof uit de koelbak lekt, gebruik de bak
dan niet meer. Neem bij abusievelijk contact de volgende
maatregelen: Verontreinigde kleding wassen, huid direct grondig
met water en zeep reinigen, bij per ongeluk inslikken de mond
spoelen en geen braken veroorzaken – raadpleeg onmiddellijk
een arts!
DE
EN
FR
NL
IT
ES
PL
Elektrische veiligheid
13. Sluit het apparaat uitsluitend op wisselstroom conform het
typeplaatje aan.
14. Dit apparaat mag niet worden gebruikt met een externe
schakelklok of een afstandsbedieningssysteem.
15. Trek na gebruik, vóór de reiniging of bij eventuele storingen
tijdens het bedrijf altijd de stekker uit het stopcontact.
16. Dompel het apparaat nooit in water of in een andere vloeistof en
bescherm de voedingskabel tegen vocht.
17. Wikkel de voedingskabel vóór gebruik helemaal af.
18. Wikkel de voedingskabel niet om het apparaat en buig de kabel
niet om schade aan de kabel te voorkomen.
19. Gebruik het apparaat uitsluitend binnen.
Stand 25.10.2024
51 von 106
Page 52

DE
Copyright UNOLD AG | www.unold.de
EN
FR
NL
IT
ES
PL
20. Trek de voedingskabel alleen aan de stekker uit het stopcontact.
Trek nooit aan de voedingskabel zelf.
21. Draag het apparaat nooit aan de voedingskabel of trek niet aan
de kabel om schade aan de voedingskabel te voorkomen.
22. Trek de stekker uit het stopcontact voordat u het apparaat
demonteert en reinigt, losse onderdelen wegneemt of aanbrengt
of als het apparaat op een andere plaats moet worden gezet.
23. Controleer de stekker en de voedingskabel regelmatig op slijtage
of beschadiging. Stuur bij beschadiging van de voedingskabel of
van andere onderdelen het apparaat voor controle en reparatie
naar onze klantenservice. Ondeskundige reparaties kunnen
leiden tot gevaren voor de gebruiker en hebben uitsluiting van
de garantie tot gevolg.
Aanwijzingen om het apparaat veilig op te stellen en te gebruiken
24. Het apparaat en de losse onderdelen zijn niet geschikt voor de
vaatwasser.
25. Zet het apparaat op een vrij en vlak oppervlak.
26. Het apparaat is uitsluitend bestemd voor huishoudelijk gebruik
of voor soortgelijke doeleinden, bv.
theekeukens in bedrijven, kantoren of overige werklocaties,
landbouwbedrijven,
voor gebruik door gasten in hotels, motels of andere
logiesbedrijven,
in particuliere pensions of vakantiehuizen.
27. Zet of gebruik het apparaat en de voedingskabel om
veiligheidsredenen nooit op of in de buurt van hete oppervlakken.
28. De kabel mag niet over de rand van het werkblad omlaag hangen.
29. Raak de binnenkant van de koelbak niet aan met blote handen
of andere lichaamsdelen (met name als deze nat zijn) om letsel/
bevriezing te voorkomen.
30. De maximale vulhoeveelheid mag niet overschreden worden. De
koelbak dient tot maximaal 5 cm onder de bovenrand gevuld te
zijn, omdat het ijs door het vriesproces uitzet.
31. Het apparaat moet volledig gemonteerd en ingeschakeld
zijn voordat u het vult met de gewenste ingrediënten. Doe de
benodigde ingrediënten nooit van tevoren in de koelbak, omdat
52 von 106
Stand 25.10.2024
Page 53
de ingrediënten aan de rand van de bak kunnen vastvriezen.
Copyright UNOLD AG | www.unold.de
Hierdoor kan het gewenste resultaat worden geschaad.
32. Beweeg het apparaat niet zolang het in bedrijf is.
33. Laat het apparaat nooit zonder toezicht als het in bedrijf is.
34. Gebruik het apparaat nooit zonder koelbakken!
35. Houd als het apparaat is ingeschakeld geen voorwerpen in het
apparaat en steek uw hand niet in de bak. Er bestaat kans op
letsel!
36. Gebruik het apparaat uitsluitend als het op de juiste wijze in
elkaar is gezet.
37. Gebruik het apparaat nooit met accessoires van andere apparaten.
38. Gebruik geen spitse of scherpe voorwerpen in de koelbak. Anders
kunnen er hierin krassen ontstaan. Gebruik zo nodig schrapers
van kunststof of hout.
39. Schakel het apparaat uit en trek de stekker uit het stopcontact
als de ijsbereiding beëindigd is, als u het apparaat wilt reinigen
of als u een storing bij het apparaat moet verhelpen.
40. LET OP: doe uitsluitend levensmiddelen in de bak.
Steek uw hand niet in het lopende apparaat - er bestaat dan
kans op letsel! Raak de binnenkant van de koelbak niet aan met
uw blote handen!
Open nooit de motor van het apparaat. Er bestaat kans op een
elektrische schok.
Let op: Raak de koelbak nooit aan met natte lichaamsdelen,
zoals bv. uw vingers om letsel/bevriezing te voorkomen.
DE
EN
FR
NL
IT
ES
PL
De fabrikant is niet aansprakelijk, indien het apparaat verkeerd gemonteerd, ondeskundig of foutief
gebruikt of door niet geautoriseerde derden gerepareerd werd.
Stand 25.10.2024
53 von 106
Page 54
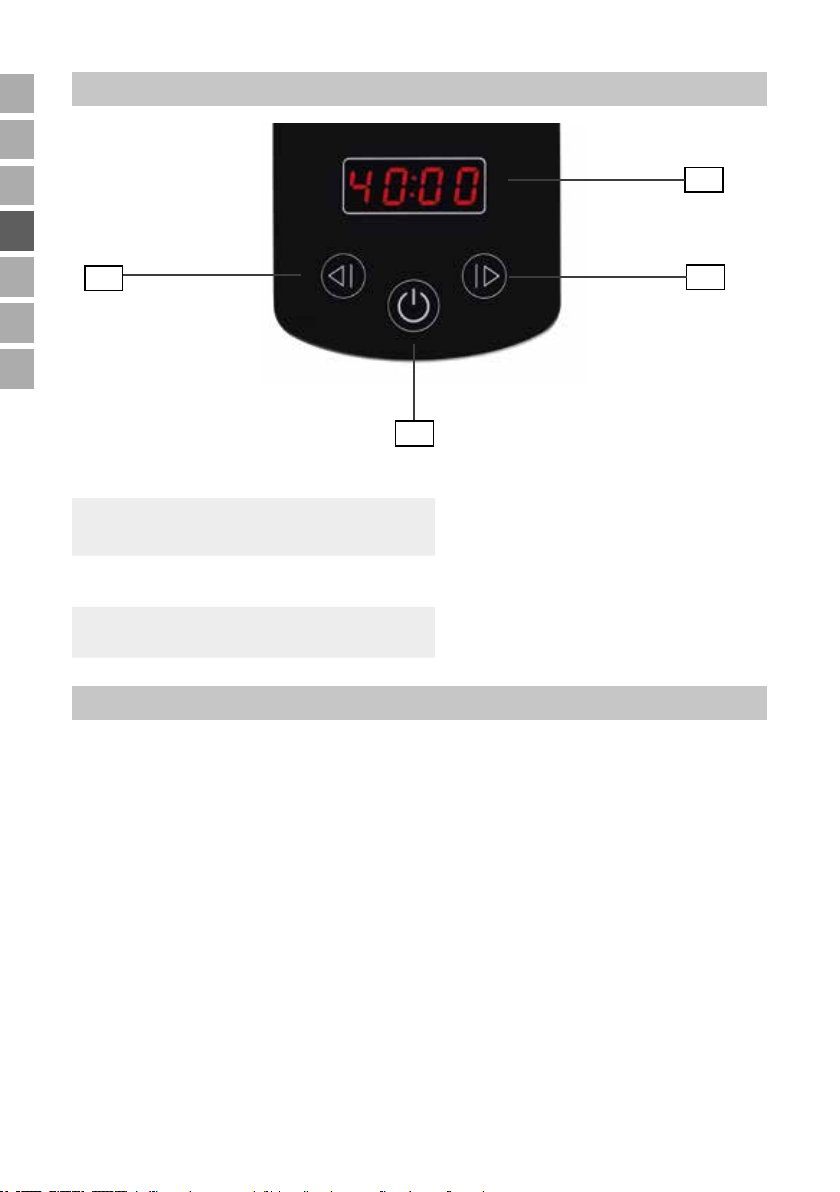
DE
Copyright UNOLD AG | www.unold.de
EN
BEDIENINGSPANEEL
FR
NL
IT
ES
PL
1
4
1
Display met looptijdaanduiding
2
AAN/UIT-knop
2
3
schakelt het apparaat in of uit.
3
Knop +
looptijd verlengen
4
Knop -
looptijd verkorten
VÓÓR HET EERSTE GEBRUIK
1. Verwijder alle verpakkingsmaterialen en evt. transportbeveiligingen en stickers (niet het typeplaatje of het serienummer!). Houd het verpakkingsmateriaal uit de buurt van kinderen i.v.m. kans op verstikking! Gooi het
verpakkingsmateriaal weg volgens de plaatselijk geldende afvalverwijderingsrichtlijnen.
2. Controleer het apparaat op beschadigingen. Neem het apparaat bij zichtbare beschadigingen niet in gebruik, maar neem contact op met onze klantenservice.
3. Reinig alle onderdelen met een vochtige doek, zoals beschreven in het
hoofdstuk „Reiniging en onderhoud“.
4. Zet het apparaat op een effen en droog werkvlak.
54 von 106
Stand 25.10.2024
Page 55
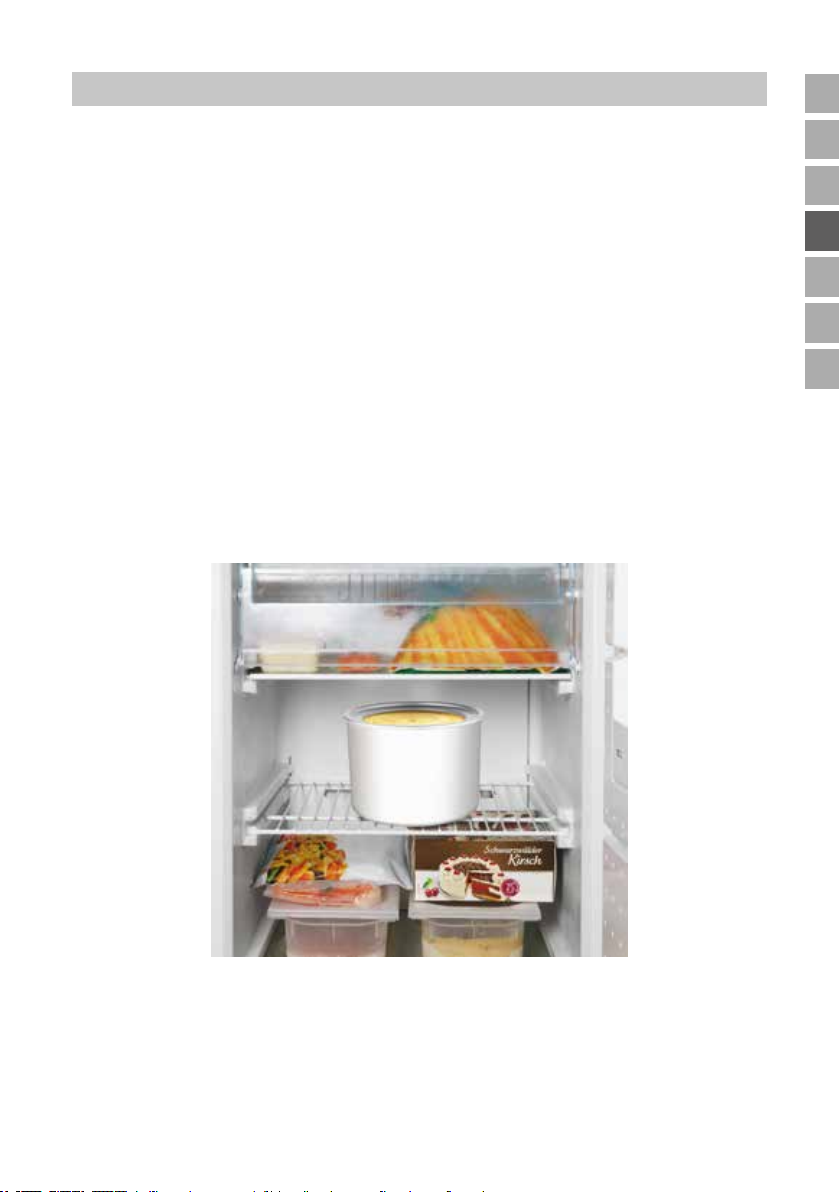
VÓÓR DE IJSBEREIDING
Copyright UNOLD AG | www.unold.de
DE
1. Voordat u ijs kunt produceren, moet u de met een koelvloeistof gevulde
koelbak minimaal 8 uur lang in het ***-diepvriesvak c.q. de vrieskist
zetten. De temperatuur moet minimaal −18 °C bedragen. Let er a.u.b. op
dat de bakken van tevoren worden gereinigd en vervolgens volledig worden
gedroogd.
2. Zet de koelbak rechtop met de opening naar boven in het diepvriesvak.
3. Afhankelijk van de temperatuur van het vriesapparaat duurt het vriesproces
8 tot 22 uur. Door aan de bak te schudden kunt u vaststellen of de hele
koelvloeistof bevroren is.
4. Tip: Als u de ijsmachine niet gebruikt, bewaar de koelbak dan bijvoorbeeld
in een plastic zak in de vriezer. Dan is de bak altijd klaar voor gebruik.
5. Als u meerdere soorten ijs achter elkaar wilt produceren, adviseren wij u om
meer koelbakken aan te schaffen. U kunt deze rechtstreeks bij ons kopen; u
vindt het bestelformulier op pagina 107.
EN
FR
NL
IT
ES
PL
Stand 25.10.2024
55 von 106
Page 56
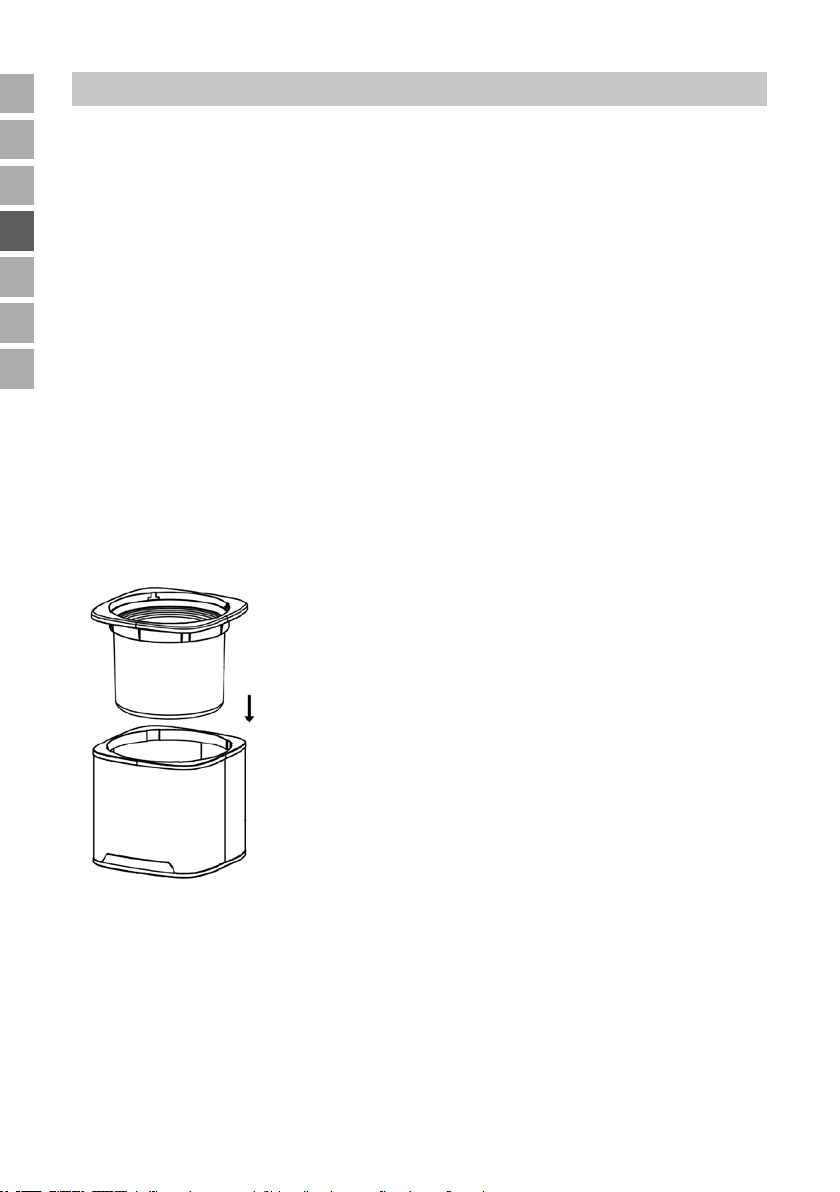
DE
Copyright UNOLD AG | www.unold.de
IJS MAKEN
EN
FR
NL
IT
ES
PL
De gewenste ingrediënten moeten enkele uren vóór de bereiding al in de koelkast
worden voorgekoeld. Als u alcohol voor het recept gebruikt, voegt u deze pas aan
het ijs toe als dit al de gewenste consistentie bezit. Het maximale vulvolume van
de koelbak bedraagt 1100 ml.
Tip: Als u een recept met alcohol gebruikt, doseert u de alcohol spaarzaam en
voegt u deze pas toe op het einde van de vriestijd, omdat alcohol de vriestijd
verlengt.
1. Bereid de ijsmassa volgens de recepten in het receptgedeelte. Als het om
een ijsmassa gaat die van tevoren gekookt moet worden, kook deze dan al
een dag eerder, zodat de massa goed kan afkoelen.
2. Wij adviseren om de ijsmassa vóór het gebruik te allen tijde in de koelkast
te koelen.
3. Neem de koelbak uit het diepvriesvak.
4. Plaats de koelbak in de koelbakinzet.
5. Plaats nu de koelbakinzet met koelbak in de behuizing van het apparaat.
6. Steek evt. de as op de mixer. Let erop dat beide delen goed met elkaar
worden verbonden – de kant van de as met de beide armpjes moet in de
richting van de mixer erop worden gezet.
7. Bevestig de motor aan het deksel en plaats beide voorzichtig op het apparaat.
8. Steek de as in de opening van de motoronderkant.
9. De motor kan maar in één richting juist op het deksel worden gefixeerd (zie
afb.).
56 von 106
Stand 25.10.2024
Page 57
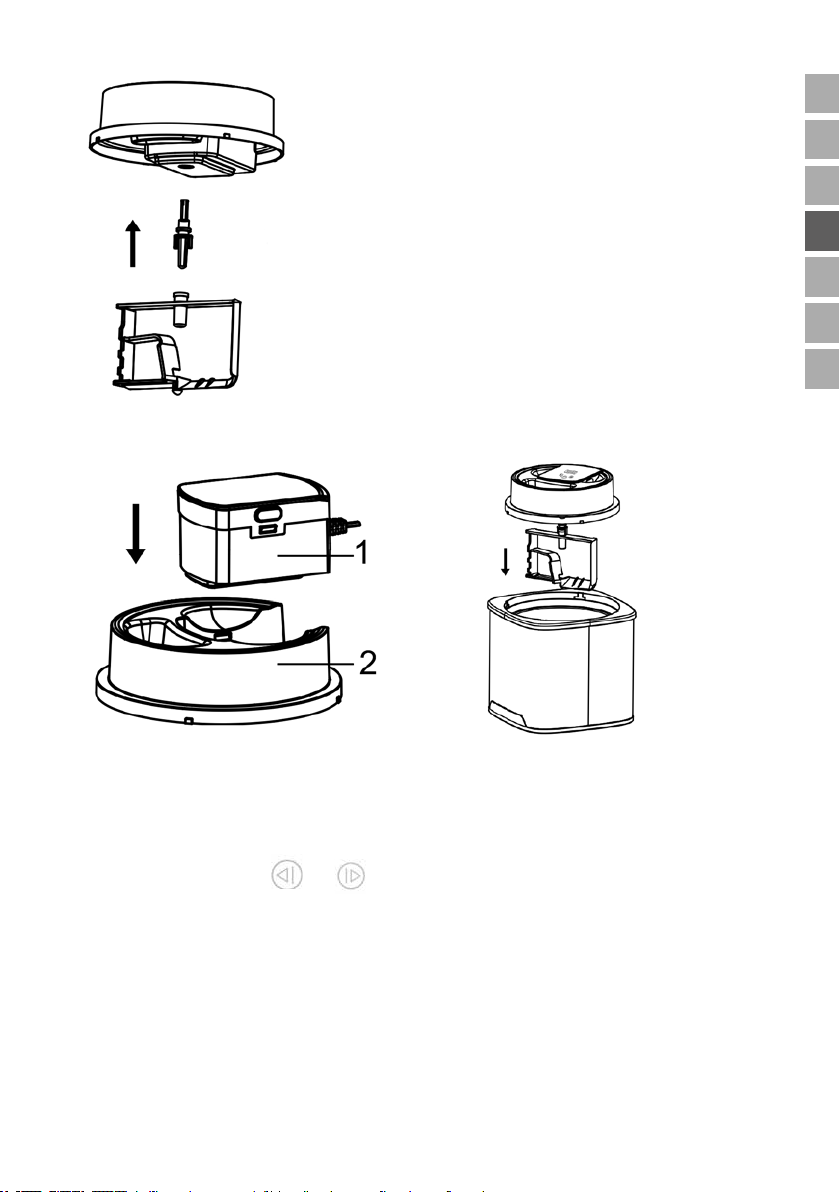
10. Draai het deksel tegen de klok in tot het vergrendelt.
Copyright UNOLD AG | www.unold.de
DE
EN
FR
NL
IT
ES
PL
11. Steek de voedingsstekker in een stopcontact. Het apparaat bevindt zich in
de stand-bymodus.
12. Schakel het apparaat in met de AAN/UIT-knop, op het display verschijnt
40:00.
13. Met de knoppen en kunt u nu de gewenste looptijd tussen 5 en
45 minuten in stappen van 5 minuten instellen. De gekozen tijd verschijnt
op het display en telt af.
14. Aanwijzing: Als u na 2 seconden niet op een knop hebt gedrukt, start de
mixermotor.
15. Open dan de opening van de vulschacht en doe ijsmassa door de schacht
in het apparaat. Doe de ijsmassa nooit in het uitgeschakelde apparaat. De
ijsmassa zou dan meteen aan de rand van de koelbak vastvriezen.
Stand 25.10.2024
57 von 106
Page 58
DE
Copyright UNOLD AG | www.unold.de
EN
FR
NL
IT
ES
PL
16. Vul, omdat tijdens het bevriezen het volume toeneemt, de bak niet tot de
rand, maar laat u ca. 5 tot 7 cm ruimte over.
17. Laat de ijsmachine net zolang lopen tot het ijs de gewenste consistentie
heeft. Indien nodig kunt u de gekozen looptijd verkorten of verlengen.
Afhankelijk van de ingrediënten duurt dit 20 tot 40 minuten. Controleer van
tijd tot tijd het vriesproces en schakel het apparaat uit als de mixer stilstaat.
18. Als de ijsmassa te vast wordt, verandert evt. de draairichting van de mixer
om schade aan de motor te voorkomen.
19. Let op: Schakel het apparaat tijdens de ijsbereiding niet uit. Hierdoor
zou de ijsmassa aan de binnenrand van de koelbak vastvriezen. Mocht de
motor tijdens de bereiding oververhit raken, wordt de motor automatisch
uitgeschakeld. Trek in dat geval de voedingsstekker uit het stopcontact en
laat het apparaat afkoelen. Als u daarna weer ijs wilt bereiden, moet u evt.
nieuwe ijsingrediënten gebruiken.
20. Als u een recept met alcohol gebruikt, doseert u de alcohol spaarzaam en
voegt u deze pas toe op het einde van de vriestijd, omdat alcohol de vriestijd
verlengt.
21. Schakel het apparaat uit met de AAN/UIT-knop.
22. Neem het deksel eraf door dit naar boven toe van het apparaat te draaien.
23. Neem de koelbakinzet met de koelbak uit het apparaat.
24. Het ijs kunt u het beste met een plastic of houten spatel wegpakken om de
bak niet te bekrassen.
25. Consumptie-ijs moet een zachte consistentie hebben. Als u echter harder ijs
prefereert, zet u de bak extra in het vriesvak/de diepvrieskast.
26. Sla het ijs in de bak echter niet langer dan 30 minuten in het vriesvak op. Als
u het ijs niet onmiddellijk wilt eten, doe het dan in een gesloten vriesdoos
en zet deze in het vriesvak. Het ijs kan daarbij door het samentrekken van
de ijskristallen waterslierten vormen, omdat de optimale ijstemperatuur bij
ca. -10 °C ligt, de temperatuur in vriezers echter meestal lager is.
Niet in het lopende apparaat grijpen - er bestaat
verwondingsgevaar! De binnenkant van de koelbak niet met
blote handen aanraken! Let op: Raak de koelbak nooit met
natte lichaamsdelen, zoals bijvoorbeeld de vingers aan. Anders
bestaat kans op letsel/bevriezing.
58 von 106
Stand 25.10.2024
Page 59

REINIGING EN ONDERHOUD
Copyright UNOLD AG | www.unold.de
Trek vóór het gebruik en vóór het reinigen de voedingsstekker van het
apparaat uit het stopcontact.
Raak de koelbak niet met blote handen aan als u deze uit het apparaat tilt.
Anders bestaat kans op letsel/bevriezing.
1. Laat de koelbak op kamertemperatuur opwarmen voordat u deze reinigt.
Anders bestaat kans op letsel/bevriezing.
2. Veeg de binnenkant van de koelbak met een vochtige doek goed schoon en
droog hem vervolgens goed af.
3. Was de mixer met een mild afwasmiddel af
4. Veeg de behuizing en het deksel van binnen en buiten af met een vochtige
doek met een beetje afwasmiddel en wis deze met een vochtige doek met
helder water na. Gebruik geen scherpe of schurende poetsmiddelen.
5. Droog het apparaat goed af.
6. Dompel de motor met de voedingskabel nooit in vloeistoffen.
7. De koelbak moet volledig droog zijn voordat u deze weer in het vriesvak
plaatst.
8. Een regelmatige reiniging verlengt de levensduur van het apparaat
aanzienlijk.
9. Bewaar het apparaat op een droge en stofvrije plek. Tip: Bewaar de
verpakking van het apparaat en sla de ijsmachine in deze doos op als u deze
niet gebruikt.
DE
EN
FR
NL
IT
ES
PL
BELANGRIJKE AANWIJZINGEN EN TIPS BIJ DE IJSRECEPTEN
Gebruik uitsluitend volledig rijp fruit.
Stukjes fruit en/of hele bessen pas op het eind toevoegen.
Als volgens het recept eieren moeten worden toegevoegd, gebruik dan uitsluitend
hele verse eieren.
U kunt melk door slagroom vervangen of slagroom door melk vervangen.
Hoe meer slagroom u gebruikt, des te romiger wordt het ijs.
U kunt suiker vervangen door honing, siroop of zoetstof. Dit is bij softijs echter
niet mogelijk.
Melk kan ook door sojadrink worden vervangen.
Stand 25.10.2024
59 von 106
Page 60

DE
Copyright UNOLD AG | www.unold.de
EN
FR
Het ijs smaakt vers bereid het beste. Als u het ijs echter vrij lang wilt bewaren, voeg
dan 30 g ijsbasis toe aan de ijsmassa. IJsbasis voorkomt dat de waterkristallen
bij het bewaren weer samentrekken en het ijs splinterig wordt. U krijgt ijsbasis
bij
NL
IT
ES
PL
Hobbybäcker-Versand - Inge Pinzer
Am Mühlholz 6 – 89287 Bellenberg
Tel. 0 73 06/92 59 00 - Fax 0 73 06/92 59 05
Internet: www.hobbybaecker.de
Als u steviger ijs wenst, zet u de ijsmassa 15–30 minuten lang in het vriesvak
voordat u de massa in de ijsmachine doet. Juist in de warme tijd van het jaar zijn
de temperaturen ook in de koelkast iets hoger, omdat bv. de deur van de koelkast
wordt geopend en de kamertemperatuur hoger is.
IJs smelt niet zo snel als u vóór het invriezen een pakje fix-gelatine (koud
oplosbare gelatine) aan de ijsmassa toevoegt.
RECEPTIDEEËN VOOR KINDEREN EN VOLWASSENEN
Vanille-ijs
150 ml melk, 150 g slagroom, 1/2 vanillestokje, 1 snufje zout, 1 eierdooier,
40 g suiker, 25 g gecondenseerde melk.
Doe de melk en 50 g slagroom in een pan en verhit deze. Snijd het vanillestokje
in de lengte open, schraap het merg met een lepel eruit en voeg dit samen met
het stokje en het zout toe aan de slagroommelk. Laat dit alles al roerend een keer
koken, neem de pan direct van de plaat en neem het vanillestokje eruit. Klop het
eigeel met de suiker tot een romige massa, roer vervolgens de hete slagroommelk
door de massa. Giet de vloeistof terug in de pan en verhit deze al roerend tot
de massa een beetje dikker wordt. Roer de gecondenseerde melk erdoor, doe
de massa in een andere bak en laat deze ongeveer een half uur afkoelen; zet
de bak daarna een uur lang in de koelkast. Klop de resterende slagroom stijf en
schep deze voorzichtig door de gekoelde puddingmassa. Doe het mengsel in de
draaiende ijsmachine en laat het in 15 tot 30 minuten bevriezen.
Chocolade-ijs
100 ml melk, 1 eierdooier, 40 g suiker, 1/2 pakje vanillesuiker, 50 g
melkchocolade, 100 g slagroom, 1 tl cacaopoeder
60 von 106
Stand 25.10.2024
Page 61

Verhit de melk in een pan en laat deze een keer koken. Klop intussen de
Copyright UNOLD AG | www.unold.de
eierdooier met de vanillesuiker tot een vaste schuimmassa. Voeg hierbij de suiker
geleidelijk aan toe. Giet de hete melk continu roerend met de garde langzaam in
de eischuimmassa. Doe de eiermelk weer in de pan en verhit deze nogmaals al
roerend tot de vloeistof een beetje dikker wordt. Doe dit mengsel vervolgens in
een beslagkom en laat het ongeveer een half uur afkoelen.
Laat in de tussentijd de chocolade met drie eetlepels slagroom au bain-marie
al roerend smelten en roer deze direct met een niet-afgestreken theelepel
cacaopoeder door de eiermelk tot de chocolade geheel is opgelost. Laat het
mengsel een half uur afkoelen en zet het daarna nogmaals ongeveer een uur lang
in de koelkast.
Klopt de resterende slagroom licht op en roer dit voorzichtig door de
chocolademelk. Doe alles in de draaiende ijsmachine en laat het in ongeveer
30 minuten bevriezen.
Yoghurt-ijs
90 g slagroom, ca. 40 g poedersuiker, 175 g yoghurt in een willekeurige smaak
( bv. vruchten- of notenyoghurt), 1 ei
Klop de slagroom met de poedersuiker tot een romige massa. Mix de yoghurt
met het ei en roer de slagroom voorzichtig erdoor. Doe alles in de draaiende
ijsmachine en laat het in ongeveer 25 minuten bevriezen.
DE
EN
FR
NL
IT
ES
PL
IJs-chocoladenzoenen
4 chocoladenzoenen, 1-2 el poedersuiker, 175 ml melk
Haal de chocoladenzoenen voorzichtig uit elkaar. Haal hiervoor de wafels los
van de chocoladelaag en leg deze aan de kant. En haal de chocolade van het
schuim Doe het schuim in een kom. Voeg de suiker en de melk toe aan het
schuim en roer alles tot een homogene crème. Doe de crème in de ijsmachine en
laat deze in ongeveer 10 minuten bevriezen. Voeg nu de stukjes chocoladelaag
toe aan de ijsmassa en laat alles in nog eens 10 tot 15 minuten bevriezen. Leg
ondertussen de wafels van de chocoladenzoenen uit op een plaat. Vul na afloop
van de vriestijd een grote ijsschep (maat 14) met de ijsmassa en leg op elke
wafel een bolletje ijs. Laat de ijs-chocoladenzoenen nog enkele uren in de vriezer
bevriezen. Tip: U kunt de ijs-chocoladenzoenen ook voorzien van een laag bruine
of witte chocolade en bestrooien met geraspte chocolade of hagelslag.
Stand 25.10.2024
61 von 106
Page 62

DE
Copyright UNOLD AG | www.unold.de
RECEPTIDEEËN VOOR VOLWASSENEN
EN
FR
NL
IT
ES
PL
Ananas-kokos-shake
1 blik ananasschijven (ca. 125 g uitlekgewicht), 65 ml kokosmelk, 2 eiwit,
25 g poedersuiker, 1 el witte rum, 1/2 banaan, 1/2 el citroensap, suikerkersen,
houten prikkertjes, 125 ml ananas-sap, nog eens 60 ml kokosmelk
Pureer 3/4 van de ananasschijven met de ananassiroop uit het blik en de
kokosmelk (62 ml). Snijd de overige schijven klein, voeg deze toe en zet dit
alles een half uur in de koelkast. Klop het eiwit met de poedersuiker en roer
dit voorzichtig door de fruitpuree. Laat dit alles in de ijsmachine ongeveer
40 minuten bevriezen. Voeg na 25 minuten de rum toe. Snijd de helft van de
banaan in schijfjes en druppel citroensap hierover. Steek de schijfjes banaan en
de kersen op houten prikkertjes.
Doe vier grote bolletjes ijs in een beslagkom. Bewaar de rest in de vriezer. Doe
het ananassap, de kokosmelk en de rest van de banaan bij de bolletjes ijs en
pureer dit alles. Verdeel het mixdrankje over een aantal glazen en versier deze
met de prikkertjes.
Campari-sinaasappelsorbet
35 ml Campari, 200 ml sinaasappelsap, 75 g poedersuiker, 1 eiwit
Doe de Campari met 180 ml sinaasappelsap en 30 g poedersuiker in een hoge
roerbeker en roer net zolang tot de suiker is opgelost. Zet alles twee uur lang in
de koelkast.
Klop na het verstrijken van de koeltijd het eiwit met de rest van de poedersuiker
en de rest van het sinaasappelsap tot een schuimige massa. Roer deze eiwitmassa
door het sinaasappel-Campari-mengsel. Doe het ijsmengsel in de draaiende
ijsmachine en laat dit in 30 tot 40 minuten bevriezen.
Tip: Het Campari-sinaasappelsorbet is door het alcoholgehalte tamelijk zacht,
zodat het direct vanuit de ijsmachine in porties kan worden verdeeld.
Dit sorbet smaakt zeer goed als u het met een spuitzak in hoge glazen doet en
opvult met vers geperst sinaasappelsap.
62 von 106
Stand 25.10.2024
Page 63
GARANTIEVOORWAARDEN
Copyright UNOLD AG | www.unold.de
DE
Wij geven 24 maanden garantie op dit apparaat van het merk UNOLD (bij commercieel gebruik 12 maanden)
vanaf de datum van aankoop voor schade die aantoonbaar te wijten is aan fabrieksfouten mits gebruik
volgens de voorschriften. Binnen de garantieperiode verhelpen we materiaal- en fabricagefouten naar eigen
goeddunken door reparatie of vervanging. Onze garantieservices gelden uitsluitend voor apparaten die in
Duitsland en Oostenrijk zijn verkocht. Neem voor andere landen contact op met de verantwoordelijke importeur.
Stuur apparaten waarvoor een defect wordt geclaimd goed verpakt naar onze klantenservice, samen met een
kopie van het machinaal gegenereerde aankoopbewijs, waarop de aankoopdatum zichtbaar moet zijn, en een
beschrijving van het defect. U kunt een retouretiket afdrukken vanaf onze website https://unold.de/pages/
rucksendungen (alleen voor retourzendingen vanuit Duitsland en Oostenrijk). De garantie dekt geen schade
veroorzaakt door slijtage, onjuist gebruik en het niet naleven van de onderhouds- en verzorgingsinstructies.
De garantie vervalt als het apparaat wordt gerepareerd of als er door derden mee wordt geknoeid. Deze
fabrieksgarantie beperkt uw wettelijke rechten of uw vorderingen tegen de verkoper of dealer die voortvloeien
uit het koopcontract in overeenstemming met de bepalingen van het Duitse Burgerlijk Wetboek (BGB) niet. Uw
wettelijke rechten als consument, in het bijzonder uw garantierechten en wettelijke aanspraken op gebreken
volgens §§ 437 e.v. BGB, blijven onaangetast.
UNOLD AG, Mannheimer Straße 4, D-68766 Hockenheim
VERWIJDEREN VAN AFVAL / MILIEUBESCHERMING
Onze apparaten zijn geproduceerd met een hoge qualiteit voor een lange gebruik. Regelmatige
onderhoud en vakkundig reparaties door onze klantenservice verlengt de gebruiksduur. Wanneer
het apparat defekt is en kan niet meer gerepareerd worden, let op de volgende instructies. Dit
product mag niet samen met het normale huishoudelijke afval worden afgevoerd. Het is wettelijk
verplicht om afgedankte elektrische en elektronische apparatuur (AEEA) en batterijen en accu’s
gescheiden van het huishoudelijk afval in te leveren. U kunt deze afgedankte apparatuur
herkennen aan het symbool van de doorgekruiste vuilnisbak (WEEE-symbool).U dient dit
product bij een voor het recycleren van elektrische of elektronische apparaten aangewezen
verzamelplaats in te leveren. Door het separaat inzamelen en recycleren van afvalproducten helpt u mee bij
het zuinig omgaan met de natuurlijke hulpbronnen en zorgt u ervoor dat het product op een gezondheids- en
milieuvriendelijke manier afgevoerd wordt.
EN
FR
NL
IT
ES
PL
Stand 25.10.2024
63 von 106
Page 64
DE
Copyright UNOLD AG | www.unold.de
ISTRUZIONI PER L’USO MODELLO 48855
EN
FR
NL
IT
ES
PL
DATI TECNICI
Potenza: 12 W, 220–240 V~, 50 Hz
Capacità: circa 1500 ml
Cavo di alimentazione: circa 120 cm
Dimensioni: circa 21,9 x 21,9 x 25,5 cm (L/P/A)
cestello refrigerante circa 19,1 x 19,1 x 14,5 cm
Peso: circa 3,2 kg
Refrigerante: Carbossimetilcellulosa, urea, acqua
Dotazione: capienza 1,5 litri, cestello refrigerante estraibile, scocca in
acciaio inox e plastica di alta qualità, coperchio con apertura
di riempimento, display con timer e pannello comandi touch-
control, motore con rotazione destrorsa/sinistrorsa, classe di
isolamento II
Accessori: Istruzioni per l‘uso con ricette
Con riserva di modifiche ed errori relativi a caratteristiche delle dotazioni, tecnica, colore e design
SIGNIFICATO DEI SIMBOLI
Questo simbolo segnala possibili pericoli in grado di provocare lesioni a persone o danni
all‘apparecchio.
PER LA VOSTRA SICUREZZA
Si raccomanda di leggere e conservare le presenti istruzioni.
Persone in ambito domestico
1. Questo apparecchio può essere utilizzato da bambini a partire
dagli 8 anni di età e da persone che presentano ridotte capacità
fisiche, sensoriali o mentali o che difettano della necessaria
esperienza e/o conoscenze solo se adeguatamente sorvegliati
o addestrati sull‘uso in sicurezza dell‘apparecchio e se a
conoscenza dei rischi correlati.
2. I bambini non devono giocare con l‘apparecchio.
3. La pulizia e la manutenzione dell‘utente non devono essere
eseguite da bambini, a meno che non abbiano più di 8 anni e
non vengano sorvegliati.
4. Conservare l‘apparecchio e il cavo fuori dalla portata dei bambini
di età inferiore agli 8 anni.
64 von 106
Stand 25.10.2024
Page 65

Avvertenze sanitarie
Copyright UNOLD AG | www.unold.de
5. Consumare immediatamente il gelato scongelato o sciolto e non
ricongelarlo.
6. Consumare il gelato soltanto finché è fresco. Congelare
immediatamente eventuali resti e consumarli nel giro di una
settimana.
7. Usare soltanto ingredienti freschi.
8. In particolare se si usano delle uova, per evitare la formazione
di batteri, accertarsi che siano sempre freschissime. Non
ricongelare i resti di gelato contenente uova.
9. Le creme gelato prodotte con uovo crudo o solo parzialmente
riscaldato non dovrebbero essere consumate da bambini piccoli,
gestanti, anziani o persone con patologie acute o croniche.
10. Lavare l‘apparecchio immediatamente appena finito di preparare
il gelato. Altrimenti possono formarsi batteri.
11. Se dal contenitore refrigerante fuoriesce del liquido il contenitore
deve essere sostituito.
12. Il liquido refrigerante contenuto nel cestello non è commestibile.
Se dal cestello refrigerante fuoriesce un liquido non usare
più il cestello. In caso di contatto involontario adottare le
seguenti misure: lavare gli indumenti contaminati, sciacquare
immediatamente la cute con acqua e sapone, in caso di
ingestione accidentale pulire la bocca e non indurre il vomito –
consultare immediatamente un medico!
DE
EN
FR
NL
IT
ES
PL
Sicurezza elettrica
13. Collegare l‘apparecchio solo a corrente alternata conforme alle
indicazioni della targhetta.
14. Questo apparecchio non deve essere comandato tramite timer
esterni o sistemi di telecomando.
15. Dopo l‘uso, prima della pulizia o in caso di eventuali anomalie
durante l‘esercizio staccare sempre la spina dalla presa elettrica.
16. Non immergere mai l‘apparecchio in acqua o altri liquidi,
proteggere il cavo di alimentazione dall‘umidità.
17. Prima dell‘uso svolgere completamente il cavo di alimentazione.
18. Per evitare danni al cavo di alimentazione non piegarlo e non
avvolgerlo attorno all‘apparecchio.
Stand 25.10.2024
65 von 106
Page 66

DE
Copyright UNOLD AG | www.unold.de
EN
FR
NL
IT
ES
PL
19. Usare l‘apparecchio solo in interni.
20. Staccare il cavo di alimentazione dalla presa elettrica afferrandolo
sempre e solamente per la spina, mai per il cavo.
21. Per prevenire danni al cavo di alimentazione, non trasportare
mai l‘apparecchio per il cavo di alimentazione e non trazionare
mai tale cavo.
22. Prima di disassemblare e pulire l‘apparecchio, di smontare o
montare singoli pezzi o di spostarlo in un altro posto staccare
sempre la spina dalla presa elettrica.
23. Controllare regolarmente la spina e il cavo di alimentazione per
verificare che non presentino tracce di usura o danni. Qualora
il cavo di allacciamento o altri componenti siano danneggiati
inviare l‘apparecchio alla nostra assistenza clienti per la verifica
e la riparazione. Riparazioni inadeguate possono comportare
pericoli per l’utente e fanno decadere la garanzia.
Avvertenze per l‘installazione e l‘uso in sicurezza dell‘apparecchio
24. L‘apparecchio nonché i singoli componenti non sono adatti per
il lavaggio in lavastoviglie.
25. Appoggiare l’apparecchio su una superficie piana sgombra.
26. L’apparecchio è progettato esclusivamente per l’uso domestico o
per impieghi similari, ad es.
in aree cucina di negozi, uffici o altri luoghi di lavoro,
aziende agricole,
per l‘uso da parte degli ospiti di hotel, motel o altre strutture
ricettive,
in pensioni private o case di vacanza.
27. Per ragioni di sicurezza non riporre o far funzionare mai
l‘apparecchio e il cavo di alimentazione su o nei pressi di
superfici calde.
28. Il cavo non deve pendere oltre lo spigolo della superficie di
lavoro.
29. Per prevenire ustioni e congelamenti non toccare mai l’interno
del contenitore refrigerante a mani nude o con altre parti del
corpo (in particolare se bagnate).
30. Non superare la quantità di riempimento massima. Il contenitore
refrigerante deve venir riempito al massimo fino a 5 cm dal bordo
66 von 106
Stand 25.10.2024
Page 67
superiore in quanto durante il processo di congelamento il gelato
Copyright UNOLD AG | www.unold.de
cresce di volume.
31. L‘apparecchio deve essere stato completamente assemblato e
acceso prima di versarvi gli ingredienti desiderati. Non mettere
mai gli ingredienti desiderati nel contenitore refrigerante in
anticipo, in quanto possono gelare lungo il bordo. Ciò potrebbe
pregiudicare il risultato desiderato.
32. Non spostare l‘apparecchio finché è in funzione.
33. Non lasciare mai incustodito l‘apparecchio quando è in funzione.
34. Non usare mai l‘apparecchio senza contenitore refrigerante!
35. Durante l‘esercizio non inserire alcun oggetto nell‘apparecchio
in funzione e non introdurre le mani nel contenitore. Sussiste il
pericolo di lesioni!
36. Utilizzare l‘apparecchio soltanto previo corretto assemblaggio.
37. Non far funzionare mai l‘apparecchio con accessori di altre
macchine.
38. Non utilizzare oggetti appuntiti o taglienti nel contenitore
refrigerante. Altrimenti può graffiarsi. Se necessario, usare
raschini in plastica o legno.
39. Quando la preparazione del gelato è terminata, se si vuole pulire
l‘apparecchio o quando occorre eliminare un guasto, spegnere
l‘apparecchio e staccare la spina dalla presa elettrica.
40. Attenzione: versare nel contenitore soltanto alimenti.
DE
EN
FR
NL
IT
ES
PL
Non introdurre parti del corpo o altri oggetti nell’apparecchio
in funzione - sussiste il pericolo di ferirsi! Non toccare l’interno
del contenitore refrigerante a mani nude!
Non aprire mai il motore dell’apparecchio. Sussiste il pericolo
di scosse elettriche.
Attenzione: per evitare ferite/congelamenti non toccare mai il
contenitore refrigerante con parti del corpo bagnate, ad es. le
dita.
Il produttore declina qualunque responsabilità in caso di montaggio errato, utilizzi errati o non idonei o
qualora le riparazioni siano eseguite da terzi non autorizzati.
Stand 25.10.2024
67 von 106
Page 68
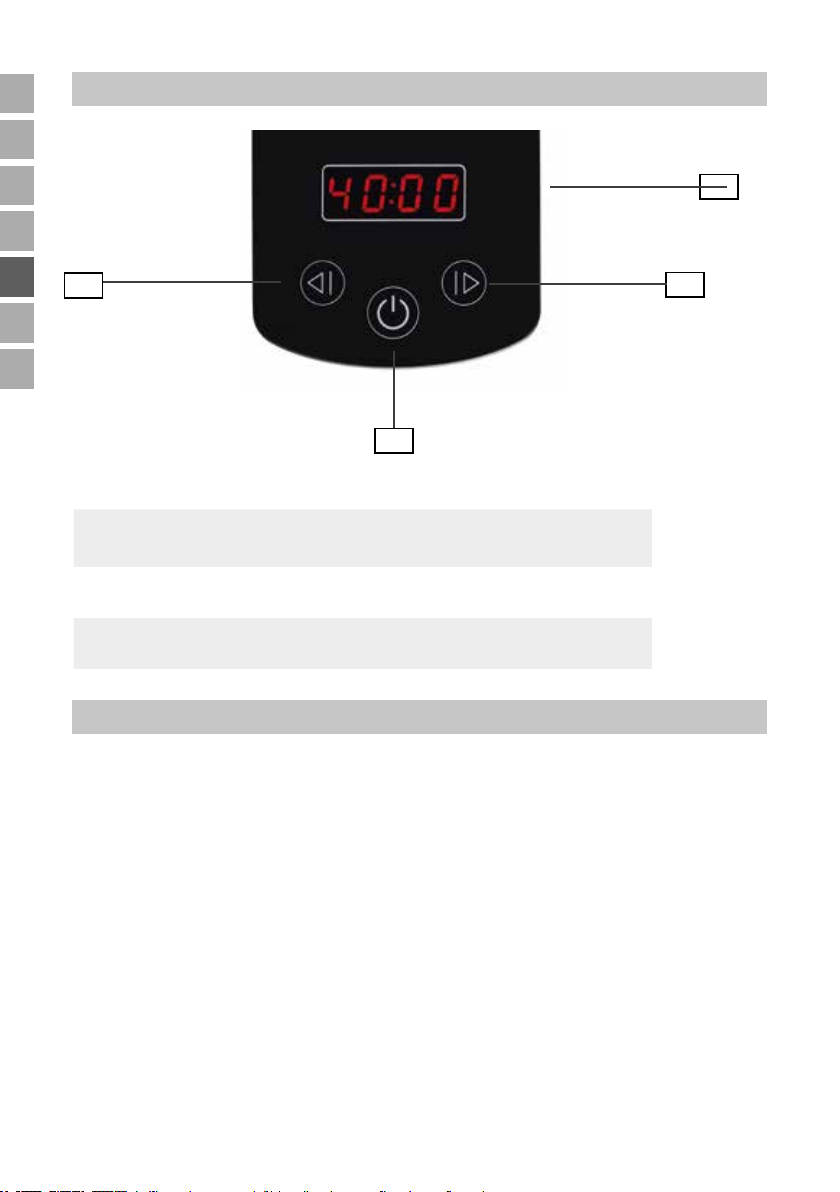
DE
Copyright UNOLD AG | www.unold.de
EN
PANNELLO COMANDI
FR
NL
IT
ES
PL
4
2
1
Display con indicatore del tempo di funzionamento
Tasto ON/OFF
2
accende o spegne l’apparecchio
Tasto +
3
Aumenta il tempo di funzionamento
Tasto -
4
Diminuisce il tempo di funzionamento
PRIMA DEL PRIMO UTILIZZO
1
3
1. Rimuovere tutti i materiali d’imballaggio, gli eventuali fissaggi utilizzati per
il trasporto e gli adesivi (non la targhetta segnaletica o il numero di serie!).
Tenere lontano dai bambini il materiale d’imballaggio - Pericolo di soffocamento! Smaltire il materiale d’imballaggio in conformità alle direttive locali.
2. Verificare che l’apparecchio sia integro. In presenza di danni visibili, non
mettere in funzione l’apparecchio e rivolgersi al nostro servizio clienti.
3. Pulire tutte le parti con un panno umido come descritto nel capitolo „Pulizia
e manutenzione“.
4. Appoggiare l‘apparecchio su un piano di lavoro piano e asciutto.
68 von 106
Stand 25.10.2024
Page 69
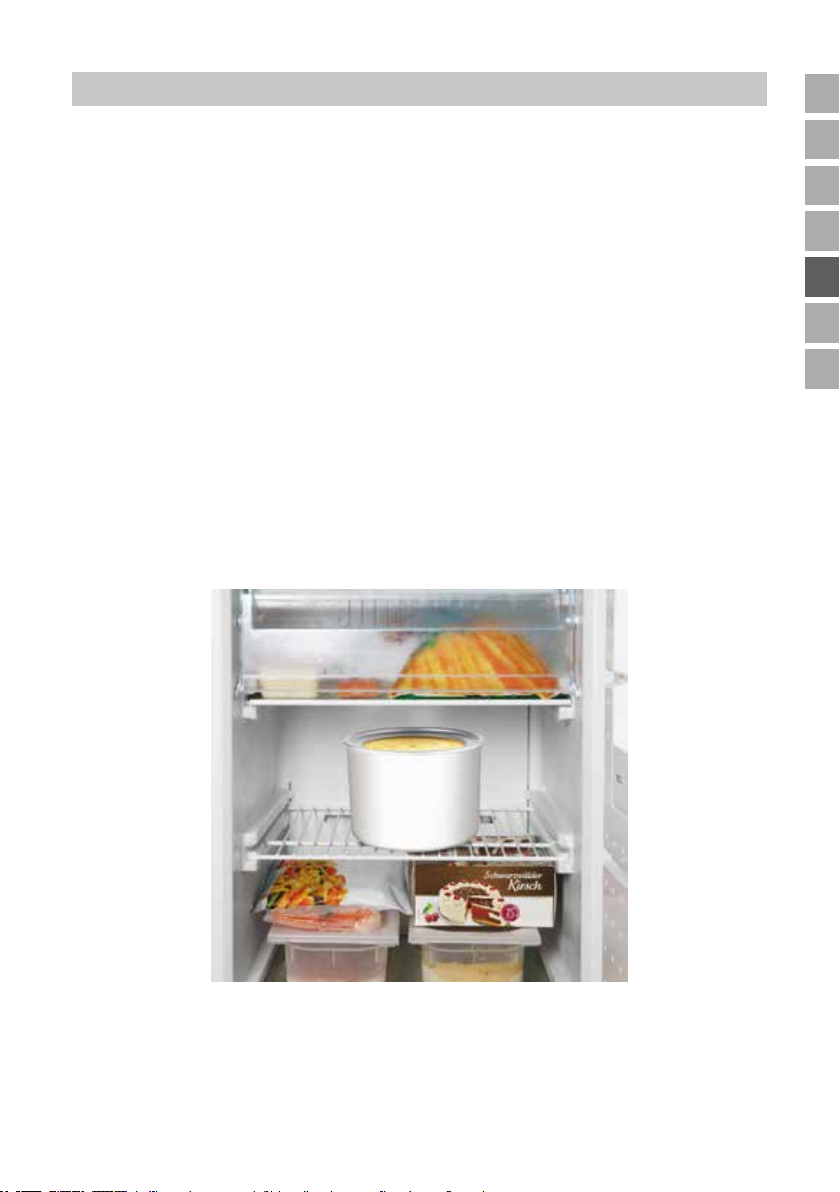
PRIMA DI PREPARARE IL GELATO
Copyright UNOLD AG | www.unold.de
DE
1. Prima di poter preparare il gelato occorre mettere il cestello pieno di liquido
refrigerante nel vano freezer *** o nel congelatore per almeno 8 ore. La
temperatura deve essere di almeno −18 °C. Accertarsi di pulire l‘interno del
cestello e poi di asciugarlo completamente.
2. Posizionare il cestello refrigerante nel vano freezer in verticale con l’apertura
rivolta verso l’alto.
3. Il processo di congelamento può durare tra le 8 e le 22 ore, a seconda della
temperatura del freezer. È possibile verificare se tutto il liquido refrigerante
è congelato scuotendo il contenitore.
4. Consiglio: quando la gelatiera è inutilizzata, conservare il cestello refrigerante
ad es. in un sacchetto di plastica nel congelatore. In questo modo è sempre
pronto all‘uso.
5. Se si desidera preparare diversi gusti di gelato uno dopo l‘altro, consigliamo
di acquistare altri cestelli refrigeranti. Questi possono essere acquistati
direttamente da noi, trovate l‘apposito modulo d‘ordine a pagina 107.
EN
FR
NL
IT
ES
PL
Stand 25.10.2024
69 von 106
Page 70
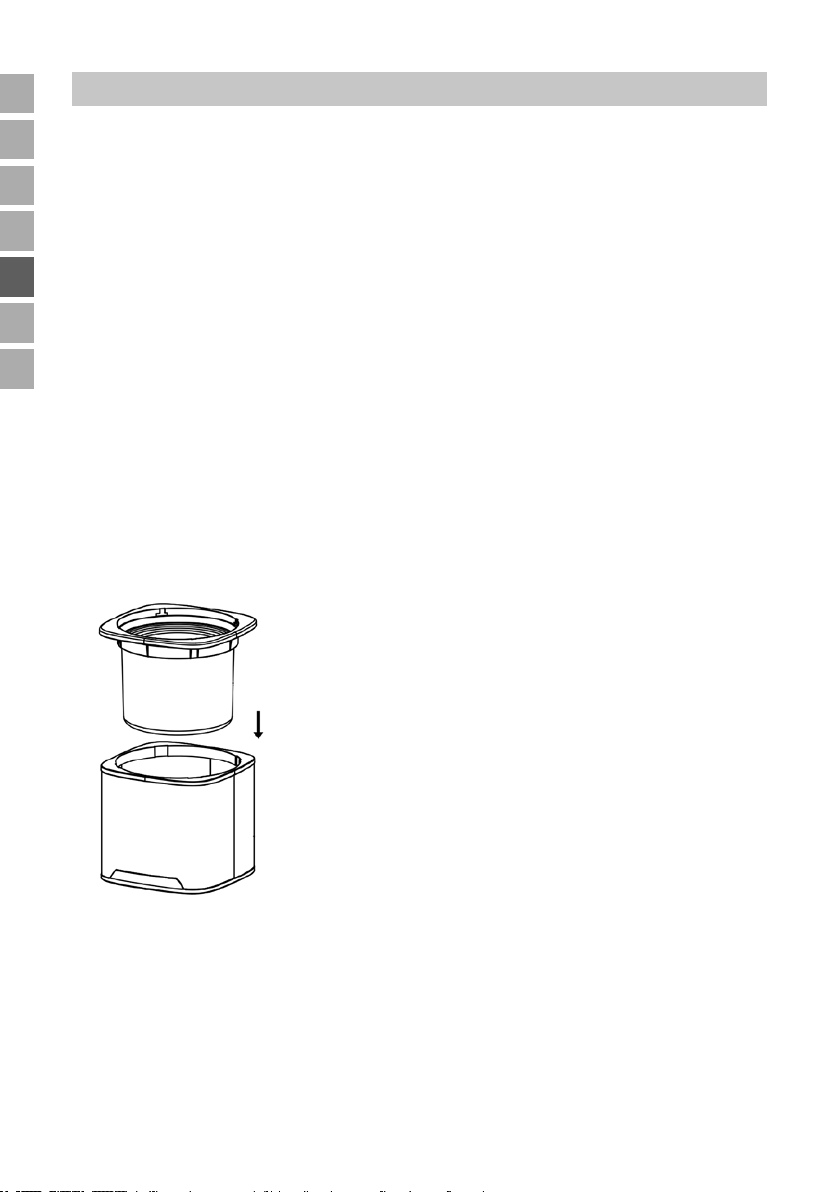
DE
Copyright UNOLD AG | www.unold.de
PREPARAZIONE DEL GELATO
EN
FR
NL
IT
ES
PL
Gli ingredienti desiderati dovrebbero venir preraffreddati in freezer per alcune ore
prima della preparazione! Se per la ricetta si usa dell‘alcol, aggiungerlo al gelato
soltanto quando questo ha già assunto la consistenza desiderata. La quantità di
riempimento massima del cestello refrigerante è di 1100 ml.
Consiglio: se per la ricetta si usa dell‘alcol, dosarlo con parsimonia e aggiungerlo
soltanto alla fine del congelamento, in quanto allunga i tempi di congelamento.
1. Preparare il composto del gelato secondo le ricette del ricettario. Se si tratta
di composti per gelato che prima devono essere cotti, cuocerli il giorno
precedente di modo che il composto possa raffreddarsi completamente.
2. Consigliamo di raffreddare il composto del gelato in frigorifero prima di
utilizzarlo.
3. Estrarre il cestello refrigerante dal vano freezer.
4. Mettere il cestello refrigerante nell’apposito inserto.
5. Quindi posizionare l’inserto con il cestello refrigerante nella scocca
dell‘apparecchio.
6. Eventualmente inserire l‘asse sul mescolatore accertandosi di collegare
correttamente i due componenti - il lato dell’asse con i due braccetti deve
essere inserito nella direzione del mescolatore.
7. Fissare il motore al coperchio e applicare entrambi sull’apparecchio con
cautela.
8. Inserire l’asse nell’apertura sul lato inferiore del motore.
70 von 106
Stand 25.10.2024
Page 71
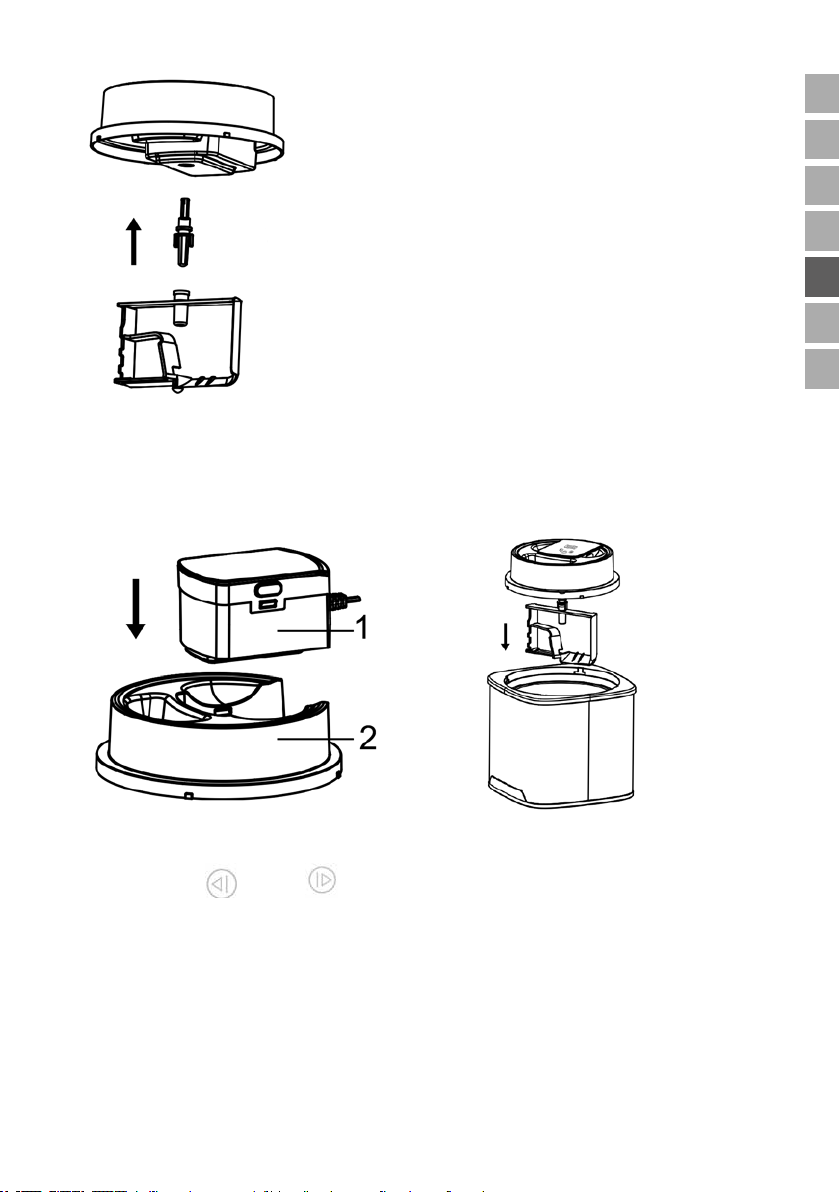
9. Il motore può essere correttamente fissato sul coperchio in un’unica
Copyright UNOLD AG | www.unold.de
direzione (vedere Fig.).
10. Girare il coperchio in senso antiorario finché si fissa saldamente in posizione.
11. Inserire la spina in una presa elettrica. L‘apparecchio è in modalità standby.
DE
EN
FR
NL
IT
ES
PL
12. Accendendo l‘apparecchio tramite il tasto ON/OFF il display indica 40:00.
13. Con i tasti e è possibile impostare il tempo di funzionamento
desiderato tra 5 e 45 minuti a intervalli di 5 minuti. Il tempo selezionato è
indicato sul display e scorre a ritroso.
14. Avvertenza: se non viene azionato alcun tasto, dopo 2 secondi il motore del
mescolare si avvia.
15. Quindi aprire l‘apertura del pozzetto di riempimento e, attraverso il pozzetto,
versare il composto nell’apparecchio. Non versare il composto, in nessun
caso, nell’apparecchio spento. Il composto di gelato congelerebbe aderendo
immediatamente al bordo del cestello refrigerante.
Stand 25.10.2024
71 von 106
Page 72

DE
Copyright UNOLD AG | www.unold.de
EN
FR
NL
IT
ES
PL
16. Non riempire il cestello fino al bordo bensì lasciare circa 5 - 7 cm di spazio,
in quanto il volume aumenta durante il congelamento.
17. Lasciare in funzione la gelatiera finché il gelato assume la consistenza
desiderata. Se necessario, è possibile abbreviare o allungare il tempo di
funzionamento selezionato. Questo dura, a seconda degli ingredienti, da
20 a 40 minuti. Di tanto in tanto controllare il processo di congelamento e
nel caso il mescolatore sia fermo spegnere l‘apparecchio.
18. Se il composto del gelato diventa troppo solido, per evitare danni al motore,
eventualmente il senso di rotazione del mescolatore si inverte.
19. Attenzione: non spegnere l‘apparecchio a preparazione del gelato in corso.
In questo caso il composto gelerebbe infatti sul bordo interno del cestello
refrigerante. Qualora il motore si surriscaldi nel corso della preparazione si
disattiva in automatico. In questo caso staccare la spina dalla presa di rete
e far raffreddare l‘apparecchio. Se successivamente si desidera continuare
a preparare il gelato eventualmente può essere necessario usare nuovi
ingredienti.
20. Se per la ricetta si usa dell‘alcol, dosarlo con parsimonia e aggiungerlo soltanto
alla fine del congelamento, in quanto allunga i tempi di congelamento.
21. Spegnere l‘apparecchio tramite il tasto ON/OFF.
22. Rimuovere il coperchio dall‘apparecchio girandolo e sfilandolo verso l‘alto.
23. Estrarre dall‘apparecchio l’inserto con il cestello refrigerante.
24. Si consiglia di estrarre il gelato con una spatola di plastica o legno in modo
da non graffiare il cestello.
25. Il gelato pronto per il consumo dovrebbe avere una consistenza molle. Se
invece lo si preferisce più duro, mettere il cestello ancora un po‘ nel vano
freezer/il congelatore.
26. Tuttavia non conservare il gelato nel cestello nel vano freezer per oltre
30 minuti. Se non si vuole mangiare subito il gelato, travasarlo in un
recipiente chiuso adatto per il freezer e quindi metterlo nel vano freezer.
Così facendo, a causa del ritiro dei cristalli di ghiaccio, nel gelato possono
però formarsi delle strie di ghiaccio, in quanto la temperatura ideale per il
gelato è di circa −-10 °C, mentre nei freezer la temperatura è solitamente
più bassa.
72 von 106
Stand 25.10.2024
Page 73
Non introdurre parti del corpo o altri oggetti nell‘apparecchio in
Copyright UNOLD AG | www.unold.de
funzione - sussiste il pericolo di ferirsi! Non toccare l’interno del
cestello refrigerante a mani nude! Attenzione: non toccare mai
il cestello refrigerante con parti del corpo nude, come ad es.
le dita. Altrimenti sussiste il pericolo di ferite/congelamenti..
DE
EN
FR
NL
PULIZIA E CURA
Dopo l’uso e prima del lavaggio staccare la spina dell‘apparecchio dalla
presa elettrica.
Non toccare il cestello refrigerante a mani nude quando lo si estrae
dell‘apparecchio. Altrimenti sussiste il pericolo di ferite/congelamenti.
1. Lasciar riscaldare il cestello refrigerante a temperatura ambiente prima di
lavarlo. Altrimenti sussiste il pericolo di ferite/congelamenti.
2. Strofinare accuratamente l‘interno del cestello refrigerante con un panno
umido e quindi asciugarlo perfettamente.
3. Lavare il mescolatore con un detersivo delicato.
4. Strofinare la scocca e il coperchio, all‘interno e all‘esterno, con un panno
inumidito con un po’ di detersivo e quindi ripassarli con un panno inumidito
con acqua pulita. Non utilizzare prodotti per pulizia aggressivi o abrasivi.
5. Asciugare bene l‘apparecchio.
6. Non immergere mai in liquidi il motore con il cavo di alimentazione.
7. Il cestello refrigerante deve essere completamente asciutto prima di
rimetterlo nel vano freezer.
8. Una pulizia regolare allunga notevolmente la durata dell‘apparecchio.
9. Conservare l’apparecchio in un luogo asciutto e al riparo dalla polvere.
Consiglio: conservare l‘imballo e quando l‘apparecchio non viene utilizzato
riporlo in tale cartone.
IT
ES
PL
Stand 25.10.2024
73 von 106
Page 74

DE
Copyright UNOLD AG | www.unold.de
AVVERTENZE IMPORTANTI E CONSIGLI PER LE RICETTE DI GELATI
EN
FR
NL
IT
ES
PL
Utilizzare soltanto frutta perfettamente matura.
Aggiungere i pezzi di frutta / i piccoli frutti interi solamente alla fine.
Se la ricetta prevede l‘aggiunta di uova, utilizzarne solamente di freschissime.
E‘ possibile sostituire il latte con la panna o la panna con il latte.
Il gelato sarà tanto più cremoso quanta più panna si userà.
E‘ possibile sostituire lo zucchero con miele, sciroppo o dolcificante. Per contro
ciò non è possibile per il soft-ice cream (gelato soffice).
Il latte può essere sostituito anche con drink di soia.
La crema gelato è più buona se consumata fresca. Per conservare la crema
gelato più a lungo aggiungere al composto 30 g di base gelato. La base gelato
impedisce che i cristalli di ghiaccio si ritirino durante la conservazione, facendo
sì che il gelato si scheggi. La base gelato può essere acquistata da
Hobbybäcker-Versand - Inge Pinzer
Am Mühlholz 6 – 89287 Bellenberg
Tel. 0 73 06/92 59 00 - Fax 0 73 06/92 59 05
Sito web: www.hobbybaecker.de
Se si desidera un gelato più solido mettere il composto nel congelatore per 15–
30 minuti prima di versarlo nella gelatiera. Soprattutto nelle stagioni calde le
temperature sono un po‘ più alte anche nel frigorifero ad es. in quanto la porta è
aperta e la temperatura ambientale è più elevata.
Aggiungendo una bustina di gelatina fissante (gelatina solubile a freddo) al
composto prima del congelamento, il gelato non si scioglie così in fretta.
SPUNTI PER RICETTE DA BAMBINI E DA ADULTI
Gelato alla vaniglia
150 ml di latte, 150 g di panna, 1/2 baccello di vaniglia, 1 presa di sale, 1 tuorlo, 40 g di zucchero, 25 g di latte condensato.
Versare in un pentolino il latte e 50 g di panna e scaldare. Intagliare il baccello
di vaniglia nel senso della lunghezza, raschiare la polpa con un cucchiaio e
aggiungerla al latte e alla panna, assieme al baccello e al sale. Portare il tutto ad
ebollizione mescolando, quindi togliere immediatamente dal fornello e rimuovere
il baccello. Sbattere il tuorlo con lo zucchero fino a ottenere un composto
cremoso, quindi, sempre mescolando, amalgamare il latte e la panna caldi.
74 von 106
Stand 25.10.2024
Page 75

Riversare il liquido nella pentola e scaldare, mescolando, finché il composto
Copyright UNOLD AG | www.unold.de
si addensa leggermente. Amalgamare il latte condensato, travasare il composto
e lasciarlo raffreddare per circa mezz‘ora, poi metterlo in frigorifero per un‘ora.
Montare la panna restante finché risulta ben ferma e incorporarla nel composto
raffreddato. Versare il composto nella gelatiera in funzione e lasciar congelare
per 15 - 30 minuti.
DE
EN
FR
NL
Gelato al cioccolato
100 ml di latte, 1 tuorlo, 40 g di zucchero, 1/2 conf. di zucchero vanigliato,
50 g di cioccolato al latte intero, 100 g di panna, 1 cucchiaino di cacao
Scaldare il latte in una pentola e portarlo ad ebollizione una volta. Nel frattempo
montare il tuorlo con lo zucchero vanigliato fino a ottenere un composto denso e
spumoso. Aggiungere a pioggia lo zucchero. Versare il latte caldo nel composto
spumoso mescolando con la frusta lentamente e in continuazione. Versare
nuovamente la crema di latte e uova nel pentolino del latte e scaldare ancora
mescolando finché il liquido si addensa leggermente. Versare il tutto in una ciotola
e lasciar raffreddare per circa mezz‘ora. Nel frattempo sciogliere a bagnomaria il
cioccolato assieme a tre cucchiai di panna, mescolando il tutto, e amalgamare
immediatamente nella crema di latte e uova un cucchiaino da tè colmo di cacao
rimestando finché il cioccolato si è sciolto completamente. Lasciar raffreddare
il composto per mezz‘ora, quindi metterlo ancora in frigorifero per circa un‘ora.
Montare leggermente il resto della panna e incorporarla nel latte e cioccolato.
Versare il tutto nella gelatiera in funzione e lasciar congelare per circa 30 minuti.
Gelato allo yogurt
90 g di panna, circa 40 g di zucchero a velo, 175 g di yogurt a qualunque gusto
(ad es. alla frutta o alle noci), 1 uovo
Sbattere la panna con lo zucchero a velo fino a ottenere un composto cremoso.
Sbattere lo yogurt con l’uovo e amalgamare la panna. Versare il composto nella
gelatiera in funzione e lasciar congelare per circa 25 minuti.
IT
ES
PL
Gelato agli Schokoküsse (cioccolatini con ripieno al marshmallow)
4 Schokoküsse , 1-2 cucchiai di zucchero a velo, 175 ml di latte
Aprire cautamente gli Schokoküsse spezzando le cialde e l’involucro al cioccolato
e tenerli da parte. Mettere in una ciotola la spuma di zucchero. Aggiungere alla
spuma di zucchero lo zucchero e il latte e mescolare il tutto fino a ottenere
una crema omogenea. Versarla nella gelatiera e lasciarla congelare per circa
10 minuti. Quindi aggiungere i frammenti di cioccolato al composto di gelato
Stand 25.10.2024
75 von 106
Page 76

DE
Copyright UNOLD AG | www.unold.de
EN
FR
NL
IT
ES
PL
e far congelare il tutto nella gelatiera per altri 10 - 15 minuti. Nel frattempo
disporre le cialde dei cioccolatini su un piatto. Una volta trascorso il tempo di
congelamento, con un porzionatore per gelato grande (misura 14) mettere una
pallina di gelato in ogni cialda. Lasciare congelare il gelato agli Schokoküsse nel
vano freezer per qualche altra ora. Consiglio: volendo, il gelato agli Schokoküsse
può essere ricoperto con glassa al cioccolato marrone o bianco e cosparso con
schegge di cioccolato.
SPUNTI PER RICETTE DA ADULTI
Shake di ananas e cocco
1 barattolo di ananas a fette (peso sgocciolato circa 125 g), 65 ml di latte di
cocco, 2 albumi, 25 g di zucchero a velo, 1 cucchiaio di rum bianco, 1/2 banana,
1/2 cucchiaio di succo di limone, ciliege candite, spiedini in legno, 125 ml di
succo d‘ananas, altri 60 ml di latte di cocco
Ridurre a purea 3/4 delle fette d‘ananas con lo sciroppo d‘ananas del barattolo e
il latte di cocco (62 ml). Tagliare a pezzi piccoli il resto delle fette, aggiungerle e
lasciar riposare al fresco il tutto per mezz‘ora. Montare l’albume con lo zucchero
a velo e incorporarlo nella purea di frutta. Lasciar congelare il tutto nella gelatiera
per circa 40 minuti. Dopo 25 minuti aggiungere il rum. Tagliare a fettine metà
della banana e irrorarla con il succo di limone. Infilare sugli spiedini le fettine
e le ciliege.
Mettere in una ciotola quattro palline di gelato grandi. Conservare il resto nel
congelatore. Aggiungere alle palline di gelato il succo d‘ananas, il latte di cocco
e il resto della banana e ridurre tutto a purea. Distribuire il frullato nei bicchieri
e decorare con gli spiedini.
Sorbetto all‘arancia e Campari
35 ml di Campari, 200 ml di succo d‘arancia, 75 g di zucchero a velo, 1 albume
Versare in una ciotola alta il Campari, 180 ml di succo d‘arancia e 30 g di
zucchero a velo e mescolare finché lo zucchero si scioglie completamente.
Mettere il tutto in frigorifero per due ore.
Al termine del raffreddamento montare l’albume con il resto dello zucchero a velo
e il rimanente succo d‘arancia fino a ottenere un composto spumoso. Mescolare
il composto di albumi con la miscela di succo d‘arancia e Campari. Versare il
composto nella gelatiera in funzione e lasciar congelare per 30 - 40 minuti.
Consiglio: il sorbetto all‘arancia e Campari è molto soffice a causa dell‘alcol
contenuto e quindi può essere suddiviso in porzioni subito dopo averlo estratto
76 von 106
Stand 25.10.2024
Page 77
dal congelatore. Questo sorbetto è buonissimo servito in bicchieri alti in cui
Copyright UNOLD AG | www.unold.de
sia stato messo con una sac à poche e successivamente riempiti con succo
d‘arancia appena spremuto.
Le ricette di queste istruzioni per l’uso sono state ideate e verificate dagli autori e da UNOLD AG.
Tuttavia non può essere emessa alcuna garanzia. È esclusa la responsabilità degli autori, di UNOLD
AG e dei rispettivi incaricati per danni provocati a persone, cose o materiali.
DE
EN
FR
NL
NORME DIE GARANZIA
Su questo apparecchio, UNOLD riconosce una garanzia di 24 mesi dalla data d’acquisto, o 12 mesi in caso di uso professionale,
per i danni dimostrabilmente riconducibili a difetti di fabbrica e che si sono prodotti durante un uso conforme. All’interno
del periodo di garanzia, a nostra discrezione possiamo ovviare ai difetti di materiali e fabbricazione mediante riparazione o
sostituzione. Le nostre prestazioni inerenti alla garanzia si applicano esclusivamente agli apparecchi venduti in Germania
e Austria. Per altri Paesi rivolgersi all’importatore competente. Gli apparecchi per i quali viene reclamata una riparazione
devono essere inviati al nostro servizio clienti, correttamente imballati e corredati di una copia dello scontrino d’acquisto
emesso con mezzi informatici sul quale risulti visibile la data d’acquisto. Sul nostro sito Internet https://unold.de/pages/
rucksendungen potete stampare una bolla per la spedizione di ritorno (solo per le spedizioni da Germania e Austria). Sono
esclusi dalla garanzia i danni causati da usura, manipolazione impropria e inosservanza delle istruzioni per la cura e la
manutenzione. Il diritto alla garanzia decade in caso di esecuzione di riparazioni o interventi sull’apparecchio da parte di
terzi. Questa garanzia del produttore non limita i vostri diritti legali o i vostri diritti nei confronti del venditore o rivenditore
derivanti dal contratto di acquisto in conformità alle disposizioni del Codice Civile tedesco (BGB). Restano invariati i diritti
legali che vi spettano in qualità di consumatori, in particolare i diritti relativi a garanzia e difettosità ai sensi dell’art. 437 e
successivi del Codice Civile tedesco.
UNOLD AG, Mannheimer Straße 4, D-68766 Hockenheim
SMALTIMENTO / TUTELA DELL’AMBIENTE
I nostri apparecchi vengono prodotti rispettando un elevato standard qualitativo per una lunga durata
di utilizzo. Una corretta manutenzione e riparazioni adeguate a cura dal nostro servizio clienti possono
prolungare la durata di utilizzo del prodotto. Se un apparecchio è difettoso e non più riparabile, per il suo
smaltimento si presti attenzione ai punti che seguono. Questo prodotto non deve essere smaltito unitamente ai comuni rifiuti domestici. È obbligatorio smaltire i rifiuti di apparecchiature elettriche ed elettroniche
(RAEE), nonché le pile e gli accumulatori, separatamente dai rifiuti domestici. Queste apparecchiature
sono riconoscibili dal simbolo del cassonetto barrato (simbolo RAEE).
Consegnare il prodotto a un centro di raccolta per il riciclaggio dei rifiuti elettrici o elettronici. Con la raccolta differenziata
dei rifiuti e dei prodotti riciclabili è possibile contribuire alla tutela delle risorse naturali e far smaltire il prodotto nel rispetto
dell’ambiente e della salute.
IT
ES
PL
Stand 25.10.2024
77 von 106
Page 78
DE
Copyright UNOLD AG | www.unold.de
MANUAL DE INSTRUCCIONES MODELO 48855
EN
FR
NL
IT
ES
PL
DATOS TÉCNICOS
Potencia: 12 W, 220-240 V~, 50 Hz
Capacidad: aprox. 1500 ml
Peso: aprox 3,2 kg
Cable de
alimentación: aprox. 120 cm
Tamaño: aprox. 21,9 x 21,9 x 25,5 cm (An/Pr/Al)
recipiente regrigerador approx. 19,1 x 19,1 x 14,5 cm
Refrigerante: Carboximetilcelulosa, urea, agua.
Equipamiento: capacidad de 1,5 litros, recipiente refrigerador, carcasa de acero inoxidable
de alta calidad y plástico, tapa con boca de llenado, pantalla con temporizador
y panel de mando con control táctil, motor con marcha derecha/izquierda,
Clase de protección II
Accesorios: Manual de instrucciones con recetas
Salvo modificaciones y errores a nivel de las características de equipamiento, la tecnología, los colores
y el diseño
EXPLICACIÓN DE SÍMBOLOS
Este símbolo se asocia con riesgos eventuales que pueden provocar lesiones o daños en
el aparato.
PARA SU SEGURIDAD
Lea y conserve las siguientes instrucciones.
Personas en el hogar
1. Este aparato puede ser usado por niños a partir de 8 años, así
como por personas con una capacidad física, mental o sensorial
reducida o carentes de experiencia y/o conocimientos siempre
que estén supervisados o hayan sido correspondientemente
instruidos en el manejo seguro de dicho aparato y comprendan
los peligros que conlleva.
2. El aparato no es un juguete.
3. No está permitido que los niños lleven a cabo la limpieza o el
mantenimiento del usuario a no ser que tengan más de 8 años y
estén supervisados.
4. Guarde el aparato y el cable fuera del alcance de niños menores
de 8 años.
78 von 106
Stand 25.10.2024
Page 79

Indicaciones para la salud
Copyright UNOLD AG | www.unold.de
5. Consumir el helado descongelado de inmediato y no volver a
congelarlo.
6. Consuma el helado solo mientras esté fresco. Congelar de
inmediato los posibles restos y consumirlos en una semana.
7. Utilice solo ingredientes frescos.
8. Durante el uso de huevos preste especial atención a que
estos sean lo más frescos posibles para evitar la formación de
gérmenes. No volver a congelar restos de helado que contienen
huevos.
9. Los niños pequeños, las mujeres embarazadas, los ancianos o
las personas con enfermedades crónicas o agudas no deberían
consumir el helado elaborado con huevo crudo o huevo solo
parcialmente calentado.
10. Limpie el aparato inmediatamente después de haber terminado
la preparación de helado. De lo contrario podrían formarse
gérmenes.
11. Si sale líquido refrigerante del recipiente refrigerador, se debe
sustituir el mismo.
12. El líquido refrigerante contenido en el recipiente refrigerador
no es apto para su consumo. Si del recipiente refrigerador sale
líquido, no lo use más. En caso de contacto accidental, tomar
las siguientes medidas: lavar la ropa contaminada y lavarse de
inmediato la piel a fondo con agua y jabón; en caso de ingestión
accidental enjuagar la boca y no provocar el vómito; ¡consultar
de inmediato a un médico!
DE
EN
FR
NL
IT
ES
PL
Seguridad eléctrica
13. Conectar el aparato solo a la corriente alterna según la placa de
características.
14. Este aparato no debe utilizarse con un reloj programador externo
ni con un sistema de mando a distancia.
15. Desenchufar siempre el aparato después de usarlo, antes de
limpiarlo o si se produce algún fallo durante el funcionamiento.
16. No sumergir nunca el aparato en agua u otros líquidos; proteja
el cable de alimentación contra la humedad.
Stand 25.10.2024
79 von 106
Page 80

DE
Copyright UNOLD AG | www.unold.de
EN
FR
NL
IT
ES
PL
17. Desenrollar completamente el cable de alimentación antes del
uso.
18. No enrolle el cable de alimentación alrededor del aparato y no lo
doble para evitar daños en el mismo.
19. Utilizar el aparato solo en espacios interiores.
20. Para retirar el cable de alimentación de la toma de corriente,
sujételo siempre por la clavija. No tire nunca del cable de
conexión.
21. Para evitar daños en el cable de alimentación, no transportar
nunca el aparato por el cable ni tirar del mismo.
22. Retire la clavija de la toma de corriente antes de desmontar y
limpiar el aparato o si quiere quitar o colocar piezas individuales
o poner el aparato en otro sitio.
23. Compruebe periódicamente si el enchufe y el cable de
alimentación están desgastados o deteriorados. En caso de daños
en el cable de alimentación o en otras piezas, envíe el aparato
para su verificación y reparación a nuestro servicio de atención
al cliente. Las reparaciones inadecuadas pueden ocasionar
peligros para el usuario y provocan la exclusión de la garantía.
Indicaciones para la colocación y el uso seguro del aparato
24. El aparato y sus componentes no son aptos para el lavavajillas.
25. Coloque el aparato sobre una superficie plana despejada.
26. El aparato está diseñado exclusivamente para un uso doméstico
o para fines de uso similares, por ejemplo,
cocinas tipo office en comercios, oficinas u otros lugares de
trabajo,
empresas agrícolas,
para el uso por parte de clientes en hoteles, moteles u otros
establecimientos de alojamiento colectivo,
en pensiones privadas o en casas vacacionales.
27. Por motivos de seguridad, nunca coloque ni ponga en marcha el
aparato sobre o cerca de superficies calientes.
28. El cable no debe quedar colgando por el borde de la superficie
de trabajo.
29. No toque la parte interior del recipiente refrigerador con las
manos desnudas u otras partes del cuerpo (especialmente si
están húmedas) para evitar lesiones/congelaciones.
80 von 106
Stand 25.10.2024
Page 81
30. No sobrepasar la cantidad máxima de llenado. El recipiente
Copyright UNOLD AG | www.unold.de
refrigerador se debe llenar hasta un máximo de 5 cm por debajo
del borde superior dado que el volumen del helado aumenta
durante el proceso de congelación.
31. El aparato debe estar completamente ensamblado y conectado
antes de llenarlo con los ingredientes deseados. No añada nunca
los ingredientes necesarios antes al recipiente refrigerador dado
que podrían congelarse en el borde del recipiente y afectar
negativamente al resultado.
32. No mueva el aparato mientras esté en funcionamiento.
33. No deje el aparato sin vigilancia mientras esté en funcionamiento.
34. ¡No utilice nunca el aparato sin el recipiente refrigerador!
35. No introduzca objetos en el aparato en marcha ni las manos.
¡Peligro de lesiones!
36. El aparato solo debe utilizarse con el ensamblaje adecuado.
37. Nunca ponga en marcha el aparato con accesorios de otros
aparatos.
38. No utilice objetos puntiagudos ni afilados en el recipiente
refrigerador. De lo contrario, podría arañarse. En caso necesario,
utilice paletas de plástico o de madera.
39. Desconecte el aparato y retire el enchufe de red si ha terminado
con la preparación del helado, a la hora de limpiar el aparato o
si debe eliminar un fallo en el mismo.
40. ATENCIÓN: verter solo alimentos en el recipiente.
DE
EN
FR
NL
IT
ES
PL
No introducir las manos en el aparato en marcha. ¡Peligro de
lesiones! ¡No tocar la parte interior del recipiente refrigerador
con las manos desnudas!
No abra nunca el motor del aparato. Existe peligro de descarga
eléctrica.
Atención: No toque nunca el recipiente refrigerador con partes
desnudas del cuerpo como, p. ej., los dedos, para evitar lesiones
o congelaciones.
El fabricante no es responsable en caso de montaje erróneo, uso inapropiado o equivocado o después de
haber sido efectuadas reparaciones por terceros no autorizados.
Stand 25.10.2024
81 von 106
Page 82
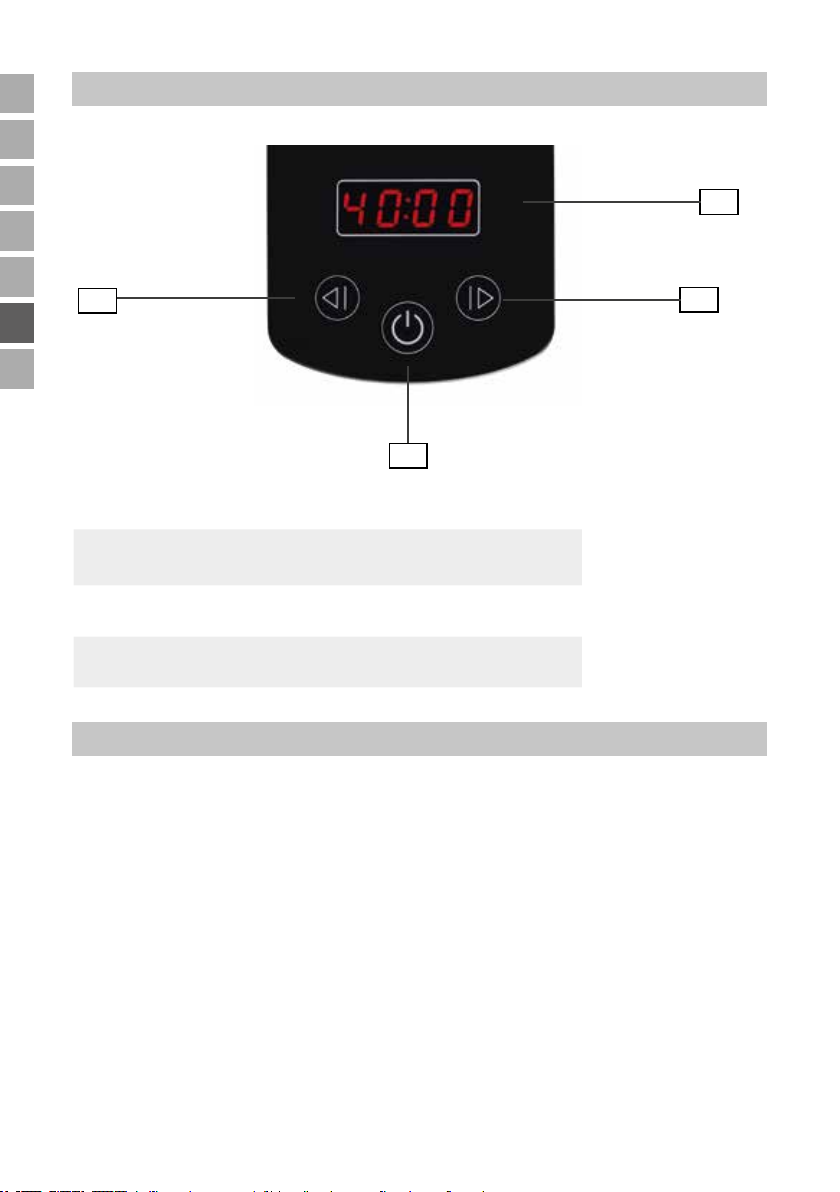
DE
Copyright UNOLD AG | www.unold.de
EN
PANEL DE MANDO
FR
NL
IT
ES
PL
4
2
1
Pantalla con indicación de tiempo de funcionamiento
Tecla CON/DES
2
conecta y desconecta el aparato.
Tecla +
3
aumento del tiempo de funcionamiento
Tecla -
4
reducción del tiempo de funcionamiento
ANTES DEL PRIMER USO
1
3
1. Retire todos los materiales de embalaje y, dado el caso, los seguros de
transporte. Mantenga el material de embalaje alejado de los niños. ¡Peligro
de asfixia!
2. Compruebe que todas las piezas están disponibles. En caso de que falten
piezas o estén deterioradas, diríjase a su proveedor o a nuestro servicio de
atención al cliente.
3. Limpie todas las piezas con un paño húmedo como se describe en el capítulo
“Limpieza y cuidado”.
4. Coloque el aparato sobre una superficie plana y seca.
82 von 106
Stand 25.10.2024
Page 83
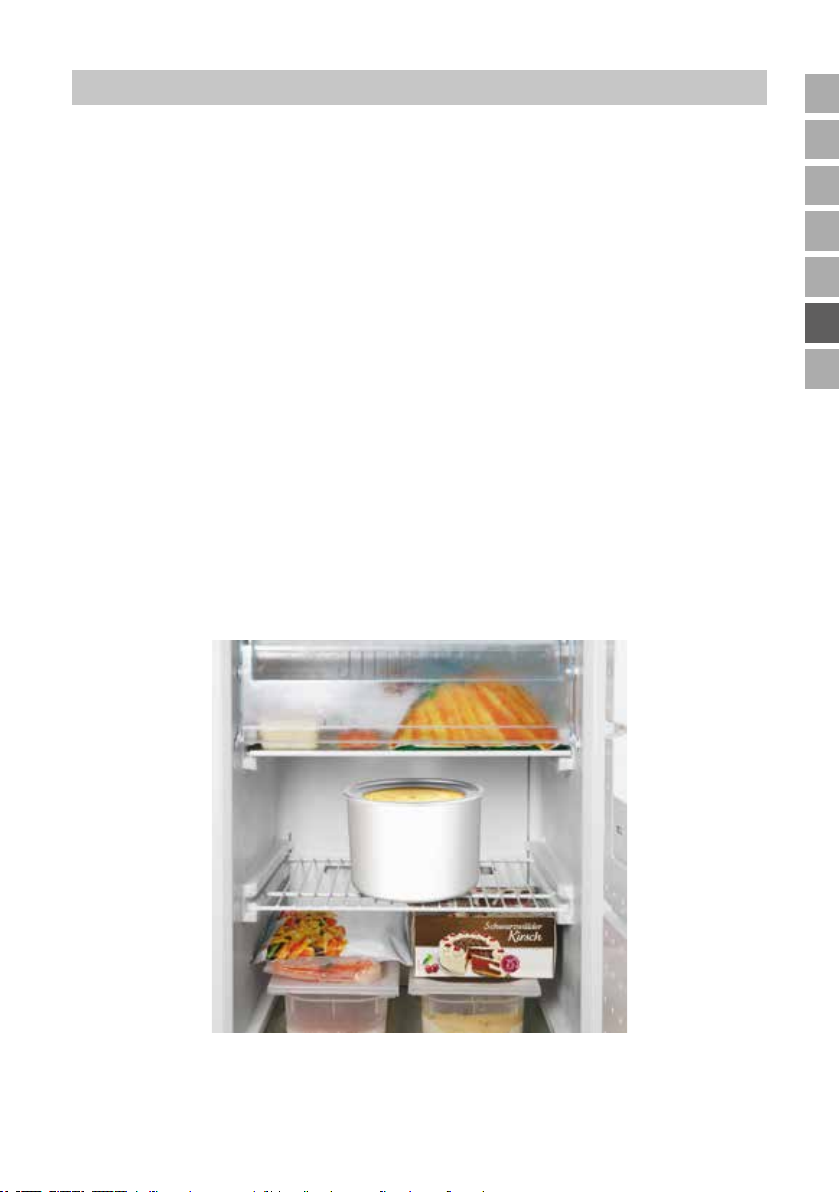
ANTES DE LA PREPARACIÓN DE HELADO
Copyright UNOLD AG | www.unold.de
DE
1. Antes de poder preparar helado debe colocar el recipiente refrigerador lleno
de un líquido refrigerante durante mínimo 8 horas en el congelador o el
arcón congelador de ***. La temperatura debe ser como mínimo de −18 °C.
Asegúrese de limpiar previamente el interior de los recipiente secándolos
bien después.
2. Coloque el recipiente refrigerador en posición vertical con la abertura hacia
arriba en el compartimento del congelador.
3. Dependiendo de la temperatura del congelador, el proceso de congelación
tardará entre 8 y 22 horas. Agitando el recipiente puede verificar si se ha
congelado todo el líquido refrigerante.
4. Consejo: si no va a utilizar la máquina de helado, guarde el recipiente
refrigerador, p. ej., en una bolsa de plástico dentro del congelador para
tenerlo siempre listo para su uso.
5. Si desea preparar varios tipos de helado sucesivamente recomendamos
adquirir varios recipientes refrigeradores. Puede pedir estos recipientes en
nuestra dirección haciendo uso del formulario de pedido que se encuentra
en la página 107.
EN
FR
NL
IT
ES
PL
Stand 25.10.2024
83 von 106
Page 84
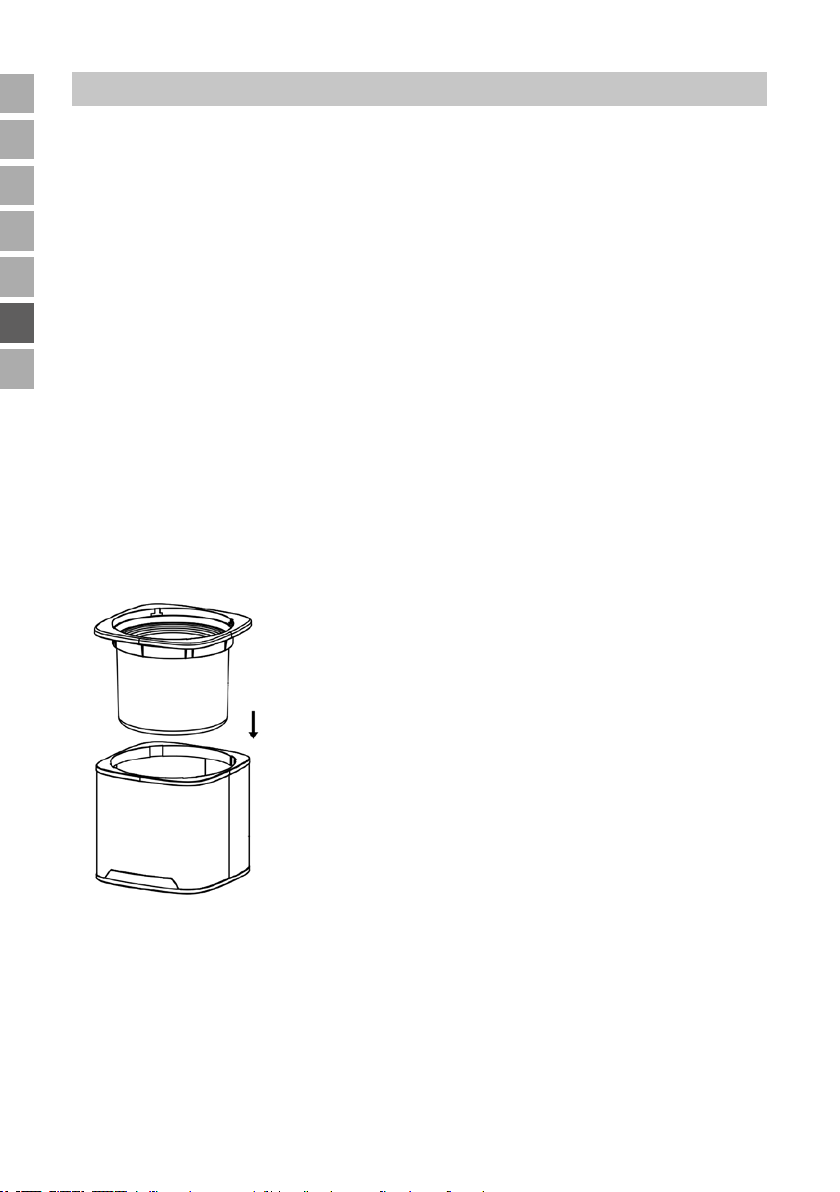
DE
Copyright UNOLD AG | www.unold.de
ELABORAR HELADO
EN
FR
NL
IT
ES
PL
¡Los ingredientes deseados deberían enfriarse previamente en la nevera durante
unas horas antes de la preparación! En caso de utilizar alcohol para la receta,
debe añadirlo al helado cuando ya tenga la consistencia deseada. La cantidad de
llenado máxima para el recipiente refrigerador es de 1100 ml.
Consejo: Si desea utilizar una receta con alcohol, dosifique bien el alcohol y
añádalo solo al final del tiempo de congelación dado que el alcohol prolonga el
tiempo de congelación.
1. Prepare la masa de helado según las recetas incluidas en el apartado de
recetas. Si se trata de masas de helado que deben cocerse previamente,
hágalo el día anterior para que la masa pueda enfriarse bien.
2. Recomendamos enfriar la masa de helado principalmente en la nevera antes
de su uso.
3. Extraiga el recipiente refrigerador del congelador.
4. Coloque el recipiente refrigerador en el soporte del mismo.
5. Ahora, coloque el soporte del recipiente refrigerador con el mismo en la
carcasa del aparato.
6. En caso necesario, coloque el eje sobre el mezclador Asegúrese de unir las
dos piezas correctamente; el lado del eje con los dos brazos pequeños se
debe colocar en la dirección del mezclador.
7. Fije el motor en la tapa y coloque ambos con cuidado sobre el aparato.
8. Introduzca el eje en la apertura en la parte inferior del motor.
9. El motor solo se puede fijar correctamente en la tapa en un sentido (véase
fig.).
84 von 106
Stand 25.10.2024
Page 85
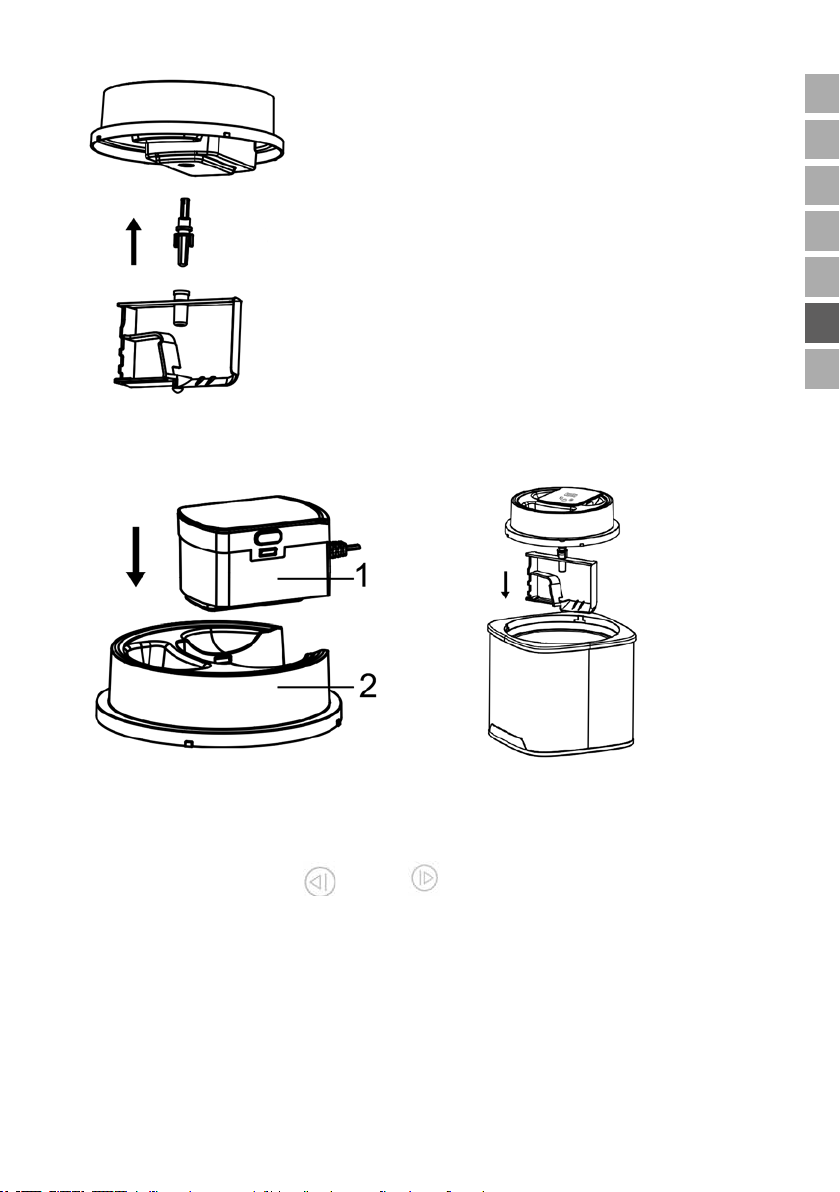
10. Gire la tapa en sentido contrario a las agujas del reloj hasta que encaje
Copyright UNOLD AG | www.unold.de
fijamente.
DE
EN
FR
NL
IT
ES
PL
11. Introduzca el enchufe de red en una toma de corriente. El aparato se
encuentra en modo standby.
12. Conecte el aparato con la tecla CON/DES; en la pantalla se muestra 40:00.
13. Ahora con las teclas y puede ajustar el tiempo de
funcionamiento deseado entre 5 y 45 minutos en pasos de 5 minutos. El
tiempo seleccionado se muestra en la pantalla y marcha hacia atrás.
14. Indicación: Si después de 2 segundos no realiza ninguna entrada más en las
teclas, se inicia el motor del mezclador,
15. Después, abra la abertura en el tubo de llenado y vierta masa de helado
a través del tubo en el aparato. No vierta nunca la masa de helado en el
aparato desconectado. La masa de helado se congelaría de inmediato en el
borde el recipiente refrigerador.
Stand 25.10.2024
85 von 106
Page 86

DE
Copyright UNOLD AG | www.unold.de
EN
FR
NL
IT
ES
PL
16. Dado que el volumen aumenta durante la congelación, no llene el recipiente
hasta el borde y deje un espacio de aprox. 5 a 7 cm.
17. Deje en marcha la máquina de helado hasta que este tenga la consistencia
deseada. En caso necesario, puede reducir o aumentar el tiempo de
funcionamiento seleccionado. Según los ingredientes se tarda entre 20 y
40 minutos. Compruebe de vez en cuando el proceso de congelación y
desconecte el aparato cuando el mezclador se detenga.
18. Si la masa de helado se pone demasiado consistente, modifique, en su
caso, la dirección de giro del mezclador para evitar daños en el motor.
19. Atención: no desconecte el aparato mientras esté preparando el helado. La
masa de helado se congelaría en el borde interior del recipiente refrigerador.
Si el motor se sobrecalienta durante la preparación, se desconectará
automáticamente. Si se da el caso, retire el enchufe y deje que el aparato
se enfríe. Si después desea preparar de nuevo helados, puede ser necesario
utilizar nuevos ingredientes.
20. Si desea utilizar una receta con alcohol, dosifique bien el alcohol y añádalo
solo al final del tiempo de congelación dado que el alcohol prolonga el
tiempo de congelación.
21. Apague el aparato pulsando el botón ON/OFF.
22. Retire la tapa del aparato girándola hacia arriba.
23. Extraiga el soporte del recipiente refrigerador con el mismo del aparato.
24. La mejor forma de retirar el helado es con una espátula de plástico o de
madera para no arañar el recipiente.
25. El helado debe tener una consistencia blanda. Sin embargo, si prefiere
helado más duro, coloque el recipiente adicionalmente en el congelador.
26. No guarde el helado en el recipiente durante más de 30 minutos en el
congelador. Si no desea consumir el helado de inmediato, páselo a un
recipiente hermético para congelación y colóquelo en el congelador. A causa
de la cristalización de las partículas de agua se pueden formar líneas. Esto
se debe a que la temperatura óptima para la conservación de helados es de
aproximadamente -10 °C, pero la temperatura de los congeladores es, por
lo general, más baja.
86 von 106
Stand 25.10.2024
Page 87
No introducir las manos en el aparato en marcha. ¡Peligro de
Copyright UNOLD AG | www.unold.de
lesiones! ¡No tocar la parte interior del recipiente refrigerador
con las manos desnudas! Atención: No toque nunca el
recipiente refrigerador con partes desnudas del cuerpo como,
p. ej., los dedos. De lo contrario, existe el peligro de lesiones/
congelación.
LIMPIEZA Y CUIDADO
DE
EN
FR
NL
IT
ES
Después del uso y antes de la limpieza, retire el enchufe de red del aparato.
No toque el recipiente refrigerador con las manos desnudas al retirarlo del
aparato. De lo contrario, existe el peligro de lesiones/congelación.
1. Deje que el recipiente refrigerador alcance la temperatura ambiente antes
de limpiarlo. De lo contrario, existe el peligro de lesiones/congelación.
2. Limpie la parte interior del recipiente refrigerador con un paño húmedo y
séquelo bien después.
3. Lave el mezclador con un detergente suave.
4. Limpie la carcasa y la tapa por dentro y por fuera con un paño húmedo y un
poco de detergente y repase con un paño humedecido con agua limpia. No
utilice limpiadores agresivos o abrasivos.
5. Seque minuciosamente el aparato.
6. No sumerja nunca el motor con el cable de alimentación en líquidos.
7. El recipiente refrigerador debe estar completamente seco antes de colocarlo
de nuevo en el congelador.
8. Una limpieza periódica prolonga considerablemente la vida útil del aparato.
9. Guarde el aparato en un lugar seco y protegido contra el polvo. Consejo:
conserve el embalaje del aparato y guarde la máquina de helado en esta caja
mientras no la utilice.
PL
Stand 25.10.2024
87 von 106
Page 88

DE
Copyright UNOLD AG | www.unold.de
INDICACIONES Y CONSEJOS IMPORTANTES PARA LAS RECETAS
EN
FR
NL
IT
ES
PL
Utilice solo frutas maduras.
Añada los trozos de fruta y/o las bayas enteras solo al final.
Si la receta exige que se utilicen huevos, cerciórese que estos sean muy frescos.
Puede sustituir leche por nata o nata por leche.
Cuanta más nata utilice, más cremoso quedará el helado.
Puede sustituir el azúcar por miel, almíbar o edulcorante. Esto no es posible si
se prepara helado blando.
También puede sustituir la leche por drink de soja.
El helado sabe mejor recién preparado. Sin embargo, si desea guardar el helado
por algún tiempo, agregue 30 g de base para helado a la masa de helado. La
base para helado impide que los cristales de agua vuelvan a contraerse durante
el almacenamiento convirtiendo el helado en crujiente. Puede adquirir la base
de helado en
Hobbybäcker-Versand - Inge Pinzer
Am Mühlholz 6 – 89287 Bellenberg
Tel. 0 73 06/92 59 00 - Fax 0 73 06/92 59 05
Internet: www.hobbybaecker.de
Si desea un helado más sólido, ponga la masa de helado entre 15 y 30 minutos
en el congelador antes de verter la masa en la máquina de helados. Durante las
estaciones cálidas, la temperatura de la nevera también es más alta porque, por
ejemplo, la puerta de la misma se suele abrir con más frecuencia y la temperatura
ambiental es también más elevada.
El helado no se derretirá tan rápido si se agrega a la masa de helado un sobre de
gelatina fix (gelatina de disolución en frío) antes de congelarlo.
IDEAS DE RECETAS PARA NIÑOS Y ADULTOS
Helado de vainilla
150 ml de leche, 150 g de nata, 1/2 vaina de vainilla, 1 pizca de sal, 1 yema,
40 g de azúcar, 25 g de leche condensada.
Verter la leche y 50 g de nata en una cacerola y calentar. Cortar la rama de vainilla
longitudinalmente, raspar el extracto con una cuchara y añadir junto con la vaina
y la sal a la mezcla de nata y leche. Remover y llevar brevemente a ebullición.
Retirar inmediatamente de la placa de cocina y quitar la vaina. Batir la yema con
88 von 106
Stand 25.10.2024
Page 89

el azúcar hasta obtener una crema. Después, añadir a la masa la mezcla de leche
Copyright UNOLD AG | www.unold.de
y nata caliente sin dejar de remover. Verter el líquido de nuevo en la cacerola y
calentarlo removiendo hasta que la masa se espese ligeramente. Añadir la leche
condensada, trasvasar la masa y dejar enfriar durante aproximadamente media
hora. Después, ponerla en la nevera durante una hora. Montar el resto de la
nata y añadirla a la masa de natillas enfriada. Verter la mezcla en la máquina de
helado en marcha y dejar congelar entre 15 y 30 minutos.
Helado de chocolate
100 ml de leche, 1 yema, 40 g de azúcar, 1/2 P. sobrecito de vainilla azucarada,
50 g de chocolate con leche, 100 g de nata, 1 cucharadita de cacao
Calentar la leche en una cacerola y llevar brevemente a ebullición. Mientras
tanto, batir la yema con la vainilla azucarada hasta obtener una masa espumosa
sólida. Al mismo tiempo, añadir poco a poco el azúcar. Verter la leche caliente
en la masa espumosa de huevo sin dejar de remover lentamente con la batidora.
Verter de nuevo la mezcla de leche y huevos al cazo y calentar otra vez sin
dejar de remover hasta que el líquido se espese ligeramente. Pasar todo a un
recipiente amasador y dejar enfriar durante aproximadamente media hora.
Mientras tanto, derretir el chocolate con tres cucharadas de nata al baño
maría sin dejar de remover y añadir directamente una cucharadita colmada de
cacao a la mezcla de leche y huevos hasta que el chocolate se haya disuelto
completamente. Dejar enfriar la mezcla durante media hora y después ponerla
de nuevo en la nevera durante aproximadamente una hora.
Montar ligeramente el resto de nata y añadirla a la leche de chocolate sin dejar
de remover. Agregar todo a la máquina de helado en marcha y dejar congelar
durante 30 minutos aproximadamente.
Helado de yogur
90 g de nata, aprox. 40 g de azúcar glass, 175 g de yogur de cualquier sabor (p.
ej., yogur de frutas o de nueces), 1 huevo
Batir la nata con el azúcar glass hasta obtener una crema. Mezclar con la
batidora el yogur con el huevo e incorporar la nata. Verter la masa en la máquina
de helado en marcha y dejar congelar durante 25 minutos aproximadamente.
Besos de moza de helado
4 besos de moza, 1-2 cucharadas de azúcar glass, 175 ml de leche
Trocear los besos de moza con cuidado. Para ello, quitar los barquillos y el
glaseado de chocolate y colocar ambos a un lado. Verter la merengue en un
recipiente. Añadir el azúcar y la lecha a la merengue y mezclar todo hasta
obtener una crema homogénea. Verter estar crema en la máquina de helado y
Stand 25.10.2024
89 von 106
DE
EN
FR
NL
IT
ES
PL
Page 90

DE
Copyright UNOLD AG | www.unold.de
EN
FR
NL
IT
ES
dejar enfriar durante unos 10 minutos. Ahora, añadir las cortezas de chocolate a
la masa de helado y dejar enfriar todo durante otros 10 a 15 minutos. Mientras
tanto, colocar los barquillos de besos de moza sobre una bandeja. Después de
finalizar el tiempo de congelado llenar un sacabolas de helado (tamaño 14) con
la masa de helado y colocar una bola sobre cada barquillo. Dejar enfriar los besos
de moza de helado durante unas horas más en el congelador. Consejo: Puede
cubrir los besos de moza de helado con glaseado de chocolate marrón o blanco
y espolvorear con virutas de chocolate.
IDEAS DE RECETAS PARA ADULTOS
PL
Batido de piña y coco
1 lata de rodajas de piña (aprox. 125 g de peso neto), 65 ml de leche de
coco, 2 claras, 25 g de azúcar glass, 1 cucharada de ron blanco, 1/2 plátano,
1/2 cucharada de zumo de limón, guindas al marrasquino, palillos, 125 ml de
zumo de piña, 60 ml más de leche de coco
Mezclar 3/4 de las rodajas de piña con el zumo de piña de la lata y la leche
de coco (62 ml) hasta obtener un puré. Cortar en trozos pequeños las rodajas
restantes, añadirlas y dejar enfriar durante media hora. Batir la clara con el
azúcar glass y añadir al puré de frutas. Dejar congelar todo durante 40 minutos
aproximadamente en la máquina de helado. Después de 25 minutos, añadir el
ron. Cortar en rodajas la mitad del plátano y rociar con el zumo de limón. Pinchar
las rodajas y las guindas en los palillos. Añadir 4 bolas grandes de helado a un
recipiente amasador. Guardar el resto en el congelador. Agregar el zumo de piña,
la leche de coco y el resto del plátano a las bolas de helado y mezclar todo hasta
obtener un puré. Distribuir el batido en vasos y decorar con los pinchos.
Sorbete de naranja y Campari
35 ml de Campari, 200 ml de zumo de naranja, 75 g de azúcar glass, 1 claras
Añadir el Campari con 180 ml de zumo de naranja y 30 g de azúcar glass en
un vaso mezclador alto y batir hasta que se haya disuelto el azúcar. Poner todo
en la nevera durante dos horas. Después del tiempo de enfriamiento, batir la
clara con el resto de azúcar glass y el zumo de naranja restante hasta obtener
una espuma. Mezclar esta masa de claras con la mezcla de naranja y Campari.
Agregar la mezcla de helado a la máquina de helado y dejar congelar entre 30 y
40 minutos. Consejo: El sorbete de naranja y Campari es bastante blando por su
contenido de alcohol, de modo que puede dividirlo en porciones directamente
90 von 106
Stand 25.10.2024
Page 91
desde el congelador. Este sorbete sabe muy bien si lo añade con una manga
Copyright UNOLD AG | www.unold.de
pastelera a vasos altos rellenándolos con zumo de naranja recién exprimido.
Las recetas del presente manual de instrucciones han sido cuidadosamente seleccionadas y probadas
tanto por sus autores como por UNOLD AG quienes, no obstante, no asumen garantía alguna. Queda
explícitamente excluida cualquier responsabilidad de los autores y UNOLD AG o sus delegados por
daños personales, materiales o financieros.
CONDICIONES DE GARANTIA
Concedemos una garantía de 24 meses, 12 meses en el caso de uso comercial, a partir de la fecha de compra de este aparato
de la marca UNOLD, para aquellos daños que se demuestren debidos a defectos de fábrica con un uso conforme a lo previsto.
Dentro del período de garantía, subsanaremos los defectos de material y de fabricación mediante la reparación o el cambio
a nuestra discreción. Nuestros servicios de garantía se aplican exclusivamente a los dispositivos vendidos en Alemania y
Austria. Para otros países, póngase en contacto con el importador responsable. Por favor, envíe bien embaladas las unidades
para las que se reclama la eliminación de un defecto junto con una copia de la factura de compra (la factura debe ser
impresa, no manual) en la que debe figurar la fecha de compra, así como una descripción del defecto, a nuestro servicio
de atención al cliente. Puede imprimir una hoja de devolución en nuestro sitio web https://unold.de/pages/rucksendungen
(solo para envíos de Alemania y Austria). Quedan excluidos de la garantía los daños debidos al desgaste, la manipulación
incorrecta y el incumplimiento de las instrucciones de mantenimiento y cuidado. La garantía queda anulada si la unidad es
reparada o manipulada por terceros. Esta garantía del fabricante no limita sus derechos legales ni sus reclamaciones contra
el vendedor o distribuidor derivadas del contrato de compraventa de conformidad con las disposiciones del Código Civil
alemán (BGB). Sus derechos legales como consumidor, en concreto sus derechos de garantía y las reclamaciones legales por
defectos según §§ 437 y siguientes del BGB, no se verán afectados.
UNOLD AG, Mannheimer Straße 4, D-68766 Hockenheim
DE
EN
FR
NL
IT
ES
PL
DISPOSICIÓN/PROTECCIÓN DEL MEDIO AMBIENTE
Nuestros aparatos se fabrican con un alto nivel de calidad por un largo período de uso. El mantenimiento
regular y las reparaciones de tipo técnico a través de nuestro servicio al cliente pueden prolongar la
duración del aparato. Cuando un aparato está defectuoso y ya no puede repararse, por favor considere
en la disposición final los siguientes puntos: Este producto no puede ser eliminado junto a la basura
domiciliaria. Existe la obligación legal de eliminar los residuos de aparatos eléctricos y electrónicos
(RAEE), así como las pilas y acumuladores, por separado de la basura doméstica. Puede reconocer estos
residuos por el símbolo del cubo de basura tachado (símbolo RAEE). Usted debe entregar este producto a un
lugar oficial para el reciclaje de aparatos eléctricos o electrónicos. Mediante la clasificación por separado
y el reciclaje de productos residuales, Usted contribuye a proteger los recursos naturales y asegura que el
producto sea eliminado de forma salubre y acorde con el medio ambiente.
Stand 25.10.2024
91 von 106
Page 92
DE
Copyright UNOLD AG | www.unold.de
INSTRUKCJA OBSŁUGI MODEL 48855
EN
FR
NL
IT
ES
PL
DANE TECHNICZNE
Moc: 12 W, 220–240 V~, 50 Hz
Pojemność: ok. 1500 ml
Rozmiary: ok. 21,9 x 21,9 x 25,5 cm (szer./gł./wys.)
pojemnik na lody ok. 19,1 x 19,1 x 14,5 cm
Ciężar: ok. 3,2 kg
Przewód zasilający: ok. 120 cm
Chłodziwa: Karboksymetyloceluloza, mocznik, woda
Wyposażenie: pojemność 1,5 l, wyjmowany pojemnik na lody, obudowa z wysokiej
jakości stali szlachetnej i tworzywa sztucznego, pokrywa z otworem do
napełniania, wyświetlacz z timerem i panelem dotykowym do sterowania,
silnik z obrotami w lewą i w prawą stronę, Stopień ochrony II
Akcesoria: Instrukcja obsługi z przepisami
Zmiany i błędy w opisie wyposażenia, technice, kolorach i konstrukcji są zastrzeżone
OBJAŚNIENIE SYMBOLI
Symbol ten oznacza ewentualne niebezpieczeństwa, które mogą prowadzić do obrażeń
lub uszkodzenia urządzenia.
DLA BEZPIECZEŃSTWA UŻYTKOWNIKA
Prosimy przeczytać poniższe instrukcje i zachować je do użytku w
przyszłości.
Wskazówki dotyczące osób w gospodarstwie domowym
1. Urządzenie może być używane przez dzieci w wieku powyżej 8 lat
oraz osoby o ograniczonej sprawności fizycznej, sensorycznej
czy umysłowej lub osoby nie posiadające doświadczenia i/lub
wiedzy, jeśli są one nadzorowane lub zostały przeszkolone w
zakresie bezpiecznego użytkowania i zrozumiały wynikającego z
tego zagrożenia.
2. Nie wolno dzieciom bawić się urządzeniem.
3. Czyszczenia i konserwacji, które powinien wykonać użytkownik,
nie mogą wykonywać dzieci poniżej 8 lat. Dzieci w wieku powyżej
8 lat mogą robić to pod nadzorem.
4. Urządzenie z przewodem przechowywać w miejscu niedostępnym
dla dzieci w wieku poniżej 8 lat.
92 von 106
Stand 25.10.2024
Page 93

Wskazówki dotyczące zdrowia
Copyright UNOLD AG | www.unold.de
5. Rozmrożone lody natychmiast spożyć i nie zamrażać ich
ponownie.
6. Lody należy spożywać tylko świeże. Ewentualne resztki
natychmiast zamrozić i spożyć w ciągu tygodnia.
7. Używać tylko świeżych składników.
8. Przede wszystkim jaja powinny być bardzo świeże, aby uniknąć
namnażania się szkodliwych mikroorganizmów. Resztek lodów,
które zawierają jaja, nie należy ponownie zamrażać.
9. Lody przyrządzone z dodatkiem surowych jaj lub częściowo
surowych jaj nie powinny być spożywane przez małe dzieci,
kobiety w ciąży, starsze osoby lub chore osoby.
10. Urządzenie należy czyścić natychmiast po przyrządzeniu lodów.
W przeciwnym wypadku może dojść do namnażania się bakterii.
11. Jeżeli z pojemnika chłodzącego wycieka płyn chłodzący, należy
go wymienić na nowy.
12. Ciecz chłodząca w pojemniku na lody nie nadaje się do spożycia.
Jeżeli z pojemnika na lody wycieka płyn, przerwać używanie
pojemnika. W przypadku nieumyślnego kontaktu podjąć
następujące środki: wyprać zabrudzoną odzież, natychmiast
dokładnie umyć skórę wodą z mydłem, w przypadku połknięcia
wypłukać usta i nie wywoływać wymiotów – zasięgnąć jak
najszybciej porady lekarza!
DE
EN
FR
NL
IT
ES
PL
Bezpieczeństwo elektryczne
13. Podłączać urządzenie wyłącznie do prądu zmiennego o napięciu
podanym na tabliczce znamionowej.
14. Urządzenie nie może pracować z zewnętrznym regulatorem
czasowym lub systemem zdalnego sterowania.
15. Po użyciu, przed czyszczeniem lub w razie ewentualnych zakłóceń
podczas pracy należy zawsze wyciągnąć wtyczkę z gniazdka.
16. Nie zanurzać urządzenia do wody ani do innej cieczy, chronić
kabel przed wilgocią.
17. Przed użyciem przewód całkowicie rozwinąć.
18. Nie owijać przewodu wokół urządzenia i nie zginać go, aby
uniknąć jego uszkodzenia.
19. Używać urządzenie tylko w pomieszczeniach wewnętrznych.
Stand 25.10.2024
93 von 106
Page 94

DE
Copyright UNOLD AG | www.unold.de
EN
FR
NL
IT
ES
PL
20. Wyciągać przewód z gniazda trzymając tylko za wtyczkę. W
żadnym wypadku nie ciągnąć za kabel przyłączeniowy.
21. Aby uniknąć uszkodzenia kabla, nigdy nie należy nosić urządzenie
trzymając za kabel lub ciągnąc za kabel.
22. Wyciągnąć wtyczkę z gniazdka sieciowego przed rozłożeniem
urządzenia na części, czyszczeniem urządzenia, włożeniem lub
wyjęciem poszczególnych części lub przestawieniem w inne
miejsce.
23. Regularnie kontrolować wtyczkę i przewód pod kątem zużycia
lub uszkodzenia. Jeżeli uszkodzony jest kabel lub inne części,
prosimy odesłać urządzenie do sprawdzenia i naprawy do naszego
serwisu klienta. Niewłaściwie wykonane naprawy mogą stanowić
zagrożenie dla użytkownika i prowadzą do unieważnienia
gwarancji.
Wskazówki dotyczące ustawienia i bezpiecznego użycia urządzenia
24. Urządzenie i jego części nie nadają się do mycia w zmywarce do
naczyń.
25. Urządzenie należy stawiać na wolnej i równej powierzchni.
26. Urządzenie przeznaczone jest wyłącznie do użycia w gospodarstwie
domowym lub w podobnych zastosowaniach, np.
aneksach kuchennych w sklepach, biurach lub innych zakładach,
gospodarstwach rolnych,
do użycia przez gości w hotelach, motelach lub innych
noclegowniach,
w prywatnych pensjonatach lub domach letniskowych.
27. Ze względów bezpieczeństwa nie umieszczać i nie używać
urządzenia ani kabla na gorących powierzchniach lub w ich
pobliżu.
28. Kabel nie może zwisać z krawędzi powierzchni roboczej.
29. Nie dotykać wnętrza pojemnika chłodzącego gołymi rękami lub
innym częściami ciała (zwłaszcza wtedy, gdy są one mokre), aby
uniknąć obrażeń/zamrożenia.
30. Nie przekraczać maksymalnej ilości napełnienia. Napełniać
pojemnik chłodzący maksymalnie do 5 cm pod górną krawędzią,
ponieważ lody podczas mrożenia zwiększają swoją objętość.
94 von 106
Stand 25.10.2024
Page 95
31. Urządzenie musi być kompletnie zmontowane i włączone, zanim
Copyright UNOLD AG | www.unold.de
włoży się do niego żądane składniki. Nie wkładać składników
wcześniej, gdyż mogą one przymarznąć do krawędzi pojemnika.
Lody mogą wówczas nie osiągnąć pożądanej konsystencji.
32. Nie poruszać pracującym urządzeniem.
33. Nie pozostawiać pracującego urządzenia bez nadzoru.
34. Nigdy nie używać urządzenia bez pojemników chłodzących!
35. Podczas pracy nie wkładać do pracującego urządzenia żadnych
przedmiotów ani rąk. Istnieje niebezpieczeństwo obrażeń!
36. Używać urządzenie wyłącznie po prawidłowym złożeniu.
37. Nie używać urządzenia z akcesoriami należącymi do innych
urządzeń.
38. Nie wkładać do pojemnika chłodzącego żadnych szpiczastych
ani ostrych przedmiotów. W przeciwnym wypadku pojemnik może
zostać zadrapany. W razie potrzeby użyć szpatułki z tworzywa
sztucznego lub drewna.
39. Wyłączyć urządzenie i wyciągnąć wtyczkę sieciową, po
zakończeniu przygotowywania lodów, przed czyszczeniem lub
gdy konieczne jest usunięcie usterki.
40. UWAGA: Do pojemnika można wkładać tylko produkty spożywcze.
DE
EN
FR
NL
IT
ES
PL
Nie wkładać ręki do pracującego urządzenia – istnieje
niebezpieczeństwo obrażeń! Nie dotykać wnętrza pojemnika
chłodniczego gołymi rękoma!
W żadnym wypadku nie otwierać silnika urządzenia. Istnieje
niebezpieczeństwo porażenia prądem elektrycznym.
Uwaga: Nigdy nie dotykać pojemnika chłodzącego mokrymi
częściami ciała, np. palcami, aby uniknąć obrażeń/zamrożenia.
Producent nie przejmuje odpowiedzialności za nieodpowiednie bądź wadliwe użytkowanie lub po
przeprowadzonych naprawach przez nieautoryzowane zakłady bądź niekompetentne osoby.
Stand 25.10.2024
95 von 106
Page 96
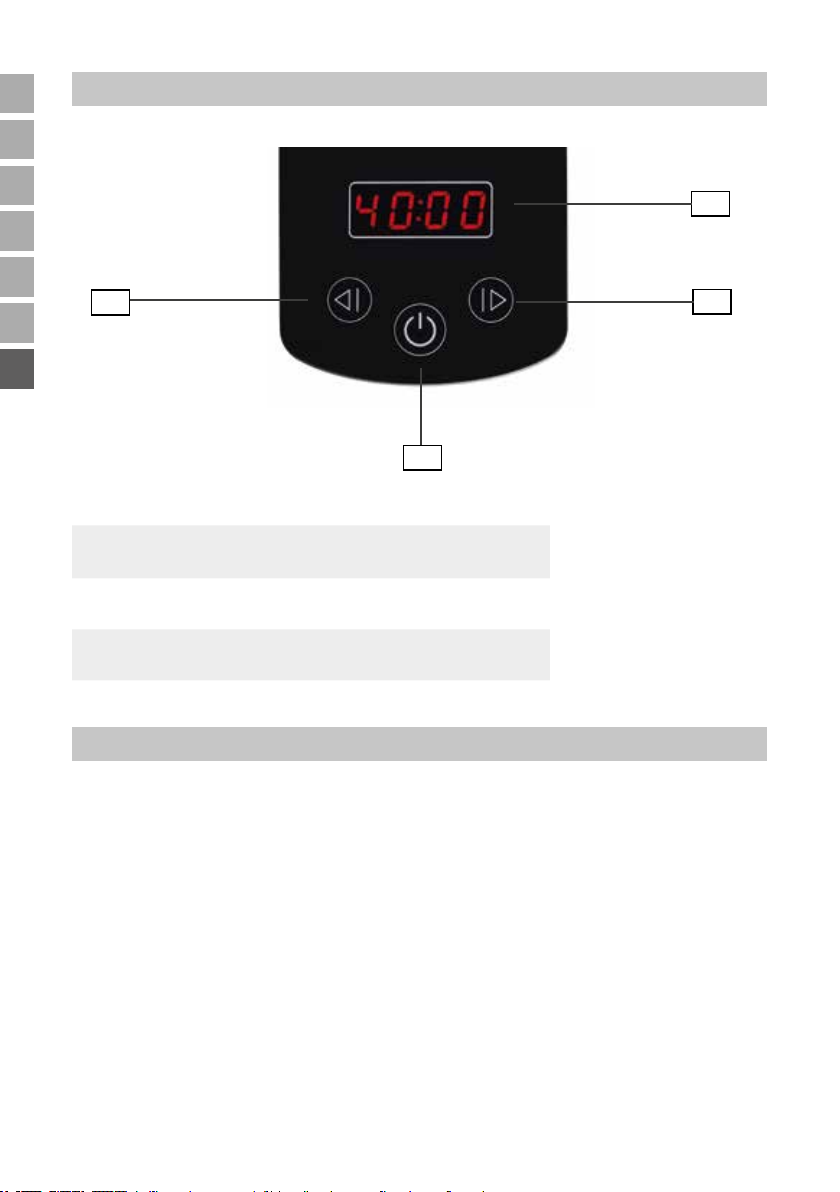
DE
Copyright UNOLD AG | www.unold.de
EN
PANEL OBSŁUGOWY
FR
NL
IT
ES
PL
4
1
Wyświetlacz ze wskaźnikiem czasu pracy
Przycisk WŁ./WYŁ
2
do włączania i wyłączania urządzenia
Przycisk +
3
do wydłużenia czasu pracy
Przycisk -
4
do skrócenia czasu pracy
PRZED PIERWSZYM UŻYCIEM
1
3
2
1. Usunąć wszystkie materiały opakowaniowe oraz wszelkie zabezpiecze-
nia transportowe i naklejki (nie usuwać tabliczki znamionowej lub numer
seryjny!). Materiał z opakowania nie może dostać się w ręce dzieci –
niebezpieczeństwo uduszenia! Materiały z opakowania powinny zostać zuty-
lizowane zgodnie z lokalnymi przepisami.
2. Proszę sprawdzić, czy urządzenie nie jest uszkodzone. W razie dostrzeżenia
jakichkolwiek uszkodzeń proszę nie włączać urządzenia do eksploatacji, lecz
zwrócić się do naszego serwisu klienta.
3. Wyczyścić wszystkie części wilgotną ścierką zgodnie z opisem podanym w
rozdziale „Czyszczenie i pielęgnacja“.
4. Ustawić urządzenie na równej i suchej powierzchni.
96 von 106
Stand 25.10.2024
Page 97
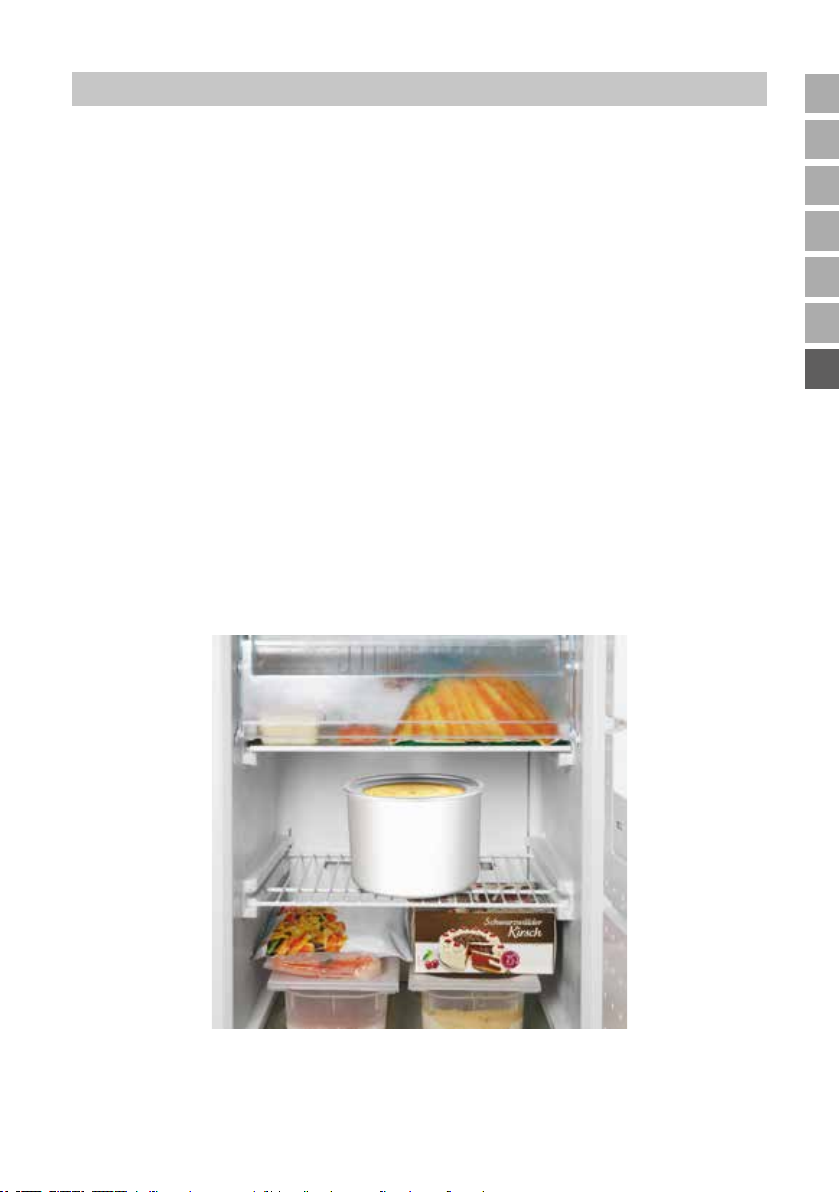
PRZED PRZYGOTOWANIEM LODÓW
Copyright UNOLD AG | www.unold.de
DE
1. Zanim możliwe będzie przygotowanie lodów, pojemnik na lody napełniony
cieczą chłodzącą należy włożyć na przynajmniej 8 godzin do zamrażalnika
*** lub zamrażarki. Temperatura musi wynosić minimum −18°C. Zwrócić
uwagę na to, aby wcześniej wyczyścić wnętrze pojemnika, po czym je dobrze
osuszyć.
2. Wstawić pojemnik na lody prosto z otworem skierowanym do góry do
zamrażalnika.
3. Zależnie od temperatury panującej w zamrażarce proces mrożenia trwa od
8 do 22 godzin. Przez potrząśnięcie pojemnika na lody można sprawdzić,
czy zamarzła cała ciecz chłodząca.
4. Porada: jeśli maszyna do lodów nie jest używana, należy przechowywać
pojemnik na lody owinięty np. w plastikowy woreczek w zamrażarce. Dzięki
temu będzie on zawsze gotowy do użycia.
5. Jeżeli przygotowywane mają być kolejno lody o różnych smakach, zalecamy
nabycie dodatkowych pojemników na lody. Można je nabyć bezpośrednio u
nas, używając do tego celu formularza zamówieniowego na stronie 107.
EN
FR
NL
IT
ES
PL
Stand 25.10.2024
97 von 106
Page 98
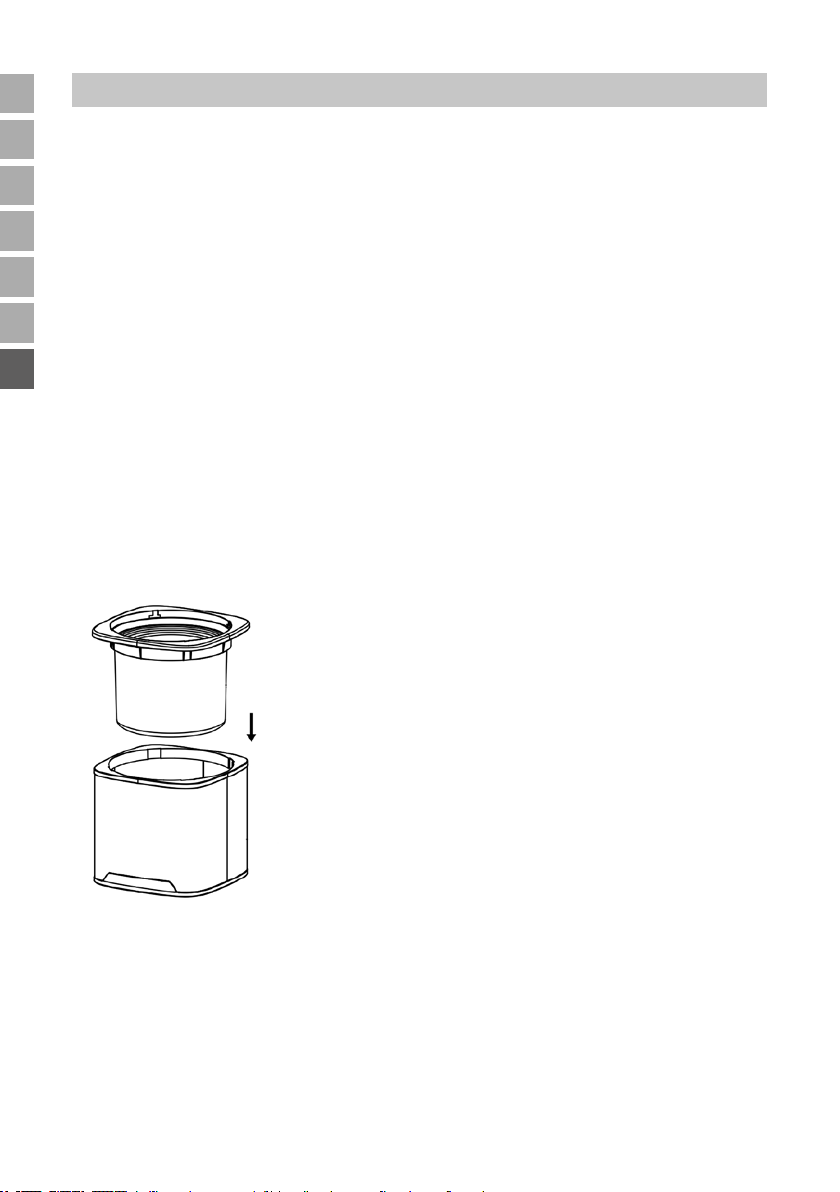
DE
Copyright UNOLD AG | www.unold.de
PRODUKCJA LODÓW
EN
FR
NL
IT
ES
PL
Żądane składniki należy już na kilka godzin przed przygotowaniem lodów schłodzić
w lodówce! Jeżeli przygotowywane są lody z zawartością alkoholu, należy go
dodać do lodów dopiero wtedy, gdy masa lodowa osiągnie żądaną konsystencję.
Maksymalna pojemność pojemnika na lody wynosi 1100 ml.
Porada: jeśli przepis zawiera alkohol, należy go dodawać w małych ilościach i
dopiero pod koniec zamrażania, gdyż alkohol wydłuża czas zamrażania.
1. Przygotować masę lodową według przepisów z części z przepisami. Jeśli
masa lodowa musi najpierw zostać ugotowana, należy zrobić to poprzedniego
dnia, aby masa mogła dobrze ochłodzić się.
2. Zalecamy, aby masę lodową przed użyciem zawsze najpierw schłodzić w
lodówce.
3. Wyjąć pojemnik na lody z zamrażalnika.
4. Włożyć pojemnik na lody do wkładu pojemnika na lody.
5. Umieścić teraz wkład pojemnika na lody z pojemnikiem w obudowie
urządzenia.
6. W razie potrzeby nałożyć oś na mieszadło. Zadbać o to, aby obie części
były prawidłowo połączone – strona osi z obydwoma ramionami musi być
nasadzona w kierunku mieszadła.
7. Zamocować silnik przy pokrywie i ostrożnie nałożyć obie części na urządzenie.
8. Włożyć oś do otworu od spodu silnika.
9. Silnik może być prawidłowo przymocowany do pokrywy tylko w jednym
kierunku (patrz rys.).
98 von 106
Stand 25.10.2024
Page 99
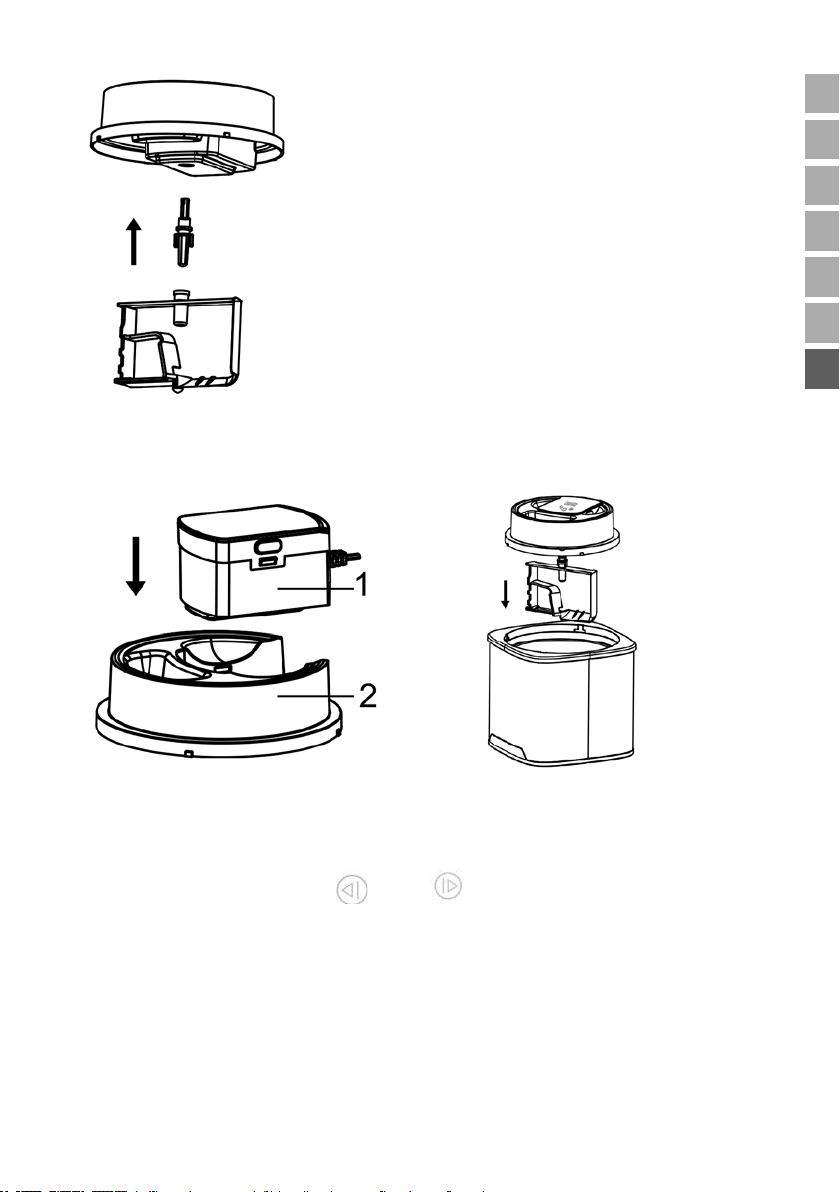
10. Obrócić pokrywę w kierunku przeciwnym do ruchu wskazówek zegara, aż się
Copyright UNOLD AG | www.unold.de
mocno zatrzaśnie.
DE
EN
FR
NL
IT
ES
PL
11. Włożyć wtyczkę do gniazdka. Urządzenie znajduje się w trybie czuwania.
12. Włączyć urządzenie przyciskiem WŁ./WYŁ., na wyświetlaczu pojawia się
40:00.
13. Za pomocą przycisków „ ” i „ ” ustawić teraz żądany czas pracy
między 5 i 45 minut w krokach co 5 minut. Wybrany czas wyświetla się na
wyświetlaczu i odlicza wstecz.
14. Wskazówka: jeśli przed 2 sekundy nie naciśnięty zostanie żaden przycisk,
uruchamia się silnik mieszadła.
15. Otworzyć otwór do napełniania i wlać przez otwór masę lodową do urządzenia.
Nie wlewać masy lodowej do wyłączonego urządzenia. Inaczej masa lodowa
natychmiast przywrze do krawędzi pojemnika na lody.
Stand 25.10.2024
99 von 106
Page 100
DE
Copyright UNOLD AG | www.unold.de
EN
FR
NL
IT
ES
PL
16. Ponieważ objętość lodów podczas zamrażania zwiększa się, nie napełniać
pojemnika do krawędzi, lecz pozostawić ok. 5 do 7 cm wolnego miejsca.
17. Maszyna do lodów powinna pracować tak długo, aż lody osiągną żądaną
konsystencję. W razie potrzeby wybrany czas pracy można skrócić lub
wydłużyć. Zależnie od składników ten proces trwa od 20 do 40 minut.
Sprawdzać od czasu do czasu proces mrożenia i wyłączyć urządzenie, jeśli
mieszadło się zatrzyma.
18. Jeżeli masa lodowa zrobi się za twarda, może zmienić się kierunek obrotów
mieszadła, co zapobiega uszkodzeniu silnika.
19. Uwaga: nie wyłączać urządzenia podczas przygotowywania lodów. Inaczej
masa lodowa przywrze do wewnętrznej krawędzi pojemnika na lody. Jeśli
silnik przegrzeje się podczas przygotowywania lodów, wyłączy się on
automatycznie. Wyciągnąć w tym przypadku wtyczkę z gniazdka i zaczekać
do ochłodzenia się urządzenia. Jeżeli lody mają być dalej przygotowywane,
konieczne może być użycie nowych składników.
20. Jeśli przepis zawiera alkohol, należy go dodawać w małych ilościach i dopiero
pod koniec zamrażania, gdyż alkohol wydłuża czas zamrażania.
21. Wyłączyć urządzenie przyciskiem WŁ./WYŁ.
22. Zdjąć pokrywę, wykręcając ją do góry z urządzenia.
23. Wyjąć wkład pojemnika na lody wraz z pojemnikiem z urządzenia.
24. Wyjąć lody najlepiej za pomocą plastikowej lub drewnianej szpatułki, aby
nie porysować pojemnika.
25. Lody powinny mieć miękką konsystencję. Jeśli preferowane są bardziej
twarde lody, można pojemnik włożyć dodatkowo do zamrażalnika/zamrażarki.
26. Nie trzymać lodów w zamrażalniku jednak dłużej niż 30 minut. Jeśli lody
nie są od razu spożywane, należy je przełożyć do zamykanego pojemnika i
wstawić do zamrażalnika. W lodach mogą się wytrącić kryształki zamarzniętej
wody, gdyż optymalna temperatura lodów wynosi ok. –10°C, a temperatura
w zamrażarkach jest z reguły niższa.
Nie wkładać rąk do pracującego urządzenia – istnieje
niebezpieczeństwo obrażeń! Nie dotykać wnętrza pojemnika
na lody gołymi rękami! Uwaga: nigdy nie dotykać pojemnika na
lody mokrymi częściami ciała, np. palcami. W innym przypadku
istnieje niebezpieczeństwo skaleczenia / odmrożenia.
100 von 106
Stand 25.10.2024
 Loading...