

Page 1

■ chapter 1 getting to know the basics
1-1
CHAPTER▼ ONE
GETTING TO KNOW THE BASICS
This chapter introduces the features and
components of the computer.
Page 2

■ chapter 1 getting to know the basics
1-2
Performance Features
High Performance Processor with Calistoga Chipset
The notebook PC is equipped with a powerful Mobile Intel
Pentium M processor. Together with the latest Calistoga
chipset and technologies, the system offers advanced PC
performances.
Advanced Graphic Engine
The system is either built with ATI Mobility M54-P with
128MB DDR dedicated frame buffer. The PCI-Express
high-end graphic engine offers excellent graphic
performance for the most demanding professionals or
gamers. The advanced graphic chip also incorporate s a
hardware-based motion-compensation engine, which gives
you smooth MPEG video playback. DirectX 9 graphics
capability also adds realism to PC games.
LCD Display
The computer is equipped with a non-wide (16:10) 15.4”
TFT display panel for best cinematic viewing experience.
Serial ATA Hard Disk Drive Support (on certain models)
The serial ATA bus offers higher data throughput than the
traditional parallel ATA bus. This gives you optimal hard
drive performance.
ExpressCard Technology
ExpressCard is the next-generation of the PC Card
standard. The bus interface is based on the two standards:
PCI Express for high-performance I/O and USB2.0 for
variety of devices.
Page 3

■ chapter 1 getting to know the basics
1-3
Expandability
The system offers upgradeable hard disk drive an d 2 DDR
SDRAM sockets for expansion, allowing the user to easily
increase the storage and system capacities as the need
arises.
Built-in Multiple Card Reader
The built-in 4-in-1 card reader lets you access many of the
portable media formats (SD Card, MMC Card, MS Ca rd,
and MS Pro Card).
Ethernet Port
The system provides built-in 10/100/1000Mbps Ethernet
network adapter for high bandwidth network connection.
Firewire (IEEE1394 / 1394a) and USB2.0 ports
In addition to a full array of built-in I/O por
ts, the computer
offers IEEE1394 for ultra high-speed connection to high
bandwidth digital video devices and USB2.0 ports to
connect to any USB-based peripheral devices.
Wireless LAN
The internal Wireless LAN module allows your notebook to
connect wirelessly to other 802.11-enabled systems,
devices, or network.
Page 4
■ chapter 1 getting to know the basics
1-4
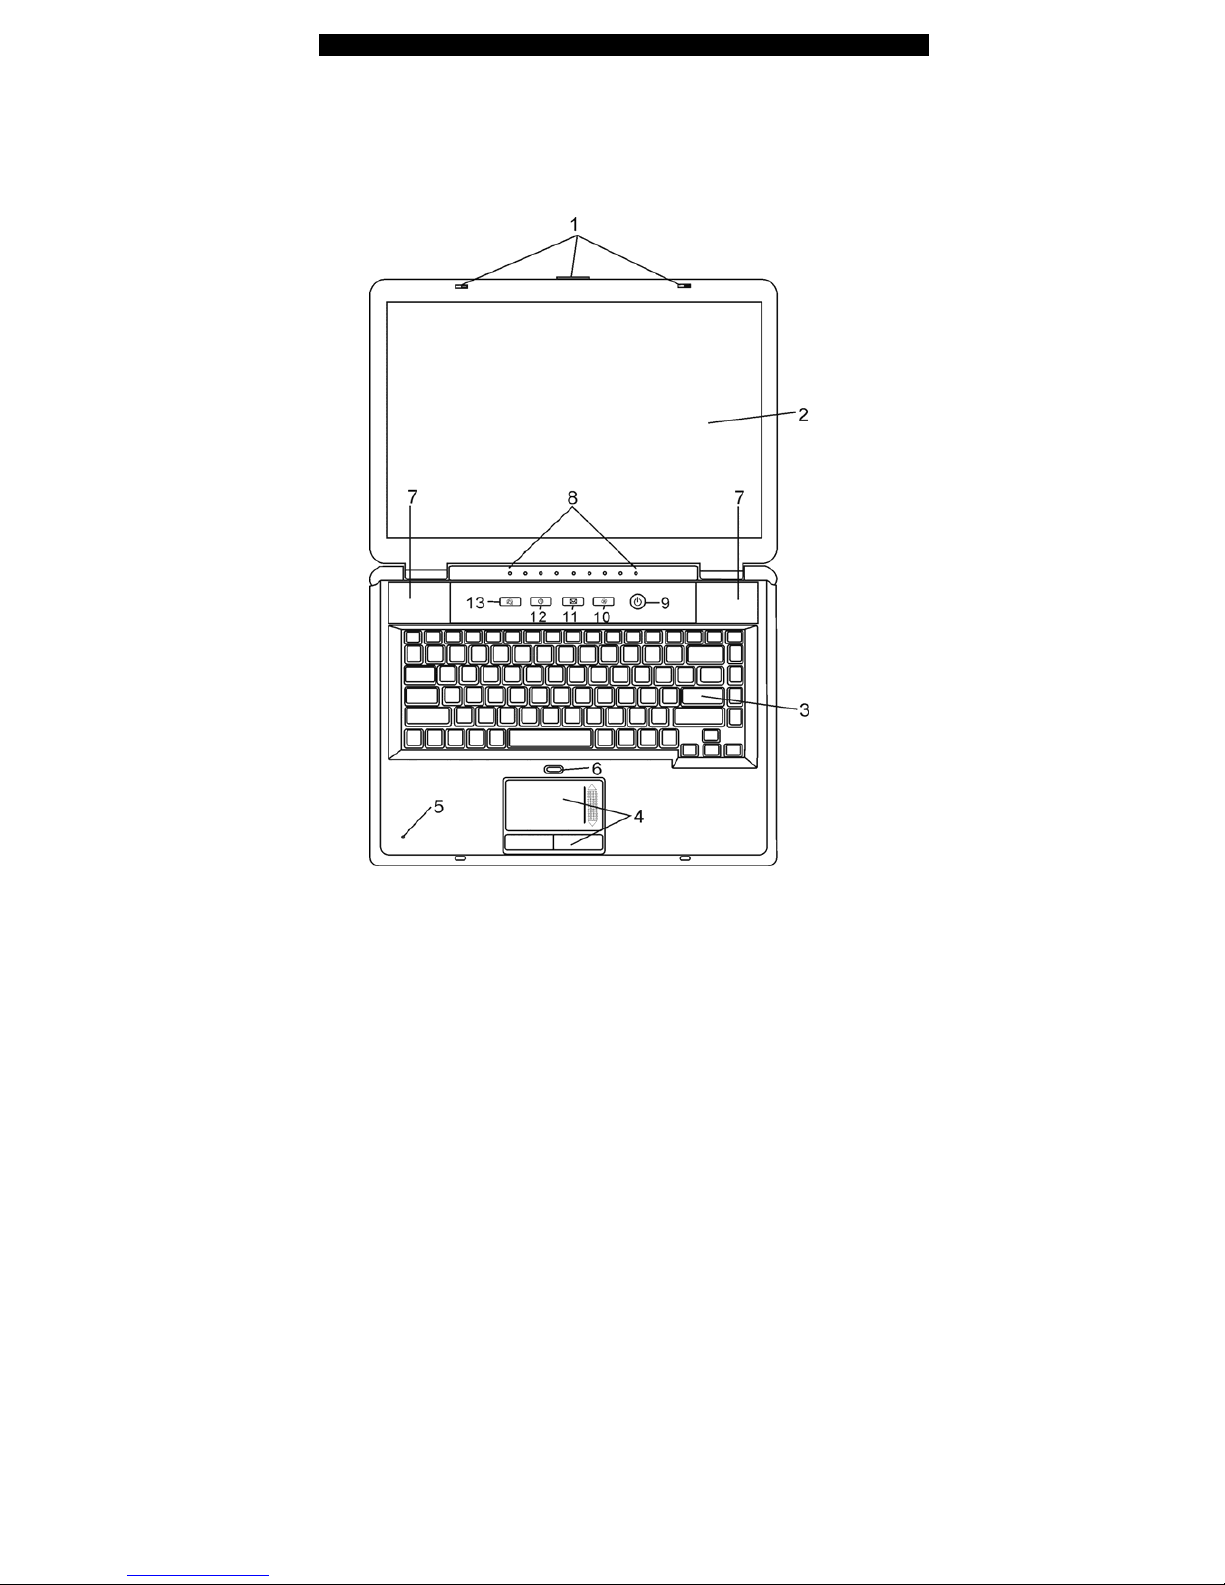
System At A Glance
T op View
1. LCD Latch
The LCD latches lock / unlock the LCD panel.
Page 5

■ chapter 1 getting to know the basics
1-5
2. LCD Display
The panel is where the system content is displayed.
3. Keyboard
The keyboard is used to enter data. It has an embedded
numeric keypad and cursor control keys. (See Keyboard
Section for details.)
4. Touch Pad
The touch pad is a built-in pointing device with functions similar
to a mouse.
5. Built-in Microphone
The built-in microphone records sound.
6. T ouch Pad Disable / Enable Button
The button enables or disables Touch Pad function.
7. Built-in Stereo Speakers
The built-in speakers output the sound in stereo.
8. LED Status Indicator
The LED Status indicators reveal the status of these functions:
Numeric keypad, cap lock, scroll lock, WLAN module enabling
and disabling and also the ODD, HDD activities. (See the LED
Status Indi cator Section for details.)
The LED Status indicators also reveal the status of the system
power state and battery-charging state. See the LED Status
Indicator Section for details.
9. Power / Suspend Button
Page 6

■ chapter 1 getting to know the basics
1-6
The power/suspend button turns the notebook on and off and it
also acts as a system suspend key. Press momentarily to turn
on the system. Press and hold for at least 4 seconds to turn off
the system. How this key behaves can be defined in [Start >
Settings > Control Panel > Power Options > Advanced] menu.
Press the power / suspend button again to return from the
suspend mode. (See Chapter 3 for more details on system
suspend function.)
Note:
When the system power is initially turned on, the Scroll-lock,
Cap-lock, and Numeric keypad LED indicators will light up momentarily to
indicate the start of the Power-On sequence.
10. Silent Mode Button
Pressing the key enables the system to lower its power usage;
therefore the fan speed is reduced to achieve lowest operating
noise.
You may need to go to BIOS Setup to enable Silent Mode for
this button. See Chapter 2 for details.
11. Outlook Express Quick Key
Pressing the button launches Outlook Express in Windows.
12. Internet Explorer Quick Key
Pressing the button launches Internet Explorer in Windows.
13. Windows Media Player Quick Key
Pressing the button launches Media Player in Windows.
Page 7
■ chapter 1 getting to know the basics
1-7
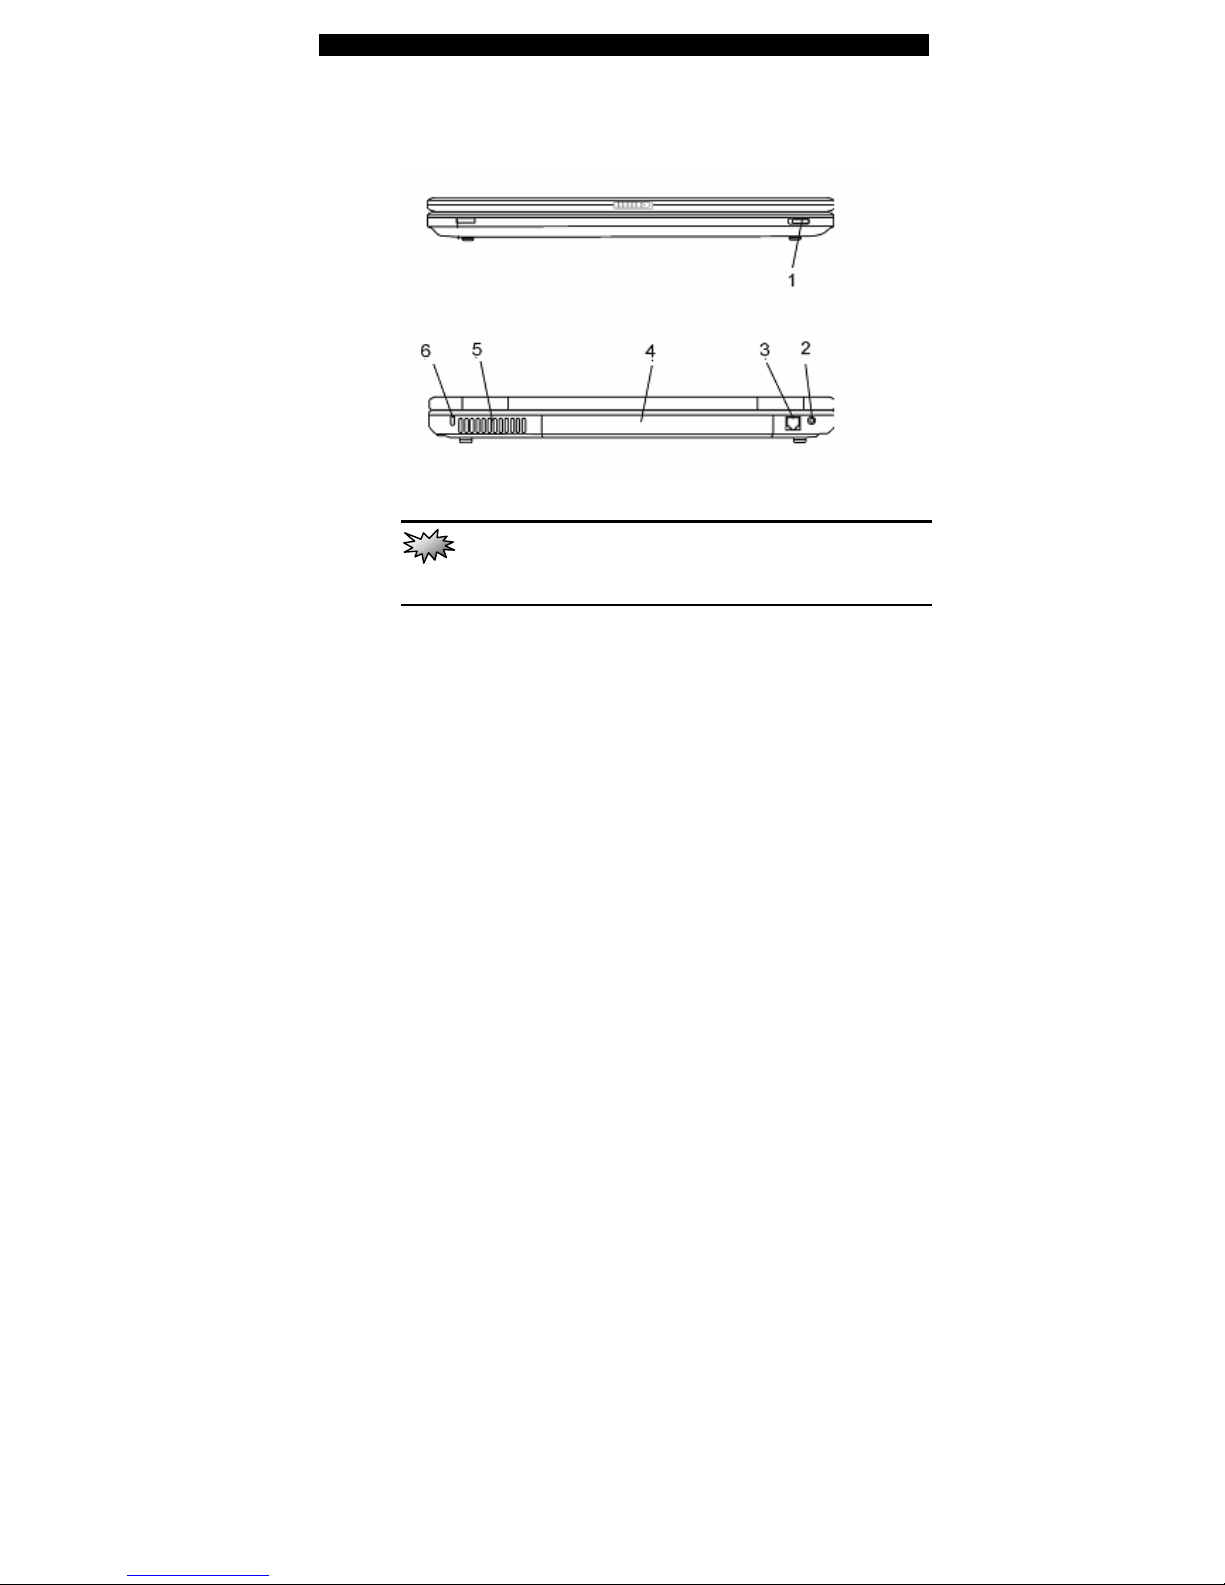
Front and Rear View
Warning:
Do not place any heavy objects on the top of notebook. This may
damage the display
1. Wireless On/Off Switch
Use the Switch to disable or enable the Wireless function.
2. Power Jack (DC-in)
The DC-out jack of the AC Adapter connects here and powers
the computer.
3. Modem Port
This is where you plug the phone jack (RJ-11) for fax/modem
functions.
4. Battery Pack
The battery pack is a built-in power source for the notebook.
5. Ventilation Grill
Page 8

■ chapter 1 getting to know the basics
1-8
The fan grill is where air is exchanged to dissipate the internal
heat. Do not block this airway completely.
6. Kensington Lock Key Hole
A Kensington-type se curity lock latches to this keyhole for
anti-theft purpose.
Page 9

■ chapter 1 getting to know the basics
1-9
Side Views
Warning:
Do not place any heavy objects on the top of notebook. This may
damage the display
1. Audio Volume Dial
Use the volume dial to control the loudness of the speakers.
2. Stereo Headphone / SPDIF-out Jack
The stereo headphone jack (3.5-mm diameter) is where you
connect the headphones or external speakers. Alternatively,
you may connect the SPDIF output to an external DTS, AC3, or
PCM sound processor / decoder in your home stereo system.
3. Microphone Jack
The microphone jack (3.5-mm diameter) is where you connect
a microphone.
4. Optical Drive and Disk Eject Button and Manual Eject Key
Page 10

■ chapter 1 getting to know the basics
1-10
Hole
If your computer comes with the Combo drive, DVD-RW,
DVD+RW , or DVD-Dual drive, you may save data onto a CD-R
/ CD-RW or DVD RW disc. Press the eject button to eject the
disk tray. The manual eject keyhole allows you to manually
eject a jammed disk.
5. USB2.0 Port (x2)
The Universal Serial Bus (USB2.0-compliant) port allows you to
connect a wide variety of devices to your computer at a rate of
up to 480 Mbps. This port conforms to the latest USB2.0
plug-and-play standards.
6. DVI-I Port
The DVI-I video output port is for connecting the external LCD
monitor or projector.
7. TV (S-Video) Port
The S-Video port permits you to redirect the screen output to a
television set or any analog video playback device. This TV
Port is copyright protected; when DVD movie is played, the
output is scrambled to prevent analog recording.
8. Ethernet / LAN Port
The port connects to a network hub via the RJ-45 cable and
also conforms to 10/100/1000Base-TX transmission protocol.
9. 4-in-1 Card Reader
The 4-in-1 Card Reader supports SD Card, MS Card, MMC
Card, and MS-Pro Card.
10. Firewire / IEEE1394 / 1394a Port
Page 11

■ chapter 1 getting to know the basics
1-11
This is a high-speed serial data port. You may connect any
Fire-wire-ready device to this port.
11. USB2.0 Port (x1)
The Universal Serial Bus (USB2.0-compliant) port allows you to
connect a wide variety of devices to your computer at a rate of
up to 480 Mbps. This port conforms to the latest USB2.0
plug-and-play standards.
12. ExpressCard Slot
The slot is where Express Card (Type 54) is inserted.
ExpressCard T y pe 54 allows insertion of 54mm and 34mm
cards. ExpressCard integrates both the PCI-Express bus
technology and USB2.0 standards.
Page 12

■ chapter 1 getting to know the basics
1-12
Bottom View
1. Battery Pack and Battery Latch
The battery pack is a built-in power source for the notebook.
Slide the battery latch to release the battery pack.
Page 13

■ chapter 1 getting to know the basics
1-13
2. Hard Disk Drive Cover
The system’s hard disk drive is located under the cover. The
HDD can be upgraded to a larger capacity. (See Chapter 4 for
instructions on a HDD upgrade.)
3. System Device Cover
The system’s processor with cooler assembly, Wireless LAN
module, and DDR memory module are located under the case
cover. You may install the WLAN module and the system
memory can be upgraded to a larger capacity. (See Chapter 4
for instructions on a memory upgrade.)
4. Ventilation Grill
The fan grill is where air is exchanged to dissipate the internal
heat. Do not block this airway completely.
Warning:
Do not block the Fan Grill outlet. Place the machine on hard
surface only. The bottom case may get very hot.
Page 14
■ chapter 1 getting to know the basics
1-14
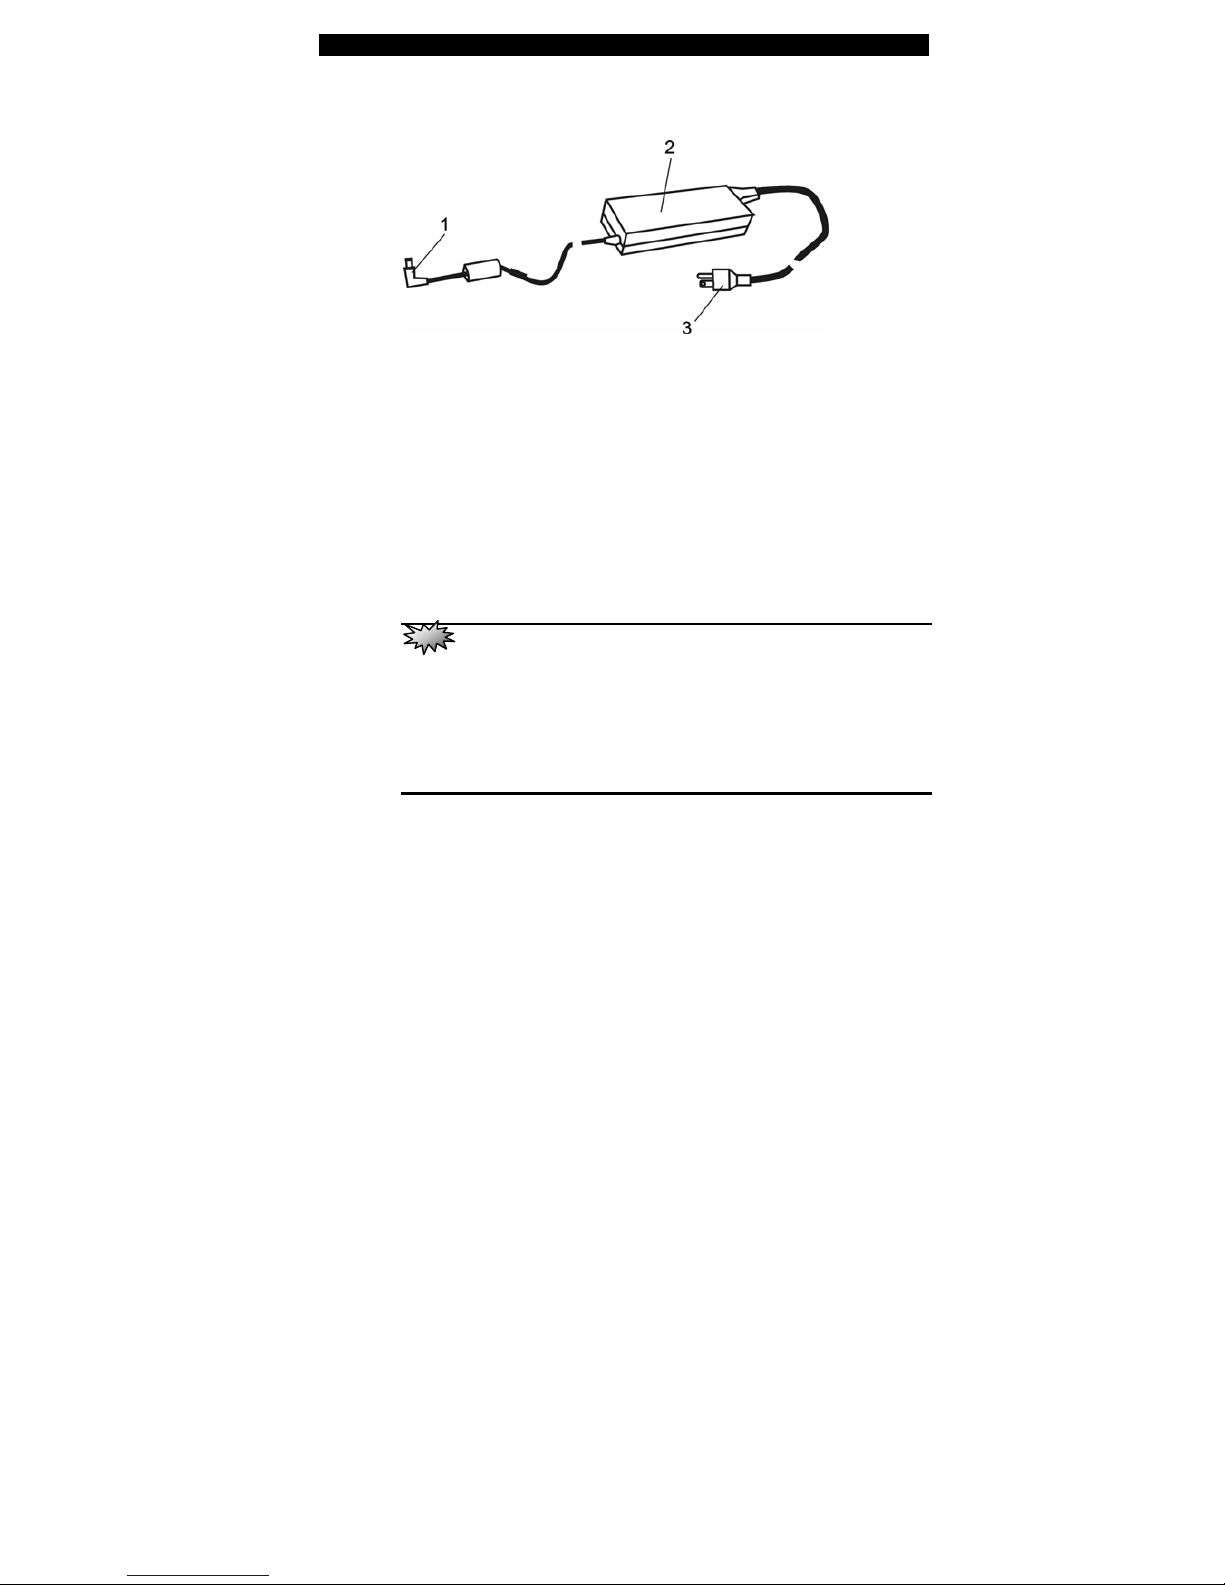
AC Adapter
1. DC-out Connector
The DC-out connector docks to the power jack (DC-in) on the
computer.
2. Adapter
The adapter converts alternating current into constant DC
voltage for the computer.
3. AC Plug
The AC plug plugs to the AC wall outlet.
Warning:
Make sure you are using a standard 3-prong AC wall socket with a
ground pin. If not, you may feel a slight tingling sensation on any of the
computer’s metal parts such as the I/O ports. This is caused by leakage current
when the AC adapter is not properly grounded (via the ground pin). However,
the amount of leakage current is within the safety regulation and is not harmful
to human body.
Page 15
■ chapter 1 getting to know the basics
1-15
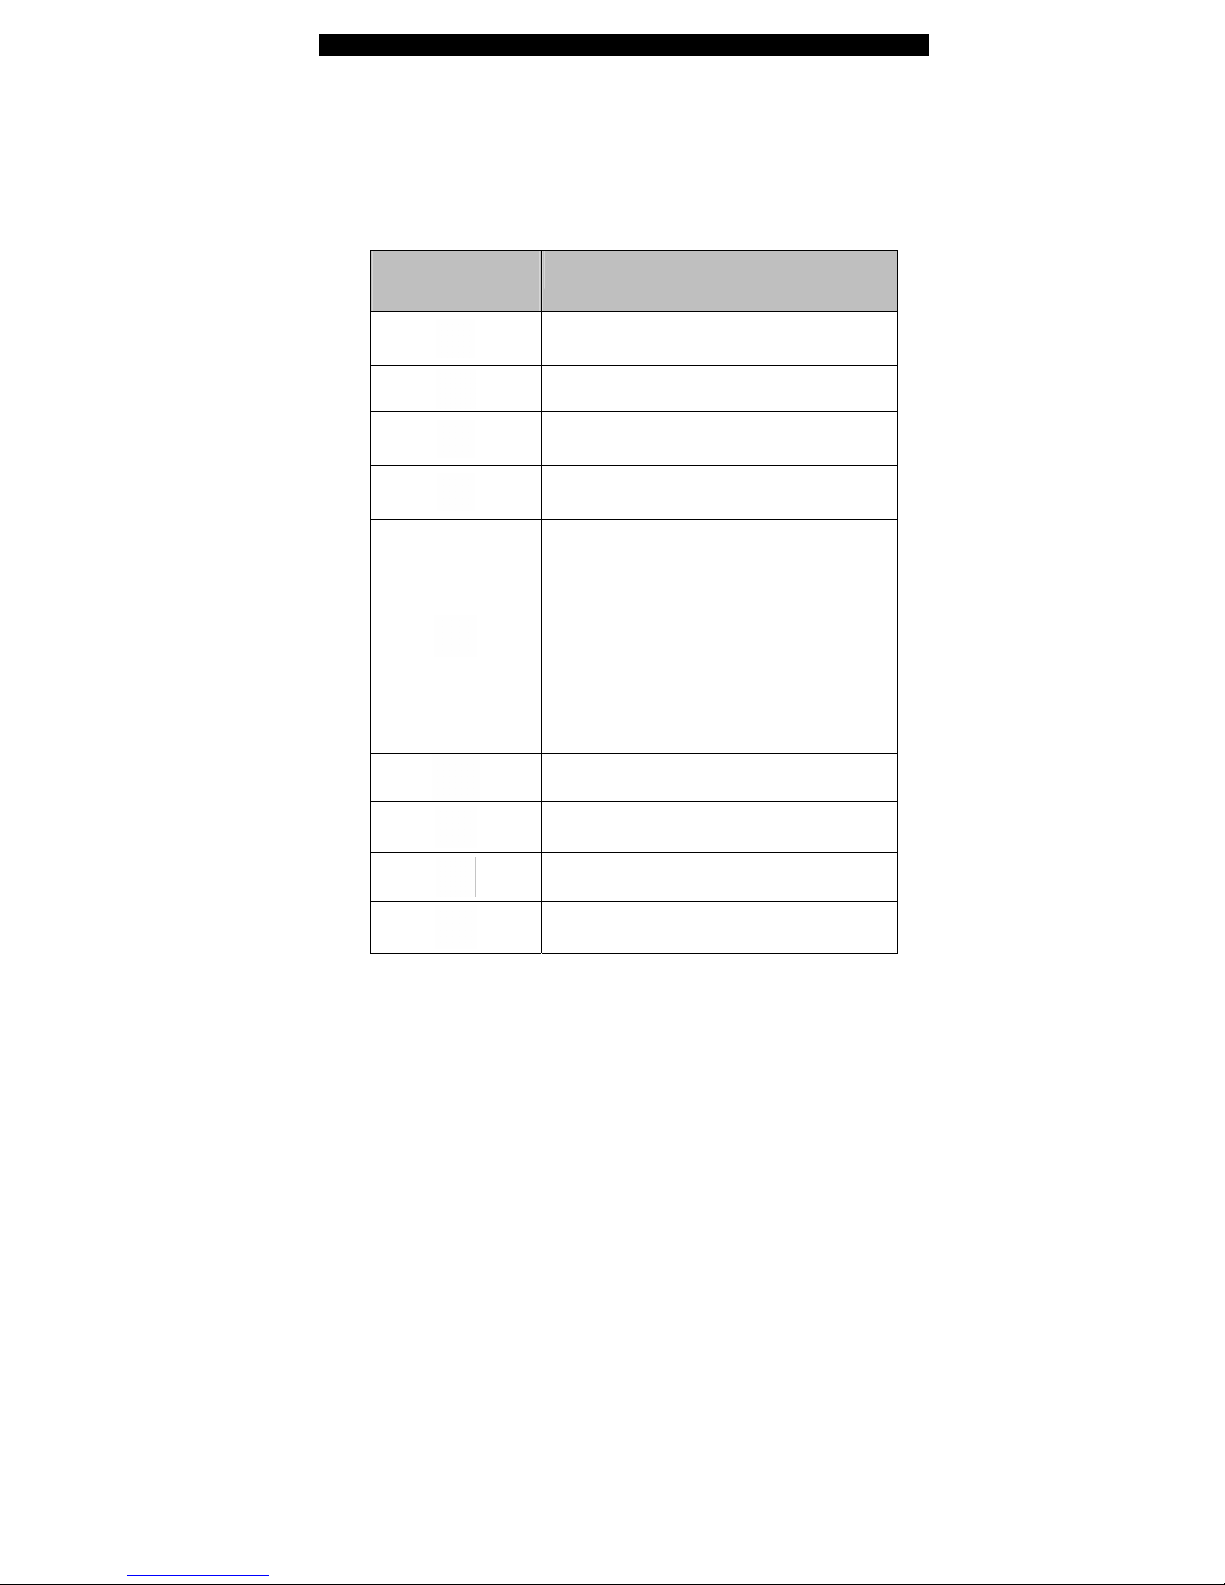
LED Status Indicator
The LED Status Indicator displays the operating status of your
notebook. When a certain function is enabled, an LED will light
up. The following section describes its i ndication.
System & Power Status Indicato rs
LED Graphic
Symbol
Indication
Green light indicates the notebook is
ON.
Green light indicates the WLAN module
is active.
Blinking green light indicates the
notebook is in suspend mode.
Green light indicates the Silent Mode is
enabled.
Blinking orange light indicates the
battery is being charged.
Blinking red light indicates the battery
power is low when the system is turned
ON.
Persistent green light indicates the
battery is Full.
LED-off (Dark) indicates the system is
without battery.
Green light indicates the hard drive
and/or optical drive is being accessed.
Green light indicates the numeric keypad
is activated.
Green light indicates the cap-lock is
activated.
Green light indicates the scroll-lock is
activated.
Page 16

■ chapter 1 getting to know the basics
1-16
Keyboard Features
Function Keys (Quick Keys)
Graphic
Symbol
Action System Control
Fn + F1 Enters Suspend Mode.
Fn + F3 Audio Mute on or off.
Fn + F4 Changes Display Mode:
LCD-only, CRT-only and
LCD&CRT.
Fn + F5 Turns Speaker Volume up.
Fn + F6 Turns Speaker Volume down.
Fn + F7 Increases Display Brightness.
Fn + F8 Decreases Display Brightness.
Fn+Num Lk Enables the embedded keypad
to work in numeric mode. The
keys act like numeric keypads
in a calculator. Use this mode
when you need to do a lot of
numeric data entry. An
alternative would be to connect
an external numeric keypad.
Fn + Scr Lk Press the Scroll Lock key and
then press ↑or ↓to move one
line up or down.
For various system controls, press the Fn (Function) key and the Fx key
simultaneously.
Page 17
■ chapter 1 getting to know the basics
1-17
Windows Keys
Your keyboard also has two Windows keys:
1. Start Key
This key allows you to pull up the Windows Start Menu at
the bottom of the taskbar.
2. Application Menu Key
This key brings up the popup menu for the application,
similar to a click of the right mouse button.
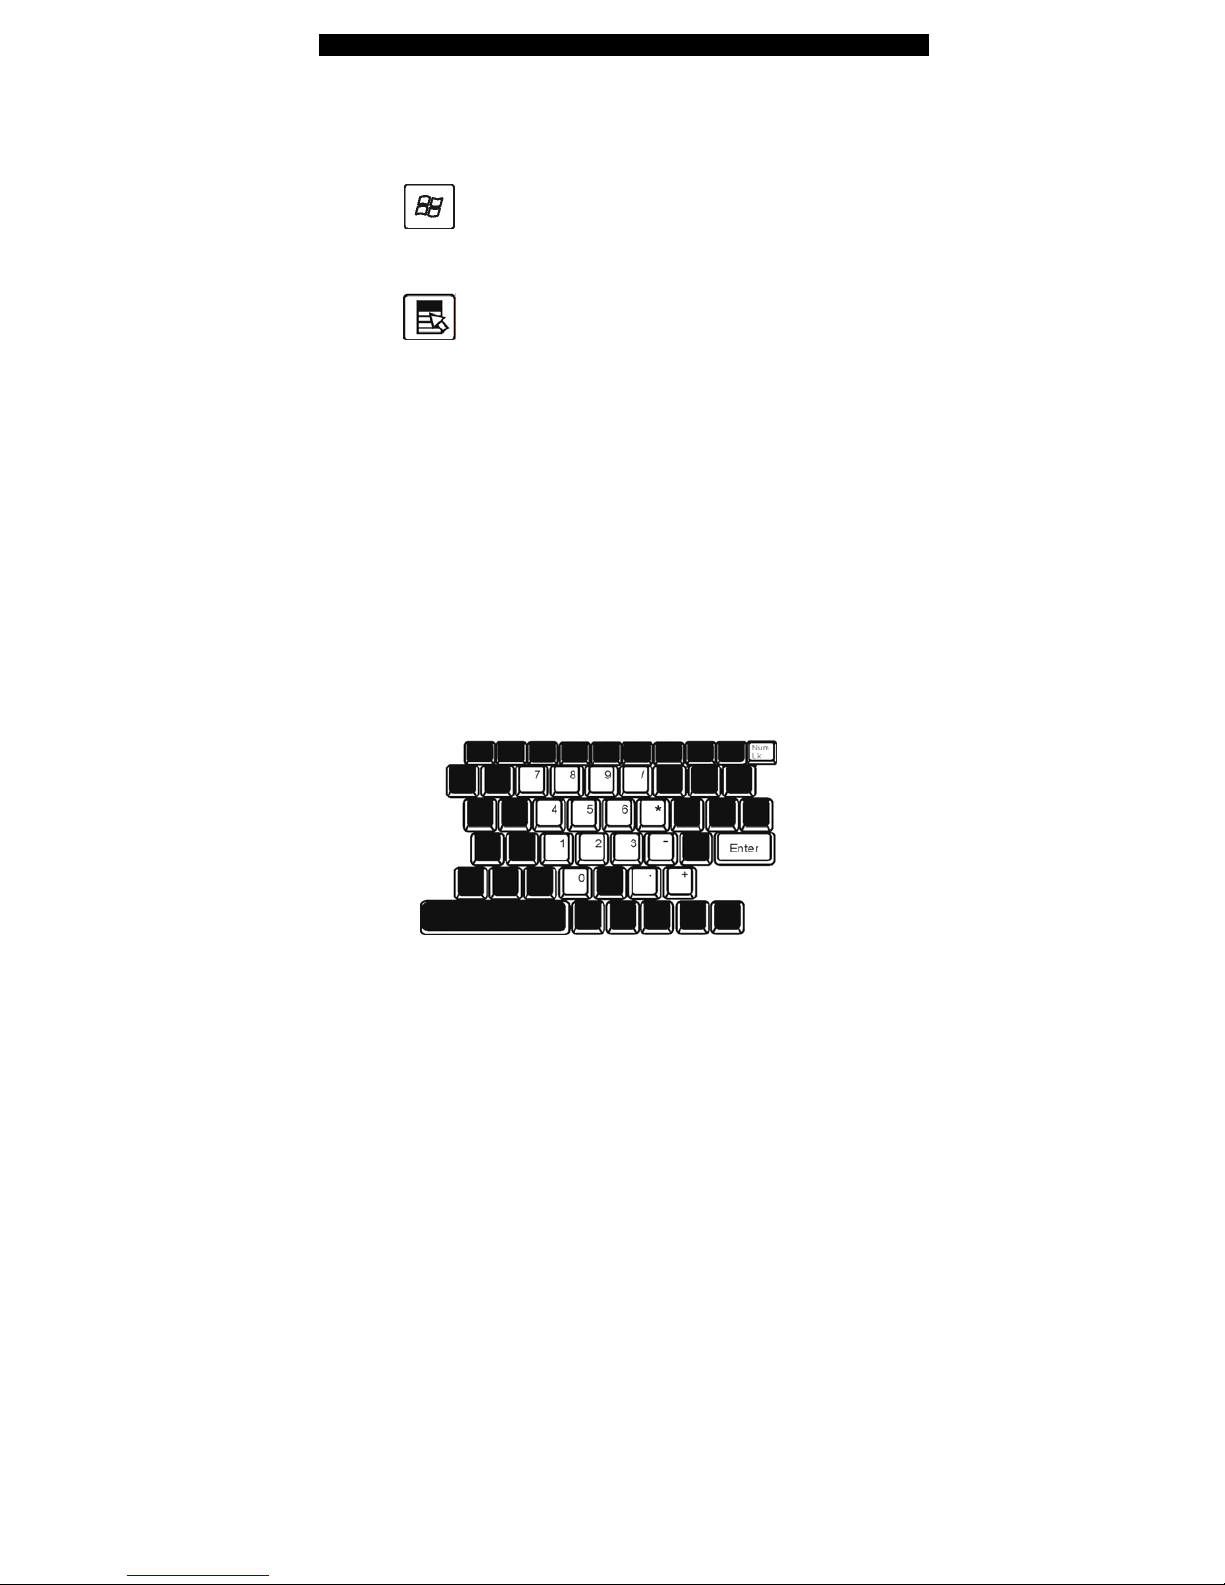
Embedded Numeric Keypad
Press Fn+NumLk to enable the embedded numeric keypad.
The numbers are printed in upper right corner of a key, in a
color different from the alphabets. This key pad is complete
with arithmetic operators (+, -, * , /).
Press Fn+NumLk to revert to normal character keys.
Page 18

■ chapter 1 getting to know the basics
1-18
Touch Pad
The built-in touch pad, which is a PS/2-compatible pointing device,
senses movement on its surface. As you move your fingertip on the
surface of the pad, the cursor responds accordingly.
The following items teach you how to use the touch pad:
1. Move your finger across the touch pad to move the cursor.
2. Press buttons to select or execute functions. These two buttons
are similar to the left and right buttons on a mouse. Tapping on the
touch pad twice produces is similar to clicking the lef t button of a
mouse.
Function Left Button Right
Button
Equivalent Tapping Action
Execution Click twice
quickly
Tap twice (at the same speed as
double-clicking
the mouse button)
Selection Click once Tap once
Drag Click and hold
to drag the
cursor
Tap twice quickly and on the
second tap hold finger to the touch
pad to drag the cursor
Access
Context Menu
Click once
Move One
Page Up or
Down
Tips on Using the Touch Pad:
1. The double-click speed is timed. If you double-click too slowly,
your notebook responds as if you single-clicked twice.
2. Keep your fingers dry and clean when using the touch pad.
Also keep the surface of touch pad clean and dry to prolong it s life.
3. The touch pad is sensitive to finger movements. Hence, the
lighter the touch, the better the response. Heavy touch does not
produce better response.
Page 19

■ chapter 1 getting to know the basics
1-19
Graphic Subsystem
Your computer uses a high performance 15.4-inch (non-wide )
active matrix TFT panel with high resol ution and multi-million colors
for comfortable viewing. The ATI Mobility M54-P video graphics
accelerator, whi ch is Microsoft DirectX 9 compatible, performs
graphic rendering at a lighting-fast speed.
Adjusting the Display Brightness
The notebook uses special key combinations, called hot keys,
to control brightness.
Press Fn+F7 to increase the brightness.
Press Fn+F8 to decrease the brightness.
Note:
To maximize your battery operating time, set the brightness to the
lowest comfortable setting, so that the internal backlight uses less power.
Extending the Life of the TFT Display Device
Observe the following guidelines to maximize the life of the
backlight in the display.
1. Set the brightness to the lowest comfortable setting
(Fn+F8).
2. When working at your desk, connect your notebook to an
external monitor and disable the internal display Fn+ F4.
3. Do not disable the suspend time-outs.
4. If you are using AC powe r and have no external monitor
attached, change to suspend mode when not in use.
Page 20

■ chapter 1 getting to know the basics
1-20
Opening and Closing the Display Panel
To open the display, push the LCD latch inwardly and lift up the
lid. Then tilt it to a comfortable viewing position.
To close the display cover, fold it down gently until the LCD
latches click into place.
Warning:
To avoid damaging the display , do not slam it when closing. Do not
place any object on top of the computer when the display is closed
Page 21

■ chapter 1 getting to know the basics
1-21
Audio Subsystem
Your computer’s audio subsystem is Sound Blaster Pro-compatible.
Adjusting the Volume Manually
To increase the volume, press Fn+ F5.
To decrease the volume, press Fn+F6.
Adjusting the Audio Volume in Windows
1. Click the speaker symbol in the task tray in Windows.
2. Drag the volume control bar up or down to adjust the volume.
3. To temporarily silence the speaker without changing the
volume setting, click Mute.
Voice Recording
A built-in microphone allows you to record sound. You will need
to use audio processing software to enable the built-in
microphone. For example, you may use Microsoft Sound
Recorder.
Page 22

■ chapter 1 getting to know the basics
1-22
Modem
Y our comp uter comes with a 56K V.92 internal fax/modem and a phone
jack (RJ-1 1), which is located on the lef t side of your computer.
Use a telephone cable to connect the computer to the telephone wall
outlet.
Connecting the Modem
1. Plug one end of the phone line into the modem port located on
the rear side of the computer . (For EMI compliance, you need to clip
the included EMI CORE to the phone line.)
2. Plug the other end of the line into the analog phone wall outlet.
Depending on where your computer is used, you may need to change
settings in the modem. Correct setting will allow you to maintain a stable
connection in a country where its telecommunication system may be
different to others.
T o change the modem setting, do the follo wing:
1. Go to [S tart > Settings > Control Panel] and doubl e-click on
Modem Settings icon. You will see a similar dialog box.
2. Click on the pull-down menu and select the country where it is
applicable. Click on OK to exit.
Page 23

■ chapter 1 getting to know the basics
1-23
Ethernet
Your computer is equipped with a 10/100/1000Base-TX Fast
Ethernet network adapter. Connect the active LAN cable to the
RJ-45 LAN port located on the left side of the computer. This allows
you to access and transmit data in the local area network.
Connecting to the Network
Use Unshielded Twisted Pair (UTP) Ethernet cable only.
1. Insert one end of the UTP cable into the network connector
until the connector snaps securely into the recept acle.
2. Either connect the other end of the cable to an RJ-45 jack
wall outlet or to an RJ-45 port on a UTP concentrator or hub in
the network.
Cabling Restriction for Networks
The following restrictions should be observed for
10/100/1000BASE-TX networks:
The maximum cable run length is 100 meters(m) (328
feet[ft]).
For 100Mbps or 1000Mbps operations, use Category 5
wiring and connections.
Note:
Consult Windows manual and / or Novell Netware user’s guide for the
software installation, configuration, operation of the network.
 Loading...